
322000-ZA.BETPLJG - Television LG - Free user manual and instructions
Find the device manual for free 322000-ZA.BETPLJG LG in PDF.
| Product type | LCD Television |
| Screen size | 32 inches (estimated) |
| Screen resolution | 1920 x 1080 (Full HD) |
| HDMI connectivity | 2 HDMI inputs (version 1.3) |
| Component connectivity | 1 component input (Y/Pb/Pr) |
| SCART connectivity | 2 SCART sockets (AV1/AV2) |
| USB connectivity | 1 USB port (version 2.0) |
| S-Video connectivity | 1 S-Video input |
| PC connectivity | 1 RGB (PC) input and audio input |
| Digital audio output | 1 optical output (except 19/22LS4D models) |
| Power supply | 100-240 V AC, 50/60 Hz |
| Weight with stand | 13.4 kg (typical for 32 inches) |
| Weight without stand | 11.9 kg (typical) |
| Main features | Automatic channel memory, teletext, parental control, multilingual OSD menu, Home/Store mode |
| Safety | Wall mounting recommended, mandatory grounding, minimum ventilation 10 cm |
| Maintenance and cleaning | Clean the screen with a soft cloth slightly dampened with warm water and dish soap; clean the chassis with a dry lint-free cloth |
| Spare parts and repairability | CD-ROM included with electronic user manual; repair by qualified personnel only |
| General information | Model 322000-ZA.BETPLJG; manual available in multiple languages on CD-ROM |
| Warranty | Image burn-in not covered by the warranty |
| Included accessories | Remote control, batteries, stand, power cord, CD-ROM |
Frequently Asked Questions - 322000-ZA.BETPLJG LG
User questions about 322000-ZA.BETPLJG LG
0 question about this device. Answer the ones you know or ask your own.
Ask a new question about this device
Download the instructions for your Television in PDF format for free! Find your manual 322000-ZA.BETPLJG - LG and take your electronic device back in hand. On this page are published all the documents necessary for the use of your device. 322000-ZA.BETPLJG by LG.
USER MANUAL 322000-ZA.BETPLJG LG
User's Guide Specification
- Model Description
| MODEL | 19/22LS4D-ZD, 19/22/26/32/37/42LG3000-ZA, 32/37/42/47/52LG5000-ZA | BRAND | LG | Part No. | MFL34441622 (0810-REV08) | |||
| SUFFIX | EU | Product Name | 19/22LS4D*, 19/22/26/32/37/42LG 30**, 32/37/42/47/52LG50** | |||||
| 2. Printing Specification | ||||||||
| 1. Trim Size (Format): 185 mm x 260 mm2. Printing Colors: 1 Color (BLACK)3. Stock (Paper)- Cover: Coated paper, S/W 150 g/m2- Inside: Uncoated paper, 백상지 60 g/m24. Printing Method: Off-set5. Bindery: Perfect bind6. Language: EN/ GE/ FR/ IT/ SP/ PO/ NE/ GR/ HU/ PL/ CZ/ SK/ RO/ BU/ SW/ NO/ DA/ FI/ ES/ LI/ LA/ SV/ SE/ CR/ TK (25)7. Number of pages: 456 pages | ||||||||
| NOTES | "This part contain Eco-hazardous substances (Pb, Cd, Hg, Cr6+, PBB, PBDE, etc.) within LG standard level, Details should be followed Eco-SCM management standard[LG(56)-A-2524].Especially, Part should be followed and controlled the following specification.(1)Eco-hazardous substances test report should be submitted when Part certification test and First Mass Production.(2) Especially, Don't use or contain lead(Pb) and cadmium(Cd) in ink. | |||||||
| 3. Special Instructions | ||||||||
| (1) Origin Notification* LGEIN: Printed in Indonesia * LGEWA: Printed in U.K. * LGEMA: Printed in Poland* LGESP: Printed in Brazil * LGEMX: Printed in Mexico* LGEND: Printed in China * LGEIL: Printed in India* Other Oversea Factories: NON | ||||||||
| 3. Changes | ||||||||
| 10 | ||||||||
| 9 | ||||||||
| 8 | 10/16/08 | SHIN HJ | S8-32451 | Deleted the contents of EPA 3.0 regulation & Added the contents of troubleshooting (Home mode). | ||||
| 7 | 09/23/08 | SHIN HJ | S8-30744 | Added the screw to fix the TV on the desk for 37LG30/50**. | ||||
| 6 | 08/27/08 | SHIN HJ | S8-28512 | Added 19/22LG3050, 19/22LG3060 & 32LG5600. | ||||
| 5 | 07/04/08 | CHOI MJ | S8-24468 | Added 26LG3050, 32/37/42LG20** & 32LG5700. | ||||
| 4 | 04/22/08 | CHOI MJ | S8-17943 | Added 19/22LS4D* & 60PG30** and 3 Languages (SE/CR/TK) | ||||
| 3 | 03/28/08 | CHOI MJ | S8-14911 | Added 42LG30** to STAND INSTALLATION | ||||
| 2 | 02/28/08 | CHOI MJ | S8-11537 | Added a sentence to the cover for Italian. | ||||
| 1 | 02/15/08 | CHOI MJ | S8-09755 | Amended a sentence for In-Store mode. | ||||
| REV.NO. | MM/DD/YY | SIGNATURE | CHANGE NO. | CHANGE CONTENTS | ||||
| 10 | ||||
| 9 | ||||
| 8 | 10/16/08 | SHIN HJ | S8-32451 | Deleted the contents of EPA 3.0 regulation & Added the contents of troubleshooting (Home mode). |
| 7 | 09/23/08 | SHIN HJ | S8-30744 | Added the screw to fix the TV on the desk for 37LG30/50**. |
| 6 | 08/27/08 | SHIN HJ | S8-28512 | Added 19/22LG3050, 19/22LG3060 & 32LG5600. |
| 5 | 07/04/08 | CHOI MJ | S8-24468 | Added 26LG3050, 32/37/42LG20** & 32LG5700. |
| 4 | 04/22/08 | CHOI MJ | S8-17943 | Added 19/22LS4D* & 60PG30** and 3 Languages (SE/CR/TK) |
| 3 | 03/28/08 | CHOI MJ | S8-14911 | Added 42LG30** to STAND INSTALLATION |
| 2 | 02/28/08 | CHOI MJ | S8-11537 | Added a sentence to the cover for Italian. |
| 1 | 02/15/08 | CHOI MJ | S8-09755 | Amended a sentence for In-Store mode. |
| REV. NO. | MM/DD/YY | SIGNATURE | CHANGE NO. | CHANGE CONTENTS |
Pagination sheet
| Front Cover (EN)P/NO. | UK Only | ||||||
| 2 | 3 | 4 | ... | ... | 19 | ||
| Front Cover (GE) | |||||||
| 2 | 3 | 4 | ... | 16 | 17 | 18 | |
| Front Cover (FR) | |||||||
| 2 | 3 | 4 | ... | 16 | 17 | 18 | |
| Front Cover (IT) | |||||||
| 2 | 3 | 4 | ... | ... | 19 | 20 | |
| Front Cover (SP) | |||||||
| 2 | 3 | 4 | ... | 16 | 17 | 18 | |
| Front Cover (PO) | |||||||
| 2 | 3 | 4 | ... | 16 | 17 | 18 | |
| Front Cover (NE) | |||||||
| 2 | 3 | 4 | ... | 16 | 17 | 18 | |
| Front Cover (GR) | |||||||
| 2 | 3 | 4 | ... | 16 | 17 | 18 | |
| Front Cover (HU) | |||||||
| 2 | 3 | 4 | ... | 16 | 17 | 18 | |
| Front Cover (PL) | |||||||
| 2 | 3 | 4 | ... | 16 | 17 | 18 | |
Pagination sheet
| Front Cover (CZ) | |||||||
| 2 | 3 | 4 | ... | 16 | 17 | 18 | |
| Front Cover (SK) | |||||||
| 2 | 3 | 4 | ... | 16 | 17 | 18 | |
| Front Cover (RO) | |||||||
| 2 | 3 | 4 | ... | 16 | 17 | 18 | |
| Front Cover (BU) | |||||||
| 2 | 3 | 4 | ... | 16 | 17 | 18 | |
| Front Cover (SW) | |||||||
| 2 | 3 | 4 | ... | 16 | 17 | 18 | |
| Front Cover (NO) | |||||||
| 2 | 3 | 4 | ... | 16 | 17 | 18 | |
| Front Cover (DA) | |||||||
| 2 | 3 | 4 | ... | 16 | 17 | 18 | |
| Front Cover (FI) | |||||||
| 2 | 3 | 4 | ... | 16 | 17 | 18 | |
| Front Cover (ES) | |||||||
| 2 | 3 | 4 | ... | 16 | 17 | 18 | |
| Front Cover (lith) | |||||||
| 2 | 3 | 4 | ... | 16 | 17 | 18 |
Pagination sheet
 |  |  |  |  |
 |  |  |  |  |
 |  |  |  |  |
 |  |  |  |  |
 |  |  |  |  |
LCD TV
OWNER'S MANUAL
LCD TV MODELS
| 19LS4D* | 32LG30** |
| 22LS4D* | 37LG30** |
| 32LG20** | 42LG30** |
| 37LG20** | 32LG5*** |
| 42LG20** | 37LG50** |
| 19LG30** | 42LG50** |
| 22LG30** | 47LG50** |
| 26LG30** | 52LG50** |
DVB®
Digital Video Broadcasting
Trade Mark of the DVB Digital Video Broadcasting Project (1991 to 1996)
| ID Number(s): | 5499: 22LS4D-ZD | 5507: 19LS4D-ZD |
| 5629: 32LG2000-ZA | 5721: 26LG3050-ZA | |
| 5630: 37LG2000-ZA | 5631: 42LG2000-ZA | |
| 5088: 19LG3000-ZA | 5090: 22LG3000-ZA | |
| 5080: 26LG3000-ZA | 5089: 32LG3000-ZA | |
| 5087: 37LG3000-ZA | 5086: 42LG3000-ZA | |
| 5085: 32LG5000-ZA | 5084: 37LG5000-ZA | |
| 5083: 42LG5000-ZA | 5082: 47LG5000-ZA | |
| 5081: 52LG5000-ZA | 5385: 52LG5010-ZD | |
| 5386: 47LG5010-ZD | 5387: 42LG5010-ZD | |
| 5388: 37LG5010-ZD | 5389: 32LG5010-ZD | |
| 5390: 52LG5020-ZB | 5391: 47LG5020-ZB | |
| 5392: 42LG5020-ZB | 5393: 37LG5020-ZB | |
| 5394: 32LG5020-ZB | 5395: 52LG5030-ZE | |
| 5396: 47LG5030-ZE | 5397: 42LG5030-ZE | |
| 5398: 37LG5030-ZE | 5399: 32LG5030-ZE | |
| 5671: 32LG5700-ZF | 5820: 19LG3050-ZA | |
| 5818: 22LG3050-ZA | 5879: 19LG3060-ZB | |
| 5880: 22LG3060-ZB | 5878: 32LG5600-ZB |
Please read this manual carefully before operating your TV.
Retain it for future reference.
Record model number and serial number of the TV. Refer to the label on the back cover and quote this information.
To your dealer when requiring service.
Extended Owner's Manual that contains advanced features of these LG TV-sets is located on CD-ROM in electronic version.
To read it You need to open chosen files by using Personal Computer (PC) equipped with CD-ROM drive.
P/NO: MFL34441622 (0810-REV08)
Printed in Korea
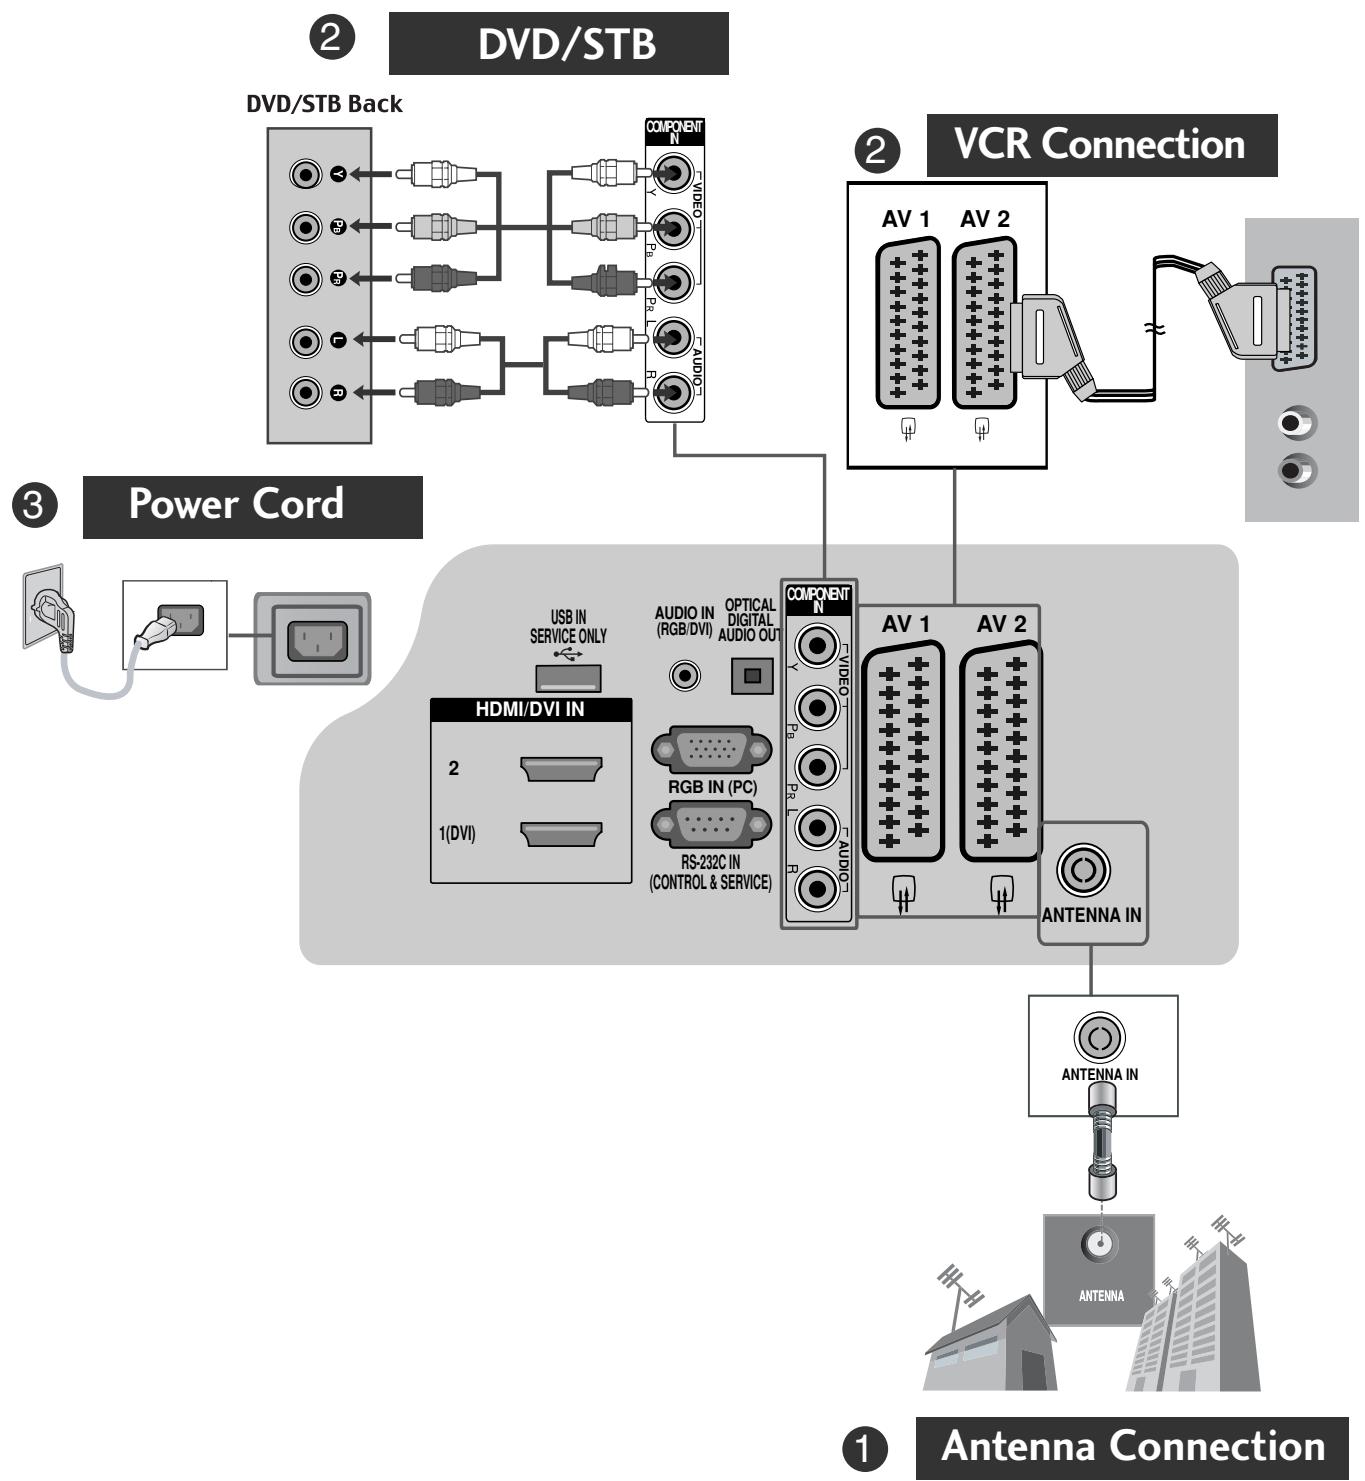
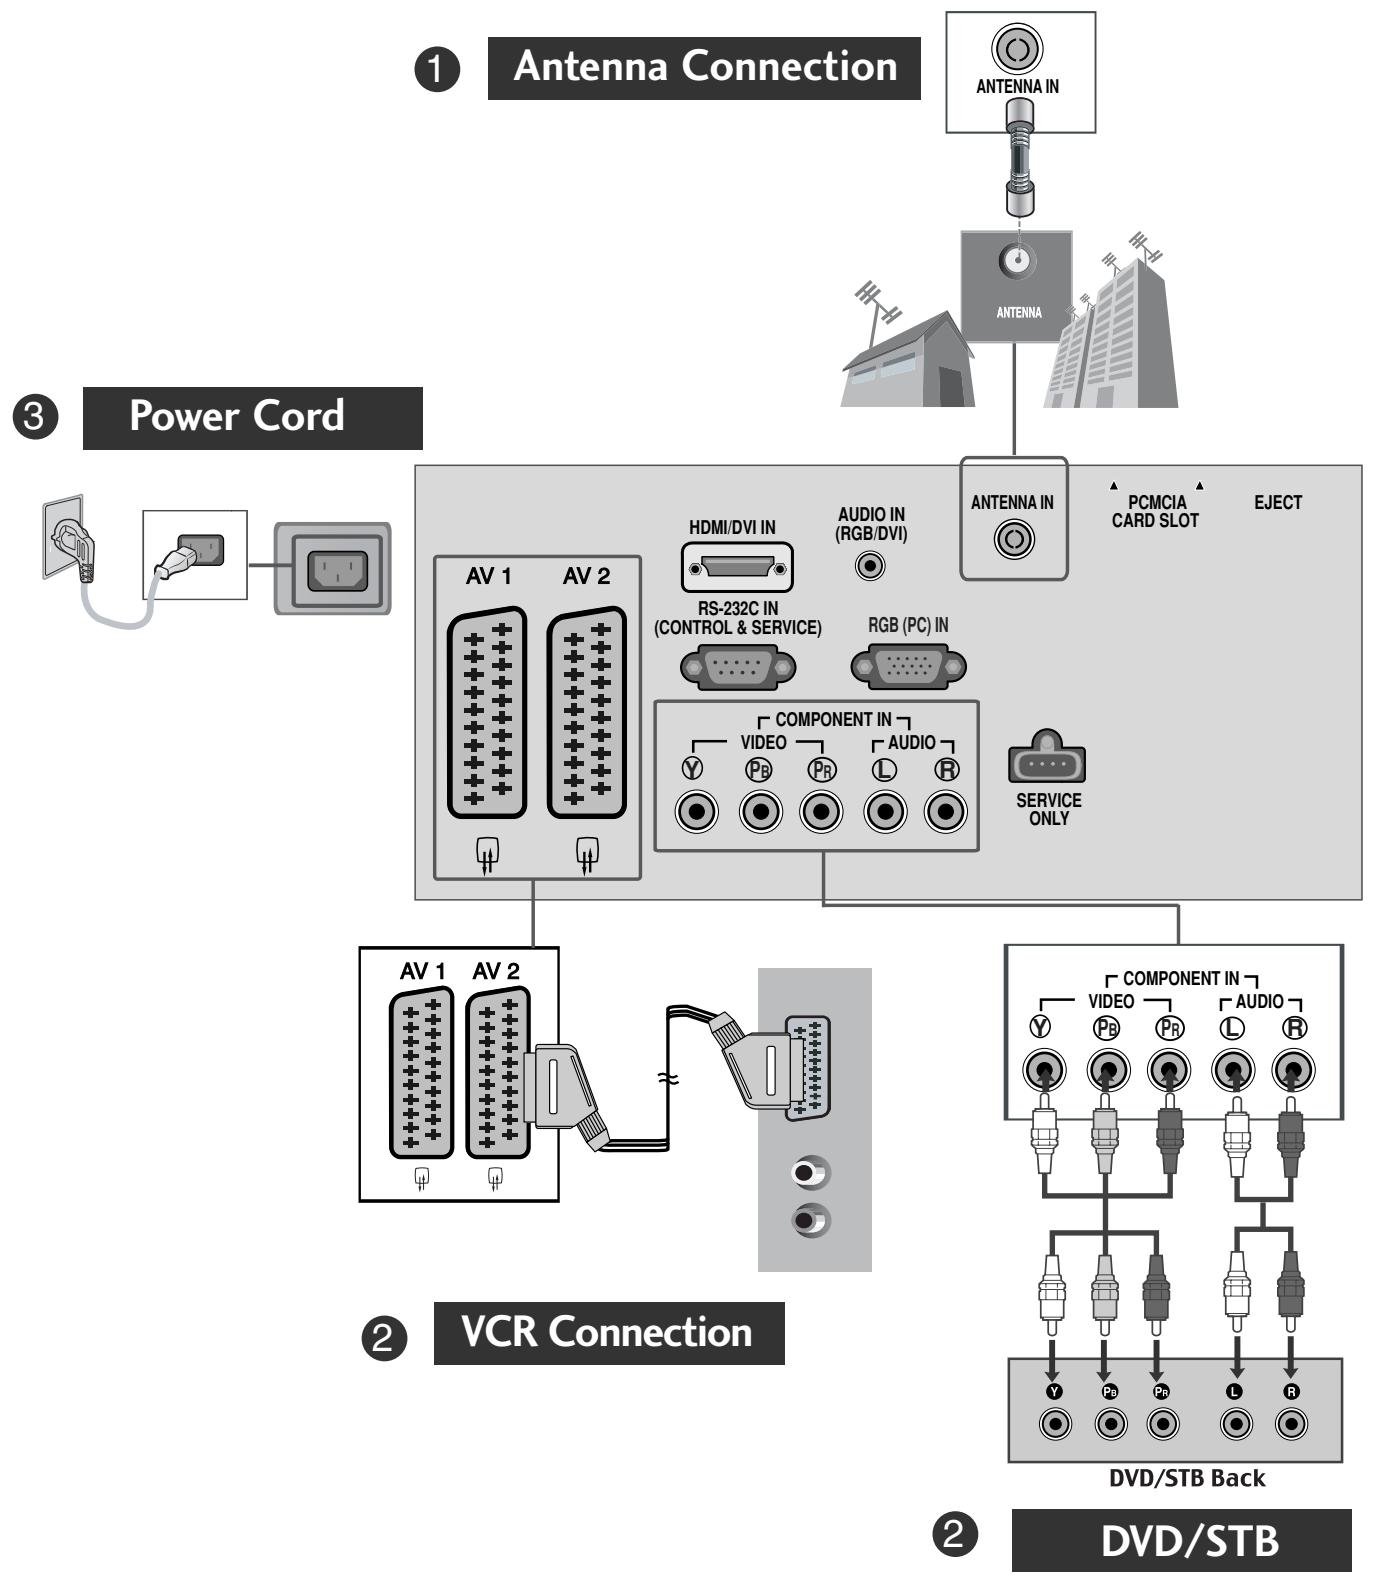
CONNECTING YOUR UNIT
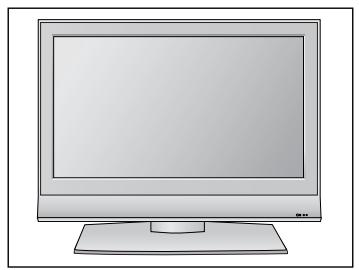
■ Image shown may differ from your TV.
flowchart
graph TD
    A["① Antenna Connection"] --> B["② DVD/STB"]
    B --> C["③ Power Cord"]
    C --> D["② VCR Connection"]
    D --> E["①"]
    style A fill:#f9f,stroke:#333
    style B fill:#ccf,stroke:#333
    style C fill:#cfc,stroke:#333
    style D fill:#fcc,stroke:#333
    style E fill:#ffc,stroke:#333
* To connect an additional equipment, see the External equipment Setup section in CD Manual.
flowchart
graph TD
    A["Antenna Connection"] --> B["Antenna IN"]
    B --> C["Antenna"]
    C --> D["Power Cord"]
    D --> E["AV 1 AV 2"]
    E --> F["HDMI/DVI IN"]
    F --> G["RS-232C IN (CONTROL & SERVICE)"]
    G --> H["RGB (PC) IN"]
    H --> I["COMPONENT IN"]
    I --> J["VIDEO"]
    I --> K["AUDIO"]
    J --> L["SERVICE ONLY"]
    K --> L
    L --> M["Component In"]
    M --> N["VIDEO"]
    M --> O["PR"]
    M --> P["L"]
    M --> Q["R"]
    N --> R["DVD/STB Back"]
    O --> R
    P --> R
    Q --> R
    R --> S["DVD/STB"]
* To connect an additional equipment, see the External equipment Setup section in CD Manual.
- Please read these safety precautions carefully before using the product.
- In this manual, the illustration may be somewhat different from your product because it is just example to help the instruction.

WARNING If you ignore the warning message, you may be seriously injured or there is a possibility of accident or death.

CAUTION If you ignore the caution message, you may be slightly injured or the product may be damaged.
Precaution in Installing the Product

WARNING

Keep away from heat sources like electrical heaters.
- Electrical shock, fire, malfunction or deformation may occur.

Do not use the product in damp place such as a bathroom or any place where it is likely to get wet.
- This may cause a fire or could give an electric shock.

If you can smell smoke or other odors or hear a strange sound unplug the power cord and contact the service center.
- If you continue to use without taking proper measures, electrical shock or fire can occur.

CAUTION

Install the product on a flat and stable place that has no risk of dropping the product.
- If the product is dropped, you may be injured or the product may be broken.

Keep the product away from direct sunlight.
- The product can be damaged.
Do not place the product in a built-in installation such as bookcase or rack.
- Ventilation required.
Electrical Power Related Precautions

WARNING
Make sure to connect the power cable to the grounded current.
- You may be electrocuted or injured.

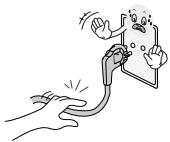
Do not touch the power plug with wet hands. Additionally, it the cord pin is wet or covered with dust, dry the power plug completely or wipe dust off.
- You may be electrocuted due to excess moisture.

During a thunder or lightning storm, unplug the power cable or signal cable.
- You may be electrocuted or a fire can break out.

CAUTION
Protect the power cord from physical or mechanical abuse, such as being twisted, kinked, pinched, closed in a door, or walked upon. Pay particular attention to plugs, wall outlets, and the point where the cord exits the appliance.
Precautions in Moving the Product

WARNING
Make sure to turn off the product.
Make sure to remove all cables before moving the product.
- You may be electrocuted or the product can be damaged.


CAUTION
Do not shock the product when moving it.
- You may be electrocuted or the product can be damaged.
Make the panel face forward and hold it with both hands to move.
- If you drop the product, the damaged product can cause electric shock or fire. Contact with the service center for repair.

Precautions in Using the Product

WARNING
Do not disassemble, repair or modify the product at your own discretion.
- Fire or electric shock accident can occur.
- Contact the service center for check, calibration or repair.

To reduce the risk of fire or electric shock, do not expose this apparatus to rain or moisture.
Apparatus shall not be exposed to dripping or splashing and no objects filled with liquids, such as vases, shall be placed on the apparatus.


CAUTION
Refer all servicing to qualified service personnel.
Servicing is required when the apparatus has been damaged in any way, such as power supply cord or plug is damaged, liquid has been spilled or objects have fallen into the apparatus, the apparatus has been exposed to rain or moisture, does not operate normally, or has been dropped.

Do not keep a still image on the screen for an extended period (e.g. by pausing a video) as the fixed image may remian visible on the screen. This is known as image burn. Image burn is not covered under the manufacturer's warranty.

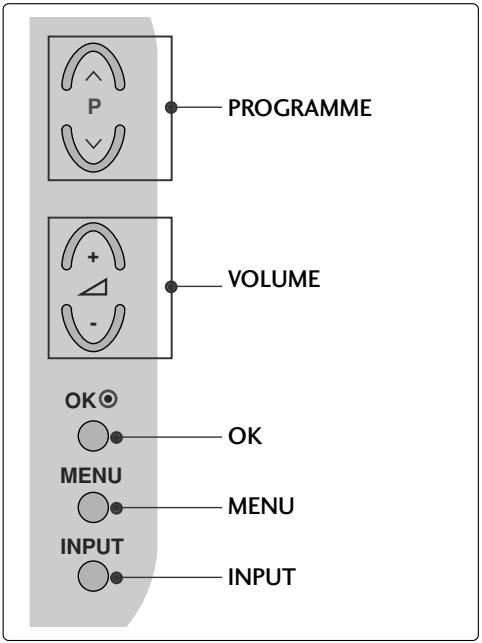
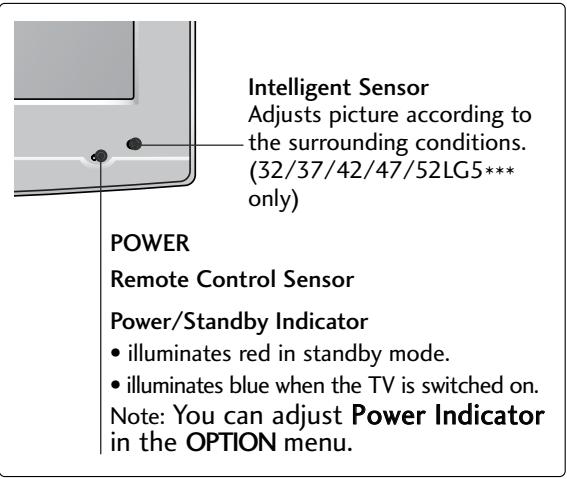
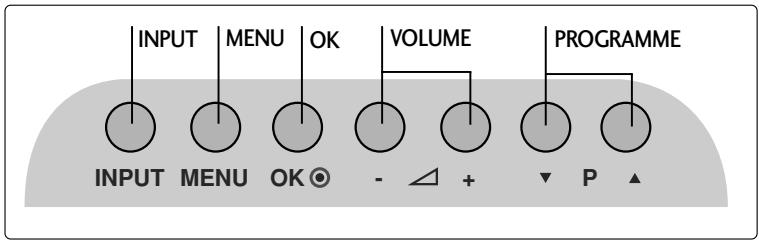
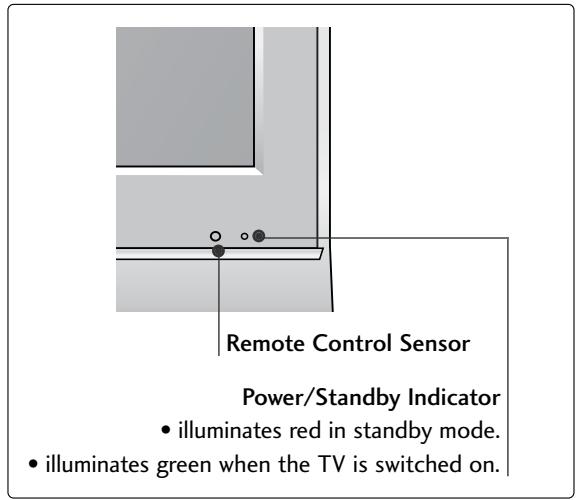
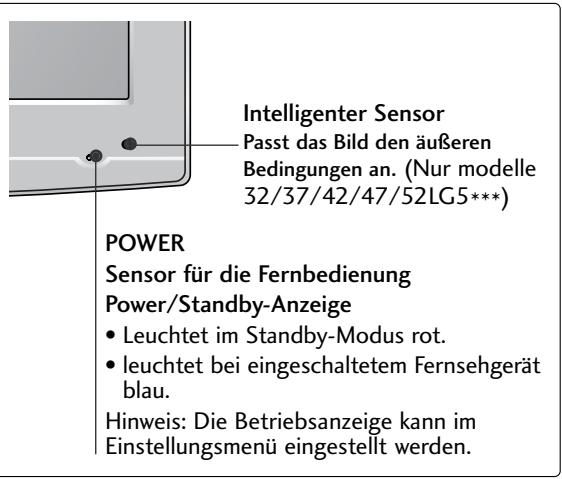
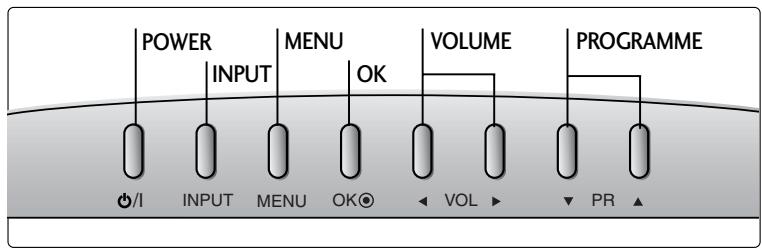
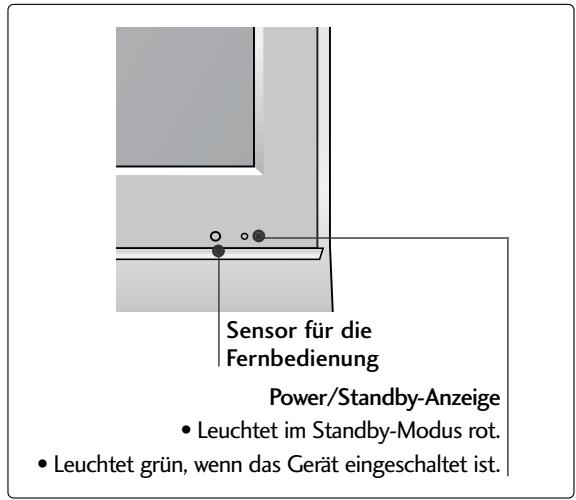
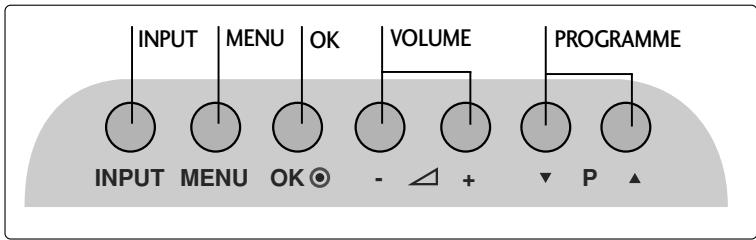
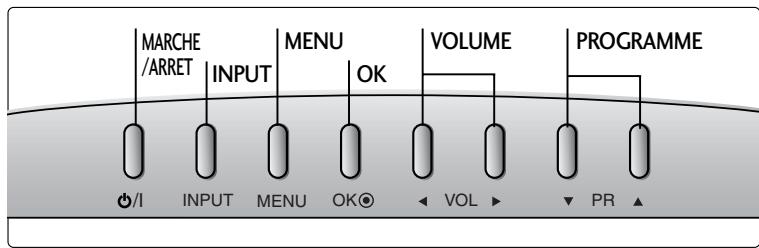
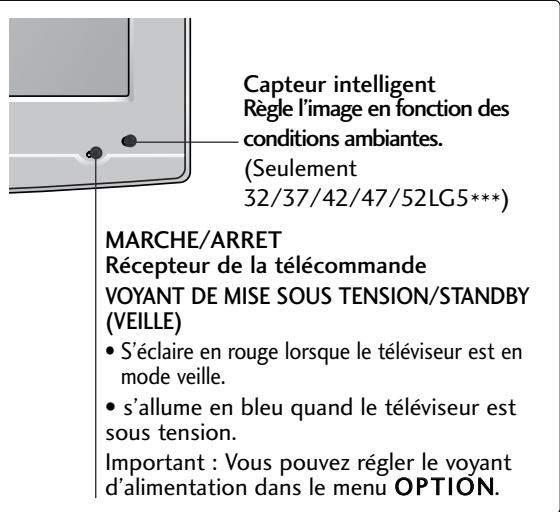
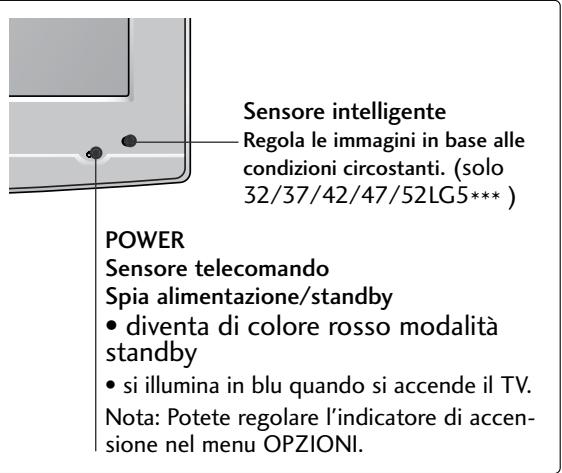
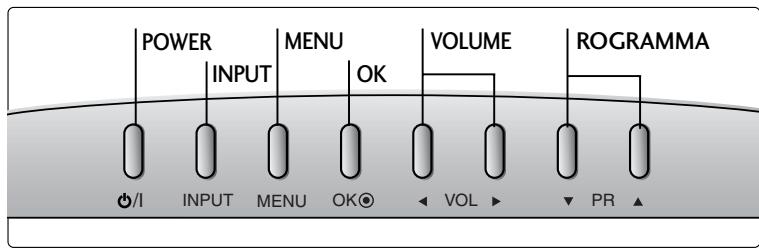
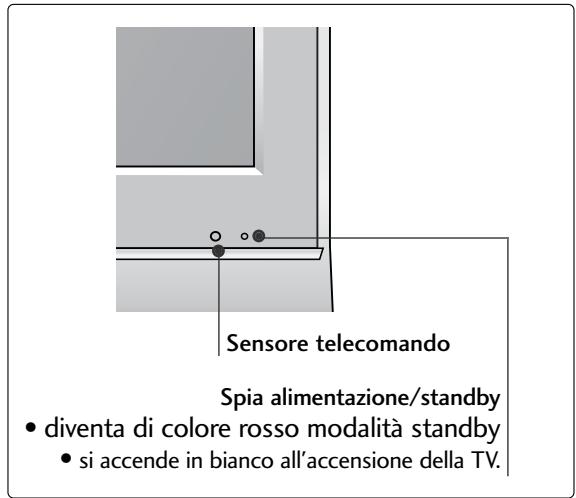
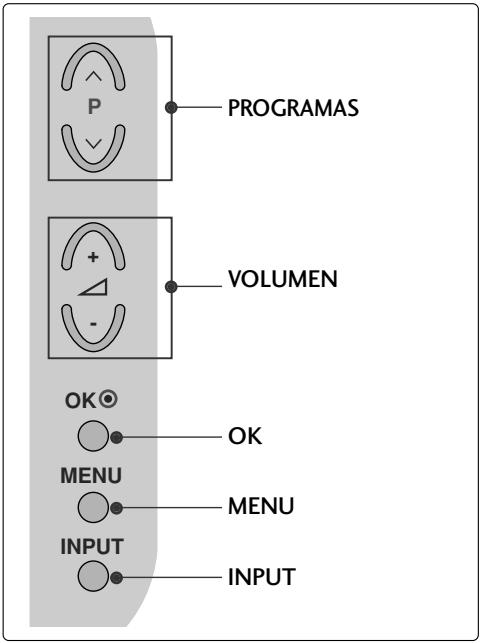
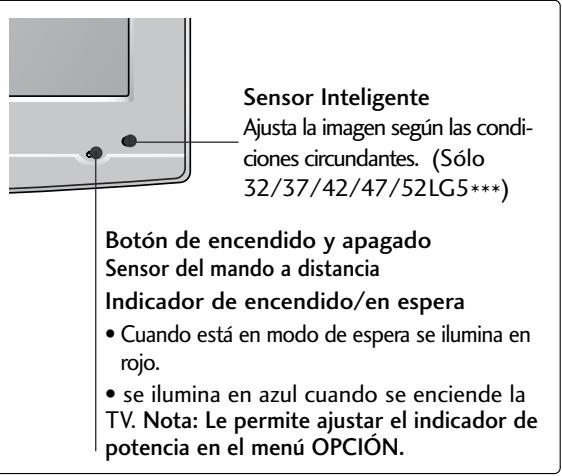
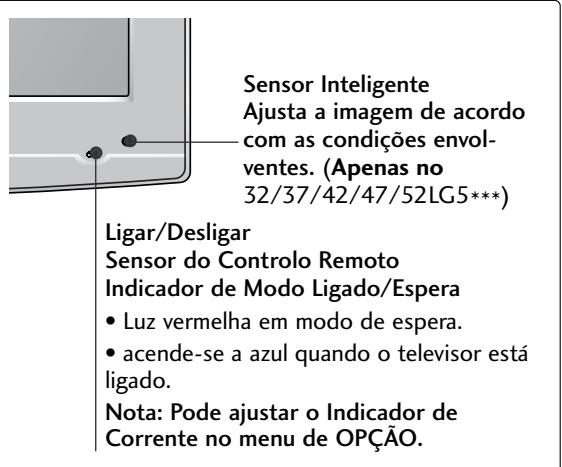
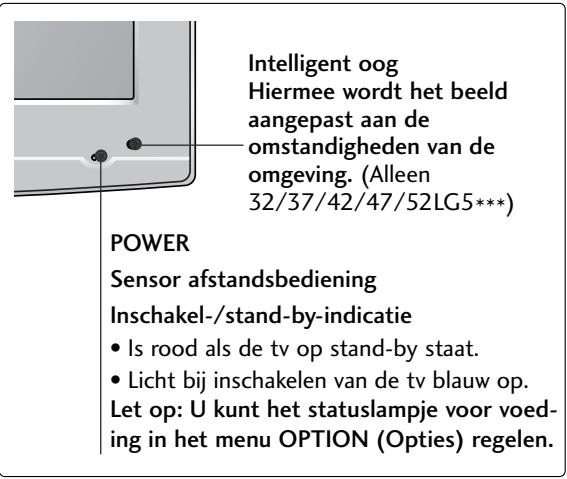
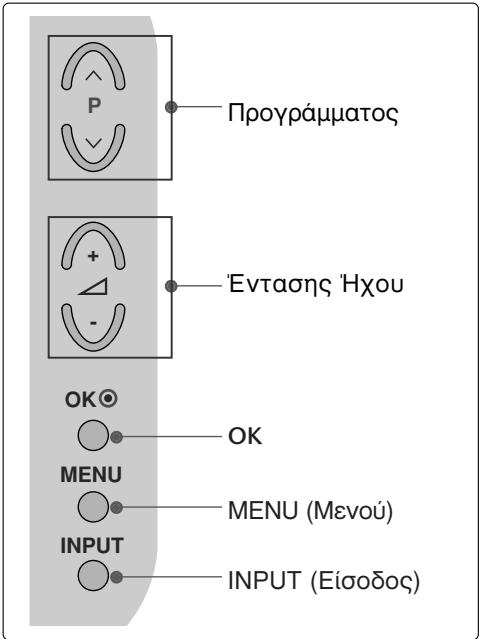
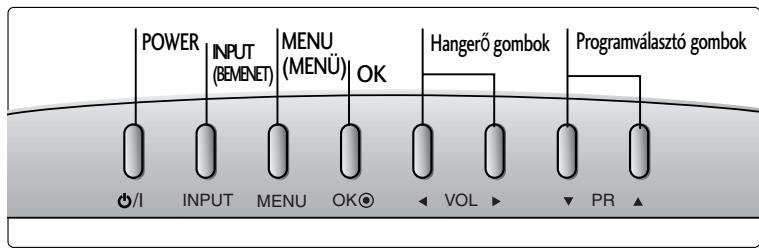
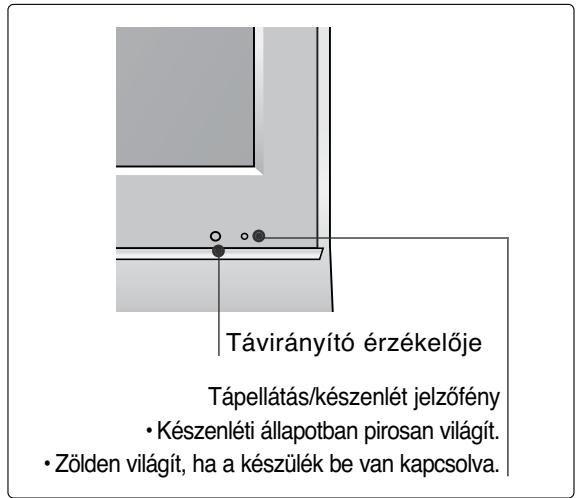
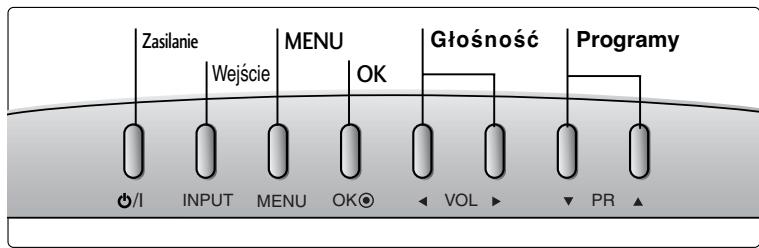
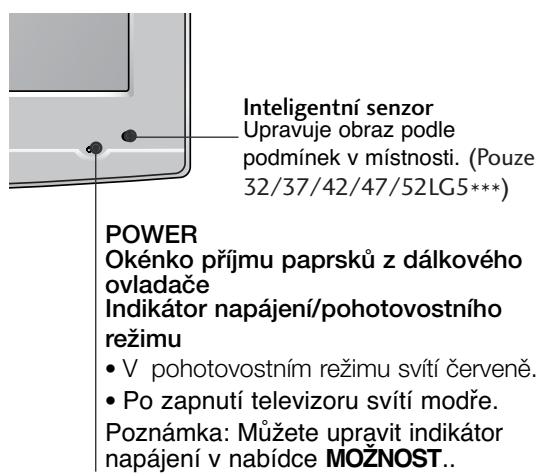
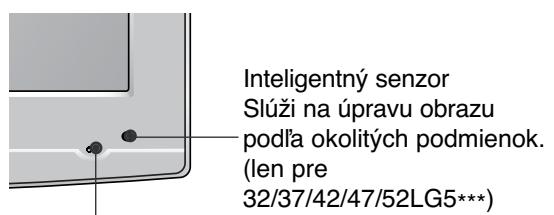
FRONT PANEL CONTROLS
■ Image shown may differ from your TV.
■ If your TV has a protection film attached, remove the film and then wipe the TV with a polishing cloth.
LCD TV Models :
32/37/42LG20**, 26/32/37/42LG30**, 32/37/42/47/52LG5***
LCD TV Models : 19/22LG30**
LCD TV Models : 19/22LS4D*

BACK PANEL INFORMATION
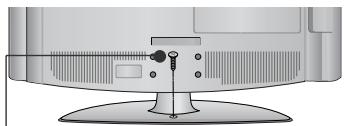
■ Image shown may differ from your TV.

![PCMCIA CARD SLOT HDMI IN 3 Except for 32/37/42LG20** S-VIDEO VIDEO [MONO AUDIO] AV IN 3 H/PΩ](/content/2024/12/69898/images/2c050c67c809e731f8eeacd39a3032db73a4f6fcbec0b7d3bb6318e496b50023.jpg)
① Power Cord Socket
This TV operates on an AC power. The voltage is indicated on the Specifications page. Never attempt to operate the TV on DC power.
② RGB/DVI Audio Input
Connect the audio from a PC or DTV.
3 DIGITAL AUDIO OUT OPTICAL (Except for 19/22LS4D*) Connect digital audio from various types of equipment. Note: In standby mode, these ports do not work.
4 Euro Scart Socket (AV1/AV2)
Connect scart socket input or output from an external device to these jacks.
⑤ HDMI Input
Connect a HDMI signal to HDMI IN. Or DVI (VIDEO) signal to HDMI/DVI port with DVI to HDMI cable.
6 RGB IN (PC)
Connect the output from a PC.
⑦ RS-232C IN (CONTROL & SERVICE) PORT Connect to the RS-232C port on a PC.
8 Component Input
Connect a component video/audio device to these jacks.
9 Antenna Input
Connect RF antenna to this jack.
10 PCMCIA (Personal Computer Memory Card International Association) Card Slot (This feature is not available in all countries.)
11 Audio/Video Input (Except for 19/22LS4D*)
Connect audio/video output from an external device to these jacks.
S-VIDEO (Except for 19/22LS4D*, 32/37/42LG20**) Connect S-Video out from an S-VIDEO device.
12 Headphone Socket (Except for 19/22LS4D*, 32/37/42LG20**) Connect the headphone plug to this socket.
13 SERVICE ONLY PORT
STAND INSTALLATION
(LCD TV Models: 32/37/42LG20**, 26/32/37/42LG30**, 32/37/42LG5***)
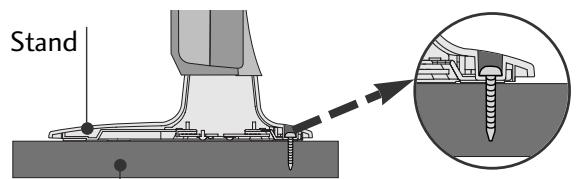
■ When assembling the desk type stand, check whether the bolt is fully tightened. (If not tightened fully, the product can tilt forward after the product installation.) If you tighten the bolt with excessive force, the bolt can deviate from abrasion of the tightening part of the bolt.
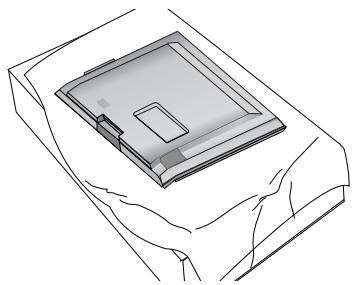
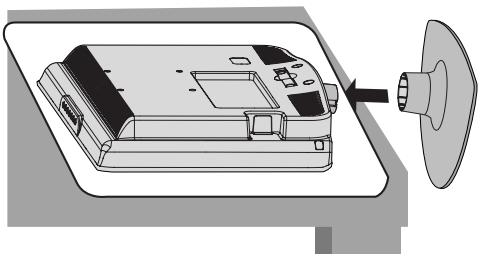
1 Carefully place the TV screen side down on a cushioned surface to protect the screen from damage.
natural_image
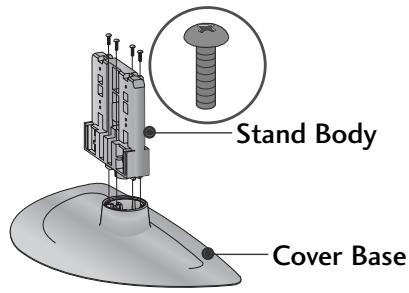
Technical line drawing of a square electronic component with a central slot, placed on a rectangular base (no text or symbols)2 Assemble the parts of the Stand Body with the Cover Base of the TV.
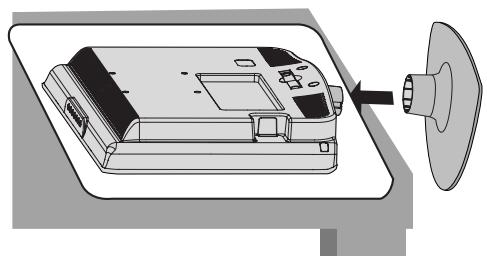
3 Assemble the TV as shown.

natural_image
Technical illustration of a mechanical assembly with a fan and internal components, showing a magnified inset (no text or symbols)4 Fix the 4 bolts securely using the holes in the back of the TV.

natural_image
Illustration of a mechanical component with a magnified inset showing a bolt (no text or symbols present)(Only 19/22LG30**)

natural_image
Line drawing of a mechanical component placed on a sheet of paper (no text or symbols)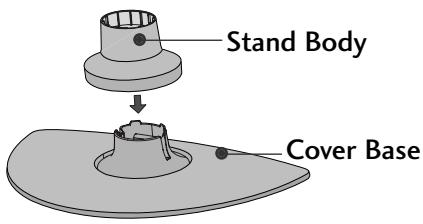
natural_image
Diagram of a device with a speaker emitting a sound wave, showing internal components and a circular component (no text or symbols)1 Carefully place the TV screen side down on a cushioned surface to protect the screen from damage.
2 Assemble the parts of the STAND BODY with COVER BASE of the TV. Insert the STAND BODY into a COVER BASE until clicking sound.
3 Assemble the TV as shown.
STAND INSTALLATION
(Only 19/22LS4D\*)
■ Image shown may differ from your TV.
1 Carefully place the TV screen side down on a cushioned surface to protect the screen from damage.

natural_image
Isometric line drawing of a mechanical component or housing with no visible text or symbols2 Hold the Hinge Body and bend it upward.
3 Insert the Stand Body into the TV until clicking sound.
4 Assemble the parts of the Stand Body with the Cover Base of the TV.
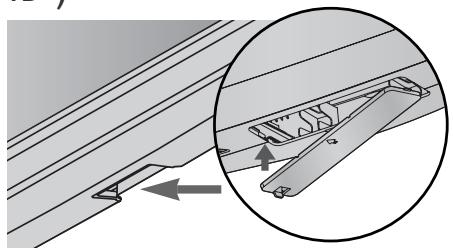
DETACHING STAND
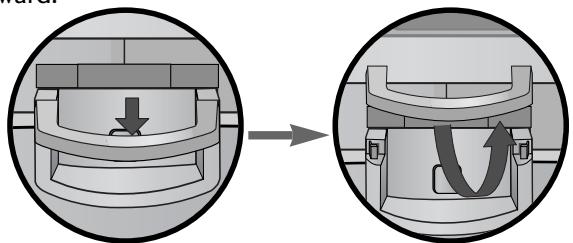
(Only 19/22LS4D\*)
1 Place the tv with its front facing downward on a cushion or soft cloth.

natural_image
Isometric line drawing of a box with a partially visible internal object (no text or symbols)2 Pull the Cover Base backward during pressing a button on the Stand Body.

natural_image
Diagram showing a hand holding a device with an arrow pointing to it, and a magnified inset of the device's internal structure (no text or symbols)3 Hold the Cover Base and pull with shake it backward to separate from the Stand Body.

natural_image
Illustration of hands installing or adjusting a device component with an arrow indicating rotation (no text or symbols present)4 Hold the Stand Body and bend it upward.

natural_image
Illustration of a hand holding a mechanical component with an inset showing a close-up of a component (no text or symbols present)5 Pull stand body to separate from the TV during pressing 2 latches.
natural_image
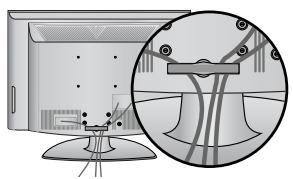
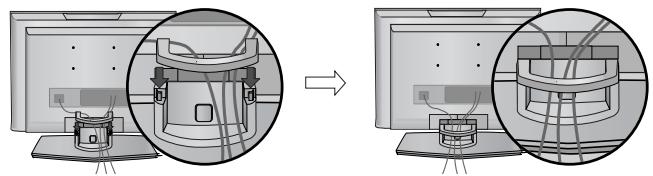
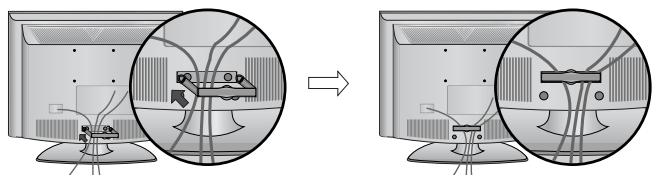
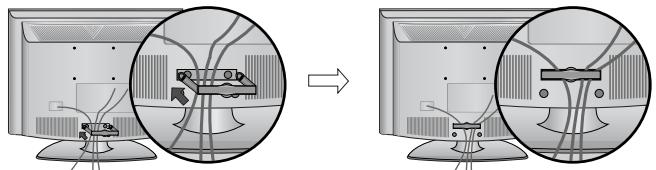
Diagram showing a hand holding a device next to a device with an arrow indicating transformation (no text or symbols present)BACK COVER FOR WIRE ARRANGEMENT
LCD TV Models:
32/37/42LG20**, 26/32/37/
42LG30**, 32/37/42/47/52LG5***
1 Connect the cables as necessary.
To connect additional equipment, see the External
Equipment Setup section of the manual.

2 Open the CABLE MANAGEMENT CLIP as shown and manage the cables.

3 Fit the CABLE MANAGEMENT CLIP as shown.
natural_image
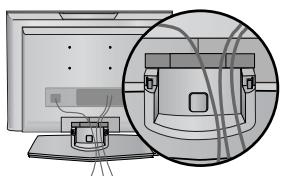
Illustration of a computer monitor with an inset close-up showing cable routing (no text or symbols)LCD TV Models :
19/22LS4D*, 19/22LG30**
1 Connect the cables as necessary.
To connect additional equipment, see the External Equipment Setup section.
natural_image
Diagram showing a computer monitor and its internal components, with an inset close-up of cable routing (no text or symbols)2 Install the CABLE MANAGEMENT CLIP as shown.
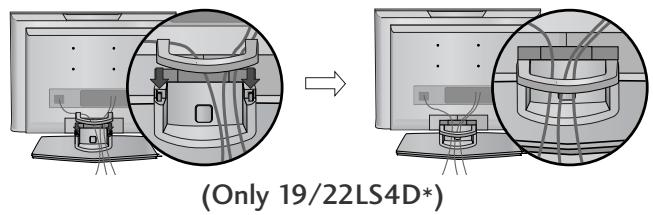
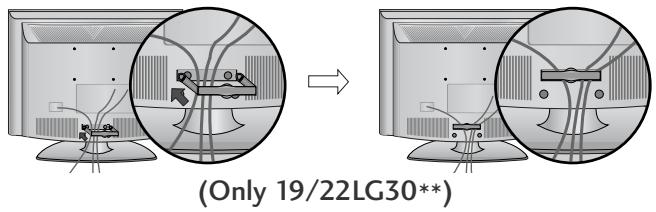
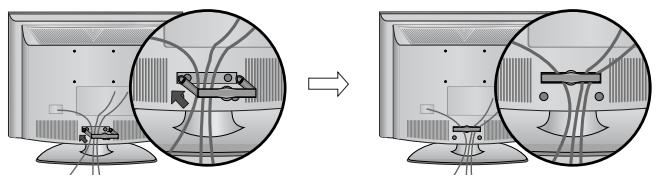
How to remove the cable management clip
First, press the cable management. Hold the CABLE MANAGEMENT CLIP with both hands and pull it upward.
natural_image
Diagram showing a mechanical component before and after assembly, with no visible text or symbols(Only 19/22LS4D*)
Hold the CABLE MANAGEMENT CLIP with both hands and pull it backward.

natural_image
Diagram showing cable routing between two monitors with a magnified inset highlighting the cable structure (no text or symbols present)(Only 19/22LG30**)
NOTE
▶ Do not use the CABLE MANAGEMENT CLIP to lift the TV.
- If the TV is dropped, you may be injured or the TV may be damaged.
PLEASE SET IT UP CAREFULLY SO THE PRODUCT DOES NOT FALL OVER.
- You should purchase necessary components to fix the TV to the wall on the market.
■ Position the TV close to the wall to avoid the possibility of it falling when pushed.
The instructions shown below are a safer way to set up the TV, which is to fix it to the wall, avoiding the possibility of it falling forwards if pulled. This will prevent the TV from falling forward and causing injury. This will also prevent the TV from damage. Ensure that children do not climb or hang from the TV.
flowchart
graph TD
    A["Computer monitor 1"] --> B["Path 1"]
    A --> C["Path 2"]
    B --> D["Arrow 1"]
    C --> E["Arrow 2"]
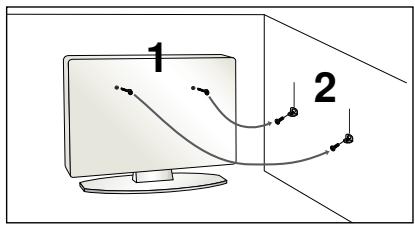
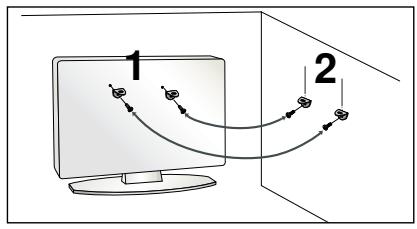
1 Use the eye-bolts or TV brackets/bolts to fix the TV to the wall as shown in the picture. (If your TV has bolts in the eyebolts, loosen these bolts.)
* Insert the eye-bolts or TV brackets/bolts and tighten them securely in the upper holes.
2 Secure the wall brackets with the bolts on the wall. Match the height of the bracket that is mounted on the wall.
natural_image
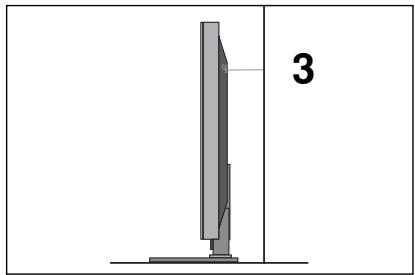
Diagram of a computer monitor with a stand and a vertical line labeled '3' (no text or symbols on the device itself)3 Use a sturdy rope to tie the TV. It is safer to tie the rope so it becomes horizontal between the wall and the TV.
NOTE
▶ When moving the TV undo the cords first.
▶ Use a platform or cabinet strong and large enough to support the size and weight of the TV.
▶ To use the TV safely make sure that the height of the bracket on the wall and on the TV is the same.
■ The TV can be installed in various ways such as on a wall, or on a desktop etc.
■ The TV is designed to be mounted horizontally.
EARTHING
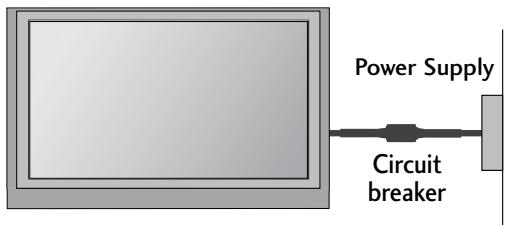
Ensure that you connect the earth wire to prevent possible electric shock. If grounding methods are not possible, have a qualified electrician install a separate circuit breaker.
Do not try to earth the TV by connecting it to telephone wires, lightening rods or gas pipes.
DESKTOP PEDESTAL INSTALLATION
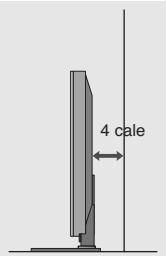
For adequate ventilation allow a clearance of 4" (10cm) all around the TV.
natural_image
Illustration of a flat-screen computer monitor with no visible text or symbols on the screen or side.
Attaching the TV to a desk (Only 32/37/42LG20**, 26/32/37/42LG30**, 32/37/42LG5***)
The TV must be attached to desk so it cannot be pulled in a forward/backward direction, potentially causing injury or damaging the product. Use only an attached screw.
natural_image
Illustration of a flat-screen computer monitor with a stand and ventilation slots (no text or symbols visible)1 -Screw
(provided as parts of the product)
Desk
! WARNING
To prevent TV from falling over, the TV should be securely attached to the floor/wall per installation instructions. Tipping, shaking, or rocking the machine may cause injury.
WALL MOUNT: HORIZONTAL INSTALLATION
For adequate ventilation allow a clearance of 4" (10cm) all around the TV. We recommend that you use a wall mounting bracket of LG brand when mounting the TV to a wall.
natural_image
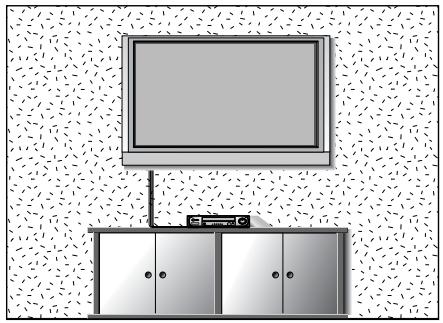
Illustration of a TV setup with a mounted monitor and cabinet, set against a patterned wall (no text or symbols)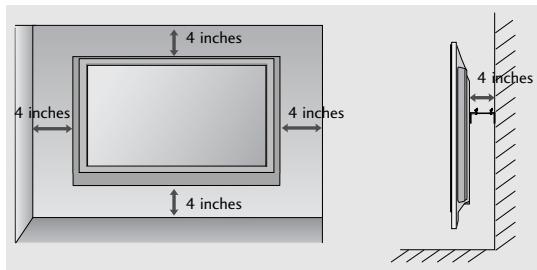
Not using the desk-type stand (Except for 19/22LS4D*)
■ Image shown may differ from your TV.
When installing the wall-mounted unit, use the protection cover for desk-type stand installation. Insert the PROTECTION COVER into the TV until clicking sound.
natural_image
Technical diagram showing a mechanical assembly with an inset close-up of a bracket component (no text or symbols present)■ To prevent damage do not connect to the mains outlet until all connections are made between the devices.
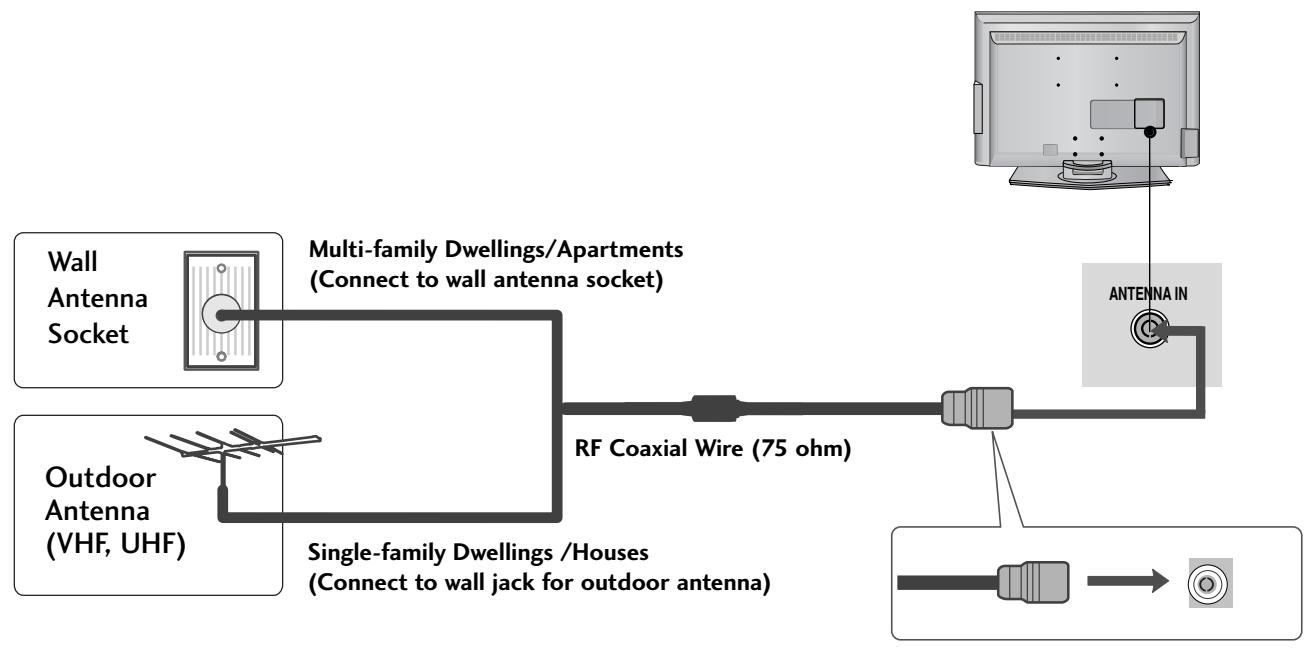
ANTENNA CONNECTION
■ For optimum picture quality, adjust antenna direction.
■ An antenna cable and converter are not supplied.
flowchart
graph LR
    A["Wall Antenna Socket"] --> B["Multi-family Dwellings/Apartments (Connect to wall antenna socket)"]
    C["Outdoor Antenna (VHF, UHF)"] --> D["Single-family Dwellings/Houses (Connect to wall jack for outdoor antenna)"]
    B --> E["RF Coaxial Wire (75 ohm)"]
    D --> E
    E --> F["Antenna IN"]

flowchart
graph LR
    A["Antenna"] --> B["UHF"]
    A --> C["VHF"]
    B --> D["Signal Amplifier"]
    C --> D
    D --> E["Antenna IN"]
In poor signal areas, to achieve better picture quality it may be necessary to install a signal amplifier to the antenna as shown above.
If signal needs to be split for two TVs, use an antenna signal splitter for connection.
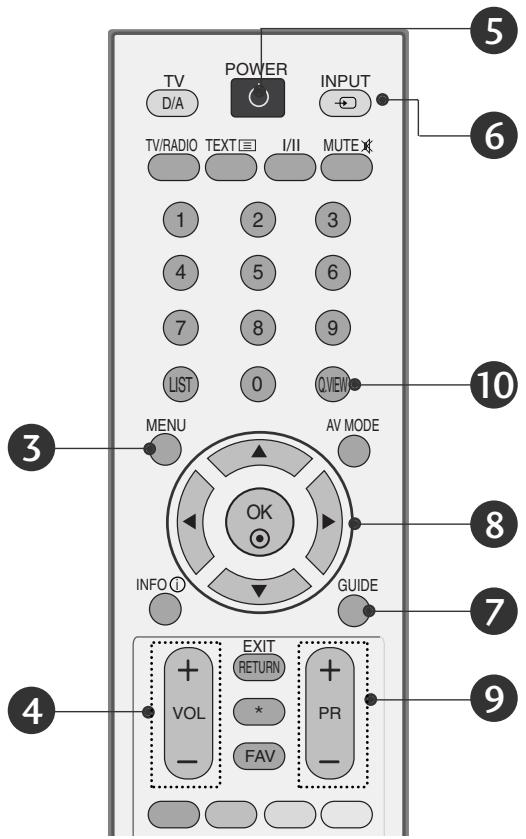
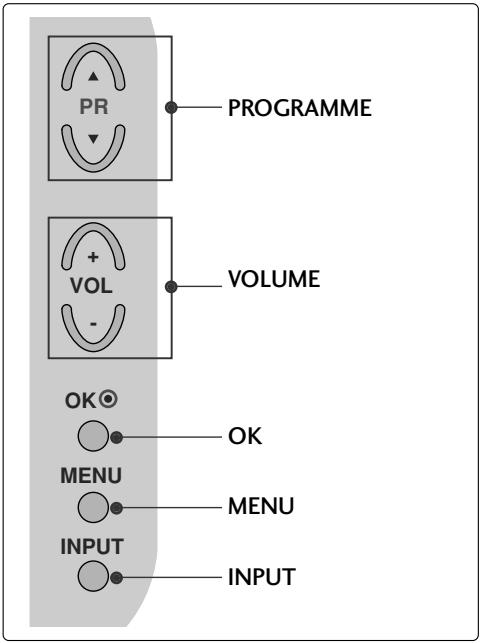
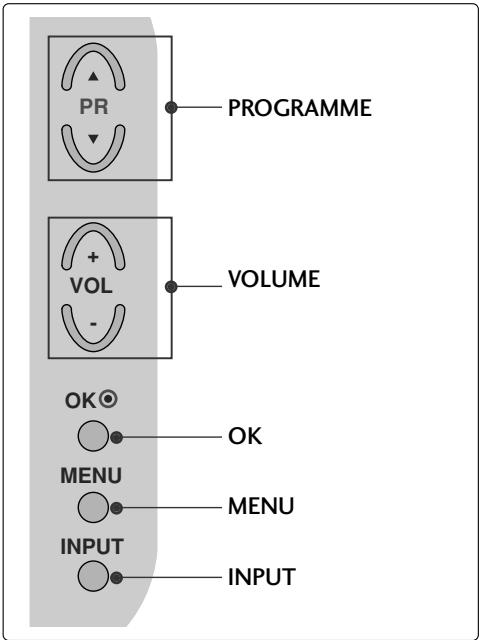
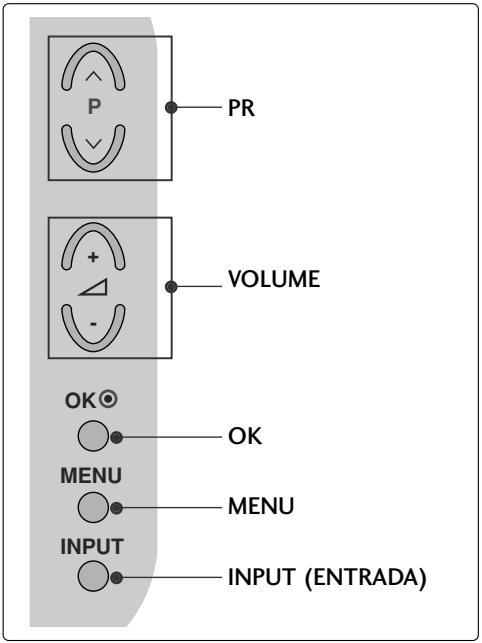
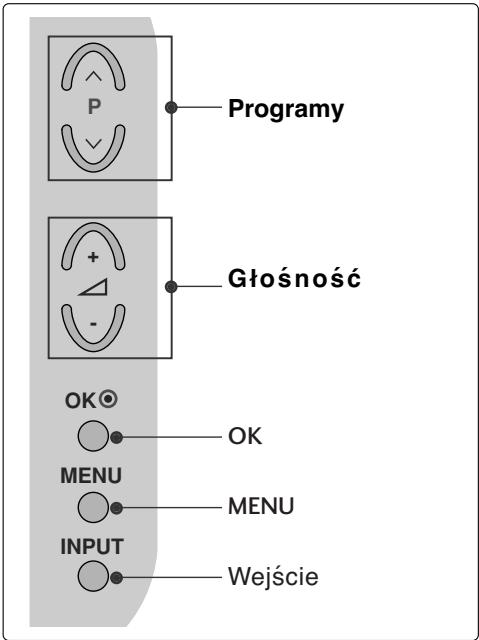
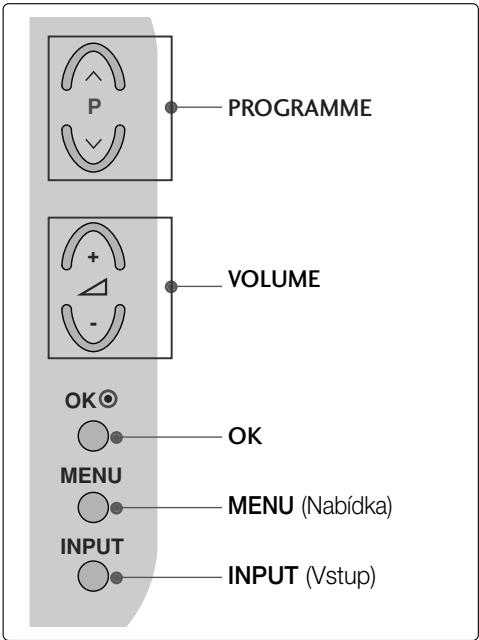
REMOTE CONTROL KEY FUNCTIONS
When using the remote control, aim it at the remote control sensor on the TV.
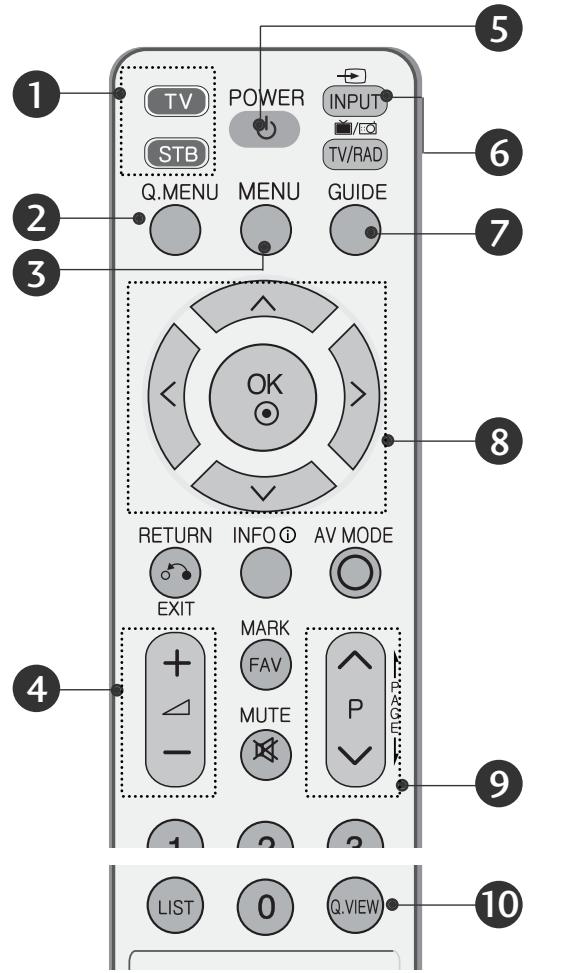
① MODE
Selects the remote operating modes.
② Q. MENU
Select the desired quick menu source.
3 MENU
Selects a menu.
Clears all on-screen displays and returns to TV viewing from any menu.
4 VOLUME UP /DOWN
Adjusts the volume.
5 POWER
Switches the TV on from standby or off to standby.
or
6 INPUT
External input mode rotate in regular sequence. Switches the TV on from standby.
7 GUIDE
Shows programme schedule.
⑧ THUMBSTICK(Up/Down/LeftRight)
Allows you to navigate the on-screen menus and adjust the system settings to your preference.
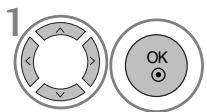
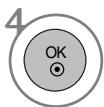
OK
Accepts your selection or displays the current mode.
9 Programme UP/DOWN
Selects a programme.
10 Q.VIEW
Returns to the previously viewed programme.
Installing Batteries
- Open the battery compartment cover on the back and install the batteries matching correct polarity (+with +,-with -).
■ Install two 1.5V AAA batteries. Do not mix old or used batteries with new ones. - Close cover.
TURNING ON THE TV
- When your TV is turned on, you will be able to use its features.
1 Firstly, connect the power cord correctly. At this stage, the TV switches to standby mode.
2 In standby mode to turn TV on, press the ⏻ / I, INPUT or P ∧ ∨ (or PR ▲ ▼) button on the TV or press the POWER, INPUT, D/A, P ∧ ∨ (or PR + -) or NUMBER button on the remote control and the TV will switch on.
Initializing setup
If the OSD (On Screen Display) is displayed on the screen after turning on the TV, you can adjust the Language, Select Mode, Country, Time Zone, Auto programme tuning.
Note:
a. It will automatically disappear after approx. 40 seconds unless a button is pressed.
b. Press the BACK or RETURN button to change the current OSD to the previous OSD.
c. For those countries without confirmed DTV broadcasting standards, some DTV features might not work, depending on the DTV broadcasting environment.
d. "Home" mode is the optimal setting for home environments, and is the TV's default mode.
e. "In Store" mode is the optimal setting for store environments." If a user modifies image quality data, "In Store" mode initializes the product to the image quality set by us after a certain period of time.
f. The mode (Home, In Store) can be changed by executing Factory Reset in the OPTION menu.
ON-SCREEN MENU LANGUAGE / COUNTRY SELECTION
The installation guide menu appears on the TV screen when it is switched on for the first time.
Select your desired language.
Select your country.
* If you want to change Language/ Country selection
Select OPTION.

Select your desired language or country.
Select Menu Language or Country.
Save it.
NOTE
▶ If you do not finish the set-up Installation Guide by pressing RETURN or if you time out on the OSD (On Screen Display) the installation menu will continuously appear until the set up is completed whenever the TV is switched on
▶ If you select the wrong local country, teletext may not appear correctly on the screen and some problems may occur during teletext operation.
The CI (Common Interface) function may not be applied based on country broadcasting circumstances.
▶ DTV mode control buttons may not function based on country broadcasting circumstances.
In country that Digital broadcasting regulation isn't fixed, some DTV function may not work depending on digital broadcasting circumstances.
The Country Setting “UK” should only be activated UK.
ON SCREEN MENUS SELECTION AND ADJUSTMENT
Your TV's OSD (On Screen Display) may differ slightly from what is shown in this manual.
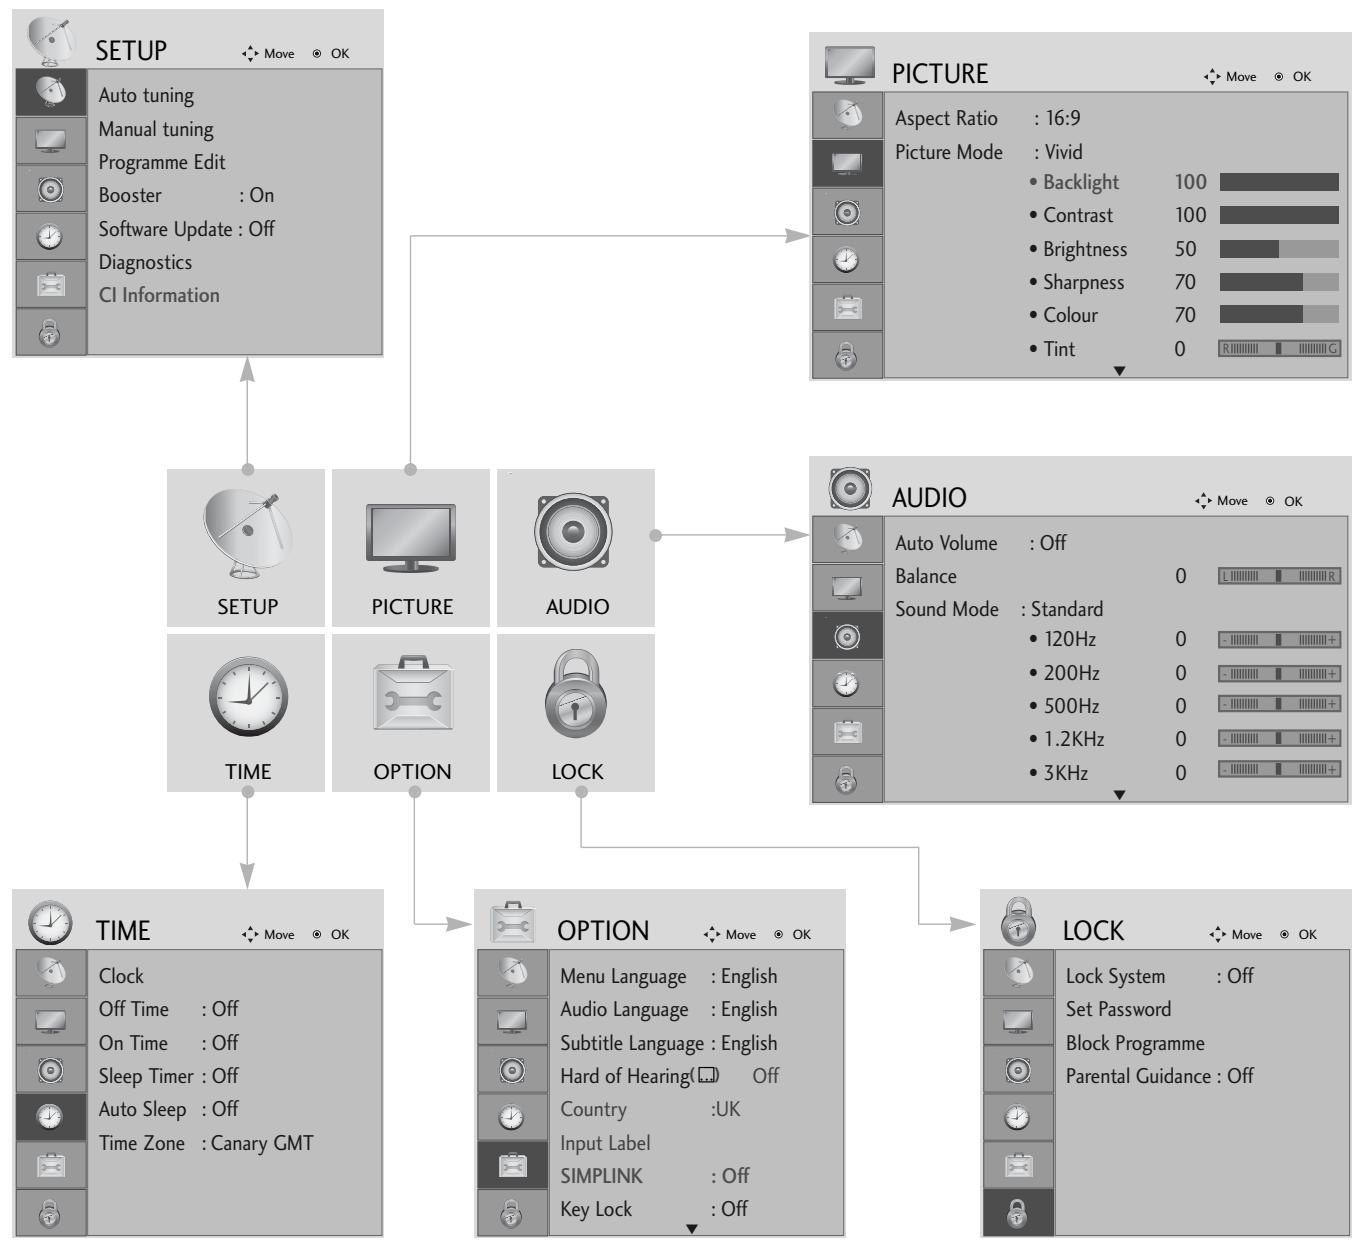
flowchart
graph TD
    A["SETUP"] --> B["Auto tuning"]
    A --> C["Manual tuning"]
    A --> D["Programme Edit"]
    A --> E["Booster : On"]
    A --> F["Software Update : Off"]
    A --> G["Diagnostics"]
    A --> H["CI Information"]
    I["PICTURE"] --> J["Aspect Ratio : 16:9"]
    I --> K["Picture Mode : Vivid"]
    I --> L["Backlight 100"]
    I --> M["Contrast 100"]
    I --> N["Brightness 50"]
    I --> O["Sharpness 70"]
    I --> P["Colour 70"]
    I --> Q["Tint 0"]
    R["AUDIO"] --> S["Auto Volume : Off"]
    R --> T["Balance 0"]
    R --> U["Sound Mode : Standard"]
    R --> V["120Hz 0"]
    R --> W["200Hz 0"]
    R --> X["500Hz 0"]
    R --> Y["1.2KHz 0"]
    R --> Z["3KHz 0"]
    AA["TIME"] --> AB["TIME : ON"]
    AA --> AC["OPTION : Canary GMT"]
    AD["OPTION"] --> AE["Menu Language : English"]
    AD --> AF["Audio Language : English"]
    AD --> AG["Subtitle Language : English"]
    AD --> AH["Hard of Hearing( Off)"]
    AD --> AI["Country :UK"]
    AD --> AJ["Input Label"]
    AD --> AK["SIMPLINK : Off"]
    AD --> AL["Key Lock : Off"]
    AM["LOCK"] --> AN["Lock System : Off"]
    AM --> AO["Set Password"]
    AM --> AP["Block Programme"]
    AM --> AQ["Parental Guidance : Off"]


Display each menu.
Select a menu item.
Move to the pop up menu.
- Press the MENU button to return to normal TV viewing.
- Press the RETURN button to move to the previous menu screen.
AUTO PROGRAMME TUNING
Use this to automatically find and store all available programmes.
When you start auto programming in digital mode, all previously stored service information will be deleted.
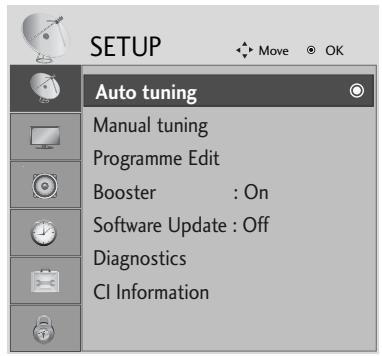
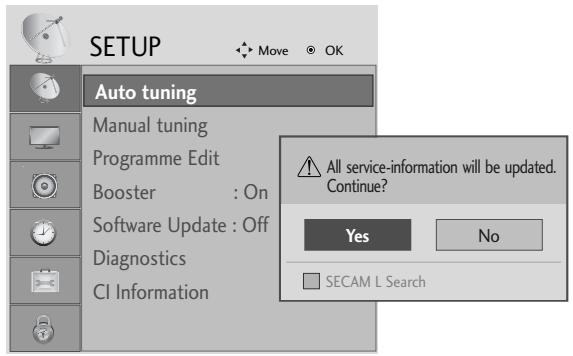

Select SETUP.

Select Auto Tuning.
Select Yes.
Run Auto tuning.
- Use NUMBER buttons to input a 4-digit password in Lock System 'On'.
-
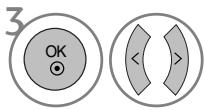
If you wish to keep on auto tuning select YES using the < > button. Then, press the OK button. Otherwise select NO.
-
Press the MENU button to return to normal TV viewing.
- Press the RETURN button to move to the previous menu screen.
MAINTENANCE
Early malfunctions can be prevented. Careful and regular cleaning can prolong the life of your new TV. Caution: Be sure to switch the power off and unplug the power cord before you begin any cleaning.
Cleaning the Screen
1 A good way to keep the dust off your screen for a while is to wet a soft cloth in a mixture of lukewarm water and a little fabric softener or dish washing detergent. Wring the cloth until it is almost dry, and then use it to wipe the screen.
2 Ensure there is no excess water on the screen. Allow any water or dampness to evaporate before switching on.
Cleaning the Cabinet
■ To remove dirt or dust, wipe the cabinet with a soft, dry, lint-free cloth.
■ Do not to use a wet cloth.
Extended Absence

CAUTION
If you expect to leave your TV dormant for prolonged periods (such as a holiday), unplug the power cord to protect against possible damage from lightning or power surges.
TO VIEW THE USER'S GUIDE ON THE CD-ROM
To view the User's guide on the CD-ROM, Adobe Acrobat Reader must be installed on your PC. The "ACRORD" folder on the CD-ROM contains the installation program for Acrobat Reader. If you want to install Acrobat Reader, Open "My Computer"→Open the folder "LG"→Open the folder "ACRORD"→double-click your language.
To view the User's guide
The User's guide files are included in the supplied CD-ROM. Load the supplied CD-ROM into the CD-ROM drive of your PC. After a while, the web page of the CD-ROM will open automatically.(Windows users only) If the web page does not appear automatically, open the User's guide file directly. Open "My computer" → Open the folder "LG" → Double click the "index.htm" file.
TROUBLESHOOTING
The TV does not operate properly.
| The remote control does not work | Check to see if there is any object between the TV and the remote control causing an obstruction. Ensure you are pointing the remote control directly at the TV.Ensure that the batteries are installed with correct polarity (+ to +, - to -).Ensure that the correct remote operating mode is set: TV, VCR etc.Install new batteries. |
| Power is suddenly turned off | Is the sleep timer set?Check the power control settings. Has the Power supply been interrupted.Is Auto sleep activated on this station? |
| The video function does not work. | |
| No picture & No sound | Check whether the TV is switched on.Try another channel. The problem may be with the broadcast.Is the power cord inserted correctly into the mains?Check your antenna direction and/or location.Test the mains outlet by plugging another TV into the same outlet. |
| Picture appears slowly after switching on | This is normal, the image is muted during the TV startup process. Please contact your service centre, if the picture has not appeared after five minutes. |
| No or poor colour or poor picture | Adjust Colour in menu option.Allow a sufficient distance between the TV and the VCR.Try another channel. The problem may be with the broadcast.Are the video cables installed properly?Activate any function to restore the brightness of the picture. |
| Horizontal/vertical bars or picture shaking | Check for local interference such as an electrical appliance or power tool. |
| Poor reception on some channels | Station or cable channel experiencing problems, tune to another station.Station signal is weak, reposition the antenna to receive weaker stations.Check for sources of possible interference. |
| Lines or streaks in pictures | Check antenna (Change the position of the antenna). |
| No picture when connecting HDMI | Check HDMI cable over version 1.3.If the HDMI cables don’t support HDMI version 1.3, it can cause flickers or no screen display. In this case use the latest cables that support HDMI version 1.3. |
| The audio function does not work. | |
| Picture OK & No sound | Press the VOLUME button.Sound muted? Press MUTE button.Try another channel. The problem may be with the broadcast.Are the audio cables installed properly? |
| No output from one of the speakers | Adjust Balance in menu option. |
| Unusual sound from inside the TV | A change in ambient humidity or temperature may result in an unusual noise when the TV is switched on or off and does not indicate a fault with the TV. |
| No sound when connecting HDMI or USB | Check HDMI cable over version 1.3.Check USB cable over version 2.0.*This feature is not available for all models. |
There is a problem with PICTURE settings.
When the user changes the picture settings, the TV automatically converts back to the initial settings after a certain period of time.
It means that the TV is currently set to In Store mode.
To switch to Home mode you should do the followings:
From the TV Menu, choose OPTION -> Factory Reset -> Yes (wait for a few seconds for the TV to download again) -> OSD "WELCOME" appears -> Press OK button -> Choose Language -> Choose Home -> Select your Country and Time Zone -> Press OK button. Program search will begin automatically (You can stop the search by pressing the OK button). Now, you have completed switching to the Home mode.
WEIGHT
| MODELS | 19LS4D* | 22LS4D* | 19LG30** | ||||
| 19LS4D-ZD | 22LS4D-ZD | 19LG3000-ZA19LG3050-ZA19LG3060-ZB | |||||
| Weight | with standwithout stand | 5.1 kg / 11.3 lbs4.6 kg / 10.2 lbs | 6.1 kg / 13.5 lbs5.7 kg / 12.6 lbs | 5.02 kg / 11.1 lbs4.76 kg / 10.5 lbs | |||
| MODELS | 22LG30** | 26LG30** | 32LG30** | ||||
| 22LG3000-ZA22LG3050-ZA22LG3060-ZB | 26LG3000-ZA26LG3050-ZA | 32LG3000-ZA32LG3030-ZA | |||||
| Weight | with standwithout stand | 5.6 kg / 12.4 lbs5.34 kg / 11.8 lbs | 10.1 kg / 22.3 lbs8.6 kg / 19.0 lbs | 13.4 kg / 29.6 lbs11.9 kg / 26.3 lbs | |||
| MODELS | 37LG30** | 42LG30** | 32LG20** | ||||
| 37LG3000-ZA37LG3030-ZA | 42LG3000-ZA42LG3030-ZA | 32LG2000-ZA | |||||
| Weight | with standwithout stand | 18.8 kg / 41.5 lbs16.2 kg / 35.7 lbs | 23.6 kg / 52.1 lbs21.0 kg / 46.3 lbs | 13.4 kg / 29.6 lbs11.9 kg / 26.3 lbs | |||
| MODELS | 37LG20** | 42LG20** | 32LG5*** | ||||
| 37LG2000-ZA | 42LG2000-ZA | 32LG5000-ZA32LG5010-ZD32LG5020-ZB32LG5030-ZE32LG5600-ZB32LG5700-ZF | |||||
| Weight | with standwithout stand | 18.8 kg / 41.5 lbs16.2 kg / 35.7 lbs | 23.6 kg / 52.1 lbs21.0 kg / 46.3 lbs | 14.1 kg / 31.1 lbs12.6 kg / 27.8 lbs | |||
| MODELS | 37LG50** | 42LG50** | 47LG50** | ||||
| 37LG5000-ZA37LG5010-ZD37LG5020-ZB37LG5030-ZE | 42LG5000-ZA42LG5010-ZD42LG5020-ZB42LG5030-ZE | 47LG5000-ZA47LG5010-ZD47LG5020-ZB47LG5030-ZE | |||||
| Weight | with standwithout stand | 18.3 kg / 40.4 lbs15.6 kg / 34.4 lbs | 26.2 kg / 57.8 lbs23.5 kg / 51.8 lbs | 29.2 kg / 64.4 lbs24.6 kg / 54.3 lbs | |||
■ The specifications shown above may be changed without prior notice for quality improvement.
(UK only)
Keep this important information about how to re-tune your TV during the digital TV switchover
Keep this leaflet and your instruction manual safe – you'll need them


natural_image
3D cartoon robot character with large eyes and a small mouth, no visible text or symbolsget set for digital √
Television in the UK is going digital, bringing us all more choice and new services. Starting in late 2007 and ending in 2012, television services in the UK will go completely digital, TV region by TV region.
Please see overleaf to find out when your area switches to digital.
Digital UK is the independent, non-profit organisation leading the process of digital TV switchover in the UK. Digital UK provides impartial information on what people need to do to prepare for the move to digital, and when they need to do it.
How the switchover affects your TV equipment:
Your new TV has a digital tuner built in, which means it is ready to receive the Freeview signal by simply plugging it into your aerial socket (check if you can get digital TV through your aerial now, or whether you'll have to wait until switchover, at www.digitaluk.co.uk).
When the TV switchover happens in your area, there are at least two occasions when you will need to re-tune your TV in order to continue receiving your existing TV channels, and also to pick up new ones. Digital UK, the body leading the digital TV switchover, will advise you when you need to re-tune during the switchover.
If you choose to connect your TV to satellite or cable with a digital box then it will not be affected by switchover, and you won't need to re-tune.
When does switchover happen?
*Copeland switches on October 17, 2007

Shetland Islands

The exact date you switch depends on the transmitter you are served by. To check when you switch, go to Digital UK's postcode checker on www.digitaluk.co.uk
Check your ITV news service or look at Teletext page 106 to see what TV region you're in.
Visit us at digitaluk.co.uk call us on 0845 6 50 50 50 ^+
^1 Calls charged at BT rate of 3p per minute daytime and 1p per minute evenings and weekends. Rates may vary for calls from non-BT lines.
How to re-tune:
To find out how to re-tune your TV, check your manufacturer's instructions for details. Or see below for a typical sequence:
-
With your TV in digital TV mode, press 'Menu' on your remote control. (Some TVs will ask you for a code. If you have not already changed it, the default code is usually 0000, or check your instruction book.)
-
From the Menu options on screen, select 'SETUP'. Select 'Auto Tuning'* to re-tune your digital TV (not 'add channels'). You may have to wait a couple of minutes for the re-tune to complete.
*Also sometimes referred to as 'Update', 'Rescan', 'Replace', 'Auto-Tuning', 'Channel Search', 'First Time Install', or 'Store Channels'.
- If you do not re-tune your channels when advised to do so by Digital UK, you may lose some or all of your channels until you do re-tune. You should re-tune your TV every few months to check for any new channels.
If you are missing any channels, it may be that they are not available in your area, or that your aerial needs upgrading.
If you have any questions, please contact your equipment supplier or call Digital UK on 0845 6 50 50 50 or visit www.digitaluk.co.uk
LCD TV
Bedienungsanleitung
LCD TV-MODELLE
19LS4D* 32LG30**
22LS4D* 37LG30**
32LG20** 42LG30**
37LG20** 32LG5***
42LG20** 37LG50**
19LG30** 42LG50**
22LG30** 47LG50**
26LG30** 52LG50**
32/37/42LG20**, 26/32/37/42LG30**, 32/37/42/47/52LG5***
LCD TV-MODELLE : 19/22LG30**
LCD TV-MODELLE : 19/22LS4D*
(LCD TV-MODELLE: 32/37/42LG20**, 26/32/37/42LG30**, 32/37/42LG5***)
natural_image
Line drawing of a square electronic component placed on a rectangular base (no text or symbols)natural_image
Technical illustration of a mechanical assembly with a fan and internal components, showing a magnified inset (no text or symbols)natural_image
Technical illustration of a mechanical component with a magnified inset showing a bolt and pin (no text or symbols)(Nur modelle 19/22LG30**)

natural_image
Line drawing of a mechanical component placed on a sheet of paper (no text or symbols)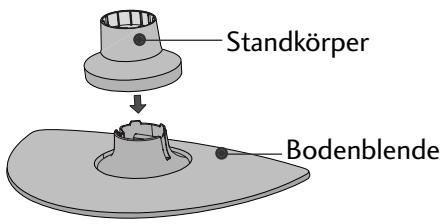
natural_image
Diagram of a device with a speaker and fan, no text or symbols presentnatural_image
Isometric line drawing of a mechanical component or housing with no visible text or symbolsnatural_image
Line drawing of a box with a partially open lid (no text or symbols)natural_image
Diagram showing a hand holding a device with an arrow pointing to it, and a magnified inset of the device's internal structure (no text or symbols)natural_image
Illustration of hands installing or removing a mechanical component (no text or symbols visible)natural_image
Illustration of a hand holding a mechanical component with an inset showing a close-up of a component (no text or symbols present)natural_image
Diagram showing a device being processed from a left-side view and then assembled into a closed-sectional view (no text or symbols present)32/37/42LG20**, 26/32/37/
42LG30**, 32/37/42/47/52LG5***
natural_image
Illustration of a computer monitor with cable routing and a magnified inset showing internal cable connections (no text or symbols)natural_image
Diagram showing a mechanical component before and after assembly, with no visible text or symbols(Nur modelle 19/22LS4D*)
LCD TV-MODELLE : 19/22LS4D*, 19/22LG30**
natural_image
Diagram showing a computer monitor with an attached device and a magnified inset view of its internal components (no text or symbols present)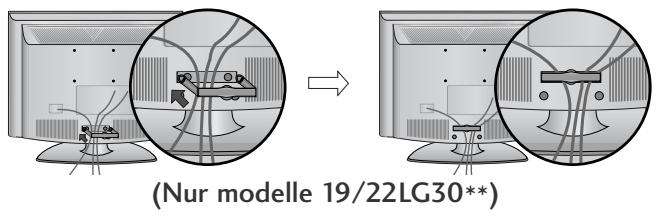
flowchart
graph TD
    A["Step 1: Initial monitor with points and curved arrows"] --> B["Step 2: Initial monitor with points and curved arrows"]
    style A fill:#f9f,stroke:#333
    style B fill:#bbf,stroke:#333
natural_image
Diagram of a computer monitor with a stand and a vertical line labeled '3' (no text or symbols on the device itself)natural_image
Illustration of a flat-screen computer monitor with no visible text or symbols on the screen or side.
MONTAGE DES FERNSEHERS AUF EINEM TISCH
(Nur Modelle 32/37/42LG20**, 26/32/37/42LG30**, 32/37/42LG5*** )
natural_image
Top-down view of a computer monitor with ventilation slots and a stand (no text or symbols visible)natural_image
Illustration of a TV setup with a mounted monitor and cabinet, set against a patterned wall (no text or symbols)
FALLS KEIN TISCH-STANDFUSS VERWENDET
32/37/42LG20**, 26/32/37/42LG30**, 32/37/42/47/52LG5***
MODÈLES DE TV LCD : 19/22LG30**
MODÈLES DE TV LCD : 19/22LS4D*
natural_image
Line drawing of a square electronic component placed on a textured surface (no text or symbols)natural_image
Technical illustration of a mechanical assembly with a fan and internal components, showing a magnified inset (no text or symbols)natural_image
Technical illustration of a mechanical assembly with a magnified inset showing a bolt and pin (no text or symbols)(Seulement 19/22LG30**)
natural_image
Isometric line drawing of a mechanical component with no visible text or symbols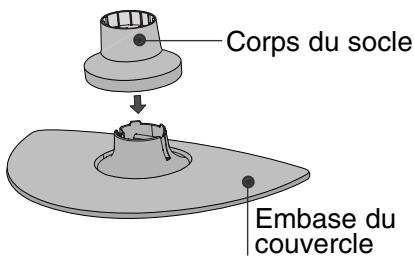
natural_image
Diagram of a device with a speaker emitting a sound wave, showing internal components and a circular component (no text or symbols)(Seulement 19/22LS4D*)
natural_image
Isometric line drawing of a mechanical component or housing with no visible text or symbols(Seulement 19/22LS4D*)
natural_image
Isometric line drawing of a mechanical component inside a rectangular housing (no text or symbols)natural_image
Diagram showing a hand holding a device with an arrow pointing to it, and a magnified inset of the device's internal structure (no text or symbols)natural_image
Illustration of hands installing or adjusting a device component with an arrow indicating rotation (no text or symbols present)natural_image
Illustration of a hand using a tool to adjust a mechanical part, with an inset showing the same component (no text or symbols present)natural_image
Diagram showing a device being processed from a left-side view and then assembled into a closed-sectional view (no text or symbols present)COUVERTURE DU PANNEAU ARRI ÊRE POUR LA DISPOSITION DES CÂBLES
natural_image
Illustration of a computer monitor with cable connectors and a magnified inset showing internal cables (no text or symbols)MODÈLES DE TV LCD : 19/22LS4D*, 19/22LG30**
natural_image
Diagram showing a computer monitor with an attached device and a magnified inset of its internal components (no text or symbols present)
natural_image
Diagram showing a mechanical component before and after assembly, with no visible text or symbols(Seulement 19/22LS4D*)
natural_image
Diagram showing cable routing between two devices, with a magnified inset highlighting the cable connection (no text or symbols present)(Seulement 19/22LG30**)
! REMARQUE
flowchart
graph TD
    A["Step 1: Initial monitor with points and curved arrows"] --> B["Step 2: Initial monitor with points and curved arrows"]
    style A fill:#f9f,stroke:#333
    style B fill:#bbf,stroke:#333
natural_image
Diagram of a computer monitor with a side panel labeled '3' (no text or symbols on the device itself)natural_image
Illustration of a flat-screen computer monitor with no visible text or symbols on the screen or side.
RATTACHER LA TV À UN MEUBLE
(Seulement 32/37/42LG20**, 26/32/37/42LG30**, 32/37/42LG5***)
natural_image
Illustration of a computer monitor with a stand and ventilation grille (no text or symbols)1 -vis
natural_image
Interior view of a TV setup with a mounted monitor and cabinet, set against a patterned wall (no text or symbols visible)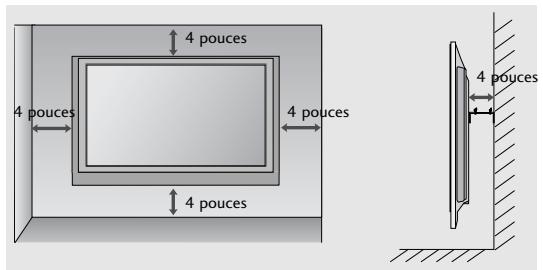
SI VOUS N'UTILISEZ PAS LE PIED A POSER
(Sauf 19/22LS4D*)
natural_image
Technical diagram showing a mechanical assembly with an inset close-up of a bracket labeled '40mm' (no text or symbols present)PRÉPARATION
32/37/42LG20**, 26/32/37/42LG30**, 32/37/42/47/52LG5***

MODELLI DI TV AL LCD : 19/22LG30**
MODELLI DI TV AL LCD : 19/22LS4D*
32/37/42LG20**, 26/32/37/42LG30**, 32/37/42LG5***
natural_image
Isometric line drawing of a mechanical component or housing with a central square component (no text or symbols)natural_image
Diagram showing a mechanical assembly with a fan and internal components, including a magnified inset of a bracket detail (no text or symbols)natural_image
Technical illustration of a mechanical assembly with a bolt and pin, no text or symbols present(solo 19/22LG30**)

natural_image
Isometric line drawing of a rectangular object with internal components, placed on a textured base (no text or symbols)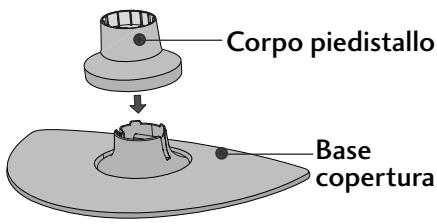
natural_image
Technical line drawing of a device with a spool attached to its side panel (no text or symbols present)natural_image
Isometric line drawing of a mechanical component or housing with no visible text or symbolsnatural_image
Line drawing of a box with a partially open lid (no text or symbols)natural_image
Diagram showing a hand holding a device with an arrow pointing to a component, and a magnified inset highlighting a curved mechanical component (no text or symbols present)natural_image
Illustration of hands installing or adjusting a device component with an arrow indicating rotation (no text or symbols present)natural_image
Illustration of a hand pressing down on a mechanical component with an inset showing a cutaway view (no text or symbols)natural_image
Diagram showing a hand holding a device next to a device with an arrow indicating transformation (no text or symbols present)COPERCHIO POSTERIORE PER L'ORGANI ZZAZIONE DEI CAVI
MODELLI DI TV AL LCD: 32/37/42LG20**, 26/32/37/ 42LG30**, 32/37/42/47/52LG5***
natural_image
Illustration of a computer monitor with cable routing and a magnified inset showing internal cables (no text or symbols)MODELLI DI TV AL LCD : 19/22LS4D*, 19/22LG30**
natural_image
Diagram showing a computer monitor with an attached device and a magnified inset view of its internal components (no text or symbols present)
natural_image
Diagram showing a mechanical component before and after assembly, with no visible text or symbols(solo 19/22LS4D*)
natural_image
Diagram showing cable routing between two monitors, with a magnified inset highlighting the cable assembly (no text or symbols present)(solo 19/22LG30**)
NOTA
flowchart
graph TD
    A["Step 1: Curve with dots"] --> B["Step 2: Arrow from left to right"]
    B --> C["End"]
natural_image
Diagram of a computer monitor with a labeled section '3' (no text or symbols on the device itself)natural_image
Illustration of a flat-screen computer monitor with no visible text or symbols on the screen or side.
FISSARE LA TV ALLA SCRIVANIA
(Solo 32/37/42LG20**, 26/32/37/42LG30**, 32/37/42LG5*** )
natural_image
Top-down view of a computer monitor with a stand and ventilation slots (no text or symbols visible)natural_image
Illustration of a TV setup with a mounted monitor and cabinet, set against a patterned wall (no text or symbols)
NON USARE IL SUPPORTO PER SCRIVANIA STAND
(Tranne 19/22LS4D*)
natural_image
Technical diagram showing a mechanical assembly with an inset close-up of a bracket component (no text or symbols)PREPARAZIONE
32/37/42LG20**, 26/32/37/42LG30**, 32/37/42/47/52LG5***
Modelos de televisores de LCD : 19/22LG30**
32/37/42LG20**, 26/32/37/42LG30**, 32/37/42LG5***
natural_image
Technical line drawing of a square electronic component with a central slot, placed on a rectangular base (no text or symbols)natural_image
Technical illustration of a mechanical assembly with a fan and internal components, showing a magnified inset (no text or symbols)natural_image
Technical illustration of a mechanical component with a magnified inset showing a bolt and pin (no text or symbols)(Sólo 19/22LG30**)

natural_image
Line drawing of a mechanical component on a folded paper (no text or symbols)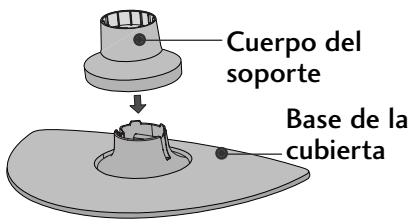
natural_image
Diagram of a device with a speaker emitting a sound wave, showing internal components and a circular component (no text or symbols)natural_image
Isometric line drawing of a mechanical component or housing with no visible text or symbolsnatural_image
Isometric line drawing of a box with a partially visible internal object (no text or symbols)natural_image
Diagram showing a hand holding a device with an arrow pointing to a component, and a magnified inset highlighting a curved mechanical component (no text or symbols present)natural_image
Illustration of hands installing or adjusting a device component with an arrow indicating rotation (no text or symbols present)natural_image
Illustration of a hand holding a mechanical component with an inset showing a close-up of a component (no text or symbols present)natural_image
Diagram showing a device being processed from a component, with an arrow indicating the process (no text or symbols present)natural_image
Illustration of a computer monitor with cable connectors and a magnified inset showing internal cables (no text or symbols)Modelos de televisores de LCD : 19/22LS4D*, 19/22LG30**
natural_image
Diagram showing a computer monitor with an inset close-up of its internal components (no text or symbols present)natural_image
Diagram showing a mechanical component before and after assembly, with no visible text or symbols.(sólo 19/22LS4D*)
natural_image
Diagram showing cable routing between two devices, with a magnified inset highlighting the cable connection (no text or symbols present)(sólo 19/22LG30**)
NOTA
natural_image
Diagram of a computer monitor with a side panel and label '3' (no text or symbols on the device itself)natural_image
Illustration of a flat-screen computer monitor with no visible text or symbols on the screen or side.
natural_image
Interior view of a TV setup with a mounted monitor and cabinet (no visible text or symbols)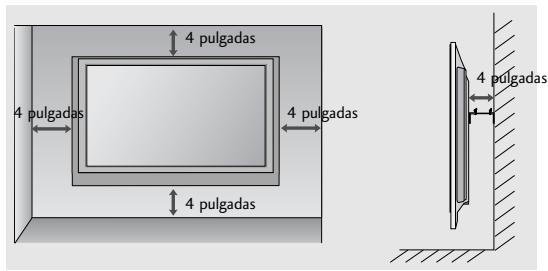
natural_image
Technical diagram showing a mechanical assembly with an inset close-up of a bracket and directional arrows (no text or symbols)PREPARATIVOS
MANUAL DE INSTRUÇÕES
MODELOS DE TV LCD
19LS4D* 32LG30**
22LS4D* 37LG30**
32LG20** 42LG30**
37LG20** 32LG5***
42LG20** 37LG50**
19LG30** 42LG50**
22LG30** 47LG50**
26LG30** 52LG50**
32/37/42LG20**, 26/32/37/42LG30**, 32/37/42/47/52LG5***
Modelos de TV LCD : 19/22LG30**
13 PORTA APENAS PARA ASSISTÊNCIA
(Modelos de TV LCD: 32/37/42LG20**, 26/32/37/42LG30**, 32/37/42LG5*** )
natural_image
Technical line drawing of a square electronic component with a central slot, placed on a rectangular base (no text or symbols)natural_image
Technical illustration of a mechanical assembly with a fan and internal components, showing a magnified inset (no text or symbols)natural_image
Technical illustration of a mechanical component with a magnified inset showing a bolt and pin (no text or symbols)(Apenas no 19/22LG30**)

natural_image
Line drawing of a mechanical component on a folded paper (no text or symbols)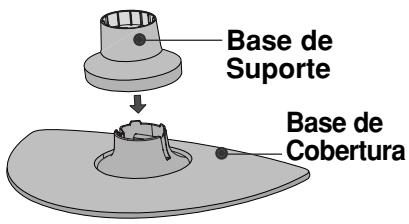

natural_image
Diagram of a device with a speaker emitting a sound wave, showing internal components and a circular component (no text or symbols)(Apenas no 19/22LS4D*)
natural_image
Isometric line drawing of a mechanical component or housing with no visible text or symbols(Apenas no 19/22LS4D*)
natural_image
Isometric line drawing of a mechanical component inside a rectangular housing (no text or symbols)natural_image
Diagram showing a hand inserting a device into a housing, with an inset close-up of the component (no text or symbols visible)natural_image
Illustration of hands installing or adjusting a device component with an arrow indicating rotation (no text or symbols present)natural_image
Illustration of a hand using a tool to adjust a mechanical component, with an oval detail showing the same part (no text or symbols present)natural_image
Diagram showing a device being processed into a box, with an arrow indicating the process (no text or symbols present)32/37/42LG20**, 26/32/37/
42LG30**, 32/37/42/47/52LG5***
natural_image
Illustration of a computer monitor with cable routing and a magnified inset showing internal cable connections (no text or symbols)Modelos de TV LCD :
19/22LS4D*, 19/22LG30**
natural_image
Diagram showing a computer monitor with an inset close-up of its internal components (no text or symbols present)2 Una os cabos, utilizando o CLIPE DE SUPORTE DO CABO fornecido.
natural_image
Diagram showing a device being processed from a computer monitor, with close-ups of internal components (no text or symbols visible)(Apenas no 19/22LS4D*)
natural_image
Diagram showing cable routing between two computer monitors, with magnified views of cable connections (no text or symbols)(Apenas no 19/22LG30**)
COMO REMOVER A GESTÃO DOS CABOS
natural_image
Diagram showing a mechanical component before and after assembly, with no visible text or symbols.(Apenas no 19/22LS4D*)
natural_image
Diagram showing cable routing between two devices, with a magnified inset highlighting the cable connection (no text or symbols present)(Apenas no 19/22LG30**)
NOTA
natural_image
Diagram of a computer monitor with a side panel labeled '3' (no text or symbols on the device itself)natural_image
Illustration of a flat-screen computer monitor with no visible text or symbols on the screen or side.
(Apenas no 32/37/42LG20**, 26/32/37/42LG30**, 32/37/42LG5***)
natural_image
Top-down view of a computer monitor with a stand and ventilation slots (no text or symbols visible)natural_image
Illustration of a TV mounted on a cabinet with a monitor overhead, set against a patterned wall (no text or symbols)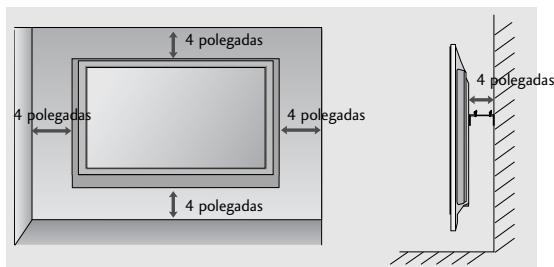
natural_image
Technical diagram showing a mechanical assembly with an inset close-up of a component (no text or symbols visible)PREPARAÇÃO
32/37/42LG20**, 26/32/37/42LG30**, 32/37/42/47/52LG5***

LCD-tv-modellen : 19/22LG30**
(LCD TV Models: 32/37/42LG20**, 26/32/37/42LG30**, 32/37/42LG5***)
natural_image
Technical line drawing of a square electronic component with a central slot, placed on a rectangular base (no text or symbols)natural_image
Technical illustration of a mechanical assembly with a fan and internal components, showing a magnified inset (no text or symbols)natural_image
Technical illustration of a mechanical component with a magnified inset showing a bolt and pin (no text or symbols)(Alleen 19/22LG30**)

natural_image
Line drawing of a mechanical component on a folded paper (no text or symbols)

natural_image
Diagram of a device with a speaker and fan, no text or symbols presentnatural_image
Isometric line drawing of a mechanical component or housing with no visible text or symbolsnatural_image
Isometric line drawing of a box with a partially visible internal object (no text or symbols)natural_image
Diagram showing a hand operating a device with a magnified inset highlighting internal components (no text or symbols)natural_image
Illustration of hands operating a device with a slide and tray (no text or symbols)natural_image
Illustration of a hand pressing down on a mechanical component with an inset showing a cutaway view (no text or symbols)natural_image
Diagram showing a device being processed from a left-side view and then assembled into a 3D model (no text or symbols present)ACHTERPANEEL VOOR KABELGELEIDING
LCD-tv-modellen:
32/37/42LG20**, 26/32/37/
42LG30**, 32/37/42/47/52LG5***
natural_image
Illustration of a computer monitor with cable connectors and a magnified inset showing internal cables (no text or symbols)natural_image
Diagram showing a mechanical component before and after assembly, with no visible text or symbols(Alleen 19/22LS4D*)
LCD-tv-modellen :
19/22LS4D*, 19/22LG30**
natural_image
Diagram showing a computer monitor with an inset close-up of its internal components (no text or symbols present)natural_image
Diagram showing a device being processed from a computer monitor, with no visible text or symbols.(Alleen 19/22LS4D*)
natural_image
Diagram showing cable installation on a computer monitor, with magnified views of cable routing (no text or symbols)(Alleen 19/22LG30**)
natural_image
Diagram showing cable routing between two monitors with a magnified inset highlighting cable routing (no text or symbols present)(Alleen 19/22LG30**)
! OPMERKINGEN
natural_image
Diagram of a computer monitor with a stand and a vertical line labeled '3' (no text or symbols on the device itself)natural_image
Illustration of a flat-screen computer monitor with a blank screen and stand (no text or symbols)
DE TV BEVESTIGEN AAN BUREAU (Alleen model 32/37/42LG20**, 26/32/37/42LG30**, 32/37/42LG5***)
natural_image
Top-down view of a computer monitor with a stand and ventilation slots (no text or symbols visible)natural_image
Illustration of a TV setup with a mounted monitor and cabinet, set against a patterned wall (no text or symbols)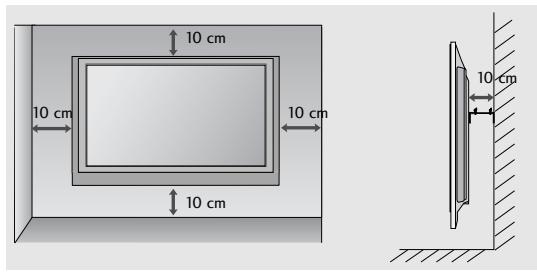
U GEBRUIKT DE TAFELSTANDAARD NIET
( behalve 19/22LS4D*)
natural_image
Technical diagram showing a mechanical assembly with an inset close-up of a component labeled '###' (no text or symbols present)VOORBEREIDING
32/37/42LG20**, 26/32/37/42LG30**, 32/37/42/47/52LG5***
32/37/42LG20**, 26/32/37/42LG30**, 32/37/42LG5***
natural_image
Line drawing of a square electronic component with a recessed top, placed on a textured surface (no text or symbols)natural_image
Technical diagram showing a mechanical assembly with an arrow indicating direction, no visible text or symbolsnatural_image
Technical illustration of a mechanical assembly with a magnified inset showing a bolt and nut (no text or symbols)natural_image
Line drawing of a mechanical component on a folded paper (no text or symbols)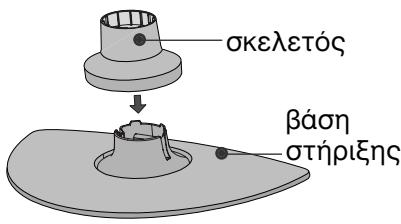
natural_image
Diagram of a device with a speaker emitting a sound wave, showing internal components and a circular component (no text or symbols)natural_image
Line drawing of a mechanical component inside a rectangular housing (no text or symbols)natural_image
Line drawing of a box with a partially open lid (no text or symbols)natural_image
Diagram showing a hand holding a device with an arrow pointing to a component, and a magnified inset highlighting a curved component (no text or symbols present)natural_image
Illustration of hands installing or adjusting a mechanical component with a slide and fan (no text or symbols)natural_image
Illustration of hands assembling a mechanical component with an inset showing a cutaway view (no text or symbols)natural_image
Diagram showing a hand holding a device next to a device with an arrow indicating transformation (no text or symbols present)natural_image
Illustration of a computer monitor with cable routing and a magnified inset showing internal cable connections (no text or symbols)MONTELA THΛΕΟΡΑΣΕΩΝ LCD: 19/22LS4D*
natural_image
Diagram showing a computer monitor and its internal cable connector (no text or symbols present)natural_image
Diagram showing a mechanical component before and after assembly, with no visible text or symbolsnatural_image
Diagram showing cable routing between two electronic devices, with a magnified inset highlighting internal components (no text or symbols present)natural_image
Diagram of a computer monitor with a stand and a vertical line labeled '3' (no text or symbols on the device itself)natural_image
Illustration of a flat-screen computer monitor with no visible text or symbols on the screen or side.
natural_image
Top-down view of a flat-screen computer monitor with ventilation grilles and a stand (no text or symbols visible)natural_image
Illustration of a TV setup with a mounted monitor and cabinet, set against a patterned wall (no text or symbols)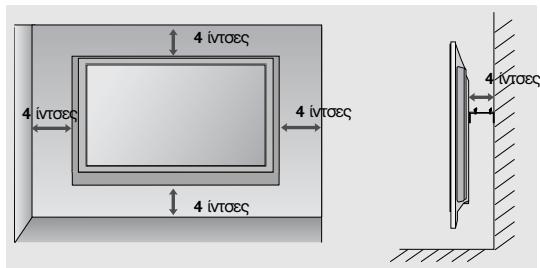
32/37/42LG20**, 26/32/37/42LG30**, 32/37/42/47/52LG5***

LCD TV-TÍPUSOK : 19/22LS4D*
(LCD TV-TÍPUSOK: 32/37/42LG20**, 26/32/37/42LG30**, 32/37/42LG5***)
natural_image
Technical line drawing of a square electronic component with a central slot, placed on a rectangular base (no text or symbols)natural_image
Technical illustration of a mechanical assembly with a fan and internal components, showing a magnified inset (no text or symbols)natural_image
Technical illustration of a mechanical component with a magnified inset showing a bolt and pin (no text or symbols)(csak 19/22LG30**)

natural_image
Isometric line drawing of a rectangular object with internal components, placed on a textured base (no text or symbols)
natural_image
Diagram of a device with a speaker emitting a sound wave, showing internal components and a circular component (no text or symbols)natural_image
Isometric line drawing of a mechanical component or housing with no visible text or symbolsnatural_image
Isometric line drawing of a box with a partially visible internal object (no text or symbols)natural_image
Diagram showing a hand holding a device with an arrow pointing to it, and a magnified inset of the device's internal structure (no text or symbols)natural_image
Illustration of hands installing or adjusting a device component with an arrow indicating rotation (no text or symbols present)natural_image
Illustration of a hand holding a mechanical component with an inset showing a close-up of a component (no text or symbols present)natural_image
Diagram showing a device being processed from a left-side view and then assembled into a closed-sectional view (no text or symbols present)A KÁBELEK ELRENDEZÉSE A HÁTLAPON
LCD TV-TÍPUSOK:
32/37/42LG20**, 26/32/37/
42LG30**, 32/37/42/47/52LG5***
natural_image
Illustration of a computer monitor with cable connectors and a magnified inset showing internal cables (no text or symbols)LCD TV-TÍPUSOK :
19/22LS4D*, 19/22LG30**
natural_image
Diagram showing a computer monitor and its internal components, with an inset close-up of cable routing (no text or symbols)
natural_image
Diagram showing a mechanical component before and after assembly, with no visible text or symbols(csak 19/22LS4D*)
natural_image
Diagram of a computer monitor with a side panel labeled '3' (no text or symbols on the device itself)natural_image
Illustration of a flat-screen computer monitor with no visible text or symbols on the screen or side.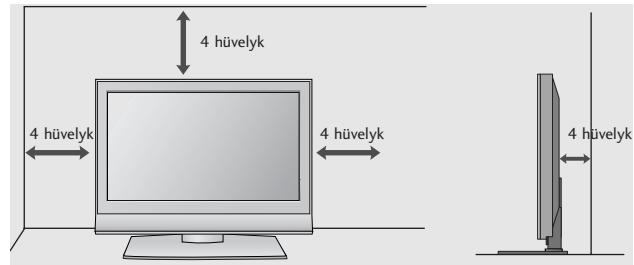
A TV-KÉSZÜLÉK ASZTALRA SZERELÉSE
(csak 32/37/42LG20**, 26/32/37/42LG30**, 32/37/42LG5***)
natural_image
Illustration of a flat-screen computer monitor with a stand and ventilation slots (no text or symbols visible)natural_image
Illustration of a TV setup with a mounted monitor and cabinet, set against a patterned wall (no text or symbols)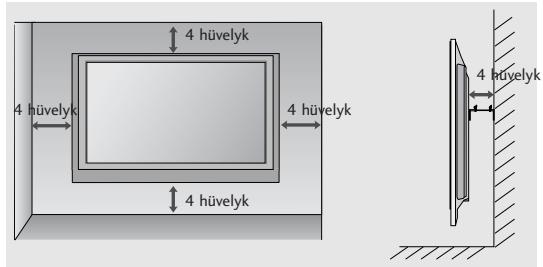
HA NEM HASZNÁLJA AZ ASZTALI ÁLLVÁNYT
(Kivéve 19/22LS4D*)
natural_image
Technical diagram showing a mechanical assembly with an inset close-up of a bracket and a directional arrow (no text or symbols)ELŐKÉSZÜLETEK
32/37/42LG20**, 26/32/37/42LG30**, 32/37/42/47/52LG5***
MODELE TELEWIZORÓW LCD : 19/22LS4D*
32/37/42LG20**, 26/32/37/42LG30**, 32/37/42LG5***
natural_image
Technical line drawing of a square electronic component with a central slot, placed on a rectangular base (no text or symbols)natural_image
Technical illustration of a mechanical assembly with a gear and housing, showing internal components and alignment (no text or symbols)natural_image
Technical illustration of a mechanical assembly with a magnified inset showing a bolt and pin (no text or symbols)(Tylko 19/22LG30**)

natural_image
Isometric line drawing of a mechanical component with no visible text or symbols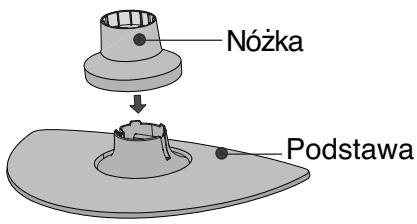
natural_image
Diagram of a device with a speaker emitting a sound wave, showing internal components and a circular component (no text or symbols)natural_image
Isometric line drawing of a mechanical component or housing with no visible text or symbolsnatural_image
Line drawing of a box with a partially open lid (no text or symbols)natural_image
Diagram showing a hand holding a device with an arrow pointing to it, and a magnified inset of the device's internal structure (no text or symbols)natural_image
Illustration of hands installing or adjusting a device component with an arrow indicating rotation (no text or symbols present)natural_image
Illustration of a hand pressing down on a mechanical component with an inset showing a close-up of the part (no text or symbols present)natural_image
Diagram showing a device being processed from a left-side view and then assembled into a closed-sectional view (no text or symbols present)SYSTEM ZARZĄDZANIA PRZEWODAMI OBUDOWY TYLNEJ
MODELE TELEWIZORÓW LCD: 32/37/42LG20**, 26/32/37/42LG30**, 32/37/42/47/52LG5***
natural_image
Illustration of a computer monitor with cables and connectors, shown in an inset circle (no text or symbols)MODELE TELEWIZORÓW LCD: 19/22LS4D*, 19/22LG30**
natural_image
Illustration of a computer monitor with an inset close-up showing internal components (no text or symbols)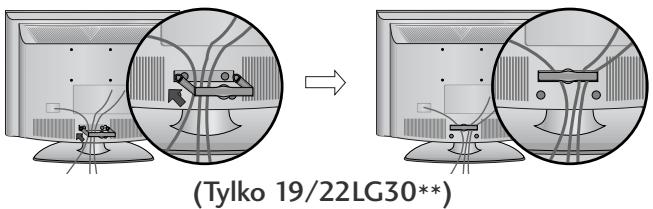
SPOSÓB DEMONTAŻU SYSTEMU ZARZĄDZANIA PRZEWODAMI
flowchart
graph TD
    A["Step 1: Initial monitor with points and curved arrows"] --> B["Step 2: Initial monitor with points and curved arrows"]
    style A fill:#f9f,stroke:#333
    style B fill:#bbf,stroke:#333
natural_image
Diagram of a computer monitor with a stand and a vertical line labeled '3' (no text or symbols on the device itself)natural_image
Illustration of a flat-screen computer monitor with no visible text or symbols on the screen or side.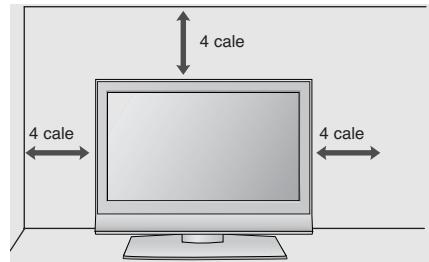
MOCOWANIE TELEWIZORA DO BLATU
(Tylko 32/37/42LG20**, 26/32/37/42LG30**, 32/37/42LG5***)
natural_image
Illustration of a computer monitor with a stand and ventilation slots (no text or symbols)natural_image
Illustration of a TV setup with a mounted monitor and cabinet, set against a patterned wall (no text or symbols)
PRACA BEZ PODSTAWY
natural_image
Technical diagram showing a mechanical assembly with an inset close-up of a bracket and directional arrows (no text or symbols)PRZYGOTOWANIE
32/37/42LG20**, 26/32/37/42LG30**, 32/37/42/47/52LG5***
LCD televizory : 19/22LG30**
(LCD televizory: 32/37/42LG20**, 26/32/37/42LG30**, 32/37/42LG5***)
natural_image
Technical line drawing of a square electronic component with a central slot, placed on a rectangular base (no text or symbols)natural_image
Technical illustration of a mechanical assembly with a fan and internal components, showing a magnified inset (no text or symbols)natural_image
Technical illustration of a mechanical component with a magnified inset showing a bolt and pin (no text or symbols)(Pouze 19/22LG30**)

natural_image
Line drawing of a mechanical component on a folded paper (no text or symbols)
natural_image
Diagram of a device with a speaker emitting a sound wave, showing internal components and a circular component (no text or symbols)natural_image
Isometric line drawing of a mechanical component or housing with no visible text or symbolsnatural_image
Line drawing of a box with a partially open lid (no text or symbols)natural_image
Diagram showing a hand holding a device with an arrow pointing to a circular inset view of the device (no text or symbols present)natural_image
Illustration of hands installing or adjusting a device component with an arrow indicating rotation (no text or symbols present)natural_image
Illustration of a hand pressing down on a mechanical component with an inset showing a close-up of the part (no text or symbols present)natural_image
Diagram showing a hand holding a device next to a device with an arrow indicating transformation (no text or symbols present)ZADNÍ KRYT PRO USPOŘÁDÁNÍ VODIČŮ
LCD televizory :
32/37/42LG20**, 26/32/37/
42LG30**, 32/37/42/47/52LG5***
natural_image
Illustration of a computer monitor with cables and connectors, shown in an inset magnified view (no text or symbols)SEJMUTÍ DRŽÁKU KABELŮ
natural_image
Diagram showing a mechanical component before and after assembly, with no visible text or symbols(Pouze 19/22LS4D*)
LCD televizory :
19/22LS4D*, 19/22LG30**
natural_image
Diagram showing a computer monitor with an attached device and a magnified inset of its internal components (no text or symbols present)natural_image
Diagram showing a mechanical assembly before and after transformation, with no visible text or symbols.(Pouze 19/22LS4D*)
natural_image
Diagram showing cable routing between two computer monitors, with no visible text or symbols(Pouze 19/22LG30**)
natural_image
Diagram showing cable routing between two electronic devices, with a magnified inset highlighting the connection mechanism (no text or symbols present)(Pouze 19/22LG30**)
! POZNÁMKA
natural_image
Diagram of a computer monitor with a labeled section '3' (no text or symbols on the device itself)natural_image
Illustration of a flat-screen computer monitor with no visible text or symbols on the screen or side.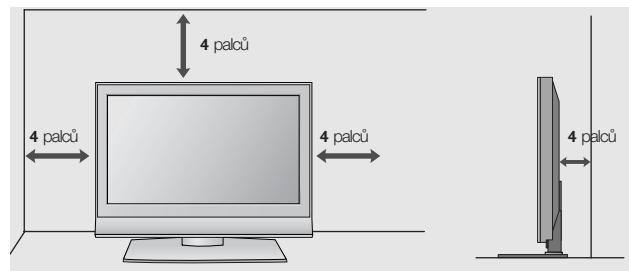
(Pouze 32/37/42LG20**, 26/32/37/42LG30**, 32/37/42LG5***)
natural_image
Top-down view of a computer monitor with a stand and cable (no visible text or symbols)natural_image
Illustration of a TV setup with a mounted monitor and cabinet, set against a patterned wall (no text or symbols)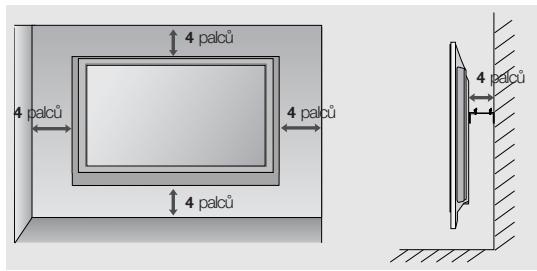
natural_image
Technical diagram showing a mechanical assembly with an inset close-up of a bracket component (no text or symbols)PŘÍPRAVA
32/37/42LG20**, 26/32/37/42LG30**, 32/37/42/47/52LG5***

Modely LCD TV : 19/22LG30**
Modely LCD TV : 19/22LS4D*


INFORMÁCIE O ZADNOM PANELI
(Modelly LCD TV : 32/37/42LG20**, 26/32/37/42LG30**, 32/37/42LG5***)
natural_image
Illustration of a square electronic component placed on a surface, with no visible text or symbols.natural_image
Technical illustration of a mechanical assembly with a fan and internal components, showing a magnified inset (no text or symbols)natural_image
Illustration of a mechanical component with a magnified inset showing a bolt (no text or symbols)(len pre 19/22LG30**)

natural_image
Isometric line drawing of a mechanical component or housing with no visible text or symbols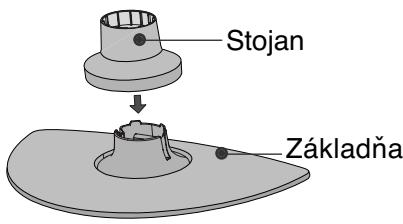
natural_image
Diagram of a device with a speaker emitting a sound wave, showing internal components and a circular component (no text or symbols)(len pre 19/22LS4D\*)
natural_image
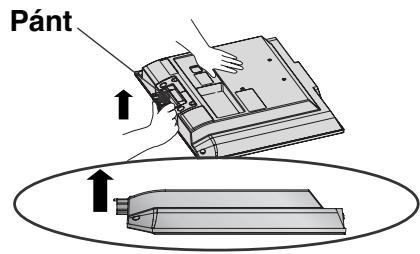
Isometric line drawing of a mechanical component or housing with no visible text or symbols2 Uchopte pánt a ohnite ho smerom nahor.
(len pre 19/22LS4D\*)
natural_image
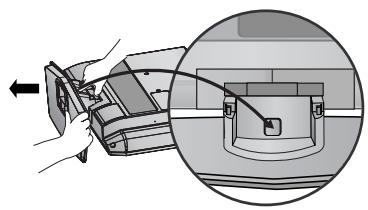
Isometric line drawing of a box with a partially visible internal object (no text or symbols)2 Stlačte tlačidlo na stojane a ťahajte základňu stojana smerom dozadu.
natural_image
Diagram showing a hand inserting a device into a housing, with an inset close-up of the component (no text or symbols visible)natural_image
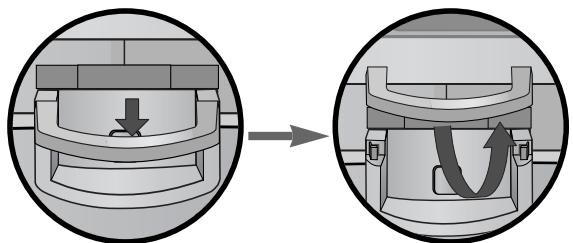
Illustration of hands installing or adjusting a device component with an arrow indicating rotation (no text or symbols present)4 Uchopte stojan a ohnite ho smerom nahor.

natural_image
Illustration of a hand pressing down on a mechanical component with an inset showing a close-up of the part (no text or symbols present)natural_image
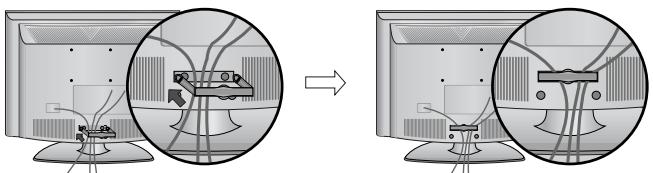
Diagram showing a hand holding a device next to a device with an arrow indicating transformation (no text or symbols present)ZADNÝ KRYT – USPORIADANIE KÁBLOV
Modely LCD TV
32/37/42LG20**, 26/32/37/
42LG30**, 32/37/42/47/52LG5***
natural_image
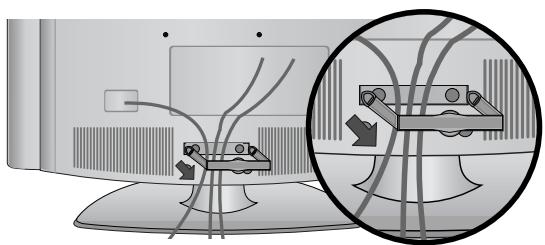
Illustration of a computer monitor with cable connectors and a magnified inset showing internal cables (no text or symbols)VYTIAHNUTIE VEDENIA KÁBLA
Najskôr stlačte úchytku na káble. Uchopte ÚCHYTKU NA KÁBLE oboma rukami a zatlačte ju smerom nahor.
natural_image
Diagram showing a mechanical component before and after assembly, with no visible text or symbols(len pre 19/22LS4D*)
Modely LCD TV :
19/22LS4D*, 19/22LG30**
natural_image
Diagram showing a computer monitor with an attached device and a magnified inset view of its internal components (no text or symbols present)natural_image
Diagram showing a device being processed from an open panel to a closed panel, with no visible text or symbols.(len pre 19/22LS4D*)
natural_image
Diagram showing cable routing between two computer monitors, with no visible text or symbols(len pre 19/22LG30**)
Uchopte ÚCHYTKU NA KÁBLE oboma rukami a zatlačte ju smerom dozadu.
natural_image
Diagram showing cable routing between two devices, with a magnified inset highlighting the cable connection (no text or symbols present)(len pre 19/22LG30**)
! POZNÁMKA
natural_image
Diagram of a computer monitor with a side panel and label '3' (no text or symbols on the device itself)natural_image
Illustration of a flat-screen computer monitor with no visible text or symbols on the screen or side.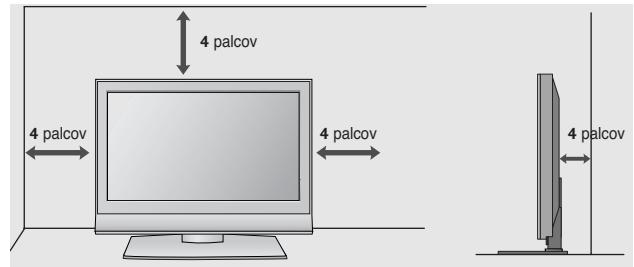
PRIPEVNENIE TELEVÍZORA K STOLU (len pre 32/37/42LG20\*\*, 26/32/37/42LG30\*\*, 32/37/42LG5\*\*\*)
natural_image
Illustration of a computer monitor with a stand and ventilation slots (no text or symbols)natural_image
Interior view of a TV setup with a mounted monitor and cabinet, set against a patterned wall (no text or symbols visible)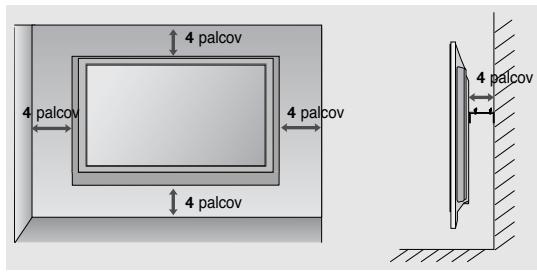
BEZ POUŽITIA STOJANA NA STÔL
natural_image
Technical diagram showing a mechanical assembly with an inset close-up of a bracket component (no text or symbols present)PRÍPRAVA
NASTAVENIE TELEVÍZNYCH STANÍC

Vyberte možnost' SETUP (NASTAVENIE).
32/37/42LG20**, 26/32/37/42LG30**, 32/37/42/47/52LG5***

Modele de televizoare cu LCD : 19/22LG30**

32/37/42LG20**, 26/32/37/42LG30**, 32/37/42LG5***
natural_image
Technical line drawing of a square electronic component with a central slot, placed on a rectangular base (no text or symbols)natural_image
Technical illustration of a mechanical assembly with a fan and internal components, showing a magnified inset (no text or symbols)natural_image
Technical illustration of a mechanical component with a magnified inset showing a bolt and pin (no text or symbols)(Doar 19/22LG30**)

natural_image
Line drawing of a mechanical component on a folded paper (no text or symbols)
natural_image
Diagram of a device with a speaker emitting a sound wave, showing internal components and a circular component (no text or symbols)natural_image
Isometric line drawing of a mechanical component or housing with no visible text or symbolsnatural_image
Line drawing of a box with a partially open lid (no text or symbols)natural_image
Diagram showing a hand holding a device with an arrow pointing to a circular inset view of the device (no text or symbols present)natural_image
Illustration of hands installing or adjusting a device component with an arrow indicating rotation (no text or symbols present)natural_image
Illustration of a hand pressing down on a mechanical component with an inset showing a close-up of the part (no text or symbols present)natural_image
Diagram showing a hand holding a device next to a device with an arrow indicating transformation (no text or symbols present)CAPACUL POSTERIOR PENTRU ARANJAREA CABLURILOR
Modele de televizoare cu LCD : 32/37/42LG20**, 26/32/37/42LG30**, 32/37/42/47/52LG5***
natural_image
Illustration of a computer monitor with an inset close-up showing internal cables (no text or symbols)Modele de televizoare cu LCD : 19/22LS4D*, 19/22LG30**
natural_image
Diagram showing a computer monitor and its internal circuit board with cables, no text or symbols present
natural_image
Diagram showing a mechanical component before and after assembly, with no visible text or symbols.(Doar 19/22LS4D*)
natural_image
Diagram showing cable routing between two electronic devices, with a magnified inset highlighting the connection mechanism (no text or symbols present)(Doar 19/22LG30**)
! OBSERVATIE
natural_image
Diagram of a computer monitor with a stand and a vertical line labeled '3' (no text or symbols on the device itself)natural_image
Illustration of a flat-screen computer monitor with no visible text or symbols on the screen or side.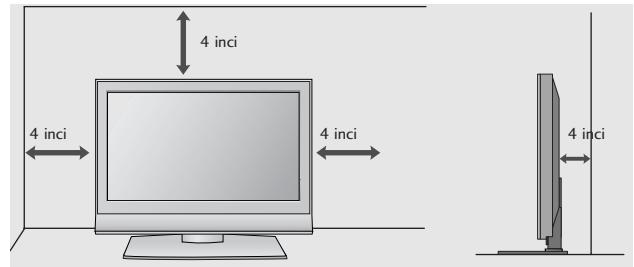
ATAŞARE TV LA UN BIROU (doar modelul 32/37/42LG20**, 26/32/37/42LG30**, 32/37/42LG5***)
natural_image
Interior view of a TV setup with a mounted monitor and cabinet, set against a patterned wall (no text or symbols visible)
FĂRĂ A UTILIZA STANDUL TIP BIROU
(Cu exceptia 19/22LS4D*)
natural_image
Technical diagram showing a mechanical assembly with an inset close-up of a bracket component (no text or symbols)PREGĂTIREA
32/37/42LG20**, 26/32/37/42LG30**, 32/37/42/47/52LG5***
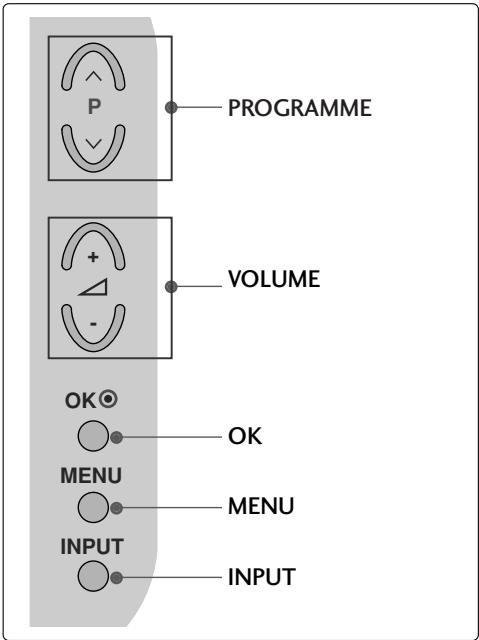
natural_image
Line drawing of a square electronic component placed on a surface, with no visible text or symbols.natural_image
Technical illustration of a mechanical assembly with a fan and internal components, showing a magnified inset (no text or symbols)natural_image
Illustration of a mechanical component with a magnified inset showing a bolt and pin (no text or symbols)(само 19/22LG30**)

natural_image
Isometric line drawing of a mechanical component or housing with no visible text or symbols

natural_image
Diagram of a device with a speaker emitting a sound wave, showing internal components and a circular component (no text or symbols)natural_image
Isometric line drawing of a mechanical component or housing with no visible text or symbolsnatural_image
Technical illustration of a mechanical assembly showing a component being processed into a final part (no text or symbols present)тяло на стойката
natural_image
Technical illustration of a mechanical assembly showing a disassembled part before and after assembly (no text or symbols present)основа на капака
natural_image
Isometric line drawing of a box with internal components (no text or symbols)natural_image
Diagram showing a hand holding a device with an arrow pointing to a component, and a magnified inset highlighting a curved mechanical component (no text or symbols present)natural_image
Illustration of hands installing or adjusting a device component with an arrow indicating rotation (no text or symbols present)natural_image
Illustration of a hand pressing down on a mechanical component with an inset showing a close-up of the part (no text or symbols present)natural_image
Diagram showing a hand holding a device next to a device with an arrow indicating transformation (no text or symbols present)natural_image
Illustration of a computer monitor with an inset close-up showing cable routing (no text or symbols)МОДЕЛИ ТЕЛЕВИЗОРИ С ТЕЧНОКРИСТАЛЕН ДИСПЛЕЙ : 19/22LS4D*, 19/22LG30**
natural_image
Diagram showing a computer monitor with an inset close-up of its internal components (no text or symbols visible)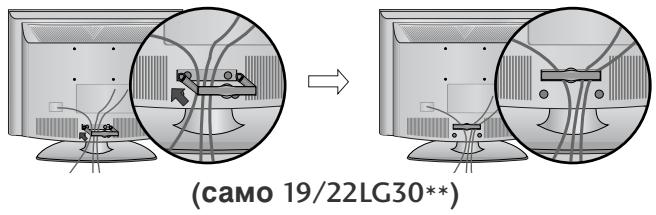
natural_image
Diagram showing a mechanical component before and after assembly, with no visible text or symbols.(само 19/22LS4D*)
natural_image
Diagram showing cable routing between two monitors with a magnified inset highlighting the cable connection (no text or symbols present)(само 19/22LG30**)
! БЕЛЕЖКА
natural_image
Diagram of a computer monitor with a stand and a vertical line labeled '3' (no text or symbols on the device itself)natural_image
Illustration of a flat-screen computer monitor with a stand (no text or symbols)
РАЗПОЛАГАНЕ НА ТЕЛЕВИЗОРА НА ПОСТАВКА
(само 32/37/42LG20**, 26/32/37/42LG30**, 32/37/42LG5***)
natural_image
Illustration of a TV setup with a mounted monitor and cabinet, set against a patterned wall (no text or symbols)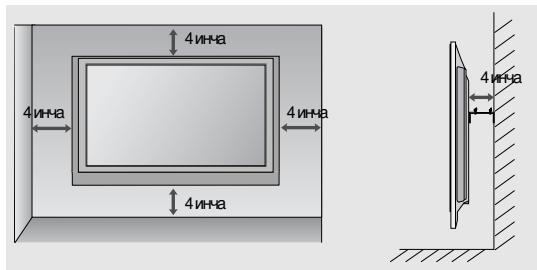
32/37/42LG20**, 26/32/37/42LG30**, 32/37/42/47/52LG5***

LCD-TV, Modeller : 19/22LG30**
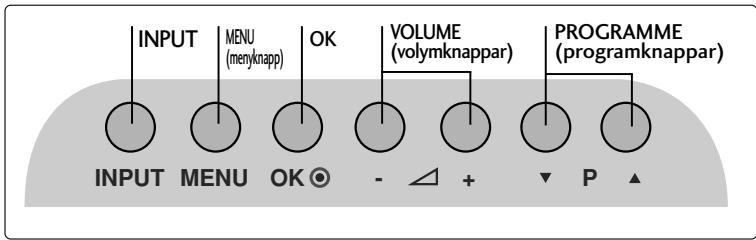
LCD-TV, Modeller : 19/22LS4D*
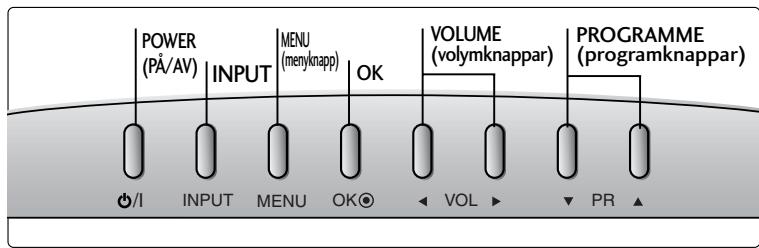
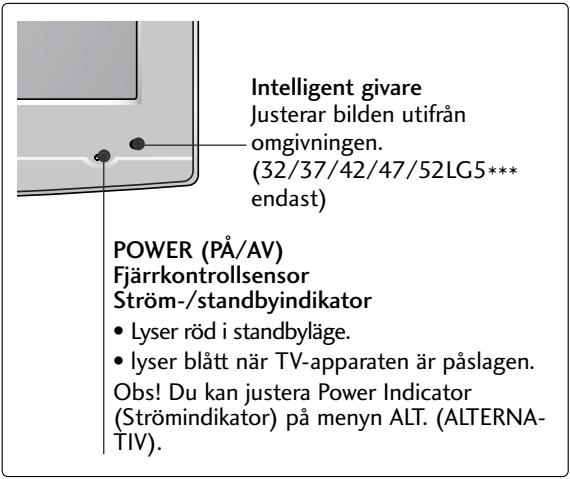
(LCD-TV, Modeller: 32/37/42LG20**, 26/32/37/42LG30**, 32/37/42LG5***)
natural_image
Line drawing of a square electronic component placed on a flat surface (no text or symbols)natural_image
Technical illustration of a mechanical assembly with a fan and internal components, showing a magnified inset (no text or symbols)natural_image
Technical illustration of a mechanical component with a magnified inset showing a bolt and pin (no text or symbols)(Endast 19/22LG30**)

natural_image
Line drawing of a mechanical component placed on a sheet of paper (no text or symbols)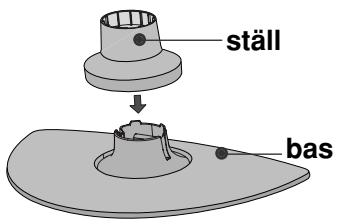

natural_image
Diagram of a device with a speaker emitting a sound wave, showing internal components and a circular component (no text or symbols)natural_image
Isometric line drawing of a mechanical component or housing with no visible text or symbolsnatural_image
Isometric line drawing of a mechanical component inside a rectangular housing (no text or symbols)natural_image
Diagram showing a hand holding a device with an arrow pointing to a circular inset view of the device (no text or symbols present)natural_image
Illustration of hands installing or adjusting a device component with an arrow indicating rotation (no text or symbols present)natural_image
Illustration of a hand holding a mechanical component with an inset showing a close-up of a component (no text or symbols present)natural_image
Diagram showing a device being processed from a left-side view and then assembled into a closed container (no text or symbols present)HÖLJE PÅ BAKSIDAN MED KABELSAMLARE
LCD-TV, Modeller:
32/37/42LG20**, 26/32/37/
42LG30**, 32/37/42/47/52LG5***
natural_image
Illustration of a computer monitor with cables and a magnified inset showing internal cable routing (no text or symbols)natural_image
Diagram showing a mechanical component before and after assembly, with no visible text or symbols.(Endast 19/22LS4D*)
LCD-TV, Modeller :
19/22LS4D*, 19/22LG30**
natural_image
Diagram showing a computer monitor and its internal components, with an inset close-up of cable routing (no text or symbols)2 Installera KABELSAMLAREN enligt illustrationen.
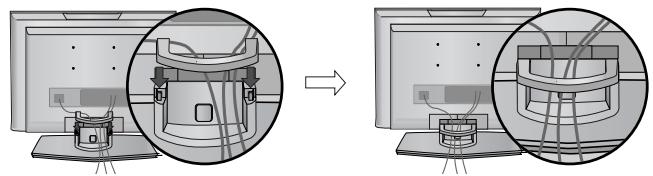
natural_image
Diagram showing a computer monitor setup with a close-up view of the internal components (no text or symbols present)(Endast 19/22LS4D*)
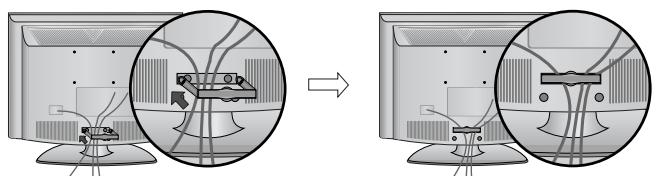
natural_image
Diagram showing two views of a computer monitor with cable routing and connectors (no text or symbols)(Endast 19/22LG30**)
natural_image
Diagram showing cable routing between two devices, with a magnified inset highlighting the cable connection (no text or symbols present)(Endast 19/22LG30**)
! OBS!
natural_image
Diagram of a computer monitor with a stand and a vertical line labeled '3' (no text or symbols on the device itself)INSTALLATION PÅ BORDSSOCKEL
natural_image
Illustration of a flat-screen computer monitor with no visible text or symbols on the screen or side.
FÄSTA TV:N PÅ ETT BORD (Endast 32/37/42LG20**, 26/32/37/42LG30**, 32/37/42LG5***)
natural_image
Illustration of a computer monitor with a stand and ventilation slots (no text or symbols)natural_image
Illustration of a TV setup with a mounted monitor and cabinet, set against a dotted wall (no text or symbols)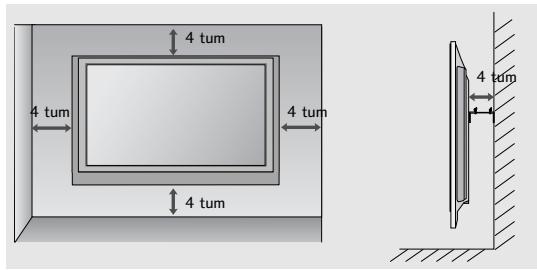
OM DU INTE ANVÄNDER BORDSSTATIVET
(Utom 19/22LS4D*)
■ Illustrationen kan se annorlunda ut än din TV.
natural_image
Technical diagram showing a mechanical assembly with an inset close-up of a component (no text or symbols visible)FÖRBEREDELSE
32/37/42LG20**, 26/32/37/42LG30**, 32/37/42/47/52LG5***
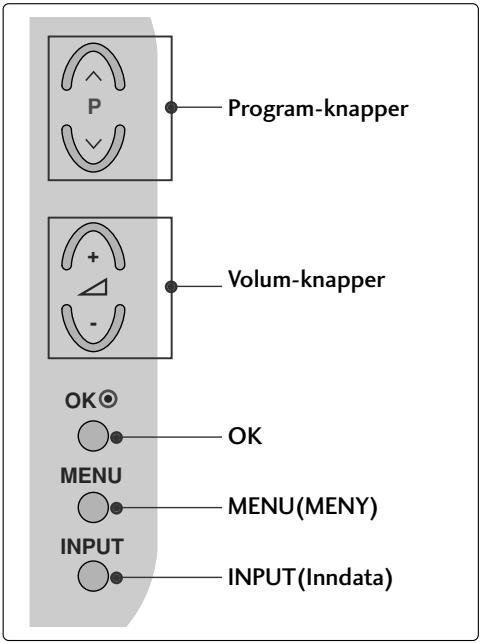
LCD-TV Modeller : 19/22LG30**
LCD-TV Modeller : 19/22LS4D*
(LCD-TV Modeller : 32/37/42LG20**, 26/32/37/42LG30**, 32/37/42LG5***)
Når du monterer stativet av skrivebordstypen, må du sjekke at boltene er trukket godt til.. (Hvis de ikke er trukket helt til, kan produktet vippe forover etter installeringen.) Hvis du strammer til bolten med overdreven kraft, kan bolten forvrenges pga. belastninger på boltens tiltrekkingsdeler.
natural_image
Technical line drawing of a square electronic component with a central slot, placed on a rectangular base (no text or symbols)natural_image
Technical illustration of a mechanical assembly with a fan and internal components, showing a magnified inset (no text or symbols)natural_image
Technical illustration of a mechanical component with a magnified inset showing a bolt and pin (no text or symbols)(Kun 19/22LG30**)

natural_image
Line drawing of a mechanical component on a folded paper (no text or symbols)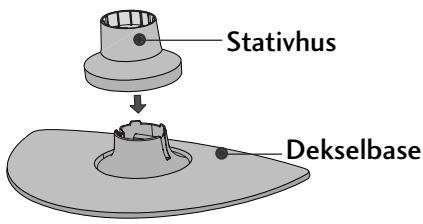

natural_image
Diagram of a device with a speaker emitting a sound wave, showing internal components and a circular component (no text or symbols)natural_image
Isometric line drawing of a mechanical component or housing with no visible text or symbolsnatural_image
Line drawing of a box with a partially open lid (no text or symbols)2 Dra sokkelen bakover mens du trykker knappen på stativet.
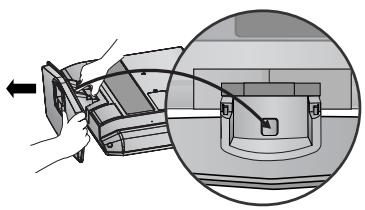
natural_image
Diagram showing a hand holding a device with an arrow pointing to a component, and a magnified inset highlighting a curved mechanical component (no text or symbols present)natural_image
Illustration of hands installing or adjusting a device component with an arrow indicating rotation (no text or symbols present)natural_image
Illustration of a hand holding a mechanical component with an inset showing a close-up of a component (no text or symbols present)natural_image
Diagram showing a device being processed from a component, with an arrow indicating the process (no text or symbols present)ORDNE LEDNINGER PÅ BAKDEKSELET
LCD-TV modeller :
32/37/42LG20**, 26/32/37/
42LG30**, 32/37/42/47/52LG5***
natural_image
Illustration of a computer monitor with cable routing and a magnified inset showing internal cable connections (no text or symbols)SLIK FJERNER DU KABELSAMLEREN
Trykk først på kabelsamleren. Grip KABELSAMLEREN med begge hender og trekk den bakover.
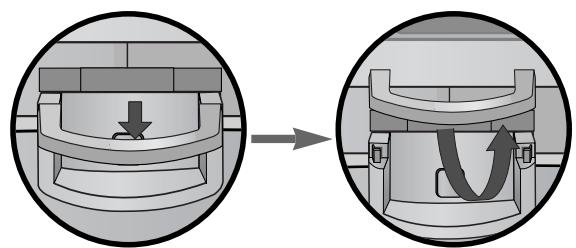
natural_image
Diagram showing a mechanical component before and after assembly, with no visible text or symbols(Kun 19/22LS4D*)
LCD-TV modeller :
19/22LS4D*, 19/22LG30**
natural_image
Diagram showing a computer monitor and its internal components, with an inset close-up of cable routing (no text or symbols)2 Installer KABELHÅNDTERINGSKLIPSEN som vist.
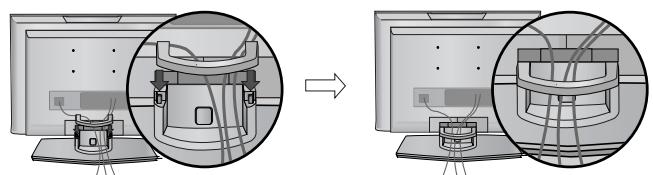
natural_image
Diagram showing a device being processed from a computer, with no visible text or symbols(Kun 19/22LS4D*)
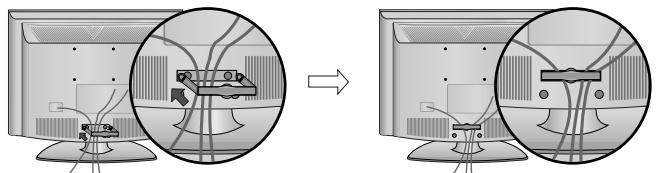
natural_image
Diagram showing cable routing between two computer monitors, with no visible text or symbols(Kun 19/22LG30**)
Hold KABELSAMLERKLIPSEN med begge hender og trekk den bakover.
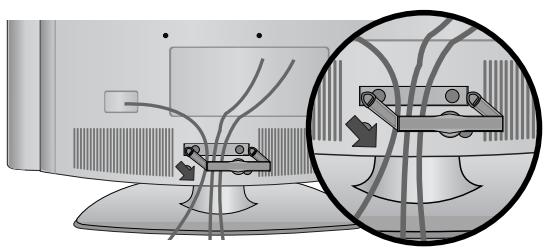
natural_image
Diagram showing cable routing between two devices, with a magnified inset highlighting the cable connection (no text or symbols present)(Kun 19/22LG30**)
! MERK
flowchart
graph TD
    A["Step 1: Initial monitor with points, arrows, and connecting lines"] --> B["Step 2: Connected monitor with points, arrows, and connecting lines"]
    B --> C["End"]
natural_image
Diagram of a computer monitor with a stand and a vertical line labeled '3' (no text or symbols on the device itself)natural_image
Illustration of a flat-screen computer monitor with no visible text or symbols on the screen or side.
KOBLING AV TV-EN TIL ET SKRIVEBORD
(Kun 32/37/42LG20**, 26/32/37/42LG30**, 32/37/42LG5*** )
natural_image
Illustration of a computer monitor with a stand and ventilation grille (no text or symbols)1 -skrues
natural_image
Illustration of a TV setup with a mounted monitor and cabinet, set against a patterned wall (no text or symbols)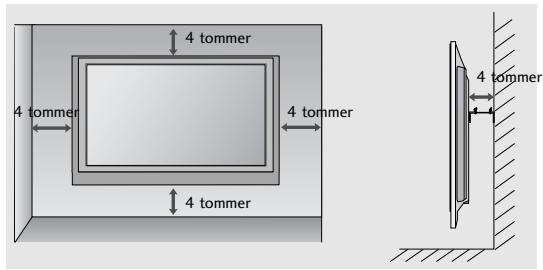
UTEN BRUK AV BENKTYPESTATIV
natural_image
Technical diagram showing a mechanical assembly with an inset close-up of a bracket labeled 'LAW' (no text or symbols present)FORBEREDELSER
SE PÅ TV / PROGRAMSTYRING
AUTOMATISK KANALS∅KING OG LAGRING
Kjør Aut. innstilling.
32/37/42LG20**, 26/32/37/42LG30**, 32/37/42/47/52LG5***

LCD-TV MODELLER : 19/22LG30**
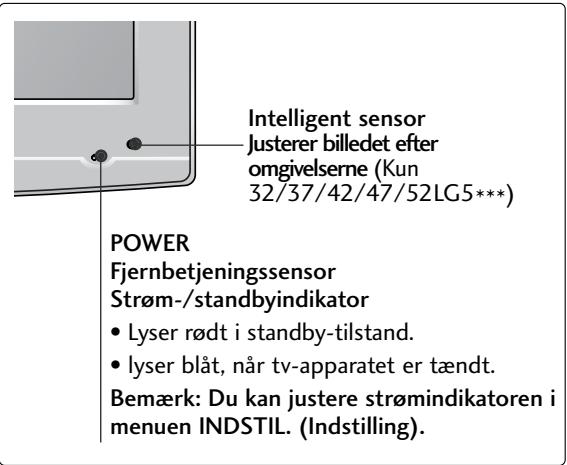
(LCD-TV MODELLER: 32/37/42LG20**, 26/32/37/42LG30**, 32/37/42LG5***)
natural_image
Technical line drawing of a square electronic component with a central slot, placed on a rectangular base (no text or symbols)2 Monter stativsøjlens dele i stativsoklen på tv'et.

3 Monter tv-apparatet som vist.
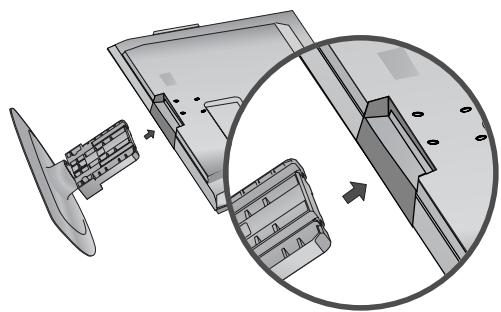
natural_image
Technical illustration of a mechanical assembly with a fan and internal components, showing a magnified inset (no text or symbols)natural_image
Illustration of a mechanical component with a magnified inset showing a bolt (no text or symbols)(Kun 19/22LG30**)

natural_image
Isometric line drawing of a device with a rectangular component on top, enclosed in a rectangular frame (no text or symbols)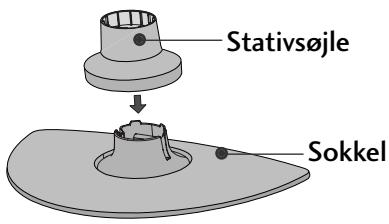

natural_image
Diagram of a device with a speaker emitting a sound wave, showing internal components and a circular component (no text or symbols)natural_image
Isometric line drawing of a mechanical component or housing with no visible text or symbolsnatural_image
Isometric line drawing of a box with internal components (no text or symbols)natural_image
Diagram showing a hand holding a device with an arrow pointing to a component, and a magnified inset highlighting a curved mechanical component (no text or symbols present)natural_image
Illustration of hands installing or adjusting a mechanical component with a slide (no text or symbols visible)natural_image
Illustration of a hand holding a mechanical component with an inset showing a close-up of a component (no text or symbols present)natural_image
Diagram showing a device being processed from a left-side view and then assembled into a closed container (no text or symbols present)BAGDÆKSEL TIL KABELSAMLING
LCD-TV MODELLER :
32/37/42LG20**, 26/32/37/
42LG30**, 32/37/42/47/52LG5***
natural_image
Illustration of a computer monitor with cables and a magnified inset showing internal cable routing (no text or symbols)natural_image
Diagram showing a mechanical component before and after assembly, with no visible text or symbols(Kun 19/22LS4D*)
LCD-TV MODELLER :
19/22LS4D*, 19/22LG30**
natural_image
Diagram showing a computer monitor and its internal components, with an inset close-up of cable routing (no text or symbols)2 Monter KABELHOLDEREN som vist.
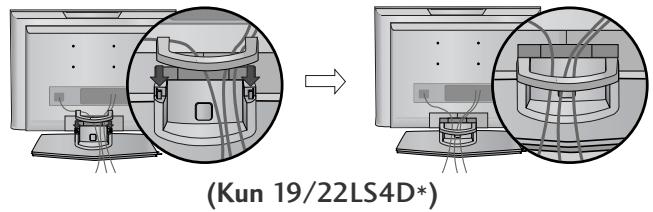
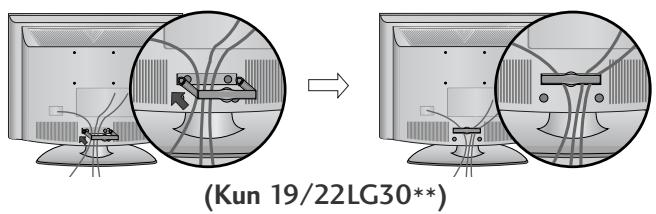
natural_image
Diagram showing cable routing between two electronic devices, with a magnified inset highlighting the connection (no text or symbols present)(Kun 19/22LG30**)
! BEMÆRK
flowchart
graph TD
    A["Step 1: Initial state with curved arrows"] --> B["Step 2: Final state with curved arrows"]
    style A fill:#f9f,stroke:#333
    style B fill:#bbf,stroke:#333
natural_image
Diagram of a computer monitor with a stand and a vertical line labeled '3' (no text or symbols on the device itself)natural_image
Line drawing of a flat-screen computer monitor with no text or symbols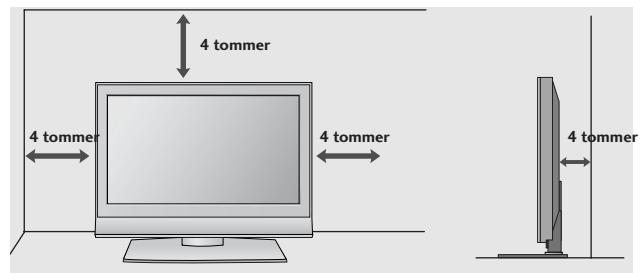
FASTG∅RING AF TV'ET TIL ET BORD
(Kun 32/37/42LG20**, 26/32/37/42LG30**, 32/37/42LG5***)
natural_image
Top-down view of a computer monitor with a stand and ventilation slots (no text or symbols visible)natural_image
Illustration of a TV setup with a mounted monitor and cabinet, set against a patterned wall (no text or symbols)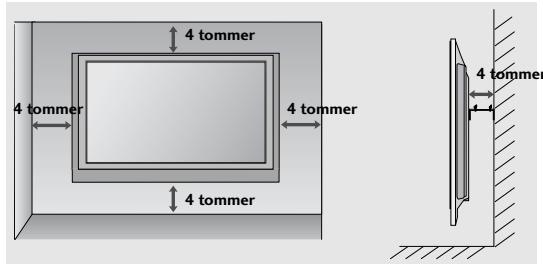
UDEN BRUG AF BORDSTATIV
(Undtagen 19/22LS4D*)
natural_image
Technical diagram showing a mechanical assembly with an inset close-up of a bracket labeled '40mm' (no text or symbols beyond the label)32/37/42LG20**, 26/32/37/42LG30**, 32/37/42/47/52LG5***
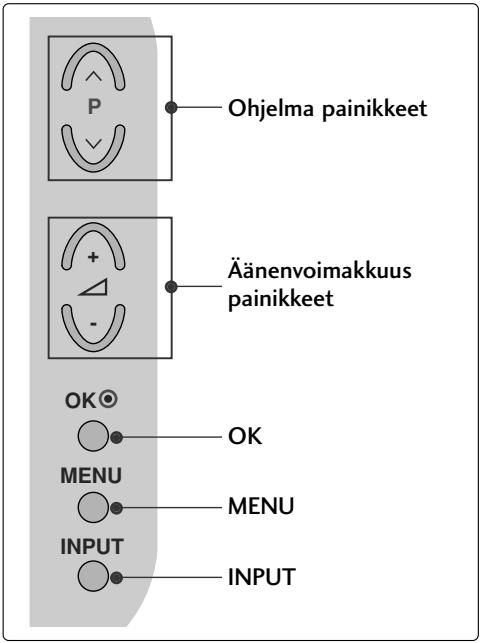
(LCD-TELEVISIONALLIT: 32/37/42LG20**, 26/32/37/42LG30**, 32/37/42LG5***)
natural_image
Technical line drawing of a square electronic component with a central slot, placed on a rectangular base (no text or symbols)2 Kokoa jalustan rungon osat ja television jalustan alaosa.
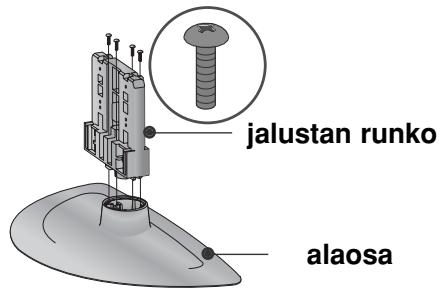
natural_image
Technical illustration of a mechanical assembly with a magnified inset showing internal components (no text or symbols)natural_image
Illustration of a mechanical component with a magnified inset showing a bolt and pin assembly (no text or symbols)(Vain 19/22LG30**)
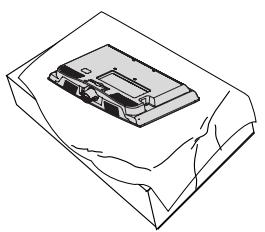
natural_image
Isometric line drawing of a rectangular object with internal components, placed on a textured base (no text or symbols)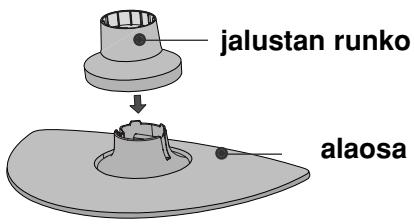

natural_image
Diagram of a device with a spool attached to its side panel, showing internal components and a pointer (no text or symbols present)natural_image
Isometric line drawing of a mechanical component or housing with no visible text or symbolsnatural_image
Isometric line drawing of a mechanical component inside a rectangular housing (no text or symbols)natural_image
Diagram showing a hand operating a device with a magnified inset highlighting internal components (no text or symbols present)natural_image
Illustration of hands installing or adjusting a device component with an arrow indicating rotation (no text or symbols present)natural_image
Illustration of a hand holding a mechanical component with an inset showing a close-up of a component (no text or symbols present)natural_image
Diagram showing a device being processed from a left-side view and then assembled into a closed container (no text or symbols present)TAKAKANNEN JOHDINTELINE
LCD-TELEVISIONALLIT:
32/37/42LG20**, 26/32/37/
42LG30**, 32/37/42/47/52LG5***
natural_image
Illustration of a computer monitor with an inset close-up showing internal cables (no text or symbols)LCD-TELEVISIONALLIT:
19/22LS4D*, 19/22LG30**
natural_image
Diagram showing a computer monitor and its internal components, with an inset close-up of cable routing (no text or symbols)
natural_image
Diagram showing a mechanical component before and after assembly, with no visible text or symbols(Vain 19/22LS4D*)
natural_image
Diagram showing a computer monitor with cable routing and a magnified inset illustrating cable routing (no text or symbols present)(Vain 19/22LG30**)
! HUOMAUTUS
natural_image
Diagram of a computer monitor with a stand and a vertical line labeled '3' (no text or symbols on the device itself)natural_image
Illustration of a flat-screen computer monitor with no visible text or symbols on the screen or side.
TV:N LIITTÄMINEN PÖYTÄÄN (Vain 32/37/42LG20**, 26/32/37/42LG30**, 32/37/42LG5***)
natural_image
Illustration of a TV setup with a mounted monitor and cabinet, set against a patterned wall (no text or symbols)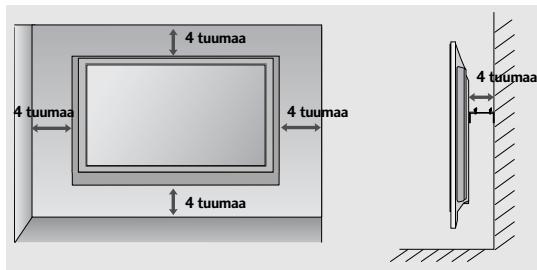
ILMAN PÖYTÄTELINETTÄ (paitsi 19/22LS4D*)
natural_image
Technical diagram showing a mechanical assembly with an inset close-up of a bracket component (no text or symbols)VALMISTELU
KAUKOSÄÄTIMEN NÄPPÄINTOIMINNOT
32/37/42LG20**, 26/32/37/42LG30**, 32/37/42/47/52LG5***
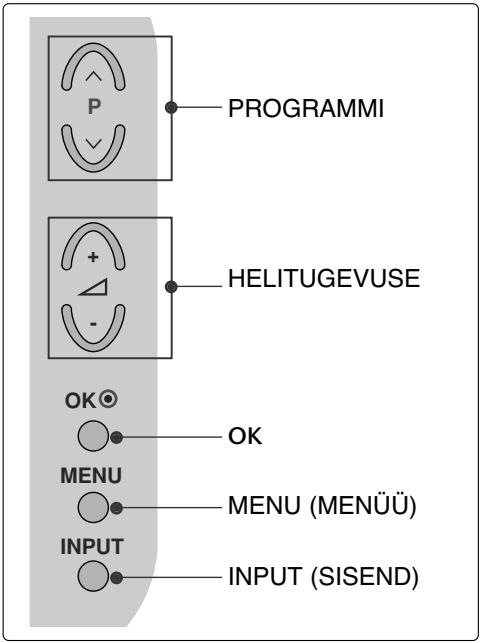
LCD-TELERITE MUDELID : 19/22LG30**

② RGB/DVI Audiosisend
natural_image
Technical line drawing of a square electronic component with a central slot, placed on a rectangular base (no text or symbols)natural_image
Technical illustration of a mechanical assembly with a fan and internal components, showing a magnified inset (no text or symbols)4 Kinnitage need 4 polti tugevasti teleri tagumisel küljel olevatesse aukudesse.
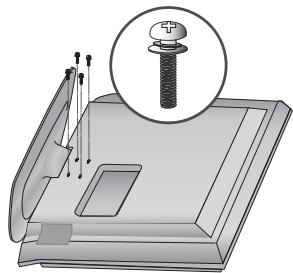
natural_image
Illustration of a mechanical component with a magnified inset showing a bolt (no text or symbols present)(Vaid 19/22LG30**)

natural_image
Line drawing of a mechanical component on a folded paper (no text or symbols)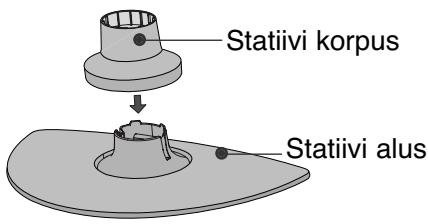
natural_image
Diagram of a device with a speaker emitting a sound wave, showing internal components and a circular component (no text or symbols)natural_image
Isometric line drawing of a mechanical component or housing with no visible text or symbolsnatural_image
Line drawing of a box with a partially open lid (no text or symbols)natural_image
Diagram showing a hand holding a device with an arrow pointing to a circular inset view of the device (no text or symbols present)natural_image
Illustration of hands installing or adjusting a mechanical component with a directional arrow (no text or symbols)natural_image
Illustration of a hand pressing down on a mechanical component with an inset showing a close-up of the part (no text or symbols present)TAGAKATE JUHTMETE SEADMISEKS
32/37/42LG20**, 26/32/37/
42LG30**, 32/37/42/47/52LG5***
natural_image
Illustration of a computer monitor with cable connectors and a magnified inset showing internal cables (no text or symbols)LCD-TELERITE MUDELID : 19/22LS4D*, 19/22LG30**
natural_image
Diagram showing a computer monitor with an attached device and a magnified inset of its internal components (no text or symbols present)
natural_image
Diagram showing a mechanical component before and after assembly, with no visible text or symbols(Vaid 19/22LS4D*)
natural_image
Diagram showing a computer monitor with cable routing and a magnified inset illustrating cable routing (no text or symbols present)(Vaid 19/22LG30**)
! MÄRKUS
flowchart
graph TD
    A["Step 1: Initial monitor with points and curved arrows"] --> B["Step 2: Initial monitor with points and curved arrows"]
    style A fill:#f9f,stroke:#333
    style B fill:#bbf,stroke:#333
natural_image
Diagram of a computer monitor with a stand and a vertical line labeled '3' (no text or symbols on the device itself)natural_image
Illustration of a flat-screen computer monitor with no visible text or symbols on the screen or side.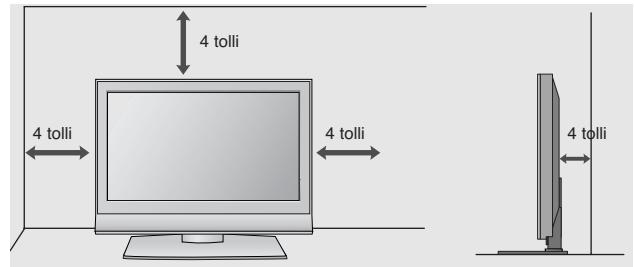
TELERI ALUSELE KINNITAMINE
(valid 32/37/42LG20**, 26/32/37/42LG30**, 32/37/42LG5***)
natural_image
Illustration of a flat-screen computer monitor with a stand and ventilation slots (no text or symbols visible)natural_image
Illustration of a TV setup with a mounted monitor and cabinet, set against a patterned wall (no text or symbols)
KUI TE EI KASUTA LAUA TÜÜPI TELERIALUST (Välja 19/22LS4D\*)
natural_image
Technical diagram showing a mechanical assembly with an inset close-up of a bracket and directional arrows (no text or symbols)ETTEVALMISTUS


Valige SETUP(Seadistus).
32/37/42LG20**, 26/32/37/42LG30**, 32/37/42/47/52LG5***
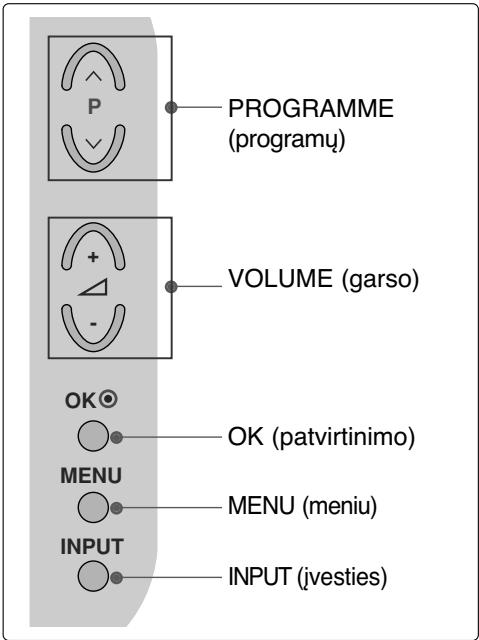
SKYSTUJU KRISTALU TELEVIZORIŲ
MODELIAI : 19/22LG30**
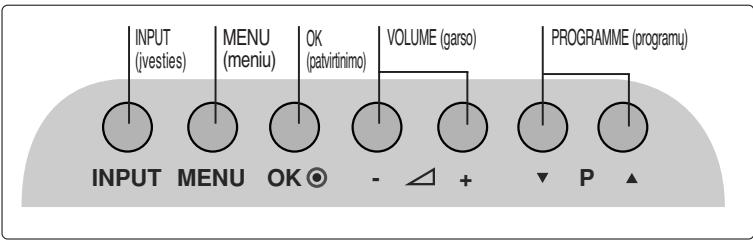
SKYSTUJU KRISTALU TELEVIZORIU
MODELIAI : 19/22LS4D*
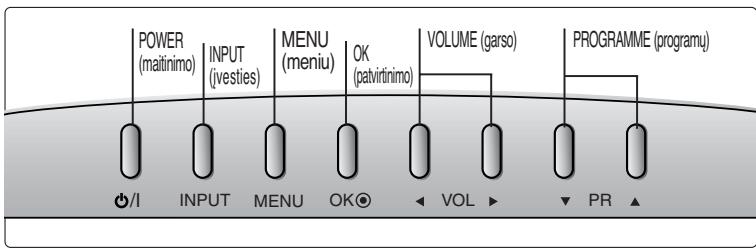
flowchart
graph LR
    A["POWER (maitinimo)"] --> B["INPUT (ivesties)"]
    B --> C["MENU (meniu)"]
    C --> D["OK (patvirtinimo)"]
    D --> E["VOLUME (garso)"]
    E --> F["PROGRAMME (programu)"]
    G["/I"] --> H["INPUT"]
    H --> I["MENU"]
    I --> J["OK"]
    J --> K["VOLUME"]
    K --> L["PROGRAMME"]
    M["PR"] --> N["PR"]
    style A fill:#f9f,stroke:#333
    style B fill:#f9f,stroke:#333
    style C fill:#f9f,stroke:#333
    style D fill:#f9f,stroke:#333
    style E fill:#f9f,stroke:#333
    style F fill:#f9f,stroke:#333
    style G fill:#ccf,stroke:#333
    style H fill:#ccf,stroke:#333
    style I fill:#ccf,stroke:#333
    style J fill:#ccf,stroke:#333
    style K fill:#ccf,stroke:#333
    style L fill:#ccf,stroke:#333
    style M fill:#ccf,stroke:#333
    style N fill:#ccf,stroke:#333

32/37/42LG20**, 26/32/37/42LG30**, 32/37/42LG5***
natural_image
Line drawing of a rectangular electronic component with a central slot, placed on a textured surface (no text or symbols)natural_image
Technical diagram showing a mechanical assembly with a fan and internal components, no visible text or symbolsnatural_image
Technical illustration of a mechanical component with a magnified inset showing a bolt and pin assembly (no text or symbols)(Tik 19/22LG30**)

natural_image
Line drawing of a mechanical component on a folded paper (no text or symbols)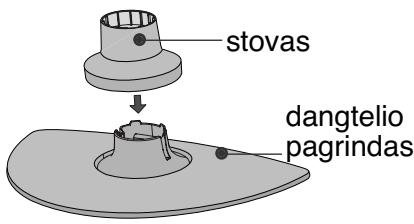

natural_image
Diagram of a device with a speaker emitting a sound wave, showing internal components and a circular component (no text or symbols)natural_image
Isometric line drawing of a mechanical component or housing with no visible text or symbolsnatural_image
Line drawing of a box with a partially open lid (no text or symbols)natural_image
Diagram showing a hand operating a device with a magnified inset highlighting internal components (no text or symbols)natural_image
Illustration of hands installing or adjusting a mechanical component with a directional arrow (no text or symbols)natural_image
Illustration of a hand pressing down on a mechanical component with an inset showing a close-up of the part (no text or symbols present)natural_image
Diagram showing a hand holding a device next to a device with an arrow indicating transformation (no text or symbols present)GALINIS LAIDŲ DANGTIS
SKYSTUJU KRISTALU TELEVIZORIU MODELIAI : 32/37/42LG20**, 26/32/37/42LG30**, 32/37/42/47/52LG5***
1 Sujunkite laidus.
natural_image
Illustration of a computer monitor with cables and a magnified inset showing internal cable routing (no text or symbols)SKYSTUJU KRISTALU TELEVIZORIU MODELIAI : 19/22LS4D*, 19/22LG30**
1 Sujunkite laidus.
natural_image
Diagram showing a computer monitor with an inset close-up of its internal components (no text or symbols present)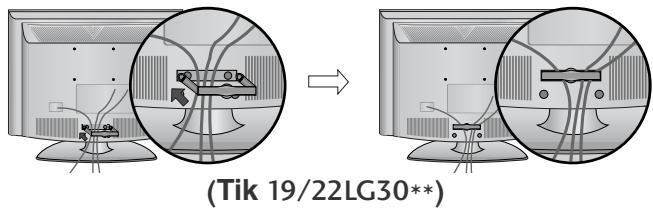
! PASTABA
SUMONTUOKITE ATIDŽIAI, KAD GAMINYS NEAPVIRSTU.
flowchart
graph TD
    A["Step 1: Click to monitor"] --> B["Step 2: Click to monitor"]
    B --> C["End"]
natural_image
Diagram of a computer monitor with a stand and labeled section '3' (no text or symbols on the device itself)natural_image
Illustration of a flat-screen computer monitor with no visible text or symbols on the screen or side.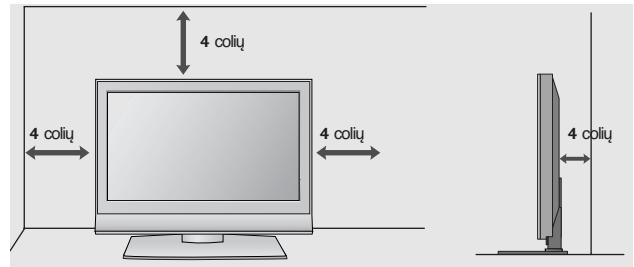
(Tik 32/37/42LG20**, 26/32/37/42LG30**, 32/37/42LG5*** )
natural_image
Illustration of a computer monitor with a stand and ventilation slots (no text or symbols)1- veržlé
(pridedama kaip sudedamosios gaminio dalys)
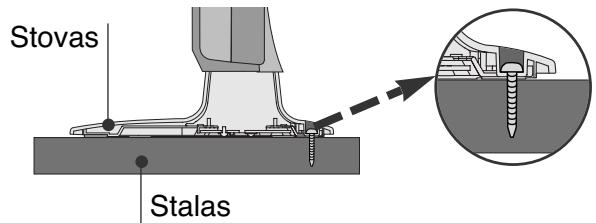
! PERSPÈJIMAS
natural_image
Illustration of a TV setup with a mounted monitor and cabinet, set against a patterned wall (no text or symbols)
natural_image
Technical diagram showing a mechanical assembly with an inset close-up of a bracket component (no text or symbols)PARENGIMAS

Pasirinkite SETUP (NUSTATYMAS).
Pasirinkite Auto Tuning (Automatinis derinimas).

Pasirinkite Yes (Taip).

Vykdykite Auto tuning (Automatinis derinimas).
32/37/42LG20**, 26/32/37/42LG30**, 32/37/42/47/52LG5***
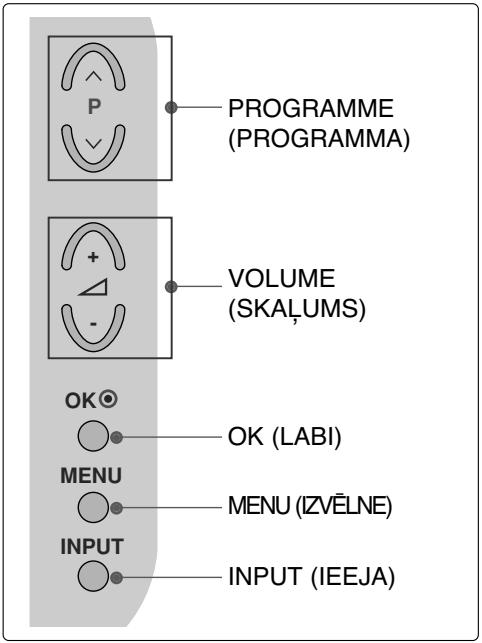
LCD TV modeli : 19/22LG30**
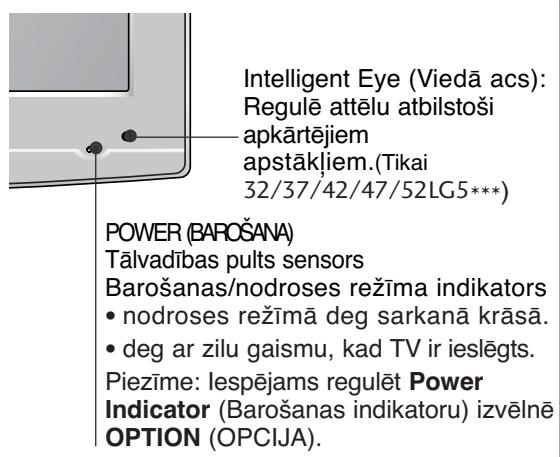
LCD TV modeli : 19/22LS4D*
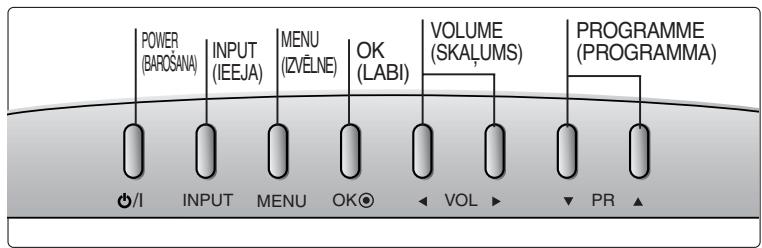
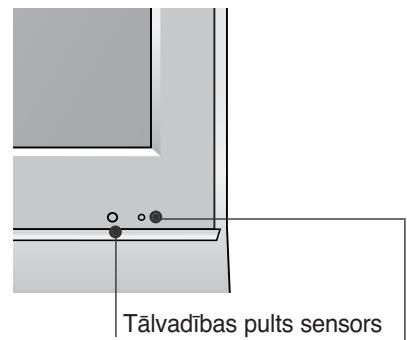
(LCD TV modeli : 32/37/42LG20**, 26/32/37/42LG30**, 32/37/42LG5***)
natural_image
Technical line drawing of a square electronic component with a central slot, placed on a rectangular base (no text or symbols)natural_image
Technical illustration of a mechanical assembly with a fan and internal components, showing a magnified inset (no text or symbols)natural_image
Technical illustration of a mechanical component with a magnified inset showing a bolt and pin (no text or symbols)(Tikai 19/22LG30**)

natural_image
Line drawing of a mechanical component on a folded paper (no text or symbols)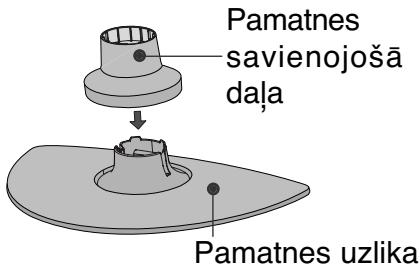
natural_image
Diagram of a device with a speaker emitting a sound wave, showing internal components and a circular component (no text or symbols)natural_image
Isometric line drawing of a mechanical component or housing with no visible text or symbols② Turiet enğes korpusu un lokiet to uz augšu.
natural_image
Isometric line drawing of a box with a partially visible internal object (no text or symbols)2 Pavelciet pamatnes uzliku atpakal, vienlaikus spiežot pogu uz pamatnes korpusa.
natural_image
Diagram showing a mechanical device with an arrow indicating direction, and a magnified inset illustrating internal components (no text or symbols present)natural_image
Illustration of hands operating a device with a handle, showing internal components and a separate view (no text or symbols)natural_image
Illustration of a hand pressing down on a mechanical component with an inset showing a close-up of the part (no text or symbols present)natural_image
Diagram showing a hand holding a device next to a device with an arrow indicating transformation (no text or symbols present)VADU IZVIETOŠANA KORPUSA AIZMUGURĚ
LCD TV modeli :
32/37/42LG20**, 26/32/37/
42LG30**, 32/37/42/47/52LG5***
natural_image
Illustration of a computer monitor with cable connectors and a magnified inset showing internal cables (no text or symbols)LCD TV modeli :
19/22LS4D*, 19/22LG30**
natural_image
Diagram showing a computer monitor with an inset close-up of its internal components (no text or symbols present)
KĀ NONEMT KABELU SATURĒTĀJU
natural_image
Diagram showing a mechanical component before and after assembly, with no visible text or symbols.(Tikai 19/22LS4D*)
Ar abām rokām satveriet KABELU TURETAJA SKAVU un velciet to atpakal.

natural_image
Diagram showing cable routing between two monitors with a magnified inset highlighting cable connections (no text or symbols)(Tikai 19/22LG30**)
! PIEZIME
flowchart
graph TD
    A["Step 1: Curve with dots and arrows"] --> B["Step 2: Curved arrow with dots and arrows"]
    B --> C["End"]
natural_image
Diagram of a computer monitor with a side panel and label '3' (no text or symbols on the device itself)natural_image
Illustration of a flat-screen computer monitor with a stand (no text or symbols visible)
TV PIESTIPRINĀŠANA PIE GALDA
(Tikai 32/37/42LG20**, 26/32/37/42LG30**, 32/37/42LG5*** )
natural_image
Illustration of a flat-screen computer monitor with a stand and ventilation slots (no text or symbols visible)natural_image
Illustration of a TV setup with a mounted monitor and cabinet, set against a patterned wall (no text or symbols)
NEIZMANTOJOT GALDA STATİVU
natural_image
Technical diagram showing a mechanical assembly with an inset close-up of a bracket component (no text or symbols)SAGATAVOŠANĀS

32/37/42LG20**, 26/32/37/42LG30**, 32/37/42/47/52LG5***

LCD TELEVIZIJSKI MODELI : 19/22LG30**
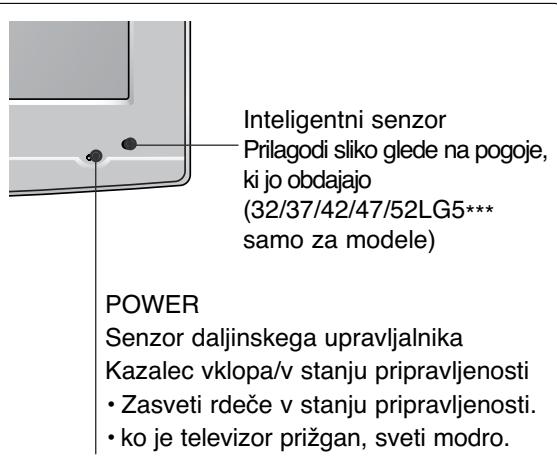
32/37/42LG20**, 26/32/37/42LG30**, 32/37/42LG5***
natural_image
Technical line drawing of a square electronic component with a central slot, placed on a rectangular base (no text or symbols)2 Sestavite dele stojala in podstavek televizorja.
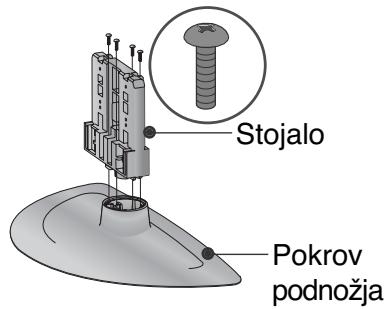
natural_image
Technical illustration of a mechanical assembly with a fan and internal components, showing a magnified inset (no text or symbols)natural_image
Technical illustration of a mechanical component with a magnified inset showing a bolt and pin (no text or symbols)(Samo za modele 19/22LG30**)

natural_image
Isometric line drawing of a mechanical component with no visible text or symbols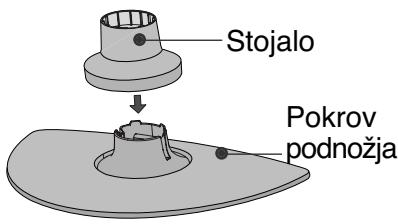
natural_image
Diagram of a device with a speaker emitting a sound wave, showing internal components and a circular component (no text or symbols)natural_image
Isometric line drawing of a mechanical component or housing with no visible text or symbols2 Držite tečaj in ga obrnite navzgor.
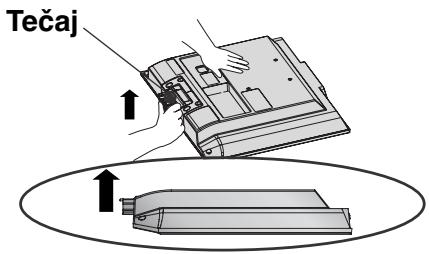
3 Nastavek vstavite v izdelek, tako da zaslišite klik.
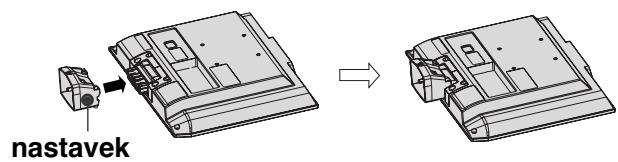
4 Sestavite dele nastavka in podstavek izdelka.
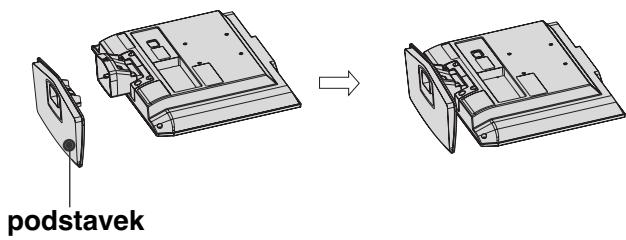
1 Položite televizor na mehko tkanino ali blazi-no s sprednjo stranjo navzdol.
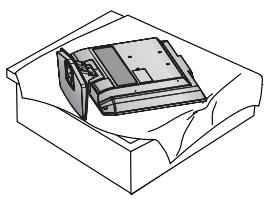
natural_image
Isometric line drawing of a box with internal components (no text or symbols)2 Povlecite pokrov nazaj, medtem ko pritiskate gumb na telesu stojala.

natural_image
Diagram showing a hand holding a device with an arrow pointing to a component, and a magnified inset highlighting a curved mechanical component (no text or symbols present)3 Držite podstavek in ga sunkovito povlecite iz nastavka.
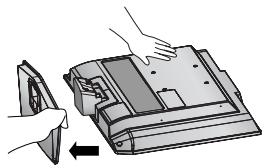
natural_image
Illustration of hands installing or adjusting a device component with an arrow indicating rotation (no text or symbols present)4 Držite stojalo in ga upognite navzgor.
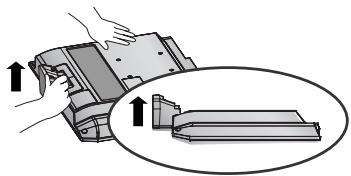
natural_image
Illustration of a hand pressing down on a mechanical component with an inset showing a close-up of the part (no text or symbols present)5 Če želite ločiti nastavek od televizorja, ga hkrati povlecite in pritisnite na 2 zatiča.
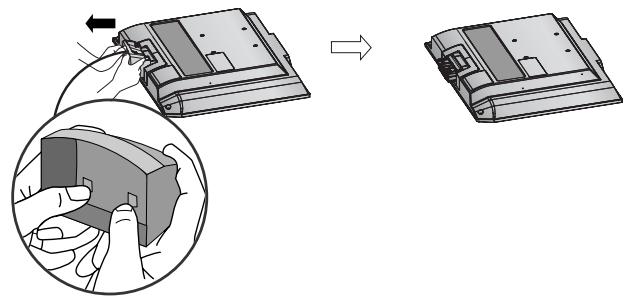
natural_image
Diagram showing a device being processed from a left-side view and then assembled into a 3D model (no text or symbols present)Pokrov zadaj za urejanje kablov
LCD TELEVIZIJSKI MODELI:
32/37/42LG20**, 26/32/37/
42LG30**, 32/37/42/47/52LG5***
1 Uredite kable.
natural_image
Illustration of a computer monitor with cables and a magnified inset showing internal cable routing (no text or symbols)natural_image
Diagram showing a mechanical component before and after assembly, with no visible text or symbols.(Samo za modele 19/22LS4D*)
LCD TELEVIZIJSKI MODELI : 19/22LS4D*, 19/22LG30**
1 Uredite kable.
natural_image
Diagram showing a computer monitor with an attached device and a magnified inset view of its internal components (no text or symbols present)natural_image
Diagram showing a mechanical assembly before and after transformation, with no visible text or symbols.(Samo za modele 19/22LS4D*)

natural_image
Diagram showing cable routing between two computer monitors, with no visible text or symbols(Samo za modele 19/22LG30**)
DRŽALO ZA KABLE pridržite z obema rokama in ga povlecite nazaj.
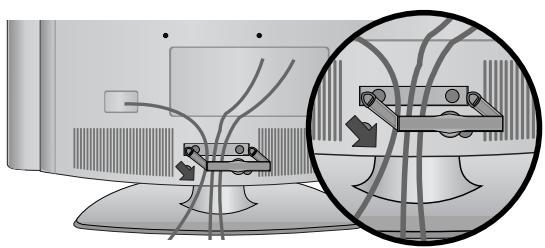
natural_image
Diagram showing cable routing between two devices, with a magnified inset highlighting the cable connection (no text or symbols present)(Samo za modele 19/22LG30**)
! POZOR
natural_image
Diagram of a computer monitor with a stand and a vertical line labeled '3' (no text or symbols on the device itself)natural_image
Illustration of a flat-screen computer monitor with no visible text or symbols on the screen or side.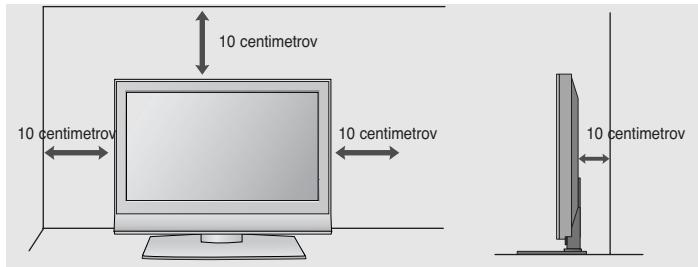
PRITRJEVANJE TELEVIZORJA NA MIZO
(Samo za modele 32/37/42LG20**, 26/32/37/42LG30**, 32/37/42LG5*** )
Televizor mora biti pritrjen na mizo, da ob premikanju naprej/nazaj ne pride do morebitnih poškodb izdelka. Uporabite le pritrdilni vijak
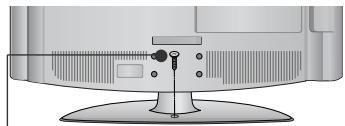
natural_image
Illustration of a flat-screen computer monitor with a stand and ventilation slots (no text or symbols visible)natural_image
Illustration of a TV setup with a mounted monitor and cabinet, set against a patterned wall (no text or symbols)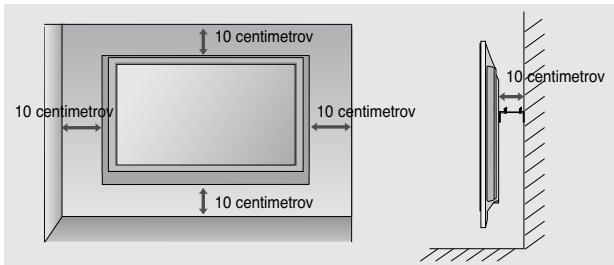
KO NE UPORABLJATE NAMIZNEGA STOJALA
(Razen19/22LS4D*)
32/37/42LG20**, 26/32/37/42LG30**, 32/37/42/47/52LG5***
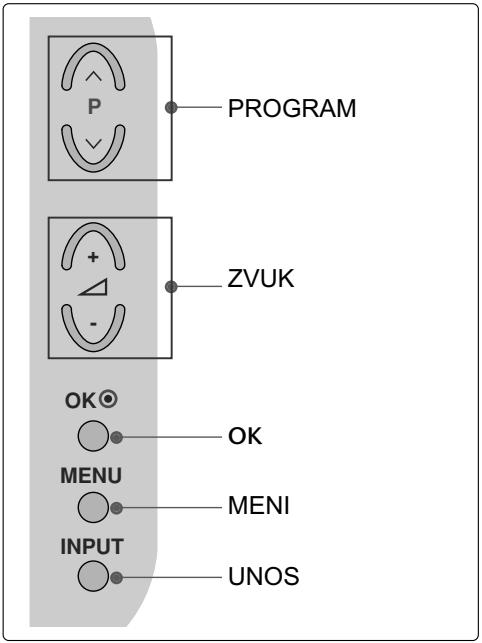
LCD TV modeli : 19/22LG30**

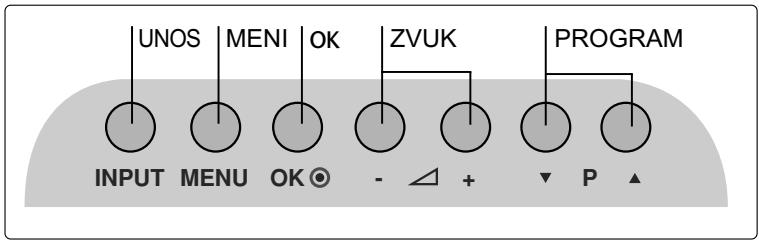
LCD TV modeli : 19/22LS4D*

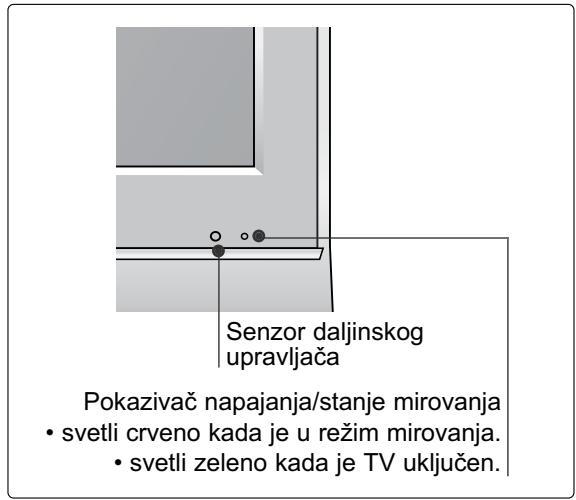
INFORMACIJE NA ZADNJOJ PLOČI
■ Prikazana slika se može razlikovati od Vašeg TV-a.
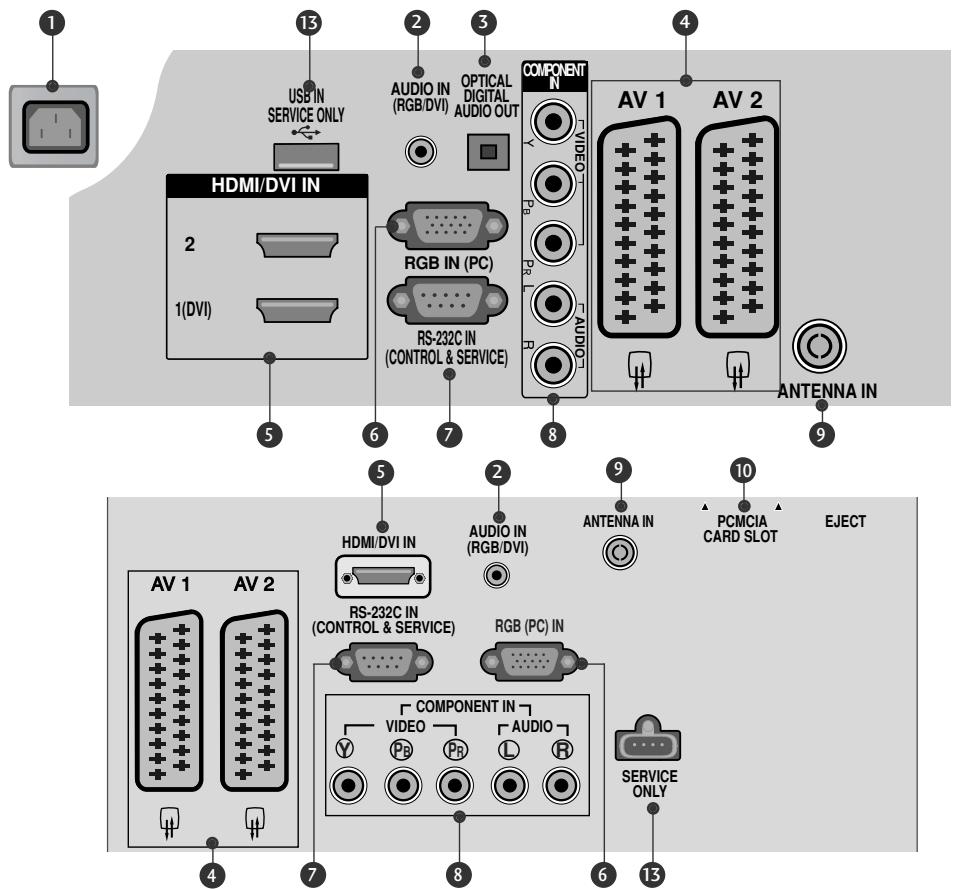
![PCMCIA CARD SLOT HDMI IN 3 osim za 32/37/42LG20** S-VIDEO VIDEO [LMO] -AUDIO - AV IN 3 H/PΩ](/content/2024/12/69898/images/611790cd2e8f87926883fae88e5c746ad52b534499904d0c79ed17a156087d85.jpg)
① Utičnica napojnog kabla
Ovaj TV radi na naizmeničnoj struji. Napon je naznačen na stranici tehničkih karakteristika. Nikada nemojte uključivati TV na jednosmernu struju.
2 RGB/DVI Audio ulaz
Povezuje audio signal od PC ili DTV.
③ OPTIČKI DIGITALNI AUDIO IZLAZ (osim za 19/22LS4D*)
Povezuje digitalni audio signal od raznih tipova opreme.
Napomena: U režimu mirovanja ovi portovi ne rade.
4 Euro Scart utičnica (AV1/AV2)
Povezuje ulaz ili izlaz scart utičnice od eksternog uređaja na ovim utikačima.
5 HDMI ulaz
Povezuje HDMI signal prema HDMI IN, ili DVI (VIDEO) signal prema HDMI/DVI port sa DVI prema HDMI kablom.
6 RGB ulaz
Povezuje izlaz iz PC.
(LCD TV modeli : 32/37/42LG20**, 26/32/37/42LG30**, 32/37/42LG5***)
■ Prilikom sklapanja postolja za sto, proverite da li je zavrtanj potpuno pritegnut. (Ako nije potpuno pritegnut, proizvod može da padne prema napred nakon njegovog postavljanja.) Ako zavrtanj previše pritegnete, onda može da proklizi u unutrašnjem delu zbog prejake sile.
1 Pažljivo postavite stranu ekrana na podmetnuti jastuk da zaštitie ekran od oštećivanje

natural_image
Line drawing of a square electronic component placed on a flat surface (no text or symbols)2 Namontirajte delove tela postolja sa podnožjem TV-a.
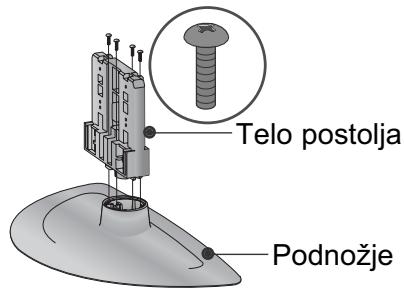
natural_image
Technical illustration of a mechanical assembly with a fan and internal components, showing a magnified inset (no text or symbols)natural_image
Technical illustration of a mechanical component with a magnified inset showing a bolt and pin (no text or symbols)(samo kod 19/22LG30**)
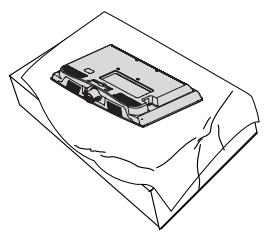
natural_image
Line drawing of a mechanical component on a sheet, no text or symbols present
natural_image
Diagram of a device with a speaker emitting a sound wave, showing internal components and a circular component (no text or symbols)1 Pažljivo postavite stranu ekrana na podmetnuti jastuk da zaštitie ekran od oštećivanje
2 Namontirajte delove tela postolja sa podnožjem TV-a. Gurnite TELO POSTOLJA u POKLOPAC OSNOVE dok ne čujete klik.
3 Monitrajte TV kao što je prikazano.
MONTAŽA POSTOLJA
(samo kod 19/22LS4D*)
■ Prikazana slika se može razlikovati od Vašeg TV-a.
1 Pažljivo postavite stranu ekrana na podmetnuti jastuk da zaštitie ekran od oštećivanje.
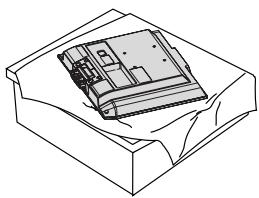
natural_image
Isometric line drawing of a mechanical component or housing with no visible text or symbols2 Uhvatite zglob tela i savijte ga prema nagore.
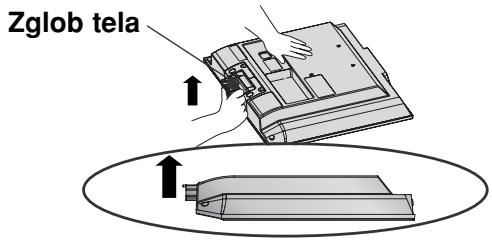
3 Gurnite telo postolja u TV dok ne čujete klik.
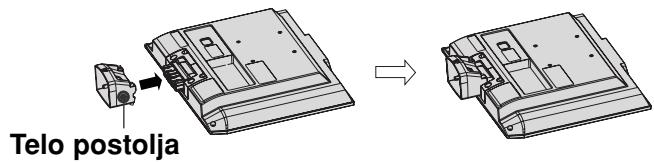
4 Namontirajte delove tela postolja sa podnožjem TV-a.
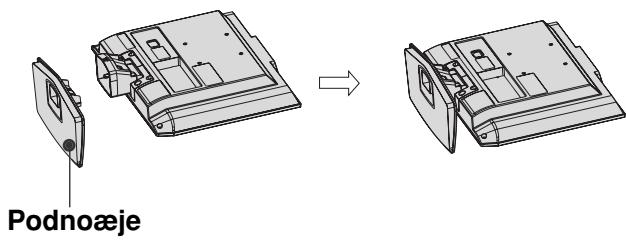
DEMONTAŽA POSTOLJA
(samo kod 19/22LS4D*)
1 Postavite TV sa prednjom stranom okrenutom nadole na meku tkaninu.
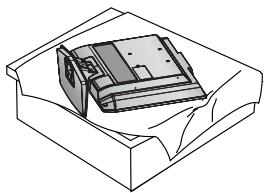
natural_image
Line drawing of a box with a partially open lid (no text or symbols)2 Povucite postolje unazad dok pritiskate dugme na telu postolja.

natural_image
Diagram showing a hand holding a device with an arrow pointing to a circular inset view of the device (no text or symbols present)3 Držite postolje i povucite ga unazad drmanjem da biste ga odvojili od tela postolja.

natural_image
Illustration of hands installing or adjusting a device component with an arrow indicating rotation (no text or symbols present)4 Uhvatite telo postolja i savijte ga prema nagore.
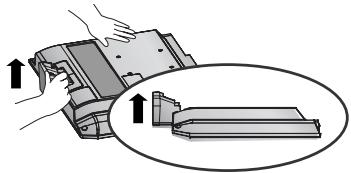
natural_image
Illustration of a hand pressing down on a mechanical component with an inset showing a close-up view (no text or symbols)5 Povucite telo postolja da biste ga odvojili od TV-a pritiskom na 2 reze.

natural_image
Diagram showing a device being processed into a housing, with an inset close-up of the component (no text or symbols present)ZADNJI POKLOPAC ZA UREĐENJE KABLOVA
LCD TV modeli :
32/37/42LG20**, 26/32/37/
42LG30**, 32/37/42/47/52LG5***
1 Priključite neophodne kablove.
natural_image
Illustration of a computer monitor with an inset close-up showing a cable or connector assembly (no text or symbols present)LCD TV modeli :
19/22LS4D*, 19/22LG30**
1 Priključite neophodne kablove.
natural_image
Diagram showing a computer monitor and its internal components, with an inset close-up of cable routing (no text or symbols)2 Montirajte KARIKU ZA UREĐIVANJE KABLOVA kao što je prikazano.
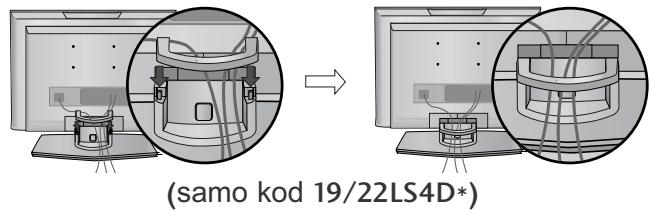
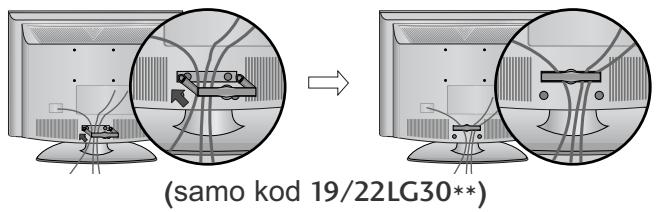
Kako da uklonite kariku za uređivanje kablova
Prvo pritisnite kariku za uređivanje kablova. Drzite KARIKU ZA UREĐIVANJE KABLOVA obema ruku i povucite je naviše.
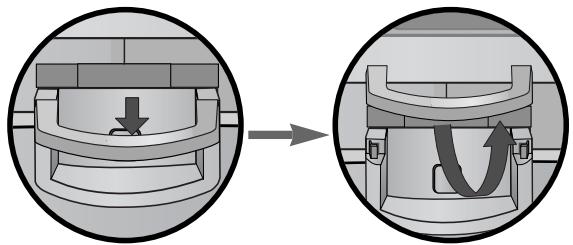
natural_image
Diagram showing a mechanical component before and after assembly, with no visible text or symbols.(samo kod 19/22LS4D*)
Drzite KARIKU ZA URE?IVANJE KABLOVA obema ruku i povucite je unazad.

natural_image
Diagram showing cable routing between two monitors with a magnified inset highlighting cable routing (no text or symbols present)(samo kod 19/22LG30**)
! NAPOMENA
Nemojte koristiti KARIKU ZA UREĐIVANJE KABLOVA da biste podizali TV.
- Ako je proizvod pao, može doći do povrede ili oštećenja proizvoda.
MOLIMO DA POSTOLJE PAŽLJIVO MONTIRATE DA PROIZVOD NE BI PAO
flowchart
graph TD
    A["Step 1: Curve with start point"] --> B["Step 2: Curve with end point"]
    style A fill:#f9f,stroke:#333
    style B fill:#bbf,stroke:#333
1 Upotrebite ušičaste zavrtnjeve ili zavrtnjeve TV konzole da biste učvrstili TV na zidu kao prikazano na slici.
(Ako Vaš TV ima zavrtnjeve u ušičastim zavrtnjevima, onda ih olabavite.)
* Umetnite ušičaste zavrtnjeve ili zavrtnjeve TV konzole i čvrsto ih pritegnite u gornjim otvorima.
2 Pritegnite zidnu konzolu sa zavrtnjevima na zidu. Izjednačite visinu konzole koja je montirana na zidu.
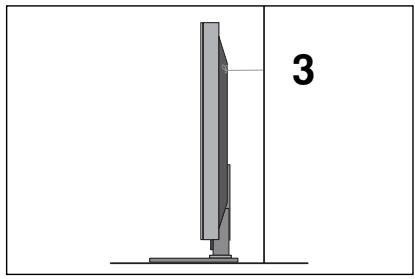
natural_image
Diagram of a computer monitor with a stand and a vertical line labeled '3' (no text or symbols on the device itself)3 Upotrebite otporno uže da vežete TV. Sigurnije je da vežete uže horizontalno u odnosu na zid i TV-a.
! NAPOMENA
▶ Kada pomerate TV prvo iskopčajte kablove.
▶ Upotrebite platformu ili orman koji je dovoljno jak i veliki da podrži veličinu i težinu TV-a.
▶ Za bezbednu upotrebu TV-a obezbedite da je visina nosača na zidu ista sa visinom TV-a.
natural_image
Illustration of a flat-screen computer monitor with no visible text or symbols on the screen or side.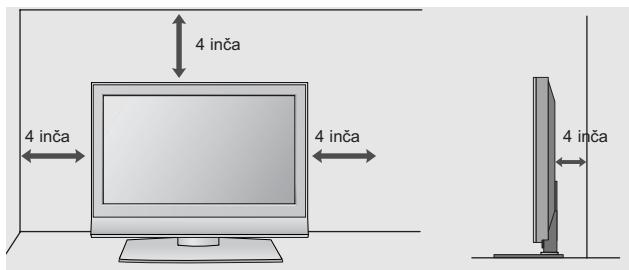
Pričvršćivanje TV-a na stolu (samo za modele 32/37/42LG20**, 26/32/37/42LG30**, 32/37/42LG5***).
TV mora biti pričvršćen na stolu tako da se ne može okrenuti unazad/unapred i eventualno uzrokovati povredu ili oštećenja na proizvodu. Koristite samo priloženi zavrtanj.

natural_image
Illustration of a flat-screen computer monitor with a stand and ventilation slots (no text or symbols visible)1-zavrtanj
(snabdeven kao deo proizvoda)
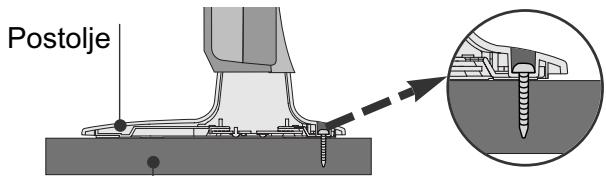
Sto
! UPOZORENJE
natural_image
Illustration of a TV set with a mounted device and cabinet, set against a patterned wall (no text or symbols)
natural_image
Technical diagram showing a mechanical assembly with an inset close-up of a bracket component (no text or symbols)32/37/42LG20**, 26/32/37/42LG30**, 32/37/42/47/52LG5***
LCD TV modeli :19/22LG30**
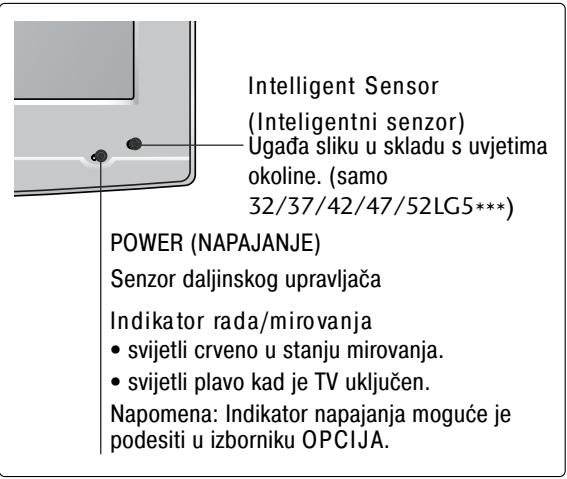
LCD TV modeli :19/22LS4D*
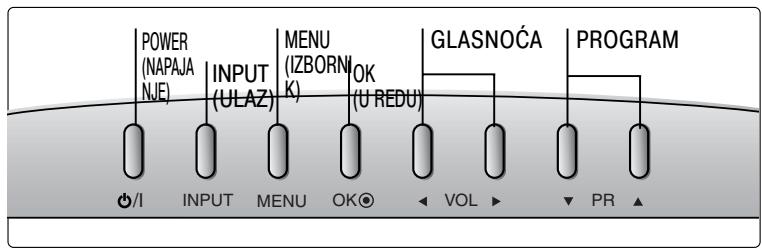
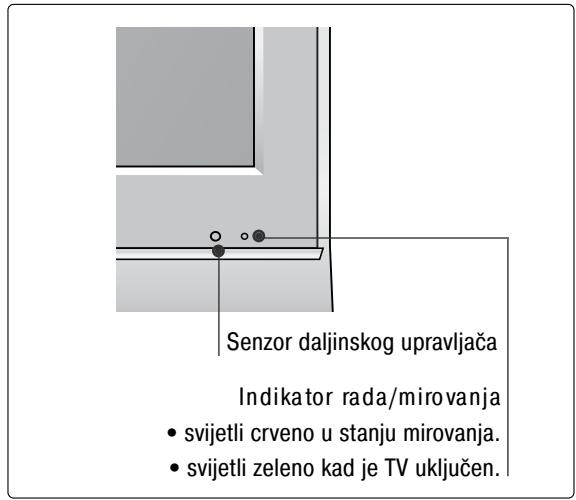
INFORMACIJE O STRAŽNJOJ PLOČI
■ Prikazana slika može se razlikovati od vašeg TV uređaja.

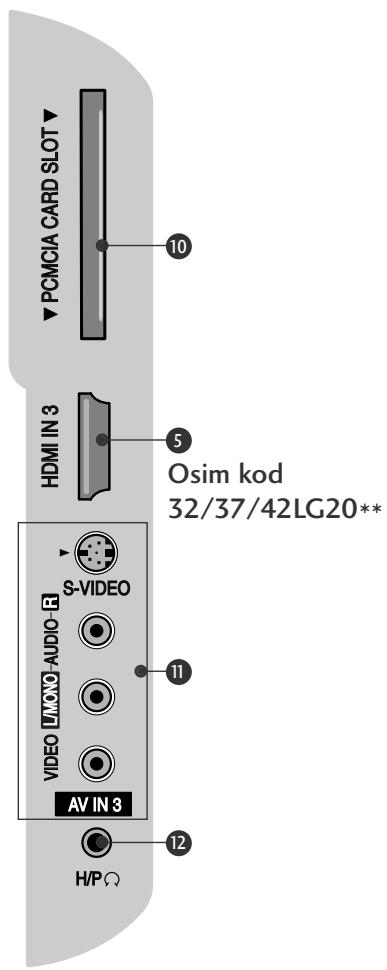
① Utičnica za napajanje
TV uređaj radi s izmjeničnim AC napajanjem. Napon je naveden na stranici s tehničkim podacima. Nikad ne priključujte TV uređaj na istosmjerno DC napajanje.
② RGB/DVI audio ulaz
Spojite audio sa PC-ja ili DTV-a.
3 OPTIČKI DIGITALNI AUDIO IZLAZ (osim za 19/22LS4D*) Spojite digitalni audio s različitih vrsta opreme. Napomena: U stanju mirovanja, ovi ulazi ne rade.
4 Euro Scart utičnica (AV1/AV2)
Spojite scart utičnicu ulaza ili izlaza vanjskog uređaja na ove utičnice.
5 HDMI IN (ULAZ)
Spojite HDMI signal na HDMI IN (ULAZ). Ili DVI (VIDEO) signal na HDMI/DVI IN (ULAZ) pomoću DVI na HDMI kabela.
⑥ RGB ulaz
Spojite izlaz sa PC-ja.
7 RS-232C IN (CONTROL & SERVICE)
(RS-232C ULAZ (UPRAVLJANJE I USLUGA))
Spojite na RS-232C ulaz PC-ja.
8 Ulaz za komponentu
Spojite video/audio komponentu uređaja na ove utičnice.
9 Antenski ulaz
Spojite RF antenu na ovu utičnicu.
10 Utor za PCMCIA (Personal Computer Memory Card International Association) karticu (Ova značajka nije dostupna u svim državama.)
11 Audio/video ulaz (osim za 19/22LS4D*)
Spojite audio/video izlaz s vanjskog uređaja na ove utičnice.
S-Video ulaz (osim za 19/22LS4D*, 32/37/42LG20**) Spojite S-Video iz S-VIDEO uređaja.
12 Utičnica za slušalice (osim za 19/22LS4D*, 32/37/42LG20**) Spojite priključnicu slušalica u ovu utičnicu.
13 ULAZ SAMO ZA USLUGU
Ugradnja postolja
(LCD TV modeli : 32/37/42LG20**, 26/32/37/42LG30**, 32/37/42LG5***)
■ Prilikom sastavljanja stalka za postavljanje na stol provjerite je li vijak potpuno pritegnut. (Ako vijak nije potpuno pritegnut, proizvod se nakon postavljanja može nagnuti prema naprijed). Ako vijak previše pritegnete, vijak se može deformirati uslijed trenja zateznog dijela vijka.
natural_image
Technical line drawing of a square electronic component with a central slot, placed on a rectangular base (no text or symbols)natural_image
Technical illustration of a mechanical assembly with a fan and internal components, showing a magnified inset (no text or symbols)4 Sigurno učvrstite 4 usadna vijka na za to predviđene otvore na stražnjoj strani TV ekrana.

natural_image
Illustration of a mechanical component with a magnified inset showing a bolt (no text or symbols present)(samo 19/22LG30**)

natural_image
Isometric line drawing of a mechanical component or housing with no visible text or symbols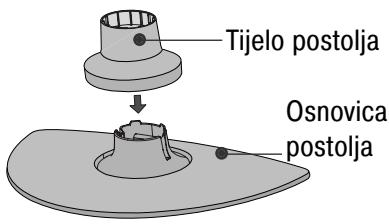
natural_image
Diagram of a device with a speaker emitting a horn, showing internal components and a circular base (no text or symbols)natural_image
Isometric line drawing of a mechanical component or housing with no visible text or symbols2 Uhvatite tijelo zgloba i savinite ga prema gore.
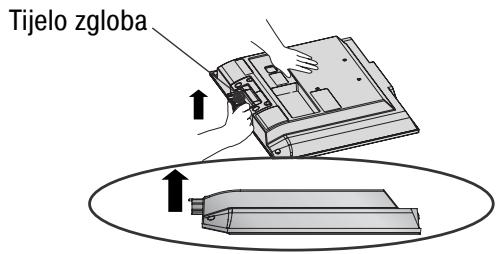
natural_image
Isometric line drawing of a box with internal components (no text or symbols)natural_image
Diagram showing a hand holding a device with an arrow pointing to a component, and a magnified inset highlighting a curved mechanical component (no text or symbols present)natural_image
Illustration of hands installing or adjusting a mechanical component with a directional arrow (no text or symbols)natural_image
Illustration of a hand pressing down on a mechanical component with an inset showing a close-up of the part (no text or symbols present)natural_image
Diagram showing a device being processed into a housing, with an inset close-up of the component (no text or symbols present)STRAŽNJA PLOČA ZA SLAGANJE KABELA
LCD TV modeli :
32/37/42LG20**, 26/32/37/
42LG30**, 32/37/42/47/52LG5***
1 Spojite kabele prema potrebi.
Za spajanje dodatne opreme, pogledajte poglavlje Postavljanje vanjske opreme u priručniku.
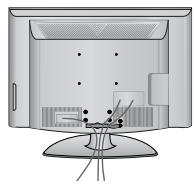
2 Otvorite OBUJMICU ZA SLAGANJE KABELA kako je prikazano i složite kabele.
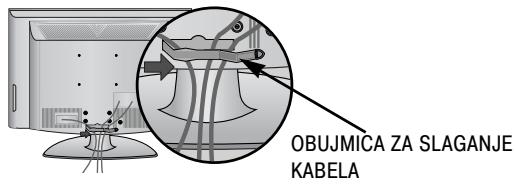
natural_image
Illustration of a computer monitor with an inset close-up showing cable routing (no text or symbols)Kako ukloniti obujmicu za slaganje kabela
Najprije, pritisnite obujmicu za upravljanje kabelom. Držite OBUJMICU ZA SLAGANJE KABELA objema rukama i povucite je prema gore.

(samo 19/22LS4D*)
LCD TV modeli :
19/22LS4D*, 19/22LG30**
1 Spojite kabele prema potrebi.
Za spajanje dodatne opreme, pogledajte poglavlje Postavljanje vanjske opreme u priručniku.
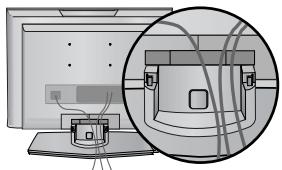
natural_image
Diagram showing a computer monitor with an attached device and its close-up view of the front panel (no text or symbols present)natural_image
Diagram of a computer monitor with a stand and a vertical line labeled '3' (no text or symbols on the device itself)natural_image
Illustration of a flat-screen computer monitor with no visible text or symbols on the screen or side.
Učvršćivanje TV uređaja na podlogu
(samo 32/37/42LG20**, 26/32/37/42LG30**, 32/37/42LG5***)
natural_image
Illustration of a computer monitor with a stand and ventilation slots (no text or symbols)natural_image
Illustration of a TV set with a mounted device and cabinet, set against a patterned wall (no text or symbols)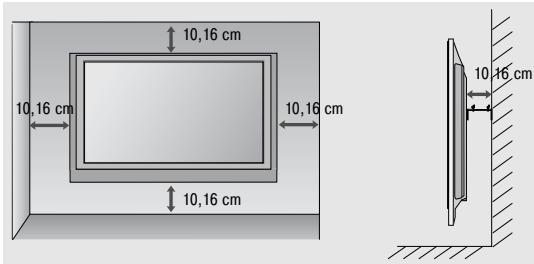
natural_image
Technical diagram showing a mechanical assembly with an inset close-up of a bracket and directional arrows (no text or symbols)PRIPREMA
32/37/42LG20**, 26/32/37/42LG30**, 32/37/42/47/52LG5***
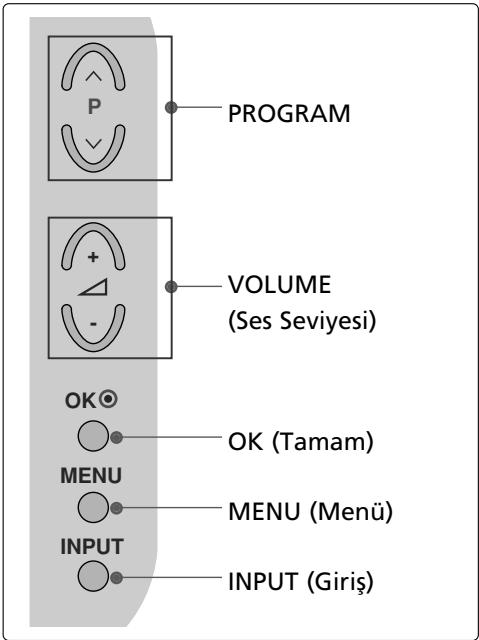
LCD TV Modelleri : 19/22LG30**
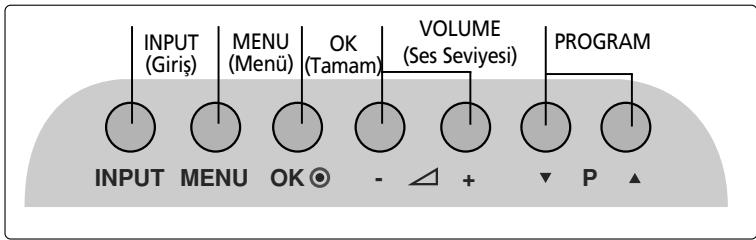
LCD TV Modelleri : 19/22LS4D*
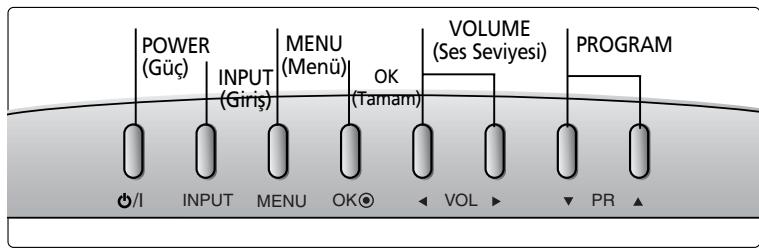
flowchart
graph LR
    A["POWER (Güç)"] --> B["INPUT (Giriş)"]
    B --> C["MENU (Menü)"]
    C --> D["OK (Tamam)"]
    D --> E["VOLUME (Ses Seviyesi)"]
    E --> F["PROGRAM"]
    style A fill:#f9f,stroke:#333
    style F fill:#f9f,stroke:#333
    subgraph Power
        G["/I"]
        H["INPUT"]
        I["MENU"]
        J["OK"]
    end
    subgraph Input
        K["INPUT"]
        L["MENU"]
        M["OK"]
    end
    subgraph Menu
        N["OUTPUT"]
        O["OUTPUT"]
        P["OUTPUT"]
        Q["OUTPUT"]
    end
    subgraph Output
        R["VOL"]
        S["PRO"]
    end
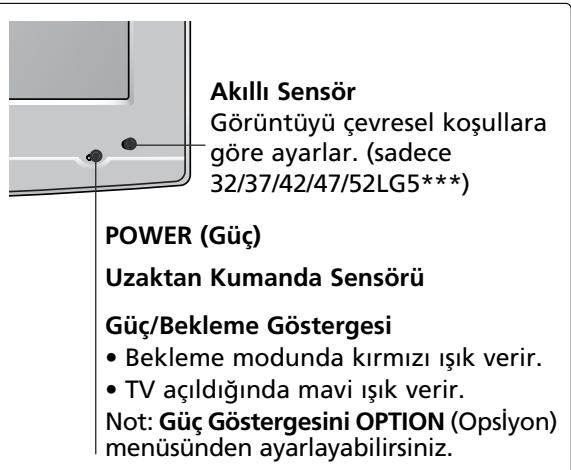
(LCD TV Modelleri: 32/37/42LG20**, 26/32/37/42LG30**, 32/37/42LG5***)
natural_image
Technical line drawing of a mechanical component or housing (no text or symbols)natural_image
Diagram showing a mechanical assembly with a fan and internal components, including a magnified inset of a component detail (no text or symbols present)natural_image
Technical illustration of a mechanical assembly with a bolt and pin, no text or symbols present(Sadece 19/22LG30**)
natural_image
Isometric line drawing of a rectangular electronic device on a sheet (no text or symbols)
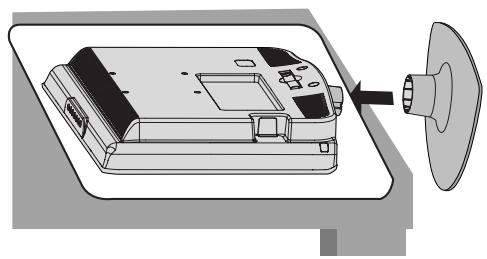
natural_image
Diagram of a device with a speaker emitting a sound wave, showing internal components and a circular component (no text or symbols)natural_image
Isometric line drawing of a mechanical component or housing with no visible text or symbolsSEHPANIN SÖKÜLMESİ (SADECE 19/22LS4D\*)
natural_image
Isometric line drawing of a mechanical component inside a rectangular housing (no text or symbols)natural_image
Illustration of hands installing or adjusting a device component with an arrow indicating rotation (no text or symbols present)natural_image
Illustration of a hand pressing down on a mechanical component with an inset showing a close-up view (no text or symbols)natural_image
Diagram showing a device being processed from a left-side view and then assembled into a 3D model (no text or symbols present)KABLO DÜZENLEMESİ İÇİN ARKA KAPAK
LCD TV Modelleri:
32/37/42LG20**, 26/32/37/
42LG30**, 32/37/42/47/52LG5***
natural_image
Illustration of a computer monitor with an inset close-up showing cable routing (no text or symbols)LCD TV Modelleri:
19/22LS4D*, 19/22LG30**
natural_image
Diagram showing a computer monitor with an attached device and its close-up view of the front panel (no text or symbols present)natural_image
Diagram showing a computer setup with an open panel and a close-up of its internal components, no text or symbols present.(SADECE 19/22LS4D*)
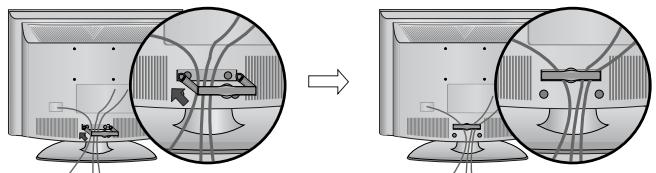
natural_image
Diagram showing cable installation on a computer monitor, with magnified views of cable routing (no text or symbols)(SADECE 19/22LG30**)
natural_image
Diagram showing a mechanical component before and after assembly, with no visible text or symbols.(SADECE 19/22LS4D*)
natural_image
Diagram showing cable routing between two monitors with a magnified inset highlighting the cable structure (no text or symbols present)(SADECE 19/22LG30**)
NOT
natural_image
Diagram of a computer monitor with a side panel and label '3' (no text or symbols on the device itself)natural_image
Illustration of a flat-screen computer monitor with no visible text or symbols on the screen or side.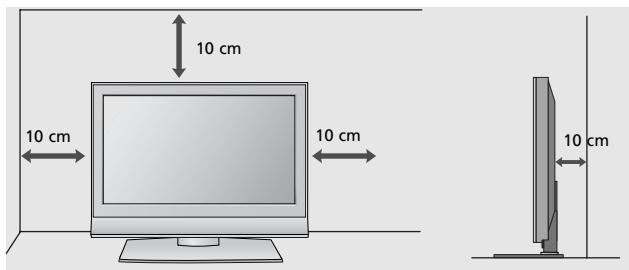
TV'yi bir masaya bağlama (Sadece 32/37/42LG20**, 26/32/37/42LG30**, 32/37/42LG5*** )
natural_image
Illustration of a flat-screen computer monitor with a stand and ventilation slots (no text or symbols visible)natural_image
Illustration of a TV setup with a mounted monitor and cabinet, set against a patterned wall (no text or symbols)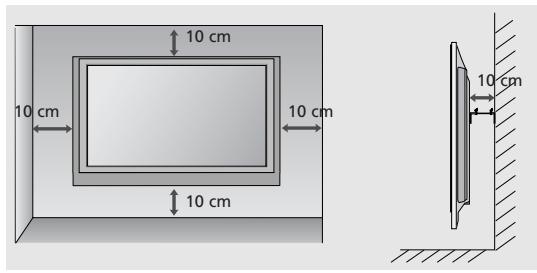
natural_image
Technical diagram showing a mechanical assembly with an inset close-up of a bracket and mounting bracket (no text or symbols)- User's Guide Specification
- Pagination sheet
- LCD TV
- OWNER'S MANUAL
- DVB®
- Digital Video Broadcasting
- CONNECTING YOUR UNIT
- Precaution in Installing the Product
- WARNING
- CAUTION
- Electrical Power Related Precautions
- Precautions in Moving the Product
- Precautions in Using the Product
- FRONT PANEL CONTROLS
- LCD TV Models :
- BACK PANEL INFORMATION
- STAND INSTALLATION
- (Only 19/22LS4D\*)
- DETACHING STAND
- BACK COVER FOR WIRE ARRANGEMENT
- How to remove the cable management clip
- NOTE
- PLEASE SET IT UP CAREFULLY SO THE PRODUCT DOES NOT FALL OVER.
- EARTHING
- DESKTOP PEDESTAL INSTALLATION
- ! WARNING
- WALL MOUNT: HORIZONTAL INSTALLATION
- ANTENNA CONNECTION
- REMOTE CONTROL KEY FUNCTIONS
- Installing Batteries
- TURNING ON THE TV
- Initializing setup
- Note:
- ON-SCREEN MENU LANGUAGE / COUNTRY SELECTION
- ON SCREEN MENUS SELECTION AND ADJUSTMENT
- AUTO PROGRAMME TUNING
- MAINTENANCE
- Cleaning the Screen
- Cleaning the Cabinet
- Extended Absence
- TO VIEW THE USER'S GUIDE ON THE CD-ROM
- To view the User's guide
- TROUBLESHOOTING
- There is a problem with PICTURE settings.
- (UK only)
- Keep this important information about how to re-tune your TV during the digital TV switchover
- How the switchover affects your TV equipment:
- When does switchover happen?
- Visit us at digitaluk.co.uk call us on 0845 6 50 50 50 +
- How to re-tune:
- Bedienungsanleitung
- MONTAGE DES FERNSEHERS AUF EINEM TISCH
- FALLS KEIN TISCH-STANDFUSS VERWENDET
- COUVERTURE DU PANNEAU ARRI ÊRE POUR LA DISPOSITION DES CÂBLES
- ! REMARQUE
- RATTACHER LA TV À UN MEUBLE
- SI VOUS N'UTILISEZ PAS LE PIED A POSER
- PRÉPARATION
- COPERCHIO POSTERIORE PER L'ORGANI ZZAZIONE DEI CAVI
- NOTA
- FISSARE LA TV ALLA SCRIVANIA
- NON USARE IL SUPPORTO PER SCRIVANIA STAND
- PREPARAZIONE
- PREPARATIVOS
- MANUAL DE INSTRUÇÕES
- Modelos de TV LCD :
- COMO REMOVER A GESTÃO DOS CABOS
- PREPARAÇÃO
- ACHTERPANEEL VOOR KABELGELEIDING
- ! OPMERKINGEN
- U GEBRUIKT DE TAFELSTANDAARD NIET
- VOORBEREIDING
- A KÁBELEK ELRENDEZÉSE A HÁTLAPON
- LCD TV-TÍPUSOK:
- LCD TV-TÍPUSOK :
- A TV-KÉSZÜLÉK ASZTALRA SZERELÉSE
- HA NEM HASZNÁLJA AZ ASZTALI ÁLLVÁNYT
- ELŐKÉSZÜLETEK
- SYSTEM ZARZĄDZANIA PRZEWODAMI OBUDOWY TYLNEJ
- SPOSÓB DEMONTAŻU SYSTEMU ZARZĄDZANIA PRZEWODAMI
- MOCOWANIE TELEWIZORA DO BLATU
- PRACA BEZ PODSTAWY
- PRZYGOTOWANIE
- ZADNÍ KRYT PRO USPOŘÁDÁNÍ VODIČŮ
- LCD televizory :
- SEJMUTÍ DRŽÁKU KABELŮ
- ! POZNÁMKA
- PŘÍPRAVA
- INFORMÁCIE O ZADNOM PANELI
- (len pre 19/22LS4D\*)
- ZADNÝ KRYT – USPORIADANIE KÁBLOV
- Modely LCD TV
- VYTIAHNUTIE VEDENIA KÁBLA
- Modely LCD TV :
- PRIPEVNENIE TELEVÍZORA K STOLU (len pre 32/37/42LG20\*\*, 26/32/37/42LG30\*\*, 32/37/42LG5\*\*\*)
- BEZ POUŽITIA STOJANA NA STÔL
- PRÍPRAVA
- NASTAVENIE TELEVÍZNYCH STANÍC
- CAPACUL POSTERIOR PENTRU ARANJAREA CABLURILOR
- ! OBSERVATIE
- FĂRĂ A UTILIZA STANDUL TIP BIROU
- PREGĂTIREA
- ! БЕЛЕЖКА
- РАЗПОЛАГАНЕ НА ТЕЛЕВИЗОРА НА ПОСТАВКА
- HÖLJE PÅ BAKSIDAN MED KABELSAMLARE
- ! OBS!
- INSTALLATION PÅ BORDSSOCKEL
- OM DU INTE ANVÄNDER BORDSSTATIVET
- FÖRBEREDELSE
- ORDNE LEDNINGER PÅ BAKDEKSELET
- LCD-TV modeller :
- SLIK FJERNER DU KABELSAMLEREN
- Installer KABELHÅNDTERINGSKLIPSEN som vist.
- ! MERK
- KOBLING AV TV-EN TIL ET SKRIVEBORD
- UTEN BRUK AV BENKTYPESTATIV
- FORBEREDELSER
- SE PÅ TV / PROGRAMSTYRING
- AUTOMATISK KANALS∅KING OG LAGRING
- BAGDÆKSEL TIL KABELSAMLING
- Monter KABELHOLDEREN som vist.
- ! BEMÆRK
- FASTG∅RING AF TV'ET TIL ET BORD
- UDEN BRUG AF BORDSTATIV
- TAKAKANNEN JOHDINTELINE
- LCD-TELEVISIONALLIT:
- ! HUOMAUTUS
- VALMISTELU
- KAUKOSÄÄTIMEN NÄPPÄINTOIMINNOT
- TAGAKATE JUHTMETE SEADMISEKS
- ! MÄRKUS
- TELERI ALUSELE KINNITAMINE
- KUI TE EI KASUTA LAUA TÜÜPI TELERIALUST (Välja 19/22LS4D\*)
- ETTEVALMISTUS
- GALINIS LAIDŲ DANGTIS
- ! PASTABA
- SUMONTUOKITE ATIDŽIAI, KAD GAMINYS NEAPVIRSTU.
- ! PERSPÈJIMAS
- PARENGIMAS
- VADU IZVIETOŠANA KORPUSA AIZMUGURĚ
- KĀ NONEMT KABELU SATURĒTĀJU
- ! PIEZIME
- TV PIESTIPRINĀŠANA PIE GALDA
- NEIZMANTOJOT GALDA STATİVU
- SAGATAVOŠANĀS
- Pokrov zadaj za urejanje kablov
- PRITRJEVANJE TELEVIZORJA NA MIZO
- KO NE UPORABLJATE NAMIZNEGA STOJALA
- INFORMACIJE NA ZADNJOJ PLOČI
- MONTAŽA POSTOLJA
- DEMONTAŽA POSTOLJA
- ZADNJI POKLOPAC ZA UREĐENJE KABLOVA
- Kako da uklonite kariku za uređivanje kablova
- ! NAPOMENA
- MOLIMO DA POSTOLJE PAŽLJIVO MONTIRATE DA PROIZVOD NE BI PAO
- ! UPOZORENJE
- INFORMACIJE O STRAŽNJOJ PLOČI
- Ugradnja postolja
- STRAŽNJA PLOČA ZA SLAGANJE KABELA
- Kako ukloniti obujmicu za slaganje kabela
- Učvršćivanje TV uređaja na podlogu
- PRIPREMA
- SEHPANIN SÖKÜLMESİ (SADECE 19/22LS4D\*)
- KABLO DÜZENLEMESİ İÇİN ARKA KAPAK
- NOT
Brand : LG
Model : 322000-ZA.BETPLJG
Category : Television