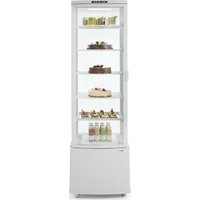
233696 - Refrigerator Arktic - Free user manual and instructions
Find the device manual for free 233696 Arktic in PDF.


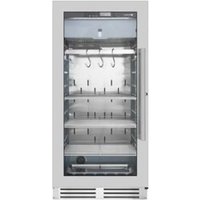
| Product type | Professional glass door refrigerator |
| Use | Storage and display of food and beverages (commercial use) |
| Adjustable temperature range | 2°C to 8°C |
| Refrigerant | R600a (flammable, environmentally friendly) |
| Power supply | 220-240 V ~ 50 Hz |
| Protection class | I (earthing required) |
| Interior lighting | Fluorescent tube 11W (220-240V~50Hz) |
| Control | Digital with LED display |
| Defrost | Automatic (LED indicator) |
| Cooling system | Forced air (ventilated) |
| Door | Glass door with magnetic gasket |
| Interior shelves | Height adjustable, max load 8 kg per shelf |
| Cleaning | Damp cloth and mild detergent; do not immerse |
| Spare parts | Replacement fluorescent lamp (11W) |
| Warranty | 1 year (subject to conditions) |
| Repairs | Must be carried out by a qualified technician |
| Safety | Overload protection, thermal cutout |
| Installation instructions | Do not use near heat sources, leave 20 cm ventilation around |
| Recommended storage | Pre-cooled food only |
Frequently Asked Questions - 233696 Arktic
User questions about 233696 Arktic
0 question about this device. Answer the ones you know or ask your own.
Ask a new question about this device
Download the instructions for your Refrigerator in PDF format for free! Find your manual 233696 - Arktic and take your electronic device back in hand. On this page are published all the documents necessary for the use of your device. 233696 by Arktic.
USER MANUAL 233696 Arktic
GB: Read user manual and keep this with the appliance.
GB: For indoor use only.
natural_image
Simple line drawing of a wine glass with a fork (no text or symbols)
natural_image
Symbol of a trash bin with crossed lines indicating no waste or discharge (no text or labels)


GB: Note: This manual is translated from English using AI and machine translations.
7
natural_image
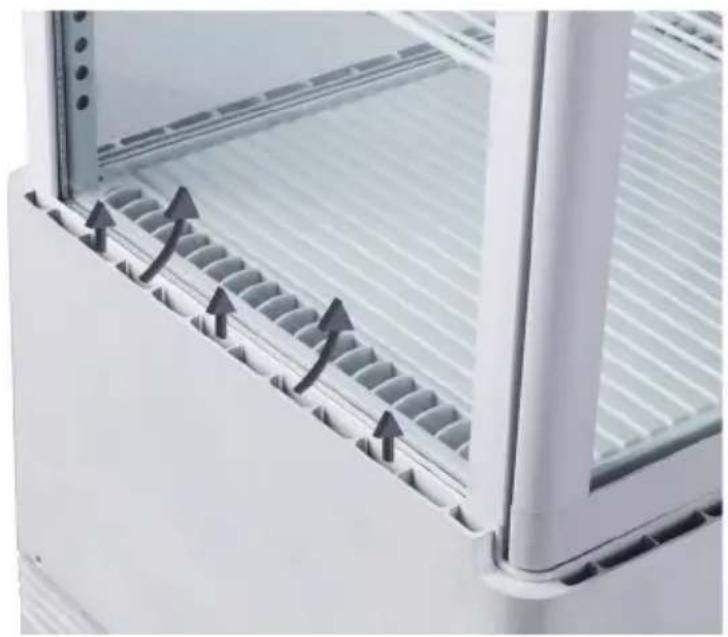
Close-up of a white refrigerator with ventilation grilles and airflow arrows indicating airflow direction (no text or symbols)2
3
4
GB: Technical specifications / DE: Technische Angaben / NL: Technische gegevens / PL: Dane techniczne / FR: Données techniques / IT: Parametri di base / RO: Parametrii de bază / GR: Bašukéç paráµetrot / HR: Tehnički podaci / CZ: Technická specifikace / HU: Můszaki adatok / UA: Texníční характеристики / EE: Tehnilised andmed / LV: Tehniskás specifikacijas / LT: Techninés specifikacijos / PT: Especificações técnicas / ES: Especificaciones técnicas / SK: Technické špecifikácie / DK: Technical specifications / FI: Tekniset tiedot / NO: Tekniske spesifikasjoner / SI: Tehnične specifikacije / SE: Tekniska specifikationer / BG: Texнически спецификации / RU: Texнические данные
| A | 233610 v.02 | 233627 v.02 | 233634 v.02 | 233238 v.02 | 233641 v.02 | 233658 v.02 | 233665 v.02 | 233269 v.02 | 233696 | 233290 |
| B 220-240V~50Hz / 220-240 B ~ 50 Гц | ||||||||||
| C 170W / Вт 210W / Вт 380W / Вт | ||||||||||
| D 14A 1.5A 2.4A | ||||||||||
| E | R600a/ 40g R290/100g | |||||||||
| F | 2°C - 6°C | 2°C - 8°C | ||||||||
| G | 4°C | |||||||||
| H | C | |||||||||
| I | I | |||||||||
| J | 4 | |||||||||
| K | LED 4W | |||||||||
| L | < 60 dB (A) | |||||||||
| M | 58 L | 68 L | 78 L | 98 L | 270 L | |||||
| N | 452x406x(H)816 mm/мм | 452x406x(H)891 mm/мм | 452x406x(H)966 mm/мм | 452x406x(H)1116 mm/мм | 556x526x(H)1913 mm/мм | |||||
| O | 32 kg / кг | 35 kg / кг | 36 kg / кг | 40 kg / кг | 90 kg / кг | |||||
A: GB:Item no. / DE:Art.-Nr. / NL:Artikelnr. / PL:Nr pozycji / FR:N° d'article / IT:N. articolo / RO:Nr. articolului/ GR:Ap. εiδους / HR:Broj stavke / CZ:Položka č. / HU:Cikkszám / UA:Homer elementa / EE:Artikli nr / LV:Vienums Nr. / LT:Prekės Nr. / PT:Item n.o / ES:N.o de artículo / SK:Č. položky / DK:Varenr. / FI:Kohteen nro / NO:Varenr. / SI:Št. izdelka / SE:Art.nr / BG:Homer na element / RU:Homer позиции
B: GB: Rated voltage and frequency / DE: Nennspannung und Frequenz / NL: Nominale spanning en frequentie / PL: Znamionowe napięcie i częstotliwość / FR: Tension et fréquence nominales / IT: Tensione e frequenza nominali / RO: Tensiune nominală și frecvență / GR: Ovojaotikn tăon kai ouxvòtnta / HR: Nazivni napon i frekvencija / CZ: Jmenovité napětí a frekvence / HU: Névleges feszültség és frekvencia / UA: Номінальна напруга та частота / EE: Nimipinge ja -sagedus / LV: Nominālais spriegums un frekvence / LT: Vardinè jtampa ir dažnis / PT: Tensão e frequência nominais / ES: Tensión y frecuencia nominales / SK: Menovité napätie a frekvencia / DK: Nominel spænding og frekvens / FI: Nimellisjännite ja -taajuus / NO: Nominell spenning og frekvens / SI: Nazivna napetost in frekvenca / SE: Märkspänning och frekvens / BG: Номинално напрежение и честота / RU: Номинальное напряжение и частота
C: GB: Rated input power / DE: Nenneingangsleistung / NL: Nominaal ingangsvermogen / PL: Znamionowa moc wejściowa / FR: Puissance d'entrée nominale / IT: Potenza nominale in ingresso / RO: Putere nominală de intrare / GR: Ovojaotikn ioxuç eisobou / HR: Nazivna ulazna snaga / CZ: Jmenovitý vstupní výkon / HU: Névleges bemeneti teljesítmény / UA: Номінальна вхідна потужність / EE: Nimisisendvõimsus / LV: Nominālā ieejas jauda / LT: Vardinė jėjimo galia / PT: Potência de entrada nominal / ES: Potencia de entrada nominal / SK: Menovitý vstupný výkon / DK: Nominel indgangseffekt / FI: Nimellistuloteho / NO: Nominell inngangseffekt / SI: Nazivna vhodna moč / SE: Märkineffekt / BG: Номинална входяща мощност / RU: Номинальная входная мощность
D: GB: Rated Current / DE: Nennstrom / NL: Nominale stroom / PL: Prąd znamionowy / FR: Courant nominal / IT: Corrente nominale / RO: Curent nominal / GR: Ovojaotikń évtaon peújatoç / HR: Nazivna struja / CZ: Jmenovitý proud / HU: Névleges áramerősség / UA: Nominalbniй струм / EE: Nimivool / LV: Nominālā strāva / LT: Vardinė srove / PT: Corrente nominal / ES: Corriente nominal / SK: Menovitý prúd / DK: Mærkestrøm / FI: Nimellisvirta / NO: Nominell strøm / SI: Nazivni tok / SE: Märkström / BG: Nominalen tok / RU: Nominalbniй tok
E: GB:Refrigerant used and injection quantity / DE:Verwendetes Kühlmittel und Injektionsmenge / NL:Gebruikte koelmiddel en hoeveelheid / PL:Czynnik chłodniczy i jego ilość / FR:Réfrigérant utilisé et quantité à injecter / IT:Refrigerante utilizzato e quantità di iniezione / RO:Agent frigorific utilizat și cantitate de injecție / GR:Ψυκτικὸ μέσο που χρησμοποιθνκε και ποσότητα ένεσης / HR:Korišteno rashladno sredstvo i količina ubrizgavanja / CZ:Použité chladivo a množství vstřiku / HU:Felhasznált hűtőközeg és befecskendezési mennyiség / UA:Використовуваний холодоагент і кількість впорскування / EE:Kasutatud külmutusagens ja injektsiooni kogus / LV:Izmantota dzesējoša viela un iesmidzināšanas daudzums / LT:Panaudotas šaltnešis ir jpurškimo kiekis / PT:Refrigerante utilizado e quantidade de injeção / ES:Refrigerante utilizado y cantidad de inyección / SK:Použité chladiace médium a množstvo injekcie / DK:Anvendt kølemiddel og indsprøjtningsmængde / FI:Käytetty kylmäaine ja injektiomäärä / NO:Kjølemiddel brukt og injeksjonsmengde / SI: Uporabljeno hladilno sredstvo in količina injekcije / SE:Använd köldmedium och injektionsmängd / BG:Използван хладилен агент и количество за инжектиране / RU:Используемый хладагент и количество впрыска
F: GB: Temperature settings / DE: Temperatur-Einstellungen / NL: Temperatuur instellingen / PL: Ustawienia temperatury / FR: Réglages de température / IT: Impostazioni della temperatura / RO: Setări de temperatură / GR: Puθμίσεις θερμοκρασίας / HR: Postavke temperature / CZ: Nastavení teploty / HU: Hőmérséklet-beállítások / UA: Налаштування температури / EE: Temperatuurisätted / LV: Temperatūras iestatījumi / LT: Temperatūros nuostatos / PT: Definições de temperatura / ES: Ajustes de temperatura / SK: Nastavenie teploty / DK: Temperaturindstillinger / FI: Lämpötila-asetukset / NO: Temperaturinnstillinger / SI: Nastavitve temperature / SE: Temperaturinställningar / BG: Настройки на температурата / RU: Настройки температуры
G: GB: Recommended temperature setting / DE: Empfohlene Temperatureinstellung / NL: Aanbevolen temperatuurinstelling / PL: Zalecane ustawienie temperatury / FR: Réglage de la température recommandée / IT: Impostazione della temperatura consigliata / RO: Setare de temperatură recomandată / GR: Συνιστώμενη ρύθμιοη θερμοκρασίας / HR: Preporučena postavka temperature / CZ: Doporučené nastavení teploty / HU: Javasolt hőmérséklet-beállítás / UA: Рекомендоване налаштування температури / EE: Soovitatav temperatuurisäte / LV: leteicamais temperatūras iestatījums / LT: Rekomenduojamas temperatūros nustatymas / PT: Definição de temperatura recomendada / ES: Ajuste de temperatura recomendado / SK: Odporúčané nastavenie teploty / DK: Anbefalet temperaturindstilling / FI: Suositeltu lämpötila-asetus / NO: Anbefalt temperaturinnstilling / SI: Priporočena nastavitev temperature / SE: Rekommenderad temperaturinställning / BG: Препоръчителна настройка на температурата / RU: Рекомендуемая настройка температуры
H: GB: Energy efficiency class / DE: Energieeffizienzklasse / NL: Energie-efficiëntieklasse / PL: Klasa efektywności energetycznej / FR: Classe énergétique / IT: Classe di efficienza energetica / RO: Clasă de eficiență energetică / GR: Tă£n ενεργειακής απόδοσης / HR: Klasa energetske učinkovitosti / CZ: Trída energetické účinnosti / HU: Energiahatékonysági osztály / UA: Klasa енергоефективности / EE: Energiatõhususe klass / LV: Energoefektivitätes klase / LT: Energijos vartojimo efektyvumo klasė / PT: Classe de eficiência energética / ES: Clase de eficiencia energética / SK: Trieda energetickej účinnosti / DK: Energiklasse / FI: Energiatehokkuusluokka / NO: Energieffektivitetsklasse / SI: Razred energijske učinkovitosti / SE: Energieffektivitetsklass / BG: Klas na енергийна ефективност / RU: Klacc энергоэффективности
I: GB:Protection class (Class) / DE:Schutzklasse (Klasse) / NL:Beschermingsklasse (klasse) / PL:Klasa ochrony (klasa) / FR:Classe de protection (classe) / IT:Classe di protezione (classe) / RO:Clasă de protectie (clasă) / GR:Kláon proostaoiaç (katnyopia) / HR:Klasa zaštite (klasa) / CZ:Třída ochrany (třída) / HU:Védelmi osztály (osztály) / UA:Kлас захисту (klac) / EE:Kaitseklass (klass) / LV:Aizsardzības klase (klase) / LT:Apsaugos klasė (klasė) / PT:Classe de proteção (classe) / ES:Clase de protección (clase) / SK:Trieda ochrany (trieda) / DK:Beskyttelsesklasse (klasse) / FI:Suojausluokka (luokka) / NO:Beskyttelsesklasse (klasse) / SI:Razred zaščite (razred) / SE:Skyddsklass (klass) / BG:Kлас на защита (Klac) / RU:Klacc защиты (klacc)
J: GB: Climate class / DE: Klimaklasse / NL: Klimaatklasse / PL: Klasa klimatyczna / FR: Classe climatique / IT: Classe climatica / RO: Clasă climatică / GR: Kluomatikn klăon / HR: Klimatska klasa / CZ: Klimatická třída / HU: Klímaosztály / UA: Klímatichniй клас / EE: Kliimaklass / LV: Klimata klase / LT: Klimato klasé / PT: Classe climática / ES: Classe climática / SK: Klimatická trieda / DK: Klimaklasse / FI: Ilmastoluokka / NO: Klimaklasse / SI: Podnební razred / SE: Klimatklass / BG: Климатичен клас / RU: Климатический класс
K: GB:Illuminate light / DE:Beleuchtung / NL:Licht op / PL:Podświetlenie światła / FR:Éclairage / IT:Illuminare la luce / RO:Lumină aprinsă / GR:Φωτισμός φωτός / HR:Svjetlosni indikator / CZ:Rozsvítit světlo / HU:Világító fény / UA:Освітлення / EE:Märgutuli / LV:Apgaismojums / LT:Apšvietimo lemputė / PT:Illuminar a luz / ES:Illuminar la luz / SK:Osvetlenie svetla / DK:Lysende lys / FI:Valaise valo / NO:Belysningslys / SI: Osvetlitev / SE:Lys upp lampan / BG:Осветление / RU:Освещение
L: Noise level / DE:Geräuschpegel / NL:Geluidsniveau / PL:Poziom hatasu / FR:Niveau sonore / IT:Livello di rumore / RO:Nivel de zgomot / GR:Eninεδο θορύΒου / HR:Razina buke / CZ:Hladina hluku / HU:Zajszint / UA:Píběny shumy / EE:Müratase / LV:Trokšnu līmenis / LT:Triukšmo lygis / PT:Nivel de ruído / ES:Nivel de ruído / SK:Hladina hluku / DK:Stojniveau / FI:Melutaso / NO:Stojniva / SI: Raven hrupa / SE:Ljudniva / BG:Nivo na shum / RU:Уровень shuma
M: GB: Capacity / DE: Kapazität / NL: Capaciteit / PL: Pojemność / FR: Capacité / IT: Capacità / RO: Capacitate / GR: Хорптикотнта / HR: Kapacitet / CZ: Kapacita / HU: Kapacitás / UA: Місткість / EE: Mahutavus / LV: Efektivităte / LT: Pajėgumas / PT: Capacidade / ES: Capacidad / SK: Kapacita / DK: Kapacitet / FI: Tilavuus / NO: Kapasitet / SI: Zmogljivost / SE: Kapacitet / BG: Капацитет / RU: Вместимость
N: GB:Dimensions / DE:Abmessungen / NL:Afmetingen / PL:Wymiary / FR:Dimensions / IT:Dimensioni / RO:Dimensiuni / GR:Διαστάσεις / HR:Dimenzije / CZ:Rozměry / HU:Méretek / UA:Розміри / EE:Mõõtmed / LV:Izmēri / LT:Matmenys / PT:Dimensões / ES:Dimensiones / SK:Rozmery / DK:Mål / FI:Mitat / NO:Mål / SI: Mere / SE:Mått / BG: Размери / RU:Размеры
O: GB:Net weight / DE:Nettogewicht / NL:Nettogewicht / PL:Waga netto / FR:Poids netto / IT:Peso netto / RO:Greutate netă / GR:Kaθαρό βάρος / HR:Neto težina / CZ:Čistá hmotnost / HU:Nettó tömeg / UA:Bara нетто / EE:Netokaal / LV:Neto svars / LT:Grynasis svoris / PT:Peso líquido / ES:Peso neto / SK:Čistá hmotnosť / DK:Nettovægt / FI: Nettopaino / NO:Nettovekt / SI:Neto teža / SE:Nettovikt / BG: Нетно тегло / RU:Вес нетто
GB: Remark: Technical specification is subjected to change without prior notification.
Thank you for purchasing this Hendi appliance. Read this user manual carefully, paying particular attention to the safety regulations outlined below, before installing and using this appliance for the first time.
Safety instructions
- This appliance is intended for commercial and professional use only.
- Only use the appliance for the intended purpose it was designed for as described in this manual.
- The manufacturer is not liable for any damage caused by incorrect operation and improper use.
- Keep the appliance and electrical plug/connections away from water and other liquids. In the event the appliance falls into water, immediately remove the connections from the mains. Do not use the appliance until it has been checked by a certified technician. Failure to follow these instructions will cause life threatening risks.
- Never attempt to open the housing of the appliance by yourself.
- Do not insert objects into the housing of the appliance.
- Do not touch the plug/electrical connections with wet or damp hands.
- DANGER! RISK OF ELECTRIC SHOCK! Do not attempt to repair the appliance by yourself. Do not immerse the electrical parts of the appliance in water or other liquids. Never hold the appliance under running water.
- Never use a damaged appliance! When it's damaged, disconnect the appliance from the socket and contact the retailer.
- Regularly check the electrical connections and cord for any damage. When damaged it must be replaced by a service agent or similarly qualified person in order to avoid danger or injury.
- Make sure the cord does not come in contact with sharp or hot objects and keep it away from open fire. Never pull the power cord to unplug it from the socket, always pull the plug instead.
- WARNING! When positioning the appliance, ensure the supply cord is not trapped or damaged.
- CAUTION! Securely route the power cord if necessary in order to prevent unintentional pulling, contact with the heating surface or cause a trip hazard.
- Never leave the appliance unattended during use.
- WARNING! As long as the plug is in the socket the appliance is connected to the power source.
- Turn off the appliance before disconnecting from the mains.
- Connect the power plug to an easily accessible electrical socket so that in case of emergency the appliance can be unplugged immediately.
- Never carry the appliance by the cord.
- Do not use any extra devices that are not supplied together with the appliance.
- Only connect the appliance to an electrical outlet with the voltage and frequency mentioned on the appliance label.
- Never use accessories other than those recommended by the manufacturer. Failure to do so could pose a safety risk to the user and could damage the appliance. Only use original parts and accessories.
- This appliance should not be operated by persons with reduced physical, sensory or mental capabilities, or persons that have a lack of experience and knowledge.
- This appliance should, under any circumstances, not be used by children.
- Keep the appliance and its electrical connections out of reach of children.
- WARNING! ALWAYS switch off the appliance before cleaning, maintenance or storage.
- This appliance should be operated by trained personnel in kitchen of the restaurant, canteens or bar staff, etc.
- Do not place the appliance on a heating object (gasoline, electric, charcoal cooker, etc.).
- Do not cover the appliance in operation and keep the appliance away from any hot surfaces and open flames. Always operate the appliance on a horizontal, stable, clean, heat-resistant and dry surface.
- Allow at least 20 cm spacing around the appliance for ventilation purpose during use.
- Any repairs shall be carried out only by persons trained or recommended by the manufacturer.
Special safety instructions
- This appliance is designed for short-time storage of packaged food such as lettuce, vegetables, drinks, fruits, etc. under low temperature. Do not store any other materials in the appliance. Do not place any dangerous products, such as fuel, alcohol, paint, flammable or explosives, etc. inside or near the appliance. Do not store medicine inside the appliance.
- Products put in the appliance must be already pre-cooled. Otherwise, moisture evaporating while cooling food products can condensate inside the cooling compartment, this is natural and does not indicate any malfunction of the appliance.
- WARNING! Do not use mechanical devices or other means to accelerate the defrosting process, other than those recommended by the manufacturer.
- WARNING! Do not damage the refrigerant circuit.
CAUTION! RISK OF FIRE! The refrigerant used is R600a / R290 It is a flammable refrigerant which is environmentally friendly. Although it is flammable, it does not damage the ozone layer and does not increase the greenhouse effect. The use of this coolant has, however, led to a slight increase in the noise level of the appliance. In addition to the noise of the compressor, you might be able to hear the coolant flowing around the system. This is unavoidable, and does not have any adverse effect on the performance of the appliance. Care must be taken during the transportation and setting up of the appliance that no parts of the cooling system are damaged. Leaking coolant can damage the eyes.
- WARNING! Keep all ventilation openings in the appliance enclosure clear of obstruction. Provide sufficient ventilation in the surrounding structure when building-in. Never block the air flow suction and air outlet in order to keep air circulation.
- WARNING! Do not use electrical appliances inside the food storage compartments of the appliance, unless they are of the type recommended by the manufacturer.
- Place the appliance on a clean, stable, dry, level surface only.
- Keep the appliance away from any hot surfaces and open flames. Protect the appliance against heat, dust, direct sun-
light, moisture, dripping and splashing water.
- Do not use hard utensils on the glass surface. Do not use water jets or steam cleaners during cleaning, do not immerse the whole appliance in water as the parts will get wet and electric shock might be resulted.
- Do not place articles on top of the appliance. Do not place objects with open sources of fire (e.g. candles) on top or beside the appliance. Do not place objects filled with water (e.g. vases) on or near the appliance.
- Never cover the appliance during use. This may cause a fire hazard.
- Do not wash the appliance with water. Washing can cause leakages and increase the risk of electric shock.
- Do not make any additional openings on the appliance. Do not install any gadgets in the appliance.
- Do not overload the racks inside to avoid damage. Max. loading of each rack is about 8kg.
- Do not attempt to climb up to the top of the appliance.
Installing the appliance
- The appliance should not be tipped over an angle of 45^ . After installing the appliance, wait for 2 hours before connecting it to the electrical power supply. The same applies if the appliance is moved at a later date.
- The appliance must always be installed in a dry environment.
- When installing, leave at least 20 cm clearance to the rear and to the left and right for adequate ventilation. Leaving less room for ventilation may affect the efficiency.
- We strongly recommend to install the appliance in a place with good natural ventilation to increase ventilation properties.
Electrical components and other dangers
- No other appliances should be plugged into the same socket as with this appliance.
- Do not place any dangerous products, such as fuel, alcohol, paint, flammable or explosives, etc. inside or near the appliance as it may result a fire hazard.
- Do not store any medications in the appliance.
- Wait about 5 minutes before switch on the appliance again after the appliance has been switched off or unplugged from the electrical power supply.
- Do not wash the appliance with water. Washing can cause leakage and increase the risk of electric shock. No any parts/accessories can be under dishwasher.
Intended use
- This appliance is designed only to keep food or beverages, under cool state and to display them. Any other use may lead to damage of the appliance or personal injury.
- Operating the appliance for any other purpose shall be deemed a misuse of the device. The user shall be solely liable for improper use of the device.
Grounding installation
This appliance is classified as protection class I and must be connected to a protective ground. Grounding reduces the risk of electric shock by providing an escape wire for the electric current.
This appliance is fitted with a power cord with grounding plug or electrical connections with grounding wire. The connections
must be properly installed and grounded.
Main parts of the product
(Fig.1 on page 3)
- Glass door
- Air suction
- Never block the suction. Air is sucked in and cold air in circulated inside the refrigerator.
-
Main ON/OFF switch
-
Rack
- The height of rack is adjustable for various goods. For adjustment :
1) Take out the rack
2) Move the rack support on suitable height.
3) Put the rack on the support.
- Air outlet
- Never block the air outlet. Let inside circulating cold air flow out.
- Digital temperature controller
- Air duct outside the glass to remove the condensation water
Control panel
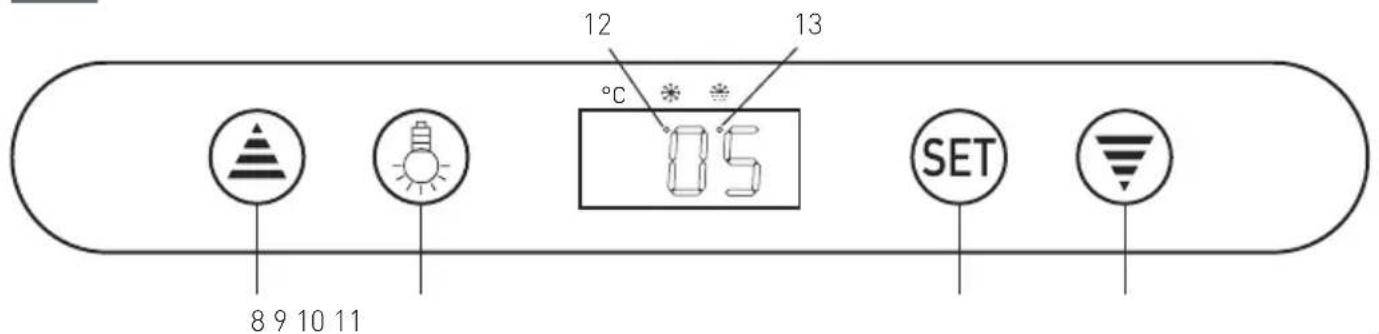
(Fig.2 on page 3)
- Increase button
- Light
- Setting button
- Decrease button
- Refrigerant LED
- Defrost LED
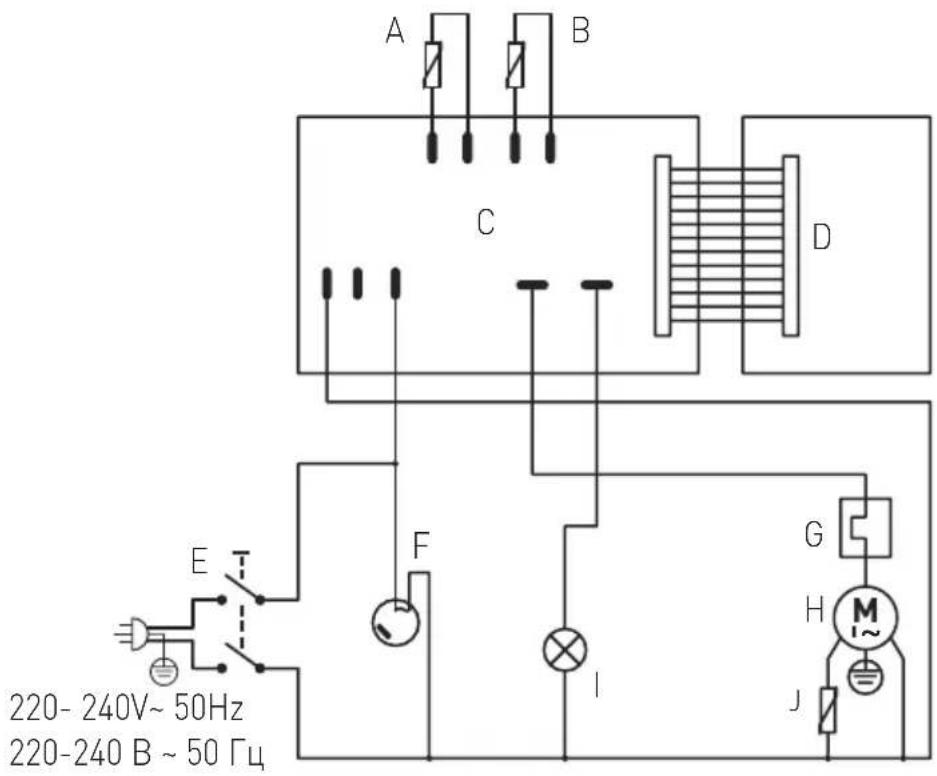
Circuit diagram
(Item 233238 v.02, 233269 v.02, 233610 v.02, 233627 v.02, 233634 v.02, 233641 v.02, 233658 v.02, 233665 v.02)
(Fig.3 on page 4)
A. Defrost probe
B. Thermostat probe
C. Digital Temperature Controller
D. Display panel
E. Power switch
F. Fan Motor
G. Over Load Protector
H. Compressor
1. Lamp
J. PTC
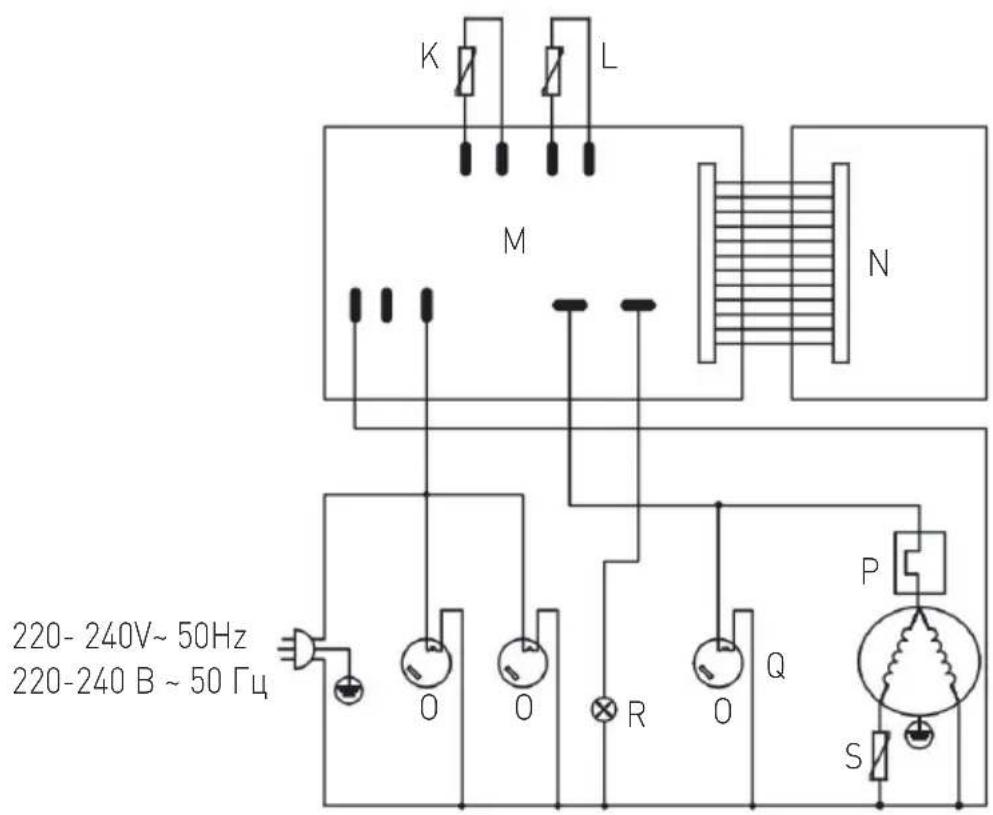
Circuit diagram
(Item 233290, 233696)
(Fig.4 on page 4)
K. Defrost probe
L. Thermostat probe
M. Digital Temperature Controller
N. Display panel
0. Fan Motor
P. Over Load Protector
Q. Compressor
R. Lamp
S. PTC
Preparation before use
- Remove all protective packaging and wrapping.
- Check to make sure the appliance is undamaged and with
all accessories. In case of incomplete delivery and damages. Please contact supplier immediately. Do not use the appliance.
- Clean the appliance before use (See ==> Cleaning & Maintenance).
- Place all the racks inside the appliance.
- Keep the packaging if you intend to store your appliance in the future.
Note: Due to manufacturing residues, the appliance may emit a slight odor in the first few cycles. This is normal and does not indicate any defect or hazard. Make sure the appliance is well ventilated.
Operating instructions
- Connect the power plug with a suitable electrical outlet. Switch on the appliance (if it is included). Leaving the appliance for running some hours to reach the cooling temperature before placing the beverage or food inside the appliance.
• Digital temperature controller operation
1). Setting the temperature
- Press (10) to enter into the setting mode. The set temperature is displayed.
- Press (8) or (11) to increase or decrease the set temperature.
- Press (10) again to confirm the setting and exit. Then, inside cabinet temperature is displayed.
Note:
- If no button is pressed within 10 seconds. The newly set temperature will be stored.
- The temperature setting range from 2°C to 6°C [233610 v.02, 233627 v.02, 233634 v.02, 233641 v.02, 233658 v.02, 233665 v.02, 233269 v.02, 233238 v.02]; The temperature setting range from 2°C to 8°C [233696, 233290].
- Keep the door open time as short as possible in order to keep a cool temperature inside.
2). Illumination inside the cabinet
- Press (9) to switch ON the light. Press (9) again to switch OFF the light.
3). Refrigerant LED indicator
- During the cooling operation (compressor enabled), this refrigerant LED (12) indicator will lights up constantly.
- After the inside cabinet reach the set temperature, the refrigerant LED (12) indicator will flashes continuously.
- When defrost start, the refrigerant LED (12) indicator light off.
4). Defrost LED indicator
- During the defrost operation, this defrost LED [13] indicator will lights up constantly.
- After the defrost operation, defrost LED (13) indicator will lights off.
Cleaning & maintenance
ATTENTION! Always disconnect the appliance from the electrical mains and cool down before storage, cleaning & maintenance.
Do not use water jet or steam cleaner for cleaning and do not push the appliance under the water as the parts will get wet and electric shock might be resulted.
Cleaning
- The exterior and interior surfaces can be cleaned with a damp
cloth and a little detergent.
- Racks can be removed and washed in water.
- Do not use water jet or steam cleaner for cleaning and do not push the appliance under the water.
- No any parts can be cleaned in the dishwasher.
- Clean the appliance regularly.
| Parts How to clean Remark | ||
| All accessories such as racks, rack holders, etc. | Soak in warm, soapy water for about 10 to 20 minutes.Rinse under running water thoroughly. | Dry all parts well at last. |
| External glass surfaces | Wipe clean with a soft cloth and a little neutral detergent. Make sure no water or moisture enters inside the of the appliance. | |
| Interior glass surfaces | Remove any food deposits.Wipe clean with a soft cloth and a little mild detergent. Make sure no water or moisture enters inside the of the appliance. | |
| Glass door | ||
Maintenance
- Check the operation of the appliance regularly to prevent problems that can cause serious accidents.
- As soon as you feel the appliance isn't working correctly or there is a problem, stop using the appliance, shut it off and contact the supplier.
Replacing the defective light
- ATTENTION! Always unplug the appliance from the electrical power outlet before replacement.
- Remove both screws on the side of the light cover
- Remove the old light and replace with a new one of the same type (not included). [Fluorescent tube 220-240V\~ /50Hz 11W]
- Reassembly the light cover.
- If you do not sure how to replace, contact the supplier/ service provider (See ==> Warranty).
Putting the appliance out of reach for a long period of time
- ATTENTION! Always unplug the appliance from the electrical power outlet.
- Remove all the food and beverage inside the appliance.
- Clean the appliance as described in Cleaning. (See ==> Cleaning).
- Store the appliance in a cool, clean place and keep out of reach of the children.
Troubleshooting
If the appliance does not function properly, please check the below table for the solution. If you are still unable to solve the problem, please contact the supplier/service provider.
| Problems Possible cause | se Possible solution | |
| The appliance does not start cooling after connect to electrical power supply and switch on (if included). | Thermal cut-out activated | Contact with the supplier/service provider for repair. |
| The compressor is defective. | ||
| The power plug is connected incorrectly with the power supply outlet. | Check the connection and make sure all the connections are correctly connected. | |
| The main ON/OFF switch is defective. | Contact your supplier. | |
| Cooling is not enough. | The appliance is under strong sunlight radiation or close to a heat source. | Move the appliance a new location to avoid direct sunlight. |
| The doors are not properly closed or the sealing gasket is defective. | Close the doors properly. | |
| Too much food is placed inside the appliance. | Place less food inside the appliance. | |
| Surrounding ventilation is insufficient. | Check that if sufficient ventilation is provided by allowing at least 10cm away from other objects or wall. | |
| Too much noise. The appliance is not placed horizontally. | Check to make sure the appliance is placed horizontally. | |
| The appliance touches surrounding wall or other objects. | ||
| There are some loose parts inside the appliance. | ||
Warranty
Any defect affecting the functionality of the appliance which becomes apparent within one year after purchase will be repaired by free repair or replacement provided the appliance has been used and maintained in accordance with the instructions and has not been abused or misused in any way. Your statutory rights are not affected. If the appliance is claimed under warranty, state where and when it was purchased and include proof of purchase (e.g. receipt).
In line with our policy of continuous product development we reserve the right to change the product, packaging and documentation specifications without notice.
Discarding & Environment
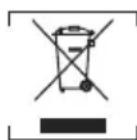
When decommissioning the appliance, the product must not be disposed of with other household waste. Instead, it is your responsibility to dispose to your waste equipment by handing it over to a designated collection point. Failure to follow this rule may be penalized in accordance with applicable regulations on waste disposal. The separate collection and recycling of your waste equipment at the time of disposal will help con-
serve natural resources and ensure that it is recycled in a manner that protects human health and the environment.
For more information about where you can drop off your waste for recycling, please contact your local waste collection company. The manufacturers and importers do not take responsibility for recycling, treatment and ecological disposal, either directly or through a public system.
DEUTSCH
(Pct. 233290, 233696)
(Fig. 4 de la pagina 4)
K. Sondă de decongelare
L. Sondă termostat
Ohutusalased erijuhised
- Klaasuks
- Ōhu imemine
PKS Hendi South East Europe SA
5 Metsovou Str.
18346 Moschato, Athens, Greece
Tel: +30 210 4839700
Email: info@pks-hendi.com
Hendi Polska Sp. z o.o.
ul. Firmowa 12
62-023 Robakowo, Poland
Tel: +48 61 658 7000
Email: info@hendi.pl
Hendi Italia S.R.L.
Via Leonardo da Vinci 4
39100 Bolzano (BZ), Italy
Tel: +39 800 727 438
Email: office.italy@hendi.eu
Hendi Food Service Equipment GmbH
Ehring 15
1208, 12/F Exchange Tower
33 Wang Chiu Road, Kowloon Bay, Hong Kong
Tel: +852 2154 2618
Email: info-hk@hendi.eu
Hendi Food Service Equipment Romania S.R.L.
https://www.linkedin.com/company/hendi-tools-for-chefs/
www.youtube.com/HendiEquipment
GB: Changes, printing and typesetting errors reserved.
- Safety instructions
- Special safety instructions
- Installing the appliance
- Electrical components and other dangers
- Intended use
- Grounding installation
- Main parts of the product
- (Fig.1 on page 3)
- Control panel
- (Fig.2 on page 3)
- Circuit diagram
- (Fig.3 on page 4)
- (Item 233290, 233696)
- (Fig.4 on page 4)
- Preparation before use
- Operating instructions
- • Digital temperature controller operation
- 1). Setting the temperature
- Note:
- 2). Illumination inside the cabinet
- 3). Refrigerant LED indicator
- 4). Defrost LED indicator
- Cleaning & maintenance
- Cleaning
- Maintenance
- Replacing the defective light
- Putting the appliance out of reach for a long period of time
- Troubleshooting
- Warranty
- Discarding & Environment
- DEUTSCH
- (Pct. 233290, 233696)
- (Fig. 4 de la pagina 4)
- Ohutusalased erijuhised
- PKS Hendi South East Europe SA
- Hendi Polska Sp. z o.o.
- Hendi Italia S.R.L.
- Hendi Food Service Equipment GmbH
- Hendi Food Service Equipment Romania S.R.L.
Brand : Arktic
Model : 233696
Category : Refrigerator