
CombiCool RF 60 - Fridge DOMETIC - Free user manual and instructions
Find the device manual for free CombiCool RF 60 DOMETIC in PDF.

| Brand | Dometic |
| Model | CombiCool RF 60 |
| Product type | Absorption refrigerator |
| Total volume | 61 L |
| Freezer compartment | No (0 L) |
| Power supplies | 12 V DC and 220-240 V AC (50/60 Hz) |
| Gas supply | Butane or propane (not natural gas) |
| Power consumption (DC) | 110 W |
| Power consumption (AC) | 110 W |
| Electrical consumption | 1.9 kWh/24 h (DC and AC) |
| Gas consumption (butane) | 17.5 g/h |
| Gas consumption (propane) | 13.5 g/h |
| Refrigerant | Ammonia (NH₃) and water (H₂O) |
| Net weight | Approximately 24 kg |
| Climate class | N (16 °C to 32 °C) |
| Maximum cooling | 30 °C below ambient temperature |
| Noise level | 0 dB (silent) |
| Defrost | Manual |
| Door reversal | Possible |
| Decorative door panel | Interchangeable |
| Door lock | Yes (for transport) |
| Delivery contents | Unit, AC connection cable |
| Warranty | Legal (see manual) |
Frequently Asked Questions - CombiCool RF 60 DOMETIC
User questions about CombiCool RF 60 DOMETIC
0 question about this device. Answer the ones you know or ask your own.
Ask a new question about this device
Download the instructions for your Fridge in PDF format for free! Find your manual CombiCool RF 60 - DOMETIC and take your electronic device back in hand. On this page are published all the documents necessary for the use of your device. CombiCool RF 60 by DOMETIC.
USER MANUAL CombiCool RF 60 DOMETIC
SK Absorpćná chladnicka
© 2024 Domatic Group. The visual appearance of the contents of this manual is protected by copyright and design law. The underlying technical design and the products contained herein may be protected by design, patent or pending patent. The trademarks mentioned in this manual belong to Domatic Sweden AB. All rights are reserved.
1
2
7

| DE, AT, CH, LU | I3B/P - 50 mbar |
| DK, FI, HU, NO, PL, SE | I3B/P - 30 mbar |
| BE, CZ, ES, FR, GB, IT, NL, PT, SK | I3±28 - 30/37 mbar |
DE, AT, CH, PL
Please read these instructions carefully and follow all instructions, guidelines, and warnings included in this product manual in order to ensure that you install, use, and maintain the product properly at all times. These instructions MUST stay with this product.
By using the product, you hereby confirm that you have read all instructions, guidelines, and warnings carefully and that you understand and agree to abide by the terms and conditions as set forth herein. You agree to use this product only for the intended purpose and application and in accordance with the instructions, guidelines, and warnings as set forth in this product manual as well as in accordance with all applicable laws and regulations. A failure to read and follow the instructions and warnings set forth herein may result in an injury to yourself and others, damage to your product or damage to other property in the vicinity. This product manual, including the instructions, guidelines, and warnings, and related documentation, may be subject to changes and updates. For up-to-date product information, please visit dometic.com.
Table of contents
1 Explanation of symbols 13
2 Safety instructions 14
3 Scope of delivery 19
4 Intended use 19
5 Technical description 21
6 Placing and connecting the device 22
7 Operation 25
8 Cleaning and maintenance. 29
9 Troubleshooting 31
10 Warranty 32
11 Disposal. 32
12 Technical data 33
1 Explanation of symbols

WARNING!
Safety instruction: Indicates a hazardous situation that, if not avoided, could result in death or serious injury.

CAUTION!
Safety instruction: Indicates a hazardous situation that, if not avoided, could result in minor or moderate injury.

NOTICE!
Indicates a situation that, if not avoided, can result in property damage.

NOTE
Supplementary information for operating the product.
2 Safety instructions
2.1 General safety

WARNING! Failure to obey these warnings could result in death or serious injury.
Electrocution hazard
- Do not operate the device if it is visibly damaged.
- If this device's AC power cable is damaged, it must be replaced by the manufacturer, customer service or a similarly qualified person in order to prevent safety hazards.
- This device may only be repaired by qualified personnel. Improper repairs can lead to considerable hazards.
Explosion hazard
- Do not store any explosive substances such as spray cans with a flammable propellant in the device.
Fire hazard
-
The refrigerant in the refrigerant circuit is highly flammable. In the event of any damage to the refrigerant circuit (smell of ammonia):
-
Switch off the device.
- Avoid naked flames and sparks.
Air the room well.
Health hazard
- Never open the absorber unit. It is under high pressure and can cause injury if it is opened.
-
This device can be used by children aged from 8 years and above and persons with reduced physical, sensory or mental capabilities or lack of experience and knowledge if they have been given supervision or instruction concerning use of the device in a safe way and understand the hazards involved.
-
Children shall not play with the device.
- Cleaning and user maintenance shall not be made by children without supervision.
- Children aged from 3 to 8 years are allowed to load and unload devices.
Risk of child entrapment
- Make sure that the shelves are mounted and secured so that children cannot lock themselves in the device.
-
Before disposing of your old refrigerator:
-
Dismantle the drawers.
- Leave the shelves in the refrigerator so that children cannot climb inside.

CAUTION! Failure to obey these cautions could result in minor or moderate injury.
Risk of injury
- Do not put your fingers into the hinge.
- Do not lean on the open device door.

NOTICE! Failure to obey these instructions may result in damage to the device.
- The lamp can only be replaced by the manufacturer, service agent or similarly qualified person to avoid hazard.
- Do not use a high-pressure cleaner near the ventilation grill when cleaning the vehicle.
- Attach the winter covers of the ventilation grille (accessories) when the vehicle is cleaned from the outside or not used for a prolonged period of time.
- The device is not suitable for transporting caustic materials or materials containing solvents.
- The insulation of the device contains flammable cyclopentane and requires special disposal procedures. Deliver the device at the end of its life-cycle to an appropriate recycling center.
- Keep the condensation opening clean at all times.
- Never immerse the device in water.
- Protect the device and cables against heat and moisture.
- The device shall not to be exposed to rain.
2.2 Placing and connecting the device safely

WARNING! Failure to obey these warnings could result in death or serious injury.
Fire hazard
- Ensure that the device circuit is not damaged during transportation.
- When positioning the device, ensure the supply cord is not trapped or damaged.
- Do not locate multiple portable socket-outlets or portable power supplies at the rear of the device.

NOTICE! Failure to obey these instructions may result in damage to the device.
Risk of overheating
- Always ensure sufficient ventilation so that the heat generated during operation can dissipate. Make sure that the device is sufficiently far away from walls and other objects so that the air can circulate.
- To enable the refrigerant to circulate properly, the device may not tilted by more than 3^ . Use a spirit level to make sure the device is level.
- Only hold the device at the body of the device during transport. Never hold the device at the absorber unit, the cooling fins, the gas pipes, the door or the control panel.
- Do not place the device near naked flames or other heat sources (heaters, direct sunlight, gas ovens etc.).
- Only use the AC connection cable supplied to connect the device to the AC mains.
- Ask your vehicle manufacturer if the battery management of your vehicle shuts down the devices to protect the battery.
- Put the device door and the ice compartment door into the winter position if you are not going to use the device for a longer period of time. This prevents mold from forming.
2.3 Operating the device safely

WARNING! Failure to obey these warnings could result in death or serious injury.
Electrocution hazard
- Before starting the device, ensure that the power supply line and the plug are dry.
- Disconnect the device from the power supply
- before each cleaning and maintenance
- after every use
Health hazard
- Please check if the cooling capacity of the device is suitable for storing the food you wish to cool.
- Only use the device where there is good ventilation.
- Only operate the device from a single energy source.
- Food may only be stored in its original packaging or in suitable containers.
- Opening the device for long periods can cause significant increase of the temperature in the compartments of the device.
- Clean regularly surfaces that can come in contact with food and accessible drainage systems.
- Store raw meat and fish in suitable containers in the device, so that it is not in contact with or can drip onto other food.
- If the device is exposed to a room temperature of below +10^ for an extended period of time, an uniform temperature cannot be guaranteed in the ice compartment. This can lead to an increase of the ice compartment temperature and the goods stored in it may defrost.
-
If the device is left empty for long periods:
-
Switch off the device.
- Defrost the device.
- Clean and dry the device.
- Leave the door open to prevent mold developing within the device.

CAUTION! Failure to obey these cautions could result in minor or moderate injury.
Risk of injury
- Close and lock the device door before beginning a journey.

- The cooling aggregate at the back of the device becomes very hot during operation. Protect yourself from coming into contact with hot parts when removing ventilation grills.
NOTICE! Failure to obey these instructions may result in damage to the device.
- Check that the voltage specification on the type plate corresponds to that of the energy supply.
- Only connect the device as follows:
- DC outlet: Only use cables with an appropriate cross section.
- AC outlet: Only use the AC cable supplied
- Never pull the plug out of the socket by the cable.
- If the device is connected to a DC outlet: Only select DC operation (battery mode) if you are using a battery monitor or if the alternator in your vehicle provides sufficient voltage.
- If the device is connected to a DC outlet: Disconnect the device or switch it off when you turn off the engine. Otherwise you may discharge the battery.
- Ensure that the ventilation openings are not covered.
- Do not use electrical devices inside the device unless they are recommended by the manufacturer for the purpose.
- Do not fill the inner container with ice or fluids.
- Only store heavy objects such as bottles or cans in the device door, in the vegetable compartment or on the bottom shelf.
2.4 Operating with gas safely

WARNING! Failure to obey these warnings could result in death or serious injury.
Explosion hazard
- Only operate the device at the pressure shown on the type plate. Only use pressure regulators with a fixed setting which comply with the national regulations. Use a pressure regulator with a fixed setting in accordance with DIN EN 16129.
Risk of asphyxiation
-
Operating the device with gas in an unventilated area will reduce the amount of oxygen in this area.
-
Do not operate the device with gas in unventilated areas such as enclosed premises, tents, motor vehicles, motor homes, caravans, ships, yachts, boots and truck cabs.
- Do not operate the device in rooms with a volume of less than 40m^3
- Never place the device near flammable materials (paper, dry leaves, textiles).
- Keep flammable objects away from the burner.
- Never store liquid gas cylinders in unventilated areas or below ground level (funnel shaped holes in the ground).
- Keep liquid gas cylinders away from direct sunlight. The temperature may not exceed 50^ .
-
Never use a naked flame to check the device for leaks.
If you smell gas: -
Close the gas supply cock and the valve on the cylinder.
- Do not press an electric switch.
- Put out any naked flames.
-
Have the gas system checked by a specialist.
-
Do not let the device operate unattended when in gas mode.

NOTICE! Failure to obey these instructions may result in damage to the device.
- Only use propane or butane gas (not natural gas).
3 S C O P E O F D
Quantity Description
1 Absorber device
1 AC connection cable
4 Intended use
The mobile refrigeration appliance is intended to be used in household and similar applications such as:
·Farmhouses
- Staff kitchen areas in shops, offices and other working environments
- Clients in hotels, motels and other residential type environments
- Bed and breakfast type environments
- Catering and similar non-retail applications
The device is suitable for:
Cooling, quick-freezing and storing food
Operation with DC power, AC power or gas
The device is not suitable for:
- Using as a built-in appliance
- Using in high-rise buildings, rooms below ground level, bathrooms and bedroom
Using in vehicles
Using in boats - Using in rooms with a volume of less than 40m^3 , e.g. room size of 4× 4m with a room height of 2.50m
- Using in not well-ventilated areas
Well-ventilated rooms are rooms with more than one air change per hour with windows and doors that are not joint-tight. The rooms must have at least one window that can be opened or a door that leads directly outside
- Storing medications
- Storing caustic substances or substances that contain solvents
This product is only suitable for the intended purpose and application in accordance with these instructions.
This manual provides information that is necessary for proper installation and/or operation of the device. Poor installation and/or improper operating or maintenance will result in unsatisfactory performance and a possible failure.
The manufacturer accepts no liability for any injury or damage to the product resulting from:
- Incorrect assembly or connection, including excess voltage
- Incorrect maintenance or use of spare parts other than original spare parts provided by the manufacturer
- Alterations to the product without express permission from the manufacturer
- Use for purposes other than those described in this manual
Domatic reserves the right to change product appearance and product specifications.
5 Technical description
The device is a refrigerator with absorption cooling. Ammonia is used as the refrigerant. All materials used are compatible for use with foodstuffs. The refrigerant circuit is maintenance-free.
5.1 Components
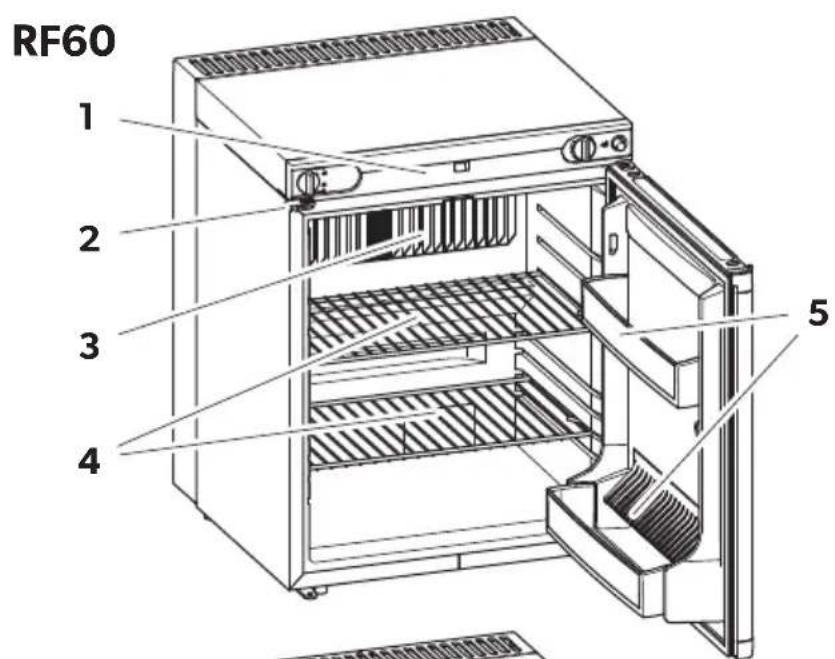
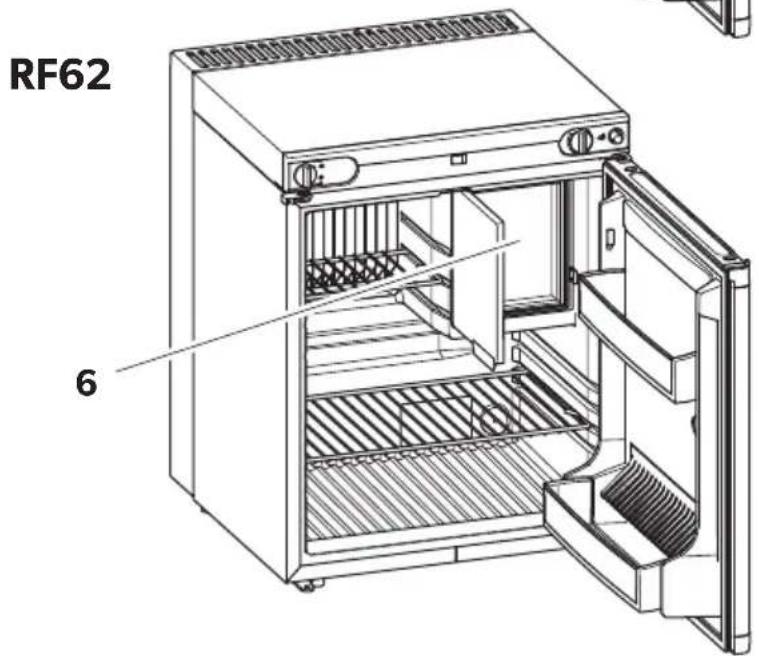
| No.in fig. 1, page 3 | Explanation | ||||
| 1 Operating panel | |||||
| 2 Door lock | |||||
| 3 Evaporator | |||||
| 4 | S | h | e | l | f |
| 5 Door inserts | |||||
| 6 Ice compartment (only RF62) | |||||
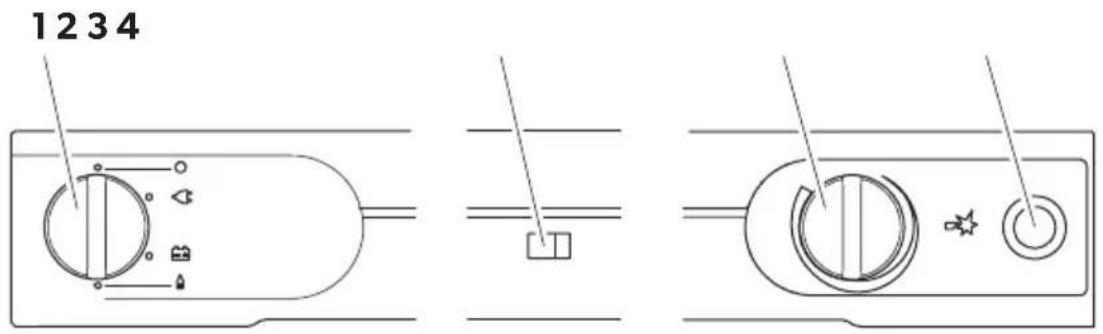
5.2 Operating panel
| No.in Description fig. 2, page 3 |
| 1 Energy selector switch |
| 2 Flame indicator |
| 3 Thermostat |
| 4 Ignition button |
Energy selector switch
| Symbol fig. 2, page 3 | Description |
| ○ | Off |
| AC operation | |
| DC operation | |
| Gas operation |
6 Placing and connecting the device
6.1 Instructions for placing the device
Observe the following when placing the device:
- Maintain at least 10mm clearance to the walls.
- Keep the ventilation openings clear of all obstructions to ensure a good ventilation.
Place the device on a level surface. Use a water level to check this.
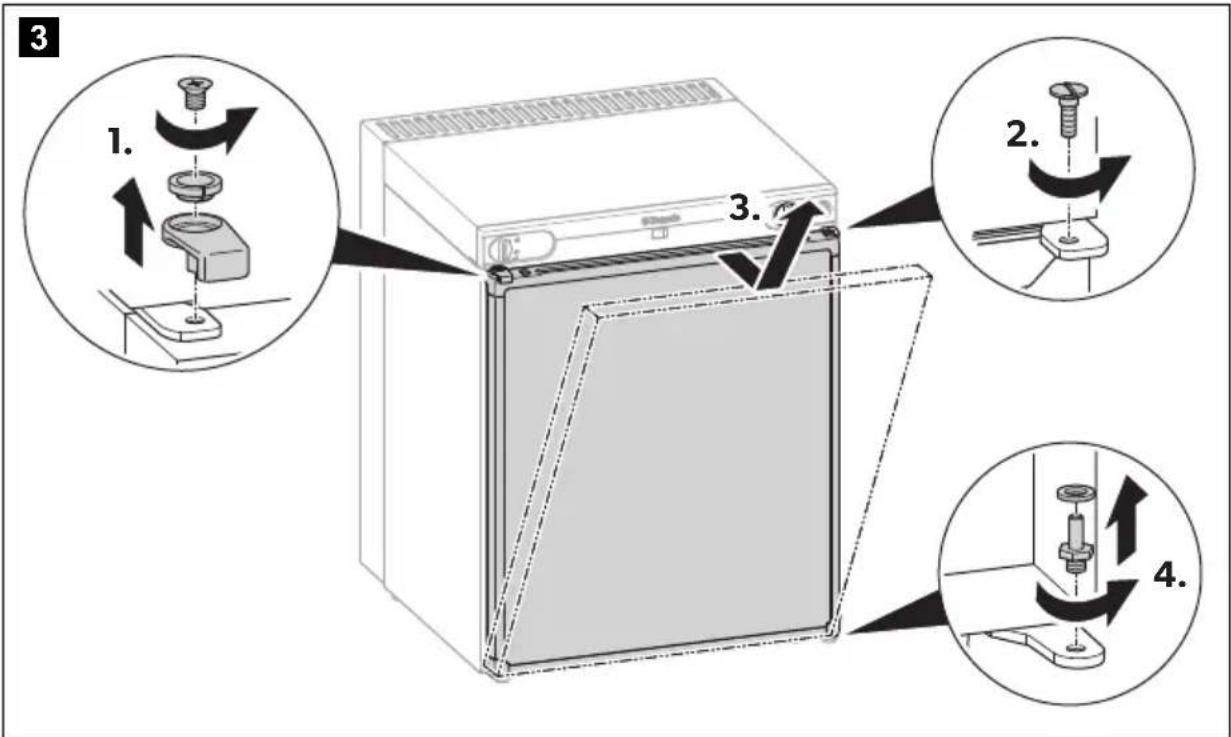
6.2 Changing the door hinge

WARNING! Electrocution hazard
Before performing any work on the device, unplug the power plug.
You can change the hinge of the door, so that it opens to the left rather than the right.
Proceed as shown to change the door hinge (fig. 3, page 4 to fig. 4, page 4).
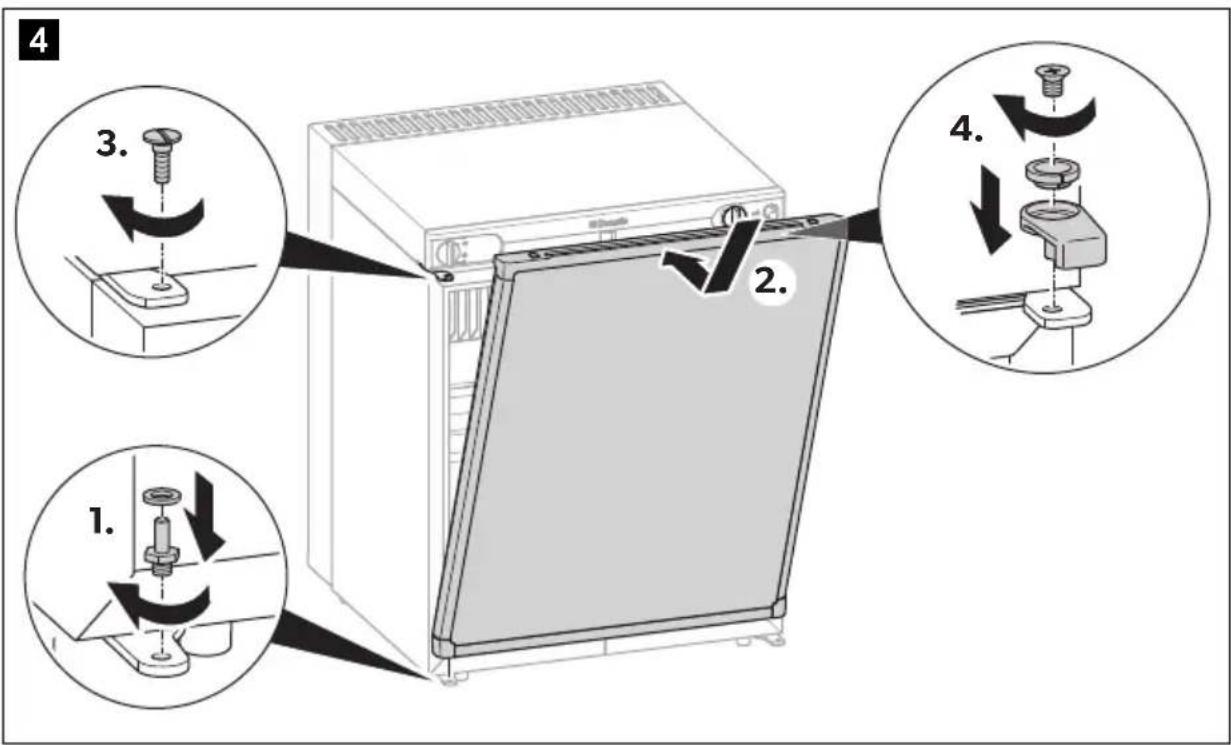
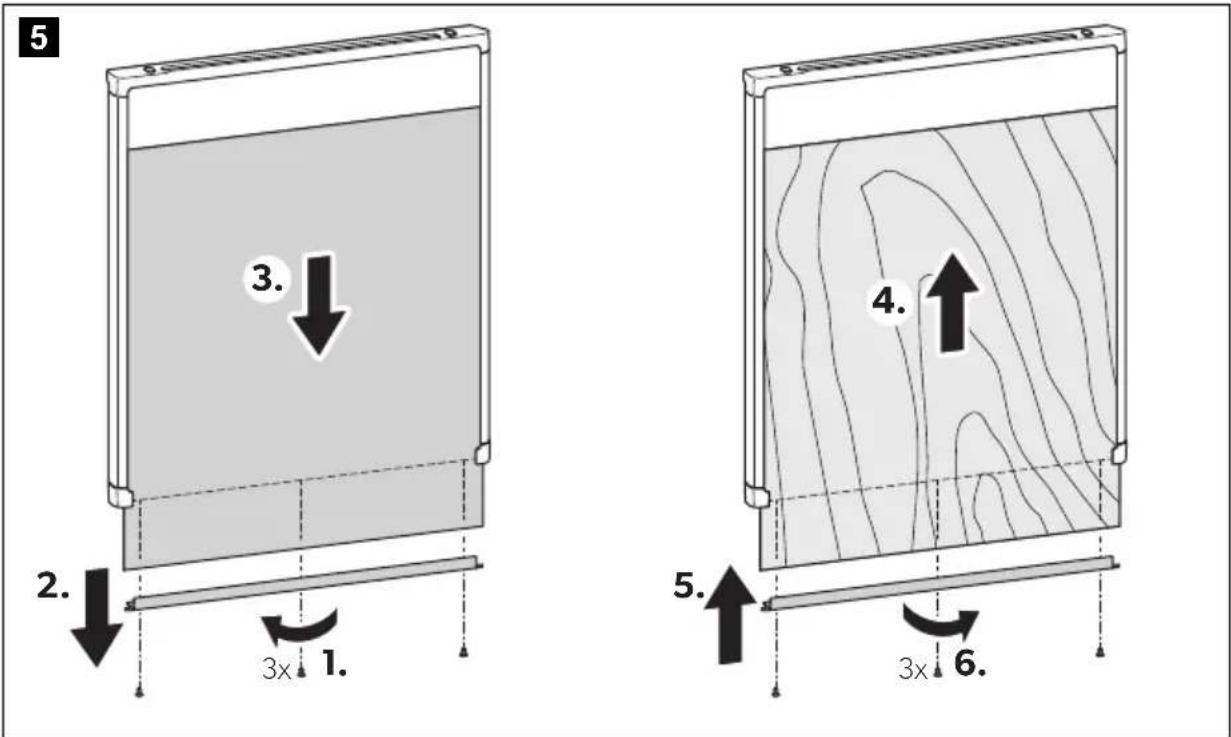
6.3 Replacing the door panel

WARNING! Electrocution hazard
Before performing any work on the device, unplug the power plug.
Proceed as shown to replace the door panel (fig. 5, page 5).
6.4 Connecting to an AC supply
- Check that the voltage specification on the type plate is the same as that of the power supply.
- Plug the AC connection cable into the AC mains.
6.5 Connecting to a DC supply

NOTICE! Damage hazard
- Make sure the polarity is correct when connecting to a terminal.
- To avoid voltage drops and loss of performance, keep the cable as short as possible and avoid joins. For this reason avoid additional switches, plugs or multi-way adapters.
- Disconnect the device and other electric loads from the battery before connecting the battery to a quick charging device. Over-voltage can damage the electronics of the device.
- Fit a fuse of at least 15 A to the positive connection.
-
If you connect the device to the vehicle power, remember that you may have to turn on the ignition to supply it with power.
-
Check that the voltage specification on the type plate is the same as the battery voltage.
- Determine the required cross section of the cable in relation to the cable length according to the following table:
| Cable length Cable cross section |
| ≤ 2.5 m 2.5 mm² |
| 2.5 m - 4.0 m 4.0 mm² |
| 4.0 m - 6.0 m 6.0 mm² |
- Connect the wires to a terminal block that is connected to the battery via a 15 A fuse.
- Install an isolating switch between both poles.
The minimum isolating distance between the two poles is 3mm
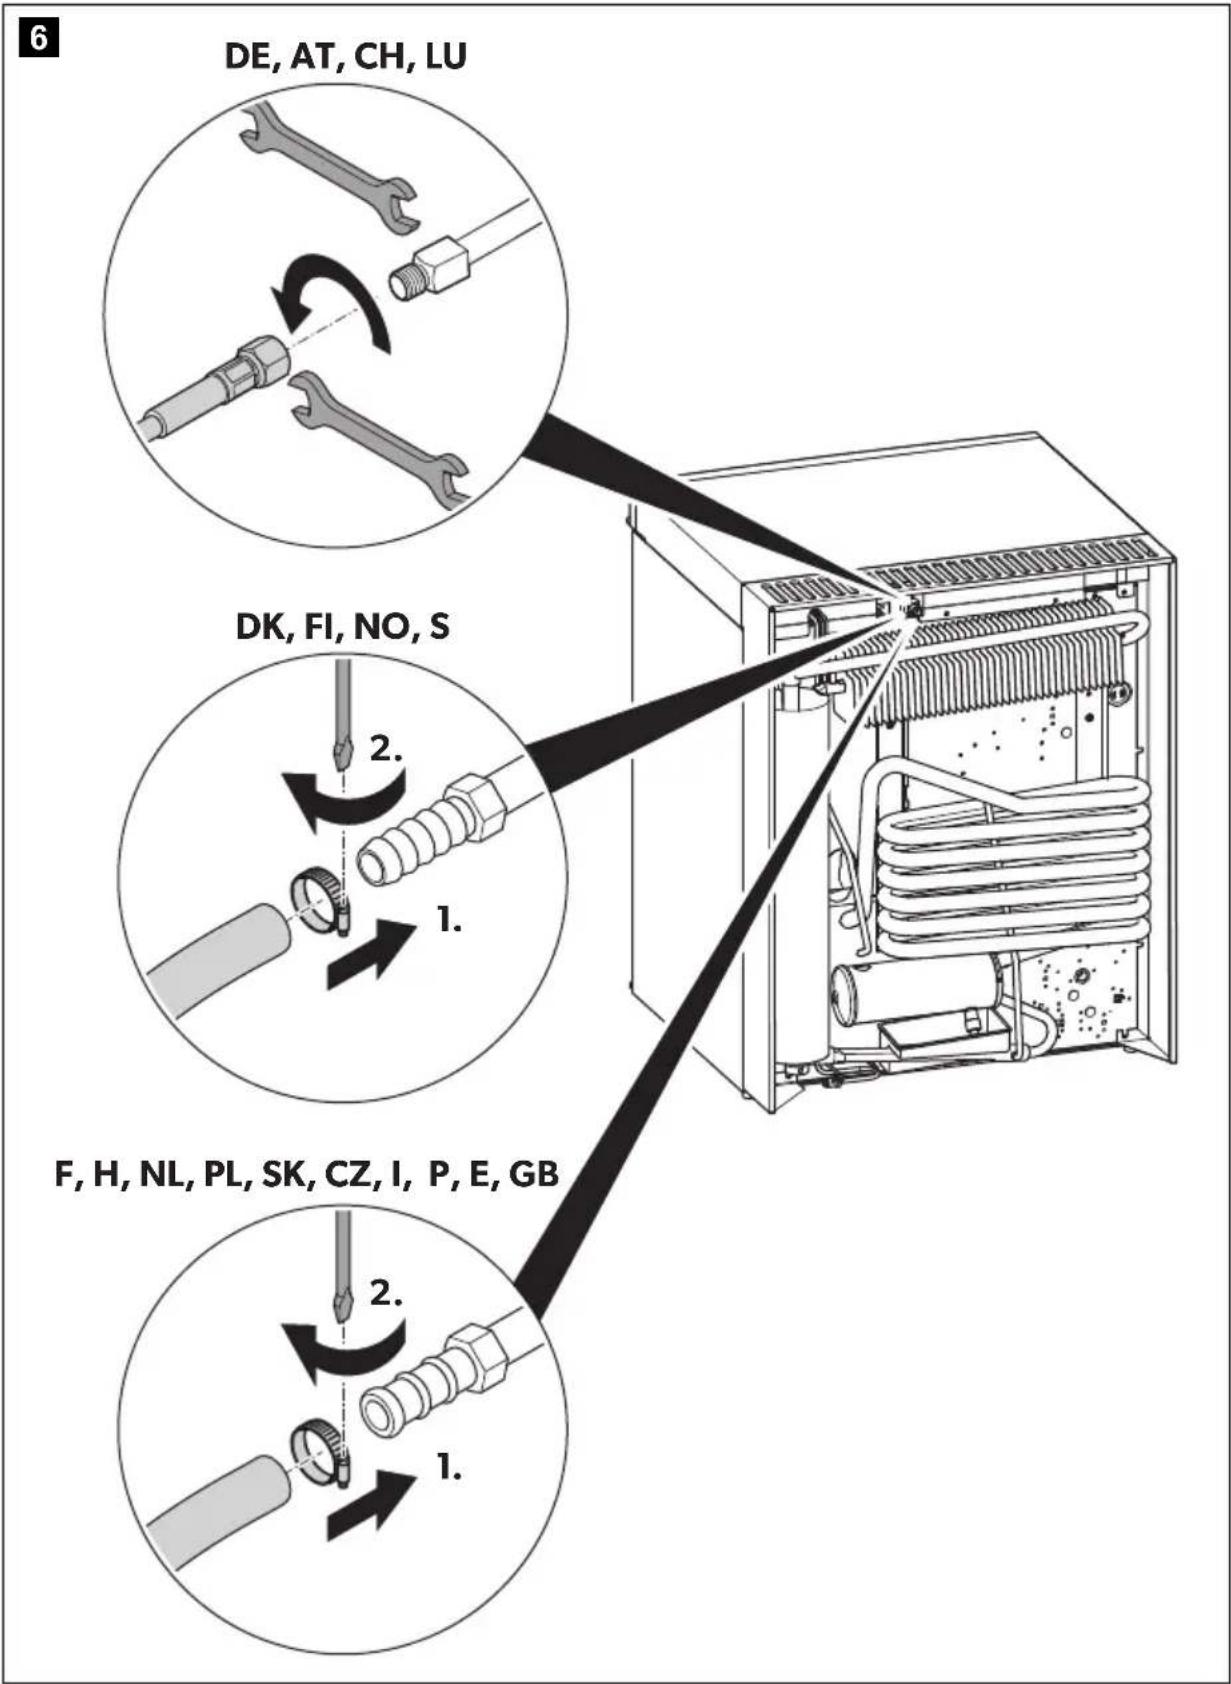
6.6 Connecting the device to a gas cylinder

WARNING!
This device may only be connected to the gas supply by a specialist in accordance with the applicable regulations and standards.

NOTICE! Damage hazard
- Only use cylinders of propane or butane gas (not natural gas or city gas) with an approved pressure reduction valve and suitable head.
- Observe the pressures which are permitted in your country. Use an approved pressure regulator with a fixed setting:
- The following applies for Europe: DIN EN 16129.
- The device may only be operated with hose lines in a perfect technical condition. Replace any porous or damaged hose lines.

NOTE
If the gas flame extinguishes the ignition control shuts off the gas supply.
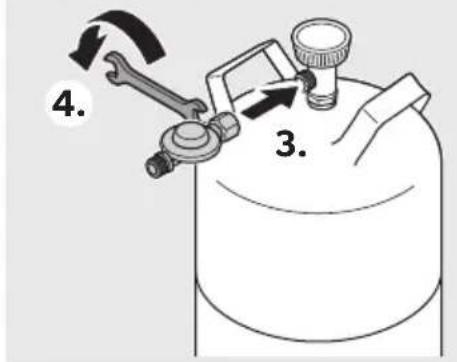
- Check that pressure specification on the type plate is the same as the pressure information on the pressure regulator on the propane or butane gas cylinder.
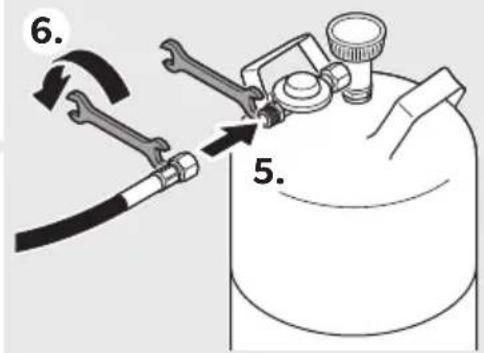
- Connect the device to the gas hose as shown (fig. 6, page 6).
- Connect the gas hose to the gas cylinder as shown (fig. 7, page 7).
After connecting the device to the gas supply
- Check the gas pipe for leakage at all the connection points (all threaded connections, hose connections with clamps, connection to the gas cylinder) using a foaming agent, e.g. soap.
- Perform a visual inspection of the hose (for cracks, weathering, damage).
7 O p e r a t i o n

NOTICE! Damage hazard
- Ensure that food or liquids in glass containers are not excessively refrigerated. Liquids expand when they freeze and can therefore destroy glass containers.

NOTE
- Before using the device for the first time, clean it inside and out with a damp cloth for hygienic reasons (see chapter "Cleaning and maintenance" on page 29).
- The cooling performance can be affected by:
- the ambient temperature
- the amount of food to be conserved
- how often the lid is opened.
- A few water drops may form inside the device if it has been cooling for a lengthy period. This is normal because the moisture in the air condenses to water when the temperature in the device falls. The device is not defective. Wipe it out with a dry cloth if necessary.
To avoid food waste, note the following:
- Keep temperature fluctuation as low as possible. Only open the refrigerator as often and for as long as necessary. Store the foodstuff in such a way that the air can still circulate well.
- Adjust the temperature to the quantity and type of the foodstuff.
- Store the different foodstuff types as shown in the figures.
- Foodstuff can easily absorb or release odor or taste. Always store foodstuff covered or in closed containers/bottles.
7.1 Saving energy
- Only open the refrigerator as often and for as long as necessary.
- Allow warm food to cool down first before placing it in the device to keep cool.
- Defrost your refrigerator as soon as a layer of ice forms.
- Avoid unnecessarily low temperature settings.
- For optimal energy consumption, position the shelves and drawers according to their position on delivery.
- On a regularly basis, make sure the door seal still fits properly.
- Clean dust and dirt from the condenser at regular intervals.
7.2 Using the device in DC mode

NOTE
- When the device is connected to the DC power socket the cooling level cannot be adjusted.
- Cool the device for about 24 hours before starting your journey using gas or electricity from the mains. This way your device will attain the required cooling level faster when you reach your destination.
Turning on the device (fig. 2, page 3)
Turn the energy selector switch (1) to the position.
The device starts cooling the interior.
Turning off the device
Turn the energy selector switch (1) to the O position.
The device is switched off.
7.3 Using the device in AC mode
Turning on the device (fig. 2, page 3)
- Turn the energy selector switch (1) to the position.
- Turn the thermostat (3) to the MAX position.
The device starts cooling the interior.
It takes about 1 h until the interior becomes noticeable cool. After approx. 5 h you can set the thermostat to a lower temperature.
To increase the cooling level, turn the thermostat (3) clockwise.
To decrease the cooling level, turn the thermostat (3) anticlockwise.
Turning off the device (fig. 2, page 3)
- Turn the energy selector switch (1) to the O position.
- Turn the thermostat (3) to the O position.
The device is switched off.
7.4 Using the device in gas mode
Turning on the device (fig. 2, page 3)
- Turn the energy selector switch (1) to the position.
- Open the gas supply at the gas cylinder.
- Turn the thermostat (3) to the MAX position.
- Press down the thermostat (3) and keep it pressed.
- After 10 s press the ignition button (4) several times, until the flame is lit.
- For devices with electronic ignition the ignition button (4) has to be kept down for some seconds. Due to air in the pipes, this may take more than 10 s when the device was out of operation for a longer time or when the gas cylinder was replaced.
- After ignition keep the thermostat (3) pressed for another 30 s.
- Release the thermostat (3).
The flame can be controlled by the flame indicator (2).
The device starts cooling the interior.
It takes about 1 h until the interior becomes noticeable cool. After approx. 5 h you can set the thermostat to a lower temperature.

NOTE
If the flame does not light up, repeat the ignition procedure after 1 min.
To increase the cooling level, turn the thermostat (3) clockwise.
To decrease the cooling level, turn the thermostat (3) anticlockwise.
Turning off the device
- Close the gas supply at the gas cylinder.
- Turn the thermostat (3) to the O position.
7.5 Positioning the shelves
Proceed as shown to position the shelves (fig. 8, page 8).
7.6 Locking the door
Proceed as shown to unlock the door (fig. 9, page 8).
Proceed as shown to lock the door for transport (fig. 10, page 9).
7.7 Defrosting the device

NOTICE! Damage hazard
- Never use mechanical tools to remove ice or to loosen objects stuck to the device.
- Never use heated devices or heaters to speed up the defrosting process.

NOTE
Over time, frost builds up on the cooling fins inside the device. If this layer of frost is about 5 mm thick, you should defrost the device.
- Disconnect the voltage and gas supply.
- Empty the device.
- Put a cloth in the compartment to absorb any excess water.
- Leave the door open.
- Wipe the compartment dry with a cloth.
7.8 Switching off and storing the device
If you intend to not use the device for a longer period, proceed as follows:
- Disconnect the voltage and gas supply.
- Clean the device (see chapter "Cleaning and maintenance" on page 29).
- Set the door lock in the ventilation position (fig. 11, page 9) to prevent odors from forming.
8 Cleaning and maintenance

WARNING! Electrocution hazard/Fire hazard
- Always disconnect the device from the mains before you clean and service it.
- Repair work and maintenance work on the cooling aggregate may only be carried out by an authorized repair center.

NOTICE! Damage hazard
Never use sharp cleaning agents or hard or pointed tools to remove ice or to loosen objects which have frozen in place.
Clean the device regularly and as soon as it becomes dirty with a damp cloth.
Make sure that no water drips into the seals. This can damage the electronics.
Wipe the device dry with a cloth after cleaning.
Check the condensate drain regularly.
Clean the condensate drain when necessary. If it is blocked, the condensate collects on the bottom of the device.
Changing the gas filter
Proceed as shown to change the gas filter (fig. 12, page 10).
Replacing the ignition battery
Proceed as shown to replace the ignition battery (fig. 13, page 11).
8.1 Cleaning the gas burner system

WARNING!
- Allow the burner to cool down before cleaning it.
- Do not modify the gas equipment.

NOTE
- Dirt in the gas burner is indicated by poor ignition or deflagrations.
- The manufacturer recommends cleaning the burner after the device has not been used for an extended period, and at least once a year.
- When using LPG the cleaning interval is reduced to half yearly or quarterly, depending on the level of dirt.
Proceed as shown to clean the burner (fig. 14, page 11).
9 Troubleshooting
| Problem Possible cause Suggested remedy | ||
| The device does not work. | The device has not been set up properly. | Check if the device is horizontal. Check if the ventilation of the device is sufficient. |
| The refrigerant circuit is defective. | This can only be repaired by an authorized repair center. | |
| In DC mode: The device is not working (plug is inserted). | No voltage is flowing from the DC power socket in your vehicle. | The ignition must be switched on in most vehicles to supply current to the DC power socket. |
| The vehicle fuse has blown. | Replace the vehicle fuse in the DC socket (usually 15 A) (Please refer to the operating manual of your vehicle). | |
| In AC mode: The device is not working (plug is inserted). | No voltage present in the AC socket. | Try using another plug socket. |
| In gas mode: The device is not working (to device is connected to the gas). | The device is not properly connected to the gas. | Check if the gas supply is in full working order. Check if the valve on the gas bottle is open. Check if there is still gas in the bottle. Check if several energy sources are connected at the same time. Hold down the temperature controller longer to ignite the flame. |
| The device does not start up after a long period of inactivity. | Disconnect the device from the power supply Turn it upside down and wait for 5 min. Turn the device the right way up again and switch it on again. | |
10 Warranty
The statutory warranty period applies. If the product is defective, please contact your retailer or the manufacturer's branch in your country (see dometic.com/dealer).
For repair and warranty processing, please include the following documents when you send in the product:
- A copy of the receipt with purchasing date
- A reason for the claim or description of the fault
Note that self-repair or non-professional repair can have safety consequences and might void the warranty.
11 Disposal

WARNING! Risk of child entrapment
Dismantle all device doors for the disposal of the old device and leave the shelves in the device to prevent accidental enclosure and suffocation of children.
Recycling packaging material

Place the packaging material in the appropriate recycling waste bins wherever possible.
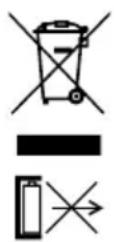
Recycling products with non-replaceable batteries, rechargeable batteries, or light sources

If the product contains any non-replaceable batteries, rechargeable batteries, or light sources, you don't have to remove them before disposal.
If you wish to finally dispose of the product, ask your local recycling center or specialist dealer for details about how to do this in accordance with the applicable disposal regulations.
The product can be disposed free of charge.
12 Technical data
| RF60 RF62 | ||
| Total volume 61 l | ||
| Capacity ice compartment - 5 l | ||
| Voltage 12 V- | 220 - 240 V~, 50/60 Hz | |
| Power consumption 110 W (DC) | 110 W (AC) | |
| Energy consumption 1.9 kWh/24 h (DC) | 1.9 kWh / 24 h (AC) | |
| Rated thermal loading 245 W (Butane) | 192 W (Propane) | |
| Gas consumption 17.5 g/h (Butane) | 13.5 g/h (Propane) | |
| Appliance category | I3B/P; I3B/P (50); I3+(28-30/37) | |
| Cooling capacity | Max. 30 °C below ambient temperature | |
| Climate class | N | |
| Intended ambient temperature use | 16 °C to 32 °C | |
| Noise emission | 0 dB | |
| Refrigerant | 357 g H2O + 168 g NH3 | 367 g H2O + 173 g NH3 |
| Dimensions (W x H x D) | See fig. 15, page 12 | |
| Weight | Approx. 24 kg | |
| Inspection/certification | CE UK CA | |
5 Description technique
| Comprimento do cabo Secção transversal do cabo |
| ≤ 2,5 m 2,5 mm² |
| 2,5 m - 4,0 m 4,0 mm² |
| 4,0 m - 6,0 m 6,0 mm² |
7.5 Positionar as prateleiras
Procede conforme ilustrado para instalar as prateleiras (fig. 8,网页 8).
7.6 Trancar a porta
| Lunghezza del cavo Sezione del cavo |
| ≤ 2,5 m 2,5 mm2 |
| 2,5 m - 4,0 m 4,0 mm2 |
| 4,0 m - 6,0 m 6,0 mm2 |
Risk for overhetting
| Kabelengde Kabeltverrsnitt |
| ≤ 2,5 m 2,5 mm² |
| 2,5 m - 4,0 m 4,0 mm² |
| 4,0 m - 6,0 m 6,0 mm² |
- Koble ledningene til en terminalblokk som er tilkoblet til batteriet via en 15 A-sik-ring.
- Installer en skillebryter mellom de to polene.
Minste isoleringsavstand mellom de to polene er 3mm
| Duljina kabla Presjek kabela |
| ≤ 2,5 m 2,5 mm² |
| 2,5 m - 4,0 m 4,0 mm² |
| 4,0 m - 6,0 m 6,0 mm² |
- Žice povežite s priključnicom koja je s akumulatorom povezana putem osigurača od 15 A.
- Ugradite izolacijski prekidač izmerodu oba pola. Najmanja udaljenost izolacije izmerodu dva pola iznosi 3 mm.
| ≤ 2,5 m 2,5 mm² |
| 2,5 m - 4,0 m 4,0 mm² |
| 4,0 m - 6,0 m 6,0 mm² |
| ≤ 2,5 m 2,5 mm² |
| 2,5 m - 4,0 m 4,0 mm² |
| 4,0 m - 6,0 m 6,0 mm² |
6 MoHTaxи CBbp3BaHe Ha ypeda
| Дылхина на ka6ILA Hanpeчно сеvelné на ka6ILA |
| ≤ 2,5 m 2,5 mm² |
| 2,5 m x 4,0 m 4,0 mm² |
| 4,0 m x 6,0 m 6,0 mm² |
- CbpxeTe npOBdHnUte KbM KneMHn8 6nOK, KOHTo e CbP3aH KbMaKymyNaTopa ue3 15 npedna3nten A.
4.МоNTирайTe ИЗОпраш превкючВаTeл мжду ДБаТа поюca. МИнмалноTo ИЗОпрашо pa3Стаяне мжду ДБаТа поюca e 3 mm.
6.6 Cbbp3BaHe ha ypeda KbM 6yTnIka c ra3

PNEyPExKdEHNIE!
To3n ypeD moxe da 6bde Cbbp3aH KbM 3axpaHbaHeTO c ra3 caMO OT cneuannCT B cbOTBeTCTBNE C npINOxIMTe pa3npoe6n I CTaNapTN.

BHIMAHHE! Onachoct ot nobpeda
- Изпождваши само 6утунки с ra3 пponан ини 6утан (He приroduен ra3 ини Meтан) с одобpen peduцр венти и похая за нава.
Cn3BaTe HnraHnTa, KOIO Ca pa3peHEn BbB BaHaTa DbpxaBa.
I3no3BaTe oO6peH perynaTOp Ha HnraHe C pIKcnpaHa
HaCTpoiKa: - 3a Ebpona ce npinara cneHoto: DIN EN 16129.
- YcTpoIcTBOTO MoKe Da pa6OTn cMo C MapKyuN B NeppeKTHO TexHInuecko CbCToRHe. 3aMeHeTe BCNUKn IOpEcTN INN NOBpeDeHN MApKyuN.

YKA3AHNE
Ako pIaMbKbT Ha ra3a yraChe, KOHTpOnbT Ha 3aIaIbAHeTO n3KIOUyBa IoJaBaHTo Ha ra3.
- Поберете дani спшикада на Налягото Вьрху ТINOBATA тбелka e sbшata kaTO Инсорmaц�а 3a Налягото Вьрху Perylnatopa на Налягото Ha ra3OBATA 6bytINKa 3a пponан Ип 6bytan.
- Cbpxte yctpoNCTBOTO KbM Mapkya 3a ra3, KaKTo e noka3aHo (pnr. 6, ctp. 6).
- Cbpxte Mapkya 3a ra3 KbM ra3OBata 6ytnka, KaKTo e NOKa3aHO (pnr. 7, ctp. 7).
Cnei cBbP3BaHe Ha ypeDa KbM 3aXpaHbaHeTo C ra3
- Побере ra3ОпрOBODa 3a TeчОBE BbB BCnUKN TOUKN Ha CBbp3BaHe (BCnUKN pe3-6OBN Bpb3KN, Bpb3KN Ha МарКУа СсСКОБИ, Bpb3Ka C ra3OBaTa 6yTInK), KaTo n3ПОЛ3ВATE NeHOO6pa3YBaш areHT, Hanp. canyH.
2.ИЗБьршeteВИЗуална поверкаHa МарКучa(3apyKHаTNH,aTMOСфернВПЯ- HNY,ПОВpeDi).
7 P a 6 o T a

BHIMAHHE! Onachoct ot nobpeda
- YBepTe ce, Ye xpaHaTa N HaNTKInTe B CTbKNeHn CbDOBe He ca CnH0 3aMpa3eHn. TeuHOCTte Ce pa3UnpRaT npN 3aMpb3BaHe n nopadi TOBa MOrAT Da pa3pyuata CTbKNeHn CbDOBe.

YKA3AHNE
- Праздддддддддддддддддддддддддддддддддддддддддддддддддддддддддддддддддддддддддддддддддддддддддддддддддддд徴пгнгнгнгнгнгнгнгнгнгнгнгнгнгнгнгнгнгнгнгнгнгнгнгнгнгнгнg" Ha CTp. 429).
- Eф ekTNBHOCTTа Ha OXnaxJaHTo MOxe Da 6bde NOBnHa OT: - Tempepatya Ta Ha OKONHaTa CpeDa - KOnIYeCTBOTo XpaHa, KoEtO Tp6Ba Da ce CbXpaHra Ba CbXpaHn - KOnKO YeCTO Ce OTBapr KaNaKbT.
B ypeMa MoT a Ce o6pa3yBaT HAKoNko BODH KApKn, aKO Ce n3PON3Ba IPObIgXHTeHNO. ToBa e HopMaHNo, Tb' KaTO BnAraTa BB Bb3Dyxa KOHdEHN3Ipa BbB BOda, KOraTo TempePaTypaTa B ypeDa CnaIHe. Toba He O3HaUaBa, ye ypeBt e DepeKeTeH. Ako e Heo6xOIMO, n36bpWeTe Cbc Cyxa KbPna.
3a da n36eHHeTe pa3BaIaHTo Ha xpaHITeHHn IpOdyKTH, ot6enExTe cneHOTO:
-
Избягайт e колков e Бьзмохно кoneбань в Temпература. OТварай Te xлдинда саю когato e Heo6xODIMO n He go Дрьжte OTbОpen. ПорpeждaiTe xpaHHTeHNTe npodukTn TaKa, Ye Bb3dUxbT da unrkynipa cBO6Odno.
-
HacrpoIte TempepaTypaTc npraMo Bnda N KOJIueCTBOTO Ha XpaHITeHNHTe npoDyKTI.
CbXpaHraBaIte pa3nUHHe BIDObe npOyKIn, KaKTo e NOKa3aHO Ha cnpyrnte.
XpaHnteHNHeIpoDyKTnMOraTdaNoEMaTnINDaN3PcKaT MInpN3Ma INn Bkyc. BnHaRn cBxpaHraBaIte XpaHnteHNHeIpoDyKTn NOKpNTu INn B 3aTBOpEHn CbdoBe/6ytunKn.
7.1Иконьня ha eheprna
- OTbaprTe XnAaHnHnKa cAmO KOraTo e Heo6XoHMo n He rO dpBXTe OTBOpEh.
OCTaBryTe ToPiHa XpaHa Da I3CTInHe npeDn Da JocTaNBe B OXJaXdaUHry UpeI.
Pa3Mpa3eTe XnAinHnKa BeHaRa Cne KaTo ce o6pa3yBa cNoi neI. - 1368BaIte HeHyxHo HAcTpoBaHe Ha HnCKa TempeaTypa.
3a onTmMaHa KOHcymaun Ha eHepn rnoCTabrTe nOnuTe N OTdeneHnra KaKTo ca 6nN noCTabeHn prn DOCTaBkata. - PeioBHO npOBepBaIe daIIyIbTHHeHneTo Ha BpaTata cyHKcIOHnpa npabINHO.
- PeIDOBHO NOUHCTBaIte npaxa H 3aMbpcraBaHHraTa OT OTBODHHTeHNHa KaHaJI.
CmHa Ha ra3OBnФHnTbp
Прдьнжete, КкTo e noka3aHo, 3a Да СмeHnte ra3OBnЯ ФиNTbp (ФИг. 12, Стp. 10).
CmHa Ha akymylaTopa 3a 3anaBaHe
PpOdbnXeTe, KaKTo e NOKa3aHo, 3a da CMeHnte aKymyNaTopa 3a 3anaBHe (pnr.13, ctp.11).
8.1 Повимстваносяtemа на га3овату ropелка

ПЕДУПЕХДЕHNE!
- OctaBeTe ropenkata Da ce OxnaDi, npeDi Da noHCTnte.
- He MoDInΦnIuPaIte Ra3OBoTo o6OpyIbAHe.

YKA3AHNE
- HaniyuTo Ha 3aMbpcBaHe Ha ra3ObTa rOpEnka ce npoBBA qpe3 NoIoo 3aapanBaHe INN KpaTKn 3aapanBaHn.
- ПОНЗВОДИТЕЛТ сьЮ ТаKa прелорьВа поисвае На горелКаТа, спед КATO урeding He e 6ин ИЗПОЛЗВан 3a прodelnxTeHEN nepINOД OT Врeme, И на-Малко Вedicн Гдшно.
- Пи ИЗПОЛЗВаHe Ha пирODEн ra3 ИНТЕРBAЛьТ Ha NOчИСТВaHe ce HaMaJIЯBa Do пОЛOBИн ГДИн ha INI TpIMeCEuH O B 3aBICUMOCT OT HIBOTO Ha 3aMbpcRABaHe.
PpOdbIxxeTe, KaTo e noka3aHo, 3a da nouchte ropeKkata (pnr. 14, ctp. 11).
9 OtrtpaHaBe Ha npo6JIeMn
PpO6IeM Bb3MOxHa npuHnHa PpeJnarHo peweHne
YcIpoNCTBOTO He pa6OTn.
YcTpoiCTBOTo He e NaCTpoEHO npaBnHNo.
PpOBepeTe daHn ypeBt exOpn-3oHTaJIeH.
PpOBepTe daHn BeHTnlaunrTa Ha ypeHa e DocTaTbUHa.
BepnataHaXnaHnna areHTe depeKTHa.
ToBa moXe da ce nonpaBn caMo OT OTOpN3npaH cepBn3.
B pexm Ha noctoHEn TOK:
UpeT He pa6OTn (Ie nCeT e noCTaBeH).
OT KOHTaKTa 3a NOCToRHeH TOK BbB BaWeToPpeBO3Ho CpeDCTBO HeTeue HApExeHne.
3anaBaeTo Tp6Ba Da 6bDe BKNIO-yeHO B NOeueTo PpeBO3Hn CpeDCTBa 3a NDoBaHe Ha TOK KbM KOHTAKTa 3a NOCTOReH TOK.
ByuohbHa aBTOMO6nna e n3ropan.
CmeHete npedna3ntenHa npeBO3HOTOCpeCTBO BrHe3dOTO 3a NOCTOReH ToK (o6nKHOBeHo 15 A) (MOJ, HapabTe CnpaBka CpbKOBOCTBOTO 3a EKCnNoatauHa BaWeTo npeBO3Ho cpeCTBO).
PpO6IeM Bb3MoXHa npuHnHa PpeIparaHo peSeHne
UpeT He pa6OTn (IeNcTbTe nOCTaBeH).
B pexm Ha ra3:
YpeBt He e npaBnHcBbP3aH KbM ra3a.
PpOBepTe daHn IOnaBaHeTo Ha ra3 e B nbHa n3npaBHOCT.
YpeabTHe pa6OTn
(yctpoNCTBOTO e Cbbp3aHO c ra3Ta).
PpOBepeTe DaIIN BeHTnIbT Ha 6yTNkata 3a ra3 e OTBopeH.
PpOBepeTe daHn B 6yTnKata BCE Oue mMa ra3.
PpOBepTe daHn HAKoNk O3TOU-HNa Ha eHepnca Cbbp3aHneHOBpeMeHHO.
3aIpbxTe peryIaTopa Ha Temnepa-Typata NO-DbIro, 3a Da 3aIaNITe PIIaMbka.
YpeBt He ce cTapTnpa CneI DbIbI nepNoI Ha HeaKTHBHOCT.
-→ N3KJIIOUeTe ypeDa ot 3axpaHbAHeTo
O6bpHeTe ro c rnaBaTa HaOny n 3yaKaIte 5 MNHyTn.
3aBbptete OTHOBO ypeHaHaJCHO nTO BKNIOUte OTHOBO.
10 rapaHcna
Baxn rapaHcnoHnT cpoK, onpeJeH e 3akOHa. Ako npOdykTBe deqekTeH, moJcBbpxTe ce c TbproBeua nIi C qHnnaHa ha npOn3BODnteY BbB BaWata cTpaHa (Bnxdomatic.com/dealer).
3a o6pa6oTkata Ha rapaHcHra Ta n peMOHTa, MoJ npInOxTe cneHNte DOKymeHTN, KOrato n3npaate npodykta:
- Konnie ot φaKTypata C dAta Ha NOKyKNKaTa
- Пиунна за петенцята ил описné на деске
Ot6eTeXete, ye camopbueH nn He npocceNoHaen peMOHT MOKe IMa nocneICTBn 3a 6e3oNaChocTt a n da anynpa rapaHunra.
11 N3xBbPJIHe

ПЕДУПЕХДECHNE! Рск OT заклошвае на дete
ДемонтураитЕ BCИЧКВрати Ha урета 3a ИЗVBьрЯне Ha CTаря урети OCTавete paФТOBETe Bурета, 3a Да пpeДOTВратиTe спчайно 3aТВаряпи 3адушаванe Ha Deцa.
PeuzknpaHe Ha onaKobbHnTe MaTepnann

IIO Bb3MOXHOCT npdaaTe ONaKOBKaTa 3a peuNKnupaHe.
Ipoodyktn 3a peuzklnpahe c He3amehyeMn 6aTePnn, npe3apexkaemn 6aTePnn Nn N3TOUHnHa Ha CBetTnHa
Ako npOdykTBcBbpxa He3aMeHReMn 6aTePnN, npe3apexJaemn 6aTePnN INI IN3TOUHNi Ha CBeTnHa, He e Heo6xoDnMo Da rN OTCTpaHraBe, npeIN da IN3XbPnITE npOdykTa.
Ako nCKaTe OKOHaTeJIHO da N3XbPnIte npOdyKta, NOIHTaIe MeCTHna CEHTbp 3a peUKNipapHe nn CneuaN3npaH dInbp 3a noDpo6HoCTn KaKTobA da Ce N3BbPnB CbOTBETCBnE C BaIIINHnTE npEINsCaHn.
PpoaykTbT MoKe da 6bde n3XbbpneH 6e3nnaTHO.
12 TexHnueckn daHHN
| RF60 RF62 | ||
| Оьш обем 61 I | ||
| Калачтет на одениeto за лед - 5 I | ||
| Напожения 12 V--- | 220-240 V~, 50/60 Hz | |
| Консушия на[eнера] 110 W (постянен Tok) | 110 W (поменлв ТOK) | |
| Енераотременце 1,9 кWh/24ч | (постянен Tok) | |
| 1,9 кWh/24ч (поменлв ТOK) | ||
| Номинанно топлино натоварвае | 245 W (6утан) | |
| 192 W (празан) | ||
| Консушия на газ 17,5 g/h (6утан) | 13,5 g/h (празан) | |
| Кaterория на урEDA I | 3В/P; 13В/P (50); 13+(28-30/37) | |
| Охадиейна мошист Мaksимум 30°С под okолна темпегатура | 30°C под okолна темпегатура | |
| Климатunic専knac | N | |
| Пробъединения okолна Temпега-tура на урOTpe6a | 16°C до 32°C | |
| Емиси на shum | 0 dB | |
| Хлadiлен arent | 357 g H2O + 168 g NH3 | 367 g H2O + 173 g NH3 |
| Разmersи (Лш x В x Д) | Вижты диг. 15,ст. 12 | |
| Тер lo Прибл. 24 kg | ||
| Инсан某一/сертофицраpane | CE UKCA | |
6.1 Seadme paigutamise juhised
Seadme paigutamisel pidage silmas jargmist.
7.5 Riiulite paigutamine
| Vada garums Vada škèresgriezums |
| ≤ 2,5 m 2,5 mm² |
| 2,5–4,0 m 4,0 mm² |
| 4,0–6,0 m 6,0 mm² |
- Pievienojiet vadus akumulatoram pieslegtajam spailu blokam, izmantojot 15 A drosinataju.
- Starp abiem poliem uzstadiet slodzes atdalitaju. Minimala atdalitaja kontaktatstarpe starp poliem ir 3 mm.
6.6 lerices pievienošana gazes balonam

BRIDINAJUMS!
dometic.com/sales-offices