
SC3, SC 3 EASYFIX, SC3 EASY FIX - Steam cleaner KARCHER - Free user manual and instructions
Find the device manual for free SC3, SC 3 EASYFIX, SC3 EASY FIX KARCHER in PDF.



| Product type | Steam cleaner |
| Brand | KARCHER |
| Model | SC3, SC 3 EASYFIX, SC3 EASY FIX |
| Power supply | 220-240 V, 1~50-60 Hz |
| Heating power | 1900 W |
| Maximum working pressure | 0,35 MPa |
| Heating time | 30 seconds |
| Continuous steam output | 40 g/min |
| Maximum steam output | 100 g/min |
| Water tank capacity | 1,0 L |
| Weight (without accessories) | 3,2 kg |
| Dimensions (L × l × H) | 360 × 236 × 252 mm |
| Protection class | I |
| Protection rating | IPX4 |
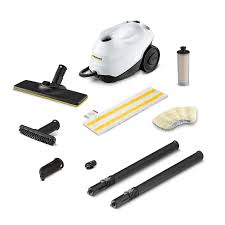
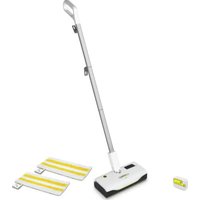
| Included accessories | Steam gun, steam hose, jet nozzle, 3 round brushes, power injector, manual nozzle, sponge and microfiber cover, 2 extension tubes, floor nozzle with sponge and microfiber mops, descaling cartridge |
| Main functions | Steam output adjustment (3 positions), child safety lock, water shortage detection, integrated descaling cartridge, automatic shut-off in case of overheating, cartridge replacement indication |
| Maintenance and cleaning | Regular replacement of the descaling cartridge; washing mops and covers at 60 °C without fabric softener; drain the tank if not used for an extended period (2 months) |
| Safety | Pressure regulator, safety fuse, child safety lock on the steam selector, dry run protection for the pump |
| Spare parts and repairability | KÄRCHER spare parts available; warranty according to country conditions; authorized after-sales service |
| General information | Household use only; steam cleaning without detergent; suitable for washable floors, windows, textiles, hard surfaces; do not use on unvarnished parquet |
Frequently Asked Questions - SC3, SC 3 EASYFIX, SC3 EASY FIX KARCHER
User questions about SC3, SC 3 EASYFIX, SC3 EASY FIX KARCHER
0 question about this device. Answer the ones you know or ask your own.
Ask a new question about this device
Download the instructions for your Steam cleaner in PDF format for free! Find your manual SC3, SC 3 EASYFIX, SC3 EASY FIX - KARCHER and take your electronic device back in hand. On this page are published all the documents necessary for the use of your device. SC3, SC 3 EASYFIX, SC3 EASY FIX by KARCHER.
USER MANUAL SC3, SC 3 EASYFIX, SC3 EASY FIX KARCHER
Description of the Appliance EN 5
Quick Reference EN 6
Effect descaler and adjustment of water hardness. EN 6
Operation. EN 7
How to Use the Accessories EN 8
Care and maintenance EN 9
Troubleshooting EN 9
Technical specifications. EN 10
General information

Please read these original operating instructions and the enclosed safety instructions prior to the initial use of your device. Proceed accordingly. Keep both booklets for future reference or subsequent owners.
structions prior to the initial use of your device. Proceed accordingly. Keep both booklets for future reference or subsequent owners.
Use the steam cleaner only for private households. The appliance is intended to be used with steam and can be used with the appropriate accessories as described in these operating instructions. You will not need any detergent. Please adhere to the safety instructions.
Use the steam cleaner only for private households. The appliance is intended to be used with steam and can be used with the appropriate accessories as described in these operating instructions. You will not need any detergent. Please adhere to the safety instructions.
The packaging material can be recycled. Please do not place the packaging into the ordinary refuse for disposal, but arrange for the proper recycling.

The packaging material can be recycled. Please do not place the packaging into the ordinary refuse for disposal, but arrange for the proper recycling.

Old appliances contain valuable materials that can be recycled. Please arrange for the proper recycling of old appliances. Please dispose your old appliances using appropriate collection systems.
Electrical and electronic devices often contain components which could potentially pose a danger to human health and the environment if handled or disposed of incorrectly. However, these components are necessary for the proper operation of the device. Devices marked with this symbol must not be disposed of with regular household rubbish.
Notes about the ingredients (REACH)
You will find current information about the ingredients at: www.kaercher.com/REACH
Scope of delivery
The scope of delivery of your appliance is illustrated on the packaging. Check the contents of the appliance for completeness when unpacking.
In the event of missing accessories or any transport damage, please contact your dealer.
Spare parts
Use only original KARCHER spare parts. You will find a list of spare parts at the end of these operating instructions.
Warranty
The warranty terms published by the relevant sales company are applicable in each country. We will repair potential failures of your appliance within the warranty period free of charge, provided that such failure is caused by faulty material or defects in manufacturing. In the event of a warranty claim please contact your dealer or the nearest authorized Customer Service centre. Please submit the proof of purchase. (See address on the reverse)
Safety Devices
CAUTION
Safety devices protect the user and must not be modified or bypassed.
Pressure controller
Should excessive pressure occur in case of an error, a safety valve ensures the release into the environment.
Fuse
Should the device be in danger of overheating, the fuse disconnects the device from the mains.
If the fuse or the safety valve responds in case of an error, please contact the competent KÄRCHER customer service.
Description of the Appliance
-> Illustrations on fold-out page 4!

A1 Descaler cartridge A2 Filling hole for water A3 Carrying handle A4 Holder for accessories A5 Display a Indicator lamp (green) - line voltage is on Indicator light (red) - water shortage c Indicator light (red) - replace descaler cartridge d RESET button - set water hardness A6 Switch - ON A7 Switch-OFF A8 Storage holder for floor nozzle A9 Running wheels (2 ea.) A10 Mains cable with mains plug A11 Steering roller B1 Steam gun B2 Unlocking button B3 Selector switch for the steam volume (with child protection) B4 Steam lever B5 Steam hose C1 Detail nozzle C2 Round brush Black C3 Round brush Red C4 Power nozzle C5 Round brush Large D1 Hand nozzle D2 Terry cloth cover D3 Microfibre cloth cover
E1 Extension tubes (two tubes) E2 Unlocking button F1 Floor nozzle F2 Retaining clip F3 Terry floor cloth F4 Microfibre floor cloth
Quick Reference
-> Illustrations on Page 2 Illustration 1 -> Insert the descaler cartridge into the opening and push it until it is tightly fitted. Illustration 2 -> Fill the water tank with a maximum of 1 litre of fresh tap water. Illustration 3 Plug in the mains plug. -> Press the ON switch to turn on the appliance. Illustration 4 Indicator lamp glows green. The device is ready for use after approx. 30 seconds. Illustration 5 Set water hardness prior to first use.
ATTENTION
In order to guarantee the optimum functionality of the descaler cartridge, the device must be set to the local water hardness prior to the first operation.
Further information concerning the device setting can be found in Chapter "Effect descaler cartridge and setting of water hardness".
Illustration 6
Connect the accessories to the steam gun. -> Operate steam lever.
Effect of descaler and adjustment of water hardness
Effect of descaler cartridge
ATTENTION
Only work with a cartridge inserted.
As soon as the device is filled with water and is taken into operation, the descaling effect of the cartridge is activated. Lime contained in the water is absorbed by the granules in the cartridge. This prevents the calcification of the device. An additional device descaling is thus not required.
Note
The granules in the cartridge can change their colour after contact with water; this is related to the mineral content in the water. This discolouration is harmless and does not have any negative effects on the device, cleaning work or the functionality of the cartridge.
Water hardness levels and flashing impulses
Note
The hardness of the tap water can be inquired at your water management office or the municipal utilities.
| Degree of hardness | ° dH | mmol/l | Number of flashing impulses | Interval of flashing impulses | |
| I | soft | 0-7 | 0-1,3 | 1x | 4 seconds |
| II | medium | 7-14 | 1,3-2,5 | 2x | |
| III | hard | 14-21 | 2,5-3,8 | 3x | |
| IV | very hard | >21 | >3,8 | 4x | |
Setting of the water hardness
ATTENTION
In order to guarantee the optimum functionality of the descaler cartridge, the device must be set to the local water hardness prior to the first operation.
This is done via the RESET button.
Notes
The device is set to the highest water hardness level (level IV) by default. After the water hardness setting is completed, it remains saved until a new setting (e.g., after relocation) is necessary. During the setting, no pause of more than 15 seconds may take place. Otherwise, the device is automatically set to the water hardness selected last or the highest water hardness with initial start-up.
Please observe the following procedure:
Connect the mains cable to the power supply system. The device must be switched off prior to the setting. Push the RESET button and hold it down during the start-up of the device. After 2 seconds, the indicator light blinks and signals the current setting of the water hardness via the number of impulses. By repeatedly pressing the RESET button, the setting of the water hardness level changes. As long as the RESET button is pressed, the flashing impulse for the relevant water hardness level is not shown. As soon as the button is released, the flashing impulse appears for the output of the selected water hardness. If the water hardness is set to the desired level, hold down the RESET button for 3 seconds so that the setting is saved. The saving process is displayed by the lighting up of the indicator light for the water hardness.
ATTENTION
If the device is used in another area with a different water hardness (e.g., after relocation), the water hardness must be reset.
Operation
Illustrations on fold-out page 3!

Assemble the appliance
Illustration A
Insert steering roller and running wheels and lock them.
Illustration B
Illustration C
Connect the required accessories (see Chapter "How to use the accessories") to the steam gun. Insert the open end of the accessory on the steam gun and push onto the steam gun until the unlocking button of the steam gun locks into place.
Illustration D
Use the extension tubes if necessary. To do so, connect one or both extension tubes to the steam gun. Insert the required accessories on the free end of the extension tube.
Removing the Accessories
Move the selector switch for the steam volume back (steam lever locked).
Illustration E
To detach the accessory parts, press the unlocking button and pull the items apart.
Filling the Water Reservoir
The water reservoir may be refilled at any time.
ATTENTION
Do not use condensation water from the drier! Do not fill with detergent or other additives (for example fragrances)!
Fill the water tank with a maximum of 1 litre of fresh tap water.
Turning on the Appliance
ATTENTION
In order to guarantee the optimum functionality of the descaler cartridge, the device must be set to the local water hardness prior to the first operation. Further information concerning the device setting can be found in Chapter "Effect descaler cartridge and setting of water hardness".
Place the unit securely on a firm surface. Insert the mains plug into a socket. Press the ON switch to turn on the appliance. Indicator lamp glows green. The device is ready for use after approx. 30 seconds.
Note
During the first steaming after removal and reinserting the cartridge the blast of steam can still be a little weak. The device requires a short break-in period, as the cartridge has to be filled with water first. This is why the steam discharge is unsteady at first and single water drops may exit. The amount of escaping steam increases continuously until the maximum amount is reached after approx. 30 seconds.
Refilling Water
In case of a water shortage in the water tank, the water shortage indicator light is continuously on.
Fill the water reservoir.
The descaler cartridge remains fixated in the device.
Notes
Fill in the water via the lid of the descaler cartridge. This way a steady steam output is always guaranteed. As soon as the water tank is filled with water again, the red indicator light goes out. The device is equipped with a dry run protection for the pump. Should the pump run dry for a longer period of time, e.g. because of an incorrectly installed cartridge, the pump switches off and the indicator light for water shortage flashes red. In order to operate the device again, the device must be switched off and back on. In the process it must be ensured that the cartridge is inserted correctly and there is enough water in the water tank.
Adjusting the Steam Quantity
Use the selector switch for the steam volume to regulate the discharged steam. The selector switch has three positions:
| Maximum steam volume |
| Reduced steam volume |
| No steam - child protection Note: In this lever position, the steam lever cannot be used. |
Set selector switch to the required steam volume. While operating the steam switch, always direct the steam gun at a separate piece of cloth until the steam is emitted evenly.
Interrupting operation
If the device is not used for more than 20 minutes, please switch off the device for energy conservation purposes. Press the OFF switch to turn off the appliance.
Turning Off the Appliance
Illustration 6
Press the OFF switch to turn off the appliance. Disconnect the mains plug from the socket.
Illustration H
Push the steam switch until steam discharge stops. Now, the boiler of the appliance is unpressurized. Then move the child protection unit toward the back (steam lever locked).
ATTENTION
If the device is not used for a longer period of time (approx. 2 months), please empty the water tank. This avoids decomposition of the water.
Illustration K
Completely empty the water tank to remove existing water.
Storing the Appliance
Illustration 1
Illustration J
Put the extension pipes into the large accessory compartments. Insert the manual nozzle and detail nozzle onto each extension pipe. Attach the big round brush to the small detail nozzle. Put the small round brush and nozzles into the medium accessory compartment. Hook the floor nozzle into the parking position. Wrap the steam hose around the extension pipes and insert the steam pistol into the floor nozzle.
How to Use the Accessories
Important application instructions
Cleaning floor surfaces
It is recommended to sweep or vacuum the floor prior to using the steam cleaner. This way, the floor is already cleared of dirt/loose particles prior to the wet cleaning.
Refreshing textiles
Prior to treatment with the steam cleaner, always check the reaction of the textiles in an inconspicuous location: Steam at first, then let dry and then check for colour or shape changes.
Cleaning of Coated or Lacquered Surfaces
When cleaning painted or plastic-coated surfaces, as found on kitchen and living room furniture, doors, parquet; wax, furniture polish, plastic surfaces or paint can come loose or stains can be created. When cleaning these surfaces, briefly steam a cloth and wipe the surfaces with it.
ATTENTION
Never direct the steam jet at glued edges as the edge band may loosen. Do not use the steam cleaner on unsealed wooden or parquet floors.
Cleaning of Glass
In case of low outside temperatures, especially in the winter, warm up the window pane by slightly steaming the entire glass surface. This will prevent tensions on the surface which might lead to glass breakage.
Then clean the window surface with the hand nozzle and attachment. Use a squeezegee to remove the water or wipe the surfaces dry.
ATTENTION
Do not direct steam onto the sealed locations of the window frame to prevent damage.
Steam gun
You can use the steam gun without any additional accessories, e.g.:
to remove light wrinkles from hanging clothes by steaming them at a distance of 10 to 20 cm, to remove dust from plants. Here, keep a distance of 20-40 cm for moist dusting, by briefly steaming the cloth and wiping the furniture with it.
Detail nozzle
The closer this nozzle is to the contaminated area, the higher the cleaning effect, as the temperature and the steam are highest at the nozzle output. Especially suited for cleaning difficult access locations, joints, fittings, drains, sinks, toilets, blinds and heaters. Heavy lime scale can be drenched in vinegar prior to steam-cleaning. Let the vinegar penetrate for about 5 minutes.
Round brush (small)
The round brush can be installed onto the detail nozzle as an accessory. Attached brushes can therefore be used to remove heavy soiling.
ATTENTION
Not suitable for cleaning sensitive surfaces. Illustration C
Attach the round brush to the detail nozzle.
Power nozzle
The power nozzle can be installed onto the detail nozzle as an accessory.
The power nozzle increases the emission speed of the steam. Therefore, it is well-suited for cleaning very tough dirt, blowing out corners, grooves, etc.
Illustration C
Attach the power nozzle to the detail nozzle according to the round brush.
Round brush (big)
The round brush can be installed onto the detail nozzle as an accessory. This round brush allows to clean large rounded surfaces (e.g. sink, shower tray, bathtub, kitchen sink).
ATTENTION
Not suitable for cleaning sensitive surfaces.
Illustration C
Attach the round brush to the detail nozzle.
Hand nozzle
Illustration B
Install hand nozzle on steam gun.
Pull the cloth cover over the hand nozzle. Especially well-suited for small washable areas, shower stalls and mirrors.
Floor nozzle
Suited for all washable walls and floor coverings, e.g. stone floors, tiles and PVC floors. Work slowly on very dirty surfaces to allow the steam to act on the dirt for a longer period of time.
Note
Detergent residue or care emulsions that are still present on the surface to be cleaned can lead to streaks during steam cleaning. However, these will disappear with repeated cleaning procedures.
Illustration F
Attach the floor cloth to the floor nozzle. 1 Place the floor nozzle on top of the floor cloth. Depending on model - fold before the floor cloth the long way. 2 Open holding clamps. 3 Place the cloth ends into the openings. 4 Close the holding clamps. CAUTION
Do not insert fingers between the clamps.
Parking the floor nozzle
Illustration
During work breaks, hook the floor nozzle into the parking holder.
Care and maintenance
Emptying the water tank
ATTENTION
If the device is not used for a longer period of time (approx. 2 months), please empty the water tank. This avoids decomposition of the water.
Press the OFF switch to turn off the appliance. Disconnect the mains plug from the socket. Remove the accessories from the accessory compartments. Remove the cartridge from the device.
Illustration K
Completely empty the water tank to remove existing water.
Replacement descaler cartridge
ATTENTION
The replacement intervals of the cartridge (display indicator light) must be complied with; otherwise the service life of the device is reduced.
If the cartridge is not replaced in the indicated intervals, irreparable damage can be caused on the device.
Note
The replacement intervals depend on the local water hardness. Areas with harder water (e.g. I/II) have a shorter replacement interval than areas with softer water (e.g. I/II).
Indicator light display at the end of the operating time
The necessary cartridge replacement is indicated via the indicator light "Replacement cartridge" by the following actions:
Two hours before the end of the operating time the necessary replacement is indicated by flashing. One hour before the end of the operating time the indicator light flashes faster. If the operating time of the cartridge is completely depleted, the indicator light "Replacement cartridge" is continuously on and the device switches itself off in order to prevent damage to the device.
Insert new descaler cartridge.
Press the OFF switch to turn off the appliance. Remove the cartridge from the device. Insert new cartridge into the device. Press the ON switch to turn on the appliance. Hold down the RESET button for 4 seconds. Then the indicator light "Replacement descaler cartridge" goes out and the operating time of the cartridge starts again. Allow the device to warm up. Then hold down the steam lever for approx. 30 seconds to bleed the cartridge.
Note
During the first steaming after removal and reinserting the cartridge the blast of steam can still be a little weak. The device requires a short break-in period, as the cartridge has to be filled with water first. This is why the steam discharge is unsteady at first and single water drops may exit. The amount of escaping steam increases continuously until the maximum amount is reached after approx. 30 seconds.
ATTENTION
When replacing the cartridge, ensure that there is no confusion and the old cartridge is not reinserted.
Care of the Accessories
Note
The floor cleaning cloth and the cloth cover have been pre-washed and can be used immediately for working with the steam cleaner.
You can wash dirty floorcloths and cloth covers in the washing machine at 60°C. Do not use a liquid softener as this would affect the ability of the cloths to pick up dirt. You may tumble dry the terry cloths. The microfiber cloths are not suitable for the tumble.
Troubleshooting
Often, failures have simple causes and you can do the troubleshooting yourself using the following overview. If you are in doubt or if the failure is not listed here please contact the authorized customer service.
No steam
Indicator light - water shortage is continuously red
No water in the water reservoir.
Refill water
Indicator light - water shortage flashes red
Dry run protection of the pump is activated. Switch the appliance on/off again. Ensure that the cartridge is inserted correctly and there is enough water in the water tank.
No or little steam despite enough water in the water tank
Descaler cartridge not inserted or inserted incorrectly.
Insert cartridge or ensure tight/correct seating. Descaler cartridge was removed during filling of the water or a new descaler cartridge was inserted. Leave the cartridge in the device during filling. Hold the steam lever down permanently; after 30 seconds the full steam output is reached.
Steam lever cannot be pressed anymore
Steam switch is secured with the lock / child-proof lock.
Move the selector switch for the steam volume to the front.
Indicator light "Replacement descaler cartridge" is on / flashes red
Operating time of the cartridge completed soon
Insert new cartridge and reset the maintenance display.
See Chapter "Insert new descaler cartridge".
RESET button was not pushed after the replacement of the cartridge
Hold down the RESET button for 4 seconds after inserting the cartridge.
The device switches off automatically
Operating time of the cartridge over
ightarrow Insert new cartridge into the device.
See Chapter "Insert new descaler cartridge".
RESET button was not pushed after the replacement of the cartridge
ightarrow Hold down the RESET button for 4 seconds after inserting the cartridge.
Technical specifications
| Power connection | |
| Voltage | 220-240 V |
| 1~50-60 Hz | |
| Protection class | IPX4 |
| Protective class | I |
| Performance data | |
| Heating output | 1900 W |
| Operating pressure max. | 0,35 MPa |
| Heating time | 30 Seconds |
| Steam volume | |
| Continuous steaming | 40 g/min |
| Steam push max. | 100 g/min |
| Filling quantity | |
| Water reservoir | 1,0 l |
| Dimensions | |
| Weight (without accessories) | 3,2 kg |
| Length | 360 mm |
| Width | 236 mm |
| Height | 252 mm |
Subject to technical modifications!
Scope of delivery
Scope of delivery
Delivery
Scope of delivery
Check the scope of delivery immediately after delivery. In case of transport damage, contact your dealer immediately.
If there are missing parts or damage during transport, please contact your dealer immediately.
Spare parts
Use only genuine KARCHER spare parts. You will find a list of spare parts at the end of the operating instructions.
Warranty
Scope of delivery
Interrupting work
www.kaercher.com/REACH
Scope of delivery
The scope of delivery is indicated on the packaging. When unpacking the device, check the completeness of the delivery.
If accessories are missing or if damage occurred during transport, please notify the dealer who sold the device.
Spare parts
Use only original spare parts from KARCHER. The description of spare parts can be found at the end of these operating instructions.
Warranty
In each country, the respective warranty conditions issued by the authorized sales organization apply.
Possible malfunctions of the device during the warranty period are eliminated free of charge if the cause is material defects or manufacturing errors. In case of complaints during the warranty period, please contact the dealer who sold the device or the nearest authorized customer service with the proof of purchase.
The date of manufacture is shown on the type plate in coded form.
The following meaning applies to the digits:
Example: 30190
3 year of manufacture 0 decade of manufacture 1 decade of manufacture 9 second digit of month of manufacture 0 first digit of month of manufacture
Thus, in this case, code 30190 indicates the date of manufacture 09/(2)013.
Protective devices
CAUTION
Protective devices are designed to protect the user. Damage to protective devices or failure to use them is not permitted.
Pressure regulator
If, as a result of a malfunction, excessive pressure arises, the pressure relief valve serves to protect the environment.
Protection by fuse
If, as a result of a malfunction, the device overheats, the fuse protection disconnects the device from the mains.
If, in the event of a malfunction, the fuse or the pressure relief valve is triggered, contact the authorized KARCHER service department.
Description of the device

See figures. On the fold-out page 4: A1 Cartridge for descaling agent A2 Filling opening for water A3 Handle for carrying the device A4 Holder for accessories A5 Indicator and control lamp (green) - mains voltage present b Control lamp (red) - "No water" c Control lamp (red) - "Replace descaling cartridge" d Reset button - setting water hardness A6 Switch "ON" A7 Switch "OFF" A8 Parking bracket for nozzle A9 Working wheels (2 pcs.) A10 Mains cable with mains plug A11 Steam hose B1 Steam pistol B2 Unlocking button B3 Steam quantity selector (with child safety lock) B4 Steam lever B5 Steam lever lock C1 Nozzle for spot cleaning C2 Round brush (small) C3 Round brush (large) C4 High-performance nozzle C5 Round brush (large) D1 Spray nozzle D2 Terry cloth cover D3 Microfiber cover E1 Extension tubes (2 pcs.) E2 Unlocking button F1 Nozzle for floor cleaning F2 Clamp F3 Terry cloth for floor cleaning F4 Cloth for floor cleaning I3 Microfiber
Brief instructions
See figures of the device. On page 2, Figure 1: Insert the descaling cartridge into the opening and press it down until it clicks into place. Figure 2: Fill the water tank with no more than 1 liter of fresh tap water. Figure 3: Insert the mains plug into the socket. Press the "ON" switch to turn on the device.
Figure 4
The control lamp lights up green. Wait approx. 30 sec. The device is ready for operation. Figure 5: Set the steam hardness with the steam quantity selector.
Important! Before using the device, the water hardness switch must be set according to the local water hardness.
For additional information on the device settings, see below, "Operating principle of the descaling cartridge and water hardness setting".
Figure 6
Accessories
→ Set the quantity switch to the lower position (feed lever for descaling).
Figure E
→ Press the accessories onto the locking contours and separate the parts from each other.
Fill the water tank
The water tank can be filled at any time.
CAUTION
Do not use condensed water from the drying machine! Do not add cleaning agents or additives (e.g., fragrances)!
→ Fill the water tank with no more than 1 liter of fresh tap water.
Switching on the device
CAUTION
Before first use of the device, the operating mode of the pump for detergent dosing must be adjusted to the hardness of the local water.
For additional information on device adjustment, see the chapter "Principles of operation of the cartridge for scale removal and adjustment of water hardness".
→ Place the device on a firm surface. Insert the mains plug into the electrical outlet. → Press the "On" switch to turn on the device. → The control lamp lights up green. → After about 30 seconds, the device is ready for operation.
Note
During the first treatment with steam after removing the cartridge from the transport lock, the steam jet may be slightly obstructed. The device requires a longer run-in period because the cartridge must be filled with water. During this time, the steam output may be irregular and may emit individual drops of water. The amount of steam delivered increases continuously and reaches its maximum after about 30 seconds.
Adding water
If there is insufficient water in the reservoir, the red control lamp for water shortage lights up continuously.
→ Fill the tank with water
www.kaercher.com/REACH
www.kaercher.com/REACH
In case of missing accessories or transport damage, please notify your dealer.
Spare parts
www.kaercher.com/REACH
Scope of delivery
www.kaercher.com/REACH
Items delivered
www.kaercher.com/REACH
Scope of delivery
The scope of delivery of your device is shown on the packaging. When unpacking, check that the contents of the package are complete.
If any parts are missing or if you discover damage caused during transport, please inform your dealer.
Spare parts
www.kaercher.com/REACH
Scope of delivery
www.kaercher.com/REACH
Scope of delivery
The contents of your device are shown on the packaging. Before removing the device from the packaging, check that the contents are complete.
Information on ingredients (REACH)
Current information on ingredients can be found at:
www.kaercher.com/REACH
Scope of delivery
The scope of delivery of your device is shown on the packaging. When unpacking, check that the contents are complete.
If accessories are missing or if there is any transport damage, please contact your dealer.
Spare parts
Use only original spare parts from KARCHER. You will find the spare parts list at the end of the operating instructions.
Warranty
In every country, the warranty conditions issued by our responsible distribution company apply. We will rectify any faults on your device free of charge within the warranty period, provided that the fault is due to a material or manufacturing defect. In the event of a warranty claim, please contact your dealer or the nearest authorized customer service center, presenting the proof of purchase. (You will find the address on the back page)
Accessories
ACCESSORIES
The accessories supplied serve to protect the consumer and must not be modified or replaced.
Pressure regulator
If the device is used in a way not specified by the manufacturer, the protection provided by the device may be impaired.
The manufacturer
If the device is used in a manner not specified by the manufacturer, the protection provided by the device may be impaired.
If the manufacturer or its authorized representative is changed without notice, please contact the service center and the manufacturer.
Description of the device

See the diagrams on the following page 4

A1 Cartridge for descaling A2 Water inlet A3 Nozzle for steam A4 Steam nozzle A5 Indicator light
a Control lamp (green) - has power supply b Control lamp (red) - no water c Control lamp (yellow) - descaling cartridge needs replacement d Button RESET - setting the water hardness
A6 Switch - on A7 Switch - off A8 Parking stand for iron A9 Water tank (2 pcs) A10 Switch for cable winding A11 Water tank B1 Steam pistol B2 Button for descaling B3 Switch for selecting the amount of steam (with safety lock) B4 Right handle
B5 Steam brush C1 Steam hose C2 Black brush C3 Red brush C4 Steam hose C5 Brush handle D1 Ironing board D2 Cover for ironing board D3 Microfiber cover E1 Ironing board (2 pcs) E2 Button for descaling F1 Ironing board F2 Mounting bracket F3 Cover for ironing board F4 Microfiber cover for ironing board
Quick start
See the illustrations on page 2 Figure 1 -> Place the descaling cartridge in the opening and turn it until it stops. Figure 2 Fill the water tank with a maximum of 1 liter of tap water. Figure 3 Plug the power cord into the electrical outlet. -> Press the button - on, to turn on the device. Figure 4 -> The control lamp lights green. After about 30 seconds the device is ready for use. Figure 5 -> Set the water hardness.
WARNING
To ensure optimal functioning of the descaling cartridge, before first use the device must be adjusted to the water hardness.
Additional information about the device can be found in the appendix "Operation of the descaling cartridge and setting the water hardness".
Bulgaria 6
→Press the button to turn on the appliance. Set the temperature for steam.
Press the button to release the descaling cartridge for the boiler.
Adjusting the water hardness
Press the button to release the descaling cartridge for the boiler.
WARNING
Work only with the supplied cartridge.
When the device is filled with water and allowed to operate, the action of the cartridge against limescale is activated. The limescale that accumulates in the water is removed from the granules in the cartridge. In this way, the formation of limescale in the device is reduced to a minimum. Thus, additional removal of limescale is not necessary.
Instruction
Use of the appliance
Important instructions for use
Cleaning the ironing surface
Before using the steam iron for the first time, it is recommended to clean the soleplate. This will remove any residues or loose particles from the soleplate.
Ironing textiles
Before treating with the steam iron, it is recommended to check the resistance and fastness of the fabrics on a hidden spot: first iron a small area, then let it dry and check for changes in color or shape.
Touching surfaces with coating or lacquer
When cleaning lacquered or painted surfaces, such as e.g. kitchens and steel furniture, doors, parquet, can be wiped with a damp cloth, furniture polish, special paints for wood and to form a film. When cleaning these surfaces, use a soft cloth and wipe the surfaces dry.
ATTENTION
Do not use steam cleaners on lacquered or painted surfaces, as they may be damaged. Do not use aggressive or abrasive cleaning agents.
Cleaning glass
First, heat the glass with the steam nozzle to loosen dirt, then gently wipe the glass surface with a cloth. Be careful not to damage the surface, which may be scratched by the nozzle. Spray the glass surface with the cloth and cover it. To remove water, use the glass scraper or wipe the surface dry.
ATTENTION
Do not point the steam nozzle at the sealed areas of the glass frame, so as not to damage them.
Steam pistol
You can use the steam pistol without accessories, for example:
Removing light stains from painted surfaces, such as by spraying with a distance of 10-20 cm. For cleaning dust from textiles. For this, increase the distance to 20-40 cm. For damp dusting, such as filling the cloth briefly and then wiping the furniture with it.
Steam nozzle
The closer you are to the dirty area, the higher the steam pressure, as the temperature of the steam is highest at the nozzle outlet. It is practical for cleaning hard-to-reach places, corners, fittings, pipes, sinks, toilets, ovens and radiators. Before cleaning with steam, strong dirt deposits can be sprayed with detergent, leave to act for 5 minutes, then treat with steam.
Curved brush (small)
The curved brush can be mounted as an accessory to the pointed steam nozzle. Thus, thanks to the brushes, the dirt can be removed and the stains cleaned.
It is not suitable for use on empty surfaces. Figure C
Attach the brush cover to the thick-walled hose.
Blow nozzle
The blow nozzle can be mounted as an accessory to the thick-walled hose.
The blow nozzle increases the speed of air extraction. This makes it suitable for cleaning particularly stubborn dirt, blowing out pipes, gutters, etc.
Figure C
Attach the blow nozzle to the thick-walled hose in accordance with the brush cover.
Brush cover (large)
The brush cover can be mounted as an accessory to the thick-walled hose. With this brush cover, larger surfaces can be cleaned (e.g., upholstery, mattresses, bathtubs, car seats).
ATTENTION
It is not suitable for use on empty surfaces.
Figure C
Attach the brush cover to the thick-walled hose.
Blow nozzle
Figure B
Mount the nozzle on the spray gun.
The nozzle cover protects the nozzle tip. It is especially suitable for small surfaces and for cleaning.
Nozzle
The nozzle is suitable for cleaning walls, floors, and coverings, e.g., stone, plaster, and PVC. It is recommended for cleaning surfaces with a brush for longer-lasting results.
Note
The remaining cleaning agent or water may remain on the surface. Cleaning with steam can help remove stubborn dirt, which may require repeated application.
F
Secure the nozzle cap for position 1. Place the nozzle on the cap for position 2. Depending on the equipment - before this, the cap for position 2 must be opened. 1 Open the locking clips. 2 Place the cap on the nozzle opening. 3 Close the locking clips. CAUTION
Do not place your fingers between the clips.
Marking the nozzle
Figure
When working, mark the nozzle with the marking device.
Nozzle replacement
Adjusting the water reservoir
WARNING
To extend the operating time (approx. 2 months), you can adjust the water reservoir. This way you can avoid the hassle of refilling.
→ Press the ON/OFF button to turn off the device. → Remove the plug from the socket. → Remove the accessories from the appliance. → Remove the cartridge from the device.
Figure K
→ Drain the water completely from the water reservoir.
Cartridge removal tool for the boiler
WARNING
The intervals for cartridge replacement (indicated by the control lamp) must be observed, otherwise the warranty period may be shortened.
If the cartridge is not replaced within the specified intervals, the device may be damaged.
Note
The replacement intervals depend on the hardness of the water. If you have hard water (e.g., III/IV), the replacement interval is shorter than for soft water (e.g., I/II).
Troubleshooting
Often the cause of malfunctions is simple, and with the help of the following instructions you can fix them yourself. If you are not sure or the malfunctions are not described here, contact the authorized service.
Descaling
Control lamp - insufficient water, lights up constantly red
Fill the water reservoir. → Fill with water
Control lamp - water level is too low
Dry run protection is activated.
→ Switch on and switch off the device. → Make sure the cartridges are installed correctly and that there is enough water in the water reservoir.
The water level in the reservoir is too low. → Fill the water reservoir with enough water.
The descaling cartridge is not installed or is installed incorrectly. → Install the cartridge or check its correct locking. The descaling cartridge has been used up over time with water and a new cartridge has been installed. → Check the descaling cartridge. → Tighten the cartridge for proper operation, after 36 seconds the pump power will be reduced.
The pump cannot be switched on
The pump is blocked by the lock / child safety. The settings for the amount of water are incorrect.
The control lamp "Descaling cartridge" lights up / flashes red
The cartridge operating time is almost over
→ Install a new cartridge and follow the instructions for technical maintenance. See the chapter "Installing a new descaling cartridge".
The RESET button was not pressed after replacing the cartridge
→ Press and hold the RESET button for 4 seconds after installing the cartridge.
Make sure it switches on automatically
The cartridge operating time is over
→ Insert the battery into the device. See chapter "Inserting the battery for the steam boiler".
If the RESET button was not pressed after changing the battery
→ Press and hold the RESET button for 4 seconds after inserting the battery.
Technical data
Electrical connection
| Hansejechen | 220-240 V |
| 1~50-60 Hz | |
| Градуς на зашита | IPX4 |
| Клас зашита | I |
| Данни за мошноста | |
| Нагревателна мошност | 1900 W |
| РавOTно налаягам макс. | 0,35 MPa |
| Вреем за подравале | 30 секунди |
| Колочевто пара | |
| Проблажимно ручке на пара | 40 r/Min |
| 100 r/Min | |
| ЕдOKратуно мизуckaце на пара макс. |
Amount of dust
www.kaercher.com/REACH
Scope of delivery
The scope of delivery of this device is shown on the packaging.
When unpacking, check the contents of the package.
www.kaercher.com/REACH
Scope of delivery
The scope of delivery of your device is shown on the packaging. When unpacking, check that the contents are complete.
If accessories are missing or damage has occurred during transport, please inform the dealer.
Spare parts
Use only original KARCHER spare parts. You can find the spare parts overview at the end of these operating instructions.
Warranty
The warranty conditions issued by our responsible company apply in each country. We will repair possible faults in your device free of charge within the warranty period, provided that the cause is a material or manufacturing defect. In the event of a warranty claim, please contact your dealer or the nearest authorized customer service center with the purchase receipt.
(Address on the back)
Safety devices
CAUTION
www.kaercher.com/REACH
Scope of delivery
Instructions for use of components (REACH)
Current information on components can be found on the website at:
www.kaercher.com/REACH
Scope of delivery
The device is supplied in packaging. When unpacking, check the scope of delivery. In case of missing accessories or damage during transport, please notify your dealer immediately.
Spare parts
Use only original KARCHER spare parts. The spare parts list is included in these operating instructions.
Tapaantia
YKOJI KpaIH DIOb yMOBN rapaHTI, HadaHO BIDNOBIOO pIFMOIO-npOABuCEM. HenoNAkIN B POBOTI nCPTOIO MNYCyBAeMO E6KOHTOBHO PnOTROM TepMHy DII rapaTII, JAKSO BOHN BIKNKAHl 6PaKOM MATEPIAY N NOMILKAMMBROTOBNEHH. Y BUNADKY INHHOI rapaHTI 3BepTTiBc DO npOdABuCA H NaBnNKJHn ABTOP3OBOAH CepBICHI CEHTP3 DOKUMEHTaJIbHM NiTBePDKEHNR NOKYNK.
(Adpecn nVB. Na 3BPOtI)
3axnch npncTrooi
OBEPEXHO
3axuChi npucmpoi cnyyomb dna 3axumy koprucmyeaeie. Budo3mHa zaxuchux npucmpoie yu HexmyaHHn HUMHe doynckaaembc.
Pernylantop Tncky
JaIIO yBnADKy NOMIKN BUNHNAE 3aHaTTO BUCOKNI TNC, 3aNo6iKn KJIaNAn 3aBe3neUye Ioro BiDjB H BaBKOINHe cepeOBNuIE.
Πλακή 3aποδιχΗΝΚ
JaKIO y BnnaJky NOMNIKNI npNCTpi MoKe JnepeRpiTncsA, 3aON6IXHKn 3a6e3NeUc BiEcdHaHHN pNCTpOo BiMepexi.
JaIIO pIIaBKM 3aONbIKHM A60 3aONbIKHM Klnanah cnpaIbOIOb T b paIi NOMINK, 6yIb Jnacka, 3eptaTeCe DO bIDNoBIAJbHOI cepBIOH clyXbKARCHER.
Onnc npuctpoH
3o6paXeHHaB.Ha po3Bopoti4

A1 Kaptripdkn BnuDaneHnHaKnny A2 3aJINBnO TBP dJa BOiN A3 Puyka A4 Tpimau nI npinaJexHocteI A5 IIndkaiaHa dncnnei a KontpoIbHa Iamna (3eIeHa)-HraBHiCTb Hnpy- rny mepexi b KoHTpOJIbHa JIaMna (YeBBoHa) - "HeCTaYa BoDn" c KoHTpOlbHa IaMaHa (YeRbOHa) - 3aMInTu KapTpPnIXK DnIe BnJaIeHnHa KaNPy d KhoNka CnIaHnra - BcTaHOBneHHra XOpCTKoCTi BOIN A6 BmMkau "BMK." A7 BmNkau"BmNk." A8 NapkyBaIbHe KpInJeHHaHacAn dIy iIbnorn A9 Po6oqi kOleca (2 uTkyu) A10 MepexeBn KaebI i3 utencbHIO BnIKOIO A11 CnpmaMOyBaJIbHn BaJIeCb B1 Napobovn nictonet B2 KhoNka po36nOKyBaHHa B3 IpeemKau KJIbKOCTI napy (3 3axUCTOM BiD BMKAHHaDiTbMn) B4 Baxjnb noaui napu B5 Napobni shnaHr
C1 Conno ToUKOBOrO CTpyMeHr C2 Kpyrna uitka Yopn C3 Kpyrna ⅢjTka YepBoHn C4 BucOKoNpOyKtNBHa opcyHka C5 Kpyrna zitka Beiikn D1 Puyne cnono D2 POKPIT3 eNoHky D3 MikoPoBoJIoKoHnHiyOxOJI E1 POnOBKByBaJIbHi Tpy6Kn (2WtYkn) E2 KhoNka po36nokyBaHHa F1 Conno nany nony F2 3aTnckau F3 MaxpoBa TkaHnHa dny nIiJnOri F4 MikpoBOJOKOHHa TkaHnHa IJI niJIOI
Instruction manual
→ See page 2 of the manual
Figure 1
Install the cartridge for dispensing the hot water and press the button for micro-fixation.
Figure 2
→ Fill the reservoir with no more than 1 liter of distilled water.
Figure 3
Insert the intensity knob.
→ Press the "ON" button to turn on the device.
Figure 4
→ The control lamp lights up green. After about 30 seconds, the device is ready.
Figure 5
→ Before first use, set the water hardness.
ATTENTION
To ensure optimal functioning of the cartridge and dispenser, the device must be adjusted before first use according to the water hardness in your area. For more information on adjusting the device, see the section "Cartridge and Dispenser Adjustment" and "Water Hardness Adjustment".
→ Connect the device to the power source. → Set the switch to the ON position.
The water tank can be filled at any time.
ATTENTION
Do not use condensate from the air conditioner drain!
Do not fill with detergents or other additives (e.g., aromatizers)!
→ The water tank must not be filled above the maximum water level mark.
Device operation
ATTENTION
To ensure optimal functioning of the humidifier, it must be filled before first use with clean water.
See additional information about filling the device in the section "Filling the humidifier with water and filling the water tank".
→ The device must be installed on a flat surface. Insert the plug into the electrical outlet of the device. → Press the "ON" button to turn on the device. → The control indicator lights up green. → After about 30 seconds, the device will be ready.
Instructions
After the first use, the water tank and the humidifier may have a slight smell. This is normal and will disappear after a short time, as the water will be replenished. The first use may produce irregular steam and may emit individual water drops. The amount of steam will gradually increase and reach its maximum after about 30 seconds.
Filling
The device is ready for operation. The first indicator of the device is on.
→ Fill the tank with water
The cartridge filling is protected during dry operation.
Instructions
Water is poured through the cartridge lid for filling. This ensures a constant flow of steam. After that, the reserve for water is filled, and the control lamp lights up. If the pump runs dry for a long time, for example, due to an incorrectly installed cartridge, the control lamp will indicate a lack of water and the device will turn off automatically. To resume operation, turn the device off and on again. This will ensure that the cartridge is installed correctly and that there is enough water in the reservoir.
Adjusting the steam quantity
Using the steam quantity switch, you can adjust the amount of steam supplied. The switch has three positions.
Set the switch to the desired steam quantity. → Press the steam button, and the steam will start flowing onto the fabric until the steam is released evenly.
Interrupting operation
If the device is not used for more than 20 minutes, turn it off to save energy. → Press the "Off" switch to turn off the device.
Turning off the device
Figure G
→ Press the "Off" switch to turn off the device. → Pull the mains plug out of the socket.
Figure H
→ Press the steam button until no more steam comes out. Now the device is free of steam. Set the steam lock to the lower position (the steam button is locked).
If the device is not used for a long time (more than 2 months), the water in the tank should be drained. This will prevent the formation of deposits.
Figure K
Drain the water from the reservoir.
Storage
Figure
Figure J
Insert the suction hose into the holder for large accessories. Then attach the foam filter and the current filter to the suction hose. Close the round cap on the suction hose connector. Insert the small round cap into the middle of the additional holder. Attach the filter holder to the bracket. Then check the tightness of the suction hoses and place the steam nozzle in the filter holder.
Application of the device
Important instructions for use
Clean the surface to be treated
Before using the device, it is recommended to clean or rinse the surface. This will remove dirt and loose particles before steam treatment.
Testing the steam output
Before using the device, check the steam output by pressing the steam button. First, select the steam level, then wait for the steam to come out, and finally check the steam output and the presence of deformations.
Cleaning the surface with the steam nozzle and accessories
It is used for cleaning and degreasing various surfaces.
Figure C
Fix the nozzle at a distance from the surface to be cleaned.
Hand nozzle
Figure D
Install the hand nozzle on the steam nozzle. Pull the trigger on the hand nozzle. Especially good for small surfaces, such as sinks, tiles, and mirrors.
Nozzle for floors
Clean all types of walls and floors, for example, stone floors, tiles, and linoleum. For heavily soiled surfaces, it is recommended to treat them twice to increase the service life of the device.
Instructions
When using the device for its intended purpose, detergents that are applied to the surface may form streaks that are visible after repeated cleaning.
Figure F
→ Close the fabric cover for the floor nozzle.
1 Install the nozzle for the floor. Depending on the cleaning task, attach the fabric cover for the floor along the length.
2 Turn on the device.
3 Insert the fabric end into the opening.
4 spare parts.
CAUTION
Do not touch the parts with your fingers.
Replacing the print cartridge
Figure
The cartridge cannot be refilled
Install a new cartridge and reset the maintenance counter. See the section on installing a new cartridge and removing the old one.
The reset button after replacing the cartridge was not pressed.
Press and hold the reset button until the indicator lights up.
The printer turns on automatically
The cartridge is empty
Install a new cartridge in the printer. See the section on installing a new cartridge and removing the old one.
The reset button after replacing the cartridge was not pressed.
Press and hold the reset button until the indicator lights up.
Technical specifications
Safety instructions KK 5
Output specifications KK 6
Short instructions KK 6
Correct use of the supplied cartridge and required water quality .. KK 6
Operation KK 7
Operation of the controls KK 8
Maintenance and technical inspection tasks. KK 9
Troubleshooting KK 10
Technical data. KK 11
Warranty

Before first use, read and follow these operating instructions and the safety instructions.
Read the safety instructions carefully before first use. Pay special attention to them. Keep the instructions for future use or for the new owner.
www.kaercher.com/REACH
Scope of delivery
If you have any problems with your device, contact your dealer or the authorized service center. The device must only be used with the original accessories and genuine spare parts. If you notice any damage or if the device is not working properly, contact the dealer where you purchased the device.
The Kärcher nozzles are designed to spray water, matching the original.
Accessories
Our accessories are designed to be used with our products. If the materials or workmanship are found to be defective, we will repair or replace them free of charge. If you have any questions about our accessories, please contact our customer service department or the store where you purchased the product.
The date of manufacture is indicated on the type plate.
The serial number is located on the type plate:
Example: 30190
3 = year of manufacture 0 = month of manufacture 9 = day of manufacture 0 = second digit of the serial number 0 = first digit of the serial number
Therefore, the code 30190 means
Manufactured on 09/2013.
Safety instructions
WARNING
The safety instructions must be followed to avoid injury, damage, or fire.
Electrical connection
If the Kärcher device is used in a wet area, the plug must be protected by a residual current device.
Bank bills and cash counting
The banknote counting machine is intended for counting banknotes and can be used in various fields of activity.
Before using the standard or banknote counting machine, read the manual carefully without fail.
Device description
See figures in the appendix

A1 Cardboard for counting banknotes A2 Water tank A3 Control panel A4 Power cord A5 Counting tray (red) - for counting banknotes - Water tray (red) - without water c Counting tray (red) - for counting banknotes - cleaning d RESET button - resetting the water counter A6 Start - Stop A7 Start - Pause A8 Power switch A9 Discs (2 pcs) A10 With electric cable A11 Drain hose B1 This pistol B2 Start button B3 Compressed air gun (for blowing dust) B4 This handle for carrying B5 This handle for carrying C1 Point the nozzle C2 Red nozzle C3 Red nozzle C4 Point the gun C5 Red nozzle D1 Point the gun D2 Cap for fuel tank D3 Microfiber cloth E1 Spare nozzles (2 pcs) E2 Start button F1 Point the gun for cleaning F2 Brush F3 Protective goggles for cleaning F4 Microfiber cloth for cleaning
Short description
See figures in the appendix
Figure 1 → Insert the cardboard for counting banknotes into the slot and secure it in place. Figure 2 → Pour at least 1 liter of clean water into the water tank. Figure 3 → Connect the power cord. → Press the Start - Stop button to turn on the device.
Figure 4
→ The counting tray is in the red position. Wait 30 seconds and the device will be ready.
Figure 5
→ Place the water tray in the initial position.
CAUTION
If the cardboard for counting banknotes is not installed correctly, the device may not work properly with the water tray in the initial position.
Before using the cartridge, carefully read the instructions for use and safety warnings.
Figure 6
→ The cartridges are disposable. Do not refill them.
Instructions for using the cartridge and safety warnings
Instructions for using the cartridge
ATTENTION
Before using the cartridge, read the instructions.
If the cartridge is not used for a long time, it may dry out. The cartridge should be stored in a cool place. Do not expose the cartridge to direct sunlight. If the cartridge is damaged, do not use it.
Note
After the water has been used, the cartridges can be replaced. The water may contain minerals. This is not a sign of malfunction. The cartridges should be replaced regularly.
Water quality standards and safety standards
Note
The water quality of the cartridges meets the requirements of the German Drinking Water Ordinance.
| Су катылыfbl | ° dH | mmol/l | Жарык сигналда рьИнbI саны | Жарык сигналда рьИнbI .apaПыfbl | |
| I | Жумсak | 0-7 | 0-1,3 | 1x | 4 cekyнд |
| II | opta | 7-14 | 1,3-2,5 | 2x | |
| III | kepmek | 14-21 | 2,5-3,8 | 3x | |
| IV | aca kepmek | >21 | >3,8 | 4x | |
Disposal of cartridges
→ Dispose of the cartridges in accordance with local regulations (see the instructions for use).
Cypet E
→ XabdkTapdbH 6bnLweKTePiAakbipatyuWih, 6nokTanh bIfapy 6bTbIpMacbH 6acbIn, 6bnLweKepdi 6bPiH 11iHHeh 6bpI cybpiB anbbl3.
Cy caybIbIH TOnTbipy
Cy caybItbH Ke3 KeIeR H Ke3e KaTt ToTbIpyFa 60bady.
HA3AP AYdAPbIHbI3
Kip Keinmipeiumeh KOHDeHcauJyIck cydbI naaanah6aHbI3!
Ta3anaftbu 3ammapbI He baca Kaocnanapbo (MbicaJIb, Jynap) KUmaHbI3!
→ Cype3epByapbHa eH KEBi 1IITp Ta3a Ky6blp cyblH KyblHbl3.
BvibMbIeWiPy
HA3AP AYdApbIhbl3
KaKmbi Kemipyee apAnranr KaMpudxdin y3diKci 3xMbic xacaybH KAmmaMab3 emy yuih, anrau naDanahy anbHda dyubim Jepeinikmi cy KepmeKmminiahe Buiimdoyni KaXem.
BiyIMhBIn pemney napamempnepi myanbl monblk aknapammbi "KaMbki kemipyee apHanraH kapmuokdi naDanaHy xeHe cy KepMeKmianiaH ophamy" mapaybHaH mabyfa bonaDb.
→ BybIMdbI TypaKbIbIbIH KaMTaMaCbI3 eTeTIN 6eTKE KObIHbI3. → ΘneKtp aWacbIH 3JIeKtp p03eTKacbHa caJIbIbI3. → ByiBIMdiKocy yuiH AxxbpataTkblI - Kocy 6acbIbI3. BaKbIay WAmbl Xacbl TycneH XaHaIbI. → ⅢaamamEn30cekyHDTAHKeiIH6yblIMKMybIcKa daibH.
Hyckay
Kaptrpndjdi anbln, onbl kaiTadaH opHaTkaHHaH KeiH anfla 6yay Ke3Ihde 6ydbH coryfbl eni anc3 bonyb MyMkiH. BybIMra Bcicka 6eimdy akytbl KaKeT, ce6ebi Kaptprndjdi andBmHey Cya TOnTbpy Kepek. CoNdbkTah 6actankb Ke3e 6 byA hBiTypaKcb3 60bnIn, tamuBlnap naia 60nyb MyMkiH. XiBepiin otbyaTbH 6ybi MeIwepi Xorapblan OTbpaBl, WamAmeh 30 cekyHtan KeH 6 byXibepy MaKcMaIbD DeHreIRE XeTei.
The reserve water must be drained through the pipe outlet after each use.
→ Before filling the tank, check that the drain valve is closed.
Be careful
The drain valve must be closed before filling the tank. If the tank is filled without closing the drain valve, water will leak out. After filling the reserve tank, close the drain valve. If the drain valve is not closed properly, water may leak. If the drain valve is in the open position, water will flow out continuously. In this case, close the drain valve immediately.
Before starting the engine, check the oil level. If the oil level is low, add oil to the reserve tank.
Engine maintenance
The composition of the fuel mixture - the ratio of oil to gasoline is 1:50. The composition of the fuel mixture - the ratio of oil to gasoline is 1:50.
| Бурын сени мениерi | |
| Бурын Кыckартыган мениерi | |
| Бусыз - балanapдын косунан корfay Нүхай: Осы позцяда 66 Бердин дөнүдүйн рemmeeisi колдын ралmaiodы. |
→ The fuel mixture must be prepared in a clean container. → Pour the mixture into the fuel tank, then, after this, close the fuel tank cap securely.
Starting the engine
Figure 6
→ To start the engine, press the primer bulb. → Pull the starter cord out of the starter handle.
Figure H
→ If the engine does not start, press the primer bulb again. If the engine still does not start, check the spark plug. → Keep the throttle in the closed position (this is normal).
Be careful
Eaep 6yubim y3ak yakbim 6oobu (uamamem 2 aui naDanaNbIMmaca, cy pe3epeyapbBn 6ocamy kaxem. Ocbinaui cyb0h 6x3bn1y 6o0nbipmbmaUbi.
Cyper K
→ CyesepebyapabldaHcSydbiB6apbIhTObnfbiMeHTeRINTACTaHb3.
BiyibIMdbicakray
Cypet 1 Cypet J
→ 丫3apTbIsh TytIKtePdi Jx6aDbkTAP yIHH YIKeH cYctayIbHTpaE hErH3iH3. → KON wymei MeH yKTENI aBbI WymeiH 3aPTkbl TytIKTepre eHRI3HJ. → YIKeH KJIJIuaKtBI HYKTeJIi aFBH IJMyMeIHe OPHATbHbI3. → KiIkeHTaK bJIiHaKaTbI Kepek-XapakTaPra apHaHaFAnOpTaBbIK YcTaFbIkaOpHaTbHb3.
Edeh kyyra aphanfah wymeri napk yctaybihia inihi3. → By xibiépyre apHaIraH uHaIriHi y3apTkbiu tyTikTeprdi aHaIbIpa opaHb3 xHe 6y TaNaIshaBi eH eHHyfa apHaIraH uMyMerIhe eHr3IH3.
Xa6bIbIKTapdbI KOJaHaY
MaHbI3DbI KOJaHaY Typanbl HycKaynapbl
Kep 6etin Ta3anay
By TaanaarbIbIbn KOnlaHb6ac 6bpyIn eEneHdi cblnbpHy He waHcOpfbInay ycbIbInaIbI. OcbInaiHa eEn h bInraIbI Taanay anabHbIa KIP/60c KOkblCTah TaanahAbaIbI.
ToKbImaHbI KaHaP Ty
ToKbIma 6yIbIMapabH Ta3aIaydb I bactMaac 6byh, anDbIMeH KePiH6eITIH aIMakTa ToKbIMahbH 6 by acepiHe TpaKaTbJIbFbH TeKcepy KaKeT. AnDbIMeH 6ymen Ta3aIahbI3 da, KeTIpIn, MaTahbI h Tyci, niiHi e3repYiH TeKcepHi3.
KanTaNFaH, XaIaNfHaH HEmeCe NaKTaNFaH 6etTepDi Ta3anay
Ac 6bnmecinih jxhe yj xnhaba, eciKtep, napket CnAaTbI nakTaTnFAH Hemece JxacAHbI MATEpnaIapMeH KAnTAfNaf 6TeTpei Ta3anaFah Ke3e, 6aNaybI, XnHa3 nonltypacbi, JxacAHbI MATEpnaIapdAn JxacAFan 6BETep JxHe cbIp 6BeHIn, Tycin kanybl, DaTAP naJa D6onybl MyMkH. OCb 6BETpePi Ta3aJIay Ke3Ihde Matahbl KIIke He KypratbHbI 3XHe 6BETepH cyPTIH3.
ATTENTION
If the appliance is not working properly, it may be necessary to contact a specialist. Do not attempt to repair it yourself.
Cleaning the appliance
Before cleaning, disconnect the appliance from the power supply and let it cool down. It is necessary to avoid deformation of the appliance parts when cleaning.
After cleaning, wipe the appliance with a dry cloth and then clean it with a damp cloth. To remove water, use a dry cloth or let it dry.
ATTENTION
Do not use abrasive cleaners on the appliance surfaces, as they may damage the coating.
This appliance
This appliance is intended for household use only. It is not intended for commercial use.
- To remove stubborn dirt, use a soft cloth dampened with water and a mild detergent. Then wipe with a dry cloth.
- To remove heavy dirt, use a soft cloth dampened with a suitable cleaning agent, then wipe with a dry cloth.
Cleaning the appliance
Before cleaning, disconnect the appliance from the power supply and let it cool down. The temperature and humidity of the environment should be taken into account. Clean the appliance regularly with a soft cloth, avoiding abrasive materials, solvents, or sharp objects. Do not immerse the appliance in water or any other liquid. Use a damp cloth with mild detergent, then wipe dry.
Cleaning the filter (if applicable)
The filter can be removed for cleaning. After cleaning, dry it thoroughly before reinstalling.
HA3AP AYdAPbIHbI3
Te3 akaynaHambin bempeDi ma3anayra kenmeDi.
CypeT C
→ LInnHnpnik KblnWakTbI WyMerHe opHaTbHb3.
Kyat wymeri
KyaT WymeriH KocbIMsa peTIne HkyTeJI aBbH WymeriHe opHatyra 60ana.
KyaT yUmeri 6y aftbHbHbIH XbIINaMdbfBh apTTbIpaDbI.
CoDbItaH on aca KaTbI NaCTaHydb Ta3aanay, 6bybIaTpdb, caBilnaynapdbJxHe T.6. yPlen Ta3ap TY uHH xApamDbI.
Cyper C
→ Kyat wymerin DeHreNEK Kblwakka cKeC Hkyteni afbH wymeriHe 6ekitih3.
Dhenrenek KblnwaK (yNKeH)
DeHreNEK KblJwaKtB KoCbIMwa petIHne HyKTei aBbH WuyMerHe OPhaTyFa 6oIaMb. Ocbl YnKeH DeHreNEK KbIwAaKeN DeHReNEK beTepdi (MbIcaMbI dyu NpODoHb, BAHHa, WHyfBIma) Ta3aJIaybIraJIbI. HA3AP AYdAPbIHbI3
Te3 akaynaHambin 6emmepoi mazanayra KeImeuoi. Cypet C
→ LiHnHApniK kblwAaKtbI wMyerHe opHaTbIb3.
KoJ wyMeri
Figure B
Remove the protective film.
Remove the protective film from the device.
Determine the type of device, then select the appropriate attachment for the device, the product, and the accessories.
For the device
For the device, select the appropriate attachment for the product and the accessories, and then attach them to the device. Before use, check that the attachment is securely attached.
Use
If the attachment is not properly attached or if the accessories are damaged, they may fall off during use, which could cause injury. Before use, check that the attachment is securely attached.
Figure F
Attach the appropriate attachment to the device.
1 Attach the appropriate attachment to the device. Make sure that the attachment is securely attached.
2 Do not use the device without the attachment.
3 Place the attachment on the surface, and then press it down.
4 Remove the attachment.
△ CAUTION
Check the spare parts list for the required components.
Before using the device, read the operating instructions.
Figure
→ When replacing the brush, follow the instructions in the operating manual.
Maintenance and technical documentation
Replacing the brushes
CAUTION
If the brushes are worn (less than 2 mm remaining), they must be replaced. Otherwise, the device may be damaged.
→ Disconnect the plug from the power outlet. Use appropriate tools. Remove the brush caps. Figure → Replace the brushes and check the tension of the springs.
Proper brush replacement
CAUTION
The brush replacement interval (depending on usage) may vary; check the brushes regularly.
If the brushes are not replaced in time, the motor may be damaged.
Note
The brush replacement intervals depend on the hardness of the water you use. The brush replacement interval is shorter for hard water (e.g., levels I/II) and longer for soft water (e.g., levels III/IV).
The "Cartridge replacement" lamp lights up when the cartridge replacement is required:
The cartridge replacement indicator lights up when the remaining cartridge life is less than two hours. When the remaining cartridge life is less than one hour, the indicator lights continuously. If the cartridge replacement indicator lights up, replace the cartridge immediately to avoid print quality issues and to prevent the printer from stopping.
Replacing the cartridge
→ Turn off the printer using the power button. Open the front cover. → Remove the used cartridge. → To install a new one, press the power button to turn it on. → Press and hold the RESET button for 4 seconds. After that, the "Cartridge replacement" lamp will light up and the cartridge replacement indicator will start from the beginning. → Allow the printer to warm up. → To clean the cartridge, press the button for 30 seconds.
Note
After removing the cartridge, place it on a flat surface and keep it upright. It is possible that some toner may spill. Be careful not to spill toner when removing the cartridge. If the cartridge is not installed correctly, it may cause paper jams. If the toner level is low, the print quality may be poor. After 30 seconds, the toner level will be at its maximum.
CAUTION
Do not touch the fuser or the area around the cartridge during or immediately after printing, as it may be hot.
Cleaning the rollers
Note
Use a soft, lint-free cloth or cotton swab to clean the rollers. Wipe them gently.
→ Dampen a soft, lint-free cloth or cotton swab with water or a mild detergent. Do not use solvents or abrasive cleaners. Wring out excess liquid before wiping. Do not use wet cloths or cotton swabs on the rollers.
Getting help
If you encounter problems, refer to the troubleshooting section in the user manual. If the problem persists, contact your local dealer or service representative.
The water tank is filled with water through the pipe.
There is water in the water.
→ Fill the water.
The water tank is filled with water through the pipe.
The pump is used to fill the tank.
→ Open the valve and close it. → Depending on the cartridge format, the cartridge is inserted into the reservoir.
If there is water in the reservoir, the pipe is not needed.
The cartridge is inserted either directly or with the format.
→ Insert the cartridge or secure it with the format.
When filling the cartridge with water, insert the cartridge into the reservoir.
→ To avoid overflow, keep the pressure for 30 seconds.
This is not possible with the current system.
The pump is used to fill the tank.
→ Place the nozzle in the correct position.
"KaKTbI Ketipyre apHaHrFaH KapTpNdxKdi aybICTbipy" 6aKblay WAmbl Kbl3bl TycneH XaHaDbI/XbInbIbIKtaDbI
Kaptrnndxndin naindaanhy mep3imi Jybyipda aayktaana
→ KaHa KapTpInxk OPhaTbHb3 KHeKbI3MeT Kepcety INdkatOpbIn KaiTa OPhaTbHb3. "KaKbI KeTIpyre AhpAnfHaKaHa KapTpInxkDi eHri3y TaPaybIn KapApHb3.
Kaptrnixdi aybictbipfahanKeiH RESET tyMeci 6acblmadaI
OpnatkannH Kein RESET Tymecin 4 ckyhD 60b1 bacIn typbHb3.
BvibIM 3diriHEn oedi
Kaptpnjjn naiJaJany mep3imi aaytanyda
→ KaHa KaTpNjdkz6 BybIM IiHHe cAnbHbI3. "KaKtby KeTipyre apHaJIrAn KaHa KaTpNjdkJ eHrI3? TaPabyH KapaHbI3
Kaptrnndzi aybictbipfahHAn KeiH RESET Tymeci 6acblmadaI
→ OphatKaHHaN KeiIN RESET Tymecin4 ckyHd 60bI bacbl typbHb3.
TexHnkaIbIK MaFlyMaTTap
| ЗлектPre кosity | |
| Злект Кернейу | 220-240 V |
| 1~50-60 Hz | |
| Корray даржесi | IPX4 |
| Корray Класы | I |
| ЖуMbIC сиразары | |
| Жылу онлайндіпiri | 1900 Вт |
| КысимьнEn снжогары Deнгелi | 0,35 бар |
| Жылу укыты | 30 Секунд |
| Бу калемi | |
| Узak укытпы by xizibepy | 40 р/мен |
| Бу aflын Мамс. | 100 р/мен |
| Толърмелшepi | |
| Су сагы | 1,0 п |
| Калемi | |
| Буйыlmьнkepek-харakтарсыз calmaftы | 3,2 кг |
| Узындыfы | 360 мм |
| Ени | 236 мм |
| Биiktтiri | 252 мм |
TexuKabik 3eepicmp nao60bIn KanybIMyMkiH!
aJll
.0yll jlll aos jj bol
aJl aawb jlljaiil" pssll ciaaa
IMO2019 x3y3( mod P2)
4
JUdWJ 10 dI/1 JyJyJyJy
Jx Jn aawgbrzll pJU UJJ
Jlll"JgjssJlaaJg aJll Jla
"awgbrz
joc p jjj 0jgclj
j0gJg jUJU
elai jE 1Jkssll 200
.ooJgacLwJzjWll o
awgbjll Jzoo jgl all>
Jlll" p>ill c1a o1a JolKJl
jglgogJolgo Jkw"aaogb
Jzj 1 J
jg>
0d j 15 allj aawb jI
4
C
.
1 1
B 0j0
.
a0y1y a@g
| الصحيى بناير | العربية |
| الصحيى بناير | العربية |
| الصحيى بناير - بناير | العربية |
| الصحيى بناير / liالعربية / liالعربية / liالعربية / liالعربية / liالعربية / liالعربية / liالعربية / liالعربية / liالعربية / liالعربية / liالعربية / liالعربية / liالعربية / liالعربية / liالعربية / liالعربية / liالعربية / liالعربية / liالعربية / liالعربية / liالع buc / liالع buc / liالع buc / liالع buc / liالع buc / liالع buc / liالع buc / liالع buc / liالع buc / liالع buc / liالع buc / liالع buc / liالع buc / liالع buc / liالع buc / liالع buc / liالع buc / liالع buc / liالع buc / liالع buc / liالع,/ liالع,/ liالع,/ liالع,/ liالع,/ liالع,/ liالع,/ liالع,/ liالع,/ liالع,/ liالع,/ liالع,/ liالع,/ liالع,/ liالع,/ liالع,/ liالع,/ liالع,/ liالع,/ liالع,/ liالع,/ liالع,/ liالع,/ liالع,/ liالع,/ liالع/, liالع,/ liالع,/ liالع,/ liالع,/ liالع,/ liالع,/ liالع,/ liالع,/ liالع,/ liالع,/ liالع,/ liالع,/ liالع,/ liالع,/ liالع,/ liالع,/ liالع,/ liالع,/ liالع,/ liالع,/ liالع,/ liالع,/ liالع,/ liالع,/ liالع-/ liالع-/ liالع-/ liالع-/ liالع-/ liالع-/ liالع-/ liالع-/ liالع-/ liالع-/ liالع-/ liالع-/ liالع-/ liالع-/ liالع-/ liالع-/ liالع-/ liالع-/ liالع-/ liالع-/ liالع-/ liالع-/ liالع-/ liالع-/ liالع-/ liالع-/-/ liالع-/-/ liالع-/-/ liالع-/-/ liالع-/-/ liالع-/-/ liالع-/-/ liالع-/-/ liالع-/-/ liالع-/-/ liالع-/-/ liالع-/-/ liالع-/-/ liالع-/-/ liالع-/-/ liالع-/-/ liالع-/-/ liالع- / liالع-/-/ liالع-/-/ liالع-/-/ liالع-/-/ li / li / li / li / li / li / li / li / li / li / li / li / li / li / li / li / li / li / li / li / li / li / li / li / li / li / li / li / li / li / li / li / li / li / / li / li / li / li / li / li / li / li / li / li / li / li / li / li / li / li / li / li / li / li / li / li / li / li / li / li / li / li / li / li / li / li / li (2) |
5 0
4
6
4
1 1
(a)
#
4g
190 p2iua/la> 1c loy1 /jao
cclieWy/91gLc0 LsJyJy2
- (a + b) = 0
baio
123 1000000000000000000000000000000000000000
I 100
all
a4 = 1/2 · 64 = 840
bJzllgJyIjLg>Jl
Jg jgeaal gga jgejll oJr> a>
.
2b > 2a
g>Jl jyj yj loylo pao g| jaaal Jg>J<
.kaERCHER aos
Inhalt
5 AR 5 AR 6 AR 6 AR 1aog wslj allj aawgbr Jac aab 6 AR oal 7 AR 9 AR 10 AR 11 AR .... 12 AR
aale
Jusss

1d 10
Jolzillpssjglplxilg
- JJJJ1i: oJrJgJl aJzJll 89 jJgJjgo
JolldssyI JdIyI bIy
Therefore, a_i = 1/2

http://www.kaercher.com/dealersearch

71364 Winnenden (Germany)
Tel.: +49 7195 14-0
Fax: +49 7195 14-2212


- GENERAL INFORMATION
- USE THE STEAM CLEANER ONLY FOR PRIVATE HOUSEHOLDS. THE APPLIANCE IS INTENDED TO BE USED WITH STEAM AND CAN BE USED WITH THE APPROPRIATE ACCESSORIES AS DESCRIBED IN THESE OPERATING INSTRUCTIONS. YOU WILL NOT NEED ANY DETERGENT. PLEASE ADHERE TO THE SAFETY INSTRUCTIONS
- THE PACKAGING MATERIAL CAN BE RECYCLED. PLEASE DO NOT PLACE THE PACKAGING INTO THE ORDINARY REFUSE FOR DISPOSAL, BUT ARRANGE FOR THE PROPER RECYCLING
- NOTES ABOUT THE INGREDIENTS (REACH)
- SCOPE OF DELIVERY
- SPARE PARTS
- WARRANTY
- SAFETY DEVICES
- CAUTION
- PRESSURE CONTROLLER
- FUSE
- DESCRIPTION OF THE APPLIANCE
- ILLUSTRATIONS ON FOLD-OUT PAGE
- QUICK REFERENCE
- ATTENTION
- EFFECT OF DESCALER AND ADJUSTMENT OF WATER HARDNESS
- EFFECT OF DESCALER CARTRIDGE
- NOTE
- WATER HARDNESS LEVELS AND FLASHING IMPULSES
- SETTING OF THE WATER HARDNESS
- NOTES
- OPERATION
- ASSEMBLE THE APPLIANCE
- ILLUSTRATION A
- ILLUSTRATION B
- ILLUSTRATION C
- ILLUSTRATION D
- REMOVING THE ACCESSORIES
- ILLUSTRATION E
- FILLING THE WATER RESERVOIR
- TURNING ON THE APPLIANCE
- REFILLING WATER
- ADJUSTING THE STEAM QUANTITY
- INTERRUPTING OPERATION
- TURNING OFF THE APPLIANCE
- ILLUSTRATION
- ILLUSTRATION H
- ILLUSTRATION K
- STORING THE APPLIANCE
- HOW TO USE THE ACCESSORIES
- IMPORTANT APPLICATION INSTRUCTIONS
- CLEANING FLOOR SURFACES
- REFRESHING TEXTILES
- CLEANING OF COATED OR LACQUERED SURFACES
- CLEANING OF GLASS
- STEAM GUN
- DETAIL NOZZLE
- ROUND BRUSH (SMALL)
- POWER NOZZLE
- ROUND BRUSH (BIG)
- HAND NOZZLE
- FLOOR NOZZLE
- PARKING THE FLOOR NOZZLE
- CARE AND MAINTENANCE
- EMPTYING THE WATER TANK
- REPLACEMENT DESCALER CARTRIDGE
- INDICATOR LIGHT DISPLAY AT THE END OF THE OPERATING TIME
- INSERT NEW DESCALER CARTRIDGE
- CARE OF THE ACCESSORIES
- TROUBLESHOOTING
- NO STEAM
- INDICATOR LIGHT - WATER SHORTAGE IS CONTINUOUSLY RED
- INDICATOR LIGHT - WATER SHORTAGE FLASHES RED
- NO OR LITTLE STEAM DESPITE ENOUGH WATER IN THE WATER TANK
- STEAM LEVER CANNOT BE PRESSED ANYMORE
- INDICATOR LIGHT "REPLACEMENT DESCALER CARTRIDGE" IS ON / FLASHES RED
- OPERATING TIME OF THE CARTRIDGE COMPLETED SOON
- RESET BUTTON WAS NOT PUSHED AFTER THE REPLACEMENT OF THE CARTRIDGE
- THE DEVICE SWITCHES OFF AUTOMATICALLY
- OPERATING TIME OF THE CARTRIDGE OVER
- DELIVERY
- INTERRUPTING WORK
- PROTECTIVE DEVICES
- PRESSURE REGULATOR
- PROTECTION BY FUSE
- DESCRIPTION OF THE DEVICE
- BRIEF INSTRUCTIONS
- ACCESSORIES
- FILL THE WATER TANK
- SWITCHING ON THE DEVICE
- ADDING WATER
- ITEMS DELIVERED
- INFORMATION ON INGREDIENTS (REACH)
- THE MANUFACTURER
- SEE THE DIAGRAMS ON THE FOLLOWING PAGE
- QUICK START
- WARNING
- PRESS THE BUTTON TO RELEASE THE DESCALING CARTRIDGE FOR THE BOILER
- ADJUSTING THE WATER HARDNESS
- INSTRUCTION
- USE OF THE APPLIANCE
- IMPORTANT INSTRUCTIONS FOR USE
- CLEANING THE IRONING SURFACE
- IRONING TEXTILES
- TOUCHING SURFACES WITH COATING OR LACQUER
- CLEANING GLASS
- STEAM PISTOL
- STEAM NOZZLE
- CURVED BRUSH (SMALL)
- BLOW NOZZLE
- BRUSH COVER (LARGE)
- NOZZLE
- MARKING THE NOZZLE
- NOZZLE REPLACEMENT
- ADJUSTING THE WATER RESERVOIR
- CARTRIDGE REMOVAL TOOL FOR THE BOILER
- DESCALING
- CONTROL LAMP - INSUFFICIENT WATER, LIGHTS UP CONSTANTLY RED
- CONTROL LAMP - WATER LEVEL IS TOO LOW
- THE WATER LEVEL IN THE RESERVOIR IS TOO LOW. → FILL THE WATER RESERVOIR WITH ENOUGH WATER
- THE PUMP CANNOT BE SWITCHED ON
- THE CONTROL LAMP "DESCALING CARTRIDGE" LIGHTS UP / FLASHES RED
- THE CARTRIDGE OPERATING TIME IS ALMOST OVER
- THE RESET BUTTON WAS NOT PRESSED AFTER REPLACING THE CARTRIDGE
- MAKE SURE IT SWITCHES ON AUTOMATICALLY
- THE CARTRIDGE OPERATING TIME IS OVER
- IF THE RESET BUTTON WAS NOT PRESSED AFTER CHANGING THE BATTERY
- TECHNICAL DATA
- TAPAANTIA
- AXNCH NPNCTROOI
- OBEPEXHO
- PERNYLANTOP TNCKY
- ΠΛΑΚΉ 3AΠΟΔΙΧΗΝΚ
- ONNC NPUCTPOH
- O6PAXEHHAB.HA PO3BOPOTI
- INSTRUCTION MANUAL
- DEVICE OPERATION
- INSTRUCTIONS
- FILLING
- TURNING OFF THE DEVICE
- FIGURE G
- FIGURE H
- FIGURE K
- STORAGE
- FIGURE
- FIGURE J
- APPLICATION OF THE DEVICE
- CLEAN THE SURFACE TO BE TREATED
- TESTING THE STEAM OUTPUT
- CLEANING THE SURFACE WITH THE STEAM NOZZLE AND ACCESSORIES
- FIGURE C
- FIGURE D
- NOZZLE FOR FLOORS
- FIGURE F
- REPLACING THE PRINT CARTRIDGE
- THE CARTRIDGE CANNOT BE REFILLED
- THE RESET BUTTON AFTER REPLACING THE CARTRIDGE WAS NOT PRESSED
- THE PRINTER TURNS ON AUTOMATICALLY
- THE CARTRIDGE IS EMPTY
- TECHNICAL SPECIFICATIONS
- SAFETY INSTRUCTIONS
- ELECTRICAL CONNECTION
- BANK BILLS AND CASH COUNTING
- DEVICE DESCRIPTION
- SEE FIGURES IN THE APPENDIX
- SHORT DESCRIPTION
- INSTRUCTIONS FOR USING THE CARTRIDGE AND SAFETY WARNINGS
- INSTRUCTIONS FOR USING THE CARTRIDGE
- WATER QUALITY STANDARDS AND SAFETY STANDARDS
- DISPOSAL OF CARTRIDGES
- CYPET E
- CY CAYBIBIH TONTBIPY
- HA3AP AYDAPBIHBI
- BVIBMBIEWIPY
- HA3AP AYDAPBIHBL
- HYCKAY
- BE CAREFUL
- ENGINE MAINTENANCE
- STARTING THE ENGINE
- CYPER K
- BIYIBIMDBICAKRAY
- CYPET 1 CYPET J
- XA6BIBIKTAPDBI KOJAHAY
- MAHBI3DBI KOJAHAY TYPANBL HYCKAYNAPBL
- KEP 6ETIN TA3ANAY
- TOKBIMAHBI KAHAP TY
- KANTANFAH, XAIANFHAH HEMECE NAKTANFAH 6ETTEPDI TA3ANAY
- CLEANING THE APPLIANCE
- THIS APPLIANCE
- CLEANING THE FILTER (IF APPLICABLE)
- KYAT WYMERI
- DHENRENEK KBLNWAK (YNKEH)
- KOJ WYMERI
- FOR THE DEVICE
- USE
- △ CAUTION
- MAINTENANCE AND TECHNICAL DOCUMENTATION
- REPLACING THE BRUSHES
- PROPER BRUSH REPLACEMENT
- REPLACING THE CARTRIDGE
- CLEANING THE ROLLERS
- GETTING HELP
- THE WATER TANK IS FILLED WITH WATER THROUGH THE PIPE
- IF THERE IS WATER IN THE RESERVOIR, THE PIPE IS NOT NEEDED
- THIS IS NOT POSSIBLE WITH THE CURRENT SYSTEM
- KAKTBI KETIPYRE APHAHRFAH KAPTPNDXKDI AYBICTBIPY" 6AKBLAY WAMBL KBL3BL TYCNEH XAHADBI/XBINBIBIKTADBI
- KAPTRNNDXNDIN NAINDAANHY MEP3IMI JYBYIPDA AAYKTAANA
- KAPTRNIXDI AYBICTBIPFAHANKEIH RESET TYMECI 6ACBLMADAI
- BVIBIM 3DIRIHEN OEDI
- KAPTPNJJN NAIJAJANY MEP3IMI AAYTANYDA
- KAPTRNNDZI AYBICTBIPFAHHAN KEIH RESET TYMECI 6ACBLMADAI
- TEXHNKAIBIK MAFLYMATTAP
- AJLL
- A0Y1Y A@G
- BAIO
- A
- INHALT
- AALE
- THEREFORE, A_I
Brand : KARCHER
Model : SC3, SC 3 EASYFIX, SC3 EASY FIX
Category : Steam cleaner