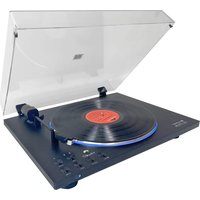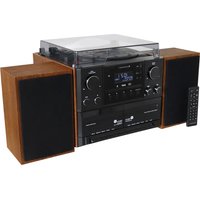
NR560 - Hi-fi system Soundmaster - Free user manual and instructions
Find the device manual for free NR560 Soundmaster in PDF.


User questions about NR560 Soundmaster
0 question about this device. Answer the ones you know or ask your own.
Ask a new question about this device
Download the instructions for your Hi-fi system in PDF format for free! Find your manual NR560 - Soundmaster and take your electronic device back in hand. On this page are published all the documents necessary for the use of your device. NR560 by Soundmaster.
USER MANUAL NR560 Soundmaster
natural_image
Black electronic device with control panel and external control panel (no visible text or symbols)DEUTSCH
ENGLISH
FRANÇAIS
NEDERLANDS
DANSK
ITALIANO
SVENSKA
PORTUGUÊS
ČEŠTINA
SLOVAK
POLSKA
Hersteller
text_image
Technical diagram of a vintage gramophone with numbered parts labeled 1 to 4natural_image
Diagram of a battery pack with an arrow indicating downward motion (no text or symbols present)INBETRIEBNAHME
LIEFERUMFANG
(1) repeat 1 → (2) repeat all track → (3) random → (4) off mode
Do not dispose of this product with the normal household waste at the end of its life cycle. Return it to a collection point for the recycling of electrical and electronic devices. This is indicated by the symbol on the product, user manual or packaging
The materials are recyclable according to their labeling. By reusing materials or other forms of recycling old devices and packaging, you are making an important contribution to protecting our environment. If necessary, remove batteries and personal data before disposal free of charge and ask your local authority about the responsible disposal point.
| WARNINGRisk of electric shockDo not open! |
Caution: To reduce the risk of electric shock, do not remove the cover (or back). There are no user serviceable parts inside. Refer servicing to qualified service personnel.
This symbol indicates the presence of dangerous voltage inside the enclosure, sufficient enough to cause electric shock.
This symbol indicates the presence of important operating and maintenance instructions for the device
Used batteries are hazardous waste and NOT to be disposed of with the household waste! As a consumer you are legally obligated to return all batteries for environmentally responsible recycling – no matter whether or not the batteries contain harmful substances*)
Return batteries free of charge to public collection points in your community or shops selling batteries of the respective kind. Only return fully discharged batteries ^* marked Cd = cadmium, Hg = mercury, Pb = lead
- Only use mercury and cadmium-free batteries.
- Used batteries are hazardous waste and NOT to be disposed of with the household waste!!!
- Keep batteries away from children. Children might swallow batteries.
- Contact a physician immediately if a battery was swallowed.
- Check your batteries regularly to avoid battery leakage.
- Batteries shall not be exposed to excessive heat such as sunshine, fire or the like.
- CAUTION: Danger of explosion if battery is incorrectly replaced
- Replace only with the same or equivalent type
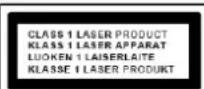
CAUTION - INVISIBLE LASER RADIATION WHEN OPENING THE COVER OR PRESSING THE SAFETY INTERLOCK. AVOID EXPOSURE TO THE LASER BEAM.
To prevent possible hearing damage, do not listen at high volume levels for long periods
- Use the device in dry indoor environments only.
- Protect the device from humidity.
- This apparatus is for moderate climates areas use, not suitable for use in tropical climates countries.
Safety, Environmental and Setup Instructions
- No objects filled with liquids, such as vases, shall be placed on the apparatus.
- The mains plug or an appliance coupler is used as the disconnect device, the disconnect devices shall remain readily operable.
- Connect this device to a properly installed and earthed wall outlet only. Make sure the mains voltage corresponds with the specifications on the rating plate.
- Make sure the mains cable stays dry during operation. Do not pinch or damage the mains cable in any way.
- A damaged mains cable or plug must immediately be replaced by an authorized service center.
- In case of lightning, immediately disconnect the device from the mains supply.
- Children should be supervised by parents when using the device.
- Clean the device with a dry cloth only.
- Do NOT use CLEANING AGENTS or ABRASIVE CLOTHS!
- Do not expose the device to direct sunlight or other heat sources.
- Install the device at a location with sufficient ventilation in order to prevent heat accumulation.
- Do not cover the ventilation openings!
- Install the device at a safe and vibration-free location.
- Install the device as far away as possible from computers and microwave units; otherwise radio reception may be disturbed.
- Do not open or repair the enclosure. It is not safe to do so and will void your warranty. Repairs only by authorized service/ customer center.
- No naked flame sources, such as lighted candles, should be placed on the unit.
- When you are necessary to ship the unit store it in its original package. Save the package for this purpose.
- In case of malfunction due to electrostatic discharge or fast transient (burst), remove and reconnect the power supply.
- If the unit is not using for a long period of time, disconnect it from the power supply by unplugging the power plug. This is to avoid the risk of fire.
LOCATION OF CONTROLS
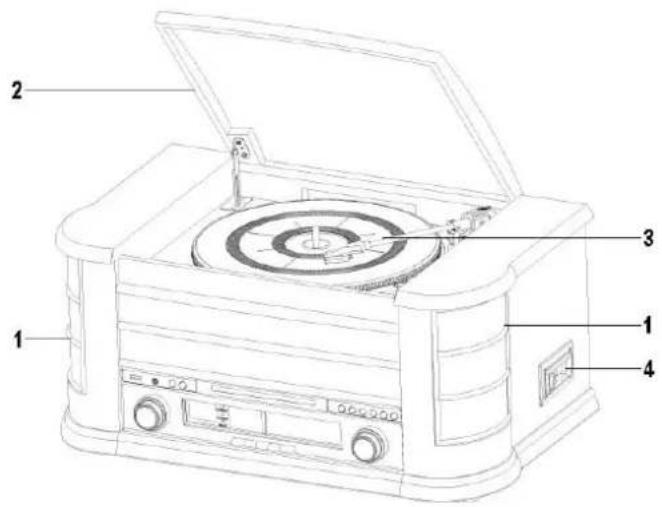
WHOLE VIEW
text_image
Technical diagram of a vintage gramophone with labeled parts including top, front, and side views1 Speaker
2 Dust cover
3 Turntable
4 Cassette player
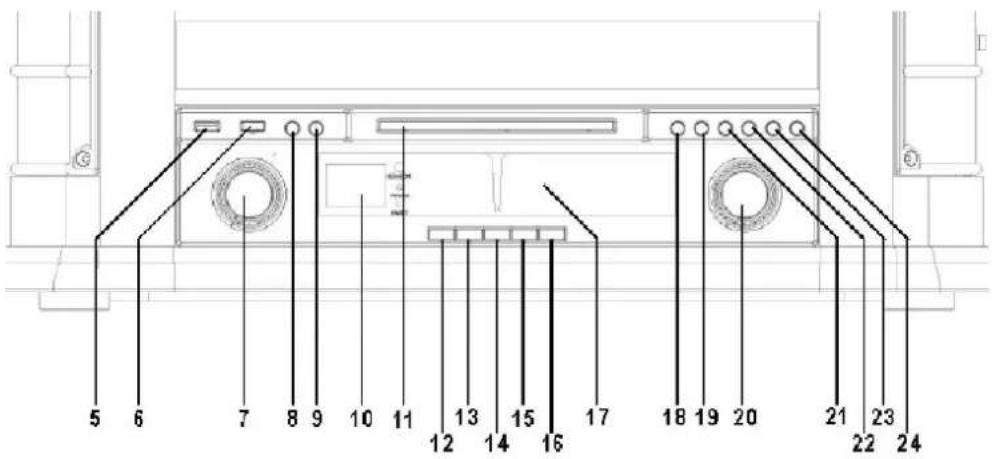
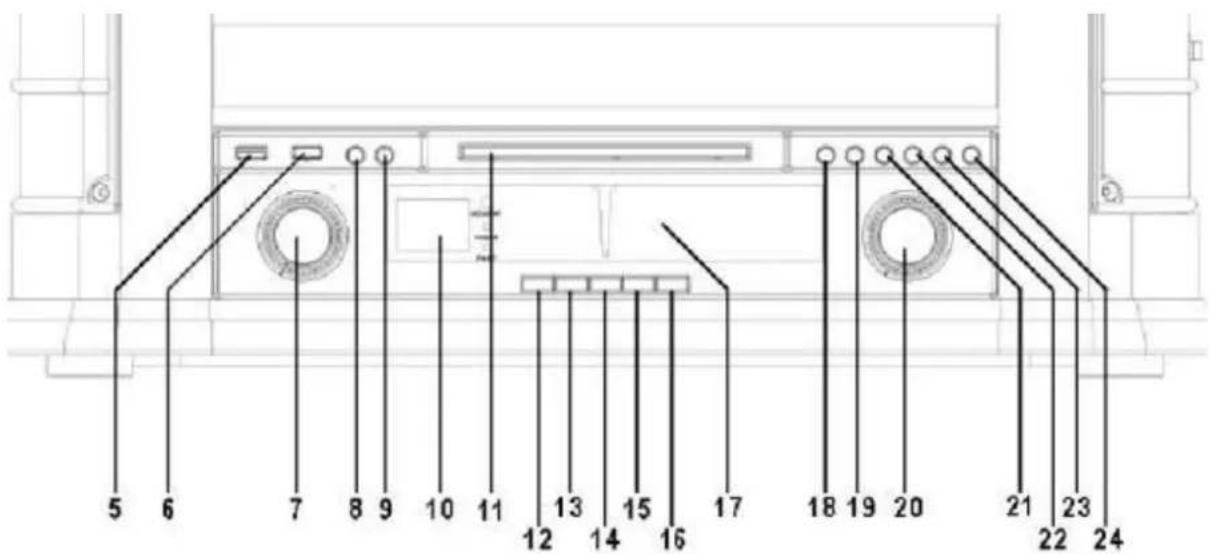
DETAILED FRONT VIEW
text_image
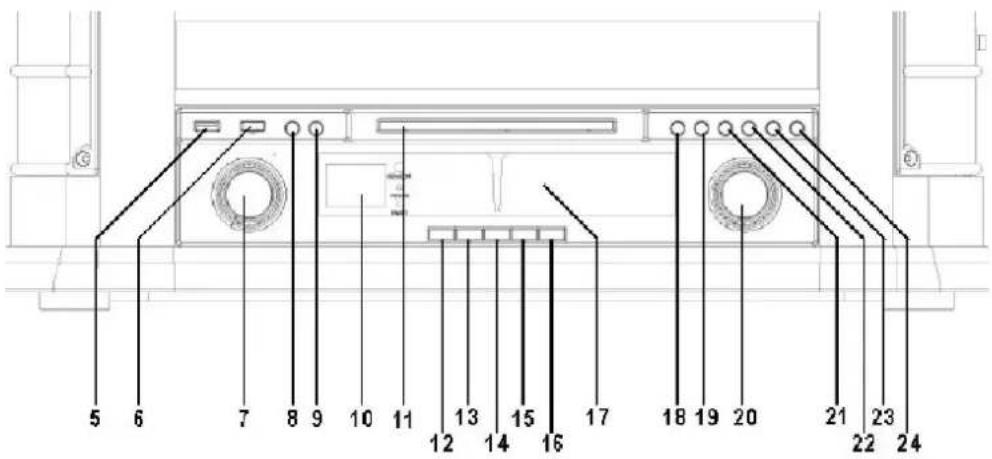
5 6 7 8 9 10 11 12 13 14 15 16 17 18 19 20 21 22 23 245 USB socket
6 Power On/Off
7 Volume knob
8 RECORD button
9 FUNCTION button
10 LCD Display
11 CD-Tray
12 USB button
13 FM/ST./MO button
14 CD button
15 TAPE button
16 PHONO button
17 FM/AM scale
18 PLAY/PAUSE button
19 STOP button
20 TUNING knob
21 DN/F.R button
22 UP/F.F button
23 PLAY.MODE button
24 OP/CL button
TOP VIEW
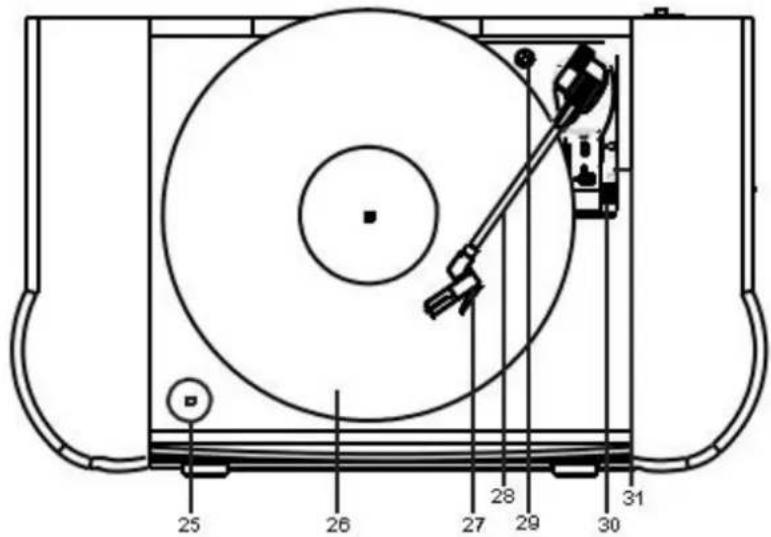
text_image
25 26 27 28 29 30 3125 Single adaptor
26 Turntable platter
27 Cartridge
28 Tone arm
29 Transit screw
30 Cue lever
31 Speed adjustment
BACK VIEW
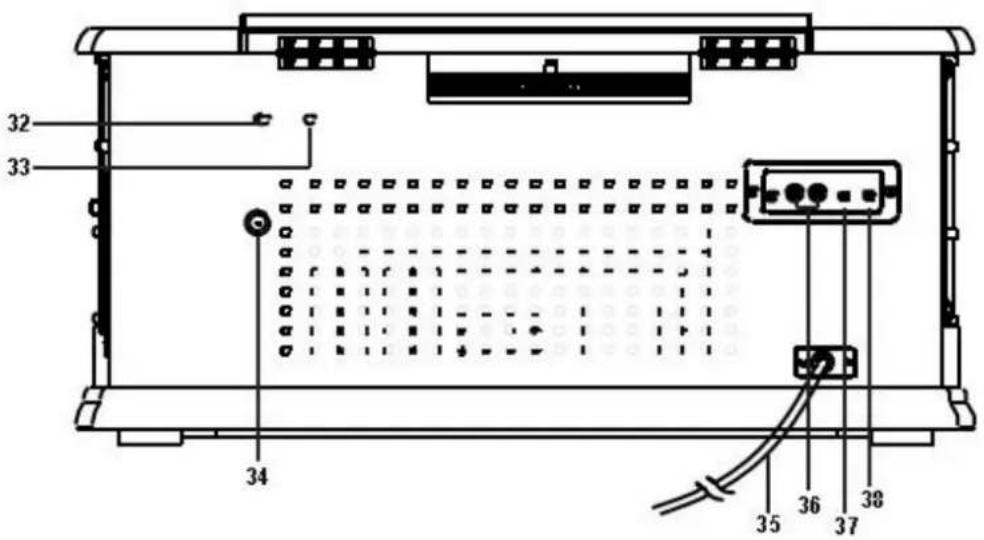
text_image
32 33 34 35 36 37 3832 Turntable adjust hole
33 Turntable adjust hole
34 Antenna Socket
35 AC cord
36 Line Out socket
37 Aux In socket
38 Headphones socket
REMOTE CONTROL
| 39 | POWER On/Off |
| 40 | DN/F.R |
| 41 | FOLDER / -10 |
| 42 | VOLUME - |
| 43 | P-Mode |
| 44 | TS |
| 45 | OPEN/CLOSE |
| 46 | FUNCTION |
| 47 | PLAY/PAUSE |
| 48 | UP/F.F |
| 49 | STOP |
| 50 | FOLDER / +10 |
| 51 | RECORD |
| 52 | VOLUME + |
| 53 | MUTE |
| 54 | PRESET / EQ |
| 55 | DELETE |
| 56 | PROG |
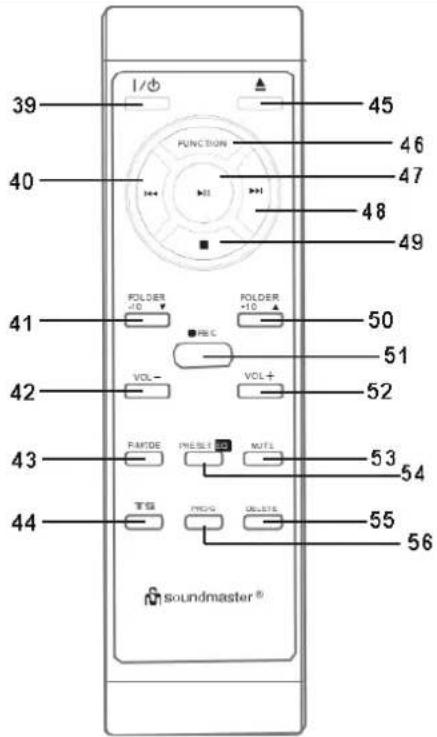
text_image
39 1/0 FUNCTION 40 41 FOLDER +0 VOL- P-MODE TSS FORDER +10 PULSE VOL+ MUTE MOG ORDER 45 46 47 48 49 50 51 52 53 54 55 56 soundmaster®INSTALLATION
CONTENT OF DELIVERY
Main unit
Instruction Manual
Antenna
POWER SUPPLY
➢ Ensure that the voltage is the same as that indicated on the ac adapter identification plate.
Connect the supplied mains cable to a properly installed safety power socket.
ERP power management
The unit will turn off complete automatically after around 20 minutes, when the unit is in standby or there is no audio signal in existence. To turn on the unit again press the "POWER" button on main unit.
BASIC OPERATIONS
POWER ON / OFF
Press the "POWER" button to turn the unit on/off.
SELECTING MODES
During playing mode, press the "FUNCTION" button repeatedly or use the function buttons below the FM scale to switch between the modes.
ADJUSTING VOLUME
Turn the "VOLUME" knob to decrease or increase the volume.
MUTE
During playing mode, press the "MUTE" button on the remote control, the sound will not be heard from the speaker.
Press the "MUTE" button again or the "VOLUME –" or "VOLUME +" button to cancel the mute function. The sound can be heard from the speakers again.
RADIO
Press the "FM" button or press the "FUNCTION" button repeatedly to select the FM mode.
TUNING
- Turn the "TUNING" knob to select the desired station.
- Adjust the Volume by turning the "VOLUME" knob.
FM-STEREO RECEIPTION
The FM-Stereo led indicator will light up to show FM-Stereo program is receiving.
BLUETOOTH®
Note: This unit only contains a Bluetooth receiver. It is not possible to connect a Bluetooth Headset or similar it! If you are using a Bluetooth audio device, make sure the working distance is within 10 meters. Different environment may have effect on the working distance.
- Press the "FUNCTION" button repeatedly to select the Bluetooth mode ("bt" will flash in the display).
- Turn on the Bluetooth function on your audio device and choose "NR560". After your audio device is paired successfully, the "Bluetooth mode" will stay on.
- Press the "PLAY/PAUSE" to start or interrupt the playback.
- Press the "DN/F.R" or "UP/F.F" button to choose the previous or next track.
USB
This unit only works with USB-Sticks which have a storage capacity of max. 16GB and FAT32 format.
- Plug the USB device in the USB socket on the front side of the unit.
- Press the "FUNCTION" button repeatedly on the RC or press the "USB" function button on the unit to select the USB mode.
- Press the "PLAY/PAUSE" to start or interrupt the playback.
-
- Press the "DN/F.R" or "UP/F.F" button to choose the previous or next track.
- Press "STOP" to stop the playback
Play modes are same as described in CD
AUX
- Plug the AUX cable at the back of the unit (not included)
- Press the "FUNCTION" button repeatedly to select the AUX mode.
- Start the playback of your external device.
LINE OUT
You can connect the system to your whole hi-fi system by connecting the line out socket to the auxiliary input socket with a RCA cable (not included).
PHONO
Press the "FUNCTION" button repeatedly or press the "PHONO" button to select Phono. "PHO" will be displayed
- Remove the stylus protector.
- Be sure that the tone arm is being detached from the tone arm rest before operating and re-secured again afterwards.
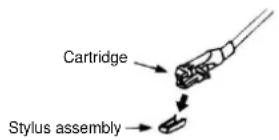
- Set the speed selector to the proper position depending on the record to be played.
- Place the record on the platter (use the spindle adaptor if required).
- Set the Tone arm lever to the up position.
- Lift the tone arm from the rest and slowly move it to the record side. The platter will start to rotate and position the tone arm over the desired position of the record.
- Pull down the Tone arm lever. The tone arm will come slowly on the recorder and start playback.
- At the end of record, the tone arm will return to the rest position automatically.
- To stop manually, lift the tone arm from the record and return it to the rest.
PLAY SUSPENSION
Set the cueing lever to the up position will life up the tone arm and then stop playback temporarily
Remark:
- Due to the auto return system was mechanical design and reset point will be affected after transportation. Thus, the tone arm will return to the rest automatically when first time place it to the platter and it was not the malfunction
- Due to the length of the record is various, if you find the tone arm cannot return automatically after playback of record. Please return the tone arm back to the rest position manually or adjust the auto return point as below procedure.
Important:
To make sure the turntable can play the record with different standard completely, a hole with "NO OPEN" PVC plate located at the back of the unit (33) to adjust the screw inside the turntable. When the turntable stop early and the auto-return, pls use a screw driver to turn the screw inside the hole about 45 degree in clockwise direction, if the record still cannot be played completely, stop play and re-turn the screw 45 degree in clockwise direction again, till the turntable can be play the record completely and auto return.
When the turntable cannot be stop and auto return but keep running after playing the record completely, pls use a screw driver to turn the screw inside the hole about 45 degrees in counterclockwise direction, if the record still cannot be played completely, stop play and re-turn the screw 45 degree in counter-clockwise direction again, till the turntable can be play the record completely and auto return.
TAPE
General operation
Set to cassette function by pressing the "TAPE" button.
Cassette playback: The system will start the playback automatically after inserting of cassette tape
Stop and ejection: Press the “Tape forward/eject” button completely inwards and the cassette tape will be ejected though the cassette door cover. The “Tape forward/eject” button will be keeping at lowest height position.
Fast forward: Press the “Tape forward/eject” button half inwards during p layback mode, the tape winding forward direction. The “Tape forward/eject” button will be keeping at middle height position.
Slightly press the “Tape forward/eject” button again to resume normal playback. The “Tape forward/eject” button will resume to the highest position.
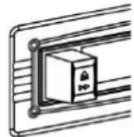
PLAY
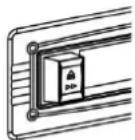
FAST FORWARD F
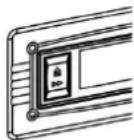
EJECT
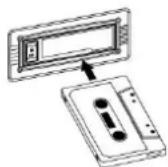
Remark
- Make sure the direction is correct when inserting the tape into the system.
- There is some searching noise can be heard and the system cannot perform normal playback function during fast forward mode.
- This is recommended to take out the cassette tape from the system every time after listening and don't leave the cassette tape inside the system when not under playback mode.
CD
PLAYING COMPACT DISC
GETTING START
- Press the "FUNCTION" button repeatedly or the "CD" button to select "CD" mode.
- Press "OP/CL" button to open the CD door.
- Place a CD with the printed side facing up inside the tray & then close the CD door.
- Focus search is performing, and then the unit will start to play the first track of disc automatically.
- Adjust the volume to desired level by "VOLUME" knob.
PLAY/PAUSE
To interrupt, press the "PLAY/PAUSE ➤ button once, the current running time will show on the LCD display. Press again to resume normal playback.
STOP MODE
If "Stop ■" button is pressed during play or pause mode, system will go to stop mode.
SKIP MODE
- During play or pause mode, if "UP/F:F ▶" button is pressed. It will go to next track and display the track no. and then remain the play or pause mode.
- During play or pause mode, if "DN/F.R ◀" button is pressed. It will go to the previous track, original track no. is displayed and remains the play or pause mode.
FOR MP3 DISC
- Press "FOLD + 10" button on the remote control, the folder no. will go up
- Press "UP/F.F" or "DN/F.R" button, the track no. change.
- When the desired track is being selected, press the CD "PLAY/PAUSE" button to start playback.
MP3 track format requirement:
- Mp3 bit rate: 32 kbps\~256 kbps.
- The performance of playing MP3 disc is various from the quality of recording disc and the method of recording. Furthermore, the searching lead-time for MP3-CD is longer than normal CD due to difference format.
REPEAT PLAY
You can listen to the desired tracks or folder repeatedly by this function.
REPEAT/RANDOM MODE
Press the "PLAY MODE" button before or during playback, a single track, single folder (MP3 only) or all the tracks can be played in difference mode as follow:
RANDOM PLAY
You can listen to all the tracks or folder in a random order by this function
For CD
(1) repeat 1 (2) repeat all track (3) random (4) off mode
| Play mode | Indicator on LCD display |
| Repeat track | REP |
| Repeat all | ○REP |
| Random | RANDOM |
| Off mode | ---- |
FOR MP3 DISC
(1) repeat 1 (2) repeat 1 folder (3) repeat all track (4) random (5) off mode
| Play mode | Indicator on LCD display |
| Repeat single track | REP |
| Repeat single folder | REP ALBUM |
| Repeat all track | REP 📊 |
| Random mode | RANDOM |
| Off mode | -------- |
CD DISC PROGRAMMING (BY REMOTE CONTROL)
Up to 20 tacks can be programmed for CD file and play in any order. Before use, be sure the system is at stop mode before programming:
- Set in CD or USB mode & stop the playback.
- Press the "PROG" button, "P01" and "PROG" will appear on LCD display. Moreover, it will indicate program no. and digits for track no. to be programmed.
- Select a desired track by pressing skip ▶or buttons.
- Press the "PROG" button to store the trace into memory.
- Repeat steps 3 and 4 to enter additional tracks into the memory if necessary.
- When all the desired tracks have been programmed, press "PLAY/PAUSE" button to play the disc in assigned order.
- To cancel the programmed file, press "STOP" button on remote handset until "PROG" is disappear on LCD display
ENCODING TO USB
The system is able to encode music to MP3 format and recording at memory media with USB connecting port. The system will create a music folder name.
A) CD encoding
- Insert a CD with the printed side facing up into the CD compartment and then close the CD compartment
- Press the "REC ●" button, the display will show "rEC".
- The CD start playing and USB encoding.
- The unit is separating each title.
- After completing of encoding, unit will stop playback automatically.
I) Encoding by program
- Place a CD with the printed side facing up inside the tray & then close the CD door
- Select the desire tracks by following "CD disc programming" procedures. Then press "CD PLAY/PAUSE" button to start playback.
- During CD playback, press the "RECORD" button LCD display will flash "rEC" a while then the display will appear "USB" and "ONE" are flashing. Encoding is performing now. After complete encoding, unit will stop playback automatically.
Remark:
- The recording speed is 1:1 and according to the actual plying time of the CD track
- The recording format is preset at – MP3 bit rate: 128 kbps, sampling rate: 44.1khz
- No song title will be recorded during encoding mode
- To interrupt the recording, press the "STOP" button during record mode
II) Copying of MP3 file
If putting a MP3 disc instead of a CD-disc, the system will copy the files to the USB if press the "Record" button. The operation procedures are the same as CD encoding as stipulate on above, and the system will switch to copy mode only if MP3 file being read.
B) Phono/Cassette/BT encoding
1) Set the function button to "Phono/Cassette/BT" mode and then press the "Record" button directly.
2) Now the system is starting the encoding mode. "USB" is flashing in the display
3) Start playback at phono or cassette for the track which you want to record to USB
4) After finish of recoding, press the "STOP" button until the LCD displays "END" and return to "PHONO/CASSETTE" mode.
C) Aux-in encoding
1) Connect the Aux-in jack with the device which you want to record
2) Set the function button to "AU" mode and then press the "Record" button directly.
3) Now the system is starting the encoding mode. "USB" is flashing in the display
4) Start playback the track which you want to record to USB
5) After finish of recoding, press the "STOP" button until the LCD displays "END" and return to "AU" mode.
D) Tuner encoding
1) Select "AM/FM" mode and tune to desired station for encoding, press the Radio "RECORD" button, LCD display will light up and appear "rEC"
2) The system is starting the encoding mode. "USB" is flashing in the display
3) After finish of recoding, press the "STOP" button until the LCD displays "END" and return to "FM" or "AM" mode.
E) Track separation (by remote handset)
You can divide the recording music from phono/Cassette/Tuner to USB track by trace during encoding. Every time when press the "Track separation" button once at remote handset during encoding from phono/tape/radio to USB, the system will generate a new track and continuous the recording. The current text at LCD display will flashing one time, it mean the unit is creating a new track successfully.
F) Delete title
Select USB mode, select the track to be deleted with the "▶" or " " button, press the "DELETE" button twice to delete the track.
Removing of USB
To remove the USB, turn off the power or switch the function mode to either CD or tuner first. For USB port, unplug it by pulling out the USB socket directly.
The current version of the manual can be downloaded from www.soundmaster.de Technical changes and misprints reserved.
Copyright by Woerlein GmbH, 90556 Cadolzburg, www.soundmaster.de
Duplication only with the permission of Woerlein GmbH

PROTECTION DE L'ENVIRONNEMENT

text_image
Technical diagram of a vintage radio with labeled parts including a top, front, and back views1 Haut-parleur
text_image
Technical diagram of a vintage gramophone with numbered parts labeled 1 to 41 Luidspreker
2 Stofkap
3 Draaiplateau
4 Cassettespeler
text_image
Technical diagram of a vintage gramophone with labeled parts including top, front, and side views1 Højttaler
2 Støvlåg
3 Pladetallerken
4 Kassetteafspiller
DETALJERET OVERSIGT OVER FRONTPANELET
text_image
5 6 7 8 9 10 11 12 13 14 15 16 17 18 19 20 21 22 23 245 USB-terminal
6 Tænd/Sluk
7 Volumenknap
8 Knappen OPTAG
9 Knappen FUNKTION
10 LCD-display
11 CD-skuffe
12 Knappen USB
13 Knappen FM/ST./MO
14 Knappen CD
15 Knappen KASSETTE
16 Knappen PLADESPILLER
17 FM/AM-skala
18 Knappen AFSPIL/PAUSE
19 Knappen STOP
20 Kanalvælger
21 Knappen NED/HURTIGT TILBAGE
22 Knappen OP/HURTIGT FREM
23 Knappen AFSPILNINGSTILSTAND
28 Tonearm
29 Transportskrue
INDSTILLING AF LYDSTYRKEN
Drej knappen "VOLUME" for at skrue op eller ned for lyden.
SLÅ LYDEN FRA
text_image
Technical diagram of a vintage gramophone with labeled parts including front panel, dials, and speaker1 Altoparlante
*) markerade Cd = kadmium, Hg = kvicksilver, Pb = bly
VARNING - OSYNLIG LASERSTRÅLNING NÄR DU ÖPPNAR LOCKET ELLER TRYCKER PÅ SÄKERHETSSPÄRREN. UNDVIK EXPONERING FÖR LASERSTRÅLEN.
text_image
Technical diagram of a vintage gramophone with labeled parts including front, top, and side views1 Högtalare
2 Dammskydd
3 Skivspelare
text_image
Technical diagram of a vintage gramophone with labeled parts including front panel, dials, and speaker grille1 Altifalante
text_image
Technical diagram of a vintage radio with labeled parts including a top, front, and back views1 Reproduktor
STEREOFONNÍ PŘÍJEM FM
Cadolzburg, www.soundmaster.de
text_image
Technical diagram of a vintage gramophone with numbered parts labeled 1 to 41 Reproduktor
2 Kryt proti prachu
3 Gramofón
CPRODUKT Z LASEREM
KLASY 1
UWAGA – EMITOWANA JEST NIEWIDOCZNA WIĄZKA LASEROWA PRZY OTWARTEJ POKRYWIE LUB PRZY NACIŚNIĘCIU ZATRZASKÓW BEZPIECZEŃSTWA. UNIKAJ KONTAKTU Z WIĄZKĄ LASERA.

text_image
Technical diagram of a vintage gramophone with labeled parts including top, front, and side viewsSZCZEGÓŁOWY WIDOK Z PRZODU
text_image
5 6 7 8 9 10 11 12 13 14 15 16 17 18 19 20 21 22 23 245 Gniazdo USB
natural_image
Diagram of a battery pack with an open circuit board and a downward arrow indicating direction (no text or symbols)INSTALACJA
ZAWARTOŚĆ DOSTAWY
Jednostka główna
Antena
Instrukcja obsługi
Pilot
ZASILACZ
D 90556 Cadolzburg, Germany
Hereby, Wörlein GmbH declares that this device is in compliance with the essential requirements and other relevant provisions of Directive 2014/53/EU.
A copy of the declaration of conformity can be obtained from the above address.