ICD2018 - Hi-fi system Soundmaster - Free user manual and instructions
Find the device manual for free ICD2018 Soundmaster in PDF.


User questions about ICD2018 Soundmaster
0 question about this device. Answer the ones you know or ask your own.
Ask a new question about this device
Download the instructions for your Hi-fi system in PDF format for free! Find your manual ICD2018 - Soundmaster and take your electronic device back in hand. On this page are published all the documents necessary for the use of your device. ICD2018 by Soundmaster.
USER MANUAL ICD2018 Soundmaster
natural_image
Exterior view of a modern audio workstation with sound block, control panel, and remote control (no visible text or symbols)DEUTSCH
ENGLISH
FRANÇAIS
NEDERLANDS
ITALIANO
DANSK
NORSK
SVENSKA
Hersteller
DAB+ (DIGITALRADIO)....15
UKW (FM)....16
SPOTIFY....17
MULTI-ROOM....18
UNDOK....19
BLUETOOTH ^® 19
KOPFHÖRERBETRIEB 19
EXTERNE EINGÄNGE 20
EINSCHLAFTIMER - SLEEP 21
WECKER - ALARM 21
STÖRUNGSBEHEBUNG 22
TECHNISCHE DATEN 24
BEDIENELEMENTE
FRONTANSICHT
text_image
1 2 3 4 5 6 7 8 9 10 11 VOLUMEAUTE 1 2 3 4 TUBE TUBE RVD ALABM SLEEP WIRELLBACK SLINCE 12 13 14 15 161 Display
2 CD-Fach (Einzug)
3 STANDBY / AN Taste
4 ALARM Taste
5 SLEEP Taste
6 STOP / EJECT Taste
7 Stationstasten 1...4
8 PRESET Taste
9 TITEL ZURÜCK / TUNE – Taste
10 PLAY / PAUSE Taste
11 TITEL VOR / TUNE + Taste
12 MULTI-FUNKTIONS-RAD / OK
13 INFO Taste
14 MENU / ZURÜCK Taste
15 SOURCE (Quelle) Taste
16 Kopfhörerbuchse
RÜCKANSICHT
text_image
1 POWER ON OFF CAUTION ICDDOT8 H/F MUSIC SYSTEM WITH WIFI STREAM 2 CABINET ANTIGER 3 CCAM OPT1 OPT2 LAN USB LINE OUT AUR IN 4 5 6 7 8 9 Made IN CHINAtext_image
SRC 1 SLEEP REP 2 INFO SHUF II OK MUTE MENU 1 2 3 4 5 6 7 8 9 10 P EQ ELITE line
text_image
STANDBY / EIN Taste SOURCE (Quelle) Taste ALARM 1 Taste ALARM 2 Taste SLEEP Taste INFO INFO Taste REP REPEAT Taste (Wiederholung) SHUFFLE Taste (Zufallswiedergabe) PLAY / PAUSE Taste STOP / EJECT Taste TITEL ZURÜCK Taste TITEL VOR Taste LAUTSTÄRKE + Taste LAUTSTÄRKE - Taste OK / STUMM Taste MENU MENÜ Taste ZURÜCK Taste ...10 Ziffern 1...10 PRESET Taste EQUALIZER TasteBATTERIEINSTALLATION
text_image
Schlüssel: 0 1 2 3 4 5 6 7 8 9 . _ - @ , a b c d e f g h i j k l m n o p q r s B K S P O K C A N C E Ltext_image
Choose media streaming options for computers and devices Name your metadata: My PC Choose default settings... Show devices on social network TCP/IP/SDN Allowed access using default settings. TCP/IP/SDN allowed Allowed access using default settings. TCP/IP/SDN allowed Allowed access using default settings. TCP/IP/SDN allowed Allowed access using default settings. TCP/IP/SDN allowed Allowed access using default settings. All devices are offered to access your shared media. Choose login-up and sharing options: Choose power options Tell me more about media streaming Read the privacy statement online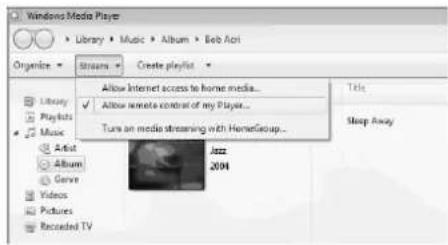
text_image
Windows Media Player Library Music Album Web Aci Organize Streams Create playlist Allow Internet access to home media... ✓ Allow remote control of my Player... Turn on media streaming with HomeGroup... Title Sleep Away Jazz 2004 Library Playlists Music Artist Album Genre Videos Pictures Recorded TV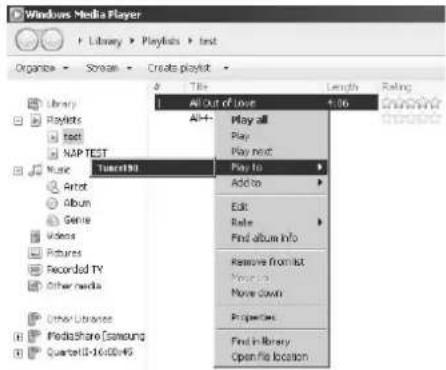
text_image
Windows Media Player Library > Playlists > text Organic > Screen > Create playlist Title Length Rating 1 All Out of Love 1.06 A++ Play all Play Play next Pay to Add to Edit Role Find album info Remove from list Your list Move down Properties Find in library Open file location Library Playlists Text NAP TEST Music iTunes30 Artot Album Genre Videos Pictures Recorded TV Other media Other Libraries MediaShare [Gameung] Quartells-16:00:45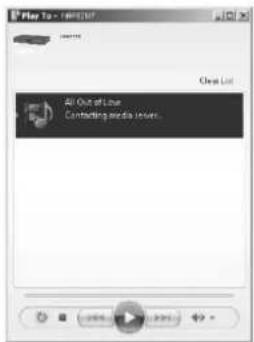
text_image
Play To - [1983-20] Clear List All Out of Line Contacting audio lines...text_image
DAB 03:28 BBC Radio 6Music to vote for a track that missed out on the 6Music playlist- Radiosender suchen
text_image
FM 03:28 Alice 97.3 Best Music in the worldtext_image
TV DVD player / TV outputs Digital Coaxial Outputtext_image
NGANG TV DVD player / TV outputs Digital Optical Outputtext_image
TV DVD player / TV outputs Analogue OutputDo not dispose of this product with the normal household waste at the end of its life cycle. Return it to a collection point for the recycling of electrical and electronic devices. This is indicated by the symbol on the product, user manual or packaging
The materials are reusable according to their markings. By reusing, recycling or other forms of utilization of old devices you make an important contribution to the protection of our environment.
Please contact your local authorities for details about collection points.
| WARNING | ! | |
| Risk of electric shockDo not open! |
Caution: To reduce the risk of electric shock, do not remove the cover (or back). There are no user serviceable parts inside. Refer servicing to qualified service personnel.

This symbol indicates the presence of dangerous voltage inside the enclosure, sufficient enough to cause electric shock.

This symbol indicates the presence of important operating and maintenance instructions for the device
Used batteries are hazardous waste and NOT to be disposed of with the household waste! As a consumer you are legally obligated to return all batteries for environmentally responsible recycling – no matter whether or not the batteries contain harmful substances*)
Return batteries free of charge to public collection points in your community or shops selling batteries of the respective kind.
Only return fully discharged batteries
*) marked Cd = cadmium, Hg = mercury, Pb = lead
- Only use mercury and cadmium-free batteries.
- Used batteries are hazardous waste and NOT to be disposed of with the household waste!!!
- Keep batteries away from children. Children might swallow batteries.
- Contact a physician immediately if a battery was swallowed.
- Check your batteries regularly to avoid battery leakage.
- Batteries shall not be exposed to excessive heat such as sunshine, fire or the like.
- CAUTION: Danger of explosion if battery is incorrectly replaced
- Replace only with the same or equivalent type
CAUTION - INVISIBLE LASER RADIATION WHEN OPENING THE COVER OR PRESSING THE SAFETY INTERLOCK. AVOID EXPOSURE TO THE LASER BEAM.
To prevent possible hearing damage, do not listen at high volume levels for long periods
- Use the device in dry indoor environments only.
- Protect the device from humidity.
- This apparatus is for moderate climates areas use, not suitable for use in tropical climates countries.
Safety, Environmental and Setup Instructions
- No objects filled with liquids, such as vases, shall be placed on the apparatus.
- The mains plug or an appliance coupler is used as the disconnect device, the disconnect devices shall remain readily operable.
- Connect this device to a properly installed and earthed wall outlet only. Make sure the mains voltage corresponds with the specifications on the rating plate.
- Make sure the mains cable stays dry during operation. Do not pinch or damage the mains cable in any way.
- A damaged mains cable or plug must immediately be replaced by an authorized service center.
- In case of lightning, immediately disconnect the device from the mains supply.
- Children should be supervised by parents when using the device.
- Clean the device with a dry cloth only.
- Do NOT use CLEANING AGENTS or ABRASIVE CLOTHS!
- Do not expose the device to direct sunlight or other heat sources.
- Install the device at a location with sufficient ventilation in order to prevent heat accumulation.
- Do not cover the ventilation openings!
- Install the device at a safe and vibration-free location.
- Install the device as far away as possible from computers and microwave units; otherwise radio reception may be disturbed.
- Do not open or repair the enclosure. It is not safe to do so and will void your warranty. Repairs only by authorized service/ customer center.
- No naked flame sources, such as lighted candles, should be placed on the unit.
- When you are necessary to ship the unit store it in its original package. Save the package for this purpose.
- In case of malfunction due to electrostatic discharge or fast transient (burst), remove and reconnect the power supply.
- If the unit is not using for a long period of time, disconnect it from the power supply by unplugging the power plug. This is to avoid the risk of fire.
TABLE OF CONTENT
LOCATIONS OF CONTROLS 2
REMOTE CONTROL 2
GETTING STARTED / SET UP....4
GET THE NETWORK ENVIRONMENT READY....4
MAIN MENU....4
SYSTEM SETTINGS....4
SETUP WIZARD ....5
EQUALISER....7
NETWORK....7
TIME/DATE 8
BRIGHTNESS......8
LANGUAGE......8
FACTORY RESET 8
SOFTWARE UPDATE ....8
INFO....8
INTERNET RADIO....9
CD....11
MEDIA PLAYER 12
SPOTIFY 15
DAB....16
FM 17
BLUETOOTH....18
HEADPHONE....18
EXTERNAL INPUT 19
MULTI-ROOM 20
UNDOK 21
SLEEP....21
ALARM....22
TROUBLESHOOTING....23
TECHNICAL SPECIFICATIONS....25
LOCATIONS OF CONTROLS
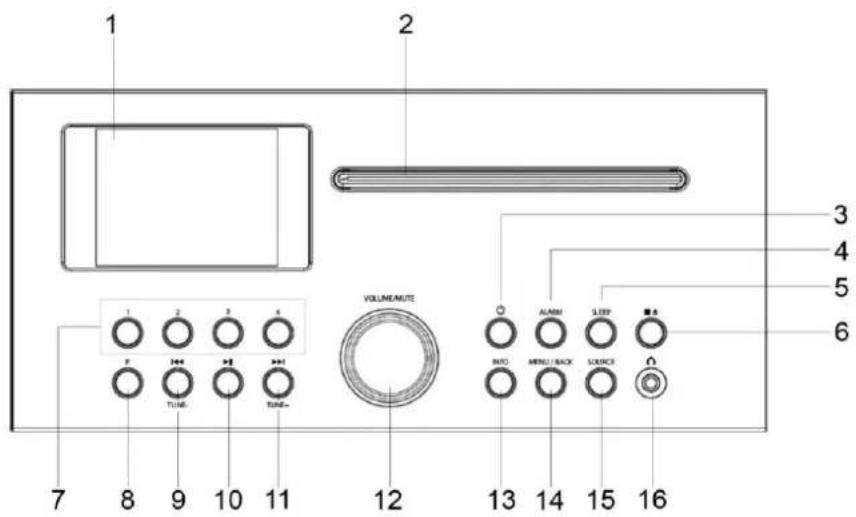
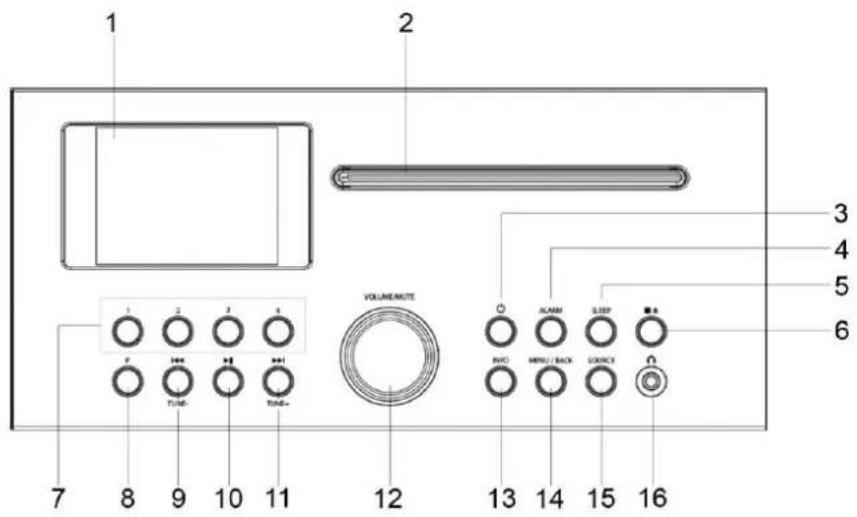
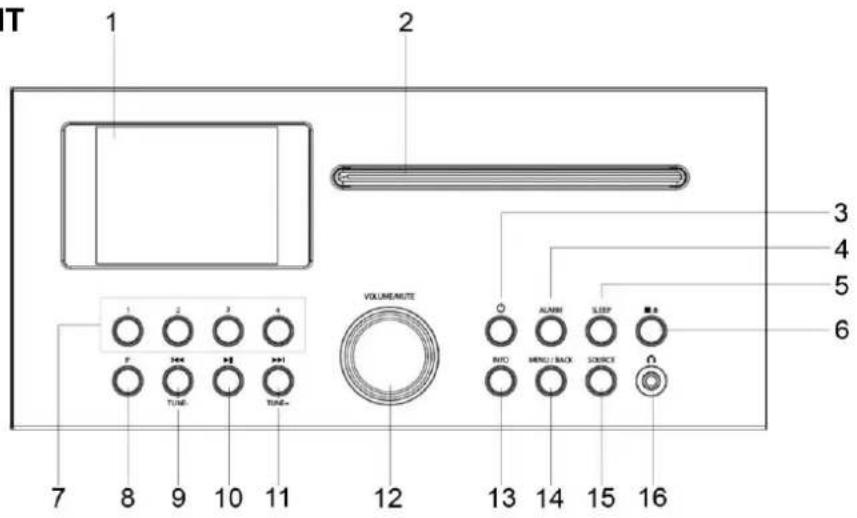
FRONT VIEW
text_image
1 2 3 4 5 6 7 8 9 10 11 VOLUME/AVUTE 12 13 14 15 161 Display
2 CD door (slot-in)
3 STANDBY / ON button
4 ALARM button
5 SLEEP button
6 STOP / EJECT button
7 Direct Preset Stations 1...4
8 PRESET button
9 SKIP BACK / TUNE - button
10 PLAY / PAUSE button
11 SKIP FORWARD / TUNE + button
12 MULTI FUNCTION knob / OK
13 INFO button
14 MENU / BACK button
15 SOURCE button
16 Headphone jack
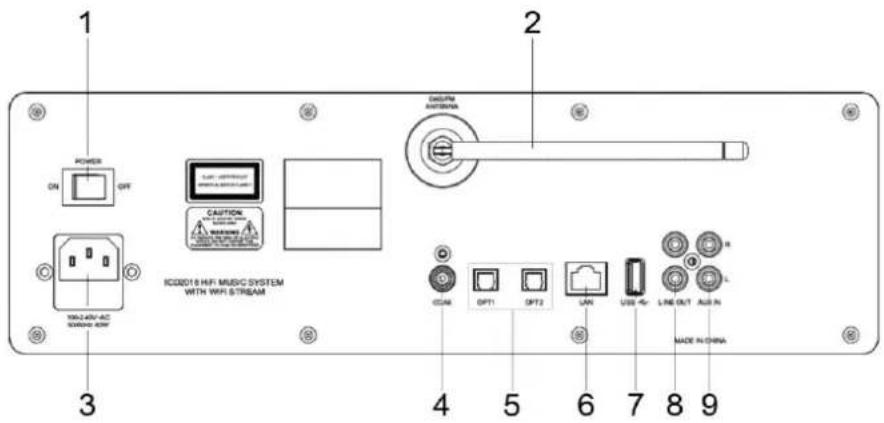
BACK VIEW
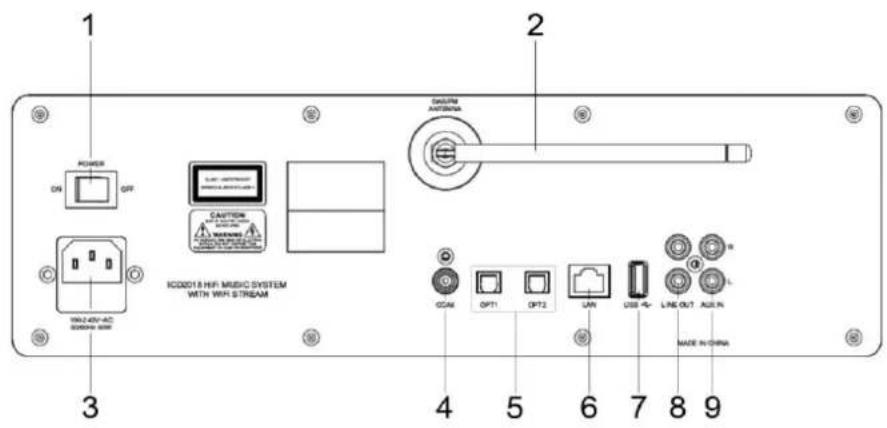
text_image
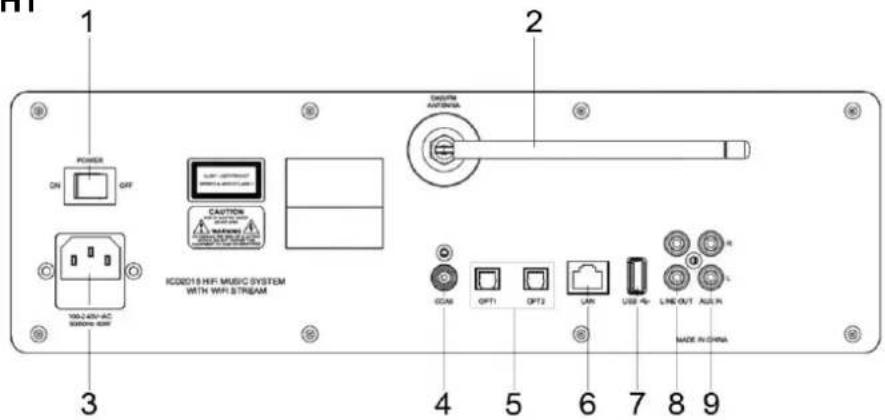
1 POWER OR OFF CAUTION ICDD2018 HiFi MUSIC SYSTEM WITH Wi-Fi STREAM 2 SUPPORT ANTERRA GCAM OPT1 OPT2 LAN USB FL LINE OUT AUR IN Made IN CHINA 3 4 5 6 7 8 91 Power switch on/off
2 Telescopic antenna
3 Main power socket
4 Coaxial input
5 Optical 1 / 2 input
6 LAN socket
7 USB jack
8 Line-Out
9 Aux-In
REMOTE CONTROL

text_image
STANDBY / ON button SOURCE button ALARM 1 button ALARM 2 button SLEEP button INFO Button REP REPEAT button SHUFFLE button PLAY / PAUSE button STOP / EJECT button SKIP BACKWARD button SKIP FORWARD button VOLUME + button VOLUME – button OK / MUTE button MENU MENU button BACK button 1 ... 10 NUMBERS 1...10 P PRESET button EQ EQUALIZER button- Press and slide the back cover to open the battery compartment of the remote control.
- Insert two AAA size batteries. Make sure the (+) and (-) ends of the batteries match the (+) and (-) ends indicated in the battery compartment.
- Close the battery compartment cover.
GETTING STARTED / SET UP
Connect the unit to a suitable power source using the power supply provided. After showing a starting screen, it will enter the last used listening mode. When the unit is started for the first time, the setup wizard will be launched automatically.
GET THE NETWORK ENVIRONMENT READY
Make sure you have setup the wireless network and you have the WEP, WPA or WPA2 security password to activate the connection.
You may also use the WPS (WiFi Protected Setup) function for easy pairing between the network device and ICD2018. Check if the light indicators on the network device are in appropriate status.
MAIN MENU
Under the main menu, you can select the following modes: Internet Radio, Spotify, Media player, DAB, FM, Bluetooth ^® , CD, OPT1, OPT2, COAX, AUX-In, Sleep and Alarm.
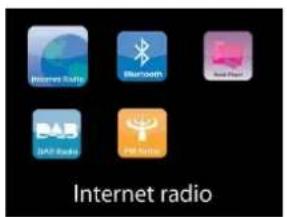
text_image
Internet radioSYSTEM SETTINGS
At the first time operation, system asks if you want to start the Setup Wizard. The Setup wizard guides you through the basic setup parameters for Time/Date and Network connection. To change any settings later all setting functions are accessible from the Settings Menu.
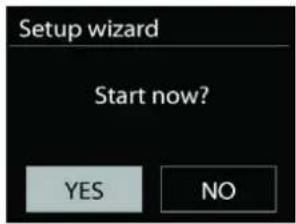
text_image
Setup wizard Start now? YES NOSETUP WIZARD
Time/Date Display format 1.
Select 12 or 24 as the time format.
Auto update 2.
The time and date can be updated manually or automatically from DAB, FM or network.
Auto update works with data sent over DAB, FM or the Internet. The clock is only updated when it is in a corresponding mode, so it is suggested to select a mode you use regularly.
DAB and FM use time signals broadcast with radio transmissions. Network uses a time signal sent from the Internet radio portal when in any network connected mode.
Time zone/daylight 3.
Set your time zone. If your country uses daylight saving and it is in effect, turn on the Daylight saving option.
Manual update 4.
If you set No update, the wizard prompts you to set the time and date manually. The date and time are displayed as dd-mm-yyyy and hh:mm.
The active value appears as flashing. Adjust each value with the "MULTI
FUNCTION" knob. Once the value is set, press the knob to continue setting with next value.
Network 5.
Keep Network connected
Select this option when the unit should the network connection in standby keep, when the function is confirmed, the unit wills faster connecting the internet and it is possible to switch on the unit with the "UNDOK" app.
Note: The standby power consumption is slightly increased with this function.
WLAN region
Select the WLAN region to obtain the optimal WLAN connectivity: Europe.
Scanning for the network
ICD2018 is compatible with all common network protocols and encryption methods. It searches for the available networks and list them out for you.
There will be hints for the type of network – if your network devices support WPS function, it will be [WPS] before the SSID (the name of the network device). Select the one you want to connect.
For the wireless connection, you will be asked for input the encryption in the next step. To enter the network's key, use the "MULTI FUNCTION" knob to move the cursor through the characters and press "OK" to confirm. As each character is selected, the key is built up near the top of the display.
There are three options accessible by tuning the navigate reel back before the first characters – Backspace, OK and Cancel.
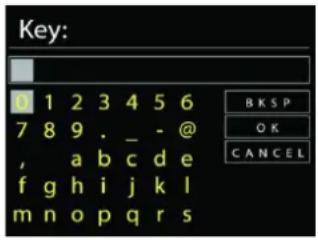
text_image
Key: 1 2 3 4 5 6 7 8 9 . _ - @ , a b c d e f g h i j k l m n o p q r s B K S P O K C A N C E LWPS encrypted network
WPS encrypted networks are identified by WPS at the start of the network name when the
ICD2018 searches the available AP. Use one of the following methods of connection: There is the shortcut WPS key on the unit.
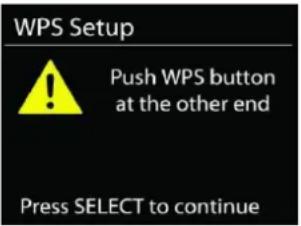
Push button
ICD2018 prompts you to press the connect button on the router. It then scans for a ready Push Button Connect network and connects.
text_image
WPS Setup ! Push WPS button at the other end Press SELECT to continuePin
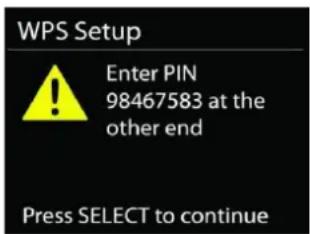
ICD2018 generates an 8-digit code number which you enter into the wireless router, access point, or an external registrar.
text_image
WPS Setup Enter PIN 98467583 at the other end Press SELECT to continueSkip WPS
Enter key as for a standard encrypted network.
For more information on setting up a WPS encrypted network, see your WPS router's instructions.
Completion
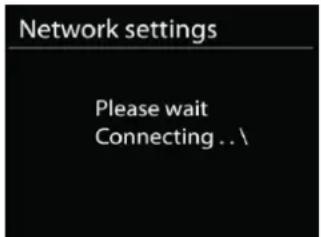
ICD2018 attempts to connect to the selected network.
text_image
Network settings Please wait Connecting .. \It will show connected if the setup is successful. If connecting fails,
ICD2018 returns to a previous screen to try again.
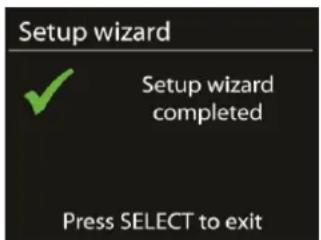
Press "OK" to quit the setup wizard.
text_image
Setup wizard ✓ Setup wizard completed Press SELECT to exitEQUALISER
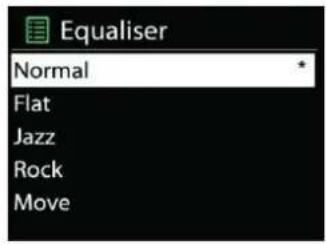
Several preset EQ modes are available: Normal, Jazz, Rock, Movie, Classic, Pop, News and My EQ.
In the My EQ settings, you can create your own EQ with custom bass and treble settings.
text_image
Equaliser Normal Flat Jazz Rock MoveNETWORK
- Network wizard
Enter to search AP SSID, then input the WEP / WPA key or choose Push Button/Pin/Skip WPS to connect to the wireless network.
- PBC Wlan setup
Push Button Configuration, it is to connect the AP that supports WPS (Wi-Fi Protected Setup).
• View settings
View the information of current connected network: Active connection, MAC address, Wlan region, DHCP, SSID, IP address, Subnet mask, Gateway address, Primary DNS and Secondary DNS.
- WLAN region
Select the WLAN region to obtain the optimal WLAN connectivity: Europe or Australia.
- Manual settings
Choose wireless network connection and enable or disable DHCP (Dynamic Host Configuration Protocol).
- Network profile
ICD2018 remembers the last four wireless networks it has connected to, and automatically tries to connect to whichever one of them it can find. From here you can see the list of registered networks. You can delete unwanted networks by turning and pressing then choosing YES to confirm delete.
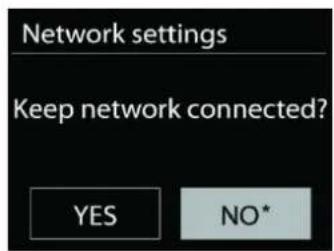
- Keep network connected
If you choose to keep network connected, the WiFi will not disconnect even you are in standby mode. Otherwise, the connection will only available in internet radio and music player modes. This option allows ICD2018 to be ready for DLNA streaming in any operating modes.
When Keep network connected is selected the standby power consumption is raised.
text_image
Network settings Keep network connected? YES NO*TIME/DATE
Set the time manually or automatically update, time format, time zone and daylight.
BRIGHTNESS
You may change the backlight of each environment (Normal or standby) to High, Medium High, Medium, Medium Low, Low or Off.
LANGUAGE
Change it as your preference.
FACTORY RESET
A factory reset resets all user settings to default values, so that time and date, network configuration and presets are lost. However, the ICD2018 's current software version is maintained, as is registration with the Internet radio portal. Internet radio favourites therefore remain unless you re-register your ICD2018 with another account on the portal website.
SOFTWARE UPDATE
From time to time, software upgrades may be created with bug fixes and/or additional features. You can either check manually or set ICD2018 to check periodically automatically (this is the default). If newer available software is detected, you will be asked if you want to go ahead with an update. If you agree, the new software is then downloaded and installed. After a software upgrade, all user settings are maintained.
NOTE: Before starting a software upgrade, ensure that ICD2018 is plugged into a stable main power connection. Disconnecting power during an upgrade may permanently damage the unit.
INFO
View the firmware version and the radio ID.
INTERNET RADIO
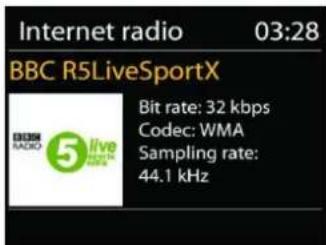
ICD2018 can play thousands of radio stations and podcasts from around the world though a broadband Internet connection.
When you select Internet radio, ICD2018 directly contacts the Frontier Silicon Internet radio portal (which is supported by v-tuner) to get a list of stations.
text_image
Internet radio 03:28 BBC R5LiveSportX BIT rate: 32 kbps Codec: WMA Sampling rate: 44.1 kHzThe portal also enables multiple lists of favourite stations that you can personalize.
If you are already listening to an Internet radio station, you can press "BACK" button to quickly return to the last visited branch of the menu tree, rather than "MENU" to go to the first menu of Internet radio mode.
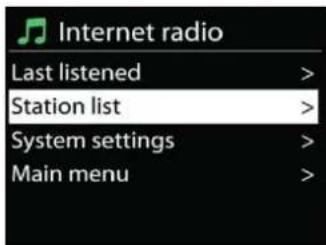
- Last listened
When Internet radio mode restarts, the last-listened station is selected. To select another recently used station, enter here to select the listed station. Most recent stations appear at the top of the list.
text_image
Internet radio Last listened > Station list > System settings > Main menu >- Station list
Browse Internet broadcasts that organized into different categories, Location, Genre, Popular and New. You can also find the station with Search by keyword.
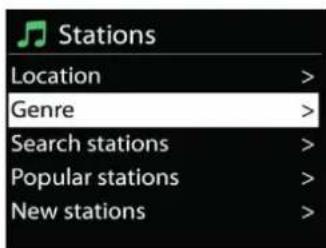
text_image
Stations Location > Genre > Search stations > Popular stations > New stations >- Favorites
Favorites are stored with the Internet radio portal, and are available through all Internet radios registered on the same account. Before favorites can be used, the radio has to be registered with the Internet radio portal.
- My added stations
Even though the Internet radio portal contains thousands of stations, you may want to listen to stations not listed. You can add your own via the portal.
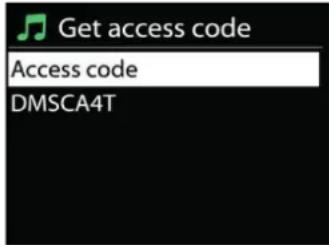
To register your ICD2018, choose Station list > Help > Get access code to get your radio's unique portal access code first. (Do not confuse the portal access code with the Radio ID from System settings.
Visit the portal website at www.wifiradio-frontier.com
text_image
Get access code Access code DMSCA4TIf this is your first visit to the portal, register for a new account, entering the following information:
- access code,
- your e-mail address,
- password,
- radio model.
If you already have an account and wish to add an additional radio, log in to your account and select My preferences > Add another Wi-Fi radio.
Once your radio is registered with the portal, you can immediately use the Internet radio favourites and added stations features.
- Presets
To store an Internet radio preset, press and hold the "PRESET" button on the unit or Remote Control until the display shows the "Save preset" screen. Select one of the 20 presets to save the current station and press "OK" to confirm. Or press and hold any of the 1 to 4 buttons on the unit or 1 to 10 on the Remote Control to store the current playing station into the preset directly.
To select a preset, press briefly the "PRESET" button, then select one of the listed preset stations and press "OK" to confirm. Or press any of the 1 to 4 buttons on the unit or 1 to 10 on the Remote Control to directly recall the presets.
You can store / recall up to 20 of your favourite stations to the memory. This will enable you to access your favourite stations 1-4 quickly and easily by using the numeric buttons on the panel, the numbers of the Remote Control or the list of preset stations in UNDOK app.
- Now playing information
While the stream is playing, the screen shows its name and description. To view further information, press “INFO” button on the radio or Remote Control. Each time you press “INFO” button, another set of information is displayed, cycle through name/description, genre/location, reliability, codec/sampling rate, playback buffer and today’s date.
CD MODE
Notice!
Improper operation can result in material damages!
Do not insert any recording media that deviate from the standard CD format (eg: mini-discs) into the CD player. These may not be played and ejected correctly. Insert only one disc at a time into the CD player.
- Press the "SOURCE" button on the unit or Remote Control to choose CD.
-
Insert a disc (with printing side facing up) until it is drawn inside. The display will say "Loading" and the disc functions will not work while the disc is loading. After Reading the display shows the following information in CD mode:
-
CD mode
- Time
• Elapsed playback time in minutes - Track number
- Playback status (playing/pause)
The Playback will begin automatically once the table of contents is read. The display will show "No Disc" when the unit is set to CD mode and there is no CD inside.
● To pause/resume playback of the CD, press the "PLAY / PAUSE" button
● To switch to the next track, press the "SKIP FORWARD" button once
- To fast forward through a track, press and hold the "SKIP FORWARD" button.
● To switch to the previous track, press the "SKIP BACKWARD" button twice
- To fast backward through a track, press and hold "SKIP BACKWARD" button.
- To stop CD playback, press the "STOP / EJECT" button.
- To eject the disc press in stop mode the "STOP / EJECT" button.
CD Program
- Set the unit in Stop mode
- Press the "PROG" button on the Remote Control. The display will show "T01 P01" and "T01" flash.
- Choose with "SKIP BACKWARD" or "SKIP FORWARD" the track which should be programmed and confirm the track by pressing the "OK" button on the Remote Control. The display changes to "P02".
- To choose more tracks do step 3 again.
- If all tracks are programmed press the "PLAY / PAUSE" button on the unit or Remote Control to start the programmed playback.
Shuffle mode
Press the "SHUF" button on the Remote Control. The display will show the Shuffle indicator.
Repeat one track
During playback press the "REP" button on the Remote Control once to repeat playback of the song you are listening to.
Repeat all tracks
During playback press the "REP" button on the Remote Control twice to repeat all songs from the CD. To cancel the Repeat mode press the "REP" button on the Remote Control until all symbols in the display disappear.
MEDIA PLAYER
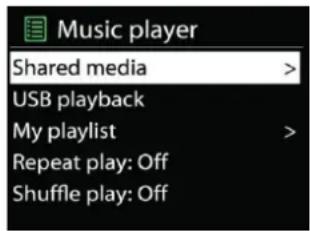
Music player mode plays audio files in MP3, WMA, WAV, AAC, FLAC or ALAC format from a computer on the local network. If you are already playing a music file, you can press "BACK" button on the radio to quickly return to the last visited branch of the menu tree.
text_image
Music player Shared media > USB playback My playlist > Repeat play: Off Shuffle play: OffYou can use "SKIP BACKWARD" button or "SKIP FORWARD" button to play the previous or the next track.
- Shared media
If you have set up shared media, you should see an entry consisting of
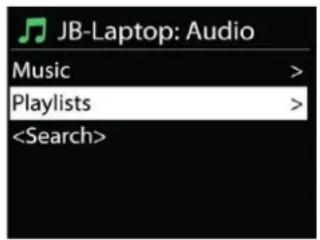
From this point on, the menus are generated from the shared media server. The first menu shows a list of media types, for example Music, Video, Pictures and Playlists. ICD2018 can only play music and playlists.
text_image
JB-Laptop: Audio Music > Playlists >There is also a search function which finds tracks in a similar way to Internet radio search.
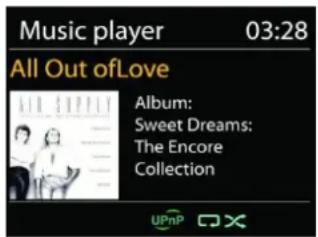
From Music, there are numerous ways of selecting tracks including Genre, Artist, Album, Composer and Rating. Once you have found a track you want to play, press "MULTI FUNCTION" knob. A short press plays the track immediately.
text_image
Music player 03:28 All Out of Love Album: Sweet Dreams: The Encore Collection- Prune Server
From time to time, it may be necessary to remove server displaying question marks in front of the server name from the server list. For example, if the device is moved to a new network or if a Wake-on-line is removed from your current network.
To perform this function: go to menu by using the Menu button > Prune servers > and select Yes.
- USB playback
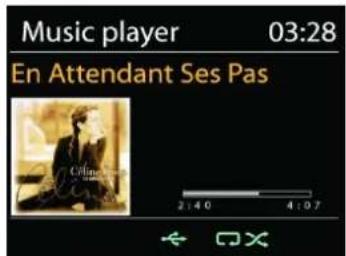
From this point on, menus are generated from the folders on the USB device. Browse folders with the "MULTI FUNCTION" knob and "BACK" button, or by using the UNDOK app. The display shows folder and file names (not necessarily track names).
Once you have found a track you want to play, press the "MULTI FUNCTION" knob on the device or click on the song title in UNDOK app.
text_image
Music player 03:28 En Attendant Ses Pas Cafina- Repeat / Shuffle
Allow you to repeat tracks or play them in random order.
• Now playing information
While a track is playing, the screen shows its track and artist (UPnP). There is also a progress bar with figures for elapsed and total track time. At the bottom of the screen, an icon indicates UPnP depending on the source. To view further information, press "INFO" button.
Each time you press "INFO" button, another set of information is displayed, cycling through the information: track/artist/progress bar/track times, album, codec/sampling rate, playback buffer and today's date.
• DMR (DLNA Streaming)
Shared music is a way of music streaming which you look for the music list and control playback from ICD2018. This topic will introduce another way to do the music streaming which is not necessary to control playback on ICD2018.
You can share the music files from PC, Android mobile or tablet, and directly use your PC, Android mobile, tablet or iPhone / iPad to control music playback on the ICD2018. It is simple called DLNA streaming.
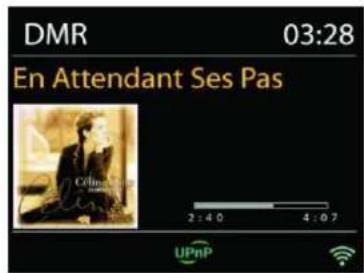
The PC system requirements for DLNA are Windows 7 or above, together with Windows Media Player 12. Setup as below:
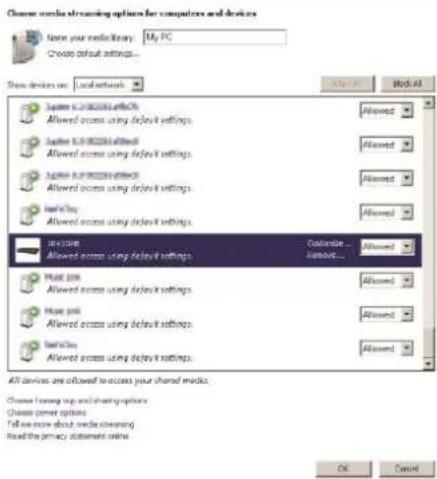
Firstly, share the media on your PC to ICD2018.
Control Panel > Network and Internet > Network and Sharing Center > Media streaming options
text_image
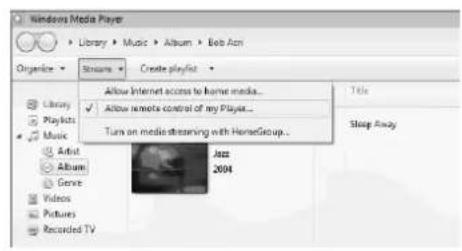
Choose media streaming options for computers and devices Name your media library: My PC Choose default settings... Show devices on: local network System 8.0.00001 settings Allowed access using default settings. System 8.0.00002 settings Allowed access using default settings. System 8.0.00003 settings Allowed access using default settings. System 8.0.00004 settings Allowed access using default settings. System 8.0.00005 settings Allowed access using default settings. System 8.0.00006 settings Allowed access using default settings. System 8.0.00007 settings Allowed access using default settings. System 8.0.00008 settings Allowed access using default settings. System 8.0.00009 settings Allowed access using default settings. System 8.0.00010 settings Allowed access using default settings. System 8.0.00011 settings Allowed access using default settings. System 8.0.00012 settings Allowed access using default settings. System 8.0.00013 settings Allowed access using default settings. System 8.0.00014 settings Allowed access using default settings. System 8.0.00015 settings Allowed access using default settings. System 8.0.00016 settings Allowed access using default settings. System 8.0.00017 settings Allowed access using default settings. System 8.0.00018 settings Allowed access using default settings. System 8.0.00019 settings Allowed access using default settings. System 8.0.00020 settings Allowed access using default settings. System 8.0.00021 settings Allowed access using default settings. System 8.0.00022 settings Allowed access using default settings. System 8.0.00023 settings Allowed access using default settings. System 8.0.00024 settings Allowed access using default settings. System 8.0.00025 settings Allowed access using default settings. System 8.0.00026 settings Allowed access using default settings. System 8.0.00027 settings Allowed access using default settings. System 8.0.00028 settings Allowed access using default settings. System 8.0.00029 settings Allowed access using default settings. System 8.0.00030 settings Allowed access using default settings. System 8.0.00031 settings Allowed access using default settings. System 8.0.00032 settings Allowed access using default settings. System 8.0.00033 settings Allowed access using default settings. System 8.0.00034 settings Allowed access using default settings. System 8.0.00035 settings Allowed access using default settings. System 8.0.00036 settings Allowed access using default settings. System 8.0.00037 settings Allowed access using default settings. System 8.0.00038 settings Allowed access using default settings. System 8.0.00039 settings Allowed access using default settings. System 8.0.00040 settings Allowed access using default settings. System 8.0.00041 settings Allowed access using default settings. System 8.0.00042 settings Allowed access using default settings. System 8.0.00043 settings Allowed access using default settings. System 8.0.00044 settings Allowed access using default settings. System 8.0.00045 settings Allowed access using default settings. System 8.0.00046 settings Allowed access using default settings. System 8.0.00047 settings Allowed access using default settings. System 8.0.00048 settings Allowed access using default settings. System 8.0.00049 settings Allowed access using default settings. System 8.0.00050 settings Allowed access using default settings. System 8.0.00156 settings Allowed access using default settings. Allowed access using default settings. Allowed access using default settings. Allowed access using default settings. Allowed access using default settings. Allowed access using default settings. Allowed access using default settings. Allowed access using default settings. Allowed access using default settings. Allowed access using default settings. Allowed access using default settings. Allowed access using default settings. Allowed access using default settings. Allowed access using default settings. Allowed access using default settings. Allowed access using default settings. Allowed access using default settings. Allowed access using double streaming Read the privacy statement onlineOpen Windows Media Player to enable Allow remote control of my Player.
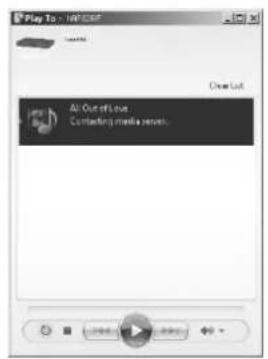
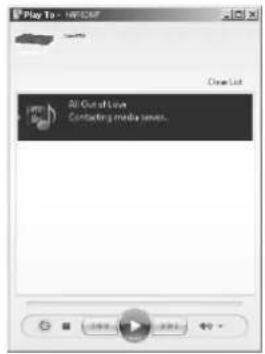
Right click any music in the library and choose Play to ICD2018. Then a box of music playback pops up for the streaming.
text_image
Windows Media Player Library > Music > Album > Bob Ann Organize > Streams > Create Playlist > Allow Internet access to home media... ✓ Allow remote control of my Player... Turn on media streaming with HomeGroup... Title Sleep Away Library Playlists Music Artist Album Genre Videos Pictures Recorded TV Jazz 2004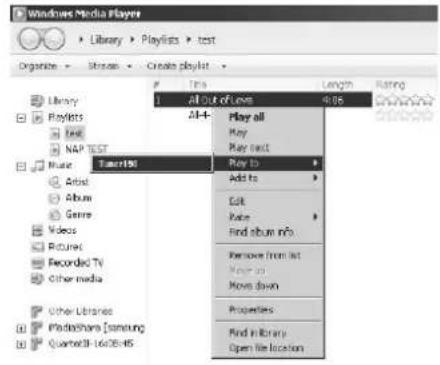
text_image
Windows Media Player Library > Playlists > test Organize > Stream > Create playlist Title All out of own Play all Play text Play to Add to Edit Paste Find album info Remove from list Move down Properties Find in library Open file location Library Playlists Text NAP TEST Music Tumor195 Album Genre Videos Pictures Recorded TV Other media Other Libraries Platndishans [Samsung] Quarter33-16028-HSThen a box of music playback pops up for the streaming.
text_image
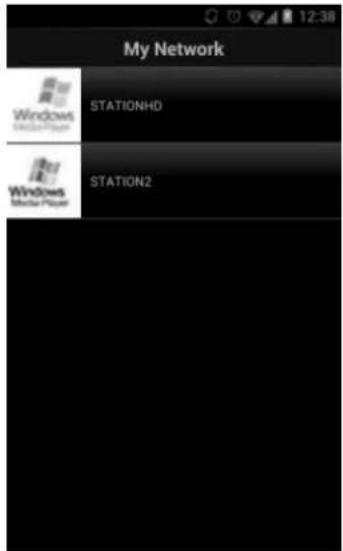
Play To: HIF.COM All Out of Use Controlling media server.• Control on Smartphone / Tablet
You may search (with keyword: DLNA) and install any free or commercial DLNA Apps from Google Play or Apple Store if you are using Android mobile, tablet or iPhone / iPad.
It is suggested to use iMediaShare on Android mobile, tablet or iPhone/iPad.
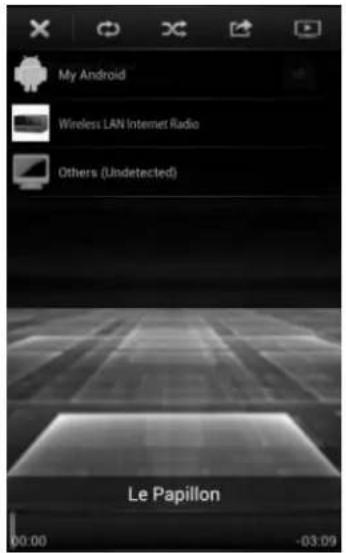
Procedures for playing shared music on the app are as follows:
- Select ICD2018 as the player.
text_image
My Android Wireless LAN Internet Radio Others (Undetected) Le Papillon 00:00 -03:09- Select music server and choose the music.
NOTE: Some Apps may not support streaming music from iPhone/iPod but iPhone/iPod could still be used to control streaming music from other servers.
Some Apps may allow to play the music to multi players at the same time.
Some Apps can create a playlist if you choose several music.
Study the own instruction of the software or Apps you use to enjoy DLNA streaming if necessary.
text_image
My Network Windows StationHD STATION2SPOTIFY
How to use Spotify Connect
You'll need Spotify Premium to use Connect.
- Connect your ICD2018 to your wifi network.
- Open up the Spotify app on your phone, tablet or laptop using the same wifi network.
- Play a song and select "Devices available".
- Select your ICD2018 and start listening.
The Spotify Software is subject to third party licenses found here: developer.spotify.com/esdk-third-party-licenses
DAB
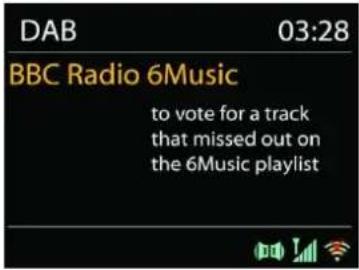
DAB mode receives DAB or DAB plus digital radio signal and displays information about the station, streaming audio and the programme details.
text_image
DAB 03:28 BBC Radio 6Music to vote for a track that missed out on the 6Music playlist- Scanning for stations
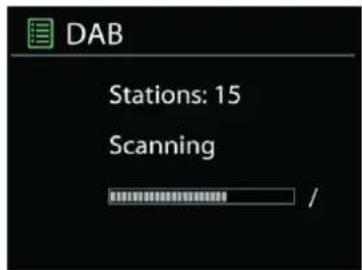
The first time you select DAB radio mode, or if the station list is empty, ICD2018 automatically performs a full scan to see what stations are available. You may also need to start a scan manually to update the list of stations for one of the following reasons:
• Available stations change from time to time.
- If reception was not good for the original scan, this may result in an empty or incomplete list of available stations.
- If you have poor reception of some stations (burbling), you may wish to list only stations with good signal strength.
text_image
DAB Stations: 15 Scanning /To start a scan manually, choose Full scan. To scan only stations with good signal strength, select Local scan.
Once the scan is complete, the radio shows a list of available stations.
To remove stations that are listed but not unavailable, choose Prune invalid.
Press the "BACK" button to view a list of stations and press "OK" to select. Once selected, the station plays and the screen shows information about station, track or show as broadcast.
- Presets
To store an Internet radio preset, press and hold the "PRESET" button on the unit or Remote Control until the display shows the "Save preset" screen. Select one of the 20 presets to save the current station and press "OK" to confirm. Or press and hold any of the 1 to 4 buttons on the unit or 1 to 10 on the Remote Control to store the current playing station into the preset directly.
To select a preset, press briefly the "PRESET" button, then select one of the listed preset stations and press "OK" to confirm. Or press any of the 1 to 4 buttons on the unit or 1 to 10 on the Remote Control to directly recall the presets.
You can store / recall up to 20 of your favourite stations to the memory. This will enable you to access your favourite stations 1-4 quickly and easily by using the numeric buttons on the panel, the numbers of the Remote Control or the list of preset stations in UNDOK app.
• Now playing information
While the stream is playing, the screen shows its name and DLS (Dynamic Label Segment) information broadcast by the station giving real-time information such as programme name, track title and contact details. Stereo broadcasts are indicated with an icon at the bottom of the screen. To view further information, press "INFO" button on the radio.
Each time you press "INFO" button on the radio, another set of information is displayed, cycling through DLS text, programme type, ensemble name/frequency, signal strength/error rate, bite rate/codec/channels and today's date.
SETTINGS
• Dynamic range compression (DRC)
If you are listening to music with a high dynamic range in a noisy environment, you may wish to compress the audio dynamic range. This makes quiet sounds louder, and loud sounds quieter. You can change DRC as off, low or high.
- Station order
You can choose the order of the DAB station list to be either Alphanumeric, Ensemble or Valid.
Ensemble lists groups of stations that are broadcast together on the same ensemble. Valid lists valid stations first, alphanumerically, then off-air stations.
FM
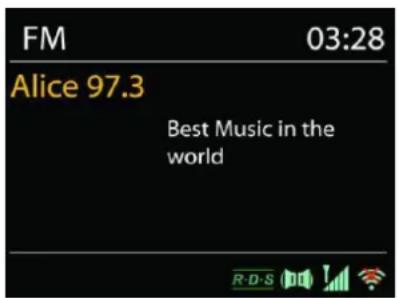
FM radio mode receives analogue radio from the FM band and displays RDS (Radio Data System) information about the station and where broadcast.
To find a station, press and hold "TUNE-" or "TUNE+". The frequency display starts to run and scans the FM band and stops at the next station.
To manual scan press the "TUNE-" or "TUNE+" button. The unit search in 0.1MHz steps.
text_image
FM 03:28 Alice 97.3 Best Music in the world- Preset
To store an Internet radio preset, press and hold the "PRESET" button on the unit or Remote Control until the display shows the "Save preset" screen. Select one of the 20 presets to save the current station and press "OK" to confirm. Or press and hold any of the 1 to 4 buttons on the unit or 1 to 10 on the Remote Control to store the current playing station into the preset directly.
To select a preset, press briefly the "PRESET" button, then select one of the listed preset stations and press "OK" to confirm. Or press any of the 1 to 4 buttons on the unit or 1 to 10 on the Remote Control to directly recall the presets.
You can store / recall up to 20 of your favourite stations to the memory. This will enable you to access your favourite stations 1-4 quickly and easily by using the numeric buttons on the panel, the numbers of the Remote Control or the list of preset stations in UNDOK app.
- Now playing information
While the stream is playing, the screen shows its frequency, or if RDS signal is available, station name and any further RDS information such as proramme name, title and other details. Stereo broadcasts are indicated with an icon at the bottom of the screen. To view further information, press Info button on the radio.
Each time you press "INFO" button on the radio, another set of information is displayed, cycling through Radio text, programme type, frequency and today's date.
SETTINGS
- Scan settings
Choose FM at first, it will go to a specific station playing. Then press "MENU" on the radio to get above table.
By default, FM scans stop at any available station. This may result in a poor signal-to-noise ratio (hiss) from weak stations. To change the scan settings to stop only at stations with good signal strength, select "Yes" after choosing Strong station only.
- Audio settings
All stereo stations are reproduced in stereo. For weak stations, this may result in a poor signal-to-noise ratio (hiss). To play weak stations in mono, select FM weak reception: Listen in mono only and then YES.
BLUETOOTH
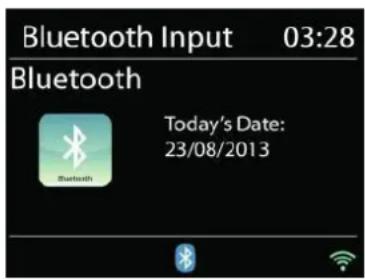
When you select the Bluetooth mode, the device is entering to pairing and the BT icon at the bottom of the screen will flash.
Turn on your smartphone, tablet or other Bluetooth devices to search for the device.
The Bluetooth pairing name is "ICD2018".
When pairing is successful, the Bluetooth indicator will light up and stop flashing.
To release BT pairing, turn off or unpair your smartphone, table or other Bluetooth devices.
text_image
Bluetooth Input 03:28 Bluetooth Today's Date: 23/08/2013Press "PLAY / PAUSE" on the radio or Remote Control to start or pause the playback. You can press "SKIP BACKWARD" or "SKIP FORWARD" on the radio or Remote Control to play the previous or next track.
HEADPHONE
To listen to music privately, use headphones with a 3.5 stereo jack plug and connect it to the headphones socket. The speakers will then be muted.

To prevent possible hearing damage, do not listen at high volume levels for long periods.
EXTERNAL INPUT
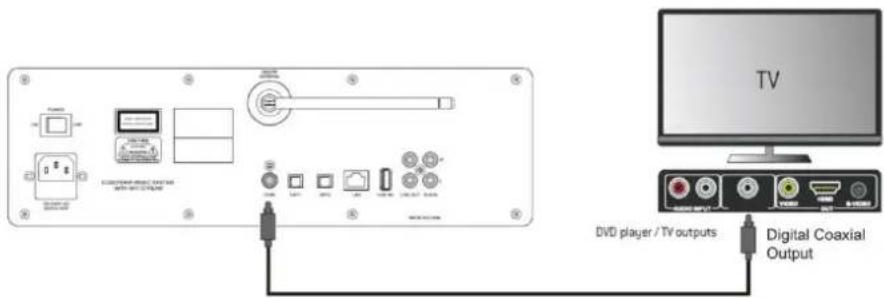
COAXIAL IN
text_image
TV DVD player / TV outputs Digital Coaxial OutputDigital Coaxial input
Connecting DVD player / Set-Top Box / TV outputs to digital coaxial inputs from the sound board. Use a Digital Coaxial audio cable to connect the device outputs with the COAX input socket from the sound board.
OPTICAL IN

text_image
TV DVD player / TV outputs Digital Optical OutputDigital Optical input
Connecting DVD player / Set-Top Box / TV outputs to digital coaxial inputs from the sound board. Use a Digital Optical audio cable to connect the device outputs with the OPT1 or OPT2 input socket from the sound board.
Set the digital audio output from your DVD player / Set-Top Box / TV to "PCM". See how to do this in the user manual from the connected device.
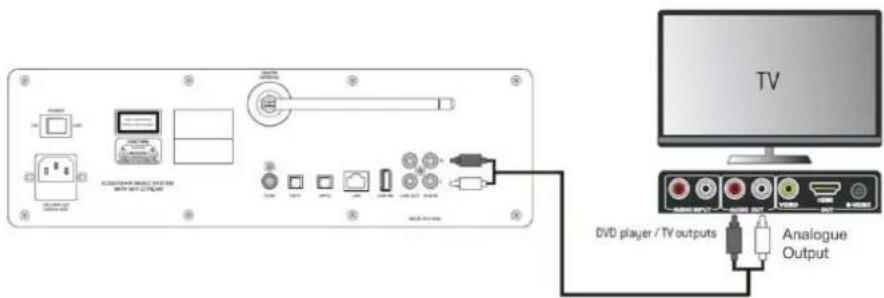
AUX-IN
text_image
TV DVD player / TV outputs Analogue OutputAnalogue input
Connecting DVD player / Set-Top Box / TV outputs to analogue inputs from the sound board. Use a RCA audio cable to connect the DVD player/TV outputs with the AUX (L/R) input socket from the sound board.
MULTI-ROOM
Multi-room function is powered by Frontier silicon. When there are more than one multi-room network devices with the same Frontier silicon chipset, they can be connected all together and stream the seamless audio to all these devices.
If you are using ICD2018, you can use the panel button with the instructions below or the UNDOK app (available for both Android devices and iOS devices) to create multi-room group, and then share the music from one of the devices to all the devices of this group in the same local area network (LAN).
- View details
State: Ungrouped as the standalone radio; or grouped with multi room function as server or client device;
- Create new group
To create a new group by inserting group name. After creating the group, you can be possibly discovering the available client devices in the same local area network (LAN). By selecting the names from the list of available clients, these devices will be added into the new created group for multi-room music streaming.
- Add to group
Adding available clients into the server group for multi-room music streaming.
- List current clients
All the connected multi-room client devices will be listed with its device names. If you want to remove the client from the current multi-room group, please use the "MULTI FUNCTION" knob to highlight and select the device for removal.
If there is no client in the group, the server will be still existing as for multi-room streaming ready.
- Leave group
Select this option will cause the device to leave current multi-room group. Note: The server or client device can also be possible to leave the group. If the server has left the group, a client device will be promoted as server for the multi-room group.
- Dissolve group
Only the server can be able to dissolve the group or by the control of UNDOK app.
UNDOK
Your ICD2018 may be used with other products as part of a multi-room system.
These products may be grouped and synchronised with several units to play the same content around your home.
Note: These products must be connected to the same local area network (LAN) for multi-room function.
• Control via the UNDOK app
The ICD2018 supports remote control from Apple iPhone, iPad and Android using the UNDOK app. The apps are available in Apple's app store and Google's android play.
You can control a single ICD2018, a group of these devices, or even multiple groups using the UNDOK app or your radio's controls.
The UNDOK app allows you to:
- Create a group
- Rename a group
• Edit a group - add or remove one or more products - Delete a group
• Control a group - choose operating mode and browse for content - Adjust volume for an entire group or for individual products within a group
• Control products which have not been assigned to any group - Control all the modes of the ICD2018, including Internet Radio, Media Player, USB playback, DAB, FM, Bluetooth, CD and AUX-In
- Adjust the volume level of current playback
- Setting EQ for various audio presets
- Setting Sleep timer
• Editing the displayed name of the radio.
SLEEP
To set the sleep timer, press "SLEEP" on the unit or Remote Control. Choose from Sleep OFF, 15mins, 30mins, 45mins or 60mins.
Once you select a sleep period, the system returns to the "Now playing" screen.
If you go under Main Menu to Sleep press "MENU" on the unit or Remote Control to return to the "Now playing" screen.
ALARM
There are two versatile wake-up alarms with snooze facility, and a sleep function to turn the system off after a set period. Each alarm can be set to start in a particular mode.
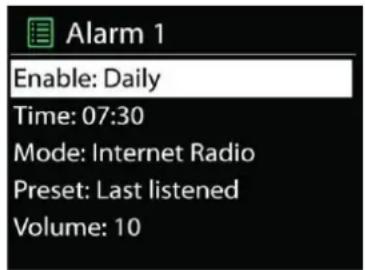
Press "ALARM" button on the unit or "ALARM1" or "ALARM2" on the Remote Control or select Alarm under Main menu to set or change an alarm.
text_image
Alarm 1 Enable: Daily Time: 07:30 Mode: Internet Radio Preset: Last listened Volume: 10Select the alarm number (1 or 2) then configure the following parameters:
- Enable: on/off, Frequency: Daily, Once, Weekends or Weekdays,
- Time
• Mode: Buzzer, Internet Radio, CD, DAB or FM, - Preset: Last listened, 1 - 20,
• Volume: 0 - 32
To activate the new settings, scroll down and select Save.
The screen shows active alarms with an icon at the bottom left.
At the set time, the alarm will sound. To temporarily silence, press "MULTI FUNCTION" button on the unit. You can change the snooze period by pressing the "MULTI FUNCTION" button. The radio returns to standby for the set period, with the silenced alarm icon flashing.
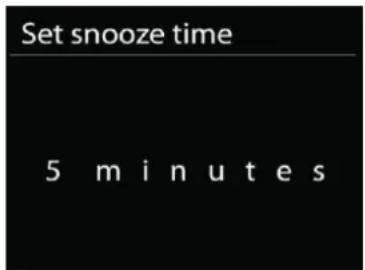
text_image
Set snooze time 5 minutesTROUBLESHOOTING
| Error | Remedy |
| The device does not switch on. | Check it the power adaptor is connected properly. |
| No sound. | 1. Turn on the sound as it may be muted2. Increase the volume.3. Pull any connected headphone or speaker from the connector jack. |
| No network connection can be established. | 1. Check the LAN cable or the WLAN function.2. Try to set an IP address at the device.3. Activate the DHCP function on the router and make the connection again at the device.4. A firewall is activated on the network – set the respective program in such a way that access is possible.5. Reboot the router |
| WiFi connection cannot be established. | 1. Check the availability of WLAN network on the router.2. Place the device closer to the router.3. Make sure the password is correct. |
| Wired connection cannot be established. | 1. Check the availability of LAN network on the access point.2. Reconnect or even replace the LAN cable. |
| No station is found. | 1. Check the network as well as the access point and firewall.2. The station may not be available currently, try it again later or select another station.3. The link of the station is changed or the station no longer transmits – ask the provider for information.4. The link of manual added station is not correct, make sure it is correct and re-enter. |
| Hiss in FM mode | 1. Check/move the FM antenna.2. Move the radio. |
| No stations available / burbling / intermittent in DAB mode. | 1. Move the radio.2. Rescan local stations only (high-strength).3. Check the local DAB coverage. |
| Alarm does not work. | 1. Switch on the alarm.2. Due to the volume setting, refer to the solutions of “No sound”.3. The source of alarm was set to be station but there is no network connection. Change the source of alarm or reconfigure the connection. |
| USB driver or MP3 player is not detected. | 1. Check if the USB driver or MP3 player is plugged properly.2. Some USB hard disks need external power supply, make sure it is connected to the power.3. Not all MP3 players can be read directly on the device – use an USB drive instead. |
| NetRemote does not show or connect to ICD2018 | 1. Reopen the App.2. If you have several streaming from several devices at the same time, it may cause crash, reboot ICD2018 and/or your device. |
| All other undetermined cases. | ICD2018 may process large amount of data after a period of operation, no matter in which mode, it will cause the system freeze or malfunction. Reboot ICD2018 if necessary. period of operation, no matter in which mode, it will cause the system freeze or malfunction. Reboot ICD2018 if necessary. |
| The normal function of the product may be disturbed by strong Electro-MagneticInterference. If so, simply reset the product to resume normal operation by following the instruction manual. In case the function could not resume, please use the product in other location. | |
| The device may malfunction when used in areas with strong radio interference. The device will work properly again once there is no more interference. | |
| Under the environment with Conducted Immunity disturbance, the sample may malfunction. It will automatically recover to normal when the Conducted Immunity disturbance stopped. |
TECHNICAL SPECIFICATIONS
| Power supply | : 100-240V~50/60Hz |
| DAB+ range | : Band III 174.928 – 239.200MHz |
| FM range | : 87.5 – 108MHz |
| Bluetooth® Version | : Version 4.0 + EDR A2DP |
| Connectivity | : WiFi Dual modes to support 2.4GHz and 5GHz WiFi system |
| Audio power output | : 80W RMS |
| Speaker | : 2-way speaker system + subwoofer |
IMPORTER
text_image
SRC 1 SLEEP REP 2 INFO SHUF II OK MUTE MENU 1 2 3 4 5 6 7 8 9 10 P EQ ELITE line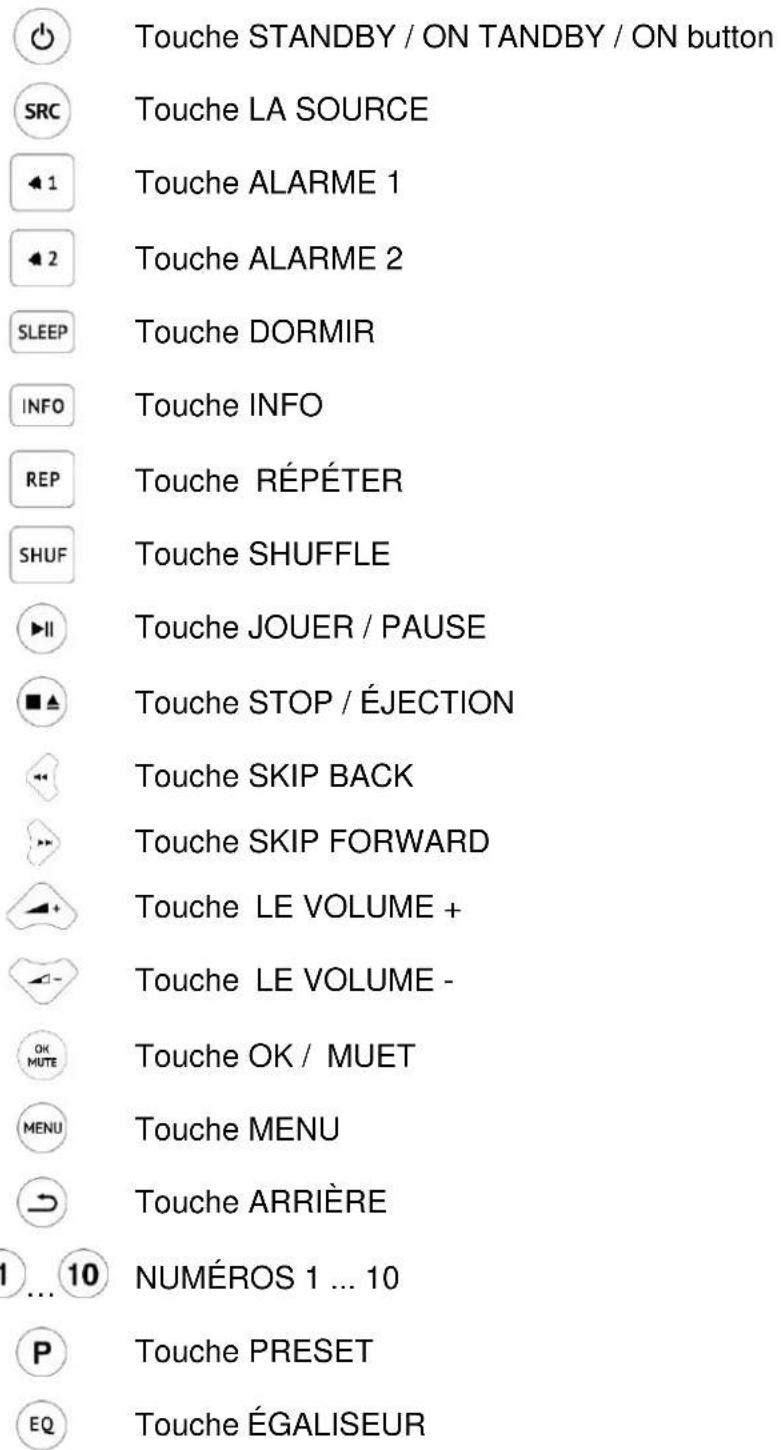
text_image
Touche STANDBY / ON TANDBY / ON button Touche LA SOURCE Touche ALARME 1 Touche ALARME 2 Touche DORMIR Touche INFO Touche RÉPÉTER Touche SHUFFLE Touche JOUER / PAUSE Touche STOP / ÉJECTION Touche SKIP BACK Touche SKIP FORWARD Touche LE VOLUME + Touche LE VOLUME - Touche OK / MUET Touche MENU Touche ARRIÈRE NUMÉROS 1 ... 10 Touche PRESET Touche ÉGALISEURFONCTIONNEMENT DE VOTRE TÉLÉCOMMANDE
text_image
Stations Location > Genre > Search stations > Popular stations > New stations >text_image
Stations Location > Genre > Search stations > Popular stations > New stations >text_image
JB-Laptop: Audio Music > Playlists >text_image
Windows Media Player Library > Music > Album > Rob Act Organize > Stream > Create Playlist Allow internet access to home media... Allow remote control of my Player... Turn on media streaming with HomeGroup... Title Sleep Away Library > Playoffs > Music > Artist > Album > Genre > Videos > Pictures > Recorded TV Jazz 2004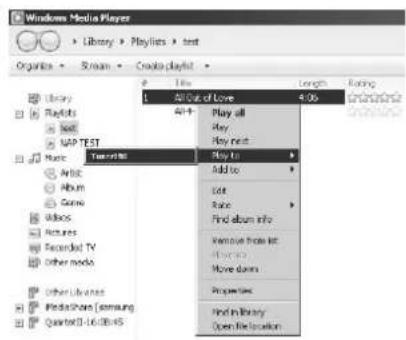
text_image
Windows Media Player Library > Playlist > text Organics > Stream > Creado Playlist Library Playlists Text VAP TEST Music Audio Album Genre Video Pictures Recorded TV Other media Other Libraries MediaShare [Samsung] Quarter3-16.08:45 All Out of Love 4.05 Play all Play next Play to Add to Set Race Find album info Remove from list Move down Properties Find in library Open the location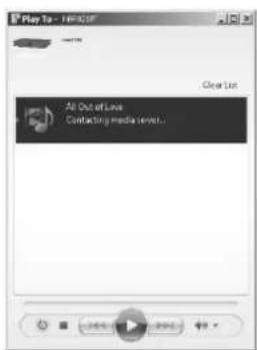
text_image
Play To - 198325F Clear List All Out of Live Contacting media devices...text_image
DAB 03:28 BBC Radio 6Music to vote for a track that missed out on the 6Music playlisttext_image
FM 03:28 Alice 97.3 Best Music in the worldtext_image
V TV DVD player / TV outputs Digital Coaxial Outputtext_image
QUE TV DVD player / TV outputs Digital Optical Outputtext_image
N TV DVD player / TV outputs Analogue OutputEntrée analogique
INSTALLATIEBEHEER....4
EQUALIZER 6
NETWERK....7
TIJD/DATUM 7
TAAL 7
TERUGZETTEN IN FABRIEKSINSTELLINGEN 8
SOFTWARE-UPDATE....8
INFO 8
ACHTERGRONDVERLICHTING 8
INTERNETRADIO....8
MEDIASPELER....10
CD....14
DAB 15
FM....16
SPOTIFY....17
MEERDERE RUIMTES....18
UNDOK....19
BLUETOOTH^ 19
HOOFDTELEFOON....19
EXTERNE INVOER 20
SLAAP 21
ALARM 21
PROBLEMEN OPLOSSEN 22
TECHNISCHE SPECIFICATIES....23
BEDIENINGSORGANEN
VOORAANZICHT
text_image
IT 1 2 3 4 5 6 7 8 9 10 11 TUNE. RARE. VOLUMEAUTE ALABBI SLEEP BHD MENI/BACK SERVICE Ω1 LCD-scherm
2 CD-deur (slot-in)
3 STANDBY / ON-knop
4 Alarm-knop
5 SLAAP-knop
6 STOP / EJECT-knop
7 Directe voorkeuzezenders 1 ... 4
8 PRESET-knop
9 SKIP BACK / TUNE - knop
10 PLAY / PAUSE-knop
11 SKIP FORWARD / TUNE + knop
12 MULTI FUNCTION knop / OK
13 INFO-knop
14 MENU / BACK-knop
15 SOURCE-knop
16 Koptelefoon aansluiting
ACHTERAANZICHT
text_image
POWER ON OFF CAUTION WIRE ICD2019 HFI MUSIC SYSTEM WITH WIFI STREAM 100.24W-AC MACHINE BEEF 3 2 CINNATE ANTAGONIS CCAS OFF1 OFF2 LAN USB 4+ LINE OUT / AUS IN MADE IN CHINA 4 5 6 7 8 9text_image
SRC 1 SLEEP REP 2 INFO SHUF II OK MUTE MENU 1 2 3 4 5 6 7 8 9 10 P EQ ELITE line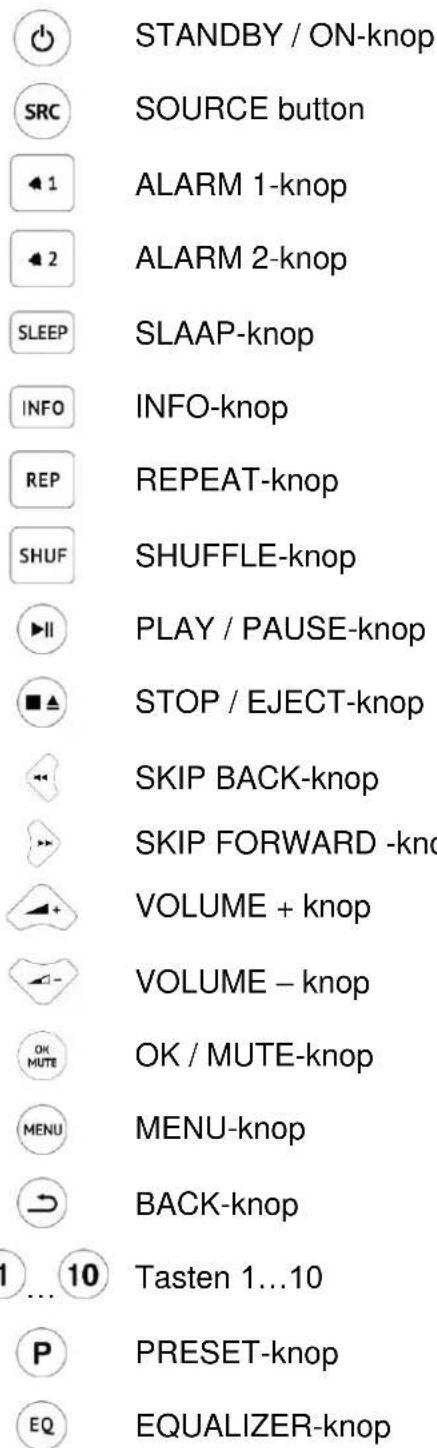
text_image
STANDBY / ON-knop SOURCE button ALARM 1-knop ALARM 2-knop SLAAP-knop INFO-knop REPEAT-knop SHUFFLE-knop PLAY / PAUSE-knop STOP / EJECT-knop SKIP BACK-knop SKIP FORWARD -kno VOLUME + knop VOLUME – knop OK / MUTE-knop MENU-knop BACK-knop Tasten 1...10 PRESET-knop EQUALIZER-knopBEDIENING UW AFSTANDBEDIENING
Setup wizard voltooid
Open Windows Media Player om Allow remote control of my Player in te schakelen.
text_image
Choose media streaming options for computers and devices Name your mailenergy: My PC Choose default settings... Show devices on: Social network System 2.0.1.0.1.1.1.1.1.1.1.1.1.1.1.1.1.1.1.1.1.1.1.1.1.1.1.1.1.1.1.1.1.1.1.1.1.1.1.1.1.1.1.1.1.1.1.1.1.1.1.1.1.1.2 Allowed access using default settings. Allowed access using default settings. Allowed access using default settings. Allowed access using default settings. Allowed access using default settings. Allowed access using default settings. Allowed access using default settings. Allowed access using default settings. Allowed access using default settings. Allowed access using default settings. Allowed access using default settings. Allowed access using default settings. Allowed access using default settings. Allowed access using default settings. Allowed access using default settings. Allowed access using default settings. Allowed access using default settings. Allowed access using Default Settings Allowed access using default settings. Allowed access using default settings. Allowed access using default settings. Allowed access using default settings. Allowed access using default settings. Allowed access using default settings. Allowed access using default settings. Allowed access using default settings. Allowed access using default settings. Allowed access using default settings. Allowed access using default settings. Allowed access using default settings. Allowed access using default settings. Allowed access using default settings. Allowed access using default settings. Allowed access using default settings. Allowed access via Default Settings Allowed access via Default Settings Allowed access via Default Settings Allowed access via Default Settings Allowed access via Default Settings Allowed access via Default Settings Allowed access via Default Settings Allowed access via Default Settings Allowed access via Default Settings Allowed access via Default Settings Allowed access via Default Settings Allowed access via Default Settings Allowed access via Default Settings Allowed access via Default Settings Allowed access via Default Settings Allowed access via Default Settings Allowed access via Default Settings Allowed access viaDefault Settings Allowed access via Default Settings Allowed access via Default Settings Allowed access via Default Settings Allowed access via Default Settings Allowed access via Default Settings Allowed access via Default Settings Allowed access via Default Settings Allowed access via Default Settings Allowed access via Default Settings Allowed access via Default Settings Allowed access via Default Settings Allowed access via Default Settings Allowed access via Default Settings Allowed access via Default Settings Allowed access via Default Settings Allowed access via Default Settings Allowed Access to Default Settings Allowed Access to Default Settings Allowed Access to Default Settings Allowed Access to Default Settings Allowed Access to Default Settings Allowed Access to Default Settings Allowed Access to Default Settings Allowed Access to Default Settings Allowed Access to Default Settings Allowed Access to Default Settings Allowed Access to Default Settings Allowed Access to Default Settings Allowed Access to Default Settings Allowed Access to Default Settings Allowed Access to Default Settings Allowed Access to Default Settings Allowed Access to Default Settings allowed Access to Default Settings allowed Access to Default Settings allowed Access to Default Settings allowed Access to Default Settings allowed Access to Default Settings allowed Access to Default Settings allowed Access to Default Settings allowed Access to Default Settings allowed Access to Default Settings allowed Access to Default Settings allowed Access to Default Settings allowed Access to Default Settings allowed Access to Default Settings allowed Access to Default Settings allowed Access to Default Settings allowed Access to Default Settings allowed Access to DefaultSettingsAll denotes are offered to access your shared media.
Groups (tumorgroup) and characteristics
Chenam dawee of Nare's
Read the privacy statement online

text_image
Windows Media Player Library > Music > Album > Bob Acri Organize > Stream > Create playlist Allow Internet access to home media... ✓ Album remote control of my Player... Turn on media streaming with HomeGroup... Title Sleep Away 1994 2004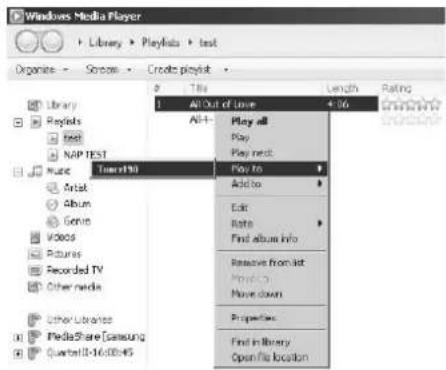
text_image
Windows Media Player Library > Playlists > test Organise > Screen > Creeds playlist > Title Length Rating 1 All Out of Love +16 Play all Play next Play to Add to Edit Rate Find album info Remove from list Move down Properties Find in library Open file location Library Replids Text NAP TEST Music Artist Album Genre Videos Pictures Recorded TV Other needs Other Libraries MediaShare [Samsung] Quartile 18-16:00:45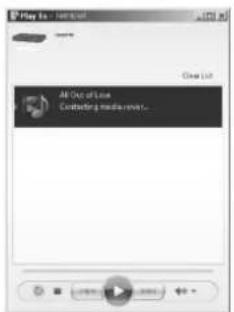
text_image
Play to: Not OK Clear List All Out of Love Controlling media review...• Bediening via Smartphone/Tablet
text_image
DAB 03:28 BBC Radio 6Music to vote for a track that missed out on the 6Music playlisttext_image
FM 03:28 Alice 97.3 Best Music in the worldtext_image
TV DVD player / TV outputs Digital Coaxial OutputDigitale coaxiale ingang
text_image
TV DVD player / TV outputs Digital Optical Outputtext_image
TV DVD player / TV outputs Analogue OutputAnaloge ingang
INGRESSO ESTERNO....20
SLEEP 21
SVEGLIA 21
RISOLUZIONE DEI PROBLEMI....22
SPECIFICHE TECNICHE 23
text_image
SRC 1 SLEEP REP 2 INFO SHUF II + OK MUTE MENU 1 2 3 4 5 6 7 8 9 10 P EQ ELITE line
text_image
Tasto STANDBY / ON SRC Tasto FONTE ▲1 Tasto ALLARME 1 ▲2 Tasto ALLARME 2 SLEEP Tasto DORMIRE INFO Tasto INFORMAZIONI REP Tasto RIPETERE SHUF Tasto SHUFFLE ▶II Tasto PLAY / PAUSA ■ ▲ Tasto STOP / EJECT ◀ Tasto SALTA INDIETRO ▶ Tasto SALTA INOLTRARE ▲+ Tasto VOLUME + ◀ - Tasto VOLUME - OK MUTE Tasto OK / MUTO MENU Tasto MENU → Tasto INDIETRO 10 NUMERI 1...10 P Tasto RESET EQ Tasto EQUALIZZATOREtext_image
Play to - Microsoft All Out of Use Contacting media news...• Controllo su Smartphone/Tablet
text_image
DAB 03:28 BBC Radio 6Music to vote for a track that missed out on the 6Music playlisttext_image
FM 03:28 Alice 97.3 Best Music in the worldtext_image
DASSIALE TV DVD player / TV outputs Digital Coaxial Outputtext_image
TICO TV DVD player / TV outputs Digital Optical Outputtext_image
TV DVD player / TV outputs Analogue OutputInput analogico
TROUBLESHOOTING....20
TEKNISKE SPECIFICATIONER ....21
text_image
SRC 1 SLEEP REP 2 INFO SHUF II OK MUTE MENU 1 2 3 4 5 6 7 8 9 10 P EQ ELITE line
text_image
STANDBY / ON-knap SOURCE-knap ALARM 1-knap ALARM 2-knap SLEEP-knap INFO-knap REPEAT-knap SHUFFLE-knap PLAY / PAUSE-knap STOP / EJECT-knap SKIP BACK-knap SKIP FORWARD-knap VOLUME + knap VOLUME - knap OK / MUTE-knap MENU-knap BACK-knap 10 NUMRE 1...10 PRESET-knap EQUALIZER-knapBETJENING DIN FJERNKONTROL
text_image
Setup wizard Start now? YES NOOPSÄETNINGSGUIDE
text_image
WPS Setup Push WPS button at the other end Press SELECT to continuePin
text_image
WPS Setup Enter PIN 98467583 at the other end Press SELECT to continueBrug ikke WPS
text_image
Network settings Please wait Connecting . . \text_image
Setup wizard Setup wizard completed Press SELECT to exitEQUALISER
text_image
Network settings Keep network connected? YES NO*TID/DATO
text_image
Internet radio Last listened > Station list > System settings > Main menu >- Stationsliste
text_image
Stations Location > Genre > Search stations > Popular stations > New stations >- Favoritter
text_image
Music player Shared media > USB playback My playlist > Repeat play: Off Shuffle play: Offtext_image
JB-Laptop: Audio Music > Playlists >text_image
Music player 03:28 All Out of Love Album: Sweet Dreams: The Encore Collectiontext_image
Windows Media Player Library > Music > Album > Bob Act Organize > Stream > Create playlist Library Playlists Music Antie Album Genre Video Pictures Recorded TV Allow Internet access to home media... Allow remote control of my Player... Turn on media streaming with HomeGroup... Java 2004 Title Stage Away
text_image
Windows *India Player Library > Playlist > text Organize Stream Create playlist Title Length Rating Library All Out of Love 4:06 Playlist All- Play all Play Play next Music Taco-1901 Play to Add to Color Rate Find album info Remove from list Play on Movie down Properties Find in library Open file location My Documents Quintest-15 08:45Then a box of music playback pops up for the streaming.
text_image
Play To - MP3247 All Out of Live Contacting media series.CD
Forkert drift kan medføre materielle skader!
text_image
DAB 03:28 BBC Radio 6Music to vote for a track that missed out on the 6Music playlisttext_image
DAB Stations: 15 Scanning /text_image
FM 03:28 Alice 97.3 Best Music in the world- Fast station
text_image
TV DVD player / TV outputs Digital Coaxial OutputDigital koaksial indgang.
text_image
TV DVD player / TV outputs Digital Optical Outputtext_image
TV DVD player / TV outputs Analogue OutputAnalog indgang
text_image
Alarm 1 Enable: Daily Time: 07:30 Mode: Internet Radio Preset: Last listened Volume: 10text_image
Set snooze time 5 minutesTROUBLESHOOTING
| Error | Remedy |
| The device does not switch on. | Check it the power adaptor is connected properly. |
| No sound. | 1. Turn on the sound as it may be muted2. Increase the volume.3. Pull any connected headphone or speaker from the connector jack. |
| No network connection can be established. | 1. Check the LAN cable or the WLAN function.2. Try to set an IP address at the device.3. Activate the DHCP function on the router and make the connection again at the device.4. A firewall is activated on the network – set the respective program in such a way that access is possible.5. Reboot the router |
| WiFi connection cannot be established. | 1. Check the availability of WLAN network on the router.2. Place the device closer to the router.3. Make sure the password is correct. |
| Wired connection cannot be established. | 1. Check the availability of LAN network on the access point.2. Reconnect or even replace the LAN cable. |
| No station is found. | 1. Check the network as well as the access point and firewall.2. The station may not be available currently, try it again later or select another station.3. The link of the station is changed or the station no longer transmits – ask the provider for information.4. The link of manual added station is not correct, make sure it is correct and re-enter. |
| Hiss in FM mode | 1. Check/move the FM antenna.2. Move the radio. |
| No stations available / burbling / intermittent in DAB mode. | 1. Move the radio.2. Rescan local stations only (high-strength).3. Check the local DAB coverage. |
| Alarm does not work. | 1. Switch on the alarm.2. Due to the volume setting, refer to the solutions of “No sound”.3. The source of alarm was set to be station but there is no network connection. Change the source of alarm or reconfigure the connection. |
| USB driver or MP3 player is not detected. | 1. Check if the USB driver or MP3 player is plugged properly.2. Some USB hard disks need external power supply, make sure it is connected to the power.3. Not all MP3 players can be read directly on the device – use an USB drive instead. |
| NetRemote does not show or connect to ICD2018 | 1. Reopen the App.2. If you have several streaming from several devices at the same time, it may cause crash, reboot ICD2018 and/or your device. |
| All other undetermined cases. | ICD2018 may process large amount of data after a period of operation, no matter in which mode, it will cause the system freeze or malfunction. Reboot ICD2018 if necessary. period of operation, no matter in which mode, it will cause the system freeze or malfunction. Reboot ICD2018 if necessary. |
| The normal function of the product may be disturbed by strong Electro-MagneticInterference. If so, simply reset the product to resume normal operation by following the instruction manual. In case the function could not resume, please use the product in other location. | |
| The device may malfunction when used in areas with strong radio interference. The device will work properly again once there is no more interference. | |
| Under the environment with Conducted Immunity disturbance, the sample may malfunction. It will automatically recover to normal when the Conducted Immunity disturbance stopped. |
TEKNISKE SPECIFIKATIONER
Strømforsyning
100-240V\~50/60Hz
DAB + område
Band III 174.928 - 239.200MHz
FM-område
87.5 - 108MHz
Bluetooth
Version 4.0 + EDR A2DP
Tilslutninger
WiFi Dual modes to support 2.4GHz and 5GHz WiFi system
Lydudgang
80W RMS
Højttaler
2-way speaker system + subwoofer
IMPORT∅R
Wörlein GmbH
Tlf.: +49 9103 71 67 0
Gewerbestrasse 12
Fax.: +49 9103 71 67 12
D-90556 Cadolzburg
E-mail: service@woerlein.com
Tyskland
SYSTEMINNSTILLINGER....4
OPPSETTSVEIVISER 4
EQUALISER....6
NETTVERK....6
KLOKKESLETT/DATO 7
BAKGRUNNSBELYSNING....7
SPRÅK 7
NULLSTILLING TIL FABRIKKINNSTILLING 8
PROGRAMVAREOPPDATERING 8
INFO 8
INTERNETTRADIO 8
MEDIEAVSPILLER....10
DAB....13
FM....14
SPOTIFY....15
CD....16
MULTI-ROOM....17
UNDOK....17
BLUETOOTH^ 18
HODETELEFONER....18
EKSTERN INGANG....19
INNSOVNING 19
ALARM....20
FEILS∅KING....21
TEKNISKE SPESIFIKASJONER 22
KONTROLLKNAPPENES PLASSERING
FORSIDE
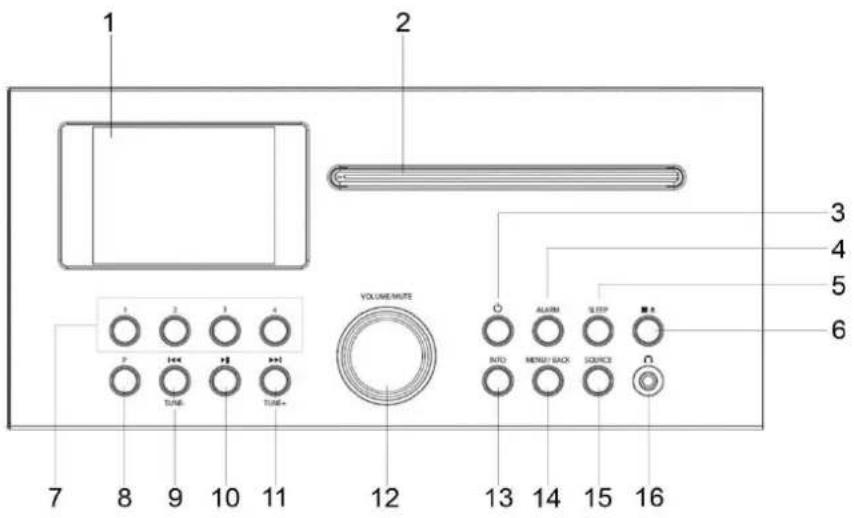
text_image
1 2 3 4 5 6 7 8 9 10 11 VOLUME/MUTE 12 13 14 15 16 TUBE TUBE+ ALARM SLEEP BVD MENU/BACK SCIENCE1 LCD-panel 9 SKIP BACK / TUNE – knappen
2 CD-deur (slot-in) 10 PLAY / PAUSE-knappen
3 STANDBY / ON-knappen 11 SKIP FORWARD / TUNE + knappen
4 ALARM-knappen 12 MULTI FUNCTION knappen / OK
5 SLEEP-knappen 13 INFO-knappen
6 STOP / EJECT-knappen 14 MENU / BACK-knappen
7 Direkte forhåndsinnstilte stasjoner 1 ... 4 15 SOURCE-knappen
8 PRESET-knappen 16 Hodetelefonkontakt
BAKSIDE
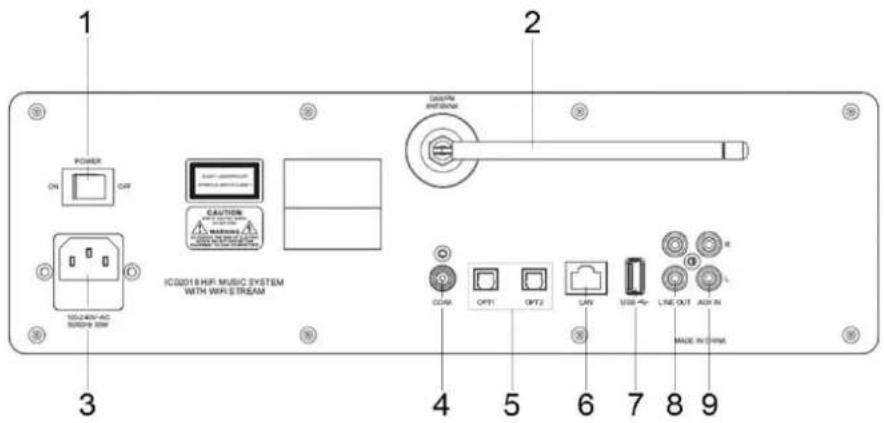
text_image
1 POWER ON OFF CAUTION IC00018.HIF MUSIC SYSTEM WITH WAFSTREAM 2 CAUTION ANTAGONAL 3 CDAX OPT1 OPT2 CAN LINE OUT ADD IN 4 5 6 7 8 9 MADE IN CHINAtext_image
SRC 1 SLEEP REP 2 INFO SHUF II + OK MUTE MENU 1 2 3 4 5 6 7 8 9 10 P EQ ELITE line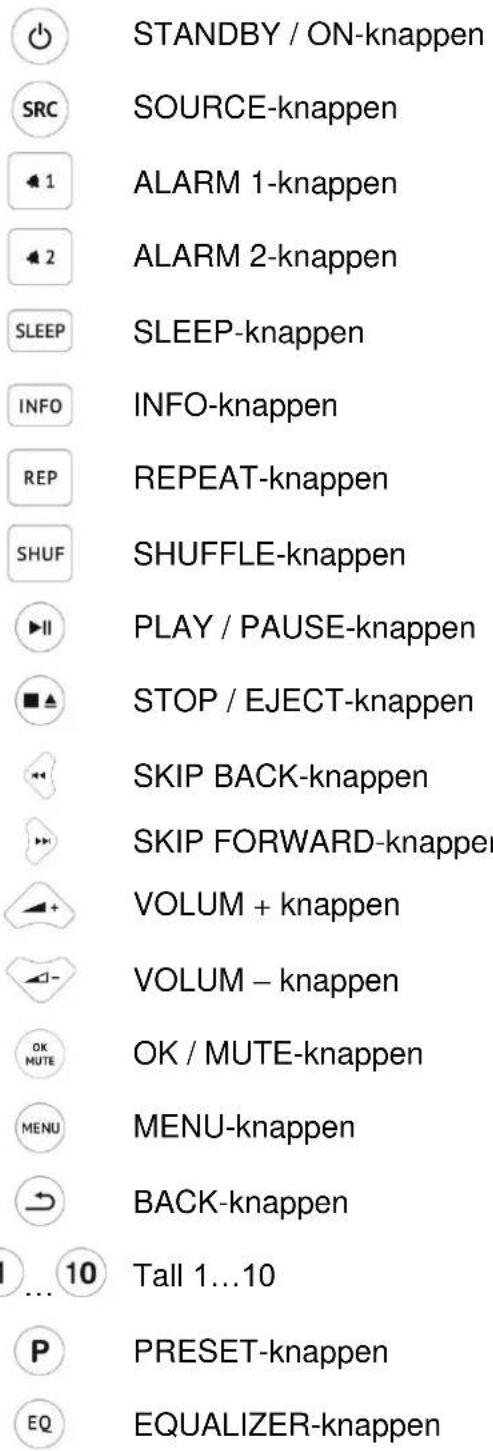
text_image
STANDBY / ON-knappen SOURCE-knappen ALARM 1-knappen ALARM 2-knappen SLEEP-knappen INFO-knappen REPEAT-knappen SHUFFLE-knappen PLAY / PAUSE-knappen STOP / EJECT-knappen SKIP BACK-knappen SKIP FORWARD-knappen VOLUM + knappen VOLUM - knappen OK / MUTE-knappen MENU-knappen BACK-knappen ... 10 Tall 1...10 PRESET-knappen EQUALIZER-knappenBRUK DIN FJERNKONTROLL
text_image
Setup wizard Start now? YES NOOPPSETTSVEIVISER
text_image
WPS Setup ! Push WPS button at the other end Press SELECT to continuePin
Enheten genererer et 8-sifret kodenummer som du legger inn i den trådløse ruteren, aksesspunktet eller en ekstern registrator.
WPS Setup

Enter PIN 98467583 at the other end
Press SELECT to continue
Hopp over WPS
Please wait Connecting..\
Setup wizard completed
Press SELECT to exit
EQUALISER
Flere forhåndsinnstilte EQ-moduser er tilgjengelig: Normal, Flat, Jazz, Rock, Movie (film), Classic (klassisk), Pop and News (nyheter).
text_image
Network settings Keep network connected? YES NO*KLOKKESLETT/DATO
NULLSTILLING TIL FABRIKKINNSTILLING
text_image
Internet radio Last listened > Station list > System settings > Main menu >- Kanalliste
text_image
Stations Location > Genre > Search stations > Popular stations > New stations >- Favoritter
text_image
Music player Shared media > USB playback My playlist > Repeat play: Off Shuffle play: Off >text_image
JB-Laptop: Audio Music > Playlists >text_image
Music player 03:28 All Out of Love Album: Sweet Dreams: The Encore Collection- Renseservere
Control Panel > Network and Internet > Network and Sharing Center > Media streaming options
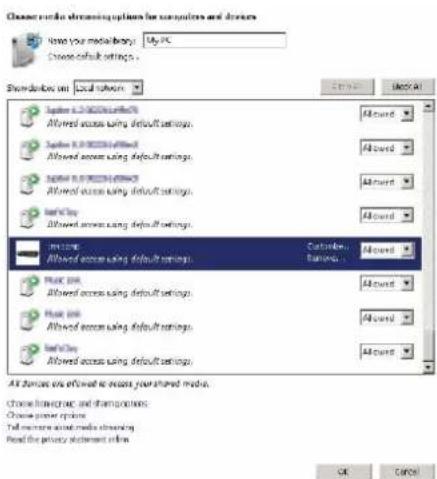
text_image
Character mode streaming options for consoles and devices Name your media library: Uy PC Choose default settings. Standarders on: Dual-Settings Symbol 3.0 (100%) Allowed access using default settings: Symbol 3.0 (100%) Allowed access using default settings: Symbol 3.0 (100%) Allowed access using default settings: Send/Day Allowed access using default settings: Allowance Allowed access using default settings: Customize Allowance Allowance Allowance Allowance Allowance Allowance Allowance Allowance Allowance Allowance Allowance Allowance Allowance Allowance Allowance Allowance Allowance Allowance Allowance Allowance Allowance Allowance Allowance Allowance Allowance Allowance Allowance Allowance Allowance Allowance Allowance Allowance Allowance AllowanceÅpne Windows Media Player og aktiver Allow remote control of my Player.
text_image
Windows Media Player Library > Music > Album > Bob Aci Organize > Streams > Create playlist Allow Internet access to home media... ✓ Allow remote control of my Player... Turn on media streaming with HomeGroup.. Jazz 2004 Shap Away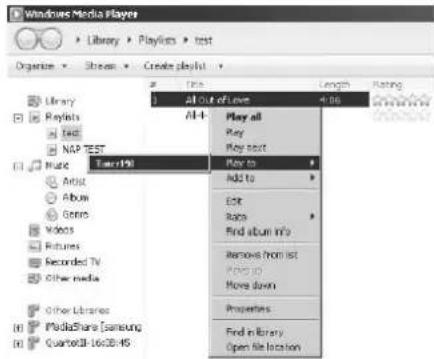
text_image
Windows Media Player Library > Playlist > test Organize > Stream > Create playlist Title Length Rating Library 1 All out of Love 4.06 Play all Play text Play to Add to Edit Runs Find album info Remove from list Move down Properties Find in library Open file location Al-1 NAP TEST Music TeneriP5 Artist Album Games Videos Returns Recorded TV Other media Other Libraries MediaShare [Samsung] Quarterall-16c28:45text_image
DAB 03:28 BBC Radio 6Music to vote for a track that missed out on the 6Music playlisttext_image
DAB Stations: 15 Scanning /Dynamic range compression (DRC)
text_image
FM 03:28 Alice 97.3 Best Music in the worldtext_image
TV DVD player / TV outputs Digital Coaxial OutputDigital koaksial inngang
text_image
TV DVD player / TV outputs Digital Optical Outputtext_image
TV DVD player / TV outputs Analogue OutputAnalog inngang
Koble til DVD-spiller / Set-Top Box / TV-utganger til analoge innganger fra lydkortet. Bruk et RCA-lydkabel til å koble til DVD-spilleren / TV-utgangene med AUX (L / R) -inngangen fra lydkortet.
INNSOVNING
Mode: Internet Radio
Preset: Last listened
Volume: 10
Velg alarmnummer (1 eller 2) og konfigurer følgende parametre:
WiFi Dual modes to support 2.4GHz and 5GHz WiFi system
Lydutgangseffekt
80W RMS
Høyttaler
*) markerade Cd = kadmium, Hg = kvicksilver, Pb = bly

VARNING - OSYNLIG LASERSTRÅLNING NÄR DU ÖPPNAR LOCKET ELLER TRYCKER PÅ SÄKERHETSSPÄRREN. UNDVIK EXPONERING FÖR LASERSTRÅLEN.

INNEHÅLLSFÖRTECKNING
REGLAGENS PLACERING ....2
FJÄRRKONTROLL 3
HÄMTA STARTADE/KONFIGURATION 4
FÖRBERED NÄTVERKSMILJÖN......4
HUVUDMENY....4
INSTALLATIONSGUIDE 4
EQUALIZER 6
NÄTVERK....6
TID/DATUM 7
BAKGRUNDSLJUS....7
SPRÅK 7
FABRIKSÄTERSTÄLLNING....8
PROGRAMUPPDATERING 8
INFO 8
INTERNETRADIO......8
MEDIESPELARE....10
CD....14
DAB 14
FM....16
SPOTIFY....17
MULTIRUM....18
UNDOK....19
BLUETOOTH^ 19
EXTERN INGÅNG 20
HÖRLUR....21
INSOMNINGSFUNKTION 21
LARM....21
FELSÖKNING 22
TEKNISKA SPECIFICATIONER 23
REGLAGENS PLACERING
FRAMSIDAN
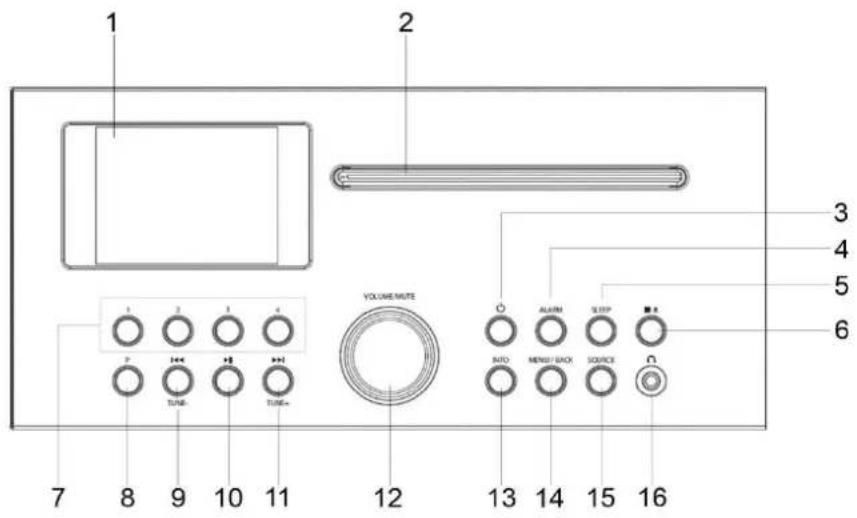
text_image
1 2 3 4 5 6 7 8 9 10 11 VOLUME/MUTE 12 13 14 15 16 TUNE TUNE RATD MENU/BACK SCIENCEtext_image
SRC 1 SLEEP REP 2 INFO SHUF II OK MUTE MENU 1 2 3 4 5 6 7 8 9 10 P EQ ELITE line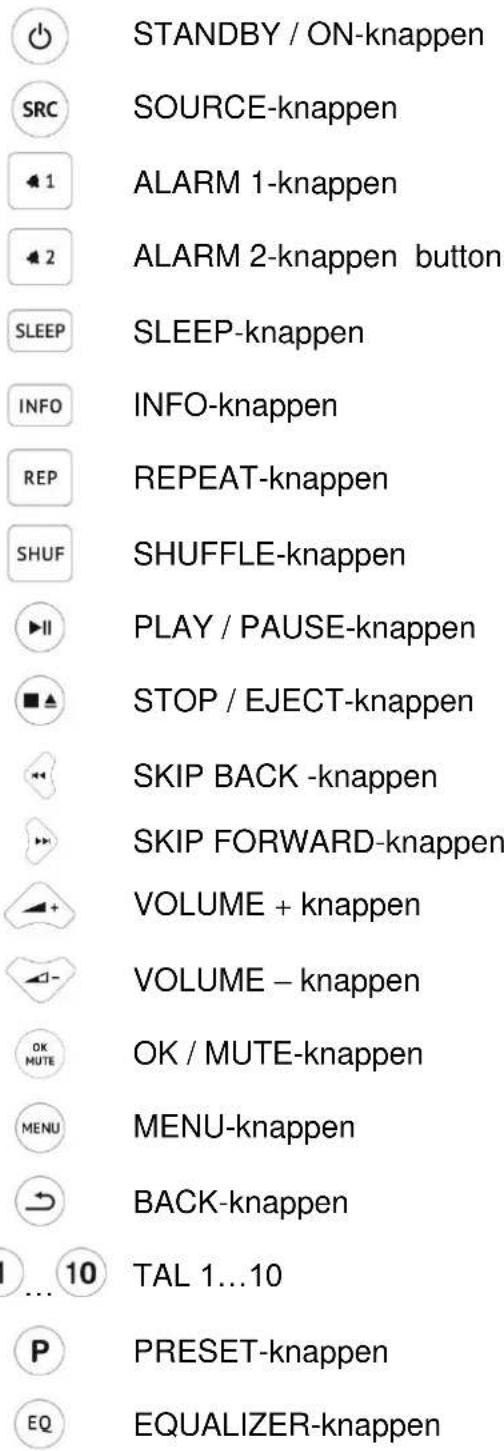
text_image
STANDBY / ON-knappen SOURCE-knappen ALARM 1-knappen ALARM 2-knappen button SLEEP-knappen INFO-knappen REPEAT-knappen SHUFFLE-knappen PLAY / PAUSE-knappen STOP / EJECT-knappen SKIP BACK -knappen SKIP FORWARD-knappen VOLUME + knappen VOLUME – knappen OK / MUTE-knappen MENU-knappen BACK-knappen ... 10 TAL 1...10 PRESET-knappen EQUALIZER-knappentext_image
Setup wizard Start now? YES NOINSTALLATIONSGUIDE
Välj språket 1.
Tid/datumvisningsformat 2.
text_image
WPS Setup ! Push WPS button at the other end Press SELECT to continuePin
Enter PIN 98467583 at the other end
Press SELECT to continue
Skippa WPS
text_image
Network settings Please wait Connecting... \text_image
Setup wizard Setup wizard completed Press SELECT to exitEQUALIZER
text_image
Equaliser EQ normal EQ rak EQ jazz EQ rock EQ filmNÄTVERK
• Nätverkens installationsguide.
text_image
Create audio streaming options for consoles and devices Name your media library: My PC Choose default settings... Show directories on local networks System 0.1.2.2.3.4.5.6.7.8.9.10.11.12.13.14.15.16.17.18.19.20.21.22.23.24.25.26.27.28.29.30.31.32.33.34.35.36.37.38.39.40.41.42.43.44.45.46.47.48.49.50.51.52.53.54.55.56.57.58.59.60.61.62.63.64.65.66.67.68.69.70.71.72.73.74.75.76.77.78.79.80.81.82.83.84.85.86.87.88.89.90.91.92.93.94.95.96.97.98.99.100 Allowed access using default settings: Allowed access using default settings: Allowed access using default settings: Allowed access using default settings: Allowed access using default settings: Allowed access using default settings: Allowed access using default settings: Allowed access using default settings: Allowed access using default settings: Allowed access using default settings: Allowed access using default settings: Allowed access using default settings: Allowed access using default settings: Allowed access using default settings: Allowed access using default settings: Allowed access using default settings: Allowed access using default settings: Allowed access using defaults: Allowed access using default settings: Allowed access using default settings: Allowed access using default settings: Allowed access using default settings: Allowed access using default settings: Allowed access using default settings: Allowed access using default settings: Allowed access using default settings: Allowed access using default settings: Allowed access using default settings: Allowed access using default settings: Allowed access using default settings: Allowed access using default settings: Allowed access using default settings: Allowed access using default settings: Allowed access using default settings: Allowed access usage: Default Allowed access: Default Allowed access: Default Allowed access: Default Allowed access: Default Allowed access: Default Allowed access: Default Allowed access: Default Allowed access: Default Allowed access: Default Allowed access: Default Allowed access: Default Allowed access: Default Allowed access: Default Allowed access: Default Allowed access: Default Allowed access: Default Allowed access: Default Allowed access: Default Allowed access: Default Allowed access: Default Allowed Access: Default Allowed Access: Default Allowed Access: Default Allowed Access: Default Allowed Access: Default Allowed Access: Default Allowed Access: Default Allowed Access: Default Allowed Access: Default Allowed Access: Default Allowed Access: Default Allowed Access: Default Allowed Access: Default Allowed Access: Default Allowed Access: Default Allowed Access: Default Allowed Access: Default Allowed Access: Default Allowed Access: Default Allowed Access: Default AllowedAccess: Default Allowed Access: Default Allowed Access: Default Allowed Access: Default Allowed Access: Default Allowed Access: Default Allowed Access: Default Allowed Access: Default Allowed Access: Default Allowed Access: Default Allowed Access: Default Allowed Access: Default Allowed Access: Default Allowed Access: Default Allowed Access: Default Allowed Access: Default Allowed Access: Default Allowed Access: Default Allowed Access: Default Allowed Access: Default Allowed Absence Usage: Default Allowed Access Usage: Default Allowed Access Usage: Default Allowed Access Usage: Default Allowed Access Usage: Default Allowed Access Usage: Default Allowed Access Usage: Default Allowed Access Usage: Default Allowed Access Usage: Default Allowed Access Usage: Default Allowed Access Usage: Default Allowed Access Usage: Default Allowed Access Usage: Default Allowed Access Usage: Default Allowed Access Usage: Default Allowed Access Usage: Default Allowed Access Usage: Default Allowed Access Usage: DefaultAX devices are allowed to access your shared media, choose home group and sharing options Choose power options Tell members about media streaming Read the privacy statement online
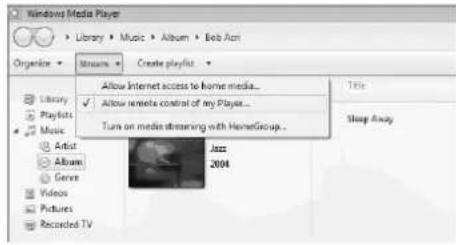
text_image
Windows Media Player Library > Music > Album > Bob Act Organize > Streams > Create playlist Allow Internet access to home media... ✓ Allow remote control of my Player... Turn on media streaming with HomeGroup... Jazz 2004 Library Playlists Music Artist Album Groups Videos Pictures Recorded TV Title Sleep Away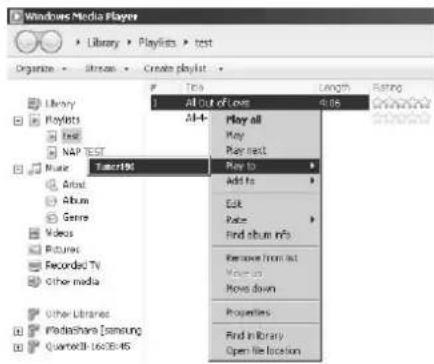
text_image
Windows Media Player Library > Playlists > test Organize > library > Create playlist Title Length Rating 1 All out of Love 4.05 Play all Play next Play to Add to Edit Paste Find album info Remove from list Move up Move down Properties Find in library Open file location Library Playlists Text NAP TEST Music Tamer1961 Album Genre Videos Pictures Recorded TV Other media Other Libraries Mediashare [samming] Quarter38-1638-45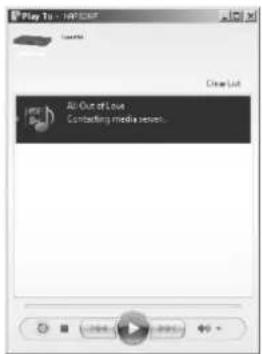
text_image
Play To - HP/3257 Close List All Out of Love Contacting media viewer.- Kontroll på Smartphone/Tablet
text_image
DAB 03:28 BBC Radio 6Music to vote for a track that missed out on the 6Music playlisttext_image
FM 03:28 Alice 97.3 Best Music in the world- Förinställningar
text_image
TV DVD player / TV outputs Digital Coaxial Outputtext_image
TV DVD player / TV outputs Digital Optical Outputtext_image
TV DVD player / TV outputs Analogue OutputAnaloga ingångar
text_image
Ange snoozetid 5 M I N SFELSÖKNING
D 90556 Cadolzburg, Germany
Tel: +49 9103 71 67 0
Fax: +49 9103 71 67 12
E-Mail: info@soundmaster.de
Internet: www.soundmaster.de
Hereby, Wörlein GmbH declares that this device is in compliance with the essential requirements and other relevant provisions of Directive 2014/53/EU.
A copy of the declaration of conformity can be obtained from the above address.