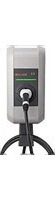
KeContact P30 - Car charger KEBA - Free user manual and instructions
Find the device manual for free KeContact P30 KEBA in PDF.


User questions about KeContact P30 KEBA
0 question about this device. Answer the ones you know or ask your own.
Ask a new question about this device
Download the instructions for your Car charger in PDF format for free! Find your manual KeContact P30 - KEBA and take your electronic device back in hand. On this page are published all the documents necessary for the use of your device. KeContact P30 by KEBA.
USER MANUAL KeContact P30 KEBA
KeContact P20 / P30 User manual
Gebruikershandboek
NL
Benutzerhandbuch
DE
Brukerhåndbok
NO
User manual
EN
Användarhandbok
SV
natural_image
Exterior view of a gray electric vehicle charging station with black cables and a digital display (no visible text or symbols)
natural_image
Exterior view of a modern electric vehicle charging station with a black cable and green indicator screen (no readable text or symbols)Document: V 3.20
Document no.: 96166 (Basic languages)
Pages: 200
© KEBA AG 2015-2016
Specifications are subject to change due to ongoing technical development. No guarantee is offered in respect of any of the specifications given here. All rights reserved.
All intellectual property, including trademarks and copyrights, are the property of their respective owners. Any unauthorized use thereof is strictly prohibited.
text_image
A B1 B2 C Dnatural_image
Simple horizontal bar with three white bars and one red bar (no text or symbols)natural_image
Simple horizontal bar with three colored blocks (blue, red) on a gray background, no text or symbols present."blau / blau / rot / rot"
Fehler 4003 [0011]
natural_image
Simple horizontal bar with three colored blocks (blue, red, gray) on a white background, no text or symbols present."blau / rot / blau / rot"
Fehler 8005 [0101]
1.1 Comments to this manual 19
1.2 Product information.... 20
1.3 Safety instructions.... 21
1.4 Intended use 22
1.5 About this manual 22
2 Using the charging station 23
3 Status LED 24
4 Display.... 25
4.1 Display informations.... 25
5 Troubleshooting.... 26
6 Maintenance.... 29
6.1 Cleaning 29
6.2 Service partner.... 29
1 Important information
1.1 Comments to this manual
Comments to this manual
In this manual you will find warnings against possible dangerous situations. The used symbols apply to the following meanings:

WARNING!
Indicates a potentially hazardous situation which, if not avoided could result in death or serious injury.

CAUTION!
Indicates a potentially hazardous situation which, if not avoided may result in minor or moderate injury.
ATTENTION
Indicates a situation which, if not avoided could result in property damage.

Notice
Notes on use of equipment and useful practical tips are identified by "i". Notices do not contain any information that draws attention to potentially dangerous or harmful functions.

Additional important information.
This icon marks steps of a sequence of operations.
1.2 Product information

The device bears the CE mark.
The declaration of conformity is being held by KEBA AG.
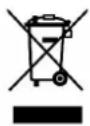
Disposal information
The symbol with the crossed-out waste container means that electrical and electronic devices including their accessories must not be disposed of in the household garbage. You can find more information about this directly on the product, in the operating manual or on the packaging.
The materials are recyclable in accordance with their labeling. You can make an important contribution to protecting our environment by reusing, renewing and recycling materials and old appliances.

Disposal of batteries
Batteries and accumulators are classed as hazardous waste and must be properly disposed of. Although batteries have a low voltage, they can provide enough current when short-circuited to ignite flammable material. They should not be disposed of together with conductive material (e.g. iron filings, wire wool contaminated with oil, etc.)

You can download the Installation manual at www.keba.com/emobility.
You can download the latest firmware at www.keba.com/emobility (download area). A new firmware can take into account modified standards or improve the compatibility with new electric vehicles, for example.
1.3 Safety instructions
WARNING!
• Electrical hazard!
Installation, commissioning and maintenance of the charging station must be performed by correctly trained, qualified and authorized electricians ^(1) who are fully responsible for the compliance with existing standards and installation regulations. For details, see "Installation manual (for the specialist)".
• Electrical hazard / risk of fire!
Never use faulty, worn-out or dirty charging connectors.
- The owner (end customer) must ensure that the charging station is only ever operated in perfect condition:
- The charging station must be checked regularly for faulty sockets and connectors (including the charging cable) and damage to the housing (visual inspection).
- A damaged charging station must be switched off immediately and replaced.
- Repair work to the charging station is not permitted and may only be performed by the manufacturer (replacement of the charging station)!
- Do not carry out any unauthorized conversion work or modifications to the charging station!
- Do not remove any notices on the device, such as safety symbols, warning notices, rating plates, nameplates or cable markings!
- The charging station does not have its own power switch! The RCD circuit breaker and the line circuit breaker of the building installation serve as mains disconnector.
- No extension cables are permitted for connecting an electric vehicle to the power supply device for electric vehicles.
Only electrical vehicles or their chargers may be connected. No connection of other loads is permitted (electric tools etc.)!
- Read the information and instructions for your vehicle carefully before you charge the vehicle using the charging station.
- Ventilation: A number of vehicles require an external ventilation system in the interior areas due to the possible creation of toxic or explosive gases during the charging procedure.

Not observing the safety instructions can result in risk of death, injuries and damage to the device! KEBA AG assumes no liability for claims resulting from this!
CAUTION!
Risk of damage!
- Never clean the charging station using spray water (from a hose, high-pressure cleaner etc.) to clean the charging station!
- Pull the charging cable out of the plug connection by the plug only and not by the cable.
- Make sure that the charging cable is not damaged mechanically (kinked, pinched or driven over) and do not allow the contact area to come into contact with sources of heat, dirt or water.
1.4 Intended use
The device is a "charging station" for the indoor and outdoor area which can be used to charge electrically operated vehicles (e.g. electric automobiles).
The charging station is designed for installation on a wall or in a floor-mounted column. The respective national regulations must be observed with regard to the installation and connection of the charging station.
The intended use of the device always includes the compliance with the environmental conditions for which this device was developed.
The device was developed, manufactured, inspected and documented in compliance with the relevant safety standards. Therefore, the products do not pose any danger to the health of persons or a risk of damage to other property or equipment under normal circumstances, provided that the instructions and safety precautions relating to the intended use are properly observed.
The instructions contained in this manual must be precisely followed in all circumstances. Failure to do so could result in the creation of potential sources of danger or the disabling of safety devices. Apart from the safety instructions given in this manual, the safety precautions and accident prevention measures appropriate to the situation in question must also be observed.
Only electrical vehicles or their chargers may be connected. The connection of other devices (e.g. electric tools) is not allowed!
Due to technical or legal restrictions, not all versions/options are available in all countries.
1.5 About this manual
This manual and the functions described apply to devices of the type:
- KeContact P20 / firmware version: v2.x (and above)
- KeContact P30 / firmware version: v3.x (and above)
Use of this manual
This manual is intended for the following groups of people:
• End-users (users of the charging station)
• Commissioning technicians, service technicians
2 Using the charging station
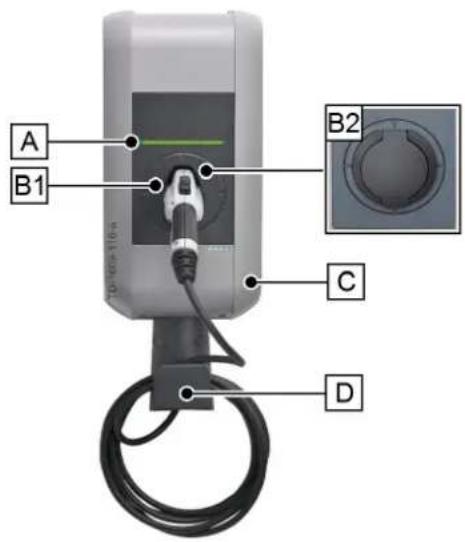
text_image
A B1 B2 C DTypical version with charging cable
[A]...Status LED
[B1]...Parking bay for charging connector
[B2]...Standard socket (variants possible)
[C]...Housing cover
[D]...Hanger for charging cable
Storing the charging connector/charging cable
If no charging procedure is being performed, the charging connector can be plugged into the parking bay [B1] for safe storage.
The charging cable can be coiled up and placed on the hanger [D].

Note
Depending on the design of the charging station, the parking bay may deviate from the one shown.
| Starting the charging procedure | Status LED |
| The charging cable is neither plugged into to the vehicle nor the charging station. | The charging station must be ready for operation, the status LED flashes green slowly every 3 seconds ("Ready for operation"). |
| Device with standard socket: Plug the charging cable into the charging station first. | The status LED lights up orange ("Wait for locking") while the system attempts to mechanically lock the plug. After successful locking, the status LED flashes green again slowly every 3 seconds. |
| Now plug the charging cable into the vehicle. | After the self-test (orange), the status LED lights up green continuously ("Ready for charging"). The charging procedure can be started from the vehicle from this point in time; the status LED then flashes green ("Charging procedure"). |
Ending the charging procedure
The charging procedure is ended by unplugging the charging cable at the vehicle. For details, please refer to the instructions of the vehicle manufacturer.
Disconnect the charging cable from the vehicle ("Wait for unplugging").
Unplug the charging cable at the charging station resp. stow the charging cable on the provided holder on the device.
3 Status LED
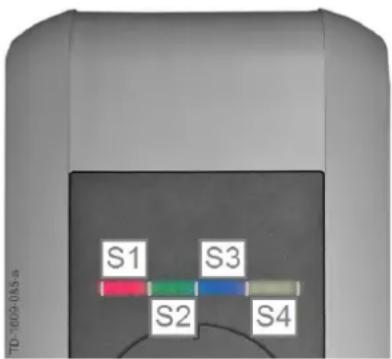
text_image
TD-769-085a S1 S3 S2 S4Status LED - segments
The status LED provides information about the current operating state of the charging station. It consists of 4 segments (S1 to S4), which can light up or flash, together or individually, in various colors.
The status LED is only visible when the power is switched on.
If not otherwise specified, all 4 segments light up together.
| Status LED Function | ||
| Flashes slowly every 3 seconds | green Ready for operation (the charging cable is not yet plugged into the vehicle;Optional: The charging station was authorized correctly by key switch or RFID card) | |
| Lights up continuously | green Ready for charging (charging cable is plugged in on both sides and locked) | |
| Flashes every second | green Charging procedure is being performed (applies for "EN 61851 Mode 3" charging procedure) | |
| Lights up orange briefly after plugging in | Wait for locking (charging cable was plugged in and the system attempts to lock the plug) | |
| Lights up orange for approximately 5 seconds | Self-test when plugging in and starting up the device. | |
| Green LED goes out briefly every 3 seconds | Wait for unplugging (charging procedure complete, vehicle unplugged) | |
| Flashes orange slowly every 5 seconds | Temperature limit exceeded (charging procedure temporarily interrupted; charging continues after cooling down) | |
| Flashes red | Malfunction (for details, see Chapter "5 Troubleshooting [26]") | |
| Segment 2 lights up orange Commissioning mode(the charging station is in commissioning mode) | ||
4 Display
Display (P30 option)
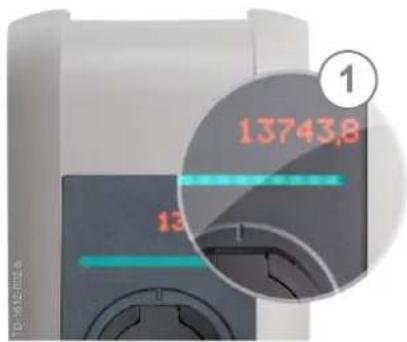
text_image
13743,8 13The optional dot matrix display (1) can display various information depending on the operating state (e.g. software version, energy meter status).
During periods of inactivity, the display brightness is dimmed/switched off after a few minutes.
The dot matrix display shines through the housing and is not visible when the display is deactivated!
4.1 Display informations
Status information
When the device is started up, some information is displayed (software version, check total, counter status).
Energy meter
At the start and end, the value of the current charging session is shown on the display, marked with a "+".
5 Troubleshooting
| PROBLEM Possible causes | |
| Status LED does not light up | No voltage supply – check the RCD and line circuit breaker and switch on, if necessary.Defective – please contact your service partner. |
| Charging procedure is not started | The plug was not plugged in correctly – unplug and plug in connector again.The charging procedure was not performed correctly – follow the instructions in Chapter "2 Using the charging station [23]".The plug may possibly be dirty in the locking area or damaged – clean the plug or have it replaced.The vehicle does not require energy or it has a fault – check vehicle.The vehicle is programmed to charge at a later starting time. |
| The vehicle not fully charged / longer charging time | Power reduction due to excessive temperature by the vehicle or the charging station:- Protect the vehicle and the charging station from direct sunlight during the charging procedure (carport, garage, etc.)- Visual inspection of the plug and socket device to see if it is dirty, worn or damaged.Contact your service partner, if necessary.No enable due to external control device (energy supplier, photovoltaic system, etc.) |
| Standard plug cannot be unplugged | The charging procedure was not ended correctly by the vehicle – end the charging procedure according to the instructions of the vehicle manufacturer.The plug may possibly not be able to be unlocked under tension – press the plug in and connect to vehicle again. Then end the charging procedure again. |
| Status LED flashes red | Malfunction – first check the possible causes of error for the malfunction (*).Switch off the supply voltage of the charging station (installed or superordinate RCD and line circuit breaker). Unplug the charging cable from the charging station. Switch on the voltage supply again.Defective – please contact your service partner. |
| For more information, please refer to the FAQ list at www.keba.com/emobility. | |
(\*) Possible causes of error for malfunction (status LED flashes red):
Malfunctions must always be acknowledged by unplugging the plug and can be triggered, for example, by the following causes:
General faults (are displayed in the colors red/white):

"White / white / white / red"
Error 1 [0001]
The plug was unplugged during the charging procedure:
The plug was not locked correctly – unplug the plug and plug in correctly and make sure it interlocks correctly.
![KEBA KeContact P30 - Error 1 [0001] - 1](/content/2026/04/670773/images/1db9565ec434cf75720e6fbe85e1a45d9ebb8530d153092e2308b5af3839582c.jpg)
natural_image
Simple horizontal bar with three white bars and one red bar (no text or symbols)"White / white / red / white"
Error 2 [0010]
The plug was not recognized:
Check whether a standard-compliant plug is being used.
![KEBA KeContact P30 - Error 2 [0010] - 1](/content/2026/04/670773/images/a19c031b52039505b22a213163c41285beae62ff82c6f16547d120201449249a.jpg)
"White / red / white / red"
Error 5 [0101]
The charging station has not detected an electric vehicle but rather a prohibited consumer:
Only standard-compliant electrically operated vehicles may be charged. Remove the prohibited consumer and start the charging procedure again.
![KEBA KeContact P30 - Error 5 [0101] - 1](/content/2026/04/670773/images/b1906b39f7dcb709ca6124aed1c9e8c21206269bbcad6d9495dd882d911ab91c.jpg)
natural_image
Simple horizontal bar with red and three white segments, no text or symbols present"Red / white / white / white"
Error 8 [1000]
The plug on the charging station supplies an invalid state:
Cable hardware fault – unplug the plug and plug it in correctly, replace the cable if necessary.
![KEBA KeContact P30 - Error 8 [1000] - 1](/content/2026/04/670773/images/68e5708e5576205ca921730ee674db39bde86b1cc064d2011779dc2fe864af6c.jpg)
"White / white / red / red"
Error 3 [0011]
Temperature shut-off:
The permitted temperature in the charging station was exceeded – unplug the plug and wait until the charging station has cooled down.
![KEBA KeContact P30 - Error 3 [0011] - 1](/content/2026/04/670773/images/335cee6a7f870f0cee8e38281ec5e1e2a9da3d8d5a35b699a7163573cdade307.jpg)
"White / red / white / white"
Error 4 [0100]
The plug could not be locked:
Unplug the plug and quickly plug it in again.
Fault in the power unit (is displayed in the colors red/blue)

natural_image
Four horizontal color bars in blue, red, and gray (no text or symbols)"blue / blue / red / red"
Error 4003 [0011]
Overcurrent detected in the vehicle:
The vehicle has not adhered to the maximum permitted current and has been switched off – should the problem persist, have the vehicle checked at a garage.
![KEBA KeContact P30 - Error 4003 [0011] - 1](/content/2026/04/670773/images/d6ac49e0d000b6f35013b4f316ba6f8d0da981d1847697ec5380d48c6fbf94c0.jpg)
natural_image
Simple horizontal bar with alternating blue and red color blocks (no text or symbols)"blue / red / blue / red"
Error 8005 [0101]
Residual current detected in the vehicle:
Check the cable, possible damage due to a storm, temporarily disconnect the charging station from the mains and start the charging process again – should the problem persist, have the vehicle checked at a garage.
Resetting an fault:
If an interruption occurs during the plugging-in or charging procedure, the charging station will attempt to automatically restart the procedure (max. 5 times).
If the charging procedure is not able to be started, this must be confirmed by properly ending the charging procedure (see Chapter "2 Using the charging station [23]") or possibly by restarting the charging station. If an untraceable fault occurs repeatedly, please contact your service partner.
6 Maintenance
The charging station is essentially maintenance free but it must be checked regularly by the owner for faulty sockets and charging connector (including the charging cable) and damage to the housing.
6.1 Cleaning
Cleaning the housing of the charging station, if necessary, using a moist cloth. Stubborn dirt can be removed using a mild, solvent-free, non-scouring cleaning agent.
6.2 Service partner
If you have questions or problems, please contact the electrical installation company that performed the installation.
Before you contact your service partner:
- Check the troubleshooting measures in Chapter "5 Troubleshooting [26]".
- Check the troubleshooting measures in the operating manual of the vehicle manufacturer.
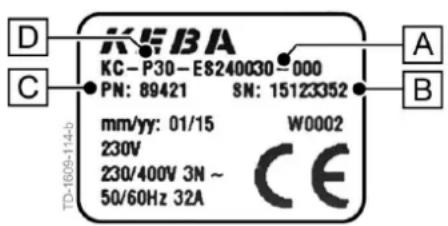
- Make note of the model version and serial number of the device (type plate on the top of the device).
text_image
KEIBA KC-P30-E8240030=000 PN: 89421 SN: 15123352 mm/yy: 01/15 W0002 230V 230/400V 3N ~ CE 50/60Hz 32A TD-1679-114-bType plate
[A]...Model version
[B]...Serial number
[C]...Material number
[D]...Device type

Table des matières
1 Informations importantes.... 32
text_image
A B1 B2 C Dnatural_image
Simple horizontal bar with red and three white segments (no text or symbols)natural_image
Four horizontal color bars in blue, red, and gray (no text or symbols)natural_image
Simple horizontal bar with alternating blue and red blocks (no text or symbols)text_image
A B1 B2 C Dnatural_image
Simple horizontal bar with three colored blocks (blue, red) on a gray background, no text or symbols present.natural_image
Simple horizontal bar with three colored blocks (blue, red, gray) on a white background (no text or symbols)text_image
A B1 B2 C Dnatural_image
Simple horizontal bar with three white bars and one red bar (no text or symbols)natural_image
Four horizontal color bars in blue, red, and gray (no text or symbols)natural_image
Simple horizontal bar with three colored blocks (blue, red, gray) on a white background (no text or symbols)text_image
A B1 B2 C Dnatural_image
Simple horizontal bar with red and three white segments, no text or symbols presentnatural_image
Simple horizontal bar with three white bars and three red bars, no text or symbols present.natural_image
Simple horizontal bar with two white bars and one red bar, no text or symbols presentnatural_image
Four horizontal color bars in blue, red, and gray (no text or symbols)natural_image
Simple horizontal bar with three colored blocks (blue, red, gray) on a white background (no text or symbols)text_image
A B1 B2 C Dtext_image
13743.8 13natural_image
Four horizontal color bars in blue, red, and gray (no text or symbols)natural_image
Simple horizontal bar with three colored blocks (blue, red, gray) on a white background (no text or symbols)text_image
A B1 B2 C D"wit / wit / wit / rood"
Storing 1 [0001]
"wit / wit / rood / wit"
Storing 2 [0010]
"wit / rood / wit / rood"
Storing 5 [0101]
"wit / wit / rood / rood"
Storing 3 [0011]
"wit / rood / wit / wit"
Storing 4 [0100]
natural_image
Simple horizontal bar with four colored blocks (blue, cyan, red, gray) on a gray background, no text or symbols present.natural_image
Simple horizontal bar with three colored blocks (blue, red, gray) on a white background (no text or symbols)text_image
A B1 B2 C Dtext_image
13743.8 13natural_image
Four horizontal color bars (blue, cyan, red, gray) with no text or symbolsnatural_image
Simple horizontal bar with three colored blocks (blue, red, gray) on a white background (no text or symbols)text_image
A B1 B2 C DStatuslysdiod – segment
natural_image
Four horizontal color bars (blue, cyan, red, gray) with no text or symbols"blå/blå/röd/röd"
Fel 4003 [0011]
natural_image
Simple horizontal bar with alternating blue and red blocks (no text or symbols)"blå/röd/blå/röd"
Fel 8005 [0101]
Felström identifierad i fordonet:
text_image
A B1 B2 C Dtext_image
13743.8 13natural_image
Four horizontal color bars in blue, red, and gray (no text or symbols)natural_image
Simple horizontal bar with three colored blocks (blue, red, gray) on a white background (no text or symbols)text_image
A B1 B2 C Dnatural_image
Simple horizontal bar with four colored blocks (blue, cyan, red, gray) on a gray background, no text or symbols present.natural_image
Simple horizontal bar with three colored blocks (blue, red, gray) on a white background (no text or symbols)text_image
A B1 B2 C Dnatural_image
Simple horizontal bar with three colored segments (blue, red, gray) on a dark background (no text or symbols)natural_image
Simple horizontal bar with three colored blocks (blue, red, gray) on a white background (no text or symbols)text_image
A B1 B2 C DŞarj kablolu tipik varyant
natural_image
Four horizontal color bars in blue, red, and gray (no text or symbols)natural_image
Simple horizontal bar with alternating blue and red segments (no text or symbols)text_image
A B1 B2 C D配备充电电缆的标准型号
text_image
13743.8 15natural_image
Four horizontal color bars in blue, red, and gray (no text or symbols)“蓝色/蓝色/红色/红色”
故障 4003 [0011]
在车辆中识别到过电流:
natural_image
Simple horizontal bar with three colored blocks (blue, red, gray) on a white background (no text or symbols)“蓝色/红色/蓝色/红色”
故障 8005 [0101]
在车辆中识别到故障电流: