USER MANUAL BOP7568BB BRANDT
natural_image
Black-and-white photo of a bowl with leaf garnish, blurred bowls in background (no text or symbols)
INSTRUCTIONS UTILISATEUR FR
FOUR

natural_image
Line drawing of an open oven with a circular vent and control panel (no text or symbols)

BVCert.6011825
Chère Cliente, Cher Client,

Important :
natural_image
Pure diagram of a grid-like structure with an arrow pointing to it, no text or symbols present.
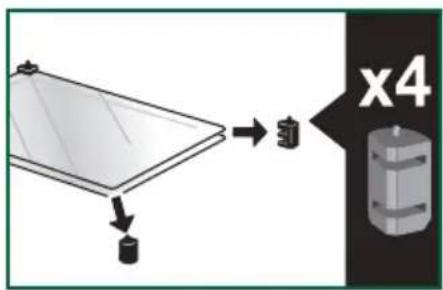
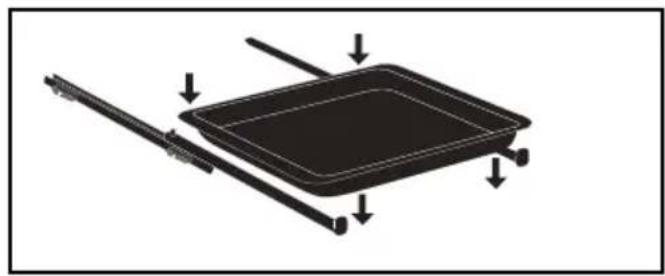
- Plat multi usages lèche-frites 45mm
natural_image
3D rendering of a mechanical component with an arrow pointing to it (no text or symbols visible)
• Plat Patisserie 20mm
natural_image
3D rendering of a gray tray with a black arrow pointing to the bottom (no text or symbols)
natural_image
Diagram of a rectangular tray with arrows indicating force or movement, no text or symbols present
Mise en garde :
natural_image
Mechanical assembly diagram showing a lever mechanism with labeled component A (no text or symbols beyond label)
natural_image
Diagram of a rectangular device with arrows indicating force or movement, no text or symbols present
natural_image
Mechanical assembly diagram showing a lever mechanism with directional arrows indicating motion (no text or symbols present)

Conseil :
natural_image
Black-and-white image of interlocking gears with a timeline icon at the bottom (no readable text or symbols)
LA FONCTION "SMART ASSIST"
FONCTION DEPART DIFFERE
LA FONCTION "GUIDE VAPEUR"
natural_image
Two-panel illustration showing a person using a rack-mounted device to lift or rotate a wall panel (no text or symbols present)
natural_image
Illustration of a hand using a tool to cut a mechanical component, with no visible text or symbols.
natural_image
Illustration of a hand using a tool to cut or install a tray inside an oven (no text or symbols visible)

natural_image
Diagram of a computer monitor with a magnified inset showing the exterior panel and base, no text or symbols present.

natural_image
Diagram showing a printer's internal structure with an inset close-up of its component (no text or symbols visible)
- Remplacement de la lampe

Important :
RELATIONS CONSOMMATEURS
natural_image
Black-and-white photo of a bowl with leaf garnish, blurred bowls in background (no text or symbols)
POKYNY PRO UŽIVATELE CS
TROUBA

natural_image
Line drawing of an open oven with a circular vent and control panel (no text or symbols)

Vážený kliente,

Důležité:
natural_image
Pure technical diagram of a grid-like structure with an arrow pointing to it, no text or symbols present.

natural_image
3D rendering of a mechanical component with an arrow indicating direction (no text or symbols)

natural_image
3D rendering of a gray tray with a black arrow pointing to the bottom section (no text or symbols)
natural_image
Diagram of a rectangular tray with arrows indicating force or movement, no text or symbols present
INSTALACE A DEMONTÁŽ POSUVNÉ TRATĚ
natural_image
Mechanical assembly diagram showing a lever mechanism with labeled component A (no text or symbols beyond label)

natural_image
Diagram of a rectangular device with arrows indicating force or movement, no text or symbols present
natural_image
Mechanical assembly diagram showing a lever mechanism with directional arrows indicating motion (no text or symbols present)

Rada :
natural_image
Black-and-white photo of interlocking gears with a timeline icon at the bottom (no readable text or symbols)
Čištění za 39 minut
natural_image
Two-panel illustration showing a hand holding a rack with an arrow indicating rotation (no text or symbols)
natural_image
Illustration of a hand holding a mechanical component with a downward arrow, next to a separate view of a mechanical part (no text or symbols)
natural_image
Illustration of a hand inserting a spring into a tray inside an oven (no text or symbols visible)
natural_image
Diagram of a computer with an open screen and a magnified inset showing a close-up of the screen area (no text or symbols present)
natural_image
Diagram showing a printer's internal structure being inserted into a device, with magnified detail highlighting the component (no text or symbols present)
• Výměna lampy

Důležité:
Vlastnosti žárovky:
25 W, 220-240 V\~, 300°C, zadek G9.
natural_image
Black-and-white photo of a bowl with leaf garnish, blurred bowls in background (no text or symbols)
BRUGERVEJLEDNING DA
OVN

natural_image
Line drawing of an oven with a circular vent and top panel (no text or symbols)

Kære kunde,

Vigtigt:
INSTALLATION AF DIT APPARAT 7
BESKRIVELSE AF DIT APPARAT 9
A Betjeningspanel
B Lampe
© Låge
D Håndgreb
natural_image
Pure technical diagram of a grid-like structure with an arrow pointing to it, no text or symbols present.

natural_image
3D rendering of a mechanical component with an arrow indicating direction (no text or symbols)

natural_image
3D rendering of a gray tray with a black arrow pointing to the bottom section (no text or symbols)

natural_image
Diagram of a rectangular tray with arrows indicating force or movement, no text or symbols present
Advarsel:
natural_image
Mechanical assembly diagram showing a lever mechanism with labeled component A (no text or symbols beyond label)

natural_image
Diagram of a rectangular device with arrows indicating force or movement, no text or symbols present

natural_image
Mechanical assembly diagram showing a lever mechanism with directional arrows indicating motion (no text or symbols present)

Rådgivning:
natural_image
Black-and-white image of interlocking gears with icons below (no readable text or symbols)
rensning på 39 minutter
natural_image
Two-panel illustration showing a person using a rack-mounted device to lift or rotate a wall panel (no text or symbols present)
natural_image
Illustration of a hand holding a small object with a downward arrow, next to a close-up of a mechanical component (no text or symbols)

natural_image
Illustration of hands installing or adjusting a window frame inside a refrigerator (no text or symbols visible)

natural_image
Diagram of a computer oven with a magnified inset showing internal components (no text or symbols)

natural_image
Diagram showing a printer's internal structure with an open lid and a magnified view of the printer's tip (no text or symbols present)
Pærens egenskaber:
25 W, 220-240 V\~, 300°C, sokkel G9.
natural_image
Black-and-white photo of a bowl with leaf garnish, blurred bowls in background (no text or symbols)
natural_image
Line drawing of an oven with a circular vent and top panel (no text or symbols)

natural_image
Pure diagram of a grid-like structure with an arrow pointing to it, no text or symbols present.
natural_image
3D rendering of a mechanical component with an arrow indicating direction (no text or symbols)

natural_image
3D rendering of a gray tray with an arrow pointing to the bottom (no text or symbols)
natural_image
Diagram of a rectangular tray with arrows indicating force or movement, no text or symbols present
Achtung
natural_image
Mechanical assembly diagram showing a lever mechanism with labeled component A (no text or symbols beyond label)

natural_image
Diagram of a rectangular device with arrows indicating force or movement, no text or symbols present

natural_image
Mechanical assembly diagram showing a lever mechanism with directional arrows indicating motion (no text or symbols present)

Empfehlung
natural_image
Black-and-white image of interlocking gears with a timeline icon at the bottom (no readable text or symbols)
natural_image
Two-panel illustration showing a person using a rack-mounted device to lift or rotate a wall, with arrows indicating motion direction (no text or symbols)
natural_image
Illustration of a hand holding a small mechanical component with a downward arrow, next to a separate view of a mechanical part (no text or symbols)

natural_image
Illustration of hands installing or adjusting a window frame inside a refrigerator (no text or symbols visible)


natural_image
Diagram of a computer with an open screen and a magnified inset showing a close-up of the screen (no text or symbols present)
natural_image
Diagram showing a printer's internal structure with an open lid and a magnified view of the printer's tip (no text or symbols present)
natural_image
Black-and-white photo of a bowl with leaf garnish, blurred bowls in background (no text or symbols)
ΟΔΗΓΙΕΣ ΧΡΗΣΤΗ ΕΛ
ΦΟΥΡΝΟΣ

natural_image
Line drawing of an open oven with a circular vent and control panel (no text or symbols)

Αγαπητέ Πελάτη,

Σημαντικό:
natural_image
Pure diagram of a grid-like structure with an arrow pointing to it, no text or symbols present.
natural_image
3D model of a mechanical component with a black arrow indicating direction (no text or symbols)
natural_image
3D rendering of a gray tray with an arrow pointing to the bottom-right corner (no text or symbols)
natural_image
Diagram of a rectangular tray with arrows indicating force or movement, no text or symbols present
! Prosoxì:
natural_image
Mechanical assembly diagram showing a lever mechanism with labeled component A (no text or symbols beyond label)
natural_image
Diagram of a rectangular tray with arrows indicating force or movement, no text or symbols present
natural_image
Mechanical assembly diagram showing a lever mechanism with directional arrows indicating motion (no text or symbols present)

Συμβουλές:
natural_image
Black-and-white image of interlocking gears with icons below (no readable text or symbols)
natural_image
Two-panel illustration showing a person using a rack-mounted device to lift or rotate a wall, with no visible text or symbols.
natural_image
Illustration of a hand holding a small mechanical component with a downward arrow, next to a close-up of a black object (no text or symbols)
natural_image
Illustration of a hand using a tool to adjust or install a tray inside an oven (no text or symbols visible)
natural_image
Diagram of a kitchen appliance with a magnified inset showing internal components (no text or symbols)

natural_image
Diagram showing a printer's internal structure with an open lid and a magnified view of the printer's base (no text or symbols present)
natural_image
Black-and-white photo of a bowl with leaf garnish, blurred bowls in background (no text or symbols)
USER INSTRUCTIONS EN
natural_image
Line drawing of an open oven with a circular vent and control panel (no text or symbols)

Dear Customer,
You have just acquired a BRANDT product and we would like to thank you.
We have designed and made this product with you, your lifestyle and your requirements in mind so that it meets your expectations. We have devoted our know-how, our innovative spirit and the passion that has been guiding us for over 60 years.
In an effort to ensure that our products meet your requirements in the best possible way, our Customer Relations department is at your disposal, to answer all your questions and to listen to all your suggestions.
Visit our website www.brandt.com where you will find our latest innovations, as well as useful and complementary information.
BRANDT is delighted to assist you every day and hopes you get the most out of your purchase.
BVCert.6011825
The label "Origine France Garantie" assures the consumer the traceability of a product by giving a clear and objective indication of the source. Brandt brand is proud to affix this label on products from our French factories based in Orléans and Vendôme.
https://brandt.com/


Important: Before using your appliance, read this user guide carefully miliarise yourself more quickly with its operation.
SAFETY INSTRUCTIONS 4
ENVIRONMENT 6
Environment 6
Energy saving councils 6
INSTALLATION 7
Choice of location and fitting 7
Electrical connection....8
DESCRIPTION OF THE OVEN....9
Presentation of the oven....9
Display and buttons 9
Accessories....10
HOW TO USE YOUR APPLIANCE 12
Settings 12
Configuration menu 13
Firing modes 14
Starting a cooking process 15
RECIPE function 17
AUTOCOOK mode 18
STEAM GUIDE function 19
Maintenance of your appliance ....20
Cleaning the interior and exterior 21
Faults and solutions 23
After-sales service 24
Servicing 24
COOKING AIDS 25
Baking charts 25
Recipes with yeast 27
Functionality tests 28
IMPORTANT - READ CAREFULLY AND RETAIN FOR FUTURE USE.
This user guide is available for download on the brand's website.
When you receive the appliance, unpack it or have it unpacked immediately. Check its general appearance. Make a note of any reservations on the delivery slip and keep a copy.

Important:
This appliance may be used by children aged 8 years and older, and by persons with impaired physical sensorial or mental capacities, or without experience or knowledge, if they are supervised or have received prior instructions on how to use the appliance safely and have understood the risks involved. Children must not be allowed to play with the appliance. Cleaning and maintenance operations must not be carried out by children without supervision.
— Children must be supervised to prevent them from playing with the appliance.

WARNING:
— The appliance and its accessible parts become hot during use. Be careful not to touch the heating elements inside the oven. Children under 8 years old must not be allowed near it unless they are supervised at all times.
— This appliance is designed to cook with the door closed.
— Before pyrolytic cleaning of your oven, remove all accessories and any thick deposits.
— During cleaning, the surfaces may become warmer than under normal conditions of use. It is advisable to keep children away from the appliance.
— Do not use a steam cleaner.
— Do not use abrasive cleaning products or hard metal scrapers for cleaning the oven's glass door, as they could scratch the surface and cause the glass to shatter.

WARNING :
Make sure the appliance is disconnected from the power before replacing the lamp in order to avoid the risk of electric shock. Change the lamp only when the appliance has cooled down. To unscrew the view port and the light, use a rubber glove, which will make disassembly easier.

The electrical plug must remain accessible after installation.
— It must be possible to disconnect the appliance from the power supply, either using a plug or by fitting a switch on the fixed wiring system in accordance with installation rules.
— If the power cable is damaged, it should be replaced by the manufacturer, its after-sales service department or by a similarly qualified person in order to avoid danger.
— This appliance may be installed either under a worktop or in a cabinet column, as indicated on the installation diagram.
— Centre the oven in the unit so as to ensure a minimum distance of 10 mm between the appliance and the surrounding unit. The material of the unit supporting the appliance must be heat-resistant (or covered with a heat-resistant material). For greater stability, attach the oven to the unit with 2 screws through the holes provided on the side panels.
— In order to avoid overheating, the appliance must not be installed behind a decorative door..
— This appliance is designed to be used for domestic and similar
applications such as:
Kitchen areas for the staff of shops, offices and other professional premises; Farms; Use by clients of hotels, motels and other residential type establishments; guest house type environments.
— The oven must be turned off when cleaning inside the oven.
Do not modify the characteristics of this appliance; doing so could be dangerous.
Do not use your oven as a larder or to store any items after use.
CARE FOR THE ENVIRONMENT
- This appliance's packing materials are recyclable. Please recycle them and help protect the environment by depositing them in municipal containers provided for this purpose.
- Your appliance also contains many recyclable materials. It is therefore marked with this logo to indicate that used appliances must not be mixed with other waste.
The appliance recycling organised by your manufacturer will therefore be conducted in optimum conditions, in accordance with European directive 2002/96/EC on electrical and electronic equipment waste.
Consult your local authority or your retailer to locate your nearest used appliance drop-off points.
- We thank you for your help in protecting the environment.
ENERGY SAVING COUNCIL
Keep the oven door closed during baking.
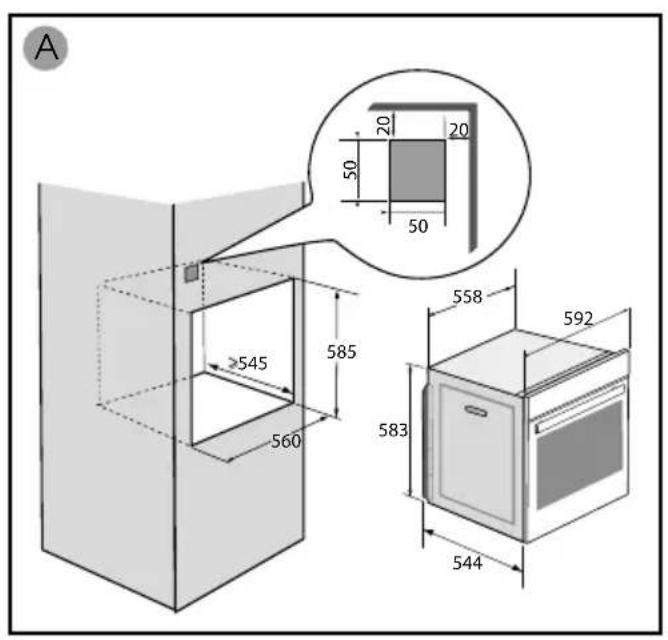
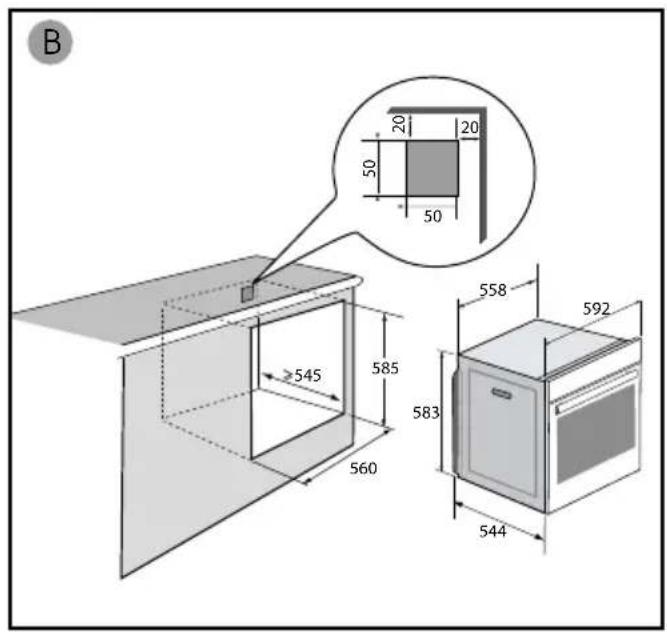
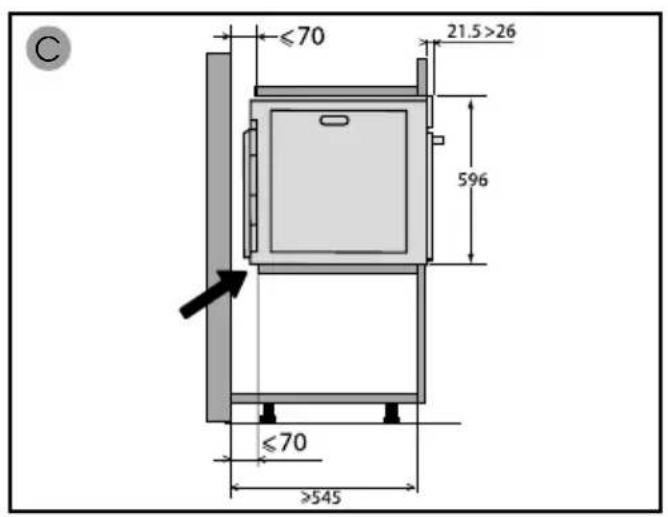
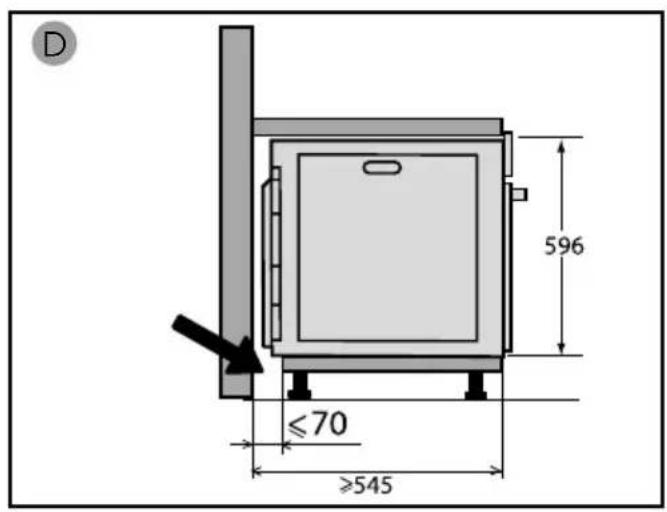
CHOICE OF LOCATION AND FITTING
The diagrams show the dimensions of a cabinet that will be able to hold your oven.
This appliance may be installed either under a worktop (A) or in a column (B). If the cabinet is open, its opening at the back must be 70 mm maximum.
Install the oven in the furniture. To do this, remove the rubber stops and pre-drill a 2-mm diameter hole in the wall of the furniture to avoid splitting the wood. Attach the oven with the two screws. Re-position the rubber stops.

Tip
To be certain that you have properly installed your appliance, do not hesitate to call on a household appliance specialist.

Warning :
If the electrical installation in your residence requires any changes in order to hook up your appliance, contact a professional electrician. If the oven malfunctions in any way, unplug the appliance or remove the fuse corresponding to the sector where the oven is hooked up.
ELECTRICAL CONNECTION
Your oven must be connected with a (standard) power cable with 3 conductors of 1.5mm^2 (1 live + 1 neutral + earth) which must be connected to a 220-240V\~ single-phase grid by means of a 1 live + 1 neutral + earth CEI 60083 standard power socket or via an all-poles cut-off device in compliance with the installation rules.

Warning
The safety wire (green-yellow) is connected to the appliance's terminal and must be connected to the earth terminal of the electrical set-up.
The fuse in your set-up must be 16 amperes.
We cannot be held responsible for any accident resulting from inexistent, defective or incorrect earthing.

- Prior to first use
Before using your oven for the first time, heat it with the door closed for about 15 minutes on the highest temperature. to break in the appliance. The mineral wool surrounding the oven cavity may initially give off a particular odour due to its composition. You may also notice smoke development. This is normal.
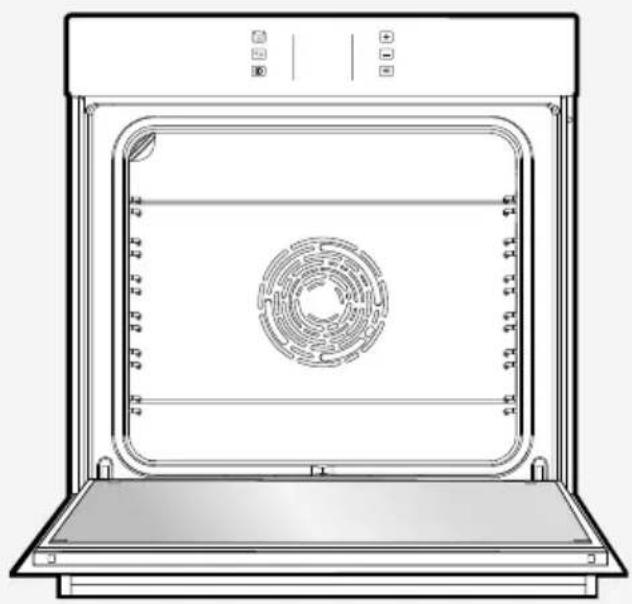
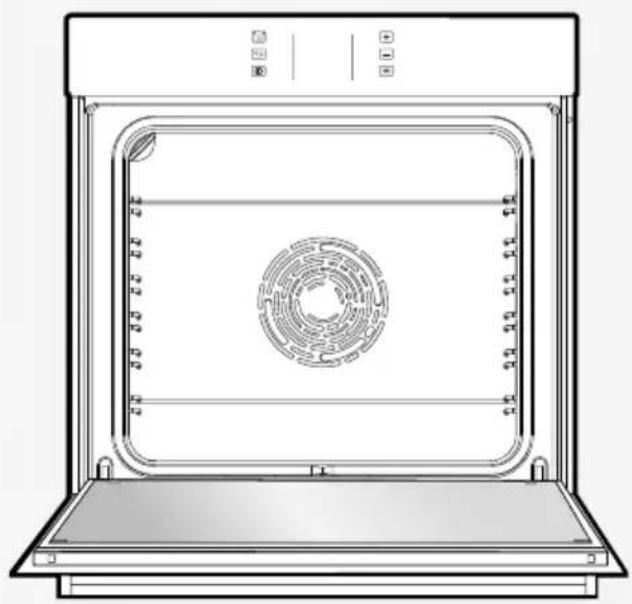
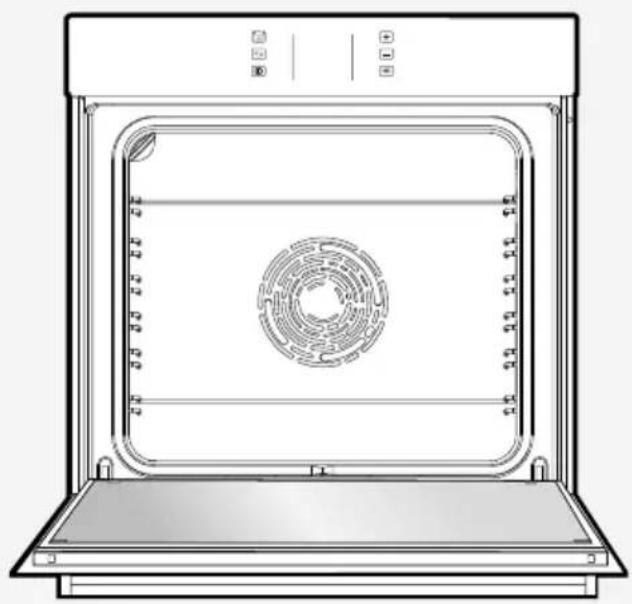
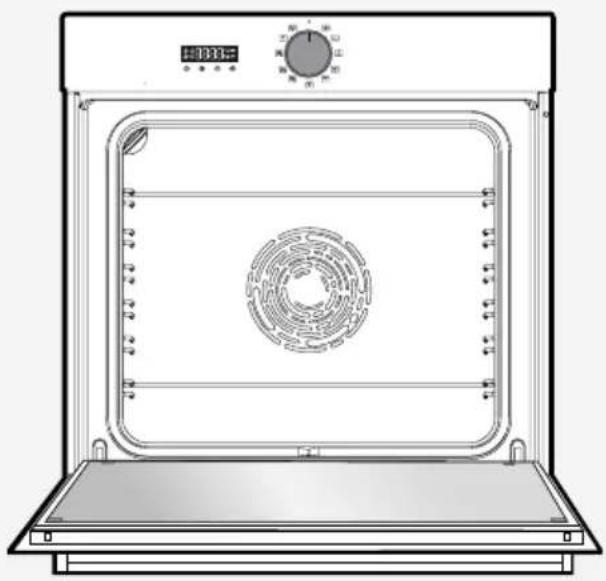
PRESENTATION OF THE OVEN

A Control panel
B Light
© Door
D Handle
This oven has 6 positions for the accessories: shelf supports 1 to 6.
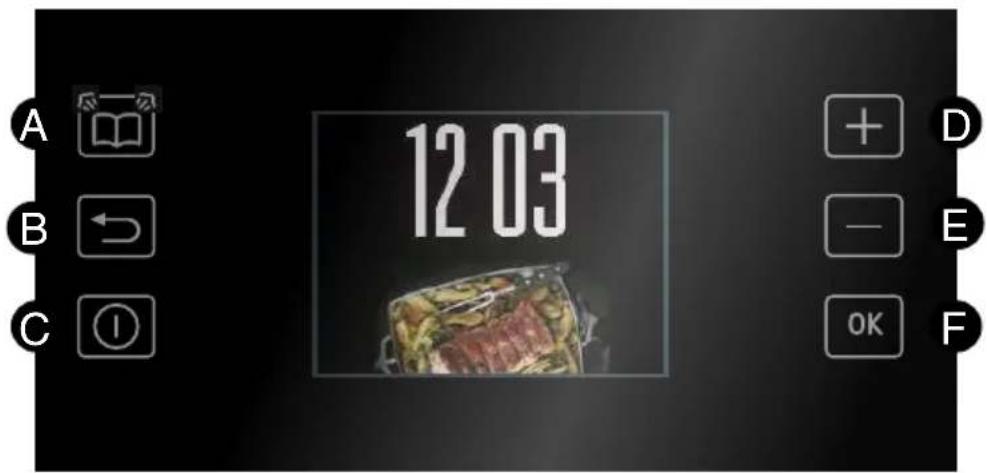
A Automatic steam function" button
B Back/unlock key
C Start/Stop" button
D Settings + (in French only)
E Settings
F Enter key
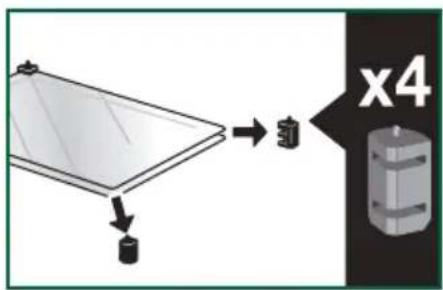
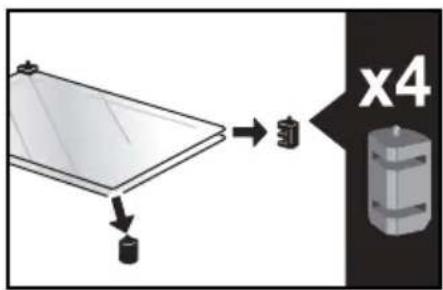
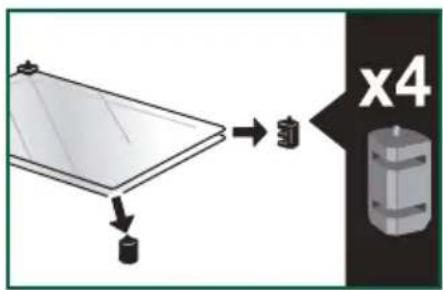
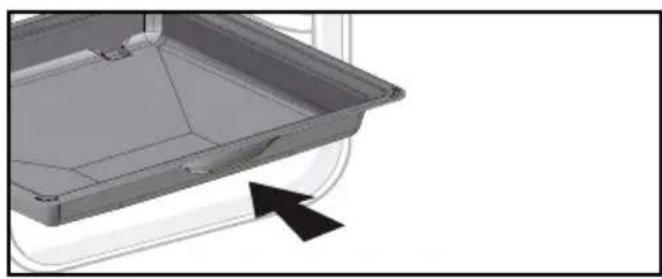
ACCESSORIES
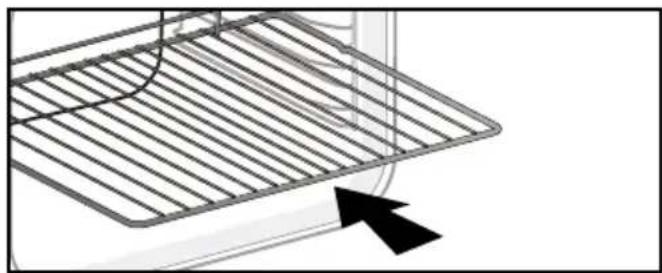
- Anti-tip safety grid
The grid can be used to hold all dishes and moulds containing foodstuffs to be cooked or browned. It can be used for barbecues (to be placed directly on the grid).
Insert the anti-tip safety grid towards the back of the oven.
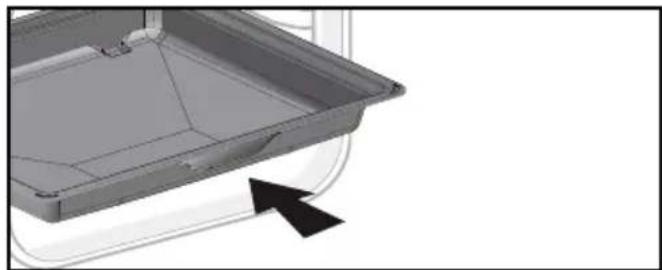
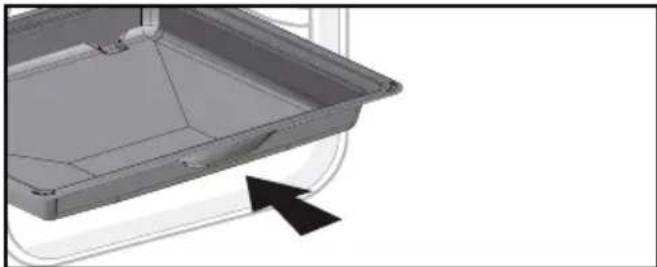
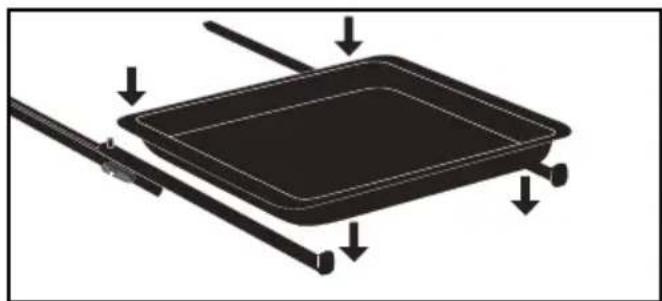
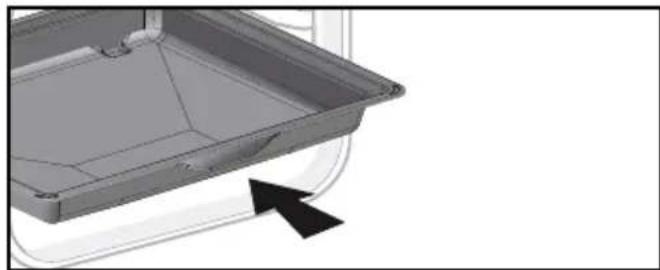
- Multi-purpose 45mm drip pan
When inserted in the supports under the grid with the handle towards the oven door, it collects juice and fat from grilling, and can be used half-filled
with water as a double-boiler.
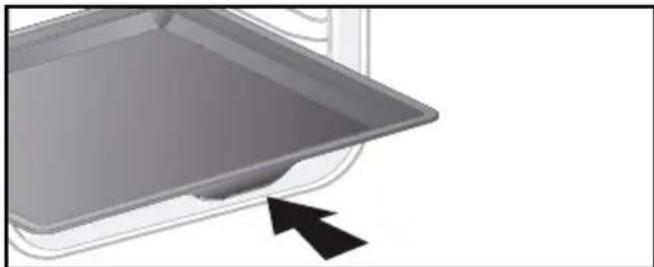
- 20mm pastry dish
When inserted in the supports with the handle towards the oven door, it is ideal for baking cookies, shortbread and cupcakes. Its tilted surface makes it practical and easy to use. Can also be inserted into the supports under the grid to collect juice and fat from grilling.
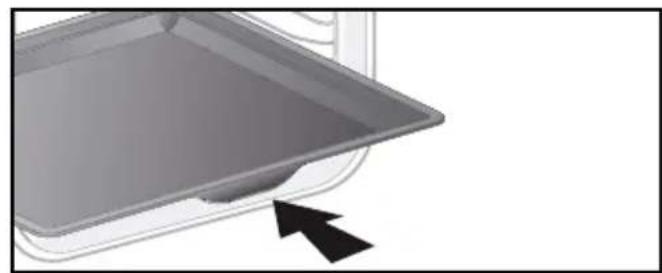
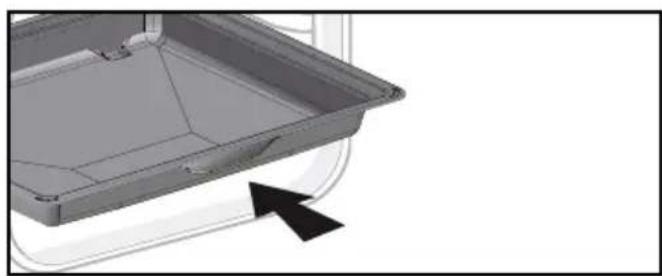
- Sliding rail system
The new sliding rail system makes food more practical and easier to handle as the trays can be effortlessly pulled for simpler handling. The trays can be completely removed, providing full access. Their stability ensures that food can be handled safely, reducing the risk of burns. This means that you can take food out of the oven far more easily.
Warning :
Remove the accessories and supports from the oven before beginning pyrolysis cleaning.
natural_image
Pure technical diagram of a metal grid with an arrow pointing to a component (no text or symbols)

natural_image
3D CAD model of a mechanical component with an arrow indicating direction (no text or symbols)
natural_image
Close-up of a gray tray with a black arrow pointing to it, no text or symbols visible

natural_image
Diagram of a rectangular tray with arrows indicating force or movement, no text or symbols present
Warning :
Under the effect of heat, the accessories may become deformed without affecting their function. They will return to their original shape when cooled.
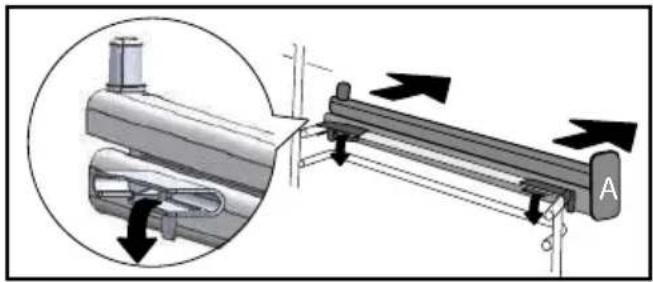
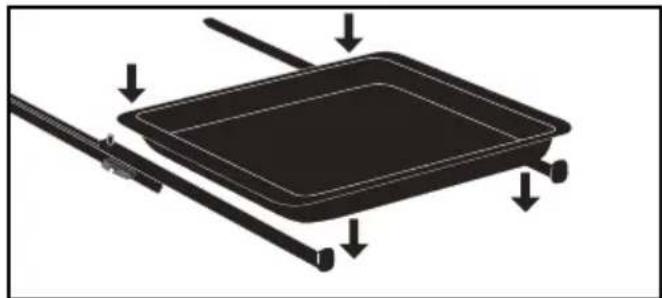
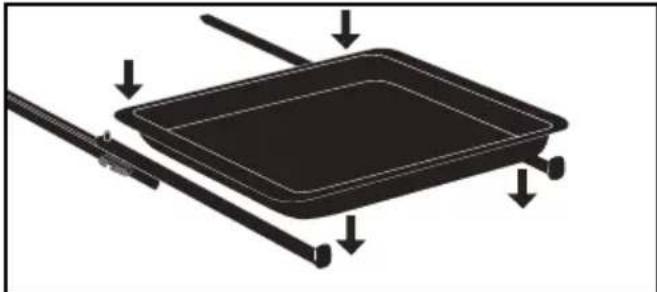
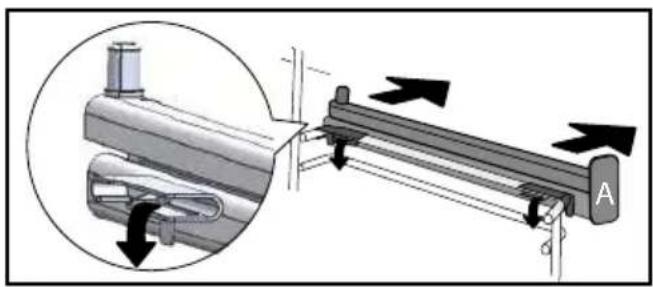
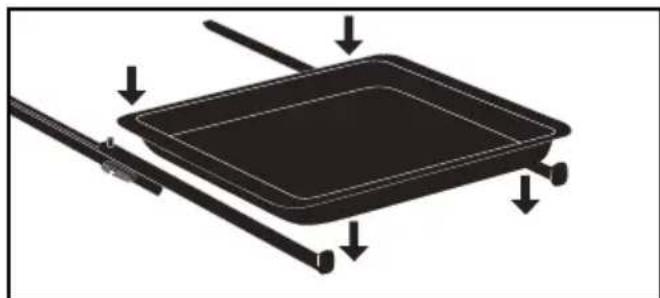
INSTALLING AND REMOVING THE SLIDING RAILS
After removing the 2 shelf runners, choose the height (2 to 5) at which you want to fit your rails. Snap the left rail against the left shelf runner by applying enough pressure to the front and back of the rail so that the 2 tabs on the side of the rail slot into the shelf runner. Do the same for the right-handrail.
NOTE: the telescopic sliding part of the rail must unfold towards the front of the oven, with the buffer A opposite you.
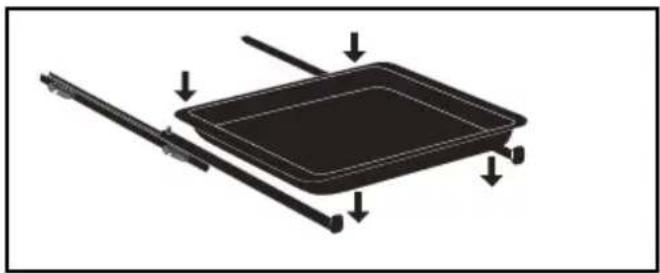
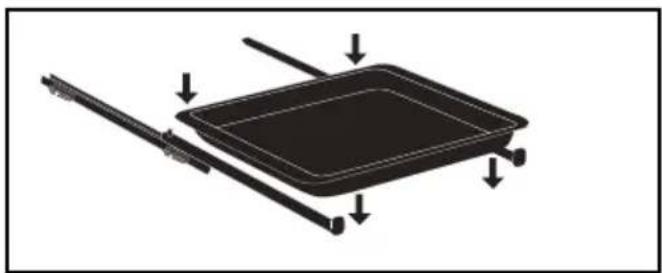
Insert your 2 shelf runners and then put your tray on the 2 rails. The system is now ready to use.
To remove the rails, remove the shelf runners again. Slightly prise apart the bottom of the tabs fixed on each rail to release
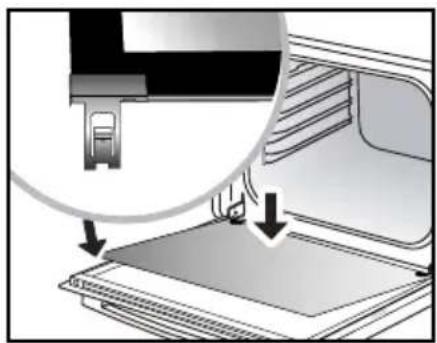
natural_image
Mechanical assembly diagram showing a lever mechanism with labeled component A (no text or symbols beyond label)
natural_image
Diagram of a rectangular tray with arrows indicating direction, no text or symbols present
natural_image
Mechanical assembly diagram showing a lever mechanism with directional arrows (no text or symbols)

To avoid fumes when cooking fatty meats, we recommend you add a small amount of water or oil to the bottom of the drip pan.
SETTING
- Setting the clock
When switching on the display flashes at 12:00.
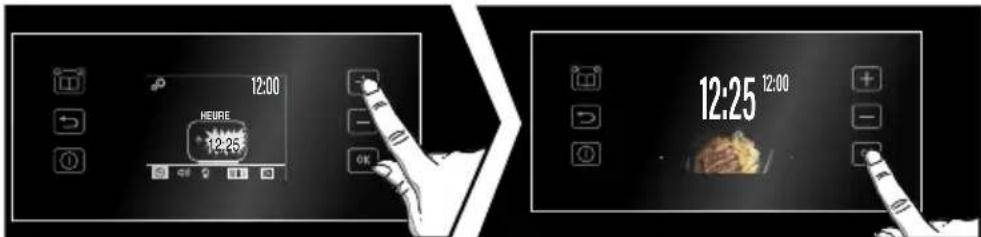
When switching on the display flashes at 12:00. Set the clock with + or -. Confirm with OK. If there is a power cut, the clock flashes
- Changing the clock
The oven must be switched off and the time displayed.
Press the OK button. Use the + and - buttons to navigate through the various settings, select "Configuration" and confirm with the OK button. Change the time and confirm with the OK button.
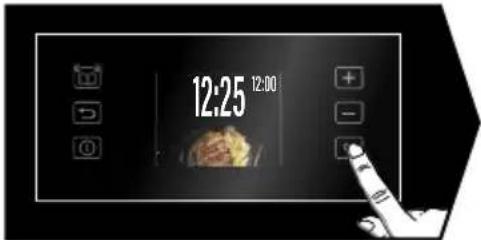
- Timer
This function can only be used when the oven is switched off.

Press the OK button. Use the + and - buttons to navigate through the various settings, select "Timer" and confirm with the OK button. Set the timer with the + or - button. Confirm with the OK button and the timer starts counting down. When the time has elapsed, a signal sounds. To stop it, press any key.
NB : You can change or cancel the timer setting at any time. To cancel, go back to the timer menu and set to 00:00. Without confirmation, the recording will automatically take place after a few seconds.
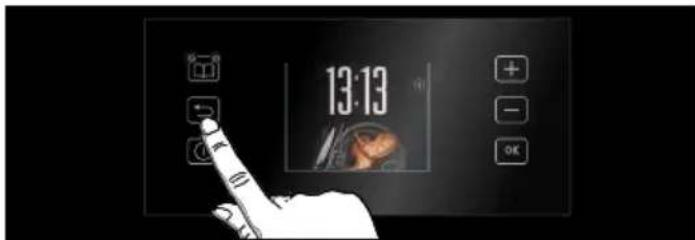
- Keypad locking
Press the ↩ until the symbol is displayed 🔗 on the screen. To unlock it, press the ↩ until the symbol 🔗 disappears from the screen.
SETTING
You can change various parameters of your oven: Select "CONFIGURATION" to access the setting mode.

natural_image
Black-and-white image of interlocking gears with a timeline icon at the bottom (no readable text or symbols)
Select with the + and - keys and confirm with the OK key to access the different parameters, see table below:
 | TIME :Allows the time to be set or changed. |
 | Sounds - KEYS :ON position, active sounds.OFF position, no sounds. |
 | Lamp management :ON position, in cooking mode, the lamp always stays on (except in ECO mode)AUTO position, in cooking mode, the cavity light goes out after about 90 seconds. |
 | LANGUAGE :FR/GRC/HE/IT/NL/NOR/POL/PT/RUS/SLK/SWE/UKR/EN/CZ/DEU/DNK/FIN |
 | DEMO mode :ON position, function activated, demonstration mode used in exhibition.OFF position, function deactivated, your oven is operational. |
COOKING MODES (depending on model)
MANUAL FUNCTIONS :

CIRCULATING HEAT\*
Min temperature 35°C, max 250°C
Recommended for keeping white meat, fish and vegetables moist. For cooking multiple items on up to three levels.

TRADITIONAL
Min temperature 35°C, max 275°C
Recommended for slow, gentle cooking: rich game, etc. For retaining the juices in red meat roasts. For simmering in a covered casserole, dishes that were begun on the hob (coq au vin, stew).

PULSED BOTTOM
(Min temperature 75°C, max 250°C)
Recommended for moist dishes (quiches, tarts with juicy fruits, etc.). The pastry will be thoroughly cooked on the bottom. Recommended for recipes which rise (cake, brioche, kügelhopf, etc.) and for soufflés which will not be stopped by a crust on the top.

ECO\*
Min temperature 35°C, max 275°C
This setting saves energy while maintaining the quality of the cooking.
All types of cooking are done without preheating.

VARIABLE GRILL
Levels from 1 to 4
Recommended for grilling toast, gratinating a dish, browning a crème brûlée...

GRILL PULSE
Min temperature 100°C, max 250°C
Roasts and poultry are juicy and crisp all over.
Slide the drip tray on to the bottom shelf support. Recommended for all spit-roasted poultry or meat, for sealing and thoroughly cooking a leg or a rib of beef. To retain the moist texture of fish steaks.
*Cooking mode as per standard EN 60350-1: 2016 to demonstrate compliance with requirements of the energy label of European regulation UE/65/2014.

TRADITIONAL PULSE
(Minimum temperature 35°C maximum 275°C) Recommended for meat, fish, vegetables, preferably in a clay dish

KEEPING WARM
Min Temperature 35°C max 100°C
Brandt offers you 3 new functions which automatically combine two cooking modes: traditional cooking and steam cooking in order to preserve the nutritional qualities of food and achieve faster cooking.

WHITE MEAT
Recommended for preserving the mussel and fondant of pork and veal rotisseries.

FISH
Recommended for cooking whole fish or fillets.

POULTRY
Recommended for cooking chickens, turkeys, guinea fowl and ducks.
For these 3 functions, all you need to do is introduce lukewarm water in sufficient quantity into your dish (drip pan) and place it in your oven in the bottom tier and your food to be cooked in tier 3.
For the quantity of water to be introduced into the drip pan, refer to the table of automatic combined functions with steam association at the end of the manual.

"Smart Assist"
Your oven has the "SMART ASSIST" function which, when programming a cooking time, will suggest a cooking time which can be modified depending on the selected cooking mode.
STARTING COOKING
The programmer must only display the time. It should not be flashing.
The timer should only display the time. The time must not be flashing.
Press the OK key, use the + and - keys to select your cooking mode and confirm with the OK key.

The oven offers you to set the other cooking parameters:

The temperature

Cooking time

The end of cooking
Use the + and - buttons to adjust the parameters. Confirm with the OK button.
- Changing the temperature

Depending on the type of cooking you have already selected, the oven recommends the ideal cooking temperature. This can be changed as follows:
Select the "Temperature" using the + / - keys and confirm with OK.
The setting is then possible, choose the desired temperature with the + and - keys, then confirm OK.
Note: You may not select a cooking time. In this case, leave the time and end of cooking boxes empty and go directly to "OK". Press OK to start the cooking process. To stop the oven, press and hold the "on/off" key.
- Programming the cooking time

Cook immediately and then select the cooking time
The cooking time symbol ⬆ flashes, the setting is now possible. Use the + or - key to set the cooking time. Confirm with OK.

Smart Assist" system
Your oven is equipped with the "Smart Assist" function which, when programming a time, will recommend a cooking time that can be modified according to the chosen cooking mode.

"Smart Assist"
Your oven has the "SMART ASSIST" function which, when programming a cooking time, will suggest a cooking time which can be modified depending on the selected cooking mode. See the table opposite:
The cooking time is saved automatically after a few seconds. The time starts to count down as soon as the cooking temperature is reached.
| COOKING MODE | TIME |
| 30 min |
| 30 min |
| 30 min |
| ECO | 30 min |
| 7 min |
| 15 min |
| 30 min |
- Delayed start

Proceed as a programmed time. When you set the cooking time, the end time G is automatically incremented. You can change this end time if you want to postpone the end of cooking. In this case, select and proceed in the same way as for setting the cooking time. Once you have set the cooking time, confirm with the OK key.
- Cooking stop
If you have programmed a cooking time, the oven will stop automatically.
Otherwise, turn off your oven by pressing and holding the "on/off" button Ⓞ.
THE "RECIPES" FUNCTION
The "RECIPES" function selects the appropriate cooking parameters for you depending on the food to be prepared and its weight.
- Salmon
- Beef, medium rare
- Pizza
- Pink shoulder of lamb
- Soufflé
- Stuffed tomatoes
- Roast pork
- Chicken
- Quiche
- Fruit pie
- Shortbread/Cookies
- Cake
Select "Recipes". The oven now offers different food families.
Use the + and - buttons to select your food family:

Once you have made your choice, confirm with the OK button. Once the food has been selected, the oven may ask you for additional information. Enter the weight 🔔 and confirm with the OK key. The oven will automatically calculate and display the ideal cooking time.
Note: If you wish, you can change the end time by selecting the ⏻ and displaying the new end time.
Start the cooking process by pressing the OK key.
The oven beeps and switches off when the cooking time is over.
"AUTOCOOK" COOKING MODE
The "AUTOCOOK" cooking mode will make your work completely easier, as the oven will automatically calculate all the cooking parameters according to the selected dish (temperature, cooking time, type of cooking) thanks to electronic sensors placed in the oven that constantly measure the degree of humidity and the temperature variation.
OPERATION OF THE "AUTOCOOK" MODE:
This cooking mode is carried out in 2 phases:
Phase 1 :
A search phase during which the oven starts to heat up and will determine the ideal cooking time. This phase lasts between 5 and 40 minutes depending on the dish.

IMPORTANT: Do not open the door du-
this phase to avoid disturbing the cal-
ion and recording of the data.
search phase is represented by the ani-
on next to the firing time.
Phase 2 :
A second cooking phase: the oven has determined the necessary time. The remaining time indicated takes into account the cooking time of the first phase. You can now open the door, for example to baste the roast. The oven offers you a choice of 12 dishes (see opposite):

AUTOCOOK
- Fish
- Roast beef (rare, medium, well done)
- Pizza
- Leg of lamb (pink, well done)
- Soufflé
- Stuffed vegetables
- Roast pork
- Chicken
- Savoury pie
- Sweet pie
- Small biscuits
- Cake
N.B.: no preheating is necessary to use the "AUTOCOOK" function. Baking MUST start with a cold oven. Wait until the oven has cooled down completely before baking a second time. If your oven is too hot to start cooking in AUTOCOOK mode, a message will appear on the display. Allow the oven to cool down.

Select AUTOCOOK mode 📄 and confirm with the OK button.
Choose your programme with the +/- keys and confirm by pressing OK.

If necessary, set your end of cooking time and confirm by pressing OK again.
The oven starts.
If necessary, set your end of cooking time and confirm by pressing OK again. The oven starts. The cooking time information flashes during this calculation phase. The oven switches off when the cooking time is over and the display indicates that the dish is ready.
DELAYED START FUNCTION
To set a delayed start:
Select the end-of-cooking symbol ⚡ and change the end time.
THE "STEAM GUIDE" FUNCTION
Press the "Steam Guide" button

The oven will then offer different food families: White meat, Fish, Poultry (see table). Select your food family with the + and - buttons and confirm with the OK button.

A weight flashes; enter the actual weight of your food with the + and - keys and confirm with OK. You do not need to set anything else, the temperature and cooking time are calculated automatically. If necessary, set the end of cooking time and confirm by pressing OK again. Your cooking starts immediately.
| TABLE OF COMBINED FUNCTIONS AUTOMATIC WITH VAPOR ASSOCIATION |
| Dishes Food | Amount of water | to be added |
| Poultry | Chicken 500 | ml lukewarm water in the multipurpose tray |
| Duck 500 ml | lukewarm water in the multipurpose tray |
| Turkey 500 ml | lukewarm water in the multipurpose tray |
| Guinea fowl 800 ml | lukewarm water in the multipurpose tray |
| Fish | Large fish 500 | ml lukewarm water in the multipurpose tray |
| Medium fish 300 ml | lukewarm water in the multipurpose tray |
| Small whole fish | 300 ml lukewarm water in the multipurpose tray |
| Fish fillets 300 ml | lukewarm water in the multipurpose tray |
| White meat | Roast pork 500 ml | lukewarm water in the multipurpose tray |
| Roast veal 500 ml | lukewarm water in the multipurpose tray |
IMPORTANT :
Place the drip pan (with the warm water) on the bottom shelf, level 1 and your food to be cooked on shelf level 3.
CLEANING INSIDE - OUTSIDE
• Self-cleaning of the cavity by pyrolysis

Warning
Remove the accessories and wire tiers from the oven before starting a pyrolysis cleaning. Before starting a pyrolysis cleaning of your oven, remove any large overflows that may have occurred. Remove excess grease from the door with a damp sponge.
For safety reasons, the pyrolysis cleaning operation is only carried out after the door has been automatically locked, the door cannot be unlocked.
- Immediate self-cleaning
The timer should display the time of day, without flashing. Select one of the self-cleaning cycles with the + or buttons -. Confirm your choice with OK.

Cleaning in 39 minutes
- At the end of each firing, "Clean 39" flashes on the display, prompting you to start cleaning. Go to the cleaning menu and confirm "Clean 39". The time 0:39 is displayed alternately with "Clean 39", your cleaning starts. After a few minutes a key will appear, the oven door will be locked automatically for safety reasons during the entire programme. If you want to start a "Clean 39" program, the oven is cold or not hot enough, the program start conditions will not allow this cleaning. 0:00 will appear on the display, you will have to choose one of the other cleaning functions.
Pyrolysis of 2 hours or 1.5 hours, as desired.
Select one of the two cleaning functions depending on how dirty your oven is.
Depending on your choice, the time 2:00 (or 1:30) is displayed. Confirm with the OK button.
The pyrolysis starts.
At the end of the cleaning process, the display shows cooling and pyrolysis completed and the door is unlocked.
- Delayed self-cleaning
You can delay the start of your Pyrolysis programme. When the programme duration appears on the display, select ⏻ and set the new end time with the + and - buttons and confirm with OK. The self-cleaning process will start later and end at the new set time.
- Cleaning the outer surfaces
Use a window washing product applied to a soft cloth. Do not use abrasive creams or scouring sponges.
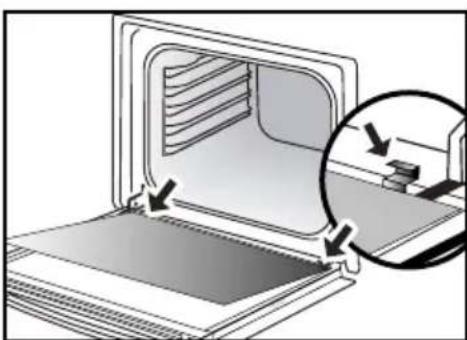
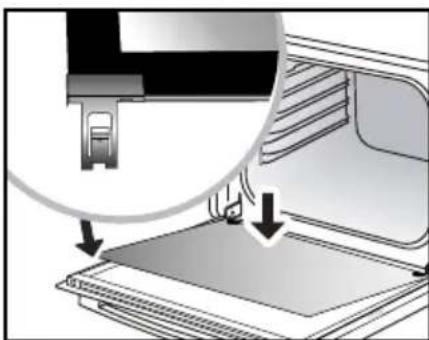
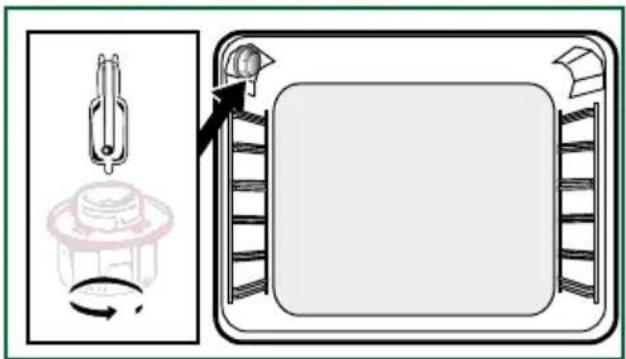
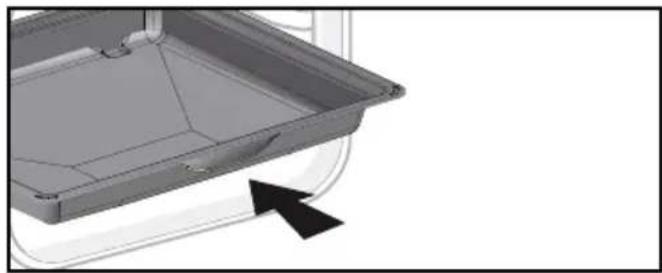
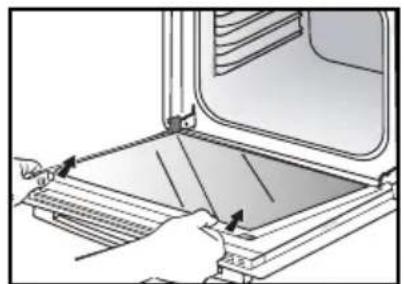
- Cleaning the shelf supports
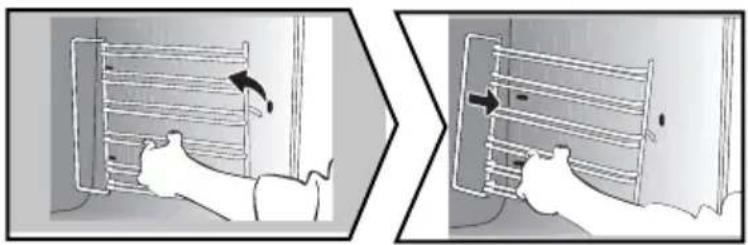
Lift the front part of the wire shelf support upwards. Press the entire shelf support and release the front hook from its housing. Then gently pull the whole of the support towards you to release the rear hooks from their housing. Pull out the two shelf supports.
natural_image
Two-panel illustration showing a person installing or adjusting a wall-mounted device, with no visible text or symbols.
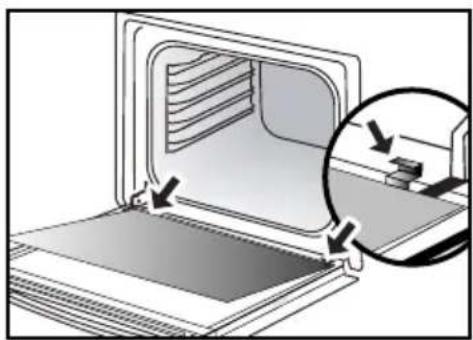
- Cleaning the inside glass
Warning
Do not use scouring cleaning products, abrasive sponges or metal scrapers to clean the oven's class door, which may scratch the surface and lead to the glass breaking.
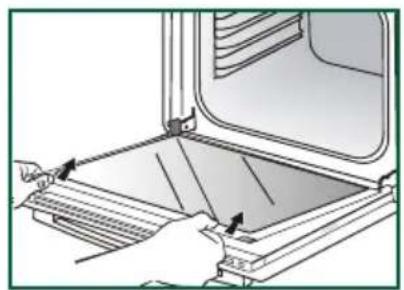
To clean the inside glass, remove the door. Before doing this, remove any excess grease with a soft cloth and washing up liquid.
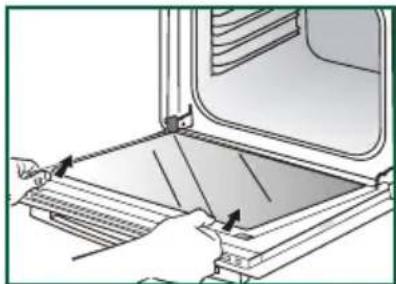
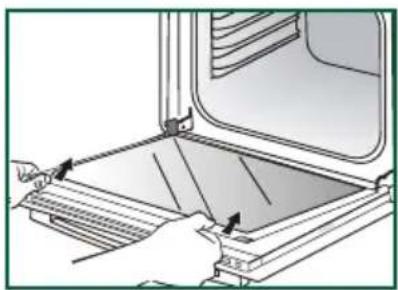
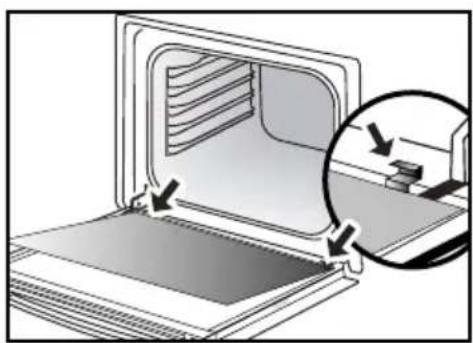
- Cleaning the inside glass
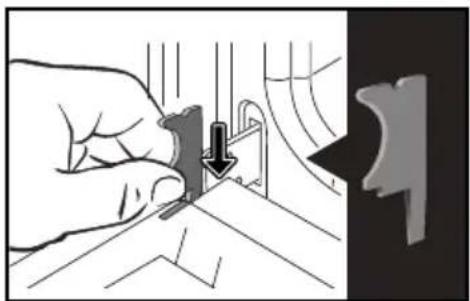
Open the door fully and block it with the plastic wedge provided in your appliance's plastic pouch.
natural_image
Illustration of a hand holding a tool with a downward arrow, next to a separate view of a mechanical component (no text or symbols)
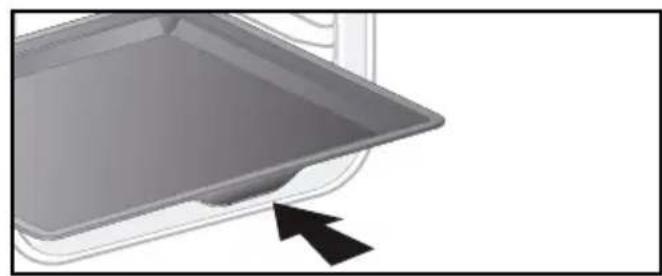
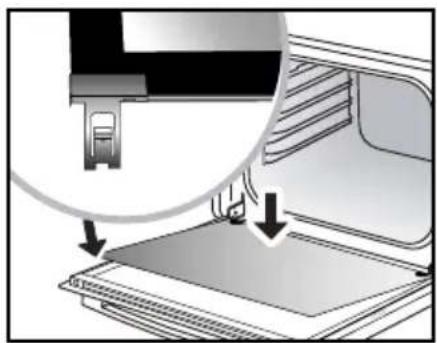
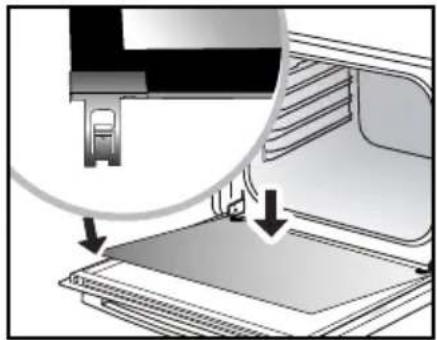
Use a tool (screwdriver) to press the slots A in order to unclip the glass panel. Remove the glass panel.

Important :
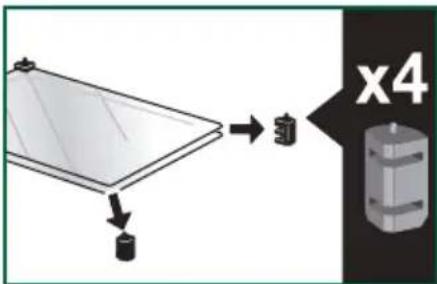
Make sure to mark the mounting direction of this first window (shiny side towards you).
Depending on the model, the door consists of two additional glass panels, with a black rubber spacer at each corner. If necessary, remove them to clean.
Do not soak the glass panels in water. Rinse with clean water and dry off with a lint-free cloth.
natural_image
Illustration of hands installing or adjusting a window frame inside a refrigerator (no text or symbols visible)
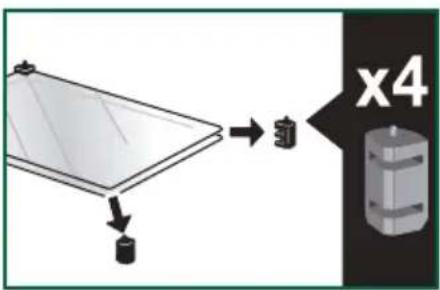
• Re-assembling the door
After cleaning, reposition the four rubber stops with the arrow upwards.
Reposition all of the glass panels.
Slip the last glass panel into the metal stops, then clip it in with the shiny side facing outwards.
Remove the plastic wedge.
Your appliance is now ready for use again.

natural_image
Diagram of a computer with an open screen and a magnified inset showing a close-up of the screen area (no text or symbols present)
natural_image
Diagram showing a printer's internal structure with an open base and a magnified view of the printer's tip (no text or symbols present)
- Replacing the oven lamp

Warning:
Make sure the appliance is disconnected from the power before replacing the lamp in order to avoid the risk of electric shock. Change the lamp only when the appliance has cooled down.
Bulb specification:
25 W, 220-240 V\~, 300°C, G9 cap.
To unscrew the view port and the light, use a rubber glove, which will make disassembly easier. This product contains a light source of energy efficiency class G.
ANOMALIES AND SOLUTIONS
The oven is not heating. Check that the oven is correctly connected and that your installation's fuse is not out of service. Increase the selected temperature.
The oven light is not working. Replace the bulb or the fuse. Check that the oven is correctly connected.
The cooling fan continues to operate after the oven stops. This is normal; the fan may continue running until a maximum of 1 hour after cooking to lower the temperature inside and outside the oven. If the fan runs for over an hour, contact the After Sales Department.
The pyrolysis cleaning cycle does not begin. Check that the door is locked. If there is a door locking or temperature sensor fault, contact the Customer Services Department.
The symbol 🔍 flashes in the display.
Door locking fault; contact the Customer Services Department.
Vibration noise.
Check that the power cord is not in contact with the rear wall.
This does not affect the proper operation of your unit, but may generate vibration noise during ventilation. Remove your unit and move the cord. Replace your oven.
SERVICE CALLS
Any repairs made to your appliance must be carried out by a qualified professional authorised to work on the brand. When calling, please provide the complete references of your appliance (commercial reference, service reference, serial number), so that we can handle your call better. This information appears on the manufacturer's nameplate attached to your equipment.
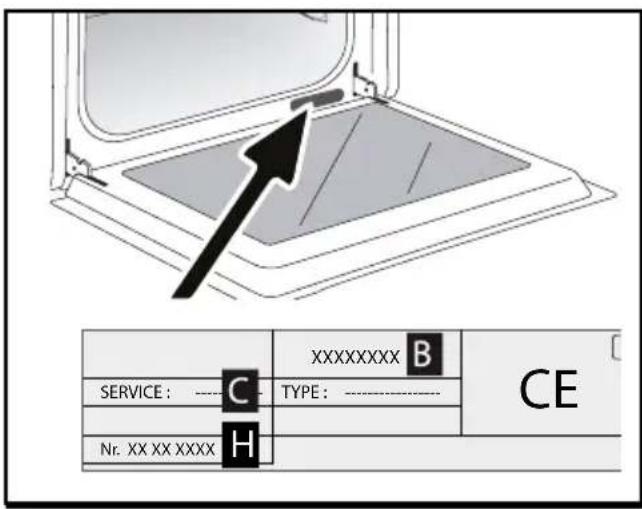
B: Commercial reference
C: Service reference
H: Serial number
GENUINE REPLACEMENT PARTS
During maintenance work, request that only certified genuine replacement parts are used.

| DISHES | | | | | | | | min |
|
| Pastries |
| Madeleines | 220 | 3 | | | | | 200 | 3 | | | | | | | 5-10 |
| Choux pastry | 200 | 3 18 | 0 3 18 | 0 3 30 | -40 | | | | | | | | | | |
| Flaky pastry hors d'oeuvres | 220 3 | | | | | | 200 3 | | | | | | | | 5-10 |
| Savarin cake | 180 3 | | | | | | | | | | | | 175 3 | | 30-35 |
| Shortcrust tart | 200 1 | | | | | | 195 1 | | | | | | | | 30-40 |
| Thin flaky crust tart | 215 1 | | | | | | 200 1 | | | | | | | | 20-25 |
| Tart made with yeast-based pastry | 210 1 | | | | | | 200 1 | | | | | | | | 10-30 |
| Other |
| Skewers | 220 3 | 210 4 | 10-15 | | | | | | | | | | | | |
| Terrine pâté | 200 2 | 190 2 | 80-100 | | | | | | | | | | | | |
| Shortcrust pizza | 200 2 | 30-40 | | | | | | | | | | | | | |
| Dough-based pizza | | | | | | | | | | | | | | | 15-18 |
| Quiches | | | | | | | | | | | | | | | 35-40 |
| Soufflé | | | | | | | | | | | | | 180 2 | 50 | |
| Pies | 200 2 | 40-45 | | | | | | | | | | | | | |
| Bread | 220 20 | 220 | 30-40 | | | | | | | | | | | | |

* Depending on the model
All T°C and cooking times are given for pre-heated ovens.
N.B: Before being placed in the oven, all meat must remain at least 1 hour at room temperature.
| RELATIONSHIP OF SETTINGS TO TEMPERATURE T °F /°C |
| Setting | 1 | 2 | 3 | 4 | 5 | 6 | 7 | 8 | 9 maxi |
| °Fahrenheit | 85 | 140 | 195 | 250 | 300 | 355 | 410 | 465 | 525 |
| | | | | | | | | |
| DISHES | | | | | | | | min |
|
| Meat |
| Roast pork (1kg) | 200 | 2 | | | | | 180 | 2 | | | | | | | 60 |
| Roast veal (1kg) | 200 2 | | | | | | 180 | 2 | | | | | | | 60-70 |
| Roast beef | 240 | 2 | | | | | | | | | | | | | 30-40 |
| Lamb (leg, shoulder, 2.5kg) | 220 | 1 | | | 220 200 | | | | | | 2 | | | 60 |
| Poultry (1kg) | 200 | 2 22 | 0 | | | | 180 | 2 21 | 0 3 | | | | | | 60 |
| Large pieces of poultry | 180 1 60-90 | | | | | | | | | | | | | |
| Chicken thighs | | | | | 220 3 | 210 3 | | | | | | | | | 20-30 |
| Pork/veal chops | | | | | 210 3 | | | | | | | | | | 20-30 |
| Beef ribs (1kg) | | | | | 210 3 | 210 3 | | | | | | | | | 20-30 |
| Lamb chops | | | | | 210 3 | | | | | | | | | | 20-30 |
| Fish |
| Grilled fish | | | | | 275 4 | | | | | | | | | | 15-20 |
| Cooked fish (bream) | 200 | 3 | | | | | 180 | 3 | | | | | | | 30-35 |
| Fish in papillotte | 220 | 3 | | | | | 200 | 3 | | | | | | | 15-20 |
| Vegetables |
| Gratins (cooked foods) | | | | | 275 2 | | | | | | | | | | 30 |
| Potato gratin | 200 | 2 | | | | | 180 | 2 | | | | | | | 45 |
| Lasagne | 200 | 3 | | | | | 180 | 3 | | | | | | | 45 |
| Stuffed tomatoes | 170 | 3 | | | | | 160 | 2 | | | | | | | 30 |
| Pastries |
| Sponge cake | | | 180 | 2 | | | | | | | | | | 180 2 35 | |
| Swiss roll | 220 | 3 | | | | | | | | | | | | 180 2 5-10 | |
| Buns | 180 1 210 180 2 35-45 | | | | | | | | | | | |
| Brownies | 180 | 2 | | | | | 175 3 | 20-25 | | | | | | | |
| Cake - Pound cake | 180 1 180 1 | 180 2 45-50 | | | | | | | | | | | |
| Clafoutis | 200 | 2 | | | | | 180 3 | 30-35 | | | | | | | |
| Baked custards | 165 | 2 | | | | | | | | | | | | 150 2 30-40 | |
| Cookies - Shortbread | 175 | 3 | | | | | | | | | | | | | 15-20 |
* Depending on the model
Recipe with yeast (depending on model)
Ingredients:
- Flour 2 kg ● Water 1240 ml ● Salt 40 g ● 4 packets of dehydrated baker's yeast
Mix the dough in a mixer and allow to rise in the oven.
Method: For yeast-based pastry recipes. Pour the dough into a heat-resistant dish. Remove the wire shelf supports and put the dish on the bottom.
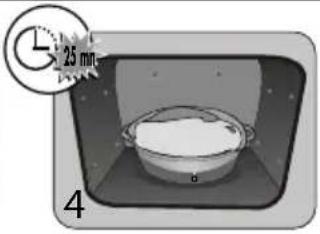
Pre-heat the oven to 40—50°C with the circulating heat function for five minutes. Stop the oven and allow the dough to rise for 25-30 minutes thanks to the residual heat.
natural_image
3D rendering of a bowl inside a rectangular frame, no text or symbols visible

natural_image
Illustration of a metal bowl on a tray, no text or symbols present
natural_image
Simple illustration of a cooking pot inside a container (no text or symbols)
Brandt
natural_image
Black-and-white photo of a bowl with leaf garnish, blurred bowls in background (no text or symbols visible)
natural_image
Line drawing of an open oven with a circular vent and side-mounted base (no text or symbols)


Importante:
natural_image
Pure technical diagram of a grid-like structure with an arrow pointing to it, no text or symbols present.
natural_image
3D CAD model of a mechanical component with a black arrow indicating direction (no text or symbols)
natural_image
3D rendering of a gray tray with a black arrow pointing to the bottom (no text or symbols)
natural_image
Diagram of a rectangular tray with arrows indicating force or movement, no text or symbols present
Advertencia:
natural_image
Mechanical assembly diagram showing a lever mechanism with labeled component A (no text or symbols beyond label)
natural_image
Diagram of a rectangular tray with arrows indicating direction or force, no text or symbols present

natural_image
Mechanical assembly diagram showing a lever mechanism with directional arrows and a magnified inset view (no text or symbols)

Consejo
natural_image
Two-panel illustration showing a person using a rack-mounted device to lift a wall, with arrows indicating motion (no text or symbols)
natural_image
Illustration of a hand holding a small mechanical component with a downward arrow, next to a close-up of a metallic bracket (no text or symbols)
natural_image
Illustration of hands installing or adjusting a window frame inside a kitchen appliance (no text or symbols visible)

natural_image
Diagram of a computer with an open screen and a magnified inset showing a close-up of the screen area (no text or symbols present)

natural_image
Diagram showing a printer's internal structure with an open base and a magnified view of the printer's tip (no text or symbols present)
natural_image
Black-and-white photo of a bowl with leaf garnish, blurred bowls in background (no text or symbols)
KÄYTTÄJÄN OHJEET FI
UUNI

natural_image
Line drawing of an open oven with a circular vent and control panel (no text or symbols)

Hyvä asiakas,

Tärkeä:
natural_image
Pure diagram of a grid-like structure with an arrow pointing to it, no text or symbols present.

natural_image
3D model of a tray with a curved arrow pointing to the bottom section (no text or symbols visible)
natural_image
3D rendering of a gray tray with a black arrow pointing to the bottom surface (no text or symbols)

natural_image
Diagram of a rectangular tray with arrows indicating force or movement, no text or symbols present
Varoitus:
natural_image
Mechanical assembly diagram showing a lever mechanism with labeled component A (no text or symbols beyond label)

natural_image
Diagram of a rectangular tray with arrows indicating direction, no text or symbols present

natural_image
Mechanical assembly diagram showing a lever mechanism with directional arrows indicating motion (no text or symbols present)

Vinkki
natural_image
Black-and-white image of a mechanical gear system with icons at the bottom (no readable text or symbols)
natural_image
Two-panel illustration showing a person using a rack-mounted device to lift or rotate a wall panel (no text or symbols present)
natural_image
Illustration of a hand using a tool to cut a component, with no visible text or symbols

natural_image
Illustration of hands installing or adjusting a window frame inside a refrigerator (no text or symbols visible)

natural_image
Diagram of a computer with an open screen and a magnified inset showing a printer's lid (no text or symbols present)

natural_image
Diagram showing a printer's internal structure with an open base and a magnified view of the printer's internal components (no text or symbols present)
Lampun tyyppi:
25 W, 220-240 V\~, 300°C, kanta G9.
POIKKEAMAT JA RATKAISUT
Uuni ei lämpene.
natural_image
Black-and-white photo of a bowl with leaf garnish, blurred bowls in background (no text or symbols)
ISTRUZIONI PER L'UTENTE IT

natural_image
Line drawing of an open oven with a circular vent and control panel (no text or symbols)

FORNO
Gentile Cliente,

Importante:
natural_image
Pure diagram of a grid-like structure with an arrow pointing to it, no text or symbols present.

natural_image
3D rendering of a mechanical component with an arrow indicating direction (no text or symbols)

natural_image
3D rendering of a gray tray with a black arrow pointing to the bottom surface (no text or symbols)

natural_image
Diagram of a rectangular tray with arrows indicating force or movement, no text or symbols present
Attenzione:
natural_image
Mechanical assembly diagram showing a lever mechanism with labeled component A (no text or symbols beyond label)

natural_image
Diagram of a rectangular tray with arrows indicating direction, no text or symbols present

natural_image
Mechanical assembly diagram showing a lever mechanism with directional arrows indicating motion (no text or symbols present)

Consiglio
natural_image
Black-and-white image of interlocking gears with no visible text or symbols
natural_image
Two-panel illustration showing a person using a rack-mounted device to lift or rotate a wall panel (no text or symbols present)
natural_image
Illustration of a hand holding a small mechanical component with a downward arrow, next to a close-up of a metallic bracket (no text or symbols)

natural_image
Illustration of hands installing or adjusting a window frame inside an oven (no text or symbols visible)


natural_image
Diagram of a computer oven with a magnified inset showing internal components (no text or symbols)

natural_image
Diagram showing a printer's internal structure with an open base and a magnified view of the printer's tip (no text or symbols present)
natural_image
Black-and-white photo of a bowl with leaf garnish, blurred bowls in background (no text or symbols)
GEBRUIKERSINSTRUCTIES NL
OVN

natural_image
Line drawing of an open oven with a circular vent and control panel (no text or symbols)

Geachte klant,

Belangrijk:
A Bedieningspaneel
B Lamp
© Deur
D Handgreep
natural_image
Pure diagram of a grid-like structure with an arrow pointing to it, no text or symbols present.
natural_image
3D rendering of a mechanical component with an arrow indicating direction (no text or symbols)

natural_image
3D rendering of a gray tray with a black arrow pointing to the bottom section (no text or symbols)

natural_image
Diagram of a rectangular tray with arrows indicating force or movement, no text or symbols present
Advies
natural_image
Mechanical assembly diagram showing a lever mechanism with labeled component A (no text or symbols beyond label)

natural_image
Diagram of a rectangular device with arrows indicating force or movement, no text or symbols present

natural_image
Mechanical assembly diagram showing a lever mechanism with directional arrows indicating motion (no text or symbols present)

Advies :
natural_image
Black-and-white image of interlocking gears with a timeline icon at the bottom (no readable text or symbols)
Reiniging in 39 minuten

natural_image
Illustration of hands installing or adjusting a window frame inside a refrigerator (no text or symbols visible)
natural_image
Diagram of a computer with an open screen and a magnified inset showing a printer's base (no text or symbols present)

natural_image
Diagram showing a printer's internal structure with an open base and a magnified view of the printer's internal components (no text or symbols present)
- Lamp vervangen

Let op
natural_image
Black-and-white photo of a bowl with leaf garnish, blurred bowls in background (no text or symbols)
BRUKERINSTRUKSJONER NO
natural_image
Line drawing of an open oven with a circular vent and control panel (no text or symbols)

Kjære kunde,
Du har nettopp kjøpt et BRANDT -produkt, og vi vil takke deg.

A Kontrollpanel
B Lys
© Dør
D Håndtak
natural_image
Pure technical diagram of a metal grate with a black arrow pointing to it, no text or symbols present.

natural_image
3D CAD model of a mechanical component with an arrow indicating direction (no text or symbols)

natural_image
3D rendering of a tray with an arrow pointing to it (no text or symbols)
natural_image
Diagram of a rectangular tray with arrows indicating force or movement, no text or symbols present
Advarsel:
natural_image
Mechanical assembly diagram showing a lever mechanism with labeled component A (no text or symbols beyond label)
natural_image
Diagram of a rectangular tray with directional arrows indicating movement or force (no text or symbols)
natural_image
Mechanical assembly diagram showing a lever mechanism with directional arrows indicating motion (no text or symbols present)

Tips
natural_image
Black-and-white image of interlocking gears with a timeline icon at the bottom (no readable text or symbols)
Recommended for keeping white meat, fish and vegetables moist. For cooking multiple items on up to three levels.

TRADISJONELL
Min temperature 35^ C, max 275^ C
Recommended for slow, gentle cooking: rich game, etc. For retaining the juices in red meat roasts. For simmering in a covered casserole, dishes that were begun on the hob (coq au vin, stew).

PULSED BUNN
(Min temperature 75°C, max 250°C)
Recommended for moist dishes (quiches, tarts with juicy fruits, etc.). The pastry will be thoroughly cooked on the bottom. Recommended for recipes which rise (cake, brioche, kügelhopf, etc.) and for soufflés which will not be stopped by a crust on the top.

ECO\*
Min temperature 35°C, max 275°C
This setting saves energy while maintaining the quality of the cooking.
All types of cooking are done without preheating.

FULL GRILL
Min temperature 180°C, max 275°C
Recommended for toast, gratin dishes, browning crème brûlée, etc.

GRILLPULS
Min temperatur 100 °C, maks 250 °C
- Delayed self-cleaning
natural_image
Two-panel illustration showing a person using a ladder to lift a wall-mounted device, with no visible text or symbols.
natural_image
Illustration of a hand using a tool to adjust or install a mechanical component, with no visible text or symbols.
natural_image
Illustration of hands operating a 3D printer or scanner device with a lid, showing internal components and no visible text or symbols.
natural_image
Diagram of a printer or printer with a magnified inset showing the printer's internal structure (no text or symbols present)
natural_image
Diagram showing a printer's internal structure with an open base and a magnified view of the printer's internal components (no text or symbols present)
- Skifte ovnslampe

Advarsel:
Bulb specification:
25 W, 220-240 V\~, 300°C, G9 cap.
natural_image
Simple 3D illustration of a metal bowl placed inside a rectangular frame (no text or symbols)
natural_image
Simple illustration of a bowl inside a container with a label '3' (no text or symbols on the diagram itself)
| YTELSE TESTING IhtSTANDARD CEI 60350 |
| MAT | * Matla-gingsmo-duser | HYLLE TILBEH∅R °C TIME min. FORVARM | | |
| Shortbread (8.4.1) 5 Deep |  mn mn | 150 30-40 ja | | | |
| Shortbread (8.4.1) |  | 5 Deep Tray 45mn 150 25-35 ja | | | |
| Shortbread (8.4.1) |  | 2 + 5 Deep Tray 45mn + grill 150 25-45 ja | | | |
| Shortbread (8.4.1) |  | 3 Deep Tray 45mn 175 25-35 ja | | | |
| Shortbread (8.4.1) s Deep |  mn mn | + grill 160 30-40 ja | | | |
| Små kaker (8.4.2) |  | 5 Deep Tray 45mn 170 25-35 ja | | | |
| Små kaker (8.4.2) |  | 5 Deep Tray 45mn 170 25-35 ja | | | |
| Små kaker (8.4.2) |  | 2 + 5 Deep Tray 45mn + grill 170 20-40 ja | | | |
| Små kaker (8.4.2) 3 Deep |  mn mn | 170 25-35 ja | | | |
| Små kaker (8.4.2) |  | 2 + 5 Deep Tray 45mn + grill 170 25-35 ja | | | |
| Fatless svampekake (8.5.1) |  | 4 Grill 150 30-40 ja | | | |
| Fatless svampekake (8.5.1) |  | 4 Grill 150 30-40 ja | | | |
| Fatless svampekake (8.5.1) |  | 2 + 5 Deep Tray 45mn + grill 150 30-40 ja | | | |
| Fatless svampekake (8.5.1) |  | 3 | Grill | 150 | 30-40 | ja |
| Fatless svampekake (8.5.1) |  | 2 + 5 Deep Tray 45mn + grill 150 30-40 ja | | | |
| Eplepai (8.5.2) |  | 1 Grill 170 90-120 ja | | | |
| Eplepai (8.5.2) |  | 1 Grill 170 90-120 ja | | | |
| Eplepai (8.5.2) |  | 3 | Grill | 180 | 90-120 | ja |
| Brun overflate (9.2.2) |  | 5 | Grill | 275 | 3-6 | ja |
natural_image
Black-and-white photo of a bowl with leaf garnish, blurred bowls in background (no text or symbols)
INSTRUKCJA OBSŁUGI PL
PIEKARNIK
natural_image
Line drawing of an open oven with a circular vent and control panel (no text or symbols)

Szanowni Klienci,

Uwaga:
WYBÓR MIEJSCA INSTALACJI I WBUDOWANIA
natural_image
Pure diagram of a grid-like structure with an arrow pointing to it, no text or symbols present.
natural_image
3D CAD model of a mechanical component with an arrow indicating direction (no text or symbols)
natural_image
3D rendering of a gray tray with an arrow pointing to the bottom (no text or symbols)
natural_image
Diagram of a rectangular tray with arrows indicating force or movement, no text or symbols present
Porada
natural_image
Mechanical assembly diagram showing a lever mechanism with labeled component A (no text or symbols beyond label)
natural_image
Diagram of a rectangular device with arrows indicating force or movement, no text or symbols present
natural_image
Mechanical assembly diagram showing a lever mechanism with directional arrows indicating motion (no text or symbols present)

Rada :
natural_image
Black-and-white photo of interlocking gears with no visible text or symbols
natural_image
Two-panel illustration showing a hand holding a rack with an arrow indicating rotation, before and after (no text or symbols)
natural_image
Illustration of a hand holding a small mechanical component with a downward arrow, next to a close-up of a metallic bracket (no text or symbols)

natural_image
Illustration of hands installing or adjusting a window frame inside a refrigerator (no text or symbols visible)

natural_image
Diagram of a computer with an open screen and a magnified inset showing a close-up of the screen (no text or symbols present)

natural_image
Diagram showing a printer's internal structure with an open lid and a magnified view of the printer's tip (no text or symbols present)
• WYMIANA LAMPKI

Ostrzeżenie
natural_image
Black-and-white photo of a bowl with leaf garnish, blurred bowls in background (no text or symbols visible)
INSTRUÇÕES DO USUÁRIO PT
FORNO
natural_image
Line drawing of an oven with a circular vent and control panel (no text or symbols)

Caro(a) cliente,

Importante:
A Módulo de comandos
B Lâmpada
© Porta
D Pega
natural_image
Pure diagram of a grid-like structure with an arrow pointing to it, no text or symbols present.
natural_image
3D model of a mechanical component with a black arrow pointing to a feature (no text or symbols visible)

natural_image
3D rendering of a gray tray with a black arrow pointing to the bottom (no text or symbols)

natural_image
Diagram of a rectangular tray with arrows indicating force or movement, no text or symbols present
Cuidado :
natural_image
Mechanical assembly diagram showing a lever mechanism with labeled component A (no text or symbols beyond label)
natural_image
Diagram of a rectangular device with arrows indicating force or movement, no text or symbols present
natural_image
Mechanical assembly diagram showing a lever mechanism with directional arrows indicating motion (no text or symbols present)

Conselho
natural_image
Black-and-white image of interlocking gears with a timeline icon at the bottom (no readable text or symbols)
natural_image
Two-panel illustration showing a person using a ladder to lift a wall, with arrows indicating motion (no text or symbols)
natural_image
Illustration of a hand holding a small mechanical component with a downward arrow, next to a separate view of a mechanical part (no text or symbols)
natural_image
Illustration of hands installing or adjusting a window frame inside a kitchen appliance (no text or symbols visible)

natural_image
Diagram of a 3D printer or printer with a magnified inset showing internal structure and arrows indicating components (no text or symbols present)

natural_image
Diagram showing a printer's internal structure with an open base and a magnified view of the printer's tip (no text or symbols present)
natural_image
Black-and-white photo of a bowl with leaf garnish, blurred bowls in background (no text or symbols)
POKYNY PRE POUŽÍVATEL'A SK
RÚRA

natural_image
Line drawing of an open oven with a circular vent and control panel (no text or symbols)

Vážený klient,

Dôležité:
natural_image
Pure diagram of a grid-like structure with an arrow pointing to it, no text or symbols present.
natural_image
3D rendering of a mechanical component with an arrow pointing to it (no text or symbols visible)
- Plech na pečivo, 20 mm
natural_image
3D rendering of a gray tray with a black arrow pointing to the bottom (no text or symbols)
natural_image
Diagram of a rectangular tray with arrows indicating force or movement, no text or symbols present
natural_image
Mechanical assembly diagram showing a lever mechanism with labeled component A (no text or symbols beyond label)
natural_image
Diagram of a rectangular device with arrows indicating force or movement, no text or symbols present
natural_image
Mechanical assembly diagram showing a lever mechanism with directional arrows indicating motion (no text or symbols present)
natural_image
Black-and-white image showing a series of interlocking gears and icons on a dark background, with no readable text or symbols.
natural_image
Two-panel illustration showing a person installing or adjusting a wall-mounted rack, with arrows indicating the motion (no text or symbols present)
- ČISTENIE VNÚTORNÝCH OKIEN
Upozornenie:
natural_image
Illustration of a hand using a tool to adjust or install a mechanical component, with no visible text or symbols.

natural_image
Illustration of hands installing or adjusting a window frame inside a refrigerator (no text or symbols visible)

- Spätná montáž okien dverí

natural_image
Diagram of a computer with an open screen and a magnified inset showing a printer's lid (no text or symbols present)

natural_image
Diagram showing a printer's internal structure with an open base and a magnified view of the printer's internal components (no text or symbols present)
• VÝMENA SVETLA

Upozornenie:
natural_image
Black-and-white photo of a bowl with leaf garnish, blurred bowls in background (no text or symbols)
BRUKSANVISNINGS SV
UGN

natural_image
Line drawing of an open oven with a circular vent and control panel (no text or symbols)

Bästa kund,

Viktigt:
VAL AV PLACERING OCH INBYGGNAD
natural_image
Pure diagram of a grid-like structure with an arrow pointing to it, no text or symbols present.
natural_image
3D rendering of a mechanical component with an arrow indicating direction (no text or symbols)

natural_image
3D rendering of a gray tray with a black arrow pointing to the bottom surface (no text or symbols)

natural_image
Diagram of a rectangular tray with arrows indicating force or movement, no text or symbols present
! Försiktighet :
natural_image
Mechanical assembly diagram showing a lever mechanism with labeled component A (no text or symbols beyond label)
natural_image
Diagram of a rectangular device with arrows indicating force or movement, no text or symbols present
natural_image
Mechanical assembly diagram showing a lever mechanism with directional arrows indicating motion (no text or symbols present)

Råd
natural_image
Black-and-white photo of interlocking gears and icons on a dark background (no readable text or symbols)
Rengöring på 39 minuter
natural_image
Two-panel illustration showing a person using a rack-mounted device to lift or rotate a wall panel (no text or symbols present)
natural_image
Illustration of a hand holding a small mechanical component with a downward arrow, next to a separate view of a mechanical part (no text or symbols)
natural_image
Illustration of hands installing or adjusting a door panel inside a refrigerator (no text or symbols visible)

natural_image
Diagram of a computer monitor with a magnified inset showing the exterior panel and base (no text or symbols)
natural_image
Diagram showing a printer's internal structure with an inset close-up of its component (no text or symbols visible)
- Byta ugnslampa

Varning:
Glödlampans specifikationer:
25 W, 220-240 V\~, 300°C, culot G9.
natural_image
Simple illustration of a metal bowl inside a rectangular frame, no text or symbols present
natural_image
Simple illustration of a metal bowl inside a rectangular frame, no text or symbols present
natural_image
Illustration of a pot with a lid, placed inside a rectangular frame (no text or symbols)
| FUNKTIONSTESTENLIGT STANDARDEN CEI 60350 |
| LIVSMEDEL | *Tilla-gningssätt | NIVÄ Tillbehör °C TID min. | | | FÖRVÄRM-NING | |
| Mördegskakor (8.4.1) |  | 5 plåt 45 mm 150 30-40 ja | | | | |
| Mördegskakor (8.4.1) |  | 5 plåt 45 mm 150 25-35 ja | | | | |
| Mördegskakor (8.4.1) |  | 2 + 5 plåt 45 mm + galler 150 25 | 45 ja | | | |
| Mördegskakor (8.4.1) |  | 3 plåt 45 mm 175 25-35 ja | | | | |
| Mördegskakor (8.4.1) |  | 2 + 5 plåt 45 mm + galler 160 30 | 40 ja | | | |
| Små fruktkakor (8.4.2) |  | 5 plåt 45 mm 170 25-35 | | | ja | |
| Små fruktkakor (8.4.2) |  | 5 plåt 45 mm 170 25-35 ja | | | | |
| Små fruktkakor (8.4.2) |  | 2 + 5 plåt 45 mm + galler 170 20 | 40 ja | | | |
| Små fruktkakor (8.4.2) |  | 3 plåt 45 mm 170 25-35 ja | | | | |
| Små fruktkakor (8.4.2) |  | 2 + 5 plåt 45 mm + galler 170 25 | 35 ja | | | |
| Mjuk kakautan fett (8.5.1) |  | 4 galler 150 30-40 ja | | | | |
| Mjuk kakautan fett (8.5.1) |  | 4 galler 150 30-40 ja | | | | |
| Mjuk kakautan fett (8.5.1) |  | 2 + 5 plåt 45 mm + galler 150 30 | 40 ja | | | |
| Mjuk kakautan fett (8.5.1) |  | 3 galler 150 30-40 ja | | | | |
| Mjuk kakautan fett (8.5.1) |  | 2 + 5 plåt 45 mm + galler 150 30 | 40 ja | | | |
| Äpplepaj (8.5.2) |  | 1 galler 170 | | 90-120 | ja | |
| Äpplepaj (8.5.2) |  | 1 galler 170 | | 90-120 | ja | |
| Äpplepaj (8.5.2) | [DSG7] | 3 galler 180 | | 90-120 | ja | |
| Gratinerad yta (9.2.2) |  | 5 galler 275 3-6 ja | | | | |