Pixi - Respiratory medical device ResMed - Free user manual and instructions
Find the device manual for free Pixi ResMed in PDF.

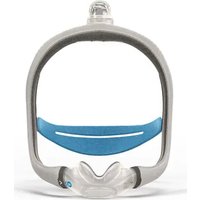
| Product type | Pediatric mask for CPAP (continuous positive airway pressure) or inspiratory assistance with EPAP |
| Brand | ResMed |
| Model | Pixi |
| Intended use | Children aged 2 to 7 years undergoing CPAP or bi-level pressure therapy |
| Treatment pressure | 2 to 30 cm H₂O |
| Dead space | 101.7 ml |
| Resistance (pressure drop) | 0.8 cm H₂O at 50 l/min; 3.1 cm H₂O at 100 l/min |
| Sound level | A-weighted sound power: 40.6 dBA; Sound pressure at 1 m: 32.6 dBA (uncertainty ±4 dBA) |
| Operating conditions | Temperature: +5°C to +40°C; Humidity: 15% to 95% non-condensing |
| Dimensions (without headgear) | 35 mm (H) x 430 mm (W) x 40 mm (D) |
| Materials | PVC-free, DEHP-free, phthalate-free, natural rubber latex-free |
| Cleaning | Hand wash with warm water (~30°C) and mild soap; do not use scented solutions, bleach, or alcohol. Clean the vent holes with a soft-bristled brush. |
| Replacement parts | Cushion, headgear, rigid frame, elbow, sealing plug, pressure port |
| Warranty | Compliant with European Directive 1999/44/EC |
| Symbols | Refer to the user manual for symbol meanings (caution, lot number, reference, temperature limits, etc.) |
Frequently Asked Questions - Pixi ResMed
User questions about Pixi ResMed
0 question about this device. Answer the ones you know or ask your own.
Ask a new question about this device
Download the instructions for your Respiratory medical device in PDF format for free! Find your manual Pixi - ResMed and take your electronic device back in hand. On this page are published all the documents necessary for the use of your device. Pixi by ResMed.
USER MANUAL Pixi ResMed
natural_image
Illustration of a Pixi Finland air filter device with a child's face and a cartoon character wearing a mask (no text or symbols on the device itself)ResMed
Pixi™
PEDIATRIC MASK
Contents / Inhalt / Contenu / Dotazione / Contenido / Conteúdo / Inhoud / Περιεχόμενα / Elementy / Tartalomjegyzék / Содержимое / ℹindekiler / Obsah / Obsah

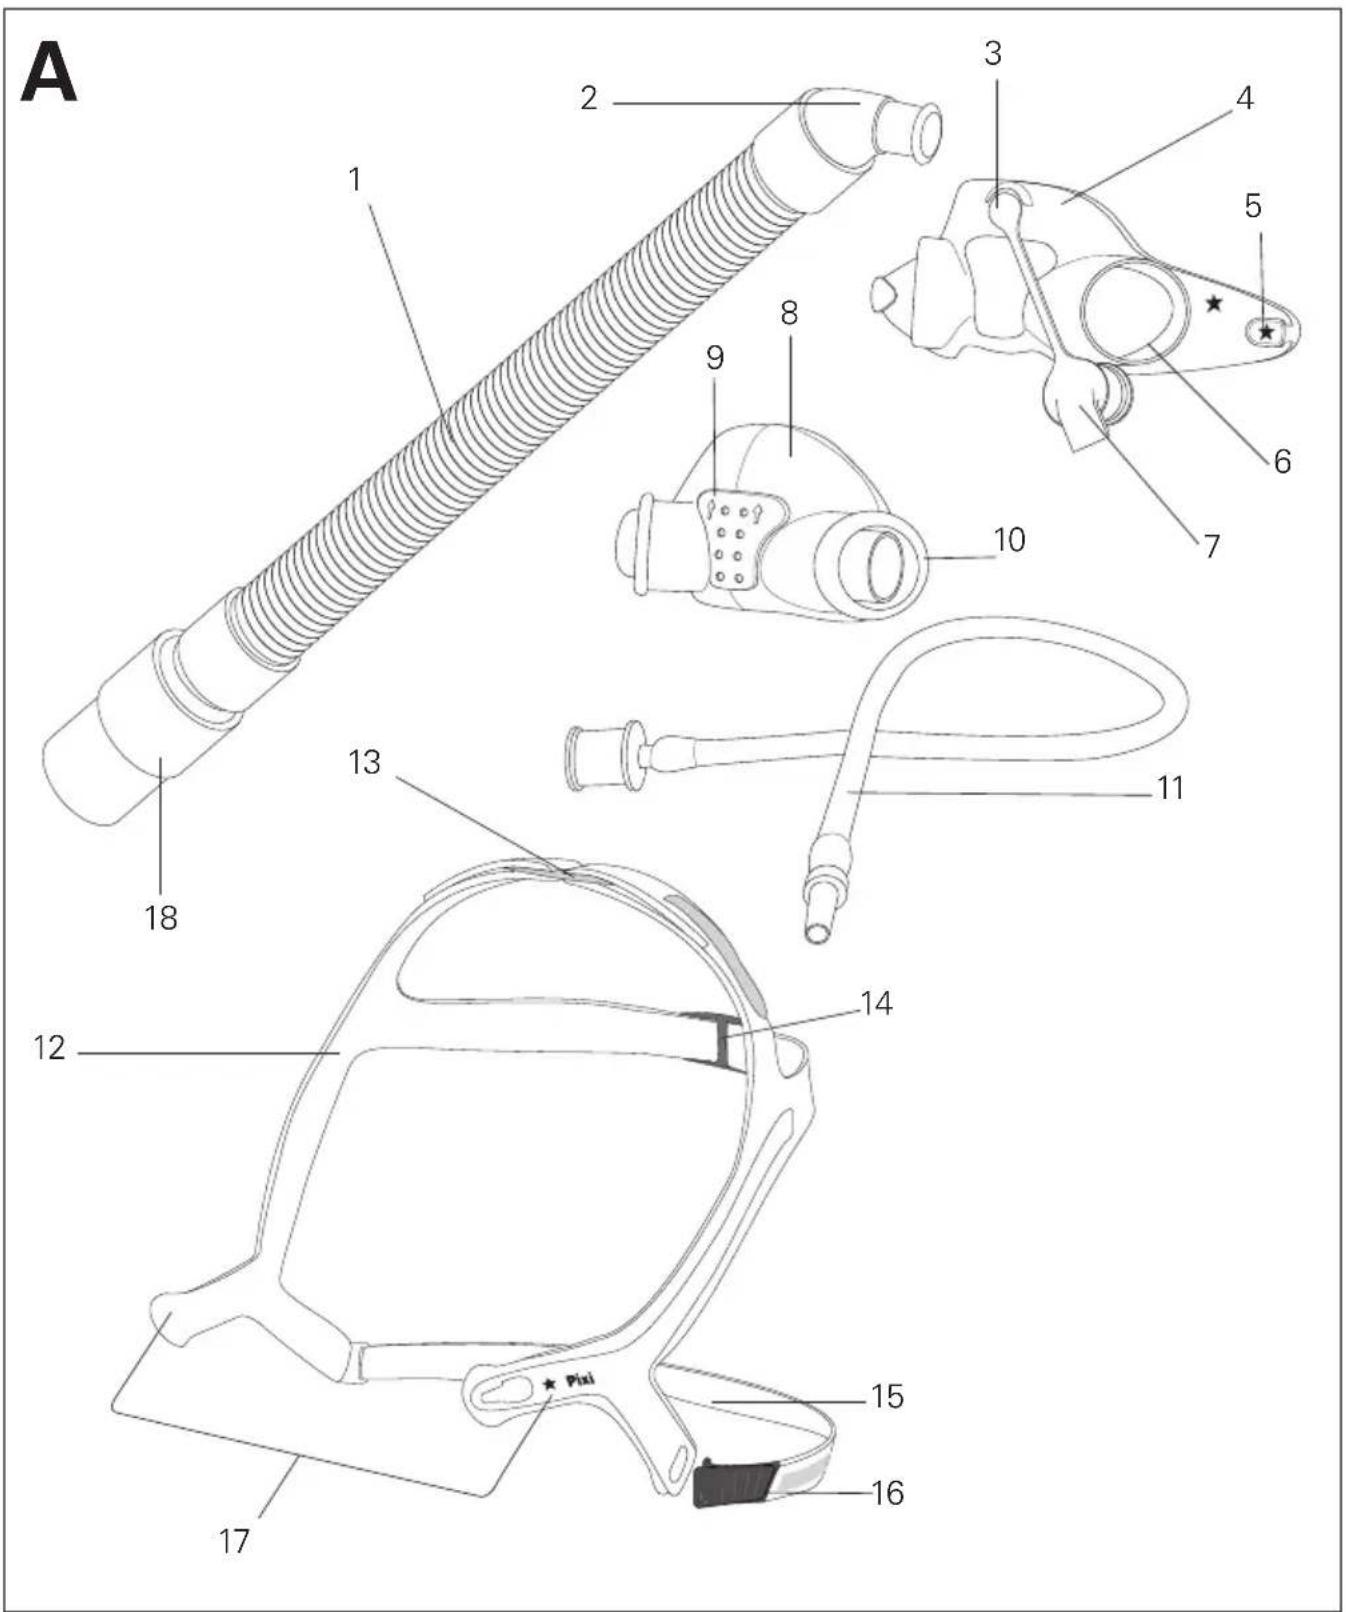
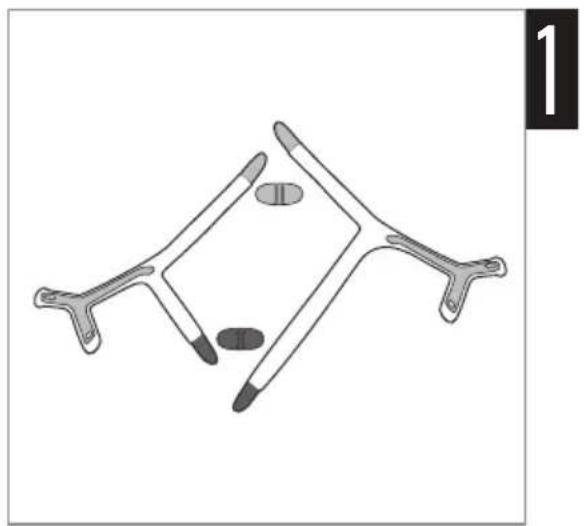
Mask components / Maskenkomponenten / Composants du masque / Componenti della maschera / Piezas de la mascarilla / Componentes da máscara / Maskeronderdelen / Εξαρτήματα της μάσκας / Elementy maski / A maszk részei / Компоненты маски / Maske bileşenleri / Součásti masky / Komponenty masky
natural_image
Technical line drawings of four different medical or industrial components: a coiled tube, a connector, a valve, and a tubing (no text or symbols present)Mask components / Maskenkomponenten / Composants du masque / Componenti della maschera / Piezas de la mascarilla / Componentes da máscara / Maskeronderdelen / Εξαρτήματα της μάσκας / Elementy maski / A maszk részei / Компоненты маски / Maske bileşenleri / Součásti masky / Komponenty masky
| Item / Artikel /Composant /Elemento /Artículo /Item / Item /Στοιχείο /Część / Tétel /Часть / Madde /Položka /Položka | Description / Beschreibung /Description / Descrizione / Descripción /Descrição / Omschrijving / Пεριγραφή /Opis / Leírás / Описание / Açıklama /Popis / Popis | Part number /Teilenummer / Codeproduit / Codiceprodotto / Número de pieza / Referência /Onderdeelnummer /Αριθμός καταλόγου /Numer części /Cikkszám /Номер детали /Parça numarası /Číslo součásti /Číslo časti |
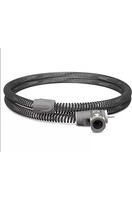
| 1. Short tube assembly / Verbindungsschlauch-Satz / Ensemble tuyau court / Gruppo circuitocorto / Conjunto de tubo corto / Conjunto de tubo curto / Korte slang-assemblage /Συγκρότημα σωλήνα μικρού μήκους / Zespółkrótkiej rury / Rövid csőszerelvény / Короткая трубка в сборе / Kısa tüp tertibatı / Krátkátrubice / Zostava krátkej trubice | — | |
| 2. Elbow / Kniestück / Coude / Gomitogirevole / Codo / Cotovelo / Bocht / Γωνία /Kolanko / Könyök / Отвод / Dirsek / Rameno /Koleno | — | |
| Item / Artikel /Composant /Elemento /Artículo /Item / Item /Στοιχείο /Część / Tétel /Часть / Madde /Položka /Položka | Description / Beschreibung /Description / Descrizione / Descripción /Descrição / Omschrijving / Пεριγραφή /Opis / Leírás / Описание / Açıklama /Popis / Popis | Part number /Teilenummer / Codeproduit / Codiceprodotto / Número de pieza / Referência /Onderdeelnummer /Арідмός каталóyou /Numer części /Cikkszám /Номер детали /Parça numarası /Číslo součásti /Číslo časti |
| 3. Plug tether / Verschlussbefestigung / Pointd’attache du bouchon d’obturation / Attaccodel tappo / Amarre del tapón / Amarra dotampão / Bevestigingspunt afsluitdop /Прóобдесн пώματος / Mocowanie zatyczki /Dugórögztítő / Страховочный тросик крышки /Kapak yuları / Upínka zátky / Uzdička zátky | — | |
| 4. Mask frame / Maskenrahmen / Entouragerigide / Telaio della maschera / Armazónde la mascarilla / Armação da máscara /Maskerframe / Плаíσιο μάσκας / Ramkamaski / A maszk kerete / Корпус маски / Maskeçerçevesi / Têlo masky / Rám masky | — | |
| 5. Frame nodes / Rahmenanschlüsse / Pointsde fixation de l’entourage / Nodi del telaio /Enganches del armazón / Encaixes daarmação / Frameknopjes / Кóμβοι πλαισίου /Występy ramki / Rögztítőbütykök a kereten /Выступы корпуса / Çerçeve düğümleri /Příchytné body těla masky / Spínacie kolíky rámu | — | |
| 6. Mask socket / Maskenfassung / Cavitédu masque / Scanalature della maschera /Cavidad de la mascarilla / Suporte damáscara / Aansluitopeningen in masker /Улобохýμάσκας / Gniazdo maski / Maszkon lévőfoglalat / Гнездо маски / Maske soketi / Zástrčkamasky / Nátrubok masky | — | |
| 7.Plug / Verschluss / Bouchon d’obturation /Tappo / Tapón / Tampão / Afsluitdop / Пώμα /Zatyczka / Dugó / Крышка / Kapak / Zátka /Zátka | — | |
| 8. Cushion / Maskenkissen / Bulle /Cuscinetto / Almohadilla / Almofada /Kussentje / Маξιλάρι / Uszczelka / Párna /Уплотнитель / Yastík / Polštářek / Poduška | 61033 | |
| Item / Artikel / Composant / Elemento / Artículo / Item / Item / Στοιχείο / Część / Tétel / Часть / Madde / Položka / Položka | Description / Beschreibung / Description / Descrizione / Descripción / Descrição / Omschrijving / Пεριγραφή / Opis / Leírás / Описание / Açiklama / Popis / Popis | Part number / Teilenummer / Code produit / Codice prodotto / Número de pieza / Referência / Onderdeelnummer / Аріθμός каталóyou / Numer części / Cikkszám / Номер детали / Parça numarası / Číslo součásti / Číslo časti |
| 9. Vent / Ausatemöffnung / Ensemble orifices de ventilation / Fori per l’esalazione / Orificios de ventilación / Respiradouro / Ventilatiegedeelte / ‘Авоігума еξαερισμού / Otwór odprowadzający powietrze / Szellőzőnyílások / Вентиляционные отверстия / Hava deligi / Odvzdušňovací otvor / Ventil | — | |
| 10. Cushion shoulder / Maskenkissenrand / Rebord de la bulle / Spalla del cuscinetto / Reborde de la almohadilla / Aba da almofada / Kraag van het kussentje / ́Ωμος μαξιλαριού / Kołnierz uszczelki / Párnaperem / Плечо уплотнения / Yastik omzu / Dosedací plocha polštářku / Nákružok podušky | — | |
| 11. Pressure port / Druckanschluss / Port depression / Presa della pressione / Puerto de presión / Porta de pressão / Drukpoort / ́Θύρα πίεσης / Port ciśnienia / Nyomásport / Порт давления / Basınç portu / Tlakový port / Tlakový port | — | |
| 12. Headgear / Kopfband / Harnais / Copricapo / Arnés / Arnês / Hoofdbandenstel / Іμάντες κεφαλής / Część nagłowna / Fejpánt / Головной фиксатор / Başlik / Náhlavní souprava / Náhlavná súprava | 61034 | |
| Item / Artikel / Composant / Elemento / Artículo / Item / Item / Στοιχείο / Część / Tétel / Часть / Madde / Položka / Položka | Description / Beschreibung / Description / Descrizione / Descripción / Descrição / Omschrijving / Пεριγραφή / Opis / Leírás / Описание / Açıklama / Popis / Popis | Part number / Teilenummer / Code produit / Codice prodotto / Número de pieza / Referência / Onderdeelnummer / Αριθμός καταλόγου / Numer części / Cikkszám / Номер детали / Parça numarası / Číslo součásti / Číslo časti |
| 13. Top headgear strap and buckle (light blue) / Oberes Kopfband und Clip (hellblau) / Sangle et boucle supérieures du harnais (bleu clair) / Cinghia e fi bbia superiore del copricapo (azzurro) / Correa superior del arnés y hebilla (azul claro) / Correia e fivela superiores do arnês (azul-claro) / Bovenste hoofdband en hoofdbandgesp (lichtblauw) / Πάνω λουράκι ἱμάντων κεφαλής και αγκράφα (γαλάζιο) / Górny pasek części nagłownej ze sprzączką (jasnoniebieski) / Felső fejpántszíj és szorítókapocs (világoskék) / Верхний ремешок головного фиксатора и пряжка (голубого цвета) / Úst başlık bandı ve tokası (açık mavi) / Horní páska a přezka náhlavní soupravy (světlemodrá) / Horný popruh a spona náhlavnej súpravy (svetlomodré) | — | |
| 14. Middle headgear strap and buckle (dark blue) / Mittleres Kopfband und Clip (dunkelblau) / Sangle et boucle du milieu du harnais (bleu foncé) / Cinghia e fi bbia intermedia del copricapo (blu) / Correa central del arnés y hebilla (azul oscuro) / Correia e fivela intermédias do arnês (azul-escuro) / Middelste hoofdband en hoofdbandgesp (donkerblauw) / Μεσαίο λουράκι ἱμάντων κεφαλής και αγκράφα (σκούρο μπλε) / Środkowy pasek części nagłownej ze sprzączką (ciemnoniebieski) / Középső fejpántszíj és szorítókapocs (sötétkék) / Средний ремешок головного фиксатора и пряжка (темно-синего цвета) / Orta başlık bandı ve tokası (koyu mavi) / Střední páska a přezka náhlavní soupravy (tmavomodrá) / Stredný popruh a spona náhlavnej súpravy (tmavomodré) | — | |
| Item / Artikel /Composant /Elemento /Artículo /Item / Item /Στοιχείο /Część / Tétel /Часть / Madde /Položka /Položka | Description / Beschreibung /Description / Descrizione / Descripción /Descrição / Omschrijving / Περιγραφή /Opis / Leírás / Описание / Açıklama /Popis / Popis | Part number /Teilenummer / Codeproduit / Codiceprodotto / Número de pieza / Referência /Onderdeelnummer /Αριθμός καταλόγου /Numer części /Cikkszám /Номер детали /Parça numarası /Číslo součásti /Číslo časti |
| 15. Lower headgear strap / Unteres Kopfband /Sangle inférieure du harnais / Cinghiainferiore del copricapo / Correa inferior delarnés / Correia inferior do arnês / Onderstehoofdband / Кáτω λουράκι ἱμάντων κεφαλής /Dolny pasek części nagłownej / Alsó fejpántszíj /Нижний ремешок головного фиксатора / Altbaślik bandí / Spodní pásek náhlavní soupravy /Dolný náhlavný popruh | — | |
| 16. Quick release clip / Schnell zu öffnenderClip / Clip de retrait rapide / Fermaglioa sgancio rapido / Broche de liberaciónrápida / Clipe de libertação rápida /Snelklem / Кліп таχείας απελευθέρωσης /Zacisk do szybkiego zwalniania / Gyorskioldócsat / Быстроразъемный зажим / Hízlí çıkarmaklipsi / Rychloupínací sponka / Spona pre rýchleodopnutie | — | |
| 17. Lower headgear arms / UntereKopfbandhalter / Bras inférieurs du harnais /Bracci inferiori del copricapo / Brazosinferiores del arnés / Braços inferiores doarnês / Wangstukken / Кáτω βραχίονες ἱμάντωνκεφαλής / Dolne odgałęzienia części nagłownej /Alsó fejpántmerevítők / Нижние планкиголовного фиксатора / Alt başlík kolları / Spodníraménka náhlavní soupravy / Dolné ramenánáhlavnej súpravy | — | |
| 18. 22 mm Swivel / 22 mm Drehadapter /Pièce pivotante 22 mm / Giunto rotante da22 mm / Pieza giratoria de 22 mm / Peçagiratória de 22 mm / Draaibare kop 22 mm /Στροφέας 22 mm / Końcówka obrotowa 22 mm /22 mm-es csukló / Шарнирное соединение,22 mm /22 mm Halka / 22mm kloubové upevnění /22 mm klíb | — | |
| Item / Artikel /Composant /Elemento /Artículo /Item / Item /Στοιχείο /Część / Tétel /Часть / Madde /Položka /Položka | Description / Beschreibung /Description / Descrizione / Descripción /Descrição / Omschrijving / Пεριγραφή /Opis / Leírás / Описание / Açıklama /Popis / Popis | Part number /Teilenummer / Codeproduit / Codiceprodotto / Número de pieza / Referência /Onderdeelnummer /Аріθμός каталóyou /Numer części /Cikkszám /Номер детали /Parça numarası /Číslo součásti /Číslo časti |
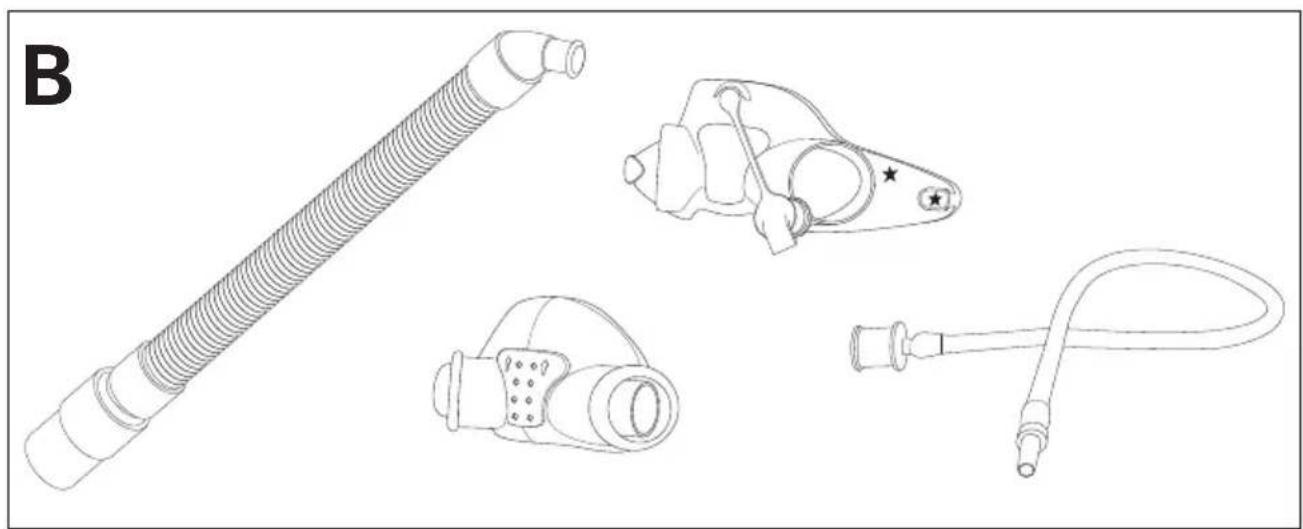
| A Complete system / Komplettes System /Masque complet / Sistema completo /Sistema completo / Sistema completo /Volledig systeem / Плήрес σύστημα / Całysystem / Teljes rendszer / Полная система /Komple sistem / Kompletní systém / Kompletný systém | 61031 | |
| B Frame System / Maskenrahmensystem /Entourage complet / Telaio / Armazón /Sistema da armação / Framesysteem /Σύστημα πλαισίου / Ramka z osprzętem /Keretrendszer / Система корпуса / Čerçevesistemi / Systém těla masky / Systém rámu | 61035 | |
Set up / Vorbereitung / Installation / Preparazione / Instalación / Preparação / Installeren / Púθμιση / Przygotowanie / Összeszerelés / Установка / Kurulum / Nastavení masky / Zostavenie
natural_image
Line drawing of a hand holding a device with an arrow pointing to a button (no text or symbols present)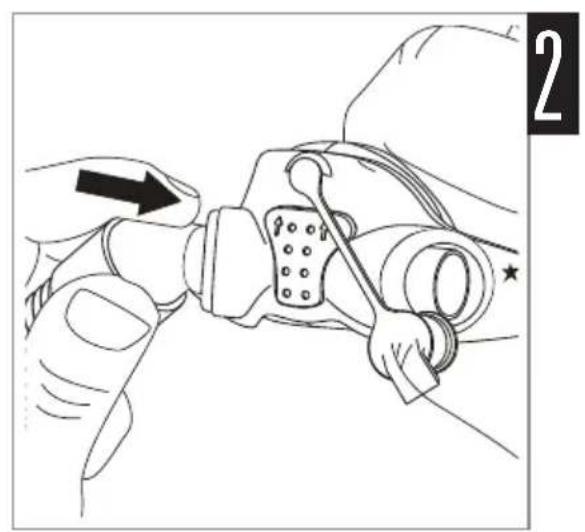
natural_image
Line drawing of a hand adjusting a mechanical component with an arrow indicating direction (no text or symbols)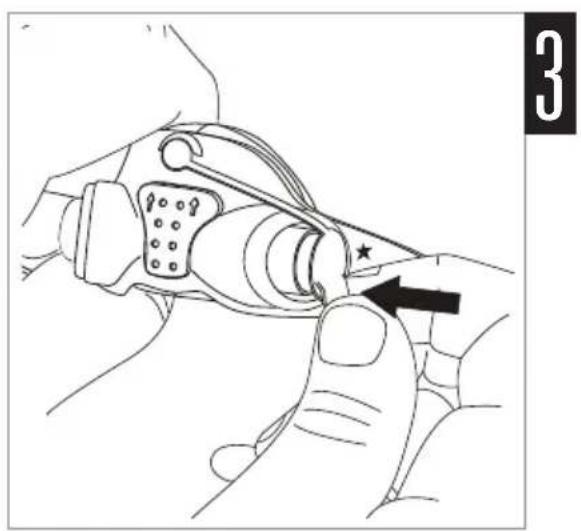
natural_image
Line drawing of a hand holding a device with a star marking on the grip (no text or symbols)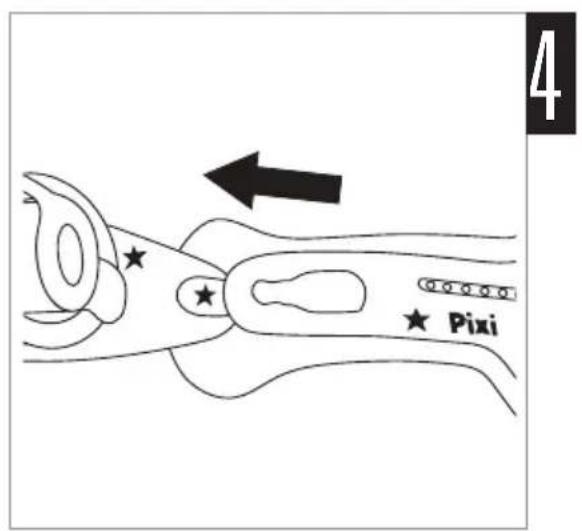

Fitting / Anlegen / Mise en place / Applicazione / Colocación / Colocação / Opzetten / Топоθέτηση της μάσκας / Zakładanie / Felhelyezés / Установка маски / Maskenin takılması / Nasazení masky / Nasadzovanie
natural_image
Line drawing of a person receiving a medical procedure from a surgical instrument (no text or symbols present)
natural_image
Line drawing of a person wearing a VR headset, with a hand adjusting the head area and a tool applying motion (no text or symbols)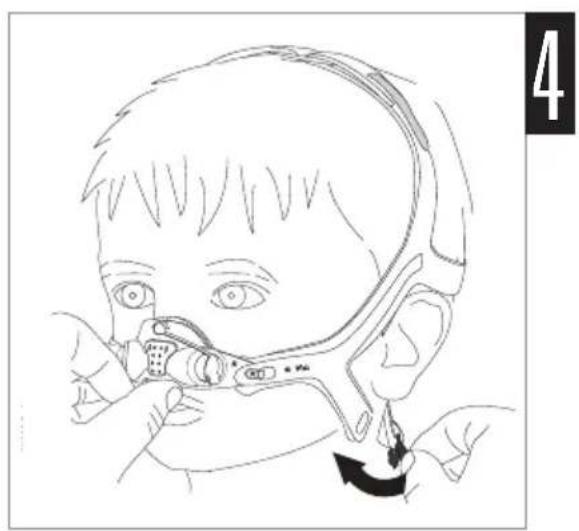
natural_image
Line drawing of a child using a medical or surgical tool to adjust the head (no text or symbols present)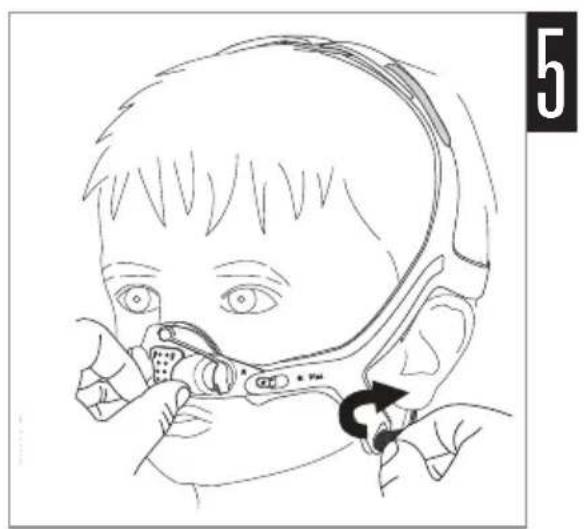
natural_image
Line drawing of a child wearing a headset, holding a device with an arrow indicating rotation (no text or symbols)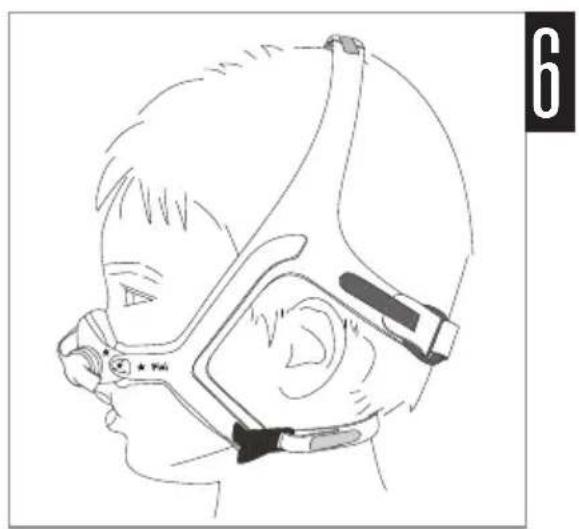
natural_image
Line drawing of a child wearing a face mask and goggles, viewed from the side (no text or symbols)Adjustment / Einstellung / Ajustement / Regolazione / Ajuste / Ajuste / Afstellen / Προσαρμογή / Regulacja / Beállítás / Pergулировка / Ayarlama / Úprava velikosti masky / Prispôsobenie
natural_image
Line drawing of a person wearing a headband with arrows indicating movement or pressure points (no text or symbols)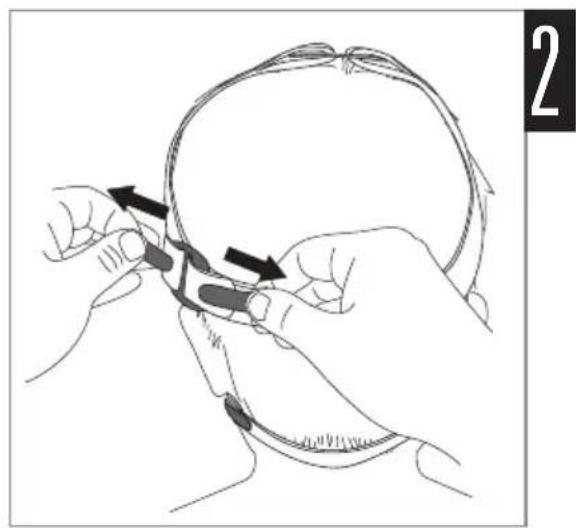
natural_image
Line drawing of hands manipulating a curved object with arrows indicating motion (no text or symbols)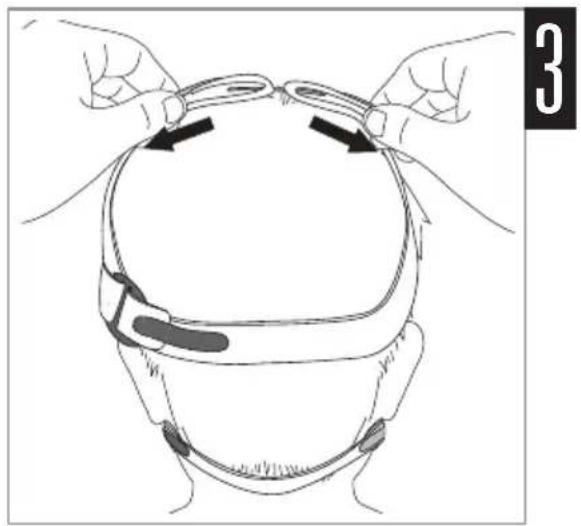
natural_image
Line drawing of a person adjusting a helmet with hands holding the clip (no text or symbols)Attaching the pressure port / Anbringen des Druckmessanschlusses / Fixation du port de pression / Collegamento della presa della pressione / Conexión del puerto de presión / Ligação da porta de pressão / Drukpoort aanbrengen / Topoθέτηση της θύρας πίεσης / Dołączanie portu ciśnienia / Nyomásport csatlakoztatása / Подсоединение порта давления / Basınç portunun takılması / Připojení tlakového portu / Pripojenie tlakového portu
natural_image
Illustration of a hand holding a tool with an arrow indicating direction (no text or symbols present)
natural_image
Illustration of hands adjusting a mechanical component with a black arrow indicating rotation (no text or symbols)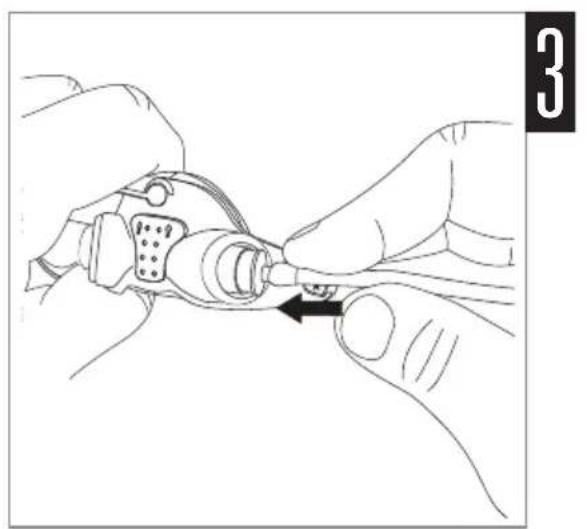
natural_image
Line drawing of hands connecting a cable to a connector (no text or symbols)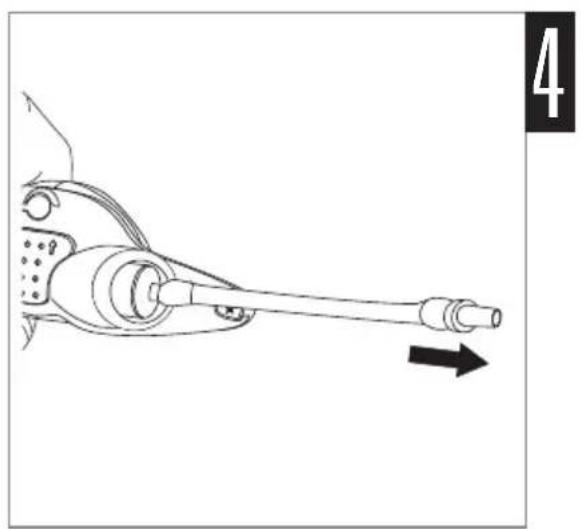
natural_image
Line drawing of a mechanical device with a lever and shaft, showing motion direction (no text or symbols)Cushion check / Überprüfen des Maskenkissens / Vérification de la bulle / Verifica del cuscinetto / Verificación de la almohadilla / Verificação da almofada / Kussentje controleren / 'Елекъхос маξιλарюу / Kontrola uszczelki / Párna ellenőrzése / Проверка уплотнителя / Yastik kontrolü / Kontrola polštářku / Skontrolovanie podušky
natural_image
Diagram of a medical or anatomical structure with arrows and dots indicating motion or force direction (no text or symbols)
Removal / Abnehmen / Retrait / Rimozione / Para quitarla / Remoção / Afnemen / Αφαίρεση / Zdejmowanie / Eltávolítás / Снятие / Çikarma / Sejmutí masky / Snímanie
natural_image
Line drawing of a child wearing a headset with a hand adjusting the jaw (no text or symbols)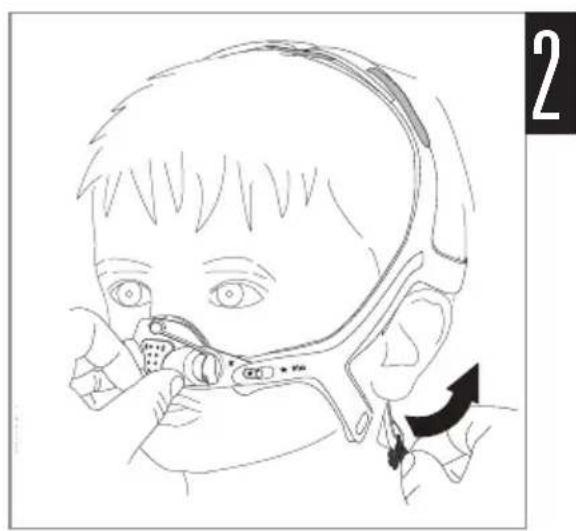
natural_image
Line drawing of a child wearing a medical device with an arrow indicating motion (no text or symbols)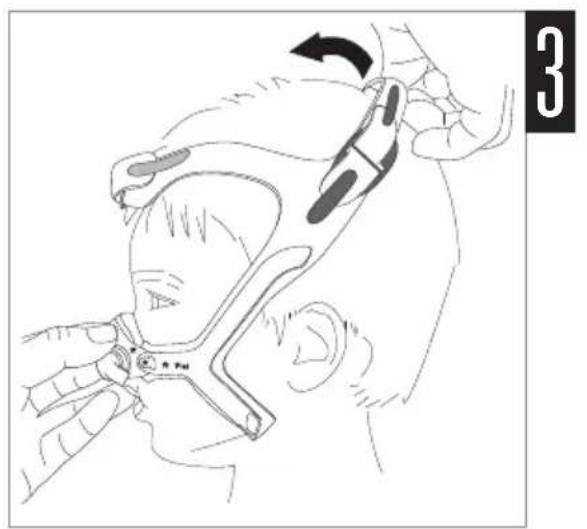
natural_image
Illustration of a child receiving medical or surgical procedure using a surgical instrument (no text or symbols present)Emergency removal / Abnehmen im Notfall / Retrait d'urgence / Rimozione d'emergenza / Para quitarla en caso de emergencia / Remoção de emergência / Afnemen bij noodsituatie / Αφαίρεση έκτακτης ανάγκης / Zdejmowanie w sytuacji awaryjnej / Eltávolítás vészhelyzet esetén / Экстренное снятие / Acil durumda çıkarma / Nouzové sejmutí / Urgentné snímanie
natural_image
Medical procedure illustration showing a surgical procedure with tool and magnified view (no text or symbols)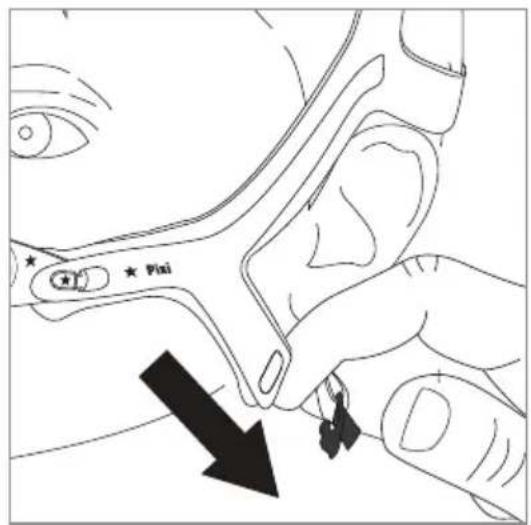
Disassembly / Auseinanderbau / Démontage / Smontaggio / Desmontaje / Desmontagem / Demonteren / Αποσυναρμολόγηση / Demontaż / Szétszerelés / Разборка / Sökme / Demontáž masky / Rozobratie
natural_image
Diagram of a hand holding a small object with arrows indicating motion or force (no text or symbols)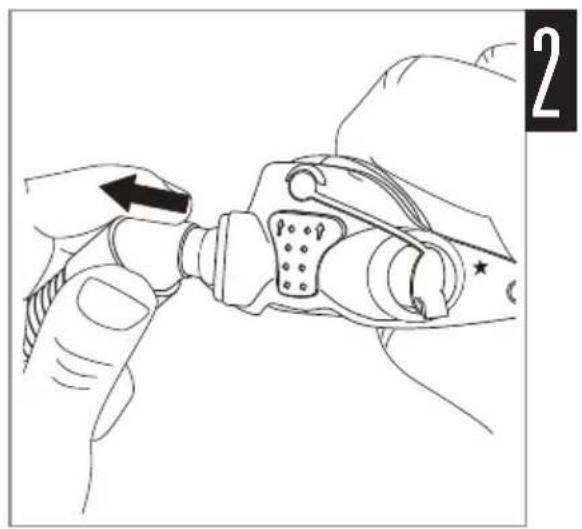
natural_image
Line drawing of a hand using a tool to adjust a mechanical component (no text or symbols)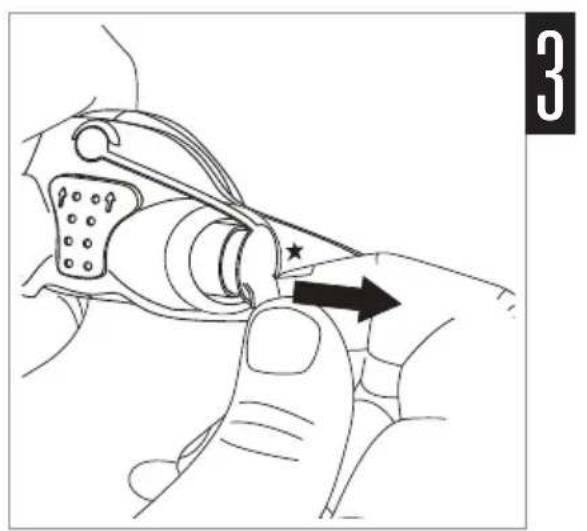
natural_image
Illustration of a hand holding a mechanical component with an arrow indicating direction (no text or symbols)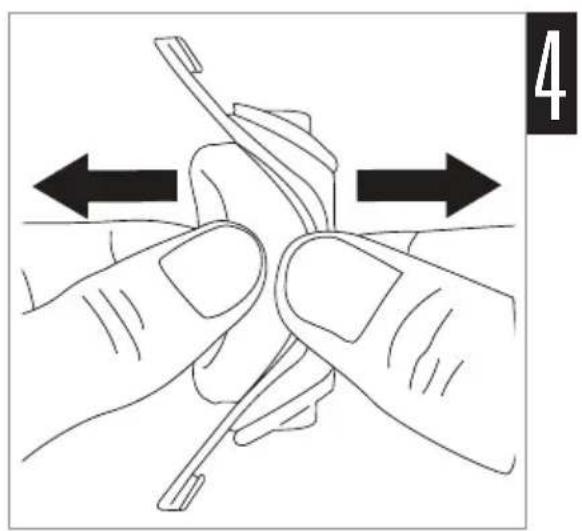
natural_image
Illustration of two hands holding a tool with directional arrows indicating movement (no text or symbols)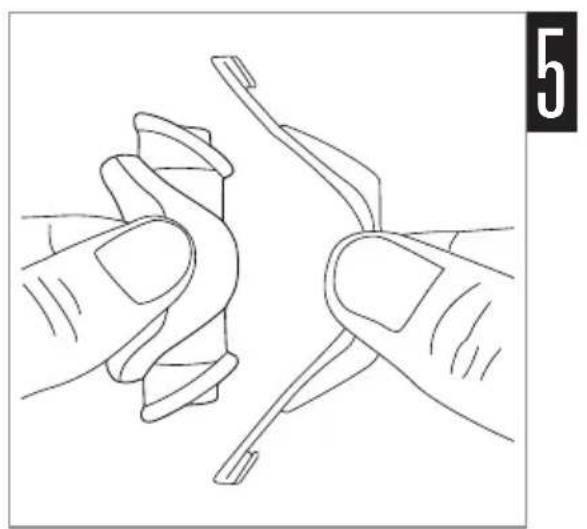
natural_image
Line drawing of two hands holding a mechanical component, no text or symbols presentHeadgear reassembly / Wiederzusammenbau des Kopfbandes / Remontage du harnais / Riassemblaggio del copricapo / Montaje del arnés / Nova montagem do arnes / Opnieuw monteren van het hoofdbandenstel / Bńματα επανασυναρμολόγησης ιμάντων κεφαλής / Ponowny montaż części nagłownej / A fejpántszíj ismételt összeszerelése / Сборка головного фиксатора / Başlığın yeniden montajı / Opětovné sestavení masky / Opätovné zostavenie náhlavnej súpravy
natural_image
Diagram of a mechanical tool with multiple arms and a central oval component (no text or symbols)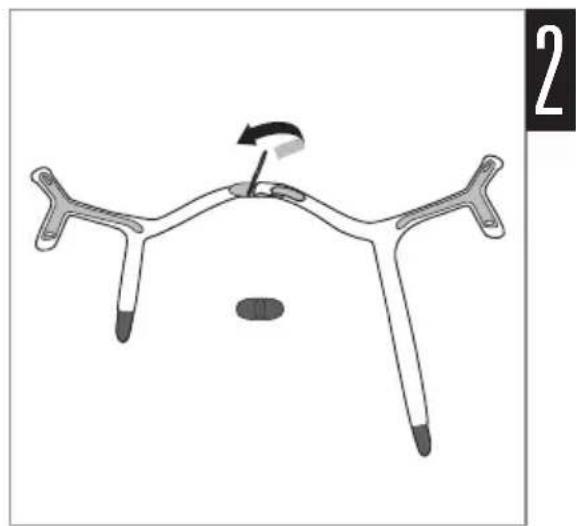
natural_image
Diagram of a drone-like mechanical component with a central body and four legs, showing a rotation arrow and a small oval base (no text or symbols)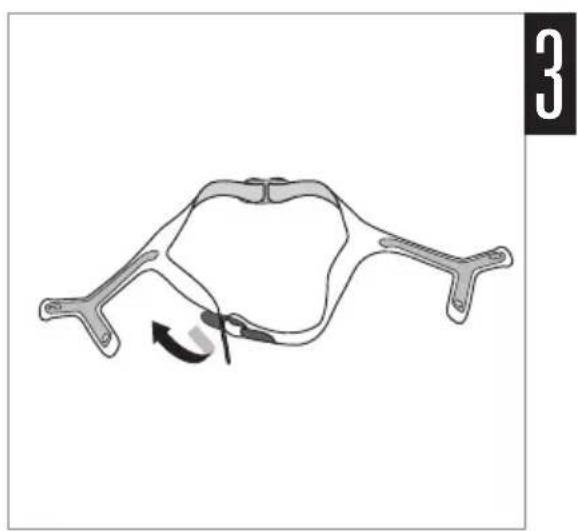
natural_image
Diagram of a mechanical or electrical component with a curved arrow indicating rotation (no text or symbols)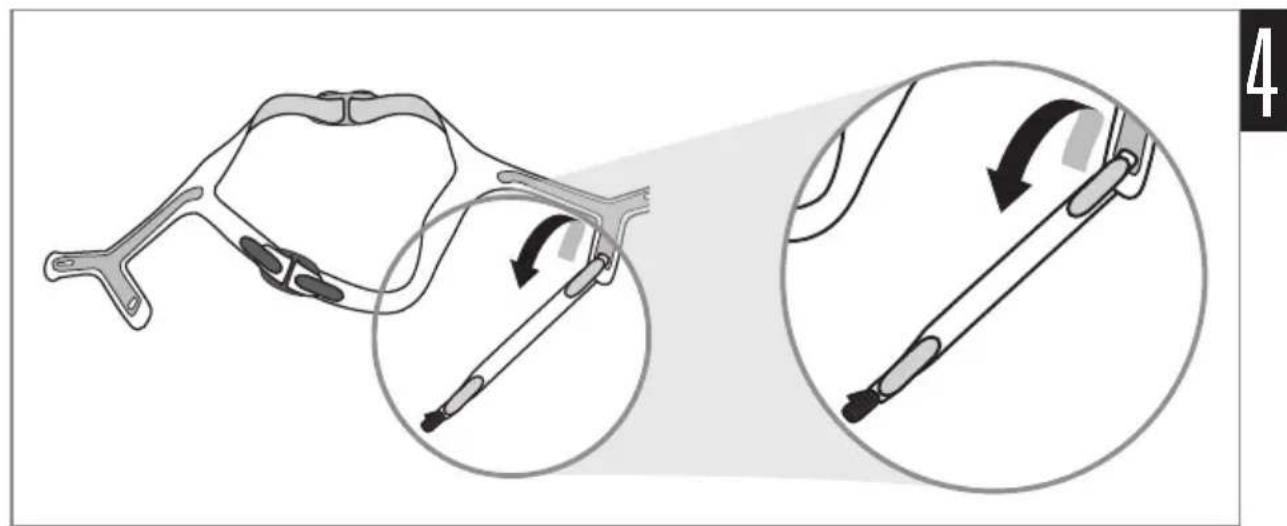
natural_image
Medical illustration showing a surgical tool being adjusted to form a needle, with magnified views of the tool (no text or symbols present)
natural_image
Line drawing of a helmet with a 'Pixi' button and star marker (no text or symbols on the helmet itself)Reassembly / Wiederzusammenbau / Remontage / Riassemblaggio / Montaje / Nova montagem / Opnieuw monteren / Επανασυναρμολόγηση / Ponowny montaż / Ismételt összeszerelés / Сборка / Yeniden montaj / Opětovné sestavení masky / Opätovné zostavenie
natural_image
Illustration of hands performing a manual tool on a mechanical component, with a black arrow indicating the process (no text or symbols present)
natural_image
Line drawing of a hand holding a mechanical device with a star marking on the grip (no text or symbols)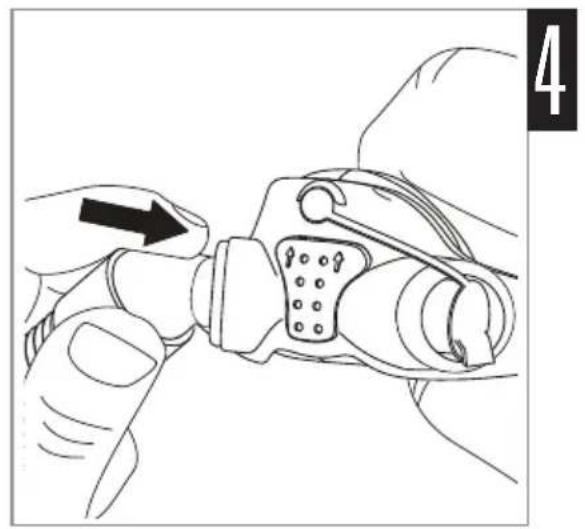
natural_image
Line drawing of a hand holding a connector with an arrow indicating direction (no text or symbols)Pixi™
PEDIATRIC MASK
Thank you for choosing the Pixi Pediatric mask. Please read the entire manual before use.
Intended use
The Pixi Pediatric mask channels airflow noninvasively to a patient from a continuous positive airway pressure (CPAP) or bilevel device ('device').
The Pixi Pediatric mask is:
- to be used by children aged between 2 and 7 for whom continuous positive airway pressure (CPAP) or bilevel therapy has been prescribed
- intended for single-patient re-use in the home and single patient re-use in the hospital/institutional environment.

WARNING
- This mask is designed to provide a stable effective air seal with minimum headgear tension. High headgear tension may lead to facial deformities with long-term use. Regular clinician review of growth patterns and the use of different styles of mask is recommended.
- The mask must be used under qualified supervision for patients who are unable to remove the mask by themselves.
- The mask may not be suitable for those predisposed to aspiration.
- If the mask is prescribed for children with serious congenital conditions or cognitive impairments, then using a device with appropriate alarms is recommended. The correct operation of the complete patient circuit, including alarms must be tested before commencing therapy.
- Follow all precautions when using supplemental oxygen.
- Oxygen flow must be turned off when the CPAP or bilevel device is not operating, so that unused oxygen does not accumulate within the device enclosure and create a risk of fire.
- Oxygen supports combustion. Oxygen must not be used while smoking or in the presence of an open flame. Only use oxygen in well ventilated rooms.
- The vent holes must be kept clear and must not sit against the nose.
- The mask should not be used unless the device is turned on. Once the mask is fitted, ensure the device is blowing air.
Explanation: CPAP and bilevel devices are intended to be used with special masks (or connectors) which have vent holes to allow continuous flow of air out of the mask. When the device is turned on and functioning properly, new air from the device flushes the exhaled air out through the mask vent holes. However, when the device is not operating, insufficient fresh air will be provided through the mask, and the exhaled air may be rebreathed. Rebreathing of exhaled air for longer than several minutes can, in some circumstances, lead to suffocation. This applies to most models of CPAP or bilevel devices. - This mask should only be used with CPAP or bilevel devices recommended by a physician or respiratory therapist.
- Using a mask may cause tooth, gum or jaw soreness or aggravate an existing dental condition. If symptoms occur, consult your physician or dentist.
- Remove and dispose of all packaging before using the mask.
Set up
Determine which side of the cushion the air tubing will be located. Ideally this should be the side that is closest to the device.
Pixi Hint! If the child has a preference for sleeping on a particular side, this should be considered when determining the location of the device.
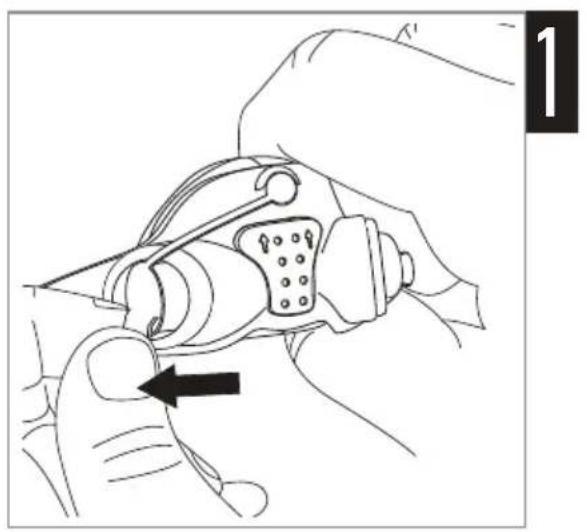
Changing the side of the air tubing
- To change the side of the air tubing, remove the plug from the cushion.
- Insert the combined elbow and air tubing until the cushion meets the ridge on the elbow.
- Ensure the opposite side of the cushion is fully closed by securely inserting the plug into the cushion opening.
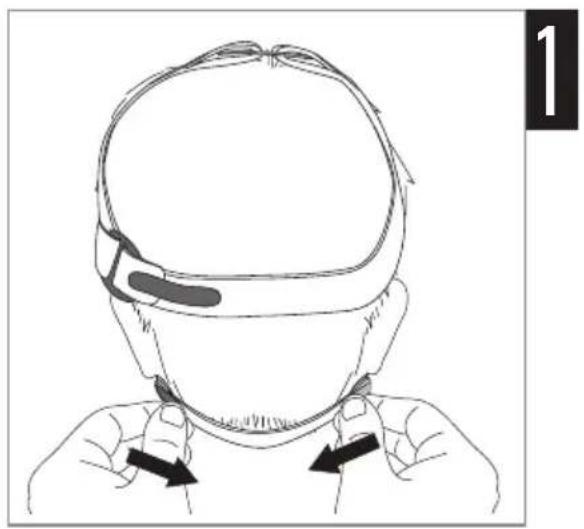
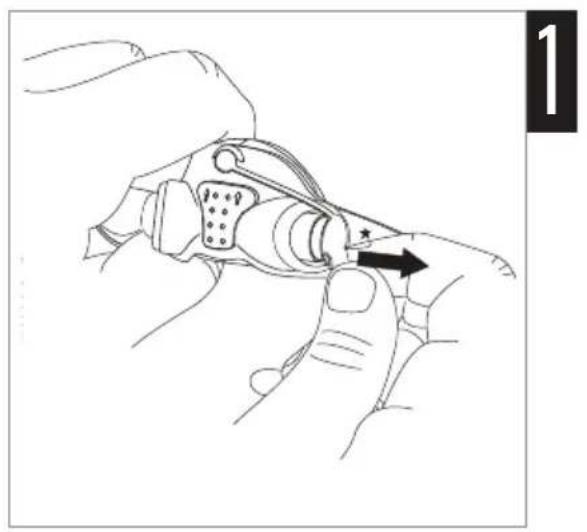
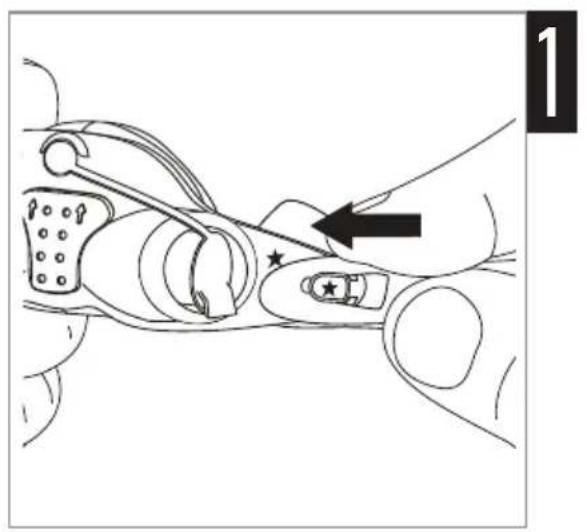
Attaching the headgear
The mask frame has been designed to ensure the headgear is fitted correctly every time.
- Latch the lower headgear arm with the star onto the frame node with two stars, so that the frame is nested between the plastic and the padding of the headgear.
- Gently pull the headgear arm into place until it clicks.
- Repeat steps 4-5 with the other side (without stars).
Set up is now complete and the mask is ready for fitting.

WARNING
- Ensure that the nasal cushion does not block the nostrils at any time during fitting or use.
- Do not leave long lengths of air tubing around the top of the child's bed. It could twist around the child's head or neck while sleeping.
Fitting
The fitting illustrations show the sequence for obtaining the best fit and comfort when using the mask.
Pixi Hints!

- If fitting the mask for the first time, we recommend the child be sitting in an upright position to ensure correct fit.
- To avoid possible anxiety by the child, ensure all parts of the mask frame and headgear are kept clear from the eyes and eye area.
- The child will best adapt to therapy if the mask is correctly fitted before the device is turned on.
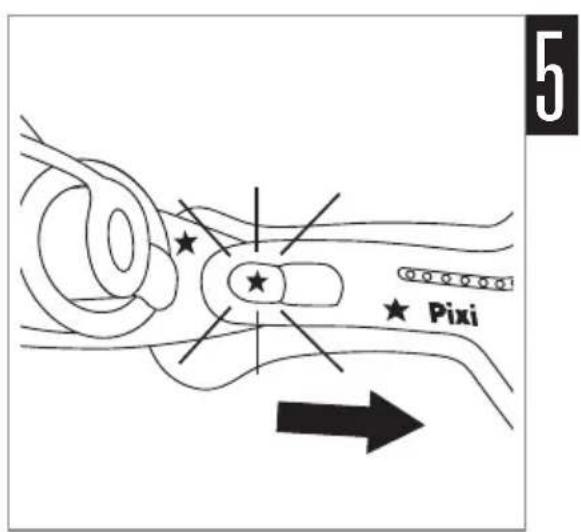
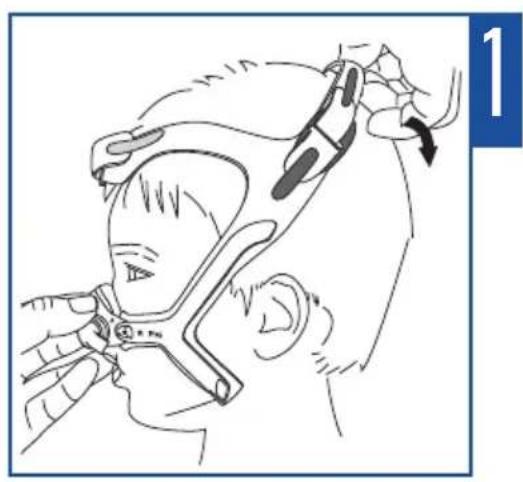
Fitting steps
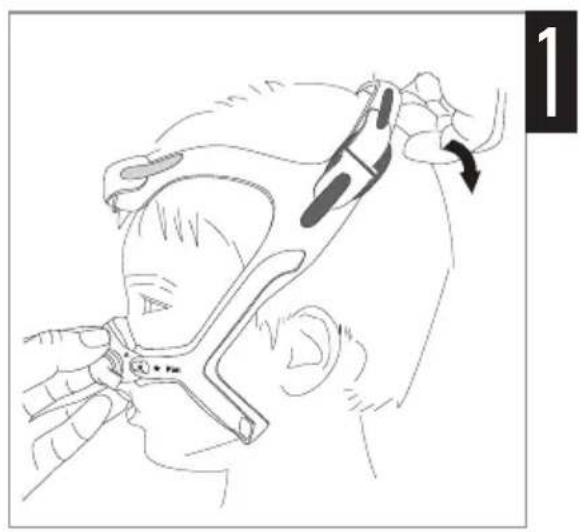
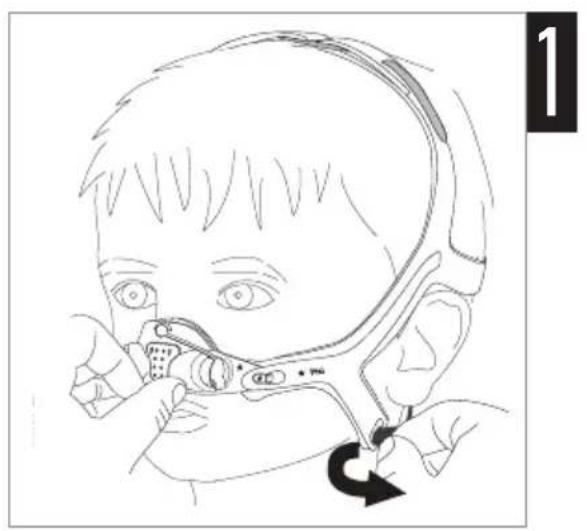
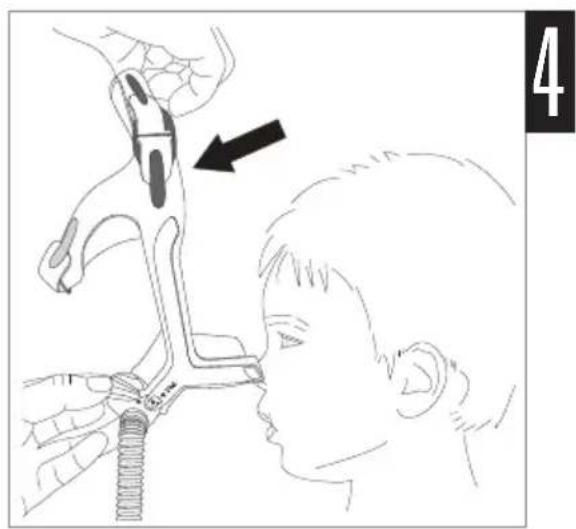
1–2. Hold the mask gently against the child's face, checking that the nose is fully enclosed by the cushion and the mouth is clear – pull the headgear up over the head. Move the middle strap down over the head until it sits across the middle of the back of the head.
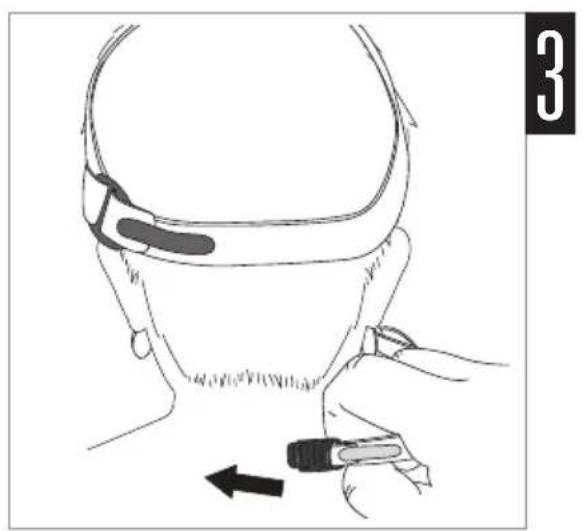
3. Keeping your hand on the frame to maintain correct headgear position, bring the lower headgear strap behind the back of the neck.
4–5. Attach the lower headgear strap to the mask by holding the tab and hooking the quick release clip onto the lower headgear arm.
6. When fully fitted, the mask and headgear should be positioned as shown. Ensure the top strap is vertically aligned with the top of the ears and the middle strap sits across the back of the head horizontally aligned with the top of the ears.
7. Finally, connect the free end of the short tube assembly to the device air tubing.
Adjustment
Pixi Hints!
- To achieve optimal seal, adjust the headgear straps starting at the bottom strap and working upwards.
- If the child experiences nasal dryness or irritation, using a humidifier is recommended.
Adjustment steps
- If necessary, adjust the straps by removing the Velcro and gently tightening the lower headgear straps until comfortable. Do not overtighten.
2–3. Repeat step 1 with both middle and top straps until comfortable.
Note: The mask is designed to fit loosely while still providing an optimal seal. Do not overtighten the straps.
Attaching the pressure port
The pressure port is used to measure the air pressure at your mask so that the correct pressure is set. This happens during the sleep study at the hospital.
The pressure port is also used to deliver oxygen. This can take place in the home or hospital environment. If necessary, your clinician will advise when this is required.
Attachment steps
- Remove the plug from the cushion.
- Move the plug to the side so that it is not obstructing the vent holes.
- Insert the larger end of the pressure port into the cushion.
- Attach the other end of the pressure port to the oxygen system.
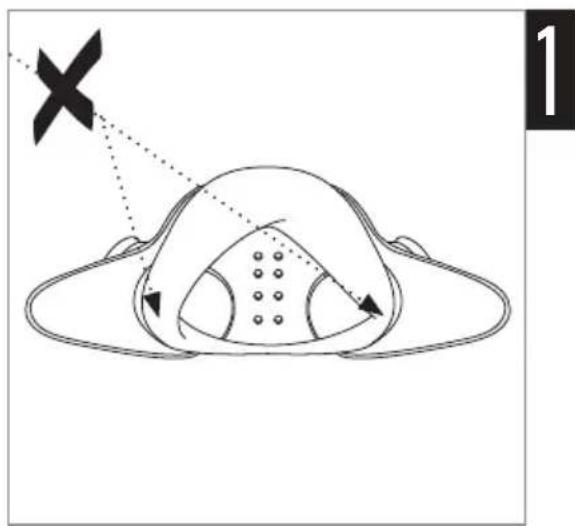
Cushion check
Cushion check steps
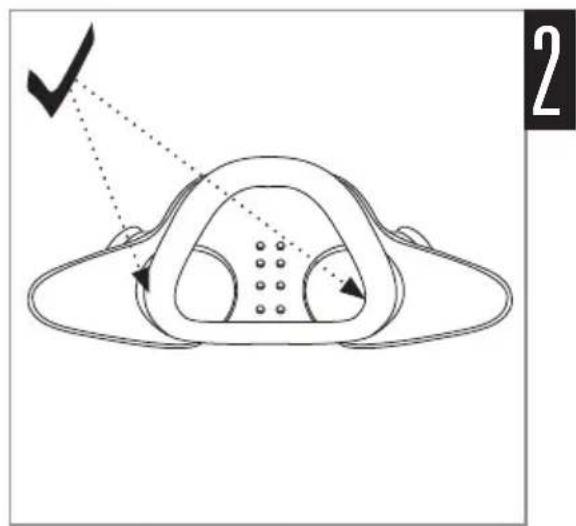
1-2. Ensure the cushion is not creased or folded or caught inside the sockets of the mask frame.
3. The Pixi cushion is designed to sit mid-bridge. Ensure that the mask does not block the nose or mouth at any time.
Removal
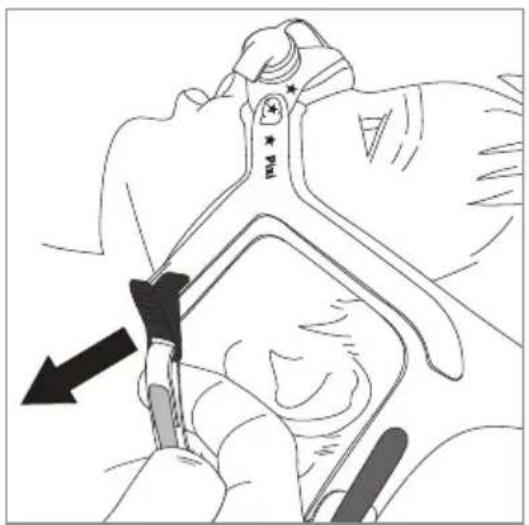
Removal steps
1–2. Gently hold the mask against the child's face. Unhook the quick release clip from the lower headgear arm by pulling forward and away from the arm.
3-4. Keep holding the mask and remove the headgear by pulling up and over the head towards the face.
Emergency removal
In the event of an emergency, remove the mask by placing your finger under the lower headgear strap and firmly pulling it away from the child – this will activate the quick release clip. Do not use this removal method under normal circumstances.
Disassembly
Disassembly steps
- Detach the headgear from the mask frame by unlatching each of the lower headgear arms from the frame nodes.
- Remove the combined elbow and air tubing from the mask.
- Remove the plug from the cushion.
4–5. Remove the cushion from the frame by gently pushing it through from the front of the frame and pulling it away from the rear of the mask frame.
WARNING
When disassembling the mask, always keep all accessories and components out of the reach of small children as small parts might present a choking hazard. Seek immediate medical attention if choking occurs or if any small part has been swallowed.
Headgear reassembly
Pixi Hints!
- You don't need to disassemble your Pixi headgear to wash it.
- The Velcro straps and plastic buckles have been color coded for ease of assembly.
Headgear reassembly steps
- Lay the headgear and plastic buckles out on a flat surface as shown, ensuring the lower headgear arms are facing up.
- Thread each light blue strap up and over the light blue buckle, then secure into place.
- Thread each dark blue strap up and over the dark blue buckle, then secure into place.
- Thread the Velcro only end of the lower headgear strap through the lower headgear arm, then secure into place. There is no need to attach the quick release clip to the headgear now.
Ensure that any Velcro or plastic parts are on the outer side of the mask, otherwise your headgear may be incorrectly assembled. The headgear is now ready for fitting. Refer to the Set up illustrations in this guide.
Reassembly
Reassembly steps
- Insert each side of the cushion into the sockets of the mask frame. Ensure the cushion is oriented correctly. The arrows on the cushion should be pointing up towards the plug tether. The raised vented area of the cushion should also be sitting up against the mask frame.
- Pull the arms of the cushion through until the collar of the cushion shoulder is sitting against the mask frame.
- Replace the plug into the appropriate side of the cushion.
- Insert the combined elbow and air tubing into the other side of the cushion, ensuring that it is fully inserted.
- Reattach the headgear. Refer to the Attaching the headgear illustrations in this user guide.
Cleaning the mask
The mask and headgear should only be gently handwashed.
Daily/After each use:
- Disassemble the mask components according to the disassembly instructions.
- Thoroughly clean the separated mask components (excluding headgear), by gently rubbing in warm (approximately 30°C) water using mild soap.
• To optimise the mask seal, facial oils should be removed from the cushion after use. - Use a soft bristle brush to clean the vent.
- Inspect each component and, if required, repeat washing until visually clean.
- Rinse all components well with drinking quality water and allow to air dry out of direct sunlight.
- When all components are dry, reassemble according to the reassembly instructions.
Weekly:
- Handwash the headgear. It can be washed without being disassembled.

WARNING
Do not use aromatic-based solutions or scented oils (eg, eucalyptus or essential oils), bleach, alcohol or products that smell strongly (eg, citrus) to clean any of the mask components. Residual vapours from these solutions can be inhaled if not rinsed thoroughly. They may also damage the mask.

CAUTION
If any visible deterioration of a system component is apparent (cracking, crazing, broken parts, tears etc), or, if after cleaning, any component remains unclean, the component should be discarded and replaced.
Troubleshooting
Problem / possible cause Solution
| Mask is too noisy | |
| Vent is blocked or partially blocked. | If the vent requires cleaning, use a soft bristle brush. |
| Elbow or plug is incorrectly inserted. | Remove the elbow and plug from the mask and then reassemble according to the instructions. |
| Mask leaks around the face | |
| Mask is not positioned correctly. | Gently pull the cushion away from the face to reinflate. Reposition the mask according to the instructions. |
Air leaking around the nose
Mask is not tightened correctly. Tighten the bottom and middle headgear straps. The top strap is designed to sit quite loosely. Do not overtighten. Turn off the device and remove the mask. Refit the mask according to the instructions. Ensure you position the cushion correctly on the face before pulling headgear over the head.
The mask does not fit properly
Mask may be incorrectly assembled.
Disassemble the mask and reassemble according to the instructions.
Cushion may be dirty. Clean the cushion according to the instructions.

WARNING
- The technical specifications of the mask are provided for your clinician to check that they are compatible with the CPAP or bilevel device. If used outside specification or if used with incompatible devices, the seal and comfort of the mask may not be effective, optimum therapy may not be achieved, and leak, or variation in the rate of leak, may affect the device function.
- Discontinue using this mask if the child has any adverse reaction to the use of the mask, and consult your physician or sleep therapist.
- At a fixed rate of supplemental oxygen flow, the inhaled oxygen concentration varies, depending on the pressure settings, patient breathing pattern, mask, point of application and leak rate. This warning applies to most type of CPAP or bilevel devices.
- As with all masks, some rebreathing may occur at low CPAP pressures. Refer to your device manual for details on settings and operational information.
Technical specifications
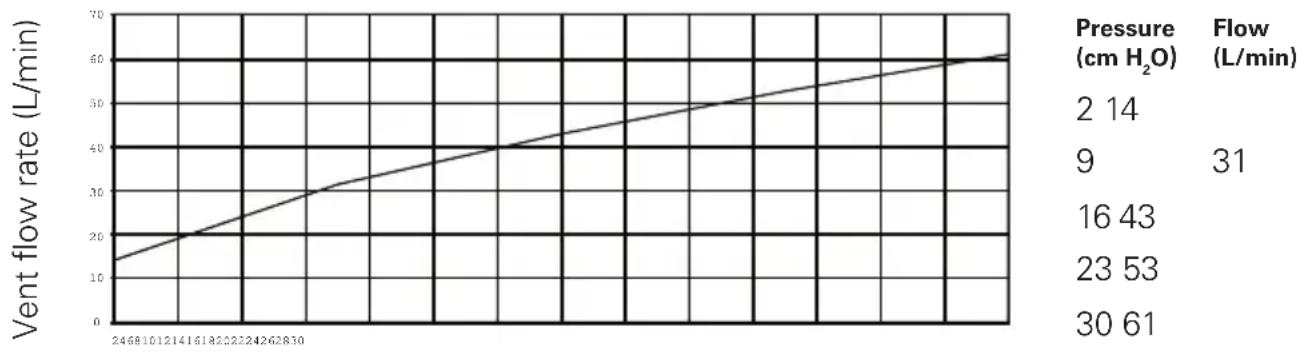
Pressure-flow curve
The mask contains passive venting to protect against rebreathing. As a result of manufacturing variations, the vent flow rate may vary.
line
| Pressure (cm H₂O) | Flow (L/min) | | ------------------ | ------------ | | 2 | 14 | | 9 | 31 | | 16 | 43 | | 23 | 53 | | 30 | 61 |Mask pressure (cm H_2O )
Dead space information
Physical dead space is the empty volume of the mask to the end of the swivel. It is 101.7 mL.
Technical specifications
| Therapy pressure | 2 to 30 cm H_2O | |
| Compliance | Mask compliance between 5 cm H _2O and 15 cm H_2O is less than 1.57 mL/cm H_2O | |
| Resistance | Drop in pressure measured (nominal)at 50 L/min: 0.8 cm H_2O at 100 L/min: 3.1 cm H_2O | |
| Sound | DECLARED DUAL-NUMBER NOISE EMISSION VALUES inaccordance with ISO 4871. The A-weighted sound power level of themask is 40.6 dBA, with uncertainty 4 dBA. The A-weighted soundpressure level of the mask at a distance of 1 m is 32.6 dBA, withuncertainty 4 dBA. | |
| Environmentalconditions | Operating temperature: +5°C to +40°COperating humidity: 15% to 95% non-condensing.Storage and transport: -20°C to +60°CStorage and transport humidity: up to 95% non-condensing. | |
| Grossdimensions | Mask fully assembled with elbow assembly – no headgear.35 mm (H) x 430 mm (W) x 40 mm (D) |
Notes:
- The mask system does not contain PVC, DEHP or phthalates.
• This product does not contain natural rubber latex. - The manufacturer reserves the right to change these specifications without notice.
Storage
Ensure that the mask is thoroughly clean and dry before storing it for any length of time. Store the mask in a dry place out of direct sunlight.
Disposal
This mask does not contain any hazardous substances and may be disposed of with your normal household refuse.
Symbols
Caution, consult accompanying documents; LOT Batch Code; REF Catalogue number; Temperature limitation; Humidity limitation; Does not contain natural rubber latex; Manufacturer; European Authorised Representative; Indicates a Warning or Caution and alerts you to a possible injury or explains special measures for the safe and effective use of the device; Keep away from rain; This way up; Fragile, handle with care.
Consumer warranty
ResMed acknowledges all consumer rights granted under the EU Directive 1999/44/EG and the respective national laws within the EU for products sold within the European Union.
Pixi™
MASKE FÜR KINDER
natural_image
Cartoon character illustration with a smiling face and raised finger (no text or symbols)natural_image
Cartoon character illustration with a smiling face and raised finger (no text or symbols)Pixi Tipps!
natural_image
Cartoon character illustration with a smiling face and raised finger (no text or symbols)natural_image
Cartoon character illustration with a smiling face and raised finger (no text or symbols)natural_image
Cartoon character illustration with a smiling face and raised finger (no text or symbols)natural_image
Cartoon character illustration with no text or symbolsAstuces Pixi
Macka Pixi Pediatric:
line
| Day | Volume (ml/min) | Daily Oil Production Rate (L/min) | |---|---|---| | 1 | 2 | 14 | | 2 | 9 | 31 | | 3 | 16 | 43 | | 4 | 23 | 53 | | 5 | 30 | 61 |ResMed Pty Ltd 1 Elizabeth Macarthur Drive Bella Vista NSW 2153 Australia
See www.resmed.com for other ResMed locations worldwide.
For patent information, see www.resmed.com/ip.
Pixi is a trademark of ResMed Pty Ltd.
Velcro is a trademark of Velcro Industries B.V.
© 2020 ResMed.
natural_image
Illustration of a person using a hairpin to adjust the head area (no text or symbols present)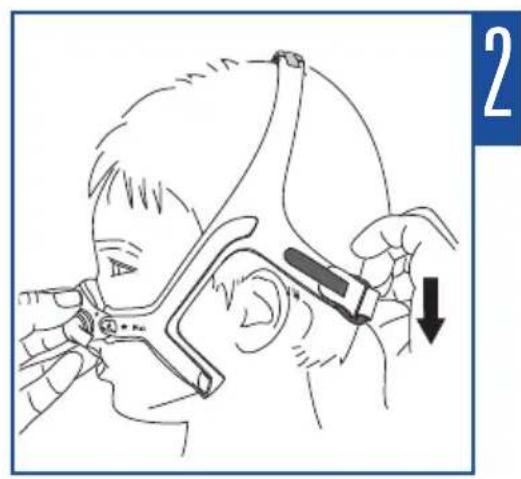
natural_image
Illustration of a person using a medical device to adjust the ear (no text or symbols present)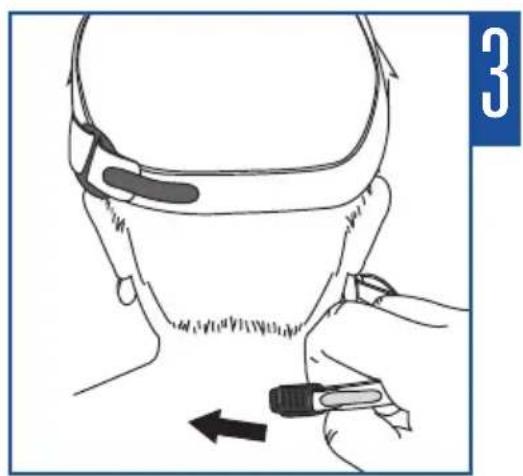
natural_image
Illustration of a person using a device to adjust the neck area (no text or symbols present)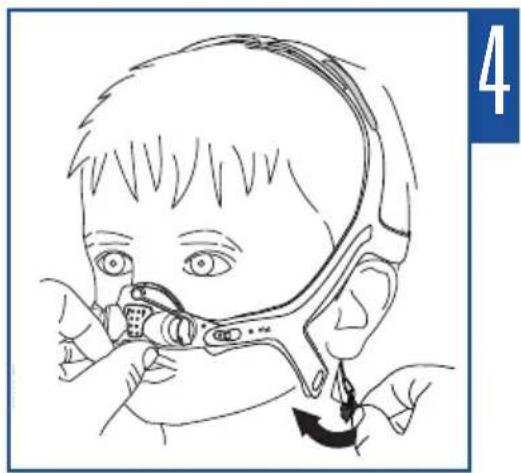
natural_image
Illustration of a child wearing a medical device with an arrow indicating motion (no text or symbols)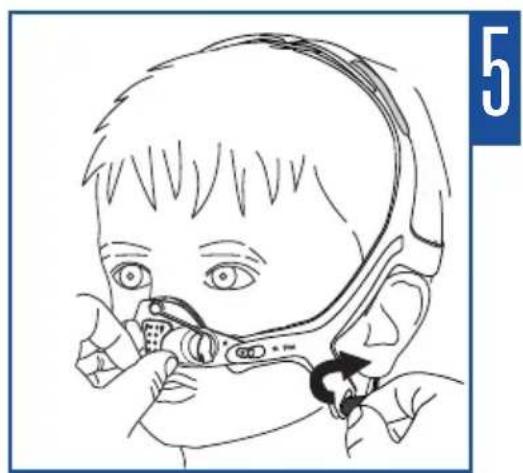
natural_image
Line drawing of a child wearing a medical device (no text or symbols)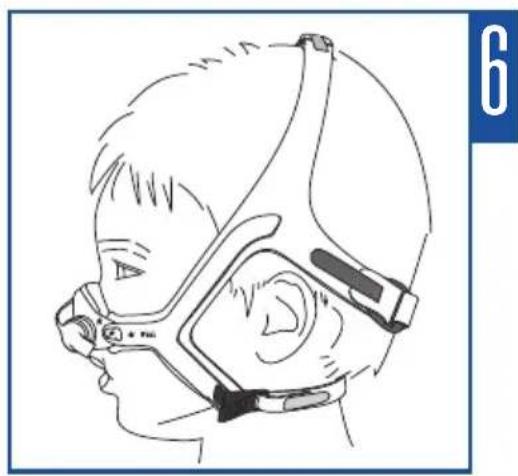
natural_image
Line drawing of a child wearing a face mask and headband, viewed from the side (no text or symbols)| 618364/12020-06 |
| Pixi |
| USER |
| EPN |