
Cesari - Toilet Schütte - Free user manual and instructions
Find the device manual for free Cesari Schütte in PDF.
| Brand | Schütte |
| Model | Cesari |
| Product type | Washlet (bidet toilet) |
| Mains voltage | 230 V AC |
| Mains frequency | 50 Hz |
| Power consumption | 1200 W |
| Standby power | < 1 W |
| Protection type | IPX4 |
| Protection class | Class I |
| Intended use | Indoor, rectal and vaginal hygiene, private use |
| Main functions | Rectal wash, feminine wash, warm air dryer, odor extraction, heated seat, remote control |
| Water supply | Cold water, mains water pressure |
| Minimum ambient temperature | 0 °C (frost protection) |
| Maintenance | Clean with soapy water and damp sponge; descale every 3 months; replace activated carbon filter every 3 months |
| Safety | Presence sensor, automatic shut-off after 3 min, burn protection, RESET system |
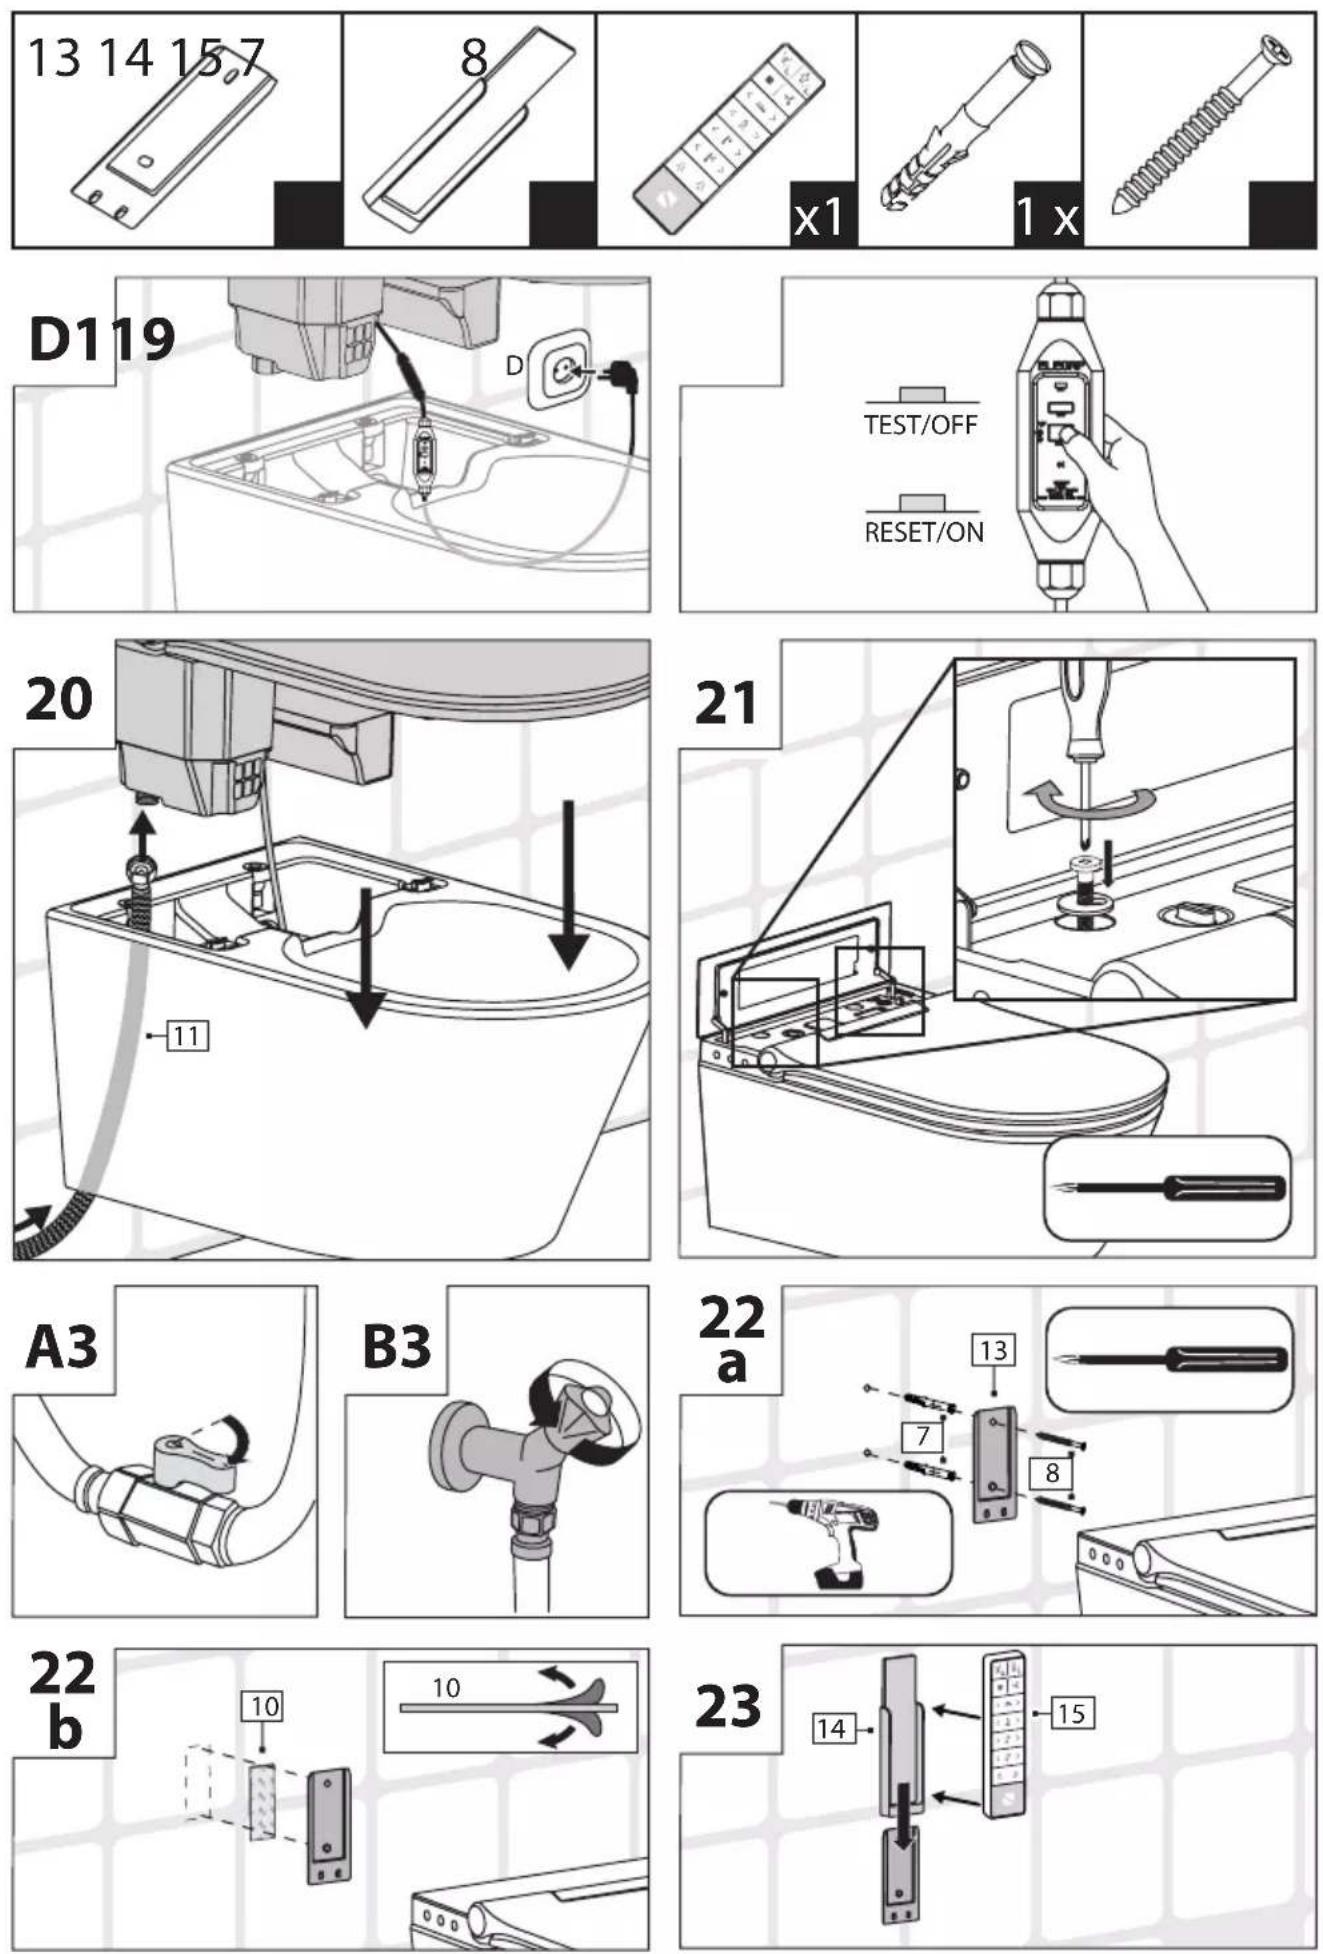
| Included accessories | Remote control (batteries not included), connection hose, shut-off valve, Velcro strip |
| Electrical connection | 230 V mains socket, minimum distance from floor 25 cm |
| Water connection | Cold water connection, shut-off valve |
| Wear parts | Activated carbon filter, sealing gaskets, washlet nozzle |
| Warranty | See manual; excluded in case of improper installation or lack of maintenance |
Frequently Asked Questions - Cesari Schütte
User questions about Cesari Schütte
0 question about this device. Answer the ones you know or ask your own.
Ask a new question about this device
Download the instructions for your Toilet in PDF format for free! Find your manual Cesari - Schütte and take your electronic device back in hand. On this page are published all the documents necessary for the use of your device. Cesari by Schütte.
USER MANUAL Cesari Schütte
natural_image
Line drawing of a modern kitchen appliance with a lid and side buttons (no text or symbols)DE Montageanleitung .... 4 NL Montage-instructie .... 31
CZ Montážní návod.... 7 PL Instrukcja montažu.... 34
DK Monteringsvejledning.... 10 RO Indicații de montaj.... 37
ESI Instrucciones de montaje .... 13 RUI Руководство по монтажу .... 40
(FRI) Notice de montage.... 16 SE Monteringsanvisning.... 43
GB Installation instructions.... 19 SI Navodila za montažo.... 47
HR Upute za montažu 22 SK Návod na montáž 50
HU Felszerelési útmutató 25 TR Montaj Kılavuzu 53
IT Istruzioni di montaggio.... 28
FJS-BAD-DWC-92100_JT_0422

text_image
592 mm
text_image
370 mm
text_image
180 mm 410 mm 320 mm 400 mm ±0.00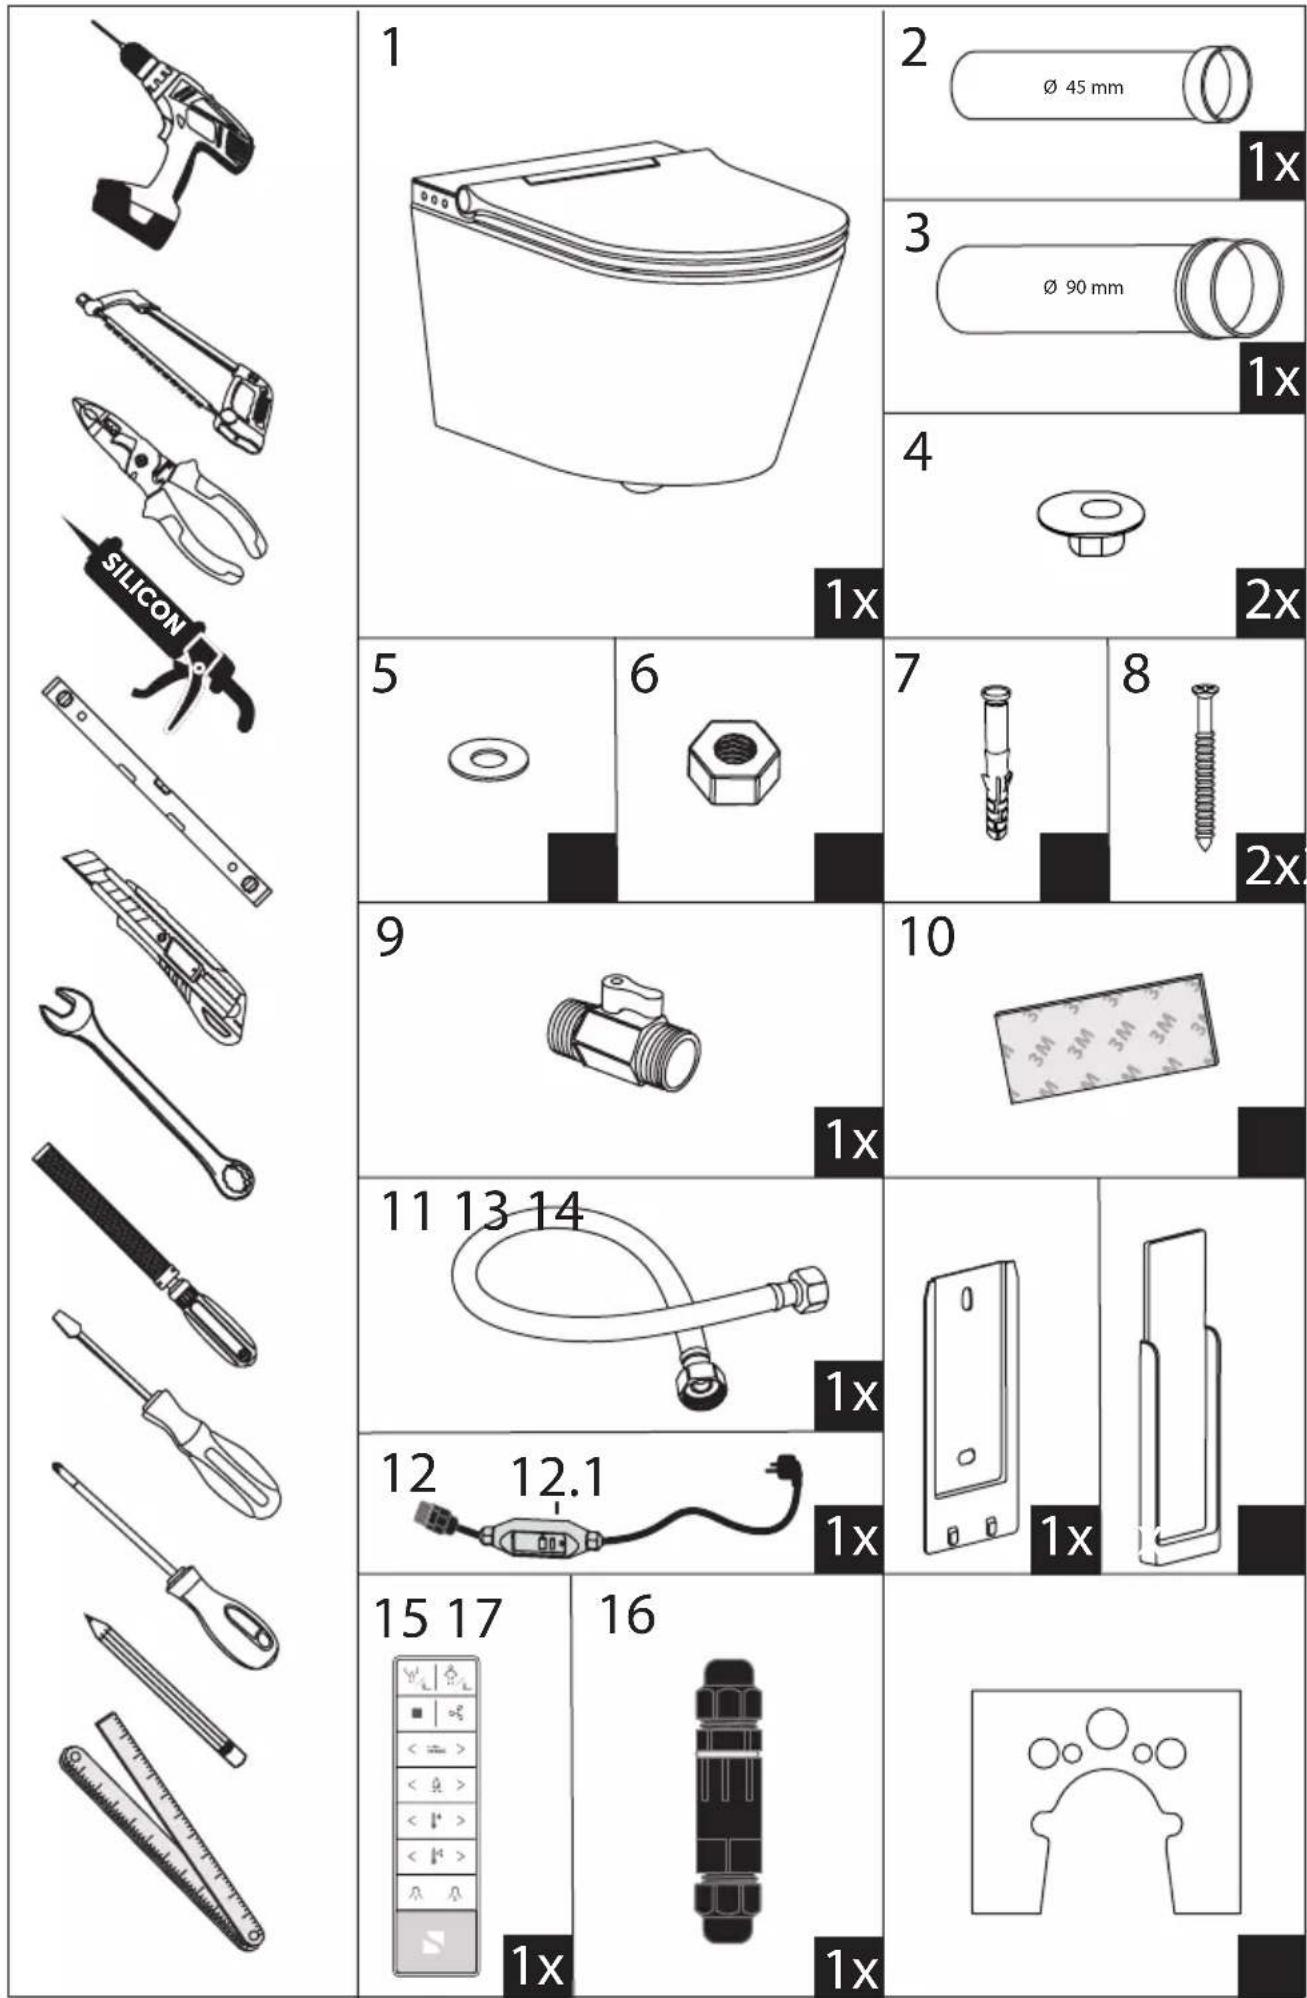
text_image
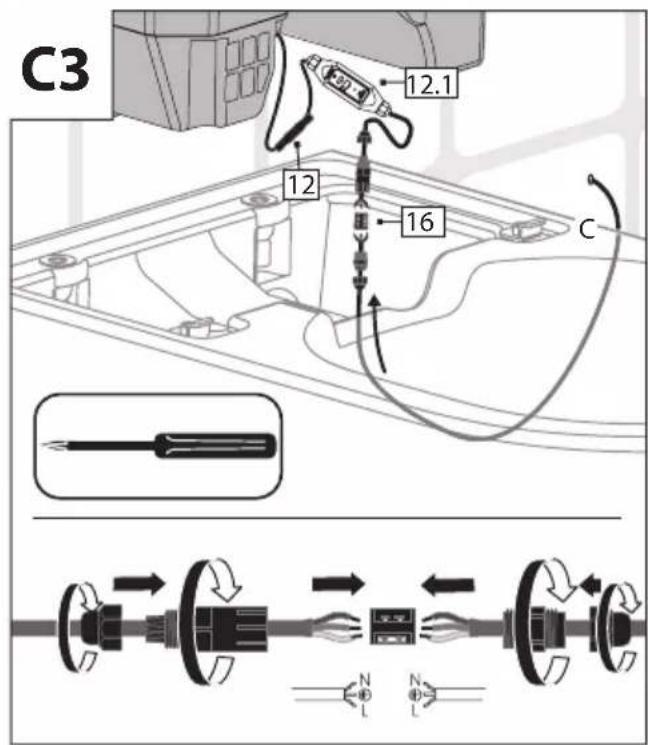
1 2 Ø 45 mm 3 Ø 90 mm 4 5 6 7 8 9 10 11 13 14 11 12 12.1 12 15 17 16 1x 1xTechnische Daten
| Modell: | Dusch-WC(Cesari)92100 |
Power frequency: 50 Hz
Power consumption: 1200 W
Power consumption (standby): <1 W
Protection method: IPX4
Protection class:

Installation instructions
Dear customer, you have purchased a product of high quality and long service life from our range. Please read this manual completely before installation and follow the instructions. Please keep the manual in a safe place and pass it on to any subsequent owners. These installation instructions can also be requested from our customer support as a PDF file.
Intended use
The shower WC is only suitable for indoor use. The shower WC can be used for cleaning the anal area and for external cleaning of the vaginal area. It is intended exclusively for private use and is not suitable for commercial use. Only use the shower WC as described in this operating manual. Any other use is considered improper and may result in damage to property or even personal injury. The manufacturer or dealer does not accept any liability for damage caused by improper or incorrect use.
Safety advice
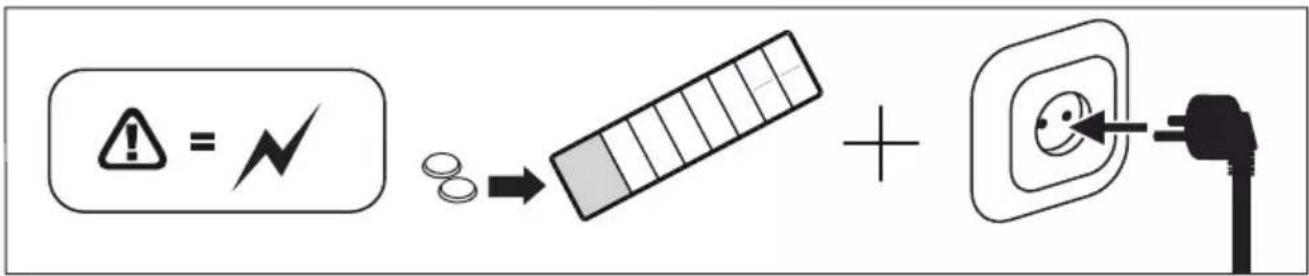
HINT: The following symbol indicates that a qualified electrician is required!

DANGER OF ELECTRIC SHOCK! Incorrect electrical installation or excessive voltage can lead to an electric shock!
- CAUTION ELECTRIC SHOCK! Before drilling, make sure that there are no electrical cables in and around the drilling location!

CAUTION! If the electrical connection is permanently installed, work necessary for this and connection to the power supply may only be tried out by a qualified electrician! Repair work the electrical system of the shower WC may be carried out by a qualified electrician or authorised service employee after consultation with the manufacturer!
- Connect the shower WC only if the voltage of the socket corresponds to the information provided on the rating plate.
- Connect the shower WC to a socket outlet only with at least 25 cm clearance from the ground.
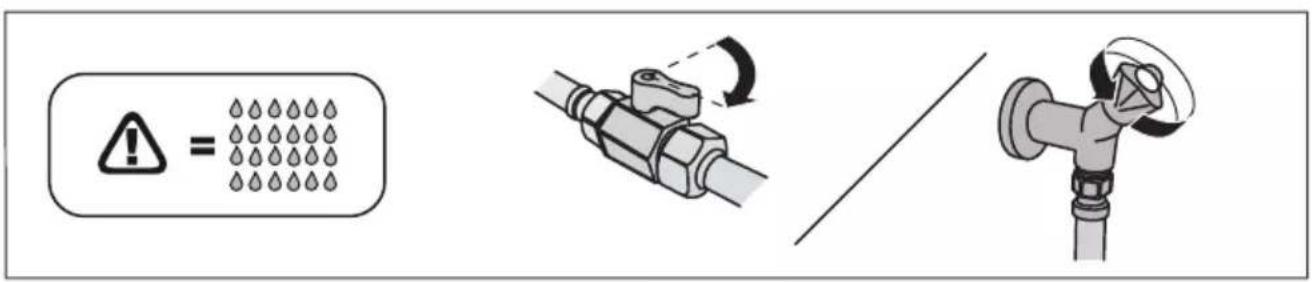
- CAUTION WATER DAMAGE! Please switch off the general water supply before installation.
- Incorrectly installed shower WCs may cause water damage!
- CAUTION WATER DAMAGE! Before drilling, make sure that there are no water mains at and around the drilling location!
- Please have the installation carried out by only a qualified plumber.
- CAUTION for hot water setting: Risk of scalding!
- Only approved for mains or potable water. Do not use seawater, service water or rain water.
- Only use a cold water supply! Connecting the appliance to a hot water supply may cause scalding and damage to the appliance.
- The shower WC is only suitable for use in rooms with a temperature above 0 °C. If there is a risk of frost, interrupt the water supply and empty the shower WC.
- Do not twist the connection hose or tension it!
- Do not operate the shower WC if there is visible damage or if the power cord or plug is defective. If the power cord of the shower WC is damaged, please contact the manufacturer immediately. It must then be replaced by the manufacturer or their customer service to avoid any hazards.
- Do not open the housing, but leave the repair to qualified personnel. Please contact the manufacturer for this.
-
Do not carry out any repairs or modifications to the product yourself. Otherwise, there is a risk of electric shock, overheating, permanent damage to the product, fire or a short-circuit.
-
Never touch the power plug and the safety device with wet hands.
- Do not insert any objects into the device openings!
- Never pull the power plug out of the socket by the power cord, but always take hold of the power plug.
- Never use the power cord as a carrying handle.
- Keep the shower WC, the power plug or power cord away from naked flames and hot surfaces.
- Do not bend the power cord and do not lay it over sharp edges.
- The water inlet hose must not touch the power plug or the connecting cable, as condensation may cause fire, electric shock, overheating or short-circuit.
- Too many plugs in the same power outlet (e.g via a power strip) may ignite due to overheating.
- To avoid hazards due to accidental activation of the thermal shutdown, the device must not be operated with an external switching device, e.g. a timer or radio socket, or connected to a circuit that is regularly switched on or off by the power supply company.
- Even with careful production there can be sharp edges. Please be careful.
- Despite automated production processes, the manufacturer of bathroom ceramics is still craftsmanship today. Many details are done by hand. During the production of bath ceramics, the blanks are fired at a very high temperature and lose about 10% of their original size. Due to the production steps just mentioned, tolerances are unavoidable.
- Before installation, inform yourself about the suitable installation material. Suitable installation material is included for installation on common pre-wall elements.
- Please note that the seals are wearing parts which must be replaced from time to time.
Operating instructions
- Do not expose to direct sunlight. Otherwise there is a risk of colour changes.
- Do not sit on the lid of the device. Do not exert excessive strain or impact on the toilet seat, place heavy objects on it or step or stand on it. Otherwise this can damage the product.
- Radio receivers or similar devices near the shower WC can interfere with the reception of the remote control.
- Do not bend or twist the shower arm.
- Keep burning cigarettes and naked flames away from the product. Do not operate a heater near the product. Otherwise there is a risk of fire.
- If a child seat or soft booster seat is used, it must be removed after use to ensure that all functions can be used properly
- Do not use toilet seat or lid covers.
- DANGER TO LIFE AND RISK OF ACCIDENT FOR YOUNG CHILDREN AND CHILDREN! Never leave children unattended with the packaging material. Risk of suffocation. The product and packaging are not toys!
- CAUTION! DANGER OF INJURY! Make sure that all parts are undamaged and properly installed. There is the risk of injury if not installed properly. Damaged parts can affect safety and function!
- WARNING! Danger to children and people with reduced physical, sensory or mental abilities or lack of experience and knowledge!
-
This shower WC can be used by children under 14 years of age and people with reduced physical, sensory or mental abilities or lack of experience and knowledge under supervision. Cleaning and user maintenance must not be carried out by children without supervision.
-
With the functions of the rear wash and lady wash certain parts of the body are cleaned. The cleaning should not be carried out for too long. Stop once cleaning is complete. Otherwise, this can also remove normal bacteria, which can lead to a bacterial imbalance in your body. People undergoing medical treatment in the aforementioned regions should consult their doctor before use.
- The sensor in the seat detects when someone is sitting on the seat. If a child uses the shower WC, the seat sensor may not be activated due to the lower body weight.
- If any of the following people use the hot air dyer, the temperature control of the toilet seat should be set to "Level 1": Children under the age of 14, senior citizens and other users who cannot adjust the temperature properly themselves. Sick, physically impaired and others who cannot move freely. People who use medicines that cause drowsiness (sleeping pills or cold medication); people who are heavily intoxicated; people who are very tired and other people who tend to fall asleep.
⚠️ Installation instructions
- Carefully check all connections for leaks after initial commissioning.
- In case of faulty installation, the warranty - especially for consequential damages - is excluded!
- Have a qualified electrician check whether the device is properly grounded.
- Liability and warrant claims are excluded in the event of repairs carried out by the customer, improper connection, incorrect operation, non-regular maintenance of the activated carbon air filters and irregular de-chalking.
- Only parts that correspond to the original device data may be used for repairs.
- Lay the power cord so that it does not become a tripping hazard. You can fix the cable under the ceramic with the included hook and loop strip.
- If the shower WC is not in use, clean it or if a fault occurs, switch off the shower WC at the main switch or, if possible, pull the power plug out of the socket.
Tehnički podaci
Model: WC sa tušem
(Cesari)
92100
natural_image
Simple line drawing of a symmetrical arch shape with three circles above it (no text or symbols)x1
text_image
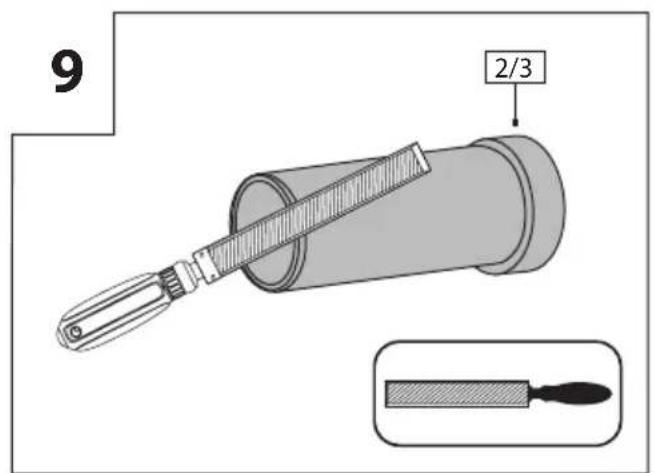
9 2/3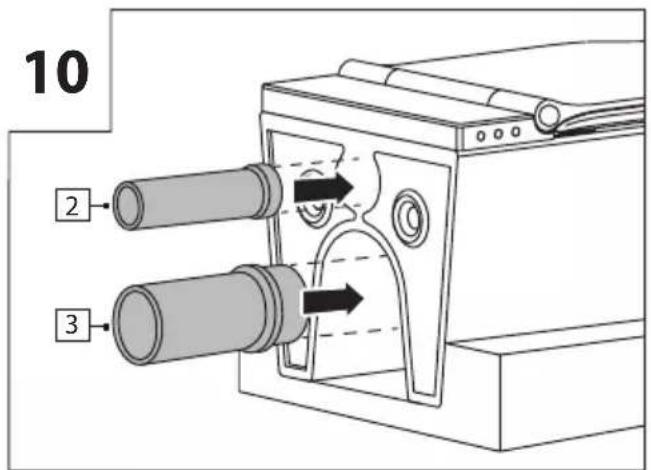
text_image
10 2 3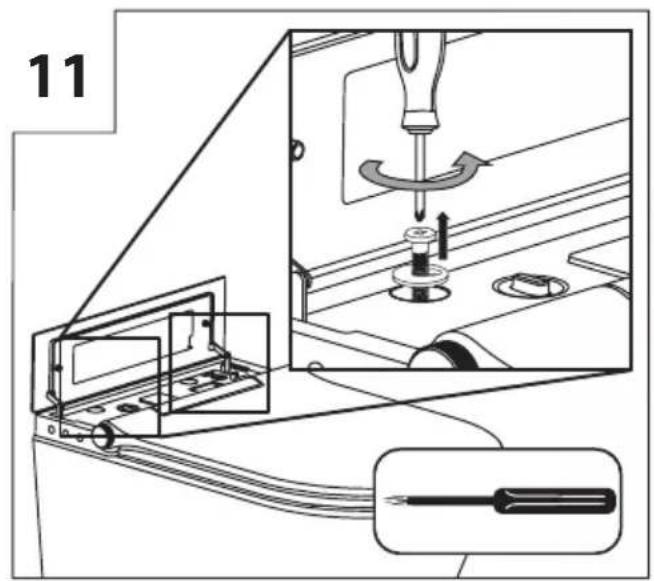
text_image
11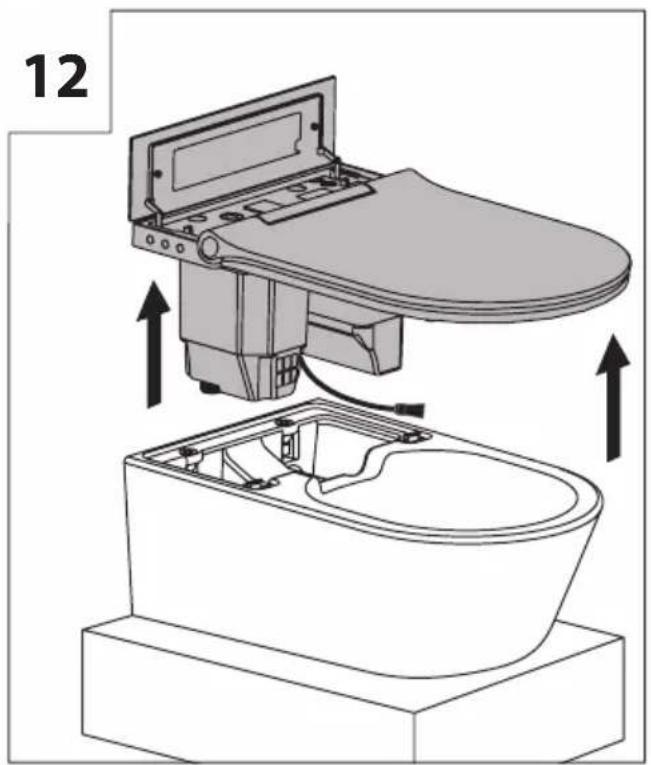
natural_image
Technical diagram of a toilet with internal components and directional arrows indicating assembly (no text or symbols)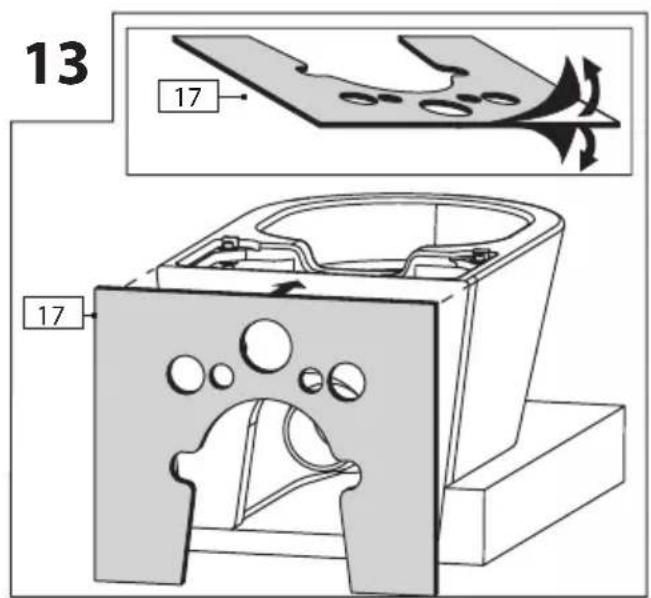
text_image
13 17 17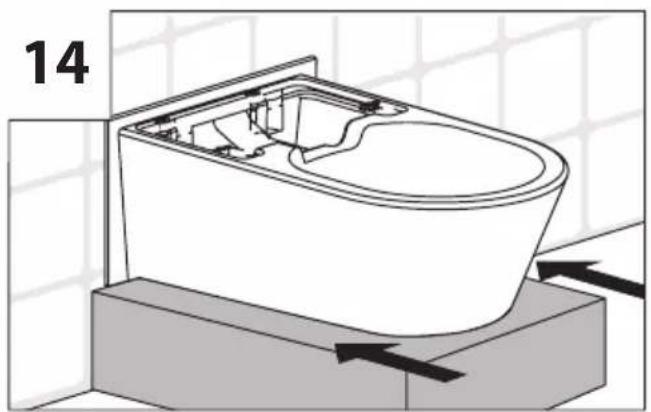
natural_image
Technical line drawing of a toilet with internal components and directional arrows indicating flow or movement (no text or symbols)
text_image
4 5 6 x1
text_image
1516 4 5 6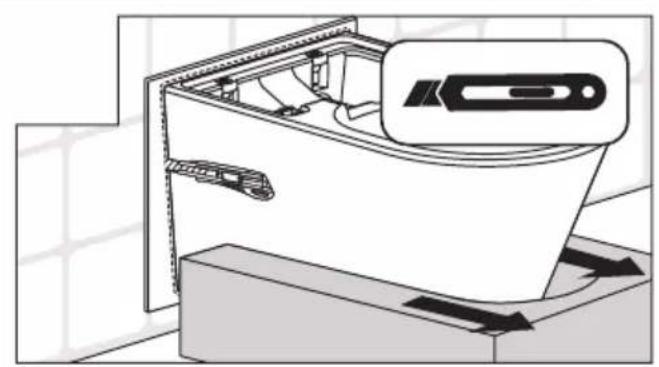
natural_image
Diagram of a device interior with cable routing and directional arrows indicating movement (no text or symbols)
text_image
17 SILICON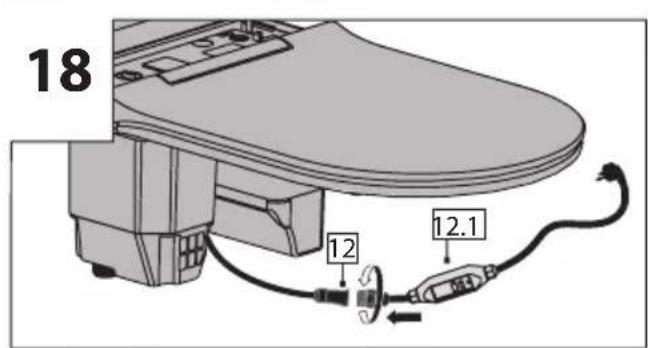
text_image
18 12 12.1
natural_image
Simple line drawing of a cable with labeled point 'C' (no text or symbols on the cable itself)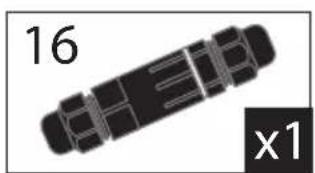
natural_image
Pure mechanical component diagram without any text, numbers, or symbols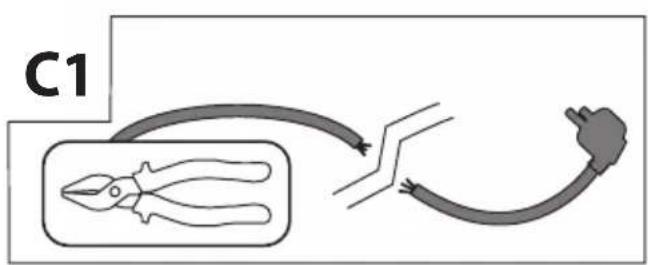
flowchart
graph TD
    A["Pliers"] --> B["Switch"]
    B --> C["Plug"]
text_image
C3 12.1 12 16 C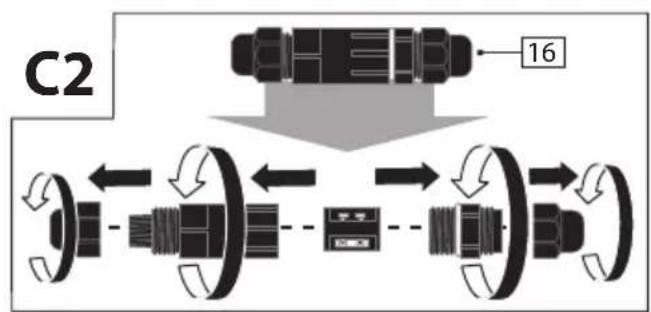
flowchart
graph TD
    A["Component 16"] --> B["Data Flow"]
    B --> C["Component 2"]
    C --> D["Data Flow"]
    D --> E["Component 3"]
    E --> F["Data Flow"]
    F --> G["Component 4"]
    G --> H["Data Flow"]
    H --> I["Component 5"]
    I --> J["Data Flow"]
    J --> K["Component 6"]
    K --> L["Data Flow"]
    L --> M["Component 7"]
    M --> N["Data Flow"]
    N --> O["Component 8"]
    O --> P["Data Flow"]
    P --> Q["Component 9"]
    Q --> R["Data Flow"]
    R --> S["Component 10"]
    S --> T["Data Flow"]
    T --> U["Component 11"]
    U --> V["Data Flow"]
    V --> W["Component 12"]
    W --> X["Data Flow"]
    X --> Y["Component 13"]
    Y --> Z["Data Flow"]
    Z --> AA["Component 14"]
    AA --> AB["Data Flow"]
    AB --> AC["Component 15"]
    AC --> AD["Data Flow"]
INBETRIEBNAHME
GETTING STARTED
text_image
! =
text_image
⚠ = √ → + □ ●
text_image
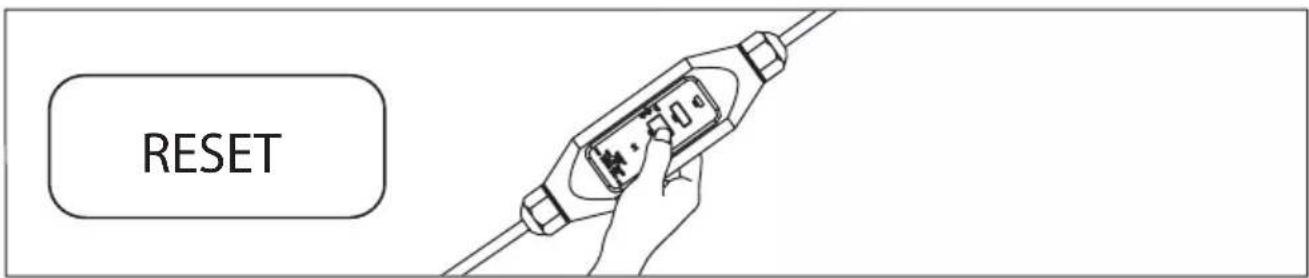
RESETVERBINDUNG
CONNECTION
text_image
Diagram showing a battery connected to a sensor and a device, illustrating wireless signal transmission.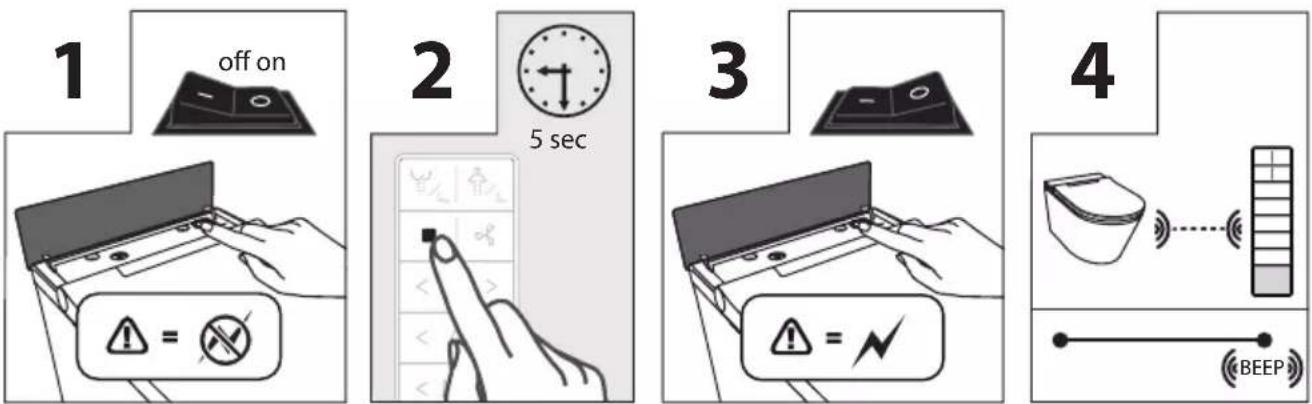
flowchart
graph TD
    A["1: off on"] --> B["2: 5 sec"]
    B --> C["3: BEEP"]
    C --> D["4: BEEP"]
The shower WC is only suitable for indoor use. The shower WC can be used for cleaning the anal area and for external cleaning of the vaginal area. It is intended exclusively for private use and is not suitable for commercial use. Only use the shower WC as described in this operating manual. Any other use is considered improper and may result in damage to property or even personal injury. The manufacturer or dealer does not accept any liability for damage caused by improper or incorrect use.
text_image
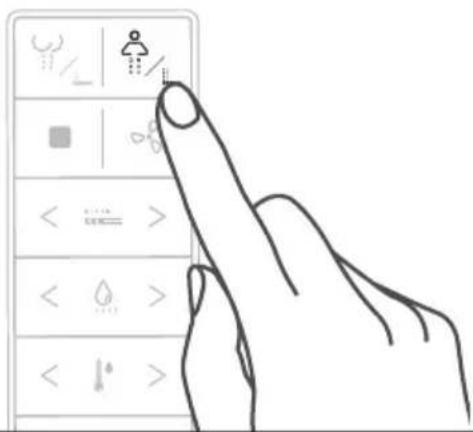
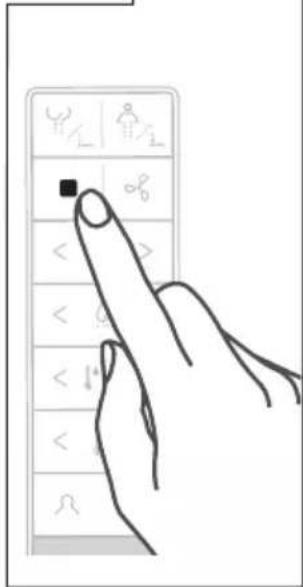
Hand gesture pointing at a control panel with icons for function keys and symbols
natural_image
Line drawing of a toilet sink with a drain and outlet, showing no text or symbols1x
text_image
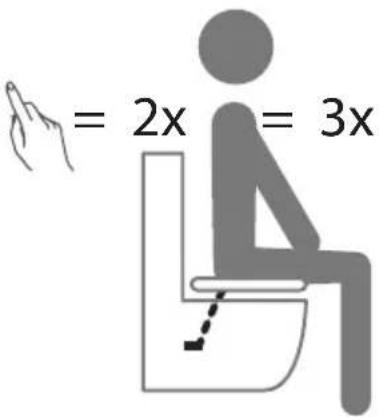
= 2x = 3x= Stop
text_image
top

= Stop
2
text_image
Hand interacting with a touchscreen device displaying icons and labels, including symbols like 'Diurea', 'Syringe', and 'Waterfall'.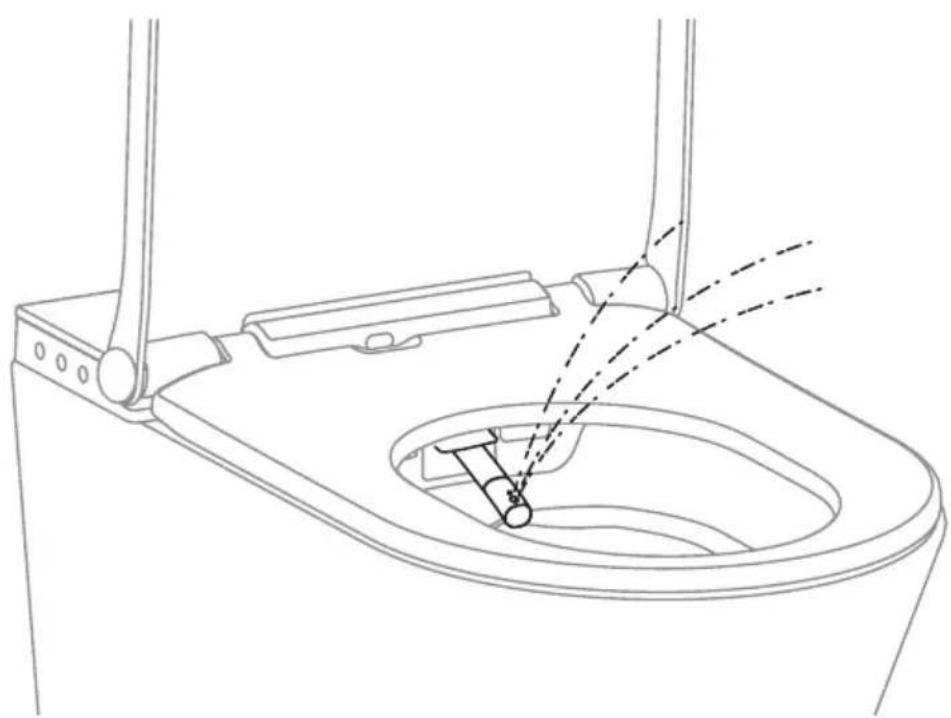
natural_image
Line drawing of a toilet sink with handrails and water spray, no text or symbols present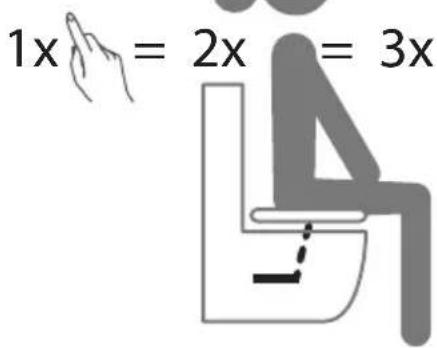
text_image
1x = 2x = 3x
text_image
= Stop
text_image
□ = Stop3
text_image
Hand interacting with a touchscreen device displaying icons for weather, humidity, and water symbols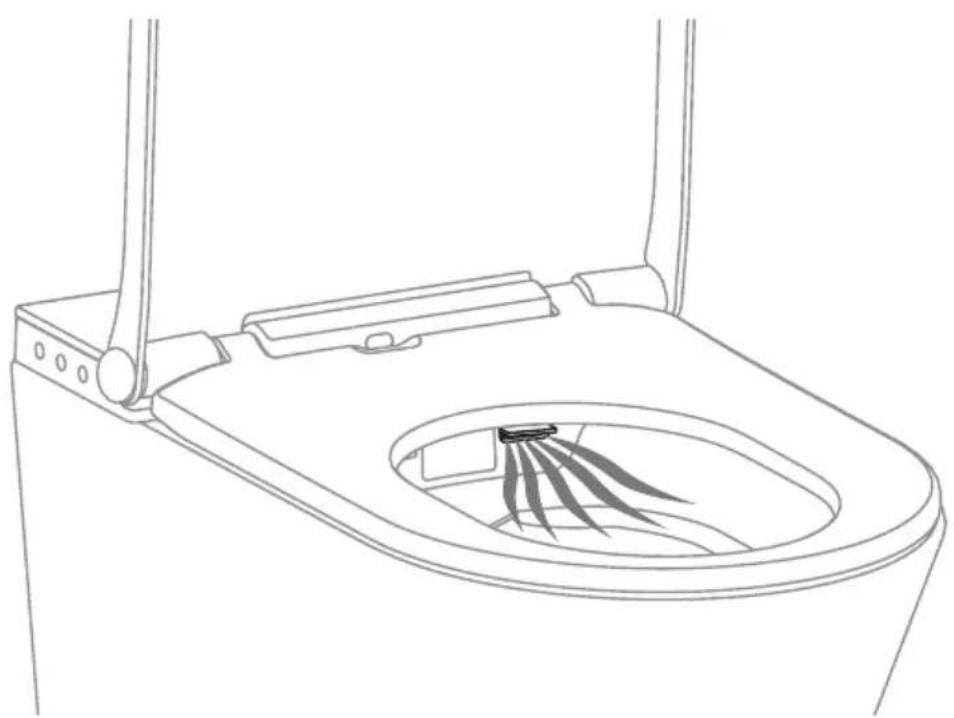
natural_image
Line drawing of a mechanical device with a central circular component and vertical supports (no text or symbols)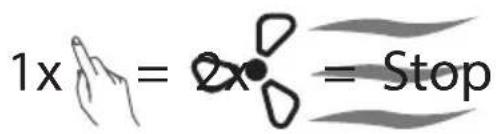
text_image
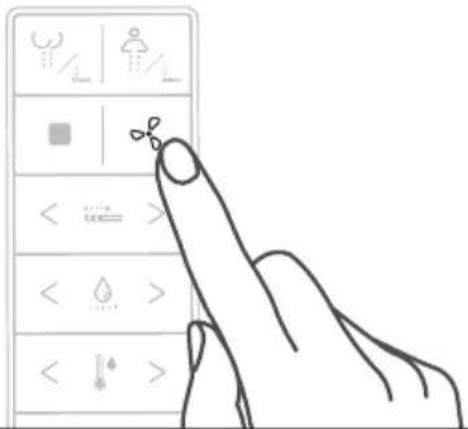
1x = 2x = Stop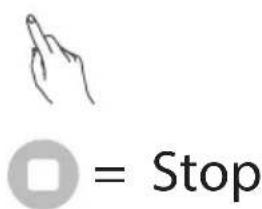
text_image
□ = Stop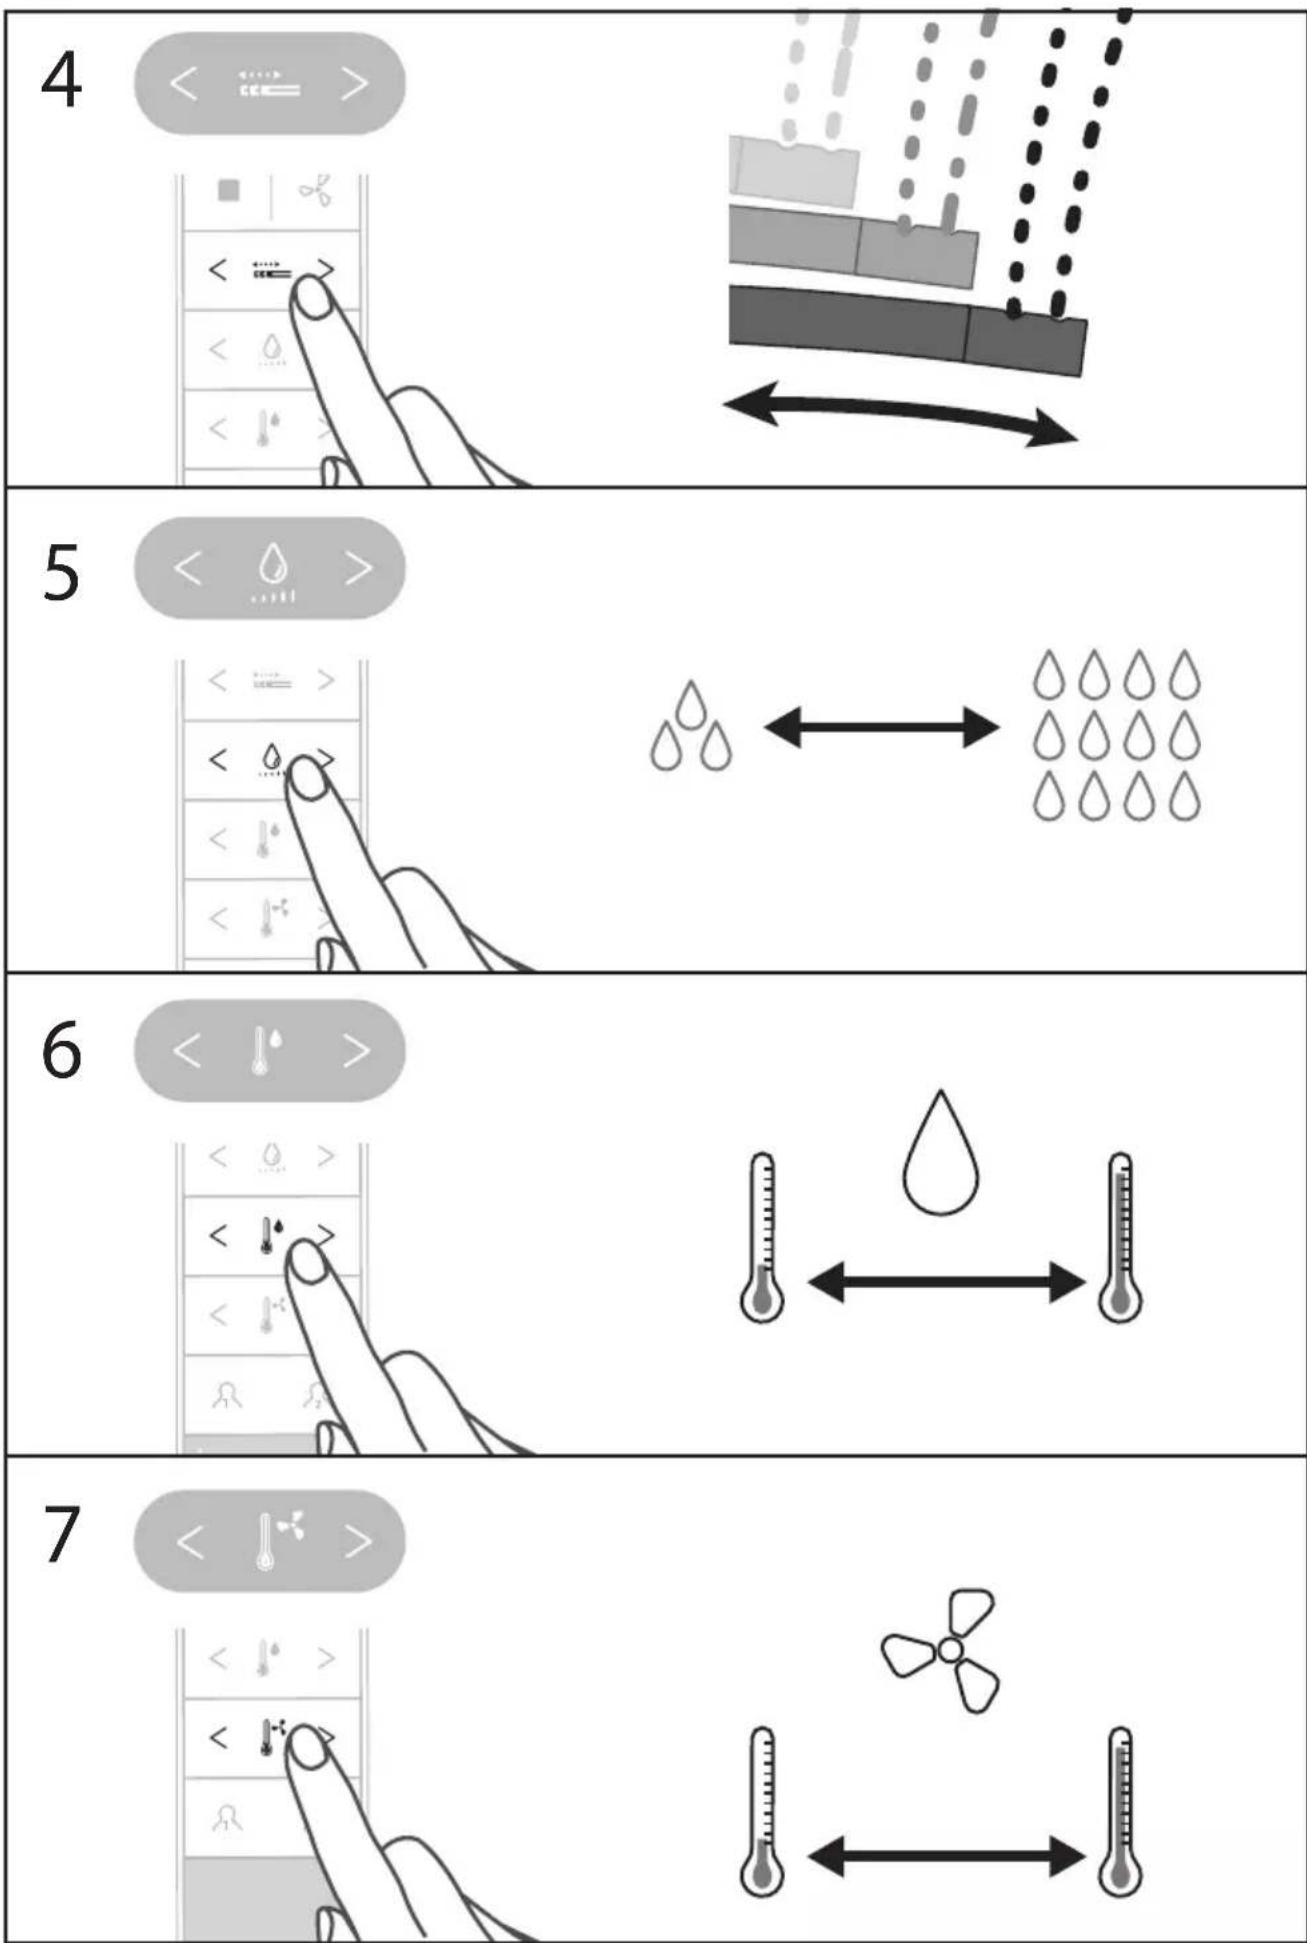

text_image
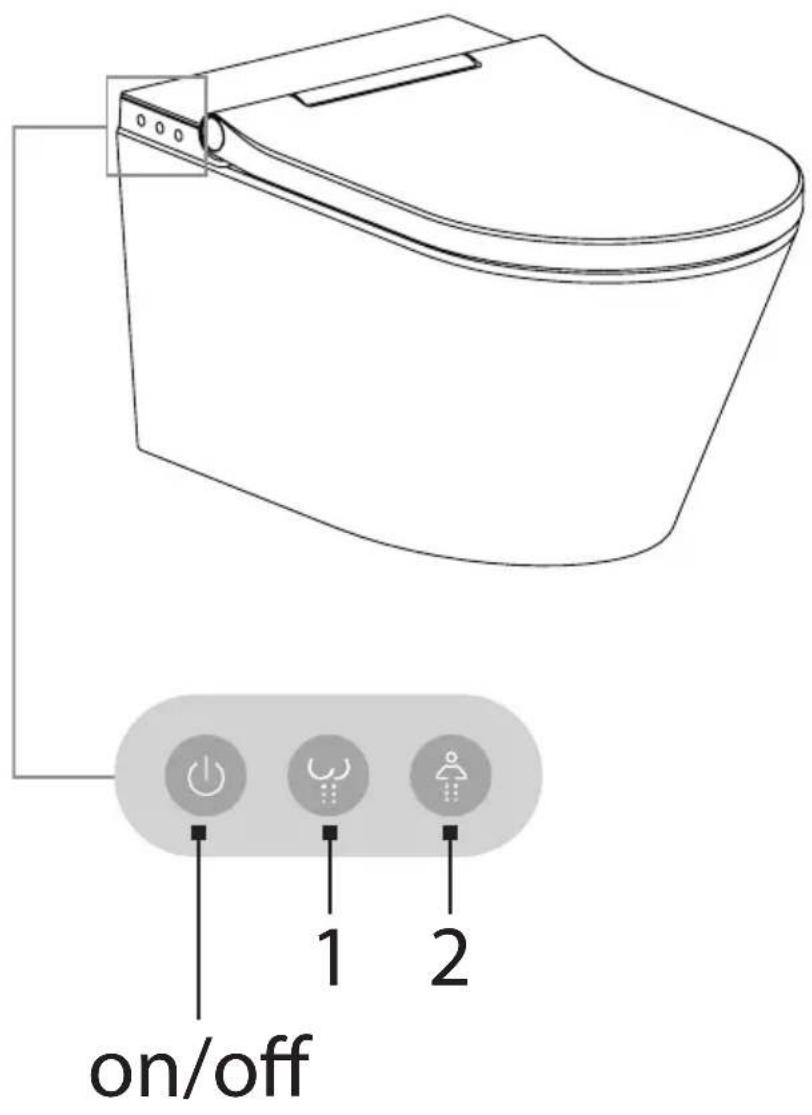
on/off 1 2
text_image
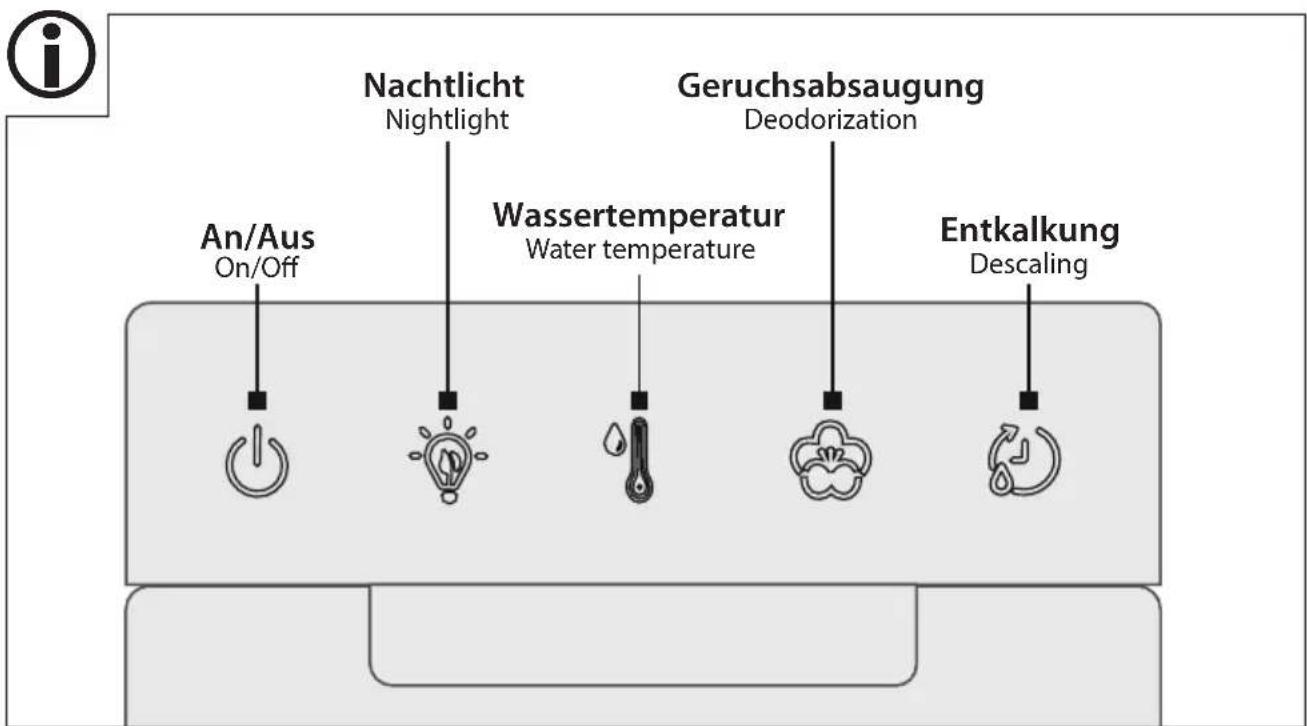
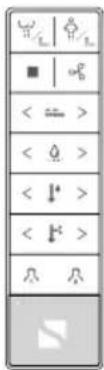
An/Aus On/Off Nachtlicht Nightlight Wassertemperatur Water temperature Geruchsabsaugung Deodorization Entkalkung DescalingDE Pflegeanleitung
This product requires special care. Therefore please pay attention to the following instructions:
- In order for the surfaces not to get scratched, wipe them only with soapy water and a soft sponge, and dry with a soft towel.
- CAUTION! Do not use any scouring agents, corrosive cleaning agents, disinfectants or sprays with aggressive additives. Handle chemical and cosmetic products with care, some of them can damage the surface of your WC seat!
- Do not use aggressive cleaning agents, brushes with metal or nylon bristles or metallic cleaning objects such as knives, hard spatulas and the like. These may damage the surfaces.
- If you use a sanitary cleaner to clean the toilet, flush it within 3 minutes, leaving the WC seat and lid open. Wipe off the cleaner residues in the WC bowl.
- The nozzle should be cleaned regularly and replaced if necessary.
- Do not insert any objects into the device openings!
HR Upute za njegu
Za ovaj proizvod potrebna je posebna njega. Molimo pridržavajte se zbog toga sljedećih napome- na:
- Kako se površina ne bi izgrebala, obrišite je samo s malo sapunice i mekanom spužvom i osušite s mekanom krpom.
- POZOR! Ne koristite abrazivna sredstva, nagrizajuća sredstva za čišćenje, sredstva za dezinfekciju ili sprejeve s agresivnim dodacima. Pažljivo postupajte s kemijskim i kozmetičkim proizvodima, pojedini mogu oštetiti površinu Vašeg WC sjedala!
- Ne koristite četke s metalnim ili najlonskim zubima kao i oštre ili metalne predmete za čišćenje kao što su nož, tvrda spatula i slično. Isti mogu oštetiti površinu.
- Kada za čišćenje toaleta koristite sredstvo za čišćenje sanitarija, isto saperite u roku od 3 minute i ostavite pri tome WC-sjedalo i poklopac otvorenim. Saperite ostatke sredstva za čišćenje u WC-umivaoniku.
- Mlaznica se treba redovno čistiti i eventualno zami- jeniti.
- Ne uvodite predmete u otvore uređaja!
- Check all the connections for leaks or visible damage at regular intervals.
- Do not operate the shower WC if there is visible damage or if the power cord or plug is defective. If the power cord of the shower WC is damaged, it must be replaced by the manufacturer, their customer service or a similarly qualified person in order to avoid hazards.
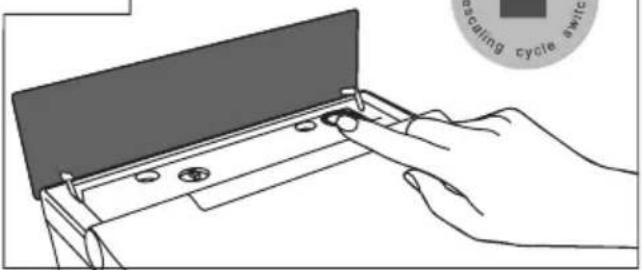
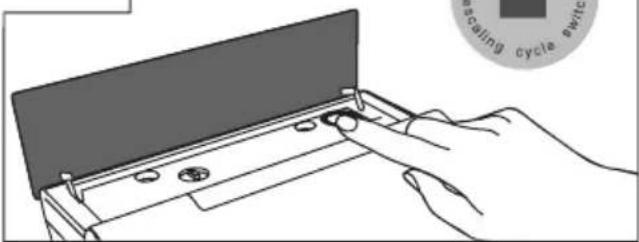
- Regular de-chalking of the unit is necessary to prevent damage. De-chalk your appliance at least every 3 months or when the display indicates that de-chalking is required. The warranty claim is voided if de-chalking is not carried out properly.
- Please note that the activated carbon filter is a wear part and should be replaced at least every 3 months or when suction is reduced. The warranty claim is voided if the replacement is not carried out properly.
HR Održavanje
- Provjerite u redovnim razmacima nepropustnost ili vidljiva oštećenja svih priključaka i spojeva.
- WC sa tušem nemojte koristiti, kada pokazuje vidljiva oštećenja ili je mrežni kabel odnosno mrežni utikač pokvaren. Kada je mrežni kabel WC-a sa tušem oštećen, mora ga zamijeniti proizvođač ili njegova servisna služba ili slično kvalificirana osoba, kako bi izbjegli oštećenja.
- Redovno uklanjanje kamenca iz uređaja je potrebno kako bi se izbjegla oštećenja. Uklonite kamenac iz Vašeg uređaja najmanje svaka 3 mjeseca ili kod prikaza uređaja. Kod nestručno izvedenog uklanjanja kamenca gubi se pravo na jamstvo.
- Molimo imajte u vidu, da je filtar za aktivni ugljen potrošni dio i da se treba zamijeniti najmanje svaka 3 mjeseca ili kod umanjenog usisavanja. Kod nestručno izvedene zamjene gubi se pravo na jamstvo.
HU Karbantartás
natural_image
Pure diagram of a mechanical component with no text, numbers, or symbols visible1
text_image
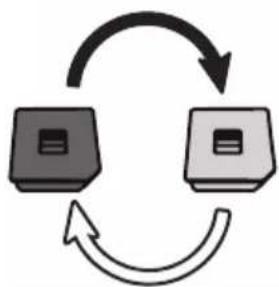
Diagram showing a hand pressing a component with a labeled 'scating cycle switch' icon on the right.2
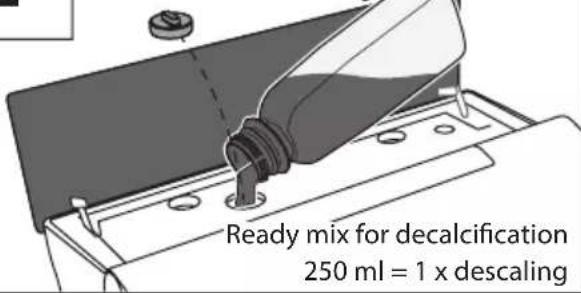
Fertigmischung zur Entkalkung
250 ml = 1 x Entkalkung
text_image
Ready mix for decalcification 250 ml = 1 x descaling3
text_image
Diagram showing a hand pressing a component with a magnified inset labeled 'scaying cycle switch' in the corner.4

natural_image
Simple analog clock face showing 3 o'clock with hour and minute hands (no numbers or text)12 min
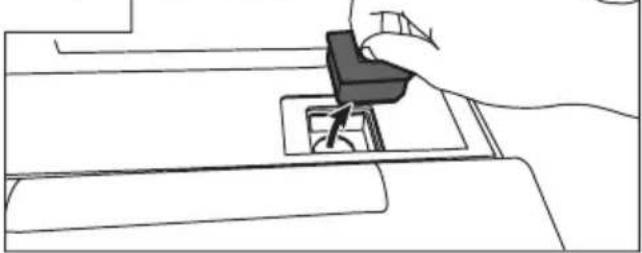
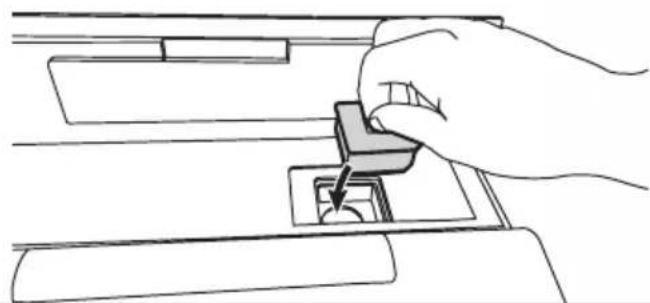
GERUCHSFILTER AUSTAUSCH
DEODORIZING DEVICE EXCHANGE
1
natural_image
Line drawing of a hand inserting a small component into a device (no text or symbols)2
flowchart
graph TD
    A["Block 1"] --> B["Block 2"]
    B --> A
    A --> C["Loop Back"]
    B --> C
    C --> A
3
natural_image
Line drawing of a hand inserting a small component into a device (no text or symbols)DÜSENREINIGUNG
NOZZLE CLEANING
1

min 5 sec!
text_image
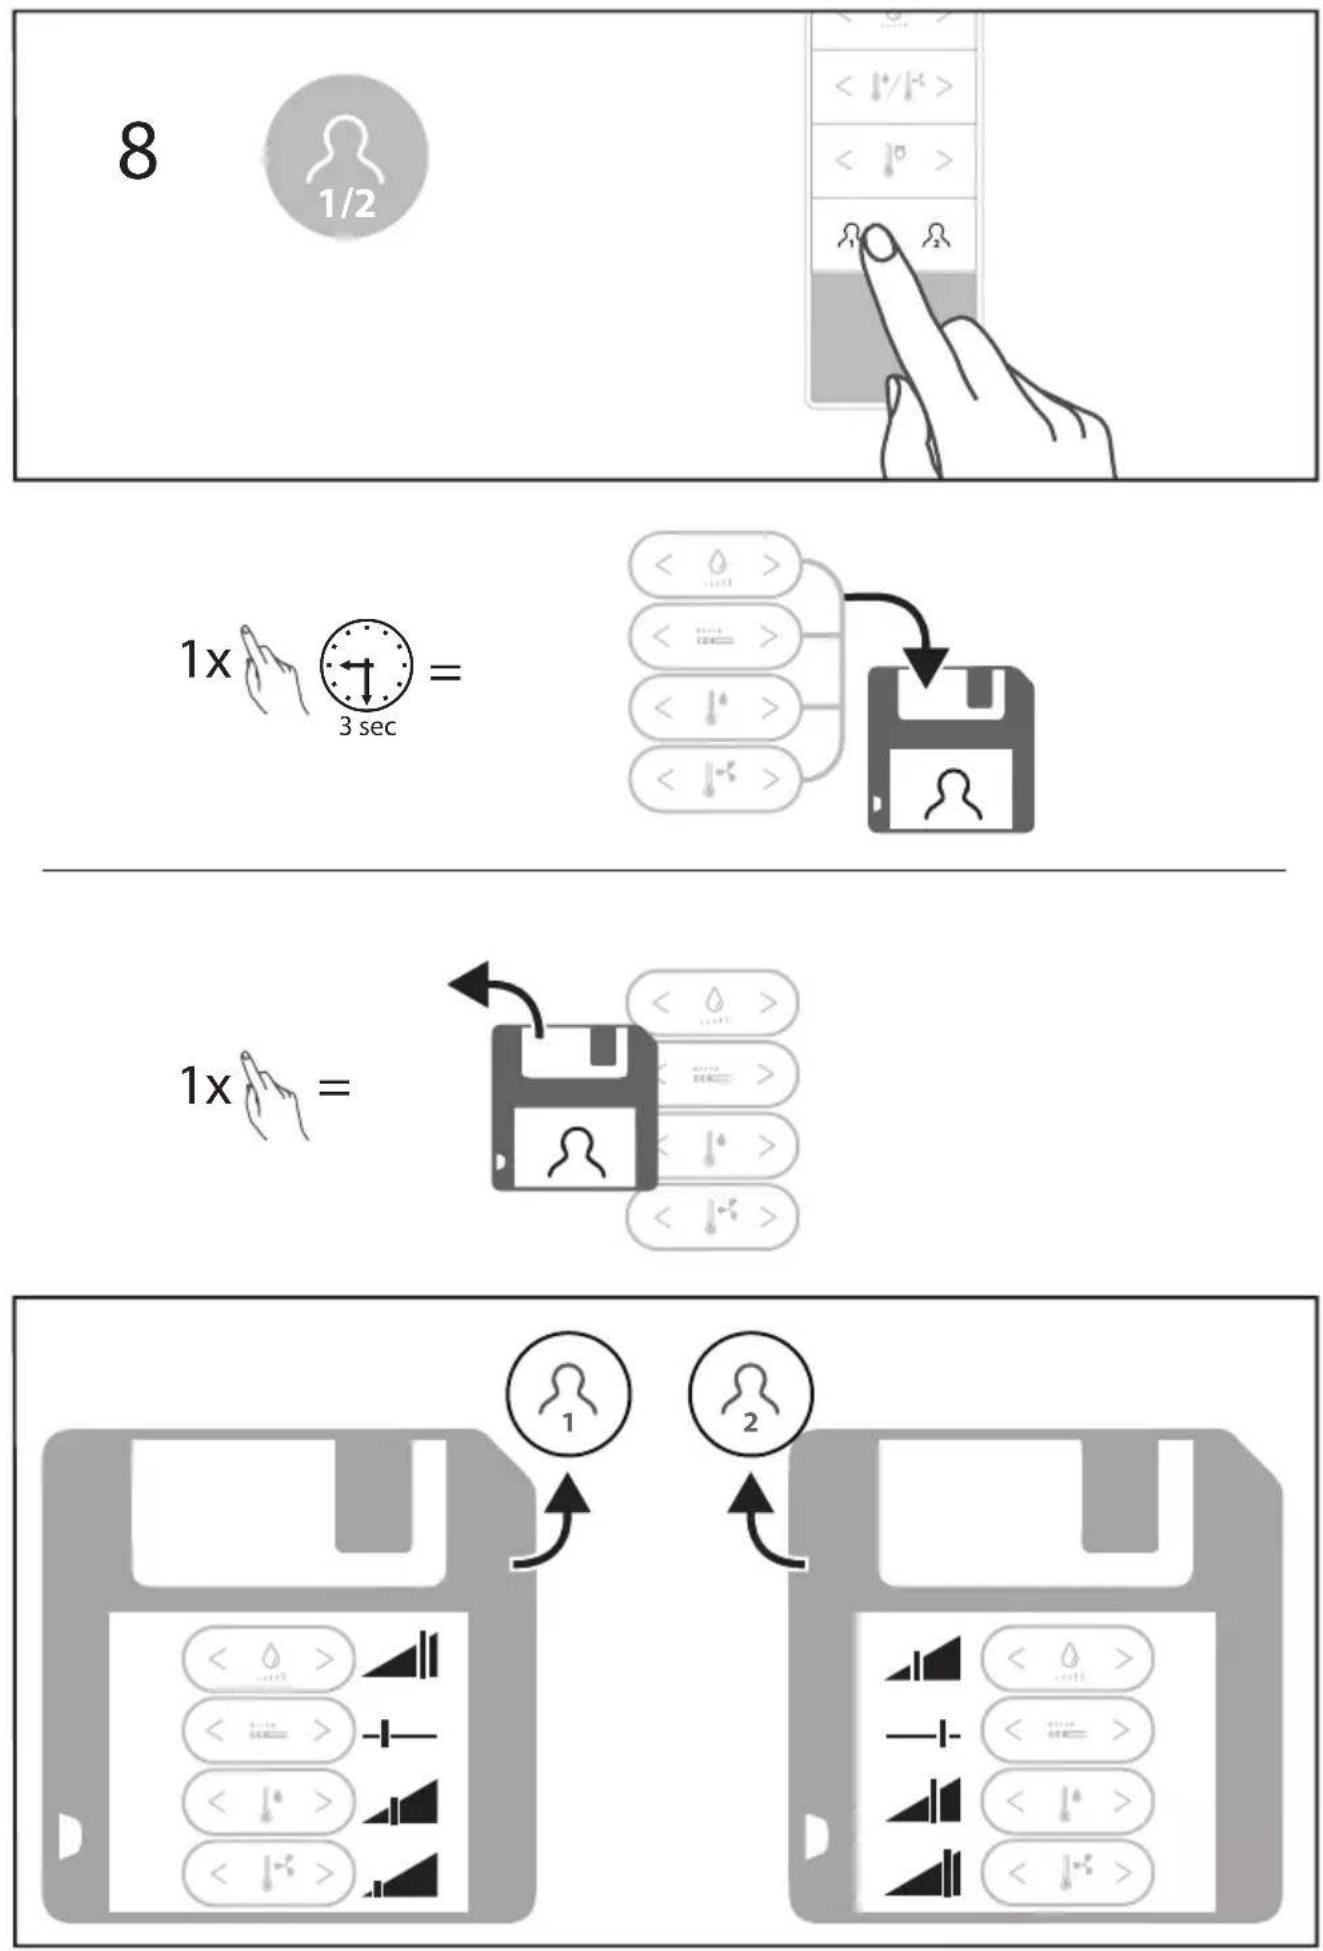
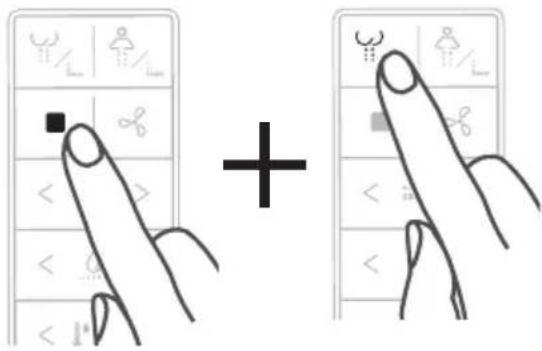
Diagram illustrating the addition of a finger to a computer screen with icons and labels, showing a plus sign.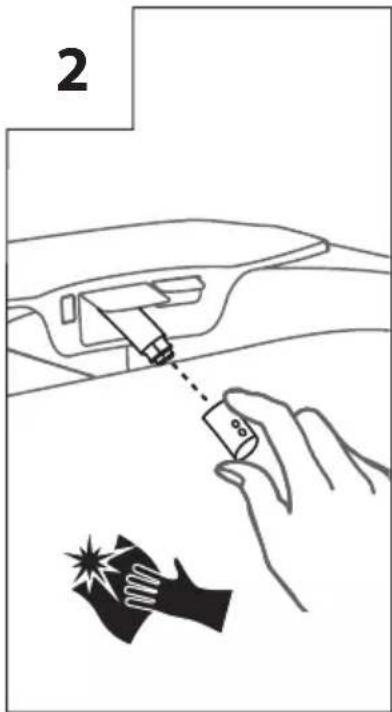
text_image
23
text_image
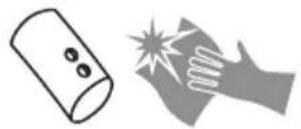
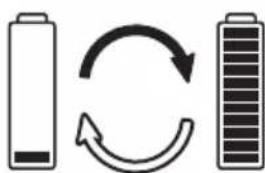
Illustration of a finger pressing a digital interface with icons for gender, gender, and medical symbolsBATTERIEWECHSEL
BATTERY CHANGE
natural_image
Three battery icons in sequence: one with a curved arrow indicating rotation, the other with an arrow and grid pattern (no text or symbols)1
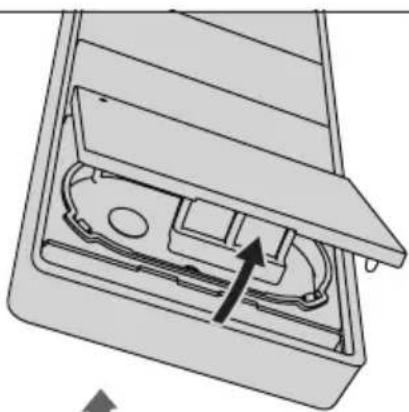
natural_image
Diagram of a device interior showing a lid, casing, and internal components with an arrow indicating direction (no text or symbols)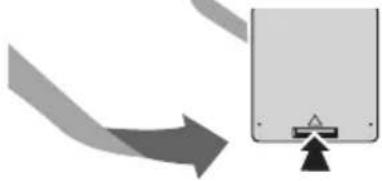
natural_image
Diagram showing a device with an arrow pointing to it, no text or symbols present2
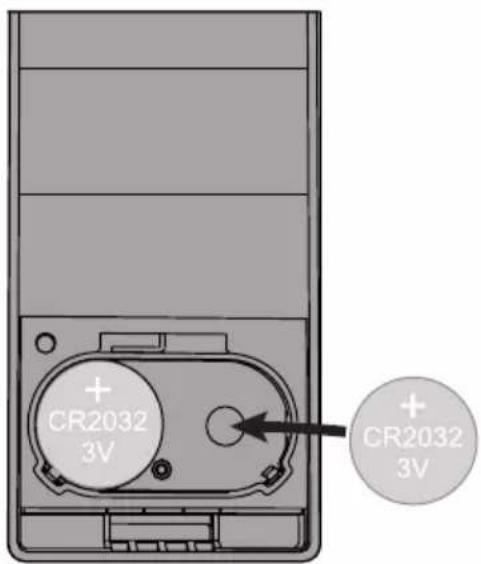
text_image
+ CR2032 3V + CR2032 3V- General recommendation: Switch off the unit at the main switch for about 5-10 minutes or pull the plug if possible.
- WARNING! Do not carry out any repairs or modifications to the product yourself. Otherwise, there is a risk of electric shock, overheating, permanent damage to the product, fire or a short-circuit!
In the following cases, it is essential that you contact the service department at the following address: Franz Joseph Schütte GmbH, Hullerweg 1, 49134 Wallenhorst/ Germany
- If the indicator light on the toilet body still does not light up but flashes after the power plug is plugged in again. (Switch off the unit at the main switch or pull the plug if possible).
- If the indicator light on the toilet is still off after switching the power supply back on (Please switch off the unit at the main switch or pull the mains plug if possible).
- If smoke or abnormal noises occur.
| Error Please check Troubleshooting | ||
| Basic functions | ||
| Shower WC does not work. | No voltage. Check the power supply. | |
| Plug not properly inserted. | Check that the power plug is inserted. | |
| The RESET button is not activated on the safety unit. | Activate the RESET button (grey) on the fuse unit in the connection cable. | |
| The shower WC is in standby mode. | Press the on/off switch under the glass cover. | |
| Water leaks at the bottom, or the side of the shower WC out of the housing of the technical unit. | Interrupt the water supply and disconnect the shower WC from the mains.Contact customer service. | |
| Remote control | ||
| The indicator light on the remote flashes continuously. | The batteries are almost depleted and should be replaced. | Replace the batteries. |
| Remote control | ||
| Remote control does not work. | Are batteries inserted? Insert batteries. | |
| Are the batteries depleted? Replace the batteries. | ||
| Are the batteries inserted correctly. | Insert the batteries with the correct polarity. | |
| Remote control defective. | Please contact customer service. | |
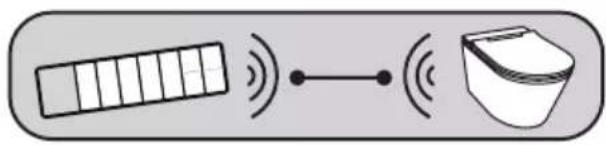
| When pressing a function button on the remote control there is no signal tone from the shower WC. | Link the remote control with the shower toilet again.Switch off the shower WC at the ON/OFF switch. Then press the stop button on the remote control for approx. 5 seconds, the LED starts flashing rapidly.Switch the shower WC back on.The remote control automatically connects to the shower WC, the LED stops flashing. | |
| Buttock shower / lady shower | ||
| Switching from rear shower to lady shower takes longer than usual. | Automatic recalibration and cleaning takes place during the transition. | Normal function, no trouble-shooting necessary. |
| Shower arm does not extend. | The water inlet hose is kinked at the WC (Fig. 20 - page 60). | Remove the kink in the water hose.Please contact customer service. |
| No water comes out of the shower arm. | The water supply is interrupted. | Restore the water supply. |
| The water intake at the connection valve is interrupted. | Open the water intake at the connection valve. | |
| Error Please check Troubleshooting | ||
| Buttock shower / lady shower | ||
| No water comes out of the shower arm. | The water inlet hose is kinked. | Remove the kink in the water hose.Please contact customer service. |
| The nozzle is blocked. | Clean the nozzle (see cleaning function page 83 in the operating instructions). | |
| The shower arm extends and retracts immediately after a signal tone. | Check the power supply. Restore the water supply. | |
| Water below the shower WC. | Switch off the shower WC at the ON/OFF switch, wait about 10 seconds and switch the shower WC on again. | |
| Check all connections of the water connection. | Reseal the connection. | |
| Check the drain valve in the water tank on the bottom of the technical unit. | Press the drain several times with a finger to remove dirt from the valve.If the drain valve continues to leak, contact customer service. | |
| The jet pattern of the shower arm is uneven. | Disconnect the device from the power supply and reconnect it.The device re-initializes itself.Please contact customer service. | |
| The water pressure is too low. | Water level is set to level 1. Switch to level 2, 3, 4 or 5*. | |
| Nozzle is blocked. | Clean the nozzle (see cleaning function page 83 in the operating instructions). | |
| Error Please check Troubleshooting | ||
| Buttock shower / lady shower | ||
| The water pressure is too low. | The water filter in the hose connection is dirty. | Clean the water filter. |
| The water inlet hos.e is kinked. | Remove the kink in the water hose.Please contact customer service. | |
| The water temperature is too low. | The water temperature is set to level 0 or 1*. | Set the water temperature to level 2, 3, 4 or 5*. |
| The water temperature is too high. | The water temperature is set to level 5*. | Set the water temperature to level 1, 2, 3 or 4*. |
| The water jet suddenly interrupts. | The shower function switches off automatically after 3 minutes. | Normal function, no troubleshooting necessary. |
| Water drips from the retracted shower arm. | The shower arm is automatically cleaned before and after use. | Normal function, no troubleshooting necessary. |
| Connect to hot water pipe. | Check if the hot water pipe is connected. | Must be connected to cold water supply. |
| Warm air dyer | ||
| No function. | The user was not detected by the seat sensor. | Change your sitting position. |
| Temperature of the hot air dryer is too cold. | The water temperature is set to level 1.* | Set the water temperature to level 2, 3, 4 or 5*. |
| Temperature of the hot air dryer is too hot. | The water temperature is set to level 5.* | Set the water temperature to level 1, 2, 3 or 4*. |
| Odour extraction | ||
| No or reduced function. | Activated carbon filter is blocked. | Replace the activated carbon filter. |
| Odour extraction makes unusual noises. | Activated carbon filter is blocked. | Replace the activated carbon filter. |
- First disconnect the power supply, then the water supply before removing the product.
- Watch out for leaking residual water.
- Carry out the dismantling in reverse order of the installation instructions.
HR Isključivanje
- Prekinite prvo dovod struje, nakon toga dovod vode prije demontaže proizvoda.
- Pazite na preostalu vodu koja curi.
- Izvedite demontažu u obrnutom redoslijedu uputa za montažu.
To protect your shower WC from damage during transport, it is delivered in solid packaging. The packaging is made of recyclable materials. Dispose of them in an environmentally friendly manner. Do not dispose of the product in normal household waste at the end of its service life, but ask your local authority about environmentally friendly disposal options.
Declaration of conformity
We hereby declare that the listed shower WC complies with the requirements of the EU and EC directives valid at the time of issue. The full text of the EU Declaration of Conformity is available under the following link: web.fjschuette.de/konformitaetserklaerung/CE-Konformitaetserklaerung_Dusch-WC.pdf
The illustrations are for visual representation, deviations from the product are possible. Subject to technical changes.
HR Odlaganje
Za zaštitu od transportnih oštećenja Vaš WC sa tušem je isporučen u solidnom pakiranju. Pakiranje sa sastoji od materijala koji se može reciklirati. Odložite ih na ekološki prihvatljiv način.
Nakon isteka vijeka trajanja proizvoda ne odložite ga u normalni kućni otpad, već se raspitajte kod Vaše komunalne uprave o mogućnostima ekološkog odlaganja.
CE
Izjava o sukladnosti
Izjavljujemo, da navedeni WC tuš odgovara zahtjevima EU-smjernica koje važe u vrijeme izdavanja. Potpuni tekst EU-izjave o usklađenosti dostupan je pod sljedećom poveznicom: web.fjschuette.de/konformitaetserklaerung/CE-Konformitaetserklaerung_Dusch-WC.pdf
① Slike služe samo radi ilustracije, moguća su odstupanja od proizvoda. Tehničke izmjene pridržane.