
18110001 - Coffee machine Gastronoma - Free user manual and instructions
Find the device manual for free 18110001 Gastronoma in PDF.
| Product type | Espresso machine |
| Brand | Gastronoma |
| Model | 18110001 |
| Dimensions (approx.) | 30 x 25 x 35 cm |
| Weight (approx.) | 5 kg |
| Power supply | 230 V, 50 Hz |
| Water tank capacity | 1,2 L |
| Pump pressure | 15 bar |
| Main functions | Espresso 1 or 2 cups, milk froth, hot water |
| Coffee type | Ground coffee suitable for espresso (medium-fine grind) |
| Control display | With pressure gauge and indicator lights |
| Included accessories | Filters for 1 and 2 cups, funnel, filter holder, measuring spoon |
| Maintenance and cleaning | Manual cleaning of removable parts, regular descaling with acetic acid |
| Safety instructions | Do not use with timer, supervise children, unplug before cleaning |
| Country of manufacture | China |
| Warranty | Conditional (proper use, no modification) |
| Repairability | Have repaired by an authorized repairer |
| Recycling | Do not dispose of with household waste, follow the WEEE directive |
Frequently Asked Questions - 18110001 Gastronoma
User questions about 18110001 Gastronoma
0 question about this device. Answer the ones you know or ask your own.
Ask a new question about this device
Download the instructions for your Coffee machine in PDF format for free! Find your manual 18110001 - Gastronoma and take your electronic device back in hand. On this page are published all the documents necessary for the use of your device. 18110001 by Gastronoma.
USER MANUAL 18110001 Gastronoma
natural_image
Technical line drawing of a mechanical device with no visible text or symbolsnatural_image
Technical line drawing of a mechanical lever assembly (no text or symbols)natural_image
Technical line drawings of two espresso machines side by side, showing internal gauges and handle mechanisms (no text or labels)text_image
Technical diagram of a coffee maker with labeled parts and rotation arrow indicating rotation directionnatural_image
Technical line drawing of a mechanical device with no visible text or symbolsnatural_image
Technical line drawing of a mechanical lever assembly (no text or symbols)natural_image
Technical line drawings of two espresso machines side by side, showing different mechanical designs (no text or labels)text_image
Technical diagram of a coffee maker with labeled parts and rotation arrow indicating rotational motiontext_image
Technical diagram of a coffee maker with numbered parts and a close-up of its internal components.PÄÄOSAT
natural_image
Technical line drawing of a mechanical device with no visible text or symbolsnatural_image
Line drawing of a mechanical lever assembly (no text or symbols)natural_image
Technical line drawings of two espresso machines side by side, showing different mechanical designs (no text or labels)text_image
Technical diagram of a coffee maker with labeled parts and rotation arrow indicating rotational motionTo get the best out of your new espresso maker, please read through these instructions carefully before using it for the first time. Take particular note of the safety precautions. We also recommend that you keep the instructions for future reference.
GENERAL SAFETY INSTRUCTIONS
- This appliance may only be used by children aged from 8 years and above and persons with reduced physical, sensory or mental capabilities or lack of experience and knowledge if they are supervised or have been given instructions concerning use of the appliance in a safe way and understand the hazards involved. Children must not play with
the appliance.
Cleaning and user maintenance must not be performed by children without supervision.
- Keep the appliance under constant supervision while in use. Keep an eye on any children in the vicinity of the appliance when it is in use. The appliance is not a toy.
- Incorrect use of this appliance may cause personal injury or damage the appliance.
- Use for its intended purpose only. The manufacturer is not responsible for any injury or damage resulting from incorrect use or
UK
handling (see also Warranty Terms).
- For domestic use only. Not for outdoor or commercial use.
- Remove all packaging and transport materials from the inside and outside of the appliance.
- Check that the appliance has no visible damage and that no parts are missing.
- Do not use with any cords other than that supplied.
- Check that it is not possible to pull or trip over the cord or any extension cord.
- The appliance must not be used together with a timer switch
or a separate remote control system.
- Turn off the appliance and remove the plug from the socket before cleaning, or when the appliance is not in use.
- Avoid pulling the cord when removing the plug from the socket. Instead, hold the plug.
- Keep the cord and appliance away from heat sources, hot objects and naked flames.
- Ensure that the cord is fully extended.
- The cord must not be twisted or wound around the appliance.
UK
- Check regularly that neither the cord nor plug is damaged and do not use the appliance if there is any damage, or if it has been dropped on the floor, dropped in water or damaged in any other way.
- If the appliance, cord or plug has been damaged, have the appliance inspected and if necessary repaired by an authorised repairer.
- Connect to 230 V, 50 Hz only. The warranty is not valid if the appliance is connected to incorrect voltage.
- Never try to repair the appliance yourself. Please
contact the store where you bought the appliance for repairs under warranty.
- Unauthorised repairs or modifications will invalidate the warranty.
- Caution! Some parts of this appliance can become very hot and cause burns. Particular attention should be paid where children and vulnerable people are present.
- Keep the appliance and its cord out of reach of children aged less than 8 years.
SPECIAL SAFETY INSTRUCTIONS
- The appliance must not be used with any equipment other than the equipment provided.
- Be careful not to burn yourself when using the appliance.
• Always place the appliance on a dry, level, firm and heat-resistant surface well away from any edges. - The appliance must not be built into a cupboard or similar.
- Do not switch the appliance on unless there is water in it. Do not switch the appliance off during the brewing process.
UK
- Please note that the appliance will remain hot for a while after you switch it off.
Always allow it to cool completely before you put it away or clean it. - If the water in your area is very hard, the appliance will need descaling regularly.
PRIOR TO FIRST USE
Before using the appliance for the first time (or after a long period of storage), wash the removable parts in hot soapy water and dry thoroughly.
SUITABLE COFFEE
Use ground coffee suitable for espresso machines, or grind whole coffee beans medium-fine in a coffee grinder.
If you use too finely ground coffee, it may penetrate the filter into the coffee.

UK
text_image
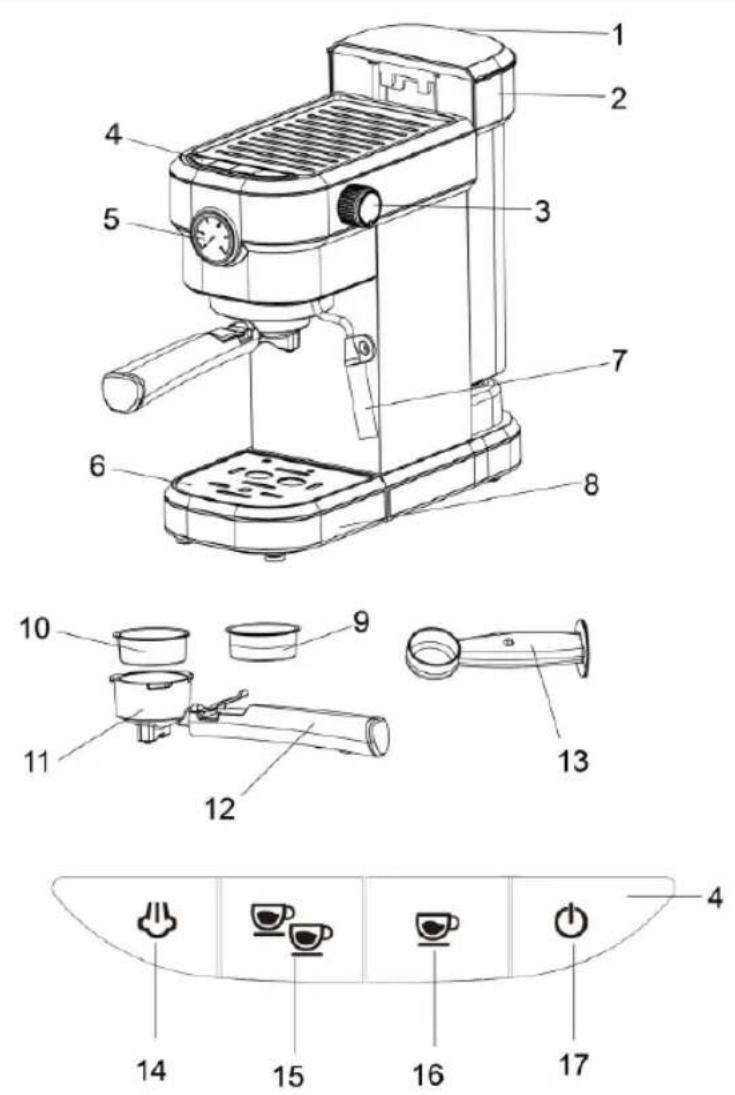
Technical diagram of a coffee maker with numbered parts and a control panel showing coffee cup, tray, and buttons.MAIN COMPONENTS
- Lid for water reservoir
- Water reservoir
- Selector knob
- Control panel
- Manometer
- Grille
- Steam pipe
- Drip tray
-
Filter for 1 cup
-
Filter for 2 cups
- Funnel
- Filter holder
- Coffee spoon
- Milk foam button
- Button for 2 cups
- Button for 1 cup
- On/Off button
UK
- Pour water into the reservoir (2) up to the MAX mark. Put the lid (1) on.
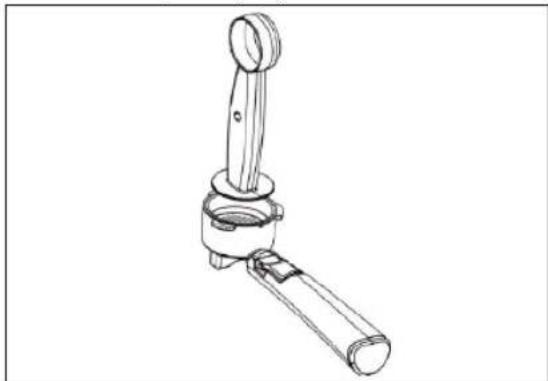
- Insert the filter (9 or 10) into the funnel (11). Attach and secure the funnel onto the bracket on the appliance by turning the filter holder to position 🔒.
natural_image
Technical line drawing of a mechanical device with no visible text or symbolsPlace a cup under the funnel's spouts.
- Plug in. Switch on the appliance using the on/off button (17). The appliance beeps and the indicator lights in the buttons (15, 16) flash 1 time, after which the appliance begins to warm up.
Make sure that the selector knob is in position ○ (3). If it is in position, the indicator lights in all 4 buttons (14, 15, 16, 17) will flash and the appliance cannot be started.
-
Once the indicator lights in the buttons (15, 16) are permanently lit, press the button for 1 cup (16) and allow the appliance to run water through without coffee beans to clean the system.
-
Once the system has been flushed, the appliance is ready for use.
BREWING ESPRESSO
- Preheat the appliance as described above.
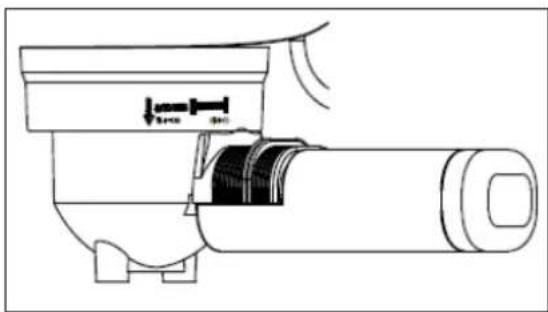
- Insert the filter for 1 or 2 cups (9, 10) into the funnel (11). Fill the inserted filter with ground coffee and tamp the coffee down using the end of the coffee spoon (13).
natural_image
Technical line drawing of a mechanical lever assembly (no text or symbols)- Insert the funnel (11) with the filter (9, 10) into the filter holder (12) and secure the funnel in the bracket on the appliance by turning the filter holder to position 🔒. Place a cup or two cups under the funnel's spouts.
natural_image
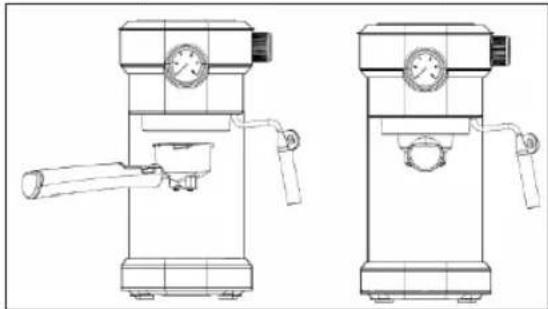
Technical line drawings of two espresso machines side by side, showing front and side views with no text or symbols.- Once the indicator lights in the buttons (15, 16) are permanently lit, press the button for 1 cup (16) or the button for 2 cups (15). The appliance brews the selected quantity of espresso.
UK
Memory function for cup size
If you press and hold the button for 1 or 2 cups (15, 16) while you brew espresso, you can save the cup size in the appliance's memory by releasing the button again once the desired amount of espresso has been brewed. One beep will be heard, and the brewing time will be saved in the memory.
The maximum brewing time is 60 seconds. If the brewing time is too short, it will not be stored in the memory.
You can reset the memory by pressing the 1 cup button (16) and the milk foam button (14) for 3 seconds until you hear 1 beep.
FOAMING THE MILK
- Press the milk foam button (4) once the appliance is turned on and warmed up.
- Pour cold milk into a cafe latte glass (approximately 1/3 of the volume of the glass), and insert the steam pipe (7) approximately 1 cm into the milk.
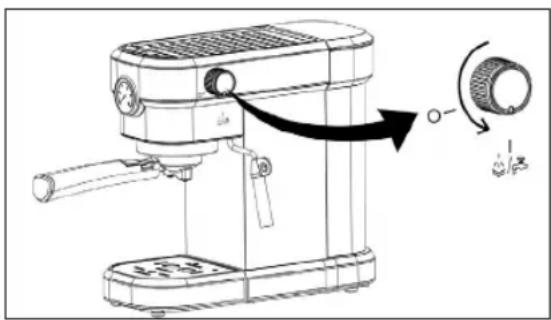
- Slowly turn the selector knob (3) to position until steam comes out of the steam pipe (7). Once the milk temperature reaches about 75^ C, the milk will start to foam. Make sure you do not burn yourself on the steam that is emitted!
text_image
Technical diagram of a coffee maker with labeled parts and a rotation arrow indicating rotational motion- Turn the selector knob back to the original position and press the milk foam button (14) to stop foaming.
- You can also make hot water by inserting the steam pipe (7) into an empty glass. Press On/Off button (17) to switch on the appliance, When the indication lights in button (14 & 15) light on constant, turn the knob (3) to position 🔊. The hot water will then flow out.
COOLING
The appliance may get too hot to make espresso when you have been foaming milk or making hot water. In that case, indicator lights in the 1 and 2 cups buttons (15, 16) will flash. The appliance needs to be cooled.
Put a cup under the steam pipe, and slowly turn the selector knob (3) to position 12 to allow the appliance to release hot water and steam. When the indicator lights flash slowly, the appliance is sufficiently cool. You can turn the selector knob back to the original position and brew espresso again.
CLEANING
Unless clearly specified in the cleaning instructions below, please note that none of the parts of this appliance are dishwasher safe.
Before cleaning, remove the plug from the wall socket and allow the appliance to cool down.
- Remove the filter holder (12), take the funnel (11) and the filter (9, 10) out and empty the filter. Rinse the filter and funnel under running water. Ensure that all traces of ground coffee are washed away.
UK
• Empty and wash the drip tray.
- Wipe the exterior of the appliance with a well-wrun cloth.
- Empty the water reservoir if the appliance is not going to be used any more that day.
DESCALING
The lime content of ordinary tap water means limescale may gradually be deposited inside the espresso maker. This limescale may be loosened using acetic acid (NOT ordinary vinegar) or descaler, available in supermarkets, etc.
-
Pour acetic acid (1 part acetic acid to 3 parts water) or descaler (dissolved as per instructions) in the water reservoir.
-
Fill the water reservoir with clean, cold water. Insert the filter holder without the filter.
- Switch the appliance on.
- Fill 2 cups with the solution and empty them.
- Allow the appliance to make steam in a cup for 2 minutes. Empty the cup.
- Switch the appliance off and allow it to stand for 15 minutes.
- Repeat steps 3-6 at least 3 times.
- Empty and rinse the water reservoir thoroughly.
- Repeat steps 2-5 at least 3 times so that the pipes are rinsed through.
TROUBLESHOOTING
| Problem Cause Solution | ||
| No water or steam comes out. | 1. There is no water in the reservoir.2. The appliance is not warmed up.3. The steam pipe is blocked. | 1. Fill with water.2. Allow the appliance to warm up.3. Clean the steam pipe with a piece of thin wire. |
| There is no foam (crema) on the espresso. | 1. The coffee is ground too coarsely or not tamped down enough. | 1. Use finer ground coffee, and tamp it down thoroughly. |
| The milk does not foam properly. | 1. The milk is not suitable for foaming.2. The appliance is not warm enough. | 1. Use whole milk only.2. Allow the appliance to warm up. |
| Espresso cannot be brewed and the indicator lights in the 1 cup button and the milk foam button flash. | 1. The appliance is too hot. | 1. Allow the appliance to cool down see (“Cooling”). |
UK
INFORMATION ON DISPOSAL AND RECYCLING OF THIS PRODUCT
Please note that this Commaxx product is marked with this symbol:

This means that this product must not be disposed of along with ordinary household waste, as electrical and electronic waste must be disposed of separately.
According to the WEEE directive, every member state must ensure correct collection, recovery, handling and recycling of electrical and electronic waste. Private households in the EU can take used equipment to special recycling stations free of charge.
In some member states you can in certain cases return used equipment to the retailer from whom you purchased it, if you are purchasing new equipment. Contact your retailer, distributor or the municipal authorities for further information on what to do with electrical and electronic waste.
WARRANTY TERMS
The warranty does not apply:
- if the above instructions have not been followed
- if the appliance has been interfered with
- if the appliance has been mishandled, subjected to rough treatment, or has suffered any other form of damage
- if the appliance is faulty due to faults in the electricity supply.
Due to the constant development of our products in terms of function and design, we reserve the right to make changes to the product without prior warning.
QUESTIONS AND ANSWERS
If you have any questions regarding the use of the appliance and cannot find the answer in this user guide, please try our website at www.commaxx.nl.
You can also see contact details on our website if you need to contact us for technical questions, repairs, accessories or spare parts.
MANUFACTURED IN CHINA FOR
Commaxx B.V.
Wiebachstraat 37,
NL-6466 NG Kerkrade
Netherlands
www.commaxx.nl
We cannot be held responsible for any printing errors.
DE
EINLEITUNG
natural_image
Technical line drawing of a mechanical device with no visible text or symbolsBRÜHEN EINES ESPRESSO
natural_image
Line drawing of a mechanical lever assembly (no text or symbols)natural_image
Technical line drawings of two espresso machines with gauges and lever arms (no text or labels)text_image
Technical diagram of a coffee maker with labeled parts and a rotation arrow indicating rotational motionnatural_image
Technical line drawing of a mechanical device with no visible text or symbolsnatural_image
Line drawing of a mechanical lever assembly (no text or symbols)natural_image
Technical line drawings of two espresso machines with gauges and lever arms (no text or labels)text_image
Technical diagram of a coffee maker with labeled parts and directional arrow indicating rotation or adjustmentCONDITIONS DE LA GARANTIE
natural_image
Technical line drawing of a mechanical device with no visible text or symbolsnatural_image
Technical line drawing of a mechanical lever assembly (no text or symbols)natural_image
Technical line drawings of two espresso machines side by side, showing different mechanical designs (no text or labels)text_image
Technical diagram of a coffee maker with labeled components and a rotation arrow indicating rotational motion.natural_image
Technical line drawing of a mechanical device with no visible text or symbolsnatural_image
Line drawing of a mechanical lever assembly (no text or symbols)natural_image
Technical line drawings of two espresso machines with gauges and lever arms (no text or labels)text_image
Technical diagram of a coffee maker with labeled parts and directional arrow indicating rotation or adjustment.natural_image
Technical line drawing of a mechanical device with no visible text or symbolsnatural_image
Technical line drawing of a mechanical lever assembly (no text or symbols)natural_image
Technical line drawings of two espresso machines side by side, showing internal components and control knobs (no text or labels)text_image
Technical diagram of a coffee maker with labeled components and a rotation arrow indicating rotational motion.WYPRODUKOWANO W CHINACH DLA
Commaxx B.V.
Wiebachstraat 37,
NL-6466 NG Kerkrade
Netherlands
www.commaxx.nl