18210002 - Hand blender Gastronoma - Free user manual and instructions
Find the device manual for free 18210002 Gastronoma in PDF.

| Product Type | Hand Blender |
| Brand | Gastronoma |
| Model | 18210002 |
| Power | 600 W |
| Voltage | 220-240 V ~ 50/60 Hz |
| Speed Settings | Variable speed with turbo boost |
| Blade Material | Stainless steel |
| Shaft Material | Stainless steel |
| Housing Material | Plastic and stainless steel |
| Accessories Included | Whisk attachment, measuring beaker (800 ml) |
| Dimensions (L x W x H) | 40 x 7 x 7 cm (approx.) |
| Cable Length | 1.2 m |
| Weight | 0.8 kg |
| Dishwasher Safe Parts | Yes (blade shaft and whisk) |
| Safety Features | Overheat protection, motor shut-off |
| Warranty | 2 years |
| Primary Functions | Blending, pureeing, whisking, emulsifying |
| Cleaning | Detachable shaft for easy cleaning |
| Repairability | Spare parts available; motor unit serviceable |
Frequently Asked Questions - 18210002 Gastronoma
User questions about 18210002 Gastronoma
0 question about this device. Answer the ones you know or ask your own.
Ask a new question about this device
Download the instructions for your Hand blender in PDF format for free! Find your manual 18210002 - Gastronoma and take your electronic device back in hand. On this page are published all the documents necessary for the use of your device. 18210002 by Gastronoma.
USER MANUAL 18210002 Gastronoma
UK Rechargeable stick mixer set 38
DE Schnurloses Stabmixer-Set 47
www.adexi.eu
DK
INDLEDNING
text_image
Labeled diagram of a cleaning or cleaning device with numbered parts including a hand tool, digital brush, and cleaning unit.APPARATETS DELE
natural_image
Diagram showing a device connected to a terminal block with a cable, no text or symbols presentnatural_image
Line drawing of a digital brush with a top, side, and base views showing a rotation and sound wave (no text or symbols)DK
BRUG SOM PISKERIS
natural_image
Diagram showing a digital brush and its mixing process, no text or symbols presentBRUG SOM MINIHAKKER
natural_image
Exploded view diagram of a hairbrush and its internal components (no text or labels)DK
RENG∅RING
text_image
Labeled diagram of a cleaning or cleaning device with numbered parts including a hand tool, digital brush, and a container.HOVEDDELER
natural_image
Diagram showing a device connected to a terminal block with a cable, no text or symbols presentnatural_image
Line drawing of a digital brush with a base and top, showing a step-by-step transformation from the brush to a cup (no text or symbols present)NO
BRUK SOM VISP
natural_image
Diagram showing a digital brush and its mixing process, no text or symbols presentBRUK SOM MINIHAKKER
natural_image
Line drawing of a hairbrush with three views: top, front, and side (no text or symbols)NO
RENGJ∅RING
text_image
Labeled diagram of a cleaning or cleaning device with numbered parts including a hand tool, digital brush, and cleaning unit.APPARATENS DELAR
natural_image
Diagram showing a cable being inserted into a terminal device (no text or symbols present)natural_image
Line drawing of a digital brush with a base and top, showing the process from top to bottom (no text or symbols)SE
ANVÄNDA SOM VISP
natural_image
Diagram showing a digital brush and its mixing process, no text or symbols presentSE
ANVÄNDA SOM EN MINIHACKARE
natural_image
Exploded view diagram of a hairbrush and its internal components (no text or labels)SE
RENGÖRING
text_image
Labeled diagram of a cleaning or cleaning device with numbered parts including a hand tool, digital brush, and cleaning unit.PÄÄOSAT
natural_image
Diagram showing a device connected to a terminal block with a cable, no text or symbols presentnatural_image
Line drawing of a digital brush with a base and top, showing a step-by-step transformation from the brush tip to the base (no text or symbols present)FI
VISPILÄN KÄYTTÖ
natural_image
Diagram showing a digital brush and its mixing process, no text or symbols presentFI
KÄYTTÖ TEHOLEIKKURINA
natural_image
Line drawing of a hairbrush with three views: top, front, and side (no text or symbols)PUHDISTUS
To get the best out of your new cordless stick mixer set, please read this user guide carefully before using it for the first time. Take particular note of the safety precautions. We also recommend that you keep the instructions for future reference, so that you can refer to them at a later date.
GENERAL SAFETY INSTRUCTIONS
- This appliance may only be used by children aged from 8 years and above and persons with reduced physical, sensory or mental capabilities or lack of experience and knowledge if they are supervised or have been given instructions concerning use of the appliance in a safe way and understand the hazards involved. Children must not play with the appliance. Cleaning and user maintenance must not be performed by children without supervision.
- Never leave unattended when in use. Keep an eye on any children in the vicinity of the appliance when it is in use. The appliance is not a toy.
- Incorrect use of this appliance may cause personal injury or damage the appliance.
- Use for the intended purpose only. The manufacturer is not responsible for any injury or damage resulting from incorrect use or handling (see also Warranty Terms).
- For domestic use only. Not for outdoor or commercial use.
- Remove all packaging and transport materials from the inside and outside of the appliance.
- Check that the appliance has no visible damage and that no parts are missing.
- Do not use with any cords other than that supplied.
- Check that it is not possible to pull or trip over the cord or any extension cord.
UK
- The appliance must not be used together with a timer switch or a separate remote control system.
- Turn off the appliance and remove the plug from the socket when cleaning or when not in use.
- Avoid pulling the cord when removing the plug from the socket. Instead, hold the plug.
- Keep the cord and appliance away from heat sources, hot objects and naked flames.
- Ensure that the cord is fully extended.
- The cord must not be twisted or wound around the appliance.
- Check regularly that neither the cord nor plug is damaged and do not use the appliance if there is any damage, or if it has been dropped on the floor, dropped in water or damaged in any other way.
- If the appliance, adapter, cord or plug has been damaged, have the appliance inspected and if necessary repaired by an authorised repairer.
- The appliance may be connected to 230 V, 50 Hz only. The warranty is not valid if the appliance is connected to incorrect voltage.
- Never try to repair the appliance yourself. Please contact the store where you bought the appliance for repairs under warranty.
- Unauthorised repairs or modifications will invalidate the warranty.
- Keep the appliance and its cord out of reach of children aged less than 8 years.
UK
SPECIAL SAFETY INSTRUCTIONS
- The appliance must not be used with boiling liquids or very hot food over 60 °C. Make sure that the food is of a low enough temperature that you do not burn/scald yourself if it touches your skin.
- Do not use for blending very hard and/or dry foods or crushing ice.
- Do not mix hot oil.
• Always add liquid when blending vegetables or fruit.
• The chopper beaker must not be more than 1/3 full.
- Do not use the beaker if it is cracked or damaged in any way.
- Once the appliance has been operated for the maximum time, it must be allowed to cool down!
- Please note that the blades may still rotate for a moment after you switch off the appliance.
- Avoid touching the sharp blades during use and when cleaning the appliance!
- Clean all parts that come in direct contact with food before using the appliance. This is particularly important when preparing food for children or elderly and frail people. Check that the food is not too hot before serving.
PRIOR TO FIRST USE
- Remove all packaging and transport materials from the inside and outside of the appliance.
- Check that the appliance has no visible damage and that no parts are missing.
- Before using for the first time (or after prolonged storage without use), wash any parts that will come into contact with food. Please refer to the section "Cleaning".
UK
text_image
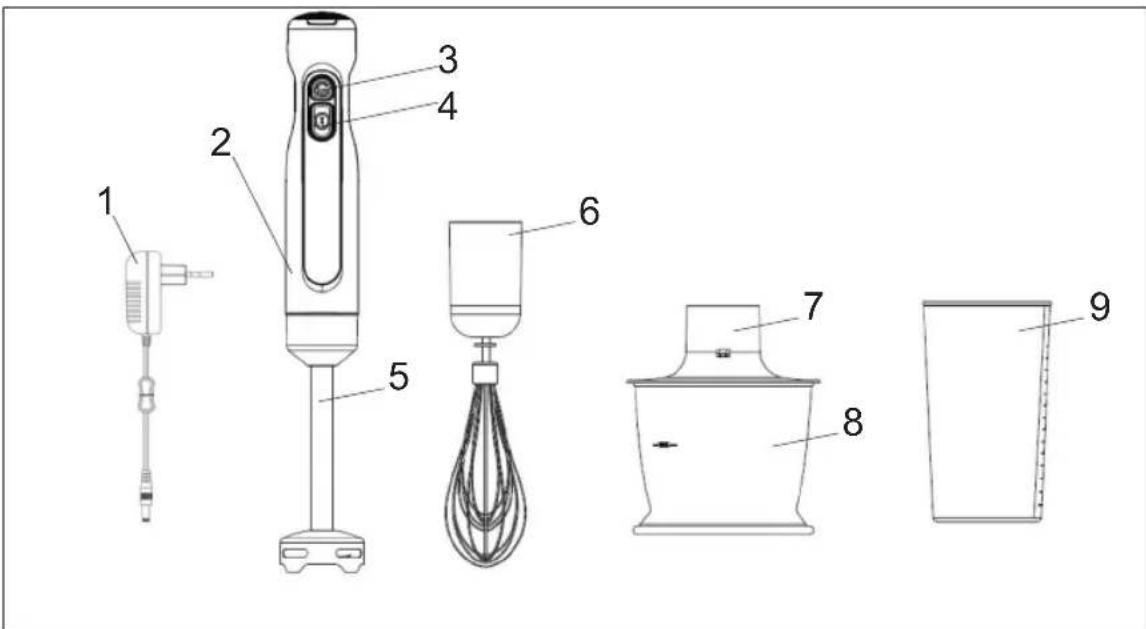
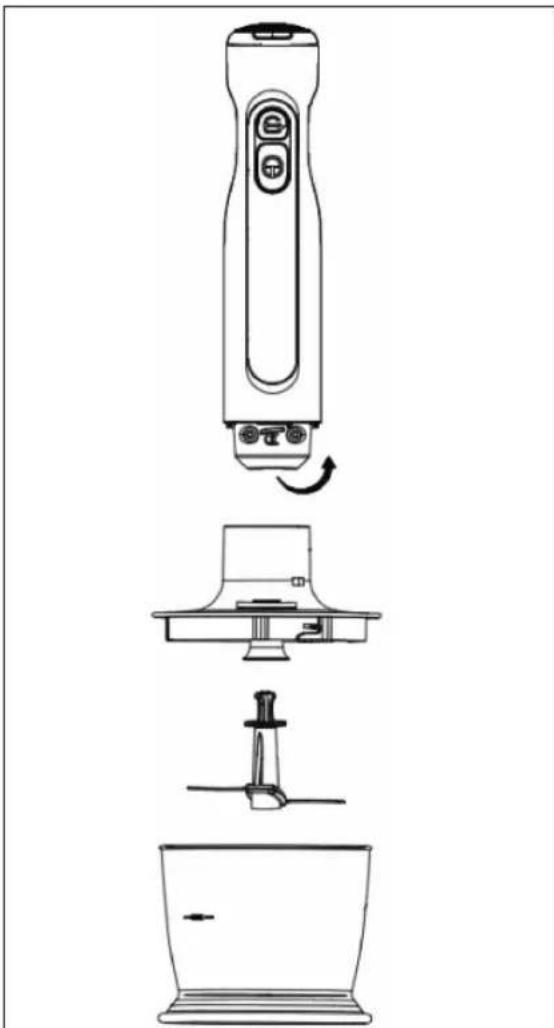
Labeled diagram of a cleaning or cleaning device with numbered parts including a hand tool, digital brush, and a container.MAIN COMPONENTS
- Adapter
- Motor unit
- Safety button
- On/off button
- Stick mixer attachment
- Whisk attachment
- Chopping beaker attachment
- Chopping beaker
- Measuring cup
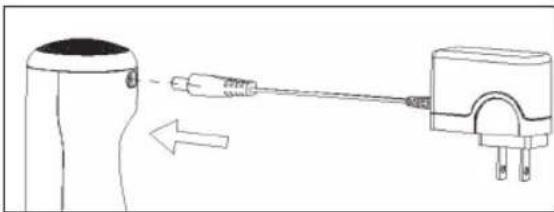
CHARGING
- Plug the adapter (1) into a mains socket and insert the connector from the adapter cord into the socket on the motor unit (2). The indicator light is red during charging.
natural_image
Diagram showing a device connected to a terminal block with a cable, no text or symbols present- Charge the motor unit's built-in battery for approximately 3 hours.
- Once the indicator turns blue, the battery is fully charged.
- If the indicator light flashes red during use, the appliance must be charged for at least 30 minutes before you continue using it.
UK
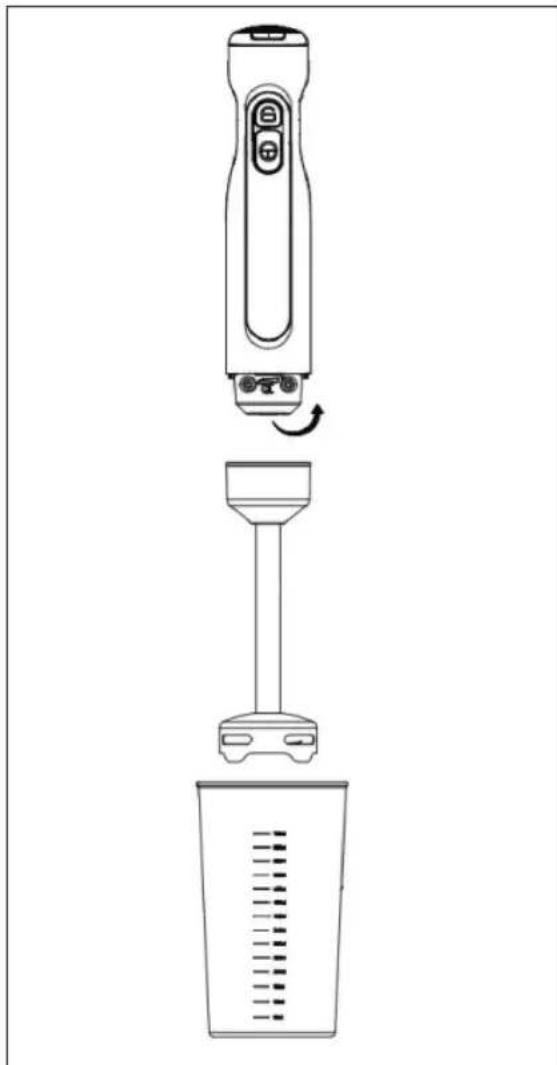
USE AS A STICK BLENDER
As a stick mixer, the appliance is designed for mixing and puréeing liquids, dairy products, sauces, fruit juices, soups, baby foods, etc.
Once the appliance has run for 1 minute, it must cool down for 2 minutes. Do not run the appliance unloaded for more than 15 seconds.
-
Attach the stick mixer attachment (5) to the motor unit (2) by turning it anticlockwise.
-
Lower the stick mixer attachment into the food or measuring cup (9). Press the safety button (3) and then the on/off button (4) to start the appliance. Keep the button pressed for as long as you are blending.
-
Move the stick mixer attachment up and down and around in circles in the food. If you purée or mix directly in a pan, remove it from the heat first so that the appliance does not overheat.
-
The appliance must not be lowered so far into the food that the coupling between the motor unit and attachment comes into contact with the food!
-
Release the on/off button or safety button (2/3), and allow the appliance to stop completely before lifting the stick mixer attachment out of the food.
natural_image
Line drawing of a digital brush with an open lid and base, showing the process from top to bottom (no text or symbols)UK
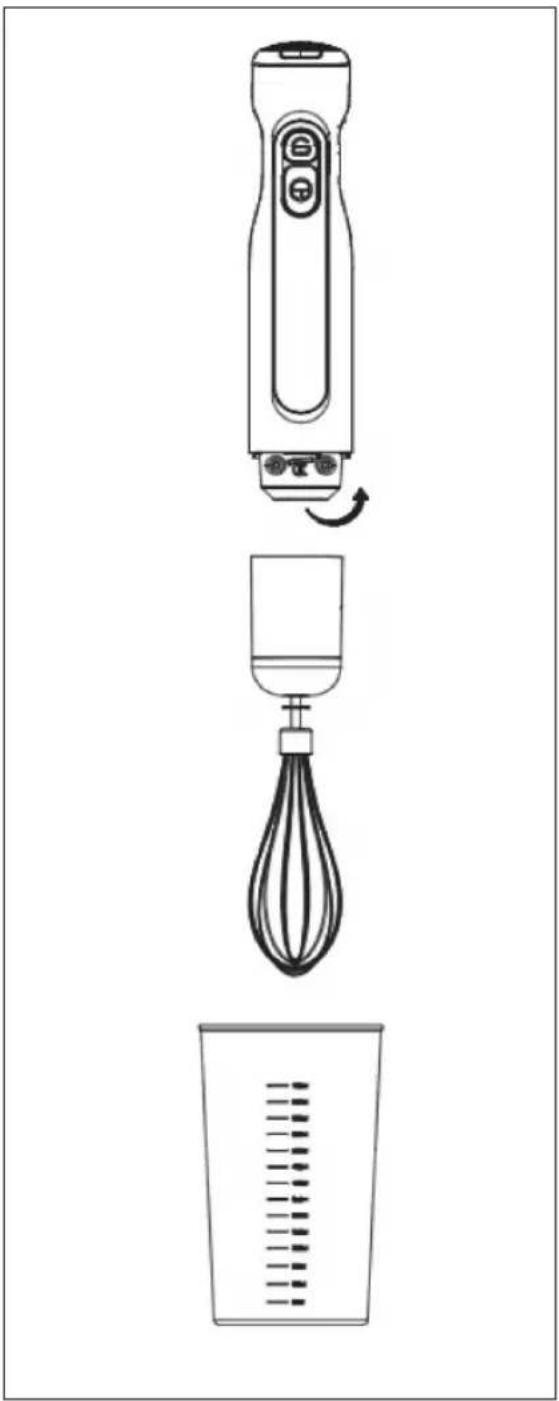
USE AS A WHISK
As a whisk, the appliance is designed to whisk whipping cream, egg whites, dessert creams, etc.
Once the appliance has run for 2 minutes, it must cool down for 3 minutes.
- Attach the attachment (6) to the motor unit (2) by turning it anticlockwise.
-
Lower the whisk into the food or measuring cup (9). Press the safety button (3) and then the on/off button (4) to start the appliance. Keep the button pressed for as long as you are whisking.
-
The appliance must not be lowered so far into the food that the coupling between the motor unit and attachment comes into contact with the food!
-
Release the on/off button or safety button (2/3), and allow the appliance to stop completely before lifting the whisk out of the food.
natural_image
Diagram showing a digital brush and its mixing process, no text or symbols presentUSE AS A MINI- CHOPPER
As a mini-chopper, the appliance is intended to chop meat, cheese, onions, garlic, herbs, carrots, nuts without shells, etc.
Do not attempt to chop very hard food such as nutmeg, coffee beans, cereal and ice cubes.
Stems and seeds must be removed from fruit and vegetables, and meat must be boned, trimmed and cut into small cubes of 1-2 cm before mincing.
Once the appliance has run for 1 minute, it must cool down for 3 minutes.
-
Attach the blade inside the chopping beaker (8).
-
Fill the chopping beaker with food.
-
Fit the attachment (7) to the chopping beaker (8) and turn it so it locks into position.
-
Insert the motor unit (2) into the attachment (7) and turn it anticlockwise until it locks into position.
UK
- Hold the chopping beaker firmly with one hand. Press the safety button (3) and then the on/off button (4) to start the appliance. Keep the button pressed for as long as you are chopping.
- Release the on/off button or safety button (2/3), and allow the appliance to stop completely before removing the attachment (7) from the chopping beaker (8).
natural_image
Exploded view diagram of a hairbrush and its internal components (no text or labels)CLEANING
• Always clean the appliance immediately after use.
- Unless clearly specified in the cleaning instructions below, please note that none of the parts of this appliance are dishwasher safe.
- Clean the motor unit by wiping it with a damp cloth.
- Rinse the attachments (5, 6, 7) under running water and stand them upright so that water can run out of them as they dry. These parts must not be immersed in water and make sure no water enters the appliance.
- All other parts can be washed up in soapy water. All parts must be completely dry before the appliance is assembled and used again.
- Be careful not to touch the blades during cleaning!
- Never use abrasive detergents or solvents.
UK
INFORMATION ON DISPOSAL AND RECYCLING OF THIS PRODUCT
Please note that this Adexi product is marked with this symbol:
This means that this product must not be disposed of along with ordinary household waste, as electrical and electronic waste must be disposed of separately.
According to the WEEE directive, every member state must ensure correct collection, recovery, handling and recycling of electrical and electronic waste. Private households in the EU can take used equipment to special recycling stations free of charge.
UK
FREQUENTLY ASKED QUESTIONS
If you have any questions regarding the use of the appliance and cannot find the answer in this user guide, please try our website at www.adexi.eu.
You can also see contact details on our website if you need to contact us for technical questions, repairs, accessories or spare parts.
IMPORTER
Adexi A/S
Lægårdsvej 9C
DK-8520 Lystrup
Denmark
www.adexi.eu
We cannot be held responsible for any printing errors
In some member states you can in certain cases return used equipment to the retailer from whom you purchased it, if you are purchasing new equipment. Contact your retailer, distributor or the municipal authorities for further information on what to do with electrical and electronic waste.
WARRANTY TERMS
The warranty does not apply:
- if the above instructions have not been followed
- if the appliance has been interfered with
- if the appliance has been mishandled, subjected to rough treatment, or has suffered any other form of damage
- if the appliance is faulty due to faults in the electricity supply.
Due to the constant development of our products in terms of function and design, we reserve the right to make changes to the product without prior warning.