18310013 - Autres appareils de cuisine Gastronoma - Free user manual and instructions
Find the device manual for free 18310013 Gastronoma in PDF.

| Product Type | Other kitchen appliance (food processor) |
| Brand | Gastronoma |
| Model | 18310013 |
| Dimensions (approx.) | 30 x 20 x 25 cm |
| Weight | 2.5 kg |
| Power Supply | 220-240 V, 50/60 Hz |
| Power Consumption | 800 W |
| Main Functions | Chopping, blending, slicing, shredding |
| Bowl Capacity | 1.5 L |
| Speed Settings | 2 speeds + pulse |
| Material | Plastic body, stainless steel blades |
| Cleaning | Removable parts dishwasher safe; wipe body with damp cloth |
| Safety Features | Non-slip feet, safety lock lid, overheating protection |
| Spare Parts | Available: bowl, lid, blades, pusher |
| Repairability | Repairable by authorized service centers; spare parts available |
| Certifications | CE, UKCA |
| Noise Level | < 85 dB |
| Warranty | 2 years |
| Included Accessories | Chopping blade, slicing disc, shredding disc, spatula |
Frequently Asked Questions - 18310013 Gastronoma
User questions about 18310013 Gastronoma
0 question about this device. Answer the ones you know or ask your own.
Ask a new question about this device
Download the instructions for your Autres appareils de cuisine in PDF format for free! Find your manual 18310013 - Gastronoma and take your electronic device back in hand. On this page are published all the documents necessary for the use of your device. 18310013 by Gastronoma.
USER MANUAL 18310013 Gastronoma
natural_image
Line drawing of a hand holding a pen or ruler over a rectangular object, with no visible text or symbols.BRUG:
natural_image
Line drawing of a device with cable inserted into a housing (no text or symbols)natural_image
Line drawing of a portable electronic device with a paper sheet and control panel, no text or symbols presentnatural_image
Line drawing of a hand pressing down on a device with a button (no text or symbols)DK
natural_image
Line drawing of a handheld electronic device with a hand holding a textured surface (no text or symbols)Husk:
natural_image
Line drawing of a hand holding a pen or ruler over a rectangular object, with no visible text or symbols.ANVÄNDNING
natural_image
Line drawing of a device with cable inserted into a housing (no text or symbols)natural_image
Line drawing of a portable electronic device with a paper sheet and control panel, no text or symbols presentnatural_image
Line drawing of a hand pressing down on a device with a button (no text or symbols)SE
natural_image
Line drawing of a handheld device with attached cable and a hand holding a textured surface (no text or symbols)OBS:
natural_image
Line drawing of a hand holding a pen or ruler over a rectangular object, with no visible text or symbols.KÄYTTÖ
natural_image
Line drawing of a device with exposed internal components and cable, no text or symbols presentnatural_image
Line drawing of a portable electronic device with a paper sheet and control panel (no text or symbols)natural_image
Line drawing of a hand pressing down on a device with a button (no text or symbols)FI
natural_image
Line drawing of a handheld electronic device with a hand holding a textured surface (no text or symbols)Tärkeää!
To get the best out of your new vacuum sealer, please read through these instructions carefully before using it for the first time. Take particular note of the safety precautions. We also recommend that you keep the instructions for future reference.
GENERAL SAFETY INSTRUCTIONS
- This appliance may only be used by children aged from 8 years and above and persons with reduced physical, sensory or mental capabilities or lack of experience and knowledge if they are supervised or have been given instructions concerning use of the appliance in a safe way and understand the hazards involved. Children must not play with the appliance. Cleaning and user maintenance must not be performed by children without supervision.
- Never leave unattended when in use. Keep an eye on any children in the vicinity of the appliance when it is in use. The appliance is not a toy.
- Incorrect use of this appliance may cause personal injury or damage the appliance.
- Use for the intended purpose only. The manufacturer is not responsible for any injury or damage resulting from incorrect use or handling (see also Warranty Terms).
- For domestic use only. Not for outdoor or commercial use.
- Remove all packaging and transport materials from the inside and outside of the appliance.
UK
- Check that the appliance has no visible damage and that no parts are missing.
- Do not use with any cords other than that supplied.
- Check that it is not possible to pull or trip over the cord or any extension cord.
- The appliance must not be used together with a timer switch or a separate remote control system.
- Turn off the appliance and remove the plug from the socket when cleaning or when not in use.
-
Avoid pulling the cord when removing the plug from the socket. Instead, hold the plug.
-
Keep the cord and appliance away from heat sources, hot objects and naked flames.
- Ensure that the cord is fully extended.
- The cord must not be twisted or wound around the appliance.
- Check regularly that neither the cord nor plug is damaged and do not use the appliance if there is any damage, or if it has been dropped on the floor, dropped in water or damaged in any other way.
- If the appliance, cord or plug have been damaged, have the appliance inspected and if necessary repaired by an authorised repairer.
UK
- Connect to 230 V, 50 Hz only. The warranty is not valid if the appliance is connected to incorrect voltage.
- Never try to repair the appliance yourself. Please contact the store where you bought the appliance for repairs under warranty.
- Unauthorised repairs or modifications will invalidate the warranty.
- Caution! Some parts of this appliance can become very hot and cause burns. Particular attention should be paid where children and vulnerable people are present.
- Keep the appliance and its cord out of reach of children aged less than 8 years.
SPECIAL SAFETY INSTRUCTIONS
- The appliance must be allowed to cool for 60 seconds between each heat-sealing or vacuum-sealing.
- Do not overfill the bag. Always leave at least 6-8 cm between the bag contents and the top of the bag.
• Make sure that liquids or liquid foods do not get sucked into the appliance.
• Make sure that the bag is dry. Elsewise, it will be difficult to make a tight seal. - Only use vacuum rolls recommended by the retailer. Do not use kitchen film or similar, as it may damage the appliance.
UK
- Remove the bag as soon as it has been heat-sealed/sealed. If it is left in the appliance while the hot wire cools, it may stick to the appliance.
• Always keep the hot wire clean to avoid contaminating the food or substances to be packed.
• Always keep the hot wire clean of food residues and dirt so that the sealing power is not reduced. - Do not use the vacuum or sealing function when the lid is open. Make sure that the lid is locked before using the vacuum or sealing function.
-
It is inevitable that small amounts of crumbs, liquid or food particles will get into the vacuum channel. Empty the drip tray after each use.
-
Make sure that there are no crumbs, liquid or other impurities in the place where the sealed seam is to be made.
- Do not vacuum pack foods such as fresh champignons and mushrooms, garlic and soft cheeses, as this can cause bacterial growth.
- All vegetables (including broccoli, Brussels sprouts, cabbage and cauliflower) produce natural gas, which will cause the vacuum pack to swell within a few days. The vegetables should therefore be cooled down and kept refrigerated after vacuum packing.
- If you vacuum pack items with sharp edges or corners, wrap them in a soft material so as not to puncture the vacuum pack.
UK
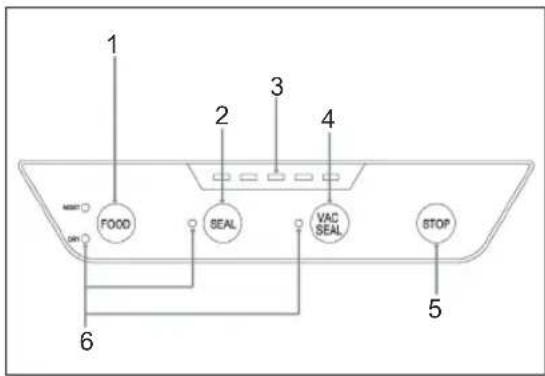
MAIN COMPONENTS
- DRY/MOIST button
- SEAL button
- Indicators
- VAC SEAL button
- STOP button
-
Indicators
-
Silicone contact bar
- VAC button (accessory)
- Vacuum nozzle
- Vacuum chamber
- Sealing strip
- Sealing foam gasket
Button functions
DRY/MOIST
Press the DRY/MOIST button to choose between dry and moist foods. The corresponding indicator comes on. Moist foods contain soup, water or oil, and the vacuum and sealing time is longer than with dry food.
SEAL
Press the SEAL button to make a sealed seam when you make vacuum bags from a vacuum roll.
text_image
1 2 3 4 FOOD SEAL VAC SEAL STOP 5 6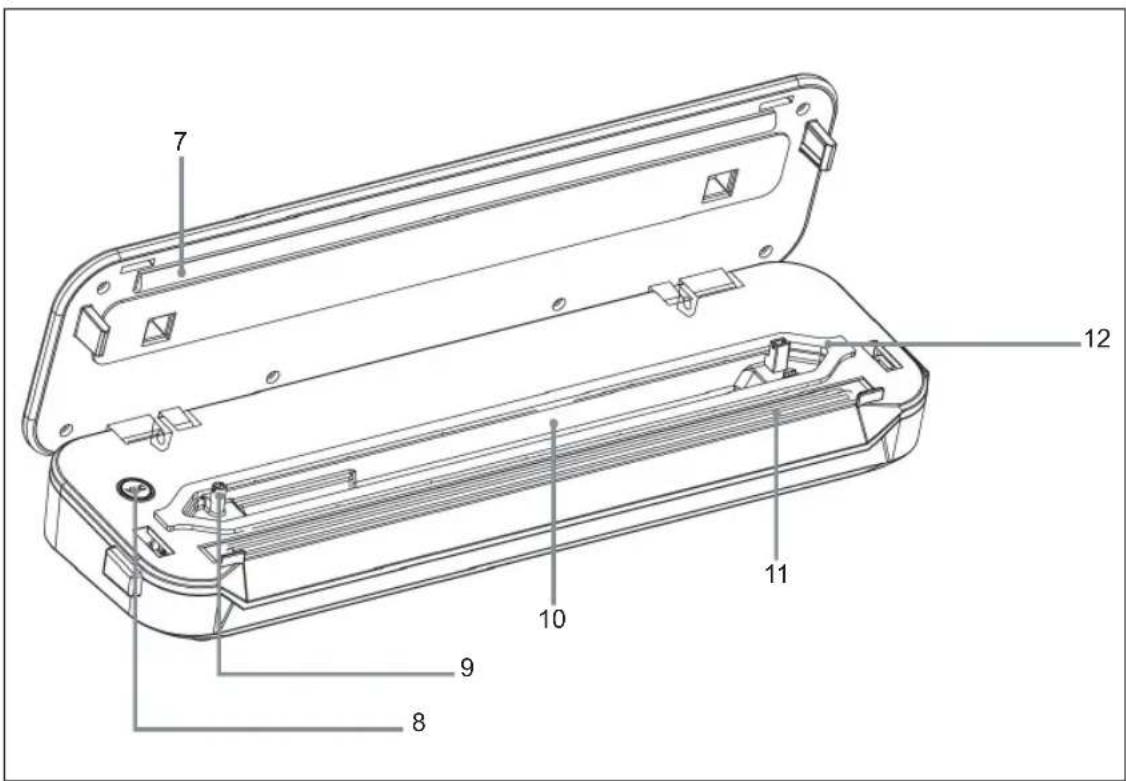
text_image
7 12 10 11 9 8UK
VAC SEAL
Press the VAC SEAL button to suck the air out of the vacuum pack and make a sealed seam once you have sucked the air out of a vacuum package.
STOP
Press the STOP button stop the current process immediately.
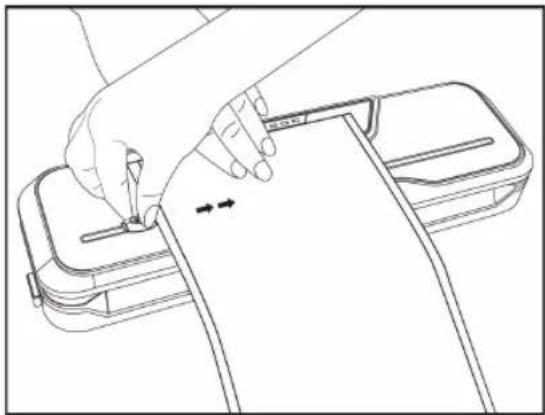
CUTTING THE VACUUM BAG
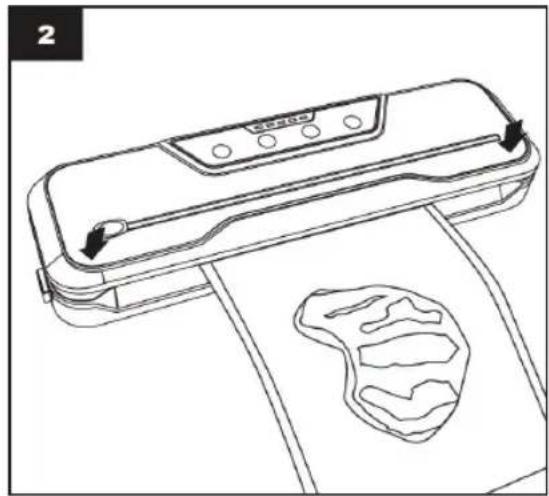
Close the upper lid cover, pull out the desired bag length, hold the bag with one hand, and slide the bag cutter across the roll to obtain the desired bag length.
natural_image
Line drawing of a hand holding a pen or ruler over a rectangular object, with no visible text or symbols.USE
Fill the bag with the required contents. Make sure that there is at least 6-8 cm from the contents to the place where the bag will be sealed.
- Put the open end of bag into vacuum chamber.

natural_image
Line drawing of a device with cable inserted into a housing (no text or symbols)- Close the lid and press on both end of the lid. You will hear a "clicking" sound with both release buttons pop up if the lid is properly locked.
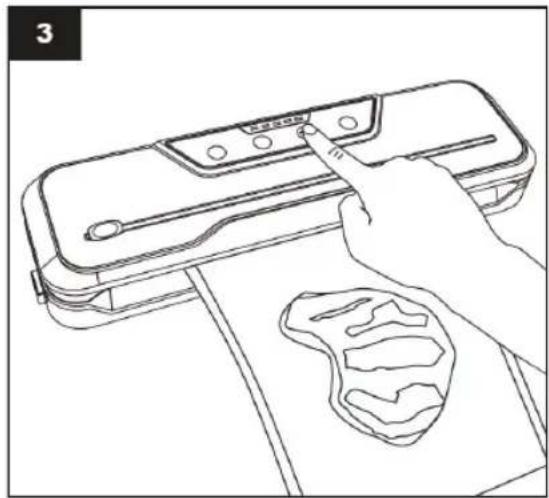
Select food type using the MOIST/DRY button.
natural_image
Line drawing of a portable electronic device with a paper sheet and control panel, no text or symbols present- Press VAC SEAL button if you want to vacuum and seal the bag.
Press SEAL button if you want to seal the bag only.
natural_image
Line drawing of a hand pressing down on a device with a button (no text or symbols)UK
- When SEAL indicator light turns off, the process is completed. Press release buttons at both ends to open the lid and remove the sealed bag.
Carefully lift out the vacuum bag. You can place the bag in the refrigerator or freezer.

natural_image
Line drawing of a handheld electronic device with a hand holding a textured surface (no text or symbols)NB!
- You can interrupt the vacuum or sealing process at any time by pressing the STOP button.
- If several indicators are flasing at the same time after continuous working, overheating protection activated. Please wait for 5-10 minutes for cooling down and the appliance will be back in normal mode.
- If the bag melts, the sealing strip may be overheated. Allow the appliance to cool for 60 seconds before using it again.
VACUUMING NOZZLE
The vacuum nozzle is used for removing air from bags/canisters/bottles. An accessory hose is required.
Attach the hose to the nozzle and the object to be vacuumed, and press the VAC button.
Do not block the vacuum nozzle when vacuuming a bag.
ADVANTAGES OF VACUUM SEALING
Vacuum-packed food keeps better and longer in the fridge or freezer compared to food in packaging with air in it.
Some types of food can also be cooked/reheated by putting the sealed bag into a dish of water or in a microwave oven. When cooking food in a microwave oven, prick holes in the bag with a fork so that steam can escape.
It is also possible to seal/vacuum-seal items such as personal papers, medicines, etc. for travelling, camping or sailing so they do not get wet.
CLEANING
• Always switch the appliance off at the wall socket and unplug before cleaning.
- Do not immerse the appliance in water or other liquids.
- Clean the outer surface using a damp cloth and, if necessary, a little detergent. Never use abrasive detergents or solvents. Dry the appliance thoroughly before using it again.
- Wipe away any food or liquid on the vacuum chamber with paper towel.
- If there are bag residues on the hot wire, you can make a seal without placing a bag in the appliance. Carefully wipe the hot wire before it is completely cold again.
- If the appliance will not be used for a prolonged period, the lid must not be locked to prevent the seal from being squeezed, which would impair the appliance's function.
UK
TROUBLESHOOTING
The appliance is plugged in, but cannot vacuum.
A. Ensure the lid is properly closed.
B. Ensure the opening end of the bag is correctly placed into the vacuum chamber.
C. Check if the bag is punctured.
D. Check if the foam sealing gasket is deformed or damaged.
Air is removed from the bag, but re-enters.
A. Check if there is a hole or puncture on the bag. It may be punctured by sharp items. Use a new bag if necessary.
B. Check the sealing seam. Any wrinkle along the sealing seam may cause air re-entering. If yes, simply cut the sealed edge and re-seal.
C. If there is moisture or liquid at the opening end, cut the bag and wipe it away. Then choose MOIST FOOD setting and reseal.
D. If the food has been stored for a long time and the bag is full of gases, it may be spoiled and must be discarded.
INFORMATION ON DISPOSAL AND RECYCLING OF THIS PRODUCT
Please note that this Adexi product is marked with this symbol:

This means that this product must not be disposed of along with ordinary household waste, as electrical and electronic waste must be disposed of separately.
According to the WEEE directive, every member state must ensure correct collection, recovery, handling and recycling of electrical and electronic waste. Private households in the EU can take used equipment to special recycling stations free of charge.
In certain member states, used appliances can be returned to the retailer where they were bought on the condition you buy new products. Contact your retailer, distributor or the municipal authorities for further information on what to do with electrical and electronic waste.
WARRANTY TERMS
The warranty does not apply:
- if the above instructions have not been followed
- if the appliance has been interfered with
- if the appliance has been mishandled, subjected to rough treatment, or has suffered any other form of damage
- if the appliance is faulty due to faults in the electricity supply.
Due to the constant development of our products in terms of function and design, we reserve the right to make changes to the product without prior warning.
FREQUENTLY ASKED QUESTIONS
If you have any questions regarding the use of the appliance and cannot find the answer in this user guide, please try our website at www.adexi.eu.
You can also see contact details on our website if you need to contact us for technical questions, repairs, accessories or spare parts.
MANUFACTURED IN CHINA FOR
Adexi A/S
Lægårdsvej 9C
DK-8520 Lystrup
Denmark
We cannot be held responsible for any printing errors.