FX-RM4180 - Lawn mower Fuxtec - Free user manual and instructions
Find the device manual for free FX-RM4180 Fuxtec in PDF.

| Product Type | 4-stroke petrol lawn mower |
| Brand | Fuxtec |
| Model | FX-RM4180 |
| Engine | OHV, air-cooled, 4-stroke |
| Displacement | 79.8 cm³ |
| Rated power | 1.3 kW |
| Engine speed | 3000 rpm |
| Cutting width | 40.6 cm |
| Adjustable cutting heights | 25 / 40 / 55 mm |
| Starter type | Recoil starter |
| Fuel tank capacity | 1.0 L |
| Oil tank capacity | 0.6 L |
| Recommended fuel | Unleaded petrol SP98 |
| Recommended engine oil | SAE30 or 15W-40 |
| Wheel diameter | 155 mm (front and rear) |
| Grass collector volume | 45 L |
| Weight | 18 kg |
| Sound power level (LWA) | 96 dB(A) |
| Hand-arm vibration | 7.759 m/s² (K=1.5) |
| Main functions | Mowing with collection or rear discharge |
| Routine maintenance | Oil change every 25 h, blade sharpening, air filter cleaning |
| Safety devices | Engine stop when releasing the handlebar lever, protective cover, anti-projections shield |
| Wear parts | Cutting blade, spark plug, air filter, oil, grass collector |
| Warranty | 24 months |
Frequently Asked Questions - FX-RM4180 Fuxtec
User questions about FX-RM4180 Fuxtec
0 question about this device. Answer the ones you know or ask your own.
Ask a new question about this device
Download the instructions for your Lawn mower in PDF format for free! Find your manual FX-RM4180 - Fuxtec and take your electronic device back in hand. On this page are published all the documents necessary for the use of your device. FX-RM4180 by Fuxtec.
USER MANUAL FX-RM4180 Fuxtec
natural_image
Illustration of a mechanical device with attached wires and components, no visible text or symbols
natural_image
Orange icon of a person reading a book (no text or symbols)
Inhalt
DEUTSCHE VERSION....11
ENGLISH VERSION....40
VERSION FRANCAISE....68
ENGLISH VERSION....40
-
Technical Data 41
-
Symbols and safety instructions on the device 42
-
Intended use and general safety instructions....45
-
Hints for accessories....47
-
Notes on working with the metal blade....48
-
Putting on the shoulder harness 48
-
Component overview ....50
-
Mounting the device....51
-
Starting the engine ....55
-
Stopping the device ....57
-
Trimming techniques....57
-
Replacing Nylon Thread....59
-
Maintenance schedule 61
-
Storage of the device....63
-
Troubleshooting....64
-
Customer Service....65
-
Warranty....65
-
Disposal note 65
-
EU Declaration of Conformity....67
VERSION FRANCAISE....68
natural_image
Exterior view of a FX-MS125 detection device with attached sensor and motor (no text or symbols on the device itself)natural_image
Person using a handheld device to lift a cylindrical object, no visible text or symbolsnatural_image
Technical line drawing of mechanical components including a tool, bracket, and bolts (no text or symbols)
natural_image
Close-up of a mechanical device with black and white components, no visible text or symbols
natural_image
Mechanical component with hexagonal and circular features, no visible text or symbolsInstallation des Schutzschildes
natural_image
Technical line drawing of a mechanical assembly with no visible text or symbols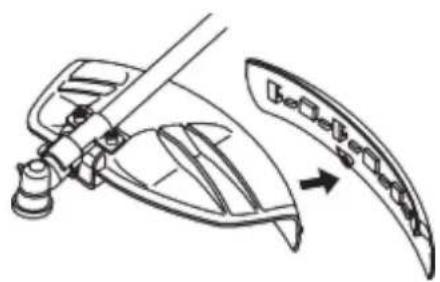
text_image
Top/BottomMontage des Metallblatts

text_image
1 2 3 4 5 6 7Schritte:
natural_image
Line drawing of hands using a tool to adjust or install a component (no text or symbols present)natural_image
Diagram of a mechanical device with a curved arm and directional arrows, no text or symbols presentnatural_image
Technical line drawing of a mechanical device with a downward arrow indicator (no text or symbols present)
natural_image
Technical line drawing of a mechanical assembly with an arrow indicating a component (no text or symbols present)natural_image
Diagram of a mechanical fan or impeller with motion arrows indicating flow or movement (no text or symbols)TRIMMEN UM BÄUME
natural_image
Technical line drawing of a mechanical assembly with a close-up view of a component (no text or symbols)Wartung Zündkerze
text_image
0.6~0.7mmWARNUNG
natural_image
Close-up of a mechanical component with labeled parts F and E, showing internal components and a ruler-like structure (no readable text or symbols beyond labels)natural_image
Mechanical device with attached lever and sensor array (no visible text or symbols)Your new device has been developed and designed to meet FUXTEC's high standards, such as easy operation and user safety. Properly treated, this device will serve you well for years to come.

WARNING: To reduce the risk of injury, the user must read and understand this manual before operating the device.
FUXTEC GMBH
CAPPING ROAD 69, 71083 HERRENBERG, GERMANY
We are continually striving to improve our products. Therefore technical data and illustrations may change!
- Technical Data
| Type | FX-MS125 |
| Engine | air-cooled; 2-stroke |
| Cubic capacity | 51.7cm^3 |
| Maximum output power (kW)(conformity with ISO 8893) | 2.2kW / 7,500min^-1 |
| Maximum speed of the engine | 9,000 min^-1 |
| Idle speed of the engine | 3,000 min^-1 |
| Maximum speed of the spindle (tooth blade) | 7,100 min^-1 |
| Maximum speed of the spindle(thread spool) | 6,600 min^-1 |
| L_PA at the operator's position | 99.5dB(A) (K=3dB) |
| Measured L_WA according to ISO 10884 | 107.7dB(A) (K=3dB) |
| Guaranteed L_WA | 113dB(A) |
| Maximum vibration values at each handle | 5.259m/s^2 k=1.5m/s^2 |
| Maximum thread diameter | 3.0mm |
| Diameter of the metal blade | 305mmx1.6mm-2T / 255mmx1.6mm-3T/ 255mmx1.6mm-4T/ 255mmx1.6mm-8T |
| Rotation direction of the cutting device | Counterclockwise (see the mark on the plate) |
| Number of handles | 2 pieces |
| Dry weight (without fuel, cutting assembly, carrying strap) | 5.5kg |
| Fuel tank capacity (L) | 1.2 |
| Fuel consumption (kg/h) (in accordance with ISO 8893) | 0.98 kg |
| Specific fuel consumption (g/kWh) (in accordance with ISO 8893) | 630 g |
22. Symbols and safety instructions on the device
 | WARNING! IMPROPER OPERATION MAYLEAD TO SERIOUS INJURY |
 | READ AND UNDERSTAND THIS USER MANUAL BEFORE USE. |
 | AYS WEAR EYE PROTECTION, EAR PROTECTION, AND HEAD PROTECTION |
 | WEAR FOOT PROTECTION. |
 | WEAR GLOVES (sharp edges!). |
 | DO NOT TOUCH THE ROTATING BLADE,DANGER OF INJURY |
 | ALWAYS KEEP 15 METERS AWAY FROMOTHER PEOPLE |
 | THE GUARANTEED NOISE LEVEL COMPLIES WITH THELEGAL NOISE GUIDELINES |
 | NO SMOKING AND OPEN FLAMES NEAR THE DEVICE |


WARNING: DANGER OF HOT COMPONENTS

H OFF THE DEVICE AND ENSURE THAT THE CUTTING TOOL IS STOPPED BEFORE CLEANING, REMOVING OR ADJUSTING IT.

WARNING: EXHAUST GASES OF THIS PRODUCT CONTAIN CHEMICALS THAT CAUSE CANCER, BIRTH DEFECTS AND OTHERS

WARNING! NEVER CHANGE THE ENGINE. IMPROPER USE OF THE DEVICE CAN CAUSE SERIOUS OR FATAL PERSONAL INJURY.

MAXIMUM NUMBER OF ROTATION OF THE SPINDLE (LAWN TRIMMER): 6600 min ^1
MAXIMUM SPEED OF THE SPINDLE (MOTOR SCYTHE): 7100 min ^-1
Do not allow others to use this Device unless they have been fully instructed and have read and understood the user manual.

Prolonged use of the device exposes the user to shocks that can lead to white finger disease (Raynaud's syndrome) or carpal tunnel syndrome. This condition reduces the hand's ability to sense and regulate temperature, causes numbness and heat
sensations, and can lead to nerve and circulatory damage and tissue death.
Not all factors leading to white finger disease are known. Still, cold weather, smoking, and other conditions affecting the blood vessels and blood circulation, as well as extensive or prolonged exposure to shocks, are mentioned as factors in the development of white finger disease. To reduce the risk of white finger disease and carpal tunnel syndrome, please note the following
• Wear gloves and keep your hands warm.
• Take regular breaks.
All the above precautions cannot eliminate the risk of white finger disease or carpal tunnel syndrome. Long-term and regular users are, therefore, advised to monitor the condition of their hands and fingers closely. Consult a doctor immediately if any of the above symptoms occur.

The operating noise of the tool may damage your hearing. Wear a sound-proofing (Oropax or ear muffs) to protect it. Long-term and regular users are recommended to check their hearing regularly. Be especially vigilant and careful when wearing hearing protection, as it limits your ability to hear warnings (cries, alarms, etc.).

WARNING: Some noise exposure from this device is unavoidable. Do not work in noisy environments during approved and designated times. If necessary, observe rest periods and limit the duration of work to the minimum required. Wear suitable hearing protection for your personal protection and the protection of persons in the vicinity.
23. Intended use and general safety instructions
This device may only mow grass, weeds, and undergrowth. Never use it for other purposes, as this can cause serious injuries!
Correct safety instructions must be followed. DO NOT EXPOSE YOURSELF OR OTHERS TO DANGER. Follow these general safety instructions:
- Always wear safety glasses for eye protection. Long hair must be tied back. Do not wear loose clothing or jewellery that can get caught in the device's moving parts. Always wear safe, non-slip and robust safety shoes. Legs and feet are recommended to be fully protected to guard against flying objects during operation.
- Check the device for loose parts (nuts, bolts, screws, etc.). Service or replace them if necessary before using the device. Do not use accessories with this drive head other than those recommended by the manufacturer. Otherwise, severe injury to the user or bystanders and damage to the device may result.
- Keep the handles free of oil and fuel.
• Always use the handles and shoulder strap when cutting.
- Do not smoke when mixing the fuel or filling the tank
- Do not mix fuel in an enclosed space or near open fires. Ensure adequate ventilation/aeration.
- Mix and store the fuel mixture in a marked container approved for such use according to local regulations
- Never remove the fuel filler cap while the engine is running.
- Do not operate the device in enclosed spaces or buildings. Exhaust gases contain dangerous carbon monoxide.
- Do not attempt to adjust the device while running or carrying it. Always fix the device on a flat, free surface.
- Do not use the device if it is damaged. Never remove any protective devices from the device. That can cause serious injury to the operator or bystanders and further damage the device.
- Check the area to be cut and remove any objects entangled in the nylon cutting head or blade. Also, remove any objects that the device may throw around while cutting.
- Never leave the device unattended.
- Do not stretch out far forward. Always maintain a firm stand and balance. Never let the device run while standing on a ladder or any other unstable standing position.
- Children must not have access to the device. Spectators should stand at least 15 meters away from the working area.
- Keep hands and feet away from the nylon cutting head or metal blade during operation.
- Do not use the device if you are tired, ill, or under the influence of medication, drugs, or alcohol.
- Use an undamaged nylon cutting head. Stop the device and check the nylon cutting head if you hit a stone or any other obstacle. Never use a defective or unbalanced nylon cutting head.
- Before starting, after failure or impact, always check the device and make sure it is in good condition.
- Attention! Local regulations may limit the use of the device
- Always keep the device with the cutting tool in good condition. Note improper maintenance, the use of non-compliant spare parts, or the removal or modification of safety devices can cause damage to the device and severe injury to the person working with it.
- Secure the device well during transport to prevent fuel loss, damage to the device, and injury. Always fit the transport protection of the cutting blade before transporting or stowing the device.
- On devices with a clutch, check that the cutting attachment stops rotating when the engine is idling.
- Always check the device for loose fasteners, fuel leaks, damaged parts, etc., before each use. Replace used parts before use.
- It is necessary to take sufficient breaks and change the working position.
- Do not store the device in a closed area where fuel vapours can reach an open fire from water heaters, stoves, etc. Store the device in a well-ventilated area only.
- IMPORTANT: When filling the fuel, ensure the engine is off and cooled down. Never refuel when the device is running or hot.
24. Hints for accessories
- Make sure that your product is only equipped with original accessories. Only use the original parts that the manufacturer specifies. The use of any other accessories or attachments may cause injury to the user and damage to the device.
- Clean the device thoroughly, especially the fuel tank and air filter. After using the device, remove all fuel.
- If you approach a user of the device as a spectator, carefully attract his attention and confirm that the user will stop the device. Please do not startle or distract the user. Otherwise, you could cause an unsafe situation.
- Never touch the nylon cutting head or metal blade when the device is running. If it is necessary to replace the guard or cutting tool, be sure that the engine and cutting tools have stopped.
- The engine must be OFF before you change the device's working range.
- If necessary, have the device repaired by an authorized workshop. If the device is defective, do not continue to run it.
- Never touch hot parts such as the exhaust, ignition cables, or spark plug when starting or operating the device.
- After the device has stopped, the exhaust pipe is still hot. Never place the device near inflammable materials (dry grass, flammable gases or liquids, etc.).
- Pay particular attention to the fact that the ground can be slippery when operating the device in or immediately after the rain.
- If you slip or fall to the ground, release the throttle immediately.
- Before removing the blockage, stop the device and remove the spark plug connector. Before adjusting or repairing the device, ensure the device is stopped and the spark plug socket is removed.
- Ensure that you do not drop the device or hit it against obstacles.
- If the device is to be stored for a more extended period, let the device cool down first. Then drain the fuel from the fuel tank and carburettor, clean the device and place it in a safe place.
- Carry out constant checks to ensure the safe and efficient operation of the device. For a complete inspection, please get in touch with us.
- Keep the device away from fire or sparks.
- Be careful when using the device. There is a risk of kick-back and recoil.
- Use extreme caution when using this device with the cutting blade. A cutting blade kick-back is a reaction that can occur when the rotating cutting blade hits an object that cannot be cut. This contact causes the cutting blade to stop for a moment and then suddenly repels from the hit object with accelerated force. This kick-back reaction can be severe enough that the operator loses control of the device. A cutter blade kick-back can occur without warning if the cutter blade encounters an obstacle that becomes blocked or jams. This is more likely in areas where it is difficult to see the material being cut. For easy and safe cutting,
approach the weeds to be cut from your right to your left side. If an object or stick of wood is hit unexpectedly, this can reduce a cutter blade kick-back.
25. Notes on working with the metal blade
A metal blade with 3 teeth is delivered with the device. It is used for cutting bushes and weeds. The use of a saw blade with this device is prohibited.
WARNING

Do not cut with blunt, cracked or damaged metal sheets.
Before working, check the surface for obstacles such as stones, metal bars or other objects. If they cannot be removed,
mark this position to avoid collision with the
blade. Lines can become entangled on the blade head and flap or be swirled in the air.
WARNING

Do not use the motor scythe for cutting out trees.
WARNING

Always use the shoulder strap. Adjust and fix the belt and belt clamping plate on the device so that the device hangs a few cm above
the ground. The cut-out head and the protective shield should be aligned horizontally in all directions. Pre-tension the devices on the right side of your body.
WARNING

Also, wear head, eye, face and hearing protection and safety shoes. Do not wear rings, jewellery or
loose, dangling clothes that could get caught in the device.
Do not wear footwear with unprotected toes, and do not work
barefoot or without leg protection. In certain situations, you
must wear head protection.
26. Putting on the shoulder harness

Important: The shoulder strap is an optional accessory
from FUXTEC, which we recommend for use with any brush cutter job. You can find the shoulder strap at www.fuxtec.de via the following item number: FX-PS152TG

natural_image
Person holding a tool with a mechanical component, viewed from above (no visible text or symbols)The shoulder strap is equipped with a quick-release device (see picture). You can quickly remove the shoulder strap by pulling on the quick-release device.
Read the manual carefully. Be thoroughly familiar with the control and correct use of the device. Understand how to stop and shut down the device. Understand how to release a clamped attachment quickly.
Do not allow anyone to enter the DANGER ZONE while working. The DANGER ZONE is an area of 15 meters in radius (approximately 16 steps). Insist that people in the DANGER ZONE wear eye protection against flinging objects. If the device must be used where people are unprotected, work at a low, reduced speed to reduce the risk of skidding.
text_image
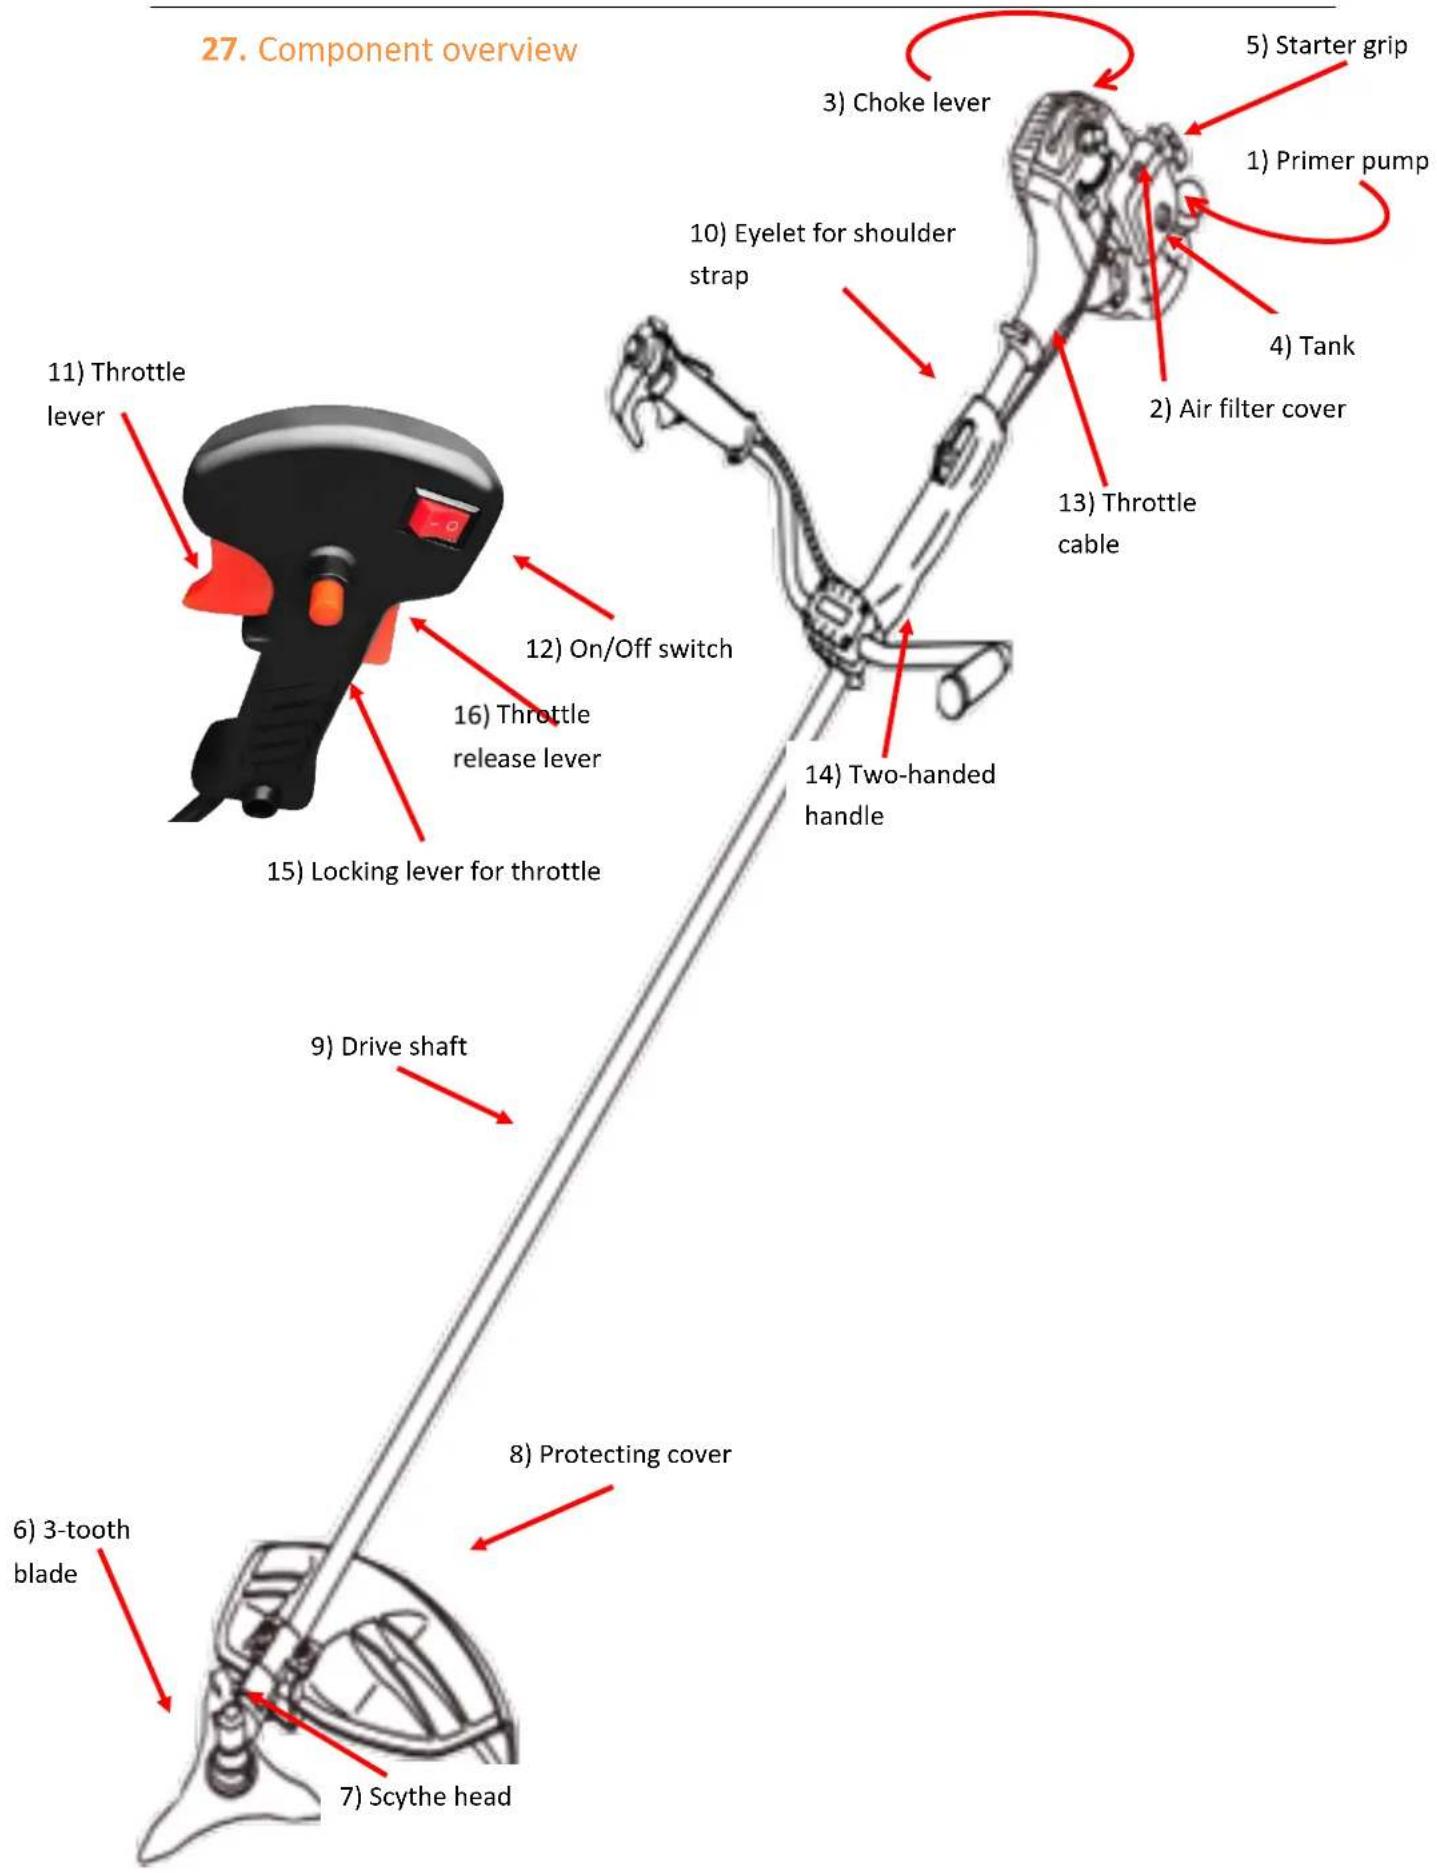
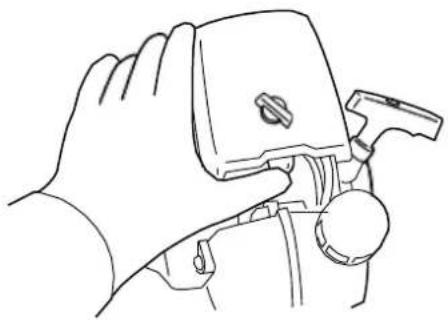
27. Component overview 1) Primer pump 2) Air filter cover 3) Choke lever 4) Tank 5) Starter grip 6) 3-tooth blade 7) Scythe head 8) Protecting cover 9) Drive shaft 10) Eyelet for shoulder strap 11) Throttle lever 12) On/Off switch 13) Throttle cable 14) Two-handed handle 15) Locking lever for throttle 16) Throttle release lever28. Mounting the device
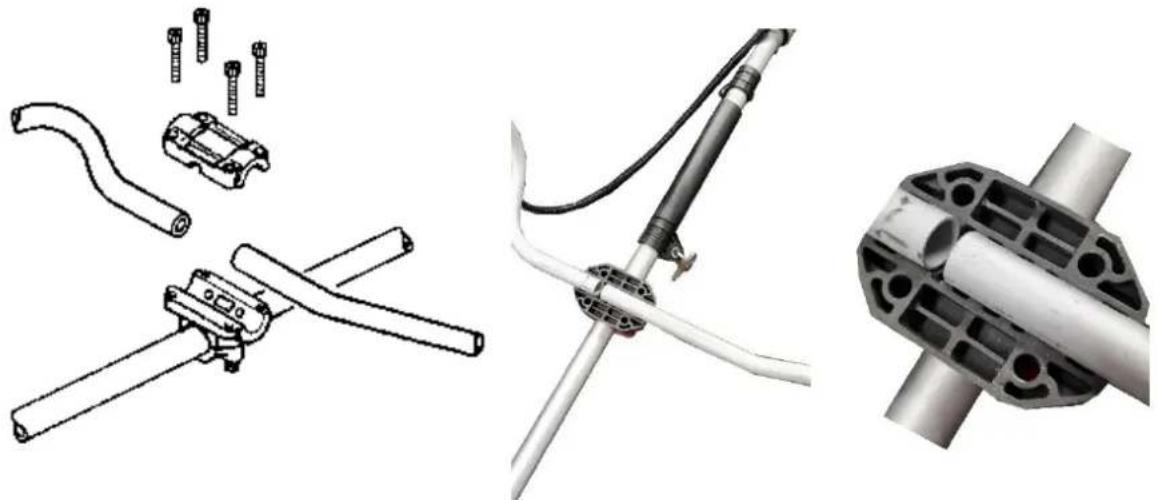
Attaching the handle
The handle must be fitted before use.
Follow the illustrations below for the correct installation.
- Loosen the 4 screws on the top cap and insert the handles. Tighten the screws again.
- Place the handle unit in the holder and slide the top cap over it. Tighten the cap firmly.
natural_image
Technical illustration of mechanical components including crimping tools, a valve assembly, and a cylindrical housing (no text or symbols)Installing the protective shield
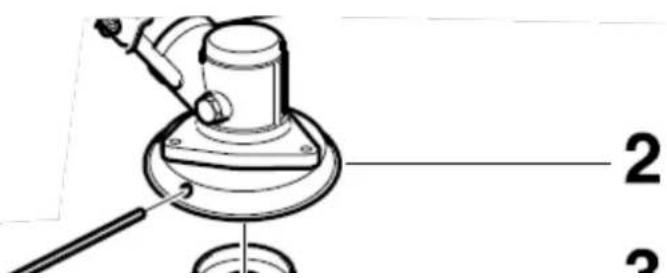
Install the protective shield with the opening facing downwards towards the gearbox housing. Tighten the holder of the guard so that the blade guard does not move or slide down during operation. When using the 3-tooth blade or other blades, remove the protective collar (if present) from the protective shield!

natural_image
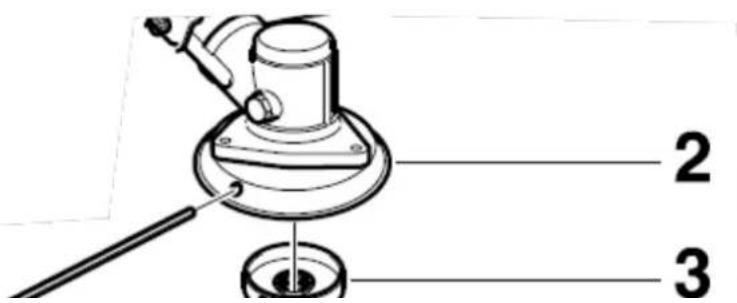
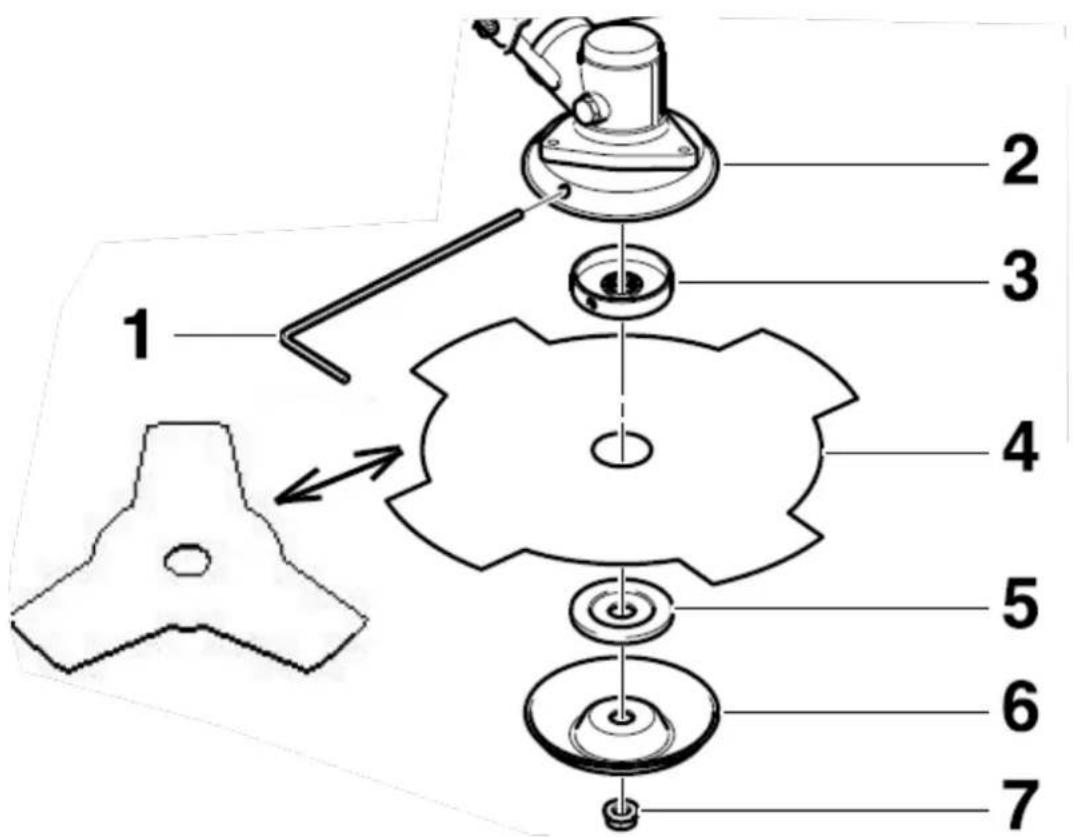
Technical line drawing of a mechanical assembly with two views (top and side), no text or symbols present.Installation of the metal blade

text_image
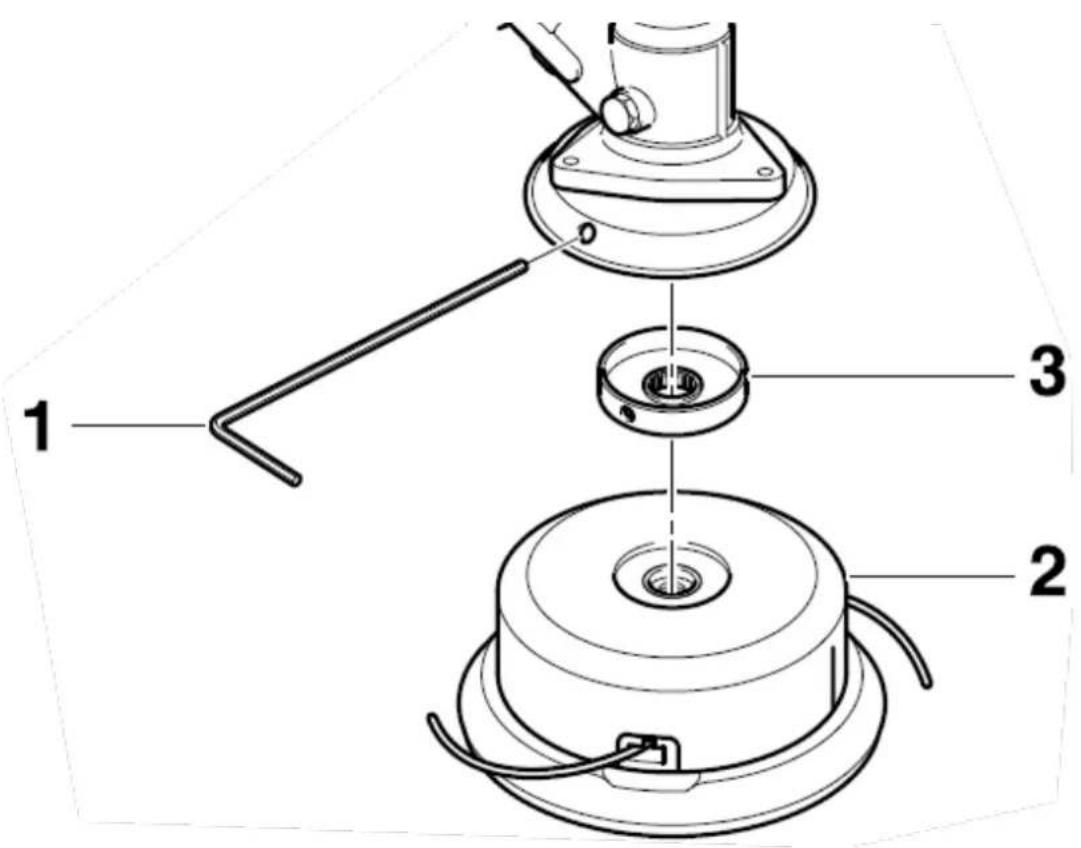
Technical diagram of a mechanical assembly with numbered parts, likely a valve or pump component.Steps:
- Remove the safety cotter pin (if present).
- Unscrew the lock nut (7) from the shaft by turning it clockwise. If necessary, block the sensor head (2) using the Allen key (1) (see the above picture). Note: The lock nut has a left-hand thread.
- Remove the disc washer (6) and washer (5).
- Use the Allen key (1) to block the scythe head. If necessary, turn the fastening disc (3) slightly.
- Position the blade (4), washer (5) and disc (6) as shown.
- Screw on the lock nut (7) and tighten it counterclockwise using the ring spanner.
- Attention! For safety reasons, the lock nut (C7) must be replaced with a new one after every 10 tool changes.
- Reattach the cotter pin.
- Remove the Allen key and check the freedom of movement of the cutting tool.
Installation of the lawn trimmer (thread spool)
text_image
1 2 3- Place the fastening disc (3) on the shaft.
- Use the Allen key (1) to lock the scythe head. If necessary, turn the fastening disc (3) slightly.
- Screw the thread spool (2) onto the shaft by turning it anticlockwise.
- Now tighten the thread spool by hand.
- Remove the Allen key and check the smooth running of the thread spool.
Warning!

Ensure that all components are correctly assembled and installed and that all screws are tightened.
FUEL AND 2-STROKE OIL
Use unleaded petrol with 2-stroke engine oil in a 40:1 ratio.
WARNING: Never use just fuel in your engine. This will cause permanent engine damage and void the manufacturer's warranty for this product. Never use a fuel mixture that has been stored for more than 90 days.
WARNING: This must be a premium grade, 2-stroke air-cooled engine oil.
FUEL MIXTURE
Mix fuel with 2-stroke oil in a container provided for this purpose. Note the following mixture table on the following page for the correct fuel/oil ratio. Shake the tank to ensure complete mixing.
| Petrol | Two-stroke engine oil (40:1) | Petrol | Two-stroke engine oil (40:1) |
| 1 litre | 0.025 litre | 5 litre | 0.125 litre |
| 2 litre | 0.050 litre | 10 litre | 0.250 litre |
WARNING: Failure to lubricate the engine eliminates the liability of the device manufacturer. Petrol and oil must be mixed in a ratio of 40:1.
Recommended fuel
It is recommended to use unleaded petrol with an octane number of 90 # or higher to reduce carbon deposition in the combustion chamber. Do not use old or dirty petrol. Keep the fuel tank dust-free and avoid water getting into the tank. Sometimes misfiring can occur in case of overload, which is normal.
If the backfiring can be heard under average load, we recommend replacing the petrol. If the misfire is still present afterwards, don't hesitate to contact our customer service.

WARNING
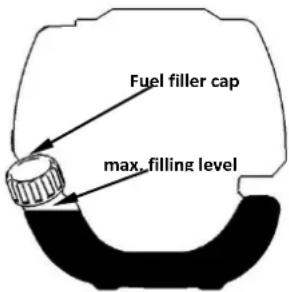
text_image
Fuel filler cap max, filling level● Petrol is highly flammable and can cause an explosion in case of sparks
- Refuel only in well-ventilated rooms and allow the engine to cool down before filling. Do not smoke during refuelling. Open fires and sparks must be avoided.
- Do not overfill the tank (see figure max. filling level).
● After refuelling, check that the fuel filler cap is closed correctly.
- Avoid any spillage of petrol.
- Keep the device away from children.
29. Starting the engine
Cold Start
CAUTION: The scythe head starts to rotate when the engine is started.
- Fill the fuel tank with gasoline and tighten the cap.
- Place the machine on a flat, firm surface. Keep the mower attachment off the ground and away from surrounding objects, as it will start to rotate when the engine is started.
- Press the primer pump several times.
natural_image
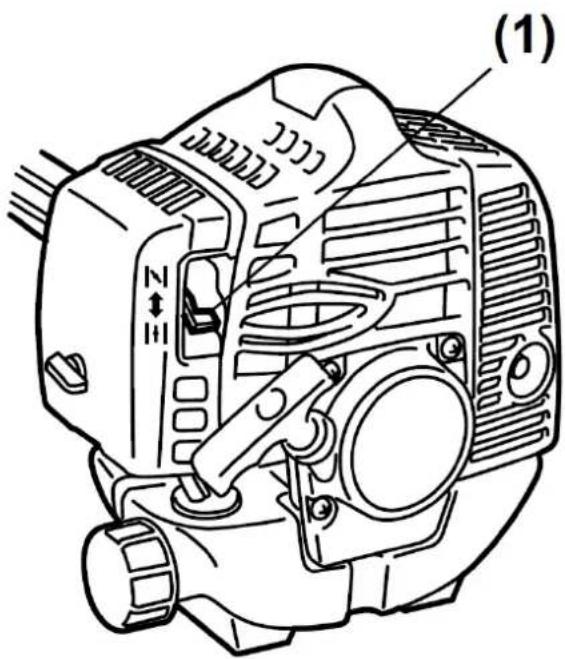
Line drawing of a hand using a tool to adjust or install a component (no text or symbols present)- Move the choke lever to the closed position.
text_image
(1)
text_image
|←| (2) ↑ ||| (3)(1) Choke lever
(2) closed
(3) open
-
Starter handle: set the on/off switch to 1
-
Hold the device and carefully pull out the starter rope until you feel the first resistance. This is the starting position for the pull starter. Now pull the rope several times until the engine starts and runs.
Avoid pulling the rope to the end or letting it recoil by releasing the handle. Such actions may cause the starter to fail.
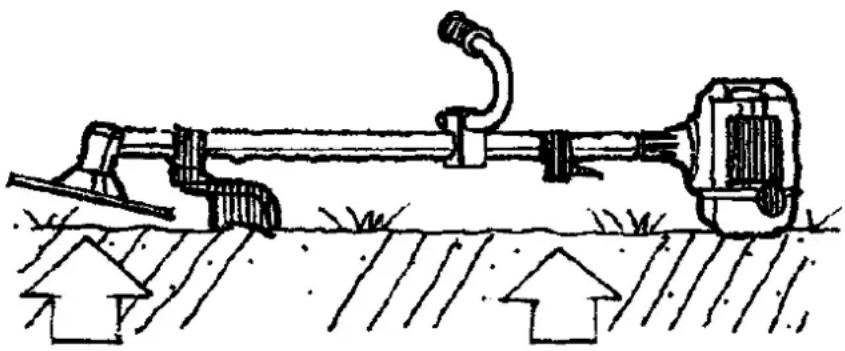
IMPORTANT: The device is equipped with a centrifugal clutch so that the cutting tool starts moving as soon as the engine is put into the start position by operating the throttle. When starting the engine, place the product on the ground in a level, clear area and hold it firmly so that neither the cutting part nor the throttle lever can come into contact with any obstacle when starting the engine.
natural_image
Diagram of a mechanical device with a curved spring and lever, positioned on a textured surface with directional arrows below (no text or symbols)- Allow the engine to warm up for a few minutes at idle after starting before starting work!
NOTE: If the machine does not start after repeated attempts, please read the troubleshooting chapter. NOTE: Always pull the starter rope straight out. Pulling the starter at an angle will cause the rope to rub against the eyelet. The diagonal pull can cause the starter rope to fray or break. Always hold the starter handle when the rope retracts. Never allow the rope to be thrown back from the pulled-out position. This could damage the starter device.
Warm start of the engine
- Place the device on a firm and flat surface.
- Switch the ON/OFF to 1.
- Slide the choke to the "OPEN" position.
- Pull out the starter rope with a short-stroke until resistance is felt (about 100mm). A continuous, mainly fast pull will provide a strong spark and start the engine.
If the engine does not start, please proceed again according to "Cold starting the engine."
30. Stopping the device
Unlock the throttle lever. Allow the device to return to idle. Press the engine stop switch on the handle (position 0) and wait until the machine stops. If it does not stop, disconnect the spark plug connector in an emergency. Never leave the device unattended while it is running.
31. Trimming techniques
ADDITIONAL SAFETY INSTRUCTIONS
Before running your device, read notes in chapters 3 and 4 of this manual.
CAUTION
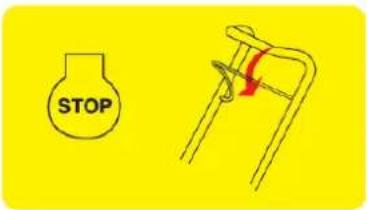
IF YOU are NOT familiar with the trimming techniques, practice with the DEVICE in the "STOP" position (turned off).
ALWAYS TRIM OR CUT AT HIGH ENGINE SPEEDS. Never run the device slowly at the beginning of (or during) the trimming operation.
ALWAYS MAKE AWAY DISTANCE IN THE WORKING AREA from cans, bottles, rocks, etc. Whirling objects can cause serious injury to users or bystanders and damage the device. If an object is accidentally knocked, immediately stop the ENGINE and check the device. Never run the device with damaged or defective parts.
Never lift the nylon cutting head above knee height during operation.
Never run the device on a slope if there is a chance of sliding or losing stability.
RELEASING THE NYLON THREAD

To release the new thread, run the engine at full throttle and tap the nylon cutting head onto the lawn. The threaded head automatically releases further threads. The blade in the protective shield cuts off the excess thread.

CAUTION: Remove grass deposits regularly to prevent overheating of the drive axle. Grass deposits occur when fibres of the weed are entangled around the shaft under the protective shield. This prevents the shaft from cooling correctly. Remove grass
deposits with a screwdriver or similar tool only when the device is switched off.
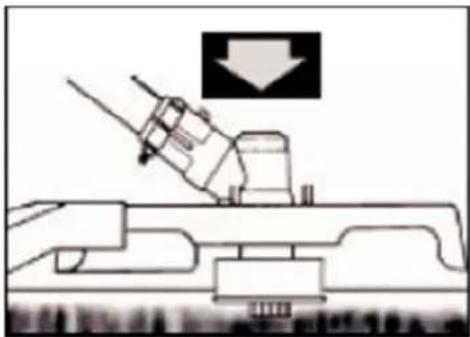
natural_image
Technical line drawing of a naval gun on a ship deck with an arrow indicating downward motion (no text or symbols)
natural_image
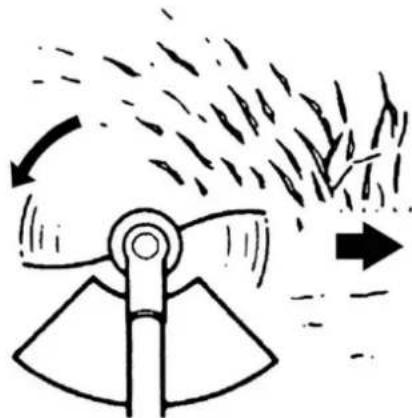
Technical line drawing of a mechanical assembly with no visible text or symbolsWhen the device is appropriately equipped with a protective shield and nylon cutting head, your device will trim unsightly weeds and large-diameter tall grass in areas along fences, walls, land, and around trees.
NOTE: Pay particular attention when trimming on brick or stone walls, etc., where rapid weed wear will occur.
Swing the trimmer's nylon cutting head horizontally from side to side. Do not tilt the nylon cutting head while working. For correct cutting height, trim in a test area beforehand. Keep nylon cutting head at the same level for even depth of cut.
TRIMMING AROUND TREES
Trim around logs with a slow approach; the thread should
not collide with the log. Walk around the tree from left to right—approach grass or weeds with the tip of the thread.
natural_image
Diagram of a mechanical device emitting particles or smoke, with no visible text or symbols32. Replacing Nylon Thread
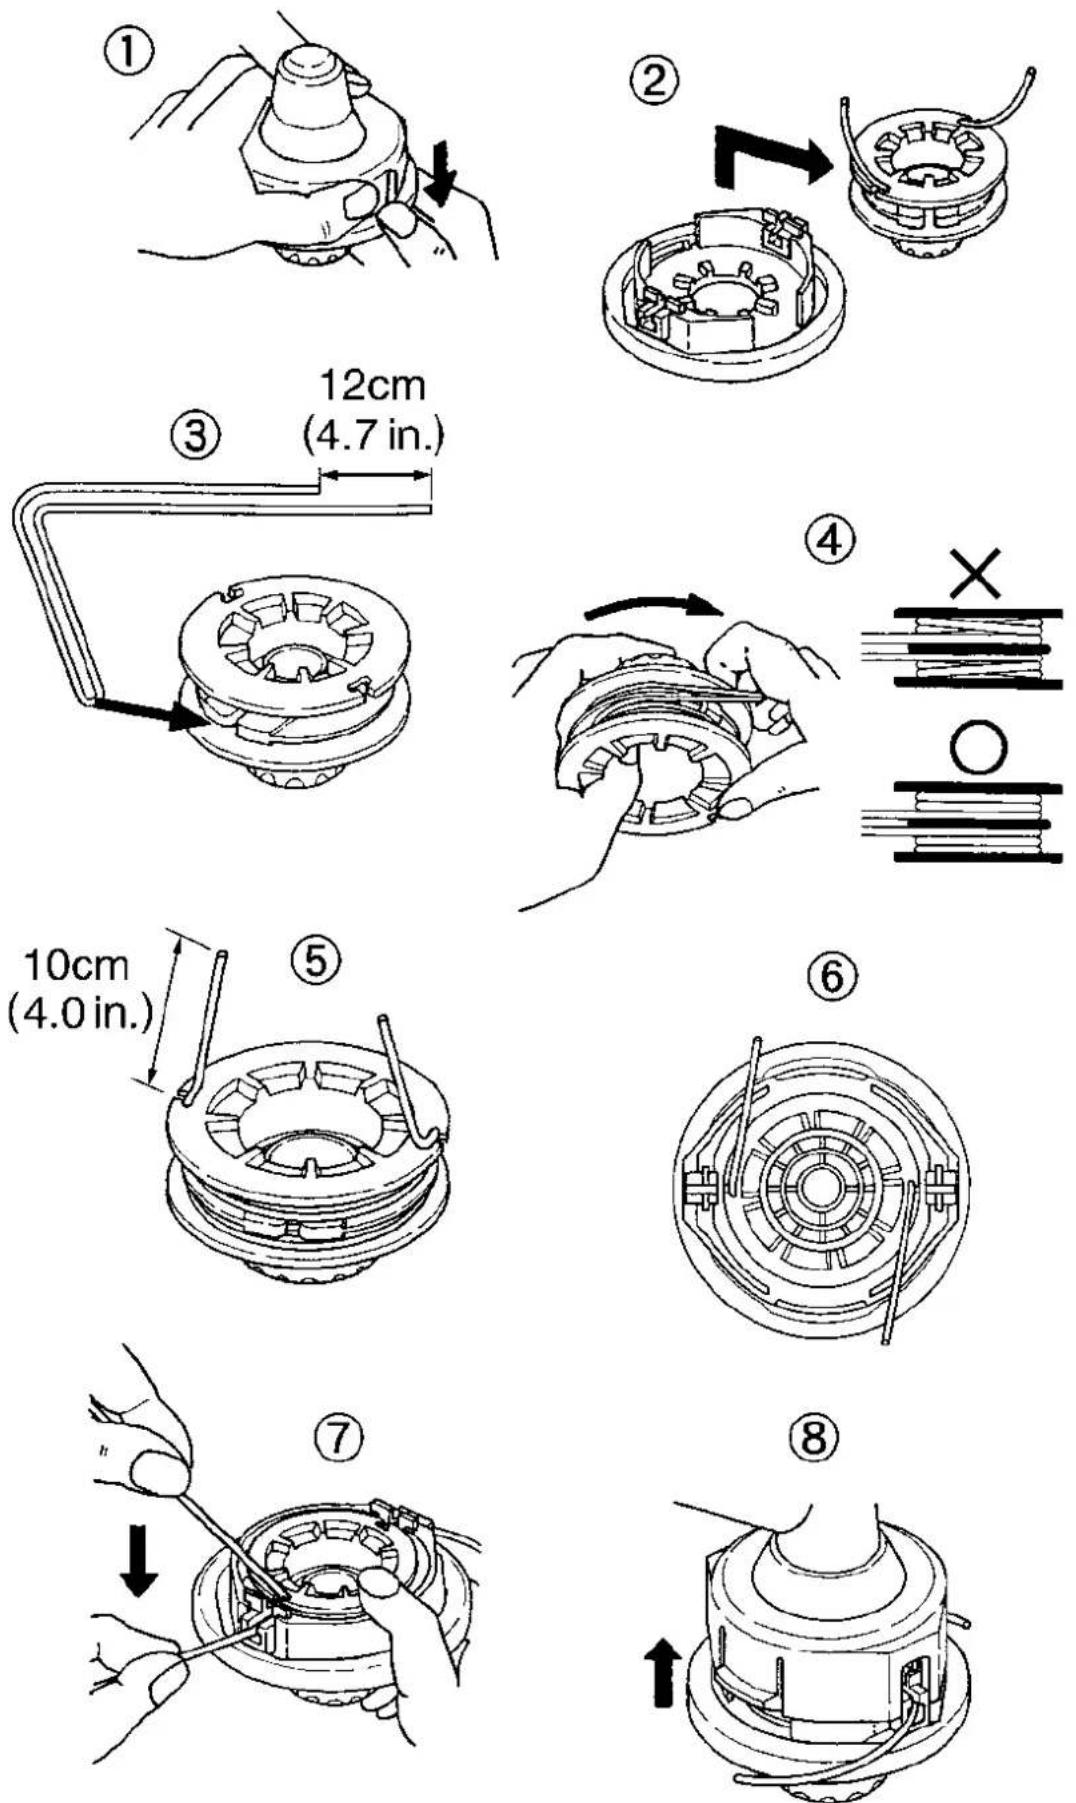
- As a replacement line, use a diameter of 2.4mm (.095in). The spool is suitable for line up to 6m (20ft) on the 10cm (4") head. Avoid using a larger cord, as this may affect trim performance.
CAUTION: For safety reasons, do not use metal-reinforced cord
- Squeeze the slotted area on both sides of the spool housing to unhook the lower cap.
- Take out the spool and pull off the old cord. Put one end of the new cord through the spool holes and pull it until the length between the two parts of the cord is the same.
- Wind the string in the correct direction as indicated on the cord.
- Hook each end of the string into the slot on the spool's edge and put the ends through the eyelets on the housing. Make sure that the spring and washers are in place.
- Hold the spool against the housing and pull the ends of the cord to release it from the slot.
- Align the slot on the lower cap with the hook on the housing and press the cap against the housing until it clicks into place.
33. Maintenance schedule
Regular checks and adjustments must be made to ensure that the petrol engine maintains its performance. Periodic maintenance also provides a long service life. See the following table for the regular maintenance cycle.
| Maintenance cycleComponent | Each use | Every month or 10h | Every 3 months or 25h | Every 6 months or 50h | Every 12 months or 100h | Every 2 years or 300h | |
| Air filter | Check | ■ | |||||
| Clean up | ■a | ||||||
| Spark plug | Check & adjust | ■ | |||||
| Exchange | ■ | ||||||
| Spark plug connector (optional) | Clean up | ■ | |||||
| Cooling fins | Audit | ■ | |||||
| Connecting elements such as screws and nuts | Check (tighten if necessary) | ■ | |||||
| Coupling | Audit | ■b | |||||
| Idle speed | Check and adjust | ■b | |||||
| Valve clearance | Check and adjust | ■b | |||||
| Combustion chamber | Clean up | 300 h after that | |||||
| Fuel | Check | ■ | |||||
| Fuel tank | Check | ■ | |||||
| Fuel line | Check | Every x years (replace if necessary) | |||||
WARNING

a. Increase maintenance intervals if working in dusty environments.
b. All maintenance work - except for that listed in the operating manual - must be carried out at regular intervals.
Work must be carried out by qualified maintenance personnel.
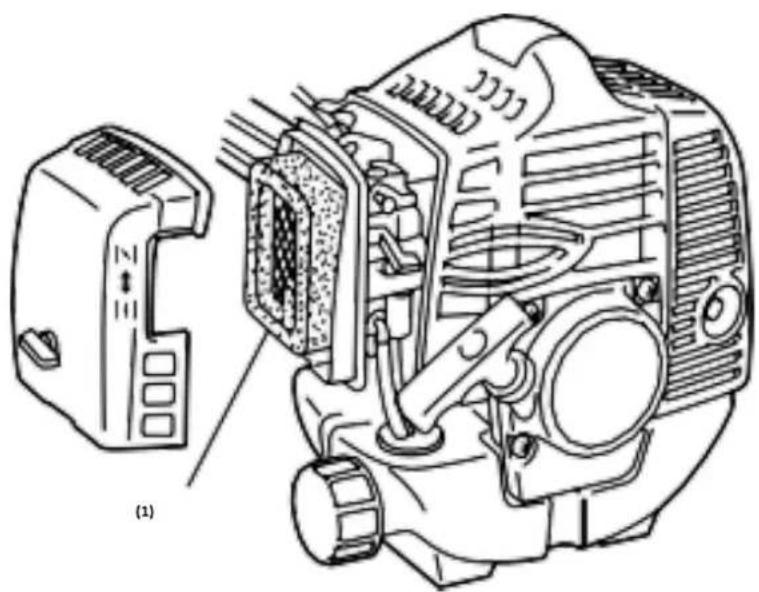
Cleaning the air filter
CAUTION: Never run the engine without the air filter.
A dirty air filter puts pressure on engine performance, increases fuel consumption, and makes starting more difficult. If you notice a loss of engine power:
1 Remove the screw on the filter cover and take out the filter.
2 Clean the filter with soap and water. Never use petrol or benzene!
3 Let the filtered air dry.
4 Put the filter back in place and fasten the filter cover with the screw.
natural_image
Technical line drawing of a mechanical assembly with no visible text or symbolsSpark plug maintenance
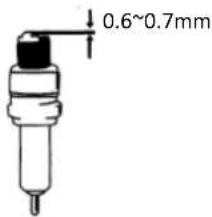
To ensure the normal operation of the engine, the ignition distance of 0.6 -0.7mm must be maintained and must be free of carbon deposits. Always carry out the following steps with the engine switched off:
- Carefully remove the spark plug connector. Do not pull on the cable but directly on the connector.
- Use the spark plug wrench supplied to unscrew the spark plug.
- Visually check the spark plug for damage and electrode burn-off,
Remove the carbon deposits.
- Check the gap with a feeler gauge and bend the electrode to the correct distance of 0.6 to 0.7mm.
- Check the spark plug washer and tighten the spark plug to a torque of 12-15 Nm.
- Put the ignition cap back on the spark plug.
text_image
0.6~0.7mmWARNING
The spark plug must be screwed down tightly; otherwise, the engine runs hot and is damaged.
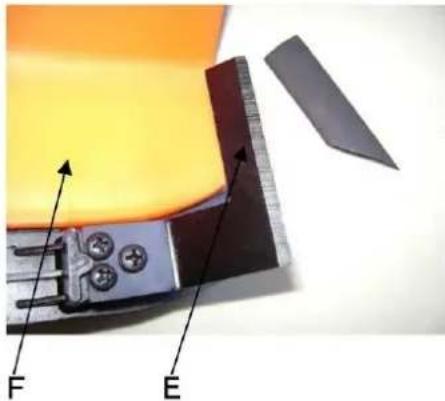
Sharpen the shielded knife
- Remove the cutting blade (E) from a protective shield (F).

- Clamp the knife in a vice.
Sharpen the knife with a flat-file.
Please make sure that you maintain the angle of the cutting edge.
Only move the grinding blade in one direction during the sharpening process.
natural_image
Close-up of a mechanical component with labeled parts F and E, showing yellow material and a ruler-like structure (no text or symbols beyond labels)34. Storage of the device

WARNING: Failure to follow these steps may result in the formation of deposits in the carburettor. This will make it challenging to start later and can cause permanent damage.
- Perform all general maintenance as described in the maintenance section of your user manual are recommended.
- Clean the exterior of the device, drive axle, protective shield, and nylon cutting head.
- Drain the fuel from the fuel tank.
- After draining the fuel, start the engine.
- Let the engine run in neutral until it stops by itself. This will clean the carburettor of fuel.
- Let the engine cool down (about 5 minutes).
- Use a spark plug wrench, and remove the spark plug.
- Pour 1 teaspoon of clean 2-stroke oil into the combustion chamber. Pull the starter cord slowly several times to coat the internal components. Replace the spark plug if necessary.
- Store the device in a cool, dry place away from any source of ignition, such as an oil burner, water heater, etc.
TRANSPORT PROTECTION
Ensure the device is well-secured during transport to avoid fuel loss, damage, or injury. Install transport protection for metal sheets during transport and storage.
35. Troubleshooting
- Difficulties during commissioning
| Situation | Cause | Solution | |
| No ignition spark | Spark plug | Carbon deposit between the diodes of the spark plug | Clean the spark plug. Adjust the gap 0.6~0.7mm, replace the spark plug |
| other | Ignition coil defective flywheel magnet too weak | Replace the ignition coil or flywheel | |
| Weak ignition spark | Compression | Too much petrol in the combustion chamber, lousy fuel or water in the tank | Remove the spark plug and allow it to dry, and replace the fuel. |
| The carburettor does not pump oil anymore. | Oil line blocked | Cleaning the carburettor and cleaning the pipes | |
| regular oil supply, but weak compression | Piston rings are worn, the spark plug is not screwed down, the cylinder head is not tight, wrong valve clearance or ignition timing. | Replace the screw tight to replace or adjust | |
| regular oil supply and proper ignition spark | Poor contact between the ignition cap and spark plug | Replace or check | |
- Difficulties during operation
| Situation | Cause | Solution |
| The engine does not reach the speed | Choke is in "COLD START" position, the exhaust system is blocked no air supply, moving elements worn, ignition spark weak too large valve clearance, cylinder head sooty | Open choke, replace exhaust system Check or replace ignition coil, adjust flywheel, spark plug |
| Operating materials are leaking | Lines to carburetor blocked Spark plug spacing incorrect | Replace lines and carburetor Adjust gap dimension |
| Motor-Noises | Wrong choke position,Camshaft damaged | Check/replace camshaft |
| Carburetor leaking | Failure of the check valve on the tank cap | Replace the fuel filler cap |
| Carburetor gasket is worn out | Replace carburetor or gasket |

If no troubleshooting solves the problem, please contact the FUXTEC customer service. Only use original parts approved by the manufacturer. Otherwise, there is a risk of danger.
36. Customer Service
Have your purchased device repaired only by qualified personnel and only with original spare parts. This will ensure that the safety of the device is maintained.
Please contact the manufacturer FUXTEC GmbH directly at www.fuxtec.co.uk at any time regarding maintenance work and the procurement of spare parts.
37. Warranty
The warranty period is 24 months from the date of purchase. Please keep your proof of purchase in a safe place. Excluded from the warranty are wearing parts and damage caused by improper use, use of force, technical modifications, use of incorrect accessories or non-original spare parts, and repair attempts by non-qualified personnel. Warranty repairs may only be carried out by authorized specialist dealers.
38. Disposal note
Please contact your local municipality for the disposal of the device. Please dispose of all operating materials such as petrol and oil in advance.
39. EU Declaration of Conformity
We hereby declare,
FUXTEC GMBH
KAPPSTRAße 69, 71083 HERRENBERG, GERMANY
that the device described below, by its design and construction and in the version marketed by us, complies with the relevant essential health and safety requirements of the EC directives.
| Designation of the device: | Petrol motor scythe/lawn trimmer |
| Engine type: | FX-MS125 |
| Trademark: | FUXTEC |
| Power consumption/displacement | 25,4cm^3 |
| Measured sound power level | LWA =107.7dB |
| Guaranteed sound power level | LWA=114dB |
| Conformity procedure 2000/14/EC according to Annex V | |
| Relevant EC straightening thread: | EC machine straightening thread 2006/42/EC |
| EC directive on electromagnetic compatibility (EMC) 2004/108/EC | |
| EC-directive thread Noise emission (2000/14/EWG & 2005/88/EC) | |
| Applied harmonized | EN ISO 11806-1 |
| Standards: | EN ISO 14982 |
Manufacturer signature/date:
C. Fille
Leonhard Zirkler, 06.12.2022
Name and address of the person authorized to compile the technical documentation established within the Community
L. Zirkler
FUXTEC GMBH - KAPPSTRAße 69, 71083 HERRENBERG, GERMANY
VERSION FRANCAISE
MODE D'EMPLOI ORIGINAL
natural_image
Exterior view of a Fuxtev-branded manual sprinkler with attached sensor and clamp (no text or symbols visible)natural_image
Person using a mechanical device with attached wires and a circular component (no visible text or symbols)natural_image
Technical illustration of mechanical components including crimping tools, a motor, and a cylindrical housing (no text or symbols)natural_image
Technical line drawing of a mechanical component assembly (no text or symbols)natural_image
Line drawing of a hand using a tool to adjust or install a mechanical component (no text or symbols present)natural_image
Diagram of a mechanical device with attached spring and lever, positioned over a field with upward arrows (no text or symbols)natural_image
Technical line drawing of a mechanical device with a downward arrow indicator (no text or symbols present)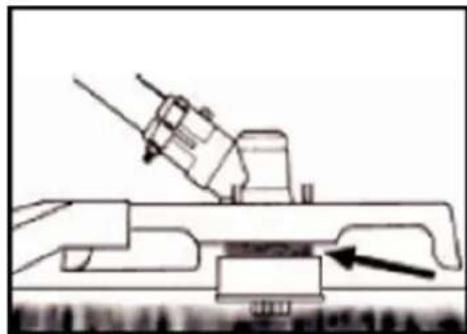
natural_image
Technical line drawing of a mechanical assembly with an arrow indicating a component (no text or symbols present)natural_image
Diagram of a mechanical fan or impeller with motion arrows indicating airflow or movement (no text or symbols)DÉCOUPAGE AUTOUR DES ARBRES
natural_image
Technical line drawing of an automotive engine showing internal components and a close-up view (no text or symbols)text_image
0.6~0.7mm
AVERTISSEMENT
natural_image
Close-up of a mechanical component with labeled parts F and E, showing internal components and a cutting tool (no text or symbols beyond labels)54. Stockage de la machine

natural_image
Simple line drawing of a tool or device with no text or symbolsnatural_image
Black and white photo of a FUTECV-branded machine tool with attached sensor array (no visible text or symbols)text_image
15m (50 ft)TENERE SEMPRE 15 METRI DI DISTANZA DALLE ALTRE PERSONE


NON FUMARE O USARE E FIAMME LIBERE VICINO L'APPARECCHIO

AVVERTENZE: PERICOLO DI COMPONENTI CALDI

SPEGNERE SEMPRE IL DISPOSITIVO E ASSICURARSI CHE L'UTENSILE DA TAGLIO SIA FERMO PRIMA DI PULIRLO, RIMUOVERLO O REGOLARLO.

AVVERTENZE: UMI DI SCARICO DI QUESTO PRODOTTO CONTENGONO SOSTANZE CHIMICHE CHE POSSONO CAUSARE CANCRO, DIFETTI ALLA NASCITA E ALTRO.

VVERTENZE! NON CAMBIARE MAI IL MOTORE. L'USO IMPROPRIO DEL DISPOSITIVO PUÒ CAUSARE LESIONI PERSONALI GRAVI O MORTALI.

MASSIMA ROTAZIONE DEL MANDRINO (con testina a filo): 6600 min ^1

text_image
Illustration showing five different safety gear and equipment installation steps, labeled (1), with illustrations of a worker adjusting gear.natural_image
Person holding a mechanical device with attached tubing against a black background (no visible text or symbols)natural_image
Technical illustration of mechanical components including a tool, bracket assembly, and cylindrical housing (no text or symbols)natural_image
Technical line drawings of a mechanical assembly with tool holders and a curved component (no text or symbols)natural_image
Line drawing of a hand using a hammer to adjust or install a small object (no text or symbols present)natural_image
Diagram of a mechanical device with a curved hook and lever, positioned on a textured surface with directional arrows (no text or symbols)natural_image
Illustration of a naval gun firing from a ship deck, with no visible text or symbols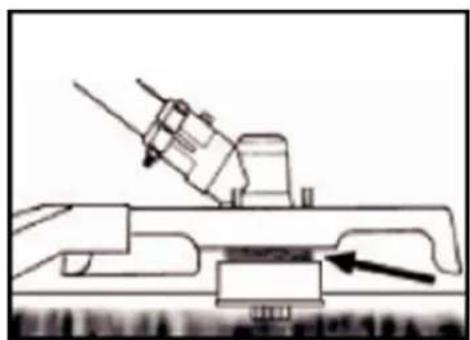
natural_image
Technical line drawing of a mechanical assembly with a tool and component (no text or symbols)natural_image
Diagram of a mechanical device emitting particles or smoke, with no visible text or symbolsTAGLIARE INTORNO GLI ALBERI
text_image
0.6~0.7mm taAVVERTENZE
natural_image
Close-up of a mechanical component with labeled parts F and E, showing internal components and a ruler-like structure (no readable text or symbols beyond labels)natural_image
Black and white photo of a FUXTEC-branded manual scrubber with attached sensor device (no visible text or symbols)text_image
15m (50 ft)MANTENGA SIEMPRE 15 METROS DE DISTANCIA CON OTRAS PERSONAS

NIVEL DE RUIDO GARANTIZADO CUMPLE CON LAS NORMAS LEGALES SOBRE RUIDO

NO FUMAR NI UTILIZAR LLAMAS LIBRES CERCA DEL APARATO

text_image
Illustration showing five different safety gear and equipment installation steps, labeled (1)natural_image
Person holding a mechanical device with attached tubing against a black background (no visible text or symbols)natural_image
Technical illustration of mechanical components including crimping tools, fasteners, and a motor assembly (no text or symbols)text_image
Technical diagram showing two mechanical assembly steps with labeled components and a directional arrow indicating motion or transformation.Montaje de la hoja
text_image
2 3Pasos:
MEZCLA DE COMBUSTIBLE
natural_image
Line drawing of a hand holding a small mechanical component (no text or symbols)natural_image
Diagram of a mechanical device with attached pipe and lever, showing directional arrows on ground (no text or symbols)natural_image
Technical line drawing of a naval gun on a ship deck with an arrow indicating downward motion (no text or symbols)
natural_image
Technical line drawing of a mechanical assembly with no visible text or symbolsnatural_image
Diagram of a mechanical device emitting particles or smoke, with arrows indicating direction (no text or symbols)CORTANDO ALREDEDOR DE LOS ÁRBOLES
natural_image
Technical line drawing of an electric motor assembly with a close-up view of its internal components (no text or labels)natural_image
Close-up of a yellow and orange surface with a ruler and two gray geometric shapes (no text or symbols visible)natural_image
Black and white photo of a FUXTECY mechanical device with attached sensor and motor (no visible text or symbols)natural_image
Person using a handheld device to lift a cylindrical object, no visible text or symbolsnatural_image
Technical illustration of mechanical components including crimping tools, a motor assembly, and a cylindrical housing (no text or symbols)natural_image
Technical line drawings of a mechanical assembly with no visible text or symbolsnatural_image
Line drawing of hands using a tool to adjust or install a mechanical component (no text or symbols present)natural_image
Technical line drawing of a mechanical device with no visible text or symbols
text_image
|←| (2) ↑ ||↓| (3)(1) Alavanca de estrangulamento(2) fechada(3) aberta
natural_image
Diagram of a mechanical device with a curved arm and directional arrows, no text or symbols presentnatural_image
Technical line drawing of a mechanical device with a downward arrow indicator (no text or symbols present)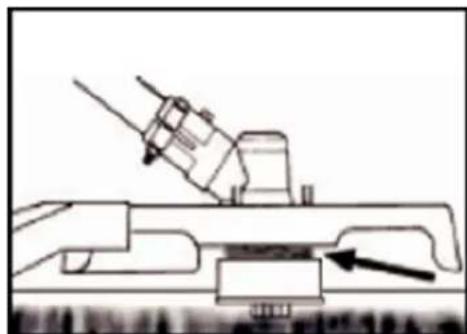
natural_image
Technical line drawing of a mechanical assembly with no visible text or symbolsnatural_image
Diagram of a mechanical device emitting particles or smoke, with arrows indicating direction (no text or symbols)CORTE EM TORNO DE ÁRVORES
natural_image
Technical line drawing of a mechanical assembly with a component labeled (1), showing internal components and no readable text or symbols.text_image
0.6~0.7mm a
ADVERTÊNCIA
natural_image
Close-up of a mechanical component with yellow and black parts, showing a ruler and a flat blade (no text or symbols visible)da borda de corte.
natural_image
Exterior view of a FUXTECY mechanical device with attached sensor and clamp (no text or symbols visible)WAARSCHUWING: GEVAAR VOOR HETE ONDERDELEN

SCHAKEL DE MACHINE ALTIJD UIT EN ZORG ERVOOR DAT HET SNIJGEREEDSCHAP IS GESTOPT VOORDAT U HET REINIGT, VERWIJDERT OF AFSTELT.

WAARSCHUWING: UITLAATGASSEN VAN DIT PRODUCT INBEGREPEN CHEMICALIËN DIE KANKER VEROORZAKEN, GEBOORTEAFWIJKINGEN EN KAN LEIDEN TOT MEER

AARSCHUWING! VERANDER NOOIT DE MACHINE. ONJUIST GEBRUIK VAN DE MACHINE KAN ERNSTIG OF DODELIJK PERSOONLIJK LETSEL VEROORZAKEN.

MAXIMALE SPILSNELHEID (GRASTRIMMER):6600 TPM

MAXIMALE SPILSNELHEID (BOSMAAIER):7100 TPM
natural_image
Person using a handheld device to lift a cylindrical object, no visible text or symbolsnatural_image
Technical line drawing of mechanical components including a tool, bracket, and bolts (no text or symbols)
natural_image
Close-up of a mechanical device with black and white components, no visible text or symbols
natural_image
Mechanical component with hexagonal and circular cutouts, no visible text or symbolsnatural_image
Technical line drawing of a mechanical assembly with bolts and a curved component (no text or symbols)
text_image
Top/Bottomnatural_image
Line drawing of hands using a hammer to adjust or install a small object (no text or symbols present)natural_image
Diagram of a mechanical device with a curved pipe and lever, positioned above ground with directional arrows (no text or symbols)natural_image
Diagram of a naval gun firing from a ship deck, showing blade and gear components (no text or symbols)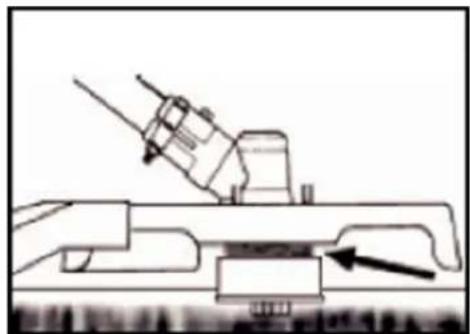
natural_image
Technical line drawing of a mechanical assembly with an arrow indicating a component (no text or symbols present)natural_image
Diagram of a mechanical device emitting particles or smoke, with arrows indicating direction (no text or symbols)natural_image
Technical line drawing of an automotive engine showing internal components and a close-up view (no text or symbols)Bougie onderhoud
text_image
0.6~0.7mm 5 Nm.
WAARSCHUWING
natural_image
Close-up of a yellow-orange material sample with a ruler and a black triangular object nearby (no text or symbols visible)BESCHERMING TEGEN TRANSPORT
natural_image
Black and white photo of a FUTECV-branded manual tool with attached sensor and clamp (no visible text or symbols)natural_image
Close-up of a person holding a mechanical device with wires and connectors (no visible text or symbols)natural_image
Technical line drawing of mechanical components including a clamp, bracket, and bolts (no text or symbols)
natural_image
Close-up of a mechanical device with metallic rod and black cable, no visible text or symbols
natural_image
3D rendering of a mechanical component with cylindrical and rectangular features (no text or symbols visible)natural_image
Technical line drawing of a mechanical assembly with bolts and a curved component (no text or symbols)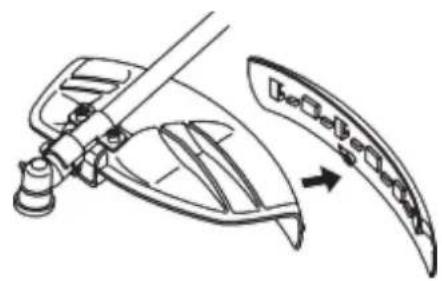
natural_image
Technical line drawing of a mechanical component with a curved blade and arrow indicating direction (no text or symbols)Montering av plåten
text_image
2 3Trappsteg:
natural_image
Line drawing of hands using a tool to adjust or install a component (no text or symbols present)natural_image
Diagram of a mechanical device with a curved handle and attached bracket, positioned on a textured surface with directional arrows below (no text or symbols)OM DU INTE ÄR BEKANT MED TRIMTEKNIKERNA, ÖVA MED MASKINEN I "STOPP"-LÄGE.
natural_image
Diagram of a naval gun firing from a ship deck, showing blade and gear components (no text or symbols)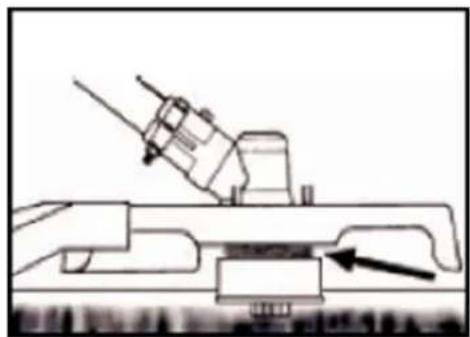
natural_image
Technical line drawing of a mechanical assembly with an arrow indicating a component (no text or symbols present)natural_image
Diagram of a mechanical device emitting smoke or vapor, with arrows indicating direction (no text or symbols)natural_image
Technical line drawing of an automotive engine showing internal components and a close-up view (no text or symbols)text_image
0.6~0.7mm
WARNING
natural_image
Close-up of a yellow fabric sample being placed on a black electronic device with a ruler for scale (no text or symbols visible)POLSKA WERSJA JEZYKOWA
ORYGINALNA INSTRUKCJA OBSŁUGI
natural_image
Black and white photo of a FUTECV-branded manual tool with attached sensor and clamp (no visible text or symbols)natural_image
Person holding a mechanical device with attached wires, black and white photo (no visible text or symbols)natural_image
Technical illustration of mechanical components including crimping tools, a motor assembly, and a cylindrical housing (no text or symbols)natural_image
Technical line drawings of a mechanical assembly with two views (top and side), no text or symbols present.Montaż blachy
text_image
1 2 3 4 5 6 7Kroki:
natural_image
Line drawing of hands using a tool to adjust or install a small object (no text or symbols present)natural_image
Diagram of a mechanical device with a curved arm and directional arrows, no text or symbols presentnatural_image
Illustration of a naval gun firing from a ship deck, with no visible text or symbols
natural_image
Technical line drawing of a mechanical assembly with no visible text or symbolsnatural_image
Diagram of a mechanical device emitting particles or smoke, with arrows indicating direction (no text or symbols)PRZYCINANIE WOKÓŁ DRZEW
natural_image
Technical line drawing of a mechanical assembly with a component labeled (1), showing internal components and no readable text or symbols.natural_image
Two colored geometric shapes: a yellow-orange rectangle and a dark gray triangular shape, with a ruler for scale (no text or symbols)
natural_image
Line drawing of a utility lawn mower with visible blades and handle, no text or symbols present
natural_image
Orange icon of a person reading a book (no text or symbols)
INHALT
DEUTSCHE VERSION 7
ENGLISH VERSION....26
VERSION FRANCAISE 43
POLSKA WERSJA JEZYKOWA....151
INHALT
DEUTSCHE VERSION 7
- Introduction and safety 26
- Safety instructions for devices 27
- Presentation 29
- Information and warnings.... 30
- Essential instructions for assembling the mower 32
- Use of the mower 34
- Maintenance work 37
- Safety instructions.... 39
- Storage 40
- Disposal 41
- Technical data.... 41
- EU Declaration of Conformity 42
VERSION FRANCAISE 43
POLSKA WERSJA JEZYKOWA....151
text_image
Technical diagram showing a mechanical assembly with labeled component '1' and directional arrow indicating motion or assembly.natural_image
Technical line drawing of a mechanical tool or bracket assembly (no text or symbols)natural_image
Illustration of hands holding a tool with a curved arrow indicating motion (no text or symbols)
natural_image
Illustration of a hand holding a tool with an arrow indicating direction, no text or symbols presentMÄHEN MIT HECKAUSWURF
natural_image
Technical line drawing of a mechanical bracket assembly with mounting holes and a cylindrical component (no text or symbols)Ölwechsel
Achtung!
Recycling raw materials instead of waste disposal.
Hereby we declare that the above mentioned machine meet the essential safety and health requirements of the above stated EC directives. Any manipulation or change of the machine not being explicitly authorized by us in advance renders this document null and void.
13. Introduction and safety
Never allow children or persons unfamiliar with these instructions to use the garden tool. Children should be supervised to ensure they do not play with the appliance.
Intended use
This appliance is intended exclusively for mowing lawns in private areas.
The device must be used following the descriptions
and safety instructions are given in this user manual. Any other use is not as intended. Uses not following the intended use will result in forfeiture of the warranty and rejection of any responsibility on the part of the manufacturer part is liable for all damages to third parties and their property. Only operate the device in the technical condition prescribed and delivered by the manufacturer.
Unauthorised modifications to the device exclude the manufacturer's liability for any resulting damage.
Vibration and noise reduction
To reduce the impact of vibration and noise, limit working time, use lower vibration and noise settings and wear personal protective equipment.
Observe the following points to keep vibration and noise pollution low:
- Only use the product as intended, following the design and instructions.
• Make sure that the product is in perfect condition and well-maintained.
• Use the right accessories and make sure they are in good condition. - Hold the product firmly but not tensely by the handles provided.
- Maintain the product according to these instructions and keep it well-lubricated.
- Plan your working hours according to these instructions to spread a higher workload over a more extended period.
Emergency
- Familiarise yourself with the product use by reading the instruction manual thoroughly. Remember the safety instructions and follow them carefully. That will help you prevent risks and hazards.
- Always be attentive when using the product to recognise and react to hazards early. Quick intervention can prevent severe injuries and property damage.
Residual risks
Even if you operate this device according to the instructions, there are always residual risks. The following hazards may occur in connection with the design and construction of this device:
• Injuries and property damage caused by flying parts.
• Hearing impairment if you do not wear suitable hearing protection or use the device for an extended period.
- Damage to health results from hand-arm vibrations if the device is used for a long time or is not guided correctly and maintained.
14. Safety instructions for devices
General safety instructions
- For your safety and the safety of others, read this instruction manual and its safety instructions before using the appliance. Please keep the operating instructions and your safety instructions in a safe place for later use and keep them handy for every application.
- Pass on the operating instructions with the device if there is a change of ownership.
- Persons operating the device must not be under the influence of intoxicants (e.g., alcohol, drugs, or medication).
- Only operate the device in the technical condition specified and delivered by the manufacturer. Unauthorised modifications to the device exclude the manufacturer's liability for any resulting damage.
- Use the device only in daylight or under good artificial lighting.
- Only use the device in dry weather conditions. Please keep it away from rain or wetness. The ingress of water into the device increases the risk of electric shock.
- Switch off the device and remove the battery in the following conditions:
♦ if the device is left unattended;
♦ if the device starts to vibrate excessively.
Before use
- Before starting work, familiarise yourself with the device and its functions and controls.
- Check the device for signs of wear or damage before commissioning and after an impact.
- Do not use a device whose switch is defective and can no longer be switched on or off.
- Check that all nuts, bolts, and screws are tight to ensure that the device is operated safely.
- Never use a device with damaged or missing parts. Instead, have them repaired or, if necessary, replaced by a qualified specialist or specialist workshop.
- Always wear sturdy shoes, long trousers, and the appropriate personal protective equipment (safety goggles, ear protectors, work gloves with a good grip, etc.) when working with or on the device. Wearing personal protective equipment reduces the risk of injury.
At use
Do not switch on the appliance when people (especially children) or animals are in the immediate vicinity. Make sure that children do not play with the device.
Stop work if you notice that people (especially children) or pets are nearby.
Working on steep slopes can be dangerous. Make sure you have a firm footing and mow slowly.
Always mow across the hill and not up and down. Be especially careful when changing direction.
There is a risk of tipping over!
Do not mow on steep slopes. Be careful when moving backwards while cutting and pulling the mower on yourself.
Refrain from tiling the mower when starting the engine.
Keep a safe distance as indicated by the handle frame.
Wait to switch on the engine until your feet are safe from the cutting blade. Be careful and do not reach into the rotating cutting blade. Please switch off the device before tipping or transporting it, e.g., from/to lawns or over paths. Never drive over gravel while the engine is running. There is a risk of being hit by stones!
Before lifting or transporting the mower, turn off the engine
until the cutting blade stops. Only adjust the cutting height once the engine is switched off and the cutting blade has reached a standstill. Never open the discharge flap while the engine is running.
Before removing the grass catcher, switch off the engine and wait until the cutting blade has stopped. After emptying the grass catcher, carefully reattach it and ensure that the grass catcher is securely attached to the device. If possible, do not mow wet grass. Do not use the garden tool in an explosive environment with flammable liquids, gases, or dust. When you stop work, never leave the device unattended and keep it in a safe place.
After use
Switch off the device, and only put the device in a safe place.
Do not store the appliance within reach of children. Make sure that the ventilation slots in the device are clean.
Keep all nuts, bolts and screws tightened to ensure the mower is in safe working condition.
Check the grass catcher frequently for wear or damage.
Only use a cutting blade designed for this device.
Please follow the installation instructions provided and remove the battery beforehand.
Only have repairs carried out by a qualified technician or service centre.
15. Presentation

text_image
1 2 3 4 5 6 7 8 UXTEV®Figure 1: Device
- On/off lever handle
- Upper spar
- Wing screw
- Lower spar
- Air filter cover
- Primer pump
- Oil filler neck
- Catcher basket cover
16. Information and warnings
 | Engine displacement: 79.88 cm3 |
 | Please only fill up with average petrol with an octane rating of at least 95. |
 | Risk of injury: keep your hands and feet away! |
 | Attention: please read the operating instructions carefully. Before using the mower for the first time, fill in at least 0.45l of engine oil with a code of 15W-40 or higher! |
 | The sound power level of the mower |
 | Press the primer pump at least three times during a cold start! |
 | To stop the engine, release the throttle! |

text_image
79.8CC 1.5kw/3000min⁻¹ 406mm 25-65mm/3 grades CE| Mower performance data + warnings to wear suitable work clothing (gloves, sturdy footwear and ear protection). | ||
 | Read entire operating instructions before using this enginePrzed przystąpieniem do użytkowania przeczytaj instrukcję. | Warnings:Please read the operating instructions carefully.Before adding petrol, when the engine is hot, allow the engine to cool down for a few minutes.Otherwise, any spilt gasoline may ignite.Attention harmful exhaust fumes: never start the engine indoors, and do not run it even when the door or window is open! |
 | Gasoline is extremely flammale, allow the engine to cool 2 minutes before refueling,Benzyna jest bardzo latwopalna, pozwól silnikowi ostygnąć 2 minuty przed tankowaniem. | |
 | Do not start or run engine in enclosed area, even if doors or windows are open,Nie uruchamiaj siłka w zamikiętym pomieszczeniu,naweł jest drzwi lub okna są obwarte. | |
 | Summary of warnings (from top left to bottom right):- Caution-Risk of burns-Flying parts-Risk of injury when the blade is running- Wait for the rotating blade to stop completely-Wear appropriate protective clothing- Read the operating instructions carefully- Do not allow other people near your work area- Before carrying out maintenance work, read the operating instructions carefully, switch off the engine and remove the spark plug.- Attention rotating blades: keep your distance.There is a risk of serious injury.- Caution: dangerous exhaust fumes- Attention: Danger of loss of limbs! | |
 | Information card:Please fill in 0.6l engine oil before using the mower for the first time. A code of 20W-40 or higher is recommended!Important note: this is not a counterpart to the above information on engine oil. Minimum specifications are given above; this card contains a recommendation! | |
17. Essential instructions for assembling the mower
Before assembling and operating the petrol device, please carefully read the entire instruction manual and the instructions.
IMPORTANT INFORMATION: The device is supplied WITHOUT FUEL AND OIL in the engine.
Your new device has been tested in the production facility, i.e., there may be a small amount of residual oil in the engine or visible on the dipstick!
Remove the device from the cardboard packaging and ensure no loose parts remain.
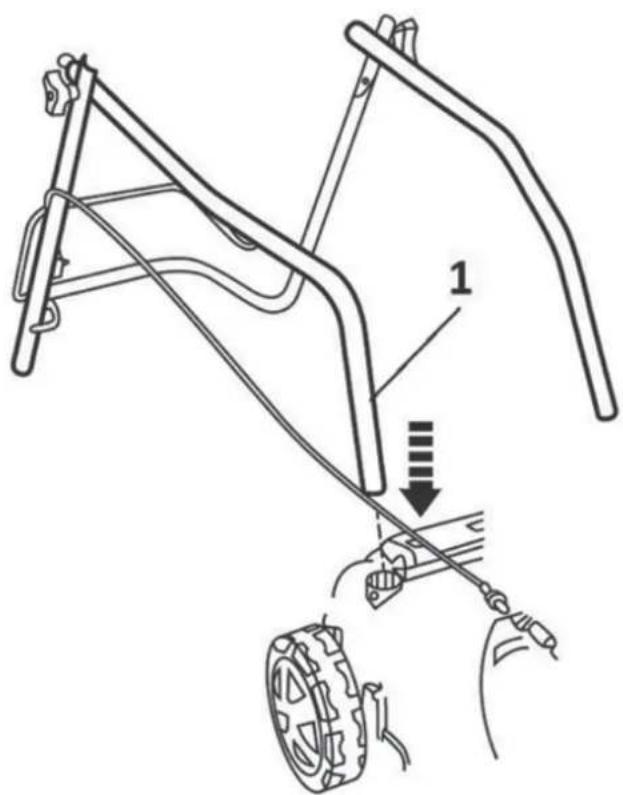
Assembly upper and lower tie bar
Carefully unfold the device's handle, taking care not to pinch or damage the control cables of the device.
Insert the lower part of the handle (see the following illustration) into the corresponding hole on the device (see arrow) and secure it with the two screws supplied - one screw with a washer on each side of the handle.
text_image
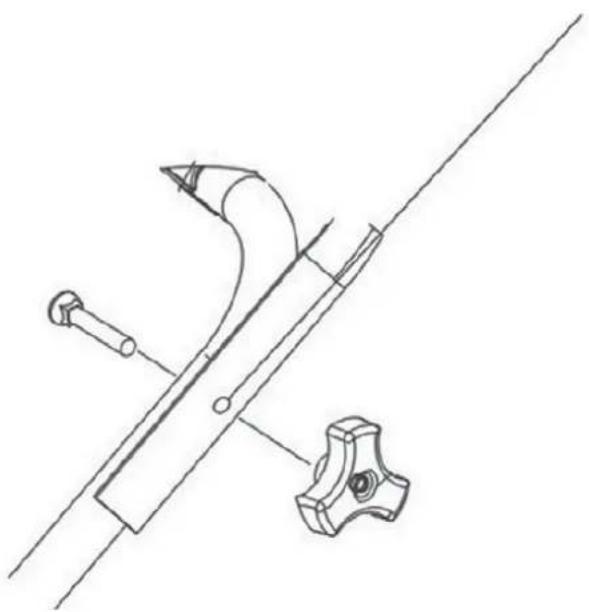
Technical diagram showing a mechanical assembly with labeled component '1' and directional arrow indicating motion or force.Attach the upper part of the handle to the lower part of the handle using the supplied screws with wing nuts (see the following figure).
natural_image
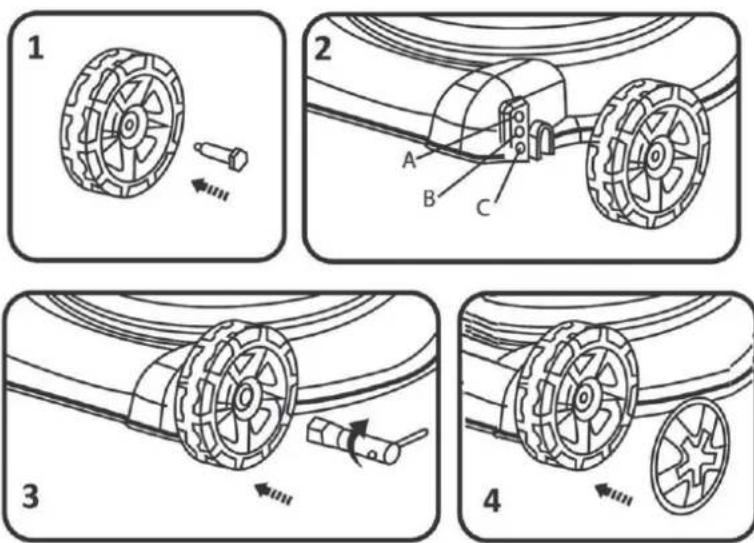
Technical line drawing of a mechanical tool or bracket assembly with no visible text or symbolsMounting the wheels and adjusting the cutting height
Push the grub screw (fig. 1) through the wheel.
Select the desired cutting height and screw the wheel into the corresponding hole (Fig. 2+3)
Cutting heights: A: 25mm B: 40mm C: 55mm.
Put on the wheel cover (Fig. 4). Repeat this procedure for all four wheels. Make sure all four wheels have been mounted at the same cutting height!
Mounting the grass catcher
Attach the textile part of the grass catcher basket to the metal frame of the basket using the plastic connectors provided.
To attach the catcher box to the mower, lift the plastic cover on the mower and then hook the catcher box onto the mower.
18. Use of the mower
Before first use:
Fill the oil into the oil tank of the engine:

text_image
MAX MINThe device is supplied without engine oil. Before the first start-up, fill engine oil SAE30 or 15W-40 (approx. 600 ml) according to the following instructions:
Place the device on a flat surface when filling the oil.
• Pull the cover with the dipstick out of the oil filler opening (see figure)
• After filling the oil, put the dipstick back into the hole and press it firmly.
- Pull out the dipstick again to check.
The oil level must be between the upper (MAX) and lower (MIN) limits (see figure).
Caution
DO NOT OVERFILL the oil tank. Otherwise, much smoke will come out of the exhaust when the mower is started.
IMPORTANT INFORMATION:
Check the oil level before each use of the device. Top up with oil if necessary. Fill oil up to the MAX level mark on the dipstick.
IMPORTANT INFORMATION:
Change the oil after the first 5 hours of operation and then after every 25 hours of operation.
ADD FUEL
After unscrewing the fuel filler cap, fill the fuel to the collar of the fuel tank, but do not overfill. Always fill with fresh, clean, and approved unleaded petrol with an octane rating of at least 95.
Caution
If you spill oil or fuel on the device when refilling, wipe it away immediately. Do not store, supply, or handle fuel near an open fire.
Caution
Fuels mixed with alcohol or fuels with ethanol or methane additives can bind moisture to themselves, leading to segregation during storage and forming acids. The acid vapours can then damage the fuel system of the device engine during storage. These fuels must not be used in the device.
IMPORTANT NOTICE:
If you do not use the device for more than 30 days, empty the fuel tank, start the engine and let it run until the fuel lines and carburettor are empty (the device will switch itself off). That prevents future engine problems.
Fill the tank with fresh fuel before the subsequent use. For more information, see the chapter on storage instructions.
Starting the engine
When cold starting the engine, press the primer pump 2-3 times to pump petrol into the carburator (see the following figure).
If the engine has already warmed up, you do not need to operate the primer pump.
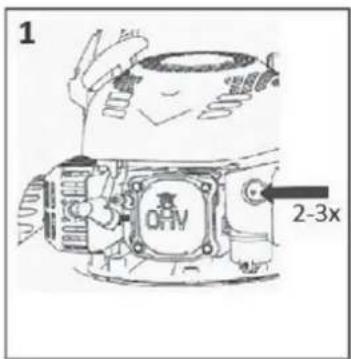
text_image
1 2-3x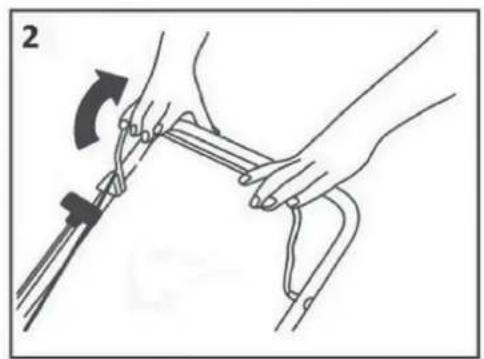
natural_image
Illustration of hands holding a tool with a curved handle and directional arrow (no text or symbols)
natural_image
Illustration of a hand holding a tool with an arrow indicating direction, no text or symbols presentPull the start/brake lever to the handle and hold it, then pull the pull cord. The engine should start after 3-4 pulls.
Releasing the start/brake lever stops the engine.
Caution
When starting the engine for the first time, there may be a slight emission of smoke as the protective layers in the engine are burnt. That is entirely normal and is not a problem.
RANGE OF APPLICATION FOR THE PETROL DEVICE
• Mowing with a collection of clippings in a grass catcher box
• Mowing with the rear discharge of the clippings
MOWING WITH THE GRASS CATCHER
When the grass catcher box is installed, the clippings are disposed of in the grass catcher box.
MOWING WITH REAR DISCHARGE
Without the grass catcher fitted, the cover of the grass catcher acts as a deflector, directing the movement of the clippings toward the ground. That creates a row of grass clippings behind the device.
19. Maintenance work
Changing the cutting knife
Attention!
We recommend contacting FUXTEC customer service and the FUXTEC workshop for this task.
Attention!
Drain the oil from the oil tank before removing the blade.
If you want to replace the cutting blade, remove the screw (see the following figure). Carry out the installation according to the illustration. Tighten the screw. The tightening torque is 40 Nm. When replacing the cutting blade, the fixing screw should also be replaced.

natural_image
Technical line drawing of a mechanical assembly with exploded view and mounting features (no text or symbols)Oil change
Attention!
We recommend that you contact professionals for this task.
The engine oil is drained via the oil filler neck. Place a suitable container to collect the used oil under the engine before opening the nozzle. Then tip the device to the side so that all the oil can drain out of the tank.
After draining the oil, replace the plug in the opening, ensure that the pin is firmly in place, and wipe off any spilt oil.
Fill the oil tank with SAE30 or 15W-40 oil. When the dipstick is inserted and screwed into the hole, the oil level should be between the Min and Max marks. Refrain from filling the oil tank overfull.
Start the engine and let it run for a short time. Switch off the engine, wait 1 minute and measure the oil level in the oil tank again. If necessary, top up the oil to the desired level. (see also chapter "Before first use").
General instructions for maintenance:
All nuts, bolts, and screws must be tightened appropriately so that the device is in a safe and operational condition. Regular maintenance is an essential requirement for the safety of the user, the maintenance of the operating condition, and the device's performance.
Never store a device with petrol in the tank in a building where the fumes could come into contact with open fire, sparks, or high temperatures.
Allow the engine to cool down before packing it in an enclosed space.
To reduce the fire risk, ensure that the device, especially the engine, the muffler and where the replacement fuel is stored, are free from grass, leaves, or excessive amounts of lubricants.
Regularly check the condition of the catcher cover and the grass catcher and replace them if damaged.
Drain the fuel in a well-ventilated area when the engine has cooled down.
Use thick work gloves when removing and installing the cutting blade.
ATTENTION:
Before doing maintenance or repair work, switch off the engine and remove the spark plug.
Check the mower regularly and ensure that all grass deposits on the underside of the chassis are removed.
Lubricate the axle of the chassis and the bearings regularly with a suitable lubricant.
Regularly check the condition of the blades, as they have a significant impact on the performance of the device. The edges should always be sharp and balanced.
Check at regular intervals that all screws and nuts are tight. Worn or incorrectly tightened bolts and nuts can cause severe damage to the engine or frame.
If the blade hits an obstacle hard, stop the device and contact FUXTEC Customer Service.
The cutting blade is made of pressed steel. For optimum mowing results, sharpen the blade regularly, approximately every 25 hours. Check that the blade is always properly balanced. To do this, insert a steel axle (with a diameter of 2-3 mm) into the middle hole. When the axis is aligned correctly, it remains in the horizontal position.
If the knife does not stay in the horizontal position, replace it.
When removing the knife, unscrew the bolt and check the knife holder. If the parts are worn or damaged, replace them.
ATTENTION:
Always use original spare parts. Low-quality spare parts can severely damage the device and pose a safety hazard.
20. Safety instructions
GENERAL SAFETY INSTRUCTIONS
This product is intended for mowing only. Please do not use it for purposes other than those it is intended for. Otherwise, there is a risk that it will be damaged or cause injury.
Never allow children or persons unfamiliar with the contents of these operating instructions to work with the appliance.
The person operating the mower is responsible for the safety of persons in the work area.
Never operate the device near other people, children, or free-roaming animals.
Before starting to mow, check the terrain where the mower is to be used and remove stones, wires, sticks, splinters, bones, and other foreign objects that could get caught or deflected and cause injury.
INSTRUCTIONS FOR USE
All nuts, pins, and bolts must be properly tightened to ensure that the device is in good working order and ready for use.
Never use the device without the protective cover.
Never use the device with a loose cutting blade. Always check that all the associated screws are tight.
Blunted knives should be replaced.
When working with a device, you must ensure that they stand securely.
Never store the device in closed or poorly ventilated areas where fumes could accumulate. The exhaust gases from the engine contain carbon monoxide, which is life-threatening.
Only work in sufficient light conditions (in twilight or with adequate artificial lighting).
Do not use the device when it is raining or when the grass is wet.
Take extra care when mowing in elevated terrain (on slopes). Always mow perpendicular to the slope, parallel to the contour, and not directly uphill/downhill.
Never leave the device running unattended; if you leave the device running, switch off the engine.
Never lift the rear of the mower when you park it and do not hold your limbs near the mowing deck or rear discharge chute when the engine is running.
Never change the speed setting of the engine.
Never transport the device with the engine running.
Stop the engine and disconnect the ignition plug in the following cases:
when carrying out work under the mower or in the discharge chute.
when you carry out maintenance, repairs, or inspections on the device.
before carrying, lifting, or transporting the device.
when you leave the device unattended or want to adjust the cutting height.
before removing and emptying the coarse discharge chute.
Stop the engine and check thoroughly for damage if a foreign object is encountered. In the event of damage, take the device to a specialised service centre for repair.
ATTENTION:
The mower fan continues to rotate for a few seconds after the engine is switched off.
If the mower vibrates abnormally, stop the engine immediately. To ensure safe operation, regularly check that the device's bolts, screws and nuts are tight.
ATTENTION: FUEL IS A HIGHLY FLAMMABLE LIQUID.
Store the fuel in a suitable container.
Fill with fuel only in an open and well-ventilated place. Do not smoke or use a mobile phone when handling power.
Only fill with fuel when the engine is switched off. Never open the fuel tank or add fuel when the engine is hot or running.
If fuel has been spilt, do not start the engine. Remove the device from where the fuel was spilt and avoid possible ignition. Do not continue work until the spilt fuel has evaporated and the fuel vapours have dissipated.
After filling the fuel, securely tighten the fuel filler cap and the fuel canister cap.
ATTENTION:
Before doing maintenance or repair work, switch off the engine and remove the spark plug.
21. Storage
If you do not use the device for an extended period, you should store it according to the following instructions. That extends the life of the device.
Drain the fuel entirely from the fuel tank and the carburettor.
Unscrew the spark plug and put a small amount of engine oil in the socket. Then pull the pull cord gently 2 to 3 times.
Clean the outer surfaces with a clean cloth. Store the device in a clean, dry place.
22. Disposal
i NOTE
Please get in touch with your local authority/city for information on disposal options,
We are recycling raw materials instead of waste disposal.
23. Technical data
| Engine | OHV, air-cooled, 4-stroke |
| Nominal power | 1.3 kW |
| Engine speed | 3000 rpm |
| Displacement | 79.8 cm ^3 |
| Starter | Wire rope hoist |
| Tank volume | 1,0l |
| Oil tank volume | 0,6l |
| Cutting heights | 25mm / 40mm / 55mm |
| Cutting width | 40.6cm |
| Diameter wheels | Front/rear 155mm each |
| Grass catcher volume | 45l |
| Sound power level | 96dB |
| Vibration | 7.759 m/s (K=1.5) |
| Weight | 18kg |
24. EU Declaration of Conformity
Hersteller / Producer FUXTEC GmbH
We declare that the abovementioned device meets the above-stated EC directives' essential safety and health requirements. Any manipulation or change of the device not being explicitly authorised by us in advance renders this document null and void.
Retention of the technical documentation: FUXTEC GmbH ● Kappstraße 69 ● 71083 Herrenberg ● Germany, L. Zirkler, Managing Director
Herrenberg, 21 ^st of December
C. Jille
text_image
Technical diagram showing a mechanical assembly with labeled component '1' and directional arrow indicating motion or assembly.natural_image
Technical line drawing of a mechanical tool or bracket assembly (no text or symbols)natural_image
Illustration of hands holding a tool with a curved arrow indicating rotation (no text or symbols)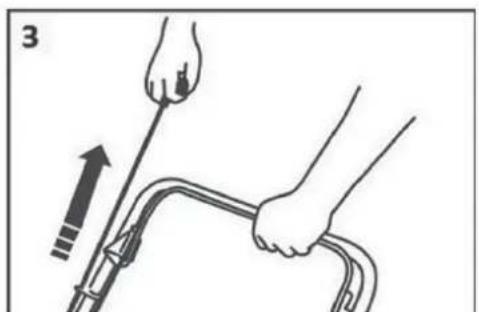
natural_image
Illustration of hands holding a tool with an arrow indicating direction (no text or symbols)natural_image
Technical line drawing of a mechanical assembly with exploded view and mounting features (no text or symbols)Changement d'huile
Attention!
Fabricant / Producer FUXTEC GmbH
Kappstraße 69, 71083 Herrenberg Allemagne / Germany
Tel.: +49 (0)7032 95608 88
Fax: +49 (0)7032 95608 89
Email: info@fuxtec.de Web: www.fuxtec.de
Hereby we declare that the above mentioned machine meet the essentialsafety and health
requirements of the above stated EC directives. Any manipulation or change of the machine not
being explicitly authorized by usin advance renders this document null and void.
Consensation des documents techniques : FUXTEC GmbH ● Kappstraße 69 ●
71083 Herrenberg ● Germany, T. Gumprecht, Direction
Herrenberg, 21.12.2023
C. Jille