FX-RME43 - Lawn mower Fuxtec - Free user manual and instructions
Find the device manual for free FX-RME43 Fuxtec in PDF.

| Product type | Corded electric lawn mower |
| Brand | Fuxtec |
| Model | FX-RME43 |
| Motor | Electric motor 220-240 V / 50 Hz |
| Power | 1200 watts |
| Cutting width | 440 mm |
| Cutting heights | 25 mm to 75 mm (6 positions) |
| Grass collection bag capacity | 45 liters |
| Front wheel diameter | 170 mm |
| Rear wheel diameter | 220 mm |
| Weight | 12 kg |
| Sound power level | 96 dB |
| Main functions | Grass collection, mulching (insert included) |
| Cutting height adjustment | Central lever, 6 positions |
| Bag filling indicator | Level window (open when empty, closed when full) |
| Safety | Motor stop when handle released, splash guard |
| Handle | Foldable, height-adjustable (3 positions) |
| Cable length | Not specified but integrated cable holder |
| Storage | Foldable handle for compact storage |
| Maintenance | Blade replacement recommended every 2 years or 50 hours |
| Warranty | 2 years (legal compliance) |
| Customer service | FUXTEC GmbH, Germany, phone +49 70329560888 |
Frequently Asked Questions - FX-RME43 Fuxtec
User questions about FX-RME43 Fuxtec
0 question about this device. Answer the ones you know or ask your own.
Ask a new question about this device
Download the instructions for your Lawn mower in PDF format for free! Find your manual FX-RME43 - Fuxtec and take your electronic device back in hand. On this page are published all the documents necessary for the use of your device. FX-RME43 by Fuxtec.
USER MANUAL FX-RME43 Fuxtec
natural_image
Line drawing of a lawn mower with 'SUXTEC' branding, shown in gold outline against black background (no text or symbols on the diagram itself)
natural_image
Orange icon of a person reading a book (no text or symbols)
Inhalt
DEUTSCHE VERSION....9
ENGLISH VERSION 25
VERSION FRANÇAISE 40
- Introduction and security 25
- Safety instructions for lawn mowers.... 26
- Symbols placed on the product.... 27
- Product details.... 29
- Assembly 30
- Adjusting the cutting height 32
- Grasscatcher 33
- Mulching....33
- Starting the lawn mower 33
- Stopping the lawn mower 34
- How to Use the Cable Holder 34
- Grass collector 34
Manual\_FX-RME43\_Int24\_rev1
- Working instructions 35
- Tips for the mowing process 36
- Storage and maintenance 36
- Specifications.... 38
- Warranty.... 38
- Disposal 38
- Customer service 39
- Copyright 39
VERSION FRANÇAISE 40
natural_image
Line drawing of a lawn mower with attached equipment, labeled Abb. 5b (no text or symbols on the diagram itself)natural_image
Line drawing of a lawn mower with a magnified inset showing the blade assembly (no text or symbols)natural_image
Technical line drawing of a mechanical clamp or bracket assembly (no text or symbols)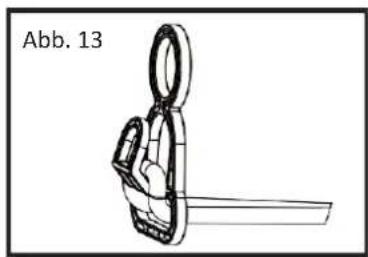
natural_image
Technical line drawing of a mechanical clamp or bracket component (no text or symbols)12. Fangkorb
natural_image
Technical line drawing of a mechanical device with internal components (no text or symbols)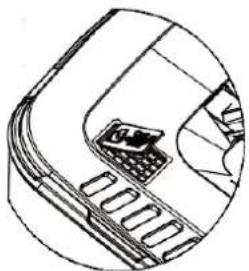
natural_image
Technical line drawing of a mechanical component with no visible text or symbolsa
natural_image
Technical line drawing of a mechanical component or housing (no text or symbols visible)b
Fangkorb entleeren
natural_image
Diagram of a mechanical device with a pile of material, labeled Abb. 15 (no text or symbols on the device itself)13. Arbeitshinweise
natural_image
Technical line drawing of a mechanical assembly with wheels and a central hub (no text or symbols)Lagerung
natural_image
Technical line drawing of a car chassis with wheels and suspension components (no text or symbols)Wartung
Never allow children or people who are not familiar with these instructions to use the garden tool. Children should be supervised to ensure that they do not play with the device.
Intended use
This device is intended exclusively for mowing the lawn in the private sector.
The appliance is designed in accordance with the instructions set out in this user manual. given descriptions and safety instructions. Any other use is not in accordance with its intended purpose. Incorrect use will void the warranty and disclaim any responsibility on the part of the manufacturer. The user is liable for any damage to third parties and their property. Only operate the device in the technical condition prescribed and delivered by the manufacturer. Unauthorized modifications to the device exclude liability of the manufacturer for resulting damage.
Vibration and noise reduction
To reduce the impact of vibration and noise, limit working time, use settings for lower vibration and noise emissions, and personally wear protective equipment.
Consider the following points to keep vibration and noise levels low:
- Use the product only as intended according to the design and instructions.
- Make sure the product is in perfect condition and well maintained.
- Use the correct accessories and make sure they are in good condition.
- Hold the product firmly but not crampedly by the intended handles.
- Maintain the product according to these instructions and keep it well lubricated.
- Plan your working hours according to these instructions in order to spread a higher workload over a longer period of time.
Emergency
- Familiarize yourself with the use of the product by reading the user manual in full. Remember the safety instructions and follow them carefully. This will help you prevent risks and hazards.
- Always be attentive when using the product so that you can detect and respond to hazards at an early stage. Quick intervention can prevent serious injury and property damage.
Residual risks
Even if you operate this lawn mower according to the regulations, there are always residual risks. The following hazards can occur in connection with the construction and design of this lawn mower:
- Injuries and property damage caused by flying parts.
- Hearing damage if you do not wear proper hearing protection or use the lawn mower for a long period of time.
- Health damage resulting from hand-arm vibrations if the lawn mower is used for a long period of time or is not properly guided and maintained.
22. Safety instructions for lawn mowers
General safety instructions
- For your safety and the safety of others, read this instruction manual and its safety instructions before using the device. Please keep the instruction manual and its safety instructions safe for later use and keep them handy for every use.
- Pass on the operating instructions in the event of a change of ownership with the device.
- Persons operating the device must not be under the influence of intoxicants (e.g. alcohol, drugs or medication).
- Only operate the device in the technical condition prescribed and delivered by the manufacturer. Unauthorized changes to the device exclude liability of the manufacturer for resulting damage.
- Use the device only in daylight or under good artificial lighting.
- Use the device only in dry weather conditions. Keep it away from rain or wet. Water ingress into the device increases the risk of electric shock.
- Turn off the appliance if you have the following conditions:
- if the device is left unattended;
- if the device starts to vibrate excessively.
Before use
Before starting work, familiarize yourself with the device and its functions as well as its controls.
- Check the device for signs of wear or damage before use and after an impact.
Do not use a device whose switch is defective and can no longer be switched on or off.
- Check that all nuts, bolts, and screws are tight to ensure that the device is operating safely.
- Never use a device with damaged or missing parts. Have them repaired or, if necessary, replaced by a qualified specialist or specialist workshop.
- When working with or on the device, always wear sturdy shoes, long trousers and the appropriate personal protective equipment (safety goggles, hearing protection, non-slip work gloves, etc.).
Wearing personal protective equipment reduces the risk of injury.
During use
Do not turn on the device if people (especially children) or animals are in close proximity. Make sure that children do not play with the device.
- Stop work if you notice that people (especially children) or pets are nearby.
- Working on steep slopes can be dangerous. Make sure you have a firm footing and mow slowly. Always mow across the slope and not up and down. Be especially careful when changing direction. There is a risk of tipping over!
- Do not mow on steep slopes. Be especially careful when moving backwards while mowing and pulling the lawn mower on itself.
- Do not tilt the lawn mower when switching on the engine.
- Keep a safe distance as indicated by the handle frame.
- Do not turn on the motor until your feet are at a safe distance from the cutting blade. Be careful and do not reach into the rotating cutting blade. Turn off the lawn mower before tipping or transporting it, e.g. from/to lawn or over paths. Never drive over gravel while the engine is running. There is a risk of being hit by stones!
- Before lifting or transporting the lawn mower, turn off the engine until the cutting blade has come to a stop.
- Do not adjust the cutting height until the motor is turned off and the cutting blade has come to a stop.
- Never open the discharge flap while the engine is running.
Before removing the grass catcher, turn off the motor and wait for the cutting blade to come to a stop. After emptying the grass catcher, carefully reattach it and make sure that the grass catcher is securely attached to the lawn mower. - If possible, do not mow wet grass. Do not work with the garden tool in an explosive environment where there are flammable liquids, gases or dust.
- If you interrupt work, never leave the device unattended and keep it in a safe place.
After the assignment
- Always unplug the power cord when leaving the lawn mower unattended.
- Turn off the device and only then move the unit to a safe place.
- Keep the device out of reach of children.
- Make sure the vents in the unit are clean.
- Keep all nuts, bolts and bolts tightened to ensure that the lawn mower is in safe working condition.
- Check the grass catcher frequently for wear or damage.
- Only use a cutting blade intended for this lawn mower.
- Only have repairs carried out by a qualified technician or service center.
23. Symbols placed on the product

General hazard warning: Indicates precautions or safety instructions. Can also be used in conjunction with other icons or images.
Read this instruction manual carefully before using the product and store it in a safe place for later use.
Be mindful. Objects can be stirred up by the mower. Therefore, please make sure that the area to be mowed is free of objects.
Keep a safe distance from people who are in your area. And keep a sufficient distance from dangerous areas
Keep your hands and feet away from the cutting unit!
Turn off the garden tool and unplug it before making any adjustments to the tool, cleaning it, loosening a tangled cable or leaving the garden tool unattended even for a short time.
DO NOT drive the mower over the power cable


Avoid rain or moisture.
Always pay attention to eyes and hearing protection.
If used improperly, there is a risk of electric shock.
Risk of injury: keep your hands and feet away!
CE mark
The product complies with the requirements and regulations of the European Community.
Noise level indicator
The tool noise level does not exceed 96dB.
Double insulated: no grounding required.
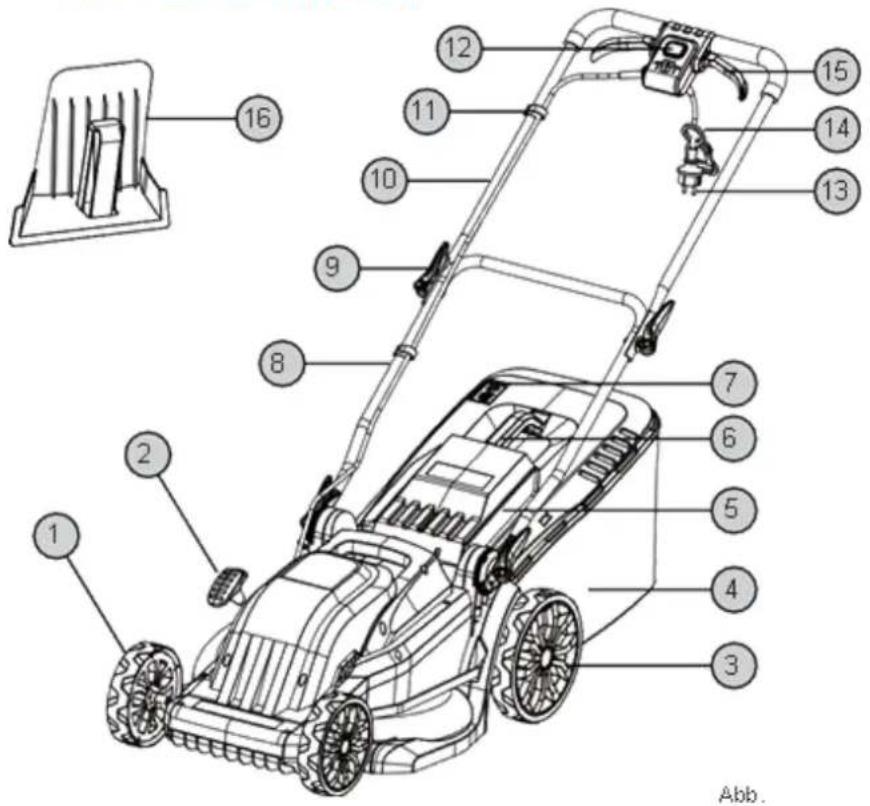
- Product details
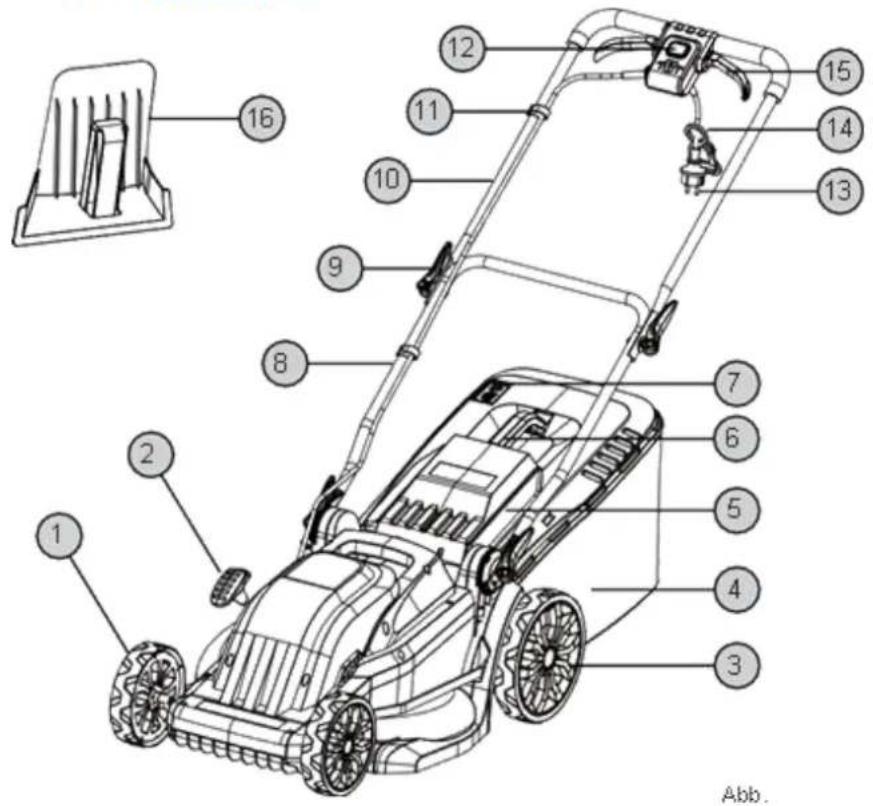
- Front wheel
- Cutting height adjustment lever
- Rear wheel
- Collection bag
- Flap grass catcher
- Handle of grass catcher
- Grass grass basket level indicator
- Bottom handle
- Quick release fastener
- Top handle
- Cable clip
- Start button
- Power cord
- Cable support
- Handle
- Mulching insert
25. Assembly
Scope of delivery
Carefully remove the machine from the packaging and check if the following parts are included:
| PACKING LIST | ||
| Description | Illustration | Quantity |
| Lawnmower | 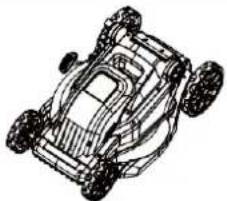 | 1 |
| Lower Handle Assembly | 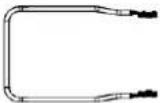 | 1 |
| Upper handle assembly | 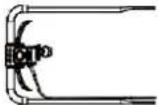 | 1 |
| Collection bag | 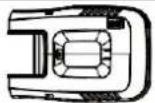 | 1 |
| Top cap handle |  | 1 |
| Step bolts |  | 2 |
| Washer |  | 2 |
| Quick release fastener |  | 4 |
| Cable clip |  | 2 |
| Rear flap bracket |  | 1 |
| Mulching insert |  | 1 |
| Tools |  | 1 |
| Directions for use |  | 1 |
Important information for mounting the mower
Before assembling and operating the electric lawn mower, please read the entire user manual and the instructions contained therein carefully first.
Remove the lawn mower from the cardboard packaging and check that there are no loose parts left in the packaging.
Attention
Never use mower unless the collection bag provided is in position.
WARNING
Always make sure the lawn mower is turned off and the power plug is unplugged from the power source before making any adjustments or performing any maintenance.
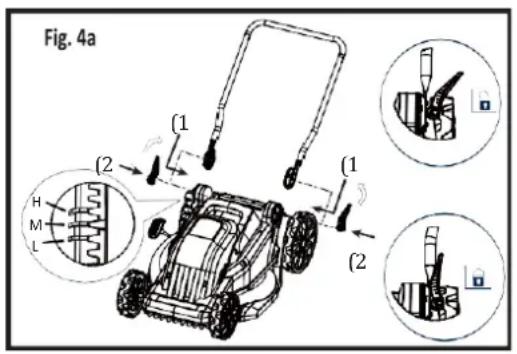
Attach the handle
Attach the lower handle assembly to the lawn mower (Fig. 4a (1)).
Screw the quick release set to the bolt and lock it firmly (Fig. 4a (2)). The height of the handle can be adjusted in three positions (L, M and H) by turning the height adjustment attachment.
Make sure the arrow is aligned in the same position on both sides of the height adjustment attachment to select the desired handle height.
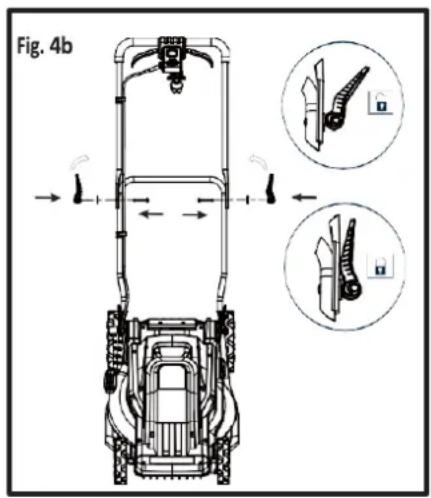
Attach the top handle to the bottom handle, align the holes in the top handle and bottom handle. Insert the screws through the holes and install the flat spacers. Screw the quick-release assembly to the screw and lock it tightly (Fig. 4b).
Attachment of the grass catcher
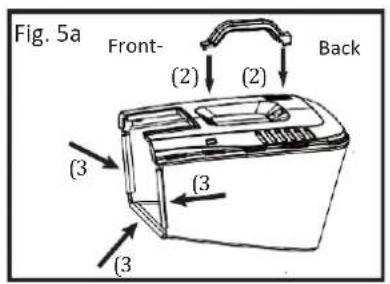
First, attach the handle of the collection bag, as shown in Fig. 5a. Insert the front end and then attach the rear end. Make sure the handle is tight before use.
- Attach the edge of the basket to the frame (Fig. 5a (3)).
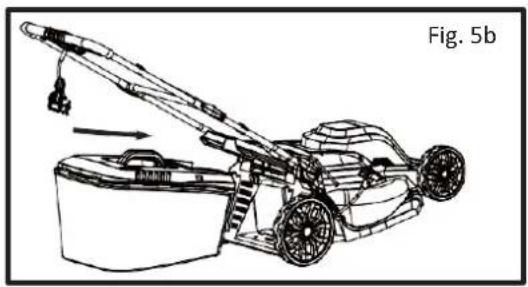
- Hang the collection bag as shown in Fig. 5b.
natural_image
Line drawing of a lawn mower with attached bucket, labeled Fig. 5b (no text or symbols on the diagram itself)Clean up the connection cable
Attach the connection cable to the handle using the cable clips (Fig. 6).
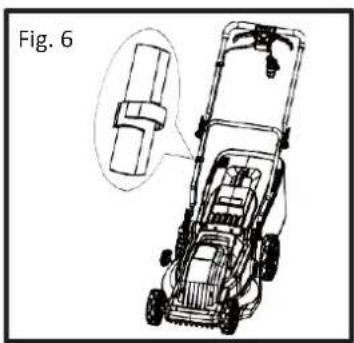
natural_image
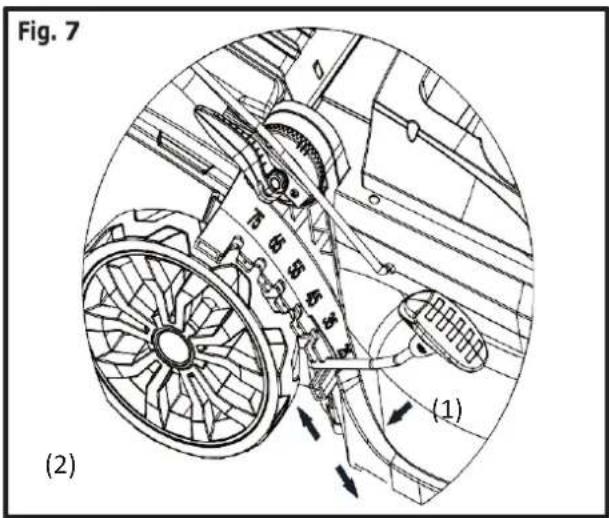
Line drawing of a lawn mower with a magnified inset showing the blade assembly (no text or symbols)26. Adjusting the cutting height
CAUTION! If the motor has been switched off, the saw blade will continue to run for a few seconds! Therefore, do not touch the underside of the mower deck until the blade has come to a stop!
If you want to change the cutting height, set the adjustment lever to the desired position. (Fig. 7). Slide the handle to the outside of the deck body (1).
Adjust the handle to the desired height (2). The mower has 6 height positions from 25 mm to 75 mm. As the number increases, the cutting height increases.
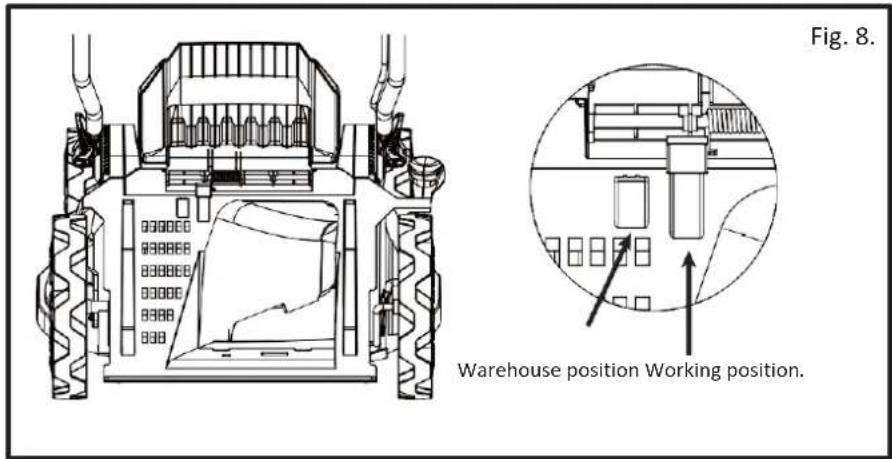
27. Grasscatcher
If you want to use the grass catcher feature, follow these steps:
- Open the back door and hold it firmly.
- Attach the rear door support to the chassis as shown in Figure 8.
- Close the back door.
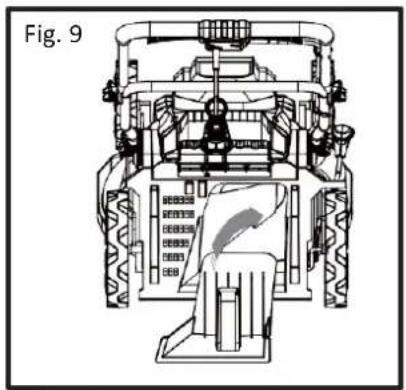
28. Mulching
You can collect and compost the grass with the grass collector or use the mulching insert for the mulching process. To do this, remove the grass collector and insert the mulching insert as shown. The cut grass is thus not thrown into the collection basket by centrifugal force but remains in the area of the knife and is thus chopped into small pieces. The chopped grass falls to the ground between the blades of grass and turns into humus through decomposition – the lawn immediately receives a natural, organic fertiliser.
- Open the back door and hold it firmly.
- Hold the mulching insert by the handle and insert it into the discharge chute (Fig. 9.).
- Close the back door.
natural_image
Technical line drawing of a mechanical assembly, possibly a tractor or agricultural machine, with no visible text or symbols.29. Starting the lawn mower
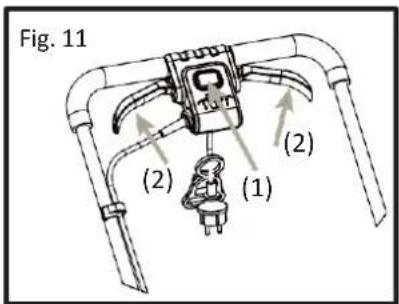
- Connect the machine to an approved outdoor extension cord.
- Hold down the start button (Fig. 11 (1)).
- Drag the handle (Fig. 11 (2)) and shift up to the handle to start the mower.
- Release the start button to start the machine.
30. Stopping the lawn mower
Release the handle switch to stop the machine.
WARNING
Wait for the blade to stop completely before starting the machine again. Do not quickly turn the device off and on again.
WARNING
Always disconnect the power supply from the power supply after you have completed the work.
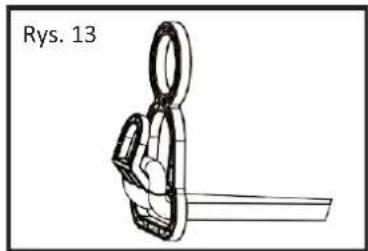
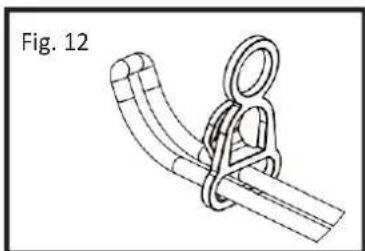
31. How to Use the Cable Holder
In case the extension cord is disconnected from the power supply during operation, the device has a cable holder. The cable holder hangs from the cable guide rod.
To use the cable holder:
- Form a tight loop near the cable holder.
- Slide the loop through the bottom hole in the cable holder (see Fig. 12).
- Move the loop over the mounting clip (see Fig. 13) and pull down until the cable is attached to the cable holder.
natural_image
Technical line drawing of a mechanical clamp or bracket assembly (no text or symbols)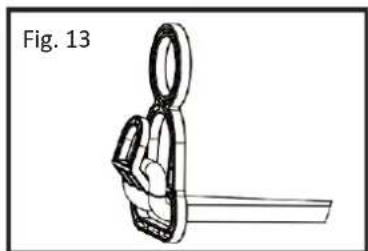
natural_image
Technical line drawing of a mechanical clamp or bracket component (no text or symbols)32. Grass collector
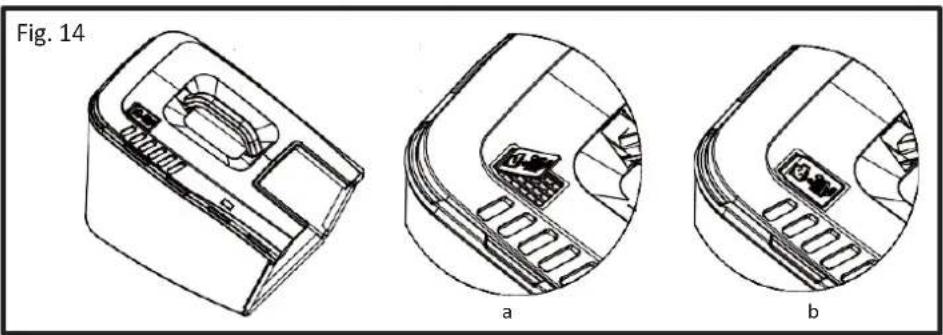
The grass collector has two functions in this device:
-
If the grass collector is empty or not completely filled with grass, the level indicator window remains open (see Fig. 14.a).
-
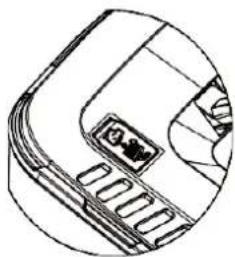
When the grass collector is completely filled with grass, the level indicator window closes (see Fig. 14.b).
⚠ WARNING The motor has been turned off, the blade will continue to run for a few seconds. Therefore, do not touch the bottom of the lawn mower until the blade has come to a complete stop!
natural_image
Three technical line drawings of a device component, labeled a, b, and Fig. 14 (no text or symbols on the diagrams themselves)Emptying the collection basket
-
Turn off the device.
-
Open the back door and hold it firmly.
-
Hold the grass catcher by the handle and unhook it from the brackets.
-
Close the back door.
-
Empty the collection basket (see Fig. 15).
⚠ WARNING Always unplug before maintenance or cleaning!

natural_image
Illustration of a mechanical device with a pile of material, labeled Fig. 15 (no text or symbols on the device itself)33. Working instructions
Carefully inspect the entire mowing area and remove any debris before you start mowing.
- Only operate the lawn mower when there are no third parties in the danger zone.
- Only mow when visibility is good.
- Only operate the machine at walking pace.
- Only operate the mower when the blade is sharp.
Do not mow over obstacles (e.g. branches, tree roots).
Always mow across the slope in sloping terrain. Do not mow uphill or downhill or on slopes with a slope of more than 20^ .
- Be extra careful when changing direction on sloping terrain.
Before mowing, between and after mowing, check the air inlets that cool the electric motor and remove any blockages. You may only do this when the engine is switched off, otherwise there is a considerable risk of injury!
34. Tips for the mowing process
- Start mowing as close to the socket as possible.
- Always keep the extension cord on the section of lawn that has already been mowed.
- Maintain a constant cutting height of 3-5 cm; Do not trim the grass to less than half of its original height.
- Do not overload the lawnmower! If the engine speed drops noticeably due to long, heavy grass, increase the cutting height and mow several times.
- Mow in the morning or late afternoon to prevent the freshly cut grass from drying out.
- Mow twice a week during periods of strong growth; In periods of low precipitation, extend the mowing intervals accordingly.
35. Storage and maintenance
Replacement of the blade
For safety reasons, you should only have your knife sharpened, balanced and assembled in an authorized workshop. For best results, it is recommended to check the knife once a year.
⚠ WARNING! Before removing the grass collector, turn off the motor and wait for the blade to come to a complete stop.
⚠ WARNING! You will need gardening gloves (not included) and a wrench to remove the blade.
△ HINT! Tilt the lawn mower slightly towards the oil filler neck without tipping it over and reach under the housing.
⚠ WARNING! Always handle the knife with care; sharp edges can cause injury. Use gloves. Replace the metal blade after 50 hours of mowing or at the latest after 2 years, whichever comes earlier, regardless of the condition.
⚠ WARNING! If the knife is cracked or damaged, replace it with a new one.
⚠ WARNING! Do not hold the knife directly with your hand.
△ HINT! Keep the blade sharp to maintain mowing performance. If the knife is badly worn, dented or dull, it should be replaced or sharpened. The sharpness of the blade significantly affects the performance of the lawn mower.
For safety reasons, we recommend that the knife should only be used by qualified and authorized professionals.
Hold the knife firmly and screw the knife screw against the knife screw with a wrench
Clockwise. Remove the knife. Install a new or sharpened knife. Set
Attach the knife to the two pins on the knife flange and replace the screw. Make sure that
the knife is correctly positioned and tighten the screw firmly (tightening torque: 45-60 Nm).
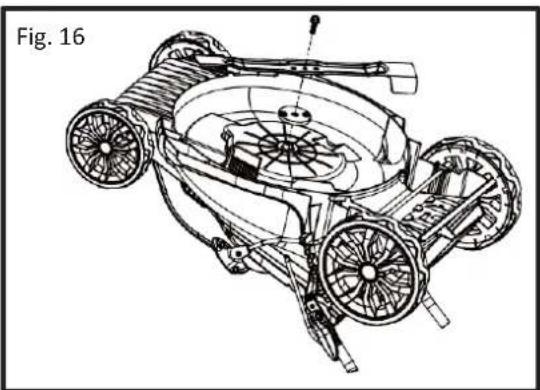
Storage
natural_image
Technical line drawing of a mechanical device with wheels and gears, labeled Fig. 16 (no text or symbols on the diagram itself)Always disconnect the machine from the power supply for storage.
Clean the appliance thoroughly after mowing. Store the device in a dry place so that the engine can cool
down beforehand. To reduce storage space, the top handle can be folded down. Release the quick-release levers and fold the handle down (Fig. 17).
Caution: Do not pinch or pinch the electric cord when folding down the handle.
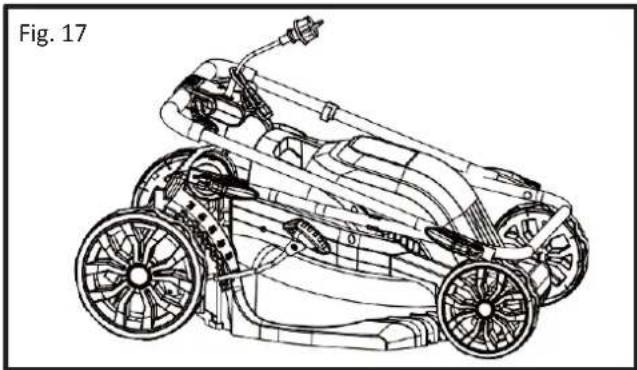
natural_image
Technical line drawing of a two-wheeled vehicle chassis with wheels and suspension components (no text or symbols)Maintenance
ATTENTION: Always unplug before maintenance or cleaning work!
- Do not spray the device with water. Contact with water can damage the switch/plug combination and the electric motor.
- Clean the device with a cloth, hand brush, etc.
WARNING
Always wear protective gloves during maintenance work. Do not perform maintenance when the engine is running or hot.
WARNING
Only use spare parts, accessories and attachments from the original manufacturer. Failure to do so can lead to injuries and loss of performance.
Maintenance is required:
a) If the lawn mower hits an object. b) If the engine stops suddenly.c) If the blade is bent (do not align!). d) If the motor shaft is bent (do not align!). e) If a short circuit occurs when connecting the lawn mower. f) If the gears are damaged.
Always have the mower blade resharpened or replaced by an authorised repair shop. Unbalanced blades lead to excessive vibrations of the lawn mower.
Cleaning
The lawn mower should be thoroughly cleaned after each use. Always clean your lawn mower immediately after use. Do not allow cut grass and other residues to dry and harden on the surfaces of the lawn mower. Dried grass residues and dirt can affect mowing performance. Check that the grass discharge channel is free of grass residue and remove it if necessary. Check the bottom of the lawn mower and the blade holder.
Troubleshooting
CAUTION: Before servicing or cleaning, turn off the engine and wait for the blade to come to a stop.
Caution! Improper repairs can cause the device to function unsafely. This puts both you and those around you at risk.
Faults that cannot be rectified with the help of the following table may only be rectified by a specialist company (customer service).
Please note that improper repairs may also void the warranty and incur additional costs.
Use only original spare parts. Only these spare parts are designed and suitable for the product. By using other spare parts, not only does the warranty expire, but you can endanger yourself and those around you.
| Error | Solution |
| Engine not running | Check the power cord and circuit breaker (fuse).Start on short grass or on an area that has already been mowed.Clean the discharge channel/housing (the mower blade must rotate freely).Correct the cutting height. |
| Engine power decreases | Increase the cutting height.Clean the ejection channel.Have the mower blade sharpened or replaced (customer service). |
| The grass catcher is not sufficiently filled | Correct the cutting height.Allow the lawn to dry.Have the mower blade resharpened or replaced (customer service).Clean the grid on the grass catcher.Clean the ejection chute. |
36. Specifications
| Model | FX-RME43 |
| Engine | Electric motor 220V connection |
| Achievement | 1200 watts |
| Rated power | 220~240V/50Hz |
| Cutting width | 440 mm |
| Cutting heights | 25mm-75mm |
| Diameter wheels | 170 mm front / 220 mm rear |
| Volumen Grass catcher | 45l |
| Sound power level | 96dB |
| Weight | 12kg |
37. Warranty
We adhere to the legal warranty provisions for all our products. The warranty covers a period of two years from the date of purchase and secures your rights in the event of defects in materials or workmanship.
38. Disposal
This appliance must not be disposed of with household waste. Electrical and electronic equipment must be collected separately and disposed of in an environmentally friendly manner in accordance with the provisions of the Electrical and Electronic Equipment Act and the EU
Directive 2012/19/EU (WEEE Directive). Please dispose of the device at an approved collection point for old devices. Proper disposal helps to protect the environment and avoid negative effects on human health. For more information on returning and disposing of old equipment, please contact your local waste disposal point or the retailer where you purchased the product. In countries outside the European Union, different regulations may apply to the disposal of waste electrical and electronic equipment.
The packaging material is made from recycled materials. Dispose of the packaging material in accordance with the applicable regulations.
39. Customer service
If you have any questions about warranty, repair or spare parts, please contact:
FUXTEC GmbH
Kappstraße 69
71083 Herrenberg
Deutschland
Telefon: +49 70329560888
E-Mail: Info@fuxtec.com
Note: Please do not send returns or repairs to this address. For returns in the event of a warranty claim, please contact our customer service.
40. Copyright
All rights reserved. The contents of this manual are protected by copyright. Their use is permitted within the scope of operation. Any further use or duplication is not permitted without the written permission of FUXTEC GmbH. FUXTEC GmbH reserves the right to make changes within this operating manual without prior communication.
VERSION FRANÇAISE
natural_image
Line drawing of a lawn mower with attached equipment, labeled Fig. 5b (no text or symbols on the diagram itself)Rangez le câble de raccordement
natural_image
Line drawing of a lawn mower with a magnified inset showing the blade assembly (no text or symbols)natural_image
Technical line drawing of a mechanical assembly (no text or symbols)natural_image
Line drawing of a mechanical clamp or bracket assembly (no text or symbols)
natural_image
Technical line drawing of a mechanical clamp or bracket component (no text or symbols)natural_image
Three technical line drawings of a device component, labeled a, b, and Fig. 14 (no text or symbols on the diagrams themselves)natural_image
Diagram of a device with a plug inserted into a pile of granular material, labeled 'Fig. 15' (no text or symbols on the diagram itself)natural_image
Technical line drawing of a mechanical device with wheels and internal components (no text or symbols)Stockage
natural_image
Technical line drawing of a two-wheeled vehicle chassis (no text or symbols)Entretien
natural_image
Line drawing of a lawn mower with attached bucket and wheels, labeled Fig. 5b (no text or symbols on the diagram itself)natural_image
Line drawing of a lawn mower with a magnified inset showing the handle (no text or symbols)natural_image
Technical line drawing of a mechanical assembly, possibly a tractor or engine, with no visible text or symbols.natural_image
Line drawing of a mechanical clamp or bracket assembly (no text or symbols)
natural_image
Technical line drawing of a mechanical clamp or bracket component (no text or symbols)natural_image
Three technical line drawings of a device component, labeled a, b, and Fig. 14 (no text or symbols on the diagrams themselves)natural_image
Illustration of a mechanical device with a pile of material, labeled 'Fig. 15' (no text or symbols on the device itself)natural_image
Technical line drawing of a mechanical device with wheels and internal components (no text or symbols)Immagazzinamento
natural_image
Technical line drawing of a car chassis with wheels and suspension components (no text or symbols)Manutenzione
natural_image
Line drawing of a lawn mower with attached bucket and wheels, labeled Fig. 5b (no text or symbols on the diagram itself)natural_image
Line drawing of a lawn mower with a magnified inset showing the blade assembly (no text or symbols)natural_image
Technical line drawing of a mechanical assembly, possibly a tractor or engine, with no visible text or symbols.natural_image
Line drawing of a mechanical clamp or bracket assembly (no text or symbols)
natural_image
Technical line drawing of a mechanical clamp or bracket component (no text or symbols)92. Cesta de captura
natural_image
Three technical line drawings of a device component, labeled a, b, and Fig. 14 (no text or symbols on the diagrams themselves)natural_image
Illustration of a mechanical device emitting powder, labeled 'Fig. 15' (no other text or symbols)natural_image
Technical line drawing of a mechanical device with wheels and structural components (no text or symbols)Almacenamiento
natural_image
Technical line drawing of a car chassis with wheels and suspension components (no text or symbols)Mantenimiento
natural_image
Line drawing of a lawn mower with attached equipment, labeled Fig. 5b (no text or symbols on the diagram itself)natural_image
Line drawing of a lawn mower with a magnified inset showing the blade assembly (no text or symbols)natural_image
Technical line drawing of a mechanical assembly with labeled components (no readable text or symbols)natural_image
Line drawing of a mechanical clamp or bracket assembly (no text or symbols)
natural_image
Technical line drawing of a mechanical clamp or bracket component (no text or symbols)112. Cesto de recolha
natural_image
Three technical line drawings of a device component, labeled a, b, and Fig. 14 (no text or symbols on the diagrams themselves)Esvaziar o coletor
natural_image
Diagram of a device emitting powder, labeled Fig. 15 (no text or symbols on the device itself)natural_image
Technical line drawing of a mechanical device with wheels and internal components (no text or symbols)Armazenamento
natural_image
Technical line drawing of a two-wheeled vehicle chassis (no text or symbols)Manutenção
natural_image
Line drawing of a lawn mower with attached bucket and load, labeled Fig. 5b (no text or symbols on the diagram itself)natural_image
Line drawing of a lawn mower with a magnified inset showing the handle (no text or symbols)natural_image
Technical line drawing of a mechanical assembly with labeled components (no readable text or symbols)129. De grasmaaier starten
natural_image
Line drawing of a mechanical clamp or bracket assembly (no text or symbols)
natural_image
Technical line drawing of a mechanical clamp or bracket component (no text or symbols)132. Vangmand
natural_image
Three technical line drawings of a device component, labeled a, b, and Fig. 14 (no text or symbols on the diagrams themselves)De opvangbak legen
natural_image
Illustration of a mechanical device with a pile of material, labeled 'Fig. 15' (no text or symbols on the device itself)natural_image
Technical line drawing of a mechanical device with wheels and internal components (no text or symbols)Opslag
natural_image
Technical line drawing of a two-wheeled vehicle chassis (no text or symbols)Onderhoud
144. Presentation sentation
natural_image
Line drawing of a lawn mower with attached equipment, labeled 'Bild 5b' (no text on diagram itself)natural_image
Line drawing of a lawn mower with a magnified inset showing the blade assembly (no text or symbols)natural_image
Technical line drawing of a mechanical assembly with labeled components (no readable text or symbols)natural_image
Technical line drawing of a mechanical clamp or bracket assembly (no text or symbols)
natural_image
Technical line drawing of a mechanical clamp or bracket component (no text or symbols)152. Fångkorg
natural_image
Three technical line drawings of a device component, labeled a, b, and Bild 14, showing internal components without any text or symbols.natural_image
Diagram of a mechanical component with a pile of material, labeled 'Bild 15' (no other text or symbols)153. Arbetsinstruktioner
natural_image
Technical line drawing of a mechanical assembly with wheels and a central hub (no text or symbols)Förvaring
natural_image
Technical line drawing of a car chassis with wheels and suspension components (no text or symbols)Underhåll
E-postadress: Info@fuxtec.com
POLSKA WERSJA JEZYKOWA
natural_image
Line drawing of a lawn mower with attached bucket cover and handle (no text or symbols)natural_image
Technical line drawing of a mechanical assembly with gears and a central component (no text or symbols)169. Uruchamianie kosiarki
natural_image
Line drawing of a rope knot with a loop, labeled 'Rys. 12' (no other text or symbols)