FX-RM4839P - Lawn mower Fuxtec - Free user manual and instructions
Find the device manual for free FX-RM4839P Fuxtec in PDF.

| Product type | Gasoline lawn mower |
| Brand | Fuxtec |
| Model | FX-RM4839P |
| Engine | OHV 4-stroke |
| Displacement (cm³) | 146 |
| Maximum engine power (kW) | 2.6 |
| Nominal power (kW) | 2.2 |
| Cutting width (mm) | 470 |
| Adjustable cutting height (mm) | 25 - 70 |
| Grass catcher capacity (L) | 60 |
| Fuel tank capacity (L) | 0.8 |
| Fuel type | Unleaded gasoline |
| Nominal speed (rpm) | 3000 |
| Sound pressure (dB(A)) | 81.4 (k=3) |
| Guaranteed sound power (dB(A)) | 96 |
| Vibration (m/s²) | 8.61 (k=1.5) |
| Net weight (kg) | 40 |
| Drive system | Rear wheel drive |
| Discharge | Rear and side |
| Mulching function | Yes (mulching blade included) |
| Cleaning system | Easy Clean (water connection) |
| Start type | Manual (pull cord) |
| Warranty | 24 months |
Frequently Asked Questions - FX-RM4839P Fuxtec
User questions about FX-RM4839P Fuxtec
0 question about this device. Answer the ones you know or ask your own.
Ask a new question about this device
Download the instructions for your Lawn mower in PDF format for free! Find your manual FX-RM4839P - Fuxtec and take your electronic device back in hand. On this page are published all the documents necessary for the use of your device. FX-RM4839P by Fuxtec.
USER MANUAL FX-RM4839P Fuxtec
natural_image
Line drawing of a Fuxtec lawn mower on a black background (no text or symbols)natural_image
Exterior view of a black and orange LVM 4 lawn mower with visible branding (no text or symbols on the device itself)FUXTEC GmbH
Kappstraße 69, 71083 Herrenberg-Gültstein, Germany

Achtung
natural_image
Yellow sign with two black hand tools, no text or symbols presentnatural_image
Technical line drawing of a robotic vacuum cleaner with a hand pouring liquid into it (no text or symbols)Montage Grasfangkorb
Batteriemontage Modell FX-RM5196eS
Ladeanschluss

natural_image
Close-up of a black electronic device with ventilation grille and a red arrow pointing to its side (no visible text or symbols)Sicherung

natural_image
Close-up of a black plastic electronic device with a yellow arrow pointing to a small connector (no visible text or symbols)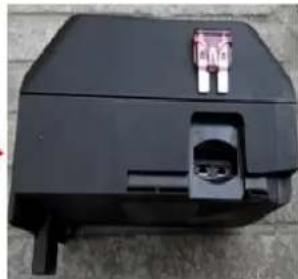
natural_image
Black plastic electronic device with a small red connector and a circular port, placed on a textured surface (no visible text or symbols)natural_image
Close-up of a black 3D printer front panel with indicator lights and a green indicator light (no readable text or symbols)
natural_image
Close-up of a black electronic device with green indicator lights and a logo (no readable text or symbols)
natural_image
Close-up of a 3D printer front panel with green indicator lights and a logo (no readable text or symbols beyond branding)natural_image
Close-up of a person using a black lawn mower with orange wheels and handlebars (no visible text or symbols)
natural_image
Black plastic container with internal compartments and side grilles (no visible text or symbols)natural_image
Technical diagram of a mechanical assembly with no visible text or symbolsnatural_image
Diagram of a mechanical device with a lever and gear mechanism, showing motion direction (no text or symbols)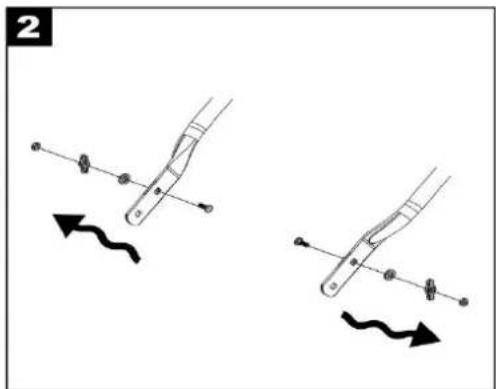
natural_image
Two diagrams showing mechanical linkage or motion with arrows indicating direction (no text or symbols)

natural_image
Diagram of a robotic arm with motion arrows indicating rotation or movement (no text or symbols)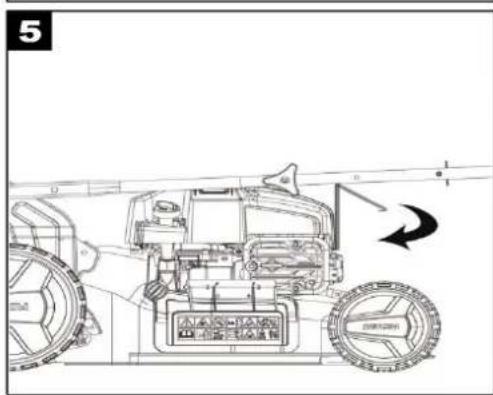
natural_image
Diagram of a mechanical or optical device with a central component and surrounding components (no text or symbols visible)natural_image
3D mechanical assembly diagram showing a motor with orange top and black body, no visible text or symbolsLuftfilter
natural_image
3D technical illustration of a mechanical engine assembly with orange and black components, no visible text or symbolsWe are pleased with your trust!
Please read these instructions for use before the first use and before every use! Here you will find all the information you need for safe use and long service life of the device. It is imperative that you observe all safety instructions in this manual! Please keep this manual always together with the device, so that you still have it at hand in case of doubt.

natural_image
Exterior view of a modern L3 lawn mower with orange and black body (no text or symbols visible)FUXTEC GmbH
Kappstraße 69, 71083 Herrenberg-Gültstein, Germany
CE
18. Table of contents
- Table of contents 37
- Intended use 38
- Product Specifications 40
- Your device at a glance.... 42
- Preface and preparation 44
- General operating and safety instructions 47
- Installation / Presettings 49
- Starting / stopping the engine.... 54
- Operating instructions for the lawn mower 56
- Maintenance and cleaning (EASY CLEAN) 59
- Mow and Stow Function (FX-RM46BS475IS only) 60
- Care, maintenance, and storage 61
- Warranty 66
- Disposal note 66
- Spare parts 67
- EC Declaration of Conformity 68
19. Intended use
The intended use of this device includes
- Mowing lawns
The device must not
- be used in any other way than described in this manual.
– be used in commercial applications.
– be used with accessories other than those specified by the manufacturer.
– be changed, modified, or operated in any other way than according to the manufacturer's specifications.
Observance of these user manuals is essential for safe assembly and use.
This device is exclusively for private domestic use according to the specified intended use. All other applications are excluded.
Vibration and noise reduction
- To reduce the effects of vibration and noise, limit working hours, use settings for lower vibration and noise emissions, and wear personal protective equipment.
- Observe the following points to keep vibration and noise levels low:
- Use the product only as intended according to its design and instructions.
- Ensure that the product is in perfect condition and well maintained.
- Use the right accessories and ensure that it is in good condition.
- Hold the product firmly but not cramped by the handles provided.
- Maintain the product according to this manual and keep it well lubricated.
- Plan your working hours according to this manual to spread a higher load over a more extended period.
Emergency
Familiarize yourself with the use of the product by reading the user manual thoroughly. Remember the safety instructions and follow them carefully. This will help you to avoid risks and dangers.
- Always be attentive when using the product so that you can recognize dangers early and react to them. Rapid intervention can prevent severe injury and damage to property.
- Turn off the product and disconnect the cordless high hedge trimmer, depending on the model. Have the product repaired by a qualified expert, if necessary, before using the product again.
1.1 Residual risks
Even if you operate this lawnmower according to the instructions, there will always be residual risks. The following hazards can occur in connection with the design and construction of this lawnmower:
d) Injuries and damage to property caused by flying parts.
e) Hearing damage if you do not wear suitable hearing protection or use the lawnmower for an extended period.
f) Damage to health resulting from hand-arm vibrations if the lawnmower is used for an extended period or is not guided correctly and maintained.
- Product Specifications
| Model type | RM4346 ECO | RM4346 | RM4646 ECO | RM4646 | RM5196 | RM5196eS | RM5196 PRO |
| Engine type | OHV 4-Takt | OHV 4-Takt | OHV 4-Takt | OHV 4-Takt | OHV 4-Takt | OHV 4-Takt | OHV 4-Takt |
| Cutting width (mm) | 420 | 420 | 457 | 457 | 501 | 501 | 501 |
| Adjustable cutting height (mm) | 25 - 70 | 25 - 70 | 25 - 75 | 25 - 75 | 25 - 75 | 25 - 75 | 25 - 75 |
| Trimmings collection capacity (l) | 40 | 40 | 50 | 50 | 60 | 60 | 60 |
| Tank (l) | 0.8 | 0.8 | 0,8 | 0,8 | 0,8 | 0,8 | 0,8 |
| Oil capacity (l) | 0.5 | 0.5 | 0,5 | 0,5 | 0,6 | 0,6 | 0,6 |
| Displacement (cm3) | 146 | 146 | 146 | 146 | 196 | 196 | 196 |
| Nominal speed (rpm) | 3,000 | 3,000 | 3.000 | 3.000 | 2.800 | 2.800 | 2.800 |
| Unit power (KW) at rated speed | 2.2 | 2.2 | 2,2 | 2,2 | 3,9 | 3,9 | 3,9 |
| max. engine power (KW) | 2.6 | 2.6 | 2,6 | 2,6 | 4,4 | 4,4 | 4,4 |
| Petrol type | Lead-free gasoline | Lead-free gasoline | Lead-free gasoline | Lead-free gasoline | Lead-free gasoline | Lead-free gasoline | Lead-free gasoline |
| Sound pressure level (dB(A)) | 81.5 (k=3) | 81.5 (k=3) | 83.1 (k=3) | 83.1 (k=3) | 83.2 (k=2.5) | 83.2 (k=2.5) | 83.2 (k=2.5) |
| Sound power level (dB(A)) | 95.05 (k=0.47) | 95.05 (k=0.47) | 95.9 (k=0.61) | 95.9 (k=0.61) | 95.9 (k=0.61) | ||
| Guaranteed sound power level (db(A)) | 96 | 96 | 96 | 96 | 98 | 98 | 98 |
| Vibrations (m/s2) | 6.52m/s2 (K=1.5m) | 6.52m/s2 (K=1.5m) | 5.856m/s2 (K=1.5m) | 5.856m/s2 (K=1.5m) | 6.36m/s2 (k=1.5) | 6.36m/s2 (k=1.5) | 6.36m/s2 (k=1.5) |
| Rear-wheel drive | • | • | • | • | • | ||
| FlexSpeed drive | • | ||||||
| Rear ejection | • | • | • | • | • | • | • |
| Side ejection | • | • | • | • | |||
| Mulching function | • | • | • | • | • | • | |
| Electric start | • | ||||||
| Net weight (kg) | 25 | 27 | 27 | 31 | 39 | 40 | 40 |
| Model type | RM4839P | RM5396P | RM51BS675IS | RM51BS500 | RM46BS475IS | RM5196eSPRO |
| Engine type | OHV 4-Stroke | OHV 4-Stroke | OHV 4-Stroke | OHV 4-Stroke | OHV 4-Stroke | OHV 4-Stroke |
| Cutting width (mm) | 470 | 520 | 501 | 501 | 457 | 501 |
| Adjustable cutting height (mm) | 25 - 70 | 25 - 70 | 21 - 71 | 25 - 75 | 25-75 | 25 - 75 |
| Trimmings collection capacity (l) | 60 | 60 | 60 | 60 | 60 | 60 |
| Tank (l) | 0,8 | 0,8 | 1,0 | 0,8 | 0.8 | 0,8 |
| Oil capacity (l) | 0,5 | 0,6 | 0,47 | 0,47 | 0.47 | 0,6 |
| Displacement (cm3) | 146 | 196 | 163 | 140 | 140 | 196 |
| Nominal speed (rpm) | 3.000 | 2.800 | 2.800 | 2.800 | 2800 | 2.800 |
| Unit power (KW) at rated speed | 2,2 | 3,9 | 2,5 | 2,0 | 2.0 | 3,9 |
| max. engine power (KW) | 2,6 | 4,4 | 2,7 | 2,03 | 2.04 | 4,4 |
| Petrol type | Lead-free gasoline | Lead-free gasoline | Lead-free gasoline | Lead-free gasoline | Lead-free gasoline | Lead-free gasoline |
| Sound pressure level (dB(A)) | 81.4(k=3) | 85.4(k=2.5) | 85.4(k=2.5) | 83.8(k=2.5) | 82.6 (k=3) | 83.2(k=2.5) |
| Sound power level (dB(A)) | 95.04(k=0.91) | 97.58(k=0.47) | 97.58(k=0.47) | 96.14(k=2.2) | 94.6(k=1.58) | 95.9 (k=0.61) |
| Guaranteed sound power level (db(A)) | 96 | 98 | 98 | 98 | 96 | 98 |
| Vibrations (m/s2) | 8.61m/s2 (k=1.5) | 6.19m/s2 (k=1.5) | 3.29m/s2 (k=1.5) | 4.03m/s2 (k=1.5) | 4.85m/s2 (k=1.5) | 6.36m/s2 (K=1.5) |
| Rear-wheel drive | • | • | • | • | • | • |
| FlexSpeed drive | • | |||||
| Rear ejection | • | • | • | • | • | • |
| Side ejection | • | • | • | • | • | • |
| Mulching function | • | • | • | • | • | • |
| Electric start | • | • | • | • | ||
| Net weight (kg) | 40 | 44 | 34 | 30 | 33 | 41 |
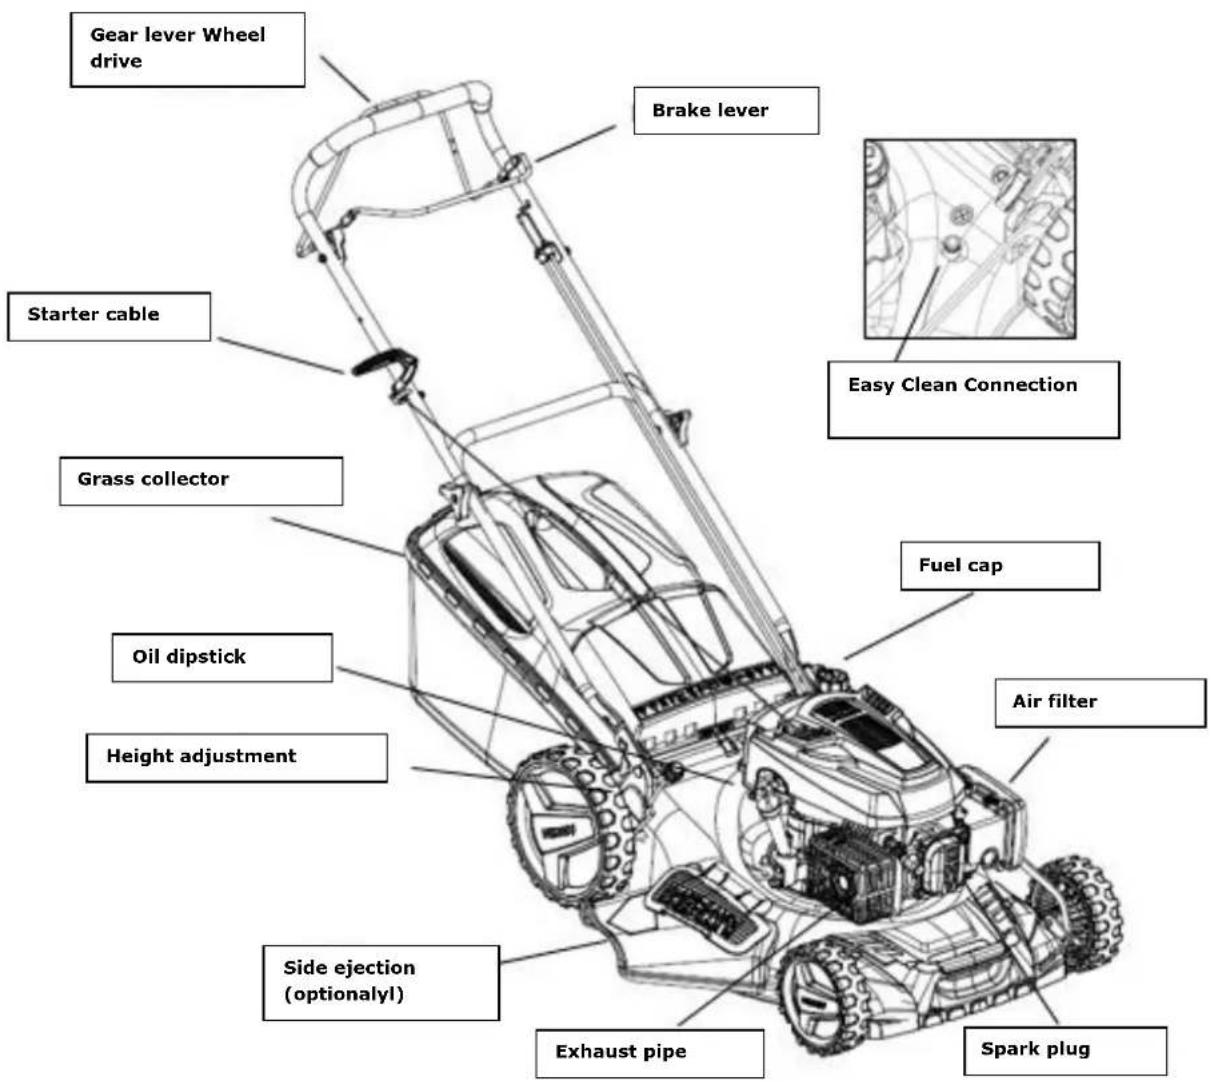
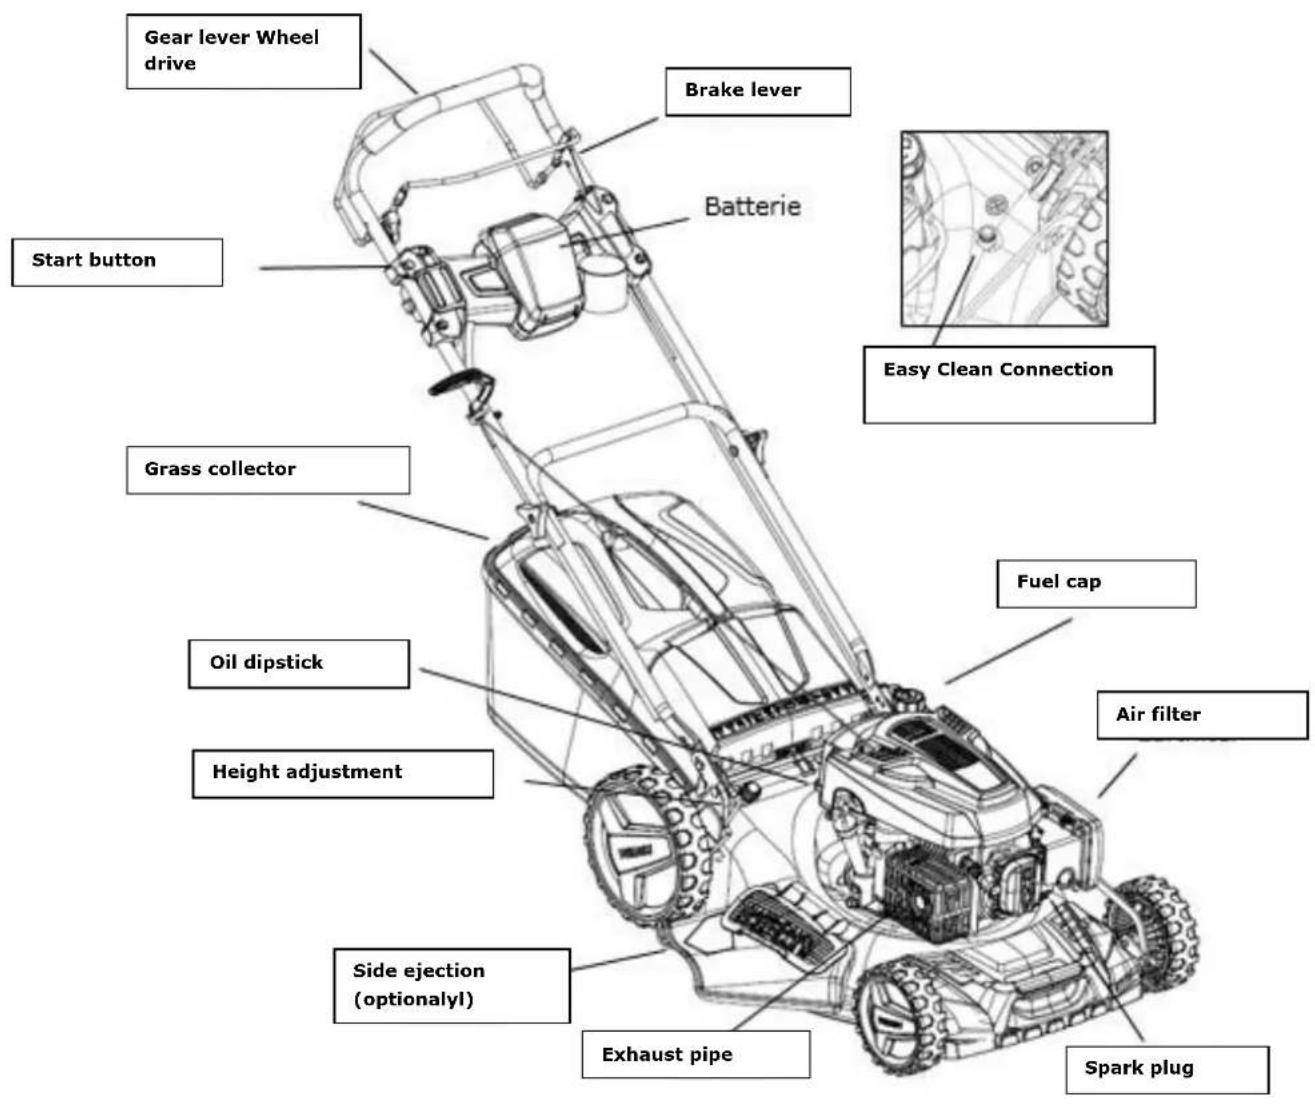
21. Your device at a glance
Except FX-RM5196eS (see next page)
Model FX-RM5196eS
22. Preface and preparation
Foreword
a) Read the instructions carefully. Familiarize yourself with the operating elements and the proper use of the device.
b) Never allow children or other persons who are not familiar with the use of the device to use the mower. Local regulations may limit the age of the operator.
c) Never mow when persons, especially children or pets, are nearby.
d) Remember that the user is responsible for accidents and damage to other people or property.
Preparation
a) Always wear sturdy shoes and long pants when mowing. Do not operate the device if you are barefoot or wearing sandals
b) Thoroughly check the areas where the device is to be used and remove all objects that could be whirled up by the device
c) WARNING - Fuel is highly flammable
- Store the oil in appropriate and designated containers
- Only fill the tank outdoors and never smoke when filling the device
- Fill up with fuel before starting the device. Never remove the cap of the fuel tank or fill it up while the engine is still running
- If fuel is spilled, do not attempt to start the engine under any circumstances, but move the device away from this location. Do not start the engine until the fuel vapors have evaporated.
- Close all fuel tanks and container caps securely.
d) Replace defective mufflers.
e) Visually inspect the device before use to check that the blades, bolts, and blade holders are not worn or damaged. Replace worn or damaged bolts and blades in sets.
Safety Instructions
t) Do not use the device in an enclosed space where dangerous carbon monoxide can accumulate.
u) Mow only in daylight or under good artificial light.
v) If possible, avoid using the device in humid conditions.
w) Make sure that you have a firm stand on hangers.
x) Never run with the device, but walk.
y) Always mow crossways with the device on slopes and not up and down.
z) Be especially careful when changing direction.
aa) Do not mow excessively steep slopes.
bb) Be especially careful when mowing backward or in your direction.
cc) Turn off the engine if the mower needs to be tilted due to transportation to move it to another mowing area.
dd) Never use the device with defective protective shields or without protective devices, such as slipped discharge chutes or cuttings catcher.
ee) Do not change the engine settings or increase the speed.
ff) Disconnect the blades and tighten the starter cord slightly before starting the engine.
gg) Start or start the engine carefully according to the instructions. Keep your feet away from the blades.
hh) Do not tilt the mower when starting the engine unless the device needs to be inclined to start. In this case, do not tilt the device more than necessary and only lift the part of the device that is away from the user.
ii) Do not start the engine when someone is standing in front of the exhaust port.
jj) Do not place your hands or feet near the rotating parts. Stay away from the exhaust ports at all times.
kk) Never lift or transport the mower while it is still in operation.
II) Stop the engine and remove the spark plug connector from the spark plug:
- Before cleaning a blockage or clogged pipes
- Before you check, clean, or perform any work on the device.
- After you have collided with a foreign object. Check the device for damage and repair it before put the device back into operation.
- If the lawnmower vibrates excessively, check this immediately.
t) Stop the engine:
- When you leave the mower/ Before refilling
Maintenance and Care
a) Make sure that all nuts, screws, and bolts are tight so that the device can work safely
b) Never store the device with fuel in the tank in buildings where vapors of open flames or sparks can be generated
c) Let the engine cool down completely before storing the device in closed rooms
d) Keep the engine, silencer, battery compartment, and fuel tank free of grass clippings, leaves, and grease to reduce the risk of fire
e) Check the grass catcher regularly for wear or loss of functionality
f) Always replace worn or damaged parts for safety reasons
g) If the fuel tank has to be emptied, this should be done outdoors
Description of security symbols
The following icons are found on the device to remind you of the care and warnings that are required. The meaning of the symbols:

natural_image
Yellow background with black line drawings of two mechanical components (no text or symbols)IMPORTANT: This device could amputate hands and feet and throw objects. Failure to observe the following safety instructions may result in severe injury or even death.
WARNING: Always remove the spark plug connector from the spark plug to prevent accidental operation of the device when adjusting, transporting, or repairing it.
WARNING: Engine exhaust fumes, some of its components contain or emit carcinogenic and harmful chemicals.
ATTENTION: The exhaust muffler and other parts of the engine become very hot during the use of the device and remain hot for some time after the device is turned off. Stay away from the hot parts of the appliance to avoid burns from contact with the parts.
23. General operating and safety instructions
- Please read the user manual carefully. Familiarize yourself with the control elements and the proper use of the device.
- Never place your hands and feet near the rotating parts of the device. Stay away from the outlet opening at all times
- Let only responsible users who are familiar with the operation of the device use this device.
- Thoroughly check the area where the device is to be used and remove all objects that could be thrown around by the device.
- Never use the device when persons, especially children or pets, are nearby.
- Always wear sturdy shoes and long pants when using the device. Do not operate the device if you are barefoot or wearing open sandals.
- Do not pull the device backward unless necessary. Always look down and behind you before and while moving the device backward.
- Never operate the mower with defective or unprotected guards, such as improperly installed deflectors and clippings.
- Use only accessories recommended by the manufacturer
- Stop the knives when crossing gravel driveways, paths, or roads.
- Stop the engine and disconnect the spark plug connector from the spark plug,
- before you remove blockages and clear the cutting channel.
- before you check, clean, or carry out any work on the device.
- after you have detected a foreign object. check the device for damage and repair it before you put the lawnmower back into operation.
- if the lawn mower vibrates unusually strongly, you should check it immediately
- Turn off the engine and wait until the blades have come to a complete stop before removing the clippings.
- Use the device only in daylight or in areas that are well lit with artificial light.
- Do not operate the device if you are under the influence of alcohol or drugs.
- Never use the device on wet grass. An unstable stand can lead to slipping. Hold the handles firmly while mowing. Never run when using the device.
- Release the self-propelled mechanism before starting the engine
- Replace defective silencers.
- Always wear safety glasses or safety goggles with side shields when using the mower
- Remove obstacles like stones, and the tree remains, etc.
- Watch out for pits, furrows, or bumps. Tall grass can hide foreign objects.
- Do not mow at differences in height, ditches, or dams. The user of the device may lose his footing and balance
- Do not mow on excessively steep slopes.
- Note that the user of the device is responsible for accidents or injuries to other people or property
- Be alert and switch off the device when children enter the work area.
- With rotating devices, you should mow horizontally and not vertically over the slope.
- Never allow children or persons not familiar with the operation of this lawnmower. Local regulations may limit the age of the user.
- WARNING - Gasoline is extremely flammable.
- Store gasoline in containers designed for this purpose.
- Fill the tank outdoors only. Never smoke while filling the tank.
- Add gasoline before starting the engine. Never remove the filler cap or fill the tank with gasoline while the engine is running or still hot.
- Never start the engine if the oil is spilled. Move the device to another location. Avoid any kind of ignition or sparking until the petrol fumes are entirely removed.
- Carefully replace all fuel tank and container caps
- Inspect the blades, bolts, and cutters for visible wear and damage before using the device. Replace worn or damaged blades and bolts in sets to avoid imbalance.
- Never change the safety devices. Check their proper function regularly.
- Keep the device free from grass, leaves, and other residues. Remove any oil or fuel residues. Let the device cool down before storing it.
- Be incredibly attentive when changing the mowing direction on slopes.
- Never attempt to adjust the cutting height while the engine is running.
- The crop catcher and its parts are subject to wear, damage, and abrasion, which could expose rotating parts. This can lead to objects being thrown. Check the individual parts regularly and, if necessary, replace them with original spare parts recommended by the manufacturer.
- The blades are sharp and cut precisely. Be careful when servicing the blades. Wrap the blades in a cloth or wear protective gloves.
- Do not change the engine speed controller and do not overload the motor
- Be especially careful when moving the mower backward or towards you.
- Stop the blades when the mower needs to be tilted for transport, especially when crossing surfaces other than grass.
- Disconnect all blades and control clutches before starting the engine.
- Start the engine carefully as described in the instructions, keeping your feet away from the blades
- Do not tilt the lawnmower when you turn on the engine, except when the lawnmower needs to be inclined to start. In this case, you should not tilt it more than necessary. Only lift the part that is away from the user.
- Do not start the engine if you are standing in front of the outlet duct
- Never transport or carry a lawnmower while the engine is still running.
- Reduce the brake setting while turning off the engine and if the engine is equipped with a shut-off valve.
Turn off the fuel supply at the end of the mowing operation. Go slowly when using a transport device.
24. Installation / Presettings
Read this manual thoroughly and carefully before installing and using your lawnmower.
IMPORTANT: The lawnmower is sold WITHOUT OIL OR FUEL. Your new lawnmower has been assembled and tested at the factory.
REMOVE ANY CARDBOARD PARTS FROM THE LAWNMOWER
Remove the device from the box and check the entire packaging thoroughly for loose parts.
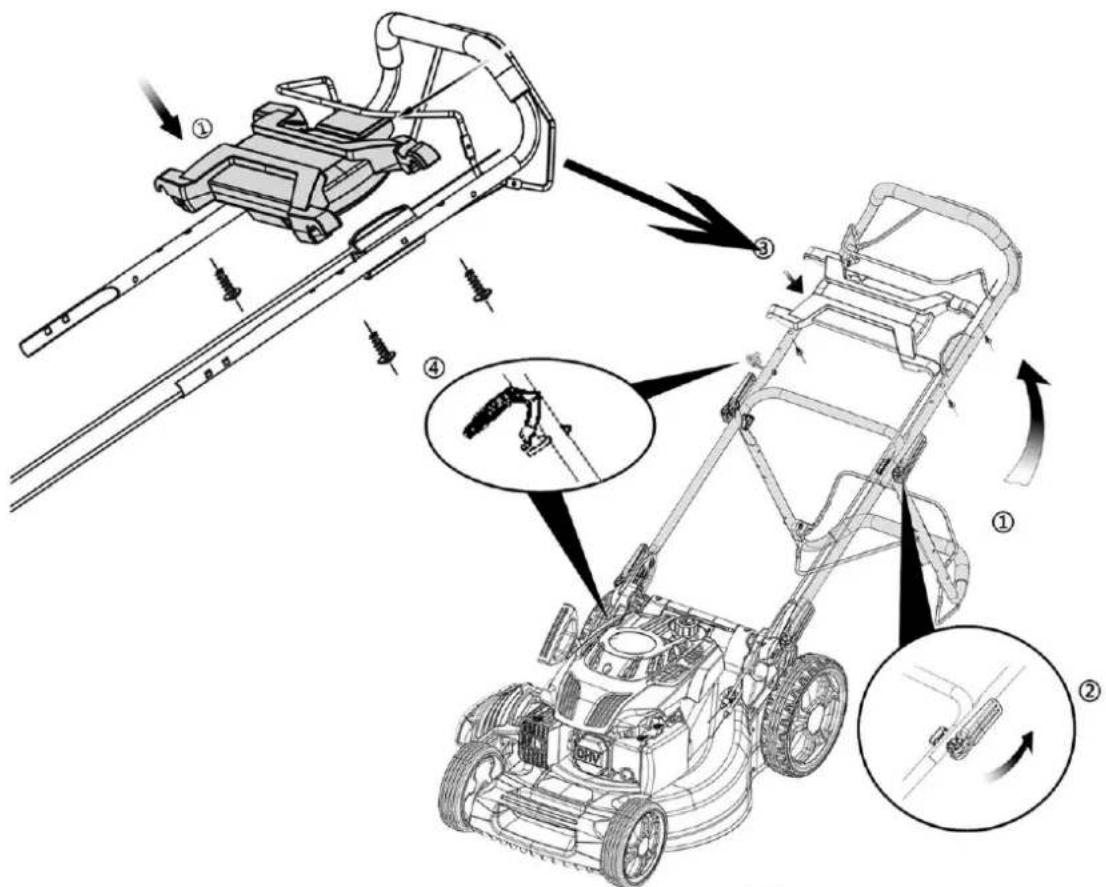
IMPORTANT: For assembly steps 1-3, depending on the model, your lawnmower will be delivered entirely pre-assembled (assembly variant 1) or in two packages (assembly variant 2). We, therefore, ask you to consider two assembly variants in the following. Assembly step 4 is the same for all variants.

(46s models)
- Remove the lawnmower from the packaging
- Insert the lower spar (A) into the body and mount it laterally on the right and left with a screw.
- Insert upper spar (B) and tighten with orange wing nut, then tighten screws + nuts on both sides.
Body version 2 (51s models)
- Remove the lawnmower from the packaging
- Remove the lower spar (B) from the accessory pack (or main pack) and screw it to the central unit (upper hole) with screws + nuts (2)
- Screw upper spar (A) to mounted lower spar (B) using orange wing nuts + screws (1).

IMPORTANT: on some models, the front wheels are removed to prevent damage to the axle during shipping. The wheels are simply screwed onto the axle with the nuts supplied.
ADJUSTING THE CUTTING HEIGHT
Raise the wheels for low cutting height and lower the wheels for high cutting height. Adjust the cutting height according to your needs centrally using the height adjustment handle (see illustration on page 2). The middle position is the most suitable position for most lawns.
FILL OIL BEFORE STARTING THE ENGINE
Before each subsequent use, check the oil level and, if necessary, top up with SAE30 engine oil. Refer to the table in Chapter 1 Product Specification for the filling quantity.
Your lawnmower is delivered to you without 4-stroke oil.
ATTENTION: DO NOT overfill the engine with oil. It could lead to the smoke formation in the muffler when
starting.
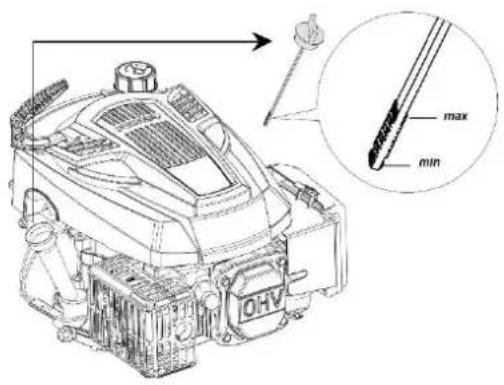
- Make sure that the lawnmower is level
- Remove the dipstick from the oil filler tube
- Insert the dipstick and pull it out slowly to check the oil level
IMPORTANT:
- Check the oil level before each use. Add oil if necessary. Fill up to the oil gauge on the dipstick.
- Change the oil every 25 working hours or every season. You will likely need to change the oil more often in dusty and dirty conditions. Refer to chapter 10 "Changing the oil."
Refuel with SUPER GASOLINE 95 octane (no mixture)
Fill the fuel tank to the bottom of the filler neck. Do not overfill the tank. Use fresh, clean unleaded fuel. Never mix oil with gasoline. Purchase fuel in quantities that can be used within 30 days to guarantee the freshness of the fuel.
Prolonged storage of the lawnmower will change the chemical composition of the gasoline, which can cause starting difficulties and unsteady running of the engine.
ATTENTION: Remove any oil or gasoline residue. Do not store, spill, or use gasoline near naked flames.
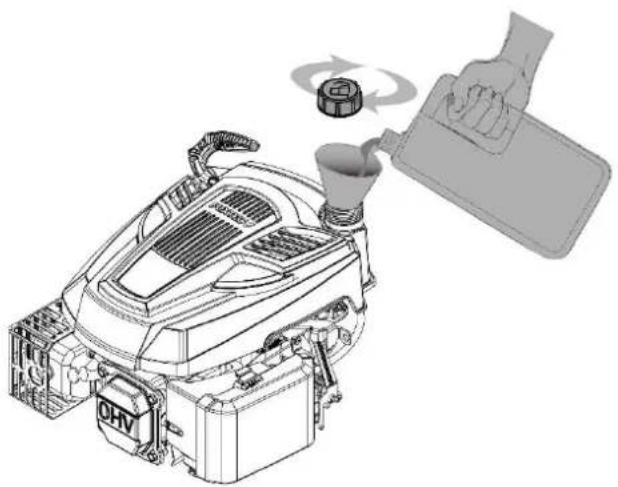
natural_image
Technical line drawing of a robotic vacuum cleaner with a hand pouring liquid into it (no text or symbols)ATTENTION: Fuels mixed with alcohol (called gasohol) or the use of ethanol or methane can attract moisture, causing separation and formation of acid during storage. Acidic gases can damage the engine's fuel system while the device is in storage. Drain the tank system if the device is stored for more than 30 days to avoid damage to the motor. Empty the fuel tank, start the engine and let it run until the fuel line and carburetor are empty. Use fresh gasoline the next time you use the device. Never use engine or carburetor cleaning agents inside the fuel tank. This can lead to permanent damage.
Mounting the tie bar apparatus
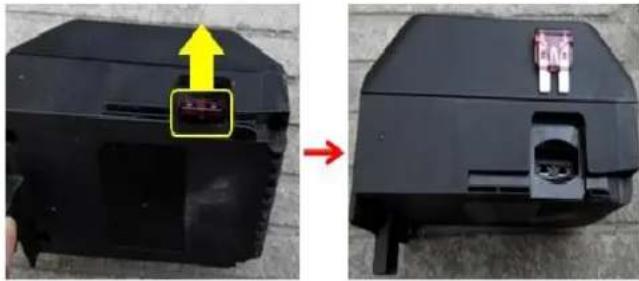
Battery Mount Model FX-RM5196eS
Charging port

natural_image
Close-up of a black electronic device with ventilation grille and a red arrow pointing to its side (no visible text or symbols)Backup
natural_image
Two views of a black plastic electronic device showing internal components and a yellow arrow indicating a component (no text or symbols visible)- Slide the battery into the holder at the rear end of the motor
- If necessary, charge the battery using the AC charging connector provided. This should only be necessary if the mower has not been moved for a long time
- If the engine does not start, check the fuse on the side of the battery
The LED lights indicate the battery's state of charge; the following notes on LED indicators should be observed:
• LED lights up red -> state of charge low
• LED flashes red -> battery alarm: fuse defect /overheating/check plug
• LED is green -> charge status is ok
- LED flashes green -> battery is charged during operation

natural_image
Close-up of a black electronic device with indicator lights and a green LED, mounted on a gray surface (no visible text or symbols)
natural_image
Close-up of a black electronic device with green indicator lights and a logo, mounted on a mechanical frame (no readable text or symbols)
natural_image
Close-up of a green LED display with 'G3elpz' branding, mounted on a mechanical device (no readable text beyond branding)Battery charge level:
4 LED green 100%
3 LED green 70 \~ 100%
2 LED green 40 \~ 70%
1 LED green 10 \~ 40%
1 LED red 0 \~ 10%
25. Starting / stopping the engine
Start (except FX-RM5196eS next page)
Make sure that the engine is filled with sufficient oil and gasoline before you start it.
Pull the brake lever (upper lever) against the handle and pull the starter cable slightly until resistance is felt. Then pull the starter cable smoothly until the engine starts. On the 4646eco model, please press the primer pump 3-5 times before pulling the starter cable to fill the carburetor with gasoline.
NOTE:
Do not operate the wheel drive lever at the same time. Only when the engine has started, and you want to use the self-propulsion do you operate the lower lever.
Due to a protective layer on the engine, a slight smoke may be produced when you use the device for the first time. This is a standard procedure. Pull the brake lever towards the push handle. Do not let the pull starter snapback.
Stop
Release the brake lever to stop the motor.
WARNING: The blade will continue to rotate for a few seconds after the engine is turned off. Unplug the spark plug connector when leaving the mower unattended.
MOWING INSTRUCTIONS
- In certain circumstances, such as high grass, it may be necessary to raise the cutting height to reduce the thrust and engine load, which can also lead to grass residue. It may also be required to reduce the basic speed and push the mower twice over this area
- Reduce the cutting width by covering the previous cut again to perform heavy cutting work
- The pores in the grass catcher bag can become clogged with dirt and dust, which means that the catcher can pick up fewer cuttings. To avoid this, you should regularly wash the catcher with a water hose and let it dry completely before reusing it.
- Keep the upper part of the engine around the starter free of grass and chopped grass clippings. This will improve engine airflow and prolong engine life.
Starting the FX-RM5196eS models

- Tighten the brake lever (1) to the handle
- Then start the engine with the start button (2)
- As soon as you release the brake lever, the engine stops immediately. To empty the grass catcher box, always remove the brake lever and stop the engine. Otherwise, there is an acute risk of injury from rotating blades.
26. Operating instructions for the lawn mower
Use of the rear-wheel-drive

ATTENTION: The brake lever must be pulled when starting the engine.
Release it to stop the engine.
Wheel drive shifts lever - To engage the powered forward movement of the device.
USING THE LAWNMOWER ENGINE SPEED
The engine speed has been preset by the manufacturer to ensure that the device delivers maximum performance. On some models, you can set a variable speed by a lever on the handlebar. Please operate this lever only when the device is in drive mode.
FlexSpeed drive (RM5196PRO only)
The speed control of the FlexSpeed transmission is located on the upper bracket. This option gives you the possibility to adjust the speed of the rear-wheel-drive differently. If you push the lever forward in the direction of the engine, the forward motion slows down. This is especially advisable on uneven terrain. If you pull the lever towards your body, the speed increases, and the mower moves forward faster. Use this option only on large flat areas without obstacles in your mowing area.

Important: The speed of the FlexSpeed gear unit may only be controlled while the engine is running! Otherwise, the gear unit may be damaged.
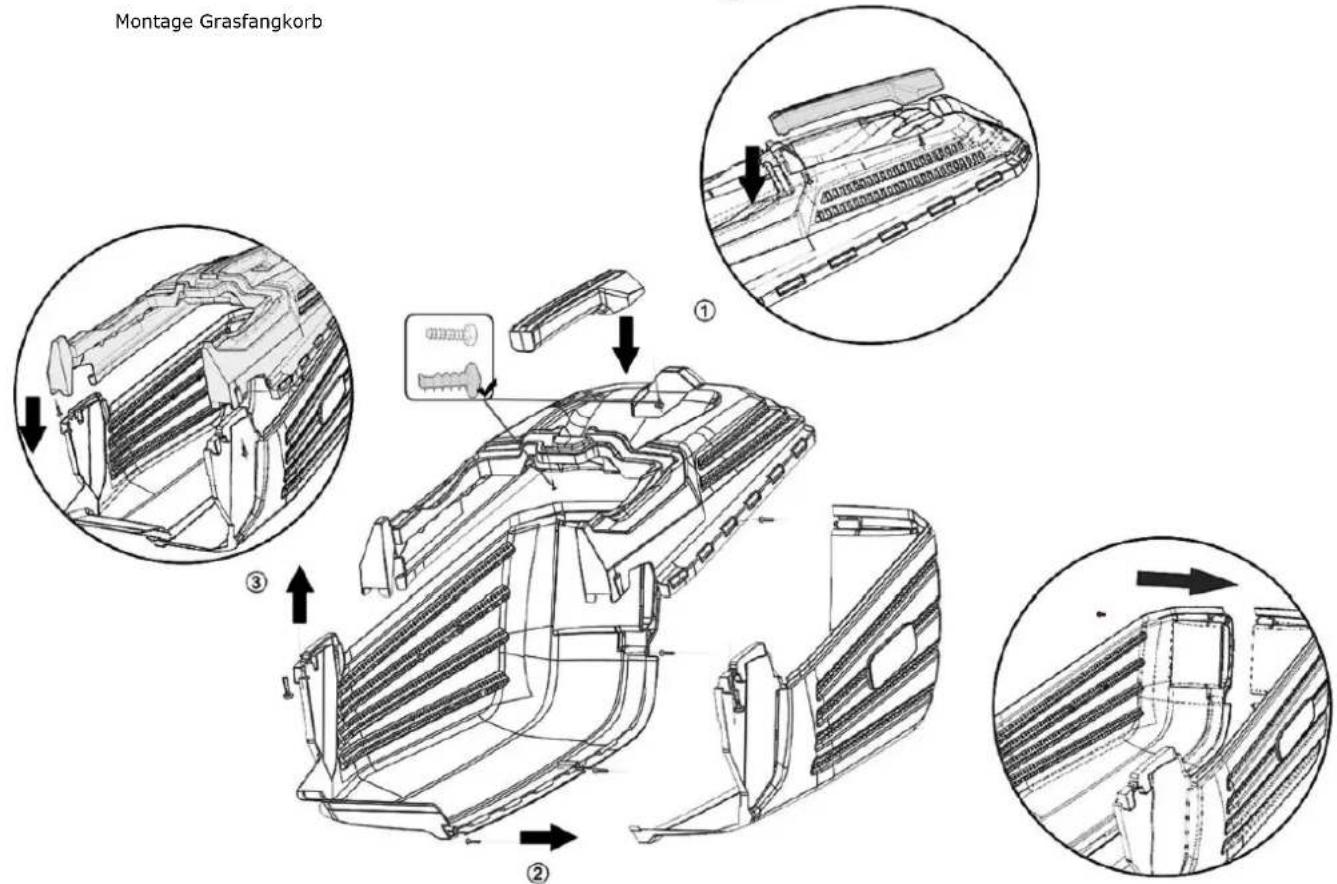
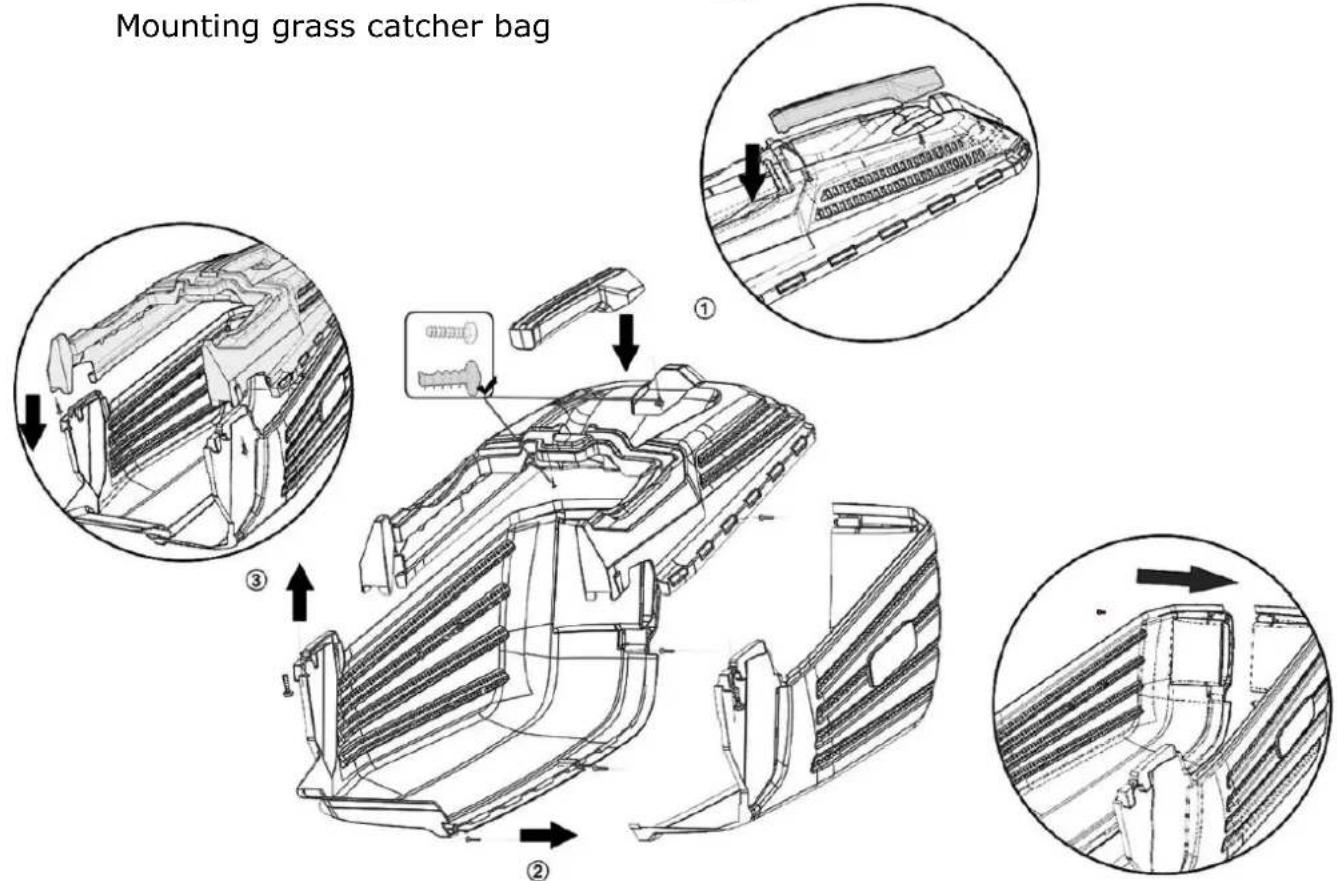
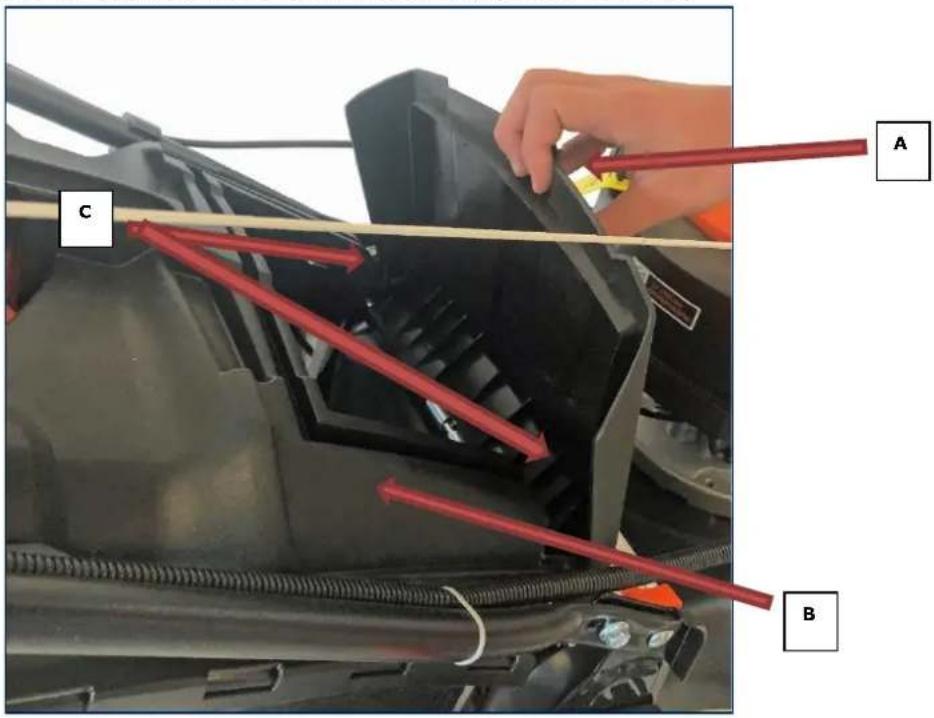
Using the grass catcher box
Open and hold the rear flap (A), then take the grass catcher bag (B) and hook it in (C)
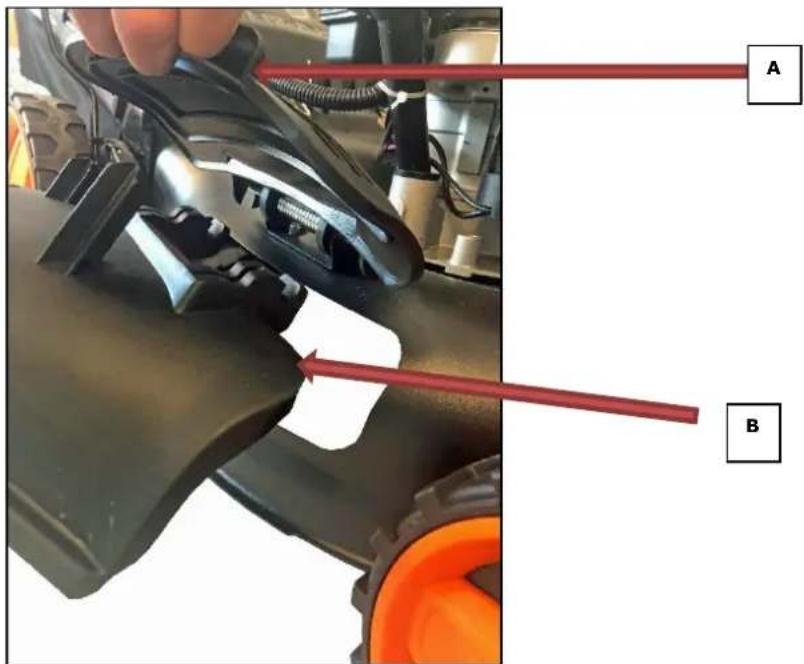
Using the side ejector
Open and hold side ejection flap (A). Take side ejector (B) and chop
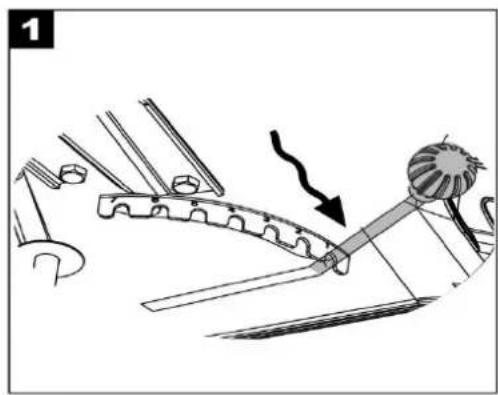
Using the Mulch kit
Open and hold rear flap (A), then insert mulch kit (B) into the opening provided. Close rear flap (A) - Ready Note: A mulching blade is already mounted and does NOT need to be mounted additionally.

natural_image
Close-up of a lawn mower with orange and black components, hands adjusting the blade (no visible text or symbols)
natural_image
Black plastic enclosure with internal compartments and grid lines (no text or symbols visible)The mulching inserts (or also called mulching kit) shown here depend on the model and may differ from the illustrations.
27. Maintenance and cleaning (EASY CLEAN)
IMPORTANT- regular, careful maintenance is necessary to ensure that the safety level and performance of the device remain unchanged.
1) Keep all nuts, screws, and bolts tightened to ensure that the device is in perfect working condition. Regular maintenance is necessary for the safety and performance of the device
2) Never store the device with the tank still full in a building where escaping vapors can reach a flame, spark, or heat source.
3) Let the engine cool down completely before storing the device in closed rooms.
4) Keep the engine, exhaust silencer, and fuel tank free of grass, leaves, or excess grease. Never leave containers with cuttings in rooms.
5) For safety reasons, do not use the device when parts are worn or damaged. Parts should be replaced. Repairing damaged parts is not sufficient. Use original spare parts. Parts that are not of the same quality can damage the device and endanger your safety.
6) If the fuel tank needs to be emptied, you should do this outdoors and with the engine cold.
7) Wear solid working gloves when removing or reattaching the blade.
8) Check that the blades are firmly and evenly seated after sharpening.
9) Regularly check the self-closing protective shield and grass catcher bag for wear and tear.
10) When operating, transporting, or tilting the device, please observe the following:
- Wear solid working gloves;
- Hold the device in places that provide a firm grip. Pay attention to weight distribution.
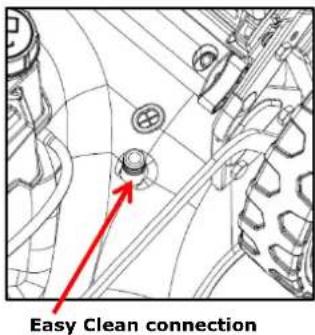
CLEANING (EASY CLEAN function)
Clean the device carefully with water after each cutting operation. Remove the grass and mud deposits that have accumulated inside the undercarriage. This will avoid drying out and possible difficulties when starting the engine again.
You can use the EASY CLEAN connection to clean the inner housing (cutting unit). Simply connect a water hose to the connection on the top of the housing and slowly turn on the water while the cutting mechanism is running. The rotation of the cutting mechanism distributes the water evenly in the inner housing and can thus flush away dirt residues.
The paint on the inner side of the undercarriage may flake off over time due to aggressive operations. In this case, you should paint over the paint with rust-resistant paint to protect the undercarriage from the corrosion of the metal.
Check the V-belt 1-2 times a year and remove any cuttings from it.
Once a year, the drive wheels should be cleaned inside.
Remove both wheels. Use a brush or compressed air to remove grass and dirt from the gear wheel and gear rim.
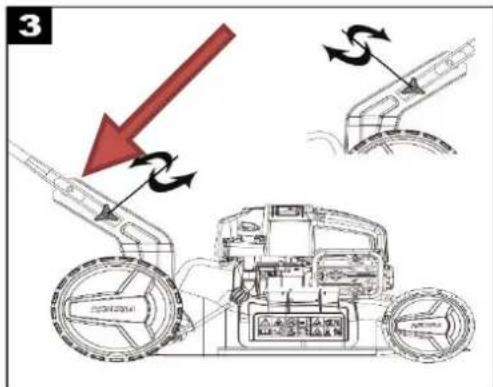
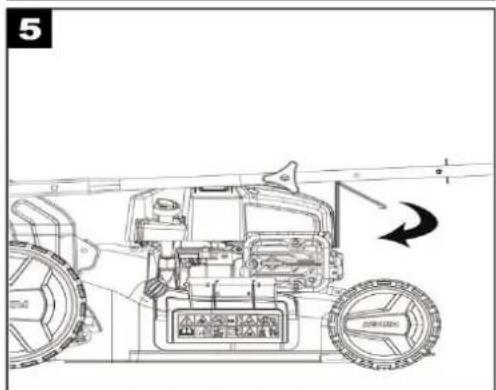
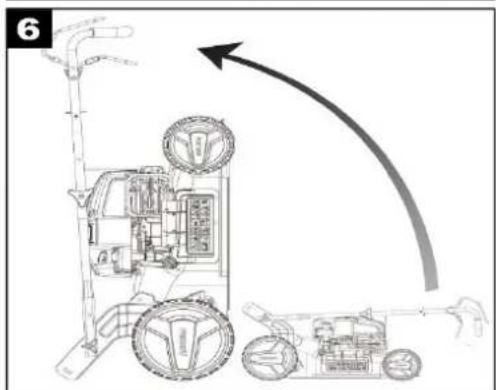
28. Mow and Stow Function (FX-RM46BS475IS only)
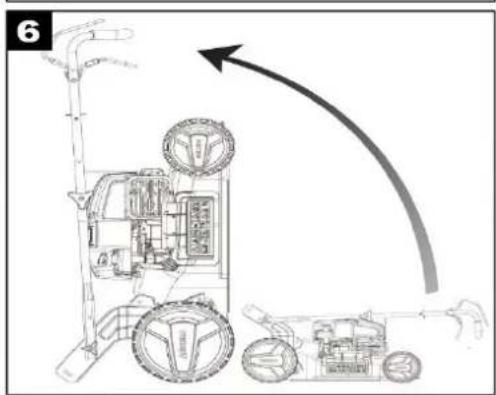
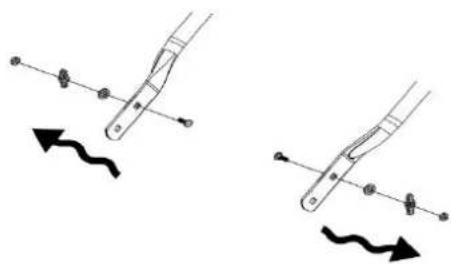
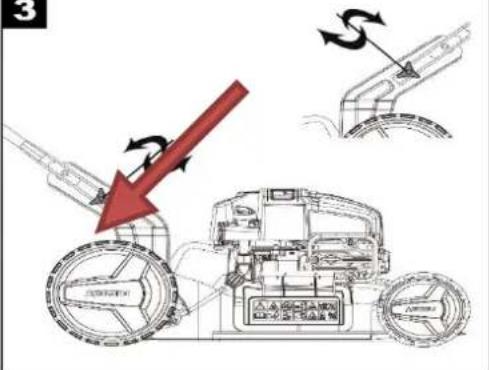
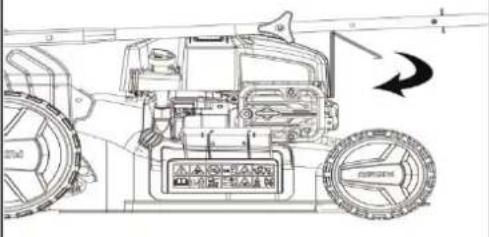
With the Mow and Stow function, you can store your mower in a space-saving way after work is done. For this stowing, please proceed as follows:
natural_image
Diagram of a mechanical device with a lever and gear mechanism, showing motion direction (no text or symbols)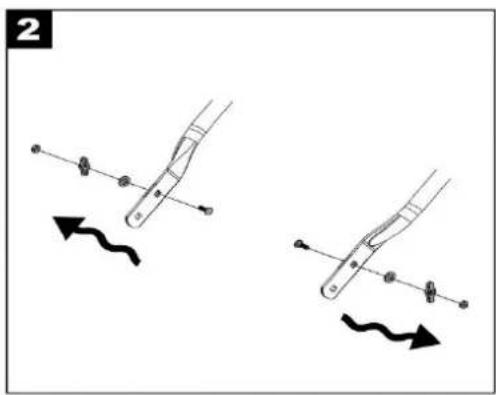
natural_image
Two diagrams showing mechanical linkage or motion with arrows indicating direction (no text or symbols)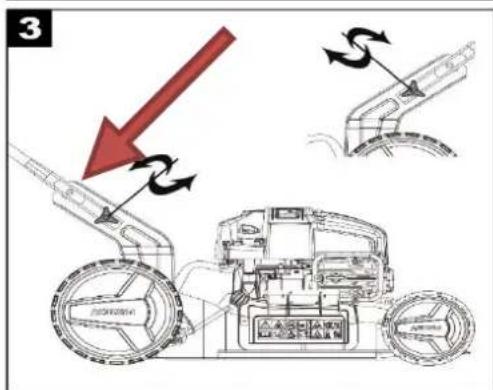

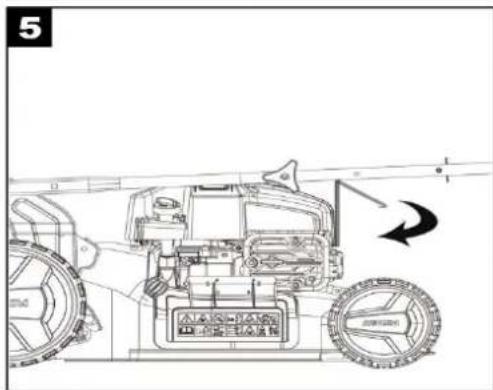
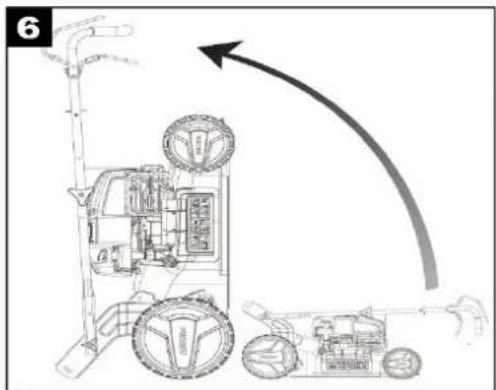
- Set the cutting height lever to the most adverse position.
- Remove the locking screws from the lower bar at the upper fixation (exact position see picture 3, red arrow) and store them well for the next use of your mower.
- Open the wing screws on the lower spar.
- Fold up the handlebar.
- Fasten the handle with the rubber band provided.
- Now stow your mower to save space.
29. Care, maintenance, and storage
CHANGING THE CUTTING BLADES
Remove the screw to replace the blade. Empty the fuel tank before removing the blade.

natural_image
Pure mechanical component diagram without any text, numbers, or symbolsReplace everything, as shown. Fasten the screw properly. The fastening torque is 45Nm. Also, replace the blade screw when replacing the blade.
OIL CHANGE
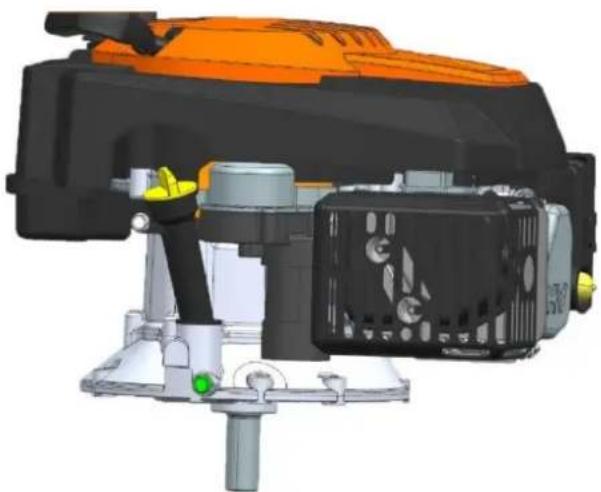
natural_image
3D mechanical assembly diagram showing orange and black components mounted on a base with no visible text or symbolsWARNING: Avoid skin contact with the oil. Wash your hands thoroughly with soap and water after changing the oil.
ATTENTION: Used oil is a hazardous waste product. We recommend that you take used oil to your local disposal center for proper disposal. Do not dispose of the device with household waste.
- Switch off the engine and let it stop completely.
- Disconnect the spark plug cable and keep it away from the spark plug.
- Empty the oil into a suitable container. Tilt the lawnmower by 45 degrees and use a FUXTEC suction pump to suck off the oil through the filler neck. Alternatively, you can tilt the mower more to drain the oil through the filler neck.
- Keep the engine balanced. Remove the dipstick. Slowly add approximately 0.5L of new recommended oil (FUXTEC 4MAX 4 stroke oil) into the container until the dipstick reads the top of the container. Do not overfill the container.
- Check the level with the dipstick
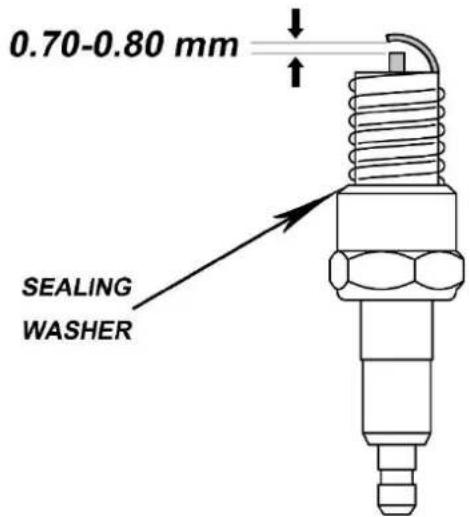
Spark plug
Remove the spark plug and clean it with a wire brush after the engine has cooled down sufficiently. Using a feeler gauge, set the gap to 0.75 mm (0.030"). Replace the spark plug, and be careful not to overtighten it.
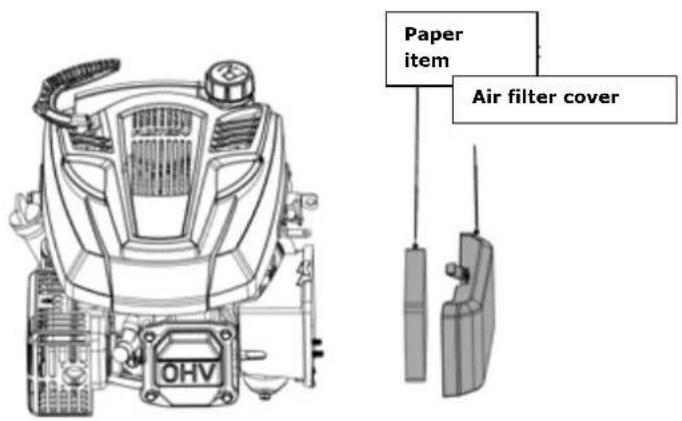
Air Filter
Disconnect the air filter cover. Replace the air filter when dirty to prevent objects from entering the air intake.
Emptying the fuel tank and carburetor
Option A (Recommended):
Use a FUXTEC suction pump to suck the gasoline out of the tank or let the mower run empty.
Option B:
- Place a manufacturer's recommended gasoline canister under the carburetor and use a funnel to avoid spills. Tilt the lawnmower forward to prevent spillage.
- Loosen the drain plug (GREEN in the illustration) and drain the gasoline through a funnel.
- Tighten the drain plug after all gasoline has drained into the canister. Fasten the drain plug securely.

natural_image
3D technical illustration of a mechanical engine assembly with orange and black components, no visible text or symbolsNote: We also offer different suction pumps to pump the fuel directly from the tank and even with the electric pump with which you can refuel. See www.fuxtec.de
Maintenance schedule
| Regular maintenance | Before each use | First month or 5 operating hours | Every 3 months or 25 operating hours | Every 6 months or 50 operating hours | Once a year or 100 operating hours | Every 2 years or 250 operating hours |
| Engine oil | Check | * | ||||
| Change | * | * | ||||
| Air filter | Check | * | ||||
| Change | ||||||
| Spark plug | Check | |||||
| Change | * | |||||
| Fuel tank and filter | Check | |||||
| Change | ||||||
| Valve clearance | Check | * | ||||
| Change | * | |||||
| Combustion chamber | ||||||
| clean | After 200 operating hours |
Troubleshooting
| The engine does not start | Possible causes | Troubleshooting |
| 1. Check fuel level | No more fuel in the tank | Refill |
| Impure gasoline: Engine stored without care, proper emptying of the tank or filled with contaminated gasoline | Empty the tank and the carburetor.Fill up with new fuel (super unleaded) | |
| 2. Remove and check the spark plug | Spark plug defective, dirty, or incorrectly attached | Replace the spark plug |
| Spark plug flooded with gasoline | Dry and reinstall properly | |
| 3. User errors | forgotten to operate the brake lever at start | While the starter is pulled, the upper lever must be pulled to the handle |
| 4. Impurities | Fuel filter or carburetor contaminated | Replace or clean the components |
| 5. Electrical contact | When tightening the engine brake lever, the contact plate at the end of the Bowden cable does not close | Bend back the holder to create the electrical contact |
STORAGE
The gasoline should not remain in the tank for more than a month.
Clean the mower thoroughly and store it in a dry place in the house.
THE ENVIRONMENT
To protect our environment, we recommend that you observe the following points and instructions:
- Always use unleaded gasoline
- Always use a funnel and a fuel canister with a liquid level indicator to avoid spilling fuel during refilling
- Do not fill the tank completely
- Do not overfill the device with engine oil
- When changing the oil, make sure that the used oil is completely collected. Avoid spilling. Take the used oil to a recycling station
- Replace the silencer if it is defective. Only use original spare parts when carrying out repairs
- Seek professional help if the carburetor requires corrections
- Clean the air filter according to the instructions
CUSTOMER SERVICE
FUXTEC provides original spare parts. We recommend that you take the device to an authorized service center for annual maintenance and inspection of the protective devices.
For more information about service and spare parts, please contact FUXTEC Customer Service.
30. Warranty
The warranty period is 24 months from the date of purchase. Please keep your proof of purchase in a safe place. Excluded from the warranty are wearing parts and damage caused by improper use, use of force, technical modifications, use of wrong accessories or non-original spare parts, and repair attempts by non-qualified personnel. Authorized dealers may only carry out repairs.
31. Disposal note
The device is in packaging to avoid transport damages. This packaging is raw material and can therefore be reused or returned to the raw material cycle. The device and its accessories consist of different materials, such as metal and plastic. Dispose of defective components in hazardous waste disposal. Ask your local dealer or the municipal administration.
- Spare parts
| Spare part | Modell | Artikelnummer | EAN |
| Carburetor | 4839P BJ2018 | 10002250 | 4260449128505 |
| 4646,4839P | 10002625 | 4260586991840 | |
| 4646ECO, 4346, 4346 ECO | 10003007 | 4260586994872 | |
| FX-RM5196/FX-RM5196PRO/FX-RM5196eS/5396P ab BJ 2021, FX-RM5196eSPRO | 10003361 | 4260586997378 | |
| 5196/5196PRO/5196eS/5396P | 10002614 | 4260586991802 | |
| Air filter | FX-RM4646,4646ECO,4839P,4346,4346ECO | 10002618 | 4260586991840 |
| FX-RM5196/FX-RM5196PRO/FX-RM5196eS/5396P/FX-RM5196eSPRO | 10000437 | 4260449123883 | |
| Blade | 4646,4646ECO, | 10002252 | 4260449128529 |
| 4646,4646ECO, | 10002253 | 4260449128536 | |
| 4839P | 10000713 | 4260249446069 | |
| FX-RM5196/RM5196PRO/RM5196eS/FX-RM5196eSPRO | |||
| Blade holder | 4346, 4346ECO | 10002254 | 4260449128543 |
| 5396P | |||
| 4346, 4346 ECO | 10002255 | 4260449128550 | |
| FX-RM4646 | 10002256 | 4260449128567 | |
| FX-RM4646ECO | 10001385 | 4260449121445 | |
| FX-RM5196/FX-RM5196eS,51BS500 | 10002628 | 4260586991925 | |
| RM51BS675IS | 10002257 | 4260449128574 | |
| 4839P,5396P | 10000738 | 4260249448254 | |
| Spark plug | all models | 10000233 | 4260249447974 |
| Recoil starter | all models | 10000250 | 4260249447868 |
| Driving belt | 4346 | ||
| FX-RM4646 | 10002260 | 4260449128604 | |
| FX-RM5196/FX-RM5196eS | 10000712 | 4260249446151 | |
| FX-RM5196PRO/FX-RM5196eSPRO | 10002261 | 4260449128611 | |
| 4839P | 10002262 | 4260449128628 | |
| 5396P | 10002263 | 4260449128635 |
33. EC Declaration of Conformity
Herewith we
FUXTEC GmbH
Kappstrasse69, 71083 Herrenberg-Gültstein - Germany
declare that the device designated below
Engine Lawn Mower, FX-RM5196, FX-RM5196PRO, FX-RM5196eS, FX-RM4839P, FX-RM5396P, FX-RM4646, FX-RM4646ECO, RM4346ECO, RM4346, RM4646, RM51BS675IS, RM51BS500, RM46BS475IS, RM5196eSPRO
To which this declaration refers, complies with the relevant essential health and safety requirements of the applicable EC Directives 2006/42/EC. This declaration refers only to the device in the condition in which it was placed on the market. Parts added and interventions carried out subsequently by the end-user are not considered.
Relevant EC directives: Devicery Directive 2006/42/EC (Annex I)
Harmonized standards applied: EN ISO 5395-1:2013+A1
EN ISO 5395-2:2013+A1+A2
EU directives also applied:
Emission of gaseous and particulate pollutants from internal combustion engines for non-road mobile devicery and devices
• EMC Directive 2014/30/EC
• Noise emission directive 2000/14/EC for devices and devices intended for outdoor use
Herrenberg, October 13, 2021

Tim Gumprecht
(Managing Partner)
Manufacturer:
FUXTEC GmbH
KAPPSTRASSE 69
71083 HERRENBERG-GÜLTSTEIN
GERMANY
Storage of the technical documentation:
FUXTEC GmbH • Kappstrasse 69 • 71083 Herrenberg-Gültstein • Germany
Tim Gumprecht, Managing Partner
Chère cliente, cher client,
natural_image
Exterior view of a black and orange LUXTEC lawn mower (no signage or text visible)FUXTEC GmbH
natural_image
Yellow sign with two black hand tools, no text or symbols presentnatural_image
Technical line drawing of a robotic vacuum cleaner with a hand pouring liquid into it (no text or symbols)natural_image
Close-up of a black electronic device with ventilation grille and a red arrow pointing to its side (no visible text or symbols)Fusible

natural_image
Close-up of a black electronic device with a yellow arrow pointing to a small component (no visible text or symbols)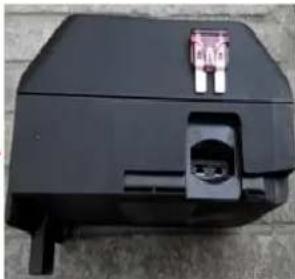
natural_image
Black plastic electronic device with a small connector and mounting bracket (no visible text or symbols)natural_image
Close-up of a black handheld electronic device with a green indicator light and power button, mounted on a vehicle (no visible text or symbols)
natural_image
Close-up of a black 3D printer front panel with green indicator lights and control buttons (no readable text or symbols)
natural_image
Close-up of a green LED display with 'GoUpz' branding, mounted on a mechanical device (no readable text beyond branding)natural_image
Close-up of a lawn mower with orange and black wheels, hands adjusting the blade (no visible text or symbols)
natural_image
Black plastic enclosure with internal compartments and ventilation grilles (no text or symbols visible)natural_image
Technical diagram of a mechanical assembly with no visible text or symbolsRaccord Easy Clean
natural_image
Diagram of a mechanical tool interacting with a curved bracket and blade, showing motion direction (no text or symbols)2
natural_image
Two diagrams showing a hand holding a tool with directional arrows indicating motion or movement (no text or symbols present)3
4

natural_image
Diagram of a robotic arm with motion arrows indicating movement (no text or symbols)5
natural_image
Technical line drawing of a mechanical device with wheels and a curved arrow indicating motion (no text or symbols)natural_image
Pure mechanical component diagram without any text, numbers, or symbolsnatural_image
3D rendering of a mechanical device with orange top and black body, no visible text or symbolsnatural_image
3D technical illustration of a mechanical engine assembly with orange and black components, no visible text or symbolsnatural_image
Exterior view of a black and orange Juxtec lawn mower (no text or symbols visible)FUXTEC GmbH
Kappstraße 69, 71083 Herrenberg-Gültstein, Germania

natural_image
Yellow background with black line and arrow symbols (no text or numbers)natural_image
Diagram of a robotic device with a hand pouring liquid into a container, showing mechanical components and motion arrows (no text or symbols)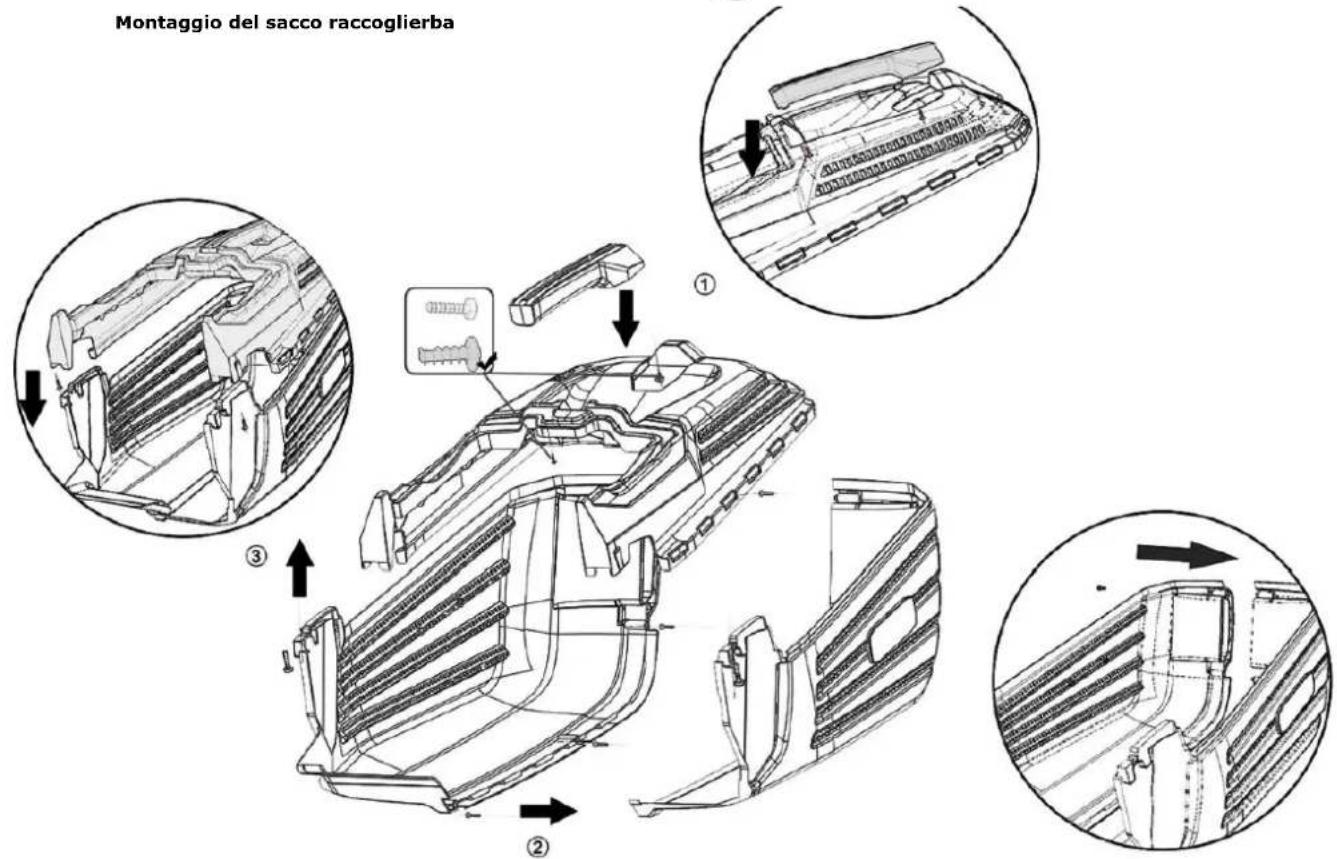
natural_image
Close-up of a person using a black lawn mower with orange wheels and handlebars (no visible text or symbols)
natural_image
Black plastic container with internal compartments and grid lines (no visible text or symbols)natural_image
Diagram of a mechanical device with a lever and gear mechanism, showing motion direction (no text or symbols)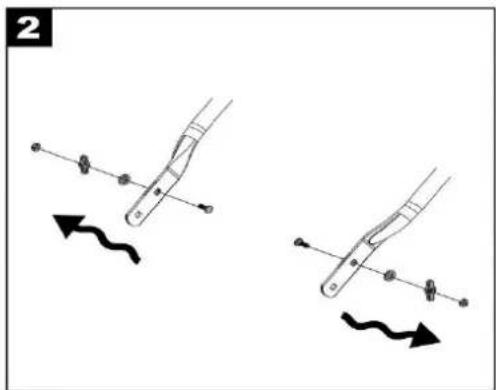
natural_image
Two diagrams showing a hand holding a tool with two different motion paths indicated by arrows (no text or symbols present)