FX-MS152T - Lawn mower Fuxtec - Free user manual and instructions
Find the device manual for free FX-MS152T Fuxtec in PDF.
| Product type | Backpack brushcutter / grass trimmer |
| Brand | Fuxtec |
| Model | FX-MS152T |
| Engine | 2-stroke, air-cooled, 52 cm³ |
| Maximum power | 2,2 kW at 7 500 min⁻¹ |
| Maximum engine speed | 9 000 min⁻¹ |
| Idle speed | 3 000 min⁻¹ |
| Cutting diameter (nylon line) | 440 mm |
| Blade diameter | 305 mm (3 teeth), 255 mm (others) |
| Dry weight | 8,8 kg |
| Fuel tank capacity | 0,9 L |
| Fuel consumption | 0,79 kg/h (according to ISO 8893) |
| Fuel/oil mixture | 40:1 (unleaded gasoline SP98 recommended) |
| Sound pressure level | 100 dB(A) |
| Guaranteed sound power level | 113 dB(A) |
| Handle vibration | 9,661 m/s² (measured value) |
| Starting | Manual starter with choke and primer bulb |
| Safety | Stop switch, anti-projections guard, safety distance 15 m |
| Maintenance | Washable air filter, spark plug (gap 0.6‑0.7 mm), blade sharpening |
| Included accessories | Carrying strap, protective cover, 3-tooth blade, spool of line, spark plug wrench, assembly tool |
| Warranty | 24 months (excluding wear parts) |
Frequently Asked Questions - FX-MS152T Fuxtec
User questions about FX-MS152T Fuxtec
0 question about this device. Answer the ones you know or ask your own.
Ask a new question about this device
Download the instructions for your Lawn mower in PDF format for free! Find your manual FX-MS152T - Fuxtec and take your electronic device back in hand. On this page are published all the documents necessary for the use of your device. FX-MS152T by Fuxtec.
USER MANUAL FX-MS152T Fuxtec
- English manual - Parts location 38
- Specification 39
-
Symbols on the machine 40
-
For safe operation 41
- Assembly of the machine 43
- Installing cutting blade and head 45
- Fuel 46
- Operation 47
- Cutting method 51
- Maintenance 51
- Troubleshooting guide 53
- EU Declaration of Conformity 54
VERSION FRANCAISE 55
L.Zirkler,30.11.2022
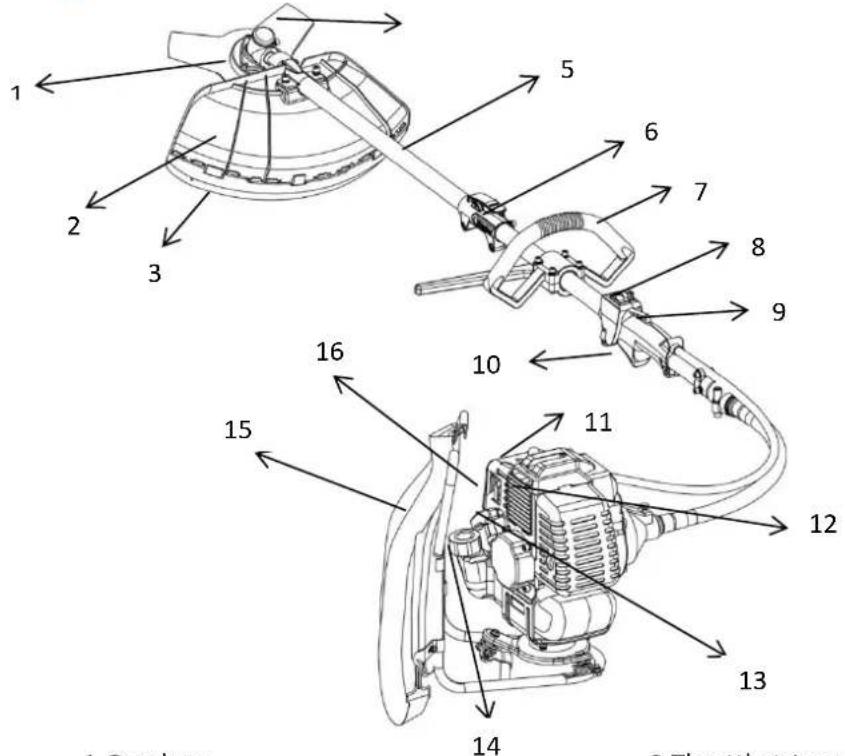
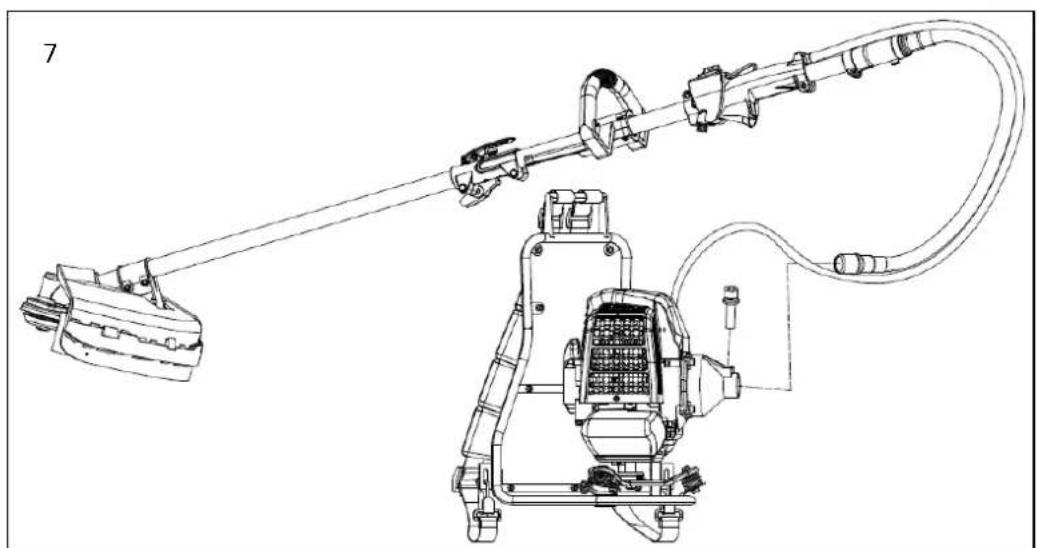
21. English manual - Parts location
1.Gearbox
2.Blade guard
3.Guard extension
4.Blade
5.Shaft
6. Switch joint
7.P-handle
8. Stop switch
9.Throttle trigger lock
10.Throttle
11.Air filter cover
12.Cylinder cover
13. Starter handle
14. Fuel tank
15. Harness
16. Choke
- Specification
| Model No. | FX-MS152T |
| Engine type | Single cylinder, air-forced cool, 2 stroke |
| Engine model | 1E44F-5 |
| Displacement | 52 cc |
| Rated engine power | 2.2 kw |
| Rated engine speed | 7500 rpm |
| Max engine speed | 9000 rpm |
| Idle speed | 3000±300 rpm |
| Fuel tank capacity | 900 ml |
| Fuel Mixture | Gasoline 40 : Oil 1 |
| Fuel flow | 790g/h |
| Tested sound pressure level, LPA (2000/14/EC & 2005/88/EC) | LPA: 102 dB(A), k=3 dB(A) |
| Guaranteed sound power level, LWA (2000/14/EC & 2005/88/EC) | LWA: 113 dB(A), k=3 dB(A) |
| Vibration level | 9.558m/s², K=1.5 m/s² |
| Attachment | 3T Blade + Nylon Head |
| Pipe Diameter | 26 mm |
| Shaft | 8mm*9T |
| G.W. / N.W. | 12.0 / 8.8 kg |
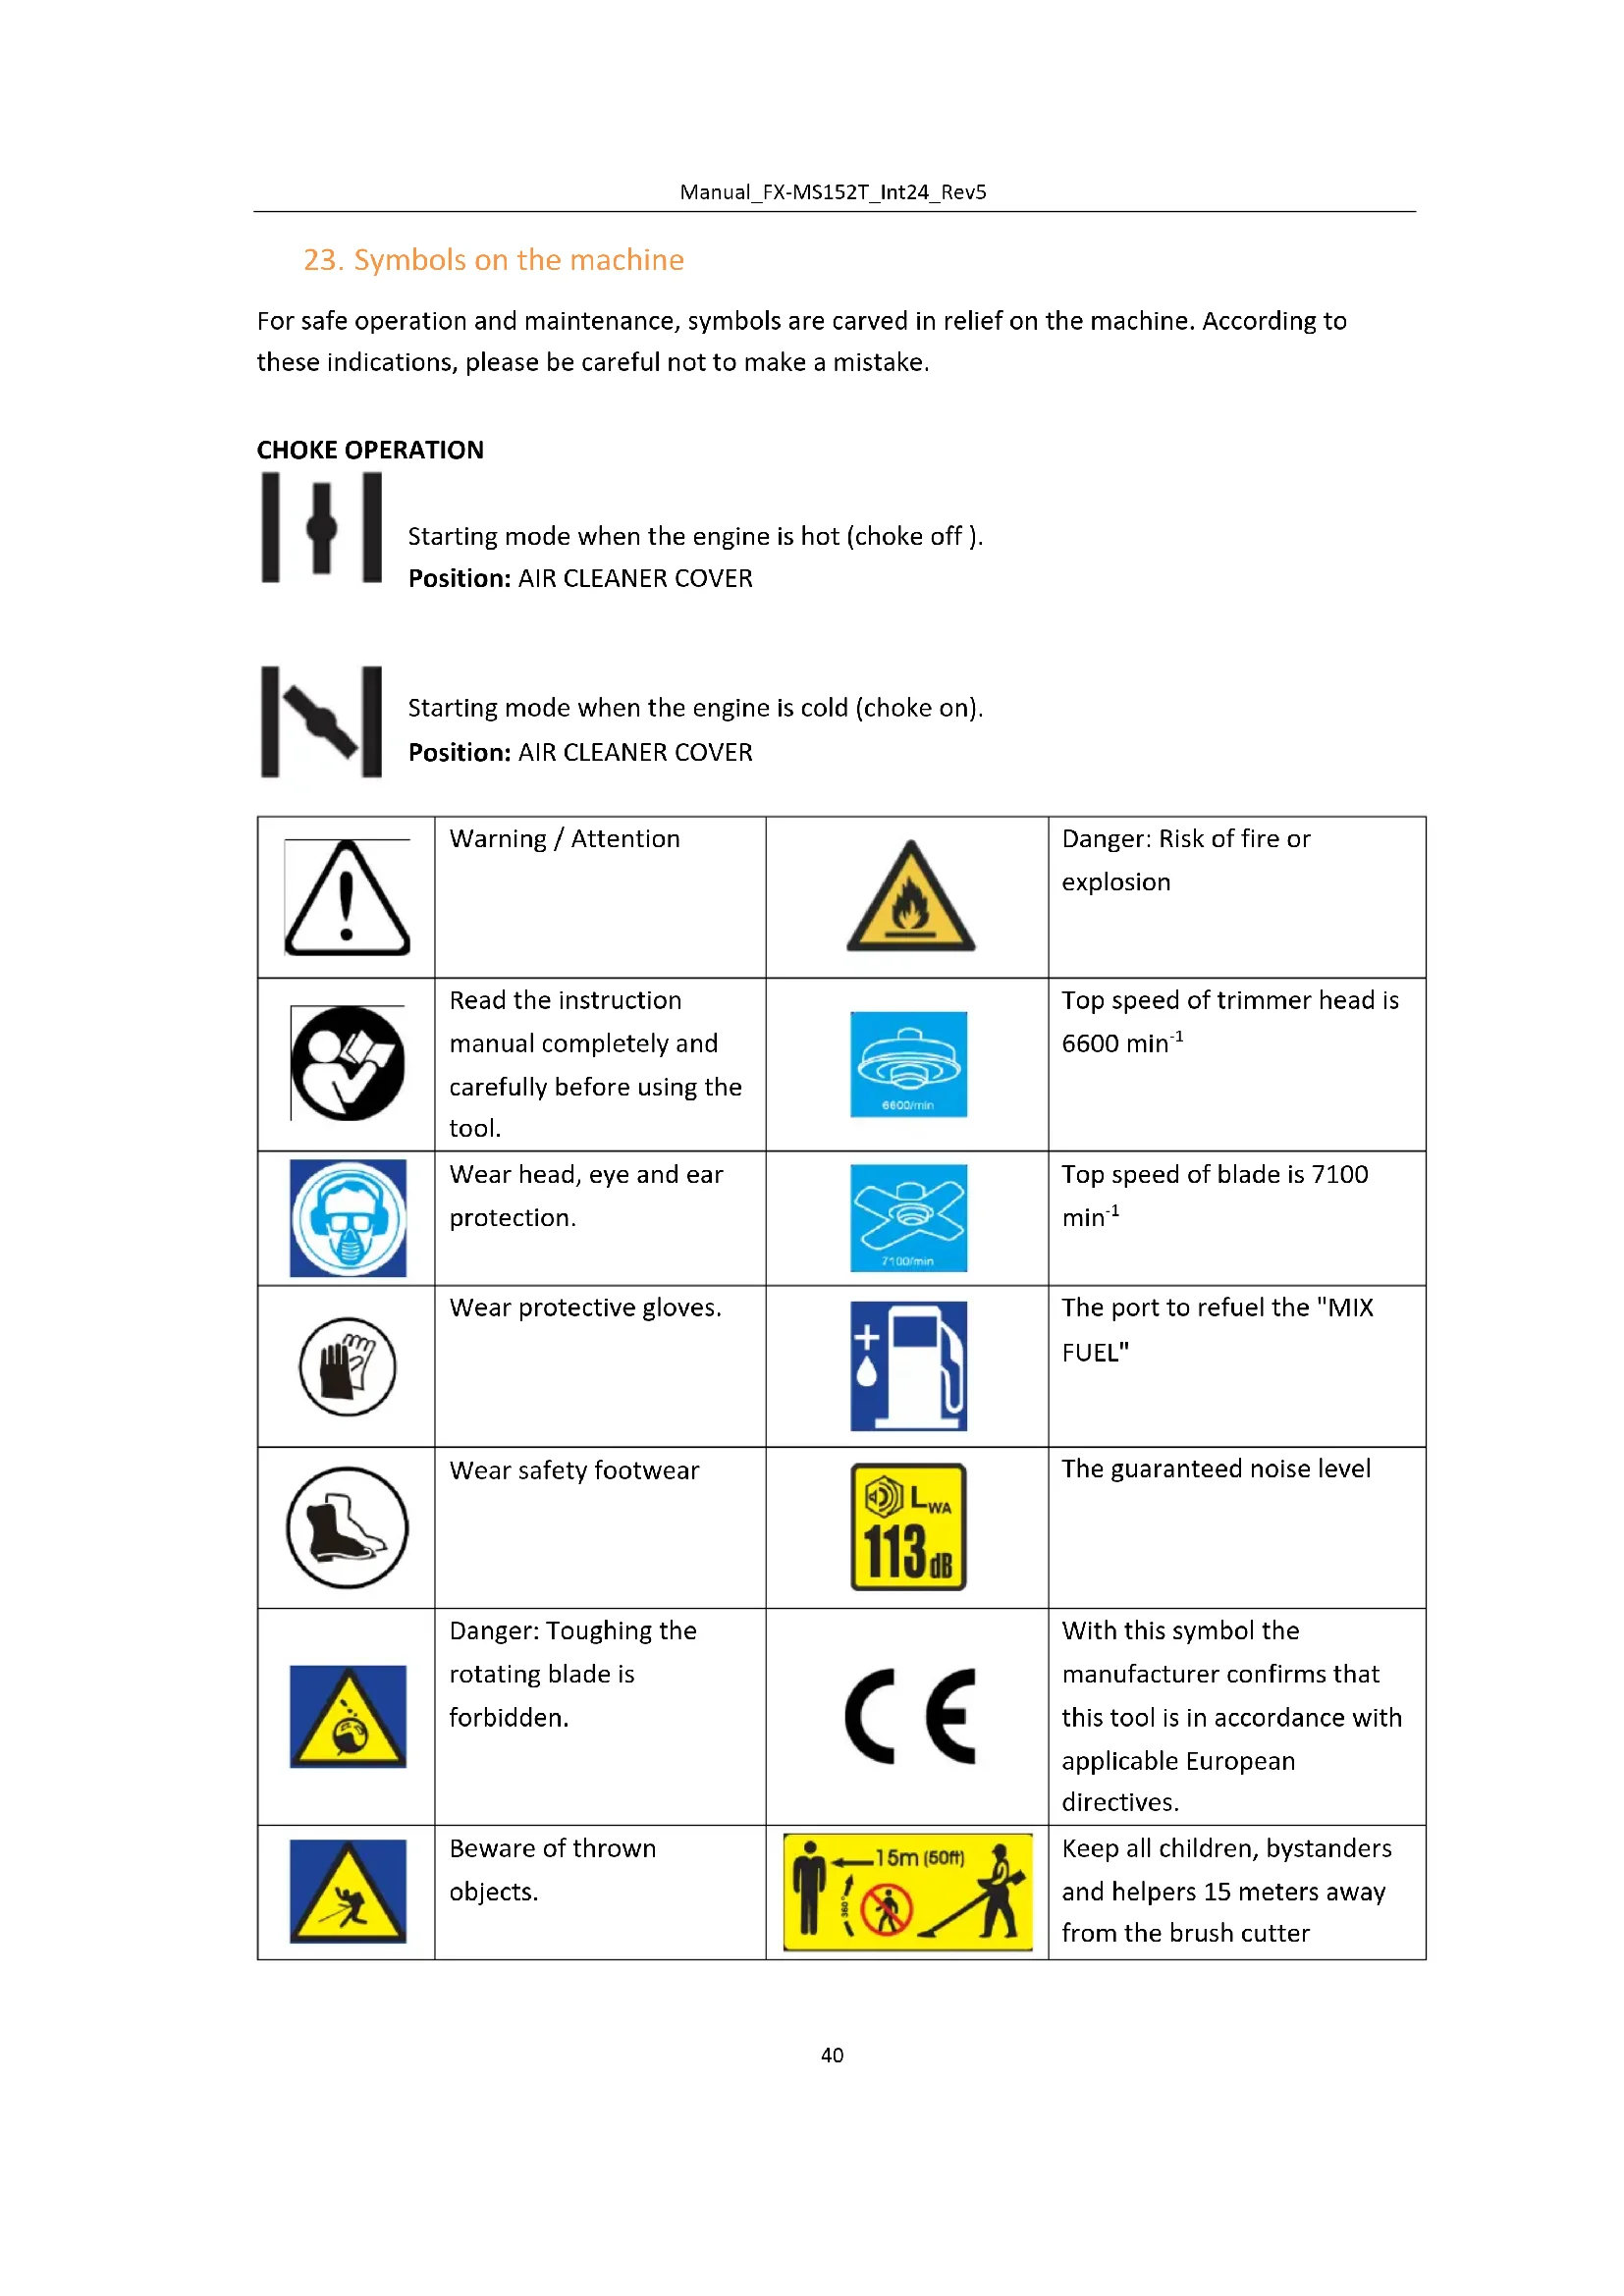
23. Symbols on the machine
For safe operation and maintenance, symbols are carved in relief on the machine. According to these indications, please be careful not to make a mistake.
CHOKE OPERATION

Starting mode when the engine is hot (choke off).
Position: AIR CLEANER COVER

Starting mode when the engine is cold (choke on).
Position: AIR CLEANER COVER
| Warning / Attention | Danger: Risk of fire or explosion |
| Read the instruction manual completely and carefully before using the tool. | Top speed of trimmer head is 6600 min-1 |
| Wear head, eye and ear protection. | Top speed of blade is 7100 min-1 |
| Wear protective gloves. | The port to refuel the "MIX FUEL" |
| Wear safety footwear | The guaranteed noise level |
| Danger: Toughing the rotating blade is forbidden. | With this symbol the manufacturer confirms that this tool is in accordance with applicable European directives. |
| Beware of thrown objects. | Keep all children, bystanders and helpers 15 meters away from the brush cutter |
| Keep away from fire | Hot surface: Risk of burn. |
0IMPORTANT
If warning label peel off or become soiled and impossible to read, you should contact the dealer from which you purchased the product to order new labels and affix them in the required location(s).
WARNING
Never modify your brush cutter. We won't warrant the machine, if you use the remodeled brush cutter or you don't observe the proper usage written in the manual.
24. For safe operation
- Read this manual carefully until you completely understand and follow all safety and operating instructions.
- Keep this manual handy so that you may refer to it later whenever any questions arise. Also note, if you have any questions which cannot be answered herein, contact the dealer from whom you purchased the product.
- Always be sure to include this manual when selling, lending, or otherwise transferring the ownership of this product.
- Never allow children or anyone unable to fully understand the directions given in the manual to use the machine.
WORKING CONDITION
- When using the product, you should wear proper clothing and protective equipment.
(1) Helmet
(2) Ear protectors
(3) Protection goggles or face protector
(4) Thick work gloves
(5) Non-slip-sole work boots
- And you should carry with you.
(1) Attached tools and files
(2) Properly reserved fuel
(3) Spare blade
(4) Things to notify your working area (rope, warning signs)
(5) Whistle (for collaboration or emergency)
(6) Hatchet or saw (for removal of obstacles)
- Do not wear loose clothing, jewelry, short trousers, sandals, or go barefoot. Do not wear anything which might be caught by a moving part of the unit. Secure hair so it is above shoulder length.
WORKING CIRCUMSTANCE
- Never start the engine inside a closed room or building. Exhaust gases contain dangerous carbon monoxide.
- Never use the product:
a. when the ground is slippery or when you can't maintain a steady posture
b. At night, at times of heavy fog, or at any other times when your field of vision might be limited and it would be difficult to gain a clear view of the working area.
c. During rain storms, during lightning storms, at times of strong or gale-force winds, or at any other times when weather conditions might make it unsafe to use the product.
WORKING PLAN
- You should never use the product when under the influence of alcohol, when suffering from exhaustion or lack of sleep, when suffering from drowsiness as a result of having taken cold medicine or at any other time when a possibility exists that your judgment might be impaired or that you might not be able to operate the product properly and in a safe manner.
- When planning your work schedule, allow plenty of time to rest. Limit the amount of time over which the product is to be used continuously to somewhere around 30 40 minutes per session, and take 10 20 minutes of rest between work sessions. Also try to keep the total amount of work performed in a single day under 2 hours or less.
25. Assembly of the machine
- Assemble the eingine on the frame
- Assemble the clutch cover
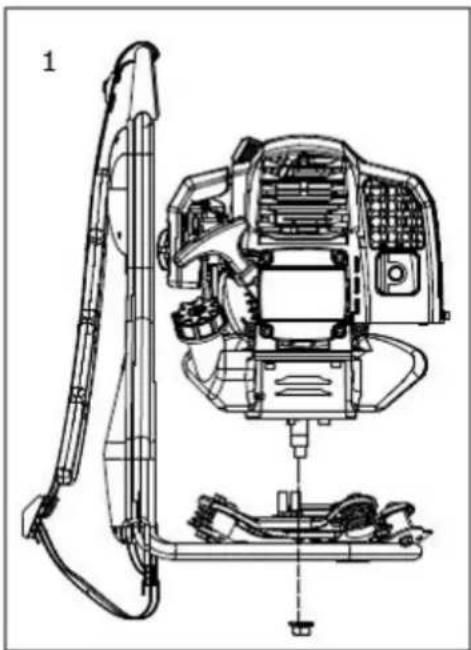
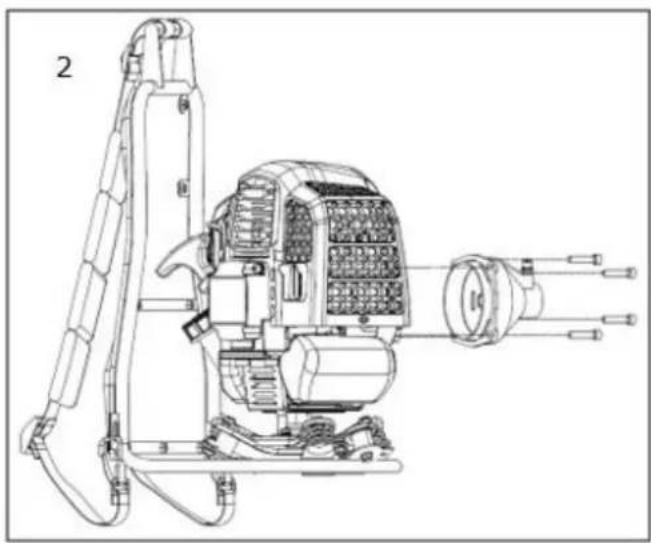
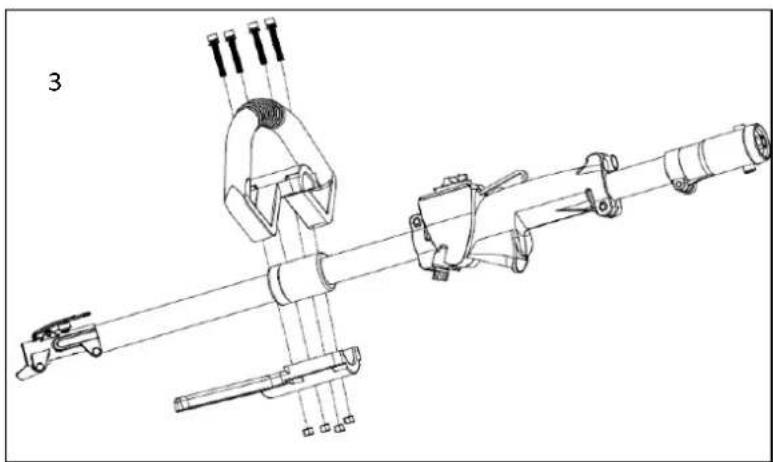
3. Assemble the handhold by using the screws
-
Put the flexible shaft on the gas handle
-
Assemble the protection cover
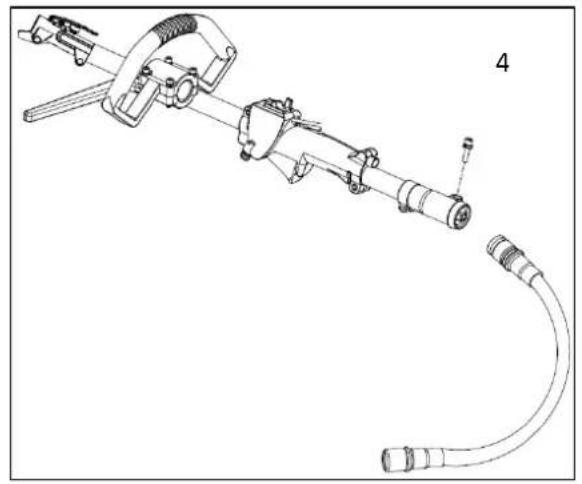
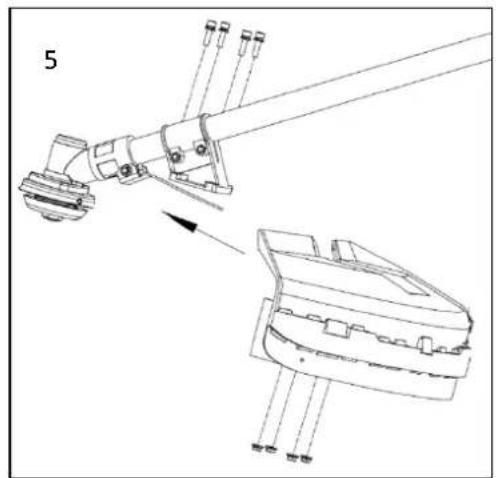
- Assemble the brush cutter attachment on the connection part
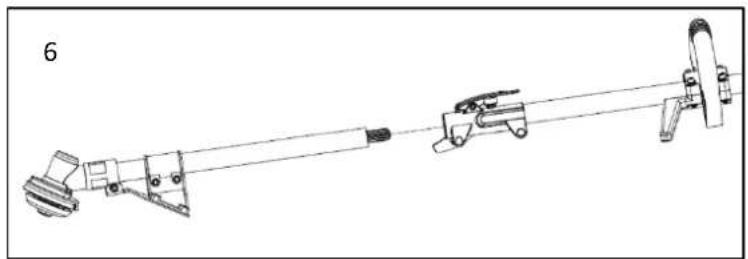
- Assemble the flexible shaft on the clutch cover
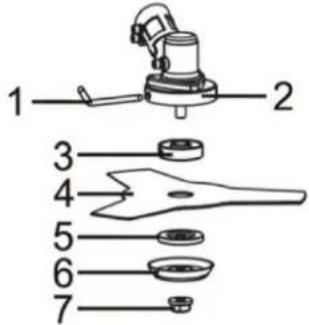
26. Installing cutting blade and head
- Put the angled bar (1) into the side holes of the gear case (2) and the plate (3) so as to fasten the axle.
- Mount the blade (4) and the washer (5) onto the axle.
- Mount the washer (6) and the nut (7). Fasten tightly anti-clockwise.
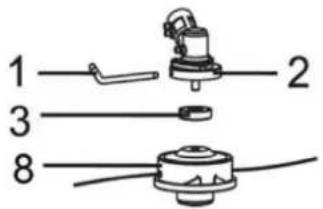
INSTALLING CUTTING HEAD
- Put the angled bar (1) into the side holes of the gear case (2) and the plate (3) so as to fasten the axle.
- Mount the trimmer head (8) on the axle. Fasten tightly anti-clockwise,
BALANCE THE UNIT
- Equal load on shoulders
A well matched saw and harness make work much easier. Adjust the harness to give the best working stance. Adjust the side straps so that the weight is equally divided across the shoulders.
- Slide clamp up or down until unit balances with head aparting from the ground when using it.


27. Fuel
WARNING
Gasoline is very flammable. Avoid smoking or bringing any flame or sparks near fuel.
- Wipe up all spills before starting the engine.
- Make sure to stop the engine and allow it cool before refueling the unit.
- Keep open flames away from the area where fuel is handled or stored.
0IMPORTANT
- Never use oil for 4 cycle engine use or water cooled 2-cycle engine.
- Never use "FUEL WITH NO OIL (RAW GASOLINE)".
- Never use fuel laced with water.
- Mixed fuels which have been left unused for a period of one month or more may clog the carburetor or result in the engine failing to operate properly. Put remained fuel into an air-tight container and keep it in the dark and cool room.
- Please ask for "mixed gasoline for air-cooled 2-cycle engines" at your nearest gas station, or use fuel made by putting unleaded gasoline for automobiles and air-cooled 2-cycle engine oil into a mixing container in accordance with the following ratios and then shaking to mix well.
HOW TO MIX FUEL
- Measure out the quantities of petrol and oil to be mixed.
- Put some of the petrol into the clean, approved fuel container supplied.
- Pour in the oil and agitate well.
- Be careful that, if the agitation is insufficient, there is an increased danger of early piston seizing due to abnormally lean mixture.
FUELING THE UNIT
- Untwist and remove the fuel cap. Rest the cap on a dustless place.
- Pour fuel into the fuel tank to 80% of the full capacity.
- Fasten the fuel cap securely and wipe up any fuel spillage around the unit.
WARNING
- Select bare ground for fueling.
- Move at least 10ft (3m) away from the fueling point before starting the engine.
- Stop the engine before refueling the unit. At that time, be sure to sufficiently agitate the mixed petrol in the container.
- In the case of storing the product for a long period of time, clean the fuel tank after rendering it empty. Next, activate the engine and empty the carburetor of the composite fuel.
28. Operation
STARTING ENGINE
WARNING
The cutting head will start rotating upon the engine starts.
- Feed fuel into the fuel tank and tighten the cap securely.
- Rest the unit on a flat, firm place. Keep the cutting head off the ground and clear of surrounding objects as it will start rotating upon starting of the engine.
- Push the primer pump several times until overflown fuel flows out in the return tube.
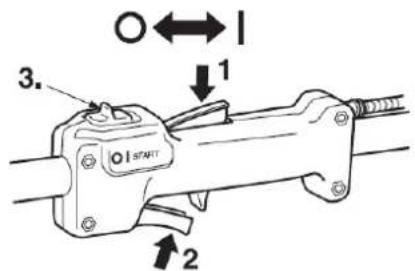
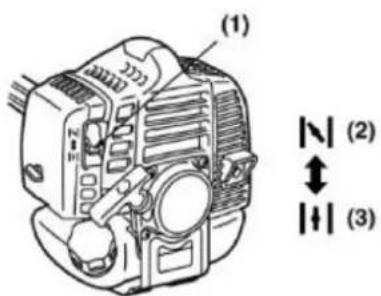
- Move the choke lever to the closed position.
(1) Choke lever
(2) Closed position
(3) Open position
- Set the ignition switch to the "start" position.
-
throttle lever
-
throttle trigger
-
Stop switch
O: Stop position
I: Start position
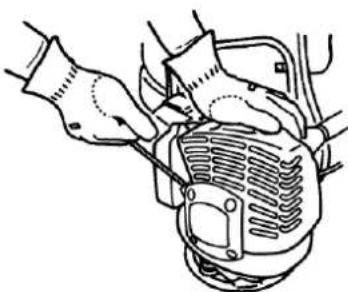
- While holding the unit firmly, pull out the starter rope quickly until engine fires.
0IMPORTANT
- Avoid pulling the rope to its end or returning it by releasing the knob. Such actions can cause starter failures.
- Move the choke lever to the open position. And pull out the starter rope quickly to restart engine.
- Allow the engine to warm up for several minutes before starting operation.

NOTE
-
When restarting the engine immediately after stopping it, leave the choke open.
-
Overchoking can make the engine hard to start due to excess fuel. When the engine failed to start after several attempts, open the choke and repeat pulling the rope, or remove the spark plug and dry it.
STOPPING ENGINE
- Release the throttle lever and run the engine for a half minute.
- Shift the ignition switch to the STOP position. (OP3)

NOTE
Except for an emergency, avoid stopping the engine while pulling the throttle lever.
TRIMMER HEAD USAGE
WARNING
- Always wear eye protection such as safety goggles. Never lean over the rotating cutting head. Rocks or other debris could be thrown into eyes and face and cause serious personal injury.
- Keep the protection guard attached in place at all times when the unit is operated.
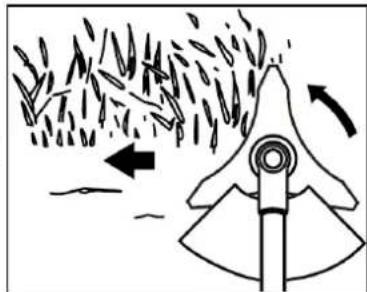
TRIMMING GRASS AND WEEDS
-
Always remember that the TIP of the line does cutting. You will achieve better results by not crowding the line into the cutting area. Allow the unit to trim at its own pace.
-
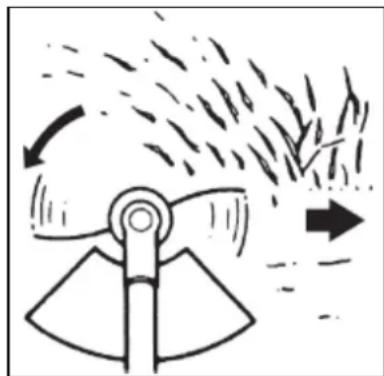
Hold the unit so the head is off the ground and is tilted about 20 degrees toward the sweep direction.
- You can avoid thrown debris by sweeping from your right to the left.
- Use a slow, deliberate action to cut heavy growth. The rate of cutting motion will depend on the material being cut. Heavy growth will require slower action than will light growth.
- Never swing the unit so hard as you are in danger of losing your balance or control of the unit.
- Try to control the cutting motion with the hip rather than placing the full workload on the arm and hands.
- Take precautions to avoid wire, grass and dead, dry, long-stem weeds from wrapping around the head shaft. Such materials can stall the head and cause the clutch to slip, resulting in damage to the clutch system if repeated frequently.
ADJUSTING THE LINE LENGTH
- Your brush cutters is equipped with a semi- auto type nylon line head that allows the operator to advance the line without stopping the engine. When the line becomes short, lightly tap the head on the ground while running the engine at full throttle.
- Each time the head is bumped, the line advance about 1 inch (25.4 mm). For better effect, tap the head on bear ground or hard soil. Avoid bumping in thick, tall grass as the engine may stall by overload.
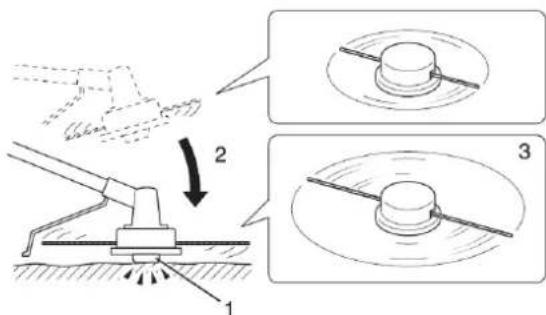
- Tap knob
- Hit knob against the ground surface lightly
- Nylon line comes out
METAL BLADE USAGE

NOTE
Choose a suitable recommended cutting attachment according to the object to be cut.

WARNING
-
When sharpening, removing, or reattaching the blade, be sure to wear thick, sturdy gloves and use only proper tools and equipment to prevent injury.
-
Check the bolt to fasten the blade and be sure the bolt has no fault, and no abrasion.
- Be sure that the blade and the holder have been fastened according to instruction and the blade turns smoothly without abnormal noise.


WARNING
- The rotating parts fastened incorrectly may cause serious accident to the operator.
- Make sure that the blade is not bent, warped, cracked, broken or damaged.
- If you find any error to the blade, discard it and change new one.
- By using the harness, hang the unit on your right side. Adjust the harness length so that the cutting head may become parallel to the ground.

WARNING
- Make sure to use harness and cutting attachment guard. If not, it is very dangerous when you slip or lose your balance.

29. Cutting method
CUTTING METHOD
(a) Use the front left side cutting.
(b) Guide the blade from your right to left with it tilted slightly to your left.
(c) When mowing a wide area, start working from your left end to avoid interference of cut grass.
(d) The blade may be seized by weeds if the engine speed is too low, or the blade cuts too deep into weeds. Adjust the engine speed and cutting depth according to the condition of object.
WARNING
- If the grass or other object gets caught in the blade, or if the unit starts to shake or vibrate, turn off the engine and check the whole unit. Change the blade if it has been damaged.
- Turn off the engine and make sure the blade has completely stopped before checking the blade, and removing any object got caught in.
30. Maintenance
Maintenance, replacement, or repair of the emission control device and systems may be performed by any non-road engine repair establishment or individual.

WARNING
- Always be sure to stop the engine before inspecting the brush cutter for problems or performing maintenance.
- Never alter the brush cutter or take the engine apart.
| System/components | Procedure | Before use | Every 25 hours after | Every 50 hours after | Every 100 hours after | Note | |
| ENGINE | fuel leaks, fuel spillage | wipe out | ✓ | ||||
| fuel tank, air filter, fuel filter | inspect/clean | ✓ | ✓ | replace, if necessary | |||
| idle speed adjuster | see adjusting idling speed | ✓ | replace carburetor if necessary | ||||
| spark plug | clean and readjust plug gap | ✓ | GAP: .025 in (0.6 ~ 0.7 mm) replace, if necessary | ||||
| intake air cooling vent | clean | ✓ | |||||
| SHIFT | throttle trigger, stop switch | check operation | ✓ | ||||
| cutting parts | replace if something's wrong | ✓ | |||||
| angle transmission | grease | ✓ | |||||
| screws/nuts/bolts | tighten/replace | ✓ | ✓ | except adjusting screws | |||
| cutting attachment guard | make sure to attach | ✓ |
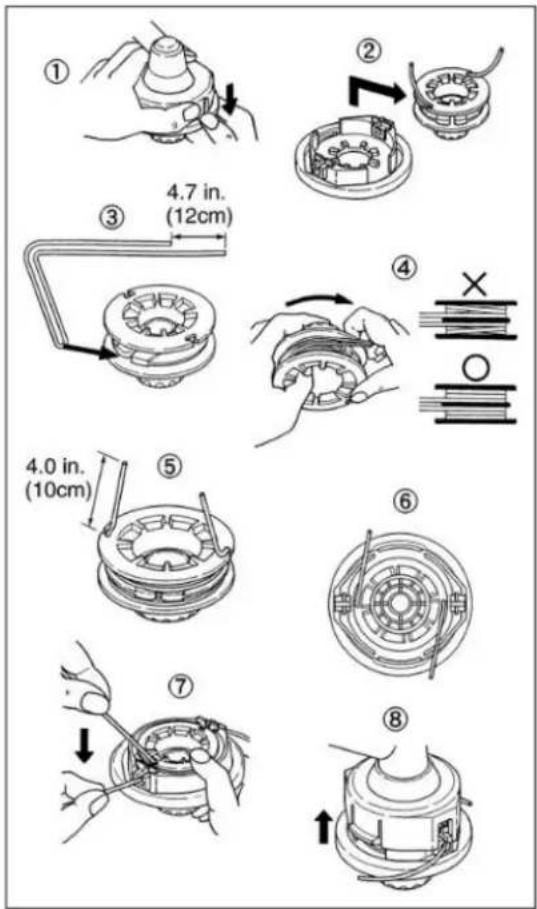
REFILLING TRIMMING LINE
- For replacement line, use a diameter of 2.4mm (.095in). The spool is capable for a line up to 6m (20ft) on the 10cm (4") head. Avoid using a larger line as it may cut down the trimming performance.
- Pinch the slotted area on the both sides of the spool housing to unhook the bottom cap.
- Take out the spool and pull off the old line. Put one end of new line through the spool holes and pull it until the length is equal between each part of the line.
- Wind up the line in the correct direction as indicated on the spool.
- Hook each end of the line in the slot on the edge of the spool, and then put the ends through the eyelets on the housing. Make sure that the spring and the washers are in place.
- While holding the spool against the housing, pull the line ends to release them from the slot.
- Line up the slot on the bottom cap with the hook on the housing, press the cap against the housing until it clicks.
AIR FILTER
The air filter, if clogged, will reduce the engine performance. Monthly check and clean the filter element in warm, soapy water as required. Dry completely before installing. If the element is broken or shrunk, replace with a new one.

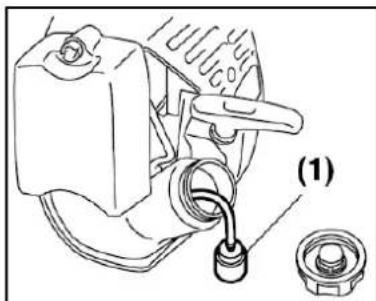
FUEL FILTER
- When the engine runs short of fuel supply, check the fuel cap and the fuel filter for blockage.
(1) Fuel filter
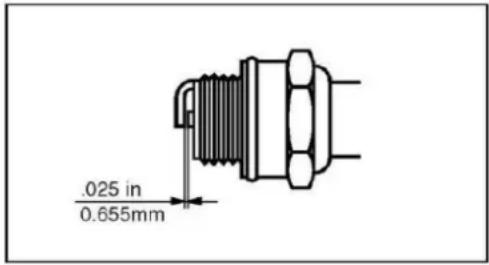
SPARK PLUG
- Starting failure and misfiring are often caused by a fouled spark plug. Clean the spark plug and check that the plug gap is in the correct range. For a replacement plug, use the correct type
Periodically clean the spark plug and check that the spark gap is in the correct range.
0IMPORTANT
- Note that using any spark plugs other than those designated may result in the engine failing to operate properly or in the engine becoming overheated and damaged.
- To install the spark plug, first turn the plug until it is finger tight, then tighten it a quarter turn more with a socket wrench.
TIGHTENING TORQUE: 9.8~11.8 N
31. Troubleshooting guide
Case 1. Starting failure
CHECK PROBABLE CAUSES ACTION
fuel tank incorrect fuel drain it and with correct fuel
fuel filter fuel filter is clogged clean
sparking (no spark) park plug is fouled/wet clean/dry
plug gap is incorrect correct (GAP: 0.6 0.7mm
spark plug disconnected retighten
Case 2. Engine starts but does not keep running/Hard re-starting.
CHECK PROBABLE CAUSES ACTION
fuel tank incorrect fuel or staled fuel drain it and with correct fuel
muffler, cylinder carbon is built-up wipe away
air cleaner clogged with dust wash
cylinder fin, fan cover clogged with dust clean
When your unit seems to need further service, please consult with service shop in your area.
32. EU Declaration of Conformity
We hereby declare, FUXTEC GMBH
KAPPSTRAE 69, 71083 HERRENBERG, GERMANY
that the device described below, by virtue of its design and construction and in the version marketed by us, complies with the essential health and safety requirements of the EC directives.
Description of device: Petrol-engine driven brushcutter/ trimmer
Machine type: FX-MS152T
Brand name: FUXTEC
Energy consumption/cubic capacity 51.7cm^3
Measured sound power level LWA =107.7dB
Guaranteed sound power level
Conformity procedure 2000/14/EC according to Annex V LWA=113dB
Relevant EC Directives
EC Machinery Directive 2006/42/EG
EC Electromagnetic Compatibility (EMC) Directive 2004/108/EC
EC Noise Emission Directive (2000/14/EEC & 2005/88/EC)
Applied harmonised standards
EN ISO 11806-1
EN ISO 14982
Manufacturer's signature/date

L.Zirkler,30.11.2022
Name and address of the person authorised to compile the technical documentation established in the Community
Leonhard Zirkler
FUXTEC GMBH - KAPPSTRAße 69, 71083 HERRENBERG, GERMANY
Translated with DeepL.com (free version)
VERSION FRANCAISE
Carburant recommende
L.Zirkler,30.11.2022
No permitted to do so.

MEZCLA DE COMBUSTIBLE
L.Zirkler,30.11.2022
Mochila Gasolina Brushcutter/Lawn Trimmer
FX-MS152T

C E
L.Zirkler,30.11.2022
BESCHERMING TEGEN TRANSPORT
L.Zirkler,30.11.2022
L.Zirkler,30.11.2022
POLSKA WERSJA JEZYKOWA
ORYGINALNA INSTRUKCJA OBSŁUGI
L.Zirkler,30.11.2022