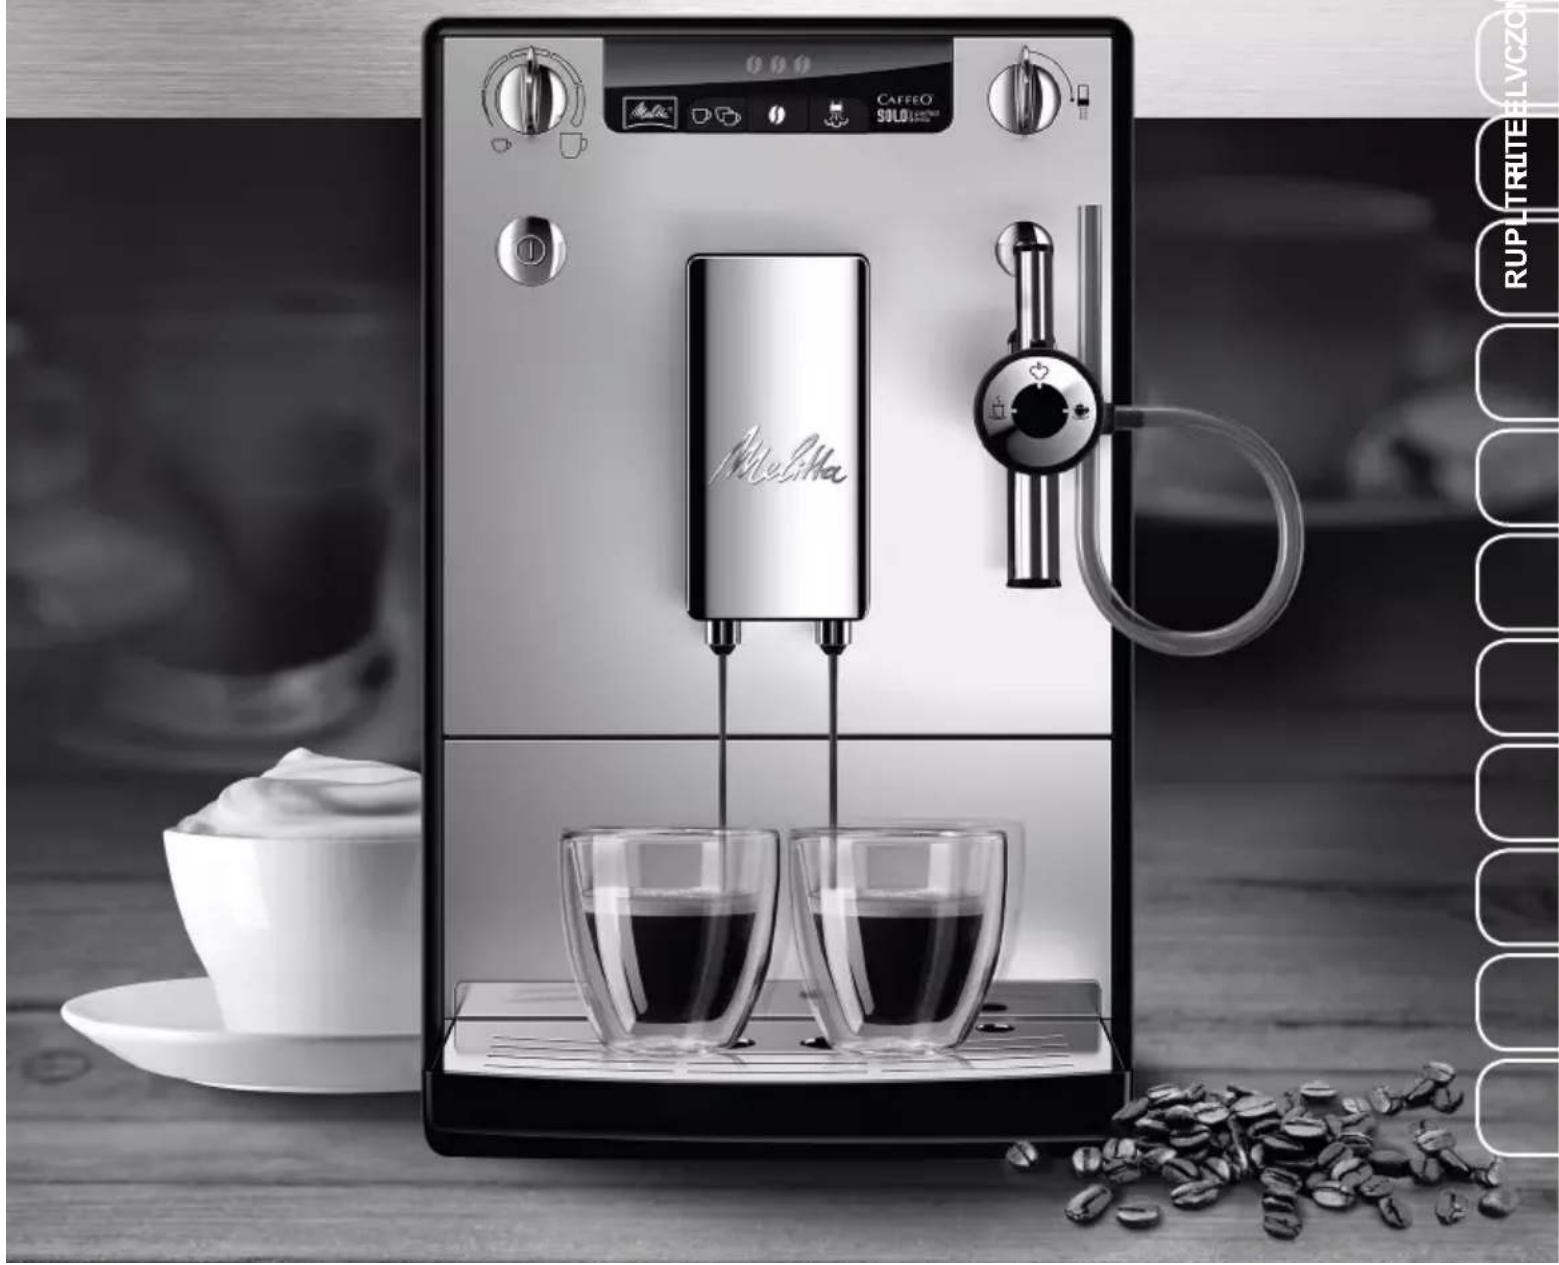
Caffeo Solo & Perfect Milk Deluxe - Coffee machine MELITTA - Free user manual and instructions
Find the device manual for free Caffeo Solo & Perfect Milk Deluxe MELITTA in PDF.
| Product Type | Automatic coffee machine with integrated milk frother |
| Brand | Melitta |
| Model | Caffeo Solo & Perfect Milk Deluxe |
| Dimensions (W x D x H) | 200 mm x 455 mm x 325 mm |
| Weight (empty) | 8.1 kg |
| Power Supply | 220-240 V, 50/60 Hz, 1400 W |
| Pump Pressure | 15 bar |
| Water Tank Capacity | 1.2 liters |
| Bean Container Capacity | 125 g |
| Coffee Types | Coffee beans, espresso |
| Beverage Functions | Espresso, long coffee, milk foam, hot milk, hot water |
| Double Cup Preparation | Yes, 2 cups simultaneously |
| Coffee Strength Adjustment | 3 levels: mild, normal, strong |
| Coffee Quantity Adjustment | From 30 ml to 220 ml per cup |
| Brewing Temperature Adjustment | 3 levels: low, medium, high |
| Grind Fineness Adjustment | Mechanically adjustable, from fine to coarse |
| Milk Frother | Removable Cappuccinatore with steam nozzle |
| Water Filtration System | Melitta® PRO AQUA filter cartridge (optional) |
| Automatic Cleaning Program | Yes, duration approx. 15 minutes, with Melitta® PERFECT CLEAN tablets |
| Automatic Descaling Program | Yes, duration approx. 30 minutes, with Melitta® ANTI-CALC |
| Cappuccinatore Cleaning | Removable, rinsing with clear water recommended after each use |
| Energy Saving Mode | Adjustable: 5, 15, 30 min or off |
| Auto Shut-off | Adjustable: 30 min, 2 h, 4 h, 8 h |
| Safety | Automatic shut-off, child lock via supervision, overheat protection |
| Spare Parts and Repairability | Cappuccinatore, tank, brewing unit, water filter; repair by authorized service center |
Frequently Asked Questions - Caffeo Solo & Perfect Milk Deluxe MELITTA
User questions about Caffeo Solo & Perfect Milk Deluxe MELITTA
0 question about this device. Answer the ones you know or ask your own.
Ask a new question about this device
Download the instructions for your Coffee machine in PDF format for free! Find your manual Caffeo Solo & Perfect Milk Deluxe - MELITTA and take your electronic device back in hand. On this page are published all the documents necessary for the use of your device. Caffeo Solo & Perfect Milk Deluxe by MELITTA.
USER MANUAL Caffeo Solo & Perfect Milk Deluxe MELITTA
SOLO® & perfect milk
Bedienungsanleitung / Operating Instructions / Mode d'emploi
Gebruiksaanwijzing / Istruzioni per l'uso / Manual de instrucciones
Betjeningsvejledning / Bruksanvising / Bruksanvising / Kayttoohje
Руковозво по заци / Instrukcja obslugi / Kullanma kilavuzu
Naudojimo instrukcija / Kasutusjuhend / Lietosanas instrukcija
Navod k obsslze / 操作手册 / 社用 Shelming
B
C
D
E

Sicherheitshinweise
Please carefully read and comply with the operating instructions.
This appliance is for the preparation of coffee drinks from coffee beans and for heating milk and water.
This appliance is intended for private domestic use.
Any other use is considered contrary to intended use and may lead to personal injury and material damage.
C
This appliance complies with the applicable European guidelines.
It has been built according to the latest technology. However, there are residual hazards.
To prevent hazards, you must follow the safety instructions.
Melitta shall not be liable for any damage caused by non-compliance with safety instructions.

WARNING
Electrical current poses a hazard!
Risk of injury due to electrical shock if the appliance or power cable is damaged.
To avoid hazards caused by electrical current:
- Do not use a damaged power cable.
A damaged power cable may only be replaced by the manufacturer, their after sale service or a similarly qualified person. - Do not open any screwed covers on the appliance housing.
- Only use the appliance if it is in a technically faultless condition.
A defective appliance may only be repaired by an authorised workshop. Do not attempt to repair the appliance yourself. - Do not make any changes to the appliance, its components and its accessories.
- Do not immerse the appliance in water.
Do not let the power cable come into contact with water.

WARNING
Burn injuries and scalding!
Released fluids and steam can be very hot. Parts of the appliance also become very hot.
To prevent scalding and burns:
- Avoid skin contact with the released fluids and steam.
- Do not touch any nozzles on the outlet during operation.
General safety!
To prevent personal injury and material damage:
- Do not operate the appliance in a cabinet or similar object.
- Do not reach into the interior of the appliance when it is in operation.
- Keep the appliance and power cable away from children younger than 8 years of age.
The appliance can be used by children from an age of 8 as well as by persons with limited physical, sensorial or mental capacities, or lacking experience and knowledge if they are supervised or were instructed on safe use of the appliance and understand the resulting risks.
Children may not play with the appliance. Children younger than 8 years of age may not perform cleaning and user maintenance. Children over 8 years of age must be supervised during cleaning and user maintenance. -
Disconnect the appliance from the power supply if it is unsupervised for a longer period of time.
-
Do not operate the appliance at high altitudes over 2000m .
- When cleaning the appliance and its components, comply with the instructions in the corresponding chapter ("Cleaning and maintenance", page 25).
At a glance
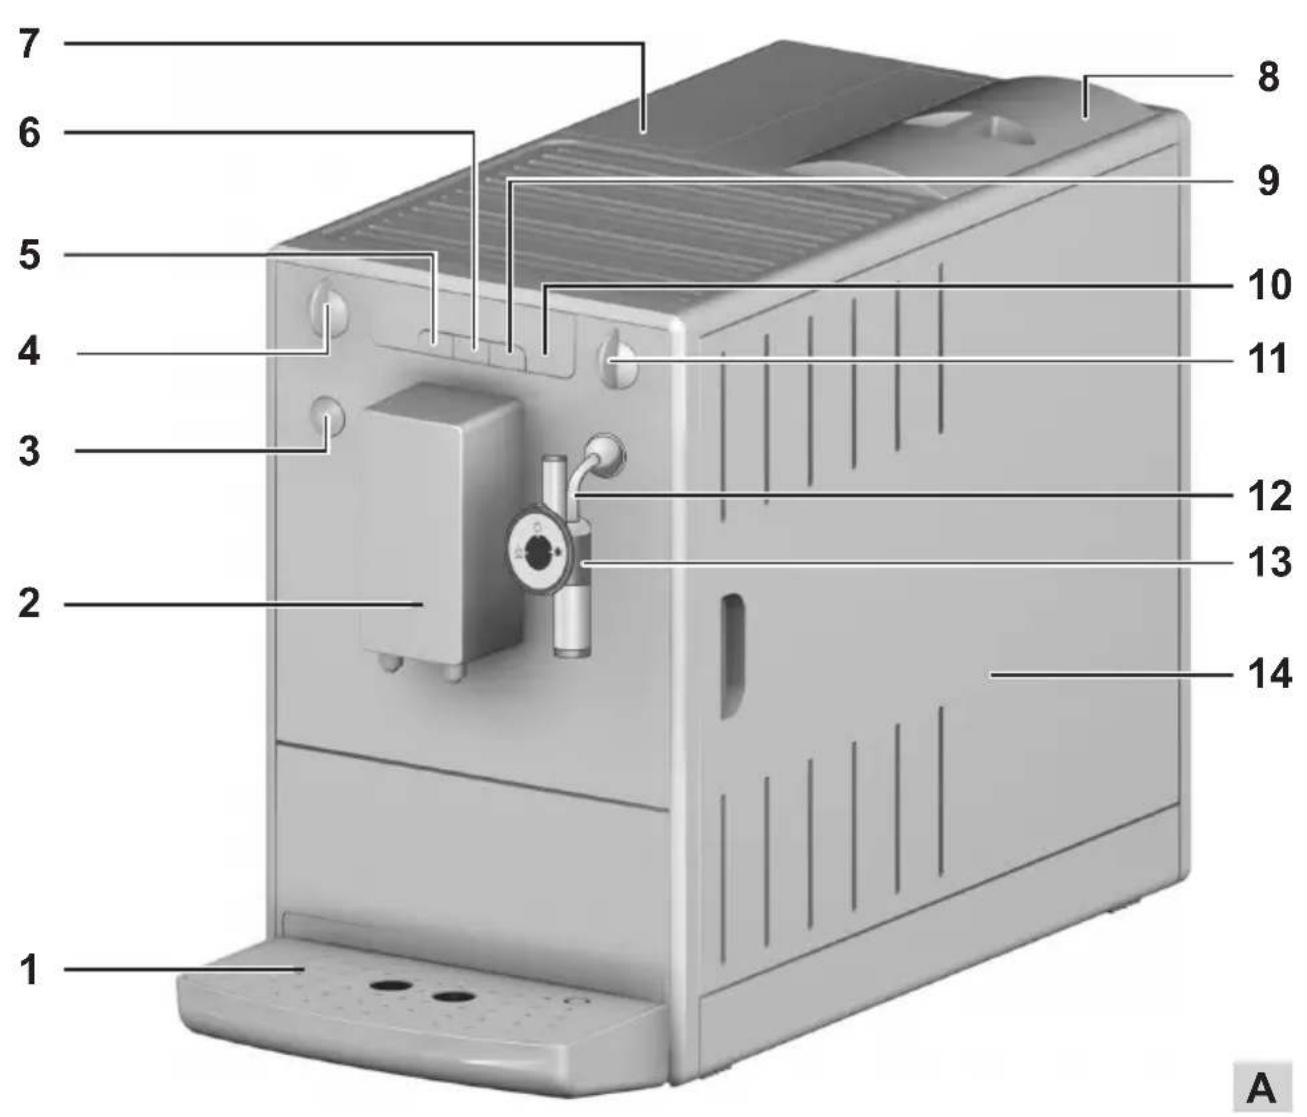
Figure A
| 1 | Drip tray with cup plate and coffee grounds container as well as display for full drip tray |
| 2 | Height-adjustable outlet |
| 3 | ON/OFF button ① |
| 4 | Coffee quantity regulator |
| 5 | Button for coffee dispensing |
| 6 | Button for coffee strength |
| 7 | Water tank |
| 8 | Bean container |
| 9 | Button for steam dispensing |
| 10 | Display |
| 11 | Valve for milk froth and hot water dispensing |
| 12 | Steam pipe |
| 13 | Cappuccinatore |
| 14 | Right cover (removable, covering the grinding fineness adjustment element, brewing unit and identifi cation label) |

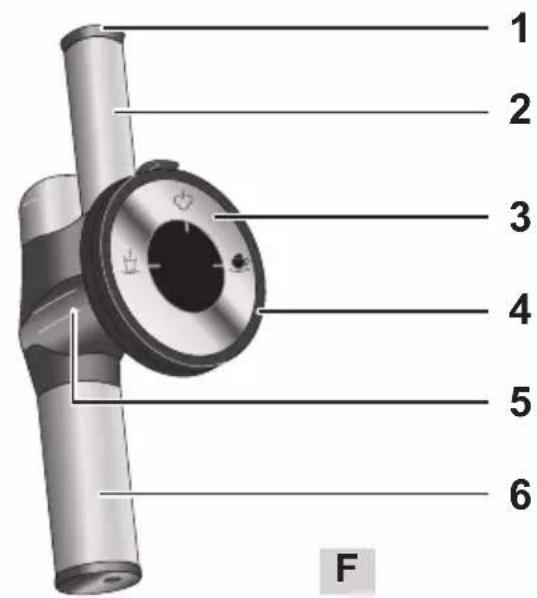
Figure F
| 1 Air intake valve |
| 2 Air intake pipe |
| 3 Control dial |
| 4 Connection for milk hose |
| 5 Connecting piece |
| 6 Milk froth / hot water nozzle |
Symbol on the Cappuccinatore selection switch
| Setting for warm milk | |
| Setting for hot water | |
| Setting for milk froth |
Display
| ① | Lights up | The appliance is ready for operation. |
| Flashes | Appliance is heating up or coffee is being dispensed. | |
| ② | Lights up | Change the Melitta® PRO AQUA fi Iter cartridge |
| Flashes | Filter change in process | |
| ③ | Lights up Fill the water tank | |
| Flashes Insert the water tank | ||
| ④ | Lights up | Empty drip tray and coffee grounds container |
| Flashes | Insert the drip tray and coffee grounds container | |
| Lights up | 1 bean: mild 2 beans: normal 3 beans: strong |
| Flashes | Fill bean container; fl ashing stops after dispensing the next coffee. |
| Lights up | Cleaning the device |
| Flashes | Integrated cleaning programme is running |
| Lights up | Descale the appliance |
| Flashes | Integrated descaling programme is running |
| Lights up | Froth standby or: Air is in the system. Turn valve switch 11 clockwise until the stop until water flows out of the appliance. |
| Flashes | Milk froth or hot water dispensing in process. |
Before using for the first time
Check the scope of supply
Use the following list to check the completeness of the delivery. Please contact your retailer if there are missing parts.
Cappuccinatore
Milk hose
-Test strips to determine water hardness
General information
- Only use pure water without carbonation.
Use the supplied test strip to determine the hardness of the water used and set the water hardness ("Water hardness and fi Iter", page 24).
If you wish to use a water filter, do not insert it until after the initial startup.
Information for using for the first time
The appliance must be vented before it is used for the first time. The appliance may only be powered on with a completely filled water tank.
- Push the Cappuccinatore 13 onto the steam pipe up to the stop 12.
- Place a vessel under the Cappuccinatore 13.
- Press the button to switch on the appliance.
illuminates on the display.
Turn the valve switch 11 clockwise until it stops. fl ashes on the display. Water will flow into the vessel.
When is illuminated on the display, turn the valve switch 11 anticlockwise until it stops.
The device is ready for operation.
After initial startup, insert the Melitta PRO AQUA fi Iter cartridge, if necessary (see page 24).
Starting up the appliance
Commissioning
WARNING
Danger of fire and electric shock due to incorrect supply voltage, incorrect or damaged connections and power cable!
- Ensure that the supply voltage corresponds to the supply voltage specified on the identification label of the appliance. The identifi cation label is located on the right side of the appliance behind the cover (Image A, 14).
Make sure that the power socket meets the applicable standards for electrical safety. If in doubt, contact a qualified electrician. -
Never use damaged power cables (damaged insulation, bare wires).
-
Place the appliance on a stable, dry and level surface with sufficient clearance (at least 10cm ) to the sides.
- Push the Cappuccinatore 13 onto the steam pipe 12 as far as it can go.
Plug the power cable into a suitable power socket. - Remove the lid from the bean container 8.
- Fill the bean container with suitable coffee beans.
Put the lid back on. -
Lift up the lid of the water tank 7 and pull the water tank up and out of the appliance.
-
Fill the water tank with fresh tap water only up to the max. mark.
- Insert the water tank into the appliance.
- Place a vessel under outlet 2.
- Press the on/off button to turn the appliance on or off. The appliance may perform an automatic rinse.
Preparation
- Fill the water tank with fresh water every day. The water tank must always be filled with enough water for the operation of the appliance.
- Fill the bean container preferably with espresso beans or bean mixtures for fully automatic coffee machines.
Do not use any ground, glazed, caramelised, or otherwise sugar-coated coffee beans.
Setting the dispensed quantity and strength
Turn the coffee quantity regulator 4 to infinitely adjust the dispensed quantity. Regulator all the way to the left = 30ml per cup Regulator all the way to the right = 220ml per cup
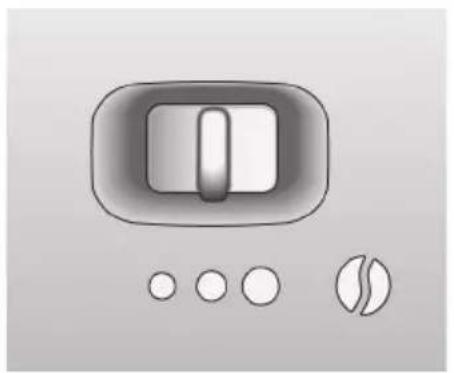
Press the button until the desired strength is adjusted. The strength is shown by the beans on the display 10 (from & = mild to 6 slofg).
Dispensing coffee or espresso
One or two cups can be dispensed simultaneously.
- Switch on the device.
- Place one or two cups under the outlet.
Preparing one cup: Press the button once.
Preparing two cups: Press the button twice.
Press the button again to cancel the coffee dispensing.
Preparing milk froth and heating milk and water

WARNING
There is a risk of burn injuries and scalding due to hot steam and the hot steam pipe!
- Never reach into the escaping steam.
- Avoid direct skin contact with hot water and the hot steam pipe.
- Never touch the steam pipe during use or immediately after use.
The Cappuccinatore is used to prepare milk froth, to heat milk or to dispense hot water.
It can froth the milk directly from the milk carton or a vessel into the cup.
You can optionally connect it to a Melitta® milk container.

Preparing milk froth
If possible, use cold milk with a high protein content.
-
Switch on the device.
Submerse the Cappuccinatore hose 13 directly into the milk.
Press the button. flashes while the appliance is heating up. After the heat-up phase, illuminated. -
Turn the control dial (Image F, 3) to the "Milk froth" position (is pointing up).
-
Turn the valve switch 11 clockwise until the stop. is flashing. The milk froth is being prepared.
Turn the valve switch 11 anticlockwise until it stops. The preparation is finished. -
Rinse the Cappuccinatore after each use.
Heating milk
- Switch on the device.
Submerse the Cappuccinatore hose 13 directly into the milk. -
Press the button. ① flashes while the appliance is heating up. After the heat-up phase, ② is illuminated.
-
Turn the control dial (Image F, 3) to the "Warm milk" position (S is pointing up).
Turn the valve switch 11 clockwise until it stops. is fl ashing. The milk is being heated.
Turn the valve switch 11 anticlockwise until it stops. The heating is completed. -
Rinse the Cappuccinatore after each use.
Rinsing the Cappuccinatore
The Cappuccinatore should be cleaned at regular intervals ("Cleaning the Cappuccinatore", page 25).
It is recommended to rinse the Cappuccinatore on a weekly basis with the Melitta® PERFECT CLEAN milk system cleaner. Use the milk cleaning solution instead of clear water.
- Switch on the device.
- Fill a vessel halfway with clear water.
Hold a vessel under the Cappuccinatore. The hose of the Cappuccinatore must be submerged in the water.
Press the button for steam dispensing.
Turn the control dial (Image F, 3) to the "Milk froth" position ( is pointing up).
Turn the valve switch 11 clockwise until it stops. Close the valve switch when a mixture of clean water and steam comes out.
Wait for 30 seconds or press the button to change to the normal operating mode.
Dispensing hot water
A maximum of 150ml of hot water can be dispensed in each process. To dispense a larger amount of hot water, repeat the process.
- Switch on the device.
Turn the control dial (Image F, 3) to the "Hot water" position (is pointing up).
Hold a vessel under the Cappuccinatore.
Turn the valve switch 11 clockwise until the stop. is fl ashing. Hot water will flow into the vessel.
Turn the valve switch 11 anticlockwise until it stops.

Water hardness and fi lter
It is important to properly set the water hardness so that the appliance displays the need to be descaled when required required. From the factory, it is set at water hardness 4.
The water hardness category 1 is automatically set after inserting the Melitta® PRO AQUA fi Iter cartridge.
Melitta® PRO AQUA Filter cartridge
The Melitta PRO AQUA fi iter cartridge fi liters lime scale and other contaminants from the water. The water fi liter should be changed every 2 months, however, at the latest when appears on the display. The water fi liter is available in specialised shops.
Inserting the water fi Iter
flashes during the entire change procedure.
-
Put the water filter in a glass with tap water for several minutes before inserting it in the appliance.
-
Switch off the device.
Press and hold the and buttons for approx. 3 seconds, then release.
appears on the display.
- Empty the drip tray and insert without the coffee grounds container.
illuminates.
Pull the water tank 7 up and out of the appliance.
Empty the water tank.
Screw the water filter onto the thread at the bottom of the water tank.
- Fill the water tank with fresh tap water up to the max. mark.
Insert the water tank into the appliance.
illuminates. - Place the coffee grounds container under Cappuccinatore 13.
Turn the valve switch 11 clockwise until it stops. fl ashes on the display. Water will flow into the vessel.
When is illuminated on the display, turn the valve switch 11 anticlockwise until it stops.
The device is ready for operation. ① and .luminate. The water hardness is automatically set to hardness level 1.
- Empty and insert the coffee grounds container.
After inserting the water fi liter, the water can be cloudy during the fi rst rinse because excess activated carbon is washed out of the fi liter. The water will then be clear again.
Setting the water hardness
The appliance includes a test strip to determine the water hardness.
Determine the hardness of the tap water using the test strip.
- Switch on the device.
Press the and buttons simultaneously for longer than 2 seconds. ① flashes rapidly.
Press the button to show the menu for setting the water hardness. I illuminates.
- Set the determined water hardness by pressing the button. The selected water hardness is shown by the bean symbols .
| Water hardness °d | H °e °f | H | |
| 1: | 0-10 | 0-13 | 0-18 |
| 2: | 10-15 | 13-19 | 18-27 |
| 3: | 15-20 | 19-25 | 27-36 |
| 4: | >20 > | 25>36 |
Press ① to confirm the selection.
Cleaning and maintenance

WARNING
Electric shock hazard due to supply voltage!
- Pull the power supply plug before cleaning.
- Never immerse the appliance in water.
Do not use a steam cleaner.
Daily cleaning
- Wipe the outside of the appliance with a soft damp cloth and normal dishwashing liquid.
Empty the drip tray.
Empty the coffee grounds container.
Cleaning the Cappuccinatore
Let the Cappuccinatore cool down.
- Wipe the Cappuccinatore on the outside with a damp cloth.
Pull the Cappuccinatore 13 off of the steam pipe 12.
- Remove the milk hose, the milk froth / hot water nozzle (Image F, 6) and the air intake pipe (Image F, 2) from the connecting piece (Image F, 5).
Rinse all of the parts thoroughly with water.
- Reassemble the Cappuccinatore in the reverse order.
Push the Cappuccinatore 13 onto the steam pipe 12.
Cleaning the brewing unit
It is recommended to clean the brewing unit once a week.
- Switch off the device.
Pull off the cover 14 to the right.
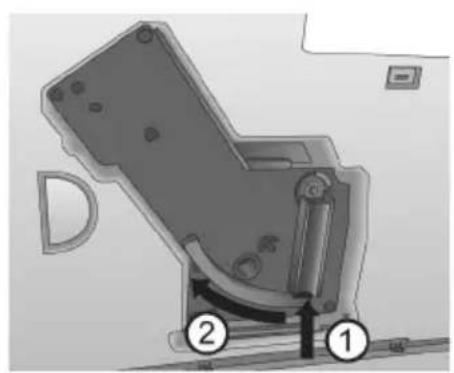
Press and hold the red button on the handle of the brewing unit (Image B, 1).
Turn the handle clockwise until it stops.
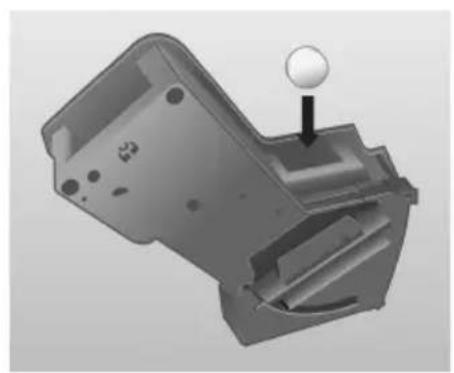
Pull the brewing unit out of the appliance by the handle. - Rinse the brewing unit thoroughly on all sides with clear water. The area shown in Image D (arrow) must be free of coffee residues.
Let the brewing unit drip dry. - Remove coffee residues from the appliance.
- Insert the brewing unit back into the appliance, press and hold the red button (Image B, 1) and turn the handle anticlockwise until it stops.
Insert the cover until it clicks in.
Integrated cleaning programme
The integrated cleaning programme (takes about 15 minutes) removes residues and coffee oil residues that cannot be removed by hand. The cleaning symbol fl ashes during the entire process.

The cleaning programme should be performed every 2 months or after 200 brewed cups, however, at the latest when is illuminated.
Before starting the cleaning program, clean the brewing group and the interior ("Cleaning the brewing unit", page 25).
Only use Melitta® PERFECT CLEAN cleaning tabs.
- Switch off the device.
- Fill the water tank with tap water up to the max. mark.
Insert the water tank.
Press the and buttons simultaneously for longer than 2 seconds. fl ashes, illuminates. - Empty the drip tray and coffee grounds container.
- Insert the drip tray without the coffee grounds container
- Place the coffee grounds container under outlet 2.
Cleaning phase 1 (0):
Two rinsing processes will be executed.
When ① illuminates, proceed as follows:
Remove the brewing unit.
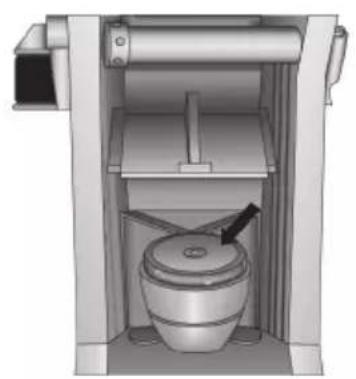
- Put a cleaning tab in the brewing unit (Image C).
Insert the brewing unit.
Cleaning phase 2 (00):
When 1uminates, proceed as follows:
- Fill the water tank with tap water up to the max. mark.
Press the button to continue with the cleaning programme (takes about 5 minutes).
Cleaning phase 3 (000):
When illuminates, proceed as follows:
-
Empty the drip tray and coffee grounds container.
-
Insert the drip tray without the coffee grounds container
- Place the coffee grounds container under outlet 2.
Cleaning phase 4 (000, the middle bean is flashing):
The cleaning programme will be continued again and takes about 5 minutes.
When illuminates, proceed as follows:
- Empty the drip tray and coffee grounds container and insert them in the appliance as usual.
The cleaning programme is finished.
Integrated descaling programme

WARNING
The descending agent can cause skin irritations!
Comply with the safety instructions and the dosing information specified on the descaling agent packaging.
The integrated descending programme (takes about 30 minutes) removes lime residues inside the appliance. The symbol for descending flashes during the entire process.
The descending programme should be performed every 3 months, however, at the latest when illuminates ("Setting the water hardness", page 24).
Only use Melitta® ANTI CALC.
- Switch off the device.
Remove the water filter if necessary ("Water hardness and fi Iter", page 24).
Press the and buttons simultaneously for approx. 3 seconds.
flashes, luminates.
Descending phase 1
Empty and reinsert the drip tray.
- Place the coffee grounds container under the Cappuccinatore.
Turn the control dial (Image F, 3) to the "Hot water" position (is pointing up). illuminates.
-
Completely empty the water tank.
-
Add the descending agent to the water tank according to the instructions on the packaging.
Insert the water tank.
Press the button to start the descending programme (takes about 15 minutes).
Descending phase 2 (00):
When illuminates, proceed as follows:
- Ensure that the coffee grounds container is placed under the Cappuccinatore.
Turn the valve switch 11 clockwise until the stop. is flashing. Water will flow intermittently into the coffee grounds container (takes about 10 minutes). is then illuminated.
- Empty the drip tray and coffee grounds container.
Reinsert the drip tray and put the coffee grounds container back under the Cappuccinatore. illuminates.
-
Remove the water tank and rinse thoroughly with clear water.
-
Fill the water tank with tap water up to the max. mark.
Insert the water tank.
Press the button to continue with the descending programme. is fl ashing. Water flows into the coffee grounds container.
Dscaling phase 3000
When illuminates, proceed as follows:
Turn the valve switch 11 anticlockwise until it stops. Water flows inside the appliance into the drip tray.
When is illuminated, empty the drip tray and the coffee grounds container and reinsert them. When ① is illuminated, the descending programme is finished.
Insert the water filter if necessary ("Water hardness and fi Iter", page 24).
Other settings
Energy-saving mode
After the last action, the appliance switches automatically (depending on the settings) to the energy-saving mode. From the factory, the appliance is set at 5 minutes
- Switch on the device.
Press the and buttons simultaneously until ① flashes.
Press the button twice. illuminates.
Press the button until one of the four times is set. The time is displayed by the beans on display 9.
| Display Time | |
| 5 minutes (factory setting) | |
| 15 minutes | |
| 30 minutes | |
| off |
Press the ① button to confirm the setting.

Auto-OFF function
The appliance switches off automatically after the last action (depending on the setting). From the factory, the appliance is set at 30 minutes
- Switch on the device.
Press the and buttons simultaneously until flashes.
Press the button three times. illuminates.
Press the button until one of the four switch-off times is set. The time is displayed by the beans on display 9.
| Display Time | |
| 30 minutes (factory setting) | |
| 2 hours | |
| 4 hours | |
| 8 hours |
Press the ① button to confirm the setting.
Brewing temperature
From the factory, the brewing temperature is set to Level 2 (medium
- Switch on the device.
Press the and buttons simultaneously until ① fl ashes.
Press the button four times. illuminates.
Press the button, until one of the three brewing temperatures is set.
The temperature is shown by the beans on display 9 (from 0 = low to hgh.
Press the button to confirm the setting.
Adjusting the grinding fineness
The grinding fineness was set before the appliance was delivered. We therefore recommend to only adjust the grinding fineness after about 1000 coffee preparations (about 1 year).
The grinding fineness should only be adjusted immediately after starting coffee dispensing and only while the mill is running.
Pull off the cover 14 to the right.
Start dispensing coffee.
Put the lever (Image E) in a desired position (left = fine to right = coarse).
- Insert the cover and swivel to the left until it clicks in.
Transport, Storage and Disposal
Venting

WARNING
There is a risk of burn injuries and scalding due to hot steam and the hot steam pipe!
The machine releases hot steam when it is vented.
- Never touch the steam pipe during use or immediately after use.
The appliance should be vented when it has not been used for a while or has been transported. The appliance is then protected from frost damage.
-
Remove the water filter if necessary ("Water hardness and fi lter", page 24) and keep it cool in a glass fi lled with tap water.
-
Switch on the device.
Press the and buttons simultaneously for approx. 2 seconds. ① flashes, and then illuminates.
Pull the water tank 7 up and out of the appliance. ① illuminates. - Place a vessel under the Cappuccinatore 13.
Turn the valve switch 11 clockwise until the stop. is flashing. Water flows out of the steam pipe and into the vessel; steam will also escape.
- When there is no more steam escaping: Turn the valve switch 11 anticlockwise until the stop.
- Insert the water tank into the appliance.
Transport
- Vent the appliance.
- Empty and clean the drip tray and coffee grounds container.
- Empty the water tank and the bean container. If necessary, vacuum out beans that are stuck at the bottom.
Pull the Cappuccinatore 13 off of the steam pipe 12.
"Cleaning the brewing unit", page 25.
If possible, transport the appliance in the original packaging including the hard foam elements.
Disposal
This appliance is labelled according to the European Directive 2002/96/EC on waste electrical and electronic equipment (WEEE). The Directive prescribes the framework for a EU-wide applicable return and recycling of waste appliances. Please contact a specialised dealer for current disposal procedures.

| Troubleshooting | ||
| Malfunction Cause Measure | ||
| Coffee only flows drop-by-drop. | Grinding fi neness is too fi ne. | Adjust the grinding fi neness more coarse.Clean the brewing unit.Perform a descending or cleaning programme if necessary. |
| Coffee does not flow. | Water tank not fi lled or incorrectly inserted. | Fill the water tank and make sure it is properly inserted. |
| The brewing unit is clogged. | Clean the brewing unit. | |
| The grinder is not grinding. | The beans are not falling into the grinder. | Tap lightly on the bean container. |
| Foreign objects in the grinder. | Call the hotline. | |
| Loud grinder noise. | Foreign objects in the grinder. | Call the hotline. |
| Bean symbols ❶ are fl ashing although the bean container is full. | Insufficient quantity of ground beans in the brewing chamber. | Press the button or button. |
| Appliance indicates "no water" even though the water tank is fi lled.Illuminates on the display. | The fl oat is blocked. | Check the condition of the fl oat in the water tank, remove the water and carefully shake the tank. |
| The ♂ symbol is illuminated without a reason. | There is air in the lines inside the appliance. | Turn the valve switch 11 clockwise until the stop until water fl ows out of the appliance Clean the brewing unit if necessary. |
| The cleaning or descending process was interrupted. | The power supply was interrupted, e.g. due to a power outage. | The appliance performs a rinsing program autonomously. To do so, follow the instructions on the appliance. |
| Not enough milk froth is formed during the frothing process. | The control dial of the Cappuccinatore is in the wrong position. | Adjust to the proper position. |
| The Cappuccinatore is dirty. | Take the Cappuccinatore apart and clean it. | |
| The brewing unit can no longer be reinserted after removal. | The brewing unit is not properly locked. | Check whether the handle for locking the brewing unit is correctly engaged. |
| The actuator is not in the proper position. | Switch the appliance off and then on again. Press the ♂ and buttons simultaneously for longer than 2 seconds. The actuator is put into position. Then reinsert the brewing unit and make sure it is correctly locked into place. | |
| The symbols for cleaning and stand-by flash alternately. | The brewing unit is missing or not properly inserted. | Insert the brewing unit properly and lock. |
| The brewing chamber is overfi lled. | Switch off the appliance and switch it on again using the ON/OFF button ① (repeat if necessary) until standby mode is displayed. | |
| Continuous fl ashing of all buttons. | System error | Switch off the appliance and switch it on again via the ON/OFF button ①; if this does not solve the problem send the appliance to the service department. |
Technical data
| Technical data | |
| Operating voltage 220-240 V, 50/60 Hz | |
| Power consumption maximum 1400 W | |
| Pump pressure maximum 15 bar | |
| Dimensions | |
| Width | 200 mm |
| Depth | 455 mm |
| Height | 325 mm |
| Capacity | |
| Bean container | 125 g |
| Water tank | 1.2 l |
| Weight (empty) 8,1 kg | |
| Ambient conditions | |
| Temperature | 10°C to 32°C |
| Relative humidity | 30% to 80% (non-condensing) |
Reset the appliance to the default settings
You can reset the appliance to the default settings.
Prerequisite: The appliance must be ready for operation.
To do so, press the on/off button and also press the steam dispensing button for more than 2 seconds.
The appliance has been reset to default settings.
Overview of default settings:
| Default settings | |
| Brewing temperature Medium | |
| Water hardness Very hard | |
| Timer for Auto OFF function | 30 minutes |
| Timer for energy-saving mode | 5 minutes |

Sette inn vannfi Iter
Under hele utskiftingsprossessen blinker
AnnapaT pa3pa6oTaH c yyeToM HOBeiXN X OCTNXeHn TExHKn. Tem He MeHee BO3MOxHbI OCTaTOUHbI pNCKn.
UTo6bI n36eXaTb pNcKOB, Heo6xOdNMO HeykoCHnTeJbHo CO6JIoDaTb yka3aHnno TexHnke 6e30nacHOCTn.
KoMaHnMy Melitta He Hecet OTBETCTBeHHOCTb 3a HeBbIINJHeHne yKa3aHnIO TeXnKe 6e3OnaChOCTn.

OCTOPOXHO
Onachoctb nopaxeHna 3JIeKtpnueckm TOKOM!
B clyuae noBpeJdeHn yctpoiCTBa nIIN cTeBOrO ka6eJIa CyuEcTByET ONaCHOCTb dJIa Xn3HN B pe3yNbTaTe nopaxeHnA 3JIeKtpnueCKm TOKOM.
UTo6bI n36eKaTb onaCHOCTN, CBraHHoN C 3JIeKTPnueCKnM TOKOM:
He nCNoJIb3yITe NOBpeJdeHHbIcTeBOI Ka6eJIb.
3aMeHy NOBpeJdeEHHOcTeBOrO Ka6eJIaDJIxKeH BbIIOJIHTb TOJIbKO IpON3BOJNTeJIb,ero cepBnCHaClyj6a nII npryoE JnIo, OblaJaIOUe e aHaJOrnHOn KBaJIuΦnKaUnei.
He otKpbBaIte 3aBnHcHbIe KpbIuKN Ha Kopnyce annapaTa.
- ИспосьуITE annapaT TOnbKO BTEXHnueCKN INCpabHOM COCTOHN.
HeincpaBbI aannapat Heo6xOdIMo peMOHTnpOBaTb NCKJIIOUHTeJIbHO B aBTOpN3OBAHHo MaCTepcKoH. HepeMOHTpyTe aannapat camocToTJe bHo.
He BHOcHTe n3MeHEny B KOHCTpyKUIO aInpaTa, eRO KOMNoHErTOB IN npHaJdJIeXKHOCTeI.
He norpykaite annapat B Body.
He donyckaTte KOHTaKTa ceTeBOrKa6eJc BDoJ.

OCTOPOXHO
Onachoctb oXora n OwnapnbHnra!
BbIeJIeMbIe XnKoCTn n napbl MOrYT 6bITb OueHb TropaUMN.
Uactn annapaTa TaKke MOryT cnIbHo HArpeBaTbcr.
UTo6bI n36eXaTb OwnpnBaHnI oXkora:
- n36eRaTe KOHTaKTa C BbIeJIeMbIMN XnIDKOCTaMn I napamn.
He KacaTecb BO BpeMpa60TbI BblnyCKhIX CONeI.
O67a8 6e30nacnoctb!
UTo6bI n36eXaTb TpaBM n MaTePnaJIbHOrO yuepe6a:
He 3Kcnpnyatnpyute annapat B wkaqyu nn noo6hoM mebenn.
He 3KcnpnyaTpyuTe annapaT Ha BbICOTe 6oJee 2000 m Hau npOBhem Mopra.
HnkOrda He BCTaBnIe pyKn BHyTpbaannapaTa BO BpeMa ero pa6Otbl.
AnnapaT n ceTeBOI Ka6eB IOJXHbI 6bITb BHe IOcraeMOCTn DeTei Do 8 neT.
Данньлларat moket
ИСПОЛБ3OBaTbCЯ DeTbM N B BO3paCTe
OT 8 let, a taKke IINuCaMn C
ORpaHnueHHbIMN cHn3UneCKnMn,
CEHCOPHbIMN nIN yMCTBeHHbIMN
BO3MOxHOCCTaMn JIn6O He IMeIOUcMn
DOCTaTOUHOrO ONbITa N 3HaHn, TOJbKO
ECIN OHN HaxOJaTc NOd pPNCmOTpOM
INI IN 6blIN PONHCTpykTIpOBAhbl
O npINCuINax 6e3OnacHOrO
ICNOJIb3OBaHnA apNaPaTa N BO3MOxHbIX
ONaCHOCTaX.
-Детам 3anpeuaeTcra nrgpaTb c annapatom.Детамdo8net 3anpeaetcBbINONHrTb ONUCTKy IOBcIyKuBaHne aannapata.ДETn CTapwe 8NETMOrT BblONHrTb ONUCTKy IOBcIyKuBaHne TOJIbKO NOI INPNCMOTpOM.
Ecn annapat doJroe Bpemn He nCNoJb3yETc,OTcoeHHTe erO OT cTn NITaHn.
Pn ouNCTke annapata n ero KOMnoHToB cJeDyIe yKa3aHnA M B COOTBeTcByUoSei INaBE («YxoJn OuNCTka》,CTpaHnua 155).
KpaTkno63op
PncyHok A
Hakimate KhoNky , noka He 6ydet yctahOBHeHa Tpe6yeMaJ KpeNoCTb KoPe. Ha KpeNoCTb yka3bIbaet KOInueCTBO KoPeHbIX 3epeH Ha dinCnnee 10 (oT = HeKpeNKnDo 000 = KpeNkn).
ПригOTOBЛЕнne KoФe nIи эспpecco
OndHOBpeMeHHo MOxHo npnroTOBntb OdHy IINI DBe YaShKn.
BknIOuHTe annapaT.
IocTaBbTe OndHy Nn DBe YaWKN NOyCTPOINCTBO NODaH KOfe.
■PpuzomobeneHue odHou Yawku: HaxMnte KHOKNy Oduh pa3.
■PpuzomobneHue deyx yauweK:HaXMnTe KHOKNy 0 0 0 0 0 pa3a.
HaxmTe KhoNky eue pa3, TTo6bl npepBaTb npnroTOBneHne Kofoe.
PnroToBneHne MoOnHoN neHbI NODOrpeB MOJOKa IIN BODbl
OCTOPOXHO
Onachoctb oxora ropaHm napom nIu ropaeTpy6koI dIa npaHn napa!
CneJyETn36eRaTbJIIO6OTo KOHTaTa C BblXODaUM NapOM.
- I36eraIte npamoro KOHTaKta Koxn C ropaey BDOOn n ropaye TpykoN dna noDAuH napa.
HnB Koem cnyae He kacaTecb Tpy6kn IJn IoJaN npa Bo BpeMye nCnoIb3OBaHn IIN Cpa3y nocJe Hero.
C NOMOuI KanyuHaTopa MoXHo nprirotabnBaTb MOnOHyIO neHy, HarpeBaTb MONOKO INI NOnLyuAtb ropauYIO BODy.
BcneHeHHoe MOJOKO MoXHO npiroTOBHTb
dIaWKn HENOCpeDCTBeHNO I3
MOJOnHOro NaKeTa INN KaKoI-Ni6o
EMKOCTN.
B KaueCTBe OOnuN BO3MOxHo NOdkIIOUeHne K EMKoCTn DnA MOJOKa Melitta.
PnuroToBneHne MoJouHOn NeHbI
Ib03MOxHOCTN CJeAyeT NcNOJb3OBaTb XoIOdHoe MOlOKO C BbICOKIM coepKaHnem 6eJa.
BknHouHTe annapaT.
Iorpy3nte ⅢaHr KanyuHaTopa 13 HeNOCpeDCTBeHHO B MOJOKO.
HaKMnTe KhoN.Bo BpeMa HArpeBa annapata Mraet ①. Nocne HarpeBa RopNT
YcTaHOBnte NOBOpOTbI peRyJrTOp (pnc.F,3) B noJIOKeHne «MonOuaHa neHa》(CmBOJ HnPaBJeH BBepx).
■Повернite nepeknioateNBBeHTnIa 11 no yacoboi cTeJIke doynopa.Muraet. PnpuroTabnBaetcMOnOuHa neHa.
■ПовернITE nepeknioateIb BeHTnla 11 npotnb yacoboi cTepnKdo ynopa. PnproTOBLeHne 3aBepseHo.
■ПомыBaIteKaIyuHaTOp nocJIe KaXdOrO nCNoJIb3OBAHnIa.
HarpeB MONoka
BknIOuHTe annapaT.
Iorpy3nte ⅢaHr KanyuHaTopa 13 HeNOCpeDCTBeHHO B MOJOKO.
Haxmte KhoN.Bo BpeMa HarpBa annapaTa Mraet ①. Nocne HarpeBa rOpNT
YcTaHOBnTe NOBOpOTHbI peRyJrTOp (pnc.F,3) B noJoxKeHne «Topyee MOJOKO» (CIMBOJ HaPpaBJIeH BBepx).
■Повернite nepeknioyateNBbENTnIa 11 no yacoboi cTepeKe doynopa.Muraet BbInonHareTcnoDorpeB MoNoka.
■ПовернITE nepeключateь BeHTnla 11 npotNB yacoboi cTpeKN do ynopa. Погрев завершen.
■ПомыBaIte KaNYuHaTOp nocJe KaXdOrO nCNoJIb3OBAHnIa.
Ppombibka kanyuHaTopa
Heo6xOJIMO peRyIaRHO BbINOJIHЯTb ouNCTky kanyuHaTopa («OuNcTka kanyuHaTopa», cTpaHnca 155).
PekomeHnyeTcExeHeJeBHo npombIBaTb
kanyuHaTop C nCnoJIb3OBAHnEM
cpeCTBa IJRA OUInCTKIO T OCTaTKOB
monoka Melitta PERFECT CLEAN.
BmecTo uNcToI BODbl cJeDyET
NCNoJIb3OBAbTb pAcTBOP 3TOrO cpeICTBa.
BknouHTe annapaT.
HANOHNHe EMKoCTb YnCTOu BOOn HAnOJOBnHy.
IocTaBbTe EMKoCTb NOJ KanyuHaTOP. Pn 3Tom WlnaHr KanyuHaTopa DOnKeH 6bITb NOrpyKeH B Body.
Haxmte KhoNky noaun npa
YcTaHOBnte NOBOpOTbI peRyJrTOp (pnc.F,3) B noJoxKeHne «MoOnuHaJ neHa» (CmBOJ HappaBJeH BBepx).
■ПовернITE посякючateь BeHTnJIa 11 no yacoboi CTpeIke do ynpa. 3akpoTe посякючateь BeHTnJIa, KOrda NaHcHET BbIXOДNTb YnCTaЯ Cmecb BOdbl napa.
IIOOxIte 30 ckyHn HaxMnte KHOKy, YTO6bI nepeiTN B CTaHdapTHbI peXIM pa6oTbl.
Пolyчени rataye BOДы
3a oINH pa3 MOxHO NOyHTb MaKcIMyM 150 mI ropayeB OdbI. IJIa NOyueHn 6OJIbIeRo KOJNueCTBa npoceDpy Tpe6yeTcNoBtOpNTb eIe pa3.
BknHouHTe annapaT.
YcTaHOBInTe NOBOpOTbI peRyJrTOp (Pnc.F,3) BNoIOXeHne «「Topaay BOda» (CmMBoN HAnpaBnEh BBepx).
IocTaBbTe emKoCTb NOd KanyuHaTOP.
■ПовернITE nepeknioateNBBeHTnla 11 no yacoboi CTpeNke Do ynopa. Miraet B emkoctb cTekae ropyaB Oda.
■Повернite поеклочаель BeHTnla 11 npOTNB yacOBoi CTpeKN Do ynopa.
KecTKoCTb BOdbI N qHJIbTp dJI BODbl
IpaBnIbHaHaHacTpoiKa XecTKoCTN BOIbI Heo6xOdIma, YTo6bl annapat MOR CBOeBpeMeHHo NODaTB CNrHaJI O Heo6xOdIMocTHu YdaJIeHn HaKnn. Ha 3aBoTe aannapat HAcTpoEH Ha ypOBeHb XecTKoCTN BOIbI 4.
nocne yctaHOBKn QnilbTpapaktpnJxk Melitta PRO AQUA claris abTomatueckn HactpanBaetcTepeH JecTKOCTN 1.
PekomeHnyetcExeHeeBHaOuNCtKa 6Joka 3aBapuBaHn.
Bbiknouhte annapat.
CHIMMTE BnpaBO KOxyx 14.
HaxmTe u ydepKnBaTepacHyo KhoNky Ha pyKe 6noka 3aBapnBaHna (pnc.B,1).
■ПовернITE руку по чабов стpeлке до уnapa.
■ИЗВЕКИТЕ 6нOK 3аВариВаня 3a руку ИЗ annapaTa.
TtataTeIbHO n CO Bcex CTOPOH npOMoIte 6nok 3aBapuBaHnA uCToN BOIo. Ha yactke, OTMeueHHOM cTpeJkoH Ha pnc. D, He DoJIxHo 6bITb OCTaTKOB KoFe.
ДаиTe BOide cTeuch n3 6noka 3aBapuBaHnI.
- YdaJIte oCtATKn KoPe n3 annapaTa.
BCTaBbTe 6nok 3abapnbHnB aannapat, HaxMnte KpaChyIO KNOpKy (pnc. B, 1), ydepxNBaIte ee n nobepHnte pyky npOTNB YacOBoN cTpeKN Do ynopa.
BcTaBbTe KOxUx Do eO fNkCaun.
BcTpoeHHa nporpaMa oUncTkN
BcTpoeHHa nporpaMa OUncTkN (dHnteIbHOCTbO OKoNo 15 MNHyT) ydaJIeT OCTaTK N KoPe H KOpeHoro Macna, KOTOpbIE HeBO3MOxHO YcTpaHNTb BpyHu. Bo BpeM BcE INpOueDypbl Mnraet CmBOJ UNCTkN
IporpaMMy OunchKn CneDyeT BbINONHtB uepe3 kaxdble 2 Mecya nn nocne npiroTOBHeHn 200 yawek, Ho He NO3dHee TOROMoMeHTa, KOrda 3arOpNTcR CNMBOJ
■Ipeed 3anyckom nporpaMMbI OunchTkn OunchTe 6nok 3abapnbAHnry n BHyTpehHee npoctpaHCTBO (OuchTka 6noka 3abapnbAHnra, ctpaHnca 155).
IcnoB3ynte TOnbKO YnCTaTne Ta6NeTkn Melitta PERFECT CLEAN.
Bbiknounte annapat.
3aopoHnTe pe3epByap InB ODbI BOOnpOBOHO BDoJ Do OTMeTKN «max>.
BcTaBbTe pe3epByap nIy BoDbl.
OndOBpeMeHHo HaXMnTe KHONKn ① n ydepxnBaIte nx 60nee 2cekynd.Miraet ,rOpNT
Onopoxhnte noDOnH nIa c6opa kaneIb IEMKoCTb dIra OCTaTKOB KoPe.
BCTaBbTe noDOn dJa c6opa Kaenb 6e3 emKoCTn dJa OCTaTKOB KoPe.
IocTaBbTe emKoCTb dIra octaTKOB KoOe noJ ycTPOiCTBO nOaun KoPe 2.
3man ouucmku 1 (0):
BbinoJHaeTc Da Ba UKNa npombIKn.
Ecnr ropnt ①, BbINOHNHe cneDyUoune DeiCTBnA:
N3BJIeKInTe 6JOK 3aBapnBaHnI.
■ПоложиTeЧпЯюТаБнeТКУВ6нOK 3авариBaHn(pnc.C).
YCTAHOBNTe 6nok 3aBapnBaHn.
3man ouucmku 2 (00):
Ecnrropnt, BbINONHnTe cneDyUoune DeiCTBnI:
3anonHnTe pe3epByap nra BObI BOONPOBOHOBODOJ OOTMeTKN «max».
HaXMMTe KHOJI, YTO6bl npOIOJKNtB BbINOJHHeHne IpOprpaMMbl OUHCTKn (dIITeJIbHOCTb OKOJO 5 MNHyT).
3000
Ecnrropnt BbINONHITe CneDyUOuNe DeiCTBnI:
Onopoxhnte noDIOH nIa c6opa KaIeJIb IEMKoCTb dIra OCTaTKOB KoOe.
BCTaBbTe noDOn dJa c6opa Kaenb 6e3 emKoCTn dJaOCTaTKOB KoPe.
IocTaBbTe eMKoCTb dIra oCTaTKOB KoOe noyycTPOINCTBO nOaun KoPe 2.
3man ouucmku 4 (000) Muzaem cpehee KoceuHoe 3epHo):
BbINOJIHeHHe npoIpaMMbI OUNCTK 6yTeT npoIoJxKeHO, OHa IInTCa OKOJO 5 MInHyT.
Ecnrropnt BbINONHTe cneDyUOune DeiCTBnI:
Onopoxhnte noDIOH nIa c6opa KaJIb I eMKoCTb IJIa OCTaTKOB KoPe IN BCTaBbTe Ix B aannapat.
Iporpamma ounctkn 3aBepseHa.
BcTpoEHnA nporpamMa dnydajEnHaKnPi

OCTOPOXHO
Onachoctb pa3dpaXeHnKoXn cpeDcTBOM dIyUdaJIeHnHaKnnn!
Co6nOdaTe yka3aHnI NO TexHnKe 6e3oNaChOCTN n CBeDeHnO 6 NcNoJb3yEmOM KOJIuYeCTBe, I3IOXeHHbIe Ha ynaKOBke cpeDCTBa dIydaJIeHnHaKnII.
BCTpoEHna npoPamma dny ydaJeHnHaKnni (dNITeNbHOCTbIO OKOIO 30 MNHyT)ydaIaIeNT3BeCTKOBBie OTIOKeHnBAHyTpna annapata.Bo BpeMRAe NPOueDypblMNrae TcIMBOJ ydaJeHnHaKnni
IporpaMMy dIy ydaJIeHnHaKnni CNe dyET BbIOJNHTb Ype3 KaXdIe 3 Meca, Ho He N03dHee TOrO MomeHTa, KOrIa 3arOpNTcY cIMBON («HacTpoNka JecTKoCTN BObl), CTpaHnUa 155).
IcnoB3yTe TOnbKO CpeDCTBO Melitta ANTI CALC.
BbIKHouHTe annapat.
■Pn Heo6xOaMocTn 3BneKeNTe PnIbTp DnBa BObl (KecTKocTB BObl N PnIbTp DnBa BObl), CtpaHnca 154).
OndHOBpeMeHHo HaxMMTe KhoNKn N ① nyepKnBaIte nx OKONo 3 ceKyHd. Muraert,Topnt.
Φa3a ydaeneHua hakunu 1 (0):
Onopoxhnte noDOnH nIa c6opa Ka6ebn IV BCTaBbTe erO.
IocTaBbTe emKoCTb dIaOCTaTKOB KoPe IOD KaNyUnHaTOp.
YcTaHOBnTe NOBOpOTbI peRyJrTOp (pnc.F,3) B noLoXeHne «Topya BOda» (CmBOJ HAnpaBNeH BBepx). TOpNT
■ПОЛноctbIO onopoKHnTe pe3epByapДЯ BOДbl.
IObaBbTe Bpe3epByap IJRA BOdbICpeiCTBO IJRA ydaJIeHnHaKINCOrnaCHO yKa3aHnM Ha yNaKOBKe.
BcTaBbTe pe3epByap nra BOIbl.
HaxmTe KhoN, 3anyCTnTb nporpaMMy dny ydaeneHaKNn (dINTeBHOCTb OKoNo 15 MNHyT).
Φa3a ydaeneHua Hakuu 2 (0)
Ecnr ropnt BbINOHHTe cneDyUOuNe DeiCTBnA:
Y6eNTecb, yTO eMKoCTb IJIa OCTaTKOB KOffe HAXODITcI NOI KanyuHaTOPOM.
■ПовернITE поpeклочаел
Вентли 11 по уасов стpenke до
унopa. МURAET. Вда выtekaet
чepe3 onpeideHьile ИHTepBaJIbl
В eMKOCtBJ ДЯ OCTaTKOB KOpe
(пpoДоIGNКИТьНOCТь OKОЛ 10 MInHyT).
В завершени 3aropaetся
Onopoxhnte noDOnH dJa c6opa Kaenb IEMKoCTb dJa OCTaTKOB KoPe.
BcTaBbTe nOdoH dIy c6opa KaIeIb IN CHOBa NOCTaBBte EMKoCTb dJIy OCTaTKOB KoPe IOD KanyuHaTOp. TopNT
I3BJIeKInTe pe3epByap IJIa BOJbI TuaTeNbHO npOMoITe erO uHCTOn BOIOJ.
3anonHnTe pe3epByap nra BObI BOOnpoBOHOB ODoJ Do OTMeTKN «max>
BcTaBbTe pe3epByap nra BOIbl.
Haxmte Kho, TTo6bl npOJXtB BbIOJIHeHne npOrpaMMbl dny ydaJeHna Haknn. Muraet Boa BbITEKaet B eMKocTb dIra ocTaTKOB Kope.
ФазaydaненHaKunu3(Ecnn ropnt, BbINOHNTe cneDyUOune DeiCTBnA:
■NoBepHnTe nepeKIOuOaTeIb BeHTnJIa 11 npOTnB YacOBoC TpeKN Do ynpa. Boda BHyTpN annapata CteKaET B noDDOH nA c6opa Kaenb.
Ecnrnp, onopoxhnte noDOnH dna c6opa kaneNb n emkoctb dna octaTKOB Kope, nocne yero choBa BCTaBbTe IX.
Ecnr ropnt ①, nporpaMma nJydaJIeHnHaKnN3aBepWeHa.
■Ipn Heo6xOaHMOCTn yCTaHOBNTe 1nnbTp dnn BODbl (KecTKocTB BObl N 1nnbTp dnn BODbl), ctpaHua 154).
Дугne Habtrokn
3Hepro6eperaoos pexim
Annapat nocne nocJeHneonepaunn ABTOMATNueckn (B 3aBNCMOCTN OT HacTroKn) nepeKJIouyaeTcB 3HeproScbeperaIOuIpeKM.3aBoDcKa HAcTroKa-5MNHyT
BknHouHTe annapaT.
OДнOBpeMeHNO haXmMaITe KHOKN I Oka He HaHT MInTaTb
ДвждынхмITEKHONky .TopNT
Haxmte KhoK, noka He 6yET yCTaHOBHeO ONo H3 YeTbIpex 3HaueHn BpemHn. Ha Bpemr yKa3bBaet KOJIuYeCTBO KoPeiHbIX 3epeH Ha DnCnIee 9.
B KaueCTBe 3aBODcKo HacTpoiKn TemnepaTypa npuroTOBJIeHny yCTaHOBJIeHa Ha yPOBeHb (CpeHn
BknouHTe annapaT.
OndHOBpeMeHNO HaxnMaITe KhoNKn N, NOKa He HaYHeT MNaTb ①.
YeTbIpeKdIHaXMMTe KHONKy TOpNT
Haxmaite KhoNk, noka He 6ydet yctahOBneHO Ondo H3 Tpex 3haeHn TemnepaTypbI npiroTOBHeHn. Ha TemnepaTypy yka3bIBaET KOInueCTBO KoepiHbIX 3epeH Ha DnCnPee 9 (OT = Hn3KaJ Do Bck) HaxmTe KhoNky, YTObl NOdTBePdNTb HactpoNky.
HactpoJa ToHkoCTn NOMOJa
Hactpoika ToHKocTn NOMa 6bila BblONHeHa nepei NoCTaBKOc C 3aBOda. Po3tomy peKOMeHnyetc NaDCtpaNBA TbOHKOCTb NOMOA ToIbKO nOcJe nprirotoblenia 1000 yawek KoFe (npimepno yepe3 1 roD).
HactpaBaiTe ToHKocTb NOMoJa HeNOCpeDCTBeHHO nepei Haayanom npuroTOBJIeHr KoPe BO BpeMpa60TbIKoΦemOJKN.
CHIMITE BnpaBO KOKyx 14.
HaunTe npuroToBJeHne KoPe.
YcTaHOBnte pbIar (pnc. E) B Tpe6yEmoe NOIOXKeHne (BNeBO = TOHKnI NOMOJ, BnpaBO = KpyNbI NOMOJ).
BcTaBbTe KpbIuKy I NOBepHnTe ee BNeBO Do QNKcaun.
TpaHcnpTnpOBka, xpaHeHne n yTuJIIn3aun
BbɪnapɪbaHne BɔdBi

OCTOPOXHO
Onachoctb oXORA ropaHm napom nnn ropaey TpykoJ dny noaun napa!
Pn BbInapuBaHn n3 annapaTa BbIXoNT ropqn nap.
HnB Koem cnyuae He kacaTecb Tpy6Kn IJn IoJaH napa Bo BpeM ee nCNoJIb3OBaHnI nn Cpa3y nocJe Hero.
Ecnn annapaT he 6ydet nCNOB3OBAtbcra DInTeIbHbI nepnoB BpeMeHN IIN ero Heo6xOdmo TpaHCnOpTnpOBaTb, CNeDyeT BbINOJNHTb BbInapNBaHne BObln annapaTa. BnaOdaPra 3Tomy OH 6ydet 3aunueH OT noLOMOK npn OTPncaTeIbHbIX TEMpepaTypax.
■Ipn Heo6xOaHMOCTn N3BJIeKNTe 1nnbTp IJNA BOdI («KeCTKOcTB BOdI IN 1nnbTp IJNA BOdI》,CTpaHua 154) nIOLOXHTe eRO IJNA XpaHeHn B CtaKaH C BOOpnpOBHOH BOOn B npoxJaHOM MecTe.
BknHouHTe annapaT.
OndOBpeMeHHO HaxMNTe KHONKn ① n ydepxnBaIte nx OKoNo 2cekynd.Muraet ①,3aTe m ropnt
I3BneKeTe pe3epByap IJRA BODbI 7 n3 annapaTa no HnpaBHeHIO BBepx. TOpNT
IocTaBbTe eMKoCTb IOKanyuHaTop 13.
■ПовернITE nepeknioyateNBBeHTnIa 11 no yacoboi cTpeJIke doynopa.Muraet.ИЗ trpy6knДЯnoDAH napa B eMKoCTb BBITEkaET BOda,TakKe BblXOINT nap.
Ecnnap60nbwe He BbIXoNT, NOBepHnTe nepeKIOUaTeIb BeHTnJIa 11 npOTNB YacOBOI cTpeKN Do ynpa.
BcTaBbTe pe3epByap nIy BODbl B annapaT.
TpaHcnpTnpoBka
BbINOHNHe BbInapNBaHne BObln3 annapaTa.
Onopoxhnte n ouhctnte noDOnH dna c6opa kaenb n emKoctb dna OCTaTKOB Kope.
Onopoxhnte pe3epByap Inra BoI IN KOHTeHep IJRA KoPeHbIX 3epen. Pnp Heo6xOIMOCTN ydaIInTe haoJaIneCer B rIy6nHe 3epHa c NOMOuBIO nbIneCocca.
-СнIMITE kanyuHaTOp 13 c Tpy6Kn ДЯподач napa 12.
OncKa 6noka 3aBapuBaHna》,CTpaHua 155.
■IIO BO3MOXHOCTN TpaHCnOpTpyuTe annapat B opHnHaNbHoYnaKOBKe BmecTe C XeCTKIM NeHONJaCTOM.
YTNJIIN3aUN
3TOT annapat nMeet MapKnpoBky
corlacho eBponeeCKoI dIpeKTHBe
2002/96/EC o6 otXoJax əJIeKtpnueckoro I
3JIeKTPoHOrO obOpyDoBaHnra
(waste electrical and electronic
equipment WEEE).ДaHHaI dIpeKTHBa
yCTaHaBnBaet pamKn dJa DeiCtByUOuIX
Ha TeppntOpn EC Bo3BpaTa n
yTInn3aun cTapbix yCTpOiCTB.ДЯ
noJyuEHHn IHΦopMaun O6 aKTyaJIbHbIX
MeToaX yTInn3aun O6paTNTecb K
npoDaBcy.
| Устраенье升降пограды升降пограды升降пограды升降пограды升降пограды升降пограды升降пограды升降пограды升降пограды升降пограды升降пограды升降пограды升降пограды升降пограды升降пограды升降пограды升降пограды升降пограды升降пограды升降пограды升降поградп升降поградп升降поградп升降поградп升降поградп升降поградп升降поградп升降поградп升降поградп升降поградп升降поградп升降поградп升降поградп升降поградп升降поградп升降поградп升降поградп升降поградп升降поградп升降поградп升降поградн. | ||
| Немправочь | Причina Меры по устраенье升降пограды升降пог irr升降пог irr升降пог irr升降пог irr升降пог irr升降пог irr升降пог irr升降пог irr升降пог irr升降пог irr升降пог irr升降пог irr升降пог irr升降пог irr升降пог irr升降пог irr升降пог irr升降пог irr升降пог irr升降пог irr升降пог irr升降пог irr升降пог irr升降пог irr升降пог irr升降пог负面影响升降пог irr升降пог负面影响升降пог负面影响升降пог负面影响升降пог负面影响升降пог负面影响升降пог负面影响升降пог负面影响升降пог负面影响升降пог负面影响升降化降化升降化升降化升降化升降化升降化升降化升降化升降化升降化升降化升降化升降化升降化升降化升降化升降化升降化升降化升降化升降化升降化升降化升降化升降化升降化升降化升降化升降化升降化升降化升降化升降化升降化升降化升降化升降化升降化升降化升降化升降化升降化升降化升降化升降化升降化升降化升降化升降化升降化升降化 升降化升降化升降化升降化升降化升降化升降化升降化升降化升降化升降化升降化升降化升降化升降化升降化升降化升降化升降化升降化升降化升降化升降化升降化升降化升降化升降化升降化升降化升降化升降化升降化升降化升降化升降化升降化升降化升降化升降化升降化升降化升降化升降化升降化升降化升降化升降化升降化升降化升降化解升降化解升降化解升降化解升降化解升降化解升降化解升降化解升降化解升降化解升降化解升降化解升降化解升降化解升降化解升降化解升降化解升降化解升降化解升降化解升降化解升降化解升降化解升降化解升降化解升降化解升降化解升降化解升降化解升降化解升降化解升降化解升降化解升降化解升降化解升降化解升降化解升降化解升降化解升降化解升降化解升降化解升降化解升降化解升降化解升降化解升降化解升降化解升降化解升降化解升降化升降化升降化升降化升降化升降化升降化升降化升降化升降化升降化升降化升降化升降化升降化升降化升降化升降化升降化升降化升降化升降化升降化升降化升降化升降化升降化升降化升降化升降化升降化升降化升降化升降化升降化升降化升降化升降化升降化升降化升降化升降化升降化升降化升降化升降化升降化升降化升降化升降化解 升降化升降化升降化升降化升降化升降化升降化升降化升降化升降化升降化升降化升降化升降化升降化升降化升降化升降化升降化升降化升降化升降化升降化升降化升降化升降化升降化升降化升降化升降化升降化升降化升降化升降化升降化升降化升降化升降化升降化升降化升降化升降化升降化升降化升降化升降化升降化升降化升降化解 升除化升降化升降化升降化升降化升降化升降化升降化升降化升降化升降化升降化升降化升降化升降化升降化升降化升降化升降化升降化升降化升降化升降化升降化升降化升降化升降化升降化升降化升降化升降化升降化升降化升降化升降化升降化升降化升降化升降化升降化升降化升降化升降化升降化升降化升降化升降化升降化升降化升降化下降化升降化升降化升降化升降化升降化升降化升降化升降化升降化升降化升降化升降化升降化升降化升降化升降化升降化升降化升降化升降化升降化升降化升降化升降化升降化升降化升降化升降化升降化升降化升降化升降化升降化升降化升降化升降化升降化升降化升降化升降化升降化升降化升降化升降化升降化升降化升降化升降化升降化升降化升降化升降化升降化升降化升降化升降化升降化升降化升降化升降化升降化升降化升降化升降化升降化升降化升降化升降化升降化升降化升降化升降化升降化升降化升降化升降化升降化升降化升降化升降化升降化升降化升降化升降化升降化升降化升降化升降化升降化升降化升降化升降化升降化升降化升降化升降化升降化升降化升降地升降化升降化升降化升降化升降化升降化升降化升降化升降化升降化升降化升降化升降化升降化升降化升降化升降化升降化升降化升降化升降化升降化升降化升降化升降化升降化升降化升降化升降化升降化升降化升降化升降化升降化升降化升降化升降化升降化升降化升降化升降化升降化升降化升降化升降化升降化升降化升降化升降化升降地 升降化升降化升降化升降化升降化升降化升降化升降化升降化升降化升降化升降化升降化升降化升降化升降化升降化升降化升降化升降化升降化升降化升降化升降化升降化升降化升降化升降化升降化升降化升降化升降化升降化升降化升降化升降化升降化升降化升降化升降化升降化升降化升降化升降化升降化升降化升降化升降化升降地 升除化升降化升降化升降化升降化升降化升降化升降化升降化升降化升降化升降化升降化升降化升降化升降化升降化升降化升降化升降化升降化升降化升降化升降化升降化升降化升降化升降化升降化升降化升降化升降化升降化升降化升降化升降化升降化升降化升降化升降化升降化升降化升降化升降化升降化升降化升降化升降化升降地 升别化升降化升降化升降化升降化升降化升降化升降化升降化升降化升降化升降化升降化升降化升降化升降化升降化升降化升降化升降化升降化升降化升降化升降化升降化升降化升降化升降化升降化升降化升降化升降化升降化升降化升降化升降化升降化升降化升降化升降化升降化升降化升降化升降化升降化升降化升降化升降化升降化升降化降落化升降化升降化升降化升降化升降化升降化升降化升降化升降化升降化升降化升降化升降化升降化升降化升降化升降化升降化升降化升降化升降化升降化升降化升降化升降化升降化升降化升降化升降化升降化升降化升降化升降化升降化升降化升降化升降化升降化升降化升降化升降化升降化升降化升降化升降化升降化升降化升降化升降化 降降降降降降降降降降降降降降降降降降降降降降降降降降降降降降降降降降降降降降降降降降降降降降降降降降降降降降降降降降降降降降降降降降降降降降降降降降降降降降降降降降降降降降降降降降降降降降降降降降降降 | |
| Устраенье升降правноctrь | ||
| Немsprавноctrь | Почина Меры по устраеньи | |
| He удаeted установпь 6лok 3аварваим пос = edo ИЗВлесеня. | Блok заварваим зашinkingован Hebergo. | Проберcrete, правлино Л# зашinkingовалась рухая заю, кpenlenя 6лokа заварваим. |
| Пробode нахочиь в Heberphom почжени. | Выковские и Величite appapat. Затem оданьсянно нажмITE Кондци Июп: и уdeckожаite их бolee 2 секун. Пробode пewemeшиетсь в Треуеме почжени. Поче ото установпь 6лok заварваим на Мec toe и пrobерcrete правлиhoctь edo Бл_OKорвки. | |
| Почереньо мигалOT СимBERОЧASTКИ СимBERО ГOTOBHOCТК kpabote | He установ lien нешар��льно установен 6лok Заварваим. | Проберhoe установп: Зашinkingуп: Балочite и Величite appapat, Иослбизу конь «ВкL./ВыкЛ.» ① (при неobхочимостп NOВTOPITE эту onepaци; пoka appapat на пегийdet в ржим готовhoeч: kpabote. |
| Перенье на вароча Камера. | ||
| Нешарьгове Могаиме BCex конок уразвлино. | Состemsнaya ошеба | Валочite и Величite appapat, Ислоьизу конь «ВкL./ВыкЛ.» ①, ссло ошебу He удауся устразы: otprabbes appapat в сервicnhyo слжбу. |
TexHnueckne daHHbIe
IpeBapntbHoe ycnoBne: annapar roTOB K pa6oTe.
OndHOBpeMeHHo HaKMnTe KHOJKy
《BKn./BbIKn.》 ① nKHOJky noaun npa
N ydepxNBaIte nx HaxaTbIMn 60onee
2cekynd.
→Bce NaCTpoNn annapaTa BO3BpaUaIOTcK 3aBODcNIM.
0630p 3aBODCKNX yCTaHOBOK
The People's Republic of China released a regulation called „Management Methods for the Restriction of the Use of Hazardous Substances in Electrical and Electronic Products" or commonly referred to as China RoHS. All products which are produced and sold for China market have to meet this regulation.
產品中有害物質的名稱和含量
Name and content of harzardous substances in products
| 組件名稱 Component Name | 有害物質 Hazardous substance | |||||
| 鉛 Lead (Pb) | 汞 Mercury (Hg) | 鎘 Cadmium (Cd) | 六價鉻 Hexavalent chromium (Cr (VI)) | 多溴聯苯 Polybrominated biphenyls (PBB) | 溴二苯醚 Polybrominated diphenyl ethers (PBDE) | |
| 塑料外殼和底盤 Plastic enclosure and chassis | ○ | ○ | ○ | ○ | ○ | |
| 印刷電路板組裝 Printed Circuit Board Assembly | × | ○ | ○ | ○ | ○ | |
| 電機、閥門 Motors, valves | × | ○ | ○ | ○ | ○ | |
| 電纜和電線 Cable and wiring | × | ○ | ○ | ○ | ○ | |
| 金屬零件 Metall parts | × | ○ | ○ | ○ | ○ | |
| 此表根據SJ/T 11364規定編製。 This table is prepared in accordance with the provisions of SJ/T 11364. O: 此組件所有均質材料中的此種有害物質含量低於GB/T 26572規定的極限值。 O: The content of such hazardous substance in all homogeneous materials of such component is below the limit required by GB/T 26572. X: 此組件某一特定均質材料中的此種有害物質含量高於GB/T 26572規定的極限值。 X: The content of such hazardous substance in a certain homogeneous material of such component is beyond the limit required by GB/T 26572. | ||||||
此產品環保標誌使用期為:
The Environment Friendly Using Period for this product is:

Anexts
i
iMnEe 1
i
■德臥連RlEi与FJFJFJFJFJFJFJFJFJFJFJFJFJFJFJFJFJFJFJFJFJFJFJFJFJFJFJFJFJFJFJFJFJFJFJFJFJFJFJFJFJFJFJFJFJFJ
自通电士托龙他梁i中燥到
自通 电
!
Division Household Products
Ringstr. 99
D-32427 Minden
Germany
www.melitta.de