LB 200 - Air purifier BEURER - Free user manual and instructions
Find the device manual for free LB 200 BEURER in PDF.
| Product Type | Air humidifier |
| Brand | Beurer |
| Model | LB 200 |
| Dimensions (W x D x H) | 230 x 230 x 350 mm |
| Weight (with filter) | Approx. 2.865 kg |
| Power supply | 220-240 V~, 50-60 Hz, 17 W |
| Water tank capacity | 3 liters |
| Evaporation power | Up to 200 ml/h |
| Recommended room size | Up to 30 m² |
| Humidity measurement range | 20 % to 95 % RH |
| Main functions | Auto, Night, Timer (1-9 h), target humidity setting (40/50/60/70 %) |
| Fan speeds | 3 speeds |
| Filter | Filter to be replaced every 6 months (ref. 110.005) |
| Filter drying function | Yes, 3 hours in high mode |
| Cleaning | Rinse the filter under running water weekly; descale with citric acid |
| Maintenance | Tank, filter holder and sensor dishwasher-safe (max 45 °C) |
| Automatic shut-off | When tank is empty or target humidity reached |
| Protection class | II (double insulation) |
| Included accessories | 1 filter, 1 filter holder with sensor, 1 instruction manual |
| Warranty | See supplied warranty card |
Frequently Asked Questions - LB 200 BEURER
User questions about LB 200 BEURER
0 question about this device. Answer the ones you know or ask your own.
Ask a new question about this device
Download the instructions for your Air purifier in PDF format for free! Find your manual LB 200 - BEURER and take your electronic device back in hand. On this page are published all the documents necessary for the use of your device. LB 200 by BEURER.
USER MANUAL LB 200 BEURER
natural_image
Beurer air fryer device with control panel and buttons (no visible text or symbols on body)natural_image
Illustration of an open book with a geometric window and horizontal lines, no text or symbols presentEN Unfold page 3 before reading the instructions for use.
natural_image
Diagram of a mechanical device with an upward arrow indicating motion or force, showing internal components (no text or symbols)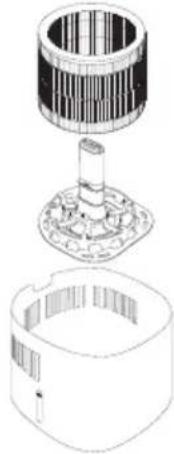
natural_image
Exploded view diagram of a mechanical assembly showing internal components (no text or labels)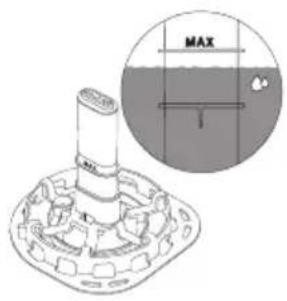
text_image
MAX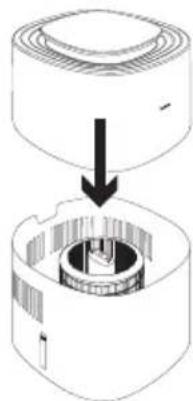
natural_image
Diagram of a mechanical device with a cylindrical housing and internal components, showing a downward arrow indicating a process (no text or symbols present)HINWEIS
natural_image
Circular diagram with concentric rings and central crosshair, no text or symbols presentSchritt 3: Filter vollsaugen lassen
natural_image
Diagram of a mechanical device with an upward arrow indicating motion or force, showing internal components (no text or symbols)flowchart
graph TD
    A["Cylindrical Component"] --> B["Cylindrical housing"]
    B --> C["Storage Unit"]
text_image
Technical diagram showing a mechanical assembly with labeled component 'XVM' and directional arrow8.6 Entkalkung
Read these instructions for use carefully. Observe the warnings and safety notes. Keep these instructions for use for future reference. Make the instructions for use accessible to other users. If the device is passed on, provide the instructions for use to the next user as well.
CONTENS
- Included in delivery 18
- Signs and symbols....18
- Intended use....19
- Warnings and safety notes....20
- Device description....23
- Initial use 23
- Usage 23
7.1 Starting use 23
7.2 Setting target humidity 25
7.3 Setting the fan speed/mode 25
7.4 Timer function....26 - Cleaning and maintenance......26
8.1 Filter drying function....26
8.2 Cleaning the filter....26
8.3 Changing the filter 27
8.4 Cleaning the motor unit housing ...... 27
8.5 Cleaning the water tank, filter holder and water level sensor ....28
8.6 Descaling....28
8.7 Storage 28 - Accessories and replacement parts.....28
- What if there are problems? 29
- Disposal....29
- Technical specifications 30
- Warranty 30
1. INCLUDED IN DELIVERY
Check that the exterior of the cardboard delivery packaging is intact and make sure that all contents are present. Before use, ensure that there is no visible damage to the device or accessories and that all packaging material has been removed. If you have any doubts, do not use the device and contact your retailer or the customer service address provided.
- 1 air humidifier
- 1 filter
• 1 filter holder incl. water level sensor
• 1 copy of instructions for use
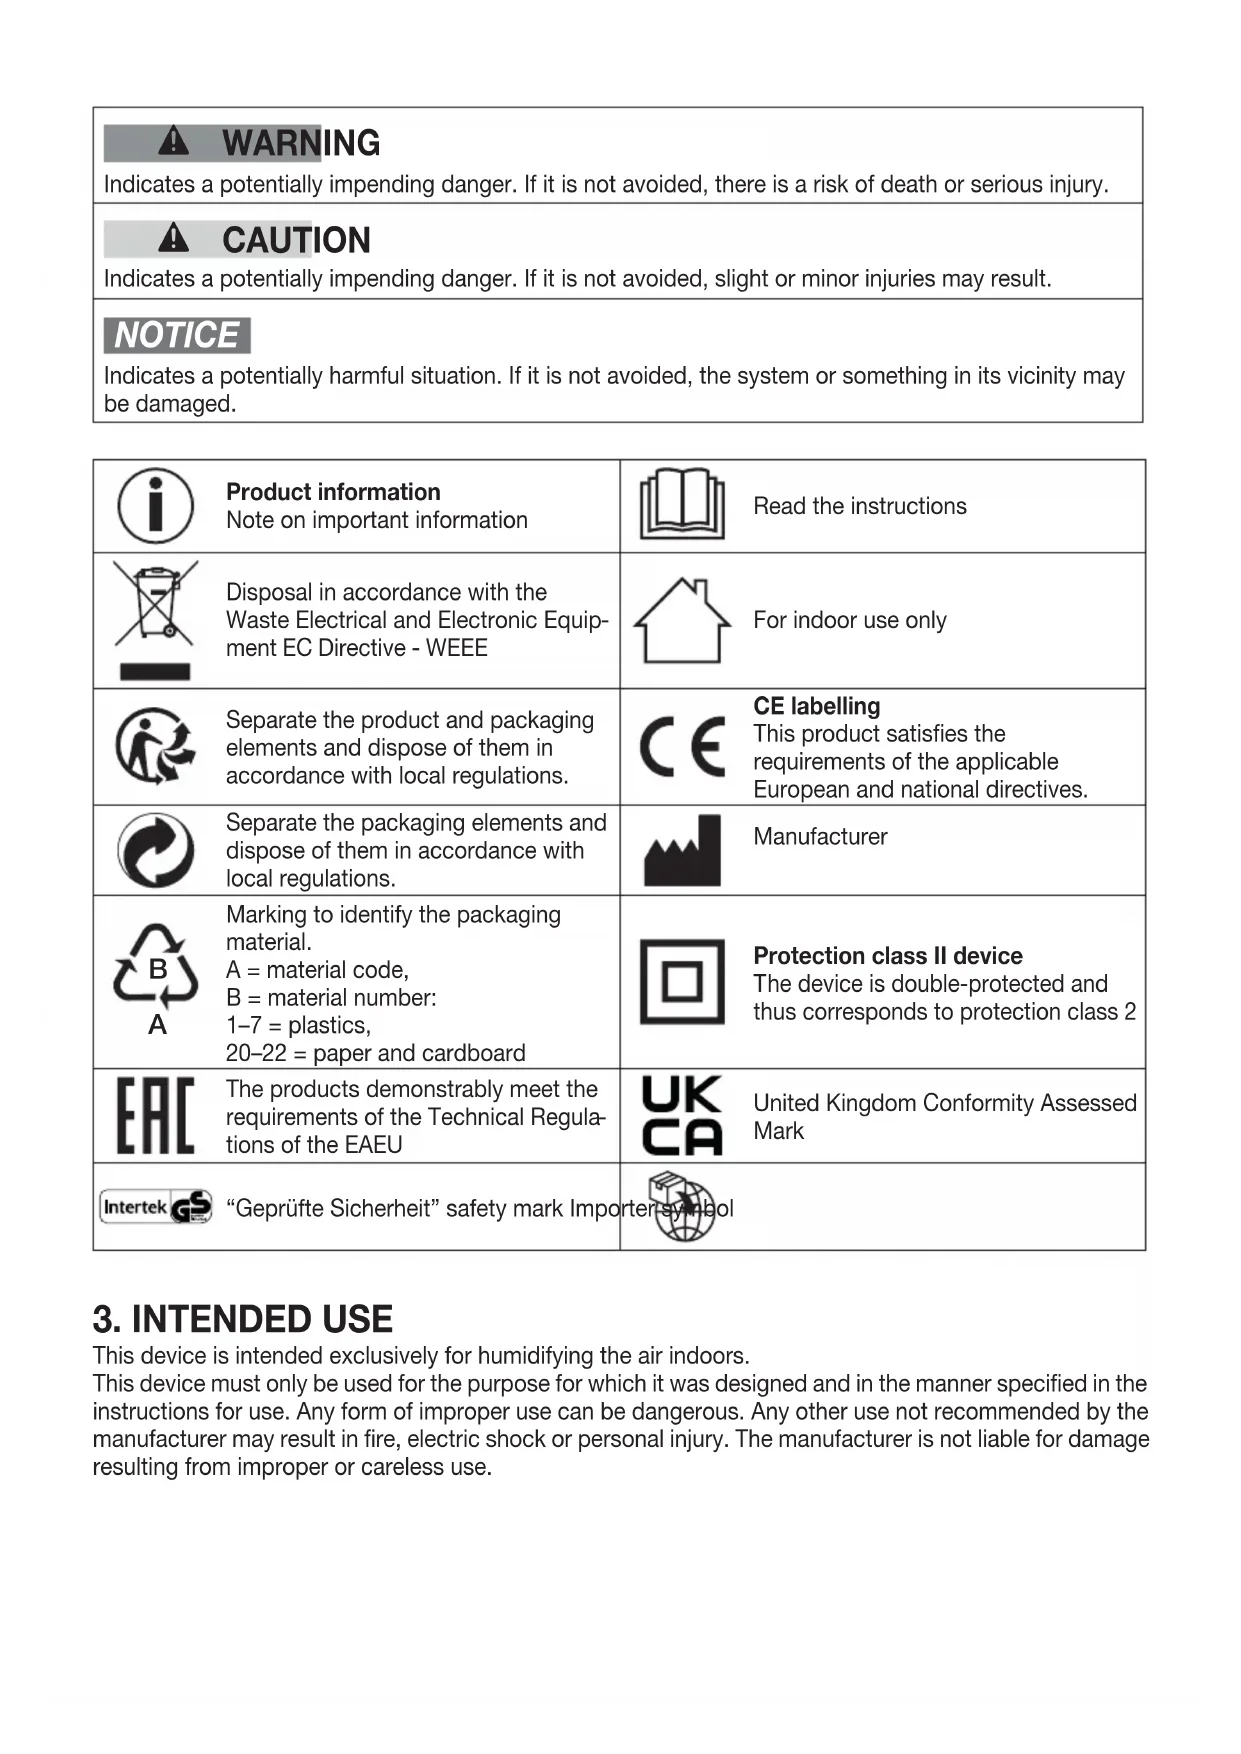
2. SIGNS AND SYMBOLS
The following symbols are used on the device, in these instructions for use, on the packaging and on the type plate for the device:
| WARNINGIndicates a potentially impending danger. If it is not avoided, there is a risk of death or serious injury. |
| CAUTIONIndicates a potentially impending danger. If it is not avoided, slight or minor injuries may result. |
| NOTICEIndicates a potentially harmful situation. If it is not avoided, the system or something in its vicinity may be damaged. |
 | Product informationNote on important information | Read the instructions | |
 | Disposal in accordance with the Waste Electrical and Electronic Equipment EC Directive - WEEE | For indoor use only | |
 | Separate the product and packaging elements and dispose of them in accordance with local regulations. | CE labellingThis product satisfies the requirements of the applicable European and national directives. | |
 | Separate the packaging elements and dispose of them in accordance with local regulations. | Manufacturer | |
 | Marking to identify the packaging material.A = material code,B = material number:1-7 = plastics,20-22 = paper and cardboard | Protection class II deviceThe device is double-protected and thus corresponds to protection class 2 | |
 | The products demonstrably meet the requirements of the Technical Regulations of the EAEU | UKCAUnited Kingdom Conformity Assessed Mark | |
| Intertek | “Geprüfte Sicherheit” safety mark Importer symbol |
3. INTENDED USE
This device is intended exclusively for humidifying the air indoors.
This device must only be used for the purpose for which it was designed and in the manner specified in the instructions for use. Any form of improper use can be dangerous. Any other use not recommended by the manufacturer may result in fire, electric shock or personal injury. The manufacturer is not liable for damage resulting from improper or careless use.
4. WARNINGS AND SAFETY NOTES
WARNING
- The device is only intended for domestic/private use, not for commercial use.
- This device may be used by children over the age of 8 and by people with reduced physical, sensory or mental skills or a lack of experience or knowledge, provided that they are supervised or have been instructed on how to use the device safely, and are fully aware of the consequent risks of use.
• Children must not play with the device. - Cleaning and user maintenance must not be performed by children unless supervised.
- Disconnect the device from the mains electricity supply during filling and cleaning.
- Clean the device using only the methods specified. Under no circumstances may liquid enter the motor unit.
- Do not use any solvent-based cleaning products.
- If the mains connection cable of this device is damaged, it must be replaced by the manufacturer, its customer service department or a similarly qualified person to avoid any risk.
- Note that high moisture levels may promote the growth of biological organisms in the environment.
- Do not allow the area around the device to become wet or damp. If moisture is present, reduce the humidification output of the device. If the humidification output cannot be reduced, temporarily suspend use of the device. Make sure that absorbent materials such as carpets, curtains, drapes or tablecloths do not become damp.
- Never leave water in the tank when the device is not in use.
- Empty and clean the device before storing it away. Clean the device before the next use.
Electric shock
As with every electrical device, use this device carefully and cautiously, in order to avoid hazards due to electric shock.
- Do not use the device if there is visible damage to the device or accessories (e.g. if the cable or mains plug is damaged, if the motor does not rotate, after a malfunction of the device or if it has been dropped or damaged in any way. In any of these cases, contact Customer Services).
- Only operate the device with the mains voltage specified on the device (the type plate is printed on the lower edge of the motor unit).
- Do not operate the device during a storm.
- In the event of defects or operational faults, switch the device off immediately and disconnect it from the mains socket.
- Do not pull on the mains cable or on the device to disconnect the mains plug from the socket.
- Never hold or carry the device by the mains cable. Keep the cable away from hot surfaces.
- Always switch off the device before disconnecting the mains plug.
- Never disconnect the mains plug with wet or damp hands.
- To avoid the risk of fire or electric shock, plug the device directly into a proper power outlet.
- In order to protect persons against electrical hazards, DO NOT immerse the device in water or other fluids. Do not use near water.
- Children are not able to assess the dangers associated with the use of electrical devices. Therefore, children must always be supervised when they are near the device.
- Always unplug the air humidifier before moving it, removing the motor unit from the water tank, changing or cleaning the filter, or when the device is not in use.
- Do not place any objects in device openings or in rotating parts. Ensure that the moving parts can move freely at all times. Never drop objects into the openings of the device.
- Do not operate the device outside.
- Never block the air inlet or air outlet. Do not place the device on a soft surface such as a bed or sofa, as this could cause the device to tip over and the air inlet or outlet to become blocked, or water could escape from the device.
- DO NOT place any objects on the device.
- DO NOT cover the cable with carpets, runners or anything similar.
- DO NOT run the cable under furniture or equipment.
- DO NOT run the cable in high traffic areas.
- Run the cable so that it does not pose a trip hazard.
- DO NOT attempt to repair or adjust any electrical or mechanical functions on this device. Failure to follow this rule shall void your warranty. Apart from the filter, there are no user-serviceable parts inside the device. Any maintenance work must be carried out by qualified personnel only.
- Ensure that the motor unit of the device and the mains cable do not come into contact with water, steam or other liquids.
- Do not fill the water tank via the air outlet.
- Prevent the motor unit from getting wet.
- Never pick up a device that has fallen into water. Disconnect the mains plug immediately.

WARNING
Risk of fire
There may be a risk of fire if the device is used improperly or these instructions for use are ignored.
- Never operate the device underneath a cover, such as a blanket, pillow, etc.
- Never use the device near petrol or other highly flammable substances.
- To reduce the risk of fire, do not place the cable near heating coils, heating pads, ovens or radiators.
- Do not operate the device in close proximity to flammable or explosive gas mixtures.
- Keep the device away from sources of heat, as the housing could melt and trigger a fire.
- Never use flammable cleaning products to clean the device.
- Never use the device near naked flames or gas-powered equipment.

WARNING
Repairs
- Only specialist personnel may perform repairs on electrical devices. Improper repairs may put users in significant danger. For repairs, please contact Customer Services or an authorised retailer.
- The motor unit must not be opened.

WARNING
Risk of Injury
- Make sure that no hair or fingers get into the air outlet.
- Do not add fragrances or chemicals to the water.
NOTICE
Handling
- After each use and before each time it is cleaned, switch off the device and pull the plug out of the socket.
- Do not operate the device in rooms with high humidity or temperature fluctuations (e.g. bathroom, kitchen).
- Do not place any objects on the device.
- Do not expose the device to high temperatures.
- Protect the device against sunlight and impact, and do not drop it.
- Never shake the device.
- Place the device on a stable, level and dry surface.
- Avoid water damage by handling the device carefully (e.g. water damage from splashing in the vicinity of wooden floors). If the device should accidentally tip over, water may escape, even if the device is switched off and unplugged.
- The immediate vicinity of the air humidifier can become damp.
- Empty any remaining water when the device is not in use. The remaining water is not drinking water! Tip the remaining water into the waste water system.
- Never drink the remaining water! Do not use the remaining water for animals or plants.
- Do not use the device in places where protection against insects was previously provided by incense sticks or incense.
- Do not use the device in rooms where there are chemical vapours or oil residues.
5. DEVICE DESCRIPTION
The associated drawings are shown on page 3.
| Air humidifier Control panel | |
| 1 Control panel2 Air outlet3 Motor unit4 Filter5 Water level sensor6 “Max.” mark7 Filter holder8 Water tank9 Air inlet | 10 ON/OFF button11 Display(shows current relative humidity, fan speed and timer duration)12 Target humidity indicator13 Target humidity button14 Timer button15 Fan speed button16 NIGHT indicator(lights up when NIGHT mode is active)17 AUTO indicator(lights up when AUTO mode is active)18 Filter drying indicator(lights up when filter drying function is active)19 Filter change indicator(lights up when filter change is necessary)20 Water tank indicator(lights up when the water tank is empty/needs to be refilled) |
6. INITIAL USE
- Open the cardboard packaging.
- Remove the device from the top of the box without opening the film bag.
- Remove all films and adhesive strips. Remove the filter 4 from the device (see section "8.3 Changing the filter") and take it out of the plastic film. Then re-insert the filter 4 into the device.
- Check the device, mains plug and cable for damage.
7. USAGE
7.1 Starting use
Step 1: Position the air humidifier
- Place the air humidifier on a stable, horizontal and level surface to prevent vibrations and noise. Never move the air humidifier during use.
- Set up the air humidifier in such a way that provides 30 cm clearance on all sides.
- Make sure that the air inlet 9 and air outlet 2 are never blocked.
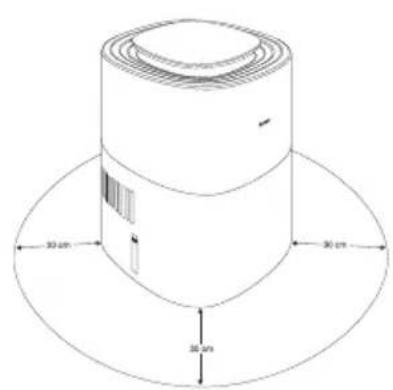
text_image
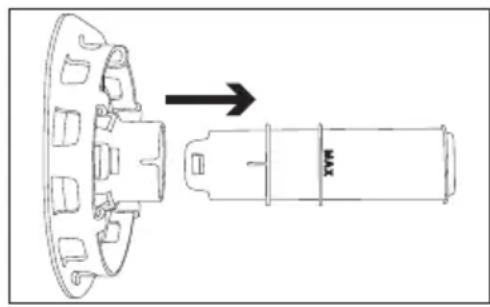
30 cm 30 cm 30 cmStep 2: Fill the water tank
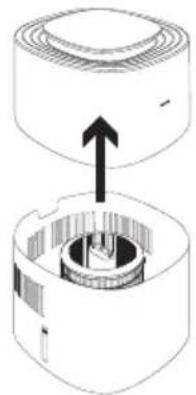
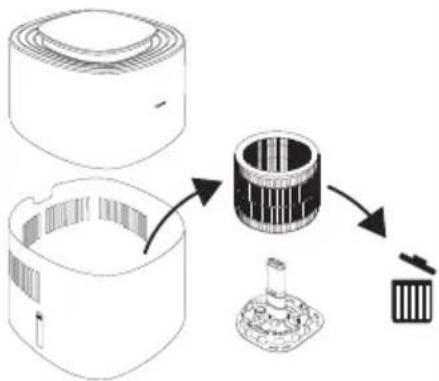
- Remove the motor unit 3 upwards.
- Insert the filter 4 into the water tank 8 using the filter holder 7 including the water level sensor 5.
- Fill the water tank 8 up to the "Max." mark 6 with cold tap water or distilled water. The water temperature should not exceed 40^ C . Do not fill the water tank 8 above the "Max." mark 6.
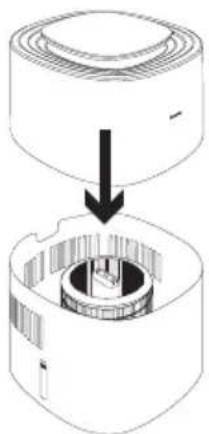
- Now put the motor unit 3 back on the water tank 8.
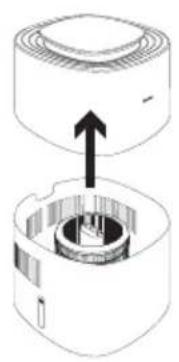
natural_image
Diagram of a cylindrical device with internal components and an upward arrow indicating motion (no text or symbols)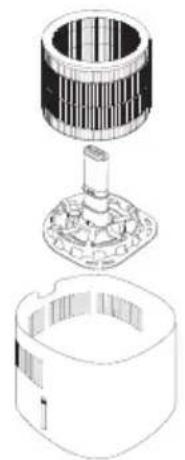
natural_image
Exploded view diagram of a mechanical assembly showing internal components (no text or labels)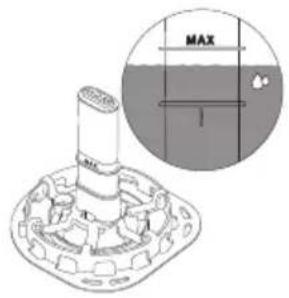
text_image
MAX T
natural_image
Diagram showing a mechanical component being inserted into a housing, with no visible text or symbols.NOTICE
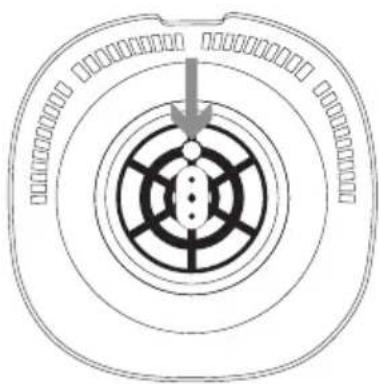
When inserting the filter holder 7 incl. filter 4 and water level sensor 5, make sure that the round hole of the filter holder 7 is on the small raised area on the bottom of the water tank.
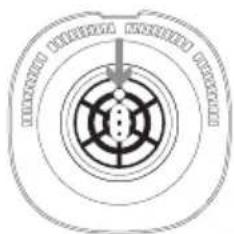
natural_image
Abstract circular diagram with concentric rings and a central arrow, no text or symbols present.Step 3: Allow the filter to become saturated
To ensure optimum humidification output, allow the filter 4 to absorb water for 30 minutes before switching on the air humidifier (the water level may fall below the "Max." mark 6 during this process).

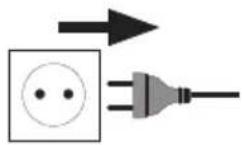
Step 4: Switch on the air humidifier
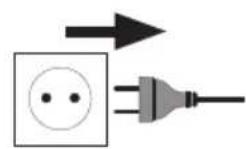
- Insert the mains plug into a suitable socket. Ensure that the cable does not pose a trip hazard.
- Press the ON/OFF button 10 to switch on the air humidifier. During initial use, the air humidifier will be in Auto mode R (see section "7.3 Setting the fan speed/mode") by default. The current relative humidity of the room is shown on the display 11 after a few seconds.

text_image
beaver- As soon as the water in the water tank is used up, the air humidifier switches off automatically and the water tank indicator lights up on the control panel. If the water tank is empty, no humidity values are shown. Now either refill the water tank with water or switch on the filter drying function as required (see section 8.1 on the filter drying function).
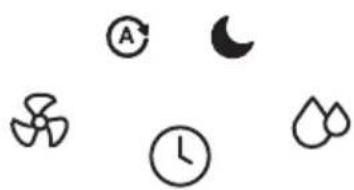
Step 5: Set additional functions
You can now optionally set the following functions:
Target humidity, fan speed/mode and timer function.
For more information on the individual functions, see sections 7.2 to 7.4.
natural_image
Simple line drawings of five distinct icons: a fan, clock, crescent moon, and droplet (no text or labels)Step 6: After use
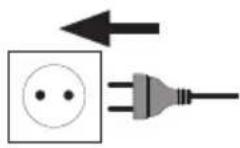
- Disconnect the mains plug from the socket after each use.
- Empty any remaining water from the water tank 8. Do not leave water in the water tank 8 when the device is not in use.
- Allow the filter 4 to air dry when not in use or use the filter drying function from time to time after use (see section "8.1 Filter drying function").

If you want to reposition the air humidifier, pull the mains plug out of the socket and empty the water tank 8 to avoid overflowing. When carrying the air humidifier, make sure that you hold the device with both hands at the bottom of the water tank 8.
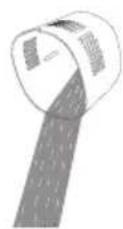
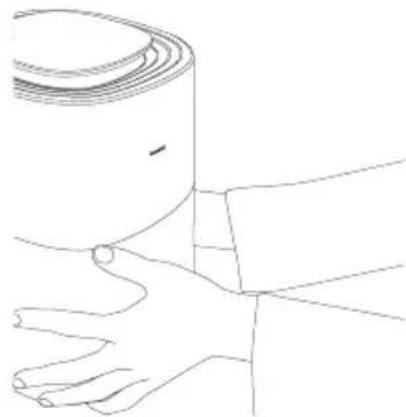
natural_image
Line drawing of a hand holding a rolled-up document or scroll (no text or symbols)7.2 Setting target humidity
If desired, you can optionally set a target air humidity on the air humidifier.
The target humidity indicator 12 shows the currently set target humidity (40 %, 50 % or 60 %).
If no value lights up in the target humidity indicator [12] , the humidifier humidifies the air until a humidity of 70 % is reached and then switches off. In order to avoid overhumidification of a room, we recommend that you select a humidity between 40–60 %.
-
Use the target humidity button 13 to select your desired target humidity.
-
The selected target humidity will light up in the target humidity indicator 12. If no value lights up in the target humidity indicator 12, the target humidity is set to 70 %. As soon as the target humidity is reached, the air humidifier switches off automatically.

In order to achieve the desired target air humidity as quickly as possible, we recommend keeping the windows and doors closed during use, as dry outside air could slow down reaching the target air humidity.
7.3 Setting the fan speed/mode
The air humidifier has three fan speeds (1, 2 and 3) and two modes (AUTO mode R and NIGHT mode SL).
- With the air humidifier turned on, use the fan speed button 15 to select a fan speed or mode. The display 11 shows the currently set fan speed or current mode. After a few seconds, the current relative humidity of the room is shown again on the display 11.
| Illuminates in display | Description |
| | | Low fan speed |
| 2 | Medium fan speed |
| 3 | High fan speed |
| SL | In NIGHT mode all displays on the control panel 1 go out, except for the NIGHT indicator 16. In NIGHT mode, the low fan speed is always active. |
| A | In AUTO mode, the fan speed is automatically adjusted depending on how close the current humidity is to the desired target humidity. |
7.4 Timer function
The air humidifier features a timer function that you can use to determine the number of hours the air humidifier should run for before it automatically switches itself off. You can set a timer for between 1 and 9 hours.
-
Use the timer button 14 to select your desired timer. The currently set timer lights up on the display 1 (e.g. 5 h). After a few seconds, the current air humidity is shown again on the display 11.
-
To switch off the timer, press the timer button 14 repeatedly until 0 h is shown in the display. The timer is now switched off.
8. CLEANING AND MAINTENANCE
8.1 Filter drying function
Mould and bacteria can form in the filter 4 when the air humidifier is not in use. Therefore, always empty the residual water from the tank and dry all parts when the device is not in use. Allow the filter 4 to air dry or use the filter drying function for faster drying:
-
Before activating the filter drying function, ensure that the residual water has been emptied from the tank (residual moisture may collect under the filter holder 7, which must be dried manually). The filter drying function can only be started once the residual water has been emptied.
-
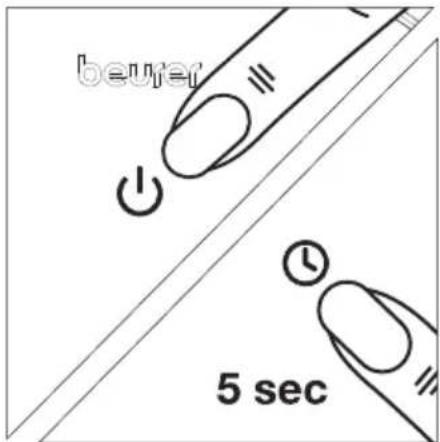
To activate the filter drying function, press and hold the fan speed button 15 for 5 seconds. The filter drying indicator 18 will start to light up. The filter drying function now dries the filter 4 at the highest setting for the next 3 hours. To switch off the filter drying function prematurely, press any other button.
-
After the time has elapsed, check that the filter 4 is completely dry. If the filter 4 is not completely dry, activate the filter drying function again.
8.2 Cleaning the filter
WARNING
Before cleaning, always ensure that the mains plug of the air humidifier has been properly disconnected. Only clean the filter 4 according to the method described in these instructions for use. Never clean the filter 4 in a washing machine or dishwasher.
Regular cleaning of the filter 4 is required to ensure hygienic and fault-free operation. Rinse the filter 4 weekly under running water to remove dust, dirt and hair.
NOTICE
Replace the filter 4 after 6 months at the latest (see section "8.3 Changing the filter"). If the filter 4 is calcified, descale it as described in section "8.6 Descaling".
8.3 Changing the filter
NOTICE
When replacing the filter 4, only use original replacement filters from Beurer (see section "9. Accessories and replacement parts").
Change the filter 4 after 6 months at the latest. After 1440 operating hours*, the filter change indicator lights up automatically. If the filter 4 is already heavily soiled, deformed or discoloured before the 1440 operating hours have elapsed, you must replace the filter 4 earlier and then reset the operating hours counter to 0 (see step 6 in this section).
- Disconnect the air humidifier from the socket.
natural_image
Diagram of a mechanical device with an upward arrow indicating motion or force, showing internal components (no text or symbols)- Pull off the motor unit 3 upwards.
flowchart
graph TD
    A["Top cylindrical component"] --> B[" gears with internal structure"]
    B --> C[" final product with internal gear"]
- Remove the old filter 4 and dispose of it properly.
natural_image
Diagram of a circular mechanical or electrical component with concentric rings and a central hub, no text or symbols present.- Place the new filter on the filter holder 7. Make sure that the round hole of the filter holder 7 is on the small projection in the bottom of the water tank.
natural_image
Diagram showing a mechanical component being inserted into a housing, with no visible text or symbols.- Put the motor unit 3 back on the water tank 8. Make sure that there is no gap between them.
text_image
beurer 5 sec- Switch on the air humidifier using the ON/OFF button 10. Press and hold the timer button 14 for 5 seconds until the filter change indicator 19 goes out. Internal operating hours counter is now reset to 0.
* Based on an average of 8 hours of daily use of the air humidifier over 6 months.
8.4 Cleaning the motor unit housing
Clean the housing of the motor unit 3 with a slightly damp cloth (water or a mild cleaning solution). Do not use solvents, other aggressive cleaning/scrubbing agents or alcohol, as these could damage the surface.

WARNING
Never clean the motor unit 3 in the dishwasher. Make sure that no liquid enters the air outlet 2.
8.5 Cleaning the water tank, filter holder and water level sensor
The water tank 8, filter holder 7 and water level sensor 5 can be cleaned in the dishwasher from time to time. The parts should not be exposed to temperatures above 45°C. The water level sensor 5 can be disconnected from the filter holder 7 by simply pulling it. To reassemble, reinsert the water level sensor 5 into the filter holder 7. Alternatively, you can also clean the water tank 8, filter holder 7 and water level sensor 5 manually with a mild cleaning solution.
text_image
Technical diagram showing a mechanical assembly with labeled component MAX and directional arrow8.6 Descaling
We recommend descaling the filter 4 and the water tank 8 weekly.
Use a citric acid solution (6 g pure citric acid powder dissolved per 1 litre of water) as a descaling solution.
Descaling the filter
- Fill a container with descaling solution.
- Place the filter holder 7 including water level sensor 5 and filter 4 in the descaling solution so that all parts are covered.
- Leave for one hour. Then rinse everything thoroughly under running water. Never squeeze out the filter 4 as this may deform it.
- Repeat this procedure if necessary.
Descaling the water tank
- Fill the water tank 8 with descaling solution up to the "Max." marking 6.
- Leave for one hour.
- Rinse out the water tank 8 with running water.
- Repeat this procedure if necessary.
8.7 Storage
When you are not using the device, we recommend that you carry out the following actions:
- Empty any remaining water from the water tank 8.
- Dry the filter 4 using the filter drying function (see section "8.1 Filter drying function") or allow it to air dry.
- Clean the filter 4, water tank 8, filter holder 7 and water level sensor 5.
- Store the air humidifier in its original packaging and in a dry environment.
- Store the humidifier without weighing it down.
9. ACCESSORIES AND REPLACEMENT PARTS
To purchase accessories and replacement parts, please visit www.beurer.com or contact the corresponding service address (according to the service address list) in your country. Accessories and replacement parts are also available from retailers.
| Designation Item number and/or order number | |
| Replacement filter 110.005 |
- WHAT IF THERE ARE PROBLEMS?
| Problem Possible cause Solution | ||
| Air humidifier will not turn on. | Mains plug not plugged in | Insert the mains plug into a suitable socket. |
| Motor unit not seated properly on water tank | Check for correct positioning. There must be no gap between the motor unit and the water tank. | |
| Water tank is empty Fill the water tank | ||
| The air humidifi-er does not start | The desired target humidity has already been reached or exceeded | If you want a higher target humidity level, set this using the target humidity button (see section “7.2 Setting target humidity”). |
| Insufficient air flow | Filter dirty | Clean the filter (see section “8.2 Cleaning the filter”) and/or descale (if necessary replace). |
| Blocked air inlet or outlet Check air inlet/air outlet | ||
| The air humidifi-er is very noisy | Foreign object in air inlet or air outlet | Pull out the mains plug and remove foreign bodies from the air inlet/air outlet. |
| Filter clogged | Clean the filter (see section “8.2 Cleaning the filter”) and/or descale (if necessary replace). | |
| Air humidifier is not standing on a flat and level surface | Place the air humidifier on a level and flat surface. | |
| Control panel not illuminated/no display. | The mains plug is not connected to the socket and/or not switched on | Insert the mains plug into a suitable socket. |
| The device is in NIGHT mode | Use the fan speed button to select another fan speed or mode. | |
| Humidifier starts at the lowest level even though the target humidity is reached. | The device performs a measurement to verify that the target humidity is still achieved. | - |
| The water tank display lights up even though the water tank is full. | Air bubbles may have accumulated at the tip of the water level sensor. | Lift the filter holder incl. filter and water level sensor upwards out of the water and reinsert everything again. |
| No current relative humidity is shown on the display. | Water tank is empty. If the water tank is empty, no humidity values are shown. | Fill the water tank |
11. DISPOSAL
For environmental reasons, do not dispose of the device in household waste at the end of its service life. Dispose of the device at a suitable local collection or recycling point in your country. Observe the local regulations for material disposal. Dispose of the device in accordance with EC Directive Waste Electrical and Electronic Equipment (WEEE). If you have any questions, please contact the local
authorities responsible for waste disposal. You can obtain the location of collection points for old devices, for example, from the local or municipal authorities, local waste disposal companies or your retailer. Also ensure that the filter is disposed of properly.
12. TECHNICAL SPECIFICATIONS
| Product name LB 200 | |
| Mains voltage/power: 220-240 V~, 50-60 Hz, | 17 W |
| Water tank capacity 3 litres | |
| Suitable for room sizes: Up to 30 m2 | |
| Evaporation output Up to 200 ml/h | |
| Measurement range for relatively humidity: 20 % to 95 % | |
| Dimensions: 230 x 230 x 350 mm | |
| Weight: approx. 2865 g incl. filter | |
| Protection class: | Protection class II / [IMAGE] |
Subject to technical changes.
13. WARRANTY
Further information on the warranty and warranty conditions can be found in the warranty leaflet supplied.
FRANÇAIS

natural_image
Abstract circular diagram with concentric rings and central arrow, no text or symbols presentnatural_image
Diagram of a mechanical device with an upward arrow indicating motion or force, showing internal components (no text or symbols)flowchart
graph TD
    A["Container with circular components"] --> B[" gears with internal blades"]
    B --> C["Final assembly with gear-like component"]
natural_image
Circular diagram with concentric rings and a central dot, no text or symbols presentnatural_image
Diagram of a mechanical device with an upward arrow indicating motion or force, showing internal components (no text or symbols)flowchart
graph TD
    A["Top cylindrical component"] --> B[" gears with internal structure"]
    B --> C[" final product with internal gear"]
text_image
Technical diagram showing a mechanical assembly with labeled component XN and directional arrownatural_image
Diagram of a mechanical device with an upward arrow indicating motion or force, showing internal components (no text or symbols)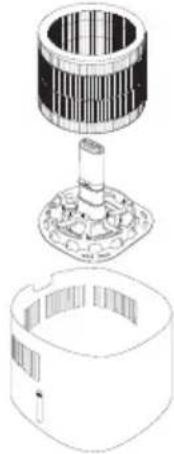
natural_image
Exploded view diagram of a mechanical assembly showing internal components (no text or labels)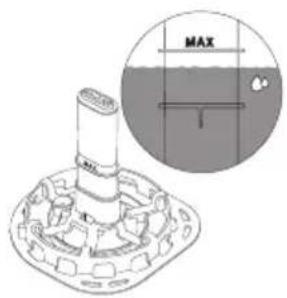
text_image
MAX T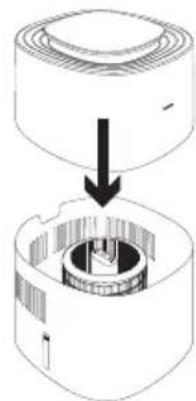
natural_image
Diagram showing a mechanical assembly with a cylindrical component and a cross-section view (no text or symbols)AVVISO
natural_image
Abstract circular diagram with concentric rings and central pattern (no text or symbols)text_image
Technical diagram showing a mechanical assembly with labeled component MAX and directional arrownatural_image
Circular diagram with concentric rings and a central arrow, no text or symbols presentnatural_image
Abstract circular diagram with concentric rings and central dots, no text or symbols presentnatural_image
Technical diagram showing a mechanical assembly with a flanged component and a shaft labeled MAX (no text or symbols beyond the label)8.6 Удаление накипи
natural_image
Abstract circular diagram with concentric rings and central dot pattern (no text or symbols)natural_image
Diagram of a mechanical device with an upward arrow indicating motion or force, showing internal components (no text or symbols)flowchart
graph TD
    A["Container with circular components"] --> B[" gears with internal blades"]
    B --> C[" final assembly with gear-like component"]
natural_image
Diagram of a circular mechanical or electrical component with concentric rings and a central hub, no text or symbols present.
natural_image
Diagram showing a mechanical component being inserted into a housing, with no visible text or symbols.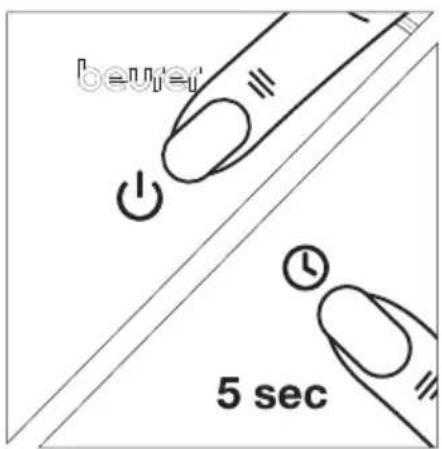
text_image
beaver 5 sectext_image
Technical diagram showing a mechanical component with a labeled arrow pointing to it, indicating assembly or assembly.8.6 Odkamienianie
4. WAARSCHUWINGEN EN VEILIGHEIDSRICHTLIJNEN
WAARSCHUWING
5. BESCHRIJVING VAN HET APPARAAT
natural_image
Circular diagram with concentric rings and a central dot, no text or symbols presentStap 3: filter laten volzuigen
text_image
Technical diagram showing a mechanical assembly with labeled component MAX and directional arrow8.6 Ontkalking
natural_image
Circular diagram with concentric rings and a central arrow, no text or symbols presentnatural_image
Diagram of a mechanical device with an upward arrow indicating motion or force, showing internal components (no text or symbols)flowchart
graph TD
    A["Top cylindrical component"] --> B[" gears with internal stripes"]
    B --> C[" final gear-like structure with base and end"]
- Fjern det gamle filter 4, og bortskaf det på korrekt vis.
natural_image
Abstract circular diagram with concentric rings and a central arrow, no text or symbols present.natural_image
Diagram of a mechanical device with an upward arrow indicating motion or force, showing internal components (no text or symbols)flowchart
graph TD
    A["Top cylindrical component"] --> B["Bottom cylindrical component"]
    B --> C["Bottom cylindrical part with internal structure"]
    C --> D["Bottom cylindrical part with internal structure"]
    D --> E["Bottom cylindrical part with internal structure"]
natural_image
Diagram of a mechanical device with an upward arrow indicating motion or force, showing internal components (no text or symbols)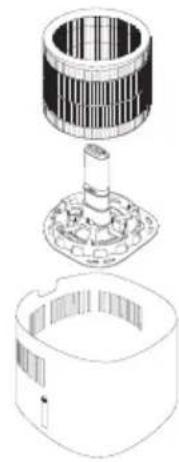
natural_image
Exploded view diagram of a mechanical assembly showing internal components (no text or labels)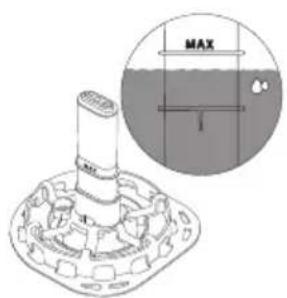
text_image
MAX T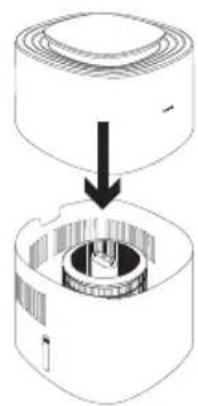
natural_image
Diagram showing a mechanical assembly with a cylindrical component and a cross-sectional view of a housing (no text or symbols)VARSEL
natural_image
Abstract circular diagram with concentric rings and a central arrow, no text or symbols present.Steg 3: La filteret suge seg helt fullt
For å sikre optimal fukteytelse, la filteret 4 suge opp vann i 30 minutter før du slår på luftfukteren (vannivået kan falle under "Max."-merket 6 under denne prosessen).

natural_image
Diagram of a mechanical device with an upward arrow indicating motion or force, showing internal components (no text or symbols)flowchart
graph TD
    A["Top cylindrical component"] --> B[" gears with internal structure"]
    B --> C[" final product with gear-like mechanism"]
natural_image
Abstract circular diagram with concentric rings and central arrow, no text or symbols presentnatural_image
Diagram of a mechanical device with an upward arrow indicating motion or force, showing internal components (no text or symbols)flowchart
graph TD
    A["Top cylindrical component"] --> B[" gears with internal blades"]
    B --> C[" final product with internal shaft"]
text_image
Technical diagram showing a mechanical assembly with a labeled component 'KVM' and directional arrow indicating process flow.8.6 Kalkinpoisto
BEURER UK Ltd., Suite 16, Stonecross Place
Yew Tree Way
WA32SH Golborne
United Kingdom