
Pressione - Sphygmomanometer Neno - Free user manual and instructions
Find the device manual for free Pressione Neno in PDF.

| Product type | Automatic arm blood pressure monitor |
| Brand | Neno |
| Model | Pressione |
| Measurement method | Oscillometric |
| Pressure measurement range | 0-295 mmHg (0-39.3 kPa) |
| Pulse measurement range | 40-199 beats/min |
| Pressure accuracy | ±3 mmHg (±0.4 kPa) |
| Pulse accuracy | ±5% of the measured value |
| Compatible arm circumference | 22-42 cm |
| Display | LED, dimensions 9.8 x 8.3 cm |
| Memory | 99 measurements per user, 2 users |
| Power supply | 4 AA batteries (DC 6 V) or USB-C (DC 5 V) |
| Monitor dimensions | 14.1 x 12 x 5.4 cm |
| Monitor weight | 304 g |
| Main functions | Systolic/diastolic blood pressure measurement, pulse, arrhythmia detection, voice guidance, movement indicator, unit change (mmHg/kPa), average memory of last 3 measurements |
| Care and cleaning | Soft dry or slightly damp cloth; disinfection with 70% isopropyl alcohol or 75% medical alcohol |
| Safety | Not suitable for newborns and young children; use under medical supervision during pregnancy; do not use on a wound |
| Spare parts and repairability | Cuff 22-42 cm; do not disassemble, contact Neno service |
| General information | 24-month warranty, CE compliant (Directive 93/42/EEC), operating conditions: 5°C-40°C, humidity 15%-85% |
Frequently Asked Questions - Pressione Neno
User questions about Pressione Neno
0 question about this device. Answer the ones you know or ask your own.
Ask a new question about this device
Download the instructions for your Sphygmomanometer in PDF format for free! Find your manual Pressione - Neno and take your electronic device back in hand. On this page are published all the documents necessary for the use of your device. Pressione by Neno.
USER MANUAL Pressione Neno
natural_image
Line drawing of a hand holding a cylindrical object with a rod, showing a curved arrow indicating direction (no text or symbols)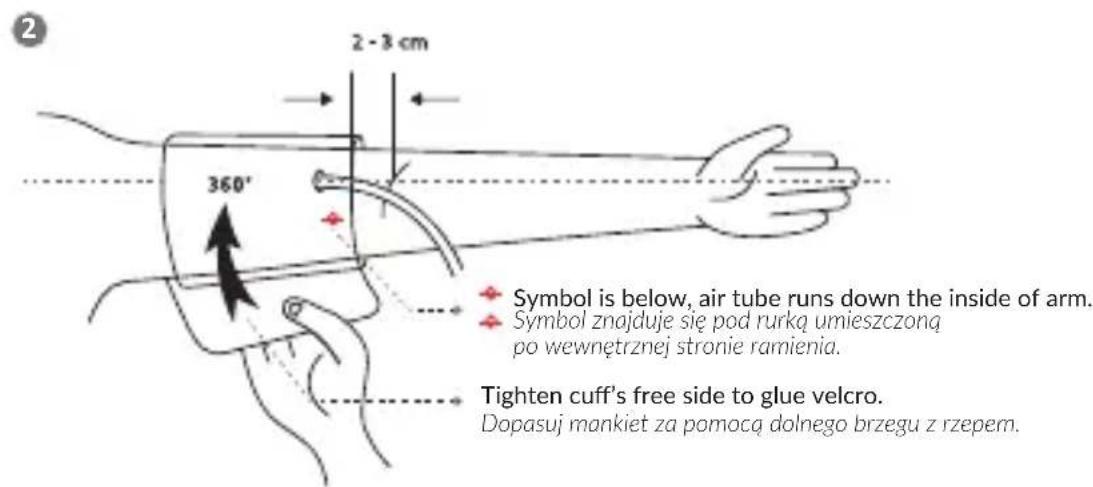
Thank you for choosing the Neno Pressione. The device you have purchased is an automatic upper arm blood pressure monitor, for measuring the diastolic pressure, systolic pressure and pulse rate of adults using the oscillometric method for diagnostic purposes. Please read the user manual below before use.
01. PRECAUTIONS AND CONTRAINDICATIONS FOR USE
- Keep the device out of the reach of children under 12 years of age and people with limited physical, mental and sensory abilities. When children between the ages of 12 and 18 use the device, they should be accompanied by an adult. Persons with limited physical, mental and sensory capabilities may use the device under adult supervision. Pregnant women should use the device under medical supervision.
- Do not wrap the cuff over the wound as this may aggravate the injury.
- This model of electronic blood pressure monitor is suitable for an arm circumference in the range 22-42cm. If your arm circumference is outside this range, you may get incorrect blood pressure measurement values.
- This model of automatic blood pressure monitor is not suitable for newborns and young children.
- Blood pressure is constantly changing. Blood pressure status should not be assessed on the basis of just one measurement. Repeated measurements over a longer period of time are more reliable.
- Do not make your own diagnosis based on the measurement results. A specialist doctor should be consulted. Treatment based on self-analysis of measurement results is very dangerous.
- Do not repair, disassemble or modify the blood pressure monitor on your own. In case of problems with the product, contact an authorised Neno service centre.
- Do not bump or drop the blood pressure monitor base.
- Room temperature, environment, noise, the position of the user's body, speech or exercise can affect blood pressure measurements.
- Body movement, magnetic fields and improper placement of the cuff and sensor also affect the measurement.
02. EXPLANATION OF SYMBOLS
SEE FIG. A
The warnings and illustrations shown in the user manual enable the product to be used safely and correctly to prevent injury to the user and others.
- Device with BF type parts
- Do not dispose of the product in the container for mixed municipal waste. Dispose of the product in accordance with the guidelines for the disposal of electronic devices of this type
- Follow the user manual for use
- CE mark: The product complies with Directive 93/42/EEC
- Degree of protection against water ingress
- Manufacturer
- Date of production
- Authorised representative in the European Union
03. QUICK START GUIDE
Avoid smoking, eating, drinking caffeinated beverages or exercising 30 minutes before taking the measurement.
- Sit upright in a chair with both feet on the floor.
- Remove tight-fitting clothing from the upper arm along with any thick clothing.
- Place the arm in the mock-up and pull the end of the cuff until it wraps around the arm. Place the arm on the table so that the cuff is at the same level as the heart.
- The cuff will automatically inflate and the measurement will start, once the power button is pressed.
- Once the measurement is complete, the cuff will automatically deflate and the display will show the systolic and diastolic blood pressure and heart rate values.
04. PRODUCT DESCRIPTION
SEE FIG. B
- Air line inlet
- Button for changing the user
- Power button
- Memory button
- USB-C socket for power supply
- Button to activate/deactivate voice commands
05. DISPLAY
SEE FIG. C
- Users
- Symbol indicating movement during measurement
- Self-monitoring cuff symbol
- Sound
- Battery level indicator
- Blood pressure indicator
- Systolic blood pressure
- Diastolic blood pressure
- Heartbeat symbol
- Pulse
- Memory with measurement number
- Arrhythmia index
06. CONTENTS OF THE KIT
• Blood pressure monitor
- Cuff 22-42 cm
Case
- User manual
07. PREPARATION
1. Battery installation:
Open the battery cover by pushing the battery cover in the direction of the arrow on the cover.
Insert 4 AA batteries, paying attention to the battery poles and then close the battery cover.
2. Battery level indicator and battery replacement:
When the product is switched on, if the low battery symbol appears on the screen and no measurement can be taken, it means that the battery needs to be replaced.
Note: Do not use expired batteries. Always insert a set of new batteries.
3. Power supply via USB:
Connect the USB-C cable to power the product without batteries.
4. Cuff:
The included mock-up has the ability to work for an arm circumference of 22-42cm.
Connection: Insert the air hose plug of the cuff into the air socket of the blood pressure monitor. SEE FIG. D
08. DESCRIPTION OF THE FUNCTION
1. User switching:
To switch between „User 1“ and „User 2“, press the user change button.
Function is possible only if the device is switched off or after the measurement has been completed.
2. Switching voice messages on/off:
To activate the voice prompt function, move the volume button to the left. If you want to turn off the voice prompt function, move the volume button to the right.
3. Unit change:
To change the unit, press and hold the user change button while the unit is switched off until the display shows the currently set unit. To change the unit, press the memory button. The unit will automatically switch over, no need to confirm the selection.
09. USE
CUFF
- Lay the cuff flat with the Velcro side down. Thread the end of the cuff through the metal ring to form a loop. The Velcro of the blood pressure cuff should point outwards. SEE FIG. E. 1.
- Insert your hand into the loop formed and pull so that the cuff ends 2-3 cm above the elbow. Check that the moccasin is placed in the right direction based on the „Φ „ symbol on the cuff. The air tubing runs along the inside of the arm as shown in SEE FIG.E. 2. Put on the cuff as shown in SEE FIG.E.
- , make sure the bottom edge of the cuff is 2\~3cm from the elbow joint, and that there is room for 2 fingers between the cuff and the arm. Velcro the free edge of the cuff.
- Remove tight clothing and thick clothing from the arm before measuring. Lay your forearm flat on a table, leaving the inside of your hand naturally up. Remember to sit upright and make sure the cuff and heart are at the same level. Note that the air tube must not be compressed or bent. SEE FIG. E. 3.
Note: If you cannot measure on the left arm, use the right arm to measure. Only compare results taken on the same arm.
MEASUREMENTS
- Press the power button and the device will automatically display 0, after which the air pump will start inflating the cuff and the screen will show the change in cuff pressure.
- Once a stable pressure has been reached after inflation, the pump will stop running and the cuff pressure will gradually decrease, as can be seen on the screen. If the inflated pressure is insufficient, the device will automatically re-inflate the cuff to achieve a higher pressure.
-
When a pulse is detected, the 'heart' symbol appears on the screen and starts flashing.
-
Once the measurement is complete, the measured values for systolic pressure, diastolic pressure and pulse will be displayed on the screen.
- The screen will continue to display the measurement results for 30 seconds. If you wish to switch off the device immediately hold down the power button for approximately 3 seconds.
Note: When the symbol appears, this indicates body movement during measurement, which may result in an incorrect measurement result.
MEMORY FUNCTION
-
This blood pressure monitor has the ability to store measurements for 2 users, with 99 measurements per user. When you have taken more than 3 measurements, press the memory button to get the average values of the last 3 measurements, stored with the number as „0”. Check the memory data by pressing the memory button. The last measurement taken is stored as „1”. Each time you press the memory button, the pressure gauge will display the previous measurement i.e. „2”, „3” etc.
-
Deleting stored measurement data You can delete all measurement data for two users by pressing the memory button for 3 seconds. It is not possible to delete the memory for one user.
10. PROBLEM-SOLVING
If you have problems using your device, check the following information:
- The blood pressure monitor does not display when the power button is pressed.
Possible cause: Low battery
Solution: Replace new batteries or use the USB-C port for power.
Possible cause: Batteries were installed the wrong way round.
Solution: Insert batteries by checking battery polarity.
- No cuff pressure
Possible cause: The air tube connector is too loosely fitted.
Solution: Make sure the air tube is well inserted into the pressure gauge.
Possible cause: The air duct is damaged or leaking.
Solution: Contact the Neno brand service.
- „Err 1“
Possible cause: The sensor is not working.
Solution: Contact the Neno brand service.
- „Err 2“
Possible cause: Pulse not detected
Solution: Check that the cuff is correctly fitted and follow the user manual on how to use the cuff.
- „Err 3”
Possible cause: The blood pressure result is incorrect.
Solution: Please measure again in the correct way.
- „Err 4“
Possible cause: The cuff is too loose.
Solution: Check that the cuff is correctly fitted and follow the user manual on how to use the cuff.
Possible cause: The air cushion of the cuff is ruptured.
Solution: Contact the Neno brand service.
- „Err 5“
Possible cause: The air duct has detected an obstruction in the early stages of pressurisation.
Solution: Check if the air duct is clogged or kinked before measuring. Please take the measurement again.
- „Err 6”
Possible cause: Signal interference.
Solution: Remove sources of interference, e.g. mobile phones, magnets.
- „Err 7“
Possible cause: Pressure value exceeds limit.
Solution: Do not touch the cuff during measurement. Do not bend the air hose during measurement.
Note: If your problem is not solved using the above advice, please contact Neno brand service. Do not disassemble the device yourself.
11. STORAGE AND CONSERVATION
-
Keep the device out of direct sunlight, extremes of temperature and humidity, and away from water.
-
Use a dry, soft cloth to clean the unit or, if necessary, use a cloth slightly dampened with water.
-
Do not use caustic cleaners, benzene, solvent or other volatile liquids to clean the unit.
-
Do not wash with water or expose the arm cuff to liquid.
-
Remove the batteries from the device if it will not be used for more than 3 months.
-
Disinfection: Recommended disinfectant: 70% isopropanol solution or 75% (±5%) medical alcohol
12. SPECIFICATION
Display: LED with dimensions of 9.8 x 8.3 cm
Measurement method: oscillometric
Measurement range:
• for pressure: 0-295 mmHg (0-39.3 kPa)
• for pulse: 40-199 beats per minute
Measurement accuracy:
• for pressure: ±3 mmHg (±0.4kP)
• for pulse: ± 5% of the measured result
Units of measurement: millimetres of mercury (mmHg) or kilopascals (kPa)
Switching off: Automatic or manual
Power supply: battery (4x AA DC 6V battery) or mains (USB-C DC5V socket)
Memory: 99 measurements each for 2 users
Cuff: shoulder 22-42 cm
Operating conditions: temperature: 5°C - 40°C; humidity: 15%-85%; atmospheric pressure: 70kPa-106kPa
Storage and transport conditions: -20°C - 55°C; humidity: 10% - 93%; atmospheric pressure: 70kPa- 106kPa
Pressure gauge dimensions: 14.1x12x5.4 cm
Pressure gauge weight: 304g
13. WARRANTY CARD
If you have any problems operating the unit under normal conditions, contact an authorised Neno service centre or distributor. Keep the warranty card in case of repair.
The product comes with a 24-month guarantee. Warranty conditions can be found at: https://neno.pl/gwarancja
Details, contact and service address can be found at: https://neno.pl/kontakt Specifications and contents are subject to change without notice. We apologise for any inconvenience.
KGK Trade declares that the Neno Pressione complies with the essential requirements of Directive 2014/53/EU. The full declaration can be found at the following
02. SYMBOLIEN SELITYS
KATSO KUVA A
06. INNHOLDET I SETTET
Løsning: Kontakt Neno brand service.
- „Err 1”
Løsning: Kontakt Neno brand service.
- „Err 2“
Løsning: Kontakt Neno brand service.
- „Err 5“
04. PRODUCTOMSCHRIJVING
ZIE FIG. B
KGK TREND Sp. z o.o. (formerly KGK Trade Sp. z o.o. Sp. K.) st. Ujastek 5b, 31-752 Cracow, Poland. Made in PRC
Producent/ Manufacturer:
Shenzhen Jumper Medical Equipment Co., Ltd. Address: D Building, No. 71, Xintian Road, Fuyong Street, Baoan, Shenzhen, Guangdong, China
Authorised representative in the EU:
MedPath GmbH Mies-van-der-Rohe-Strasse 8, 80807 Munich, Germany
CE 0482

- PRECAUTIONS AND CONTRAINDICATIONS FOR USE
- EXPLANATION OF SYMBOLS
- SEE FIG. A
- QUICK START GUIDE
- PRODUCT DESCRIPTION
- SEE FIG. B
- DISPLAY
- CONTENTS OF THE KIT
- PREPARATION
- Battery installation:
- Battery level indicator and battery replacement:
- Power supply via USB:
- Cuff:
- DESCRIPTION OF THE FUNCTION
- User switching:
- Switching voice messages on/off:
- Unit change:
- USE
- CUFF
- MEASUREMENTS
- MEMORY FUNCTION
- PROBLEM-SOLVING
- STORAGE AND CONSERVATION
- SPECIFICATION
- Measurement range:
- Measurement accuracy:
- WARRANTY CARD
- SYMBOLIEN SELITYS
- KATSO KUVA A
- INNHOLDET I SETTET
- PRODUCTOMSCHRIJVING
- ZIE FIG. B
- Producent/ Manufacturer:
- Authorised representative in the EU:
Brand : Neno
Model : Pressione
Category : Sphygmomanometer