AX3100G - Soundbar HISENSE - Free user manual and instructions
Find the device manual for free AX3100G HISENSE in PDF.
User questions about AX3100G HISENSE
0 question about this device. Answer the ones you know or ask your own.
Ask a new question about this device
Download the instructions for your Soundbar in PDF format for free! Find your manual AX3100G - HISENSE and take your electronic device back in hand. On this page are published all the documents necessary for the use of your device. AX3100G by HISENSE.
USER MANUAL AX3100G HISENSE
natural_image
Black audio streaming device with a speaker block and a long rectangular screen (no visible text or symbols)
√ Simple setup √ One remote √ Quick settings
280W
Max Audio Power
Dolby Atmos

HDMI™
HIGH-DEFINITION MULTIMEDIA INTERFACE
Bluetooth®
USER MANUAL

Before using the soundbar, please read this manual thoroughly and retain it for future reference.
Contents
1. Important Safety Instructions.... 3
1.1 Safety....3
1.2 Warning....4
1.3 Supported Input Audio Formats 6
2. What's in the Box 7
3. Identifying the Parts 8
3.1 Main Unit 8
3.2 Wireless Subwoofer 8
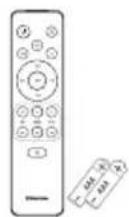
3.3 Remote Control 9
4. Preparations 10
4.1 Prepare the Remote Control....10
4.2 Replace the Remote Control Battery 10
4.3 Placement and Mounting....10
4.4 Mounting the Soundbar on the Wall....11
5. Connections.... 12
5.1 Dolby Atmos ^® 12
5.2 DTS: X 12
5.3 Use the HDMI eARC Socket 12
5.4 Use the OPTICAL Socket 12
5.5 Connect to AUX Socket 13
5.6 Use the COAXIAL Socket 13
5.7 Connect Power 13
5.8 Pair up with the Subwoofer 14
6. Basic Operation 14
6.1 Standby/On 14
6.2 Auto-Standby / Auto-Wake Feature 14
6.3 Select Modes 15
6.4 Adjust the Bass/Treble Level 15
6.5 Switch the Surround Sound ON/OFF 15
6.6 Adjust the Soundbar's Volume 15
6.7 Adjust the Brightness 15
6.8 Select Equalizer (EQ) Effect 15
6.9 Set the Audio Delay (AV SYNC)....15
7. DTS: X Operation 16
7.1 DRC / Dialog Control / Neural:X / Virtual:X Features.... 16
8. OPTICAL / COAXIAL / HDMI eARC / AUX Operation 16
9. Bluetooth Operation.... 17
9.1 Pair Bluetooth-enabled Devices....17
9.2 Listen to Music from Bluetooth Device....17
10. USB Operation.... 18
11. Setup Menu.... 19
12. Troubleshooting 19
13. Specifications 21
1. Important Safety Instructions
| CAUTION | |
| RISK OF ELECTRIC SHOCKDO NOT OPEN | |
| AVIS | |
| RISQUE DE CHOCÉLECTRIQUE NE PAS OUVRIR |
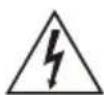
The lightning flash with arrowhead symbol, within an equilateral triangle, is intended to alert the user to the presence of uninsulated "dangerous voltage" within the product's enclosure that may be of sufficient magnitude as to constitute a risk of electric shock to persons.

The exclamation point within an equilateral triangle is intended to alert the user to the presence of important operating and maintenance (servicing) instructions in the literature accompanying the appliance.
1.1 Safety
1 Read these instructions – All the safety and operating instructions should be read before this unit is operated.
2 Keep these instructions – The safety and operating instructions should be retained for future reference.
3 Heed all warnings – All warnings on the appliance and in the operating instructions should be adhered to.
4 Follow all instructions – All operating and usage instructions should be followed.
5 Do not use this unit near water – The appliance should not be used near water or moisture – for example, in a wet basement or near a swimming pool or similar location.
6 Clean only with a dry cloth.
7 Do not block any ventilation openings. Install in accordance with the manufacturer's instructions.
8 Do not install near any heat sources such as radiators, heaters, stoves, or other apparatus (including amplifiers) that produce heat.
9 The unit is supplied with a standard mains lead and moulded plug which for safety reason must not be modified. If the provided plug does not fit into your wall socket, consult an electrician for replacement of the obsolete mains socket.
10 Protect the power cord from being walked on or pinched particularly at plugs, convenience receptacles, and the point where they exit from the apparatus.
11 Only use attachments/accessories specified by the manufacturer.
12 Use only with the cart, stand, tripod, bracket or table speci ed by the manufacturer, or sold with the unit. When a cart or rack is used, use caution when moving the cart/ unit combination to avoid injury from tip-over.
13 Unplug the unit during lightning storms or when unused for long periods of time.
14 Refer all servicing to qualified personnel. Servicing is required when the unit has been damaged in any way, such as power supply cord or plug is damaged, liquid has been spilled or objects have fallen into the unit, the unit has been exposed to rain or moisture, does not operate normally, or has been dropped.
15 ☐ This equipment is a Class II or double insulated electrical appliance. It has been designed in such a way that it does not require a safety connection to electrical earth.
16 Do not place liquid filled objects such as vases on the unit.
17 Minimum distance around the unit for sufficient ventilation is 5cm.
18 The ventilation should not be impeded by covering the ventilation openings with items, such as newspapers, table-cloths, curtains, etc.
19 No naked flame sources, such as lighted candles, should be placed on the unit.
20 Batteries should be recycled or disposed of as per state and local guidelines.
21 The unit can be used in moderate or tropical climates.
Caution:
- Use of controls or adjustments or performance of procedures other than those described herein, may result in hazardous radiation exposure or other unsafe operation.
- To reduce the risk of fire or electric shock, do not expose this unit to rain or moisture. The unit must not be exposed to dripping or splashing and objects filled with liquids, such as vases, must not be placed on unit.
- The mains plug/appliance coupler is used as the disconnect device, the disconnect device must remain readily operable.
- Danger of explosion if battery is incorrectly replaced. Replace only with the same or equivalent type.
1.2 Warning
- The battery (batteries or battery pack) shall not be exposed to excessive heat such fires, or other direct heat sources.
- Before operating this unit, check the voltage of this unit to see if it is identical to the voltage of your local power supply.
- Do not place this unit close to strong magnetic fields.
- Do not place this unit on the or amplifier receiver.
- If any solid object or liquid falls into the system, unplug the system and have it checked by qualified personnel before operating it any further.
- Do not attempt to clean the unit with chemical solvents as this may damage the finish. Use a clean, dry or slightly damp cloth.
- When removing the power plug from the wall outlet, always pull directly on the plug, never yank on the cord.
- Changes or modifications to this unit not expressly approved by the party responsible for compliance will void the user's authority to operate the equipment.
- The rating label is pasted on the bottom or back of the equipment.
- This equipment should be installed and operated with minimum distance 20cm between the radiator&your body.

Battery usage CAUTION
To prevent battery leakage which may result in bodily injury, property damage, or damage to the apparatus:
- Install all batteries correctly, + and - as marked on the apparatus.
- Do not mix old and new batteries.
- Do not mix alkaline, standard (Carbon-Zinc) or rechargeable (Ni-Cd, Ni-MH, etc.) batteries.
- Remove batteries when the unit is not used for a long time.
Correct Disposal of this product. This marking indicates that this product should not be disposed with other household wastes throughout the EU.
To prevent possible harm to the environment or human health from uncontrolled waste disposal, recycle it responsibly to promote the sustainable reuse of material resources. To return your used device, please use the return and collection systems or contact the retailer where the product was purchased. They can take this product for environmental safe recycling.
CE
We hereby declares that this product is in compliance with the essential requirements and other relevant provisions of Directive 2014/53/EU.

Bluetooth®
The Bluetooth® word mark and logos are registered trademarks owned by Bluetooth SIG, Inc. and any use of such marks by Hisense is under license. Other trademarks and trade names are those of their respective owners.
HDMI™ HIGH-DEFINITION MULTIMEDIA INTERFACE
The terms HDMI and HDMI High-Definition Multimedia Interface, and the HDMI Logo are trademarks or registered trademarks of HDMI Licensing Administrator, Inc.
Dolby Atmos
Dolby, Dolby Atmos, and the double-D symbol are registered trademarks of Dolby Laboratories Licensing Corporation. Manufactured under license from Dolby Laboratories. Confidential unpublished works. Copyright © 2012-2021 Dolby Laboratories. All rights reserved.
Roku, the Roku logo, Roku TV, Roku TV Ready, and the Roku TV Ready logo are trademarks and/or registered trademarks of Roku, Inc. Roku TV Ready is only authorized by Roku for agreed-upon countries. This product is Roku TV Ready-supported in the United States, United Kingdom, Mexico and Canada. Countries are subject to change. For the most current list of countries in which this product is Roku TV Ready-supported, please email rokutvready@roku.com.
dtsx
For DTS patents, see http://patents.dts.com. Manufactured under license from DTS, Inc. (for companies headquartered in the U.S./Japan/Taiwan) or under license from DTS Licensing Limited (for all other companies). DTS, DTS:X, Virtual:X, and the DTS:X logo are registered trademarks or trademarks of DTS, Inc. in the United States and other countries. © 2021 DTS, Inc. ALL RIGHTS RESERVED.
1.3 Supported Input Audio Formats
| Format | Function | |||
| OPTICAL COAXIAL | HDMI ARC | HDMI eARC | ||
| LPCM 2ch | ||||
| LPCM 5.1ch | ||||
| LPCM 7.1ch | ||||
| Dolby Atmos - Dolby TrueHD | ||||
| Dolby Atmos - Dolby Digital Plus | ||||
| Dolby TrueHD | ||||
| Dolby Digital Plus | ||||
| Dolby Digital | ||||
| DTS | ||||
| DTS-ES Discrete 6.1 | ||||
| DTS-ES Matrix 6.1 | ||||
| DTS 96/24 | ||||
| DTS-HD High Resolution Audio | ||||
| DTS-HD Master Audio | ||||
| DTS-HD LBR | ||||
| DTS:X | ||||
● : Supported format.
-- : Unsupported format.
2. What's in the Box

Main Unit
natural_image
Simple line drawing of a rectangular frame with a small horizontal line at the bottom, no text or symbols present.Wireless Subwoofer

Optical Cable

AC Power Cord x 2
For Main Unit / Wireless Subwoofer

text_image
For UK For AUS For US For EU* Plug type varies by region

natural_image
Line drawing of a coiled electrical cable with connectors and a connector pin (no text or symbols)HDMI Cable

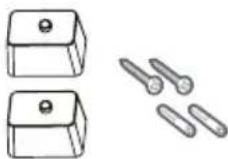
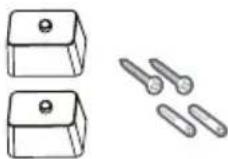
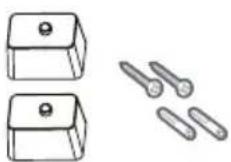
Brackets (x2) /Bracket Screw (x2) / Wall Anchors (x2)

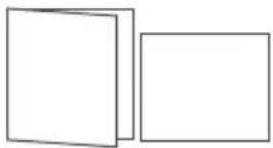
Remote Control / AAA Batteries x 2

natural_image
Two overlapping empty square panels, no text or symbols presentUser Manual / Quick Start Guide
* Power cord quantity and plug type vary by regions.
- Images, illustrations and drawings shown on this User Manual are for reference only. Actual product may vary in appearance.
• Design and specifications are subject to change without notice.
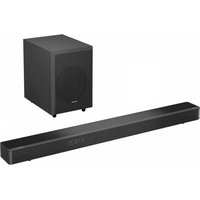
3. Identifying the Parts
3.1 Main Unit
text_image
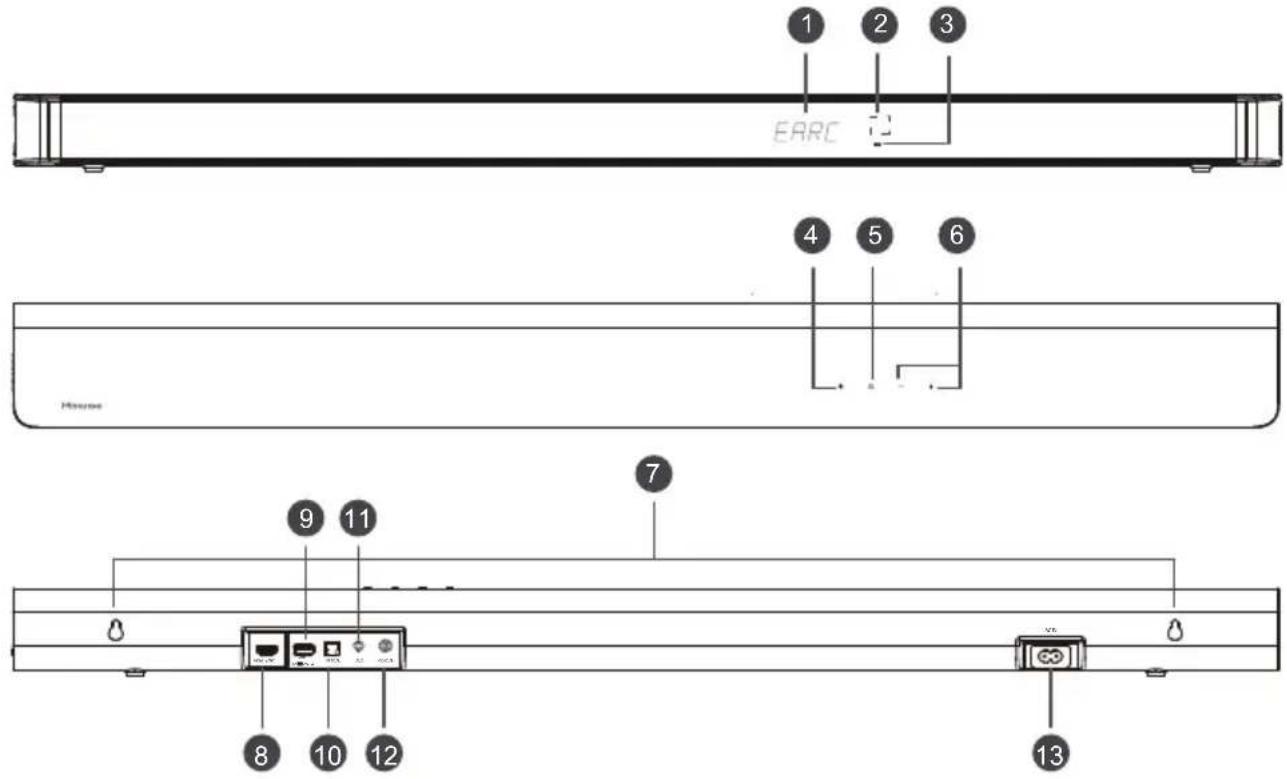
1 2 3 EARC 4 5 6 H2008 9 11 7 8 10 12 13① Display Window
Show the current status.
② Remote Control Sensor
Receive signal from the remote control.
③ Red Standby Indicator
| • Constant on | In Standby mode |
| • Slow blink | In Auto-Wake On mode |
④ ⏻ (ON/OFF) Button
Switch the unit between ON and STANDBY mode.
⑤ (SOURCE) Button
Select the play mode.
⑥ +/- (VOL+/VOL-) Button
Increase/decrease the volume level.
⑦ Wall Mount
Install the wall mounting screws into the wall mount of the unit.
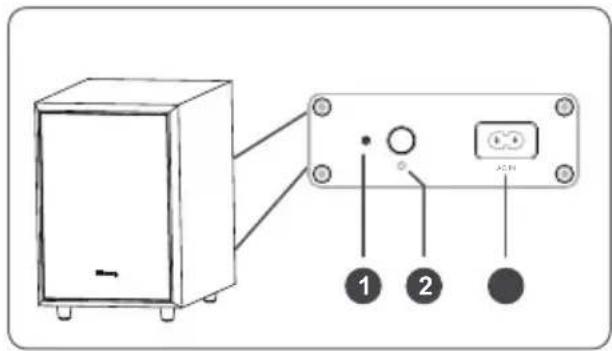
3.2 Wireless Subwoofer
① Indicator
| • Fast blink | The subwoofer in pairing mode |
| • Constant on | Connected / Paired successfully |
| • Slow blink | Connection / Pairing failed |
⑧ HDMI eARC Socket
The port for connecting a TV. The port supports the eARC/ARC HDMI feature, which allows the soundbar to play audio that originates on the connected TV.
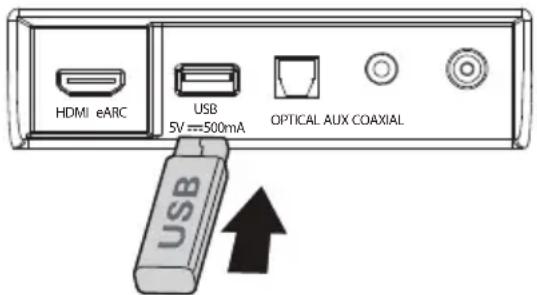
⑨ USB Socket
Insert the USB device to play music.
10 OPTICAL Socket
Connect to the OPTICAL OUT socket on an external device.
⑪ AUX Socket
Connect to an external audio device.
⑫ COAXIAL Socket
Connect to the COAXIAL OUT socket on an external device.
13 AC IN Socket
Connect to the power supply.
text_image
Diagram showing connection between a device box and an electronic control panel with labeled pins 1, 2, and a black dot.② PAIR Button
| 2 seconds | Pairing mode |
| 5 seconds | Clear the pairing record |
③ AC IN Socket
Connect to power supply.
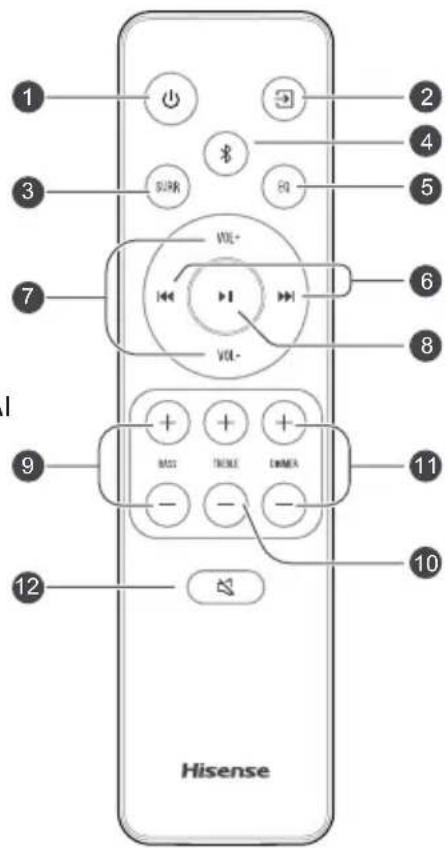
3.3 Remote Control
① ⏻ Switch the unit between ON and STANDBY mode.
② → (SOURCE) Select the play mode.
③ SURR Adjust the surround ON/OFF.
④ ⚙ (BT) Select the Bluetooth mode. Press and hold the ⚙ (BT) button to activate the pairing function in Bluetooth mode or disconnect the existing paired Bluetooth device.
⑤ EQ Select MUSIC/MOVIE/NEWS/SPORT/NIGHT/GAME/AI
⑥ ◀◀/▶◀ Skip to previous/next track in BT / USB mode.
⑦ VOL+/VOL- Increase/decrease the volume level.
⑧ ▶Ⅱ Play/pause/resume playback in BT / USB mode. Press and hold the ▶Ⅱ button for 3s to enter setup menu. Confirm a selection.
⑨ BASS+/- Adjust bass level.
⑩ TREBLE+/- Adjust treble level.
⑪ DIMMER+/- Adjust display brightness.
12 (MUTE) Mute or resume the sound.
text_image
1 2 3 4 5 6 7 8 9 10 11 12 MSS TICKLE COMEX Hisense4. Preparations
4.1 Prepare the Remote Control
The provided Remote Control allows the unit to be operated from a distance.
• Even if the Remote Control is operated within the effective range 19.7 feet (6m), remote control operation may be disrupted if there are any obstacles between the unit and the remote control.
• If the Remote Control is operated near other products which generate infrared rays, or if other remote control devices using infrared rays are used near the unit, it may operate incorrectly. Conversely, the other products may operate incorrectly.
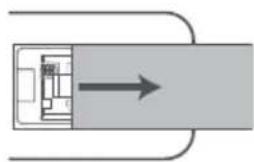
4.2 Replace the Remote Control Battery
1 Press and slide the back cover to open the battery compartment of the remote control.
2 Insert two AAA size batteries. Make sure the (+) and (-) ends of the batteries match the (+) and (-) ends indicated in the battery compartment.
3 Close the battery compartment cover.
natural_image
Simple diagram of a rectangular object with an arrow pointing right, no text or symbols present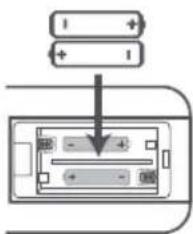
text_image
Diagram showing battery connection with labeled components and a downward arrow indicating a process or operation.• Do not use any batteries other than those specified.
- Do not mix new batteries with old ones.
- Never recharge a battery unless it is confirmed to be a rechargeable type.
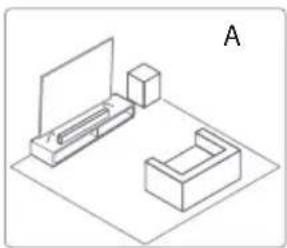
4.3 Placement and Mounting
Placement
A If your TV is placed on a table, you can place the unit on the table directly in front of the TV stand, centered with the TV screen.
B If your TV is attached to a wall, you can mount the unit on the wall directly below the TV screen.
Note: The unit should be placed to avoid covering the signal receiver of the TV or the remote of TV can not work.
natural_image
Isometric line drawing of a room layout with monitor, cabinet, and lamp (no text or symbols)
natural_image
Isometric line drawing of a room layout with monitor, cube, and furniture (no text or symbols)Precautions Concerning Batteries
- Be sure to insert the batteries with correct positive “⊕” and negative “⊖” polarities.
• Use batteries of the same type. Never use different types of batteries together.
• Either rechargeable or non-rechargeable batteries can be used. Refer to the precautions on their labels. - Be aware of your fingernails when removing the battery cover and the battery.
- Do not drop the remote control.
- Do not allow anything to impact the remote control.
• Do not spill water or any liquid on the remote control.
• Do not place the remote control on a wet object.
- Do not place the remote control under direct sunlight or near sources of excessive heat.
- Remove the battery from the remote control when not in use for a long period of time, as corrosion or battery leakage may occur and result in physical injury, and/or property damage, and/or fire.
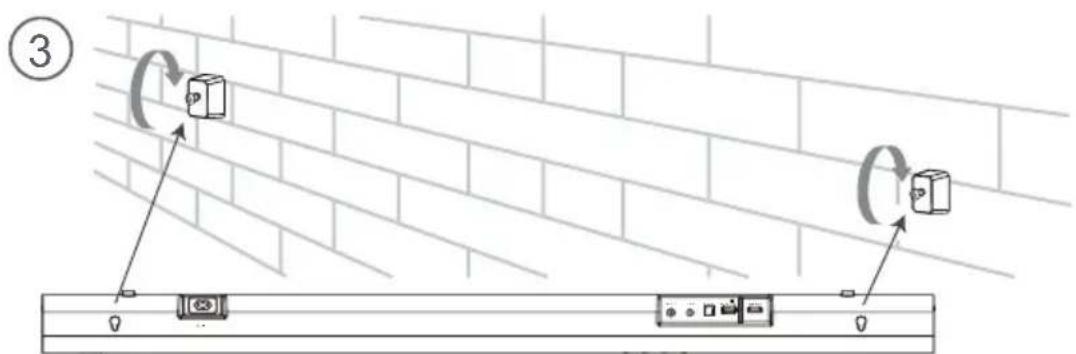
4.4 Mounting the Soundbar on the Wall
Note:
- Installation must be carried out by qualified personnel only. Incorrect assembly can result in severe personal injury and property damage (if you intend to install this product yourself, you must check for installations such as electrical wiring and plumbing that may be buried inside the wall). It is the installer's responsibility to verify that the wall will safely support the total load of the unit and wall brackets.
- Additional tools (not included) are required for the installation.
- Do not overtighten screws.
- Keep this instruction manual for future reference.
- Use an electronic stud finder to check the wall type before drilling and mounting.
WARNING
- To prevent injury, this unit must be securely attached to the floor/wall in accordance with the installation instructions.
• Suggested wall mounting height: ≤ 1.5 meters.

natural_image
Simple line drawing of a U-shaped object with a horizontal line at the bottom (no text or symbols)
text_image
770 mm / 30.3"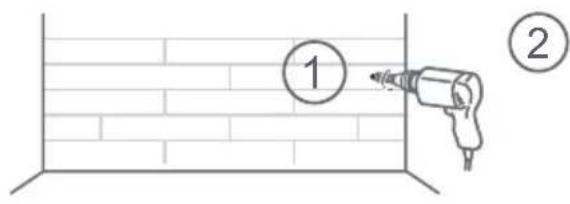
text_image
① ②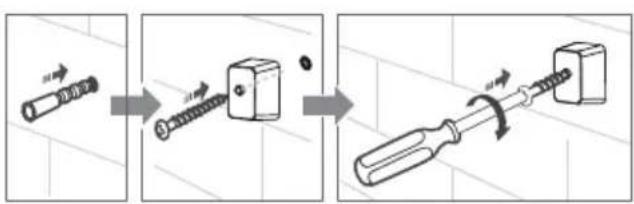
text_image
Diagram illustrating the step-by-step assembly of a screwdriver, showing disassembly and rolling process.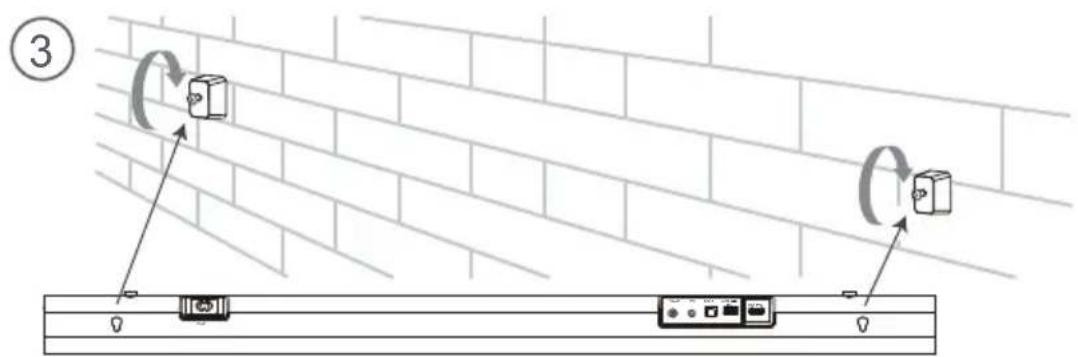
text_image
Diagram showing wall-mounted electrical components with rotating arrows and labeled parts, likely illustrating a circuit or signal processing setup.5. Connections
5.1 Dolby Atmos®
Dolby Atmos® gives you immersive listening experience by delivering sound in three dimensional space, and all the richness, clarity, and power of Dolby sound. For more information, please visit dolby.com/technologies/dolby-atmos
5.2 DTS: X
DTS: X, the border sound is no longer constrained by fixed-position speaker placement or specific channel signals.
For using Dolby Atmos® / DTS: X
Dolby Atmos® / DTS: X is available in HDMI eARC /ARC mode. For the details of the connection, please refer to "HDMI Connection". HDMI eARC /ARC
- To use Dolby Atmos® / DTS: X mode, Your TV has to support Dolby Atmos® / DTS: X or HDMI audio passthrough.
- Make sure that "Bitstream", "RAW" or "No Encoding" is selected for bitstream in the audio output of the connected external device (e.g. Blu-ray DVD player, TV etc.).
- While entering Dolby Atmos / DTS: X / Dolby Digital / PCM format, the soundbar will show DOLBY ATMOS / DTS: X / DOLBY AUDIO / PCM AUDIO.
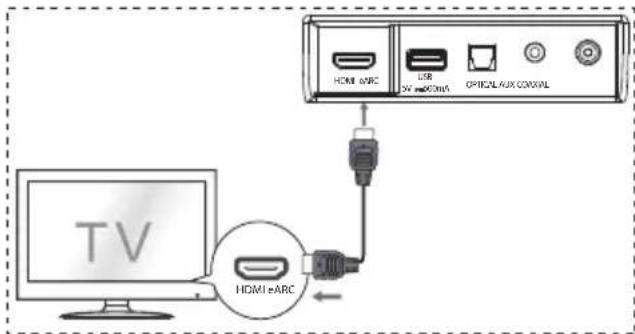
5.3 Use the HDMI eARC Socket
Using HDMI to connect the soundbar, AV equipment and TV:
eARC / ARC (Audio Return Channel)
The eARC / ARC (Audio Return Channel) function allows you to send audio from your ARC-compliant TV to your soundbar through a single HDMI connection. To enjoy the ARC function, please ensure your TV is both HDMI-CEC and ARC compliant and set up accordingly. When correctly set up, you can use your TV remote control to adjust the volume output (VOL +/- and MUTE) of the soundbar.
text_image
HDMI ABC USB TV ABC OPTICAL AUX CONVIAL HDMI ABC- Connect the HDMI cable from unit's HDMI eARC socket to the HDMI socket on your ARC compliant TV. Then press the remote control to select HDMI eARC.
Tips:
- Your TV must support the HDMI-CEC and ARC function. HDMI-CEC and ARC must be set to On.
- The setting method of HDMI-CEC and ARC may differ depending on the TV. For details about ARC function, please refer to the owner's manual.
- ARC only works with devices that are HDMI ARC capable as well as with an HDMI 1.4 cable (and higher).
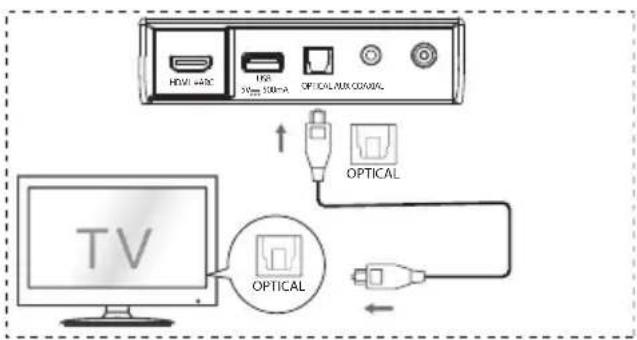
5.4 Use the OPTICAL Socket
- Connect an OPTICAL cable to the TV's OPTICAL OUT socket and the OPTICAL socket on the unit.
flowchart
graph TD
    A["TV"] --> B["USB"]
    B --> C["USB"]
    C --> D["USB"]
    D --> E["Optical"]
    E --> F["Optical"]
    F --> G["Optical"]
    G --> H["Optical"]
    H --> I["Optical"]
    I --> J["Optical"]
    J --> K["Optical"]
    K --> L["Optical"]
    L --> M["Optical"]
    M --> N["Optical"]
    N --> O["Optical"]
    O --> P["Optical"]
    P --> Q["Optical"]
    Q --> R["Optical"]
    R --> S["Optical"]
    S --> T["Optical"]
    T --> U["Optical"]
    U --> V["Optical"]
    V --> W["Optical"]
    W --> X["Optical"]
    X --> Y["Optical"]
5.5 Connect to AUX Socket
A Use a RCA to 3.5mm audio cable to connect the TV's audio output sockets to the AUX socket on the unit.
B Use a 3.5mm to 3.5mm audio cable to connect the TV's or external audio device AUX socket to the AUX socket on the unit.
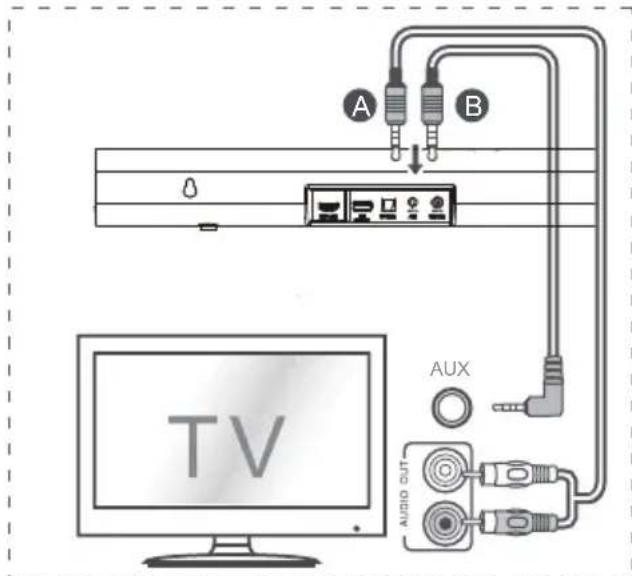
text_image
A B O TV AUX AUDIO OUT5.6 Use the COAXIAL Socket
• You also can use the COAXIAL cable to connect the TV's COAXIAL OUT socket and COAXIAL socket on the unit.
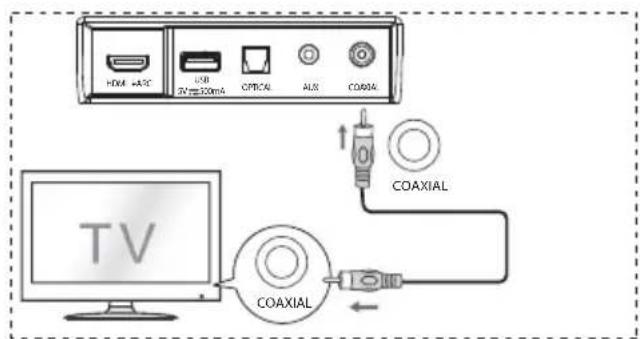
text_image
HDMI +AIC USB TV 120mA OPTICAL ALX COXIAL TV COAXIAL COAXIALTips: The unit may not be able to decode all digital audio formats from the input source. In this case, the unit will mute. This is NOT a defect. Ensure that the audio setting of the input source (e.g. TV, game console, DVD player, etc.) is set to PCM or Dolby Digital (Refer to the user manual of the input source device for its audio setting details) with HDMI / OPTICAL / COAXIAL input.
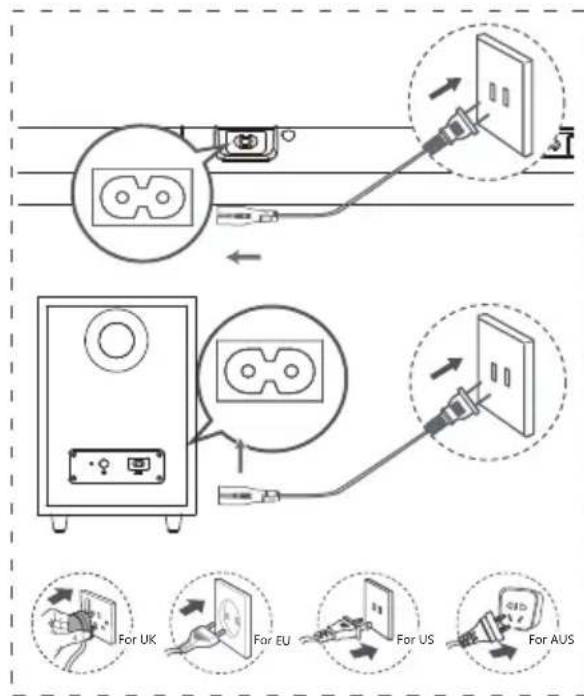
5.7 Connect Power
• Risk of product damage!
• Ensure that the power supply voltage corresponds to the voltage printed on the back or the underside of the unit. • Before connecting the AC power cord, ensure you have completed all other connections.
- Soundbar
Connect the mains cable to the AC IN socket of the main unit and then into a mains socket.
- Subwoofer
Connect the mains cable to the AC IN socket of the subwoofer and then into a mains socket.
flowchart
graph TD
    A["Device"] --> B["Switch"]
    B --> C["Line"]
    C --> D["Switch"]
    D --> E["Line"]
    E --> F["Switch"]
    style A fill:#f9f,stroke:#333
    style B fill:#ccf,stroke:#333
    style C fill:#cfc,stroke:#333
    style D fill:#fcc,stroke:#333
    style E fill:#cff,stroke:#333
    style F fill:#ffc,stroke:#333
* Power cord quantity and plug vary by regions.
5.8 Pair up with the Subwoofer
Automatic pairing
The subwoofer and soundbar will automatically pair when they are plugged into the mains sockets and turned on.
No cable is needed for connecting the two units.
- The status of the indicator on the wireless subwoofer.
LED State Status
| Fast blink | Subwoofer in pairing mode |
| Constant on | Connected / Pairing successfully |
| Slow blink | Connection / Pairing failed |
NOTE:
- Do not press the PAIR button on the rear of the subwoofer, except for manual pairing.
- If the automatic pairing fails, pair the subwoofer with the main unit manually.
Manual pairing
- Ensure that all cables are well connected and the main unit is in Standby mode.
- Press the ⏻ button on the main unit or on the remote control to switch the main unit on.
- Press the ➕ button on the main unit or on the remote control for 3 seconds to enter Pairing mode. The display will scroll "SW Pairing".
- Press and hold the PAIR button on the rear of the subwoofer for 2 seconds. The subwoofer will enter the pairing mode and the indicator on the subwoofer will blink quickly.
- After the wireless connection succeeded, the Pair indicator will light up and the display on main unit will scroll "SW_IN".
- If the Pair indicator blink slowly, the wireless connection has failed. Unplug the cable of the subwoofer and then reconnect the main cables after 3 minutes. Repeat step 1 \~ 4.
NOTE:
- If the wireless connection fails again, check if there is conflict or strong interference (for example, interference from an electronic device) around your location. Remove these conflicts or strong interferences and repeat the above procedures.
- The subwoofer should be within 6m (18 feet) of the soundbar in an open area.
- If the main unit is in On mode, and not connected with the subwoofer, the indicator on the subwoofer will flash slowly. Follow step 1\~4 above to pair the subwoofer to the main unit.
6. Basic Operation
6.1 Standby/On
When you first connect the main unit to the mains socket, the main unit will be in STANDBY mode.
- Press the ⏻ button on the unit or on the remote control to switch the unit ON.
- Press the ⏻ button again to switch the unit back to STANDBY mode.
- Disconnect the mains plug from the mains socket if you want to switch the unit OFF completely.
6.2 Auto-Standby / Auto-Wake Feature
- [Auto-Standby] Your soundbar has been programmed to enter STANDBY mode automatically when no audio is detected for 15 minutes. For example, this would happen when pausing playback, or should the soundbar be left on accidentally.
- [Auto-Wake] If a TV or an external device is connected (HDMI eARC/OPTICAL/COAXIAL mode), the unit will switch on automatically when the TV or the external device is switched on.
To disable this feature, please follow the steps below:
- During ON mode, pointing the remote at the soundbar, press and hold the ▶II button for 3 seconds to open the menu.
-
The unit's display will scroll "MENU".
-
Press the ▶▶1 button 6 times in succession: the display shows: Auto Wake [ON / OFF]. or Press the ▶▶1 button 7 times in succession, the display shows: Auto Standby [ON / OFF].
-
Select the content with VOL +/- button on the remote control, and then press ▶II to confirm your selection and exit the settings.
- Repeating these steps will toggle the feature "ON" and "OFF".
6.3 Select Modes
- Press the → (SOURCE) button repeatedly on the unit or on the remote control to select the OPTICAL, COAXIAL, HDMI eARC, BT(Bluetooth), USB and AUX mode.
- Press the ✕ button on the remote control to select the BT (Bluetooth) mode.
• The selected mode will show on the display.
| Display | Mode |
| EARC | HDMI eARC |
| ARC | HDMI ARC |
| OPT | OPTICAL |
| COAX | COAXIAL |
| BT_INNO BT | BluetoothConnectedNot Connected |
| USBNO USB | USBNo USB connected |
| AUX | AUX |
6.4 Adjust the Bass/Treble Level
- Press the BASS +/- buttons on the remote control to adjust bass level (bass +5 / bass -5).
- Press the TREBLE +/- buttons on the remote control to adjust treble level (treble +5 / treble -5).
6.5 Switch the Surround Sound ON/OFF
- Press the SURR button on the remote control to turn on the surround sound. Press this button again to turn off the surround sound.
6.6 Adjust the Soundbar's Volume
- Press the + / - buttons on the unit or the VOL+ / VOL- buttons on the remote control to adjust the volume.
- If you wish to turn the sound off, press the ⏻ (MUTE) button on the remote control. Press the ⏻ (MUTE) button again or press the VOL+ / VOL- buttons to resume normal listening.
- In BT/USB mode, if the main unit is mute, press ▶ button 2 times can resume normal listening.
6.7 Adjust the Brightness
- Press the DIMMER +/- button on the remote control to select brightness level.
6.8 Select Equalizer (EQ) Effect
• While playing, press the EQ button on the remote control to select desired preset equalizers: MUSIC, MOVIE, NEWS, SPORT, NIGHT, GAME, AI EQ.
6.9 Set the Audio Delay (AV SYNC)
- Video image processing, sometimes longer than the time required to process the audio signal. This is called "delayed." Audio Delay feature is designed to remedy this delay.
- Set the audio delay, provided only for the current playback mode. (As provided in the HDMI ARC audio delay mode, the delay mode is valid only for the HDMI ARC).
-
By default, the audio delay is set to 00.
-
During ON mode, press and hold the ▶|| button for 3 seconds to open the menu, then press the ▶▶I button 9 times in succession. The unit's display will scroll "LT 00".
-
Press the VOL+/- buttons to initiate a 10 ms frequency hopping to adjust the delay time. HR Set 200 ms maximum delay.
- Press the ▶ button or wait 10 seconds to exit. HU
Tips:
• Adjustment range: [00\~200ms]
- The audio delay setting is only valid for digital audio (eg, HDMI eARC, COAXIAL, OPTICAL).
7. DTS: X Operation
7.1 DRC / Dialog Control / Neural:X / Virtual:X Features
DTS:X ^® technologies provide users with virtual multi-channel virtual surround effects, creating an immersive audio volume.
- During ON mode, pointing the remote at the soundbar, press and hold the ▶|| button for 3 seconds to open the menu.
- The unit's display will scroll "MENU".
DRC Level Setting:
- Press the ▶▶I button 10 times in succession, the display shows: DRC 0/1/2
Adjust the Dialog Control Level:
- Press the ▶▶I button 11 times in succession, the display shows: DCL 0/1/2/3/4/5/6
Neural:X Setting:
- Press the ▶▶I button 12 times in succession: the display shows: Neural X ON / OFF.
Virtual:X Setting
- Press the ▶▶I button 13 times in succession, the display shows: VIRTUAL X ON/OFF.
Note:
Above operations are mainly for DTS compliance requirement and only Virtual:X Setting is open for consumer.
8. OPTICAL / COAXIAL / HDMI eARC / AUX Operation
1 Ensure that the unit is connected to the TV or audio device.
2 Press the ➞ button repeatedly on the unit or on the remote control to select the OPTICAL, COAXIAL, HDMI eARC, BT, USB, AUX mode.
3 Operate your audio device directly for playback features.
4 Press the VOL +/- button to adjust the volume to your desired level.
Tips:
- The unit may not be able to decode all digital audio formats from the input source. In this case, the unit will mute. This is NOT a defect. Ensure that the audio setting of the input source (e.g. TV, game console, DVD player, etc.) is set to PCM or Dolby Digital (Refer to the user manual of the input source device for its audio setting details) with HDMI eARC / OPTICAL / COAXIAL input.
- When selecting a different audio format, the unit will display the following as follows:
| Input Format | Surround On/Off | Display |
| Dolby Digital | On | DOLBY SURROUND |
| Dolby Digital | Off | DOLBY AUDIO |
| Dolby Digital Plus - Atmos | - | DOLBY ATMOS |
| Dolby Digital Plus | On | DOLBY SURROUND |
| Dolby Digital Plus | Off | DOLBY AUDIO |
| Dolby TrueHD - Atmos | - | DOLBY ATMOS |
| Dolby TrueHD | On | DOLBY SURROUND |
| Dolby TrueHD | Off | DOLBY AUDIO |
| Dolby MAT - Atmos | - | DOLBY ATMOS |
| Dolby MAT | On | MPCM |
| Dolby MAT | Off | MPCM |
| PCM | On | DOLBY SURROUND |
| DTS DTS | |
| DTS Discrete Surround DTS | |
| DTS-ES 6.1 Matrix DTS | |
| DTS-ES 6.1 Discrete | DTS |
| DTS 96/24 | DTS |
| DTS 96/24 ES Matrix | DTS |
| DTS Express | DTS |
| DTS-ES 8-Channel Discrete | DTS |
| DTS-HD High Resolution | DTS-HD |
| DTS-HD Master Audio | DTS-HD |
| DTS:X | DTS:X |
| DTS:X Master Audio | DTS:X |
9. Bluetooth Operation
9.1 Pair Bluetooth-enabled Devices
The first time you connect your bluetooth device to this unit, you need to pair your device to this unit.
Note:
- The operational range between this unit and a Bluetooth device is approximately 26 feet (8m) (without any object between the Bluetooth device and the unit).
- Before you connect a Bluetooth device to this unit, ensure you know the device's capabilities.
- Compatibility with all Bluetooth devices is not guaranteed.
- Any obstacle between this unit and a Bluetooth device can reduce the operational range.
- If the signal strength is weak, the unit may disconnect, but it will re-enter pairing mode automatically.
1 During ON mode, press the ➕ button repeatedly on the unit or the ✗ button on the remote control to select Bluetooth mode. "NO BT" will show on the display if the unit is not paired to any Bluetooth device.
2 Activate your Bluetooth device and select the search mode. "Hisense AX3100G" will appear on your Bluetooth device list.
- If you cannot find the unit, press and hold the ✝ button in BT mode for 2 seconds make it searchable. The display will show "BT Pairing" and you will hear the prompt sound from the unit.
3 Select "Hisense AX3100G" in the pairing list. After successful pairing, you will hear the prompt sound from the unit, and the display panel shows "BT_IN".
4 Play music from the connected Bluetooth device.
To disconnect the Bluetooth function, you can :
- Switch to another mode on the unit.
- Disable the BT function from your Bluetooth device. The Bluetooth device will be disconnected from the unit after the voice prompt.
- Press and hold the ✕ button 2 seconds.
Tips:
- Enter "0000" for the password if necessary.
• If no other Bluetooth device pairs with this unit within two minutes, the unit will recover its previous connection. - The unit will also be disconnected when your device is moved beyond the operational range.
• If you want to reconnect your device to this unit, place it within the operational range.
• If the device is moved beyond the operational range, when it is brought back, please check if the device is still connected to the unit. - If the connection is lost, follow the instructions above to pair your device to the unit again.
9.2 Listen to Music from Bluetooth Device
- If the connected Bluetooth device supports Advanced Audio Distribution Profile (A2DP), you can listen to the music stored on the device through the unit.
-
If the device also supports Audio Video Remote Control Profile (AVRCP), you can use the unit's remote control to play music stored on the device.
-
Pair your device with the unit.
- Play music via your device (if it supports A2DP).
- Use supplied remote control to control play (if it supports AVRCP).
| ▶|| | Start, pause or resume play. |
| |◀◀/ ▶▶| | Skip to the previous or next track. |
10. USB Operation
1 Insert the USB device.
text_image
HDMI eARC USB 5V =500mA OPTICAL AUX COAXIAL USB2 Press the ➕ button repeatedly on the unit or on the remote control to select USB mode.
3 During playback:
| ▶|| | Start, pause or resume play. |
| |◀◀/ ▶▶| | Skip to the previous or next track. |
Tips:
- The unit can support USB devices with up to 32 GB of memory.
• This product may not be compatible with certain types of USB storage devices.
• If you use a USB extension cable, USB hub, or USB Multifunctional card reader, the USB storage device may not be recognized. - Do not remove the USB storage device while reading files.
- Embedded USB full speed host for USB applications should not exceed 6.5 Mbps.
- For the files in FLAC format, the max blocksize 8107/8109 can support 4608 as the maximum.
Supported USB formats:
| Extension Codec Sampling Rate | Bit Rate | ||
| *.mp3 | MPEG - 1 Layer1/2/3 32kHz~48kHz 32kbps~320kbps | ||
| MPEG - 2 Layer1/2/3 | 16kHz~24kHz | 8kbps~160kbps | |
| MPEG - 2.5 Layer3 | 8kHz~12kHz | ||
| *.wma | WMA7/8/9/STD | 8kHz~48kHz | ≤ 320kbps |
| *.aac | AAC | 8kHz~96kHz | ≤ 1728kbps |
| AAC-LC | |||
| HE-AAC | |||
| *.ogg | Vorbis codec | 8kHz~48kHz | ≤ 500kbps |
| *.flac | - | 8kHz~192kHz | ≤ 9Mbps |
| *.wav | PCM、LPCM、IMA_ADPCM、MPEG、ALAW、MULAW、 | 8kHz~192kHz | ≤ 9Mbps |
| *.AIFF | PCM、ALAW、MULAW | 8kHz~192kHz | ≤ 9Mbps |
| • Only USB Format Type FAT 32 is supported for USB storage device connection.• for *.ogg audio files, below are unsupported formats:1). block size 0 < 64 block size 0 > 2048; 2). block size 1 < 64 , block size 1 > 4096; 3). codebook counter > 64; 4). codebook entry > 640; 5). floor counter > 4; 6). floor type 0; 7). residua counter > 4; 8). dimension != 2; 9). mapping counter > 2; 10). mode couter > 2.• For the file in FLAC format, the max blocksize 8107/8109 can support 4608 as the maximum. | |||
11. Setup Menu
- During ON mode, press and hold the ▶II button for 3 seconds to open the menu.
- Select the content with ◀◀/▶▶buttons.
- Change the initial values for each of the settings with VOL +/- buttons.
- Press the ▶II button to confirm your selection and exit the settings.
- If no button is pressed within 10 seconds, the system will automatically exit the menu.
| Display(press ◀◀◀ /▶▶▶) | Description(press VOL + / - ) |
| 1 MUSIC | Select Equalizer (EQ) Effect.(MUSIC, MOVIE, NEWS, SPORT,NIGHT, GAME, AI EQ) |
| 2 SUR ON | Switch Surround Sound[ON / OFF] |
| 3 BAS O | Adjust the Bass Level |
| 4 TRE O | Adjust the Treble Level |
| 5 DIM H | Adjust the Brightness(Exit menu to take effect) |
| 6 AUTOWAKE OFF | Switch Auto Wake[ON / OFF] |
| 7 AUTOSTANDBY ON | Switch Auto Standby[ON / OFF] |
| 8 DEEP ON | Switch Beep[ON / OFF] |
| 9 LT 00 | Set the Audio Delay(AV SYNC) |
| 10 DRC O | Adjust DTS DRC Level: DRC 0/1/2 |
| 11 DCLO | Adjust DTS Dialog ControlLevel: DCL 0/1/2/3/4/5/6 |
| 12 DTS NEURAL ON | Switch: DTS Neural[ON / OFF] |
| 13 DTS VIRTUALX | Switch: DTS Virtual:X[ON / OFF] |
| 14 BASSBOOST ON | Switch: BassBoost[ON / OFF] |
12. Troubleshooting
To keep the warranty valid, never try to repair the system yourself. If you encounter problems when using this unit, check the following points before requesting service.
No power
- Ensure that the AC cord of the unit is properly connected.
- Ensure that there is power at the AC outlet.
- Press standby button to turn the unit on.
Remote control does not work
• Before you press any playback control button, first select the correct source.
- Reduce the distance between the remote control and the unit.
- Insert the battery with its polarities (+/-) aligned as indicated.
- Replace the battery.
- Aim the remote control directly at the sensor on the front of the unit.
No sound
• Make sure that the unit is not muted. Press or VOL+/- button to resume normal listening.
- Press ⏻ button on the unit or on the remote control to switch the soundbar to standby mode. Then press the ⏻ button again to switch the soundbar on.
- Unplug both the soundbar and the subwoofer from the mains socket, then plug them again. Switch on the soundbar.
- Ensure the audio setting of the input source (e.g. TV, game console, DVD player, etc.) is set to PCM or Dolby Digital mode while using digital (e.g. HDMI, OPTICAL, COAXIAL) connection.
- The subwoofer is out of range, please move the subwoofer closer to the soundbar. Make sure the subwoofer is within 5 m of the soundbar (the closer the better).
- The soundbar may have lost connection with the subwoofer. Re-pair the units by following the steps on the section "Pairing the Wireless Subwoofer with the Soundbar".
- The unit may not be able to decode all digital audio formats from the input source. In this case, the unit will mute. This is NOT a defect. The device is not muted.
I can't find the Bluetooth name of this unit on my Bluetooth device for Bluetooth pairing
- Ensure the Bluetooth function is activated on your Bluetooth device.
- Ensure you have paired the unit with your Bluetooth device.
This is a 15 mins power off function, one of the ERPII standard requirement for saving power
- When the unit's external input signal level is too low, the unit will be turned off automatically in 15 minutes. Please increase the volume level of your external device.
- For more networked equipment information, see https://hisense.fr/cat-produit/barres-de-son/
The subwoofer is idle or the indicator of subwoofer does not light up.
- Please unplug power cord from the mains socket, and plug it in again after 4 minutes to reset the subwoofer.
13. Specifications
| Model Name | AX3100G |
| Soundbar | |
| Power Supply AC 100-240V~50/60Hz | |
| Power Consumption | 20 W |
| Standby Power | < 0.50 W |
| USB port for playbackUSB CompatibilityUSB Playback support / file formats | 5V== 500mAHi-Speed USB (2.0) / FAT32 / FAT1632G (max), WAV/WMA/MP3/FLAC/ALAC |
| Dimension (WxHxD) | 920 x 60 x 90 mm / 36.2" x 2.4" x 3.5" |
| Net weight 2.62 kg | |
| Frequency Response 120Hz~20KHz | |
| Operating Temperature 0°C - 45°C | |
| Wireless Specification | |
| Bluetooth version / profilesBluetooth frequency rangeBluetooth Max. transmitting power (EIRP) | V5.32400 MHz ~ 2483.5 MHz≤10 dBm |
| Modulation Type GFSK, π/4 DQPSK, 8DPSK | |
| Subwoofer | |
| Power Supply AC 100-240V~50/60Hz | |
| Power Consumption 15 W | |
| Standby Power < 0.50 W | |
| Dimension (WxHxD) | 214 x 294 x 304 mm / 8.4" x 11.6" x 12" |
| Net weight 5.24 kg | |
| Frequency Response 40Hz~120Hz | |
| Amplifier (Max Audio Power) | |
| Total 280 W | |
| Main Unit | 160W |
| Subwoofer | 120 W |
| Remote Control | |
| Distance/Angle | 19.7 feet (6m) / 30° |
| Battery type | AAA (1.5V X 2) |
natural_image
Black audio streaming device with a speaker block and a long rectangular sound player (no visible text or symbols)
Configuration facile
√ Une télécommande
Réglages rapides
280W
Max Audio Power
Dolby Atmos
dtsx
HDMI™
HIGH-DEFINITION MULTIMEDIA INTERFACE
Bluetooth®
MANUEL D'UTILISATION

natural_image
Simple line drawing of a rectangular frame with two legs and a central label (no text or symbols on the frame itself)Caisson de basses sans fil

Câble Optique
natural_image
Line drawing of a coiled electrical cable with connectors and a connector pin (no text or symbols)Câble HDMI
Supports (× 2) / Vis de support (× 2) /
Ancrages muraux (× 2)
natural_image
Two empty square panels, one tilted and one upright, with no text or symbols.text_image
Diagram showing connection between a device box and an electronic device with labeled pins 1, 2, and a button.② Bouton PAIR
| 2 secondes Mode d'association |
| 5 secondes Effacer l'association |
③ Prise AC IN
text_image
Diagram showing battery connection steps with arrows indicating direction of movementnatural_image
Isometric line drawing of a room layout with a monitor, cube, and bench (no text or symbols)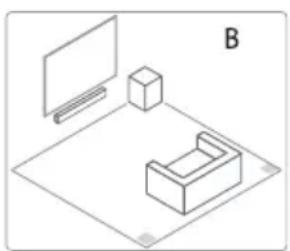
natural_image
Isometric line drawing of a room layout with monitor, cube, and furniture (no text or symbols)natural_image
Simple U-shaped line drawing with no text, numbers, or symbols
text_image
770 mm / 30,3"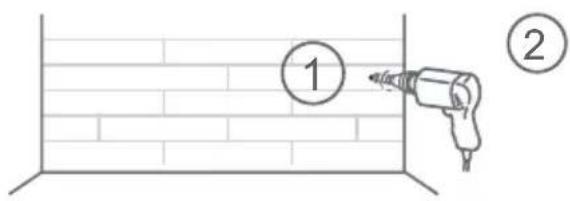
text_image
① ②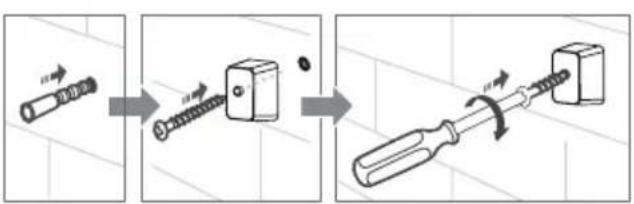
text_image
Diagram illustrating the step-by-step assembly of a screwdriver, showing disassembly and rolling process.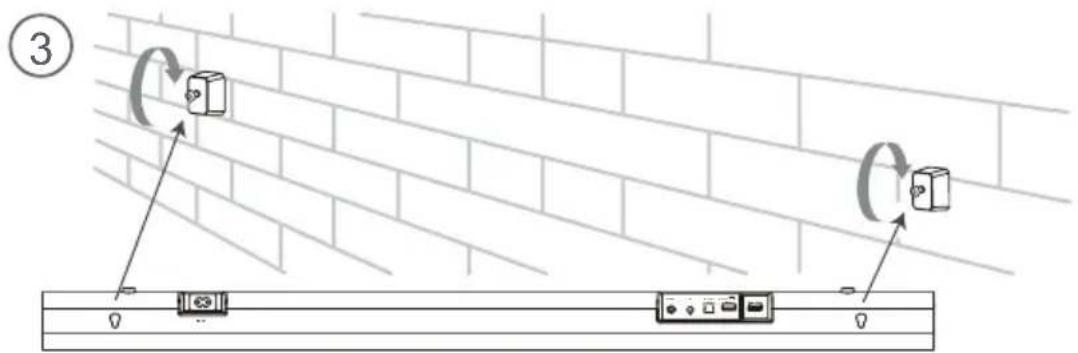
text_image
Diagram showing wall-mounted electrical components with rotating arrows and labeled components, likely illustrating a circuit or signal flow.5. Connexions
5.1 Dolby Atmos®
eARC/ARC (Audio Return Channel)
flowchart
graph TD
    A["Device 1: Cable"] --> B["Switch"]
    B --> C["Wall-mounted Power Outlet"]
    C --> D["Switch"]
    D --> E["Ground"]
natural_image
Black audio streaming device with a rectangular speaker and a rectangular screen, both shown against a white background (no text or symbols visible)
natural_image
Simple line drawing of a rectangular frame with two legs and a central blank space, no text or symbols present.natural_image
Line drawing of a coiled electrical cable with connectors and a connector pin (no text or symbols)Cable HDMI
Soportes (× 2) / Tornillo de soporte (× 2) / Anclajes de pared (× 2)
natural_image
Two empty square panels, one tilted and one upright, with no text or symbols.text_image
Diagram showing connection between a device box and an electronic device with labeled pins 1, 3, and 2② Botón PAIR
natural_image
Simple diagram of a rectangular object with an arrow pointing right, no text or symbols presentnatural_image
Isometric line drawing of a mechanical setup with a monitor, box, and housing (no text or symbols)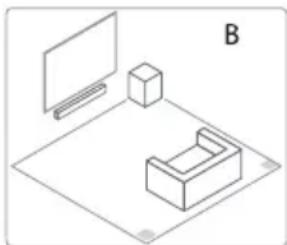
natural_image
Isometric line drawing of a room layout with monitor, cube, and bench (no text or symbols)natural_image
Simple U-shaped line drawing with no text, numbers, or symbols
text_image
770 mm / 30,3"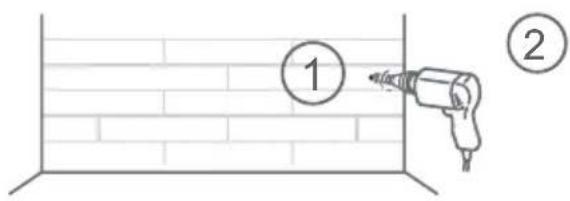
text_image
① ②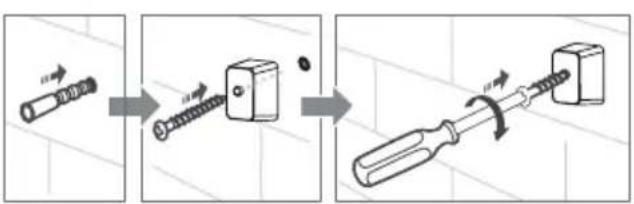
text_image
Diagram illustrating the step-by-step assembly of a screwdriver, showing disassembly and rolling process.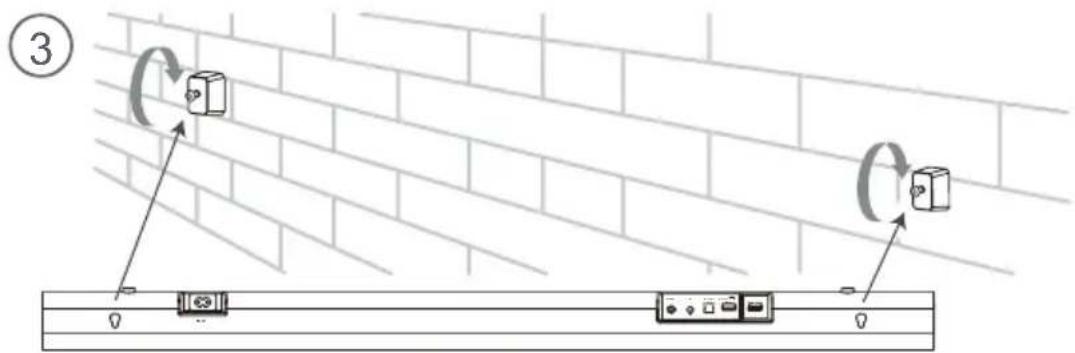
text_image
Diagram showing wall-mounted electrical components with rotating arrows and labeled components, likely illustrating a circuit or safety concept.5. Conexiones
5.1 Dolby Atmos®
text_image
Diagram illustrating cable installation and connection to a power outlet, showing cable routing and component disassembly steps.natural_image
Black audio streaming device with a rectangular speaker and a rectangular screen, shown against a white background (no text or symbols visible)
3. Identificar as peças....8
natural_image
Simple line drawing of a rectangular frame with two legs and a central label (no text or symbols on the frame itself)Subwoofer sem fios

Cabo Ótico
natural_image
Line drawing of a coiled electrical cable with connectors and a connector pin (no text or symbols)Cabo HDMI
Suportes (× 2) / Parafuso do suporte (× 2) / Âncoras de parede (× 2)
Controlo Remoto / 2 × pilhas AAA
natural_image
Two empty square panels, one tilted and one upright, with no text or symbols.text_image
Diagram showing connection between a device box and an electronic device with labeled pins 1, 2, and a button.② Tecla PAIR
natural_image
Simple diagram of a rectangular object with an arrow pointing right, no text or symbols presenttext_image
Diagram showing battery connection with polarity labels and internal componentsnatural_image
Isometric line drawing of a mechanical setup with a monitor, cube, and base (no text or symbols)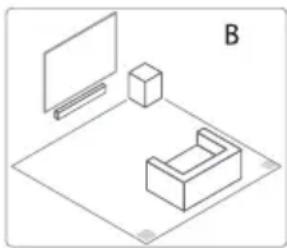
natural_image
Isometric line drawing of a room setup with monitor, cube, and bench (no text or symbols)4.4 Montar a Barra de Som na Parede
Notas:
text_image
Diagram showing wall-mounted electrical components with rotating arrows and a close-up of a device panel below, labeled with number 3.5. Ligações
5.1 Dolby Atmos®
text_image
Diagram illustrating cable installation and connection to a device, showing cable routing and component placement with labeled parts.natural_image
Black audio streaming device with a speaker block and a rectangular sound bar (no visible text or symbols)
natural_image
Simple line drawing of a rectangular frame with two legs and a small horizontal bar at the bottom (no text or symbols)Drahtlos-Subwoofer

Optisches Kabel
text_image
Diagram showing a device with labeled components: front panel, control panel, and three terminal blocks marked 1, 2, and 3.② PAIR-Taste
natural_image
Simple diagram of a rectangular object with an arrow pointing right, no text or symbols present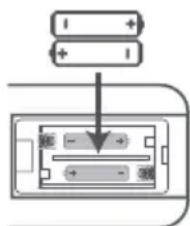
text_image
Diagram showing battery connection with labeled components and directional arrow indicating flow or movementnatural_image
Isometric line drawing of a mechanical setup with a monitor, cube, and base (no text or symbols)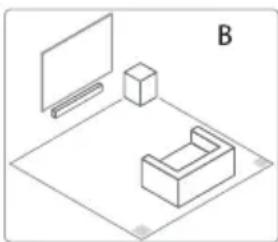
natural_image
Isometric line drawing of a room layout with monitor, cube, and furniture (no text or symbols)natural_image
Simple line drawing of a U-shaped object with a horizontal line inside (no text or symbols)
text_image
770 mm / 30,3"
text_image
①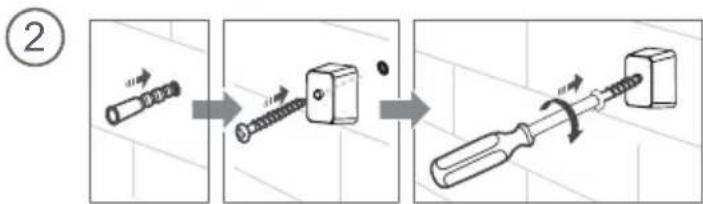
text_image
Diagram illustrating the step-by-step assembly of a screwdriver, showing how fastening and turning to a final product.
text_image
Diagram showing wall-mounted electrical components with rotating arrows and a separate panel below, labeled with number 3.5. Anschlüsse
5.1 Dolby Atmos®
eARC / ARC (Audio Return Channel)
text_image
Diagram illustrating cable installation and connection to a device, showing cable routing and component disassembly steps.natural_image
Black audio streaming device with a speaker block and a rectangular sound bar (no visible text or symbols)
natural_image
Simple line drawing of a rectangular cabinet or enclosure with two legs and a small horizontal bar at the bottom (no text or symbols)Subwoofer wireless

Cavo Ottico
text_image
Diagram showing a device connected to an electrical panel with labeled components 1, 2, and 3.② Tasto PAIR
natural_image
Diagram of a device with an arrow indicating direction, no text or symbols present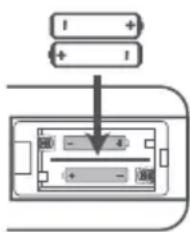
text_image
Diagram showing battery connection with labeled terminals and polarity indicatorsnatural_image
Isometric line drawing of a room setup with a monitor, cabinet, and bench (no text or symbols)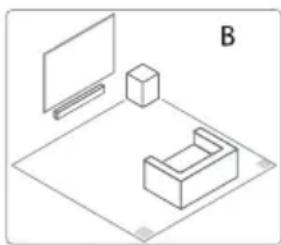
natural_image
Isometric line drawing of a room setup with monitor, box, and furniture (no text or symbols)natural_image
Simple line drawing of a U-shaped object with a central horizontal bar (no text or symbols)
text_image
770 mm / 30,3"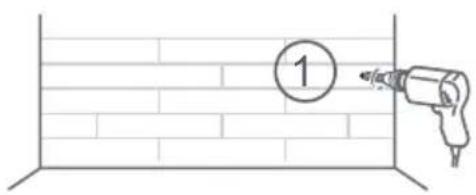
text_image
①
text_image
Diagram illustrating the step-by-step assembly of a screw with directional arrows indicating motion and rotation.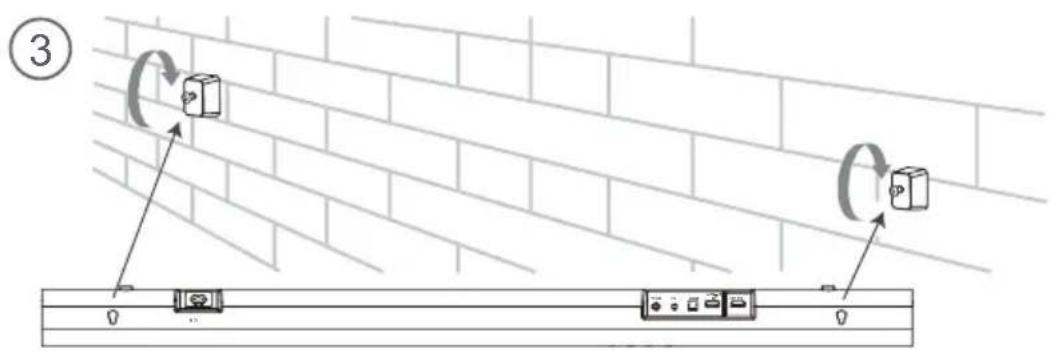
text_image
Diagram showing wall-mounted electrical components with rotating arrows and a separate panel below, labeled with number 3.5. Collegamenti
5.1 Dolby Atmos®
text_image
Diagram illustrating cable installation and connection to a device, showing cable routing and component placement with labeled parts.natural_image
Black electronic device with a speaker and a rectangular sound block, no visible text or symbols
natural_image
Simple line drawing of a rectangular cabinet with two legs and a base, no text or symbols present.natural_image
Line drawing of a coiled electrical cable with connectors and a connector (no text or symbols)Kabel HDMI
natural_image
Two empty square panels, one tilted and one upright, with no text or symbols.text_image
Diagram showing connection between a device box and an electronic device with labeled pins and indicators② Przycisk PAIR
natural_image
Isometric line drawing of a mechanical setup with a monitor, box, and base (no text or symbols)
natural_image
Isometric line drawing of a room layout with monitor, cube, and furniture (no text or symbols)text_image
770 mm/380.5" ① ②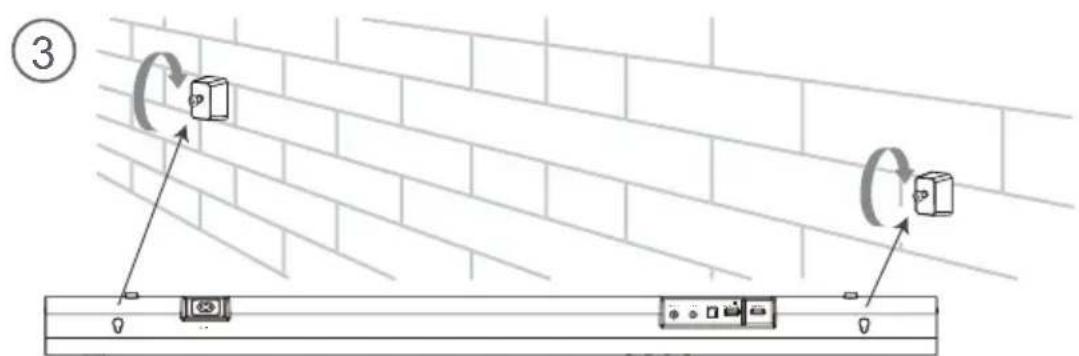
text_image
Diagram showing wall-mounted electrical components with rotating arrows and labeled parts, likely illustrating a circuit or safety concept.5. Połączenia
5.1 Dolby Atmos®
eARC / ARC (Audio Return Channel)
flowchart
graph TD
    A["Device with mask"] --> B["Wall-mounted panel"]
    C["USA"] --> D["Line with plug"]
    E["UK"] --> F["Line with plug"]
    G["Australia"] --> H["Line with plug"]
natural_image
Black audio streaming device with a speaker block and a rectangular sounder bar (no visible text or symbols)
√ Configurare simplă
√ O telecomandā
√ Setäri rapide
280W
Max Audio Power

Dolby Atmos

HDMI™
HIGH-DEFINITION MULTIMEDIA INTERFACE

Bluetooth®
MANUAL DE UTILIZARE

natural_image
Simple line drawing of a rectangular frame with two legs and a small horizontal line at the bottom (no text or symbols)Subwoofer wireless

Cablu optic
text_image
Diagram showing a device with labeled components: battery, switch, and terminal blocks 1, 2, 3.② Buton PAIR
| 2 secunde Modul | Asociere |
| 5 secunde Ştergeti înregistrarea de asociere | |
③ Mufă AC IN
natural_image
Simple diagram of a rectangular object with an arrow pointing right, no text or symbols present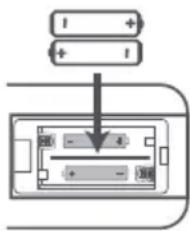
text_image
1 + + 1 4 + - 300natural_image
Isometric line drawing of a room setup with a monitor, cabinet, and bench (no text or symbols)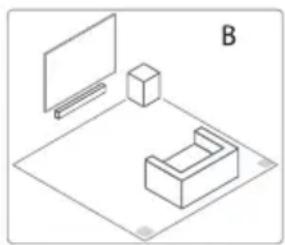
natural_image
Isometric line drawing of a room layout with monitor, cube, and 3D block (no text or symbols)text_image
770 mm/30,3" ① ②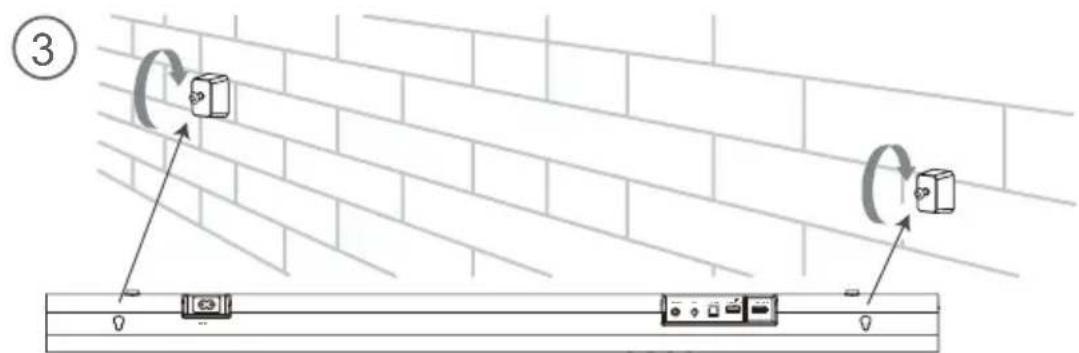
text_image
Diagram showing electrical connections between a wall-mounted device and a control panel, with labeled components and directional arrows.5. Conexiuni
5.1 Dolby Atmos®
natural_image
Black audio streaming device with a speaker block and a rectangular sound strip (no visible text or symbols)
natural_image
Simple line drawing of a rectangular frame with two legs and a small horizontal line at the bottom (no text or symbols)natural_image
Two empty square panels, one tilted and one upright, with no text or symbols.text_image
Diagram of a device with labeled components including a box, indicator lights, and three numbered connection points.② Tlačítko PAIR
natural_image
Isometric line drawing of two furniture or devices on a flat surface, labeled 'A' in the top right corner (no text or symbols on the devices themselves)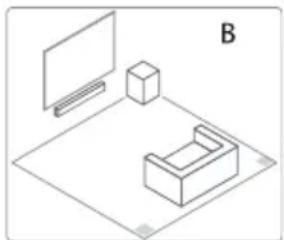
natural_image
Isometric line drawing of a room layout with monitor, cube, and furniture (no text or symbols)text_image
Diagram showing wall-mounted electrical components with rotating arrows and labeled parts, likely illustrating a circuit or safety concept.5. Připojení
5.1 Dolby Atmos®
eARC/ARC (Audio Return Channel)
text_image
Diagram illustrating cable installation and connection to a device, showing cable routing and cable assembly steps with labeled components.natural_image
Black audio streaming device with a speaker block and a rectangular sound strip (no visible text or symbols)
natural_image
Simple line drawing of a rectangular frame with two legs and a small horizontal line at the bottom (no text or symbols)Draadloze subwoofer

Optische kabel
natural_image
Two empty square panels, one tilted and one upright, with no text or symbols.text_image
Diagram of a device with labeled components including a control panel and three labeled ports (1, 2, 3)② PAIR-knop
text_image
Diagram showing battery connection with labeled components and a downward arrow indicating directionnatural_image
Isometric line drawing of a room layout with a monitor, cube, and U-shaped object (no text or symbols)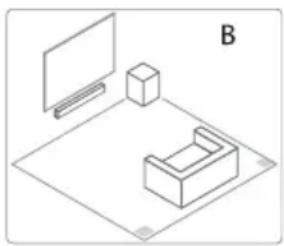
natural_image
Isometric line drawing of a room layout with monitor, cube, and furniture (no text or symbols)text_image
Diagram showing wall-mounted electrical components with rotating arrows and labeled parts, likely illustrating a circuit or safety concept.5. Aansluitingen
5.1 Dolby Atmos®
text_image
Diagram illustrating cable connection to a device via USB cable, showing cable routing and component installation steps.natural_image
Black audio streaming device with a speaker block and a rectangular sound strip (no visible text or symbols)
natural_image
Simple line drawing of a rectangular frame with four legs and a small horizontal line at the bottom (no text or symbols)natural_image
Two empty square panels, one tilted and one upright, with no text or symbols.text_image
Diagram of a device with labeled components including a box, control panel, and three numbered indicators.② Tlačidlo PAIR (párovania)
text_image
Diagram showing battery charging process with input and output arrows, including battery stack and internal components- Nepoužívajte iné než uvedené batérie.
- Nemiešajte spolu staré a nové batérie.
- Batériu nikdy nenabíjajte, pokial' nie je potvrdené, že je to nabíjateľný typ batérie.
natural_image
Isometric line drawing of a room layout with a monitor, cabinet, and base (no text or symbols)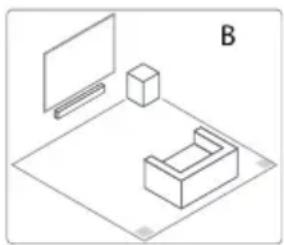
natural_image
Isometric line drawing of a room setup with monitor, cube, and bench (no text or symbols)text_image
770 mm/30,3" ① ②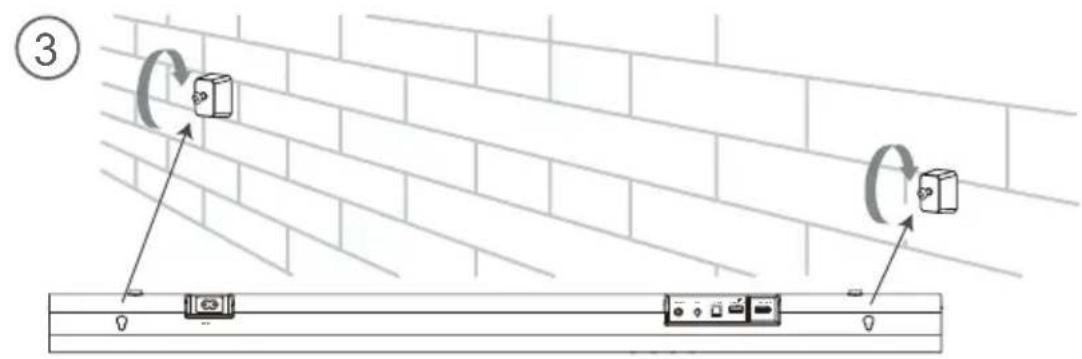
text_image
Diagram showing wall-mounted electrical components with rotating arrows and labeled parts, likely illustrating a circuit or safety concept.5. Pripojenia
5.1 Dolby Atmos®
text_image
Diagram illustrating cable installation and connection to a device, showing cable routing and cable attachment steps with labeled components.natural_image
Black audio streaming device with a speaker block and a rectangular sound bar (no visible text or symbols)
natural_image
Simple line drawing of a rectangular frame with two legs and a small horizontal bar at the bottom (no text or symbols)natural_image
Two empty square panels, one tilted and one upright, with no text or symbols.text_image
Diagram of a device with labeled components including a box, control panel, and three numbered indicators.② Gumb PAIR
text_image
Diagram showing battery terminal connections with polarity indicators and internal componentsnatural_image
Isometric line drawing of a room layout with a monitor, cabinet, and bench (no text or symbols)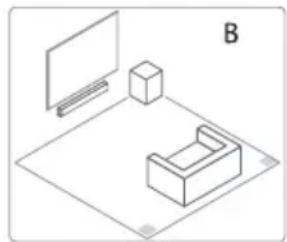
natural_image
Isometric line drawing of a room layout with monitor, cube, and furniture (no text or symbols)Previdnostni ukrepi v zvezi z baterijami
natural_image
Simple line drawing of a U-shaped object with a central horizontal bar (no text or symbols)
text_image
770 mm / 30,3"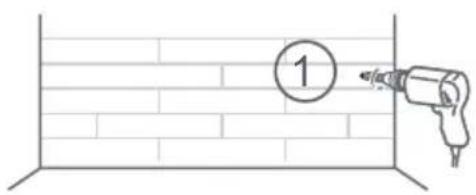
text_image
①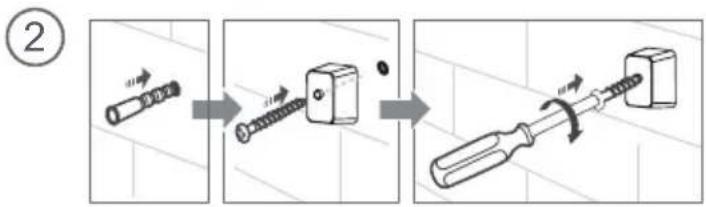
text_image
Diagram illustrating the step-by-step assembly of a screwdriver, showing disassembly and rolling process.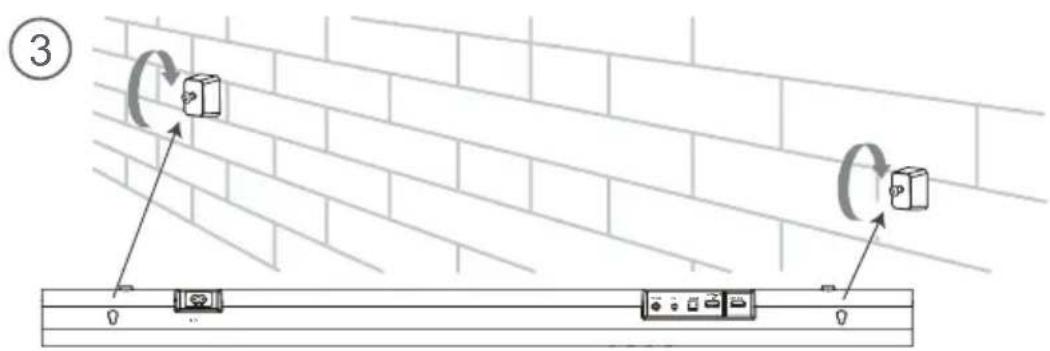
text_image
Diagram showing wall-mounted electrical components with rotating arrows and a close-up of a device panel below, labeled with number 3.5. Povezave
5.1 Dolby Atmos®
eARC/ARC (Audio Return Channel)
text_image
Diagram illustrating cable installation and connection to a power outlet, showing cable routing and wiring connections with labeled components.* Število napajalnih kablov in priključki so odvisni od regije.
natural_image
Black audio streaming device with a speaker block and a rectangular sound bar (no visible text or symbols)
√ Jednostavna postavka
√ Jedan daljinski upravljač
√ Brze postavke
280W
Max Audio Power
Dolby Atmos

HDMI™
HIGH-DEFINITION MULTIMEDIA INTERFACE
Bluetooth®
KORISNIČKI PRIRUČNIK

Prije upotrebe soundbara temeljito pročitajte ovaj priručnik i sačuvajte ga za daljnju upotrebu.
Sadržaj
1. Važne sigurnosne upute .... 3
1.1 Sigurnost....3
1.2 Upozorenje....4
1.3 Podržani ulazni zvučni formati....6
2. Što se nalazi u kutiji....7
natural_image
Simple line drawing of a rectangular frame with two legs and a small horizontal bar at the bottom (no text or symbols)text_image
Diagram showing a device with labeled components: battery, switch, and power outlet② Gumb PAIR
| Dvije sekunde Način povezivanja |
| Pet sekundi Obrište evidenciju povezivanja |
③ AC IN utičnica
text_image
Diagram showing battery terminal connections with polarity indicators and internal components- Ne upotrebljavajte nijedne druge baterije osim onih navedenih.
- Ne miješajte nove baterije sa starima.
- Nikad nemojte ponovo puniti bateriju ako se ne potvrdi da je vrsta koja se može ponovno puniti.
natural_image
Isometric line drawing of a room layout with a monitor, cabinet, and bench (no text or symbols)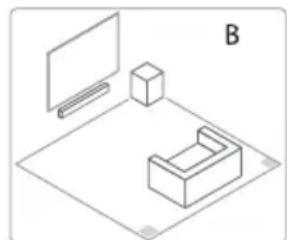
natural_image
Isometric line drawing of a room layout with monitor, cube, and furniture (no text or symbols)Mjere opreza glede baterija
- Pobrinite se da umetnete baterije s ispravnim pozitivnim „” i negativnim polaritetom „”.
- Upotrijebite baterije iste vrste. Nikada zajedno ne upotrebljavajte različite vrste baterije.
- Mogu se upotrebljavati punjive ili nepunjive baterije. Pogledajte mjere opreza na njihovim oznakama.
- Pazite na svoje nokte prilikom uklanjanja poklopca i baterija.
- Nemojte ispustiti daljinski upravljač.
- Pazite da ništa ne udre daljinski upravljač.
- Nemojte proliti vodu ili bilo koju drugu tekućinu na daljinski upravljač.
- Ne postavljajte daljinski upravljač na mokri predmet.
- Ne postavljajte daljinski upravljač na izravnu Sunčevu svjetlost ili blizu izvora prekomjerne topline.
- Uklonite bateriju iz daljinskog upravljača kada se ne upotrebljava duže vrijeme budući da može doći do korozije ili curenja baterije i nastanka tjelesnih ozljeda i/ili imovinske štete i/ili požara.
4.4 Postavljanje zvučne trake na zid
Napomene:
text_image
Diagram illustrating the step-by-step assembly of a screwdriver, showing disassembly and rolling process.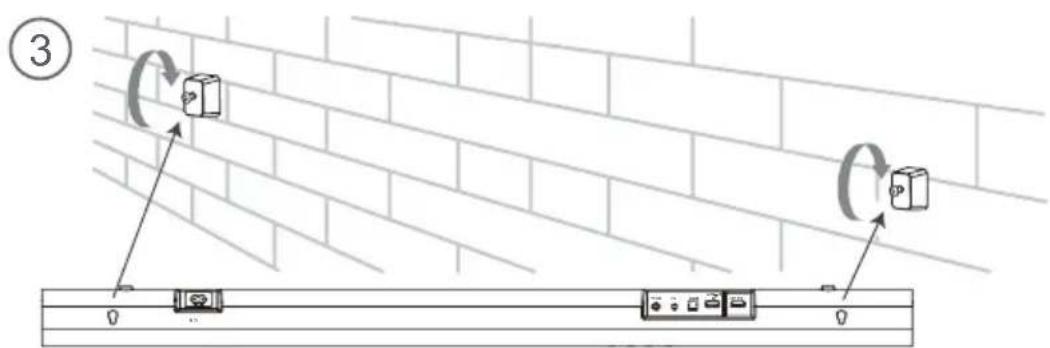
text_image
Diagram showing wall-mounted electrical components with rotating arrows and labeled parts, likely illustrating a circuit or safety concept.5. Veze
5.1 Dolby Atmos®
Dolby Atmos® vam pruža uvjerljivo iskustvo slušanja isporučujući zvuk u trodimenzionalnom prostoru i svo bogatstvo, jasnoću i snagu zvuka Dolby. Za više informacija posjetite dolby.com/technologies/dolby-atmos
5.2 DTS:X
DTS:X, rubni zvuk više nije ograničen položajem zvučnika u fiksnom položaju ili specifičnim signalima kanala.
Za upotrebu tehnologije Dolby Atmos® / DTS:X
Dolby Atmos® / DTS:X dostupan je u načinu rada HDMI eARC/ARC. Za pojedinosti o priključivanju pogledajte „Priključak HDMI”. HDMI eARC/ARC
- Za upotrebu načina rada Dolby Atmos® / DTS:X, vašim televizorom moraju biti podržani Dolby Atmos® / DTS:X ili prolaz zvuka HDMI.
- Pobrinite se da nije odabrano „Bitstream“, „RAW“ ili „Bez šifriranja“ za tok bita u zvučnom izlazu spojenog vanjskog uređaja (npr. reproduktor Blu-ray-a ili DVD-a, televizor itd.).
- Dok ulazite u formate Dolby Atmos / DTS:X / Dolby Digital / PCM zvučna će traka prikazati DOLBY ATMOS / DTS:X / DOLBY AUDIO / PCM AUDIO.
text_image
Diagram illustrating cable installation and connection to a device, showing cable routing and cable attachment steps with labeled components.HU
TR
RU
* Količina kabela za napajanje i vrsta utikača razlikuju se po regijama.
natural_image
Black audio streaming device with a speaker block and a rectangular sound bar (no visible text or symbols)
natural_image
Simple line drawing of a rectangular frame with two legs and a small horizontal bar at the bottom (no text or symbols)text_image
Diagram showing a device connected to an electronic control panel with labeled ports 1, 2, and 3.② PAIR gomb
text_image
Diagram showing battery connection with labeled terminals and internal componentsnatural_image
Isometric line drawing of a mechanical setup with a rectangular block and a flat plate, labeled 'A' (no text or symbols on the diagram itself)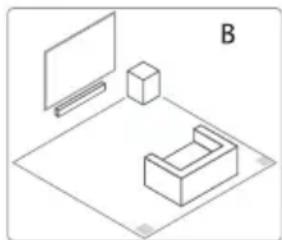
natural_image
Isometric line drawing of a monitor, a cube, and a 3D object on a plane (no text or symbols)text_image
Diagram showing a tool in a brick wall with two numbered annotations indicating positions of the tool.
text_image
②
text_image
Diagram showing wall-mounted electrical components with rotating arrows and labeled parts, likely illustrating a circuit or safety concept.5. Csatlakoztatások
5.1 Dolby Atmos®
eARC/ARC (Audio Return Channel)
text_image
Diagram illustrating cable installation and connection to a device, showing cable routing and cable attachment steps with labeled components.natural_image
Black audio streaming device with a speaker block and a rectangular sound strip (no visible text or symbols)
natural_image
Simple line drawing of a rectangular frame with two legs and a small horizontal line at the bottom (no text or symbols)Kablosuz Subwoofer

Optik Kablo
text_image
Diagram of an electronic device with labeled components including a control panel and three indicator lights② PAIR Düğmesi
text_image
Diagram showing battery connection with labeled components and a downward arrow indicating direction of connectionnatural_image
Isometric line drawing of a mechanical setup with a monitor, cube, and base (no text or symbols)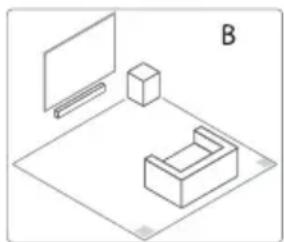
natural_image
Isometric line drawing of a room layout with monitor, cube, and bench (no text or symbols)text_image
Diagram showing wall-mounted electrical components with rotating arrows and labeled parts, likely illustrating a circuit or signal flow.5. Bağlantılar
5.1 Dolby Atmos®
text_image
Diagram illustrating cable installation and connection to a device, showing cable routing and cable attachment steps.natural_image
Black audio streaming device with a speaker and sound block, no visible text or symbols280W
Max Audio Power
Dolby Atmos
dtsx
HDMI™
HIGH-DEFINITION MULTIMEDIA INTERFACE
Bluetooth®
natural_image
Simple line drawing of a rectangular cabinet with two legs and a base, no text or symbols present.natural_image
Line drawing of a coiled electrical cable with connectors and a connector (no text or symbols)Кабель HDMI
natural_image
Two empty square outlines with no text or symbolstext_image
Diagram showing a device connected to an electronic control panel with labeled pins 1, 2, and 3.② Кнопка PAIR
natural_image
Simple line drawing of a rectangular object with an arrow pointing right, no text or symbols present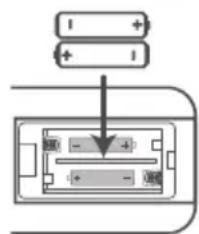
text_image
Diagram showing battery connection with polarity indicators and internal components labeled in Chinesenatural_image
Isometric line drawing of a mechanical setup with a monitor, box, and base (no text or symbols)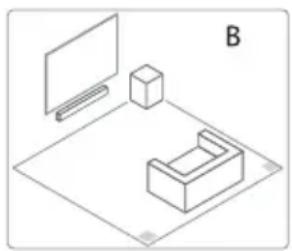
natural_image
Isometric line drawing of a room layout with monitor, cube, and furniture (no text or symbols)natural_image
Simple U-shaped line drawing with no text, numbers, or symbols
text_image
770 mm / 30.3"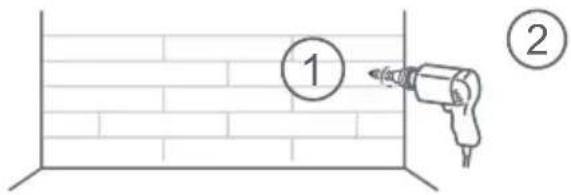
text_image
① ②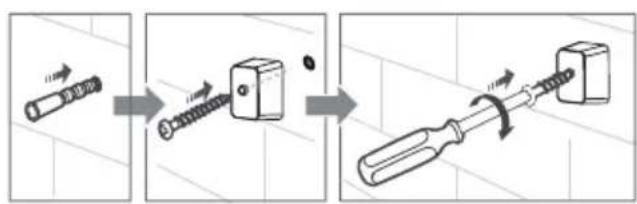
text_image
Diagram illustrating the step-by-step assembly of a screwdriver, showing how to move from a bolt to a cube and then to a screwdriver.