HS2000 - Soundbar HISENSE - Free user manual and instructions
Find the device manual for free HS2000 HISENSE in PDF.

User questions about HS2000 HISENSE
0 question about this device. Answer the ones you know or ask your own.
Ask a new question about this device
Download the instructions for your Soundbar in PDF format for free! Find your manual HS2000 - HISENSE and take your electronic device back in hand. On this page are published all the documents necessary for the use of your device. HS2000 by HISENSE.
USER MANUAL HS2000 HISENSE
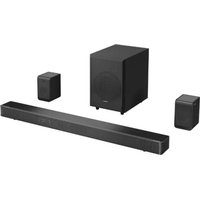
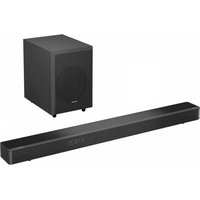
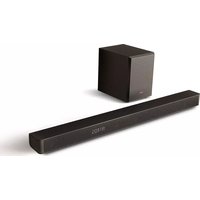
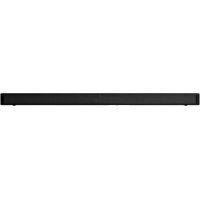
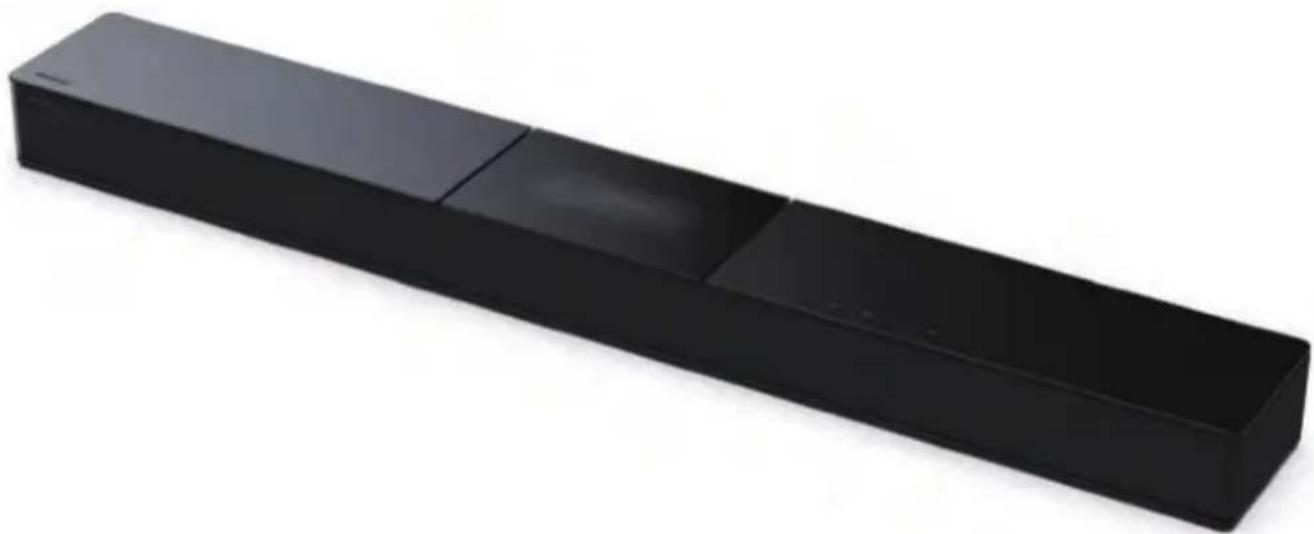
2.1 Channel Soundbar with Built in Subwoofer Model: HS2000
EN
FR
ES
PT
DE
IT
RO
CZ
HU
BG
Dolby Audio

Bluetooth
HOMI
HIGH-DEFINITION MULTIMEDIA INTERFACE
dt
Roku TV Ready
USER MANUAL

Before using the soundbar, please read this manual thoroughly and retain it for future reference.
DE
IT
RO
CZ
HU
Contents
- Important Safety Instructions 3
- What's in the Box 5
- Product Diagram 6
3.1 Main Unit 6
3.2 Remote Control 7
4.Preparations 7
4.1 Prepare the Remote Control 7
4.2 Replace the Remote Control Battery 7
4.3 Placement and Mounting 8
4.4 Wall Mounting (if using option-B) 8
- Connections 9
5.1 Use the HDMI ARC Socket.. 9
5.2 Use the OPTICAL Socket 10
5.3 Use the COAXIAL Socket 10
5.4 Use the AUX Socket 10
5.5 Connect Power 10
- Basic Operation 10
6.1 Standby/ON 10
6.2 Auto-Standby / Auto-Wake 11
6.3 Select Modes 11
6.4 Adjust the Volume 11
6.5 Turn the Surround Sound ON/OFF 11
6.6 Select Equalizer (EQ) Effect 11
6.7 Adjust the Bass/Treble 11
6.8 Adjust the Brightness 11
6.9 Voice prompts ON/OFF 11
5.10 Factory reset 11
- AUX/ OPTICAL/COAXIAL/HDMI ARC Operation 12
- USB Operation 12
- Bluetooth Operation 12
- Troubleshooting 13
- Specifications 14
1. Important Safety Instructions
| CAUTION RISK OF ELECTRIC SHOCK DO NOT OPEN | |
| AVIS | |
| RISQUE DE CHOC ÉLECTRIQUE NE PAS OUVRIR |
The lightning flash with arrowhead symbol, within an equilateral triangle, is intended to alert the user to the presence of uninsulated "dangerous voltage" within the product's enclosure that may be of sufficient magnitude as to constitute a risk of electric shock to persons.

The exclamation point within an equilateral triangle is intended to alert the user to the presence of important operating and maintenance (servicing) instructions in the literature accompanying the appliance.
Safety
1 Read these instructions - All the safety and operating instructions should be read before this product is operated.
2 Keep these instructions - The safety and operating instructions should be retained for future reference.
3 Heed all warnings - All warnings on the appliance and in the operating instructions should be adhered to.
4 Follow all instructions - All operating and usage instructions should be followed.
5 Do not use this apparatus near water - The appliance should not be used near water or moisture - for example, in a wet basement or near a swimming pool and the like.
6 Clean only with a dry cloth.
7 Do not block any ventilation openings. Install in accordance with the manufacturer's instructions.
8 Do not install near any heat sources such as radiators, heaters, stoves, or other apparatus (including amplifiers) that produce heat.
9 Do not defeat the safety purpose of the polarized or grounding plug. A polarized plug has two blades with one wider than the other. A grounding plug has two blades and a third grounding prong. The wide blade or
the third prong is provided for your safety. If the provided plug does not fit into your outlet, consult an electrician for replacement of the obsolete outlet.
10 Protect the power cord from being walked on or pinched particularly at plugs, convenience receptacles, and the point where they exit from the apparatus.
11 Only use attachments/accessories specified by the manufacturer.
12 Use only with the cart, stand, tripod, bracket or table specified by the manufacturer, or sold with the apparatus. When a cart or rack is used, use caution when moving the cart/ apparatus combination to avoid injury from tip-over.
13 Unplug the apparatus during lightning storms or when unused for long periods of time.
14 Refer all servicing to qualified personnel. Servicing is required when the apparatus has been damaged in any way, such as power supply cord or plug is damaged, liquid has been spilled or objects have fallen into the apparatus, the unit has been exposed to rain or moisture, does not operate normally, or has been dropped.
15 This equipment is a Class II or double insulated electrical appliance. It has been designed in such a way that it does not require a safety connection to electrical earth.
16 The apparatus shall not be exposed to dripping or splashing. No objects filled with liquids, such as vases, shall be placed on the apparatus.
17 Minimum distance around the apparatus for sufficient ventilation is 5cm
18 The ventilation should not be impeded by covering the ventilation openings with items, such as newspapers, table-cloths, curtains, etc.
19 No naked flame sources, such as lighted candles, should be placed on the apparatus.
20 Batteries should be recycled or disposed of as per state and local guidelines.
21 The use of apparatus in moderate or tropical climates.
Caution:
- Use of controls or adjustments or performance of procedures other than those described herein, may result in hazardous radiation exposure or other unsafe operation.
- To reduce the risk of fire or electric shock, do not expose this apparatus to rain or moisture. The apparatus must not be exposed to dripping or splashing and objects filled with liquids, such as vases, must not be placed on apparatus.
- The mains plug/appliance coupler is used as the disconnect device, the disconnect device must remain readily operable.
- Danger of explosion if battery is incorrectly replaced. Replace only with the same or equivalent type.
Warning
- The battery (batteries or battery pack) shall not be exposed to excessive heat such as sunshine, fire or the like.
- Before operating this system, check the voltage of this system to see if it is identical to the voltage of your local power supply.
- Do not place this unit close to strong magnetic fields.
- Do not place this unit on the amplifier or receiver.
- If any solid object or liquid falls into the system, unplug the system and have it checked by qualified personnel before operating it any further.
- Do not attempt to clean the unit with chemical solvents as this may damage the finish. Use a clean, dry or slightly damp cloth.
- When removing the power plug from the wall outlet, always pull directly on the plug, never yank on the cord.
Changes or modifications to this unit not expressly approved by the party responsible for compliance will void the user's authority to operate the equipment. - The rating label is pasted on the bottom or back of the equipment.

Battery usage CAUTION
To prevent battery leakage which may result in bodily injury, property damage, or damage to the apparatus:
- Install all batteries correctly, + and - as marked on the apparatus.
- Do not mix old and new batteries.
- Do not mix alkaline, standard (Carbon-Zinc) or rechargeable (Ni-Cd, Ni-MH, etc.) batteries.
- Remove batteries when the unit is not used for a long time.

Correct Disposal of this product. This marking indicates that this product should not be disposed with other household wastes throughout the EU. To prevent possible harm to the environment or human health from uncontrolled waste disposal, recycle it responsibly to promote the sustainable reuse of material resources. To return your used device, please use the return and collection systems or contact the retailer where the product was purchased. They can take this product for environmental safe recycling.

We hereby declares that this product is in compliance with the essential requirements and other relevant provisions of RED Directive 2014/53/EU and UK Radio Equipment Regulations 2017.
1. What's in the Box
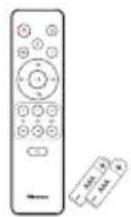
Remote control AAA batteries × 2^**

HDMI cable AC Power cord *


Wall mount kit Bracket(x2) / Wall Plug(x2) / screw(x2) / bracket screw(x2)
Warranty card/Quick start manual / Wall mount guide
- Power cord quantity and plug type vary by regions. ** The accessories may be different from the list above due to different models, countries/ regions, please refer to the actual accessory bag.
- Images, illustrations and drawings shown on this User Manual are for reference only, actual product may vary in appearance.
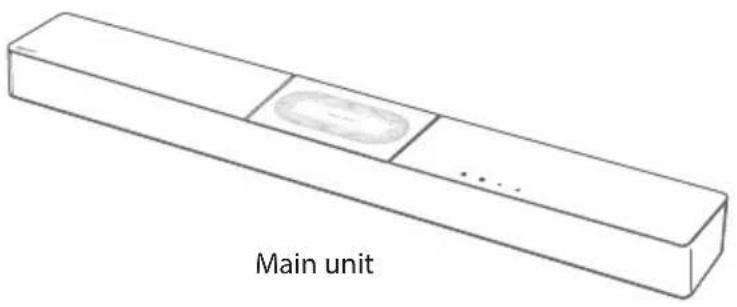
2. Product Diagram
2.1 Main Unit

EN
Remote Control Sensor
Receive signal from the remote control.
② LED Indicators
| -amp | Mode |
| ● Red Standby | |
| ● Green AUX | |
| ● Blue BT (Bluetooth) | |
| ● Orange OPTICAL | |
| ● Light blue | COAXIAL |
| ● White | HDMI ARC |
| ● Yellow | USB |
(3) (ON/OFF) Button
Switch the soundbar between ON and Standby mode.
(4) (SOURCE) Button
Select the play function.
(5) Volume Buttons
Increase/decrease the volume level.
⑥ AC IN ~ Socket
Connect to the power supply.
AUX Socket
Connect to an external audio device.
USB Socket
Insert the USB device to play music.
9 HDMI ARC Socket
Connect to a TV via HDMI cable.
OPTICAL Socket
Connect to an optical audio output on the TV.
COAXIAL Socket
Connect to the COAXIA audio output on the TV.
12 Wall hanging points
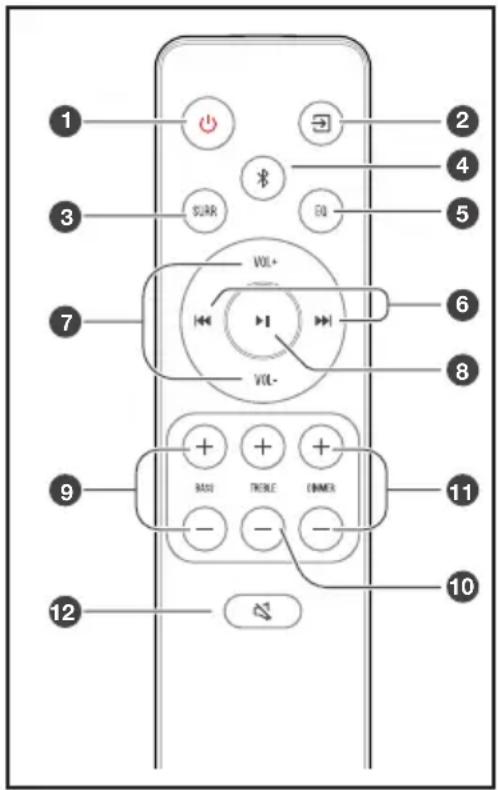
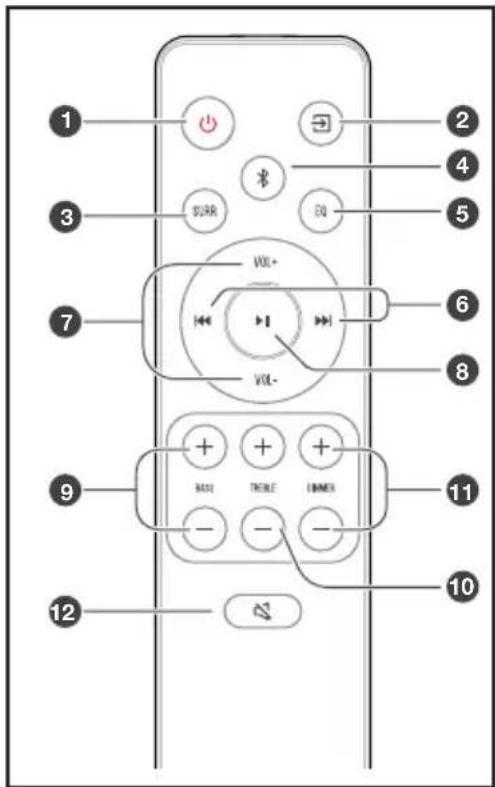
2.2 Remote Control
Switch the unit between ON and STANDBY mode.
(2) (SOURCE) Select the play function.
3 SURR Adjust the surround ON/OFF.
(4) (BT) Select the Bluetooth mode. Press and hold the (BT) button to activate the pairing function in Bluetooth mode or disconnect the existing paired Bluetooth device.
5 EQ Select a preset sound effect.
6 skip to previous/next track in BT / USB mode.
VOL /VOL Increase/decrease the volume level.
Play/pause/resume playback in BT/USB mode.
BASS Adjust bass level.
10 TREBLE / Adjust treble level.
DIMMER Adjust LED brightness.
12 (MUTE) Mute or resume the sound.
3. Preparations
3.1 Prepare the Remote Control
The provided Remote Control allows the unit to be operated from a distance.
Even if the Remote Control is operated within the effective range 19.7 feet (6m), remote control operation may be impossible if there are any obstacles between the unit and the remote control.
If the Remote Control is operated near other products which generate infrared rays, or if other remote control devices using infra-red rays are used near the unit, it may operate incorrectly. Conversely, the other products may operate incorrectly.
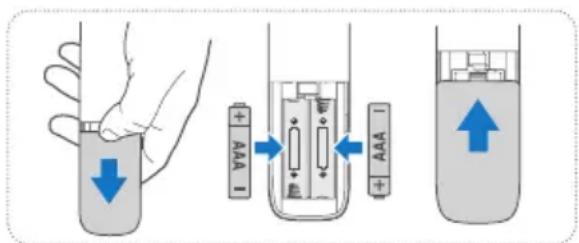
3.2 Replace the Remote Control Battery
1 Press and slide the back cover to open the battery compartment of the remote control.
2 Insert two AAA size batteries. Make sure the (+) and (-) ends of the batteries match the (+) and (-) ends indicated in the battery compartment.
3 Close the battery compartment cover.
Precautions Concerning Batteries
- Be sure to insert the batteries with correct positive “⊕” and negative “ ” polarities.
Use batteries of the same type. Never use different types of batteries together.
Either rechargeable or non-rechargeable batteries can be used. Refer to the precautions on their labels. - Be aware of your fingernails when removing the battery cover and the battery.
- Do not drop the remote control.
- Do not allow anything to impact the remote control.
- Do not spill water or any liquid on the remote control.
- Do not place the remote control on a wet object.
- Do not place the remote control under direct sunlight or near sources of excessive heat.
- Remove the battery from the remote control when not in use for a long period of time, as corrosion or battery leakage may occur and result in physical injury, and/or property damage, and/or fire.
- Do not use any batteries other than those specified.
- Do not mix new batteries with old ones.
- Never recharge a battery unless it is confirmed to be a rechargeable type.
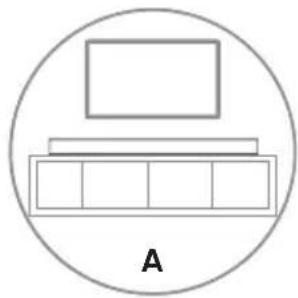
3.3 Placement and Mounting
Placement
A If your TV is placed on a table, you can place the unit on the table directly in front of the TV stand, centered with the TV screen.
B If your TV is attached to a wall, you can mount the unit on the wall directly below the TV screen.
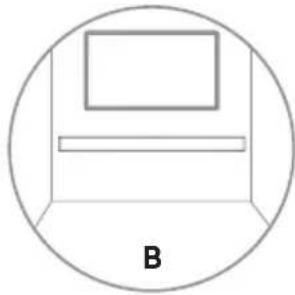
3.4 Wall Mounting (if using option-B)
Note:
- Installation must be carried out by qualified personnel only. Incorrect assembly can result in severe personal injury and property damage (if you intend to install this product yourself, you must check for installations such as electrical wiring and plumbing that may be buried inside the wall). It is the installer's responsibility to verify that the wall will safely support the total load of the unit and wall brackets.
- Additional tools (not included) are required for the installation.
- Do not overtighten screws.
- Keep this instruction manual for future reference.
- Use an electronic stud finder to check the wall type before drilling and mounting.
EN
WARNING
- To prevent injury, this apparatus must be securely attached to the floor/wall in accordance with the installation instructions.
-
Suggested wall mounting height: ≤ 1.5 meters.
-
Drill 2 parallel holes (0.5-6 mm each according to wall type) in the wall. The distance between the holes should be 680mm / 26.8^ .
- Firmly fix 1 dowel into each hole in the wall if necessary. Tighten the wall mount brackets on the wall with screws and screwdriver (included). Make sure that they are securely installed.
- Install the wall mounting screws into the back of the unit.
- Lift the unit onto the wall mount brackets and slot into place.
4. Connections
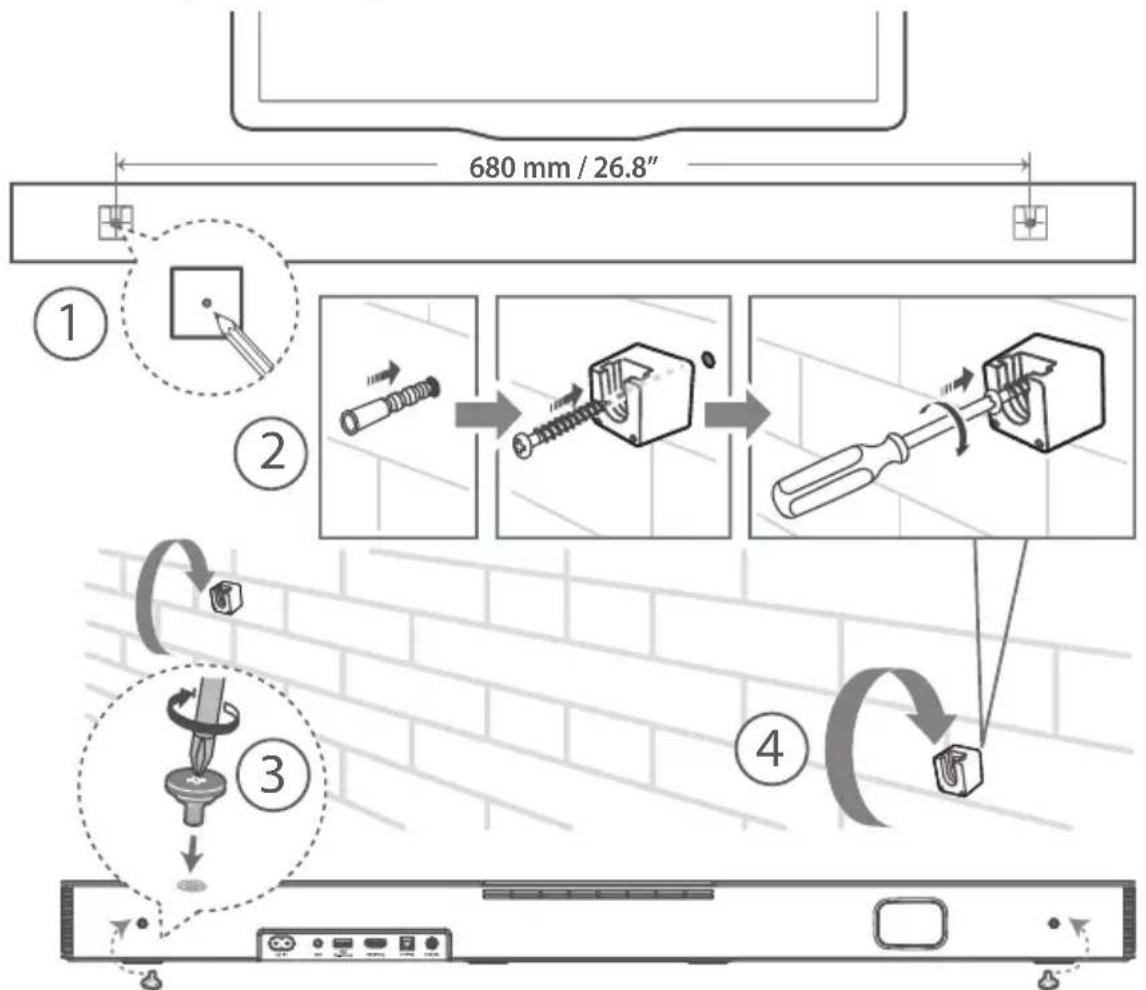
4.1 Use the HDMI ARC Socket
The ARC (Audio Return Channel) function allows you to send audio from your ARC- compliant TV to your soundbar through a single HDMI connection. To enjoy the ARC function, please ensure your TV is both HDMI-CEC and ARC compliant and set up accordingly. When correctly set up, you can use your TV remote control to adjust the volume output (VOL + / and Mute) of the soundbar.
- Connect the HDMI cable from unit's HDMI ARC socket to the HDMI (ARC) socket on your ARC compliant TV. Then press the remote control to select HDMI ARC.
Tips:
- Your TV must support the HDMI-CEC and ARC function. HDMI-CEC and ARC must be set to On.
- The setting method of HDMI-CEC and ARC may differ depending on the TV. For details about ARC function, please refer to the owner's manual.
Only HDMI 1.4 or higher version cable can support the ARC function.
Use the Roku TV
- If you have a Roku TV™, setup is easy. Just use the included cable to connect your soundbar to the HDMI ARC port on your TV and follow the on-screen instructions.

Simple setup One remote Quick settings
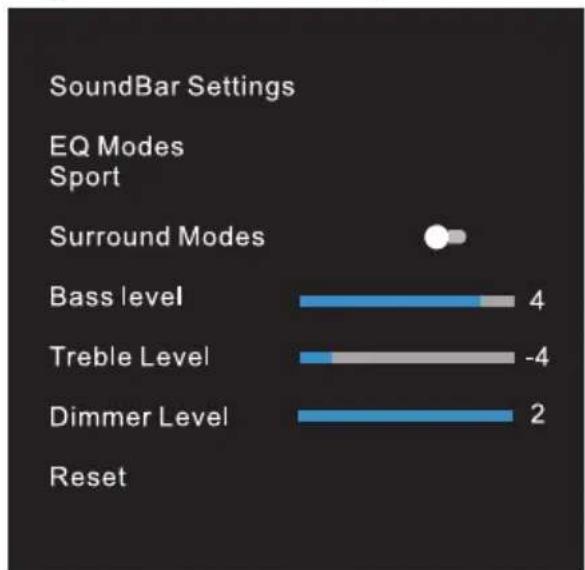
Use the Hisense EzPlay Function
For Hisense EzPlay, when the Soundbar connects with a Hisense TV via HDMI ARC, there will be a Soundbar Setting menu on the TV, and you can control this menu via your TV remote to control most of the Soundbar features.
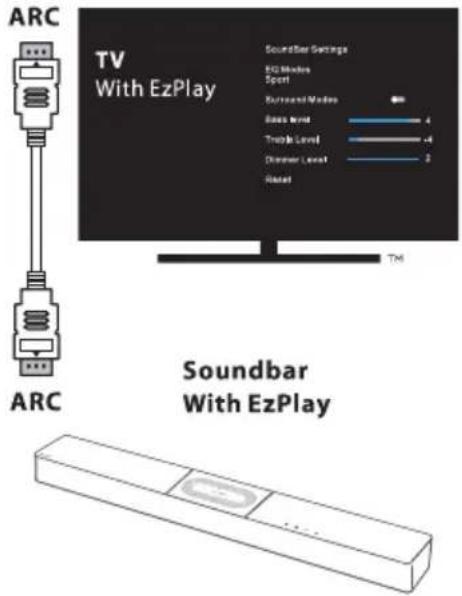
TV menu example (different models may have different menus):
Setting--sound--Soundbar Setting.
Note:
- This function is available only when both Soundbar and TV support Hisense Ezplay.
- This function requires Soundbar and TV connected via HDMI ARC, and the CEC of the TV must be trned ON.
- If every time setting right, for the first time connect, there would be a tip on the TV screen to guide you find the Soundbar setting menu.
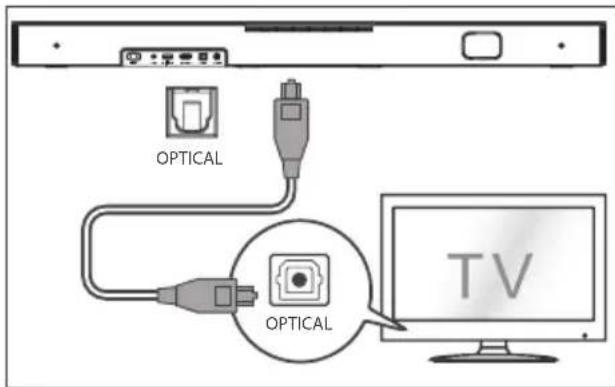
4.2 Use the OPTICAL Socket
- Connect an OPTICAL cable to the TV's OPTICAL OUT socket and the OPTICAL socket on the unit.
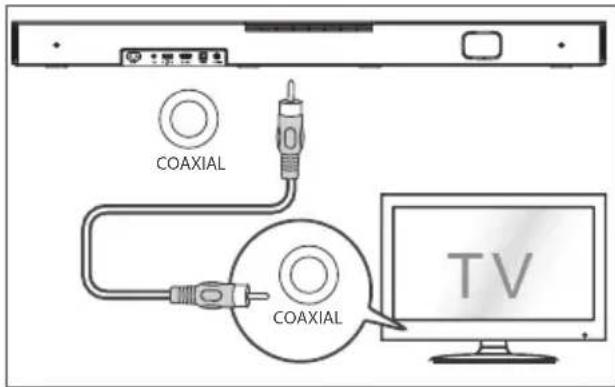
4.3 Use the COAXIAL Socket
- You also can use the COAXIAL cable to connect the TV's COAXIAL OUT socket and COAXIAL socket on the unit.
Tip: The Soundbar may not be able to decode all digital audio formats from the input source. In this case, the Soundbar will mute. This is NOT a defect. Ensure that the audio setting of the input source (e.g. TV, game console, DVD player, etc.) is set to PCM or Dolby Digital (Refer to the user manual of the input source device for its audio setting details) with HDMI ARC / OPTICAL / COAXIAL input.
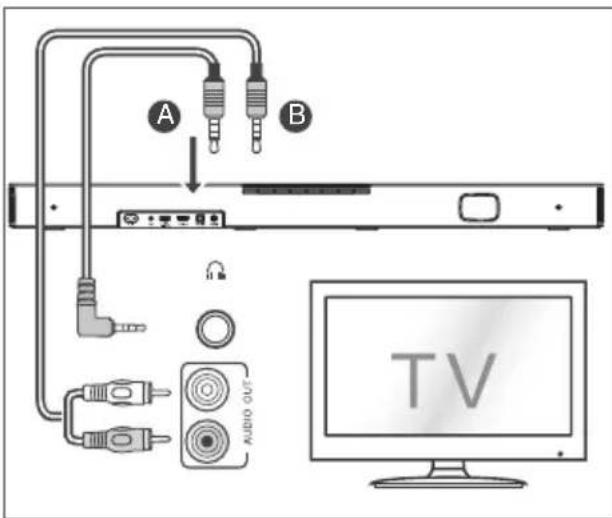
4.4 Use the AUX Socket
A. Use a 3.5mm to 3.5mm audio cable to connect the TV's or external audio device headphone socket to the AUX socket on the unit.
B. Use a RCA to 3.5mm audio cable to connect the TV's audio output sockets to the AUX socket on the unit.
4.5 Connect Power
Risk of product damage!
- Ensure that the power supply voltage corresponds to the voltage printed on the back or the underside of the unit.
Before connecting the AC power cord, ensure you have completed all other connections. - Connect the mains cable to the AC~ socket of the Sound Bar and then into a mains socket.
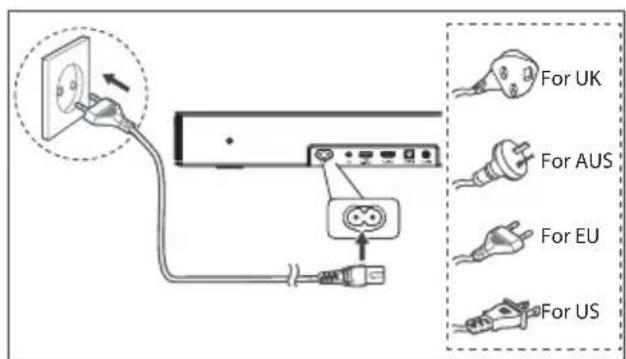
- Power cord quantity and plug very by regions.
5. Basic Operation
5.1 Standby/ON
When you first connect the main unit to the mains socket, the main unit will be in Standby mode.
- Press the button on the unit or on the remote control to switch the unit ON.
- Press the button again to switch the unit back to STANDBY mode.
- Disconnect the mains plug from the mains socket if you want to switch the unit OFF completely.
5.2 Auto-Standby / Auto-Wake
[Auto-Standby] The soundbar automatically turns to Standby mode after about 15 minutes if the TV or the external soundbar is disconnected (or USB, BT function bit playback pause), or switched off.
[Auto-Wake] If a TV or an external device is connected (AUX / OPTICAL / HDMI ARC socket), the unit will switch on automatically when the TV or the external device is switched on.
Auto-standby ON/OFF
Switch the soundbar on the optical mode, double click the (x2) and 2) buttons on the remote control to activate and deactivate the auto-standby:
| Auto Standby | |
| On | Your Soundbar has been programmed to enter Standby mode automatically when no audio is detected for 15 minutes. LED State: |Yellow blink quick for 3 times |
| Off | You can turn off the Auto Standby to keep your Soundbar always working. LED State: |Yellow blink slowly for 3 times |
Activate and Deactivate the Auto-Wake:
Turn on the soundbar, press the[ ] [ ] button at the same time on the soundbar to activate and deactivate the auto-wake:
| Auto-Wake | |
| On | The Soundbar will wake up automatically when audio input is detected. LED State: White>White>Green>Green |
| Off | The Soundbar does not wake up automatically. LED State: White>White>Red>Red |
5.3 Select Modes
- Press the (SOURCE) button repeatedly on the unit or on the remote control to select the desired mode.
The indicator light on the front of the main unit will show which mode is currently in use.
| ●amp Mode |
| ●Red Standby |
| ●Green AUX |
| ●Blue BT (Bluetooth) |
| ●Orange OPTICAL |
| ●Light blue COAXIAL |
| ●White HDMI ARC |
| ●Yellow USB |
5.4 Adjust the Volume
- Press the VOL /VOL- buttons on the unit or on the remote control to adjust the volume.
If you wish to turn the sound off, press the (MUTE) button on the remote control. Press the (MUTE) button again or press the VOL button to resume normal listening.
5.5 Turn the Surround Sound ON/OFF
- Press the SURR button on the remote control to turn on the surround sound. Press this button again to turn off the surround sound.
5.6 Select Equalizer (EQ) Effect
While playing, press the EQ button on the remote control to select desired preset equalizers: music, movie, news, game, sport, night.
5.7 Adjust the Bass/Treble
- Press the BASS / buttons on the remote control to adjust bass level.
- Press the TREBLE / buttons on the remote control to adjust treble level.
5.8 Adjust the Brightness
- Press the DIMMER / button on the remote control to select brightness level.
5.9 Voice prompts ON/OFF
- Turn the soundbar on, press and hold the [U] and [VOL] button on the soundbar to enable or disable voice prompts.
| Status | LED State |
| Notice OFF | (Solidly red and white LEDs flash 3 times) |
| Notice ON | (Solidly green and white LEDs flash 3 times) |
5.10 Factory reset
Reset device to default setting.
- Switch the soundbar on the optical mode, press and hold the [U] button on the soundbar, the soundbar will enter factory reset mode and turn to standby state.
MODE DEFAULT
SOURCEARC
Volume 30
Surround ON
Dimmer MAX
Bass 0
Treble 0
EQ Music
Auto Wake OFF
Auto Standby ON (Except the United States, Canada)
Notice ON
6. AUX/ OPTICAL/COAXIAL/HDMI ARC Operation
1 Ensure that the unit is connected to the TV or audio device.
2 Press the button repeatedly on the unit or on the remote control to select AUX, OPTICAL, COAXIAL, HDMI ARC mode.
3. Operate your audio device directly for playback features.
4 Press the VOL button to adjust the volume to your desired level.
Tip: The Soundbar may not be able to decode all digital audio formats from the input source. In this case, the Soundbar will mute. This is NOT a defect. Ensure that the audio setting of the input source (e.g. TV, game console, DVD player, etc.) is set to PCM or Dolby Digital (Refer to the user manual of the input source device for its audio setting details) with HDMI ARC / OPTICAL/ COAXIAL input.
7. USB Operation
1 Insert the USB device.
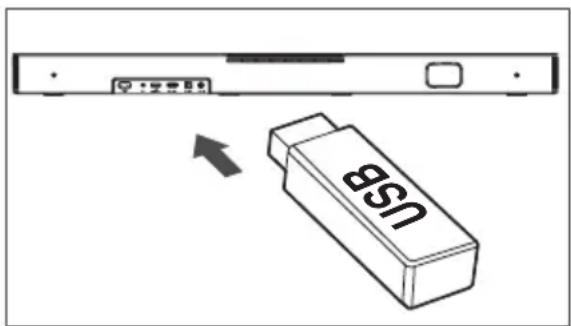
2 Press the button repeatedly on the unit or on the remote control to select USB mode.
3 During playback:

Start, pause or resume play

Skip to the previous or next track
Tips:
The unit can support USB devices with up to 32 GB of memory.
- This unit can play WAV / WMA / MP3 / FLAC.
This product may not be compatible with certain types of USB storage devices.
If you use a USB extension cable, USB hub, or USB Multifunctional card reader, the USB storage device may not be recognized.
- Do not remove the USB storage device while reading files.
8. Bluetooth Operation
Through Bluetooth, connect the Soundbar with your Bluetooth device (such as an iPad, iPhone, iPod touch, Android phone, or laptop), and then you can listen to the audio files stored on the device through your Soundbar speakers.
First time pairing
1 Press the (SOURCE) button on the unit or the × button on the remote control to select Bluetooth mode. The Blue indicator will flash slowly and the white running horse lamp rolling.
2 Activate your Bluetooth device and select the search mode.
3 Select "Hisense HS2000" in the pairing list. After audio prompt, the system is successfully connected and Blue indicator will light up solidly.
If you want to connect your soundbar with another Bluetooth device, press and hold the button on the remote control to disconnect the currently connected Bluetooth device. Follow step 2-3 to pair your Bluetooth device.
To disconnect the Bluetooth function, you can:
- Switch to another function on the unit.
- Disable the function from your Bluetooth device.
- Press and hold the × button, the Bluetooth device will be disconnected from the soundbar.
Listen to music from Bluetooth Device
- If the connected Bluetooth device supports Advanced Audio Distribution Profile (A2DP), you can listen to the music stored on the device through the player.
-
If the device also supports Audio Video Remote Control Profile (AVRCP), you can use the player's remote control to play music stored on the device.
-
Pair your device with the player.
- Play music via your device (if it supports A2DP).
- Use supplied remote control to control play (if it supports AVRCP).
11
Start, pause or resume play
Skip to the previous or next track
Tips:
- The operational range between the Sound Bar and the device is approximately 8 metres.
- Before connecting a Bluetooth device to the Sound Bar, ensure you know the device's capabilities.
- Compatibility with all Bluetooth® devices is not guaranteed.
- Any obstacle between the device and the Sound Bar can reduce operational range.
- Keep this player away from other electronic devices that may cause interference.
- The player will also be disconnected when your device is moved beyond the operational range.
9. Troubleshooting
To keep the warranty valid, never try to repair the system yourself. If you encounter problems when using this unit, check the following points before requesting service.
No power
- Ensure that the AC cord of the apparatus is properly connected.
- Ensure that there is power at the AC outlet.
- Press standby button to turn the unit on.
Remote control does not work
-
Before you press any playback control button, first select the correct source.
-
Reduce the distance between the remote control and the unit.
- Insert the battery with its polarities (+/-) aligned as indicated.
- Replace the battery.
- Aim the remote control directly at the sensor on the front of the unit.
No sound
Make sure that the unit is not muted. Press or VOL+/- button to resume normal listening.
- Press button on the unit or on the remote control to switch the soundbar to standby mode. Then press the button again to switch the soundbar on.
- Ensure the audio setting of the input source (e.g. TV, game console, DVD player, etc.) is set to PCM or Dolby Digital mode while using digital (e.g. HDMI, OPTICAL, COAXIAL) connection.
- The unit may not be able to decode all digital audio formats from the input source. In this case, the unit will mute. This is NOT a defect. device is not muted.
I can't find the Bluetooth name of this unit on my Bluetooth device for Bluetooth pairing
- Ensure the Bluetooth function is activated on your Bluetooth device.
- Ensure you have paired the unit with your Bluetooth device.
The Soundbar turns off
- When the unit's external input signal level is too low, the unit will be turned off automatically in 15 minutes. Please increase the volume level of your external device.
10. Specifications
| Brand Hisense | |
| Model HS2000 |
Soundbar
EN
| Power Supply 100-240V~ 50/60Hz | |
| Power Consumption | 50 W< 0.5 W (StandBy) |
| USB | 5V=500mAHi-Speed USB (2.0) / FAT32 / FAT1632G (max), WAV / WMA / MP3 / FLAC. |
| Dimension (WxHxD) 800 x 60 x 105 mm / 31.5" x 2.4" x 4.1" | |
| Net weight 2.22 kg | |
| Audio input sensitivity 700mV | |
| Frequency Response 40Hz - 20KHz | |
| Operating Temperature 0°C - 45°C | |
Wireless Specification (EU)
| Bluetooth version / profiles | V 5.3 (A2DP, AVRCP) |
| Bluetooth frequency range | 2400 MHz ~ 2483.5 MHz |
| Bluetooth Max. transmitting power | ≤ 5 dBm |
Amplifier (max audio power)
| Total 240 W | |
| Soundbar 60 W x 2 + 120 W (built-in Subwoofer) |
Remote Control
| Distance/Angle | 19.7 feet (6m) / 30° |
| Battery type | AAA (1.5V x 2) |
- Design and specifications are subject to change without notice.
Hisense
Kit du support mural
Support (× 2) / Prise murale (× 2) / Vis (× 2) / Vis de support (× 2)
6. Functionarea in modul AUX/OPTICAL/COAXIAL/HDMI ARC
Specifications wireless (UE)
| Versiune/profiluri Bluetooth Gama de freçvente Bluetooth Putere maximalà de transmisie Bluetooth | V 5.3 (A2DP, AVRCP) 2400 MHz ~ 2483,5 MHz ≤ 5 dBm |
Amplificator (putere audio maxima)
| Total 240 W |
| Bara de sunet 60 W × 2 + 120 W (subwoofer incorporat) |
Telecomanda
| Distanță/Unghi 6 m (19,7 ft) / 30° | |
| Tipul bateriei | AAA (1,5 V × 2) |
② CBeToaNoaHm HMaKaTOpN
| ●Светлина | Рек imm |
| ●Черван Готовноct | |
| ●Зелен AUX | |
| ●СиН BT (Bluetooth) | |
| ●Оразшиев OTТУЕH | |
| ●Светлосин | KOAKСИАLEH |
| ●Бал | HDMI ARC |
| ●Жыт | USB |
③ ① ByToH (BKJIIOUBAHE/M3KJIIOUBAHE)
PpeBkIIOUba cayHd6apa MeKdy BkIIOueH peKIM n peKIM Ha rTOBHOCT.
4 ByTOH (M3TOUHHK)
I36op Ha ΦyHKUraTa 3a Bb3npOn3BexJaHe.
5 ByToHn (cHna Ha 3Byka)
YBEnuBaHe/HaMaJIbAHe Ha CnlaTaHa 3ByKa.
⑥ ACIN~rHe3do
Cbbp3BaHe KbMeJKeKtpnueckKaTaMpexka.
AUXrHe3do
Ihe3o 3a BbHnHO aydno yctpoCTBO.
8 USBrHe3do
IocTabete USB yctpoiCTBOTO 3a Bb3npou3BexKaHe Ha My3nka.
HDMIARCrHe3do
Cbbp3BaHe KbM TeJebn3Op Upe3 HDMI Ka6en.
10 OPTICAL rHe3do
Cbpb3BaHe KbM ONTnueH ayDnO n3XoHa TeIeBn3Opa.
11 COAXIAL He3do
Cbpb3BaHe KbM KOAKCNJAEH aydno n3XoJ Ha TeJIeBn3Opa.
12 Tockn 3a cTeHHo OKaYBaHe
2.2ДиuctaHNoHHo ynpabJeHne
①
0
IpeBknUcbya ypeDa MeJy BKJIIOUeH peKIM n peKIM Ha IOTOBHOCT.
②
(ИЗТОЧИК)
I36op Ha yHKunraTa 3a Bb3npOn3BexKaHe.
3
SURP PerynnpaHe Ha BKJI./I3KJI. Ha cbpaynH 3ByK.
(4)
(BT)
I36op Ha Bluetooth pexm. Hatnche Te 3aDpBXTe (BT) 6yToHa , 3a Da BKNIOUHTe fYHKUraTa 3a CDBOBAHe B pexm Bluetooth nIN Da n3KIOUHTe CbIeCTByBaIoTO CdBEOHO c Bluetooth yctpoCTBO.
⑤
EKB.ИЗбогнпpeДварNTENHO3aДаEN 3ByKOB eФeKT.
⑥

Ppeckaane do npeinnneH/cneDbaa 3Byko3anC BBT/USB pexm.
7
VOL/VOL
YBeIuHaBaHe/HaMaIyBaHe Ha CnJaTa Ha 3ByKa.
8

Bb3npoun3BekJaHe/nay3a/Bb3ctaHOBaHe Ha Bb3npoun3BexKaHeTo BBT/USB pexm.
9
BASS /
PerynnpaHe Ha HNBOTo Ha HNCNtTe YecToTn.
10
TREBLE /
Perynpahe Ha HNBOTO Ha BVCOKITE YecToTNI.
11
DIMMER /
PerynnpaHe Ha npKoCTHa CBeToDnOdnte.
12

(4)KIRANSAHARA
N3KJIIOUBaHe Ha 3Byka NIIIN NOBTOPOB BKNIOUBAHe.
3. Пodedотовka
HaTnuchTe OTHOBO 6yToHa
0,3aДaВbpeTe
yctpoiCTBOTO BpeKIM Ha FOTOBHOCT.
Ako nckate da N3KJIIOUHTE ypea HanbJHo,
I3KJIIOUcTe IeNcena O T 3axpaHbua KONTaKT.
5.2 ABTomaTHuHa FOToBHOCT/ ABTomaTHUHO Cb6yKJaHe
[Auto-Standby] Cayn6apbT aBtOMaTHNO pemHnBaB PexIM Ha rotOBHOCT cIeO OKoI 15 MNHyTN, aKO TeLeBn3OpbT nIN BbHNHnA Cayn6ap (nIN USB, BT YHKsraTa e Ha Naay3a Ha Bb3pOn3BExKaHe) caN3KnIOueHn INC N3KnIOueHo 3axpaHbAHe.
[Auto-Wake] Ako nma cBbP3aH TeLEBn3Op nIN BbHNo yctpoiCTBO (AUX / OPTICAL / HDMI ARC rHe3do),ypeBt ige Ce BKnIOuAn ABToMaTuH No pIn BKnIOUbaHe Ha TeLEBn3Opa nIN BbHNoHOTo yCTpoiCTBO.
BKJIIOUYEHA/N3KJIIOUYEHA ABTomaTHHa rTOBOHOCT
PpeBknOteCayH6apaHaontnueh peKm,paKaHeTe DBA nTn Bbpxy 6yToHnTe (x2) n(2) Ha
ДиСТаHцИоHHTOУпраВлeнe,За ДаakTиВираTe И DeakTиВирaTe aBTOMaTиHО ПpeMnHaBaH e B pexm Ha rOTOBHOCT:
AKTHBHPaHE HJeakTHBHPaHE Ha ABTOMaTHHOTO Cb6yKaHa:
BknIOUeTe cayH6apa,HaTnCHeTe n3aIpbjXte eNHOBPemEHNO 6yToHa [ ] [ ] Ha cayH6apa,3a da aKTNbIPate n DeaKTNbIPate fYHKunraTa 3a ABTomaTHO cb6yKaDaHe:
CnyuShaHeHaMy3nKaOTBluetooth yCTpOiCTBO
-Ako Cbbp3aHOTo Bluetooth yctpoiCTBO noDlbpka Pa3uipen npoqnil 3a aydno pa3npocTpaHeHne (A2DP), moKeTe da cnyuata Mey3nKaTa, 3aIncHa BVcTpoiCTBTO, Upe3 nIeNbpa.
-Ako yctpoiCTBTO IOdIbPka n npoΦnJ 3a DnCTaHcUHOynpaBneHne Ha ayDIO-BuJeO yctpoiCTBO (AVRCP), MoXeTe Da n3NoJ3BaTe DnCTaHcUHOHTo ynpaBleHne Ha npeJbpa, 3a Da Bb3pOuN3BExJaTe My3NuKa, CbXpaHeHa BVyCTPOICTBOTO.
- CdBoTeyctpoiCTBOToC nneIbpa.
- Bb3npoN3BexJaIte My3nKa ype3 ycTpoNcTBOTO (aKO TO noDlbpka A2DP).
3.ИЗнOLЗВаiteпpeДОCTaBEHOTо ДИСТаHцИОНHoуравлеси,здуравлЯВATEБЗПОНЗВЕЖДанeto(aKTo noДыржАVRCP).

CtaptnpaHe, nay3a nnBb3ctaHOBAhe Ha Bb3npOn3BExKaHeTo

PpeKaaHe Ha npEiunHnIynn CneBaun3ByKO3annC
CbBETn:
Pa60THnIaT 0xbaT MeKdy cayHd6apa n yctpoiCTBOTO e OKoNo 8 MeTpa.
-Прени CBbp3BaHe Ha Bluetooth® yctpoiCTBO C To3nypei ce yBepTe, Ye n03HaBaTe Bb3MOxHOCHTNe Ha yctpoiCTBOTO.
CbBmecTUMOCCTa CBCNUKn Bluetooth yctpoiCTBa He e rapaHTnpaHa.
BcKaIO npEnrTCTBne MeKdy TOBa yCToPiCTBO n cayHd6apa MoKe Da HaMaII pa6OThnO6xbat.
-ДрьжтTo3nПлельдалeчOTdpyгнeелктpoHHnyctpoiCTBa,KoNTOMORaTda npuHHTcMyeHna.
-Пельрт ще се ИЗКЛЮЧи КORAТУСТРОДТВОТСЕпеметсиИЗБВH pa6OTHNЯ 06XBAТ.
9.Отстараимяванон。
3a da octane rapaunra BaHnHa, HNKora He ce ONNTBaTe Da pemOHnpate cncTeMaTa cam. Ako ce c6nbckate C npo6nmpn n3no3BaHeTo Ha ypeDa, npedn da Ce 06bphete KbM cepBn3, npOBepe CneHNTE NyHKTOBe.
HЯма зхсанын.
- YBepete ce, Que npomeHJIIBOTOKOBnT Ka6eI Ha ypeJa e Cbpb3aH npaBnHO.
- YBepeTe ce, Ye B KOHTaKTa 3a npOMEHnB TOK mA 3axpaHbaHe.
- Hatnche 6yToHa 3a peXIM Ha roTOBHOCT, 3a da BKIOHTE ypeHa.
DnctaHcnoHTo ynpabHeHne he pa60Tu
-Предида натус悔Te Няков OT 6утонITEаупавлелно HabвзпюиЗБжданeto,пьрбои36ерete пабиннИЯ n3TOUHNK.
- HamaIepea3CToHHeToMeXyIINCTaHcHnHOHTO ynpabLnHneNypeda.
- Поставе 6atepmaTaka, Ye noJIocuTe (+/-) da ca opneHTupaHn, KaKTo e NOCOHeO.
3aMeHeTe 6aTePnIraT.
Hacoute TnctaHIOHHOTy npabHeNHe KbM ceH3opa OTnpedHaTa CtpaHa Ha ypeda.
HЯмаЗByK
- YBepTe ce, Ye 3ByKbT Ha ypeHa He e n3KnIoueH. Hatnche Tnn6yToHa VOL+/-, 3a da ce BbpHeTe KbM HopMaJIHHra pexm Ha 3Byka.
HaTnCHete 6yToHa Ha ypeHa nn Ha DCtAHCIOHHOT O npabIeHne,3a Da BkIIOHTe cayH6apaB pexKm Ha rotOBHOCT.CneToba HaTnCHete 6yToHa OTHOBO,3a Da BkIIOHTe cayH6apa. - YBepTe ce, Ye NaCTPOkKaTa Ha 3Byka Ha BXOJHnI n3ToUHnK (HaNP. TeNEBn3Op, INrPoBa KOH3OJa, DVD nneBp n.T.H.) e 3aJaDeHa Ha pexm PCM nn Dolby Digital, Korato n3NoJ3BaTe uΦpoBa (HaNP. HDMI, ONTNUHA, KOAKCNAJIHA) Bpb3Ka.
- YpeBMOKeJaHeBcCTOHaNEdaDeKOHaPa BCNUKnUΦpOBaayDnOΦOpMaTOnOTBXODHn N3TOuHnK.BTo3nCnya3BykBTHa ypeDaue6bJe N3KIOUeH.ToBaHEeΦeKT,yctpoiCTBOTo He c N3KIOUeH 3ByK.
He mora da hamepia Bluetooth nmeTo Ha To3n ypeB MoeTo Bluetooth ycTpoiCTBO 3a cDBoABe ue3 Bluetooth
- YBepTe ce, che fynkunra Bluetooth e aKTnBnpaHa Ha BaWEto Bluetooth yCTpoiCTBO.
- YBepete ce, ye cTe cDBoUInypeDa C BaWeToe Bluetooth yCTpOInCTBO.
Caynd6apbTce n3KIOUvBa
Korato BbHnHnT BxOeH CnHnKbM ypeJa e TBbpIe cna6, ypeBt ige ne 3KIOuN aBTOMaTHoCne15 MHyTu. YBeenuTe CnIaTa Ha 3Byka Ha BbHnHOTO yCTPOINCTBO.
10. TexHnueckn daHHN
YcunBaTeI(MAkCmMaHa 3ByKObMoUHOCT)
| Ов钮 240 W |
| Саундамр 60 W × 2 + 120 W (Вградан субуфер) |
The Bluetooth® word mark and logos are registered trademarks owned by Bluetooth SIG, Inc. and any use of such marks by Hisense is under license. Other trademarks and trade names are those of their respective owners.

The terms HDMI, HDMI High-Definition Multimedia Interface, HDMI trade dress and the HDMI Logos are trademarks or registered trademarks of HDMI Licensing Administrator, Inc.
Dolby Audio
Manufactured under license from Dolby Laboratories. Dolby, Dolby Audio, and the double-D symbol are trademarks of Dolby Laboratories.
dt
For DTS patents, see http://patents.dts.com. Manufactured under license from DTS, Inc. (for companies headquartered in the U.S./Japan/Taiwan) or under license from DTS Licensing Limited (for all other companies). DTS, Digital Surround, Virtual:X, and the DTS logo are registered trademarks or trademarks of DTS, Inc. in the United States and other countries. © 2021 DTS, Inc. ALL RIGHTS RESERVED.

EN Roku, the Roku logo, Roku TV, Roku TV Ready, and the Roku TV Ready logo are trademarks and/or registered trademarks of Roku, Inc. This product is Roku TV Ready-supported in the United States, Canada, United Kingdom and Mexico. Countries are subject to change. For the most current list of countries in which this product is Roku TV Ready-supported, please email rokutvready@roku.com.