USER MANUAL AX3120G HISENSE
1. Important Safety Instructions 3
1.1 Safety 3
1.2 Warning 4
1.3 Supported Input Audio Formats 5
2. What's in the Box 6
3. Identifying the Parts 7
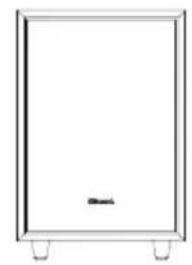
3.1 Main Unit 7
3.2 Wireless Subwoofer 7
3.3 Remote Control 8
4.Preparations 9
4.1 Prepare the Remote Control 9
4.2 Replace the Remote Control Battery 9
4.3 Placement and Mounting 9
4.4 Mounting the Soundbar on the Wall 10
5. Connections 11
5.1 Dolby Atmos 11
5.2 DTS: X 11
5.3 Use the HDMI Socket 11
5.4 Use the OPTICAL Socket 12
5.5 Connect to AUX Socket 12
5.6 Connect Power 12
5.7 Pair up with the Subwoofer 13
6. Basic Operation 13
6.1 Standby/On 13
6.2 Auto-Standby / Auto-Wake Feature 13
6.3 Select Modes 14
6.4 Adjust the Bass/Treble Level 14
6.5 Turn the Surround Sound ON/OFF 14
6.6 Adjust the Soundbar's Volume 14
6.7 Adjust the Brightness 14
6.8 Select Equalizer (EQ) Effect 14
6.9 Set the Audio Delay (AV SYNC) 14
7. DTS: X Operation 15
7.1 DRC / Dialog Control / Neural:X / Virtual:X Features 15
8. HDMI eARC/HDMI ARC, HDMI IN, OPTICAL, AUX Operation 15
9. Bluetooth Operation 16
9.1 Pair Bluetooth-enabled Devices 16
9.2 Listen to Music from Bluetooth Device 16
10. USB Operation 17
12. Troubleshooting 18
13. Specifications 20
1. Important Safety Instructions
| CAUTION
RISK OF ELECTRIC SHOCK
DO NOT OPEN | |
| AVIS |
| RISQUE DE CHOC
ÉLECTRIQUE NE PAS OUVRIR |
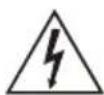
The lightning ash with arrowhead symbol, within an equilateral triangle, is intended to alert the user to the presence of uninsulated "dangerous voltage" within the product's enclosure that may be of sufficient magnitude as to constitute a risk of electric shock to persons.

The exclamation point within an equilateral triangle is intended to alert the user to the presence of important operating and maintenance (servicing) instructions in the literature accompanying the appliance.
Safety1.1
1 Read these instructions - All the safety and operating instructions should be read before this unit is operated.
2 Keep these instructions - The safety and operating instructions should be retained for future reference.
3 Heed all warnings - All warnings on the appliance and in the operating instructions should be adhered to.
4 Follow all instructions - All operating and usage instructions should be followed.
5 Do not use this unit near water - The appliance should not be used near water or moisture - for example, in a wet basement or near a swimming pool or similar location.
6 Clean only with a dry cloth.
7 Do not block any ventilation openings. Install in accordance with the manufacturer's instructions.
8 Do not install near any heat sources such as radiators, heaters, stoves, or other apparatus (including amplifiers) that produce heat.
9 The unit is supplied with a standard mains lead and moulded plug which for safety reason must not be modified. If the provided plug does not fit into your wall socket, consult an electrician for replacement of the obsolete mains socket.
10 Protect the power cord from being walked on or pinched particularly at plugs, convenience receptacles, and the point where they exit from the apparatus.
11 Only use attachments/accessories specified by the manufacturer.
12 Use only with the cart, stand, tripod, bracket or table speci fied by the manufacturer, or sold with the unit. When a cart or rack is used, use caution when moving the cart/ unit combination to avoid injury from tip-over.
13 Unplug the unit during lightning storms or when unused for long periods of time.
14 Refer all servicing to qualified personnel. Servicing is required when the unit has been damaged in any way, such as power supply cord or plug is damaged, liquid has been spilled or objects have fallen into the unit, the unit has been exposed to rain or moisture, does not operate normally, or has been dropped.
15 This equipment is a Class II or double insulated electrical appliance. It has been designed in such a way that it does not require a safety connection to electrical earth.
16 Do not place liquid filled objects such as vases on the unit.
17 Minimum distance around the unit for sufficient ventilation is 5cm.
18 The ventilation should not be impeded by covering the ventilation openings with items, such as newspapers, table-cloths, curtains, etc.
19 No naked flame sources, such as lighted candles, should be placed on the unit.
20 Batteries should be recycled or disposed of as per state and local guidelines.
21 The unit can be used in moderate or tropical climates.
Caution:
- Use of controls or adjustments or performance of procedures other than those described herein, may result in hazardous radiation exposure or other unsafe operation.
- To reduce the risk of fire or electric shock, do not expose this unit to rain or moisture. The unit must not be exposed to dripping or splashing and objects filled with liquids, such as vases, must not be placed on unit.
- The mains plug/appliance coupler is used as the disconnect device, the disconnect device must remain readily operable.
- Danger of explosion if battery is incorrectly replaced. Replace only with the same or equivalent type.
1.2 Warning
be exposed to excessive heat such fires, or other direct heat sources.
voltage of this unit to see if it is identical to the voltage of your local power supply.
fields.
amplifier
receiver.
system, unplug the system and have it checked by qualified personnel before operating it any further.
solvents as this may damage the finish. Use a clean, dry or slightly damp cloth.
outlet, always pull directly on the plug, never yank on the cord.
modific
expressly approved by the party responsible for compliance will void the user's authority to operate the equipment.
The rating label is pasted on the bottom or back of the equipment.
This equipment should be installed and operated with minimum distance 20cm between the radiator&your body.

Battery usage CAUTION
To prevent battery leakage which may result in bodily injury, property damage, or damage to the apparatus:
Install all batteries correctly, + and - as marked on the apparatus.
- Do not mix old and new batteries.
- Do not mix alkaline, standard (Carbon-Zinc) or rechargeable (Ni-Cd, Ni-MH, etc.) batteries.
- Remove batteries when the unit is not used for a long time.

Correct Disposal of this product. This marking indicates that this product should not be disposed with other household wastes throughout the EU.
To prevent possible harm to the environment or human health from uncontrolled waste disposal, recycle it responsibly to promote the sustainable reuse of material resources. To return your used device, please use the return and collection systems or contact the retailer where the product was purchased. They can take this product for environmental safe recycling.

We hereby declares that this product is in compliance with the essential requirements and other relevant provisions of Directive 2014/53/EU.

Bluetooth
The Bluetooth® word mark and logos are registered trademarks owned by Bluetooth SIG, Inc. and any use of such marks by Hisense is under license. Other trademarks and trade names are those of their respective owners.

The terms HDMI and HDMI High-Definition Multimedia Interface, and the HDMI Logo are trademarks or registered trademarks of HDMI Licensing Administrator, Inc.
Dolby Atmos
Dolby, Dolby Atmos, and the double-D symbol are registered trademarks of Dolby Laboratories Licensing Corporation. Manufactured under license from Dolby Laboratories. Confidential unpublished works. Copyright © 2012-2021 Dolby Laboratories. All rights reserved.

| Format | Function |
| OPTICAL | HDMIARC | HDMI HDMIeARC | IN |
| LPCM 2ch | ● ● ● | | | ● |
| LPCM 5.1ch | -- -- | ● | | ● |
| LPCM 7.1ch | -- -- | ● | | ● |
| Dolby Atmos - Dolby TrueHD | -- -- | ● | | ● |
| Dolby Atmos - Dolby Digital Plus | -- ● ● | | | ● |
| Dolby TrueHD | -- -- | ● | | ● |
| Dolby Digital Plus | -- ● ● | | | ● |
| Dolby Digital | ● ● ● | | | ● |
| DTS | ● ● ● | | | ● |
| DTS-ES Discrete 6.1 | ● ● ● | | | ● |
| DTS-ES Matrix 6.1 | ● ● ● | | | ● |
| DTS 96/24 | ● ● ● | | | ● |
| DTS-HD High Resolution Audio | -- -- | ● | | ● |
| DTS-HD Master Audio | -- -- | ● | | ● |
| DTS-HD LBR | -- -- | ● | | ● |
| DTS:X | -- -- | ● | | ● |
:Supported format.
:Unsupported format.
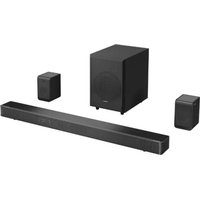
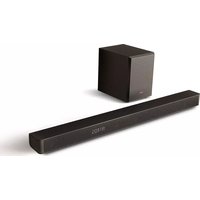
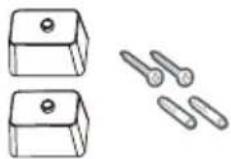
2. What's in the Box

Main Unit
Wireless Subwoofer

AC Power Cord x 2
For Main Unit/Wireless Subwoofer

* Plug type varies by region

Optical Cable

HDMI Cable

Brackets (x2)/Bracket Screw (x2) / Wall Anchors (x2)
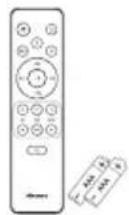
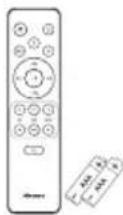
Remote Control / AAA Batteries x 2
User Manual / Quick Start Guide
- Power cord quantity and plug type vary by regions.
- Images, illustrations and drawings shown on this User Manual are for reference only. Actual product may vary in appearance.
Design and specifications are subject to change without notice.
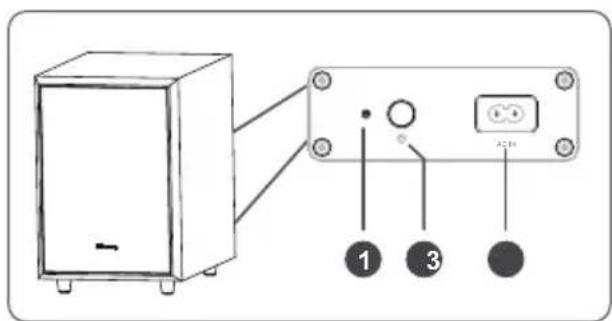
3. Identifying the Parts
3.1 Main Unit
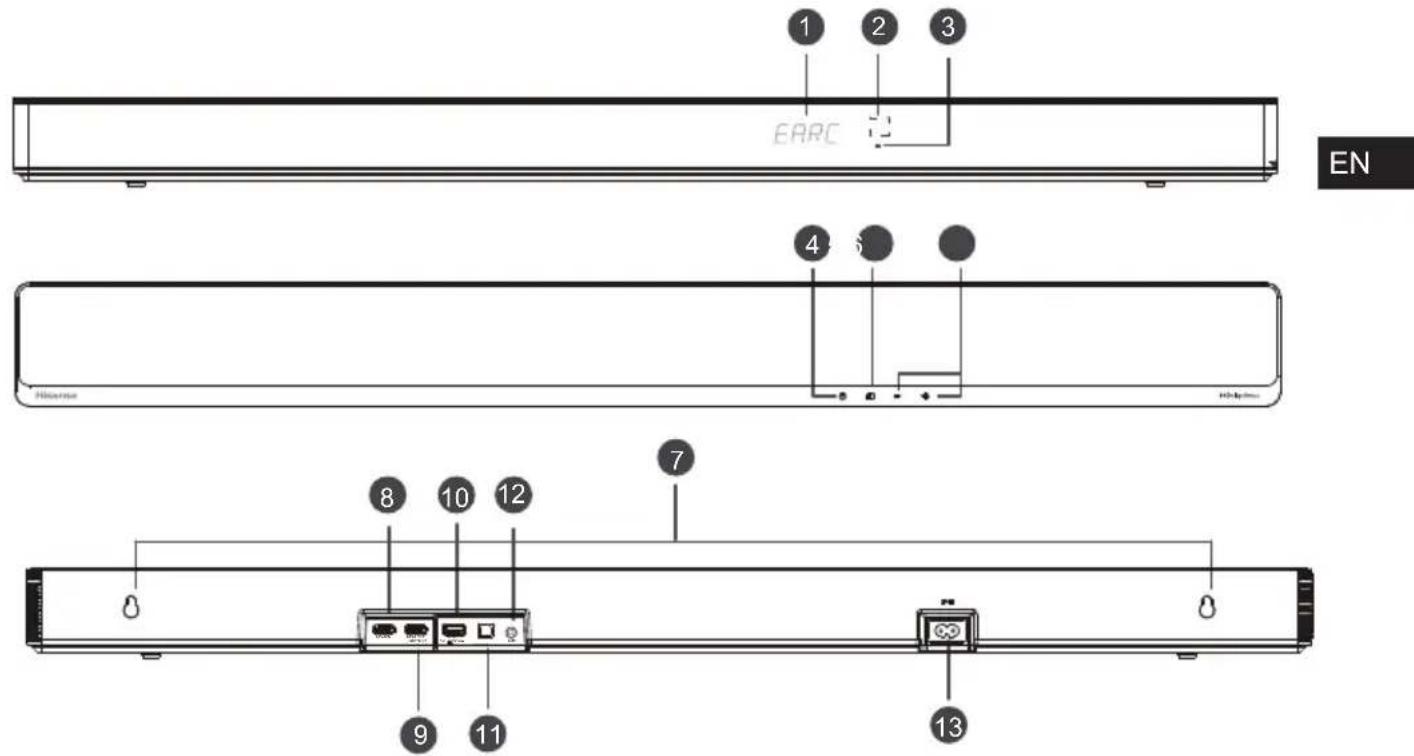
① Display Window
Show the current status.
Remote Control Sensor
Receive signal from the remote control.
③ Red Standby Indicator
- Constant on In Standby mode
(4) (ON/OFF) Button
Switch the unit between ON and STANDBY mode.
SOURCE)Button
Select the play mode.
Increase/decrease the volume level.
⑦ Wall Mount
Install the wall mounting screws into the
wall mount of the unit.
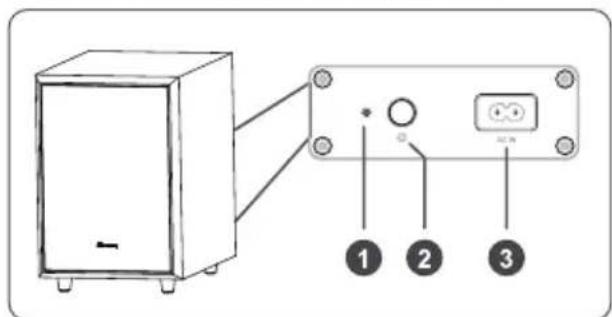
3.2 Wireless Subwoofer
Indicator
- Fast blink The subwoofer in pairing mode
- Constant on | Connected / Paired successfully
- Slow blink Connection / Pairing failed
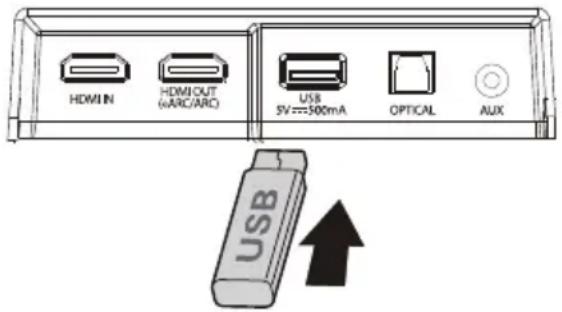
HDMI IN Socket
For connecting HDMI source devices, such as a DVD player, Blu-ray Disc^TM player, or gaming console.
HDMI OUT (TV eARC/ARC) Socket
The port for connecting a TV. The port supports the eARC/ARC HDMI feature, which allows the soundbar to play audio that originates on the connected TV.
10 USB Socket
Insert the USB device to play music.
1 OPTICAL Socket
Connect to the OPTICAL OUT socket on an external device.
12 AUX Socket
Connect to an external audio device.
⑬ ACIN Socket
Connect to the power supply.

| 2 seconds | Clear the pairing record and enter to pairing mode |
③ AC IN Socket
Connect to power supply.
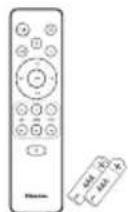
3.3 Remote Control
Switch the unit between ON and STANDBY mode.
(2) (SOURCE) Select the play mode.
③ SURR Adjust the surround ON/OFF.
4 (Bluetooth) button to activate the pairing function in Bluetooth mode or disconnect the existing paired Bluetooth device.
⑤ EQ Select MOVIE/MUSIC/GAME/NEWS/SPORT/NIGHT/AI
6 Skip to previous/next track in Bluetooth / USB mode.
VOL+/VOL- Increase/decrease the volume level.
Play/pause/resume playback in Bluetooth / USB mode. Press and hold the button for 3s to enter setup menu. Confirm a selection.
BASS+/- Adjust bass level.
10 TREBLE+/- Adjust treble level.
DIMMER+/- Adjust display brightness.
12 (MUTE) Mute or resume the sound.

4. Preparations
4.1 Prepare the Remote Control
The provided Remote Control allows the unit to be operated from a distance.
Even if the Remote Control is operated within the effective range 19.7 feet (6m), remote control operation may be disrupted if there are any obstacles between the unit and the remote control.
If the Remote Control is operated near other products which generate infrared rays, or if other remote control devices using infrared rays are used near the unit, it may operate incorrectly. Conversely, the other products may operate incorrectly.
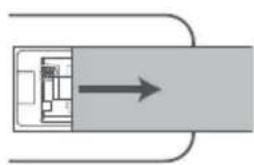
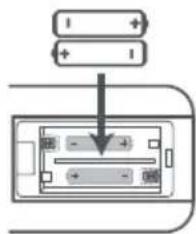
4.2 Replace the Remote Control Battery
1 Press and slide the back cover to open the battery compartment of the remote control.
2 Insert two AAA size batteries. Make sure the (+) and (-) ends of the batteries match the (+) and (-) ends indicated in the battery compartment.
3 Close the battery compartment cover.
- Do not use any batteries other than those specified.
- Do not mix new batteries with old ones.
- Never recharge a battery unless it is confirmed to be a rechargeable type.
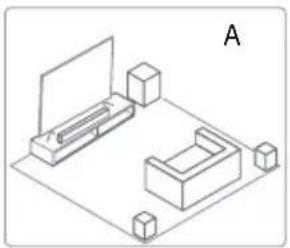
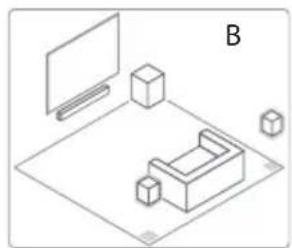
4.3 Placement and Mounting
Placement
A If your TV is placed on a table, you can place the unit on the table directly in front of the TV stand, centered with the TV screen.
B If your TV is attached to a wall, you can mount the unit on the wall directly below the TV screen.
Note: The unit should be placed to avoid covering the signal receiver of the TV or the remote of TV can not work.
Precautions Concerning Batteries
- Be sure to insert the batteries with correct positive " " and negative " " polarities.
- Use batteries of the same type. Never use different types of batteries together.
- Either rechargeable or non-rechargeable batteries can be used. Refer to the precautions on their labels.
- Be aware of your fingernails when removing the battery cover and the battery.
- Do not drop the remote control.
- Do not allow anything to impact the remote control.
- Do not spill water or any liquid on the remote control.
- Do not place the remote control on a wet object.
- Do not place the remote control under direct sunlight or near sources of excessive heat.
- Remove the battery from the remote control when not in use for a long period of time, as corrosion or battery leakage may occur and result in physical injury, and/or property damage, and/or fire.
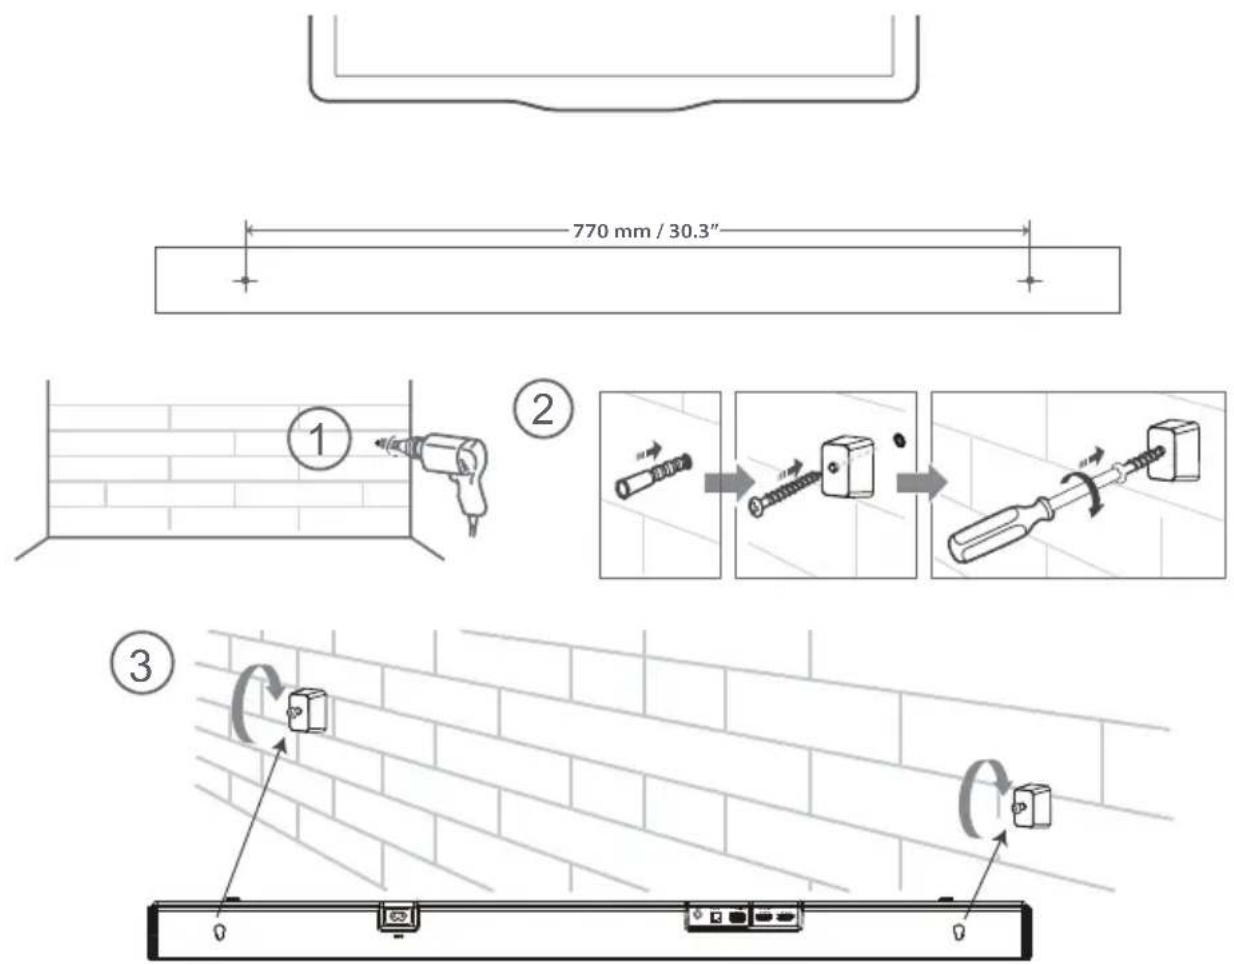
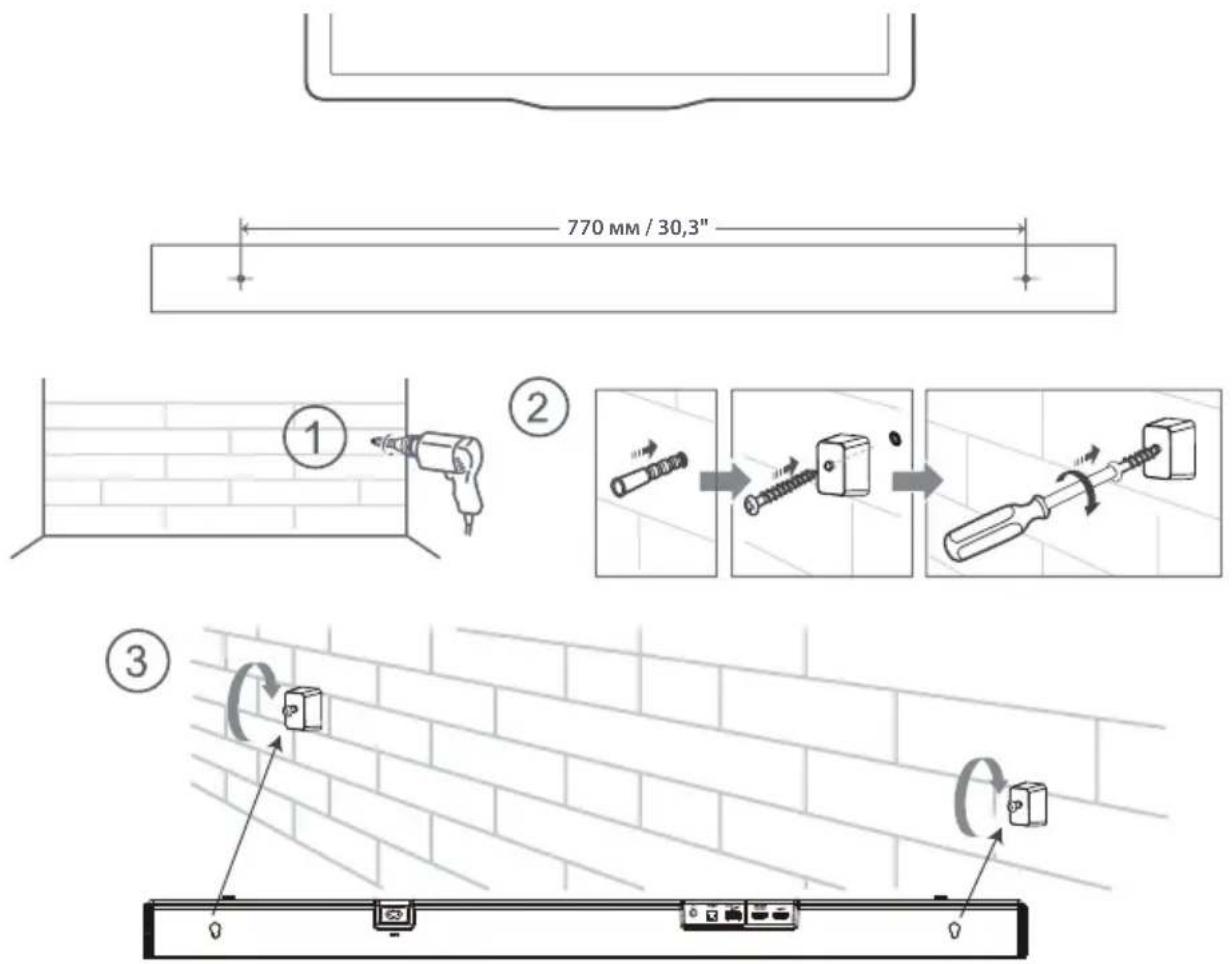
4.4 Mounting the Soundbar on the Wall
Note:
- Installation must be carried out by qualified personnel only. Incorrect assembly can result in severe personal injury and property damage (if you intend to install this product yourself, you must check for installations such as electrical wiring and plumbing that may be buried inside the wall). It is the installer's responsibility to verify that the wall will safely support the total load of the unit and wall brackets.
Additional tools (not included) are required for the installation.
- Do not overtighten screws.
- Keep this instruction manual for future reference.
Use an electronic stud finder to check the wall type before drilling and mounting.
WARNING
- To prevent injury, this unit must be securely attached to the floor/wall in accordance with the installation instructions.
- Suggested wall mounting height: ≤ 1.5 meters.
5. Connections
5.1 Dolby Atmos
Dolby Atmos gives you immersive listening experience by delivering sound in three dimensional space, and all the richness, clarity, and power of Dolby sound. For more information, please visit dolby.com/technologies/dolby-atmos
5.2 DTS:X
DTS: X, the border sound is no longer constrained by fixed-position speaker placement or specific channel signals.
For using Dolby Atmos® / DTS: X
Dolby Atmos® / DTS: X is available in HDMI eARC /ARC mode. For the details of the connection, please refer to "HDMI Connection". HDMI eARC /ARC
- To use Dolby Atmos / DTS: X mode, Your TV has to support Dolby Atmos / DTS: X or HDMI audio pass through.
- Make sure that "Bitstream", "RAW" or "No Encoding" is selected for bitstream in the audio output of the connected external device (e.g. Blu-ray DVD player, TV etc.).
- While entering Dolby Atmos / DTS: X / Dolby Digital / PCM format, the soundbar will show DOLBY ATMOS / DTS: X / DOLBY AUDIO / PCM AUDIO.
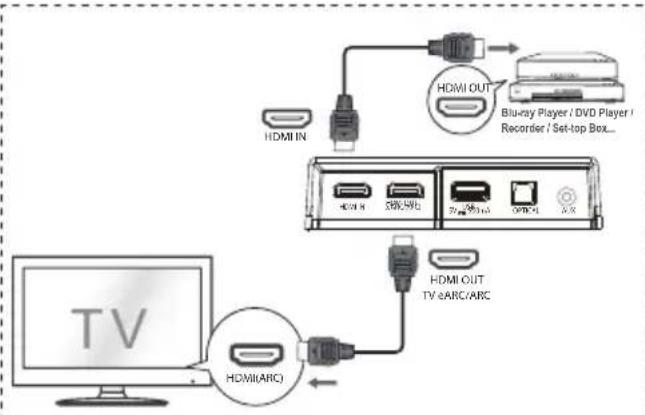
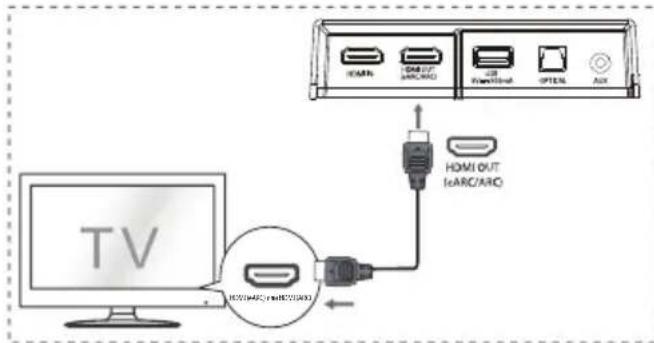
5.3 Use the HDMI Socket
Some 4K HDR TVs require the HDMI input or picture settings to be set for HDR content reception. For further setup details on HDR display, please refer to the instruction manual of your TV.
Using HDMI to connect the soundbar, AV equipment and TV:
Method 1: Standard HDMI
- If your TV is not HDMI ARC-compliant, connect your soundbar to the TV through a standard HDMI connection.
- Use an HDMI cable to connect the soundbar's HDMI OUT (eARC/ARC) socket to the TV's HDMI(ARC) socket.
- Use an HDMI cable to connect the soundbar's HDMI IN socket to your external devices (e.g. games consoles, DVD players and blu-ray).
Method 2:
eARC / ARC (Audio Return Channel)
The eARC / ARC (Audio Return Channel) function allows you to send audio from your ARC-compliant TV to your soundbar through a single HDMI connection. To enjoy the ARC function, please ensure your TV is both HDMI-CEC and ARC compliant and set up accordingly. When correctly set up, you can use your TV remote control to adjust the volume output (VOL +/- and MUTE) of the soundbar.
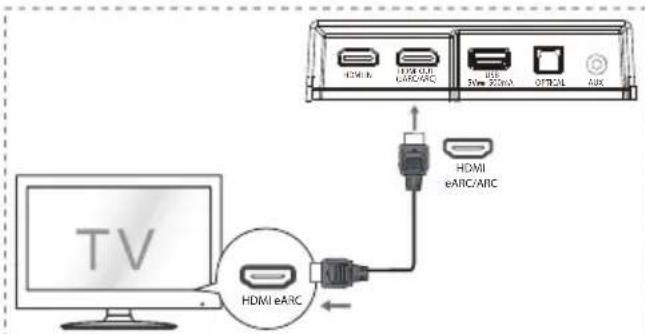
Connect the HDMI cable from unit's HDMI OUT (TV eARC/ARC) socket to the HDMI (ARC) socket on your ARC compliant TV. Then press the remote control to select HDMI eARC.
Tips:
function. HDMI-CEC and ARC must be set to On.
EC and ARC may differ depending on the TV. For details about ARC function, please refer to the owner's manual.
ARC capable as well as with an HDMI 1.4 cable (and higher).
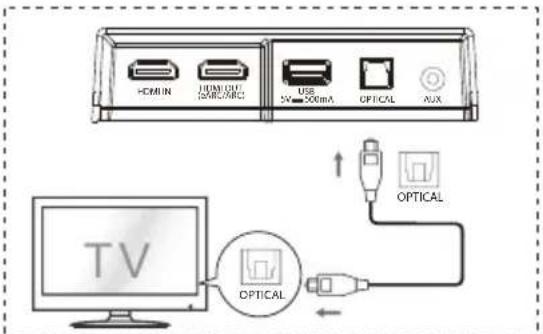
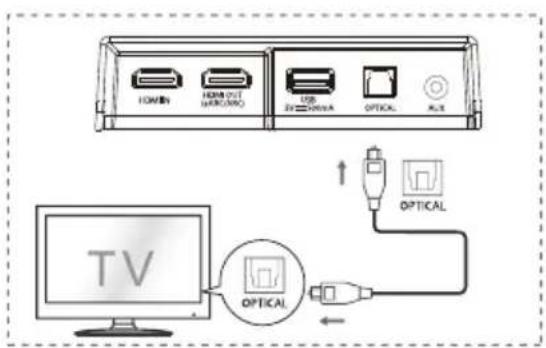
5.4 Use the OPTICAL Socket
- Connect an OPTICAL cable to the TV's OPTICAL OUT socket and the OPTICAL socket on the unit.
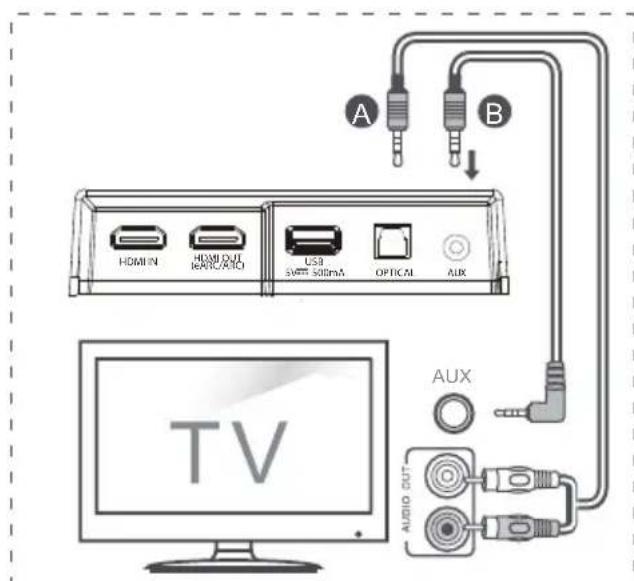
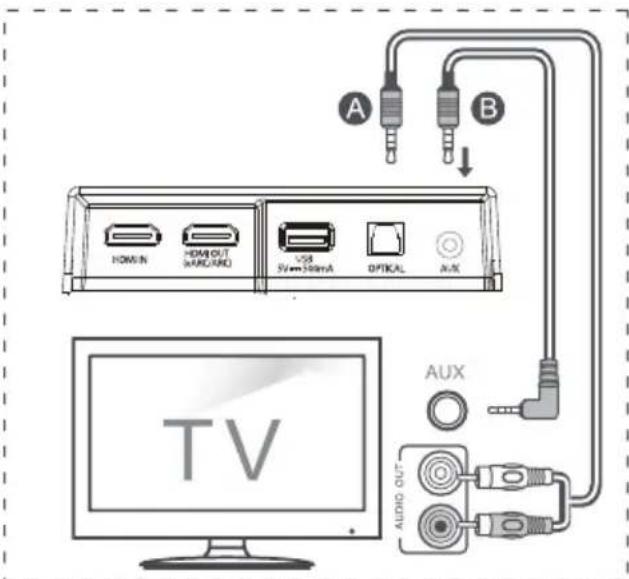
5.5 Connect to AUX Socket
A Use a RCA to 3.5mm audio cable to connect the TV's audio output sockets to the AUX socket on the unit.
B Use a 3.5mm to 3.5mm audio cable to connect the TV's or external audio device AUX socket to the AUX socket on the unit.
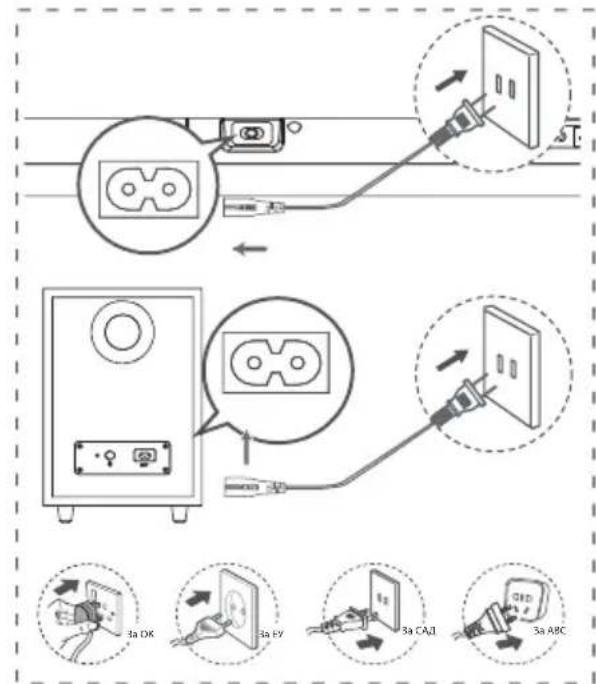
5.6 Connect Power
Risk of product damage!
Ensure that the power supply voltage corresponds to the voltage printed on the back or the underside of the unit.
you have completed all other connections.
Connect the mains cable to the AC IN socket of the main unit and then into a mains socket.
Connect the mains cable to the AC IN socket of the subwoofer and then into a mains socket.
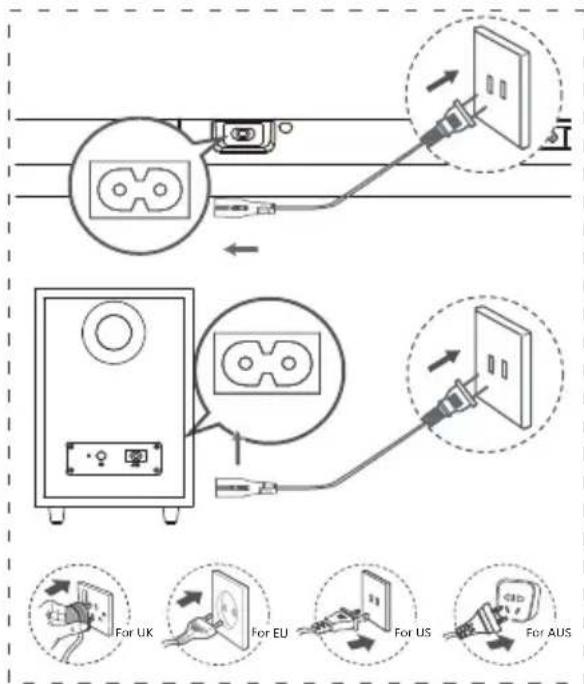
- Power cord quantity and plug vary by regions.
5.7 Pair up with the Subwoofer
Automatic pairing
The subwoofer soundbar will automatically pair when they are plugged into the mains sockets and turned on.
No cable is needed for connecting the two units.
subwoofer.
| LED State Status |
| Fast blink | Subwoofer in pairing mode |
| Constant on | Connected / Pairing successfully |
| Slow blink | Connection / Pairing failed |
NOTE:
- Do not press the PAIR button on the rear of the subwoofer, except for manual pairing.
If the automatic pairing fails, pair the subwoofer with the main unit manually.
Manual pairing
- Ensure that all cables are well connected and the main unit is in Standby mode.
- Press the button on the main unit or on the remote control to switch the main unit on.
remote control for 3 seconds to enter Pairing mode. The display will scroll "SW Pairing".
- Press and hold the PAIR button on the rear of the subwoofer for 2 seconds. The subwoofer will enter the pairing mode and the indicator on the subwoofer will blink quickly.
- After the wireless connection succeeded, the Pair indicator will light up and the display on main unit will scroll "SW IN".
- If the Pair indicator blink slowly, the wireless connection has failed. Unplug the cable of the subwoofer reconnect the main cables after 3 minutes. Repeat step 1 4
NOTE:
if there is conflit or strong interference (for example, interference from an electronic device) around your location. Remove these conflicts or strong interferences and repeat the above procedures.
of the soundbar in an open area.
connected with the subwoofer, the indicator on the subwoofer will flash slowly. Follow
step 1~4 above to pair the subwoofer to the main unit.
EN
6. Basic Operation
6.1 Standby/On
When you first connect the main unit to the mains socket, the main unit will be in STANDBY mode.
button on the unit or on the remote control to switch the unit ON.
button again to switch the unit back to STANDBY mode.
socket if you want to switch the unit OFF completely.
6.2 Auto-Standby / Auto-Wake Feature
mode, the soundbar would standby automatically when no audio is detected for 15 minutes. For example, this would happen when pausing playback, or should the soundbar be left on accidentally.
connected (HDMI IN/HDMI ARC/HDMI eARC/OPTICAL/AUX mode), the unit will switch on wautomatically hen the TV or the extern device is switched on.
To disable this feature, please follow the steps below:
- During ON mode, pointing the remote at the soundbar, press and hold the button for 3 seconds to open the menu.
- The unit's display will scroll "MENU".
-
Press the the display shows: Auto Wake [ON/OFF]. or Press the button 7 times in succession, the display shows: Auto Standby [ON/OFF].
-
Select the content with VOL +/- button on the remote control, and then press to confirm your selection and exit the settings.
"ON" and "OFF".
6.3 Select Modes
(SOURCE) button repeatedly on the unit or on the remote control to select the HDMI eARC/HDMI ARC, HDMI IN, OPTICAL, AUX, USB, BT(Bluetooth) mode.
button on the remote control to select the BT (Bluetooth) mode.
| Display Mode | |
| EARC | HDMI eARC |
| ARC | HDMI ARC |
| HDMI | HDMI IN |
| OPT | OPTICAL |
| AUX | AUX |
| USB
NO USB
NO FILE | USB
No USB connected
No Music Or No File Supported |
| BT_IN
NO BT | Bluetooth
Connected
Not Connected |
6.4 Adjust the Bass/Treble Level
control to adjust bass level (bass +5 / bass -5).
control to adjust treble level (treble +5 / treble -5).
6.5 Turn the Surround Sound ON/OFF
to turn on the surround sound. Press this button again to turn off the surround sound.
6.6 Adjust the Soundbar's Volume
/VOL- buttons on the remote control to adjust the volume.
ff,press the (MUTE) button on the remote control. Press the (MUTE) button again or press the VOL + /VOL - buttons to resume normal listening.

In BT mode, only press VOL+/VOL buttons on the connected phone can resume normal listening.
6.7 Adjust the Brightness
- Press the DIMMER +/- button on the remote control to select brightness level.
6.8 Select Equalizer (EQ) Effect
remote control to select desired preset equalizers: MUSIC, MOVIE, NEWS, SPORT, NIGHT, GAME, AI EQ.
6.9 Set the Audio Delay (AV SYNC)
than the time required to process the audio signal. This is called "delayed." Audio Delay feature is designed to remedy this delay.
current playback mode. (As provided in the HDMI ARC audio delay mode, the delay mode is valid only for the HDMI ARC).
-
By default, the audio delay is set to 00.
-
During ON mode, press and hold the button for 3 seconds to open the menu, then press the button 9 times in succession. The unit's display will scroll "LT00".
- Press the VOL + / - buttons to initiate a 10 ms frequency hopping to adjust the delay time. Set 200 ms maximum delay.
- Press the button or wait 10 seconds to exit.
Tips:
digital audio (eg, HDMI IN, HDMI ARC, HDMI eARC, OPTICAL).
7. DTS: X Operation
7.1 DRC / Dialog Control / Neural:X / Virtual:X Features
DTS:X® technologies provide users with virtual multi-channel virtual surround effects, creating an immersive audio volume.
- During ON mode, pointing the remote at the soundbar, press and hold the button for 3 seconds to open the menu.
- The unit's display will scroll "MENU".
DRC Level Setting:
- Press the button 10 times in succession, the display shows: DRC 0/1/2
Adjust the Dialog Control Level:
- Press the button 11 times in succession, the display shows: DCL 0/1/2/3/4/5/6
Neural:X Setting:
- Press the button 12 times in succession the display shows: Neural X ON / OFF.
Virtual:X Setting
Press the button 13 times in succession, the display shows: VIRTUAL X ON/OFF.
Note:
Above operations are mainly for DTS compliance requirement and only Virtual:X Setting is open for consumer.
8. HDMI eARC/HDMI ARC, HDMI IN, OPTICAL, AUX Operation
1 Ensure that the unit is connected to the TV or audio device.
2 Press the button repeatedly on the unit or on the remote control to select the HDMI eARC/HDMI ARC, HDMI IN, OPTICAL, AUX, USB, BT(Bluetooth) mode.
3. Operate your audio device directly for playback features.
4 Press the VOL + / - button to adjust the volume to your desired level.
Tips:
- The unit may not be able to decode all digital audio formats from the input source. In this case, the unit will mute. This is NOT a defect. Ensure that the audio setting of the input source (e.g. TV, game console, DVD player, etc.) is set to PCM or Dolby Digital (Refer to the user manual of the input source device for its audio setting details) with HDMI eARC / OPTICAL / input.
- When selecting a different audio format, the unit will display the following as follows:
| Input Format Display | |
| PCM PCM | |
| Dolby Digital | DOLBY AUDIO/DOLBY SURROUND |
| Dolby Digital Plus | DOLBY AUDIO/DOLBY SURROUND |
| Dolby TrueHD | DOLBY AUDIO/DOLBY SURROUND |
| Dolby MAT | MPCM |
| Dolby Digital Plus-Atmos | DOLBY ATMOS |
| Dolby TrueHD-Atmos | DOLBY ATMOS |
| Dolby MAT-Atmos | DOLBY ATMOS |
| DTS | DTS |
| DTS Discrete Surround | DTS |
| DTS-ES 6.1 Matrix | DTS |
| DTS-ES 6.1 Discrete | DTS |
| DTS 96/24 | DTS |
| DTS 96/24 ES Matrix | DTS |
| DTS Express | DTS |
| DTS-ES 8-Channel Discrete | DTS |
| DTS-HD High Resolution | DTS-HD |
| DTS-HD Master Audio | DTS-HD |
| DTS:X | DTS-X |
| DTS:X Master Audio | DTS-X |
9. Bluetooth Operation
9.1 Pair Bluetooth-enabled Devices
The first time you connect your bluetooth device to this unit, you need to pair your device to this unit.
Note:
- The operational range between this unit and a Bluetooth device is approximately 26 feet (8m) (without any object between the Bluetooth device and the unit).
- Before you connect a Bluetooth device to this unit, ensure you know the device's capabilities.
- Compatibility with all Bluetooth devices is not guaranteed.
- Any obstacle between this unit and a Bluetooth device can reduce the operational range.
- If the signal strength is weak, the unit may disconnect, but it will re-enter pairing mode automatically.
1 During ON mode, press the button repeatedly on the unit or the button on the remote control to select Bluetooth mode. "NO BT" will show on the display if the unit is not paired to any Bluetooth device.
2 Activate your Bluetooth device and select the search mode. "Hisense AX3120G" will appear on your Bluetooth device list.
- If you cannot find the unit, press and hold the button in BT mode for 2 seconds make it searchable. The display will show "BT Pairing" and you will hear the prompt sound from the unit.
3 Select "Hisense AX3120G" in the pairing list. After successful pairing, you will hear the prompt sound from the unit, and the display panel shows "BT_IN".
4 Play music from the connected Bluetooth device.
To disconnect the Bluetooth function, you can :
- Switch to another mode on the unit.
- Disable the BT function from your Bluetooth device. The Bluetooth device will be disconnected from the unit after the voice prompt.
- Press and hold the button 2 seconds.
Tips:
- Enter "0000" for the password if necessary.
- If no other Bluetooth device pairs with this unit within two minutes, the unit will recover its previous connection.
- The unit will also be disconnected when your device is moved beyond the operational range.
- If you want to reconnect your device to this unit, place it within the operational range.
- If the device is moved beyond the operational range, when it is brought back, please check if the device is still connected to the unit.
- If the connection is lost, follow the instructions above to pair your device to the unit again.
9.2 Listen to Music from Bluetooth Device
- If the connected Bluetooth device supports Advanced Audio Distribution Profile (A2DP), you can listen to the music stored on the device through the unit.
- If the device also supports Audio Video Remote Control Profile (AVRCP), you can use the unit's remote control to play music stored on the device.
- Pair your device with the unit.
- Play music via your device (if it supports A2DP).
- Use supplied remote control to control play (if it supports AVRCP).
| Start, pause or resume play. |
| Skip to the previous or next track. |
10. USB Operation
1 Insert the USB device.
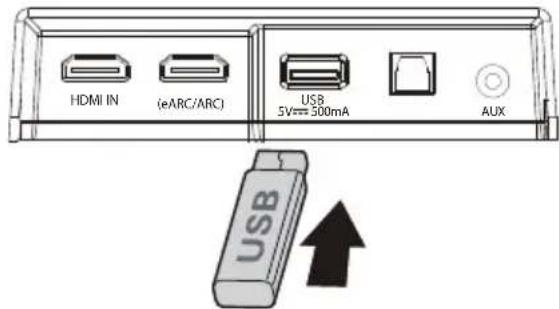
2 Press the button repeatedly on the unit or on the remote control to select USB mode.
3 During playback:
| Start, pause or resume play. |
| Skip to the previous or next track. |
Tips:
32 GB of memory.
with certain types of USB storage devices.
or USB Multifunctional card reader, the USB storage device may not be recognized.
reading files.
applications should not exceed 6.5 Mbps.
8107/8109 can support 4608 as the maximum.
| Extension C | Codec Sampling Rate | | Bit Rate |
| *.mp3 | MPEG - 1 Layer1/2/3 32kHz | z~48kHz 32kbps~320kbps |
| MPEG - 2 Layer1/2/3 | 16kHz~24kHz | 8kbps~160kbps |
| MPEG - 2.5 Layer3 | 8kHz~12kHz |
| *.wma | WMA7/8/9/STD | 8kHz~48kHz | ≤320kbps |
| *.aac | AAC | 8kHz~96kHz | ≤1728kbps |
| AAC-LC |
| HE-AAC |
| *.ogg | Vorbis codec | 8kHz~48kHz | ≤500kbps |
| *.flac | - | 8kHz~192kHz | ≤9Mbps |
| *.wav | | 8kHz~192kHz | ≤9Mbps |
| | 8kHz~192kHz | ≤9Mbps |
| 1). block size 0<64 block size 0>2048;2). block size 1<64, block size 1>4096;3). codebook counter>64;4). codebook entry>640;5). floor counter>4;6). floor type0;7). residua counter>4;8). dimension!=2;9). mapping counter>2;10). mode couter>2. For the file in FLAC format, the max blocksize 8107/8109 can support 4608 as the maximum. |
EN
- During ON mode, press and hold the button for 3 seconds to open the menu.
- Select the content with / buttons.
- Change the initial values for each of the settings with VOL +/- buttons.
- Press the button to confirm your selection and exit the settings.
- If no button is pressed within 10 seconds, the system will automatically exit the menu.
| Display
(press /▶/▶) | Description
(press VOL + / - ) |
| 1 MOVIE | Select Equalizer (EQ) Effect
MOVIE,MUSIC,GAME,NEWS, |
| 2 SUR OFF | Switch Surround Sound
[ON/OFF] |
| 3 JAS 0 | Adjust the Bass Level |
| 4 TRE 0 | Adjust the Treble Level |
| 5 DIM 0 | Adjust the Brightness
(Dimmer Level: DIM 0/1/2/3,
exit menu to take effect) |
| 6 AUTOWAKE OFF | Switch Auto Wake
[ON/OFF] |
| 7 AUTOSTANDBY OFF | Switch Auto Standby
[ON/OFF] |
| 8 BEEP ON | Switch Beep
[ON/OFF] |
| 9 LT 00 | Set the Audio Delay
(AV SYNC) |
| 10 IRCO | Adjust DTS DRC Level:
DRC 0/1/2 |
| 11 DCLD | Adjust DTS Dialog Control
Level:DCL 0/1/2/3/4/5/6 |
| 12 NEURAL ON | Switch: DTS Neural
[ON/OFF] |
| 13 VIRTUALX | Switch: DTS Virtual:X
[ON/OFF] |
| 14 JASSODST ON | Switch: BassBoost
[ON/OFF] |
12. Troubleshooting
To keep the warranty valid, never try to repair the system yourself. If you encounter problems when using this unit, check the following points before requesting service.
No power
- Ensure that the AC cord of the unit is properly connected.
- Ensure that there is power at the AC outlet.
- Press standby button to turn the unit on.
Remote control does not work
- Before you press any playback control button, first select the correct source.
- Reduce the distance between the remote control and the unit.
- Insert the battery with its polarities (+/-) aligned as indicated.
- Replace the battery.
- Aim the remote control directly at the sensor on the front of the unit.
No sound
Make sure that the unit is not muted. Press or VOL+/- button to resume normal listening.
- Press button on the unit or on the remote control to switch the soundbar to standby mode. Then press the button again to switch the soundbar on.
- Unplug both the soundbar and the subwoofer from the mains socket, then plug them again. Switch on the soundbar.
- Ensure the audio setting of the input source (e.g. TV, game console, DVD player, etc.) is set to PCM or Dolby Digital mode while using digital (e.g. HDMI, OPTICAL,) connection.
- The subwoofer is out of range, please move the subwoofer closer to the soundbar. Make sure the subwoofer is within 5m of the soundbar (the closer the better).
- The soundbar may have lost connection with the subwoofer. Re-pair the units by following the steps on the section "Pairing the Wireless Subwoofer with the Soundbar".
- The unit may not be able to decode all digital audio formats from the input source. In this case, the unit will mute. This is NOT a defect. The device is not muted.
I can't find the Bluetooth name of this unit on my Bluetooth device for Bluetooth pairing
- Ensure the Bluetooth function is activated on your Bluetooth device.
- Ensure you have paired the unit with your Bluetooth device.
This is a 15 mins power off function, one of the ERPII standard requirement for saving power
- When the unit's external input signal level is too low, the unit will be turned off automatically in 15 minutes. Please increase the volume level of your external device.
For more networked equipment information, see https://hisense.fr/cat-produit/barres-de-son/
The subwoofer is idle or the indicator of subwoofer does not light up.
- Please unplug power cord from the mains sockect, and plug it in again after 4 minutes to reset the subwoofer.
13. Specifications
| Model Name | AX3120G |
| Soundbar |
| Power Supply AC 100-240V~50/60Hz | |
| Power Consumption | 20 W |
| Standby Power | < 0.50 W |
| USB port for playback
USB Compatibility
USB Playback support / file formats | 5V==500mA
Hi-Speed USB (2.0) / FAT32 / FAT16
32G (max), WAV/WMA/MP3/FLAC/ALAC |
| Dimension (WxHxD) | 920 x 60 x 90 mm / 36.2" x 2.4" x 3.5" |
| Net weight 2.9 kg | |
| Frequency Response 150Hz~20KHz | |
| Operating Temperature 0°C - 45°C | |
| Wireless Specification |
| Bluetooth version / profiles
Bluetooth frequency range
Bluetooth Max. transmitting power (EIRP) | V5.3
2400 MHz ~ 2483.5 MHz
≤10 dBm |
| |
| Subwoofer |
| Power Supply AC 100-240V~50/60Hz | |
| Power Consumption 15 W | |
| Standby Power | < 0.50 W |
| Dimension (WxHxD) | 214 x 294 x 304 mm / 8.4" x 11.6" x 12" |
| Net weight 5.27kg | |
| Frequency Response 40Hz~180Hz | |
| Amplifier (Max Audio Power) | |
| Total 360 W | |
| Main Unit 240W | |
| Subwoofer 120 W | |
| Remote Control |
| Distance/Angle 19.7 feet (6m) / 30° | |
| Battery type | AAA (1.5V X 2) |
EN
| Format | Fonction |
| OPTIQUE HD | MI ARC HDMI eARC | ENTRÈE HDMI |
| LPCM 2ch | ● ● ● | ● | | |
| LPCM 5.1ch | --- -- | ● ● | | |
| LPCM 7.1ch | --- -- | ● ● | | |
| Dolby Atmos - Dolby TrueHD | --- -- | ● ● | | |
| Dolby Atmos - Dolby Digital Plus | --- ● ● ● | | | |
| Dolby TrueHD | --- -- | ● ● | | |
| Dolby Digital Plus | --- ● ● ● | | | |
| Dolby Digital | ● ● ● ● | | | |
| DTS | ● ● ● ● | | | |
| DTS-ES Discrete 6.1 | ● ● ● ● | | | |
| DTS-ES Matrix 6.1 | ● ● ● ● | | | |
| DTS 96/24 | ● ● ● ● | | | |
| DTS-HD High Resolution Audio | --- -- | ● ● | | |
| DTS-HD Master Audio | --- -- | ● ● | | |
| DTS-HD LBR | --- -- | ● ● | | |
| DTS:X | --- -- | ● ● | | |
(4) Butoon (MARCHE/ARRÉT)
eARC/ARC (Audio Return Channel)
| Formato | Función |
| óPTICO | HDMIARC | HDMIeARC | ENTRADAHDMI |
| LPCM 2ch | ● ● ● | ● | | |
| LPCM 5.1ch | --- -- | ● ● | | |
| LPCM 7.1ch | --- -- | ● ● | | |
| Dolby Atmos - Dolby TrueHD | --- -- | ● ● | | |
| Dolby Atmos - Dolby Digital Plus | --- ● ● | ● | | |
| Dolby TrueHD | --- -- | ● ● | | |
| Dolby Digital Plus | --- ● ● | ● | | |
| Dolby Digital | ● ● ● | ● | | |
| DTS | ● ● ● | ● | | |
| DTS-ES Discrete 6.1 | ● ● ● | ● | | |
| DTS-ES Matrix 6.1 | ● ● ● | ● | | |
| DTS 96/24 | ● ● ● | ● | | |
| DTS-HD High Resolution Audio | --- -- | ● ● | | |
| DTS-HD Master Audio | --- -- | ● ● | | |
| DTS-HD LBR | --- -- | ● ● | | |
| DTS:X | --- -- | ● ● | | |
: Formatos compatibles.
:: Formato no compatible.
ES
| Formatar | Função |
| ÓTICO HDMI ARC | HDMI eARC | ENTRADA HDMI |
| LPCM 2ch | ● ● ● | ● | | |
| LPCM 5.1ch | --- | ● ● | | |
| LPCM 7.1ch | --- | ● ● | | |
| Dolby Atmos - Dolby TrueHD | --- | ● ● | | |
| Dolby Atmos - Dolby Digital Plus | --- | ● ● | | |
| Dolby TrueHD | --- | ● ● | | |
| Dolby Digital Plus | --- | ● ● | | |
| Dolby Digital | ● ● ● | ● | | |
| DTS | ● ● ● | ● | | |
| DTS-ES Discrete 6.1 | ● ● ● | ● | | |
| DTS-ES Matrix 6.1 | ● ● ● | ● | | |
| DTS 96/24 | ● ● ● | ● | | |
| DTS-HD High Resolution Audio | --- | ● ● | | |
| DTS-HD Master Audio | --- | ● ● | | |
| DTS-HD LBR | --- | ● ● | | |
| DTS:X | --- | ● ● | | |
| Format | Funktion |
| OPTISCH HD | MI ARC | HDMI eARC | HDMI-Eingang |
| LPCM 2ch | ● ● ● | ● | | |
| LPCM 5.1ch | --- -- | ● ● | | |
| LPCM 7.1ch | --- -- | ● ● | | |
| Dolby Atmos - Dolby TrueHD | --- -- | ● ● | | |
| Dolby Atmos - Dolby Digital Plus | --- ● | ● ● | | |
| Dolby TrueHD | --- -- | ● ● | | |
| Dolby Digital Plus | --- ● | ● ● | | |
| Dolby Digital | ● ● ● | ● | | |
| DTS | ● ● ● | ● | | |
| DTS-ES Discrete 6.1 | ● ● ● | ● | | |
| DTS-ES Matrix 6.1 | ● ● ● | ● | | |
| DTS 96/24 | ● ● ● | ● | | |
| DTS-HD High Resolution Audio | --- -- | ● ● | | |
| DTS-HD Master Audio | --- -- | ● ● | | |
| DTS-HD LBR | --- -- | ● ● | | |
| DTS:X | --- -- | ● ● | | |
9 HDMI OUT (TV eARC/ARC)
eARC / ARC (Audio Return Channel)
| Formattare | Funzione |
| OTTICA HD | MI ARC | HDMI eARC | INGRESSO HDMI |
| LPCM 2ch | ● ● ● | ● | | |
| LPCM 5.1ch | --- -- | ● ● | | |
| LPCM 7.1ch | --- -- | ● ● | | |
| Dolby Atmos - Dolby TrueHD | --- -- | ● ● | | |
| Dolby Atmos - Dolby Digital Plus | --- ● | ● ● | | |
| Dolby TrueHD | --- -- | ● ● | | |
| Dolby Digital Plus | --- ● | ● ● | | |
| Dolby Digital | ● ● ● | ● | | |
| DTS | ● ● ● | ● | | |
| DTS-ES Discrete 6.1 | ● ● ● | ● | | |
| DTS-ES Matrix 6.1 | ● ● ● | ● | | |
| DTS 96/24 | ● ● ● | ● | | |
| DTS-HD High Resolution Audio | --- -- | ● ● | | |
| DTS-HD Master Audio | --- -- | ● ● | | |
| DTS-HD LBR | --- -- | ● ● | | |
| DTS:X | --- -- | ● ● | | |
| Formát | Funkce |
| OPTICKY HD | MI ARC | HDMI eARC | HDMI IN |
| LPCM 2ch | ● ● ● | ● | | |
| LPCM 5.1ch | — — | ● ● | | |
| LPCM 7.1ch | — — | ● ● | | |
| Dolby Atmos - Dolby TrueHD | — — | ● ● | | |
| Dolby Atmos - Dolby Digital Plus | — ● | ● ● | | |
| Dolby TrueHD | — — | ● ● | | |
| Dolby Digital Plus | — ● | ● ● | | |
| Dolby Digital | ● ● ● | ● | | |
| DTS | ● ● ● | ● | | |
| DTS-ES Discrete 6.1 | ● ● ● | ● | | |
| DTS-ES Matrix 6.1 | ● ● ● | ● | | |
| DTS 96/24 | ● ● ● | ● | | |
| DTS-HD High Resolution Audio | — — | ● ● | | |
| DTS-HD Master Audio | — — | ● ● | | |
| DTS-HD LBR | — — | ● ● | | |
| DTS:X | — — | ● ● | | |
: Podporovany format.
---:Nepodporovany format.
2. Co je v krabici

Hlavni pristroj
4 Tchitko (ZAP./VYP.)
Prepinani pristroje mezi ZAPNUTYM a
POHOTOVOSTNIM rezimem.
5 Tktko (ZDROJ)
| Formát | Funkcia |
| OPTICKY HDMI | ARC HDMI | eARC HDMI IN | |
| LPCM 2ch | ● ● ● | ● | | |
| LPCM 5.1ch | --- | ● ● | | |
| LPCM 7.1ch | --- | ● ● | | |
| Dolby Atmos - Dolby TrueHD | --- | ● ● | | |
| Dolby Atmos - Dolby Digital Plus | --- | ● ● | | |
| Dolby TrueHD | --- | ● ● | | |
| Dolby Digital Plus | --- | ● ● | | |
| Dolby Digital | ● ● ● | ● | | |
| DTS | ● ● ● | ● | | |
| DTS-ES Discrete 6.1 | ● ● ● | ● | | |
| DTS-ES Matrix 6.1 | ● ● ● | ● | | |
| DTS 96/24 | ● ● ● | ● | | |
| DTS-HD High Resolution Audio | --- | ● ● | | |
| DTS-HD Master Audio | --- | ● ● | | |
| DTS-HD LBR | --- | ● ● | | |
| DTS:X | --- | ● ● | | |
| Formátum | Funkció |
| OPTIKAI HDMI | ARC HDMI eARC | HDMI IN | |
| LPCM 2ch | ● ● ● | ● | | |
| LPCM 5.1ch | --- | ● ● | | |
| LPCM 7.1ch | --- | ● ● | | |
| Dolby Atmos - Dolby TrueHD | --- | ● ● | | |
| Dolby Atmos - Dolby Digital Plus | --- | ● ● | | |
| Dolby TrueHD | --- | ● ● | | |
| Dolby Digital Plus | --- | ● ● | | |
| Dolby Digital | ● ● ● | ● | | |
| DTS | ● ● ● | ● | | |
| DTS-ES Discrete 6.1 | ● ● ● | ● | | |
| DTS-ES Matrix 6.1 | ● ● ● | ● | | |
| DTS 96/24 | ● ● ● | ● | | |
| DTS-HD High Resolution Audio | --- | ● ● | | |
| DTS-HD Master Audio | --- | ● ● | | |
| DTS-HD LBR | --- | ● ● | | |
| DTS:X | --- | ● ● | | |
eARC / ARC (Audio Return Channel)
| Format | Funkcija |
| OPTICKI | HDMIARC | HDMIeARC | HDMIIN |
| LPCM 2ch | ● ● ● | ● | | |
| LPCM 5.1ch | --- -- | ● ● | | |
| LPCM 7.1ch | --- -- | ● ● | | |
| Dolby Atmos - Dolby TrueHD | --- -- | ● ● | | |
| Dolby Atmos - Dolby Digital Plus | --- ● | ● ● | | |
| Dolby TrueHD | --- -- | ● ● | | |
| Dolby Digital Plus | --- ● | ● ● | | |
| Dolby Digital | ● ● ● | ● | | |
| DTS | ● ● ● | ● | | |
| DTS-ES Discrete 6.1 | ● ● ● | ● | | |
| DTS-ES Matrix 6.1 | ● ● ● | ● | | |
| DTS 96/24 | ● ● ● | ● | | |
| DTS-HD High Resolution Audio | --- -- | ● ● | | |
| DTS-HD Master Audio | --- -- | ● ● | | |
| DTS-HD LBR | --- -- | ● ● | | |
| DTS:X | --- -- | ● ● | | |
Podrzani format.
---:Nepodrzani format.
SR
2. Sadržaj kutije

Glavna jedinica
Bezicni niskotonac

Kabl za napajanje naizmeničnom strujom x2 Za glavnu jedinicu /bežićni niskotonac
| Format | Funkcija |
| OPTICKI | HDMIARC | HDMIeARC | HDMIIN |
| LPCM 2ch | ● ● ● | ● | | |
| LPCM 5.1ch | --- -- | ● ● | | |
| LPCM 7.1ch | --- -- | ● ● | | |
| Dolby Atmos - Dolby TrueHD | --- -- | ● ● | | |
| Dolby Atmos - Dolby Digital Plus | --- ● | ● ● | | |
| Dolby TrueHD | --- -- | ● ● | | |
| Dolby Digital Plus | --- ● | ● ● | | |
| Dolby Digital | ● ● ● | ● | | |
| DTS | ● ● ● | ● | | |
| DTS-ES Discrete 6.1 | ● ● ● | ● | | |
| DTS-ES Matrix 6.1 | ● ● ● | ● | | |
| DTS 96/24 | ● ● ● | ● | | |
| DTS-HD High Resolution Audio | --- -- | ● ● | | |
| DTS-HD Master Audio | --- -- | ● ● | | |
| DTS-HD LBR | --- -- | ● ● | | |
| DTS:X | --- -- | ● ● | | |
Podrzani format.
::Nepodrzani format.
2. Šta je u kutiji

Glavna jedinica

Bezični niskotonski zvučnik

Kabl za napajanje naizmjeničnom strujom x2 Za glavnu jeginuc/ bežični niskotonski zvučnik

* Vrsta utikača razlikuje se u zavisinosti od regiona


Kabl HDMIOpticki kabl
Nosaci (× 2) /Vijak za nosac (× 2) / Zidna sidra (× 2)
Daljinski upravljac / baterije AAA × 2

Korisnicki priručnik / Vodič za brzi početak
- Količina napojnog kabela i utišć razlikuju se u zavisnosti od regiona.
- Slide, ilustracije i crtezi prikazani u ovom Korisnickom prisučniku služe samo za upucivanje.
Stvarni proizvod moze izgledati drugacije.
- Dizajn i specifikacije podliježu izmjena na bez prethodne najave.
| Formati | Funksioni |
| OPTIKE | HDMIARC | HDMIeARC | HDMIIN |
| LPCM 2ch | ● ● ● | ● | | |
| LPCM 5.1ch | --- -- | ● ● | | |
| LPCM 7.1ch | --- -- | ● ● | | |
| Dolby Atmos - Dolby TrueHD | --- -- | ● ● | | |
| Dolby Atmos - Dolby Digital Plus | --- ● | ● ● | | |
| Dolby TrueHD | --- -- | ● ● | | |
| Dolby Digital Plus | --- ● | ● ● | | |
| Dolby Digital | ● ● ● | ● | | |
| DTS | ● ● ● | ● | | |
| DTS-ES Discrete 6.1 | ● ● ● | ● | | |
| DTS-ES Matrix 6.1 | ● ● ● | ● | | |
| DTS 96/24 | ● ● ● | ● | | |
| DTS-HD High Resolution Audio | --- -- | ● ● | | |
| DTS-HD Master Audio | --- -- | ● ● | | |
| DTS-HD LBR | --- -- | ● ● | | |
| DTS:X | --- -- | ● ● | | |
:Formatimbshtetur.
::Formatipambeshtetur.
SQ
2. Cfarkekanekuti

Njësia kryesore

Drejtuesi me frekuencé tê ulét pa tel
5.5 Lidhja me folene AUX
- Shtypni butonin 12 here radhazi, ekrani tregon: Neural X ON/OFF.
Cilesimi Neural:X:
- Shtypni butonin 13 here radhazi, ekrani tregon: VIRTUAL X ON/OFF.
Shenim:
| Формат | Функциja |
| Опточkin | HDMIARC | HDMIeARC | HDMIIN |
| LPCM 2ch | ● ● ● | ● | | |
| LPCM 5.1ch | --- | ● ● | | |
| LPCM 7.1ch | --- | ● ● | | |
| Dolby Atmos - Dolby TrueHD | --- | ● ● | | |
| Dolby Atmos - Dolby Digital Plus | --- ● | ● ● | | |
| Dolby TrueHD | --- | ● ● | | |
| Dolby Digital Plus | --- ● | ● ● | | |
| Dolby Digital | ● ● ● | ● | | |
| DTS | ● ● ● | ● | | |
| DTS-ES Discrete 6.1 | ● ● ● | ● | | |
| DTS-ES Matrix 6.1 | ● ● ● | ● | | |
| DTS 96/24 | ● ● ● | ● | | |
| DTS-HD High Resolution Audio | --- | ● ● | | |
| DTS-HD Master Audio | --- | ● ● | | |
| DTS-HD LBR | --- | ● ● | | |
| DTS:X | --- | ● ● | | |
:PoiDpXkaHfOpMaT.
::HenoDpKahΦopMaT.
MK
2.Штоима BO Ктуната

TnabHa eDnHua
Bε3xμηeH cy6ByΦep

Ka6eI3a Hau3MeHnUHa cTpyja × 2
3aTnabHa eINHua /Be3Jmueh cy6Byfepe
*Tnnot Ha npnklyukce pa3nkyBa od peHNOHOT


HDMI ka6eONTNUKIN ka6eN


Држачи (× 2) / 山 рафздржач (× 2) / Ппцврстувачи 3a snd (× 2)
Даелнскуnpавва / AAAбатери × 2

Kopncnkyo ynatCTBO / Kpatko ynatCTBO
*ДолжинотаHa eelenKtpuHnot Ka6eI n TnTNot Ha npNKJyOc ce pa3JInKyBaat cnopei perNoHnte.
CnKnte, nIyCTpaunTe n CpTeKNTe npKaKaHb BO OBA KOpNCNcKO yNaTCTBO ce cAmo 3a yNaTyBaHe. KoHKpeTHNO T pOUN3BOD MoKe da ce pa3NIkyBa BO n3rIeDTo.
-Ди3ajHot n cneuФнkaUte ce npedMeT Ha npomeHa 6e3 npetXoJHO n3BecTyBaHbe.
3. Идентнофикува.Table на.Deюbite
3.1 TnaBha eDHHnca

MK


1 PpO3opeuHaekpaH
To NOKaKyBa TEKOBHNO TAtYC.
② Cen3op Ha daJIeunHcN ynpaByBaY
Ppma cunhaHn OJ daJeun HcKnOT ynpaByBa.
3 LpBEN HnDnKaTOp 3a noDrotBeHOCT
- Noctojano BknyeHo Bo peKm Ha NoIrotBeHOCT
4 Knye (BKJyEHO/MCKJyEHO)
Ja nppepna einnuata nomery pekmnte BKJyEHO nIOIFTBEHOCT.
5 KHe (M3BOP)
I36peTe ja yHKunja Ha pe npodynpaHe.
6 +/KoNue (VOL+/VOL-)
Ja 3rOJIeMyBa/HaMaIyBa jaUHHaTa Ha 3ByK.
⑦ MoHTnpaBeHa sna
Ctabete nI wpafoBnte 3a MOHTnpaHe Ha sNd BO dpXkaOT 3a sNd Ha eINHuaTa.
3.2 Be3xmuen cy6ByΦep
1 HndnkaTop
| • Брзо Трека | Суб-byферов вedo ржим
над с nanopувае |
| • Постоно Вклухени | Усpenho nobрзан / с nanopen |
| • Бавно Трека | Повзува beneTo /
с nanopува beneTo не усанea |
HDMI IN npnKnyuok
3a noBp3yBaHbe ypeu co HDMi n3Bop, kako DVD nleep, Blu-ray DiscTM nleep, nn KoH3oJa 3a nrpn.
9 HDMI OUT (eARC/ARC) npKnyHnua
IopTa 3a noBp3yBaHBe Ha TeJeBn3OpOT.
IopraTnOdpKByeARC/ARCHDMI
kapaTepeNCTnKa, KoJa Do3BoNyBa cayH6apoT
da pePpOduu np aynIO Koe npOn3neryBa od
noBp3AHNO TeneBn3Op.
10 USB npnKnyuok
Ctabete YCb-ypeD da penpoDyunpa My3nka.
11 OPTICAL npnKnyOc
Iobp3eHa npnKnyHncaTa OPTICAL OUT Ha HndBopeweH ypeJ.
12AUX npnKnyuok
Iobp3yBaHBe Ha NaDbOpweH ayDNo ypeI.
13 ACIN npNKnyuOK
Pobp3yBaHa eNeKtpnHn HanojyBaHe.
② Konque CNAPN
4.4 MoNTnpaBe Ha cayH6apoT Ha sIodOT
Beneukn:
-
INhctaInpaHbTo Mopa da ce n3Bpwn camo od KBaIINKyBaH nepcoHaJ. HenpaBnHOTo MOHTnpaHe MoKe da npedn3Bnka cepno3Ha InuHa NOBpeDa u OwTeTyBaBe Ha NMOT (ako cakate da ro INhCTaInpaTe npon3BOoT camite, Mopa da npOBepnte 3a INHCTanaCUNTE kako 1to e eneKTPuHa INCTaJa I BOIOBOnHa INCTaJa Ka MoKe da ce 3aKoPaHN BHaTppe BO sIdOT).OndroBOPHOCT e Ha INCTaJIATEpOT da ocNrypa DeKa SIdOT 6e36eHNO Ke ro NOdPrjYBa BKynHOTO ONTOBapYBaBe OD EINHuaTa I dPxaHTe 3a Ha sId.
-
3a MOHTIpaHbeto Ce Notpe6Hn DOnOpHnTeHn anaTu (He ce BknyeHn).
- He npe3aterHybajTe rH npaOboNTe.
- UyBaJte ro OBA yNaTCTBO 3a noHaTaMoUHa yNtpe6a.
- Kopuncte npohaoaay Ha cToIbOBN da ro npOBepuTe Tnnot Ha sNpEa 6yUnTe mOnHTnpaTe.
PNEyPENEYBAHbE
3a da ce cnpeu nOBpe, OBOJ anapat Mopa da e 6e36eHNO npkaue H a noD/snD BO cornaCHOCT co ynatCTBaT 3a INCTaInpaHe.
- PpEINOxKeHa BucnHa 3a MoHTnpaBe Ha sN; ≤ 1,5 MeTpN.
5. Поврзува
5.1 Dolby Atmos
Dolby Atmos Bn daBa ceonphiATHO NCKyCTBO npn cnyaHaBe CO nCnyTaHBe 3ByK BO TPOdIMeH3nOHaJIHHOT pOcTOp, n CeTo 60raTCTBO, uNCTnHa n MoK Ha Dolby 3ByK. 3a NOBeKe INHΦopMauI, nocTeTe dolby.com/ technologies/dolby-atmos.
5.2 DTS:X
DTS:X, rpaHnUHnOT 3Byk He e NOBeKe orpaHnueH oI NOCTaBHeOCT Ha 3ByuHnCn CO fNkcha nOJox6a nn CnHaJI Na KOHKpeTeH KaHaJI.
3a KopucTeHe Bolby Atmos / DTS:X
Dolby Atmos / DTS:X e noctaneH BO HDMl eARC/ARC pexnM.3a deTalnte 3a noBp3yBaHbETo, nOrneHHeTe BO.HDMI nobp3yBaHbe".HDMl eARC/ARC
- 3a Да Кориспгут Solby Atmos® / DTS:X peхим, Валnot Телевизм Рара Ддржув Solby Atmos® / DTS:X ИИн HDMI aydno ПOMИНУВа He.
- YBepTe ce deKa „Bitstream"„RAW" nnn „No Encoding" e n36paHO 3a emTuBaHe Ha aynO npOTOKOT ha NOBp3aHNO T haBOpEweH ypeI (np. Blu-ray DVD nleep, TB n cn.).
- Довда ВлergyВATE BO Dolby Atmos / DTS:X / Dolby Digital / PCM ФорmaT, сayндбарот Ке ппкаме DOLBY ATMOS / DTS:X / DOLBY AUDIO / PCM AUDIO.
5.3 KopncTebe Ha HDMI npKnyuHnca
Hekon 4K HDR TeleBn3Op6apaaT HDMI Bne3 nnnoctabknte 3a cnka da 6ndat noctabeHn 3a npnem Ha HDR coDpxnHa. 3a donoHnTeHn DeTaHn 3a noCTabyBaHbe Ha HDR ekpan, nOrrJeHHeTo npnpauHnKOT co yNaTCTBa 3a Baunot TeleBn3Op.
KopncTeHeHDMI da ce nobp3aT cayn6apoT, AV onpema n TeJebu3OpOT:
HaunH1:CTaHdapDenHDMI
- Ako Baunot TeNeBn3Op He COODBeTCTByBa coHDMIARC, noBp3eTe ro Baunot cayndapHa TeNeBn3OpT npeky cTaHdapdno HDMI NOBp3yBaHe.
- KopncTeHDMI ka6eJ da ja noBp3eTe HMI OUT (eARC/ARC) npNKnyuHaTa Ha caynd6apot co HDMI IN npNKnyuHaTa Ha TeJeBu3OpOT.
- KopucTeTe HDMI ka6eJ da ja noBp3eTe HDMI IN npKnyHHncaTa Ha cayHdapot co BaWnte HAdBopeuHn ypei (np.KOH30JI 3a nIgpaBe, DVD nIeepn n blu-ray).

Haun2:
eARC (KaHaI Ha 360rataTeHO nobpaTHo aydno)/ARC (KaHaI Ha nobpaTHO aydno)
Функида eARC uINARC Bn OBO3MOKyBa da
uCnpaTNe aYdno od Baunot TeJeBn3Op KoJ e
ycorlacen co ARC uIN eARC ha Baunot cayH6ap
npeky edIneHNO HDMI nobp3yBaHe. 3a da yKbTaTe
Bo fynkunjata ARC uIN eARC, yBepete ce deka
Baunot TelenBn3Op noDprKyBa n HDMI-CEC n ARC
uIN eARC n e cooDBetNo noctabEn. Kora e npabUnHo
noCTaBeH, moKeTe da ro KopnCTne daJeHHCKNt
ypabByBaU Ha Baunot TB da ro npnilarOuTe
u3ne3OT ha 3ByK (VOL +/− u NcknyuBaHe 3ByK) Ha
cayH6apOt.
Iob3eHDMI Ka6en od HDMI OUT (eARC/ARC) npKnyuHncaTa Ha eDInHncaTa BO HDMI (eARC) nn HDMI (ARC) npKnyuHncaTa Ha BaAnot TeJeBn3Op Koj noDprkUyBa eARC nn AR. IToa anPNTncHeT He daLeueHckNt ynpaByba Ja n36peTe HDMI eARC nn HDMI ARC.
Cobetn:
TeIeBn3OpOT Mopa Ia nOdpjxByHDMI-CEC u yHKunjata ARC nn eARC.HDMI-CEC u ARCN eARC Mopa da ce nocTaBeH na BKnyeHo.
Haunhot Ha noctabvbahe Ha HDMI-CEC n ARCNn eARC moxe da ce pa3nyBa BO 3aBnchoCToTeneBn3opOT.3a Detan3a yHKunjata ARCNn eARC, norneHete ro npnpauHnKOT 3aCONCTBeHnKOT.
- ARC pa60tu cmo co ypeu KOn uMaat HDMIARC kaKo u co HDM1.4 Ka6eI (n noHOB).
5.4 KopncTeTe ro npnKnyOkot OPTICAL
-ПовретеОПТИЧКиKa6eнHa npиклуокOT OPTICAL OUT Ha TBиnpиклуокOT OPTICAL Ha edиницат.
5.5 NopbyBaHe Ha AUX npnKnyuHnua
A Kopnctete RCA co 3,5 MM aydno ka6en 3a da nn noBp3eTe npKnyoUte 3a aydno n3ne3 Ha TB n npKnyOkoT AUX ha einnuata.
B Kopnctete 3,5 MM co 3,5 MM aydno ka6en 3a da ja noBp3eTe AUX npKnyuHncaTa Ha TeIeBn3OpOT nIN haDBopeuHnOt aydno ypei co npKnyuHncaTa AUX Ha eINHncaTa.
5.6 Nobp3yBaHbe co HanojyBaHbe
- Pn3NK od owTeYbaHe Ha npOn3BODOT! YbepTe ce deKa HanoHOT Ha cTpyjata COOdBETCTByBa CO HanoHOT OTneuAteH Ha 3aDHNO T NIN DOJHNOT DeI Od eINHnUcaTa.
- PpeI da ro nobp3eTe ka6enot 3a HauH3MeHnUHO HanojyBaHbe, yBepTe ce DeKa CTe rN 3aBpuHne cnte npu NOBp3yBaHa.
Caynd6ap Iobp3eTe ro eIektpnHnot Ka6en Bo npNKnyHuNcaTa 3a AC IN Ha rnaBnata eHNu, na nToa BO npNKnyHuNcaTa 3a eIektpnUHO HanojyBaHe.
Cy6Byepe Iobp3eTe ro eNeKtpnHnoT Ka6en Bo npNKnyuHncaTa 3a AC IN ha Cy6ByepeoT, na notoa BO npNKnyuHncaTa 3a eNeKtpnHo HanojyBaHe.
*Должина на[elektpruHnot kabeи TINOT ha npiknyok ce pa3nkyBaat cnopeD perNoHnte.
5.7 CnapyBaHbe co cy6ByΦep
ABTomatcko cnapyBaHe
Caynd6apot Ha cy6ByepoT aBTOMaTcKn Ke ce cnapn Kora Tne Ce BknyeHn BO eJeKtpnHOTO HanojyBaHe n pa60TaT.
He ce nOTope6Hn Ka6Hn 3a noBp3yBaHbe Ha dBeTe eHNHcN.
- CtaTyc Ha INHnKaTopoT Ha 6e3KnUHnOT cy6ByΦep.
| LED coctoj6a | Statyc |
| Брзо Трека | Субъферов воз реким на с nanopуваpheres |
| Постоюв BKлунец | Поврзуваtheses / с nanopуваtheses усnea |
| Бавно Трека | Поврзуваtheses / с nanopуваtheses не усnea |
Beneukn:
- He npitnckajte ro konyeTo PAIR Ha 3aHaTa cTpaHa Ha cy6ByΦepoT,OCBeH 3a pauHo cnapyBaHe.
-AKO aTOMaTCKOTo cnapyBaHbe He ycnee,paHOn CnapeTe ro cy6ByΦepOT co rnaBHaTa eDHHua.
PauHo cnapyBaBe
- OcnypeTe ce deKa cTe Ka6n Ce do6po NOBp3aHn I rnaBHaTa eDInHua e BO pexm Ha NOIOTBeHOCT.
2.ПиTиСHTeTo KOnчeto HaIaBHaTa eINHua INHa daleuHcknOT ynpabyBaY3a da ja BkIyUHTe IaBHaTa eINHua.
3.ПиТиСHTeTo KOnчeTo Ha rnaBHaTa eHnHua HnHa daneuHcKnOT ynpaByBaU 3 cKnHn 3a Da BHe3e BO pexnM Ha cnapyBaHbe. Ekpanot Ke n3Ne Do ,SW Pairing".
4.ПиТИСHTeTo n 3aДржTe ro KOnчeTo CПAPn Ha 3aДнnot DeN od cy6ByΦepOT 2 cekyHn. Cy6ByΦepOT Ke BNe3e BO pexm Ha cnapyBaHe n INHДИKaTOpOT Ha cy6ByΦepOT Ke TpeNka 6p30.
- OTKAKO Ke ycnee 6e3xuHOTo NOBp3yBaHBe, INdNkATOpOT 3a cnapyBaHBe Ke CBETHe N ekpaHot Ha rnaBHnAte eINHnCa Ke Jn3He Do ,SW IN".
- Ako nHdNkAToPOT 3a cnapyBaHe TpeNka NOleKa, 6e3KnUHTo NOBp3YBaHe He ycneAIO. Ncknyute ro Ka6enot Ha cy6ByepeoT n noToa NOBTOPONoBp3Te Ro rnaBHNOT Ka6eI No 3 MNHyTN. NOBTOpeTe rueKOpnte 1\~4.
Beneukn:
Ako 6e3xuHTo NOBp3yBaHe IOBTOPOHe yCnee, npOBepTe Da He nMa KOHfNkT nIi CnIHa INTEppeHcUJa (Ha npIMep INTEppeHcUJa oJ eNEKtpoHcKn ypeD) OKOly BaWata JOKaUJa. OTCpaHeT rN OBne KOHfNkTn IINI CNIHN INTEppeHcUIn I NOBTOpeTe rN NorOpHnTe NoCTaKN.
Cy6ByfepoT Tpe6a Da 6nHe Ha 6 M (18 CTanKn) Ond cayH6apot BO OTBopeH npocstop.
Ako rnaBHaTa eHnHua e BO pexm BknyeHo n He e NObp3aHa CO cy6ByΦepOT, INndkaTOpOT Ha cy6ByΦepOT Ke TpeNk PoneKa. CneDeTe rHuekopnte 1\~4 Norope 3a da ro cnapnte cy6ByΦepOT co rnaBHaTa eHnHua.
6. Ochobho pa6oTehe
6.1 NpOdrToBHeNoCT/BkIyueHo
Kora 3a npB nat ke ja nobp3eTe rnaBHata eHHua BO npNKnyHnUaTa 3a eNeKTPnuHo HanojyBaHe, rnaBHata eHHua Ke 6nDe BO peXm Ha IIOIOTBEHOCT.
-ПиTNCHeTe ro konyeTo HaNaBHata eINHua nHa daJeuHcKnOT ynpaByBaay 3a da ja BKJyUHTE rnaBHata eINHua.
- PnTnCHete ro konyeTo IOBTOpHo, 3a Ja ja nppePnIte eHnHuaTa Ha3aD Ha peKIM Ha IODΓOTBEHOCT.
- I3BaTe ro eIeKtpnHnot npNKlyuOK od npNKnyHuNcata 3a eIeKtpnuHo hanojuBaHe aKO cakate ceNoCHO da ja NCKJIyUHTE edHnCuTa.
6.2Функида АВТOMATСКА NOДROТBEHOCT / ABTOMATСКО 6удени
[ABTOMATCKA NOIROTBEOCT] Bo TeKOT Ha peXIM BknyeHa aBtOMATCKA NOIROTBEOCT, cayHdapot aBTOMATCKN Ke OIN BO NIOIROTBEOCT KORA He e oTKpneHO aynIO 15 MNHyTN. Ha npimep, oBA Ke ce cnuyi KORA nay3npaTe penpoDyKunja, INN aKO cayHdapOT e OCTaBeH BKnyeH HecaKaJKN.
- [ABTomatcko 6ydehe] Ako Tebeu3op uHnHaBopeeH ypeE e noBp3an (HDMI IN/HDMIARC/HDMI eARC/ONTNUKIN/AUX pexum),eHNuTa aBTOMaTcN Ke ce BkIuyu KOraTeBeu3OpOT uHn HaBopeuHNoT ypeD Ke ce BkIuyu.
3a da ja oheBO3MOKNTe OBaa yHKuJa, cneDeTe rueKOpNTe noDony:
1.Bo TeKOT Ha pexKIMOT BKJLYEHO,HacoueTe ro daJeunHcKnOT ynpaBvBauchon cayH6apot, npTnCHete ro n 3aDpXeTe ro konyeTo|3 ceKyHn 3a Da ro OTBOpHTe MeHtO.
- EkpaHot Ha eDHHuata Ke IIN3ra Do „MENU".
2.Причсichte ro koncheTo 6 ha n eHONOpyro: Ha ekpaHot ce nokaJyBa: Auto Wake [ON/OFF]. IIn npuTncHeTe ro konyeTo haTu eHONOpyro,Ha ekpaHot ce nokaJyBa:Auto Standby [ON/OFF].
3. 136epeje ja codpxnHaTa co konyeTo VOL+/- Ha daJeunHCKNOT ynpabByBaay, a nToa npTncHeI Da rO nOBpInTe n36opot I da n3ne3eTe oJ NOCTABKNTE.
- Повтуваьeto Ha OBne uekopn Ke npeφρna nomery φункцижаТ „BKЛУЧЕHO"И „NCKЛYЧЕHO".
6.3 N36npaHbepeXMMN
- Hekonky nati npuTncheTe ro konyeto (N3BOP)Ha eHnuaTa nn Ha daJeHHcknOT ynpaByBaY 3a da n36peTe HDMl eARC/HDMI ARC, HDMl IN, ONTNUKN, AUX, YCB, BT (Bluetooth) peKm.
-ПиTuNcHTe ro KonUeTo Ha JIaJIeUHcKNoT ynpaBvBaY3aДa I36epTe BT (Bluetooth) pexkM.
- I36paHnOT pexkIm Ke ce npikakKe Ha ekpaHot.
| Екраз Реким | |
| EARC | HDMI eARC |
| ARC | HDMI ARC |
| HIMI | HDMI IN |
| OPT | ОПТИЧКИ |
| AUX | AUX |
| USB | UCS |
| NO USB | Hema поьрзан YCB |
| NO FILE | Hema подрахана
музika пли Нема
дато-teka |
| BT_IN | Bluetooth |
| NO BT | Поврзано
He e поьрзано |
6.4ПилагуBaHeHaHnBOHaBac/ BnCOKnTOHOBn
-ПиТИСHTЕгКОПЧИБаТАВASS+/-Ha
ДалеуннсnotУпраВьвачДа ro пилагдTe
НИВOTO Ha 6ac (6ac +5/6ac -5).
-ПиТиСHTeTe rN KOnuHbTa TREBLE +/-Ha
ДaJIeUHcKnot yIpaByBaU da ro pIpuJaOriTe
HIBOTO Ha BUCOKn TOHOBn (BUCOKn TOHOBn +5 /
ВИСОКNTOHOBn -5).
6.5 BKJyUyBAHbE/NUCKJyUyBAHbE ONKpyxuBaQn 3ByK
-Причнсichte ro konчete SURHa
Далецнcknot упаByBaчда ro BKnyuite
ОnkpyЖуВauchnot 3Byk. Повторно
Прричнсichte ro konчete 3da ra ro nCKnyuite
ОnkpyЖуВauchnot 3Byk.
6.6ПилагоуВаБeHa jaUnHa Ha 3ByK Na cayHбapoT
-ПуNTИСHTЕгКОПЧИБАТа+/-нэдINHицаТа
NII N VOL+/VOL-наДалeуннСКNotУпавВа
da ja npnilarOДTe ja jauHnHaТа Ha 3ByK.
Ako cakate da ro ncknyuHTe 3ByKOT, npTncHeTe ro konyeTo (NCKJyUYBAHbE 3BYK)Ha daJeunHcKnOT ynpaBvBauch. NobTopHo npTncHeTe ro konyeTo (NCKJyUYBAHbE 3BYK)nn npTncHeTe rK konChnBaTa VOL+/ VOL- da npoDJIxHte CO HopMaIIHO cnUshaHe.
Bo YCB peKIM, npNTnCHeTo KOnueTo II
nH /pOIOJXKeTcO HopMaHOn CnyuHaBe.
Bo BT pexum, cmo npntncheTe rN KOunHbataVOL+/VOL- ha noBp3aHnot Telefoh 3a da ce npoDOnJn HopMaHnOTo cnUshaHe.
6.7 PpnilarOyBaHbe Ha oCBetIyBaHbeto
-ПиТИСНЕТI KОЧИБАТДIMMER+/-HaДалеуннсnotуnpaByBaUda n36epeTe HNBOHa OCBeJIyBaHbE.
6.8 I36epete eΦeKT Ha eKbunaj3ep (EQ)
-Додакpenpoусupa,прнисе ro konчeto EQ Ha Далецнскnot упраByвадаги n36ерete npetxodno NOCTaBeHnTe ekBnaj3epn: EKBNJA3EPN MY3NKA,ФИМ, BECTI, CNOPT, HOK, INPNU, BN.
6.9 ПoctabeTe OndoxyBaHbe Ha aydno (AV SYNC)
3a 6pa60tka Ha Bndeo Cnka, noHeKOraw e nOtpe6Ho nOdoIro BpeMe otKOnky Da ce npouecnpa aydno cnHaN. Oba ce Bnka "OdNoXeHO".ФyHKuJata OndoxyBaHbe Ha aydno e dN3ajHnpaHa 3a da ro KopnInpa Oba odNoxyBaHbe.
- IocTaBeTe OndOxyBaHbe Ha aydno, 06e36eHcO cMo 3a TeKOBHNOT peXIM Ha penpoDykuJia. (Kako wTo e o6e36eHcO BO peXIMOT Ha OndOxYBaHbe Ha aydno HDMl ARC,peXIMOT Ha OndOxYBaHbe e BaXeUKN cMo 3a HDMl ARC).
- CtaHdapdNO, OndoxyBaHeTo Ha aydno e noctabeHo Ha 00.
1. Bo TeKOT ha pexkum BKJUYEHO, npuTuscheTe ro n 3aDpxKeTe ro konyeTo || 3 cekyHn 3a Da ce OTbOpn MeHnTo, a noToa npTuChHeTe ro konyeTo 19 natn eHOnoDpyRo. EkpaHOT ha eINHncaTa Ke IIN3ra Do "LT00".
2.ПиTиСHTe Tn KOnuHbTa VOL+/- da HnUpaTe ΦpeHBeHuzja od 10 ms HaDeBajKn ce DeKa BpeMeTo Ha DoUHeHe Ke ce npnaOdi. NocTaBeTe MaKcUmAnHo DoUHeHe od 200 ms.
3. PnTnCHeTe ro KOnyTe ⅡI nn noyekajte 10 ceKynDa n3Je3eTe.
Cobetn:
- Oncer ha npnilarodyBaHbe: [00 ~ 200 ms]
- ПoctabуbaHeTo Ha ayDnO DoUneHbe e BaxKeYko cMo 3aДиГntaJIHo ayDnO (np, HDMI IN, HDMI ARC, HDMI eARC, ONTNUK).
7. DTS:X onepaunja
7.1 DRC / KoHTpOHa HaДиJaIor /ФункцИ Neural:X/Virtual:X
DTS:X texhONrHn m 06e36eYBa Ha KOpncnUInTe BnptyeHn NOBeKeKaHaHN eΦeKn 3a BnptyeHNOkpyxuBaHe, KpenpaKn ceonphiTe aynO3ByK.
-Bo TeKOT Ha pexHmOT BKNyUeHO, Hacouete ro daJeunHcKnOT ynpaByBauch KOH cayHapot, npHTncHeTe ro n 3aDpXeTe ro konyeTo113 ceKHydN 3a Da ro OTBOpNTe MeHnTO.
- EkpaHot Ha eDInHncaTa Ke Jln3ra Do „MENU".
NocTabka 3a DRC HnBO:
- Пптисе ГКончeto 10 natn
eДнОДPyRo,Ha ekpaHOT ce nOKaЖуBa: DRC
0/1/2.
PpunarogeTo HNBOTo Ha KOHTpOHa dJanaIor:
-ПиNTСHETe ro konyeto 11 natu eHONODpyro,Ha ekpaHOT ce nokaxya: DCL 0/1/2/3/4/5/6.
Nocetabka Neural:X:
- PnTnCHeTe ro konyeto 12 nataeHONOpyro,Ha ekpaHot ce noKaxyBa:NeuralXON/OFF.
NocTabka Virtual:X:
- Пи捜снete ro konчeto 13 natn eHONOДPyro,Ha ekpaHOT ce noKaJyBa: VIRTUALXON/OFF.
Beneuka:
Tognnte onepaunCe BOrnaBHO 3a 6apaHbata 3a ycornaceHoCT co DTS n camo noctabkata Virtual:X e OTBopeHa 3a KIneHTN.
8. Pa6oTeHe co HDMI eARC/HDMI ARC, HDMI IN, ONTNUKN, AUX
1 Ocnypete ce deka eunHncaTa e nobp3aHa Ha TeJeBn3OpOT nHa ayDnO ypeI.
2 Hekonky nATn npHTncHeTe ro KonyeTo Ha eHNucaTa nn Ha daJeunHcKnOT ynpaByBa3a Da n36epTe HDMI eARC/HDMI ARC, HDMI IN, ONTNKU, AUX, YCB, BT (Bluetooth) peKIM.
3ДиpeKTHO pa6oTeTe co Baunot ayno ypeJ 3a ΦyHKnHa penpoDyKuJa.
4ПиТиСHTe ro konTuTe VOLO+/-3aJa ja npuIarOДte jaunHaTa Ha 3ByK Ha BaWeTo NOCaKyBaHO HnBO.
Cobertn:
- EdnHnIaTMOKe6Hema da MoKe da nI deKOInpa CNTe DnITaJIHn ayNo oOpMaTu Od n3BOPOT Ha BHeCyBaIbe. Bo OoJ cnyaj, eHNuata Ke ro NCKlyuN 3ByKot. Oba HE e DeΦeKT. YBepeTe ce DeKa NOCTaBYBaIbeTo ayNo od BnE3HnOt n3Bop (np. TB, KOH30na 3a irpn, DBD penpoyKTop n cn.) e noCTaBeHo Ha PCM nn Dolby Digital (nOrneHete Ro KOpNCnUcKOTo yNaTCTBO 3a BnE3HnO t n3BOp 3a DeTaN 3a NOCTaBYBaIbe ayNo) co HDMI eARC / ONTNUKN BnE3.
Kora n36npaTe pa3nueH ayDnO foOpMaT, eINHnCata Ke ro npkaKe cneHOBO KaKO wTO CneDN:
| Влесен ФорматЕкpen | |
| PCM PCM | |
| Dolby Digital | DOLBY AUDIO / DOLBY SURROUND |
| Dolby Digital Plus | DOLBY AUDIO / DOLBY SURROUND |
| Dolby TrueHD | DOLBY AUDIO / DOLBY SURROUND |
| Dolby MAT MPCM | |
| Dolby Digital Plus - Atmos | DOLBY ATMOS |
| Dolby TrueHD - Atmos DOLBY ATMOS | |
| Dolby MAT - Atmos DOLBY ATMOS | |
| DTS DTS | |
| DTS Discrete Surround DTS | |
| DTS-ES 6.1 Matrix | DTS |
| DTS-ES 6.1 Discrete DTS | |
| DTS 96/24 | DTS |
| DTS 96/24 ES Matrix | DTS |
| DTS Express | DTS |
| DTS-ES 8-Channel Discrete | DTS |
| DTS-HD High Resolution | DTS-HD |
| DTS-HD Master Audio | DTS-HD |
| DTS:X | DTS-X |
| DTS:X Master Audio | DTS-X |
9. Pa6oTeIbe co Bluetooth
9.1 Cnapu ypeu co oObo3moxhen Bluetooth
PpBnOT nAT kora ro nobp3yBaTe Baunot Bluetooth ypeo co oOBJ nleep, Tpe6a da ro cnapnte ypeoT co nleepoT.
Beneuken:
- OnepaTnBnOTo nOcer nomery eDInHncaTa n Bluetooth ypee e npu6nKHo 26 cTaNk (8 m) (6e3 HnKaKOB npEaMeT nomery Bluetooth ypeoT n eDInHncaTa).
-ПпeДда поьрзе Te Bluetooth уpeД Ha OBaa eДиница,уверете ce Deka ГИЗhaeTe MOxHocHTte Ha ypeДOT.
- KompaTn6uHocT co cnte Bluetooth ypei He e rapaHTnpaHa.
- Cekoja npeuKa nomery Obaa eunHnua u ypeD co Bluetooth moKe da ro HamaJn onepaTbHnot oncer.
- Ako jaunhaTa Ha cnHanaTcna6a, eHNuata MoKe Da ce NCKnyu, HO NOBTOpHO aBTOMaTCKn Ke BHe3e BO peKmHa cnapyBaHe.
1 Bo TeKOT Ha pexkIM BknyeHo, HeKoIky NaTIN npITnCHHeTo KOChTe OHa eINHnCaTa NnKoNcTe OHa daneuHcknOT ynpaBvBaY da n36epTe Bluetooth pexkIM. Ha ekpaHot Ke ce npikKaKe, NO BT" aKO eINHnCaTa He e cnapeHa co HeKoJ Bluetoothypei.
2 AkTbBpajTe ro Baunot Bluetooth ypei n36epeTe pexm 3a npebapyBaHe. Hisense AX3120G" Ke ce nojabn Ha BaWata Jncta co Bluetooth ypeu.
- Ako He mokeTe da ja HajdeTe eHnHaTa, npTncHeTe ro n 3aDpxKeTe ro KonyeTo BO BT pekm2 cekyHn 3a da MoKe Da ce ppe6apyBa. Ha ekpaHot Ke ce npKkae, "BT Pairing" n Ke cnUshHeTe 3Byk 3a N3BeCTyBaHbe Od eHnHaTa.
3 N36epeTe,Hisense AX3120G"BO JnCTaTa 3a cnapyBaHe. Ioo ycneuHo cnapyBaHe,Ke CnyuHHe Te 3ByK 3a n3BeCTyBaHe oEeHNuCaTa H Na ekpaHOT Ke ce npkaKe ,BT_IN".
4 PpenpoDyuHpaHbe My3nKa OJ NOBp3aHNOBTe Bluetooth ypeI.
Ja ja ncknyuTe fynkunjata Bluetooth, moKeTe da:
- npeΦpnte Ha npyprxim Ha eHNHuaTa.
- ja OHeBO3MOxNtTe HKuJnajaTbOT Od Baunot Bluetooth ypeI. Bluetooth ypeoT Ke 6nDe NCKJIyueH ON eHNuCaTa nO rnaOBHOT NOTcETyBaHbe.
-Припснichteизаджete ro konчeto 2 cekyHn.
Cobetn:
BheceTe,0000"ako e noTpe6Ha lo3nHka.
AkoDpyr Bluetooth ypeH He ce cnapyBa co OBaa eINHua BO pOK OJ DBe MNHyTu, eINHuaTa Ke ro 0bOBn npTeXoJHOTo NOBp3yBaHe.
- EdnHncaTa nCTo Taka Ke ce NcKnyu Kora Baunot ypeKe ce npemectn HaBOp oJ oncerOT ha pa6oteHe.
Ako cakaTe NOBTOPOHa rO NOBp3eBaHNOtypeiHa OBOjPiEEP,CTaBeTe rO BO ONCEROT Ha pa6oTeHe.
Ako ypeoTe npemecTeHnBOp od onceroT ha pa6oTeHe, Kora Ke ro BpaTne, npOBepTe daHypeoTe ce yuTe NOBp3aH co nneepOT.
- Ako NOBp3yBaHbETo ce n3ry6n, cIeTe rnyaTCTbata norope 3a noBtOpHo da ro cnapnte Baunot ypeD co nIIeepOT.
9.2 Cnyuhahe my3nka od Bluetooth ype
-Ako noBp3aHnoi Bluetooth ypei noDprkyBa HanpeDen npoФnlaДиCTrp6uJa Ha ayNo (A2DP), moKe da cnUwate My3nka cKnadnpaHa Ha ypeoT npeky eHNucaTa.
- Ako ypeDTo nTo TaKa noDpKBya PpoΦnHa daLeuHcKa KOHTpOJa Ha ayDIO BVJeO (AVRCP), MoKe Da ro KopIcTne daLeuHcKnOT ynpaBvBaU Ha eINHuaTa Da penPoDyCupaTe My3nKa cKlaInpaHa Ha ypeDTo.
- Cnapete ro ypeodt co eDHHuata.
- Penuyupajte myzika npeky Baunot ypei (ako noDpxyBa A2DP).
- KopuCTeTe ro DoCTaBeHnot daJeunHcKn ynpaByBaU da ja KOHTpOJIpaTe pe npOduKUnjaTa (ako noDpKBya AVRCP).
| II | Стар, параза подожувае на ретрордунциja. |
| I / II | Песkokни на петховни на следа Нумера. |
10. Pa6oTe№ co YCb
1 CtabeTe YCb-ypei.
2 Hekonky natu npntncheTe ro konyeTo Ha eHHuata NaHa daJeunHCKNOT ynpaByBa Da n36epete YcB peKm.
3 Bo TeKoT Ha penpOdykUnjaT: