
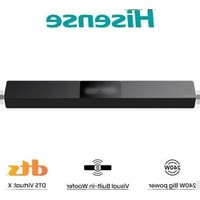
HS205G - Soundbar HISENSE - Free user manual and instructions
Find the device manual for free HS205G HISENSE in PDF.
| Product type | 2.0 channel soundbar |
| Model | HS205G |
| Brand | Hisense |
| Dimensions (W × H × D) | 880 × 56 × 88 mm |
| Net weight | 1.6 kg |
| Power supply | AC 100-240 V ~ 50/60 Hz, DC 24 V / 2 A adapter |
| Standby power consumption | ≤ 0.5 W |
| Total audio power | 120 W |
| Speaker impedance | 8 Ω × 2 |
| Frequency response | 40 Hz - 20 kHz |
| Bluetooth version | Bluetooth 5.0 |
| Audio inputs | HDMI ARC, OPTICAL, USB, Bluetooth |
| Supported audio formats | LPCM 2ch, Dolby Digital, DTS; via HDMI ARC: LPCM 5.1/7.1, Dolby Digital Plus |
| USB port | USB 2.0, FAT32, up to 32 GB, formats: MP3, WMA, AAC, OGG, FLAC, WAV, AIFF |
| Preset equalizer | Music, Movie, News, Night |
| Additional functions | Virtual surround sound (DTS Virtual:X), bass boost, auto standby, auto wake |
| Cleaning | Dry cloth only |
| Wall mounting | Possible, screws included |
| Package contents | Soundbar, remote control, AAA batteries ×2, power adapter, power cable, HDMI cable, optical cable, wall brackets and screws, manual |
| Safety | Double insulation class II, do not expose to water or liquid objects |
| Repairability | Have any repair done by qualified personnel |
Frequently Asked Questions - HS205G HISENSE
User questions about HS205G HISENSE
0 question about this device. Answer the ones you know or ask your own.
Ask a new question about this device
Download the instructions for your Soundbar in PDF format for free! Find your manual HS205G - HISENSE and take your electronic device back in hand. On this page are published all the documents necessary for the use of your device. HS205G by HISENSE.
USER MANUAL HS205G HISENSE
Before using the soundbar, please read this manual thoroughly and retain it for future reference.
Roku TV Ready
Bluetooth
HOMI
Dolby Audio
dtss
C E UK CA
Contents
Package Contents 2
Product Diagram 3
Main Unit 3
Remote Control 4
Preparations 5
Prepare the Remote Control 5
Replace the Remote Control Battery 5
Placement and Mounting 6
Wall Mounting (if using option-B) 6
Connections 7
Connect to HDMI (ARC) Socket 7
Connect to OPTICAL Socket 7
Connect Power 8
Basic Operation 8
Standby/ON 8
Select Modes 9
Adjust the Volume. 9
Select a Preset Sound Effect 9
OPTICAL/HDMIARCOperation11
Bluetooth Operation 11
Pair Bluetooth-enabled Devices 11
Listen to Music from Bluetooth Device 12
USB Operation 13
Troubleshooting 14
Specifications 15
Package Contents
- Main Unit
- Remote Control / AAA Batteries (x2)
- AC Power Cord
- Power Adapter
- Wall Plug (x2) / screw(x2)
Optical Cable
HDMI Cable
Quick Start Manual - Design and specifications are subject to change without notice.
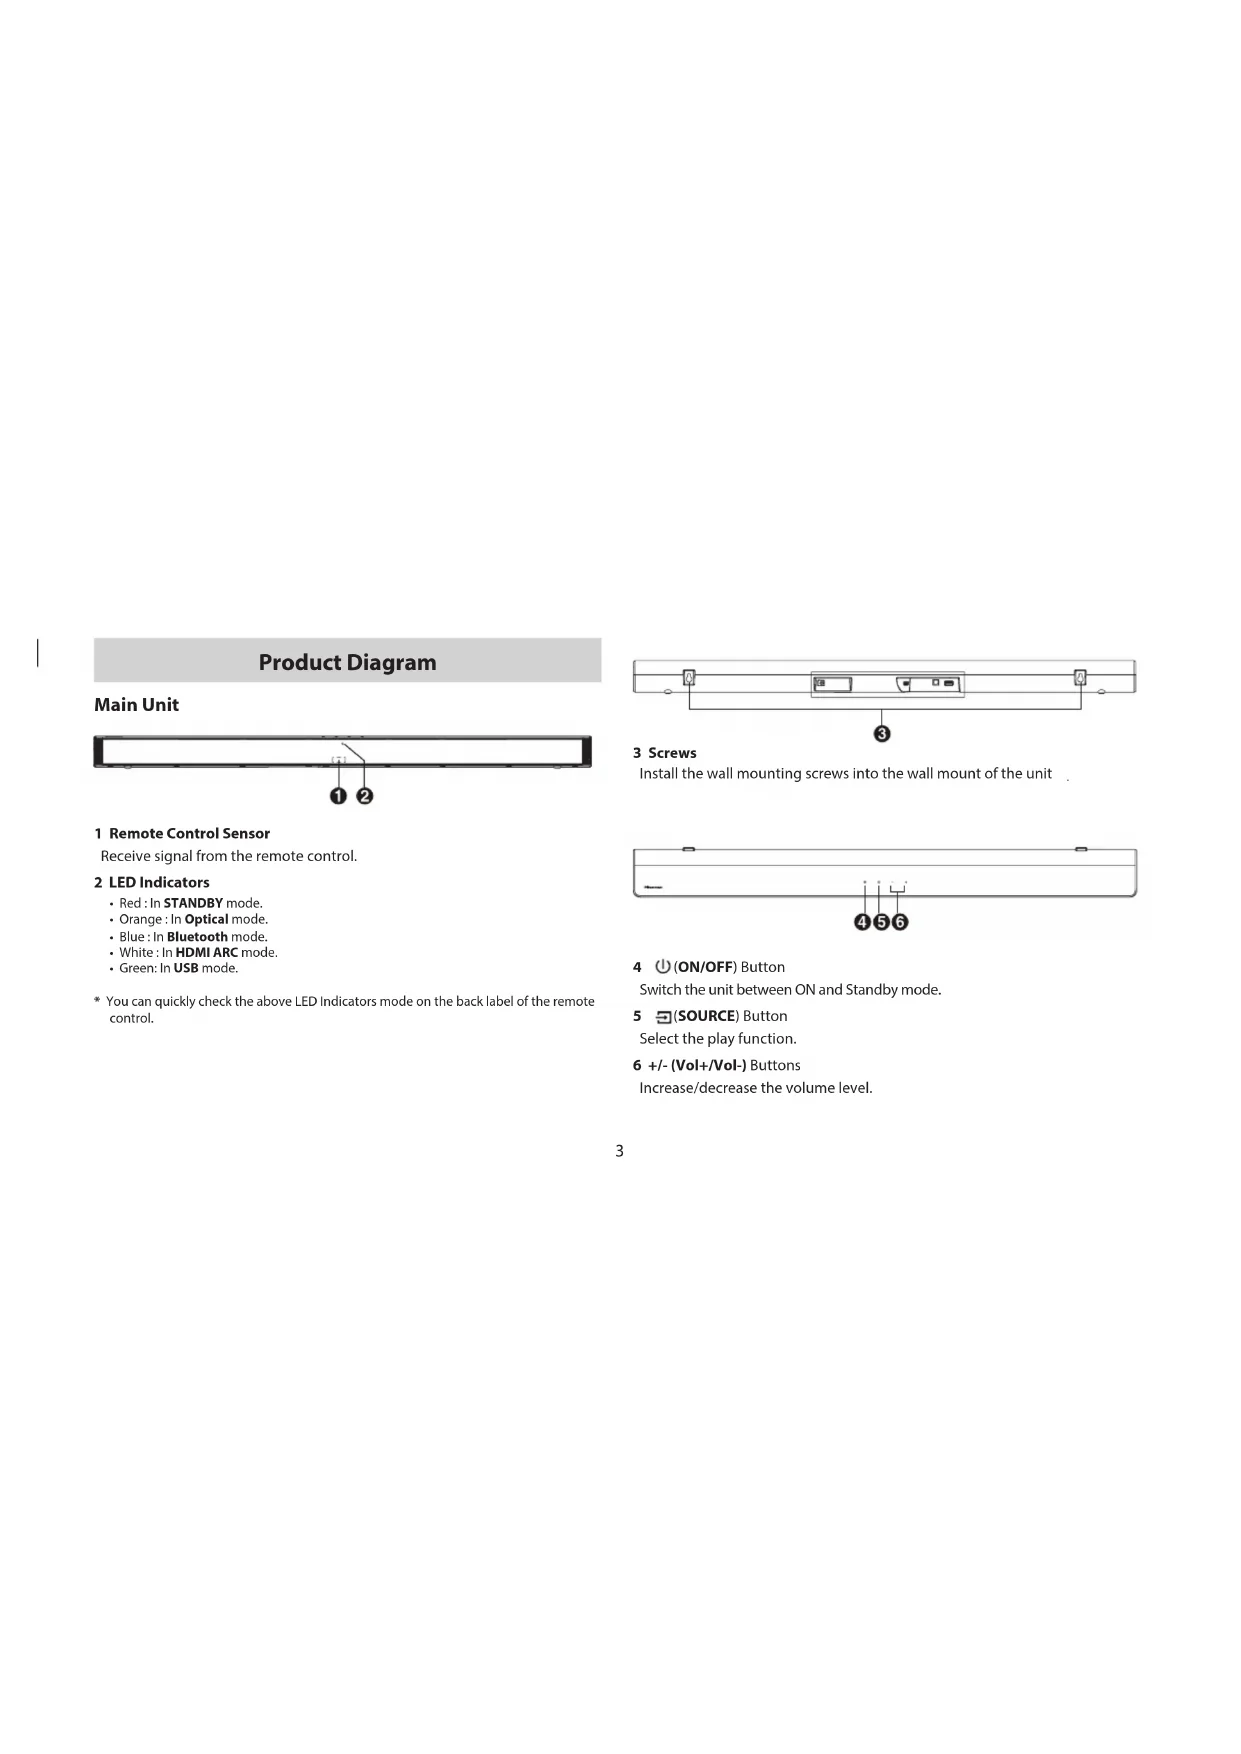
Product Diagram
Main Unit

1 Remote Control Sensor
Receive signal from the remote control.
2 LED Indicators
Red:In STANDBY mode.
Orange:In Optical mode.
- Blue: In Bluetooth mode.
- White: In HDMI ARC mode.
Green: In USB mode.
- You can quickly check the above LED Indicators mode on the back label of the remote control.

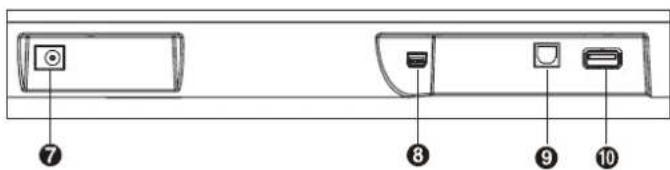
3 Screws
Install the wall mounting screws into the wall mount of the unit

4 (ON/OFF) Button
Switch the unit between ON and Standby mode.
5 (SOURCE) Button
Select the play function.
6 +/-(Vol+/Vol-) Buttons
Increase/decrease the volume level.
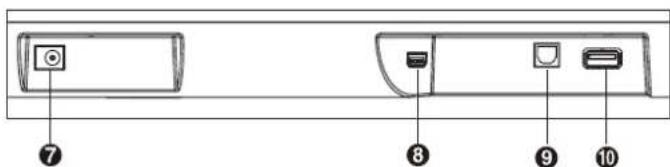
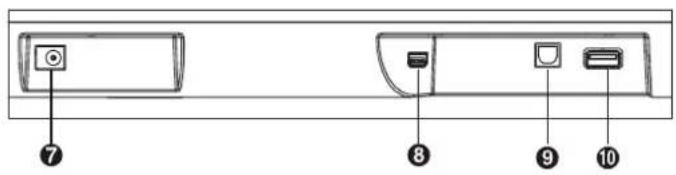
7 DC Socket
Connect to the power adapter.
8 HDMI ARC Socket
Connect to a TV via HDMI cable.
9 OPTICAL Socket
Connect to an optical audio output on the TV.
10 USB Socket
Insert the USB device to play music.
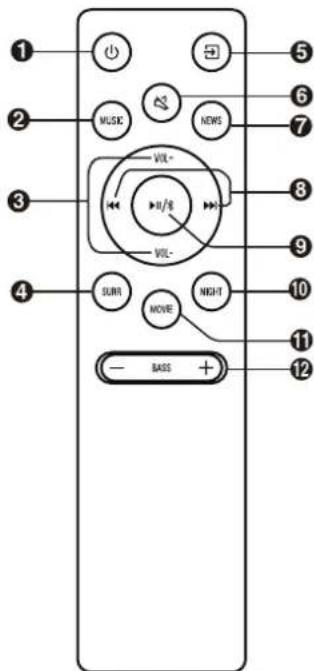
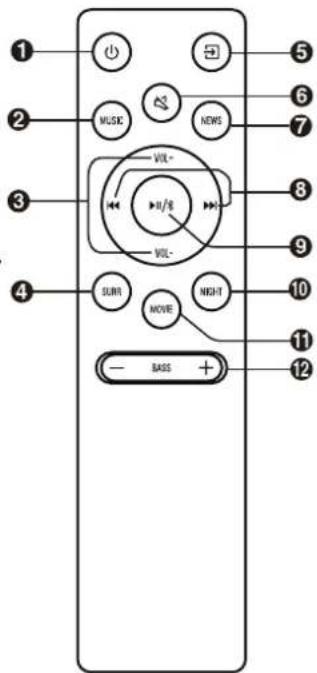
Remote Control
1
Switch the unit between ON and STANDBY mode.
2 MUSIC
Switch to MUSIC EQ effect.
3 VOL+/VOL-
Increase/decrease the volume level.
4 SURR
Adjust the surround ON/OFF.
5 (Source)
Select the play mode.
6 (MUTE)
Mute or resume the sound.
7 NEWS
Switch to NEWS EQ effect.
8
Skip to previous/next track in BT/USB mode.
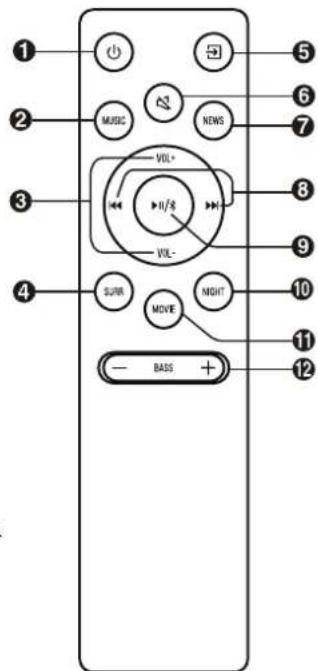
9118
Play/pause/resume playback in BT/USB mode. Press and hold to activate the pairing function in Bluetooth mode or disconnect the existing paired Bluetooth device.
10 NIGHT
Switch to NIGHT EQ effect.
11 MOVIE
Switch to MOVIE EQ effect.
12 BASS+/-
Increase/decrease the bass level.
Preparations
Prepare the Remote Control
The provided Remote Control allows the unit to be operated from a distance.
Even if the Remote Control is operated within the effective range 19.7 feet (6m), remote control operation may be impossible if there are any obstacles between the unit and the remote control.
If the Remote Control is operated near other products which generate infrared rays, or if other remote control devices using infra-red rays are used near the unit, it may operate incorrectly. Conversely, the other products may operate incorrectly.
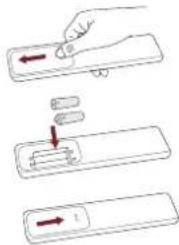
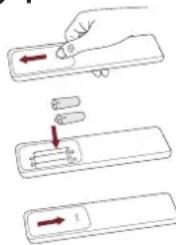
Replace the Remote Control Battery
1 Press and slide the back cover to open the battery compartment of the remote control.
2 Insert two AAA size batteries (included). Make sure the (+) and (-) ends of the batteries match the (+) and (-) ends indicated in the battery compartment.
3 Close the battery compartment cover.
Precautions Concerning Batteries
- Be sure to insert the batteries with correct positive (+) and negative (-) polarities.
- Use batteries of the same type. Never use different types of batteries together.
- Either rechargeable or non-rechargeable batteries can be used. Refer to the precautions on their labels.
- Be aware of your fingernails when removing the battery cover and the battery.
- Do not drop the remote control.
- Do not allow anything to impact the remote control.
- Do not spill water or any liquid on the remote control.
- Do not place the remote control on a wet object.
- Do not place the remote control under direct sunlight or near sources of excessive heat.
-
Remove the battery from the remote control when not in use for a long period of time, as corrosion or battery leakage may occur and result in physical injury, and/or property damage, and/or fire.
-
Do not use any batteries other than those specified.
- Do not mix new batteries with old ones.
- Never recharge a battery unless it is confirmed to be a rechargeable type.
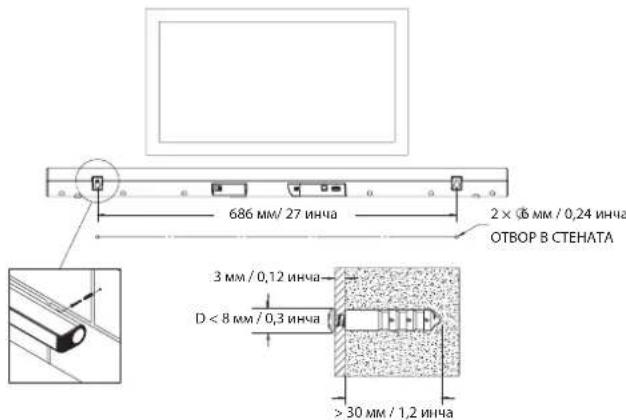
Placement and Mounting
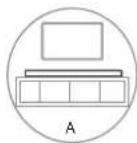
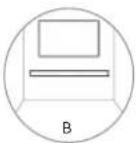
Placement
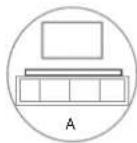
A If your TV is placed on a table, you can place the unit on the table directly in front of the TV stand, centered with the TV screen.
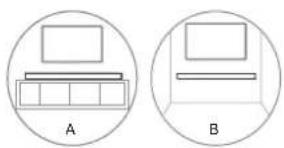
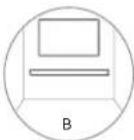
B If your TV is attached to a wall, you can mount the unit on the wall directly below the TV screen.
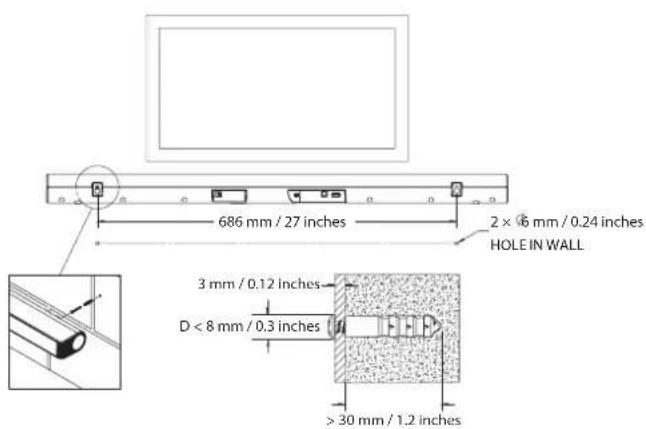
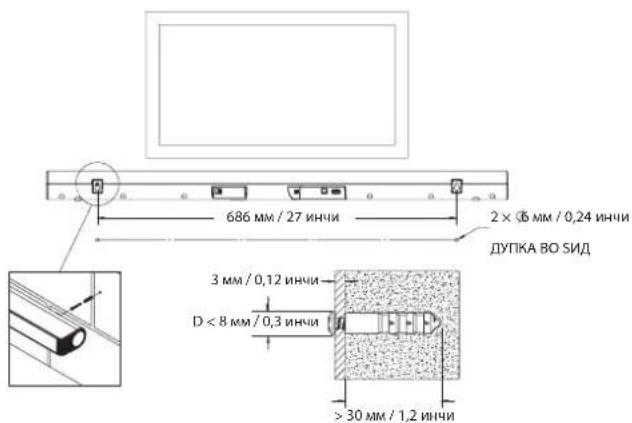
Wall Mounting (if using option-B)
Note:
- Installation must be carried out by qualified personnel only. Incorrect assembly can result in severe personal injury and property damage (if you intend to install this product yourself, you must check for installations such as electrical wiring and plumbing that may be buried inside the wall). It is the installer's responsibility to verify that the wall will safely support the total load of the unit and wall brackets.
- Additional tools (not included) are required for the installation.
-
Do not overtighten screws.
-
Keep this instruction manual for future reference.
- Use an electronic stud finder to check the wall type before drilling and mounting.
Connections
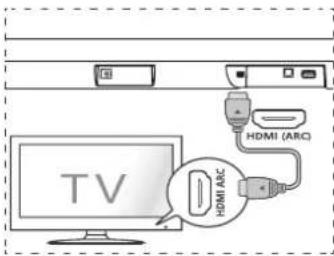
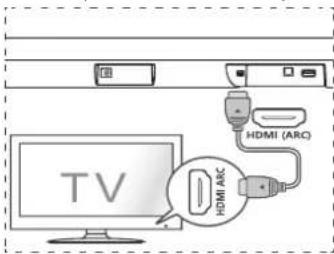
Connect to HDMI (ARC) Socket
Your Soundbar supports HDMI with Audio Return Channel (ARC). If your TV is HDMI ARC compliant, you can hear the TV audio through your Soundbar by using a single HDMI cable.
1 Using a High Speed HDMI cable, connect the HDMI ARC connector on your Soundbar to the HDMI ARC Connector on the TV.
- The HDMI ARC connector on the TV might be labeled differently. For details, see the TV user manual.
2 On your TV, turn on HDMI-CEC operations. For details, see the TV user manual.
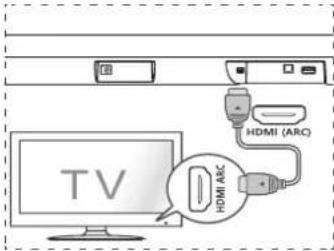
Tips:
- Your TV must support the HDMI-CEC and ARC function. HDMI-CEC and ARC must be set to On.
- The setting method of HDMI-CEC and ARC may differ depending on the TV. For details about ARC function, please refer to your TV owner's manual.
- Only HDMI 1.4 compatible cables can support the ARC function.
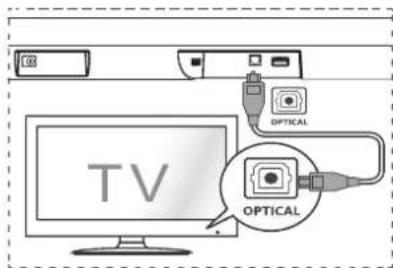
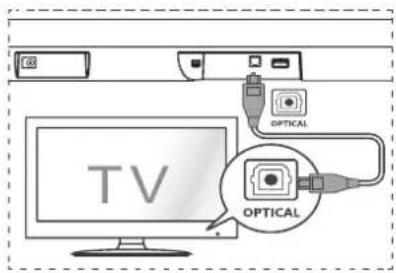
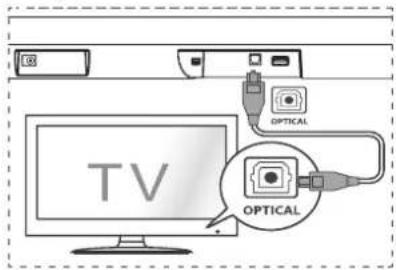
Connect to OPTICAL Socket
- Remove the protective cap of the OPTICAL cable, then connect an OPTICAL cable to the TV's OPTICAL OUT socket and the OPTICAL socket on the unit.
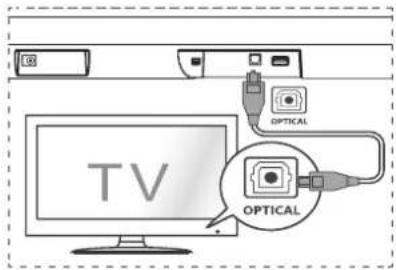
Tip:
- While in OPTICAL or HDMI ARC mode, if there's no sound output from the unit, you may need to activate PCM Signal output on your source device (eg. TV, DVD or Blu-ray player).
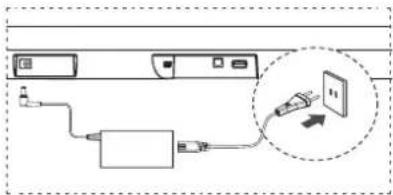
Connect Power
Risk of product damage!
- Ensure that the power supply voltage corresponds to the voltage printed on the back or the underside of the unit and the power adapter.
- Before connecting the AC power cord, ensure you have completed all other connections.
- Connect the DC cable of the power adapter to the DC Socket of main unit.
- Connect the mains cable to the AC~ Socket of power adapter and then into a mains socket.
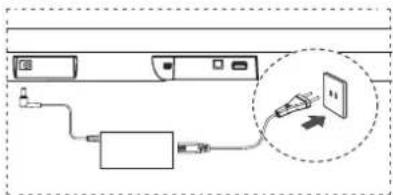
- Power cord quantity and plug type vary by regions.
Basic Operation
Standby/ON
When you first connect the main unit to the mains socket, the main unit will be in Standby mode.
- Press the button on the unit or on the remote control to switch the unit ON.
- Press the button again to switch the unit back to STANDBY mode.
- Disconnect the mains plug from the mains socket if you want to switch the unit OFF completely.
Auto Wake
- If a TV or an external device is connected (OPTICAL / HDMI ARC), the unit will switch on automatically when the TV or the external device is switched on and output audio signals.
How to Enable Auto Wake
- Short press the (SURCE) button and VOL + button on the unit to enable or disable Auto Wake function.
- Auto Wake On: white and green LED blink twice sequentially. While in STANDBY mode, the RED LED is breathing.
- Auto Wake Off: white and red LED blink twice sequentially. While in STANDBY mode, the LED is in solid red.
Automatic Power Off Function
The unit automatically turns to STANDBY mode after about 15 minutes if the TV or the external unit is disconnected, switched off.
- To switch the unit off completely, remove the mains plug from the mains socket.
- Please turn the unit off completely to save energy when not in use.
- In optical mode, press in sequence to turn on Auto Standy mode, the Yellow LED Flash 3 times quickly.
- In optical mode, press in sequence to turn off Auto Standy mode, the Yellow LED Flash 3 times slowly.
Select Modes
Press the (SOURCE) button repeatedly on the unit to select the desired mode.
The indicator light on the front of the main unit will show which mode is currently in use.
Adjust the Volume
Press the VOL + / VOL - buttons on the unit or on the remote control to adjust the volume.
If you wish to turn the sound off, press the button on the remote control. Press the button again or press the VOL+/VOL- buttons to resume normal
listening.
Note: While adjusting the volume, the status LED indicator will flash once. When the volume has hit maximum/minimum value level, the status LED indicator will flash quickly.
Select a Preset Sound Effect
While playing, press the EQ button on the remote control to select desired preset equalizers: MUSIC, MOVIE, NEWS, NIGHT.
| Indicator light function | ||
| Features | Display Operation | |
| Automatic Standby On | Yellow-Yellow-Yellow, quickly | Optical mode, "Prev"-"Prev"- "Next"- "Next" |
| Automatic Standby Off | Yellow-Yellow-Yellow, slowly | |
| Auto Wake Mode On | White-White-Green-Green | Soundbar: "Source" + "Vol+" |
| Auto Wake Mode Off | White-White-Red-Red | |
| Volume limit The light flashes 3 times Adjust volume | ||
| Bluetooth pairing | Red-Blue-Red-Blue...... | In Bluetooth Mode, Press and hold the Play button |
| Failed to play Red-Green-Red-Green...... | ||
| Surround On The light flashes 5 times, quickly | Press "SURR" | |
| Surround Off The light flashes 5 times, slowly | ||
| DTS Digital Surround | Cyan-Cyan-Cyan, quickly DTS | signal received |
| Dolby Digital Green-Green-Green, quickly Dolby signal received | ||
| Bass Boost On | The light flashes 3 times, quickly | Optical mode, "Prev"+ "Play" + "Next" |
| Bass Boost Off | The light flashes 3 times, slowly | |
OPTICAL/HDMIARCOperation
1 Ensure that the unit is connected to the TV or audio device.
2 Press the button repeatedly on the unit or on the remote control to select the OPTICAL, HDMI ARC mode.
3. Operate your audio device directly for playback features.
4 Press the VOL + / - button to adjust the volume to your desired level.
Tips:
- The unit may not be able to decode all digital audio formats from the input source. In this case, the unit will mute. This is NOT a defect. Ensure that the audio setting of the input source (e.g. TV, game console, DVD player, etc.) is set to PCM, Dolby Digital, Dolby Digital Plus or DTS, refer to the table "Supported Input Audio Formats" (Refer to the user manual of the input source device for its audio setting details) with HDMI ARC / OPTICAL input.
- While in OPTICAL or HDMI ARC mode, you may need to set the sound output device of your TV to OPTICAL or HDMI ARC, for the detailed operation please refer to the manual of your TV.
Bluetooth Operation
Pair Bluetooth-enabled Devices
The first time you connect your bluetooth device to this player, you need to pair your device to this player.
Note:
- The operational range between this player and a Bluetooth device is approximately 26 feet (8m) (without any object between the Bluetooth device and the unit).
- Before you connect a Bluetooth device to this unit, ensure you know the device's capabilities.
- Compatibility with all Bluetooth devices is not guaranteed.
- Any obstacle between this unit and a Bluetooth device can reduce the operational range.
-
If the signal strength is weak, your Bluetooth receiver may disconnect, but it will re-enter pairing mode automatically.
1 During ON mode, press the button repeatedly on the unit to select Bluetooth mode. The Blue indicator will light flash.
2 Activate your Bluetooth device and select the search mode. "Hisense HS205G" will appear on your Bluetooth device list. -
If you cannot find the unit, press and hold the button on the remote control to be searchable. The system has entered pairing mode. You will hear audio prompt from the unit and the Bluetooth indicator will flash quickly.
3 Select "Hisense HS205G" in the pairing list. After audio prompt, the system is successfully connected and the Bluetooth indicator will light up solidly.
4 Play music from the connected Bluetooth device.
To disconnect the Bluetooth function, you can :
- Switch to another function on the unit.
-
Disable the function from your Bluetooth device. The Bluetooth device will be disconnected from the soundbar after audio prompt.
-
Press and hold the button on the remote control.
Tips:
- Enter "0000" for the password if necessary.
- If no other Bluetooth device pairs with this player within two minutes, the player will recover its previous connection.
- The player will also be disconnected when your device is moved beyond the operational range.
- If you want to reconnect your device to this player, place it within the operational range.
-
If the device is moved beyond the operational range, when it is brought back, please check if the device is still connected to the player.
-
If the connection is lost, follow the instructions above to pair your device to the player again.
Listen to Music from Bluetooth Device
- If the connected Bluetooth device supports Advanced Audio Distribution Profile (A2DP), you can listen to the music stored on the device through the player.
- If the device also supports Audio Video Remote Control Profile (AVRCP), you can use the player's remote control to play music stored on the device.
1 Pair your device with the player.
2 Play music via your device (if it supports A2DP).
3 Use supplied remote control to control play (if it supports AVRCP).
- To pause/resume play, press the button on the remote control.
- To skip to a track, press the buttons on the remote control.
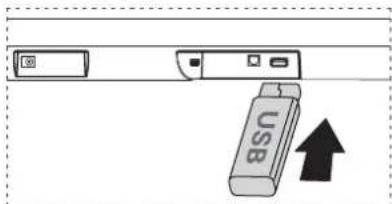
USB Operation
1 Insert the USB device.
2 Press the button repeatedly on the unit or press the USB button on the remote control to select USB mode.
3 During playback:
- To pause or resume play, press the button on the remote control.
- To skip to the previous/next file, press the /buttons on the remote control.
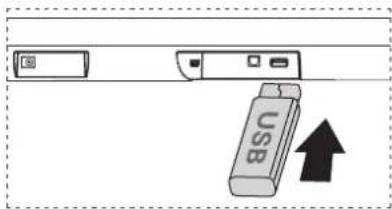
Tips:
- The unit can support USB devices with up to 32 GB of memory.
This unit can play MP3/WMA/AAC/OGG/FLAC/WAV/AIFF.
File Format Type Compatibility list
| Extension | Codec Sampling Rate Bit Rate | ||
| *.mp3 | MPEG-1 Layer1/2/3 32kHz | ~48kHz 32kbps~320kbps | |
| MPEG-2 Layer1/2/3 16kHz | ~24kHz | 8kbps~160kbps | |
| MPEG-2.5 Layer3 8kHz~12kHz | |||
| *.wma WMA7/8/9/STD 8kHz~48kHz | ≤320kbps | ||
| *.aac | AAC | 8kHz~96kHz | ≤1728kbps |
| AAC-LC | |||
| HE-AAC | |||
| *.ogg | Vorbis codec | 8kHz~48kHz | ≤ 500kbps |
| *.flac | - | 8kHz~192kHz ≤9Mbps | |
| *.wav | PCM、LPCM、IMA_ADPCM、MPEG、ALAW、MULAW | 8kHz~192kHz ≤9Mbps | |
| *.AIFF | PCM、ALAW、MULAW | 8kHz~192kHz ≤9Mbps | |
- Only USB Format Type FAT 32 is supported for USB storage device connection.
- for *.ogg audio files, below are unsupported formats:
1). block size 0 < 64 block size 0 > 2048;2) .block size 1 < 64 ,block size 1 >4096;3) .codebook counter >64;4) .codebook entry >640;5) .floor counter >4;6) .floor type 0;7).residua counter >4;8) .dimension ! = 2;9) mapping counter >2;10) .mode couter >2
Troubleshooting
To keep the warranty valid, never try to repair the system yourself. If you encounter problems when using this unit, check the following points before requesting service.
No power
- Ensure that the AC cord of the apparatus is properly connected.
- Ensure that there is power at the AC outlet.
- Press standby button to turn the unit on.
- Ensure that the DC cable of the power Adapter is properly connected.
Remote control does not work
- Before you press any playback control button, first select the correct source.
- Reduce the distance between the remote control and the unit.
- Insert the battery with its polarities (+/-) aligned as indicated.
- Replace the battery.
- Aim the remote control directly at the sensor on the front of the unit.
No sound
-
Increase the volume. Press Volume Up on the remote control or on the soundbar.
-
Press MUTE on the remote control to ensure the soundbar is not muted.
- Press source buttons to select a different input source.
-
When using either of the Digital inputs, if there is no audio:
-
Try setting the TV output to PCM or
-
Connect directly to your Blu-ray/other source, some TVs do not pass through digital audio.
-
Your TV may be set to variable audio output. Confirm that the audio output setting is set to FIXED or STANDARD, not VARIABLE. Consult your TV's user manual for more detailed information.
- If using Bluetooth, ensure that the volume on your source device is turned up and that the device is not muted.
I can't find the Bluetooth name of this unit on my Bluetooth device for Bluetooth pairing
- Ensure the Bluetooth function is activated on your Bluetooth device.
- Ensure you have paired the unit with your Bluetooth device.
This is a 15 mins power off function, one of the ERPII standard requirement for saving power
- When the unit's external input signal level is too low, the unit will be turned off automatically in 15 minutes. Please increase the volume level of your external device.
Specifications
| Model Name HS205G | |
| General | |
| Power Supply | AC100-240V ~ 50/60HzDC 24V/2A |
| Standby Power ≤ 0.5 W | |
| USB port for playbackUSB CompatibilityUSB Playback support / file formats | 5V ---500mAHi-Speed USB (2.0) / FAT3232G (max), MP3 |
| Dimension (WxHxD) | 34.6 x 2.2 x 3.5inches(880 x 56 x 88 mm) |
| Net weight 3.5 lbs / (1.6 kg) | |
| Impedance 8Ω x 2 | |
| Frequency Response 40Hz - 20kHz | |
| Wireless Specification | |
| Bluetooth Version V 5.0 | |
| Frequency bands 2402 MHz ~ 2480 MHz | |
| Max Audio Power | |
| Total 120W | |
| Remote Control | |
| Distance/Angle 6m / 30° | |
| Battery type AAA (1.5V X 2) | |
Supported Input Audio Formats
Audio formats supported by the Soundbar are as follows:
| Format | Function | |
| Optical HDM | ARC | |
| LPCM 2ch | ○ | ○ |
| LPCM 5.1ch | × | ○ |
| LPCM 7.1ch | × | ○ |
| Dolby Digital Plus | × | ○ |
| Dolby Digital | ○ | ○ |
| DTS | ○ | ○ |
Supported format.
× :Unsupported format.
Hisense
https://hisense.co.uk
- Remove the protective cap of the OPTICAL cable, then connect an OPTICAL cable to the TV's OPTICAL OUT socket and the OPTICAL socket on the unit.
Consejo:
https://hisense.co.uk

HESHE-OF-SENTINN-NOMULTIMEDB-ENTERNA
https://hisense.co.uk
Lieferumfang
Aparelho principal 7
Controlo remoto 8
Preparacoes 9
Preparar o Controlo Remoto 9
Trocar as Pilhas do Controlo Remoto 9
https://hisense.co.uk
Trocar as Pilhas do Controlo Remoto
https://hisense.co.uk
JnjarpaHa npoun3BODOT 3
Tnabha edHHua 3
DaleuHcN ynpabyBa. 4
IodrotobKu 5
IoprobyBaHe Ha daJeHHcknOT ynpabByaay
3aMeHa Ha 6aTepeJa Ha daleuHcknoT ynpabByBaU.5
IocTabyBaBe mOHTnpaBe 6
MoHTnpaHe Ha sUd (ako ja KopncTe Ounja-b) 6
Nobp3yBaHa 7
Tobp3yBaHe Ha HDMI (ARC) npiknyuk 7
Tobp3yBaHe Ha OPTICAL npiknyuk .7
Tobp3yBaHe co HanojyBaHe 8
OchOBHO pa6oTeHe 8
IoproBeHoC/TBKJUyeHO 8
I36upa pexumn 9
PpnilarodyBaHe Ha jaunHaTa Ha 3ByK
I36npa npTeXoHO noCTaBeH 3ByeH eEeKt .9
Onepaunja ONTNUKN/HDMIARC 11
Pa6oTeBe co Bluetooth 11
Cnapu ypeDu co Obo3moKeH Bluetooth 11
CnyuhaBe My3nKa oD Bluetoothype12
Pa6oTebe co YCb 13
PeuBaBe npo6Jemn 14
Cneunfukauu 15
CoDpXmHa Ha naKeToT
-ⅡaBHa eHHnHua
-Далачнсknупрауван/AAA6aTepern(×2)
Ka6eI3a HauHMeHnUHa cTpyja
Aaantep3a HanojyBahe
-Пркнукв БОsin(×2)/шраф(×2)
-Оптук Кбел
HDMI ka6en
KpaTko ynaTcTB03a pa6oTa
*Iin3ajhot n CpeunphiKaunTe ce npedMeT Ha npomeHa 6e3 npetXoHOnn3BecTyBaHe.
ДиjarpaHa npOn3BODOT
TnaBHa eHnHua

1 CeH3Op Ha daJeunckynpaByBa
PpimacunrhaioaIaeHcknoytnpabvba.
2JIEDnHmKaTOpN
UpBeHa:BopeKIMHaNOIROTBEHOCT.
- NoptoKanoba: Bo OnTuKpexnM.
CnHa:BopeKmHaBluetooth
- Bena:BoHDMIARCpexM.
-3eneHa:BoYc6pexMm.
- Moxete 6p30 da ro npOBepnte peKIMOT ha rOpHnTE JLE INHnKAtOPN Ha 3aHaTa eTKeTe Ha daJeuHcKnot ynpaByBa.

3UpaΦOBn
CTabete rH upafoBHTe 3a MOHTnpaHe Ha sNHa JeNt 3a MOHTnpaHe Ha sNHa eINHnTa.

4 Konue (BKJYEHO/ACKJYEHO)
Ja npéφpna eunnncata nomery pekmnnte BKnyEHO nIoprodtehoct.
5 Konue (M3BOP)
I36epete ja fynkunja ha peinpodynpahe.
6 Konue + / - (Vol+/Vol-)
Ja 3rOlenMyBa/HamanyBa jaHnHaTa Ha 3ByK.
7 DC npnKnyok
Ppknnyte ro ha aanTePOT 3a HanojyBahe.
8HDMIARCnpNKlyyok
TObp3eToHa TB npekyHDMI ka6en.
9 OPTICAL npnkyok
Pobp3yBa co onTnukn ayDnO n3neHa TeleBn3OpOT.
10YCb npKnyok
CTaBete YCb-yped ana penpOdyu npa My3nka.
DaneuHcN ynpaByBa
1
Ja nppepna eudnncata nomery pexmmte BKJUYEHO nIOIOTBEHOCT.
2 MUSIC
IpeepnaHa eefKT EKBUNAJ3EP 3A MY3NKA.
3 VOL+/VOL-
Ja 3ronemyBa/HamanyBa jaHHaTa Ha 3ByK.
4 SURR
To npnnaooyba onkpykybaKnot 38yB KNYEHO/ NCKJYEHO.
5 (M3BOP)
I36epepejnHa peponykuja.
6 (MCKJnyEH 3BYK)
To ncknyuBa nn noBtPO To BknyuBa 3ByKOT.
7 NEWS
PpeepnTe Ha ekeKToEKBUNAJ3EP 3A BECTN.
8
PpeckoKHyBa H npTeXoHa/cneHa Hymepa Bo BT/Yc6 pexMM.
9/11 8
Penpodykunja/hayaa/npojIoKnpenpodykuniya BO BT/YCb pexmm. PnTINCHete n 3adpke tae ja akTNbnpate fynkuijata ha cnapybaie bo pekmHa Bluetooth inn knclyheta n noctoeqKnctcnpeahny yepdi co Bluetooth.
10 NIGHT
Ipeepnete Ha ekeKToT EKBNIAJ3EP 3A HOK.
11 MOVIE
PpeepneHa eefektor EKBNJAJ3EP 3AΦNIMOBN.
12 BASS+/-
To 3rOenemyBa/HaMaNyBa HnBTo Ha 6ac.
NorotoBkn
NoTByBaIbe Ha daJeHHCKNt ynpaByBa
IOCTABEHNOI DaneyHCKN ynpabyBaO OBO3MOxyBa CO eHNHcTa Da CE ynpabyBa OJ daeHHa.
Дури и по сдячнсКНТ оупавыч супавыь BA pамкITE ha epeKTHENB oncer od 19,7 CTANKN (6 M), onepaunite CO daneyнchknOT npabaybAM OMO de ce hapuyehena kANO mja PNeuN NOMERY EINHnUATA n danayhenckKNT OYnpabaybA.
Ako co daneyHcknOT npabayBaCy e npabayBa BO 6bnHna Ha dpyrn npon3BOn KOI rheepnpaat nHpaupBeHH 3paun. nn dpyrnn ypean Co daJeHHckn npapbyBa KON Kopncstat nHpaupBeHH 3paun c KeopnCTaT BO 6bnHna Ha eHNHnata, NCTNt MOKeJa He paobTo npabInHO.CnpotnBO, IN dpyrnt npo3BOn MoKe Da He paobTo npabInHO.
3aMeHa Ha 6aTepuJa Ha daJeHHCKNt ynpaByBa
1PnTNCHTe HmHHeTe Ro 3aHnOT kAnak Da ro OTbOpnte denot 3a 6atepna Ha daaneuHcNtO npabyBa.
2 Ctabete DBe 8aepnco rolemna AAA (BknyeHn).Ybepete ce deKa Kpaebnte (+) -Ha 8aepnne co cOBNAar co +) n (-) Kpaebnte HabeDHe BO denot 3a 8aptnja.
3 3aTbOpTe ro kaNakOT ha denot 3a 6atePM.

MepKHa npetna3nBOcT 3a6atepuuTe
YBepete Ce deka CTe Tn CTABNIE 6atePMTe CO TOHTMBHn(+)N HERATMBHn(-) nnonapnttn.
KopncTe6bepnOdTmHikorauHe KopncTepeaunuTNIOB6aepn3aeHNO.
MoKeJaCeKopmctATn6atePMuTO NOBtOPHOceNOHATn6atePMKoHHeCENOHAT. IorneHete nnpdynpdeyBaHaTa HnHBnTe etHKeTn.
BHIMABAJTe HA BAWIte HOKTI KORA ro BAJITE KANAKOT 3a 6atepnn 6atepnjata.
He ncyuTajre ro daJeMHCKnTo npabyBa.
- He do3bonybajte HeuTo da ro npntncka daJeHHcknOT ynpaByBaH.
He nCtypajTe BOda nn HeKaBb TeHNoCT Ha daJeuncknO tynpaByBa.
- He ctabaje ro daeneHHcknoynpaBybau Ha bnaXeH npedmet.
He ctabaje ro daneyHCKNt ynpabyaBn noD npekTHa coHcyeBa CBETINHa mbo 6m3Ha Ha H3BOp Ha npekymepHa tonnHa.
IbAeTeTnBatePNTeOJdaneHcNkOT npYabayKaHrCe He cOpKtN DOrf BpeMeHckn nepHO, bJeekMoKeJa ceNojABn Kopo3Nu JmN nCTeKyBaHaBe Od BatePHTe N daDobedeNo fM3uKHa NoBepa Hn/nnl OiouTeYBaHaBe Ha MIOH rNnN noXapar.
He ynoTpe6yBaJte 6aTeepn nonHaKnBn oD OHne uTO ce HabeDeHn.
- He Meuajte HOB6aTePN co cTAPN.
HnKorau He noHHe ja 6aTepujara oCBen aKO He e nOTBpeHo deKa e od TIN uTO NOBtOPHO ce noHN.
IocTaByBaHbe mMOHTnpaHbe
NoctabyBaBe
A Ako Baunot TeneBn3Op e Noctaben Ha noDnora, MoKe da ja cTaBnTe eHINuCaTa Ha noDnOrata DnpeKTHo nped dpXaHOT 3a TeneBn3Op, UeHTpPaHo Co ekpaHOT Ha TeneBn3OpOT.
B Ako TeneBn3OpO t 3aKaueH hA sUd, MoKeJa ja MaOHtUpate eDInHuaTa Ha SuDDOT DnpeKTHo NOD ekpaHot HAnTeBn3OpOT.
MOnTnpaBe Ha sni (ako ja Kopucntne onuja-B)
Beneuka:
IINCTaIIpaBeTo Mopa da Ce I3BpUc Camo OJ KBaIINΦKByan NepcoHAn. HenpaBnHOTo MOHTIPAhe MoKe da npEiN3Bnka Cepno3Ha IInuHa nobpeDa n OwTeYBaHe Ha IMOT (ako cakate Da ro INCTaIIpaTe npON3BOoT CaMITE, MOPa Da npOBepNTe 3a INCTaIauNTe KaKO wTO e eNEKTpuHa INCTaIauJa In BOIOBODHa INCTaIauNuja KOI MOKe da ce 3aKoNaHb BHATpe Bo sIoD).OgROBOPHOCT e Ha INCTaIauTEpot Da ocNrypa
IeKa SInOTo 6e36eHNO Ke IOnIOaPxyBa BkyiHOTo ONTObApyBaHe OJ eHNHcTaI NpXaHTe 3a Ha sN.
-3aMOHTnpaBeToCeNoTpe6HnDoNoHnTeHnAnaTn(HeCEBknyeHn)
-He npe3aterHybajTe rWpafoBnTe.
- 4ybajte ro oba ynaTCTBO 3a noHaTaMoUHa yNoTpe6a.
Kopncte npohoraH a cTol6OBn da ro npOBepntu TUNOT Ha snd npe Da 6yntne mOnHTnpate.
Nobp3yBaHa
Nobp3yBaHe Ha HDMI (ARC) npnkyoc
CayHd6apot noDpKya HDMc o NobpaTeH aynokahan (ARC). Ako Baunot TeeBnOpe HDMl ARC ycorlaaceH, moXeTe da cnUaTe TB ayNo npeky CayHd6apot co KopncTeHe Ha eInneHed HDMkaben.
1 Co kopnctehe Ha HDMI ka6en co rolemea 6p3nHa, noBp3eTo HDMI ARC KOHEKTOPOT Ha BaAMOT CayH6ap Ha HDMI ARC KOHEKTOPOT Ha TB.
- KoHEKTOPOH HDMI ARC ha TENEBn3OPOT MoKeJa 6nne O3HaueH nonHky. 3a Detalnn, BnDETo ROpNCNHKOTo ynaCTBO 3a TENEBn3OPOt.
2 Ha Baunot TB Bknyute rnopeaunnte HDMI-CEC. 3a Detanu, BuTe ro KOpncnKoTO yNaTCTBO 3a TeNeBn3OpOT.
Cobetn:
-TeneBn3opOT mopa da rna noDapKyBa yHKnUInTe HDMI-CEC nARC. HDMI-CEC n ARC mopa da ce noCTaBeHN Ha BknyeHo.
- NaHINOT Ha NoctabyaBaHe Ha HDMI-CEC n ARC moKe da ce paaNkyBa BO 3aBnCHoCT na TeBeNu3Opot. 3a DeTaN 3a fHyKUnjata ARC, norneHte ro KOpNCNHcKOTO ynATcBO 3a TB.
- Camo HDMI 1.4 KomnataHn Hn Ka6nn MoKe da ja noDpXaT yHKuJaTa ARC.
Nobp3yBaBe Ha OPTICAL npnKnyyok
- ɪəbæte ro əaʊtɪnɪhʊtə kanaue ha ONTNUKNOT ka6en, noɪtoa nobpʒete ro ONTNUKNT ka6en BO npɪknyokot ha teɪeɪnɪsɔpɒr 3a OPTICAL OUT n OPTICAL npɪknyuHɪza ha eɪnɪuŋa tə.
Cobet:
-Додакa e BO peЖIM ONTNUK, HDMI ARC, aKO HeMa n3neryBaHe Ha 3Byk Od einnucaTa, MoKe6n Ke Tpe6a da aKTbBnpuTe PCM n3Ne3 Ha cnHan Ha Baawot n3BOpen ypeD (np. TeBn3Op, DVD nn Blu-ray penpOdykTOp).
Tobp3yBaBe co HanojyBaBe
Pn3NK oJ owTeYBaHe Ha npOn3BODOT!
- Ocnyperte ce Iek HanoHOT ha eIeKTPnHOT hanoJyBaBe oIgOBapa Ha HanoHOT OTneuAteH ha 3aIHNOT den nnn noD eINHmIaT a I daIaTePOT 3a HanoJyBaBe.
IpeJa ro nobp3eTe Ka6eNt 3a Han3MeHnHO HanojyBaHe, yBepTe ce deKa CTe r3aBpWHne CNTe DpyrNoBp3yBaHa.
IIOBp3eToKabenot3aedHOHacOuHa eEeKtpnHa eHeprJa oadantpeoT3a HanojyBaHe Bo npNKnyokOT 3a eEeKtpnHa eHeprJa Ha rnaBHaTa eHNHua.
IIOBp3eTnKabntte3aCTpyaBO npknlyuOK 3aHaHImMeHnHa CTpyja Ha aanTepot 3a HanojyBaHe nnoToa BO npknkyoKOT 3a HanojyBaHe.
* DOnKnHaT ha eneKtpnHnOT Ka6en n TnO7 Ha npNKnyOK ce pa3NkYBaAT cnopepepepe
OchOBHO pa6oTeHe
IoproTBeHoCt/BKJIyUeHO
Kora 3a npB nAT ke ja nobp3e TnabHata eHnHa BO npMKnyHnCtata 3a enEKTpuHHO HanojyBaHbe, TnABHata eHnHua Ke 6nDE Bo peKM Ha NODTBEHOCT.
- PnTINCHETe ro KOnHTo Ha eHNHcTa nHa Ha daJeHHCKNtO ynpaBvBa 3a Da ja nppepnpnte edHNHcTa ha BKJyEHO.
- PnTnCHETe ro KonHero (NOBtOPO, 3a da ja nppepnpTe eMHuaTa Ha3aHa peKIM HAIOIOTBEHOCT.
I3BaTe ro eNeKtpuHnO npKnyok oN npKlyuHnUaTa 3a eNeKtpuHo HanojyBaHe aKO cakTe UeNoCHO da Ja ICKnyITE eInHnUaTa.
ABTomatcko 6ydebe
Ako TB nHaDbopeueH ype e noep3aH (OTTHK/HDMIARC),eHHnucata Ke cnpepfn Ha abTomatckn Kora TB nHa hDaBopeuHnO type e Bknyen H emtlya aaymoCnHnau
KaKo Da OBO3MOXnTe ABTomatcko 6yndeHe
KpaTko npntncheTe ro konHTeTo (N3BOP) n konHTeTO VOL + Ha eINHuaTa 3a da ja OBO3MOXnTE INI OHEBO3MOXnTE fYHKnJaTAt ABtOMATCKO 6yHe.
BknyeHO AToMaTcKO 6yHe: 6eNo 3eNEHO JEL TpeNkaat BpaanHnHa3MeuHNO. IdoKea e BO pekm Ha IOIOTBEHOCT, LpBEHOJEL 3abAbDyHo CEBTKA.
NcknyBaBe ABOMATcKo 6yHeBe: 6eNo u pBeHo IED TpeKaat DbaNat Hn3MeHnHNO. DoKeKa e BO peKm Ha IOIOTBEHOCT, IED e noctoJaHO CpBeHo.
Функида abTomatcno ncknyuBahe Ha HanojyBahe
EINHncaTa aBToMaTcKn ce npeepna Bo pexmHa NODΓOTBEHOCT no okony
15 MnHytn aKO TB nHn HauBopeuHaTa eDnHua ce NcknyueHn, n3rachaTn.
3a 10ncno da ja ncknyuTe einnucaTa nckyuTe ro eneKtpnHnot npNKlyOOK od pNknyuHuaTa 3a eneKtpnuHo hanojyBahe.
- Lcnocho ncknyete ja eHHncaTa Kora He ce KopncTn 3a da 3aWTeiTe eheprnja.
Bo onTnK npNTnCHTe -HnHaTn 3a da Bknynte peKnM Ha ABtOMaTcKa noIroTBHeOCT, KOITOTO JEi6p3o CBETHyBa 3 naTn.
Bo onTNuK peKIM, npTnCHete -HeHHTnHaTn 3aJa NCKnyUte peKIM Ha ABTomatCk aNoIrotBeHOCT, KOITOTO IED 6abHO CBETHyBa 3 nATN.
U36upapexmm
HeKoIky nAn npTnCHTe ro konTuTo 13BOP) HC eDHHuata 3a da ro n36epTe nocayBaHnot pexm.
CBeTJTOHa HnHnKaTOpOT Ha npeHnO TdH Ha rnaBHaTa eHnHaKe NOKaKe KOJ pEXJM CE KOpIcTN BO MOMHTOT.
PpnilarodyBaHbeHa jaunHaTa Ha 3ByK
PnITNCHETe rKoNCHbTaVOL+/VOL- Ha eHNHcata nHa daJeHHcknOT ynpabYBaJda ja npnilarOHTe ja jauHnHa Ha 3ByK.
Ako cakate da ro nckluynte 3bkyot, npitncheTe ro konHToHa daeneHHCKNOT ynpabvBauch. NobTOpHn npitncheTe ro konHTo nn npitncheTe rKoHNbTa VOL+/VOL- da npoDoJXnTe co HopMaJIHO cnyuhahe.
Beneuka:doeka ja npinarodybaTe jaunHaTa Ha 3ByKOT, INHnKaTOpOT 3a cTATc Ha JEKe CBETHe eDhau. Kora jaunHata Ha 3ByK ro DOCTNRHyBa HNBOTo Ma MaKcMnMaHa/MnHmMaHa BpeDHOCT, INHnKaTOpOT 3a cTATc Ha JEKe cBETKa 6p30.
M36npa npetXoJHO noCTaBEn 3ByuH eΦeKT
Iopeka penpojduuipa, npntncheTe ro konueTo EQ ha daJeunHcknOt ynpaByBa Ta r n36peTe npetxOJHO NOCTABeHnTe ekBnaj3epn: My3NKA, FIMM, BECTN, HOK.
| Функциja на Иndикатор-cbvтlo | ||
| Kapakternstkni | Еран Onepaциja | |
| АвTomатcka побrotvehoct Вклчedo | Жолто-ЖOLTИ-ЖOLTо,брzo | Опtuчkn ржим,„Петх“-,„Ретх“-,„Следно“-,„Следно“ |
| АвTomatcka побrotvehoct Исклчedo | Жолто-ЖOLTИ-ЖOLTо,пoleka | |
| Ржим Ha abTomatско Буdenы Вклчedo | Бени-Бени-3elenho-3elenho | Сayндбар:„Извор“+ „Vol+” |
| Ржим Ha abTomatско Буdenы Исклчedo | Бени-Бени-Црвени-Црвени | |
| Орданувае Ha ячна Ha звук | Сbvтnoto сbvten 3 natu | Прилароувае щашиha Ha Звук |
| Bluetooth с鞘�вае | Црвени-Сино-Црвени-Сино...... | Во Bluetooth ржим, при[tuschene ro и за[pexte ro konчeteо Ррpondукциja |
| He усdea дa penpondуцра | Црвени-3elenho-Црвени- 3elenho...... | |
| Оnkтукувачи 3вук Вклчedo | Сbvтnoto сbvthenya 5 natu,брzo | При[tuschene„SURR“ |
| Оnkтукувачи 3вук Исклчedo | Сbvтnoto сbvthenya 5 natu, пoleka | |
| DTS Дигитален Одктукувачки 3ык | Турkinзно-Tурkinзно-Tурkinзно, 6рзо | Приимен e DTS сигнан |
| Dolby Digital зелero-Зелero-Зелero, 6рзо Приимен e Dolby сигнан | ||
| Засильва bene bас Вкунеho | СbvтлоTO сbvтуна 3 пати, 6рзо | Опtuчkn ржим, "Претх" + "Рэрpondушиja" + "Следно" |
| Засильва bene bас Искунеho | СbvтлоTO сbvтуна 3 пати, полега | |
Onepaunja ONTNUKN /HDMIARC
1 Ocunpyte ce deka einnuatae noBp3Ha Ha TeeneBn3OpOT nH Ha ayno ype.
2 HeKoNky nAn npTncHe ro konyeTo Ha eHnHaTa Hn Ha daJeHHcknot ynpabYbau 3a Da n36epeTe ONTHKN, HDMI ARC peKM.
3 DnpeKTHo pa6oTe co BaaHOT ayDNo ypeD 3a fynKmHa pePnoykuJa.
4PnTncheTe ro konHeTo VOL+/-3aJa npnaarOnte jaHnHa Ha 3ByK HA BaWEto NOckyBaHO HNO.
Cobetn:
-EdHHuata MoKe6n Hema da MoKe da rN deKoDnpa CNTe dHHTaHny ayno fOpMaTN oN 13BOpOT hA BHeCyBaHe. Bo OOB cnuyaj, eHNuata Ke ro NckIyUm 3BykOT. Oba HE e DeEeKT. Ocnypete DeKa noCTaBkata 3a ayno HA Bne3HNO tBnOP (np. TB, KOHOna 3a irpu, DVD penpOyKtop nC.) e NOCTABeHO h PCM, Dolby Digital, Dolby Digital Plus nTDS, norNEHene BO TaBeNaT, "NoDpxAnu FopMaTH na ayINO BNe3OBN" (POrneJeHete Ro KopcHnUKTo yNATCTBO h YpeDTo CO bJe3eH 3bOp 3a HerOBnTe Detanl 3a NoCTaBYBaHe ayND) co HDMI ARC / OTNtUKN Bne3.
-Додак e bo ONTNUKn nH HDMI ARC pexum, moke6n Ke tpe6a da ro noctabne ypeod 3a n3ne3 Ha 3Byk Ha BaWnoT TB ha ONTNUKn nHDMI ARC, 3a detanHn onepauin noRnEHDhe ro npupaunHKOT 3a BaWnoT TB.
Pa6oTeHe co Bluetooth
CnapypeincoOBO3MOxENBluetooth
PpBnOT nAT Kora ro nobp3yBaTe BaWnOT bluoteoh ypeD co OBaa eINHua, Tpe6a da ro cnapnte ypeDOT co eINHuaTata.
Bellewka:
OnepaTHBnOT ONcer NOMeFy eINHnUaTa n Bluetooth ypeE npu6mNknO 26 CTANKI (8 M) (6e3 HnKaOB ppeMeT NOMeFy Bluetooth ypeoT n EINHnUata).
IpeJ da noBp3eTe Bluetooth ypeJ ha OBaa eHNHua, yBepTe ce deKa rN 3HaTe MoXHOCTnTe Ha ypeJoT.
- KomnataH6uHocT co CHTe Bluetooth ypeNi He e rapaHTnpaHa.
- Cekoja npeyka nomery obaa ednHua u ypeed co Bluetooth moke da ro HamaJIn onepaTIBHnot oncer.
Ako jaunha Ta hCunHanot e cna6a,Bluetooth pniemHKOT moKe da ce ncknyu,HO NOBTOPOH aBtOMATcKn Ke BnEe BO peKIM Ha cnapyBaHe.
1 Bo TeKoT ha pexKIMOT BKJYUEHO, npntnckajre ro konyeTo nobKe naTn Ha eHnHuaTa 3a da n36epete pexKIM Bluetooth. CInHnot HnDnKaTOp Ke TpeNka.
2 AkTnBnapJte ro Baunot Bluetooth ypeN n36peTe peKIM 3a npe6apyBaHbe.Hisense HS205G"Ke ce nojABn Ha BaWata JnCTa co Bluetooth ypeN.
-Ako He MoxKeTaJa Ja HajTe eDINHuaT, npNTnCHeTo n 3aApKeTe ro KonueTo I/Ha daJeunHcNtO npAByBaU 3a Da MoKe Ta ce npEapyBa. CnCTemOT Bnero Bo pexm Ha cnapyBaHe. Ke cnyHete ayNo NotCteYbaBe o eDHNuTa, a INdkaTopot 3a Bluetooth Ke cBETKa 6p30.
3 136epete,Hisense HS205G" BO Jnctata 3a cnapybahe. No aydno notcetybaHeTo, cntemOT e ycneHNO NOBp3H IN HnIKaTOpOT 3a Bluetooth ke CBETn noctoJaHO.
4 PepoDyupaHbE My3nka OJ nobp3AHOT Bluetooth ypeI.
Ja ja ncknynnte fynkunjara Bluetooth, moxete da:
-ПпeфрлenteHaДугИЗВОрHaEDHINUcaTа.
- OHeB03MoKInTe ja yHKnjata oBaunot Bluetooth ypeI. BluetoothypeoT Ke 6nne ncknyeoh on cayn6apot no ayno notcetybaheTo.
-ПиNTИСHTЕгИЗДРЖETEGKONЧETOII/Ha daneuHCKNOT ynpaByBaY.
Cobetn:
BheceTe,0000"ako e nTopeHa no3nHa.
Ako pyr Bluetooth ypeH He ce cnapya co Obaa einnuca BO pok od Dbe MNHyTu, einnuata Ke ro 06HOBn npTeXoHTo NOBp3yBahe.
- EINHnIaTa IcTo TaKa Ke Ce NcKlnyu Kora BaHnO T ypeI Ke ce npMeCTn HauBOp od onCerOT Ha pa6oTeHe.
-Ako cakate noBtopno da ro nobp3eTe BaWnOT ypeH na OBaa eHNuca, CTabeTe ro BO ONcerOT ha pa6oTeHe.
Ako ypeoTe npemecTeH naBOp od onceroT ha paobotebe, kora ke ro BpaTne, npoBepeTe daHn ypeoTe ce yuTe noBp3aH co nneepoT.
Ako nobp3ybaHbTo ce n3ry6n, cneTe rnyuata norope 3a noBtopHo da ro cnapnte BaHNOtype co eHNHuaTa.
Cnywabbe my3ka oD Bluetooth ype
-Ako noBp3aHnot Bluetooth ypei noDnpxyBa Hanpehen npoΦin 3a Dnctpn6uynja Ha aydno (A2DP), moxe da cnyuatae Myzka cknadnpaHa HaypeoT npeky einnuata.
-Ako ypeoI nTo taKa noDpKByBa IpofoHnHa daJeunHcKa KOHTpona Ha aydno Bndeo (AVRCP), Moke da ro Kopncnte daJeunHcKnOT npapBybHa eHNuTa Ta paepnpOuyuPaTe My3Nka cKnApHa Ha ypeoT.
1 Cnapete ro ypeoT co einnnuaT.
2 Pnpodyunpajme My3nka npeky BaaHOTypei (ako noDpkyBaA2DP).
3 Kopnctete ro doctabehnoT danueHHN cnypabyBa y ja koHTpoJnPate penpoNykujata (ako noDprkyba AVRCP).
-Да penpoусира/nay3ира, npntncheTo ro konHeTo ⅡI/ндалеуннcknotуnpaByBa.
-Да пleckokне Нмера,прпснсerte ГКОПИHBaТа /далецнcknotупаввач.
Pa6oTeHbe co yCb
1 CTaberte YCb-ypea.
2 HeKoKny nATn npNTncHeTo KOChTe Ha eHNHuaTn npNTncHeTo KOChTe YCb Ha daNeuHckNt O npabyBa Ta u36peTe YcB peXMM.
3 Bo TeKoT Ha penpOdyKuJiaTa:
- Dape npoaynpa/nay3npa, npntncheTe ro konyeto Haa daeneHHCKNOT ynpabya.
Ja npeckokHe Ha npTeXoHa/CneHa Hymepa, npTncHete Rn KOnuHbata
COBETN:
- EdnHncaTa MoKe da noDpKu YCb-ypeu co MemOpJa do 32 GB.
- Obaa eunuca moke da penpodyupa MP3/WMA/AAC/OGG/FLAC/WAV/AIFF.
JIncta HA KOMnATn6HnH TnNOBn Ha daToteKn
| Ekstetenija | Košek | Стankа на семлираяе | Стankа на битови |
| *.mp3 | MPEG-1 Layer1/2/3 32 kHz | ~48 kHz 32 kbps ~ | |
| MPEG-2 Layer1/2/3 16 kHz | ~24 kHz | 8 kbps ~ 160 kbps | |
| MPEG-2.5 Layer3 8 kHz ~ 12 kHz | |||
| *.wma WMA7/8/9/STD 8 kHz ~ 48 kHz ≤ 320 kbps | |||
| *.aac | AAC | 8 kHz ~ 96 kHz ≤ | 1728 kbps |
| AAC-LC | |||
| HE-AAC | |||
| *.ogg Vorbis codec 8 kHz ~ 48 kHz ≤ 500 kbps | |||
| *.flac - | 8 kHz ~ 192 kHz | ≤ 9 Mbps | |
| *.wav | PCM, LPCM, IMA_ADPCM, MPEG, ALAW, MULAW | 8 kHz ~ 192 kHz | ≤ 9 Mbps |
| *.AIFF | PCM, ALAW, MULAW | 8 kHz ~ 192 kHz | ≤ 9 Mbps |
IopdkaH e cAmo TnHa YCb foPmaT FAT 32 3a noBp3yBaHe Ha YCb MemOpucn ypei.
3a*.oggyaIIMO daToTeKn, noDony ce HabeEnH HeNoIpXaHNTe fOpMaTH:
1). block size 0 < 64 block size 0 > 2048; 2). block size 1 < 64, block size 1 > 4096; 3). codebook counter > 64; 4). codebook entry > 640; 5). floor counter > 4; 6). floor type 0; 7). residua counter > 4; 8). dimension != 2; 9). mapping counter > 2; 10). mode counter > 2.
PeeBaBbe npo6lemn
3a rapaunjata da 6iide baxeuka, hinkorauh he oibdyajte ce da ja nonpabaute ednHua t a camite. Ako ce coooyate co npo6menn kora ja kopnctnte obaa einnua, npoBepete rn cnednhe ctabkn nped da no6apate cepbuc.
Hema HanojyBahe
OcHpyeTe ce deKa KaBenoT 3a HAMMeHHUHO HAnoJyBaHe Ha eDINuTa e npabnHO nOBp3AH.
YBepete Ce deKa IMA eEKeTpuHa eHeprIJa BO npKJyHuNtata 3a eEKeTpnuHO hanojyBaHe.
PiHTNCHE To KONHTo 3a NOdTBeHOCT 3a ja JA BKNYUte EINHtata.
Ocmrgpcre ce deka ka6enot 3a eHNOcmepe hneKTPnHa eHepnJa Ha aanTepot 3a Hanojybahe enpaBnHO NOB3AH.
DaneuHcKnOt ynpaByBaH He pa6oTu
-Ппддпгснсerteкoe6илкончe3aКоHTрonaHa penpoуKuJa,првИЗбepete roTOUHNOIT3BOP.
HamaIeTe ro pactoJAHHeTo nomery daJeuHCKnO TnpaBvBaN eDHHUta.
CTaBete 6bATEHTE CO nonapHTeTHe(+/-) nocTaBeHN KAKO tEO HabeDeHO.
-3aMeHETe 6aTeepnnte.
HacoueTe ro daneyuHcNt ynpaByBaU dIpeKTHO KOH cEH3OpOT Ha npedHnOT den Ha eHNHnCATA.
Hema 3Byk
3roIeMeTe ja jaHnHaTa Ha 3Byk. PpTncHeTe VOL+ Ha daJeHHcknOT ynpabyBaHn Ha eHNHnAta.
IpnTnCHeTE NCKNHYBAHBe 3BYK Ha daaneMHcKnOT ynpabyBaU Da ce ocurnypate Ea Ka HcayHbapoT He My e NCKnyeuH 3BykOT.
PnTCHETe ro konHTo source da n36epete pa3nueHnBOp Ha BHeC.
Kora KopriCTte KOJ 6IIO OD DNITANHITE BHECOBI, AKO Hema ayDIO: - 6OJIETe Ce da ro nocTAnite N3NEOT ha TeneBn3OpOT HA PCM VNN - NOB3Te Ro DNPEKTHO Ha BauNtOT Blu-ray/DPyT N3BOP, HEKON TENEBn3OpH HEMAAT DNITANHO ayDIO.
BauHOT TEeBN3Op MOKeJa e noCTABEN HA nPOMeHNbA yAnIO hN2EpeCe daKa noCTabkata Ha ayDIO nIe3e e noCTABeHa NΦKCHA Hn CTAHDPHA, He na POMEHJNA. 3a noTeTANHnHPOpMaHn nOrneHedre ro kOpCHNkoTO ynaTcBO 3a TB.
Ako KopnCTHte Bluetooth,ocnyperte Ce deKa jaunHa Ha 3ByK Ha BaWIOr n3BopeH ypeed e 3rOleMeHa HyaypeoT He Mye NCKJyueH 3ByKOT.
He moxam da ro hajdam Bluetooth mMeTo Ha OBaa edHnua ha mojot Bluetooth ypeq 3a cnapyBaBe co Bluetooth
Ocinyperte ce deka yhkujata Bluetooth eaktnbnpaHa Baanot Bluetoothypei
Ocnyptece deka cte ja cnapnne eHNHuaTc co BaaNnot Bluetooth ypeI.
Oba e yHKuJa 3a ucknyBaHe hanojyBaHe no 15 MNHyTn, eoHO od cTaHapdHnTe 6apaHa Ha ERPII 3a WteJeBe eheprnja
Kora HNBOTo Ha HADBOpueHEN BNEsEHNrHaN Ha eJIMnIaTa e npEHNCo, EINHnIaTa aBTOMATCKNe ce Ie NCKLyuN 3a 15 MNHyTN. 3rOJeMeTe ja JauHnATA Ha 3ByK HA BAaHOT HADBOpueHEn YpeD.
Cneunkaun
| Име на морел HS205G | |
| Ошто | |
| Еlektрично наноюваBE | AC 100-240 V~ 50/60 HzDC 24 V/2 A |
| Еlektрична[eheprnja BOpoindrotbehoCT | ≤0,5 W |
| UCB-Порта за ретрodyкциjaKompatибийност co YCBПордрашика за UCБ-prelpopуdkциja/Формати надато.... Димен... � (UH × B × D) | 5 V = 500 mAUCB co rolenma 6рзиna (2.0) / FAT3232 GB (мakc), MP334,6 × 2,2 × 3,5 mHH(880 × 56 × 88 MM) |
| Нeto Текина 3,5 Фунт/N (1,6 кг) | |
| Импесанca 8 Ω × 2 | |
| Φ装配ьениcki odroвор 40 Hz - | 20 kHz |
| БeЗжуни спесификazioni | |
| Верзиjsa на Bluetooth V 5.0 | |
| Фразковциско onceи 2402 MHz | z ~ 2480 MHz |
| Мakсимална щашина на щадио | |
| Вкунио 120 W | |
| Далейнску ураввач | |
| Растосане/Агол 6 м / 30° | |
| Ти п на батериjsa AAA (1,5 V × 2) | |
Aydno oopmatn co noadpkaH Bne3
Aynio fopmatn noadpkaHOn od cayndapot ce kaKo wTo CneHn:
Bb3npoun3BexkaHe/nay3a/Bb3CTaHOBBaHe
Ha Ba3PnOu3BExKaHeTo B/UT USB pexMM. Hatnche T 3aDpKTe, 3a Da BkIOHTe FyHKnUra 3a CDBoBaHe B pexm Bluteoth nnn da nKIOHTe CbuEYBaTOO c DOBOeHO c Bluteoth yctPOCTBO.
10 NIGHT
PpeBkIIOUbaHe KbM eΦeKr EKBANIA3EP HOU.
11 MOVIE
PpeBKnOuBaHe KbMeΦeKTEKBAIa3EPΦnIM.
12 BASS+/-
YBeIuHaBaHe/HaMaJIraBaHe HNBOTO Ha HNCKeTe YecTOTn.
NoDrToBka
IodrotobkaHa nctaunnoHTo ynpabneHne
Ipeoctabehoto duCTaHIOHO ynpabneHne no3BOJBA ynpabneHne Ha ypea ot pa3OTHHe.
IopnAkoNCTaHcHIOHHOTy npabJIeHHe paOToB pAmKInTe Ha eΦeKTINBHnO6xbAT 19,7 cyta (6M),paOToTa CmCTaHcHIOHHOTy npabJIeHHe MoKeJa e HeBb3MOxHa, aKO MeJxU ypea N dNCTaHcHIOHHOTy npabJIeHHe mMa npenrTCTBn.
Ako nctaHOnHOTo ynpBneHnCe n3non3Ba 6m3o Do pyr npOpykTN, KOTo THeepnPAT HnPpaepeBHeN TBnU,nnu Ako 6n3o Do ypeDa ce n3non3BaT pyny UcTPOCTBA 3a DnCTaHnOHO npPabHnE, n3non3Baun HnPpaepeBHeN TLbY, To Moxe da pa6oTn Heu3npABHo. N o6paTHo -dpyrnte npOpykTN CbIO MOrA Da pa6oTn Heu3npABHo.
CmHa Ha 6aTePnTa Ha ductanHnHOTo ynpabHeHne
1 HaTnCHeTe nПьБнeTe 3aДнИЯ KANak, 3a Д aTbOpIte OТДeLEHnETo 3a 6aTePnIte H aNCTaHnOHHOTO ynpabNeHne.
2 NocTabete DBe batepnn Tn AAA (BknioueHN B KOMNNEKA).Ybepe Ce,ye nIOcNTe (+) n (-) Hs batepnte cBoTbETCTBa Ha KNMeNTe (+) n (-), 06o3haeHN BOTBeHNeTO 3a batepnte.
3 3aTbOpTe Kanaka Ha otDenenHneTo 3a 6aTepeNITE.
IpeNa3Hm MepK 3a6aTepuNTe
yBepTeCe,ye cTe NoCTabUNI 6aTepeINTE C npABUNHa NIOJXITeINHa" ^+ nOTPiuTaTeINHa-"NOLpHOCT.
V3nON3BaIte 6atepnn OT eINH cBt Tn. Hnkora He n3non3BaTe 3aeDho paanuHn TnOBe 6atepnn.
MoraT Da ce n3n0n3Ba kAto AkyMylatOpHn, Taka HneOpnHexaun Ha np3apeXeJdane 6aTePm. Cna3BaIte npedna3HITe MepK, nocOeHNHa etHKETTE IM.
BHNMABAITE Da He NOBpeJITe HOKTIne Cn, KORATO OTCpaHbAte KaNaka Ha 6aTePnra Tc Camata 6aTePnra.
He n3nyckaIte nctaHnHOHHoY npabHeHne.
- He Donyckai Te KaBTo I Da e Bb3eIcTBe N Bbpxu DuctaHnOHTO ynpabHeHne.
- He pa3nBaIte BODa ININ DpyrTe TeyHOctn Bbpxy DnCTAHUOnHHTO ynpaBneHne.
He noctabTae taHOnHHTo ynpaBHeHne Bbpx MOKpn NOBbpxHOCTN.
He noctabTte nCTaHnOHnTo ynpBnene No, npKa CbHueBa CBtlnHa 1nn6Jn3o Do n3TOuHNu Ha npekomepHa TOnnHa.
I3BaTe 6Bate Ot HCTaHIOHHTO ynpabHe, KOrATo He ro nNo3BaTe 3a DbTf nepNOd OT BpMe, Tb KaTO MoKeJa PocNEBA KOp03NA INN N3TuHa He 6BaTePA, KOte Da DoBeDo To TeneCHO HapaHbaHe N/INMaTePnAnHn 电tn N/INn NoXap.
He n3non3BaIte 6aTeepnn pa3nHn OT nocoyHne.
HeKoM6HnHpaIteHOB6aTePNCbCstapu.
Hikora He npesapexkndte 6atepna,ocbeaKO He ce yctahOBu,ye TaekymnataTopHa.
Pa3noIarHe MoHTaX
Paznonarane
A Ako TeneBn3OpBt e noCTaBeH Ha Maca, MoKete Da NoCTaBITE ypeDa Ha Macata DnpeKTHo NpeC tOiKaTa Ha TeneBn3Opa, ueTnpaH CNpMa oEpaHa Ha TeneBn3Opa.
B Ako TeneBn3OpbTe npnKpehen KbM CTHe, MoKTe Da MOHTnpaTe ypeHa Na CTeHaTouHO nOd ekpaHa Ha TeneBn3Opa.
CteHeH MoHTax (aKo ce n3noJ3Ba BapnaHT B)
3a6eJexKa:
-MoHTaXbT TpB6Ba da ce n3BbpWbCa mo OT KBaHnФu npaH ekn. HenpaBIneH MoTHaX MoTeJa DoBoTe Da To EKKn TeneChn NoBpeN mATEpMaHnIeTo (ako Bb3HaMePraBe Da MOHTnpaTe To Nt pOyKT cam, TpBAJa IpoBepTe 3n HCTanaun, KaTO eNEkTPnuEckn Ka6enn I BOOpnoBOD, KOITo MoKe Da ca CKpTN BCTehata).OTROBOPHOCT Ha
MOHTaXnHa e da npOBePn dAn CTHeTa 7e n3Dbpxn HaJeKdHO o6oTo HAtOBaBaHe Ha yPeJa N CTHeHrte KOH30n.
-3aMOHTaxaCa Heo6xOdMMDOnbHnTeHNnHCTpyMeHTn (He Ca BKNIOUeHNB KOMNKeTAt).
-He3aTaraTeBnHTOBeTe npekaneHO.
-3ana3eToBa pBkoBOdCTBO CnHCTpyKun 3a 6bdeu cnpaBKn.
-Изпалдайе eелкгтонг Тьрсан ha CTeHn, 3a Да поберпт Tmna Ha CTeha npdДnp6bBaHe moHTnPaHc.
Bpb3ka
Cbbp3BaHe cHDMI (ARC) rHe3do
CayHbapbT noDbpka HDMICbB3bpaTe ayDnO kaHAn (ARC).Ako TeneBn3OpbT e cbbMeCTm C HDMARC,MOKeTe Da yyBaTe 3ByKa Ha TeneBn3Opa npes CayHbapa c nOMoUta Ha eINH HDM Ka6eJ.
1 C NOMOùTa Ha BnCOKOCKOPoCTeH HDMI ka6eB cBbpxKeTe HDMI ARC KOHeKTopa Ha cayHd6apa c HDMI ARC KOHeKTopa Ha TeneBn3opa.
HDMIARC KOHeKToPbT HaTeJeBn3Opa MoKeJa e o6o3HaueH No pa3nueH HauHH.3aNoIpo6HoCTN BIXTe PbKOBoDcTBOTo Ha Notpe6uTeJI Ha TeJeBn3Opa.
2 Ha TeneBn3Opa BkIOUeTe onepaunite HDMI-CEC. 3a noDpo6HocTN BnKTe pbKOBOCTBOTO Ha notpeBntenHa TeneBn3Opa.
CbBET:
- TeneBn3OpBt Tpr6Ba Da noDttpKa fynKunTe HDMI-CEC n ARC.HDMI- CEC n ARC Tpr6Ba Da ca 3aadaeHn Ha BknIoueHo.
-MetobHa HAcTpoKa HaHDM-CEC n ARc Moke da e paoiueh B 3aBnOUMOTeNEBUN3Opa.3aNoDpObHOCTN OTHOCHOyHKUHTAARC, BNKeTe pkoBOdCTBOTo HA NOTpe6BtEHA TeneBUN3Opa. - Camo cbbmecTmH HDMI 1.4 ka6eJn morat da noDdbpxaT yHKnra tARC.
Cbbp3BaHe KbM OPTICAL rHe3do
- Cbane 3aunTHata kanaKa ha ONTNUHn Ka6en, cneKoTo CBpbXeTe ONTNUH ka6en KbM rHe3dOTo OPTICAL OUT Ha TeNeBn3opa N KbM OPTICAL rHe3do Ha yCTpoNCTBOTO.
Cbbet:
-Дokato e B ONTUHEH nH HDMI ARC peKIM, aKo OT yCTpoCTBOTO HMa 3ByK, MoKe da ce HaIOXn Da kTbIPaTe NxOda 3a CnHan PCM Ha yCTPOCTBTOHa BxOda (Hanp.TeNEBnOp, DVD nnBlu-ray nnebp).
Cbbp3BaHe KbmeEneKtpo3axpaHbaHe
OnachocOT yBpekdahe Ha npodykta!
- YBepeTe Ce,Ye HAnpeKeHHeTo Ha 3xaPbHaBeTo Cb0TBeCTBa Ha HAnpeKeHHeTo,OT6en3aHo HA Tbp6a nnOt DOJIHaTc TpaHa Ha ypeHa HA aDAnTepa Ha 3xaPbHaBeTo.
-Ппдддддддддддддддддддддддддддддддддддддддддддддддддддддддддддддддддддддддддддддддддддддддддддддддддддд徴уверетe,чсгнанравии BCUKNOCHaJIIN BpB3KN.
CbpxTe NOCTOHHOTOKOBNA Ka6eHa aadTepa 3a 3axpaHbaHe KbM NOCTOHHTOKOBTO rHe3do HA OCHOBHMAyI.
-CbpxKeTe MpxKOBn Ka6en KbM rHe3dTo AC~ Ha aanTepa 3a 3axpaHbAne H cIeT TOBa KbM MpxKOB KONTaKT.

KolnyeCTBTO 3axpaHbaun Ka6enn n Tnnt Ha zencena ca pa3nnuHn B pa3nnuHnTe pernoHn.
OCHOBHa pa6oTa
TOTOBHOCT/BKJI.
Korato CbpxeTe rnaBnMoyn Kbmy eKeTpueeKaTa MPexa 3a NpBPbN Tb, Toi ue 6bDe B pexum Ha roTOBHOCT.
Ha ypeHa Ha Hn Ha nHa nHa nHa nHa nHa nHa nHa nHa nHa nHa nHa nHa nHa nHa nHa nHa nHa nHa nHa nHa nHa nHa nHa nHa nHa nHa nHa nHa nHa nHa nHa nHa nHa nHa nHa nHa nHa nHa nHa nHa nHa nHa nHa nHa nHa nHa nHa nHa nHa nHa nHnHa nHa nHa nHa nHa nHa nHa nHa nHa nHa nHa nHa nHa nHa nHa nHa nHa nHa nHa nHa nHa nHa nHa nHa
HaTNCHETe OTHOBO 6yTOHa U,3a Da BbPHeTe yCTpOiCTBOTO B pEXKIM Ha FOTOBHOCT.
Ako nckate da N3KJIIOUHTe ypeda HanbIHO, n3KIOUHTe eencena oT 3axpaHbaun KONTaKT.
ABTomTuHc6b6yKdaHe
Ako NMA Cbbp3aH TeneBnOOP mN BnBnHNO yCtpoCTBO (OTNTNUHO/HDMIARC),yctpoIcTBOI Oe Ce BkIOuN AOBMATNUO nPn BKNIOVAheHaTeeneBnOPOmN BbHnHOTo YcTOpOCTBO nO I3BeDE ayDINO CnTHAHN.
Kak da aKTbBnpaTe ABTomTuHc b6yKaHa
HaTINCHETa 3Kpatko 6yToHa (TOUHUK) 6yToHa VOL+Ha yctpOHTBO,3a da aKTbBnPaTe nn DeakTNBnPate fHKunraTa 3a ABTomATNUO cb6yKaDa
BkIIOeHO bAOTMAHNO cb6yKaHe: 6eHNr H3eNEHnT CBeTOaIOu MmTa DbA nTn NocEneOeTeNHO. OkaTo E B pexKIM FOTOBHOCCT, UepBEHnT CBTeOtnoN pIAmRBA.
ИЗкунець АВТМАПСБуЖДа:белгNTИЧЕВЕНТСБETODIO MнгатДВа ПБТИ NOСпЕДОВATEЛH.ДOKАТЕВЕРЖIMHAFTOBHOCT, CBETODIOДТCBETNNOCTOЯнHOвЧЕВЕHo.
ФункцязabTomatnHOnnKIIIOUBaHeHa3aXpaHBAHeTo
YcTpoCTbTO ABTOMaTHNO IpemHaba B peXIM Ha ITOBHOCT cIed OKOIO 15 MInHTN, Ako TEJIeBn3OpbT NIN BbHhOHO TYcPoIcTBo Ca nKlnHoeHN iN C nKIINoHcEO 3xApHaBAHe.
3a da n3KIOHTye cTPOIcTBOTO HAnbIHO, INBaTe IeNcEJa OT KOHTaKaTa Ha eNEKTPnueckaTa Mpeka.
ИЗКИЮВаТе yctpoДСТБОТЯньлно,зд пecNTe eHepRЯ,KORATo He ro n3NoI3BaTe.
B OINTUHEN peKIM HATNCHE T KHOHHTAteHNO,3a da BKNIOUHTepeKIMAA"ABToMaTNUHa rOToBHOCT',KBJTNrTcBTeOAnODIe MURA 3PbTN6b3pO.
BontuH peKIM HATiCHETe -TIOHO,3a da n3KIOUHTe peKIMAbTOMaTuHa rTOBHOCT',XbNTnTcBToDnOid Me mRa 3nt6aBHO.
U36opHa pexmm
HaTnCHete 6yToHa 13TOUHk) Ha yCTpoiCTBOTO HeKoJIKKoPaTHO, 3a da n36epTe Jekalna pekim.
CBeTINHHIHT INHNIKATop OTnpeHa IaBmro MOyI NOKa3Ba KOIOT peKIMNTe Ce 13non3BA B MOMEHTA.
PerylmpaHe Ha cnlaTa Ha 3Byka
HaTnchete 6yToHnTe VOL+/VOL- Ha ypeJa nn Ha nctaHnOHnOуnpaBneHne,3a da perynipate cinnata Ha 3Byka.
Ako nckate da n3kIouHte 3Byka, haTnCHete 6yToHa Ha nCTaHIOHHOTO ynpabHeHne. HATnCHete 6yToHa THOBo IIN HA TnCHete 6yToHtE VOL+ / VOL-, 3a da ce BbpHeTe KbM HopMaIIHnpeKIM Ha 3Byka.
3a6eEka:doKaTopeRynpateCnIataHa38yKa,CBeTOnIOHNHTNHNKaTOp 3aCbCTOHNHeTo pnnmIRBa BeHbK.KORA TO CNIATA Ha 38yKa DOCTMHRc MaKcMaHIO/MNHMaHIO HNO, CBTeOIOHNHT NHNKaTOp 3a CbCToHNTe Oe 3aONueHO daPmIRBA6b30c.
I36opHa npedBapuTeHNO 3aadaeH 3BykoB eΦeKT
IIO Bpeme Ha B3PON3BcKaDa He HATNCHETe 6yToHa EQ Ha INCTaHcNHOHOTO ynpabHe, 3a da u36peTe OT ppeBaPnteHNo 3aJaDeHnTe eKBaJau3epn: MY3NK4, FNIIM, HOBNH, HOUEN.
| Функция на сbeltлингий Иndикатор | ||
| Функции По | КазваеОперацу | |
| Вкlioоча АВТOMATЧИ �OTOBHOCT | Жыltо-Жыltо-Жыltо, 6ыр30 | Опточен реким, "Предишени"- "Прendeши- "Следвац"- "Следвац" |
| Излolyоча АВТOMATЧИ �OTOBHOCT | Жыltо-Жыltо-Жыltо, 6abHo | |
| Вкlioочen реким АВТOMATЧИ сБужданe | Баял-баял-Зелно-Зелно | Сayндар:"ИЗточник" + "Vol+" |
| Излolyочen реким АВТOMATCHU СБужданe | Баял-баял-червени-червени | |
| Оранчени сnilata на 3bvyka | С Beetлинота пемигва 3 nbTu | Настоюкна на сnilata на 3bvyka |
| Сдвогаhe c Bluetooth | Червано-синьо-черва- синьо...... | В рекимBluetooth натисане и задръсту被打она "Bьзэрumsвесдаи" |
| Heycpeшно Бьзэрumsвесдаи | Червано-Зелно-черва- Зелно...... | |
4 (PAALLE/POIS)-painike
Juster surround PA/AV.
5 (Kilde)
Velg avspillingsmodus.
6 (STUM)
4 (KVEIKT/SLOKKT) Hnappur
Skiptu à milli KVEIKT og Biostödu stillingar.
5 (UPPRUNI) Hnappur
Veldu spilunarstillingu.
6 +/- (Vol+/Vol-) Hnappar
Haekka/laekka hljóostyrkinn.
7 DC Innstunga
Tengdu vià rafmagn.
8 HDMI ARC Innstunga
Tengjast TV meD HDMI snuru.
9 OPTICAL Innstunga


- Contents
- Package Contents 2
- Product Diagram 3
- Preparations 5
- Connections 7
- Basic Operation 8
- OPTICAL/HDMIARCOperation11
- Bluetooth Operation 11
- USB Operation 13
- Troubleshooting 14
- Specifications 15
- Package Contents
- Product Diagram
- Main Unit
- Remote Control Sensor
- LED Indicators
- Screws
- (ON/OFF) Button
- (SOURCE) Button
- +/-(Vol+/Vol-) Buttons
- Remote Control
- 9118
- NIGHT
- MOVIE
- BASS+/-
- Preparations
- Prepare the Remote Control
- Replace the Remote Control Battery
- Precautions Concerning Batteries
- Placement and Mounting
- Placement
- Wall Mounting (if using option-B)
- Note:
- Connections
- Connect to HDMI (ARC) Socket
- Tips:
- Connect to OPTICAL Socket
- Tip:
- Connect Power
- Risk of product damage!
- Basic Operation
- Standby/ON
- Auto Wake
- How to Enable Auto Wake
- Automatic Power Off Function
- Select Modes
- Adjust the Volume
- Select a Preset Sound Effect
- OPTICAL/HDMIARCOperation
- Bluetooth Operation
- Pair Bluetooth-enabled Devices
- To disconnect the Bluetooth function, you can :
- Listen to Music from Bluetooth Device
- USB Operation
- Troubleshooting
- No power
- Remote control does not work
- No sound
- I can't find the Bluetooth name of this unit on my Bluetooth device for Bluetooth pairing
- This is a 15 mins power off function, one of the ERPII standard requirement for saving power
- Supported Input Audio Formats
- Hisense
- Consejo:
- Lieferumfang
- Preparacoes 9
- Trocar as Pilhas do Controlo Remoto
- JnjarpaHa npoun3BODOT 3
- IodrotobKu 5
- Nobp3yBaHa 7
- OchOBHO pa6oTeHe 8
- Onepaunja ONTNUKN/HDMIARC 11
- Pa6oTeBe co Bluetooth 11
- Pa6oTebe co YCb 13
- PeuBaBe npo6Jemn 14
- Cneunfukauu 15
- CoDpXmHa Ha naKeToT
- ДиjarpaHa npOn3BODOT
- TnaBHa eHnHua
- CeH3Op Ha daJeunckynpaByBa
- 2JIEDnHmKaTOpN
- 3UpaΦOBn
- Konue (BKJYEHO/ACKJYEHO)
- Konue (M3BOP)
- Konue + / - (Vol+/Vol-)
- DaneuHcN ynpaByBa
- 9/11 8
- NorotoBkn
- NoTByBaIbe Ha daJeHHCKNt ynpaByBa
- 3aMeHa Ha 6aTepuJa Ha daJeHHCKNt ynpaByBa
- MepKHa npetna3nBOcT 3a6atepuuTe
- IocTaByBaHbe mMOHTnpaHbe
- NoctabyBaBe
- MOnTnpaBe Ha sni (ako ja Kopucntne onuja-B)
- Beneuka:
- Nobp3yBaHa
- Nobp3yBaHe Ha HDMI (ARC) npnkyoc
- Cobetn:
- Nobp3yBaBe Ha OPTICAL npnKnyyok
- Cobet:
- Tobp3yBaBe co HanojyBaBe
- Pn3NK oJ owTeYBaHe Ha npOn3BODOT!
- OchOBHO pa6oTeHe
- IoproTBeHoCt/BKJIyUeHO
- ABTomatcko 6ydebe
- KaKo Da OBO3MOXnTe ABTomatcko 6yndeHe
- Функида abTomatcno ncknyuBahe Ha HanojyBahe
- U36upapexmm
- PpnilarodyBaHbeHa jaunHaTa Ha 3ByK
- M36npa npetXoJHO noCTaBEn 3ByuH eΦeKT
- Onepaunja ONTNUKN /HDMIARC
- Pa6oTeHe co Bluetooth
- CnapypeincoOBO3MOxENBluetooth
- Bellewka:
- Ja ja ncknynnte fynkunjara Bluetooth, moxete da:
- Cnywabbe my3ka oD Bluetooth ype
- Pa6oTeHbe co yCb
- PeeBaBbe npo6lemn
- Hema HanojyBahe
- DaneuHcKnOt ynpaByBaH He pa6oTu
- Hema 3Byk
- He moxam da ro hajdam Bluetooth mMeTo Ha OBaa edHnua ha mojot Bluetooth ypeq 3a cnapyBaBe co Bluetooth
- Oba e yHKuJa 3a ucknyBaHe hanojyBaHe no 15 MNHyTn, eoHO od cTaHapdHnTe 6apaHa Ha ERPII 3a WteJeBe eheprnja
- Cneunkaun
- Aydno oopmatn co noadpkaH Bne3
- NoDrToBka
- IodrotobkaHa nctaunnoHTo ynpabneHne
- CmHa Ha 6aTePnTa Ha ductanHnHOTo ynpabHeHne
- IpeNa3Hm MepK 3a6aTepuNTe
- Pa3noIarHe MoHTaX
- CteHeH MoHTax (aKo ce n3noJ3Ba BapnaHT B)
- Bpb3ka
- Cbbp3BaHe cHDMI (ARC) rHe3do
- CbBET:
- Cbbp3BaHe KbM OPTICAL rHe3do
- Cbbp3BaHe KbmeEneKtpo3axpaHbaHe
- OnachocOT yBpekdahe Ha npodykta!
- OCHOBHa pa6oTa
- TOTOBHOCT/BKJI.
- ABTomTuHc6b6yKdaHe
- Kak da aKTbBnpaTe ABTomTuHc b6yKaHa
- ФункцязabTomatnHOnnKIIIOUBaHeHa3aXpaHBAHeTo
- U36opHa pexmm
- PerylmpaHe Ha cnlaTa Ha 3Byka
- I36opHa npedBapuTeHNO 3aadaeH 3BykoB eΦeKT
- (PAALLE/POIS)-painike
- (KVEIKT/SLOKKT) Hnappur
- (UPPRUNI) Hnappur
- +/- (Vol+/Vol-) Hnappar
Brand : HISENSE
Model : HS205G
Category : Soundbar