Rallybar S - Soundbar JBL - Free user manual and instructions
Find the device manual for free Rallybar S JBL in PDF.
| Brand | JBL |
| Model | Rallybar S |
| Product Type | Universal Bluetooth soundbar for outdoor vehicles with lighting |
| Dimensions (L x W x H) | 537.5 x 135.2 x 118 mm |
| Weight | 5.2 kg |
| Power Supply | 9.6 - 16 V DC (vehicle battery) |
| Output Power | 150 W RMS, 300 W peak (IEC60268) |
| Max Current | 25 A |
| Transducers | 4 woofers 70 mm (2.75"), 2 tweeters 25 mm (1"), 2 oblong passive radiators 182.8 x 76.2 mm |
| Frequency Response | 45 Hz - 40 kHz |
| Signal-to-Noise Ratio | > 80 dB |
| Bluetooth Version | 5.3 |
| Bluetooth Profiles | A2DP V1.3, AVRCP V1.6 |
| Inputs | USB (FAT16/32, up to 64 GB), AUX-In (3.5 mm, levels 2/4/6 V RMS) |
| Outputs | AUX-Out (3.5 mm, 2 V RMS) |
| Lighting | MAP (playback) and RGB (multi-pattern, adjustable and DIY) |
| Mounting | Brackets and hose clamps for tubes (diameters 38/44/51 mm) |
| Advanced Features | Broadcast mode (multi-speaker), party mode (2 Bluetooth devices), demo mode, deep standby, factory reset |
| Care and Cleaning | Clean with a soft dry cloth. Do not use abrasive products. |
| Safety | In-line ATC fuse (25 A), protection against overvoltage/undervoltage/overheating |
| Spare Parts and Repairability | Parts available via JBL customer service. Do not repair yourself. |
| General Information | Manual available in multiple languages. Firmware update via USB key. |
Frequently Asked Questions - Rallybar S JBL
User questions about Rallybar S JBL
0 question about this device. Answer the ones you know or ask your own.
Ask a new question about this device
Download the instructions for your Soundbar in PDF format for free! Find your manual Rallybar S - JBL and take your electronic device back in hand. On this page are published all the documents necessary for the use of your device. Rallybar S by JBL.
USER MANUAL Rallybar S JBL
JBL RALLYBAR S/RALLYBAR/ RALLYBAR XL
natural_image
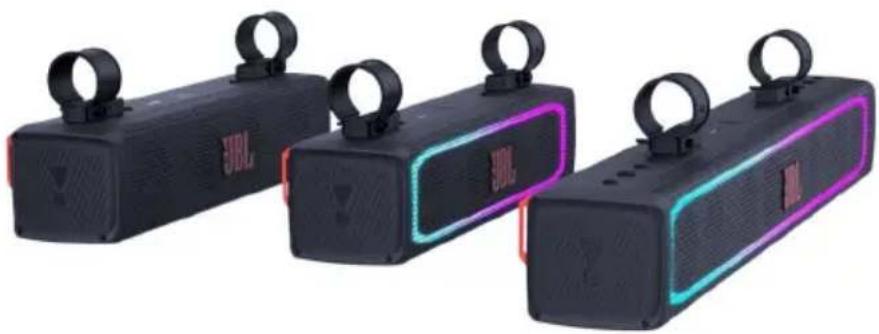
Three black JBL-branded sound amplifiers with neon lighting and matching earphones, displayed side by side (no visible text or symbols on devices)RALLYBAR S RALLYBAR RALLYBAR XL
Owner's Manual
EN
Mode d'emploi
FR
- INTRODUCTION....2
- WHAT'S IN THE BOX.... 2
- PRODUCT INSTALLATION .... 2
3.1 Product Dimensions 2
3.2 Product Mounting 2
- WIRING AND POWER ON 3
4.1 WIRING 3
4.2 Power on 4
- PRODUCT OVERVIEW .... 4
5.1 Side panel....4
5.2 Bottom Panel 4
- USING YOUR RALLAYBAR....5
6.1 Bluetooth connection 5
6.2 USB Connection 5
6.3 AUX connection 5
6.4 Source Priority 6
- ADVANCED USAGE....6
7.1 MAP Lights Effect 6
7.2 RGB Lights Effect....6
7.3 RGB Lights Brightness Setting 6
7.4 RGB Lights DIY Setting....7
7.5 Broadcast mode 7
7.6 Party Mode 8
7.7 DEMO Mode 8
7.8 DEEP STANDBY MODE 8
7.9 FACTORY RESET 8
7.10 Firmware Upgrade Service 9
- SPECIFICATION 9
- TROUBLESHOOTINGS .... 10
1. INTRODUCTION
Congratulations on your purchase! This manual includes information about "RALLYBAR S", "RALLYBAR" and "RALLYBAR XL" speakers.
We encourage you to take a few minutes to read this manual, which describes general installation guidelines and operation instructions. Please note that proper installation of mobile audio and video components require qualified experience with mechanical and electrical procedures. If you do not have the knowledge and tools to successfully perform this installation, we strongly recommend consulting an authorized JBL dealer about your installation options.
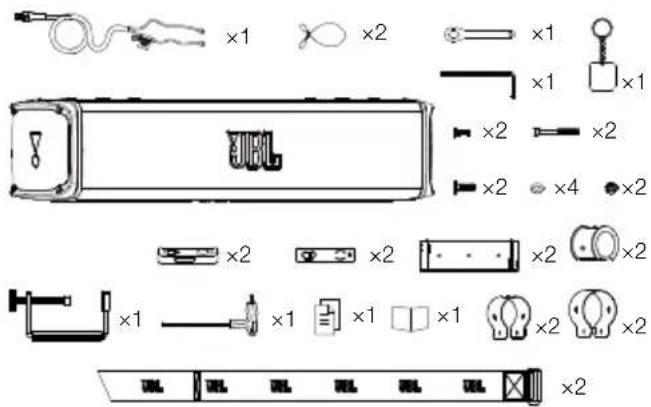
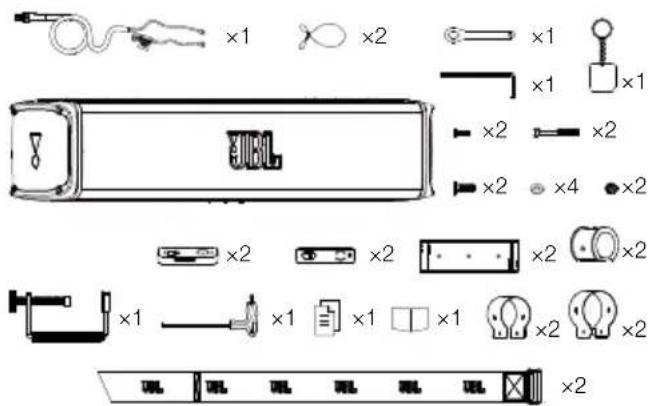
- WHAT'S IN THE BOX
text_image
Technical diagram showing various electrical components and symbols with labels like 'x1', 'x2', and '×1' for different types of devices.| 1x Soundbar 2x Short M8 | screws |
| 2x Security cables 2x Short M5 screws | |
| 1xSmall Wrench 2x Long M5 screws | |
| 1 x L- Small Allen wrench 2x M5 screw nuts | |
| 1xT-handle hex wrench 4X Flat washers | |
| 2x Straps with Velcro 2X C -Clamps (2") | |
| 1X G -Clamp 2X C -Clamps (1.75") | |
| 1x Keychain 2X Thick rubber strips (for 1.5" pole) | |
| 1x 12ft (3.66m) power/ground wire harness | 2x Thin rubber strips(for 2" &1.75" pole) |
| 2x Rubber top covers 1x Q | quick start guide |
| 2x Mount cleats 1x Safety sheet &warranty card | |
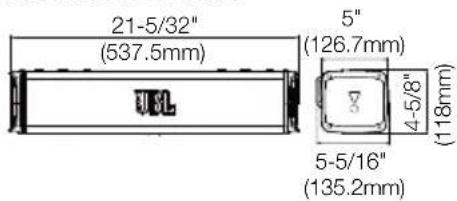
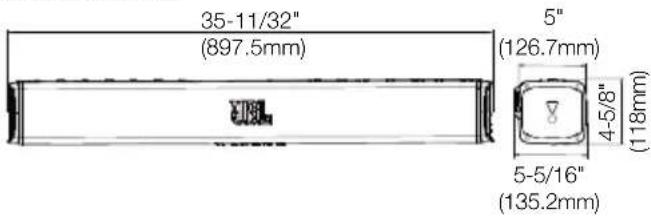
3. PRODUCT INSTALLATION
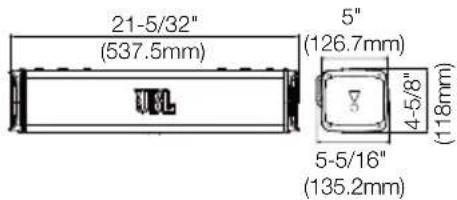
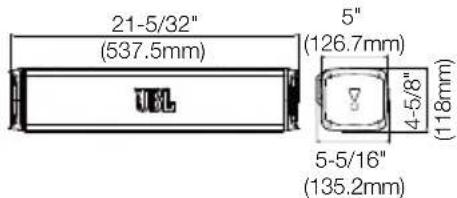
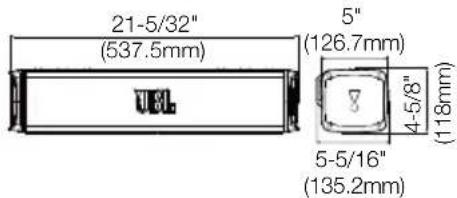
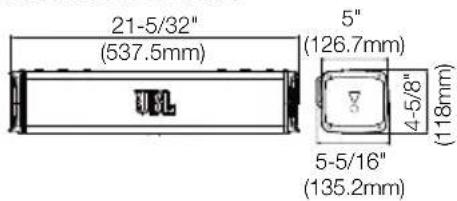
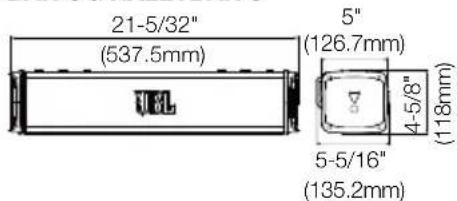
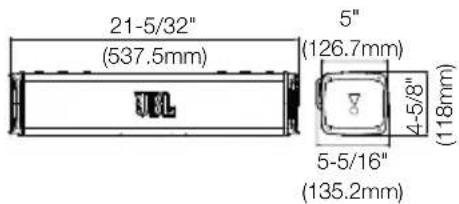
3.1 Product Dimensions
RALLYBAR&RALLYBAR S
text_image
21-5/32" (537.5mm) 5" (126.7mm) 4-5/8" (118mm) 5-5/16" (135.2mm)RALLYBAR XL
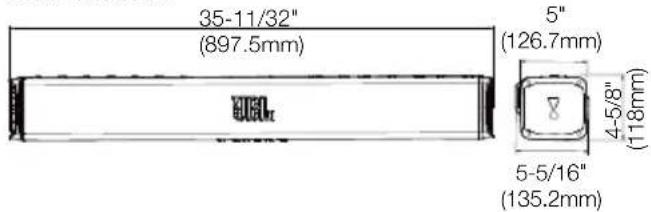
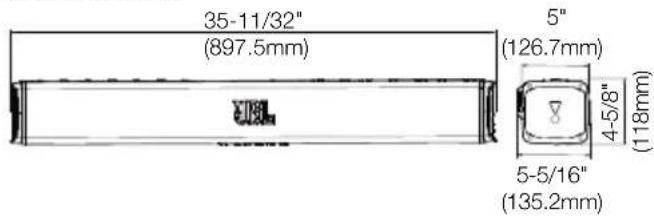
text_image
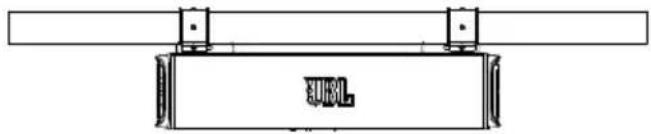
35-11/32" (897.5mm) 5" (126.7mm) 4-5/8" (118mm) 5-5/16" (135.2mm)3.2 Product Mounting
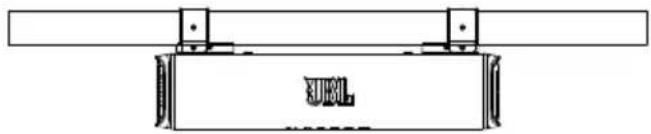
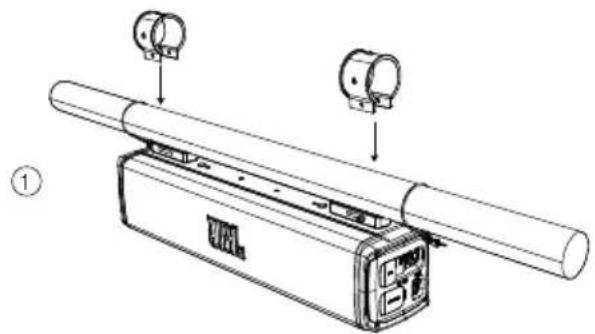
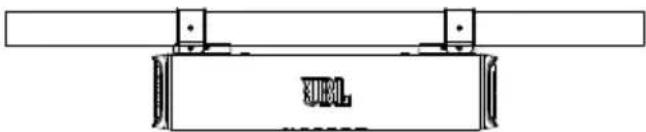
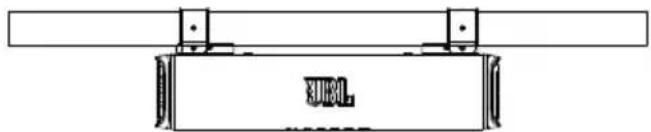
1) Top mount view
natural_image
Pure mechanical assembly diagram showing a rectangular component with mounting brackets and a label 'SUEL' (no text or symbols beyond the label)2) Back mount view

natural_image
Technical line drawing of a mechanical device with cylindrical body and control panel (no text or symbols)3) Mounting Steps
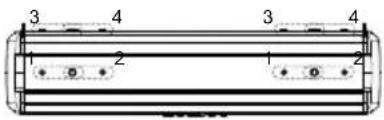
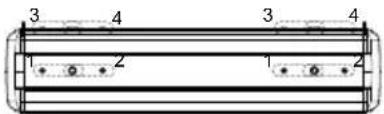
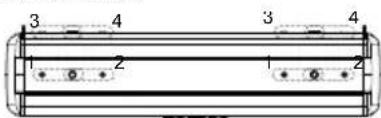
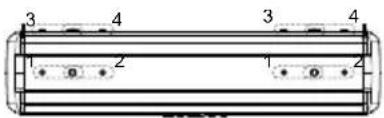
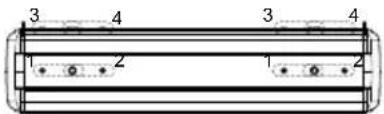
Step 1 - Choose cleat mounting positions on soundbar.
Note: There are 4 (RALLYBAR /RALLYBAR S), or 8 (RALLYBAR XL) mounting positions for left cleat and right cleat;
RALLYBAR&RALLYBAR S
text_image
3 4 3 4 1 2 1 2RALLYBAR XL

text_image
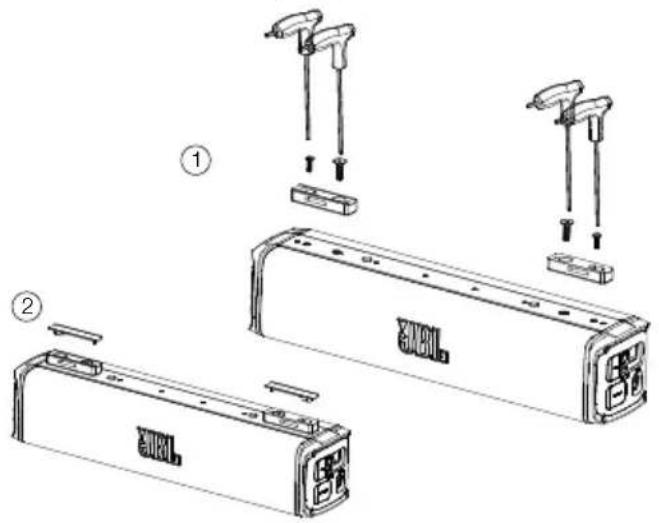
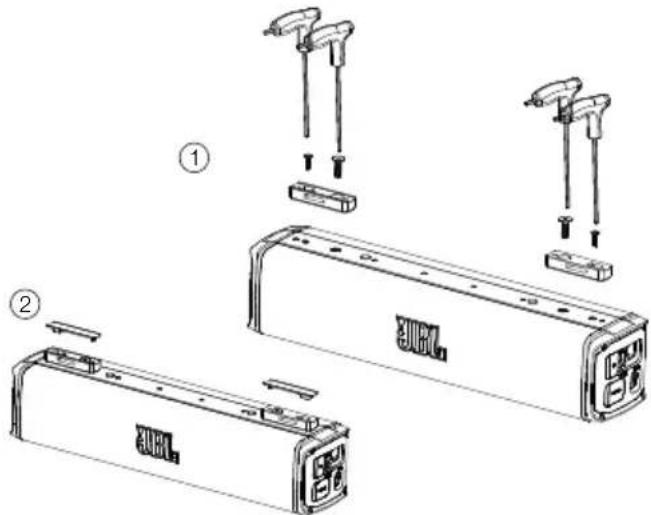
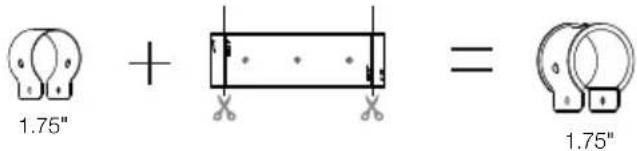
5 6 7 8 5 6 7 8 1 2 3 4 1 2 3 4Step 2-put cleat on soundbar
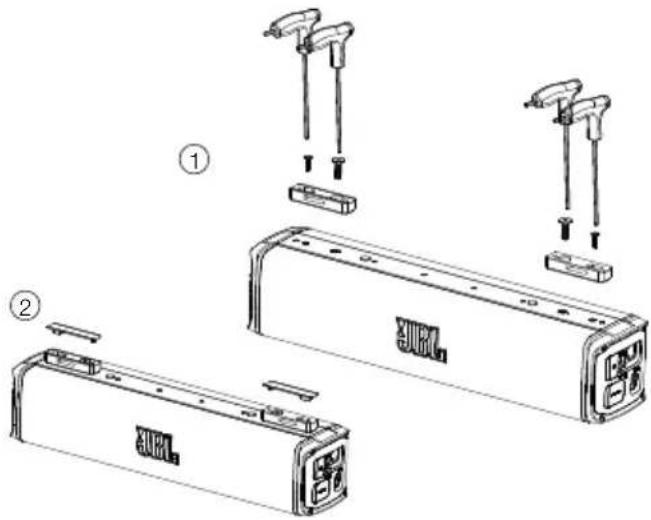
text_image
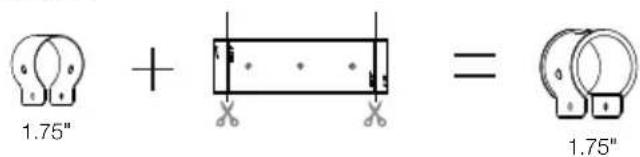
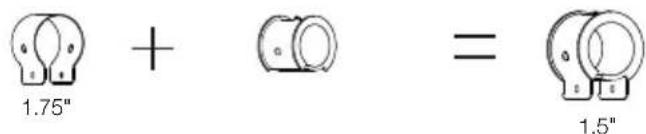
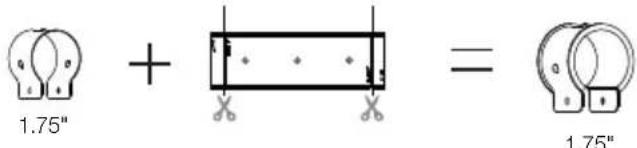
Technical diagram showing exploded view of a battery pack with labeled components and partsStep 3-Choose C-Clamps and rubbers based on your pole size.
Option 1:
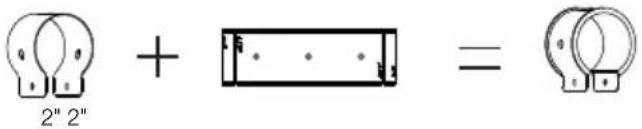
text_image
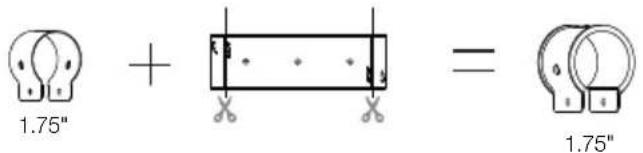
2" 2" + =Option 2:
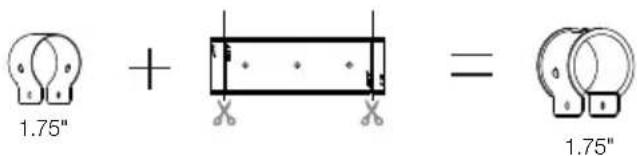
text_image
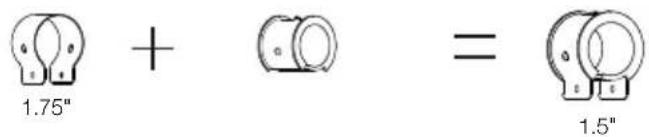
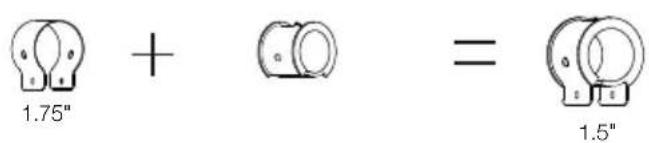
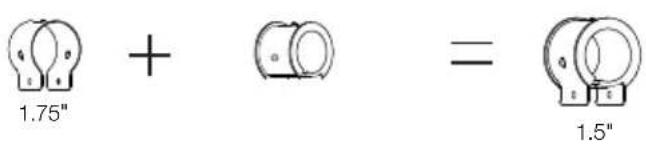
1.75" + = 1.75"Option 3:
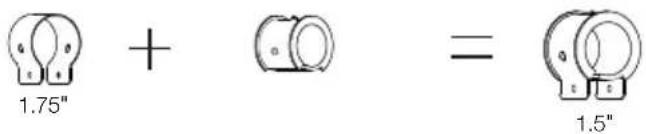
text_image
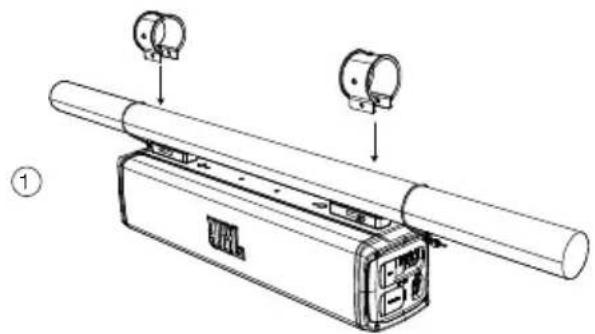
1.75" + = 1.5"Step 4-Mount soundbar on the pole.
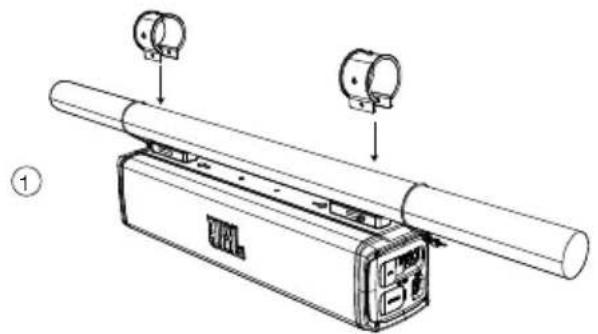
text_image
Technical diagram showing assembly of a mechanical device with labeled parts and directional arrows indicating assembly steps.
natural_image
Technical line drawing of a mechanical assembly with two views (top and side), no visible text or symbols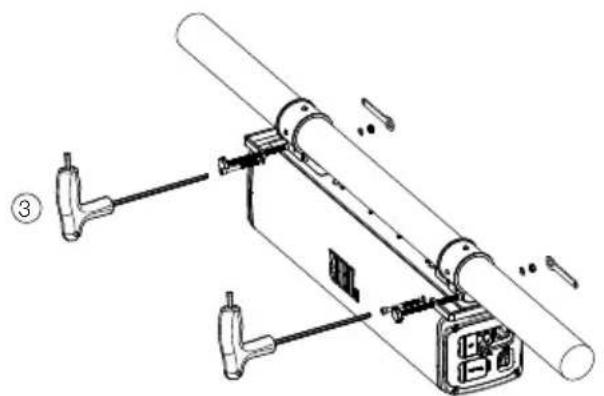
text_image
Technical diagram of a mechanical assembly with labeled parts, including tool holders and a digital display unit.
text_image
0° 90° 270° 180° ④Remarks: JBL logo badge is rotatable.
Step 5-Safety Cable
Loose the safety cable screws
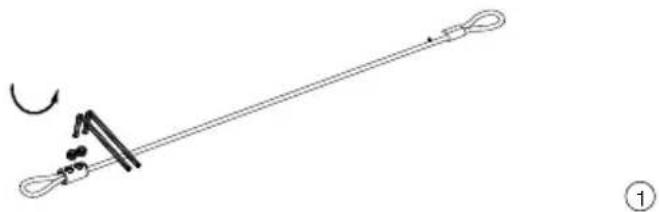
natural_image
Simple line drawing of a string with a loop and a curved arrow, no text or symbols presentTight the safety cable screws
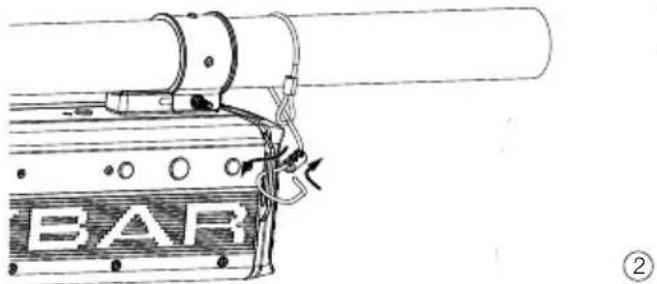
text_image
BAR ②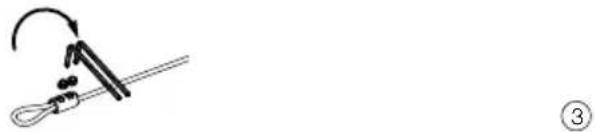
natural_image
Simple line drawing of a tool with an arrow indicating rotation (no text or symbols)Note: Before using the L-hex wrench to tighten the cable, please make sure the distance is over 2"(50mm) from the cable end.

text_image
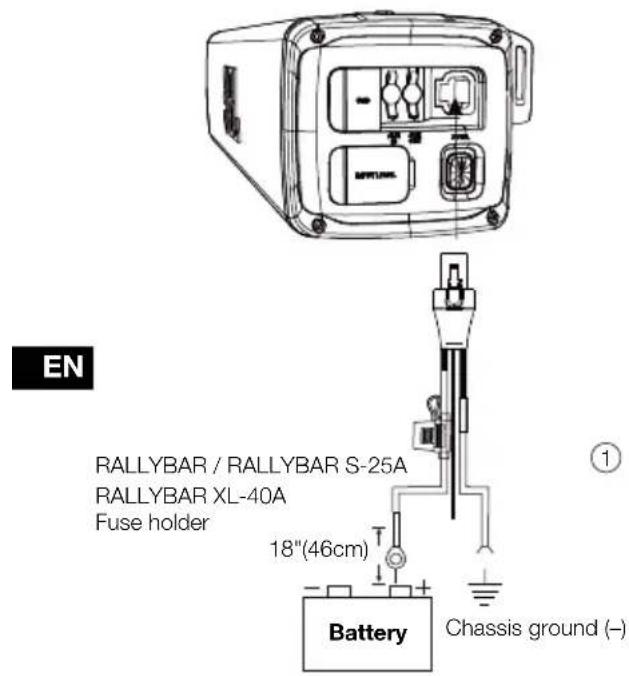
>2"(50mm)4. WIRING AND POWER ON
4.1 WIRING
Power: Connect the red +12V power wire in the wire harness to the positive terminal of the vehicle battery. The wire harness includes an inline 25A ATC fuse (RALLYBAR&RALLYABR S) or 40A ATC fuse (RALLYBAR XL), and 5/16" ring terminals. The ring terminals can be cut off if they're not needed, but the fuse should always be kept within 18"(457mm) of the battery
Ground: Connect the black GND wire in the wire harness to bare metal of the vehicle's chassis, such as at a seat belt bolt.
NOTE: 1. Use the provided power wire harness only 2. If possible, remove any paint from the chassis for best contact. It is recommended to use a star washer below the ring connector for a secure connection; 2. Disconnect the vehicle's battery to avoid an electrical short.
Plug-in: Plug the power connector into the "Power" port on side of the speaker.
text_image
EN RALLYBAR / RALLYBAR S-25A RALLYBAR XL-40A Fuse holder 18"(46cm) Battery Chassis ground (-)4.2 Power on
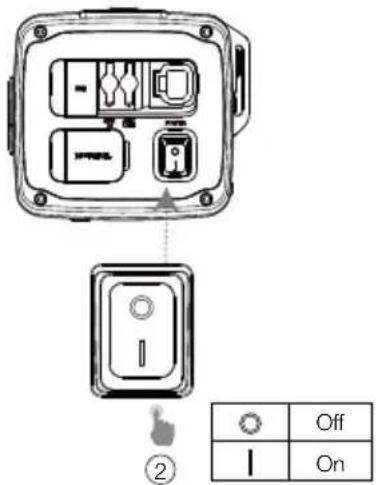
Main Power Switch: Press the main power switch on the side panel to turn on and turn off the speaker.
Once turn on the main power, the Power button(on the bottom backlight will be white color and start to get slow flash, which shows the speaker is on Deep standby mode.
text_image
Diagram showing a device with labeled buttons and an icon, alongside a table for 'Off' and 'On' options.Note: on the Deep standby mode, only the MAP Light can be turned on/off by short pressing light button.
Press Power button: Press the power button, the backlight of the power button will become constant white, which shows that the speaker is on operation mode.
text_image
= ▷ + * * ◦ ×1 ③| Off | Main power switch is off | |
| White (Flashing) | Main power switch is on-(Deep standby mode) | |
| White (Constant) | Operation mode on | |
| Red (Constant) (15 seconds) | Protection: OVP/UVP/OTP |
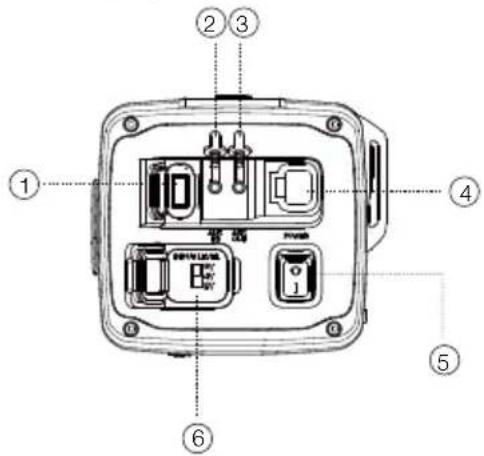
5. PRODUCT OVERVIEW
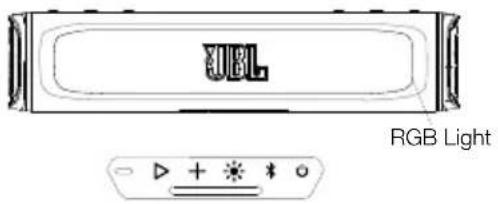
5.1 Side panel
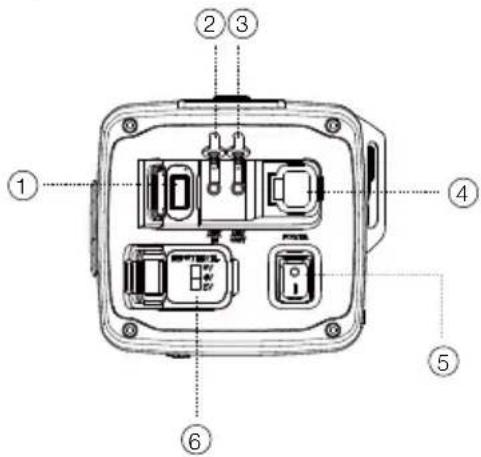
text_image
Technical diagram of an electrical switchgear box with numbered components for identification- USB
- Connect to a USB storage device.
- Aux-in
- Connect to an external audio device through a 3.5mm audio cable (not supplied).
- Aux-out
- Connect to a secondary soundbar, amplified Subwoofer through a 3.5mm audio cable (not supplied)
- Power
- Connect to vehicle battery.
- Main Power Switch
- Press to switch power on and power off. It is power on, is power off.
- Input Level
- Provides 3 different Gain settings when use AUX-IN to connect with head unit: 2V, 4V, and 6V. (2Vrms: 0.35Vrms - 2Vrms; 4Vrms: 0.7Vrms - 4Vrms; 6Vrms: 1.05Vrms - 6Vrms)
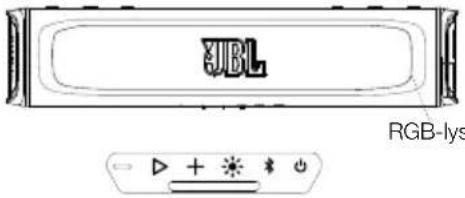
5.2 Bottom Panel
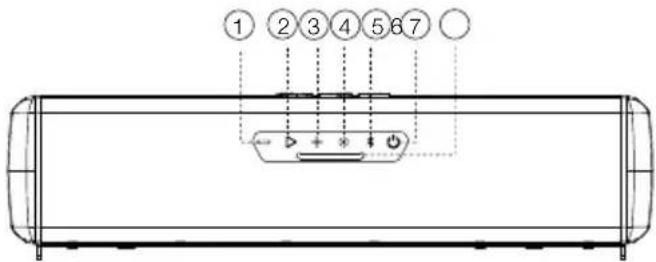
text_image
① ② ③ ④ ⑤ ⑥ ⑦ ○ ← ▶ + * + ●7 MAP Lights
| NO. | BUTTON | $hort Press Long press | |
| 1 | — | Press to decrease the volume level step by step | decreasing volume continually (Press and hold 1 second) |
| 2 | ▷ | Press to play or pause the music.;Press twice to play the next track.;Press three times to play the previous track. | |
| 3 | + | Press to increase the volume level step by step | Increasing volume continually (Press and hold 1 second) |
| NO. | BUTTON | Short Press Long press | |
| 4 | Press to switch MAP lights based on sequence: 100% brightness -> 50% brightness -> OFF | Press and hold for 2 seconds to switch light show patterns based on sequence: Rock -> Flow -> Cross->Ripple->Flash-> Static1 -> Static2 -> Mix -> DIY -> OFF | |
| 5 | Press to enter Bluetooth pairing mode. | Press and hold for 5seconds to disconnect all Bluetooth devices and enter Bluetooth pairing mode | |
| 6 | Press to switch between Operation mode and Deep standby mode |
6. USING YOUR RALLAYBAR
6.1 Bluetooth connection
You can use your RALLYBAR as an external speaker for your Bluetooth enabled smartphone or tablet.
1) Press ✗ to enter Bluetooth pairing mode.
2) Select "JBL RALLYBAR", "JBL RALLYBAR S" or "JBL RALLYBAR XL" to connect.
3) Once successfully connected, audio will stream from your Bluetooth device to this speaker.
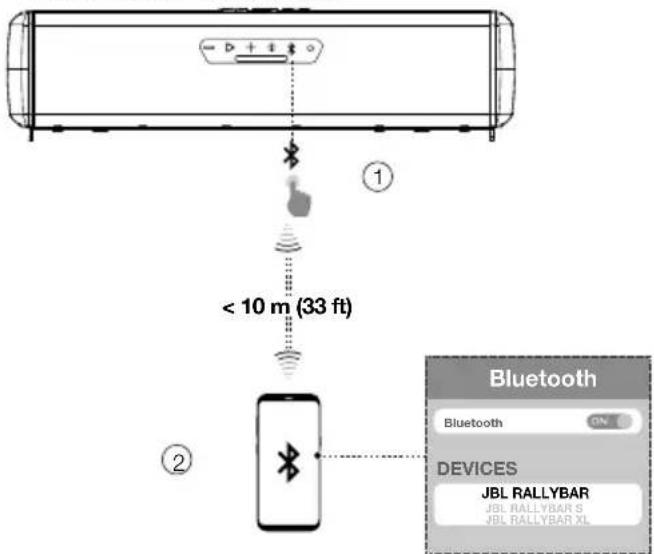
text_image
- D + E + ① < 10 m (33 ft) ② Bluetooth Bluetooth DEVICES JBL RALLYBAR JBL RALLYBAR S JBL RALLYBAR XL| * | Off | Power off |
| White (Constant) | In operation mode But no Bluetooth connection | |
| Blue (Constant) | Bluetooth connected | |
| Blue (Flashing) | Bluetooth pairing |
Notes:
- This speaker can memorize a maximum of 8 paired devices. The ninth paired device will replace the first one.
- Bluetooth performance can be affected by the distance between this product and your Bluetooth device and the environment of operation.
To terminate the Bluetooth-enabled device:
- Turn off this speaker.
- Disable Bluetooth on your device; or Move this speaker beyond the Bluetooth operational range.
To reconnect the Bluetooth-enabled device:
- When you turn on this speaker next time, it tries to reconnect the last connected device automatically;
- If not, manually select "JBL RALLYBAR", "JBL RALLYBAR S" or "JBL RALLYBAR XL" on your Bluetooth device to start a connection
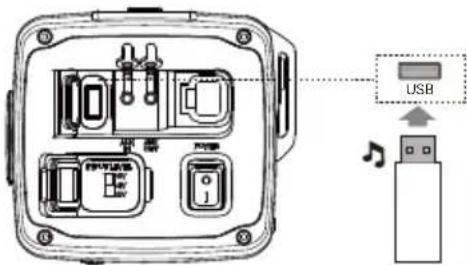
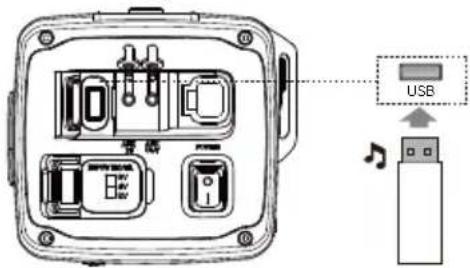
6.2 USB Connection
With your RALLYBAR, you can enjoy music that is stored on a USB storage device such as an MP3 player. Plug your USB storage device into the USB port of your RALLYBAR. The music will play automatically. If not, please check if the USB device contains playable audio contents.
text_image
Diagram showing internal components of an electronic device with USB connection to a USB port, including ports labeled in Chinese.EN
Supported Audio Format
| Extension | Codec Sample rate | Bitrate | |
| WAV PCM | 44.1KHz ~ | 192KHz | < 5Mbps |
| LPCM 44.1KHz ~ | 192KHz | < 5Mbps | |
| MP3 MPEG | 1 layer1/2/3 32KHz ~ | 48KHz | 32Kbps ~320Kbps |
| MPEG2 layer1/2/3 16 | KHz ~24KHz | 8Kbps ~160Kbps | |
| MPEG2.5 layer3 8KHz ~12KHz | 8Kbps ~160Kbps |
Tip:
- The speaker plays audio files on the USB storage device from the root folder to the last level of subfolders in alphabetical sequence. Up to 8 levels of subfolders are supported.
- Supported USB Drive File System: FAT16, FAT32
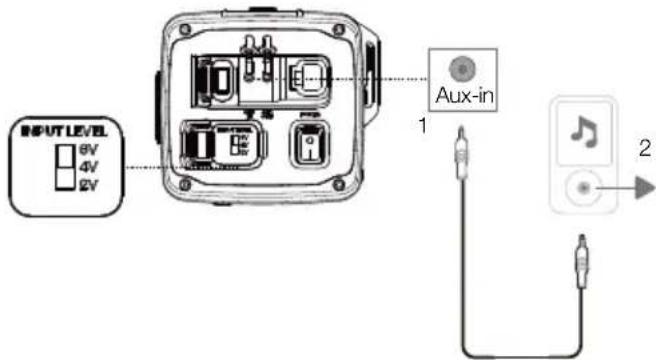
6.3 AUX connection
6.3.1 Aux-In connection
- Connect a 3.5mm audio cable (not supplied) to:
- the Aux-out port of your portable audio device or headunit in the car.
• the AUX-in port of this speaker - Turn on your portable audio device or head unit and it starts playing.
text_image
INPUT LEVEL 6V 4V 2V Aux-in 1 2Notes:
- if use Aux-in to connect the head unit and this speaker, you may need a RCA to 3.5mm cable or adapter (not supplied).
- there are 3 different INPUT LEVEL options to choose from when use AUX-IN to connect with head unit to avoid noise: 2Vrms (0.35Vrms - 2Vrms); 4Vrms (0.7Vrms - 4Vrms); 6Vrms (1.05Vrms - 6Vrms).
6.3.2 Aux-out connection
There is Aux-out available for you to connect with external speaker or subwoofer (for example, JBL BASSPRO GO, which is sold separately on www.jbl.com).
- Connect a 3.5mm audio cable (not supplied) to:
• the Aux-out port of RALLYBAR
• the AUX-in port of external speaker or subwoofer

text_image
EN Aux-out6.4 Source Priority
- 1st priority - USB disk >2nd Priority -Bluetooth >3rd Priority Aux-in, only one source will play at one time.
- Higher priority can break in lower priority source; Starting a source with higher priority will always interrupt a source with lower priority.
Source Situation 1: when USB disk is on soundbar.
| USB disk source is playing | USB disk source is not playing | Remarks | |
| Bluetooth Source | if Bluetooth source want to play, user need press play/pause button on the RALLYBAR to stop the music from USB disk, then play the music from Bluetooth source | Bluetooth source can break-in directly | Control buttons (PLAY /PAUSE, VOLME +; VOLUME -) on soundbar will control the USB disk source |
| AUX-in Source | Need press play/pause button on RALLYBAR to stop the music from USB Disk and play the music from Aux-in source directly | Aux-in source can break-in and play directly. |
Source Situation 2: when there is Bluetooth connection on soundbar.
| Bluetooth source is playing | Bluetooth source is not playing | Remarks | |
| USB disk Source | 1. plug in the USB disk, the music from USB disk will start playing directly2. if USB disk already on RALLYBAR and Bluetooth source is playing, Pressing play/pause button on the RALLYBAR will stop the Bluetooth music and play the music from USB disk | USB disk source can break-in directly | Control buttons (PLAY /PAUSE, VOLME +; VOLUME -) on soundbar will control the USB disk source |
| AUX-in Source | Need press play/pause button on RALLYBAR to stop the music from Bluetooth source and play the music from Aux-in source directly | Aux-in source can break-in and play directly. | Control buttons (PLAY /PAUSE, VOLME +; VOLUME -) on soundbar will control the Bluetooth source |
Source Situation 3: When there is AUX-IN connection on soundbar.
| AUX-IN source is playing | AUX-IN source is not playing | |
| USB Disk Source | USB disk can break in and play directly | |
| Bluetooth Source | Bluetooth source can break-in and play directly. | |
7. ADVANCED USAGE
7.1 MAP Lights Effect
Short Press 📍 switch MAP lights effect: Map Lights on at 100% brightness, Map Lights on at 50% brightness, Off

text_image
map light 100% brightness 50% brightness MAP light off x1 x1 x17.2 RGB Lights Effect
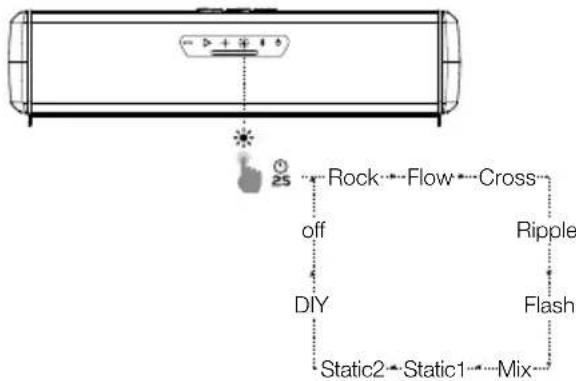
Press button and hold for 2 seconds to select your preferred lights patterns: Rock -> Flow -> Cross -> Ripple -> Flash -> Static1 -> Static2 -> Mix -> DIY -> OFF
flowchart
graph TD
    A["Game Engine"] --> B["Rock"]
    A --> C["Flow"]
    A --> D["Cross"]
    A --> E["Ripple"]
    A --> F["Flash"]
    A --> G["Mix"]
    A --> H["Static2"]
    A --> I["Static1"]
    A --> J["DIY"]
    A --> K["off"]
    style A fill:#f9f,stroke:#333
    style B fill:#ccf,stroke:#333
    style C fill:#ccf,stroke:#333
    style D fill:#ccf,stroke:#333
    style E fill:#cfc,stroke:#333
    style F fill:#fcc,stroke:#333
    style G fill:#fcc,stroke:#333
    style H fill:#cff,stroke:#333
    style I fill:#cff,stroke:#333
    style J fill:#ffc,stroke:#333
    style K fill:#ffc,stroke:#333
text_image
JBL RGB Light| Button Press Behaviors | ||
| RGB Light pattern change | ||
| Turn off RGB light | ||
Notes:
- Press and hold the ▶ and ● buttons simultaneously 2 seconds to quickly turn off the RGB lights on front.
- The DIY pattern will be your latest saved Pattern based on your RGB Light DIY setting
7.3 RGB Lights Brightness Setting
text_image
JBL RGB Light - ▷ + * * *| Button Press Behaviors | ||
| RGB Light Brightness Setting Mode | ||
Button Backlights Status

| Off | Power off |
| White (Constant) | In operation mode |
| White (Flashing) | 1. In RGB Light DIY menu mode2. In RGB Brightness menu mode |
RGB Light Brightness Adjustment Level
Level 1: Minimal
Level 2: 50% Brightness
Level 3: 70% Brightness
Level 4: Max Brightness
- Press and hold+ and buttons simultaneously 2 seconds to enter or exit from RGB lights brightness menu mode
- Short press + to increase the brightness level; press to decrease from current brightness level
- press ▷ to save the Brightness selection and exit from the Brightness menu mode
Notes:
- When in RGB lights brightness menu mode, the backlights of the +, and buttons will be white flashing status.
- There are 4 levels brightness selection: Minimal, 50%, 70%, Max
- The brightness level selection is for all RGB lights patterns.
- If there is no action in the brightness menu mode over 2 minutes, RGB lights brightness menu mode will automatically exit but brightness adjustment will not be saved.
-Press + and buttons simultaneously 2 seconds to exist, brightness adjustment will not be saved. - Only press ▶ button to confirm, then the brightness adjustment could be finally saved.
- If press the main power switch to shut down the speaker directly, the brightness adjustment will not be saved properly for next time usage, only user press the power button to enter the deep standby mode first then press the main power switch to shut down power, then DIY setting will be finally saved.
7.4 RGB Lights DIY Setting
text_image
IBL RGB Light| Button Press Behaviors | ||
| + | 2S | RGB Light DIY Setting Mode |
Button Backlights Status

| Off | Power off |
| White (Constant) | In operation mode |
| White (Flashing) | In RGB Light DIY menu modeIn RGB Brightness menu mode |

| Off | Power off |
| White (Constant) | In operation mode |
| Blue (Constant) | In RGB Light DIY menu mode |
| Light Pattern | 1. Rock2. Flow3. Cross4. Ripple5. Static6. Mix | Primary Color Zone | 1. Aquamarine2. Blue3. Green4. Orange5. Purple6. Red7. White8. Yellow9. Off | Secondary Color Zone | 1. Aquamarine2. Blue3. Green4. Orange5. Purple6. Red7. White8. Yellow9. Off |
- Press and buttons simultaneously 2 seconds to enter or exit RGB Lights DIY menu.
- Press + or buttons to choose from 6 Light pattern: Rock, Flow, Cross, Ripple, Static and Mix.
- Press ▷ button to confirm the pattern selection and enter the Primary Color Zone menu at the same time
- Press + or buttons to choose from 9 Light colors: Aquamarine, Blue, Green, Orange, Purple, Red, White, Yellow and Off.
- Press ▷ button to confirm the Primary color selection and enter the Secondary Color Zone menu at the same time.
- Press + or buttons to choose from 9 Light colors: Aquamarine, Blue, Green, Orange, Purple, Red, White, Yellow and Off.
- Press ▷ button to confirm the secondary color selection and exit RGB Lights DIY menu.
Notes:
- When in RGB lights DIY menu mode, the backlights of the +, and ▶ buttons will be white flashing status, the backlight of button will be constant Blue at the same time.
- If there is no action in the RGB lights DIY menu mode over 2 minutes, RGB lights DIY menu mode will automatically exit but DIY setting will not be saved.
-Press + and ● buttons simultaneously 2 seconds to exit, brightness adjustment will not be saved. - Only press ▶ button to confirm, then the DIY setting will be finally saved and exit.
- Latest saved DIY setting will cover the previous DIY setting, there is only one latest pattern to be saved under DIY pattern.
- If press the main power switch to shut down the speaker directly, the DIY adjustment will not be saved properly, only user press the power button to enter the deep standby mode first then press the main power switch. The DIY setting will be finally saved for next time.
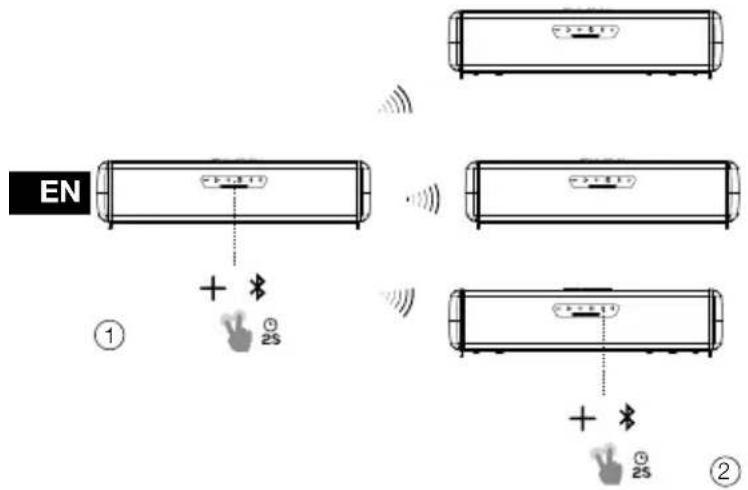
7.5 Broadcast Mode
Broadcast Mode allows you to play your audio through multiple soundbar speakers. The backlights of + button will be constant blue when soundbar on Broadcast Mode
Button Backlights Status

| Blue (Constant) | Broadcast mode on |
- Press and buttons simultaneously 2 seconds to enter or exit Broadcast mode.
- Repeat Step 1 for all additional soundbars.
- When in broadcast mode the backlight of + button will be constant blue status.
text_image
EN ① + * 0 25 ②Notes:
- Broadcast Mode is compatible with AUX-IN, USB-Disk and Bluetooth input sources.
- Both audio and the RGB light will synchronize on broadcast mode
- Local source (Bluetooth/AUX-IN&USB) can break-in broadcasting mode: Secondary soundbar receives music from other soundbar only when local source not playing on Secondary soundbar
- In Broadcast mode, only the Primary soundbar will synchronize the volume or RGB light change to other soundbar, while the Secondary/third /forth.... soundbar will not synchronize the volume change to other soundbar.
- RALLYBAR can connect with RALLYBAR, RALLYBAR S and RALLYBAR XL in Broadcast mode
- Multiple soundbars Broadcast mode connect scenarios example below:
| A soundbar | B soundbar | C soundbar | Result | |
| Scenario 1 | playing music when enter broadcast mode | Not playing music when enter broadcast mode | / A is primary | B is Secondary |
| Scenario 2 | playing music when enter broadcast mode | playing music when enter broadcast mode | / Both A and B | are primary, cannot connect to each other; need one of the 2 soundbars stopping music to become secondary. |
| Scenario 3 | playing music when enter broadcast mode | playing music when enter broadcast mode | Not playing music when enter broadcast mode | Both A and B are primary, C will connect A or B randomly to become the secondary |
text_image
Technical diagram showing a cylindrical component with a central label and a plus/aster symbol below it.
7.6 Party Mode
One soundbar have simultaneous connection of up to two Bluetooth ^® devices.
text_image
Diagram showing audio signal transmission from two speakers to a rectangular device with speaker icon and control buttonsNotes:
- When turn off the soundbar speaker, it will only connect the device with the latest action automatically, user need manually connect the second device.
- Maximum 2 devices connect at same time, Last action on one of the devices will always take the control.
- Third device cannot find soundbar speaker's name when there are 2 Bluetooth devices are connected.
7.7 DEMO Mode
| Button Press Behaviors | ||
| To enter or exit DEMO mode | ||
To enter or exit from DEMO MODE, press and hold "Bluetooth"&"play/pause" button at same time 5 seconds
NOTES:
- Only AUX audio can work, USB & Bluetooth is disabled
- Long Press light button will switch to next pattern. short press for MAP lights turn on/off/50%
Every 30 seconds, auto switch to next light pattern in following sequences:
Rock -> Flow -> Cross -> Ripple -> Flash -> Static1 -> Static2 -> Mix if no action for 1 hours, device will auto switch to default pattern Rock
7.8 DEEP STANDBY MODE
The product will enter into Deep standby mode
- If there is no Bluetooth connection and there is no any action over 15 minutes.
- If there is Bluetooth connection and there is no any action over 1 hour.
Note:
- Power button's backlight is on white and slow flash status and rest buttons' backlights are off, if product is on Deep standby mode
- The MAP light can be turned on or off in Deep standby mode, while if there is no any button press action over 15 minutes, MAP lights will shut-off automatically.
- Press the power button, the product will exist from deep standby mode
7.9 FACTORY RESET
To restore the factory settings, Press and buttons simultaneously 10 seconds.
7.10 Firmware Upgrade Service
text_image
Diagram of an electronic device showing internal components and a USB connection to a USB port, with a note indicating the USB signal.| Button Press | Behaviors | ||
| Firmware version check | |||
| + * |  | firmware upgrade | |
- Firmware Version Check:
When main power switch is on and soundbar in operation mode, Press and hold "volume down" & "BT" button at same time over 10 seconds, the machine voice out the firmware version number
- Firmware Upgrade by U Disk (Flash drive)
1) Download the latest firmware to a USB stick (the USB Disk file system need to be FAT32 or FAT16) and plug the USB Stick into USB port.
2) Make sure the main power switch is off. Press and hold the "volume up" & "BT" button at same time then turning on the main power switch, after 1 second, release hand from the "volume up" & "BT" buttons to trigger the firmware upgrade.
Note:
- You can download the latest firmware on JBL Website (www.JBL.com) If there is new firmware release
- SPECIFICATION
| RALLYBAR RALLYBAR $ RALLYBAR XL | |||
| Product Description | 21" Bluetooth® Universal Outdoor Vehicle Soundbar with LED lights and 150Wrms amplifier | 21" Bluetooth® Universal Outdoor Vehicle Soundbar with 150Wrms amplifier | 35" Bluetooth® Universal Outdoor Vehicle Soundbar with LED lights and 300Wrms amplifier |
| Transducers: | 4 x 2.75" (70mm) woofers;2 x 1" (25mm) Tweeters;2 x 7.2" (182.8mm) x 3" (76.2mm) Racetrack Passive Radiators | 4 x 2.75" (70mm) woofers;2 x 1" (25mm) Tweeters;2 x 7.2" (182.8mm) x 3" (76.2mm) Racetrack Passive Radiators | 8 x 2.75" (70mm) woofers;2 x 1" (25mm) Tweeters;4 x 7.2" (182.8mm) x 3" (76.2mm) Racetrack Passive Radiators |
| Output Power: | 150WRMS; 300W PEAK (IEC60268) | 150WRMS; 300W PEAK (IEC60268) | 300WRMS; 600W PEAK (IEC60268) |
| THD at Rated RMS Power: <1% <1% <1% | |||
| Voltage Range: 9.6 - 16VDC | 9.6 - 16VDC 9.6 - 16VDC | ||
| Quiescent Current Draw: | <0.9A | <0.9A | <0.9A |
| Maximum Current Draw: | 25A 25A 40A | ||
| Frequency response: | 45Hz-40kHz 45Hz-40kHz 45Hz-40kHz | ||
| Signal-to-noise Ratio: | >80 dB >80 dB >80 dB | ||
| Cable type | 12AWG. | 12AWG. | 10 AWG. |
| Cable length | 12 Feet (3.66m) | 12 Feet (3.66m) | 12 Feet (3.66m) |
| Bluetooth® Version | 5.3 | 5.3 | 5.3 |
| Bluetooth® Profile | A2DP V1.3, AVRCP V1.6 | A2DP V1.3, AVRCP V1.6 | A2DP V1.3, AVRCP V1.6 |
| Bluetooth® transmitter frequency range | 2400 MHz - 2483.5 MHz | 2400 MHz - 2483.5 MHz 2400 MHz | - 2483.5 MHz |
| Bluetooth® transmitter power | ≤ 15 dBm (EIRP) | ≤ 15 dBm (EIRP) | ≤ 15 dBm (EIRP) |
| Aux-In | 2Vrms (0.35Vrms - 2Vrms);4Vrms (0.7Vrms - 4Vrms);6Vrms (1.05Vrms - 6Vrms):(3.5 mm connector) | 2Vrms (0.35Vrms - 2Vrms);4Vrms (0.7Vrms - 4Vrms);6Vrms (1.05Vrms - 6Vrms):(3.5 mm connector) | 2Vrms (0.35Vrms - 2Vrms);4Vrms (0.7Vrms - 4Vrms);6Vrms (1.05Vrms - 6vrms):(3.5 mm connector) |
| Aux-Out | 2 Vrms (3.5 mm connector) | 2 Vrms (3.5 mm connector) | 2 Vrms (3.5 mm connector) |
| USB Drive File System | FAT16, FAT32 | FAT16, FAT32 | FAT16, FAT32 |
| USB Drive Maximum Capacity | 64GB | 64GB | 64GB |
| Soundbar Housing Dimension (L x W x H) | 21-5/32" x 5" x 4-5/8"(537.5 x 126.7 x 118mm) | 21-5/32" x 5" x 4-5/8"(537.5 x 126.7 x 118mm) | 35-11/32" x 5" x 4-5/8"(897.5 x 126.7 x 118mm) |
| Soundbar Dimension (L x W x H) | 21-5/32" x 5-5/16" x 4-5/8"(537.5 x 135.2 x 118mm) | 21-5/32" x 5-5/16" x 4-5/8"(537.5 x 135.2 x 118mm) | 35-11/32" x 5-5/16" x 4-5/8"(897.5 x 135.2 x 118mm) |
| Soundbar Weight | 11.57 lbs (5.25 kg) | 11.46 lbs (5.2 kg) | 20.83 lbs (9.45 kg) |
| Packaging dimensions (W x H x D) | 24" x 9" x 7.6"(611 x 229 x 193mm) | 24" x 9" x 7.6"(611 x 229 x 193mm) | 38.2" x 9" x 7.6"(971 x 229 x 193mm) |
| Gross weight | 17.14 lbs (7.79 kg) | 17 lbs (7.74 kg) | 27.5 lbs (12.52 kg) |
9. TROUBLESHOOTINGS
Caution:
- Never try to repair the product by yourself. If you have any problems while using this product, check the following points before you request service.
| Problem Causes and | Solutions |
| No sound (Standby indicator is off) • | Check that the soundbar's +12V and GND connections have been properly made.• Check if the fuse on the +12V wire located near the battery is blown; if so, replace it with an identical fuse. |
| No sound from the speaker • Ensure | that the soundbar is powered on and operation mode is on• Adjust volume.• Ensure that a sound source is active and not muted. |
| Bluetooth device cannot connect with the soundbar | • Ensure that the Bluetooth function of the device is enabled.• The soundbar is already connected with another Bluetooth device. Hold ➤ button on the soundbar for more than 5 seconds to disconnect and pair with a new device. |
| Poor audio quality from a connected Bluetooth device. | The Bluetooth reception is poor. Move the device closer to the soundbar, or remove any obstacle between the device and the soundbar. |
| No response from some buttons | The product may be in demo mode. In demo mode, all the USB&Bluetooth input sources and buttons except ➤ are disabled. Hold ➤ and simultaneously for more than 5 seconds to exit. |
| USB DISK FIRMWARE Upgrade failed and soundbar get brick or Soundbar hang up after unplugging U-disk during upgrading process | In this case, please re-do the firmware upgrade process again to make the soundbar work: make main power switch off. Press and hold the “volume up” & “BT” button at same time then turning on the main power switch, after 1 second, release hand from the “volume up” & “BT” buttons to trigger the firmware upgrade. |
| Cannot auto resume USB music after deep stand by or main power on/off | Press play/pause button to resume soundtrack play from USB disk |
TABLE DES MATIÈRES
- INTRODUCTION....12
- CONTENU DE LA BOÎTE....12
- INSTALLATION DU PRODUIT....12
text_image
Diagram showing various electrical components and symbols with labels like 'x1', 'x2', and connection points.3. INSTALLATION DU PRODUIT
text_image
21-5/32" (537.5mm) 5" (126.7mm) 4-5/8" (118mm) 5-5/16" (135.2mm)RALLYBAR XL
text_image
35-11/32" (897.5mm) 5" (126.7mm) 4-5/8" (118mm) 5-5/16" (135.2mm)natural_image
Pure technical diagram of a mechanical assembly with no text, numbers, or symbolsnatural_image
Technical line drawing of a mechanical device with cylindrical body and rectangular housing (no text or symbols)text_image
Technical diagram showing exploded view of a battery pack with labeled components and partstext_image
2" 2" + =Option 2 :

text_image
1.75" + = 1.75"Option 3 :
text_image
1.75" + = 1.5"text_image
Technical diagram showing a mechanical assembly with labeled components and directional arrows indicating assembly or movement.
natural_image
Technical line drawing of a mechanical assembly with two views (one showing internal components, one showing external housing), no text or symbols present.
text_image
Technical diagram of a mechanical device with labeled components and angular measurements, including a FR component inset.natural_image
Simple line drawing of a string with a hook and a numbered label (1) at the bottom right, no text or symbols present.text_image
→ + * * ×1 ③text_image
Technical diagram of an electrical switchgear box with numbered components for identification- USB
text_image
Diagram showing internal components of an electronic device with USB and music device connectionsFormats audio reconnus
| Extension | Codec Fréquence | d'échantillonnage | Débit binaire |
| WAV PCM | 44,1 kHz - 192 kHz < 5 Mb | it/s | |
| LPCM | 44,1 kHz - 192 kHz < 5 Mbit/s | ||
| Extension | Codec Fréquence | d’échantillonnage | Débit binaire |
| MP3 MPEG | 1 layer1/2/3 32 kHz | - 48 kHz 32 kbit/s - | 320 kbit/s |
| MPEG2 layer1/2/3 | 16 kHz - 24 kHz 8 kbit/s - | 160 kbit/s | |
| MPEG 2.5 layer 3 8 | kHz - 12 kHz 8 kbit/s - | 160 kbit/s |
Conseil :
-
Rock
-
Flow
-
Cross
-
Ripple
-
Static
-
Mix

-
Aigue-marine
-
Bleu
-
Vert
-
Orange
-
Violet
-
Rouge
-
Blanc
-
Jaune
-
Éteint

-
Aigue-marine
-
Bleu
-
Vert
-
Orange
-
Violet
-
Rouge
-
Blanc
-
Jaune
-
Éteint
FR
text_image
Diagram illustrating wireless signal transmission between two devices, showing 25s hand signals and signal waves.Remarques :
text_image
Diagram showing two devices with wireless signals, one emitting sound waves to the other, connected by a device panel.Remarques :
text_image
Diagram showing internal components of an electronic device with USB and music player connectionsFR
- INTRODUKTION......22
- HVAD ER DER I ÅESKEN 22
- INSTALLATION AF PRODUKTET 22
3.1 Produktets mål 22
3.2 Montering af produktet 22
- LEDNINGSF∅RING OG TÆNDING 24
4.1 LEDNINGSF∅RING 24
4.2 Tænd....24
- PRODUKTOVERSIGT 24
5.1 Sidepanel....24
5.2 Bundpanel 24
- BRUG AF DIN RALLYBAR....25
6.1 Bluetooth-forbindelse 25
6.2 USB-forbindelse.... 25
6.3 AUX-forbindelse 25
6.4 Prioritet for kilden 26
- AVANCERET BRUG 26
7.1 MAP-lyseffekt....26
7.2 RGB-lys-effekt 27
7.3 Indstilling af RGB-lysets lysstyrke 27
7.4 Indstilling af DIY-RGB-lys....27
7.5 Broadcast-tilstand....28
7.6 Party-tilstand....28
7.7 DEMO-tilstand 28
7.8 DYB STANDBYTILSTAND 29
7.9 NULSTILLING 29
7.10 Firmwareopgradering 29
- SPECIFICATIONER....29
- FEJLFINDING 30
1. INTRODUKTION
text_image
Diagram showing various electronic components and symbols with labels like 'x1', 'x2', and '×1' for different types of devices or connectors.3. INSTALLATION AF PRODUKTET
3.1 Produktets mål
RALLYBAR&RALLYBAR S
text_image
21-5/32" (537.5mm) 5" (126.7mm) 4-5/8" (118mm) 5-5/16" (135.2mm)RALLYBAR XL

text_image
35-11/32" (897.5mm) 5" (126.7mm) 4-5/8" (118mm) 5-5/16" (135.2mm)natural_image
Pure mechanical assembly diagram showing a rectangular component with mounting brackets and a central label (no text or symbols)natural_image
Technical line drawing of a mechanical device with cylindrical body and internal components (no text or symbols)3) Monteringstrin
text_image
Technical diagram showing exploded view of a refrigerant air conditioner unit with labeled parts and component detailstext_image
2" 2" + =Mulighed 2:

text_image
1.75" + = 1.75"Mulighed 3:

text_image
1.75" + = 1.5"Trin 4 - Monter soundbaren på stangen.
text_image
Technical diagram showing a mechanical assembly with labeled components and directional arrows indicating assembly or movement.
natural_image
Technical line drawing of a mechanical device with two views of internal components (no text or symbols)
text_image
Technical diagram of a mechanical device with labeled components and angular measurements, including a 180° angle and 90°/270° reference.natural_image
Simple line drawing of a string with a loop and a numbered label (1), no text or symbols present.text_image
>2"(50mm) AF4. LEDNINGSF∅RING OG TÆNDING
4.1 LEDNINGSF∅RING
natural_image
Technical line drawing of a device rear panel with buttons and ports (no text or symbols)
text_image
RALLYBAR / RALLYBAR S-25A RALLYBAR XL-40A Sikringsholder 46 cm Batteri Chassisjord (–)4.2 Tænd
text_image
→ + * * ③ ×1text_image
Technical diagram of an electrical outlet with numbered components for identification- USB
- Tilslut en USB-lagerenhed.
- Aux-ind
text_image
Diagram of an electronic device showing internal components and a USB connection to a USB port, with a note indicating music playback.text_image
USB RGB-Iy5text_image
USB RGB-lys| Knap Tryk Funktion | ||
| + | 2S | RGB-lys DIY-indstillingstilstand |
Status for knapbaggrundsbelysning
| Sluk | Sluk |
| Hvidt (konstant) | I driftstilstand |
| Hvidt (blinker) | I RGB-lys DIY-menutilstandI RGB-lysstyrke-menutilstand |

7.5 Broadcast-tilstand
text_image
Diagram illustrating wireless signal transmission between two devices, showing + and - symbols with 25-second intervals.Bemærk:
text_image
Diagram showing wireless signal transmission between two devices with a speaker icon and power linesBemærk:
Rock -> Flow -> Cross -> Ripple -> Flash -> Static1 -> Static2 -> Mix
text_image
Diagram of an electronic device showing internal components and a USB connection to a device with music note.| Knap Tryk Funktion | ||
| Kontrol af firmwareversion | ||
| Firmwareopgradering | ||
- Kontrol af firmwareversion:
RALLYBAR & RALLYBAR S
text_image
21-5/32" (537.5mm) VSL 5" (126.7mm) 4-5/8" (118mm) 5-5/16" (135.2mm)RALLYBAR XL

text_image
35-11/32" (897.5mm) 5" (126.7mm) 4-5/8" (118mm) 5-5/16" (135.2mm)natural_image
Pure technical diagram of a mechanical assembly with no text, numbers, or symbolsnatural_image
Technical line drawing of a mechanical device with cylindrical body and internal components (no text or symbols)3) Montageschritte
RALLYBAR & RALLYBAR S
text_image
3 4 3 4 1 2 1 2RALLYBAR XL

text_image
5 6 7 8 1 2 3 4 5 6 7 8 1 2 3 4text_image
Technical diagram showing exploded view of a battery pack with labeled components and partstext_image
2" 2" + =Option 2:
text_image
1.75" + = 1.75"Option 3:
text_image
1.75" + = 1.5"natural_image
Technical line drawing of a mechanical device with two cylindrical components and a base housing (no text or symbols)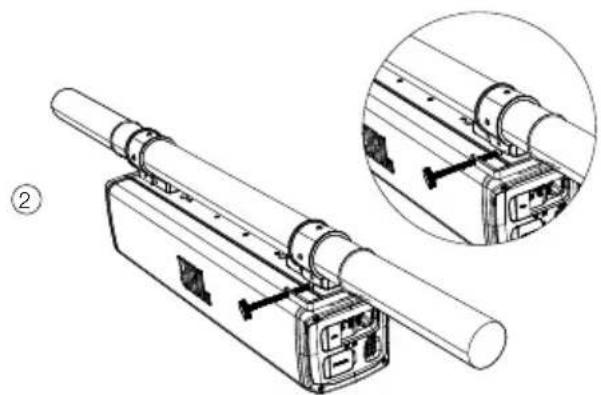
natural_image
Technical line drawing of a mechanical device with two views of internal components (no text or symbols)
text_image
Technical diagram of a mechanical device with labeled components and angular measurements, including a 180° angle indicator.natural_image
Simple line drawing of a string with a loop and a numbered label (1), no text or symbols present.text_image
= ▷ + + + + ×1 ③text_image
Technical diagram of an electrical switchgear box with numbered components for identification- USB
text_image
① ② ③ ④ ⑤ ⑥ ⑦ ○ ① ▶ + * -text_image
Bluetooth Bluetooth DEVICES JBL RALLYBAR JBL RALLYBAR S JBL RALLYBAR XLtext_image
Diagram of an electronic device showing internal components and USB connection to a USB port, with a note indicating music playback.- Rock
- Flow
- Cross
- Ripple
- Static
- Mix

text_image
Diagram illustrating two device configurations with labeled components and signal waves, including hand icons and 25-second mark indicators.Hinweise:
text_image
Diagram showing two electronic components connected to a cylindrical device with signal waves and a display screen labeled with power and resistance symbols.Hinweise:
text_image
Diagram of an electronic device showing internal components and a USB connection to a USB port, with a note indicating the USB signal.text_image
21-5/32" (537.5mm) VSL 5" (126.7mm) 4-5/8" (118mm) 5-5/16" (135.2mm)RALLYBAR XL
text_image
35-11/32" (897.5mm) 5" (126.7mm) 4-5/8" (118mm) 5-5/16" (135.2mm)natural_image
Pure mechanical assembly diagram showing a rectangular component with mounting brackets and a central label (no text or symbols)natural_image
Technical line drawing of a mechanical device with cylindrical body and internal components (no text or symbols)RALLYBAR Y RALLYBAR S
text_image
3 4 3 4 2 1 2RALLYBAR XL

text_image
5 6 7 8 1 2 3 4 5 6 7 8 1 2 3 4text_image
Technical diagram showing exploded view of a refrigerant air conditioner unit with labeled components and partstext_image
2" 2" + =Opción 2:
text_image
1.75" + = 1.75"Opción 3:

text_image
1.75" + = 1.5"natural_image
Technical line drawing of a mechanical device with two circular components and a cylindrical shaft (no text or symbols)
natural_image
Technical line drawing of a mechanical device with two views of internal components (no text or symbols)
text_image
Technical diagram of a mechanical device with labeled components and angular measurements, including a 180° angle and 90°/270° reference.natural_image
Simple line drawing of a string with a loop and a curved arrow, no text or symbols presenttext_image
>2"(50mm) AF4. CABLEADO Y ENCENDIDO
4.1 CABLEADO
text_image
= ▷ + + + + ×1 ③text_image
Technical diagram of an electrical switchgear box with numbered components and labeled ports- USB
text_image
Bluetooth Bluetooth DEVICES JBL RALLYBAR JBL RALLYBAR S JBL RALLYBAR XL- Rock
- Flow
- Cross
- Ripple
- Static
- Mix

text_image
Diagram illustrating wireless signal transmission between two devices, showing 25s hand signals and signal waves.Notas:
text_image
Diagram showing two devices with signal icons and a central display panel, likely illustrating audio or sound system concepts.Notas:
Rock -> Flow -> Cross -> Ripple -> Flash -> Static1 -> Static2 -> Mix
text_image
Diagram of an electronic device showing internal components and a USB connection to a USB port, with a note indicating music playback.ES
- TEKNISET TIEDOT....59
- VIANMÄÄRITYS 60
1. ESITTELY
text_image
21-5/32" (537.5mm) 5" (126.7mm) 4-5/8" (118mm) 5-5/16" (135.2mm)RALLYBAR XL

text_image
35-11/32" (897.5mm) 5" (126.7mm) 4-5/8" (118mm) 5-5/16" (135.2mm)natural_image
Pure technical diagram of a mechanical assembly with no text, numbers, or symbolsnatural_image
Technical line drawing of a mechanical device with cylindrical body and internal components (no text or symbols)text_image
Technical diagram showing exploded view of a refrigerant air conditioner unit with labeled components and partstext_image
2" 2" + =Vaihtoehto 2:

text_image
1.75" + = 1.75"Vaihtoento 3:
text_image
1.75" + = 1.5"natural_image
Technical line drawing of a mechanical device with two circular components and a cylindrical shaft (no text or symbols)
natural_image
Technical line drawing of a mechanical device with two views of internal components (no text or symbols)
text_image
Technical diagram of a mechanical device with labeled components and angular measurements, including a 180° angle and 90°/270° reference.natural_image
Simple line drawing of a string with a loop and a numbered label (1), no text or symbols present.text_image
Technical diagram of an electrical switchgear box with numbered components and labeled ports- USB
text_image
Diagram of an electronic device showing internal components and a USB connection to a USB jack, with a note indicating music.- Rock
- Flow
- Cross
- Ripple
- Static
- Mix
text_image
Diagram illustrating wireless signal transmission between two devices, showing 25s hand icons and signal waves.Huomautuksia:
text_image
Diagram showing wireless signal transmission between two devices with speaker icons and a control panelHuomautuksia:
7.8 SYVÄ VALMIUSTILA
text_image
Diagram showing internal components of an electronic device with USB and music player connections- CABLAGGIO ED ACCENSIONE....64
4.1 CABLAGGIO 64
4.2 Accensione 64
- PANORAMICA DEL PRODOTTO 64
5.1 Pannello laterale....64
5.2 Pannello inferiore....65
- UTILIZZO DELLA RALLYBAR....65
text_image
21-5/32" (537.5mm) 5" (126.7mm) 4-5/8" (118mm) 5-5/16" (135.2mm)RALLYBAR XL

text_image
35-11/32" (897.5mm) 5" (126.7mm) 4-5/8" (118mm) 5-5/16" (135.2mm)natural_image
Pure technical diagram of a mechanical assembly with no text, numbers, or symbolsnatural_image
Technical line drawing of a mechanical device with cylindrical body and internal components (no text or symbols)text_image
Technical diagram showing exploded view of a refrigerant air conditioner unit with labeled components and partstext_image
2" 2" + =Opzione 2:

text_image
1.75" + = 1.75"Opzione 3:
text_image
1.75" + = 1.5"natural_image
Technical line drawing of a mechanical device with two circular components and a cylindrical shaft (no text or symbols)
natural_image
Technical line drawing of a mechanical assembly with two views (one showing internal components, one showing external assembly), no text or symbols present.
text_image
Technical diagram of a mechanical device with labeled components and angular measurements, including a 180° angle indicator.natural_image
Simple line drawing of a string with a loop and a hook, no text or symbols present4. CABLAGGIO ED ACCENSIONE
4.1 CABLAGGIO
text_image
Diagram of a device panel with labeled buttons and a finger icon indicating '×1' operationtext_image
Diagram of an electrical switchgear box with numbered components and labeled ports- USB
text_image
① < 10 m (33 ft) ② Bluetooth Bluetooth DEVICES JBL RALLYBAR JBL RALLYBAR S JBL RALLYBAR XLtext_image
Diagram of an electronic device showing internal components and a USB connection to a USB port, with a note indicating music.text_image
Diagram illustrating sound wave propagation between two devices, showing signal waves and hand gestures with 25 dB mark indicators.Note:
text_image
Diagram showing two devices with wireless signals, one emitting sound waves to the other, labeled with speaker icons and text.Note:
Rock -> Flow -> Cross -> Ripple -> Flash -> Static1 -> Static2 -> Mix
text_image
Diagram of an electronic device showing internal components and a USB connection to a USB port, with a note indicating music playback.text_image
Diagram showing various electrical components and symbols with labels like 'x1', 'x2', and '×1' for different types of devices or connectors.3. PRODUCTINSTALLATIE
RALLYBAR & RALLYBAR S
text_image
21-5/32" (537.5mm) 5" (126.7mm) 4-5/8" (118mm) 5-5/16" (135.2mm)RALLYBAR XL

text_image
35-11/32" (897.5mm) 5" (126.7mm) 4-5/8" (118mm) 5-5/16" (135.2mm)3.2 Product monteren
1) Bovenaanzicht montage
natural_image
Pure mechanical assembly diagram showing a rectangular component with mounting brackets and a central label (no text or symbols)natural_image
Technical line drawing of a mechanical device with cylindrical body and internal components (no text or symbols)3) Montagestappen
RALLYBAR & RALLYBAR S
text_image
3 4 3 4 1 2 1 2RALLYBAR XL

text_image
5 6 7 8 1 2 3 4 5 6 7 8 1 2 3 4text_image
Technical diagram showing exploded view of a refrigerant air conditioner unit with labeled components and partstext_image
2" 2" + =Optie 2:

text_image
1.75" + = 1.75"Optie 3:

text_image
1.75" + = 1.5"natural_image
Technical line drawing of a mechanical device with two circular components and a cylindrical shaft (no text or symbols)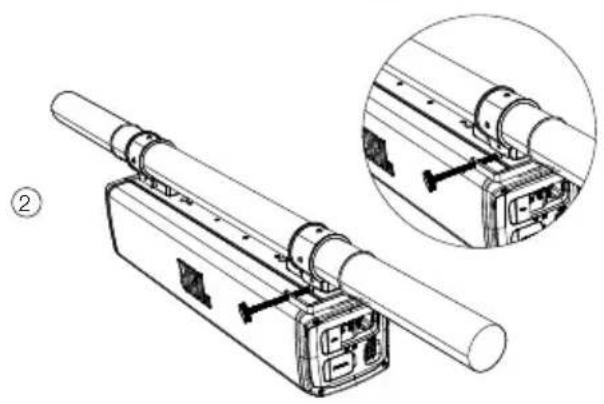
natural_image
Technical line drawing of a mechanical assembly with two views (one showing internal components, one showing external components) and no visible text or symbols.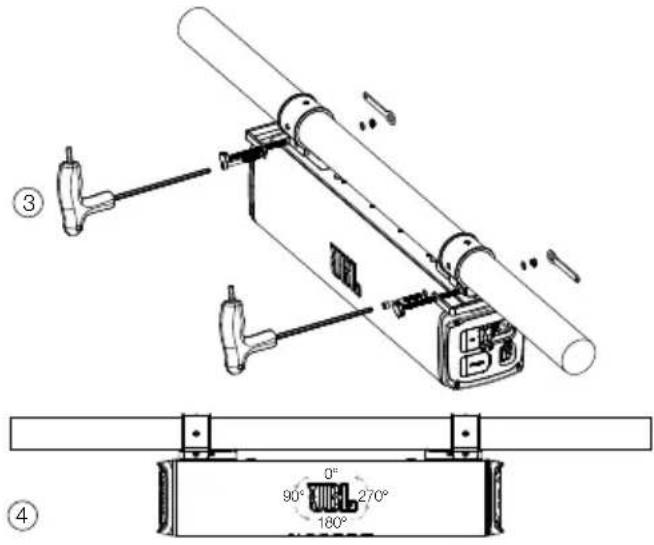
text_image
Technical diagram of a mechanical device with labeled components and angular measurementsnatural_image
Simple line drawing of a string with a loop and a numbered label (1), no text or symbols present.text_image
>2"(50mm) AF4. BEDRADING EN STROOM AAN
4.1 BEDRADING
text_image
Technical diagram of an electrical switchgear box with numbered components and labeled ports- USB
text_image
Diagram of an electronic device showing internal components and a USB connection to a USB device with music notes.Opmerkingen:
-
Rock
-
Flow
-
Cross
-
Ripple
-
Static
-
Mix
Primaire kleurzone
text_image
Diagram illustrating sound wave propagation between two rectangular devices, with labeled components and signal icons.Opmerkingen:
text_image
Diagram showing two connected devices with signal waves, one labeled with a speaker icon and text 'D + E B h'Opmerkingen:
Rock -> Flow -> Cross -> Ripple -> Flash -> Static1 -> Static2 -> Mix
7.10 Firmware-upgradeservice
text_image
Diagram of an electronic device showing internal components and a USB connection to a USB port, with a note indicating music playback.- Firmware-upgrade door U Disk (flashstation)
NL 9. PROBLEEMOPLOSSING
Voorzorg:
- INNLEDNING....82
- ESKENS INNHOLD 82
- INSTALLERING AV PRODUKTET 82
text_image
Diagram showing various electrical components and symbols with labels like 'x1', 'x2', and '×1' indicating different types of devices or connectors.RALLYBAR OG RALLYBAR S
text_image
21-5/32" (537.5mm) 5" (126.7mm) 4-5/8" (118mm) 5-5/16" (135.2mm)RALLYBAR XL
text_image
35-11/32" (897.5mm) 5" (126.7mm) 4-5/8" (118mm) 5-5/16" (135.2mm)natural_image
Pure technical diagram of a mechanical assembly with no text, numbers, or symbols2) Bakmontert

natural_image
Technical line drawing of a mechanical device with cylindrical body and internal components (no text or symbols)3) Monteringstrinn
Trinn 1 - Velg klemmenes monteringsposisjoner på lydplanken.
RALLYBAR OG RALLYBAR S
text_image
3 4 3 4 1 2 1 2RALLYBAR XL

text_image
5 6 7 8 1 2 3 4 5 6 7 8 1 2 3 4Trinn 2- Sett klemmen på lydplanken
text_image
Technical diagram showing exploded view of a refrigerant air conditioner unit with labeled components and partsTrinn 3 - Velg C-klemmer og gummibånd utfra stangstørrelsen.
Alternativ 1:

text_image
2" 2" + =Alternativ 2:

text_image
1.75" + = 1.75"Alternativ 3:

text_image
1.75" + = 1.5"Trinn 4 - Monter lydplanken på stangen.

natural_image
Technical line drawing of a mechanical device with two circular components and a cylindrical shaft (no text or symbols)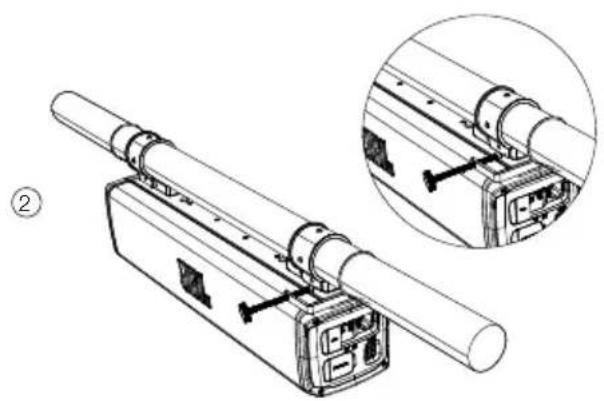
natural_image
Technical line drawing of a mechanical assembly with two views (one showing internal components, one showing external components) and no visible text or symbols.
text_image
Technical diagram of a mechanical device with labeled components and angular measurements, including a 180° angle and 90°/270° reference.Merknader: JBL-logoemblemet kan roteres.
natural_image
Simple line drawing of a string with a loop and a curved arrow, no text or symbols presenttext_image
Technical diagram of an electrical switchgear box with numbered components for identification- USB
- Koble til en USB-lagringsenhet.
- Aux-inn
text_image
Diagram of an electronic device showing internal components and a USB connection to a USB jack, with musical notes visible.Merknader:
text_image
JBL RGB-lys7.4 DIY-innstilling for RGB-lys
text_image
JBL RGB-lys| Knapp Presse Atferd | ||
| + | 2S | DIY-innstillingsmodus for RGB-lys |
text_image
Diagram illustrating sound wave propagation between two devices, showing signal waves and hand gesture icons with 25-second intervals.Merknader:
- Strommemodus er kompatibelt med inngangskildene AUX-INN, USB-disk og Bluetooth.
-
Både lyd og RGB-lys synkroniseres i strømmemodus
-
Lokal kilde (Bluetooth/AUX-INN og USB) kan overstyre strømmemodus: Sekundær lydplanke mottar musikk fra andre lydplanker bare når en lokal kilde ikke avspilles på den sekundære lydplanken
- I kringkastingsmodus vil bare den primære lydplanken synkronisere volumet eller RGB-lyset endres til den andre lydplanken, mens den sekundære/tredje/fjerde ... lysplanken ikke synkroniserer volumendringen til andre lydplanker.
- RALLYBAR kan koble til RALLYBAR, RALLYBAR S og RALLYBAR XL i kringkastingsmodus
- Flere tilkoblingsscenarioer for lydplanker i strømmemodus nedenfor:
text_image
Diagram showing a device with two Bluetooth indicators and a speaker icon, connected to a sound wave symbol.Merknader:
text_image
Diagram of an electronic device showing internal components and a USB connection to a USB port, with a note indicating music playback.text_image
Diagram showing various electronic components and symbols with labels like 'x1', 'x2', and '×1' indicating different types of devices or connectors.PT-BR
text_image
21-5/32" (537.5mm) 5" (126.7mm) 4-5/8" (118mm) 5-5/16" (135.2mm)RALLYBAR XL

text_image
35-11/32" (897.5mm) 5" (126.7mm) 4-5/8" (118mm) 5-5/16" (135.2mm)natural_image
Pure mechanical assembly diagram showing a rectangular component with mounting brackets and a central label (no text or symbols)natural_image
Technical line drawing of a mechanical device with cylindrical body and internal components (no text or symbols)RALLYBAR e RALLYBAR S
text_image
3 4 3 4 1 2 1 2RALLYBAR XL

text_image
5 6 7 8 1 2 3 4 5 6 7 8 1 2 3 4text_image
Technical diagram showing exploded view of a refrigerant air conditioner unit with labeled components and partstext_image
2" 2" + =Opção 2:
text_image
1.75" + = 1.75"Opção 3:
text_image
1.75" + = 1.5"Passo 4 - Monte a barra no suporte.
natural_image
Technical line drawing of a mechanical device with two circular components and a cylindrical shaft (no text or symbols)
natural_image
Technical line drawing of a mechanical assembly with two views (one showing internal components, one showing external components) and no visible text or symbols.
text_image
Technical diagram of a mechanical device with labeled components and angular measurements, including a 180° angle and 90°/270° reference.natural_image
Simple line drawing of a string with a loop and a numbered label (1), no text or symbols present.text_image
BAR PT-BR ② ③text_image
Desligado Ligatext_image
▶ + * * 0 ×1 ③text_image
Technical diagram of an electrical switchgear box with numbered components and labeled ports- USB
text_image
Diagram of an electronic device showing internal components and USB connection to a USB port, with a note indicating music playback.Formatos de áudio suportados
| Extensão | Codec Taxa de | amostragem | Bitrate |
| WAV PCM | 44,1 kHz - | 192 kHz | <5 Mbps |
| LPCM 44,1 kHz - | 192 kHz | <5 Mbps | |
| MP3 MPEG1 layer 1/2/3 32 kHz | -48 kHz | 32 Kbps -320 Kbps | |
| MPEG2 layer 1/2/3 16 kHz -24 kHz | 8 Kbps -160 Kbps | ||
| MPEG2.5 layer3 8 kHz -12 kHz | 8 Kbps -160 Kbps | ||
Dica:
text_image
Diagram illustrating wireless signal transmission between two devices, showing 25s hand icons and signal waves.Observações:
text_image
Diagram showing two connected devices with signal waves, one labeled with a starburst icon and the other with a speaker symbol.Observações:
Rock -> Flow -> Cross -> Ripple -> Flash -> Static1 -> Static2 -> Mix
text_image
Diagram showing internal components of an electronic device with USB and music player connectionsINNEHÅLLSFÖRTECKNING
- INLEDNING.... 103
- DETTA FINNS I LÅDAN 103
- PRODUKTINSTALLATION 103
2. DETTA FINNS I LÅDAN
text_image
Diagram showing various electronic components and symbols with labels like 'x1', 'x2', and '×1' indicating different types of devices or connectors.text_image
21-5/32" (537.5mm) 5" (126.7mm) 4-5/8" (118mm) 5-5/16" (135.2mm)RALLYBAR XL

text_image
35-11/32" (897.5mm) 5" (126.7mm) 4-5/8" (118mm) 5-5/16" (135.2mm)3.2 Montering av produkten
1) Vy uppifrån
natural_image
Pure mechanical assembly diagram showing a rectangular component with mounting brackets and a central label (no text or symbols)2) Vy från baksidan

natural_image
Technical line drawing of a mechanical device with cylindrical body and control panel (no text or symbols)text_image
Technical diagram showing exploded view of a refrigerant air conditioner unit with labeled components and partstext_image
2" 2" + =Alternativ 2:

text_image
1.75" + = 1.75"Alternativ 3:

text_image
1.75" + = 1.5"text_image
Technical diagram of a mechanical device with labeled components and angular measurements, including a 180° angle and 90°/270° reference.natural_image
Simple line drawing of a string with a loop and a curved arrow, no text or symbols presenttext_image
AF >2"(50mm)4. KABELDRAGNING OCH STRÖM
4.1 KABELDRAGNING
text_image
Diagram of a device panel with labeled buttons and a table showing Av and På valuestext_image
→ + * * ③ ×1text_image
Technical diagram of an electrical switchgear box with numbered components for identification- USB
text_image
Diagram showing internal components of an electronic device with USB and music player connectionsObs!
text_image
Diagram of an electronic device showing internal components and USB connection to a USB port, with a note indicating music playback.text_image
JBL RGB-ljutext_image
JIBL RGB-ljusRock -> Flow -> Cross -> Ripple -> Flash -> Static1 -> Static2 -> Mix
text_image
Diagram of an electronic device showing internal components and a USB connection to a USB jack, with a note indicating the USB signal.text_image
Technical diagram showing various electrical component symbols and labels, including bulbs, switches, and a toolbar with '×1' and '×2' indicators.RALLYBAR 与 RALLYBAR S
text_image
21-5/32" (537.5mm) 5" (126.7mm) 4-5/8" (118mm) 5-5/16" (135.2mm)RALLYBAR XL

text_image
35-11/32" (897.5mm) 5" (126.7mm) 4-5/8" (118mm) 5-5/16" (135.2mm)3.2 产品安装
1) 顶部安装视图
natural_image
Pure technical diagram of a mechanical assembly with no text, numbers, or symbols2) 背面安装视图

natural_image
Technical line drawing of a mechanical component with cylindrical body and internal components (no text or symbols)3) 安装步骤
RALLYBAR 与 RALLYBAR S

text_image
3 4 3 4 1 2 1 2RALLYBAR XL

text_image
5 6 7 8 1 2 3 4 5 6 7 8 1 2 3 4ZH-CN
第 2 步:把夹板放到条形音箱上
text_image
Technical diagram showing exploded view of a battery pack with labeled components and partstext_image
2" 2" + =选项2:
text_image
1.75" + = 1.75"选项3:

text_image
1.75" + = 1.5"第 4 步:在支杆上安装条形音箱。
text_image
Technical diagram showing a mechanical assembly with labeled components and directional arrows indicating assembly steps.
natural_image
Technical line drawing of a mechanical assembly with two views (one showing internal components, one showing external components) and no visible text or symbols.ZH-CN
text_image
Technical diagram of a mechanical device with labeled components and angular measurements备注:JBL 标志徽章可以旋转。
第5步:安全绳
松开安全绳螺钉
natural_image
Simple line drawing of a string with a loop and a curved arrow, no text or symbols present拧紧安全绳螺钉
text_image
BAR ②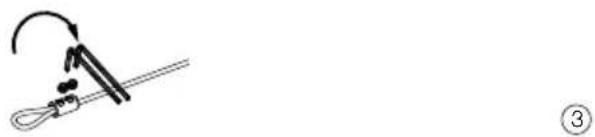
natural_image
Simple line drawing of a tool with an arrow indicating rotation (no text or symbols)text_image
>2"(50mm) AF4. 布线和通电
4.1 布线
text_image
= ▷ + * * Ⓧ ×1 ③text_image
Technical diagram of an electrical switchgear box with numbered components and Chinese labels- USB
- 连接 USB 存储设备。
- AUX-IN (辅助输入)
- Rock
- Flow
- Cross
- Ripple
- Static
- Mix
原色区域
text_image
Diagram illustrating two devices with 25-second signal transmission, showing device positions and signal patterns.注:
text_image
Diagram showing a device with a plus and minus symbol, plus an icon labeled '2S' and a hand gesture.②
7.6 派对模式
text_image
Diagram showing wireless signal transmission from two devices to a device with indicator lights and power lines注:
Rock -> Flow -> Cross -> Ripple -> Flash -> Static1 -> Static2 -> Mix
text_image
Diagram of an electronic device showing internal components and a USB connection to a USB port, with a note indicating music playback.text_image
Diagram showing various electrical components and symbols with labels like '×1' and '×2', including a car body and various switchgear.| 1x Soundbar 2x Sekrup M8 pendek | |
| 2x Kabel keamanan 2x Sekrup M5 pendek | |
| 1x Kunci kecil 2x Sekrup M5 panjang | |
| 1x Kunci L kecil 2x Mur sekrup M5 | |
| 1x Kunci T segi enam 4x Ring datar | |
| 2x Tali pengikat Velcro 2x Klem C (2") | |
| 1x Klem G 2x Klem C (1,75") | |
| 1x Gantungan kunci 2x Potongan karet tebal(untuk tiang 1,5") | |
| 1x Wire-harness daya/ground 12 kaki (3,66 m) | 2x Potongan karet tipis(untuk tiang 2" & 1,75") |
| 2x Karet pelindung atas 1x Panduan memulai cepat | |
| 2x Gerigi pemasangan 1x Lembar panduankeselamatan & kartu garansi | |
3. PEMASANGAN PRODUK
3.1 Dimensi Produk
RALLYBAR & RALLYBAR S
text_image
21-5/32" (537.5mm) 5" (126.7mm) 4-5/8" (118mm) 5-5/16" (135.2mm)RALLYBAR XL
text_image
35-11/32" (897.5mm) 5" (126.7mm) 4-5/8" (118mm) 5-5/16" (135.2mm)natural_image
Pure technical diagram of a mechanical assembly with no text, numbers, or symbols2) Tampak belakang

natural_image
Technical line drawing of a mechanical device with cylindrical body and internal components (no text or symbols)RALLYBAR & RALLYBAR S

text_image
3 4 3 4 1 2 1 2RALLYBAR XL

text_image
5 6 7 8 1 2 3 4 5 6 7 8 1 2 3 4text_image
Technical diagram showing exploded view of a refrigerant air conditioner unit with labeled parts and component detailstext_image
2" 2" + =Opsi 2:
text_image
1.75" + = 1.75"Opsi 3:

text_image
1.75" + = 1.5"text_image
Technical diagram showing a mechanical assembly with labeled components and directional arrows indicating assembly or movement.
natural_image
Technical line drawing of a mechanical device with two views of internal components (no text or symbols)
text_image
Technical diagram of a mechanical device with labeled components and angular measurements, including a 180° angle and 90°/270° reference.natural_image
Simple line drawing of a string with a loop and a numbered label (1), no text or symbols present.text_image
▶ + * * 0 ×1 ③| ●Mati | Sakelar daya utama mati | |
| Sakelar daya utama menyala- (mode Siaga Dalam) | ||
| Mode operasional aktif | ||
| Perlindungan: OVP/UVP/OTP |
5. GAMBARAN UMUM PRODUK
5.1 Panel samping
text_image
Technical diagram of an electrical switchgear box with numbered components and labeled ports- USB
text_image
① ② ③ ④ ⑤ ⑥ ⑦ ○ ▶ ▶ *text_image
① < 10 m (33 ft) ② Bluetooth Bluetooth DEVICES JBL RALLYBAR JBL RALLYBAR S JBL RALLYBAR XL| * | ● Mati | Mematikan |
| ○ Putih (Konstan) | Dalam mode operasional tanpa koneksi Bluetooth | |
| ● Biru (Konstan) | Bluetooth tersambung | |
| ○ Biru (Berkedip) | Pemasangan Bluetooth |
Catatan:
text_image
Diagram of an electronic device showing internal components and USB connection to a USB port, with a note indicating music playback.RALLYBAR RALLYBAR S RALLYBAR XL
| Keterangan Produk | Soundbar Kendaraan Luar Ruangan Universal Bluetooth ^ 21" dengan lampu LED dan amplifier 150 Wrms | Soundbar Kendaraan Luar Ruangan Universal Bluetooth ^ 21" dengan amplifier 150 Wrms | Soundbar Kendaraan Luar Ruang Universal Bluetooth ^ 35" dengan lampu LED dan amplifier 300 Wrms |
| Transduser: | 4 x woofer 2,75" (70 mm);2 x tweeter 1" (25 mm);2 x Racetrack Passive Radiators 7,2" (182,8 mm) x 3" (76,2 mm) | 4 x woofer 2,75" (70 mm);2 x tweeter 1" (25 mm);2 x Racetrack Passive Radiators 7,2" (182,8 mm) x 3" (76,2 mm) | 8 x woofer 2,75" (70 mm);2 x tweeter 1" (25 mm);4 x Racetrack Passive Radiators 7,2" (182,8 mm) x 3" (76,2 mm) |
| Daya Keluaran: | 150 WRMS; PUNCAK 300 W (IEC60268) | 150 WRMS; PUNCAK 300 W (IEC60268) | 300 WRMS; PUNCAK 600 W (IEC60268) |
| THD pada Daya RMS Terukur: | <1% <1% <1% | ||
| Rentang Tegangan: | 9,6–16 VDC | 9,6–16 VDC | 9,6–16 VDC |
| Tarikan Arus Diam: | <0,9 A | <0,9 A | <0,9 A |
| Tarikan Arus Maksimum: | 25 A | 25 A | 40A |
| Respons frekuensi: | 45 Hz–40 kHz | 45 Hz–40 kHz | 45 Hz–40 kHz |
| RALLYBAR RALLYBAR $ RALLYBAR XL | |||
| Rasio sinyal terhadap derau: | >80 dB >80 dB >80 dB | ||
| Jenis kabel 12 AWG. 12 AWG. | 10 AWG. | ||
| Panjang kabel 12 kaki (3,66 m) | 12 kaki (3,66 m) 12 kaki (3,66 m) | ||
| Versi Bluetooth® | 5.3 5.3 5.3 | ||
| Profil Bluetooth® | A2DP V1.3, AVRCP V1.6 A2DP V1.3, AVRCP V1.6 A2DP V1.3, AVRCP V1.6 | ||
| Rentang frekuensi pemancar Bluetooth® | 2400 MHz-2483,5 MHz | 2400 MHz-2483,5 MHz | 2400 MHz-2483,5 MHz |
| Daya pemancar Bluetooth® | ≤15 dBm (EIRP) ≤15 dBm (EIRP) ≤15 dBm (EIRP) | ||
| Aux-In | 2 Vrms (0,35 Vrms-2 Vrms);4 Vrms (0,7 Vrms-4 Vrms);6 Vrms (1,05 Vrms-6 Vrms):(konektor 3,5 mm) | 2 Vrms (0,35 Vrms-2 Vrms);4 Vrms (0,7 Vrms-4 Vrms);6 Vrms (1,05 Vrms-6 Vrms):(konektor 3,5 mm) | 2 Vrms (0,35 Vrms-2 Vrms);4 Vrms (0,7 Vrms-4 Vrms);6 Vrms (1,05 Vrms-6 Vrms):(konektor 3,5 mm) |
| Aux-Out | 2 Vrms (konektor 3,5 mm) | 2 Vrms (konektor 3,5 mm) | 2 Vrms (konektor 3,5 mm) |
| Sistem File Drive USB | FAT16, FAT32 | FAT16, FAT32 | FAT16, FAT32 |
| Kapasitas Maksimum Drive USB | 64 GB | 64 GB | 64 GB |
| Dimensi Kerangka Soundbar(P x L x T) | 21-5/32" x 5" x 4-5/8"(537,5 x 126,7 x 118 mm) | 21-5/32" x 5" x 4-5/8"(537,5 x 126,7 x 118 mm) | 35-11/32" x 5" x 4-5/8"(897,5 x 126,7 x 118 mm) |
| Dimensi Soundbar(P x L x T) | 21-5/32" x 5-5/16" x 4-5/8"(537,5 x 135,2 x 118 mm) | 21-5/32" x 5-5/16" x 4-5/8"(537,5 x 135,2 x 118 mm) | 35-11/32" x 5-5/16" x 4-5/8"(897,5 x 135,2 x 118 mm) |
| Berat Soundbar | 11,57 lbs (5,25 kg) | 11,46 lbs (5,2 kg) | 20,83 lbs (9,45 kg) |
| Ukuran kemasan (P x T x L) | 24" x 9" x 7,6"(611 x 229 x 193 mm) | 24" x 9" x 7,6"(611 x 229 x 193 mm) | 38,2" x 9" x 7,6"(971 x 229 x 193 mm) |
| Berat kotor 17,14 lbs (7,79 kg) | 17 lbs (7,74 kg) | 27,5 lbs (12,52 kg) | |
9. PEMECAHAN MASALAH
Perhatian:
The Bluetooth ^® word mark and logos are registered trademarks owned by Bluetooth SIG, Inc. and any use of such marks by HARMAN International Industries, Incorporated is under license. Other trademarks and trade names are those of their respective owners.


FR