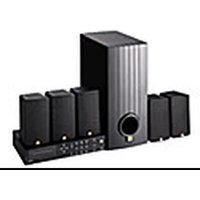
Simply Cinema ESC230 - Soundbar JBL - Free user manual and instructions
Find the device manual for free Simply Cinema ESC230 JBL in PDF.


| Type | Soundbar |
| Model | Simply Cinema ESC230 |
| Brand | JBL |
| Dimensions (L x H x D) | 965 x 75 x 110 mm |
| Weight | 2.8 kg |
| Total Power Output | 120 W |
| Power Supply | 100-240 V, 50/60 Hz |
| Connectivity | Bluetooth, HDMI ARC, Optical, AUX |
| Audio Channels | 2.1 (with wireless subwoofer) |
| Decoding | Dolby Digital |
| Remote Control | Included (battery not included) |
| Wall Mountable | Yes |
| Cleaning Instructions | Wipe with a dry, soft cloth |
| Safety Warnings | Do not expose to water or heat sources |
| Spare Parts Availability | Contact JBL support for replacement parts |
| Repair Service | Authorized service centers only |
Frequently Asked Questions - Simply Cinema ESC230 JBL
User questions about Simply Cinema ESC230 JBL
0 question about this device. Answer the ones you know or ask your own.
Ask a new question about this device
Download the instructions for your Soundbar in PDF format for free! Find your manual Simply Cinema ESC230 - JBL and take your electronic device back in hand. On this page are published all the documents necessary for the use of your device. Simply Cinema ESC230 by JBL.
USER MANUAL Simply Cinema ESC230 JBL
Thank you for choosing JBL. For more than 50 years, JBL has been involved in every aspect of music and film recording and reproduction, from live performances to the recordings you play in your home, car or office. We're confident that the JBL system you have chosen will provide every note of enjoyment that you expected – and that when you think about purchasing additional audio equipment for your home, car or office, you will once again choose JBL. Please take a moment to complete the enclosed profile card. It enables us to keep you posted on our latest advancements, and helps us to better understand our customers and to build products that meet their needs and expectations.
JBL Consumer Products
read first! Important Safety Precautions!
CAUTION
RISK OF ELECTRIC SHOCK DO NOT OPEN
CAUTION: To prevent electric shock,
do not remove the grounding plug on the power cord, or use any plug
or extension cord that does not have
a grounding plug provided.
Make certain that the
AC outlet is properly grounded.
Do not use an adapter plug
with this product.

The lightning flash with arrowhead symbol within an equilateral triangle is intended to alert the user to the presence of uninsulated "dangerous voltage" within the product's enclosure that may be of sufficient magnitude to constitute a risk of electric shock to persons.

The exclamation point within an equilateral triangle is intended to alert the user to the presence of important operating and maintenance (servicing) instructions in the literature accompanying the appliance.
-
Read Instructions. All the safety and operating instructions should be read before the product is operated.
-
Retain Instructions. The safety and operating instructions should be retained for future reference.
-
Heed Warnings. All warnings on the product and in the operating instructions should be adhered to.
-
Follow Instructions. All operating and use instructions should be followed.
-
Cleaning. Unplug this product from the wall outlet before cleaning. Do not use liquid cleaners or aerosol cleaners. Use a damp cloth for cleaning.
-
Attachments. Do not use attachments not recommended by the product manufacturer, as they may cause hazards.
-
Water and Moisture. Do not use this product near water-for example, near a bathtub, wash bowl, kitchen sink or laundry tub; in a wet basement; near a swimming pool; or the like.
-
Accessories. Do not place this product on an unstable cart, stand, tripod, bracket or table. The product may fall, causing serious injury to a child or adult, and serious damage to the product. Use only with a cart, stand, tripod, bracket or table recommended by the manufacturer, or sold with the product. Any mounting of the product should follow the manufacturer's instructions, and should use a mounting accessory recommended by the manufacturer.
-
A Product and Cart Combination Should Be Moved with Care. Quick
stops, excessive force and uneven surfaces may cause the product and cart combination to overturn.
- Ventilation. Slots and openings in the cabinet are provided for ventilation and to ensure reliable operation of the product and to protect it from overheating, and these openings must not be blocked or covered. The openings should never be blocked by placing the product on a bed, sofa, rug or other similar surface. This product should not

be placed in a built-in installation, such as a bookcase or rack, unless proper ventilation is provided or the manufacturer's instructions have been adhered to.
-
Power Sources. This product should be operated only from the type of power source indicated on the marking label. If you are not sure of the type of power supply to your home, consult your product dealer or local power company. For products intended to operate from battery power, or other sources, refer to the operating instructions.
-
Grounding or Polarization. This product may be equipped with a polarized alternating-current-line plug (a plug having one blade wider than the other). This plug will fit into the power outlet only one way. This is a safety feature. If you are unable to insert the plug fully into the outlet, try reversing the plug. If the plug should still fail to fit, contact your electrician to replace your obsolete outlet. Do not defeat the safety purpose of the polarized plug.
-
Power-Cord Protection. Power-supply cords should be routed so that they are not likely to be walked on or pinched by items placed upon or against them, paying particular attention to cords at plugs, convenience receptacles, and the point where they exit from the product.
-
Nonuse Periods. The power cord of the product should be unplugged from the outlet when left unused for long periods of time.
-
Outdoor Antenna Grounding. If an outside antenna or cable system is connected to the product, be sure the antenna or cable system is grounded so as to provide some protection against voltage surges and built-up static charges. Article 810 of the National Electrical Code, ANSI/NFPA 70, provides information with regard to proper grounding of the mast and supporting structure, grounding of the lead-in wire to an antenna discharge unit, size of grounding conductors, location of antenna-discharge unit, connection to grounding electrodes, and requirements for the grounding electrode. See Figure 1.
-
Lightning. For added protection for this product during a lightning storm, or when it is left unattended and unused for long periods of time, unplug it from the wall outlet and disconnect the antenna or cable system. This will prevent damage to the product due to lightning and power-line surges.
-
Power Lines. An outside antenna system should not be located in the vicinity of overhead power lines or other electric light or power circuits, or where it can fall into such power lines or circuits. When installing an outside antenna system, extreme care should
be taken to keep from touching such power lines or circuits, as contact with them might be fatal.
-
Overloading. Do not overload wall outlets, extension cords, or integral convenience receptacles, as this can result in a risk of fire or electric shock.
-
Object and Liquid Entry. Never push objects of any kind into this product through openings, as they may touch dangerous voltage points or short-out parts that could result in a fire or electric shock. Never spill liquid of any kind on the product.
-
Servicing. Do not attempt to service this product yourself, as opening or removing covers may expose you to dangerous voltage or other hazards. Refer all servicing to qualified service personnel.
-
Damage Requiring Service. Unplug this product from the wall outlet and refer servicing to qualified service personnel under the following conditions:
a. The power-supply cord or the plug has been damaged; or
b. Objects have fallen onto, or liquid has been spilled into, the product; or
c. The product has been exposed to rain or water; or
d. The product does not operate normally when following the operating instructions. Adjust only those controls that are covered by the operating instructions, as an improper adjustment of other controls may result in damage and will often require extensive work by a qualified technician to restore the product to its normal operation; or e. The product has been dropped or damaged in any way; or
f. The product exhibits a distinct change in performance; this indicates a need for service.
-
Replacement Parts. When replacement parts are required, be sure the service technician has used replacement parts specified by the manufacturer or that have the same characteristics as the original part. Unauthorized substitutions may result in fire, electric shock or other hazards.
-
Safety Check. Upon completion of any service or repairs to this product, ask the service technician to perform safety checks to determine that the product is in proper operating condition.
-
Wall or Ceiling Mounting. The product should be mounted to a wall or ceiling only as recommended by the manufacturer.
-
Heat. The product should be situated away from heat sources such as radiators, heat registers, stoves or other products (including amplifiers) that produce heat.

Please read this manual carefully before you begin
Included:
- Dolby* Pro Logic* processor (main unit) with 6 amplifiers and 6-channel direct inputs for use with external decoders
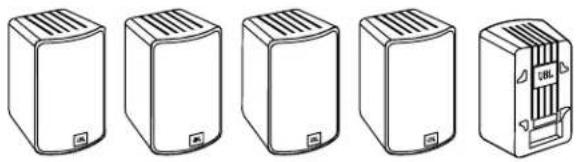
- 5 Video-shielded satellites, wall-mountable, for front, center and rear channels
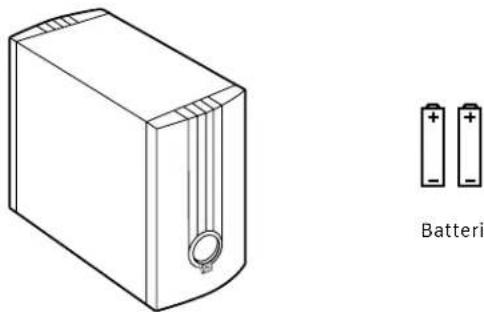
• Powerful subwoofer for deep bass - Remote control
- All necessary cables and wires
- Complete, simple-to-follow setup guide
ESC230 Main Unit.

Front, rear and center speakers with rotating logo.
Subwoofer.
Wall-Mounting Your Satellites
The satellites may be wall-mounted. The customer is responsible for proper selection and use of mounting hardware available through hardware stores to properly and safely wall-mount the satellites. This product is not intended for ceiling mounting.

1 Speaker Placement
For optimum performance, follow these guidelines when placing the speakers.
Front Speakers
Place the front left and right speakers on the sides of the television. The distance between them should be the same as the distance from the television to the listener. The center-channel speaker should be placed on top of the television.
![graph TD A["Box 1"] --> B["Car"] C["Box 2"] --> B B --> D["Car"] style A fill:#f9f,stroke:#333 style C fill:#f9f,stroke:#333 style B fill:#ccf,stroke:#333 style D fill:#cfc,stroke:#333](/content/2026/07/1440572/images/e32e8bea8239a5254d7b88412f3984767e8d88d8fb4fdc65eace2530984800e8.jpg)
Place the center speaker even with the left and right speakers, or slightly behind them.
Place all three front speakers at approximately the same height (height of ears preferable).

Surround Speakers
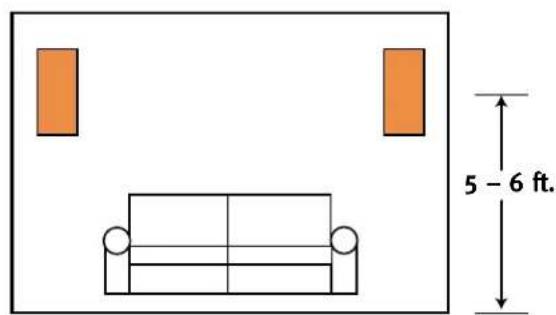
The surround speakers should be placed 5'-6' high and parallel to the main listening area, facing each other. Alternatively, they may be mounted on a wall behind the listening area, facing forward.

1 Speaker Placement (Cont.)
On optional stands. Part No. FS10/20.

Subwoofer
The subwoofer should be placed along the front wall. Bass output will increase as the subwoofer is moved closer to a corner.

Rotating logo. Pull out gently and turn.

2 Speaker Connection
To connect your speakers, press down on the quick-release tab, which opens the terminal for the speaker wire, and put the bare end of the wire in straight. Release the tab and give
the speaker wire a gentle tug. If it's in properly, it won't "give" at all. If it slides, repeat the procedure. Use the shortest wire for the CENTER speaker, the two medium-length wires for the
FRONT speakers and the long wires for the REAR speakers. Always insert the RED-coated wire into the RED terminals and the BLACK-coated wire into the
BLACK terminals on each of your speakers and on the appropriate terminal on the back of the Main Unit.
![graph TD A["Front Right Speaker"] --> B["Center Speaker"] C["Front Left Speaker"] --> B D["Rear Right Speaker"] --> E["Rear Left Speaker"] F["Subwoofer"] --> G["JBL"] style A fill:#f9f,stroke:#333 style C fill:#f9f,stroke:#333 style D fill:#f9f,stroke:#333 style F fill:#f9f,stroke:#333 style G fill:…](/content/2026/07/1440572/images/37eacf7688a18b4341300d58676667ce30d12d76316c778e5bcdbe49225bea76.jpg)
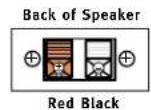
Make sure you match RED to RED and BLACK to BLACK on both ends.
3 Source Connection (TV or VCR)
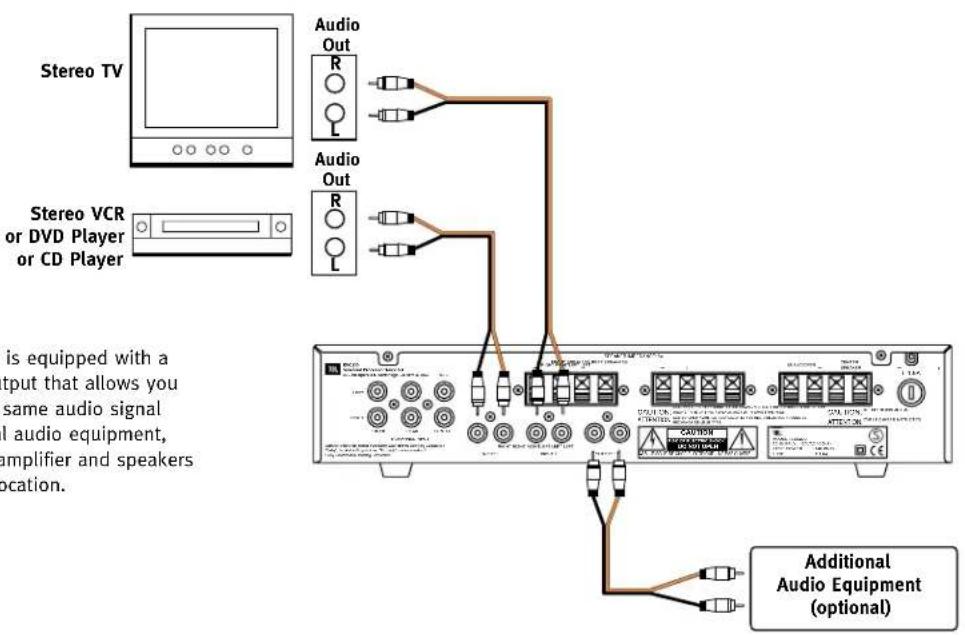
The ESC230 is equipped with a line-level output that allows you to send the same audio signal to additional audio equipment, such as an amplifier and speakers in another location.
4 DVD Player with Built-In Dolby Digital or DTS® Processor or Outboard Surround Processor

6-Channel Digital Direct
If you have a DVD player or surround processor with a built-in Dolby Digital or DTS processor, connect the 6 outputs of the DVD player/processor as shown. Please check that all 5 satellites and the subwoofer are configured correctly through the DVD player or the outboard processor. Depending on the product you own, you may have to configure these settings using the on-screen display of the DVD player or the outboard processor. Make sure that the satellites are set to On and are in Small mode, and that the subwoofer is also set to On.
5 Source Connection (Headphone)

6 Plug In

7 Turn On
The Master Power Switch should be turned off when the unit will be unused for a long period of time.

Note: The unit will return to default settings when the Master Power Switch is turned off.
8 Surround Modes
Dolby Pro Logic
Use this mode for films recorded using Dolby Surround. The surround channels have a 20-ms delay.
Hall/Concert
These modes create surround sound from stereo recordings. The center channel is not used and the surround channels have a 20-ms delay. Repeated pressing and releasing of the button provides access to these two modes.
Stereo
This mode plays two-channel recordings through the front left and right speakers.
6-Channel Direct Digital
If you have a DVD player or surround processor with a built-in Dolby Digital or DTS processor, this mode will provide the best quality surround-sound presentation.

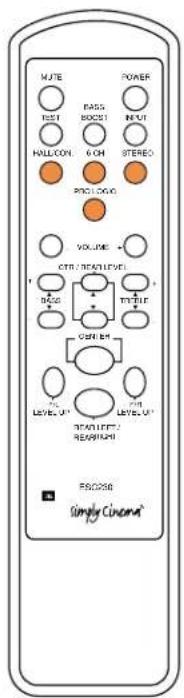
9 Test Mode and Level Adjustments
Test Tone
The test tone is used to calibrate the level settings of the speakers. A static noise will be heard cycling, in order, from the front left, center, right and both surround speakers. Using the remote control, adjust the Center and Surround levels until the volume of all the speakers is the same during the test. The test tone is used to calibrate the performance of the system. When listening to an actual recording, the volume level of the surround channels is generally much lower than that of the front channels. In fact, when listening to a movie, virtually all of the dialogue and a substantial number of effects are reproduced through the center channel.

Step 2
CTR / REAR LEVEL

Dolby Pro Logic, Hall and Concert Modes
- Push the Test button on the remote control.
- When the test tone is heard from the center speaker, push the + or - Ctr/Rear Level button to match the volume of the center channel to the front left and right channels.
- When the test tone is heard from the surround speakers, push the + or - Ctr/Rear Level button to match the volume of the rear channels to the front.
6-Channel Input
- Push the Test button on the remote control. The test tone will cycle through all channels.
- When the test tone is heard from the center speaker, push the + or - Ctr/Rear Level button to match the volume of the center channel to the front left and right channels.
- When the test tone is heard from one of the surround speakers, push the + or - Ctr/Rear Level button to match the volume of that surround speaker to the front, left and right channels.
- Repeat step (3) when the test tone is heard from the other surround speaker.
Please note that the 6-channel direct input mode has its own level settings that are independent of the other modes.
10 Bass Boost
The Bass Boost will increase the amount of low-frequency output.

11 Volume
Push Volume+ to raise the system volume or Volume- to lower the system volume.
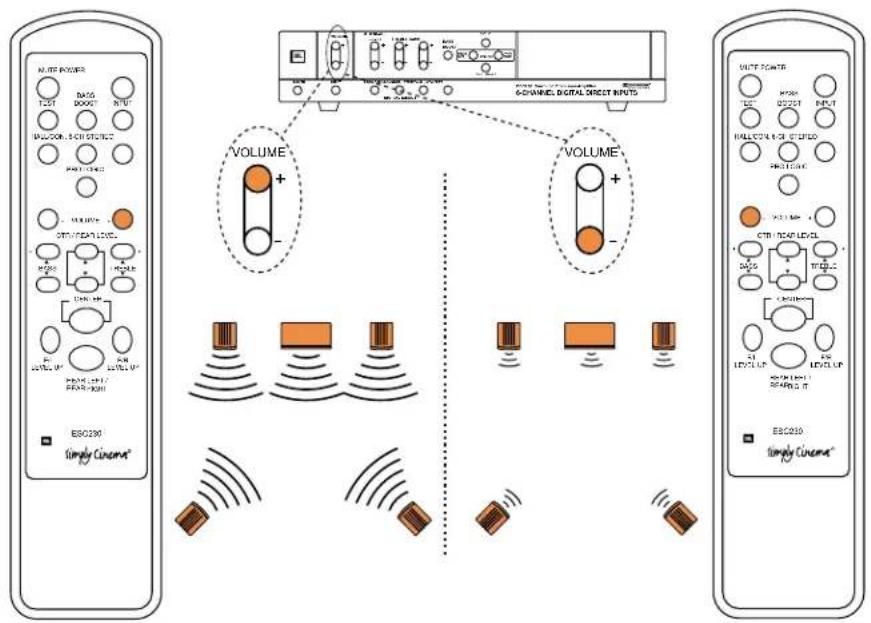
12 Center Channel
- Push Center.
- The word CENTER will be illuminated on the display.

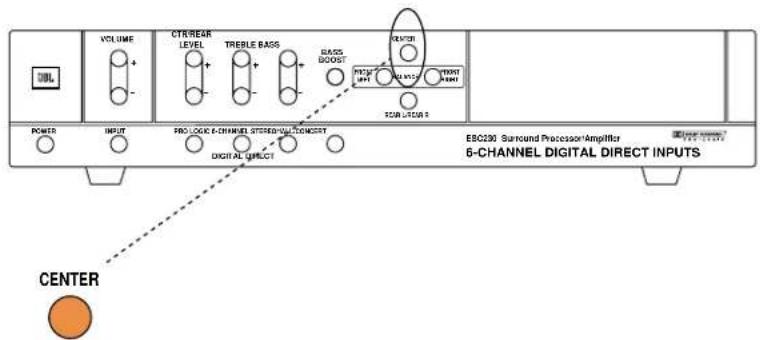
- Push Level ▲ or Level ▼ to adjust the center-channel volume.

13 Balance
Push Left to increase the volume of the left channel in relation to the right channel. Push Right to increase the volume of the right channel in relation to the left channel
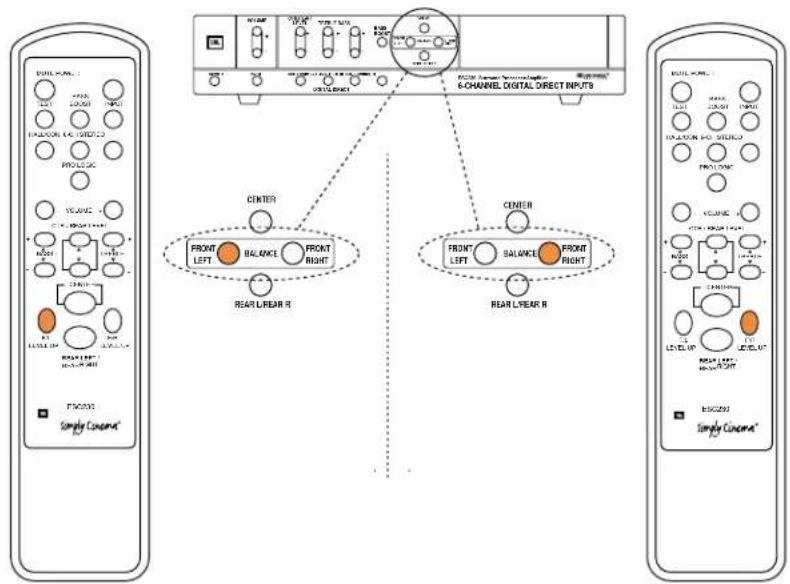
14 Surround Channel
6-Channel Mode
- Push Rear to choose left- or right-surround levels. The display will indicate which rear surround is selected.
- Push Level ▲ or Level ▼ to adjust the surround-channel volume for that specific channel.
- Push Rear again to choose the other surround channel. The display will indicate which rear surround is selected.
- Push Level ▲ or Level ▼ to adjust the surround-channel volume for that specific channel.
Dolby Pro Logic Mode
- Push Rear. The display will indicate which rear surround is selected.
- Push Level ▲ or Level ▼ to adjust surround-channel volume.
Step 1

Step 2
![graph TD A["Remote Device 1"] --> B["Server"] C["Remote Device 2"] --> B B --> D["Output Device 1"] B --> E["Output Device 2"] D --> F["Output Device 3"] E --> G["Output Device 4"] style A fill:#f9f,stroke:#333 style C fill:#f9f,stroke:#333 style B fill:#ccf,stroke:#333 style D fill:#cfc,stroke:#333…](/content/2026/07/1440572/images/00c8e7efffddc73f734c1609d330e7376893be5aa89b88a345a58a23386b07ad.jpg)
15 Bass and Treble
Push Bass ▲ to increase the level of low frequencies. Push Bass ▼ to decrease the level of low frequencies.
Push Treble ▲ to increase the level of low frequencies. Push Treble ▼ to decrease the level of low frequencies.

Troubleshooting
If you hear no sound at all:
- Make sure the ESC230 main unit is plugged into a live electrical outlet and that the power switch is on.
- Check connections from the ESC230 main unit to the TV, VCR, DVD player and the outboard surround processor.
- If using with a television or outboard surround processor, make sure that the TV or the surround processor is on and a signal is present.
- If using with a VCR, make sure the VCR is playing a tape.
- If using a DVD player, make sure that the DVD is playing.
-
If using the 6-channel digital direct inputs, make sure that the 6-channel mode is selected and its indicator is illuminated on the display. There will be no output if the product is in any other mode.
-
If using the conventional right and left inputs 1 or
2, make sure that Dolby Pro Logic, Hall, Concert or Stereo mode is selected and its indicator is illuminated in the display. There will be no output if the product is in the 6-channel mode. Also make sure that the appropriate input (1 or 2) is selected as illuminated in the display. - Check all connection between the ESC230 main unit and each of the speakers.
If one or more of the speakers does not play:
- Check all connections between the ESC230 main unit and each of the speakers.
- Adjust the balance controls from left to right and front to rear.
If you have very little bass output:
- Make sure the subwoofer is connected properly to the ESC230 main unit.
- Experiment with placement of the subwoofer. Remember, place the subwoofer in a corner to get maximum bass output from the system.
- Make sure Bass Boost is on.
- Adjust Bass level.
If there is no sound coming from the rear speakers or the volume is very low:
- Check all connections between ESC230 main unit and each of the speakers.
- Adjust the front-rear balance controls on the ESC230 main unit.
- Make sure the TV show or movie you are watching is recorded in Dolby Surround. If it is not, try the Concert Hall or Stereo settings on the ESC230 main unit.
When using the 6-channel digital direct inputs, if there is no sound coming from some channels:
• Make sure that all 6 connectors are securely connected on both the DVD player/outboard processor side and the ESC230 side.
- Make sure that the DVD player/outboard processor's built-in decoder is correctly configured to provide output to all 5 satellites and the subwoofer.
(Depending on the product you own, you may have to do this using that specific product's on-screen display.) Make sure that the satellites are set to Small and the subwoofer is set to On by checking the settings of the DVD player or outboard surround processor.
Specifications
Power Output 15 watts x 6 @ 0.1% THD
Signal-to-Noise Ratio 90 dBA
Input Impedance 20k ohms
Input Sensitivity 400 mV
System Frequency Response 35Hz to 20kHz
Dimensions (H x W x D) Main Unit: 2-11/16 x 13-1/2 x 9 inches
6 9 × 3 4 3 × 2 3 0 mm
Satellites: 7-1/2 x 4-1/16 x 4-3/8 inches
1 9 0 × 1 0 3 × 1 1 1 mm
Subwoofer: 17-3/4 x 7-3/4 x 13-7/8 inches
4 5 1 × 1 9 7 × 3 5 2 mm
JBL
JBL Consumer Products
250 Crossways Park Drive, Woodbury, NY 11797
8500 Balboa Boulevard, Northridge, CA 91329
(800) 336-4JBL (4525) www.jbl.com
©1999 JBL, Incorporated, JBL and Simply Cinema are registered trademarks of JBL, Incorporated.
Manufactured under license from Dolby Laboratories Licensing Corporation.
*Trademarks of Dolby Laboratories. DTS is a registered trademark of Digital Theater Systems, Inc.
Part No. 4301-4096-0 A Harman International Company


- READ FIRST! IMPORTANT SAFETY PRECAUTIONS
- CAUTION
- RISK OF ELECTRIC SHOCK DO NOT OPEN
- PLEASE READ THIS MANUAL CAREFULLY BEFORE YOU BEGIN
- INCLUDED
- WALL-MOUNTING YOUR SATELLITES
- 1 SPEAKER PLACEMENT
- FRONT SPEAKERS
- SURROUND SPEAKERS
- 1 SPEAKER PLACEMENT (CONT.)
- SUBWOOFER
- 2 SPEAKER CONNECTION
- 3 SOURCE CONNECTION (TV OR VCR)
- 4 DVD PLAYER WITH BUILT-IN DOLBY DIGITAL OR DTS® PROCESSOR OR OUTBOARD SURROUND PROCESSOR
- 6-CHANNEL DIGITAL DIRECT
- 5 SOURCE CONNECTION (HEADPHONE)
- 6 PLUG IN
- 7 TURN ON
- 8 SURROUND MODES
- DOLBY PRO LOGIC
- HALL/CONCERT
- STEREO
- 6-CHANNEL DIRECT DIGITAL
- 9 TEST MODE AND LEVEL ADJUSTMENTS
- TEST TONE
- DOLBY PRO LOGIC, HALL AND CONCERT MODES
- 6-CHANNEL INPUT
- 10 BASS BOOST
- 11 VOLUME
- 12 CENTER CHANNEL
- 13 BALANCE
- 14 SURROUND CHANNEL
- 6-CHANNEL MODE
- DOLBY PRO LOGIC MODE
- 15 BASS AND TREBLE
- TROUBLESHOOTING
- SPECIFICATIONS
Brand : JBL
Model : Simply Cinema ESC230
Category : Soundbar