
CDM1142P - Drill Ferm - Free user manual and instructions
Find the device manual for free CDM1142P Ferm in PDF.
| Product Type | Cordless Impact Driver |
| Brand | Ferm |
| Model | CDM1142P |
| Nominal Voltage | 20 V |
| Battery Type | Lithium-Ion (Li-Ion) |
| Battery Capacity | 2 Ah (CDA1132P) or 4 Ah (CDA1133P) |
| Tool Holder | Hexagonal chuck 6.35 mm (1/4") |
| No-load Speed | 0 – 2900 /min |
| Impact Rate | 0 – 3300 /min |
| Max Torque | 150 Nm |
| Screw Diameter | M6 – M14 mm |
| Weight (without battery) | 1.18 kg |
| Sound Pressure Level | 80 dB(A) (K=3 dB) |
| Sound Power Level | 91 dB(A) (K=3 dB) |
| Vibration Level | 1.740 m/s² (K=1.5 m/s²) |
| Charging Time (2 Ah battery) | 60 minutes |
| Charging Time (4 Ah battery) | 120 minutes |
| Recommended Charger | CDA1131P (100–240 VAC, 50/60 Hz, output 20 V / 2 A) |
| LED Lighting | Yes, integrated, automatically turns on when starting |
| Belt Hook | Yes, removable and can be mounted on left or right |
| Rotation Direction | Reversible (left/right) with central lock |
| Electronic Speed Control | Yes, by pressing the on/off trigger |
| Maintenance and Cleaning | Clean the housing with a soft, slightly damp cloth; do not use solvents |
| Safety | Lock-off switch (center position); double insulation (class II) |
| Spare Parts and Repairability | Contact Ferm customer service or an authorized center |
| Warranty | Refer to the supplied warranty certificate |
Frequently Asked Questions - CDM1142P Ferm
User questions about CDM1142P Ferm
0 question about this device. Answer the ones you know or ask your own.
Ask a new question about this device
Download the instructions for your Drill in PDF format for free! Find your manual CDM1142P - Ferm and take your electronic device back in hand. On this page are published all the documents necessary for the use of your device. CDM1142P by Ferm.
USER MANUAL CDM1142P Ferm

natural_image
Black FERM Industrial electric drill putter with two battery packs (no visible text or symbols on the main body)CDM1142P
EN Original instructions 04
DE Übersetzung der Originalbetriebsanleitung 08
NL Vertaling van de oorspronkelijke gebruiksaanwijzing 14
FR Traduction de la notice originale 19
ES Traducción del manual original 25
IT Traduzione delle istruzioni originali 29
SV Översättning av bruksanvisning i original 34
FI Alkuperäisten ohjeiden käännös 39
DA Oversættelse af den originale brugsanvisning 43
HU Eredeti használati utasítás fordítása 48
CS Překlad původního návodu k používání 53
SK Preklad pôvodného návodu na použitie 57
SL Prevod izvirnih navodil 62
PL Tłumaczenie instrukcji oryginalnej 67
LT Originalios instrukcijos vertimas 72
LV Instrukciju tulkojums no originālvalodas 77
RO Traducere a instructiunilor originale 81
BG Оригинални инструкции 86
EL Μετάφραση του πρωτοτύπου των οδηγιών χρήσης 92
AR
تعليمات للاستخدام 97
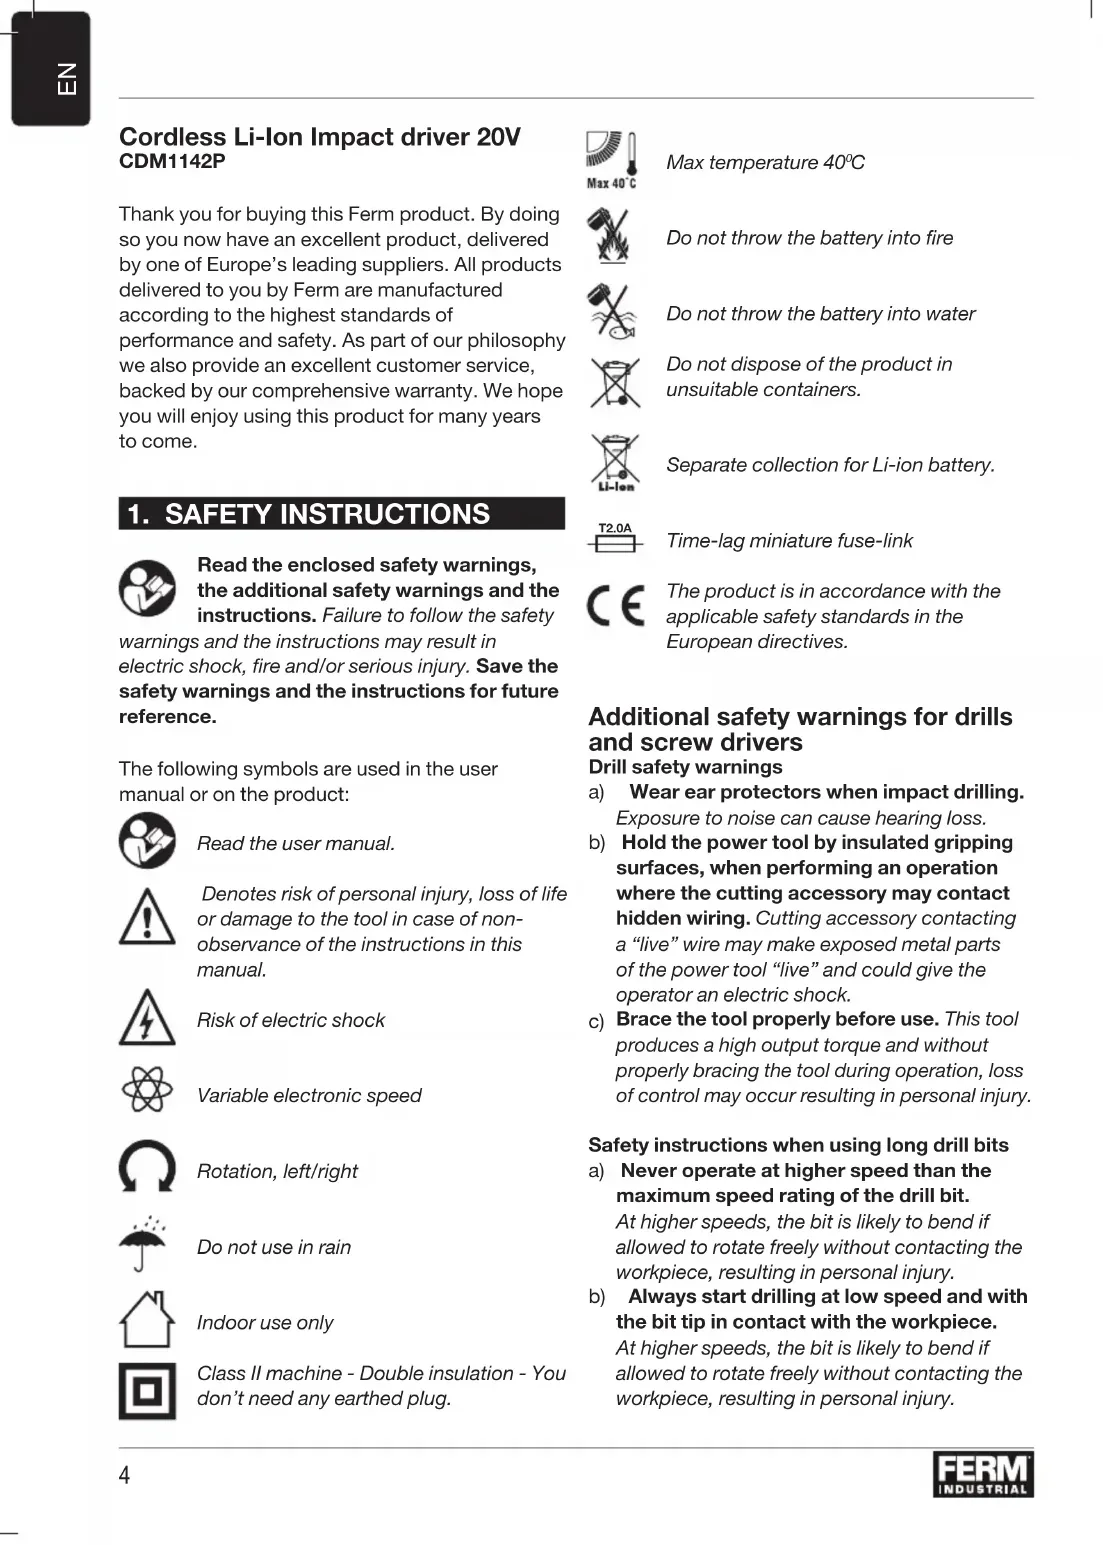
Cordless Li-Ion Impact driver 20V CDM1142P
Thank you for buying this Ferm product. By doing so you now have an excellent product, delivered by one of Europe's leading suppliers. All products delivered to you by Ferm are manufactured according to the highest standards of performance and safety. As part of our philosophy we also provide an excellent customer service, backed by our comprehensive warranty. We hope you will enjoy using this product for many years to come.
1. SAFETY INSTRUCTIONS

Read the enclosed safety warnings, the additional safety warnings and the instructions. Failure to follow the safety warnings and the instructions may result in electric shock, fire and/or serious injury. Save the safety warnings and the instructions for future reference.
The following symbols are used in the user manual or on the product:

Read the user manual.

Denotes risk of personal injury, loss of life or damage to the tool in case of non-observance of the instructions in this manual.

Risk of electric shock

Variable electronic speed

Rotation, left/right

Do not use in rain

Indoor use only

Class II machine - Double insulation - You don't need any earthed plug.

Max temperature 40°C

Do not throw the battery into fire

Do not throw the battery into water

Do not dispose of the product in unsuitable containers.

Separate collection for Li-ion battery.

Time-lag miniature fuse-link

The product is in accordance with the applicable safety standards in the European directives.
Additional safety warnings for drills and screw drivers Drill safety warnings
a) Wear ear protectors when impact drilling. Exposure to noise can cause hearing loss.
b) Hold the power tool by insulated gripping surfaces, when performing an operation where the cutting accessory may contact hidden wiring. Cutting accessory contacting a "live" wire may make exposed metal parts of the power tool "live" and could give the operator an electric shock.
c) Brace the tool properly before use. This tool produces a high output torque and without properly bracing the tool during operation, loss of control may occur resulting in personal injury.
Safety instructions when using long drill bits
a) Never operate at higher speed than the maximum speed rating of the drill bit.
At higher speeds, the bit is likely to bend if allowed to rotate freely without contacting the workpiece, resulting in personal injury.
b) Always start drilling at low speed and with the bit tip in contact with the workpiece.
At higher speeds, the bit is likely to bend if allowed to rotate freely without contacting the workpiece, resulting in personal injury.
c) Apply pressure only in direct line with the bit and do not apply excessive pressure. Bits can bend causing breakage or loss of control, resulting in personal injury.
Safety warnings for battery
a) Do not open the battery. Danger of shortcircuiting.
b) Protect the battery against heat, e. g., against continuous intense sunlight, fire, water, and moisture. Danger of explosion.
c) In case of damage and improper use of the battery, vapours may be emitted. Ventilate the area and seek medical help in case of complaints. The vapours can irritate the respiratory system.
d) Use the battery only in conjunction with your Ferm Industrial product. This measure alone protects the battery against dangerous overload.
e) The battery can be damaged by pointed objects such as nails or screwdrivers or by force applied externally. An internal short circuit can occur and the battery can burn, smoke, explode or overheat.
Safety warnings for charger Intended use
Charge only CDA1132P and CDA1133P type rechargeable Battery packs with the charger.
Only use the following batteries of the Ferm Industrial FI20V battery platform. Using any other batteries could cause serious injury or damage the tool.
CDA1132P 20V, 2Ah Lithium-Ion
CDA1133P 20V, 4Ah Lithium-Ion
The following charger of the can be used to charge these batteries.
CDA1131P Quick charger
The batteries of the Ferm Industrial FI20V battery platform are interchangeable with all the Ferm Industrial FI20V battery platform tools.
Residual risks
Even when the power tool is used as prescribed it is not possible to eliminate all residual risk factors. The following hazards may arise in connection with the power tool's construction and design:
a) Health defects resulting from vibration emission if the power tool is being used over longer period of time or not adequately managed and properly maintained.
b) Injuries and damage to property to due to broken accessories that are suddenly dashed.

Warning! This power tool produces an electromagnetic field during operation. This field may under some circumstances interfere with active or passive medical implants. To reduce the risk of serious or fatal injury, we recommend persons with medical implants to consult their physician and the medical implant manufacturer before operating this power tool.
Power cord replacement
If the supply cord is damaged, it must be replaced by the manufacturer, its service agent or similarly qualified persons in order to avoid a hazard.
2. MACHINE INFORMATION
Intended use
The impact driver is intended for driving in and loosening screws.
Technical specifications
| Machine CDM1142P | |
| Voltage 20V | |
| Tool holder 6.35 mm 1/4" internal hexagon | |
| No load speed 0-2900/min | |
| Impact rate 0-3300/min | |
| Max torque | 150 Nm |
| Machine screw diameter | M6–M14mm |
| Weight (without battery pack) | 1.18 kg |
| Sound pressure level | L_pA 80.0 dB(A), K=3dB(A) |
| Sound power level | L_wA 91.0 dB(A), K=3dB(A) |
| Vibration | 1.740 m/s2 K=1.5 m/s2 |
Charger CDA1131P
Charger input 100-240VAC 50-60Hz, 50W
Charger output 20V 2A
Charging time 2Ah battery 60 minutes
Charging time 4Ah battery 120 minutes
Recommended batteries CDA1132P, CDA1133P
Weight 0.36 kg
Battery CDA1132P
Battery Type Lithium-Ion
Voltage 20V
Capacity 2.0 Ah
Recommended charger CDA1131P
Weight 0.38 kg
Vibration level
The vibration emission level stated in this instruction manual has been measured in accordance with a standardized test given in EN 62841; it may be used to compare one tool with another and as a preliminary assessment of exposure to vibration when using the tool for the applications mentioned.
- Using the tool for different applications, or with different or poorly maintained accessories, may significantly increase the exposure level.
- The times when the tool is switched off or when it is running but not actually doing the job, may significantly reduce the exposure level.
Protect yourself against the effects of vibration by maintaining the tool and its accessories, keeping your hands warm, and organizing your work patterns.
Description
The numbers in the text refer to the diagrams on pages 2-3
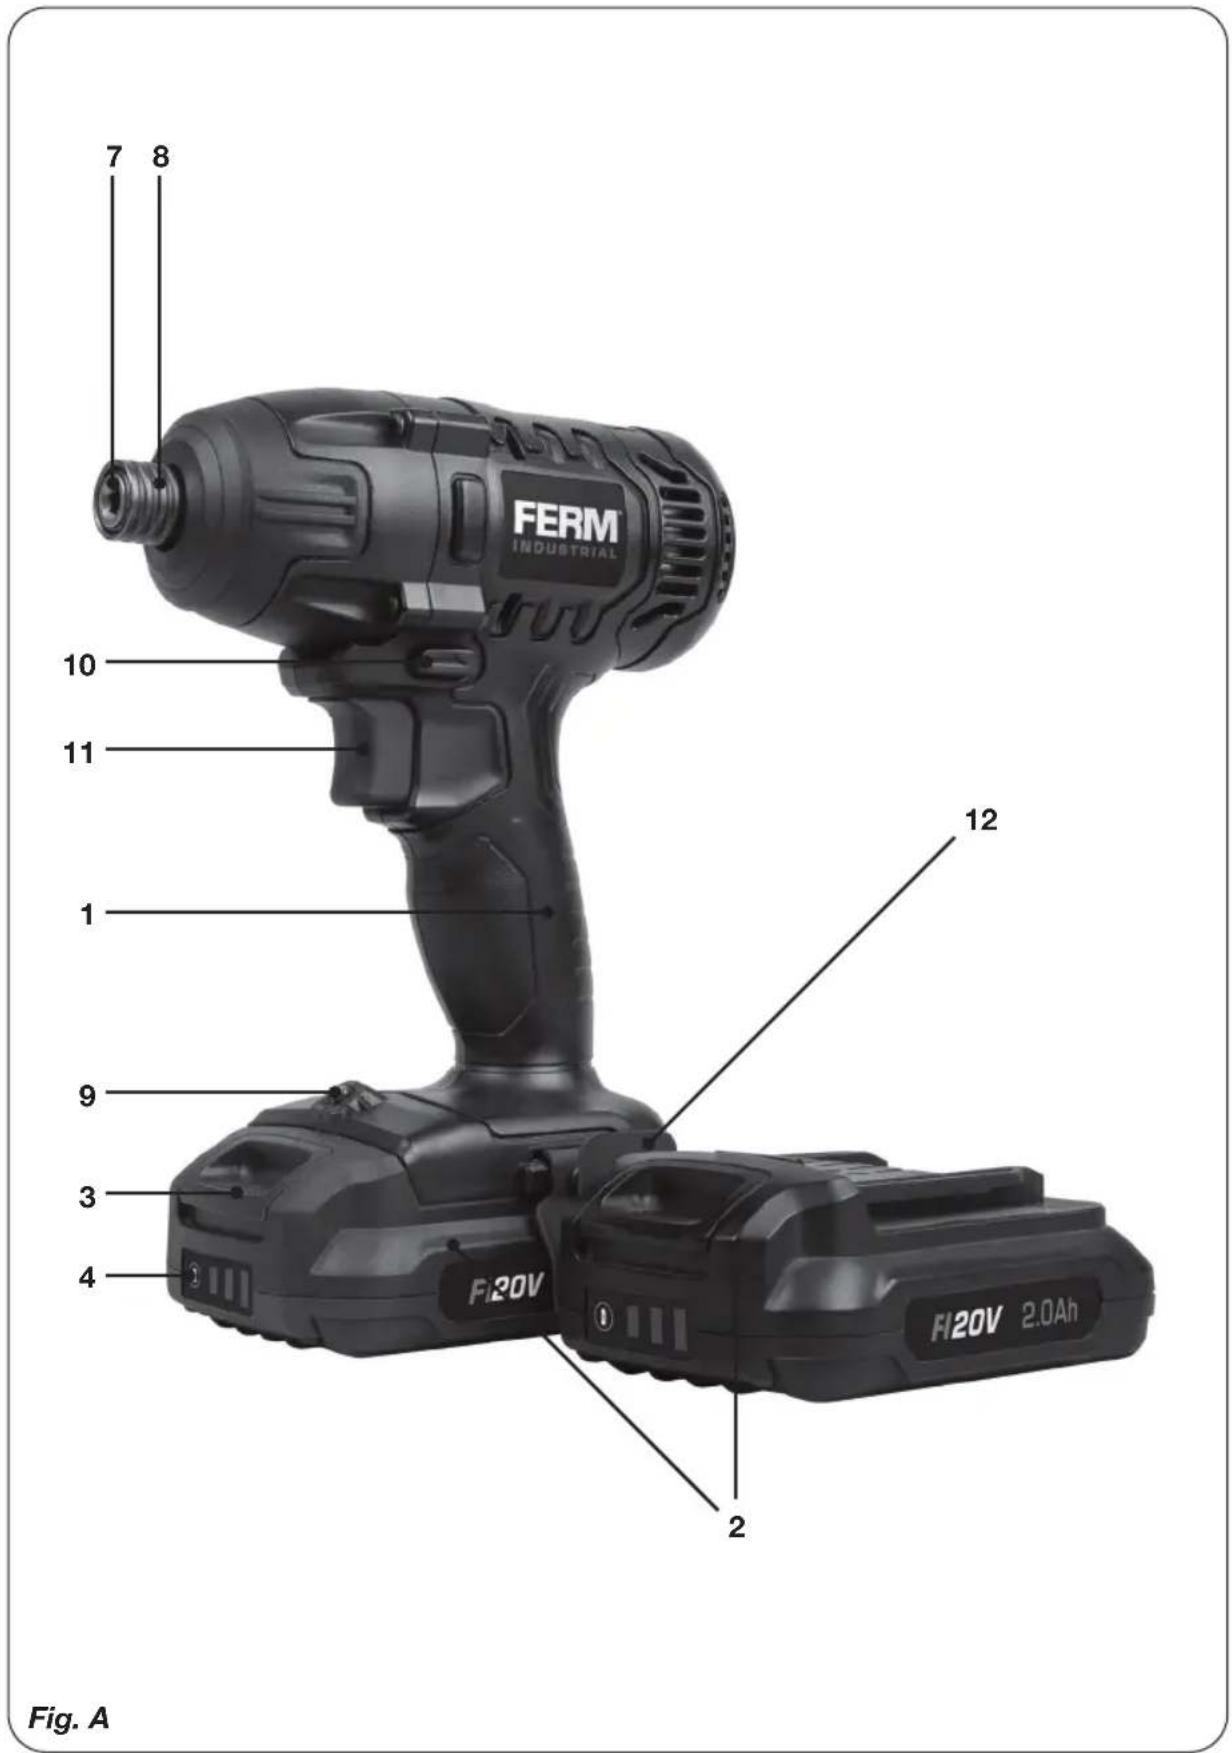
Fig. A
- Machine
- Battery
- Battery unlock button
- Battery charge indication
- Charger
- Charger LED indicators
- 1/4" (6.35 mm) hex chuck
-
Chuck collar
-
Work light
- Direction switch
- On / off switch
- Belt hook
3. OPERATING

The battery must be charged before first use.
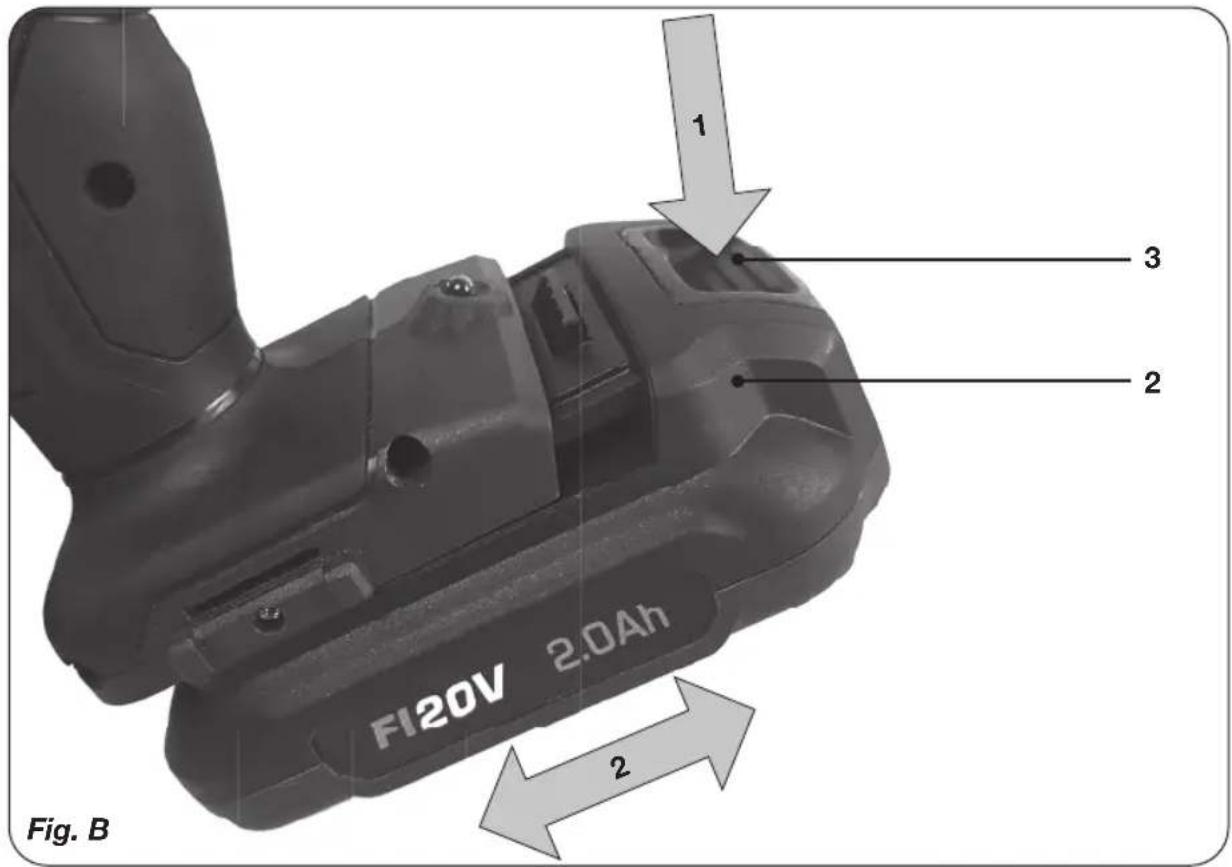
Removing the battery from the machine Fig. B
- Hold the machine (1) firmly with one hand
- Push down the battery unlock button (3) located on the rear side of the battery (2) with the other hand.
- Keep pushing this button (3) down and slide the battery backwards out of the machine, like shown in Fig. B.
Inserting the battery into the machine Fig. B

Ensure that the exterior of the battery is clean and dry before connecting to the charger or machine.
- Hold the machine (1) firmly with one hand
- Insert the battery (2) into the base of the machine as shown in Fig. B.
- Push the battery further forward until it clicks into place.
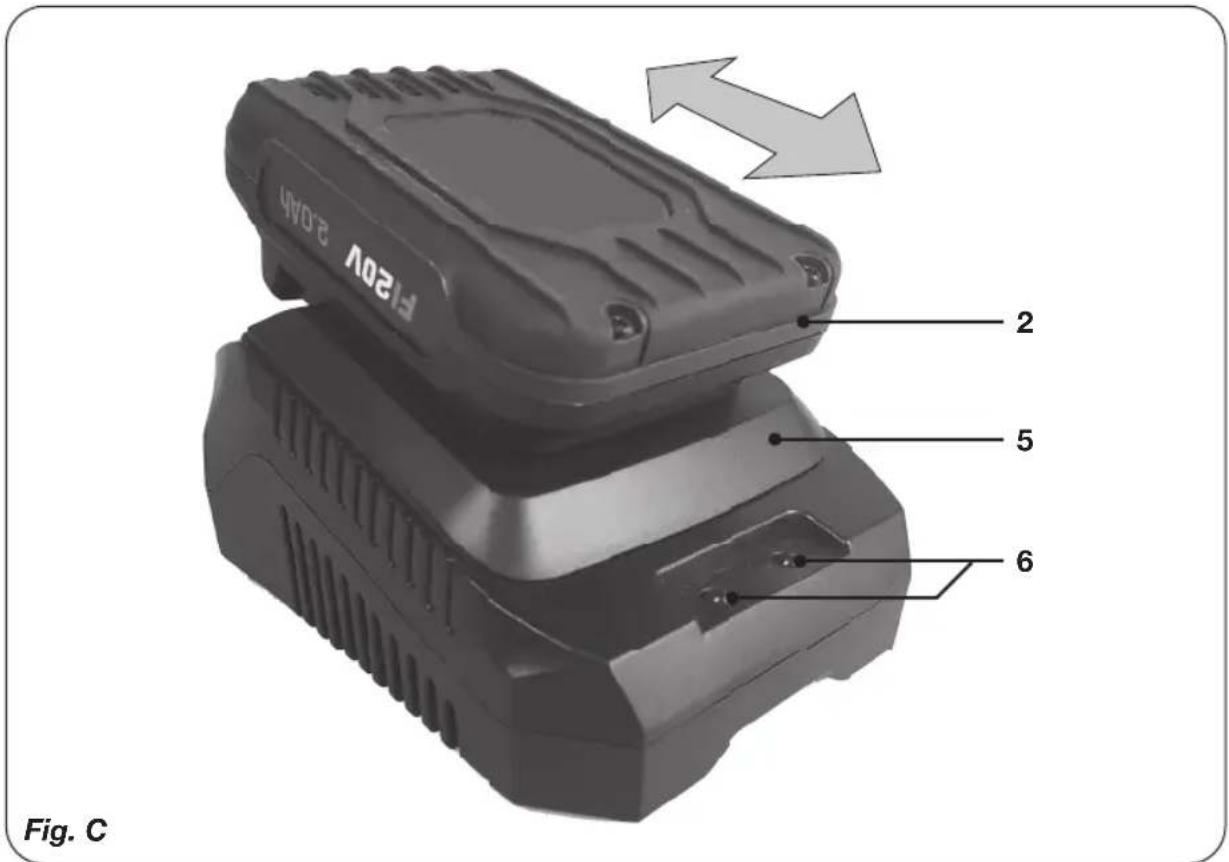
Checking the battery charging status Fig. C

The included battery is delivered in partly charged condition.
- To check the battery charge status, push the button (4) on battery shortly.
- The battery has 3 lights indicating the charge level, the more lights that burn, the more charge the battery has left.
Charging the battery (with the charger) Fig. C
• Take the battery (2) from the machine
- Turn the battery (2) to upside down position and slide it onto the charger (5) as shown in Fig. C.
- Push the battery until it is fully pushed into the slot.
- Plug the charger plug into an electrical outlet and wait for a while. The LED indicators on the charger (6) will lighten up and show the charger status.
LED indicators (6)
Fig.C
The charger has 2 LED indicators (6) which indicate the status of the charging process:
| Red LED status: | Green LED status: | Charger status |
| Off Off No power | ||
| On Off | Standby mode:-No battery is inserted or,-Battery inserted but charging has finished more then 2 hours ago | |
| Blinking Blinking Defective battery | ||
| On Blinking Battery charging in progress | ||
| On On | Battery charging finished, battery fully charged | |
| Blinking Off | Battery is too hot, charging progress is on hold. Charging will start automatically after the battery has cooled down. | |
- Fully charging the battery may take up to 60 minutes.
- After the battery is fully charged remove the charger plug from the outlet and remove the battery from the charger.
- The battery can be stored or directly installed on the machine.

Lithium-Ion cells can be stored for a long period without losing much of their charge. When the machine is not being used over a longer period of time it is best to store the battery in charged condition.
Quick-Release Chuck

Use only 1/4" (6.35 mm) hex impact accessories. Non-impact accessories may break and cause a hazardous condition. Inspect accessory prior to use to ensure that it contains no cracks.
Place the direction switch (10) in the lock-off (centre) position or remove battery pack before changing accessories. To install an accessory, fully insert the accessory. The accessory is locked into place. To remove an accessory, pull the chuck collar (8) away from the front of the tool. Remove the accessory.
Adjusting the direction of rotation
Fig. A
- Set the direction switch (10) to position “←” in order to drive screws or to use it for drilling.
- Set the direction switch (10) to position “→” in order to remove screws
Switching the machine on and off
Fig. A
The on/off switch (11) is used for activating the machine and adjusting rotation speed.
- Pressing the on/off switch (11) will activate the machine, the further the switch is being pushed, the faster the drill will turn.
- Releasing the on/off switch (11) will stop the machine.
- Move the direction reversing switch (10) to the middle position to lock the movement of the on/off switch. It cannot be activated in this position.

Only lay down the machine when it has stopped running completely. Do not place it on a dusty surface as particles of dust could get into the mechanism.
Work light (9)
Fig. A
The machine is equipped with a work light to illuminate the work location.
- It automatically switches on when the on/off switch is being pressed.
- It automatically switches off when the on/off switch is released again.
Belt hook (12)
Fig. A
The machine is equipped with a belt hook for hanging the machine to your belt during use.

Always switch the direction switch (10) to middle position to avoid accidental startup of the machine.
- When delivered, the belt hook (12) is assembled to the left side of the machine.
- It can easily be removed by removing the screw on the hook and taking it off.
- It can be assembled on the right side of the machine when this is preferred.
4. MAINTENANCE

Before cleaning and maintenance, always switch off the machine and remove the battery pack from the machine.
Clean the machine casings regularly with a soft cloth, preferably after each use. Make sure that the ventilation openings are free of dust and dirt. Remove very persistent dirt using a soft cloth moistened with soapsuds. Do not use any solvents such as gasoline, alcohol, ammonia, etc. Chemicals such as these will damage the synthetic components.
ENVIRONMENT

Faulty and/or discarded electrical or electronic apparatus have to be collected at the appropriate recycling locations.
Only for EC countries
Do not dispose of power tools into domestic waste. According to the European Guideline 2012/19/EU for Waste Electrical and Electronic Equipment and its implementation into national right, power tools that are no longer usable must be collected separately and disposed of in an environmentally friendly way.
WARRANTY
The warranty conditions can be found on the separately enclosed warranty card.
The product and the user manual are subject to change. Specifications can be changed without further notice.
CE
DECLARATION OF CONFORMITY CDM1142P - CORDLESS LI-ION IMPACT DRIVER
(EN) We declare under our sole responsibility that this product is in conformity with directive 2011/65/EU of the European parliament and of the council of 8 June on the restriction of the use of certain hazardous substances in electrical and electronic equipment is in conformity and accordance with the following standards and regulations:
(DE) Der Hersteller erklärt eigenverantwortlich, dass dieses Produkt der Direktive 2011/65/EU des Europäischen Parlaments und des Rats vom 8. Juni 2011 über die Einschränkung der Anwendung von bestimmten gefährlichen Stoffen in elektrischen und elektronischen Geräten entspricht, den folgenden Standards und Vorschriften entspricht:
(NL) Wij verklaren onder onze volledige verantwoordelijkheid dat dit product voldoet aan de conform Richtlijn 2011/65/EU van het Europees Parlement en de Raad van 8 juni 2011 betreffende beperking van het gebruik van bepaalde gevaarlijke stoffen in elektrische en elektronische apparatuur en in overeenstem ming is met de volgende standaarden en reguleringen:
(FR) Nous déclarons sous notre seule responsabilité que ce produit est conforme aux standards et directives suivants: est conforme à la Directive 2011/65/EU du Parlement Européen et du Conseil du 8 juin 2011 concernant la limitation d'usage de certaines substances dangereuses dans l'équipement électrique et électronique.
(ES) Declaramos bajo nuestra exclusiva responsabilidad que este producto cumple con las siguientes normas y estándares de funcionamiento: se encuentra conforme con la Directiva 2011/65/UE del Parlamento Europeo y del Consejo de 8 de junio de 2011 sobre la restricción del uso de determinadas sustancias peligrosas en los equipos eléctricos y electrónicos.
(PT) Declaramos por nossa total responsabilidade-de que este produto está em conformidade e cumpre as normas e regulamentações que se seguem: está em conformidade com a Directiva 2011/65/EU do Parlamento Europeu e com o Conselho de 8 de Junho de 2011 no que respeita à restrição de utilização de determinadas substâncias perigosas existentes em equipamento eléctrico e electrónico.
(IT) Dichiariamo, sotto la nostra responsabilità, che questo prodotto è conforme alle normative e ai regolamenti seguenti: è conforme alla Direttiva 2011/65/UE del Parlamento Europeo e del Consiglio dell'8 giugno 2011 sulla limitazione dell'uso di determinate sostanze pericolose nelle apparecchiature elettriche ed elettroniche.
(SV) Vi garanterar på eget ansvar att denna produkt uppfyller och följer följande standarder och bestämmelser: uppfyller direktiv 2011/65/EU från Europeiska parlamentet och EG-rådet från den 8 juni 2011 om begränsningen av användning av farliga substanser i elektrisk och elektronisk utrustning.
(FI) Vakuulamme yksinomaan omalla vastuullamme, että tämä tuote täyttää seuraavat standardit ja säädökset: täyttää Euroopan parlamentin ja neuvoston 8. kesäkuuta 2011 päivätyn direktiivin 2011/65/EU vaatimukset koskien vaarallisten aineiden käytön rajoitusta sähkö- ja elektronisissa laitteissa.
(NO) Vi erklærer under vårt eget ansvar at dette produktet er i samsvar med følgende standarder og regler: er i samsvar med EU-direktivet 2011/65/EU fra Europa-parlamentet og Europa-rådet, pr. 8 juni 2011, om begrensning i bruken av visse farlige stoffer i elektrisk og elektronisk utstyr.
(DA) Vi erklærer under eget ansvar, at dette produkt er i overensstemmelse med følgende standarder og bestemmelser: er i overensstemmelse med direktiv 2011/65/EU fra Europa-Parlamentet og Rådet af 8. juni 2011 om begrænsning af anvendelsen af visse farlige stoffer i elektrisk og elektronisk udstyr.
(HU) Felelősségünk teljes tudatában kijelentljük, hogy ez a termék teljes mértékben megfelel az alábbi szabványoknak és előírásoknak: je v souladu se směrnící 2011/65/EU Evropského parlamentu a Rady EU ze dne 8. června 2011, která se týká omezení použiti určitých nebezpečných látek v elektrických a elektronických zařízeních.
(CS) Na našivlastní zodpovědnost prohlašujeme, že je tento výrobek v souladu s následujícími standardy a normami: Je v súlade s normou 2011/65/EÚ Európskeho parlamentu a Rady z 8. júna 2011 týkajúcej sa obmedzenia používania určitých nebezpečných látok v elektrickom a elektronickom vybavení.


- CDM1142P
- Cordless Li-Ion Impact driver 20V CDM1142P
- SAFETY INSTRUCTIONS
- Additional safety warnings for drills and screw drivers Drill safety warnings
- Safety instructions when using long drill bits
- Safety warnings for battery
- Safety warnings for charger Intended use
- Residual risks
- Power cord replacement
- MACHINE INFORMATION
- Intended use
- Charger CDA1131P
- Battery CDA1132P
- Vibration level
- Description
- Fig. A
- OPERATING
- Removing the battery from the machine Fig. B
- Inserting the battery into the machine Fig. B
- Checking the battery charging status Fig. C
- Charging the battery (with the charger) Fig. C
- LED indicators (6)
- Fig.C
- Quick-Release Chuck
- Adjusting the direction of rotation
- Switching the machine on and off
- Work light (9)
- Belt hook (12)
- MAINTENANCE
- ENVIRONMENT
- Only for EC countries
- WARRANTY
- CE
- DECLARATION OF CONFORMITY CDM1142P - CORDLESS LI-ION IMPACT DRIVER
Brand : Ferm
Model : CDM1142P
Category : Drill