ESE 4216 - Lawn mower Gardol - Free user manual and instructions
Find the device manual for free ESE 4216 Gardol in PDF.
| Brand | Gardol |
| Model | ESE 4216 |
| Product type | Corded electric lawn mower |
| Cutting width | 42 cm (estimated) |
| Cutting height range | 25 – 73 mm, central continuous adjustment |
| Power supply | 230 V ~ 50 Hz |
| Motor power | Not specified (estimated 1600 W) |
| Cutting type | Rotary blade with grass catcher |
| Grass catcher capacity | Not specified (estimated 40 L) |
| Weight | Not specified (estimated 12 kg) |
| Cable length | Max. 50 m (section 3x1.5 mm²) |
| Safety | Two-point switch, restart protection, emergency stop |
| Main functions | Mowing, mulching possible via flap, collection in bag |
| Maintenance and cleaning | Manual cleaning with brush or cloth; do not use water or solvent |
| Spare parts and repairability | Original parts available; blade replaceable by specialist |
| Warranty | 5 years (under conditions) |
Frequently Asked Questions - ESE 4216 Gardol
User questions about ESE 4216 Gardol
0 question about this device. Answer the ones you know or ask your own.
Ask a new question about this device
Download the instructions for your Lawn mower in PDF format for free! Find your manual ESE 4216 - Gardol and take your electronic device back in hand. On this page are published all the documents necessary for the use of your device. ESE 4216 by Gardol.
USER MANUAL ESE 4216 Gardol
text_image
1 2: 7 STOP1= Read the operating manual before using for the first time
2= Caution, rotating blade
3= Keep others away from the danger area
4= Disconnect the mains plug before working on the cutter unit
5= Caution, the blade will continue to turn after the motor has been switched off
6= Switch off the motor and disconnect the mains plug before carrying out adjustment or cleaning work or if the mains lead has been snagged or damaged.
7= Caution, keep the mains lead away from the cutting tools.
①
text_image
Labeled diagram of a lawn mower with numbered parts for identification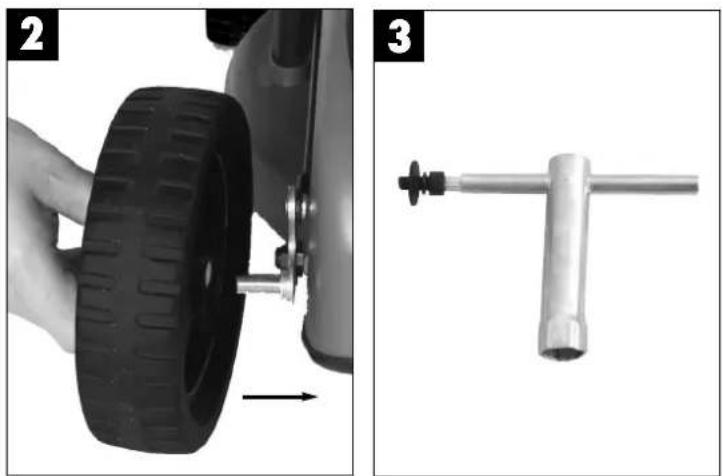
natural_image
Two-step diagram showing a hand adjusting a tire and a tool with a handle (no text or symbols)4

natural_image
Close-up of hands using a tool to adjust or install a tire component (no visible text or symbols)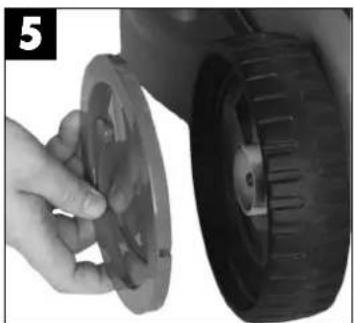
natural_image
Close-up of a hand holding a mechanical component next to a tire, no visible text or symbols
natural_image
Close-up of a black bicycle wheel handle and lever mechanism (no text or symbols visible)
natural_image
Close-up of a hand holding a black mechanical component with a circular knob (no text or symbols visible)
natural_image
Close-up of a black mechanical component with curved arrows indicating motion or assembly (no text or symbols visible)
natural_image
Close-up of a hand holding a tool interacting with a black mechanical component (no visible text or symbols)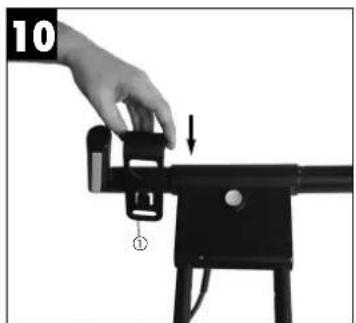
natural_image
Hand operating a camera setup with a lock and adjustment knob (no text or symbols visible)
natural_image
Diagram of a bicycle frame with arrows indicating motion direction (no text or symbols)
text_image
12 ① ②
natural_image
Black plastic hook-shaped object with a looped end, isolated on white background (no text or symbols)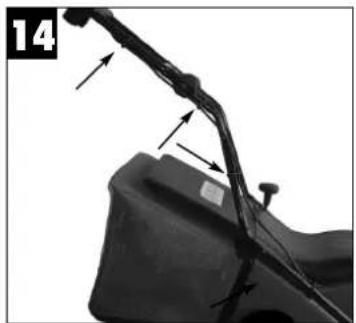
natural_image
Close-up of a mechanical device with arrows indicating motion or force direction (no text or symbols visible)
natural_image
Hand holding a black fabric box with metal frame, no visible text or symbols6

natural_image
Hand holding a black plastic bag with mesh mesh, no visible text or symbols
natural_image
Hand placing a black plastic component into a dark rectangular housing (no text or symbols visible)
natural_image
Person using a lawn mower to handle a bag, no visible text or symbols
natural_image
Close-up of a hand adjusting a black mechanical component (no visible text or symbols)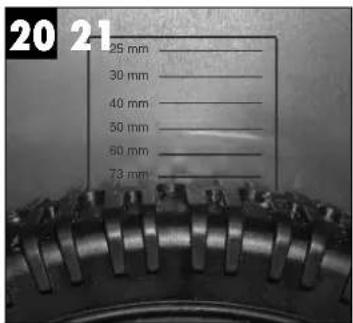
text_image
20 21 25 mm ____ 30 mm ____ 40 mm ____ 50 mm ____ 50 mm ____ 73 mm ____
natural_image
Close-up of a mechanical component with a circular head and directional arrows indicating rotation (no text or symbols)

natural_image
Close-up of a mechanical device with labeled parts (① and ②), no readable text or symbols beyond labels
text_image
23 ① ②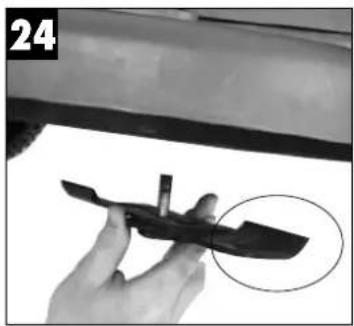
natural_image
Close-up of a hand holding a small black object with a circular highlight, next to a vehicle (no visible text or symbols)
natural_image
Close-up of a mechanical fan or impeller component with visible blades and central hub (no text or symbols)Before you carry out any work on this electric lawn mower, read the following safety instructions and the operating manual carefully.
Make yourself familiar with the adjusting parts and how to use the mower correctly.
Improper use of the electric lawn mower can cause serious injuries.
This electric lawn mower is only designed for cutting grass.
1. General safety instructions
● Never allow children or others who are not familiar with the operating instructions to use the lawn mower. Local regulations may fix the minimum age of the user.
● Disconnect the mains lead before carrying out any inspection, servicing and maintenance work
● The user is responsible for any harm to third parties in the working area of the lawn mower, caused by using the lawn mower.
- Only work in good light or provide the appropriate artificial light.
● Always check the mower for signs of damage.
- Ensure that all the guards are fitted and function correctly.
● Never use the mower when you are tired.
● Never use the mower in enclosed or poorly ventilated rooms or if there are inflammable or explosive fluids, vapours or gases nearby.
- Switch off the motor and disconnect the mains lead before releasing blockages in the discharge channel and before you check, clean, service or work on the lawn mower or if the mower has struck a foreign body.
● Before use always inspect the mower to check the cutting tools, fastening bolts and the entire cutting unit for signs of wear or damage. To prevent imbalance, worn or damaged cutting tools and fastening bolts may only be replaced in full.
● Damaged parts on the mower must be replaced by trained personnel. Use only genuine spare parts.
- Follow the instructions to fit or remove the blade and wear protective gloves.
- Check the site on which you intend to use the lawn mower and remove all objects that may be caught and thrown up by the mower. Foreign bodies must be removed before you start mowing. Keep an eye of the extension cables
that you need to power the mower.
● Always wear strong, anti-slip footwear and long trousers when using the mower. Never mow in bare feet or in open-toed sandals.
● Always use the lawn mower with the grass bag attached or with the safety flap closed if you are not using the grass bag.
- Do not lift the lawn mower when you start the motor.
● Never reach into rotating parts with your hands or feet. Always keep away from the discharge opening.
● Before you attach or empty the grass bag, switch off the motor and wait until the blade has reached a standstill.
● The safety distance produced by the long handle must be maintained at all times.
- If you use the mower on a slope, mow across the slope (not in up or down direction).
- Do not use the lawn mower on gradients of over 15%.
● Before you lift the lawn mower to transport it, switch off the motor, disconnect the mains lead and wait until the blade has reached a standstill.
- When the mower is working ensure that nobody, particularly children and animals, is in the immediate vicinity of the lawn mower. Ensure that you keep everybody 10 meters away from the mower when it is working.
- Keep the lawn mower in a dry place which is inaccessible to children.
● Repair work on the electrical parts of the lawn mower may only be carried out by an electrician.
- The mains leads must be no lighter than lightweight rubber hose cables H07RN-F as described in DIN 57 282/VDE 0282 and must have a minimum cross-section of 1.5mm^2 . The plug connectors must have safety contacts and the connection must be splashproof. The mains lead must be threaded through the strain-relief clamp on the strut and connected to the switch/plug combination. Before use check the lead for signs of damage and ageing. Never use the mower if the cables are not in perfect condition (this also applies to the motor supply cable on the mower). If the cable is damaged whilst the mower is working, disconnect the mains plug from the power supply immediately and then check the extent of the damage.
- When you start the motor the lawn mower must not be tilted unless it has to be raised for this purpose. In this case only tilt it up as far as is really necessary and only raise the side that is furthest away from the user.
- Pull the plug out of the socket-outlet if the device starts to vibrate in an unusual manner (check immediately).
- Ensure that all the nuts, bolts and screws are light and that the mower is in a safe condition for use.
● Shut down the motor and pull the mains power plug from the socket-outlet if ever a foreign object should be hit. Check for any damage on the lawn mower and have it repaired before you restart and use the mower. - Do not leave the mower out in the rain. The lawn must not be wet or very damp.
● Ensure that you have safe footing at all times whilst working with the mower.
● Only push the mower at walking pace. - Be particularly careful when changing direction with the mower whilst working on a slope.
- Be particularly careful when you change the direction of the mower or pull it towards you.
- Switch off the mower whenever it has to be tipped while moving, whenever you have to cross any surface other than the lawn and when taking it to and from the surface to be mown.
- Start or use the starter switch with care as described in the manufacturer's instructions. Ensure that your feet are a safe distance from the cutting tool.
● Never lift or carry the mower whilst the motor is running.
● Switch the mower off before leaving it. - Allow the motor to cool down before you place the machine in enclosed rooms for storage.
- Check the grass bag at regular intervals for signs of wear and to ensure that it is still in perfect working order.
● Before you adjust or clean the mower or check whether the mains lead is kinked or damaged, switch off the mower and disconnect the plug from the power supply.
● The connection sockets on the connectors must be made of rubber, soft PVC or other thermoplastic material with the same strength or they must be coated with this material. - Ensure that you do not push the mower over routes that might hamper the free movement of the extension cable.
- Do not switch the mower on and off frequently over a short period of time, and in particular do not play with the ON/OFF switch.
- As a result of the voltage fluctuations this mower causes as it gets up to speed, other equipment connected to the same circuit may suffer faults if the mains supply is not in perfect condition. In
this case suitable action has to be taken (for example connect the mower to a different circuit or run the mower on a circuit with lower impedance).
● Disconnect the plug from the power supply:
- whenever you leave the mower.
- if the mower starts to suffer unusual vibrations (check immediately).
● Always pull the mains power plug from the socket-outlet:
- Whenever you leave the machine unattended.
- If the machine starts to vibrate in an unusual manner (check immediately).
● The user is responsible for all accidents or dangers to third parties or their property.
2. Layout (see Fig. 1)
-
2-point safety switch
-
Cable grip
-
Handle fastener
-
Grass bag
-
Ejector flap
-
Central height adjuster
3. Correct use
Power supply
The lawn mower can be connected to any light socket-outlet (with 230 Volt alternating current). However, only a socket-outlet with earthing contact is permitted, which should be protected by providing a miniature circuit-breaker for 16A and an earth-leakage circuit-breaker with max. 30 mA.
Power cable for the device
Never use a power cable that is damaged in any way. The power cable for the device must not exceed 50m in length otherwise the performance of the electric motor will be impaired. The power cable must have a cross-section of 3 x 1.5mm ^2 . Insulation on lawn mower power cables frequently becomes damaged as a result of the following:
- Cuts caused by running over the cable
- Pinching caused by running the cable under doors or windows
- Cracks as the insulation ages
- Kinks caused by improper fastening or guidance of the power cable
Power cables damaged in these ways are often used in spite of the fact that the damaged insulation poses a risk to life. Cables, plugs and portable socket-outlets must meet the following requirements. Power
GB
cables for lawn mowers must have rubber insulation.
The power cables must be of type H05RN-F as a minimum and be 3-wire cables. Statutory regulations require that the type description is imprinted on the power cable. Never buy a power cable without such identifying markings! The plug and the portable socket-outlets on power cables must be made of rubber and be protected against splash water. The power cables may not be of unlimited length. Longer power cables require bigger conductor cross-sections.
Power cables and connection cables should be checked regularly for damage. Always make sure that the cables are switched off before you start to inspect them. Wind out the power cable completely. You should also check the power cable bushings on plugs and portable socket-outlets for kinks.
The lawn mower is designed for private use in the home garden and allotment garden.
Lawn mowers for the home garden and allotment garden are ones which are not normally used for more than 50 hours in the year and which are mainly used for the care of grass surfaces and lawns but not for public open spaces, parks, sports facilities or for agricultural or forestry purposes.
Compliance with the operating instructions enclosed by the manufacturer is essential for the proper use of the lawn mower. The operating instructions also contain all requirements for operation, maintenance and servicing.
Important! To avoid risk of injury to the user the lawn mower must never be used for trimming bushes, hedges or shrubs, for cutting and shredding climbing plants or lawns on roof gardens or in balconies, or for cleaning (vacuuming) paths or as a shredder for shredding tree and hedge trimmings. Furthermore, the lawn mower must never be used as a motorized hoe or for levelling uneven ground, e.g. for levelling mole-hills.
For safety reasons the lawn mower must never be used as a drive unit for other working tools or sets of tools of any kind unless expressly authorized by the manufacturer.
4. Assembly of the lawn mower
The lawn mower is delivered disassembled. The wheels, the entire push bar, the grass bag and the
handle for the central height adjuster all have to be assembled before the lawn mower can be used. Follow the operating instructions step by step and refer to the illustrations to make it easier to complete the assembly work.
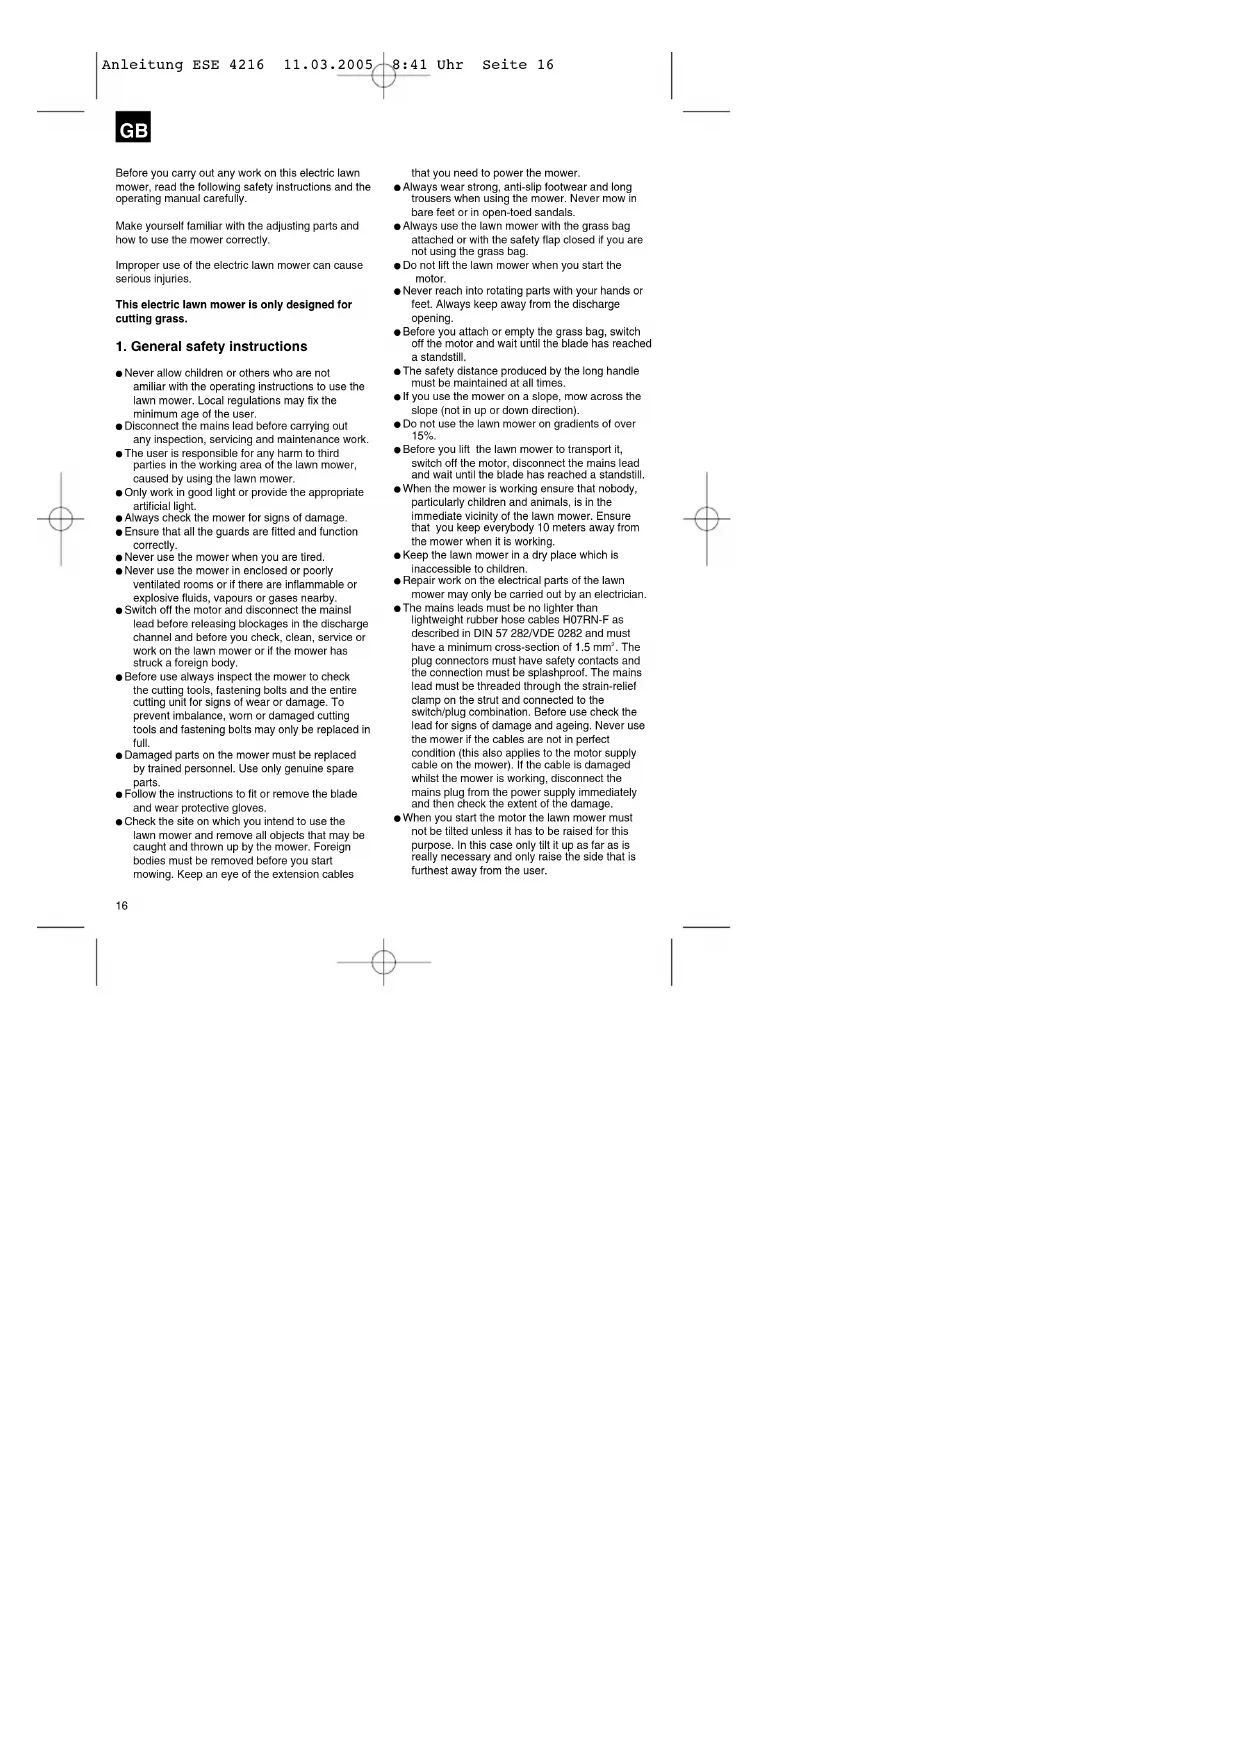
Fitting the wheels (see Figs. 2 to 5)
Take the lawn mower out of the box. The wheels are in the mowing compartment of the lawn mower. For protection during transportation a protective cap was fitted to each of the rear axles. These are no longer required for the later use of the lawn mower. Fit the wheel onto the axle (Fig. 2). Using the supplied universal wrench and the Allen screws with corresponding washers (Fig. 3), fasten the wheel in position (Fig. 4). Once you have fastened the wheel, fit the wheel cap (Fig. 5). Repeat for the other 3 wheels.
Assembling the adjuster knob for the central height adjuster
(see Figs. 6 and 7)
For protection during transportation a protective cap was fitted to the square bar for the central height adjuster. This is no longer required for the later use of the lawn mower.
Fit the supplied adjuster knob to the square bar (Fig. 6) and fasten it with the supplied screw (Fig. 6). Then fit the upper part of the adjuster knob to the lower part (Fig. 7).
Assembling the push bar (see Figs. 8 to 14)
Slide the lower push bar into the pre-mounted stay tubes (Fig. 8). Fasten the lower push bar with the supplied cap nuts as shown in Fig. 9.
The upper switch-off lever then has to be slid onto the lower push bar (Fig. 11). Then fasten the upper push bar with the supplied screws (1) and handwheels (2) (Fig. 12). Fasten the cable to the push bar (Fig. 14) using the supplied cable clips (Fig. 13).
Assembling the cable grip (see Fig. 10)
The cable grip must be slid onto the upper part of the handle until it locks into position. It can be fitted either on the side shown in Fig. 10 or on the opposite side.
Assembling the grass bag (see Figs. 15 to 17)
Pull the grass bag over the bar frame (Fig. 15). The grass bag must be fastened to the bar frame as shown in Fig. 16 and 17.
Before you ever fit the grass bag to the mower you
must ensure that the motor is switched off and the blade is not rotating. Lift the ejector flap (Fig. 1 / Item. 5) with one hand. With the other hand, hold the grass bag by the handle and fit from above (Fig. 18).
5. Adjusting the cutting height
Important! Never adjust the cutting height without the motor switched off and the power cable pulled out from the socket-outlet.
Before you start to mow the grass, check that the blade is not blunt and that its fasteners are not damaged. Replace a blunt and/or damaged blade to avoid imbalance. Always switch off the motor and pull out the mains power plug before starting this inspection.
The cutting height is adjusted as follows (see Figs. 19 and 21):
● To reduce the cutting height, turn the adjuster knob to the left.
● To increase the cutting height, turn the adjuster knob to the right.
Reading off the cutting height
The cutting height is infinitely adjustable between 25 - 73mm.
The cutting height can be read off on the outside of the housing just above the rear left wheel (see Fig. 20).
6. Using for the first time
Connect the power cable to the plug unit (Fig. 22/Item. 1) in the handle and secure the cable with the cable grip (Fig. 22/Item. 2). The cable grip for the power cable must be used at all times.
Important!
In order to prevent the lawn mower from being switched on unintentionally it comes with a two-point switch (Fig. 23). To switch on, press and hold the button (1). Then press the button switch (2) and release the button (1). To switch off, release the button switch (2).
Repeat this procedure several times so that you can be sure that your device works properly. Before you ever start any work of repair or maintenance on the device, always check that the blade is not rotating and the device has been disconnected from the mains power supply.
Important! Never open the ejector flap when the
grass bag is being emptied and the motor is still running. A rotating blade can cause injury. Fasten the ejector flap and grass bag with good care. Always switch off the motor before removing. The safety distance between the blade housing and the user created by the long handles must be maintained at all times. Take particular care when mowing and changing the direction of mowing on slopes. Make sure you have a firm footing at all times, wear shoes with non-slip soles and a good grip, and long trousers. Always mow crosswise to the slope.
For safety reasons, never use the lawn mower to mow grass on slopes with an incline of more than 15 degrees.
Take particular care when moving backwards with the lawn mower and when pulling the lawn mower. Risk of tripping!
7. Tips on mowing properly
It is recommended that you work on an overlapping basis when mowing the grass.
Only ever use sharp blades which are in perfect condition to avoid fraying the grass and making it turn yellow.
For the most attractive mowing results, guide the lawn mower in straight lines as far as possible. In so doing, allow the mowing paths to overlap by a few centimeters to avoid leaving any unmowed lines. The frequency with which you have to mow the lawn will depend largely on the speed with which the grass grows. In the main growing season (May - June) you will probably need to mow the lawn twice a week,
otherwise just once a week. The cutting height should be between 4 - 6cm and the amount of growth before mowing again should be 4 - 5cm. If the grass is allowed to grow somewhat longer on occasion, never make the mistake of cutting it back to the normal height in one go. This will harm the lawn. Never cut it back by more than half the height in one go. Keep the underside of the mower housing clean at all times. It is essential that you remove all grass deposits on the mower as these will impair the start-up, reduce the quality of the mowing results and impair the grass ejection. On slopes, always mow crosswise to the slope. You can prevent the lawn mower from slipping down by holding a position at an angle upwards.
Select the cutting height according to the actual length of the grass. If necessary, mow a number of times so that you never cut more than 4cm of grass in one go.
Always switch off the motor before starting to inspect

GB
the blade. Remember that the blade will continue to rotate for several seconds after the motor has been switched off. Never try to stop the blade rotating yourself.
Check that the blade is firmly fastened at regular intervals and that it is in good condition and sharp. Should this not be the case, have it resharpened or replaced.
Should the blade hit an object while rotating, stop the lawn mower and wait until the blade has come to a complete standstill. Then check the condition of the blade and the blade holder. Replace if either is damaged.
Lay out the power cable in loops on the ground in front of the socket outlet. Mow the grass by moving away from the socket outlet/cable and make sure that the power cable always lies in mown grass only so that you can never run over it with the lawn mower.
8. Mowing
Whenever any grass remains are left in the lawn during mowing, this means that the grass bag has to be emptied. Important! Always switch off the motor and wait for the blade to stop rotating before you remove the grass bag.
To remove the grass bag, lift the ejector flap with one hand and lift out by the handle with the other hand. In accordance with safety regulations the ejector flap swings down when the grass sack is removed and closes the rear ejector opening. If any grass remains are left in the opening it is advisable to move the lawn mower back by approx. 1m so that the motor can start up more easily again.
Do not remove any grass cutting remains inside the mower housing and on the working tool by hand.
Always use suitable equipment instead, e.g. a brush. To ensure that the mown grass is collected effectively, the grass bag and especially the net must always be cleaned on the inside after use.
Never fit the grass bag without the motor switched off and the blade at a standstill.
Lift the ejector flap with one hand and, holding by the handle with the other hand, fit the grass bag from above.
9. Maintenance and storage
Before starting any work of maintenance and cleaning on the lawn mower or removing the safety guards you must ensure that the motor is shut down
and the power cable disconnected from the mains power supply.
Worn or damaged blades, blade holders and bolts must be replaced in sets by an authorized dealer, otherwise the blade will become unbalanced. Never clean the lawn mower with running water, particularly high-pressure water.
Make sure that all fastening elements (screws, nuts, etc.) are fastened tightly at all times so that you can work in safety with your lawn mower.
Check the grass bag regularly for signs of wear. Replace any worn or damaged parts.
Store your lawn mower in a dry room. For a longer service life, clean and lubricate all screwed parts such as the wheels and axles.
Regular care of your lawn mower will not only ensure that it offers you lasting service, it will also help you to mow your lawn with care and with ease. Use a brush or cloth to clean your lawn mower. Never use solvents or water to remove soiling. The part which is subject to the most wear is the blade. Check the condition of the blade and its fasteners at regular intervals. If the blade is worn it must be replaced or resharpened immediately. If the lawn mower should vibrate excessively, this means that the blade is not correctly balanced or has been deformed by impacts. If this is the case it should be replaced (see Fig. 23 and 24).
10. Replacing the blade
For safety reasons we recommend that you always have the blade replaced by an authorized dealer. Important! Always wear work gloves!
Use only genuine replacement blades, otherwise proper functioning and safety cannot always be guaranteed.
To change the blade, proceed as follows:
● Unfasten the fastening screw using the supplied ring wrench.
- Remove the blade and replace with a new one. - When fitting the blade, make sure it is installed in the right direction. The blade's fly regulators must jut into the motor compartment (see Fig. 24). The dome mounts must be aligned with the punch holes in the blade (see Fig. 25).
- Then retighten the fastening screw with the ring wrench (see Fig. 25). The tightening torque should be approx. 25 Nm.
At the end of the season you should perform a general inspection of the lawn mower and remove any residue.
Before the start of each season it is imperative that
you check the condition of the blade.
Contact our customer services center for any repairs. Use only genuine spare parts.
11. Ordering of spare parts
Spare parts can be ordered from ISC GmbH (see the warranty certificate for the address). When doing so, please supply the following information:
● Device type
● Article No. of the device
● ID No. of the device
● Spare part number of the required spare part
Spare blade 34.055.21
12. Technical data
Mains voltage: 230V - 50Hz
Power input: 1600 W
Motor speed: 3000min
Cover width: 47cm
Cutting width: 42cm
Cutting height adjustment: infinite 25 - 73mm
Grass bag volume: 62 liters
LPA sound pressure level: 79.7 dB(A)
LWA sound power level: 94 dB(A)
Vibration at the handle bars: 10 m/s
GB
13. Troubleshooting
| Fault | Possible | causes |
| The motor fails to start a) The capacitor is defective a) The mower housing is b) There is no electricity at the plug b) c) The cable is defective c) Check the cable d) The combined switch/plug is d) Have repaired by the defective Customer Service Center e) The connectors have become e) Have repaired by the separated from the motor Customer Service Center or the capacitor f) The mower is standing in high f) Start in low grass or on an grass g) The mower housing is clogged | clogged Have repaired by the Customer Service CenterCheck the cable and the fuse | |
| The motor performance drops | a) The grass is too high or too damp b) The mower housing is clogged c) The blade is severely worn | a) Correct the cutting height b) Clean the housing c) Replace the blade |
| Cutting is irregular | a) The blade is worn b) Wrong cutting height | a) Replace or resharpen the blade b) Correct the cutting height |
Subject to change without notice
GB WARRANTY CERTIFICATE
The product described in these instructions comes with a 5-year warranty covering defects. This 5-year warranty period begins with the passing of risk or when the customer resolves the product.
For warranty claims to be accepted, the product has to receive the current maintenance and be put to the proper use as described in the operating instructions.
Your statutory rights of warranty are naturally unaffected during these 5 years.
This warranty applies in Germany, or in the respective country of the manufacturer's main regional sales partner, as a supplement to local regulations. Please note the details for contacting the customer service center responsible for your region or the service address listed below.
E CERTIFICADO DE GARANTIA
Eschenstraße 6 - D-94405 Landau/Isar (Germany)
Info-Tel. 0180-5 120 509 • Telefax 0180-5 835 830
88 Recycling alternative to the demand to return electrical devices: As an alternative to returning the electrical device, the owner is obliged to cooperate in ensuring that the device is properly recycled if ownership is relinquished. This can also be done by handing over the used device to a returns center, which will dispose of it in accordance with national commercial and industrial waste management legislation. This does not apply to the accessories and auxiliary equipment without any electrical components which are included with the used device.
natural_image
Simple line drawing of a trash bin with crossed lines indicating no waste or plastic (no text or symbols)© Nur für EU-Länder
For EU countries only
Never place any electric tools in your household refuse.
To comply with European Directive 2002/96/EC concerning old electric and electronic equipment and its implementation in national laws, old electric tools have to be separated from other waste and disposed of in an environment-friendly fashion, e.g. by taking to a recycling depot.
The reprinting or reproduction by any other means, in whole or in part, of documentation and papers accompanying products is permitted only with the express consent of ISC GmbH.