
POWX07588 - Saw PowerPlus - Free user manual and instructions
Find the device manual for free POWX07588 PowerPlus in PDF.
| Product type | Table saw |
| Brand | PowerPlus |
| Model | POWX07588 |
| Rated power | 800 W (S6 15%) / 500 W (S1) |
| Supply voltage | 230-240 V, 50 Hz |
| No-load speed | 2950 min⁻¹ |
| Blade diameter | 200 mm |
| Blade bore | 16 mm |
| Blade thickness | 2.4 mm |
| Number of teeth | 24 |
| Max cutting depth at 90° | 43 mm |
| Max cutting depth at 45° | 27 mm |
| Table dimensions | 505 x 373 mm |
| Weight | 11 kg |
| Sound pressure level | 87 dB(A) |
| Sound power level | 100 dB(A) |
| Protection class | II (double insulation) |
| Dust extraction outlet | ∅ 30 mm |
| Warranty | 36 months |
| Package contents | Table saw, blade guard, parallel fence, miter gauge, push stick, mounted blade |
| Main functions | Ripping, crosscutting, miter cutting (0° to 45°), adjustable parallel fence, adjustable miter gauge |
| Maintenance | Clean with a damp cloth; do not use solvents; keep ventilation openings clean |
| Safety | Blade guard, riving knife, push stick, two-button on/off switch, emergency stop |
| Usable materials | Solid wood, laminated wood, particle board, plywood; do not use for metal or stone |
Frequently Asked Questions - POWX07588 PowerPlus
User questions about POWX07588 PowerPlus
0 question about this device. Answer the ones you know or ask your own.
Ask a new question about this device
Download the instructions for your Saw in PDF format for free! Find your manual POWX07588 - PowerPlus and take your electronic device back in hand. On this page are published all the documents necessary for the use of your device. POWX07588 by PowerPlus.
USER MANUAL POWX07588 PowerPlus
natural_image
Yellow power plant machine with transparent internal components and control panel (no visible text or symbols)
NL NEDERLANDS VERTAALDE VERSIE VAN DE ORIGINELE HANDLEIDING
FR FRANÇAIS TRADUCTION DU MODE D'EMPLOI D'ORIGINE
EN ENGLISH ORIGINAL INSTRUCTION MANUAL

FIG. A

Fig. 1 Fig. 2

Fig. 3 Fig. 4
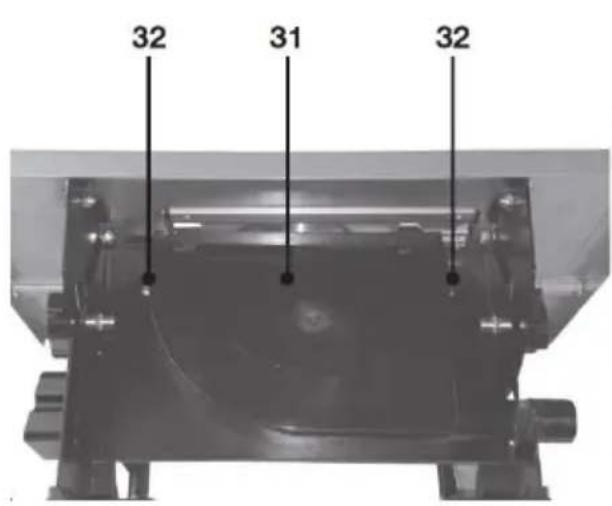
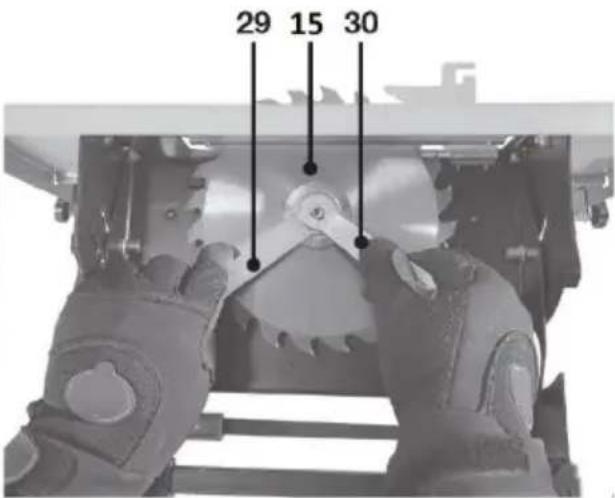
Fig. 5 Fig. 6

Fig. 7
Fig. 8
natural_image
Close-up of a gloved hand holding a transparent plastic object, with part number 11 pointing to it (no text or symbols on the object itself)Fig. 9

Fig. 10
1 TOEPASSING 3
2 BESCHRIJVING (FIG. A, B & C)....3
3 INHOUD VAN DE VERPAKKING 3
4 TOELICHTING VAN DE SYMBOLEN 4
5 ALGEMENE VEILIGHEIDSVOORSCHRIFTEN ....4
5.1 Werkplaats....4
5.2 Elektrische veiligheid ....4
2 BESCHRIJVING (FIG. A, B & C)
natural_image
Simple line drawing of a rounded rectangular shape with a small mark on the top right corner (no text or symbols)Philippe Vankerkhove
Certificatiemanager
03/12/2021, Lier - Belgium
1 UTILISATION .... 3
2 DESCRIPTION (FIG. A, B & C) 3
3 LISTE DES PIÈCES CONTENUES DANS L'EMBALLAGE....3
4 PICTOGRAMMES 4
5 CONSIGNES DE SÉCURITÉ GÉNÉRALES ....4
natural_image
Simple hand-drawn outline of a rounded rectangular shape with no text or symbolsPhilippe Vankerkhove
03/12/2021, Lier - Belgium
1 APPLICATION....3
2 DESCRIPTION (FIG. A, B & C) 3
3 PACKAGE CONTENT LIST....3
4 SYMBOLS 4
5 GENERAL POWER TOOL SAFETY WARNINGS ....4
5.1 Working area 4
5.2 Electrical safety....4
5.3 Personal safety .... 5
5.4 Power tool use and care....5
5.5 Service....5
6 ADDITIONAL SAFETY INSTRUCTIONS 6
7 SAFETY EQUIPMENT 7
7.1 Cleaving wedge....7
7.2 Saw blade protector....7
7.3 Push stick....7
8 UNPACKING AND ASSEMBLY 7
8.1 Installing/removing saw blade guard (Fig. 1-2)....7
8.2 Adjusting the Riving knife (Fig.3-4) 8
8.3 Mounting / changing the saw blade (Fig. 5-6)....8
8.4 Dust Extraction (Fig. 7)....8
9 OPERATION....9
9.1 Check before starting the device!....9
9.2 On/off switch....9
9.3 Workpiece stops....9
9.3.1 Mitre angle stop (Fig. 10)....9
9.3.2 Parallel stop (Fig. 8-9)....9
9.4 Setting the saw blade angle (Fig. 7)....10
9.5 Sawing 10
9.5.1 Lengthwise sawing....10
9.5.2 Crosswise sawing 11
10 CLEANING AND MAINTENANCE....11
POWERPLUS® HIGH QUALITY TOOLS
POWX07588 EN
10.1 Cleaning the device 11
10.2 Unit maintenance....11
11 STORAGE, TRANSPORTATION .... 12
11.1 Storage 12
12 TECHNICAL DATA 12
13 NOISE....12
14 WARRANTY....13
15 ENVIRONMENT 13
16 DECLARATION OF CONFORMITY 14
TABLE SAW 800W-200MM POWX07588
1 APPLICATION
The device is designed to cleave and-cross-cut solid wood, laminated wood, chipboard, wood core plywood and similar wooden materials. Round pieces may not be sawed as the rotating saw blade may cause them to roll. Only those materials may be processed for which the particular saw blade is designed. Only saw blades suitable for the unit (carbide and chrome vanadium blades) may be used. The use of high-speed steel blades and cutting wheels of any type is not permitted. The unit may not be used in areas where there is an explosion hazard. Not suitable for professional use.het

WARNING! For your own safety, read this manual and the general safety instructions carefully before using the appliance. Your power tool should only be given to other users together with these instructions.
2 DESCRIPTION (FIG. A, B & C)
- On switch I (green)/ Off switch 0 (red)
- Front knob for angle adjustment
- Rear knob for angle adjustment
- Cut angle indicator
- Dust extraction connection
- Groove in table surface
- Saw blade guard
- Cleaving wedge
-
Knob for parallel guide
-
Mitre guide
- Parallel stop
- Knob for mitre angle
- Push stick
- Table surface
- saw blade
- Agnle scale indicator
- Mounting holes
- Measuring scale
- Extension for mitre guide
3 PACKAGE CONTENT LIST
■ Remove all packaging.
- Remove remaining packing and packing inserts (if included).
- Check that the package contents are complete.
- Check the appliance, the power cord, the power plug and all accessories for transportation damage.
- Keep the packaging until expiration of the warranty period. Then take it to your local waste disposal system.

WARNING: Packaging materials are not toys! Children must not play with plastic bags! There is a danger of suffocation!
Table saw
Blade guard
Parallel stop
Mitre guide
Push-stick
Operating Instructions
2 x wrench
1 x blade (mounted on
the machine)

If any parts are missing or damaged, please contact your dealer.
4 SYMBOLS
The following symbols are used in this manual and/or on the machine:
 | Denotes risk of personal injury or damage to the tool. |  | Read manual before use. |
 | Conforms to essential safety standards of applicable European directives. |  | Wear noise protection. |
 | Wear eye protection. |  | Keep hands away from blades, Don’t touch the blades when starting or while operating the unit. |
 | Wear a mask in dusty conditions! |  | Class II - The machine is double insulated; Earthing wire is therefore not necessary. |
5 GENERAL POWER TOOL SAFETY WARNINGS
Read all safety warnings and instructions. Failure to heed warnings and follow instructions may result in electric shock, fire and/or serious injury. Keep safety warnings and instructions for future reference. The term "power tool" in the safety warnings refers to your mains-operated (corded) power tool or battery-operated (cordless) power tool.
5.1 Working area
- Keep working area clean and well lit. Untidy and dark areas can lead to accidents.
- Do not operate power tools in potentially explosive surroundings, for example, in the presence of inflammable liquids, gases or dust. Power tools create sparks that may ignite the dust or fumes.
- Keep children and bystanders at a distance when operating a power tool. Distractions can cause you to lose control of it.
5.2 Electrical safety

Always check that the power supply corresponds to the voltage on the rating plate.
- Power tool plugs must match the outlet. Never modify the plug in any way. Do not use adapter plugs with earthed power tools. Unmodified plugs and matching outlets will reduce the risk of a lethal electric shock.
- Avoid body contact with earthed surfaces such as pipes, radiators, kitchen ranges and refrigerators. There is an increased risk of a lethal electric shock if your body is earthed.
- Do not expose power tools to rain or wet conditions. If water gets inside a power tool, it will increase the risk of a lethal electric shock.
- Do not damage the cord. Never use the cord for carrying, pulling or unplugging the power tool. Keep the cord away from heat, oil, sharp edges or moving parts. Damaged or tangled cords increase the risk of a lethal electric shock.
- When operating a power tool outdoors, use an extension cable suitable for outdoor use. Using a cord suitable for outdoor use reduces the risk of a lethal electric shock.
- If operating a power tool in a damp location is unavoidable, use a power supply protected by a residual current device (RCD). Using an RCD reduces the risk of a lethal electric shock.
5.3 Personal safety
- Stay alert, watch what you are doing and use common sense when operating a power tool. Do not use a power tool when you are tired or under the influence of drugs, alcohol or medication. A moment of inattention when operating a power tool may result in serious personal injury.
- Use safety equipment. Always wear eye protection. Using safety equipment such as a dust mask, non-skid safety shoes, a hard hat, or hearing protection whenever it is needed will reduce the risk of personal injury.
- Avoid accidental starts. Ensure the switch is in the off position before inserting the plug. Carrying power tools with your finger on the switch or plugging in power tools when the switch is in the on position makes accidents more likely.
- Remove any adjusting keys or spanners before turning on the power tool. A spanner or key left attached to a rotating part of the power tool may result in personal injury.
- Do not reach out too far. Keep your feet firmly on the ground at all times. This will enable you to retain control over the power tool in unexpected situations.
- Dress properly. Do not wear loose clothing or jewellery. Keep your hair, clothing and gloves away from the power tool. Loose clothes, jewellery or long hair can become entangled in the moving parts.
- If there are devices for connecting dust extraction and collection facilities, please ensure that they are attached and used correctly. Using such devices can reduce dust-related hazards.
5.4 Power tool use and care
- Do not expect the power tool to do more than it was designed to do. Use the correct power tool for what you want to do. A power tool will achieve better results and be safer if used in the circumstances for which it was designed.
- Do not use the power tool if the switch cannot turn it on and off. A power tool with a broken switch is dangerous and must be repaired.
- Disconnect the plug from the power source before making adjustments, changing accessories, or storing power tools. Such preventive safety measures reduce the risk of starting the power tool accidentally.
- Store power tools when not in use, out of the reach of children and do not allow people who are not familiar with the power tool or these instructions to operate it. Power tools are potentially dangerous in the hands of untrained users.
- Maintenance. Check for misalignment or jammed moving parts, breakages or any other feature that might affect the operation of the power tool. If it is damaged, the power tool must be repaired. Many accidents are caused by using poorly maintained power tools.
- Keep cutting tools sharp and clean. Properly maintained cutting tools with sharp cutting edges are less likely to jam and are easier to control.
- Use the power tool, accessories and cutting tools, etc., in accordance with these instructions and in the manner intended for the particular type of power tool, taking into account the working conditions and the work which needs to be done. Using a power tool in ways for which it was not intended can lead to potentially hazardous situations.
5.5 Service
- Your power tool should be serviced by a qualified specialist using only standard spare parts. This will ensure that it meets the required safety standards.
6 ADDITIONAL SAFETY INSTRUCTIONS
- When using the saw blades with hard metal teeth (Carbon tipped) it is advisable to use blades with a negative or slightly positive cutting angle. Do not use any saw blades with deeply cut teeth. They can grip the protective cap.
- Attention: First carefully assemble all the parts before starting work. Follow the procedure as indicated.
- Always clamp or press the workpiece firmly against the saw guide, before you carry out the process. The use of all possible clamping set-ups is preferable to using your hands.
- Important: If you are holding the workpiece by hand for the process to be carried out, keep a minimum distance of 100 mm from the saw blade.
- Always press the workpiece against the bench.
- Keep the saw blade sharp and check regularly whether it rotates freely without abnormal vibrations. Replace the saw blade if necessary.
- Allow the machine to rotate freely until it reaches the maximum number of revolutions, before you start the process.
- Maintain the air inlets at the back and the bottom of the bench saw machine and electric motor for a longer machine life. Dust piles must be removed.
- Always lock the different degree set-ups before you start processing.
- Only buy suitable saw blades with a number of revolutions of at least 6000 revolutions per minute.
- Only use the correct saw blade. Too small or too big saw blades are extremely dangerous.
- Regularly inspect the saw blade for any faults. Replace the saw blade if necessary.
- Grease the new saw blade and clean the flanges before you assemble the new blade. Then assemble the blade in the correct direction and pull the flanges firmly using the central bolt.
- Only use original flanges. All other types are not suitable.
- Never work without the protective cap of the saw blade.
- The moving part of the protective cap must also remain assembled.
- Never grease the saw blade while it is rotating.
■ Always keep your hands removed from the track of the saw blades.
- Never pick up the workpiece by grasping with your hands along or behind the saw blade.
- Ensure that the workpiece never touches the saw blade before the machine has been switched on.
- Never process metal or stone sorts with this machine.
- Use support aids in order to support long workpieces.
- Never use the machine in a dangerous environment, where inflammable gases or fluids are present.
- Never leave the machine unattended without first disconnecting it from the mains voltage.
- If you hear abnormal noises, try to trace them or take the machine to a recognized fitter, or repair company.
- If a part is broken or damaged, replace it or repair it immediately.
- Never stand in the track of the saw blade but stand to the left or the right of the saw bench.
- Your hands must likewise be placed next to the track of the saw blade.
- Always use the push stick instead of your hands to push the wood through the saw.
■ Always place the wood at the front of the saw bench and then push it further back.
- For mitring only the adjustable guide must be used and the fence must be removed.
- Never use the fence as a linear measure for cutting off beams.
- If the saw blade is locked: first switch off the machine before you attend to the fault.
- Avoid workpieces hitting back in your direction by taking the following measures:
i. Always use sharp saw blades.
ii. Do not saw too small workpieces.
POWX07588 EN
iii. Never release the workpiece before it has been completely pushed through the saw.
iv. Always adjust the guide parallel to the saw blade.
v. Never remove the saw protection.
- Before you continue sawing, ensure that you are standing firmly and that your hands are in the required position.
- Never use thinners to clean the machine. Only use a damp cloth for cleaning.
- Do not use saw blades which are damaged or deformed.
- Replace table insert when worn.
- Only use saw blades specified by the manufacturer that are intended for working with wood or similar materials according to EN847-1.
- Take care that the selection of the saw blade depends on the material to be cut.
- Connect labelsaws to a dust-collecting device when sawing.
■ Use and correct adjustment of the riving knife - Use and correct adjustment of the upper saw blade guard.
■ Take care when slotting.
7 SAFETY EQUIPMENT
7.1 Cleaving wedge
The cleaving wedge (8) prevents a workpiece being caught by the ascending teeth and being thrown against the operator. The cleaving wedge must remain in place during operation.
7.2 Saw blade protector
The saw blade guard (7) protects the user from accidentally touching the saw blade and from flying splinters. The saw blade protector must always remain in place during operation.
7.3 Push stick
The push stick (13)) serves as an extension of the hand and protects the user from accidentally touching the saw blade. The push stick must always be used when the gap between the stop and the saw blade is less than 120 mm.
8 UNPACKING AND ASSEMBLY
Unpack the unit and make sure all of the pieces are there.

Note: If any of the parts is missing or damaged contact the retailer.
Before carrying out any work on the machine, disconnet the mains plug from the power supply
8.1 Installing/removing saw blade guard (Fig. 1-2)
- Loosen the knob (33) as far as possible until the knob (33) touches the nut (34), as shown on figure B. Attention: do not adjust the nut (34).
- Push the carriage bolt (35) as far as possible through the saw blade guard (7) so that the square profile of the carriage bolt (35) protrudes from the saw blade guard (7).
- Mount the saw blade guard (7) with the carriage bolt (35) into the L-shaped recess (18) of the Riving knife (8): first forward and then down, as shown on figure C.
- Then push the carriage bolt (35) back again, with the square profile into the recess in the saw blade guard (7).
- Tighten the knob (33) as far as possible. Attention: the upper saw blade guard must be able to move freely. Disassembly is carried out in reverse order.
8.2 Adjusting the Riving knife (Fig.3-4)
■ Remove the saw blade guard (7)
- Loosen the screws (19) and remove the riving knife (8). The distance between saw blade (15) and Riving knife (8) should be 3-8 mm, as shown on figure F.
- Ensure the riving knife is straight and centered behind the saw blade (15).
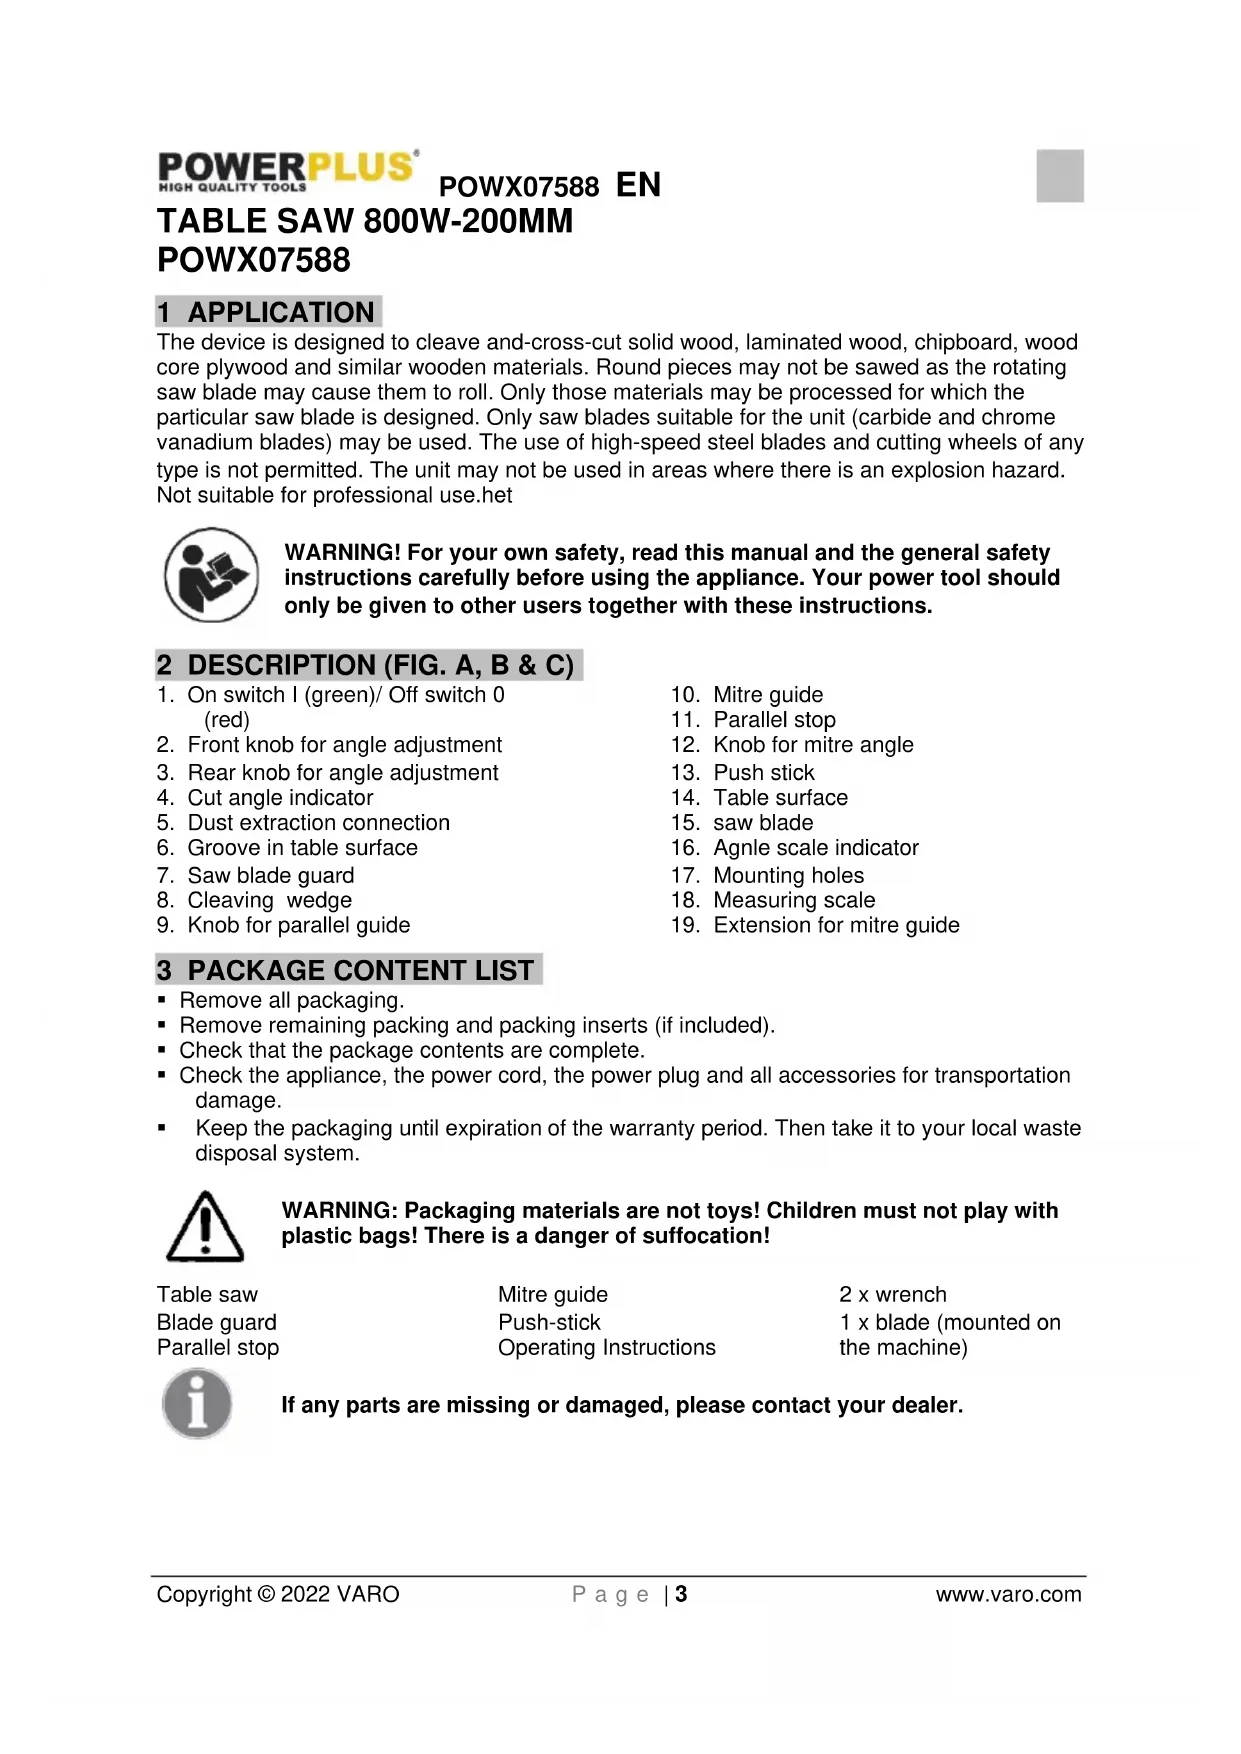
8.3 Mounting / changing the saw blade (Fig. 5-6)

When mounting the saw blade, wear protective gloves. Danger of injury when touching the saw blade.

Only use saw blades that correspond with the characteristic data given in the operating instructions. Use only saw blades that are marked with a speed equal or higher than the speed marked on the machine.

Do not under any circumstances use grinding discs as the cutting tool.
- Remove the saw blade cover (31) by loosening the Phillips screws (32).
- Loosen the nut by attaching the large spanner (29) to the nut and using the small spanner (30) on the motor shaft in order to counteract. Attention: turn the nut in the direction of rotation of the saw blade.
- Remove the outer flange and remove the saw blade (15).
- Carefully clean the saw blade flanges before installing the new saw blade. Replace and tighten the new saw blade in reverse order.
The arrow marked on the saw blade, which indicates the direction of rotation, must point in the same direction as the arrow marked on the machine, the saw blade teeth must point downwards on the front of the saw.
■ Before you start working with the saw again, the functionality of the protective devices must be checked.
- Warning! After each saw blade change, check that the saw blade guard (7) opens and closes as required. Additionally check whether the saw blade (4) runs freely in the saw blade guard (7).
- Warning! After each saw blade change, check that the saw blade (15) can move freely in the table insert (6), when in vertical position and when tilted to 45°.
8.4 Dust Extraction (Fig. 7)
- The saw is equipped with a dust extraction system.
- It is strongly advised to use a dust extraction system that is suitable for the material wherever possible.
- Regularly check and clean the suction channels.
9 OPERATION

Risk of injury! In the event of a functional fault, immediately press the red button 0 on the On / Off switch and unplug.
9.1 Check before starting the device!

Risk of injury! The device may only be put into operation if there are no defects. If a part is defective danger it must be replaced before the device is used again.
Check to make sure the device is in safe operating condition:
- Check to make sure there are no visible defects.
- Check to make sure all device components are correctly mounted.
- Check to make sure the safety equipment is functioning properly.
- Check to make sure that the saw blade runs freely.
- Check whether the adjusting screw for setting the angle of tilt is tightened.
9.2 On/off switch
- Switching on: Pressing the green button I on the On / Off switch (1) switches on the saw. Before starting to saw, wait until the blade has reached maximum speed.
- Switching off: Pressing the red button 0 on the On / Off switch (1) switches off the saw.
9.3 Workpiece stops
For cross-cutting of wooden parts, the Mitre guide(10) must be used.
- Fix the Mitre guide extension (19) to the Mitre guide (10) with the knobs for mitre guide.
- Push the Mitre guide(10) into the groove of the table surface.
■ Loosen the knob for mitre angle (12). - Turn the Mitre guide extension (19) until the arrow points to the desired angle.
- Tighten the knob for mitre angle (12) again.
- Check the distance between Mitre guide extension (19) and saw blade (15).

Warning! Do not push the Mitre guide extension (19) too far towards the saw blade. The distance between Mitre guide extension (19) and saw blade (15) should be approx. 2 cm. If necessary, loosen the two knobs for mitre guide and adjust the Mitre guide extension (19). Afterwards, retighten the knobs for mitre guide.
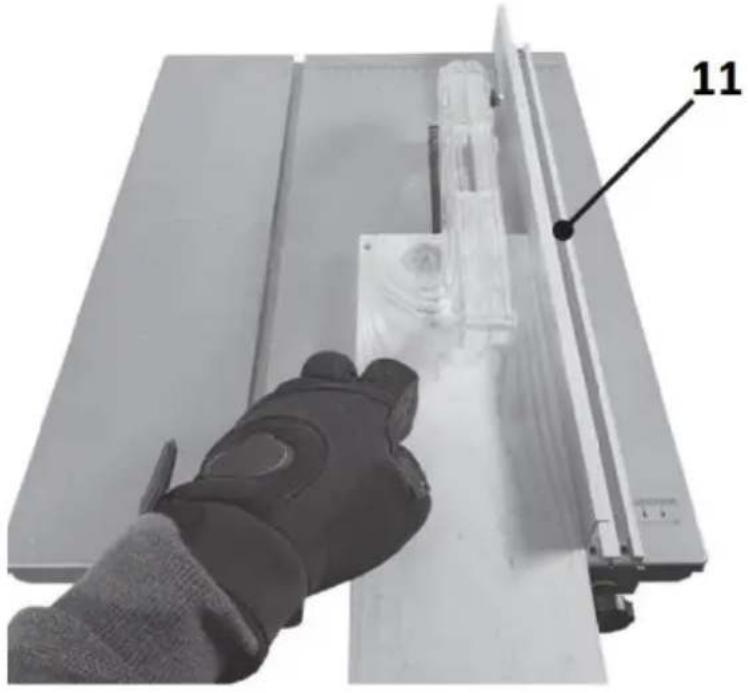
9.3.2 Parallel stop (Fig. 8-9)

Do not use the paralell stop and miter gauge at the same time!
When slitting wood parts, the Parallel guide (11) must be used.
- Mount the Parallel guide (11) on the table surface (14) with the clamping plate (26); Washers (27) and knobs (12): Outside of the saw table: set screw (12) and washer (27); Inside of the saw table: clamping plate (26).
User modes
The supplied Parallel guide (11) has two different height guide surfaces, one on each side of the guide. Use the lower height side for flat workpieces, the higher stop height for tall workpieces.
- To change the height of the stop, loosen the knobs (12) on the Parallel guide (11) and remove it from the table.
- Turn the Parallel guide (11) 180 ° so that the front end points to the rear.
- Tighten the knobs (12) again.
Cutting width
The Parallel guide (11) can be mounted on both sides of the table surface (14).
■ Loosen the two knobs (9).
- With the aid of the ruler (18) on the table surface (14), the Parallel guide (11) can be adjusted to the desired size.
- Tighten the two knobs (12) to fix the Parallel guide (11).
- In addition to the scale display, measure the cutting width between saw blade and Parallel guide. After a new setting, make a test cut to check the dimensions.
9.4 Setting the saw blade angle (Fig. 7)

Risk of injury! Parts of the body or objects located in the adjustment area may be caught by the operating saw blade! Only adjust the blade angle when the saw blade is at a standstill!
- Loosen both the front knob for angle adjustment (2) and the rear knob for angle adjustment (3).
- Adjust the saw blade angle by sliding the two knobs (2, 3) until the indicator (16) matches the desired angle on the angle scale (4).
- Tighten both the front knob for angle adjustment (2) and the rear knob for angle adjustment (3).
9.5 Sawing
There are two types of sawing methods:
Lengthwise sawing (Fig.9)
■ Sawing the workpiece in the length of the wood grain
■ Sawing off the workpiece crosswise
Cross-cutting or cutting off, use the mitre guide (Fig.10)
9.5.1 Lengthwise sawing
- Secure the fence to the correct measuring position and remove the cut-off guide from the bench carriage.
- Press the wood lightly towards the bench and let it glide against the cut-off fence.
POWX07588 EN
Remain at least 3 cm. from the front of the saw blade before you switch on thmotor. The side of the wood which is against the fence must be completely straight. Keep your hands at least 10 cm away from the saw track to be followed.
- Switch on the motor and wait until the saw blade has reached the maximum speed before you start sawing.
- While you press the wood against the bench and the fence, you can carefully push the wood through the saw blade without forcing it.
- Never pull the workpiece backwards. If necessary, switch off the motor first without altering the position of the workpiece.
9.5.2 Crosswise sawing
- Remove the fence and apply the cross-cut fence in the righthand carriage.
- Adjust the height of the saw blade (see lengthwise sawing).
- Press the workpiece against the cross-cut fence and keep at least 2,5 cm distance from the front of the saw blade.
- Switch on the motor and wait until the maximum speed has been reached.
- Press the workpiece against the fence and the bench. Carefully push the wood through the saw blade. Continue until behind the saw blade. Then switch off the motor and keep this position until the saw blade has stopped completely before you remove the wood.
- Never pull the wood back. If necessary, switch the motor off and keep the position until the saw blade has stopped completely.
10 CLEANING AND MAINTENANCE
10.1 Cleaning the device

Risk of electric shock! Never splash with water or expose to water. Never use detergents or solvents to clean. These may cause irreparable damage to the unit The plastic pieces may be corroded by the chemicals.
Careful treatment and regular cleaning will ensure that the unit remains functional and performs well for a long time.
■ Remove dirt with a brush.
■ Wipe the tool with a damp cloth.
- Keep ventilation slots clean and free of dust
10.2 Unit maintenance
Risk of injury! Before conducting any maintenance work make sure the device is unplugged (disconnect the power supply).
Risk of injury! Shortly after sawing, the saw blade may be very hot. Allow a hot blade to cool down. Never dean a hot saw blade with flammable liquids.
A still saw blade can cause injury! Use gloves to change the saw blade.
11 STORAGE, TRANSPORTATION
11.1 Storage

Risk of injury! Store the unit in such a way that it cannot be started by unauthorised persons. Ensure that no one is able to injury themselves on the stored unit.
Machine damage! Do not store unprotected in a damp environment.
12 TECHNICAL DATA
| Rated Voltage | 230-240 V |
| Rated Frequency | 50 Hz |
| Rated Power | S1:500W S6 15% 800W |
| Weight | 11,00 kg |
| Protection class | I |
| Rotation speed | 2950 min-1 |
| Diameter of saw blade (external) | 200 mm |
| Saw blade hole (internal) | 16 mm |
| Saw blade thickness | 2.4 mm |
| Number of teeth | 24T |
| Max. cutting depth at 90° | 43 mm |
| Max. cutting depth at 45° | 27 mm |
| Table size | 505 x 373 mm |
| Dust extraction outlet | ∅ 30mm |
13 NOISE
| Noise values measured according to relevant standard. (K=3) | |
| Acoustic pressure level LpA | 87 dB(A) |
| Acoustic power level LwA | 100 dB(A) |

ATTENTION! The sound power level may exceed 85 dB(A), in this case individual hearing protection shall be worn.
14 WARRANTY
- This product is warranted as provided by law for a 36-month period effective from the date of purchase by the first user.
- This warranty covers all material or production flaws excluding : batteries, chargers, defective parts subject to normal wear & tear such as bearings, brushes, cables, and plugs, or accessories such as drills, drill bits, saw blades, etc. ; damage or defects resulting from maltreatment, accidents or alterations; nor the cost of transportation.
- Damage and/or defects resulting from inappropriate use also do not fall under the warranty provisions.
- We also disclaim all liability for any bodily injury resulting from inappropriate use of the tool.
- Repairs may only be carried out by an authorised customer service centre for Powerplus tools.
- You can always obtain more information at the number 00 32 3 292 92 90.
- Any transportation costs shall always be borne by the customer, unless agreed otherwise in writing.
- At the same time, no claim can be made on the warranty if the damage of the device is the result of negligent maintenance or overload.
- Definitely excluded from the warranty is damage resulting from fluid permeation, excessive dust penetration, intentional damage (on purpose or by gross carelessness), inappropriate usage (use for purposes for which the device is not suitable), incompetent usage (e.g. not following the instructions given in the manual), inexpert assembly, lightning strike, erroneous net voltage. This list is not exhaustive.
- Acceptance of claims under warranty can never lead to the prolongation of the warranty period nor commencement of a new warranty period in case of a device replacement.
- Devices or parts which are replaced under the warranty therefore remain the property of Varo NV.
- We reserve the right to reject a claim whenever the purchase cannot be verified or when it is clear that the product has not been properly maintained. (Clean ventilation slots, carbon brushes serviced regularly, etc.).
- Your purchase receipt must be kept as proof of date of purchase.
- Your appliance must be returned undismantled to your dealer in an acceptably clean state, (in its original blow-moulded case if applicable to the unit), accompanied by proof of purchase.
15 ENVIRONMENT
Should your appliance need replacement after extended use, do not dispose of it with the household refuse, but in an environmentally safe way.
Please dispose of used motor oil in a manner that protects the environment. We suggest you take it in a sealed container to your local service station for recycling. Do not throw it into the refuse or pour it on the ground
VARO N.V. - Vic. Van Rompuy N.V. Joseph Van Instraat 9 - BE2500 Lier - BELGIUM, declares that,
product: Table saw trade mark: PowerPlus model: POWX07588
is in conformity with the essential requirements and other relevant provisions of the applicable European Directives, based on the application of European harmonized standards. Any unauthorized modification of the apparatus voids this declaration.
European Directives (including, if applicable, their amendments up to the date of signature); 2011/65/EU 2014/30/EC 2006/42/EC
European harmonized standards (including, if applicable, their amendments up to the date of signature);
EN62841-1:2015
EN62841-3-1:2014
EN55014-1:2017
EN55014-2:2015
EN IEC 61000-3-2:2019
EN61000-3-3:2013
Keeper of the Technical Documentation : Philippe Vankerkhove, VARO – Vic. Van Rompuy N.V.
The undersigned acts on behalf of the company CEO,

natural_image
Simple line drawing of a rounded rectangular shape with a curved top edge (no text or symbols)Philippe Vankerkhove Certification Manager 03/12/2021, Lier - Belgium
1 EINSATZBEREICH 3
natural_image
Simple line drawing of a rounded rectangular shape with no text or symbolsPhilippe Vankerkhove
03/12/2021, Lier - Belgium
1 APLICACIÓN....3
The parallel guide (11) can be mounted on both sides of the table surface (14).
■ Loosen the two knobs (9).
- With the aid of the ruler (18) on the table surface (14), the parallel guide (11) can be adjusted to the desired size.
- Tighten the two knobs (12) to fix the parallel guide (11).
- In addition to the scale display, measure the cutting width between saw blade and parallel guide. After a new setting, make a test cut to check the dimensions.
natural_image
Simple line drawing of a rounded rectangular shape with no text or symbolsPhilippe Vankerkhove
03/12/2021, Lier - Belgium
1 APPLICAZIONE 3
2 DESCRIZIONE (FIGG. A, B & C)....3
3 DISTINTA DEI COMPONENTI....3
4 SIMBOLI 4
5 NORME GENERALI DI SICUREZZA....4
natural_image
Simple line drawing of a rounded rectangular shape with a small mark on the top right corner (no text or symbols)Philippe Vankerkhove
Regulatory Affairs – Compliance Manager
03/12/2021, Lier - Belgium
1 APLICAÇÃO....3
9.2 Interruptor Ligado (On)/Desligado (Off)....9
9.2 Interruptor Ligado (On)/Desligado (Off)
natural_image
Simple line drawing of a rounded rectangular shape with a small protrusion (no text or symbols)Philippe Vankerkhove
03/12/2021, Lier - Belgium
1 BRUKSOMRÅDE 3
2 BESKRIVELSE (FIG. A, B & C)......3
3 PAKKENS INNHOLD 3
4 SYMBOLFORKLARING .... 4
5 GENERELLE SIKKERHETSADVARSLER 4
natural_image
Simple line drawing of a rounded rectangular shape with a curved top edge (no text or symbols)Philippe Vankerkhove
Regulatoriske saker – Samsvarsleder
03/12/2021, Lier - Belgium
1 ANVENDELSE 3
2 BESKRIVELSE (FIG. A, B & C) 3
3 MEDF∅LGENDE INDHOLD 3
4 SYMBOLER 4
5 GENERELLE SIKKERHEDSFORSKRIFTER 4
natural_image
Simple hand-drawn outline of a rounded rectangular shape with no text or symbolsPhilippe Vankerkhove
Regulatory Affairs (afdelingen for juridiske anliggender) – Compliance Manager 03/12/2021, Lier - Belgium
1 ANVÄNDNINGSOMRÅDE 3
2 BESKRIVNING (FIG. A, B & C) 3
3 FÖRPACKNINGSINNEHÅLL 3
4 SYMBOLER....4
5 ALLMÄNNA SÄKERHETSANVISNINGAR 4
8 UPPACKNING OCH MONTERING....7
8.1 Installation/borttagning av klingskyddet (Fig. 1-2) 7
3 FÖRPACKNINGSINNEHÅLL
natural_image
Simple hand-drawn sketch of a rounded rectangular shape with no text or symbolsPhilippe Vankerkhove
03/12/2021, Lier - Belgium
1 KÄYTTÖ 3
2 KUVAUS (KUVA A, B & C)....3
3 PAKKAUKSEN SISÄLTÖ....3
4 SYMBOLIT 4
5 YLEISET TURVALLISUUSOHJEET....4
PÖYTÄSAHA 800 W – 200 MM POWX07588
1 KÄYTTÖ
Do not use the paralell stop and miter gauge at the same time!
natural_image
Simple line drawing of a rounded rectangular shape with no text or symbolsPhilippe Vankerkhove
03/12/2021, Lier - Belgium
1 ΕΦΑΡΜΟΓΗ....3
natural_image
Simple line drawing of a rounded rectangular shape with no text or symbolsPhilippe Vankerkhove
03/12/2021, Lier - Belgium
1 PRIMJENA 3
2 OPIS (SLIKE A, B I C) 3
3 POPIS SADRŽAJA PAKETA 3
4 SIMBOLI 4
5 OPĆA UPOZORENJA O ELEKTRIČNIM ALATIMA....4
6 DODATNE SIGURNOSNE UPUTE....6
7 SIGURNOSNA OPREMA....7
7.1 Klin za kalanje....7
7.2 Štitnik lista pile....7
7.3 Štap za guranje 7
8 RASPAKIRAVANJE I SASTAVLJANJE....7
8.1 Umetanje/uklanjanje štitnika lista pile (slike 1 – 2)....7
8.2 Podešavanje klina za kalanje (slike 3 - 4)....8
8.3 Postavljanje/zamjena lista pile (slika 5 – 6)......8
6 DODATNE SIGURNOSNE UPUTE
- Prilikom korištenja listova pile sa zupcima od tvrdog metala (vrhovi od ugljika) preporučljivo je koristiti listove pile s negativnim ili malim pozitivnim kutom rezanja. Ne koristite nikakve listove pile s duboko urezanim zupcima. Oni mogu zahvatiti zaštitni poklopac.
natural_image
Simple line drawing of a rounded rectangular shape with a small mark on the top right corner (no text or symbols)Philippe Vankerkhove
03/12/2021, Lier - Belgium
1 PRIMENA 3
2 OPIS (SL. A, B & C) 3
3 SPISAK SADRŽAJA PAKOVANJA .... 3
4 SIMBOLI 4
5 OPŠTA BEZBEDNOSNA UPUTSTVA ZA ELEKTRIČNE ALATE .4
5.1 Radna oblast 4
6 DODATNA BEZBEDNOSNA UPUTSTVA....6
7 ZAŠTITNA OPREMA 7
7.1 Klin za razdvajanje....7
7.2 Štitnik lista testere....7
7.3 Štap za guranje ....7
8 RASPAKIVANJE I MONTAŽA....7
8.1 Montiranje / uklanjanje štitnika lista testere (Sl. 1-2)....8
8.2 Podešavanje klina za razdvajanje (Sl. 3-4)....8
8.3 Montiranje / zamena lista testere (Sl. 5-6)....8
8.4 Uklanjanje prašine (Sl. 7)....8
9 RAD 9
9.1 Proverite pre uključivanja uređaja! 9
6 DODATNA BEZBEDNOSNA UPUTSTVA
- Kada se koriste listovi testere sa tvrdim metalnim zubima (sa karbidnim vrhovima) preporučuje se da se koriste listovi sa negativnim ili blago pozitivnim uglom sečenja. Ne koristite listove testere sa duboko usečenim zubima. Oni mogu da zahvate zaštitni poklopac.
- Pažnja: Prvo pažljivo sklopite sve delove pre početka rada. Pratite postupak kao što je navedeno.
- Uvek pričvrstite radni predmet stegom ili ga čvrsto pritisnite uz graničnik pre nego što izvršite proces. Upotreba svih mogućih načina pričvršćivanja stegom je bolje nego da koristite ruke.
- Važno: Ukoliko rukom držite radni predmet tokom procesa koji treba izvršiti, ruke držite na odstojanju od najmanje 100 mm od lista testere.
■ Uvek pritisnite radni predmet uz radni sto. - Održavajte list testere oštrim i redovno proveravajte da li se slobodno obrće bez neuobičajenih vibracija. Zamenite list testere ukoliko je to potrebno.
■ Sačekajte da se mašina slobodno obrće sve dok ne postigne maksimalni broj obrtaja pre nego što započnete proces. - Održavajte otvore za ulaz vazduha na zadnjoj i na donjoj strani stone testere i elektromotora za duži životni vek mašine. Nagomilana prašina se mora ukloniti.
■ Uvek blokirajte postavke različitog stepena pre početka obrade. - Kupujte samo odgovarajuće listove testere sa brojem obrtaja od najmanje 6000 obrta u minutu.
- Koristite samo tačan list testere. Isuviše mali ili isuviše veliki listovi su izuzetno opasni.
- Redovno pregledajte list testere da biste utvrdili da li ima bilo kakvih nedostataka. Zamenite list testere ukoliko je to potrebno.
- Podmažite novi list testere i očistite prste pre nego što montirate novi list. Zatim montirajte list u pravilnom smeru i čvrsto povucite prirubnice pomoću centralnog zavrtnja.
- Koristite samo originalne prirubnice. Svi ostali tipovi su neodgovarajući.
■ Nikada ne radite bez zaštitnog poklopca lista testere.
■ Pokretni deo zaštitnog poklopce mora takođe da ostane montiran.
■ Nikada ne podmazujte list testere dok se on obrće.
■ Uvek držite ruke na udaljenosti od putanje lista testere.
■ Nikada ne podižite radni predmet hvatajući ga rukama duž ili iza lista testere. - Osigurajte da radni predmet nikada ne dodirne list testere pre nego što se mašina uključi.
■ Nikada ne obrađuje ni metal ni kamen ovom mašinom. - Koristite pomagala za oslanjanje da biste oslonili dugačke radne predmete.
- Nikada ne koristite ovu mašinu u opasnoj okolnoj sredini, u kojoj su prisutni zapaljivi gasovi ili tečnosti.
- Nikada ne ostavljajte mašinu bez nadzora ukoliko je prethodno niste isključili iz električne mreže.
- Ukoliko čijete neuobičajene zvuke, pokušajte da utvrdite odakle dolaze ili odnesite mašinu kod ovlašćenog mehaničara ili u preduzeće za popravke.
■ Ukoliko je neki deo polomljen ili oštećen, odmah ga zamenite ili popravite. - Nikada nemojte da stojite na putanji lista testere već stojite sa leve ili desne strane stola testere.
- Na isti način, i vaše ruke moraju da budu postavljene sa strane putanje lista testere.
■ Uvek koristite štap za guranje umesto ruku za guranje drveta kroz testeru.
■ Uvek postavite drvo na prednju stranu ploče testere a zatim ga gurnite unazad.
- Za koso sečenje mora da se koristi samo podesivi graničnik a paralelni graničnik se mora ukloniti
■ Nikada ne koristite paralelni graničnik kao meru za odsecanje greda.
- Ukoliko se list testere blokira: prvo isključite mašinu pre nego što pristupite otklanjanju greške.
- Izbegavajte da radni predmeti odskoče unazad u vašem pravcu preduzimanjem sledećih mera:
i. Uvek koristite oštre listove testere.
ii. Ne secite isuviše male radne predmete.
iii. Nikada ne oslobađajte radni predmet pre nego što se potpuno ne progura preko testere.
iv. Uvek podesite da graničnik bude paralelan sa listom testere.
v. Nikada ne uklanjajte štitnik testere.
- Pre nego što počnete da sečete testerom, osigurajte da stojite čvrsto i da su vam ruke u položaju koji se zahteva.
- Nikada ne koristite razređivače za čišćenje mašine. Za čišćenje koristite samo vlažnu krpu.
■ Ne koristite listove testere koji su oštećeni ili deformisani.
- Kada se umetak ploče pohaba zamenite ga.
natural_image
Simple line drawing of a rounded rectangular shape with no text or symbolsPhilippe Vankerkhove
03/12/2021, Lier - Belgium
1 OBLAST POUŽITÍ....3
2 POPIS (OBRÁZKY A, B, C)....3
3 OBSAH BALENÍ....3
4 SYMBOLY 4
5 OBECNÁ BEZPEČNOSTNÍ UPOZORNĚNÍ PRO ELEKTRICKÉ STROJE....4
STOLNÍ OKRUŽNÍ PILA 800 W – 200 MM POWX07588
1 OBLAST POUŽITÍ
03/12/2021, Lier - Belgium
1 POUŽÍVANIE 3
2 POPIS (OBR. A, B A C) 3
3 OBSAH BALENIA....3
4 VYSVETLENIE SYMBOLOV 4
5 VŠEOBECNÉ BEZPEČNOSTNÉ VAROVANIA PRE ELEKTRICKÉ NÁRADIE....4
5.1 Pracovná plocha ....4
natural_image
Simple line drawing of a rounded rectangular shape with no text or symbolsPhilippe Vankerkhove
Regulačné záležitosti – Compliance Manager
03/12/2021, Lier - Belgium
1 DOMENII DE UTILIZARE....3
2 DESCRIERE (FIG. A, B & C) 3
3 CONTINUTUL PACHETULUI 3
4 SIMBOLURI....4
5 AVERTISMENTE GENERALE DE SIGURANTĂ PRIVIND APARATELE ELECTRICE 4
FERĂSTRĂU CU MASĂ 800 W – 210 MM POWX07588
1 DOMENII DE UTILIZARE
natural_image
Simple hand-drawn sketch of a rounded rectangular shape with a curved line on top (no text or symbols)Philippe Vankerkhove
Divizia de reglementare – Director de conformitate
03/12/2021, Lier - Belgium
1 ZASTOSOWANIE....3
2 OPIS (RYC. A, B & C) 3
3 SPIS CZEŚCI....3
4 OZNACZENIA 4
5 OGÓLNE ZASADY BEZPIECZNEJ PRACY ELEKTRONARZĘDZIAMI....4
Do not use the paralell stop and miter gauge at the same time!
natural_image
Simple line drawing of a rounded rectangular shape with no text or symbolsnatural_image
Simple line drawing of a rounded rectangular shape with a small mark at the bottom (no text or symbols)Philippe Vankerkhove
03/12/2021, Lier - Belgium
natural_image
Simple line drawing of a rounded rectangular shape with no text or symbolsPhilippe Vankerkhove
natural_image
Simple line drawing of a rounded rectangular shape with a small arrowhead on top (no text or symbols)Philippe Vankerkhove
03/12/2021, Lier - Belgium

natural_image
Yellow and gray industrial machine with visible components and mounting base (no text or symbols)varo
WWW.VARO.COM
DESIGNED AND MARKETED BY VARO
©copyright by varo
VARO - VIC. VAN ROMPUY nv
JOSEPH VAN INSTRAAT 9 - 2500 LIER - BELGIUM
OFFICES:


- BESCHRIJVING (FIG. A, B & C)
- POWERPLUS® HIGH QUALITY TOOLS
- POWX07588 EN
- TABLE SAW 800W-200MM POWX07588
- APPLICATION
- DESCRIPTION (FIG. A, B & C)
- PACKAGE CONTENT LIST
- SYMBOLS
- GENERAL POWER TOOL SAFETY WARNINGS
- Working area
- Electrical safety
- Personal safety
- Power tool use and care
- Service
- ADDITIONAL SAFETY INSTRUCTIONS
- SAFETY EQUIPMENT
- Cleaving wedge
- Saw blade protector
- Push stick
- UNPACKING AND ASSEMBLY
- Installing/removing saw blade guard (Fig. 1-2)
- Adjusting the Riving knife (Fig.3-4)
- Mounting / changing the saw blade (Fig. 5-6)
- Dust Extraction (Fig. 7)
- OPERATION
- Check before starting the device!
- On/off switch
- Workpiece stops
- Parallel stop (Fig. 8-9)
- User modes
- Cutting width
- Setting the saw blade angle (Fig. 7)
- Risk of injury! Parts of the body or objects located in the adjustment area may be caught by the operating saw blade! Only adjust the blade angle when the saw blade is at a standstill!
- Sawing
- Lengthwise sawing (Fig.9)
- Cross-cutting or cutting off, use the mitre guide (Fig.10)
- Lengthwise sawing
- Crosswise sawing
- CLEANING AND MAINTENANCE
- Cleaning the device
- Unit maintenance
- STORAGE, TRANSPORTATION
- Storage
- WARRANTY
- ENVIRONMENT
- Interruptor Ligado (On)/Desligado (Off)
- FÖRPACKNINGSINNEHÅLL
- PÖYTÄSAHA 800 W – 200 MM POWX07588
- KÄYTTÖ
- Do not use the paralell stop and miter gauge at the same time!
- DODATNE SIGURNOSNE UPUTE
- DODATNA BEZBEDNOSNA UPUTSTVA
- STOLNÍ OKRUŽNÍ PILA 800 W – 200 MM POWX07588
- OBLAST POUŽITÍ
- FERĂSTRĂU CU MASĂ 800 W – 210 MM POWX07588
- DOMENII DE UTILIZARE
Brand : PowerPlus
Model : POWX07588
Category : Saw