Plissé MDL08 - Toaster ALESSI - Free user manual and instructions
Find the device manual for free Plissé MDL08 ALESSI in PDF.

User questions about Plissé MDL08 ALESSI
0 question about this device. Answer the ones you know or ask your own.
Ask a new question about this device
Download the instructions for your Toaster in PDF format for free! Find your manual Plissé MDL08 - ALESSI and take your electronic device back in hand. On this page are published all the documents necessary for the use of your device. Plissé MDL08 by ALESSI.
USER MANUAL Plissé MDL08 ALESSI
natural_image
Line drawing of a modern flat-screen toaster with ribbed top and side control buttons (no text or symbols)MDL08 - "Plissé" Tostapane - Toaster design Michele De Lucchi 2020
Italiano 6
English 14
Français 22
Dansk 31
Deutsch 39
Español 48
Nederlands 56
Norsk 65
Português 73
Svenska 81
Suomi 89
Ελληνικά 97
Русский 106
Český 114
Polski 122
Slovenščina 130
Magyar 138
Slovenský 146
MDL08
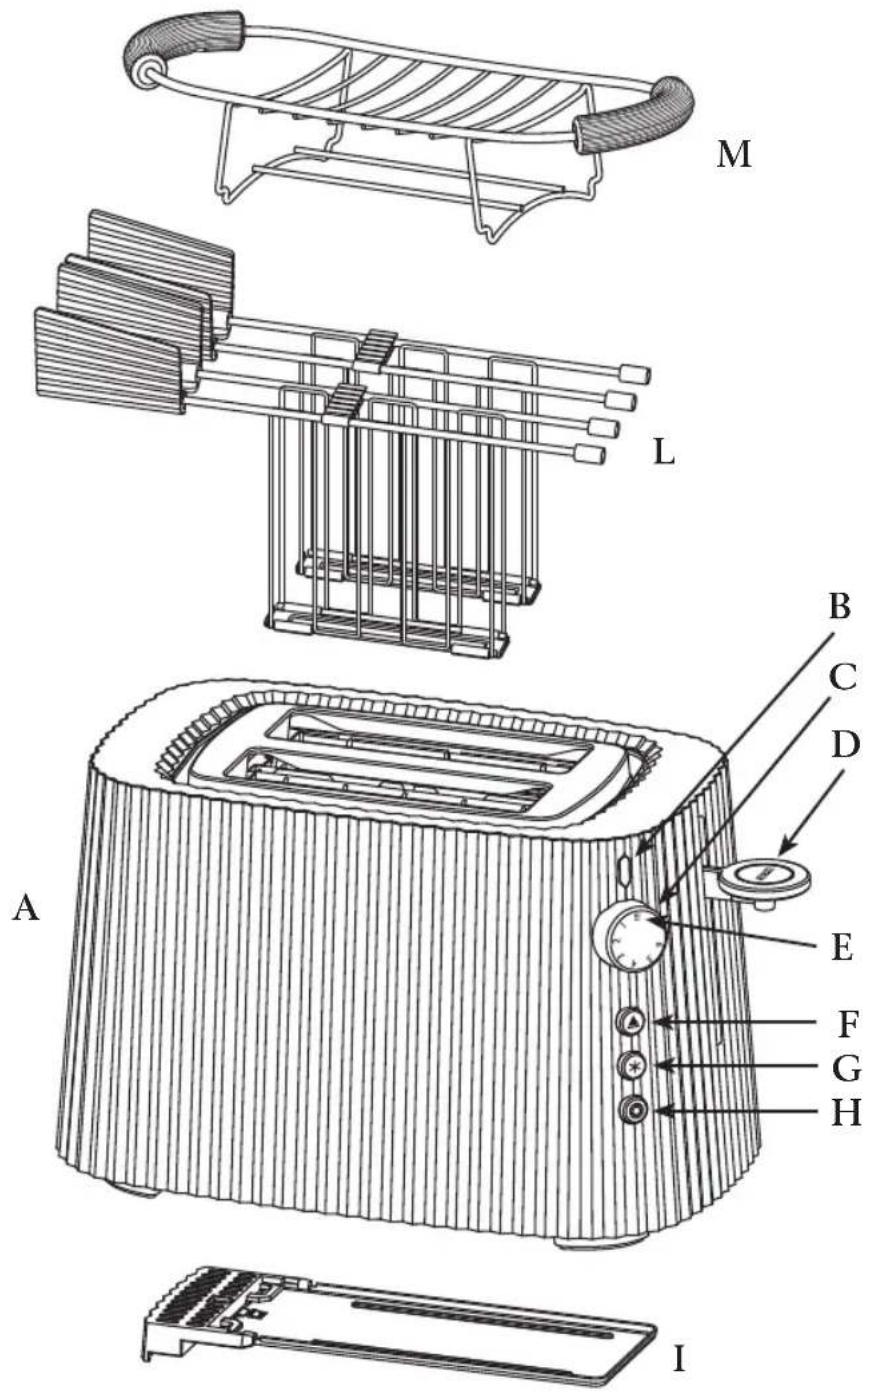
fig. 1
natural_image
Illustration of a hand inserting into a device casing with no visible text or symbolsfig. 2
natural_image
Illustration of a hand inserting a component into a device casing (no text or symbols visible)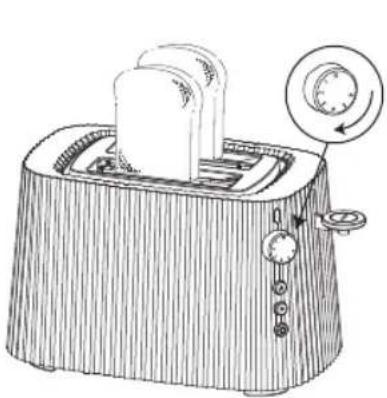
natural_image
Line drawing of a toaster with a circular dial indicator showing the rotary knob (no text or symbols present)
natural_image
Line drawing of a toaster with a control panel showing rotary buttons and a downward arrow indicating cooling (no text or symbols present)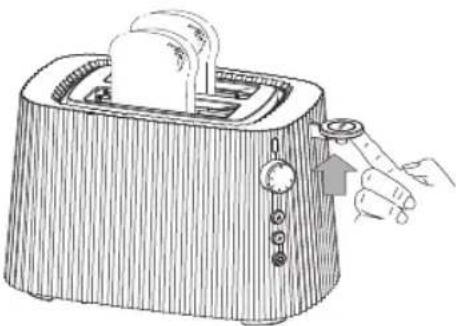
natural_image
Illustration of a hand pressing down on a textured rectangular toaster with a lid (no text or symbols)fig. 4 fig. 5 fig. 3
natural_image
Line drawing of a toaster with a side panel showing the blade and handle (no text or symbols)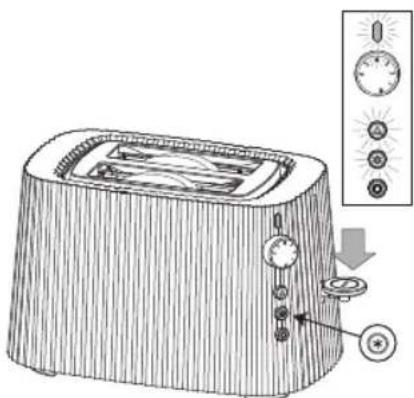
natural_image
Line drawing of a wooden toaster with a hand adjusting its tip (no text or symbols)fig. 7fig. 6 fig. 8
natural_image
Line drawing of a wooden toaster with two blades and a handle (no text or symbols)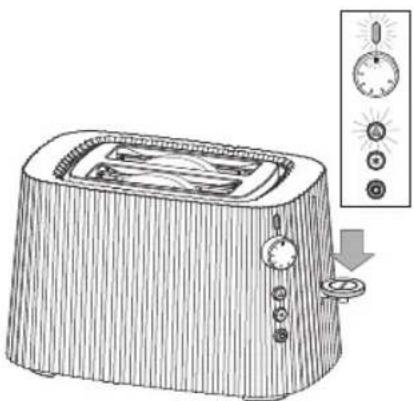
natural_image
Line drawing of a toaster with a control panel and indicator lights (no text or symbols)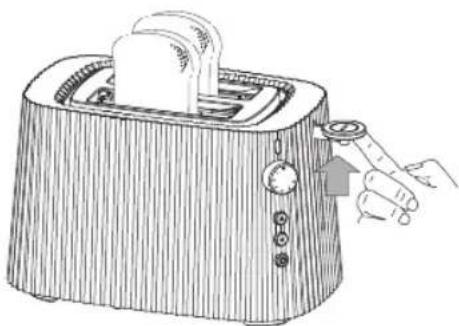
natural_image
Line drawing of a toaster with a hand adjusting the tray (no text or symbols)fig. 9 fig. 10 fig. 11

natural_image
Line drawing of a toaster with a roll of dough and a circular dial indicator (no text or symbols)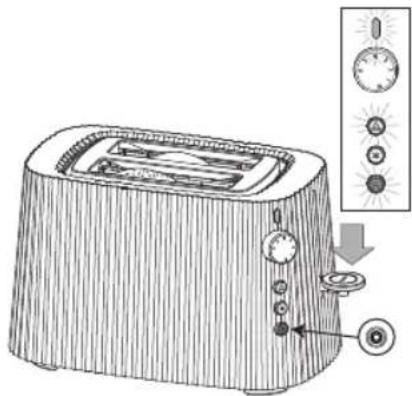
natural_image
Line drawing of a modern toaster with a dome-shaped top and side-mounted control knobs (no text or symbols)fig. 13 fig. 14 fig. 12
natural_image
Line drawing of a hand pressing down on a flat-topped toaster (no text or symbols)fig. 15
natural_image
Illustration of a modern toaster with a handle and grille (no text or symbols)fig. 16

natural_image
Illustration of a modern toaster with a handle and side panel, showing no text or symbols.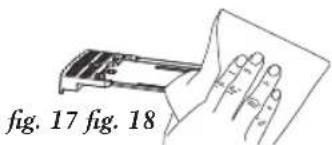
natural_image
Illustration of hands using a tool to adjust or install a mechanical component (no text or symbols visible)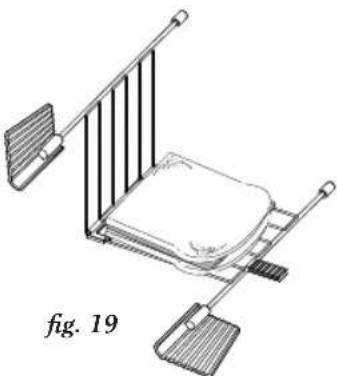
natural_image
Isometric line drawing of a bed with metal railings and a handle, labeled 'fig. 19' (no text or symbols on the diagram itself)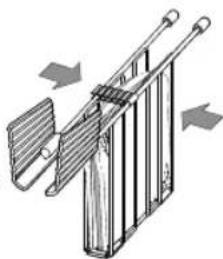
natural_image
Diagram of a mechanical device with directional arrows indicating rotation or movement (no text or symbols)fig. 20
natural_image
Technical line drawing of a mechanical device with rotating components and a magnified inset showing a circular component (no text or symbols)
natural_image
Illustration of a traditional toaster with cooling fan and control knob (no text or symbols)fig. 21
natural_image
Line drawing of a traditional flat-screen toaster with cooling fins and a handle (no text or symbols)fig. 22
natural_image
Line drawing of a toaster with a cloth cover and handle, no text or symbols present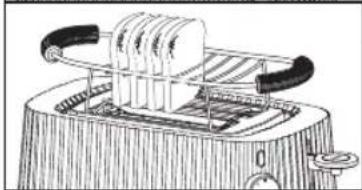
natural_image
Line drawing of a toaster with a flat-screen die and handle (no text or symbols)Italiano
D - Leva lift mechanism
PREPARARE I SANDWICHES
The use of electrical appliances always requires compliance with general safety precautions in order to reduce the risk of fire, electric shock and/or injury to persons.
A list of such precautions follows
- READ THE INSTRUCTIONS THOROUGHLY BEFORE USING THE PRODUCT.
- Do not touch hot surfaces.
- Do not use the toaster outdoors.
- To avoid the risk of fire, electric shock or injury, do not immerse the power cable or the plug in water or other liquids.
- Do not allow children to use the appliance or play with the appliance.
- Be especially careful when the appliance is used near children or used by children directly.
- Disconnect the toaster from the mains when it is not in use and to conduct cleaning operations. Allow the appliance to cool before inserting or removing components and before conducting any cleaning operations.
- Always remove the plug from the socket when the appliance is left unattended, after each use, before any cleaning or maintenance or in the event of a malfunction. Bread can burn, which is why you should never use the toaster near tecurtains or other flammable materials. When the toaster is turned on, and immediately after use, the metal parts around the heating element, the grill, the sandwich gripper and the brioche heating grill reach very high temperatures. NEVER touch them while the appliance is in operation.
- Do not use this appliance if the power cable or plug are damaged or after the appliance malfunctions or is damaged in any way. Return the appliance to the nearest authorised service centre for revision or repairs You can contact the manufacturer Alessi SpA at the mail address : help@alessi.com
- Do not use adaptors and/or extension cables.
- Do not pull on the cable when removing the plug from the socket.
- Use of accessories that have not been recommended by the manufacturer may cause a fire hazard or cause electric shock and/or personal injury.
-
Do not allow the cable to hang from the edge of a table or work area and avoid any position that could cause one to trip or become ensnared. Do not allow contact with hot surfaces.
14 Do not place the toaster on or near gas or electric burners or a hot oven. -
Do not use the toaster for anything other than its intended purpose.
- To disconnect the appliance press the CANCEL button, then remove the plug from the socket.
- After having removed the appliance from its packaging, dispose of the plastic bags correctly.
They may cause hazard for children or invalids.
-
Check that the power source complies with the specifications marked on the label on the bottom of the toaster.
-
Never move the toaster while it is in use.
-
Do not use the toaster with wet hands.
-
The toaster was not designed to be used with an external timer or a separate remote control system.
-
This appliance can be used by children aged from 8 years and above and persons with reduced physical, sensory or mental capabilities or lack of experience and knowledge if they have been given supervision or instruction concerning use of the appliance in a safe way and understand the hazards involved. Children shall not play with the appliance. Cleaning and user maintenance shall not be made by children without supervision.
-
The door or the outer surface may get hot when the appliance is operating.
-
If the supply cord is damaged, it must be replaced by the manufacturer, its service agent or similarly qualified persons in order to avoid a hazard.
THE PRODUCT IS FOR INDOOR HOUSEHOLD USE ONLY
SAVE THESE INSTRUCTIONS
WWW. ALESSI.COM
MDL08 "Plissé" Toaster
Designed by Michele De Lucchi in 2020, this toaster is made of thermoplastic resin and steel, and has been tested and certified to guarantee consumer safety.
DESCRIPTION OF THE TOASTER
A - Body made of thermoplastic resin (PP)
B - Power indicator light
C - Adjustment knob
D - Lift mechanism lever
E - Reheat function
F - CANCEL button
G - DEFROST button
H - BAGEL button
I - Crumb tray
L - Rack for sandwiches (accessory not included)
M - Brioche warmer grill
(accessory not included)
(fig. 1)

ATTENTION!
- KEEP THE APPLIANCE OUT OF THE REACH OF CHILDREN.
- Bread may burn, therefore do not use the toaster near curtains or other flammable materials.
- When the toaster is on and immediately after use the metal components near the heating element, the rack and the sandwich rack reach very high temperatures.
NEVER touch them while the appliance is in operation.
- Do not touch the appliance with wet hands.
- NEVER put metal objects into the product.
To clean the toaster and to remove any bread that has become stuck, unplug the toaster from the mains and never use metal tools.
• After use, allow the appliance to cool before covering it or putting it away. - Never open the appliance. All electrical repairs must be done by authorised personnel.
- Only use Alessi guaranteed spare parts and accessories.
• THIS PRODUCT IS FOR HOUSEHOLD USE ONLY.
BEFORE USING THE TOASTER
- After removing the toaster from its packing, check that it is in perfect condition.
- Check to be sure that the compartments are empty
- Do not toast any bread the first time you turn it on (see the paragraph on “Using the toaster”): the new heating elements may emit some harmless fumes that will disappear shortly.
USE OF THE TOASTER
- Place the toaster on a flat surface, far from any flammable materials.
- Unwind the power cable from the winder located under the base of the toaster and adjust the length of the cable, using the slot to lock it in place (fig. 2)
- The silicone rubber feet on the base of the toaster provide the appliance with greater grip and stability and make it easier to unwind the cable
- Insert the plug in the power socket.

ATTENTION!
DO NOT LET THE CABLE HANG FROM THE TABLE.
TOAST THE BREAD
- The toaster has two compartments for toasting bread.
- Insert the slices (2 slices can be toasted at a time) (fig. 3).
INSERT ONLY SLICES OF BREAD WITHOUT FILLING INTO THE COMPARTMENTS. - Turn the adjustment knob to set the desired level of toasting. (fig. 3)
Toasting time can be set anywhere from 1 (minimum) to 6 (maximum toasting time).
The lower the level the shorter the toasting time, toasting time will be longer at higher levels (see the paragraph on “Advice for toasting”). - Lower the lift mechanism lever to turn on the appliance and to lower the slices of bread into the toaster (fig. 4). When the toaster is in operation the LED lights for the power indicator, the toasting number selected and the CANCEL button ▲ will turn on (fig. 4).
If the lever doesn't stay down, check that the plug is inserted in the outlet. - When the toasting cycle finishes, the lift mechanism lever rises automatically; the slices of bread are lifted and can be removed from the toaster.
- To more easily remove the bread, use the (EXTRA LIFT function) (fig. 5) to raise the lift mechanism lever even higher.
Be careful, touching any metal
parts may cause burns.
- The toaster will switch off at the end of the toasting cycle.
- If the bread gets stuck inside the toaster, unplug the toaster and remove the bread without using metal objects. Be careful NOT to burn yourself.
- To switch off the toaster before the toasting cycle is complete press the CANCEL button ▲.
The toaster will switch off and the slices of bread will be lifted out.
ADVICE FOR TOASTING:
This toaster can be used to toast all the varieties of sliced bread ordinarily available for sale. The slices must be no more than 3 cm thick. If you wish to toast multiple slices of bread at the same time, use the same type of bread to ensure that they toast evenly. Remember, different types of bread require different toasting times. It takes longer to toast very moist bread compared to very dry bread. Toasting time will, of course, vary according to personal taste. For lightly toasted bread set a short toasting time. On the other hand, if you want well-toasted bread you will need to set a longer toasting time.
TOASTING FROZEN BREAD
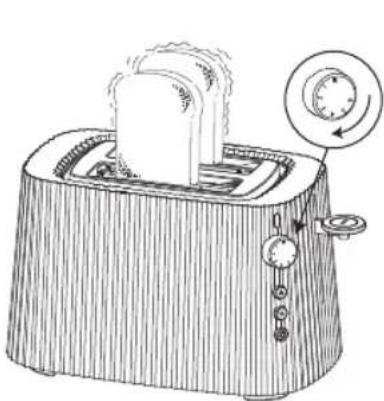
- Place the slices of frozen bread into the toasting compartments.
- Turn the adjustment knob to set the degree of browning desired (fig. 6)
- Lower the lift mechanism lever to turn on the appliance and to lower the slices of bread into the toaster (fig. 7). When the toaster is in operation the LED lights for
the power indicator, the toasting number selected and the CANCEL button ▲ will turn on.
-
Press the DEFROST button (*) to activate the function (fig. 7). The button turns on.
-
When the defrost and toasting cycles finish, the lift mechanism lever rises automatically, the slices of bread are lifted and can be removed from the toaster.
-
To more easily remove the bread, use the (EXTRA LIFT function) (fig. 8) to raise the lift mechanism lever even higher. Be careful, touching any metal parts may cause burns.
-
The toaster will switch off at the end of the toasting cycle.
- To turn off the toaster before the defrost and toast cycle has finished press the CANCEL button ▲. The toaster will switch off and the slices of bread will be lifted out.
REHEATING BREAD
This function is very useful when you wish to reheat bread that has already been toasted but has cooled down.
-
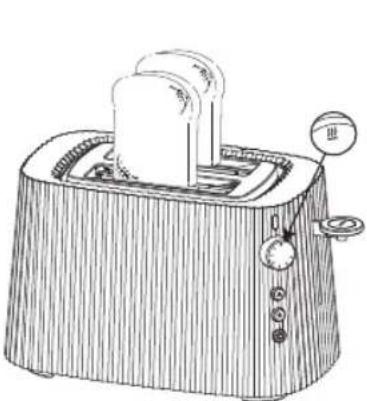
Place the slices of bread into the compartments to reheat them (fig. 9).
-
Turn the adjustment knob to the symbol
-
Lower the lift mechanism lever to turn on the appliance and to lower the slices of bread into the toaster (fig. 10). When the toaster is in operation the LED lights for the power indicator, the heating symbol and the CANCEL button are on ▲.
-
When the heating cycle finishes, the lift mechanism lever rises automatically, the slices of bread are lifted and can be removed from the toaster.
-
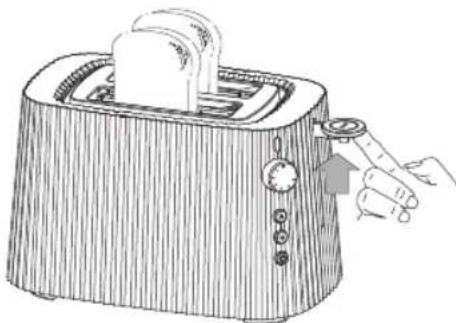
To more easily remove the bread,
use the (EXTRA LIFT function) (fig. 11) to raise the lift mechanism lever even higher.
Be careful, touching any metal parts may cause burns.
- The toaster will switch off at the end of the toasting cycle.
- To turn off the toaster before the heating cycle has finished press the CANCEL button ▲.
The toaster will switch off and the slices of bread will be lifted out.
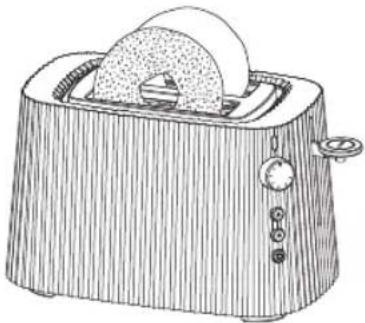
BAGEL FUNCTION
The Plissé toaster includes a bagel function.
-
Slice a bagel in half and place the halves in the toaster compartments with the sliced half facing the inside of the toaster (fig. 12). This function will only toast the inner half of the bagel, while the outer half will be heated but not toasted.
-
Turn the adjustment knob to set the degree of browning desired.
-
Lower the lift mechanism lever to turn on the appliance and to lower the slices of bread into the toaster (fig. 13). When the toaster is in operation the following LED lights are on: the power indicator, the number selected for the level of browning and the CANCEL button ▲.
-
Press the BAGEL button ⚙ to activate the function (fig. 13). The button turns on.
-
When the toasting cycle finishes, the lift mechanism lever rises automatically, the bagels are lifted and can be removed from the toaster.
Be careful, touching any metal parts may cause burns.
- The toaster will switch off at the end of the toasting cycle.
- To turn off the toaster before the toasting cycle has finished press the
CANCEL button
The toaster will switch off and the bagels will be lifted out.
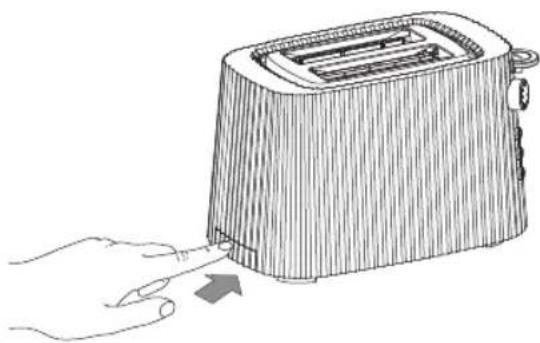
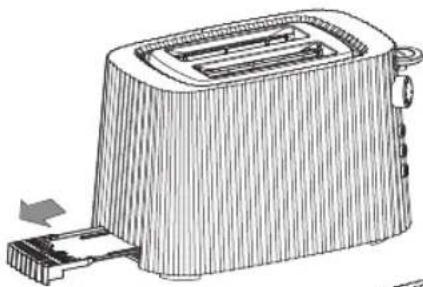
HOW TO CARE FOR THE TOASTER
- Before each maintenance operation, always unplug the power cord and check that the toaster has cooled down.
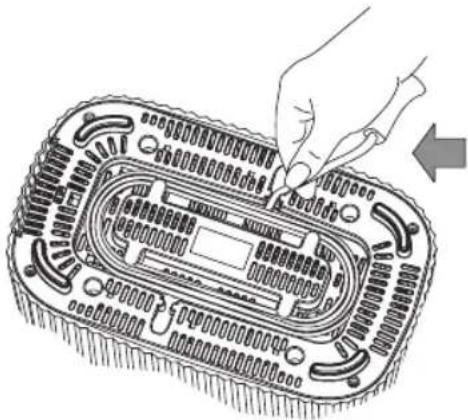
- Clean the outer surface with a damp cloth and dry carefully. Do not flip the toaster upside down or shake it, rather remove the crumbs from the collection tray located near the base of the toaster.
- To remove the tray, press and release the central part of the tray and then pull outwards. Once the crumbs have been removed, reposition the tray and press lightly to ensure that it closes completely. (fig. from 15 to 18).
- Remove the crumbs from the tray after each use and do not place the tray in the dishwasher.
- Before putting the toaster away, always allow it to cool completely and be sure to wind the cable around the winder and not around the body of the appliance.
ACCESSORIES
(not included in the package)
The two sandwich racks may be purchased at Alessi dealers and shops.
PREPARING TOASTED SANDWICHES
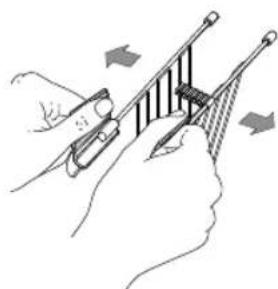
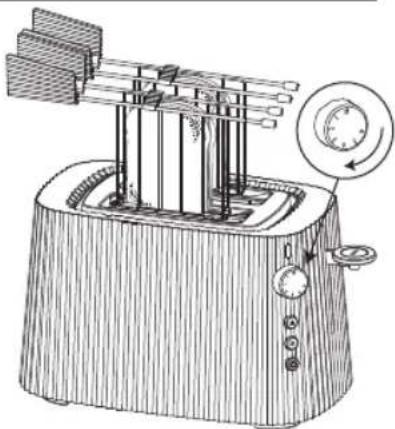
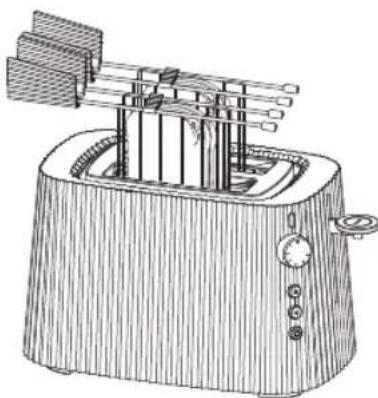
- Widen the gripper to remove the hook that keeps the two parts of the grill together and insert the sandwich (fig. 19).
- Close the gripper to keep the bread still and close the hook to hold the two parts of the grill together. Since
there are 2 grippers, 2 sandwiches can be cooked at the same time.
- Insert them in the toaster. (fig. 20)
- Turn the adjustment knob to set the desired cooking time.
- Lower the lift mechanism lever to turn on the appliance and to lower the sandwiches into the toaster (fig. 21). When the toaster is in operation the following LED lights are on: the power indicator, the number selected for the level of browning and the CANCEL button ▲.
- Once the sandwiches are ready the lever will move up automatically, raising the racks. (fig. 22)
- Remove the gripper holding only by the handles, widen them to remove the hook and let the sandwiches slide out onto a plate. Set the grippers on a cutting board to avoid damaging the surface. Be careful, touching any metal parts may cause burns.
- The toaster will switch off at the end of the toasting cycle.
- To turn off the toaster before the toasting cycle has finished press the CANCEL button ▲.
The toaster will switch off and the sandwiches will be lifted out.
To remove any crumbs or melted cheese from the racks, wash them by hand with warm water and washing-up liquid and use a soft cloth to dry them carefully.
The racks are NOT dishwasher safe.
After use, the metal wires of the sandwich racks are very hot: take hold of them by the plastic handles only.
BRIOCHE WARMER GRILL
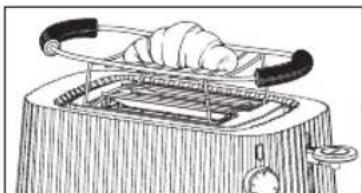
The practical brioche heating grill is available as an accessory for the Plissé toaster. It is NOT included in the package. The grill, suited for heating small
cakes, croissants, rolls and mini-pizzas, is made in 18/10 stainless steel with thermoplastic resin handles. (M fig. 1)
Attention:
DO NOT insert these foods in the toaster compartments; place them only on the grill.
Place the foods to be heated so that they cannot drip jams, creams, condiments or fats into the compartments, as these would be difficult to clean.
- Place the grill on the toaster (fig. 23) and place the food to be heated on the grill.
- Turn the knob to adjust toasting time to level 2, lower the lift mechanism lever to switch on the appliance. The suggested level corresponds to an average food heating level. You may wish to increase it slightly according to the size and preferred food heating level.
- When the toaster is in operation the LED lights for the power indicator, the heating time and the CANCEL button ▲ will turn on.
- When the heating cycle has ended, the lift mechanism lever rises automatically, the toaster switches off and you can remove the brioche warmer from the toaster.
To switch off the toaster before the heating cycle has finished press the CANCEL ▲ button.
Attention: after heating, the metallic wires in the brioche warmer grill are very hot. Grasp the grill by the plastic handles using insulated pot holders.
Place the brioche warmer on a board or plate to prevent damaging the counter top.
Do not place the brioche warmer grill on the toaster while bread is being toasted.
Do not use the brioche warmer grill to defrost frozen products.
This practical accessory can also be used for reheating bread that has
cooled after being toasted (see paragraph "Reheating bread"). Up to 7 slices of bread can be inserted at the same time.
Wait for the brioche warmer grill to cool down completely before cleaning. Wash with warm water and washing-up liquid and dry thoroughly.
DO NOT wash the brioche warmer grill in the dishwasher.
PROBLEMS AND SOLUTIONS
- The lift mechanism lever does not stay down.
- check that the plug is properly inserted in the outlet. If the problem persists, refer to an authorisedservice centre.
• The bread is stuck in the appliance. - always remove the plug from the outlet and, being careful to avoid burns, raise the lift mechanism lever to extract the bread. NEVER use metal objects. NEVER open the appliance.
- The lift mechanism lever doesn't remain in the EXTRA LIFT position.
- the lift mechanism lever won't hold the EXTRA LIFT position, you will need to hold it in place until you have removed the slices of bread.
FAQ: Frequently asked questions
- Question: Can I interrupt the toasting cycle before it has ended?
- Answer: Yes, to interrupt the toasting cycle press the CANCEL button.
- Question: Can I change the degree of browning while the appliance is in operation?
- Answer: To change the degree
of browning while the device is in operation press the CANCEL button, this will interrupt the toasting cycle. Next turn the adjustment knob to the desired toasting time and lower the lift mechanism lever once more.
- Question: What type of bread can I use?
- Answer: This toaster can be used to toast all the varieties of sliced bread ordinarily available for sale. The slices must be no more than 3 cm thick.
- Question: How can I extract small slices of bread?
- Answer: To extract small slices of bread use the EXTRA LIFT function.
SPARE PARTS
In the event of wear, loss or damage, you may purchase the following spare parts from your trusted Alessi dealer:
I - Crumb tray.
WARRANTY
This product is covered by a two-year warranty from the moment of sale. The warranty covers any manufacturing defects; damage caused by accidental impact or improper use is therefore excluded. Alessi declines any responsibility for damage caused by improper use.
WARRANTY inside the packaging.
DISPOSAL

At the end of the appliance's life cycle, be sure to dispose of it correctly by contacting a specific waste disposal centre.
Disassemble all components to dispose of them in compliance with any applicable waste disposal laws in your country. Never use force to attempt to open the motor unit.
WEEE inside the packaging.
FOOD SAFETY

This appliance is made with materials designed for contact with food products and is compliant with applicable laws.
Français
INFORMATIONS IMPORTANTES EN MATIÈRE DE SÉCURITÉ
MDL08 "Plissé" Grille-pain
MDL08 "Plissé" Toaster
PROBLEMAS E SOLUÇÕES
MDL08 "Plissé" Toaster
MDL08 "Plissé" Toaster
MDL08 "Plissé" Toaster
MDL08 "Plissé" Toaster
PROBLEMY I ROZWIAZANIA
MDL08 "Plissé" Toaster
MDL08 "Plissé" Toaster
D - Lift mechanism kar