SG68 - Toaster ALESSI - Free user manual and instructions
Find the device manual for free SG68 ALESSI in PDF.

| Product type | Toaster |
| Brand | Alessi |
| Model | SG68 |
| Body material | 18/10 stainless steel, polycarbonate base |
| Number of slots | 2 slices |
| Functions | Toasting, defrosting (DEFROST), reheating (REHEAT), croissant warming rack, sandwich tongs (accessory) |
| Controls | Rotary toasting selector (degrees), lift mechanism lever, CANCEL, DEFROST, REHEAT buttons with indicator lights |
| Power supply | 220-240 V ~ 50/60 Hz |
| Power | Approximately 900 W (estimated) |
| Dimensions (approx.) | Height 20 cm, width 30 cm, depth 18 cm |
| Weight (approx.) | 1.5 kg |
| Cord length | Short with winder (adjustable) |
| Safety | Automatic shut-off, hot surfaces indicated, do not immerse, child safety |
| Maintenance | Removable crumb tray; clean exterior with a damp cloth; croissant warming rack and tongs dishwasher safe |
| Spare parts available | Crumb tray, croissant warming rack |
| Repairability | Authorized after-sales service; do not open yourself |
| Intended use | Household use only |
| General information | Design by Stefano Giovannoni (2005); safety certified |
Frequently Asked Questions - SG68 ALESSI
User questions about SG68 ALESSI
0 question about this device. Answer the ones you know or ask your own.
Ask a new question about this device
Download the instructions for your Toaster in PDF format for free! Find your manual SG68 - ALESSI and take your electronic device back in hand. On this page are published all the documents necessary for the use of your device. SG68 by ALESSI.
USER MANUAL SG68 ALESSI
When using electrical appliances, basic safety precautions should always be followed to reduce the risk of fire, electric shock and/or injury to persons, including the following:
- READ ALL INSTRUCTIONS.
- Do not touch hot surfaces.
- Do not use the appliance outdoors.
- To protect against fire, electric shock and injury to persons do not immerse the cord or plug in water or other liquid.
- Close supervision is necessary when any appliance is used near children.
- Do not allow children to use or play with the appliance.
- Unplug the appliance from the outlet when not in use and before cleaning. Allow it to cool before inserting or removing parts and before cleaning the appliance.
- Do not operate any appliance with a damaged cord or plug or after the appliance malfunctions, or has been damaged in any manner. Return the appliance to the nearest authorized service facility for examination, repair or adjustment.
- The use of accessory attachments not recommended by the appliance manufacturer may result in fire, electric shock or personal injury.
- Do not let the cord hang over the edge of a table or counter, or touch hot surfaces.
- Do not place on or near a hot gas burner or electric burner, or in a heated oven.
- Do not use the toaster for any purpose other than what it is intended for.
- To disconnect, push the CANCEL button, then remove the plug from the wall outlet.
- After unpacking the appliance, be sure to dispose of the plastic bags carefully so that children or the infirm cannot reach them.
- Ensure that your mains supply voltage is the same as that marked on the underside of your toaster.
- Do not allow the mains lead to hang over the edge of the table or work surface, or anywhere it may be accidentally caught or tripped over.
- Never move the toaster while it is in use.
- Do not use the toaster if your hands are wet.
THIS PRODUCT IS FOR HOUSEHOLD USE ONLY
SAVE THESE INSTRUCTIONS
SHORT CORD SET INSTRUCTIONS
- A short power cord is provided to reduce risks resulting from becoming entangled in or tripping over a longer cord.
- Longer, detachable power supply cords or extension cords are available and may be used if care is exercised in their use.
- If an extension cord is used, the marked electrical rating should be at least as great as electrical rating of the appliance. If the appliance is provided with a 3 wire grounded type cord, the extension should be a GROUNDING TYPE 3-WIRE CORD.
The longer cord should be arranged so that it will not drape over the counter top or table top where it can be pulled on by children or tripped over.
For U.K. and Ireland only:
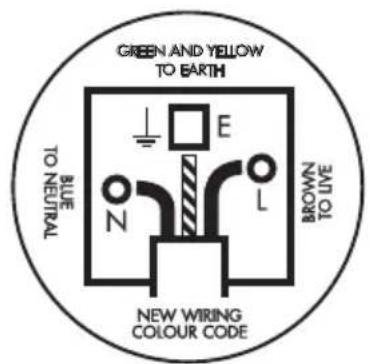
The wires in this mains lead are coloured in accordance with the following code:
As the colours of the wires in the mains lead of this appliance may not correspond with the coloured markings identifying the terminals in your plug, proceed as follows: The green-and-yellow wire must be connected to the terminal in the plug which is marked with the letter E or by the earth symbol or coloured green or green-and-yellow.
The blue wire must be connected to the terminal which is marked with the letter N or coloured black.
The brown wire must be connected to the terminal which is marked with the letter 1, or coloured red.
Radio interference suppression: in compliance with regulation 82/499/EEC.
AVERTISSEMENTS IMPORTANTS
For U.K. and Ireland only:
WARNING - THIS APPLIANCE
MUST BE EARTHED!
IMPORTANT
The product is fitted with a BSI 1363 plug fused at 13A . If the plug is unsuitable, it should be
disconnected and an appropriate plug fitted as detailed below. If it is necessary to replace the plug fuse, use only fuses that are approved to BSI 1362, rated at 13A . If in doubt consult a qualified electrician.
The wire in the mains lead are coloured in accordance with the following code:
As the colours of the wires in the mains lead of this appliance may not correspond with the coloured markings identifying the terminals in your plug, proceed as follows;
- the wire which is coloured BLUE must be connected to the terminal which is marked "N" or coloured BLACK.
- the wire which is coloured BROWN must be connected to the terminal which is marked "L" or coloured RED.
- the wire which is coloured GREEN AND YELLOW must be connected to the terminal which is marked “E” or by the symbol or coloured GREEN or GREEN AND YELLOW.
SG68 W
SG68 W/CH
SG68 W/UK
ALESSI
Model: SG68 Type:01
220-240V\~50-60Hz1080W
Ser. Nr.
EMA EUR


Italiano
When using electrical appliances, basic safety precautions should always be followed to reduce the risk of fire, electric shock and/or injury to persons, including the following:
- READ ALL INSTRUCTIONS.
- Do not touch hot surfaces.
- Do not use the appliance outdoors.
- To protect against fire, electric shock and injury to persons do not immerse the cord or plug in water or other liquid.
- Close supervision is necessary when any appliance is used near children.
- Do not allow children to use or play with the appliance.
- Unplug the appliance from the outlet when not in use and before cleaning. Allow it to cool before inserting or removing parts and before cleaning the appliance.
- Do not operate any appliance with a damaged cord or plug or after the appliance malfunctions, or has been damaged in any manner. Return the appliance to the nearest authorized service facility for examination, repair or adjustment.
- The use of accessory attachments not recommended by the appliance manufacturer may result in fire, electric shock or personal injury.
- Do not let the cord hang over the edge of a table or counter, or touch hot surfaces.
- Do not place on or near a hot gas burner or electric burner, or in a heated oven.
- Do not use the toaster for any purpose other than what it is intended for.
- To disconnect, push the CANCEL button, then remove the plug from the wall outlet.
- After unpacking the appliance, be sure to dispose of the plastic bags carefully so that children or the infirm cannot reach them.
- Ensure that your mains supply voltage is the same as that marked on the underside of your toaster.
- Do not allow the mains lead to hang over the edge of the table or work surface, or anywhere it may be accidentally caught or tripped over.
- Never move the toaster while it is in use.
- Do not use the toaster if your hands are wet.
THIS PRODUCT IS FOR HOUSEHOLD USE ONLY
SAVE THESE INSTRUCTIONS
SHORT CORD SET INSTRUCTIONS
- A short power cord is provided to reduce risks resulting from becoming entangled in or tripping over a longer cord.
- Longer, detachable power supply cords or extension cords are available and may be used if care is exercised in their use.
- If an extension cord is used, the marked electrical rating should be at least as great as electrical rating of the appliance. If the appliance is provided with a 3 wire grounded type cord, the extension should be a GROUNDING TYPE 3-WIRE CORD.
The longer cord should be arranged so that it will not drape over the counter top or table top where it can be pulled on by children or tripped over.
For U.K. and Ireland only:
The wires in this mains lead are coloured in accordance with the following code:
As the colours of the wires in the mains lead of this appliance may not correspond with the coloured markings identifying the terminals in your plug, proceed as follows: The green-and-yellow wire must be connected to the terminal in the plug which is marked with the letter E or by the earth symbol or coloured green or green-and-yellow.
The blue wire must be connected to the terminal which is marked with the letter N or coloured black.
The brown wire must be connected to the terminal which is marked with the letter L or coloured red.
Radio interference suppression: in compliance with regulation 82/499/EEC.
For U.K. and Ireland only:
WARNING - THIS APPLIANCE
MUST BE EARTHED!
IMPORTANT
The product is fitted with a BSI 1363 plug fused at 13 A. If the plug is unsuitable, it should be disconnected and an appropriate plug fitted as detailed below. If it is necessary to replace the plug fuse, use only fuses that are approved to BSI 1362, rated at 13 A. If in doubt consult a qualified electrician. The wire in the mains lead are coloured in accordance with the following code: BLUE - NEUTRAL BROWN - LIVE GREEN AND YELLOW - EARTH
As the colours of the wires in the mains lead of this appliance may not correspond with the coloured markings identifying the terminals in your plug, proceed as follows;
- the wire which is coloured BLUE must be connected to the terminal which is marked "N" or coloured BLACK.
the wire which is coloured BROWN must be connected to the terminal which is marked "L" or coloured RED.
the wire which is coloured GREEN AND YELLOW must be connected to the terminal which is marked "E" or by the symbol 12 or coloured GREEN or GREEN AND YELLOW.
SG68W
SG68 W/CH
SG68 W/UK
ALESSI
Model: SG68 Type:01
220-240V 50 - 60Hz 1080W
Ser. Nr.


English
This Toaster, designed by Stefano Giovanni in 2005, has been tested and certified to guarantee the user's safety.


WARNING:
- Read and follow the instructions carefully before using the Toaster Save them for reference for as long as you use the product.
- Check that the product is in perfect condition.
- Dispose of the packing properly and keep the plastic bags out of reach of children.
- Use the Toaster only for its intended purpose. Alessi will not be liable for any damage caused by improper use.
Do not use any voltage other than the one indicated on the bottom of the product.
Do not let the cord hang over the table.
- Do not pull on the power cord when removing the plug.
Always connect the product to a grounded outlet.
- Use adapters or extension cords that conform to safety standards
- KEEP THE TOASTER OUT OF REACH LICHES CHILDREN
- Bread can burn: do not use the Toaster near curtains or other flammable materials.
- NEVER LEAVE THE TOASTER UNATTENDED WHEN IT IS ON.
When the Toaster is on, and immediately after use, the metal parts near the heating element, the gunwarmer, and the sandwich rack become very hot. NEVER touch them when the product is on.
Always use the bunwarmer to heat brochies, sandwiches and locaccia.
- Never place the Toaster, the cord, or the plug in water or in other liquids.
- Never touch the Toaster with wet hands. Never use it in the bathroom or near water.
- Never use the Toaster outdoors.
- NEVER insert metal objects into the Toaster. Pull out the plug when cleaning the toaster or removing pieces of stuck bread, and never use metal utensils.
After use, let the Toaster cool off before covering it or putting it away.
- Never open the Toaster. All electrical repairs must be done by an authorised service centre.
- Use only original Alessi accessories and spare parts.
If the Toaster malfunctions, or if the Toaster or cord is damaged, do not use the product. Take it to an authorised Alessi dealer.
Before discarding the Toaster, dismantle it and eliminate its components in compliance with your country's disposal regulations.
THIS PRODUCT IS FOR HOUsHOLD USE ONLY
This appliance is not intended for use by persons (including children) with reduced physical, sensory or mental capabilities or lack of experience and knowledge unless they have been given initial supervision or instruction concerning use of the appliance by a person responsible for their safety.
CHILDREN SHOULD BE SUPERVISED TO ENSURE THAT THEY DO NOT PLAY WITH THE APPLIANCE.
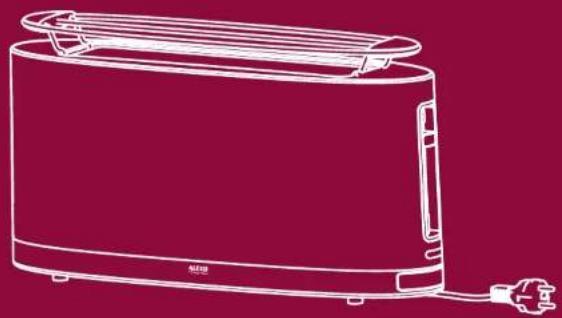
DESCRIPTION OF TOASTER
This Toaster consists of
(fig.1):
A 18/10 stainless steel body with polycarbonate base;
B crumb tray;
C bunwarmer;
D toasting selector and REHEAT function.
E REHEAT light;
F DEFROST button with light;
G lift mechanism lever,
H CANCEL button;
sandwich rack accessory.
BEFORE USING THE TOASTER
- Remove the Toaster from its packing and check that it is in perfect condition.
Turn it on without any bread the Toaster]:the new heating elements may emit some fumes.
How to use the Toaster
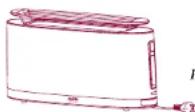
- Place the Toaster on a level surface, away from flammable materials.
- Adjust the cord to the length needed to reach the electrical outlet (use the winder located under the base) (fig. 2). Insert the plug into the outlet.
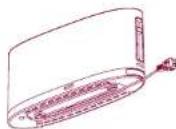
Fig. 2

WARNING!
Do not let the cord hang off the table.
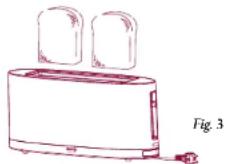
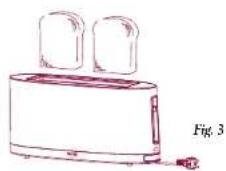
A. Toasting bread
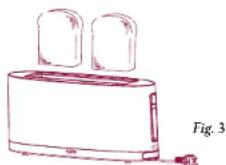
1 Insert one or two slices of bread (fig. 3).
2 Set the selector for the desired degree of toasting. Set it toward the bottom for shorter toasting time; toward the top for longer toasting time (fig. 4) (see "Advice on toasting").

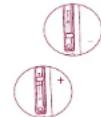
Fig. 4
3 Lower the lift mechanism lever to turn on the Toaster: the CANCEL button will light up (fig. 5). If the lever doesn't stay down, check that the plug is inserted in the outlet.
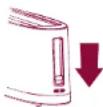
Fig. 5
4 When toasting finishes, the lift mechanism lever rises automatically and the CANCEL button light turns off (fig. 6).
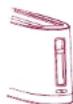
Fig. 6
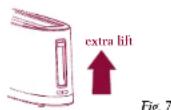
5 Remove the toast. For easier removal, raise the lever a little more and keep it raised until the toast has been removed (EXTRA LIFT function) (fig. 7).
If braid becomes stuck inside the Toaster, unplug the Toaster and remove the toast without using metal objects. Be careful not to burn yourself on the metal parts.
To turn off the Toaster before toasting has finished push the CANCEL button or raise the lift mechanism lever.
Advice on toasting
This Toaster will toast all kinds of sliced bread normally sold in shops. The slice must not be more than 3cm thick. If you want to toast two slices of bread at the same time, use the same kind of bread to obtain the same degree of toasting. Remember that different kinds of bread need different toasting times. Very moist bread takes longer to toast than dry bread. Of course, toasting time is a matter of personal taste: if you prefer lightly toasted bread, set a short toasting time; for well-toasted bread, set a longer time. The levels on the toasting selector let you obtain the degree of toasting you want.
B. Toasting frozen bread
1 Insert one or two slices of frozen bread.
2 Set the selector for the desired degree of toasting.
3 Lower the lift mechanism lever to turn on the Toaster: the CANCEI button will light up.
4 Push the DEFROST button the light will turn on (fig. 8).
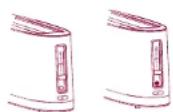
Fig. 8
C. Heating bread
This function is very useful when you want to reheat toast that has become cold.
1 Insert one or two slices of toast to be reheated.
2 Lower the lift mechanism lever to turn on the Toaster: the CANCEL button will light up.
3 Move the toasting selector down until it "clicks": the selector is now in REHEAT position. The light under the selector will turn on (fig. 9).

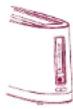
Fig. 9

WARNING!
Push the CANCEI button to interrupt the toasting cycle or to cancel the REHEAT and DEFROST functions.
D. Heating brioches, indwiches and focaccia
1 Placc the bunwarmer on top of the Toaster (fig. 10).
2 Put no more than two pieces at a time in the centre of the bunwarmer (fig. 11).
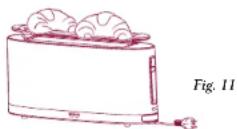
3 Set the toasting selector to the REHEAT position
4 Lower the lift mechanism lever to turn on the Toaster: the CANCEL button will light up.
Bunwarmer
Always use the bunwarmer to heat brioches, sandwiches and focaccia.
- Do not heat brioches, sandwiches or focaccia on the bunwarrner while you are toasting slices of bread.
- Do not use the bunwarmer to defrost frozen food.
- The metal wires of the bunwarmer are very hot when heating has finished: hold the bunwarmer only by its plastic handles.
Be careful not to place it on a surface that might become damaged.
To clean the bunwarmer, wait until it has cooled, then wash it with hot water and dish soap. Dry thoroughly. You can wash the bunwarmer in the dishwasher, at the end of the wash cycle, dry it with a soft towel.
How to care for your Toaster
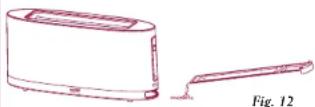
Before doing any maintenance, always turn off the Toaster, remove the plug from the outlet, and wait until the Toaster has cooled.
Clean the exterior with a damp cloth and dry thoroughly. Don't turn the Toaster over or
shake it: eliminate crumbs after each use by detaching the bottom tray (fig. 12).
Accessories
The toasted sandwich rack (not included) may be purchased at Alessi dealers and shops.
A.Preparing toasted sandwiches
1 Open the rack by pressing the two handles. Insert one or two sandwiches (fig. 13).
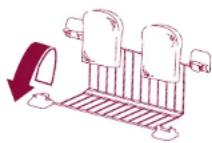
Fig. 13
2 Close the rack and place it in the Toaster (fig. 14).
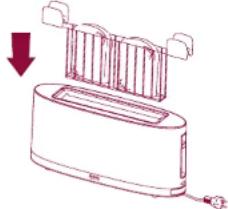
Fig. 14
3 Lower the lift mechanism lever to turn on the Toaster. The CANCEL button will light up.
4 When the sandwich is ready, the
lever will automatically rise and the Toaster will turn off.
5 Remove the rack using the handles, place it on a cutting board or plate and slide out the sandwich.
- The metal wires of the sandwich rack are very hot when grilling has finished: hold the rack only by its plastic handles.
To clean the rack, wait until it has cooled, then open it completely to remove crumbs and bits of melted cheese.
Wash it with hot water and dish soap, then dry thoroughly. You can wash the rack in the dishwasher; at the end of the wash cycle, dry it with a soft towel.
Troubleshooting
Problem: the lift mechanism lever does not stay down.
Solution: check that the plug is correctly inserted in the outlet. If the problem persists, call an authorised service centre.
Problem: bread is stuck inside the Toaster.
Solution: remove the plug from the outlet, raise the lift mechanism lever, and remove the bread. NEVER use metal objects to remove bread. NEVER open the Toaster. Be careful not to burn yourself.
Problem: the lift mechanism ever does not stay in the EXTRA LIFT position.
Solution: the lift mechanism lever does not lock in the EXTRA LIFT position: you have to keep it in this position until you have removed the toast.
FAQ: Frequently Asked Questions
Question: can I interrupt the.
toasting cycle before it has ended?
Answer: yes. To interrupt the toasting cycle, push the CANCEL button.
Question: can I change the degree of toasting while the Toaster is on?
Answer: yes. To change the degree of toasting while the Toaster is on, push the CANCEL button to interrupt the toasting cycle, set the toasting selector to obtain the degree of toasting you want, and then lower the lift mechanism lever again.
Question: what kinds of bread can I use?
Answer: This Toaster will toast all kinds of sliced bread normally sold in shops. The slice must not be more than 3 cm thick.
Question: how do I rmovc small slices of bread?
Answer: use the EXTRA LIFT function to remove small slices of bread.
Spare parts
In case of wear, loss, or damage, the following spare parts may be purchased at your authorised Alessi dealer:
B crumb collector tray; C bunwarmer.
ALESSI
ALESSI
Alessi s.p.a. 28887 Crusimallo (VB) Italia Tel. 0039 0323 868611 - Fax 0039 0323 641605 www.alessi.com - E-mail: sac.alessi@alessi.com
SG68
When using electrical appliances, basic safety precautions should always be followed to reduce the risk of fire, electric shock and/or injury to persons, including the following:
- READ ALL INSTRUCTIONS.
- Do not touch hot surfaces.
- Do not use the appliance outdoors.
- To protect against fire, electric shock and injury to persons do not immerse the cord or plug in water or other liquid.
- Close supervision is necessary when any appliance is used near children.
- Do not allow children to use or play with the appliance.
- Unplug the appliance from the outlet when not in use and before cleaning. Allow it to cool before inserting or removing parts and before cleaning the appliance.
- Do not operate any appliance with a damaged cord or plug or after the appliance malfunctions, or has been damaged in any manner. Return the appliance to the nearest authorized service facility for examination, repair or adjustment.
- The use of accessory attachments not recommended by the appliance manufacturer may result in fire, electric shock or personal injury.
- Do not let the cord hang over the edge of a table or counter, or touch hot surfaces.
- Do not place on or near a hot gas burner or electric burner, or in a heated oven.
- Do not use the toaster for any purpose other than what it is intended for.
- To disconnect, push the CANCEL button, then remove the plug from the wall outlet.
- After unpacking the appliance, be sure to dispose of the plastic bags carefully so that children or the infirm cannot reach them.
- Ensure that your mains supply voltage is the same as that marked on the underside of your toaster.
- Do not allow the mains lead to hang over the edge of the table or work surface, or anywhere it may be accidentally caught or tripped over.
- Never move the toaster while it is in use.
- Do not use the toaster if your hands are wet.
THIS PRODUCT IS FOR HOUSEHOLD USE ONLY
SAVE THESE INSTRUCTIONS
SHORT CORD SET INSTRUCTIONS
- A short power cord is provided to reduce risks resulting from becoming entangled in or tripping over a longer cord.
- Longer, detachable power supply cords or extension cords are available and may be used if care is exercised in their use.
- If an extension cord is used, the marked electrical rating should be at least as great as electrical rating of the appliance. If the appliance is provided with a 3 wire grounded type cord, the extension should be a GROUNDING TYPE 3-WIRE CORD.
The longer cord should be arranged so that it will not drape over the counter top or table top where it can be pulled on by children or tripped over.
For U.K. and Ireland only:
The wires in this mains lead are coloured in accordance with the following code:
As the colours of the wires in the mains lead of this appliance may not correspond with the coloured markings identifying the terminals in your plug, proceed as follows: The green-and-yellow wire must be connected to the terminal in the plug which is marked with the letter E or by the earth symbol or coloured green or green-and-yellow.
The blue wire must be connected to the terminal which is marked with the letter N or coloured black.
The brown wire must be connected to the terminal which is marked with the letter 1. or coloured red.
Radio interference suppression: in compliance with regulation 82/499/EEC.
AVERTISSEMENTS IMPORTANTS
For U.K. and Ireland only:
WARNING - THIS APPLIANCE
MUST BE EARTHED!
IMPORTANT
The product is fitted with a BSI 1363 plug fused at 13A . If the plug is unsuitable, it should be
disconnected and an appropriate plug fitted as detailed below. If it is necessary to replace the plug fuse, use only fuses that are approved to BSI 1362, rated at 13A . If in doubt consult a qualified electrician.
The wire in the mains lead are coloured in accordance with the following code:
As the colours of the wires in the mains lead of this appliance may not correspond with the coloured markings identifying the terminals in your plug, proceed as follows;
- the wire which is coloured BLUE must be connected to the terminal which is marked "N" or coloured BLACK.
- the wire which is coloured BROWN must be connected to the terminal which is marked "L" or coloured RED.
- the wire which is coloured GREEN AND YELLOW must be connected to the terminal which is marked “E” or by the symbol or coloured GREEN or GREEN AND YELLOW.
SG68 W
SG68 W/CH
SG68 W/UK
ALESSI
Model: SG68 Type:01
220-240V\~50-60Hz1080W
Ser. Nr.
EMA EUR


Deutsch
For U.K. and Ireland only:
WARNING - THIS APPLIANCE
MUST BE EARTHED!
IMPORTANT
The product is fitted with a BSI 1363 plug fused at 13A . If the plug is unsuitable, it should be
disconnected and an appropriate plug fitted as detailed below. If it is necessary to replace the plug fuse, use only fuses that are approved to BSI 1362, rated at 13A . If in doubt consult a qualified electrician.
The wire in the mains lead are coloured in accordance with the following code:
As the colours of the wires in the mains lead of this appliance may not correspond with the coloured markings identifying the terminals in your plug, proceed as follows;
- the wire which is coloured BLUE must be connected to the terminal which is marked "N" or coloured BLACK.
- the wire which is coloured BROWN must be connected to the terminal which is marked "L" or coloured RED.
- the wire which is coloured GREEN AND YELLOW must be connected to the terminal which is marked “E” or by the symbol or coloured GREEN or GREEN AND YELLOW.
SG68W
SG68 W/CH
SG68 W/UK
ALESSI
Model: SG68 Type:01
220-240V -50-60Hz 1080W
Ser. Nr.
KEMA EUR


Français
When using electrical appliances, basic safety precautions should always be followed to reduce the risk of fire, electric shock and/or injury to persons, including the following:
- READ ALL INSTRUCTIONS.
- Do not touch hot surfaces.
- Do not use the appliance outdoors.
- To protect against fire, electric shock and injury to persons do not immerse the cord or plug in water or other liquid.
- Close supervision is necessary when any appliance is used near children.
- Do not allow children to use or play with the appliance.
- Unplug the appliance from the outlet when not in use and before cleaning. Allow it to cool before inserting or removing parts and before cleaning the appliance.
- Do not operate any appliance with a damaged cord or plug or after the appliance malfunctions, or has been damaged in any manner. Return the appliance to the nearest authorized service facility for examination, repair or adjustment.
- The use of accessory attachments not recommended by the appliance manufacturer may result in fire, electric shock or personal injury.
- Do not let the cord hang over the edge of a table or counter, or touch hot surfaces.
- Do not place on or near a hot gas burner or electric burner, or in a heated oven.
- Do not use the toaster for any purpose other than what it is intended for.
- To disconnect, push the CANCEL button, then remove the plug from the wall outlet.
- After unpacking the appliance, be sure to dispose of the plastic bags carefully so that children or the infirm cannot reach them.
- Ensure that your mains supply voltage is the same as that marked on the underside of your toaster.
- Do not allow the mains lead to hang over the edge of the table or work surface, or anywhere it may be accidentally caught or tripped over.
- Never move the toaster while it is in use.
- Do not use the toaster if your hands are wet.
THIS PRODUCT IS FOR HOUSEHOLD USE ONLY
SAVE THESE INSTRUCTIONS
SHORT CORD SET INSTRUCTIONS
- A short power cord is provided to reduce risks resulting from becoming entangled in or tripping over a longer cord.
- Longer, detachable power supply cords or extension cords are available and may be used if care is exercised in their use.
- If an extension cord is used, the marked electrical rating should be at least as great as electrical rating of the appliance. If the appliance is provided with a 3 wire grounded type cord, the extension should be a GROUNDING TYPE 3-WIRE CORD.
The longer cord should be arranged so that it will not drape over the counter top or table top where it can be pulled on by children or tripped over.
For U.K. and Ireland only:
The wires in this mains lead are coloured in accordance with the following code:
As the colours of the wires in the mains lead of this appliance may not correspond with the coloured markings identifying the terminals in your plug, proceed as follows: The green-and-yellow wire must be connected to the terminal in the plug which is marked with the letter E or by the earth symbol or coloured green or green-and-yellow.
The blue wire must be connected to the terminal which is marked with the letter N or coloured black.
The brown wire must be connected to the terminal which is marked with the letter 1. or coloured red.
Radio interference suppression: in compliance with regulation 82/499/EEC.
AVERTISSEMENTS IMPORTANTS
For U.K. and Ireland only:
WARNING - THIS APPLIANCE
MUST BE EARTHED!
IMPORTANT
The product is fitted with a BSI
363 plug fused at 13 A. If the plug is unsuitable, it should be
disconnected and an appropriate plug fitted as detailed below. If it is necessary to replace the plug fuse use only fuses that are approved by BSI 1362, rated at 13 A. If in doubt consult a qualified electrician.
The wire in the mains lead are coloured in accordance with the following code:
BLUE-NEUTRAL
BROWN-LIVE
As the colours of the wires in the mains lead of this appliance may not correspond with the coloured markings identifying the terminals in your plug, proceed as follows;
- the wire which is coloured BLUE must be connected to the terminal which is marked "N" or coloured BLACK.
- the wire which is coloured BROWN must be connected to the terminal which is marked "L" or coloured RED.
- the wire which is coloured GREEN AND YELLOW must be connected to the terminal which is marked “E” or by the symbol or coloured GREEN or GREEN AND YELLOW.
SG68 W
SG68 W/CH
SG68 W/UK
ALESSI
Model: SG68 Type:01
220-240V\~50-60Hz1080W
Ser. Nr.
EMA EUR


Espanol
1 Insert one or two slices of bread (fig. 3).
A. Preparing toasted sandwiches
When using electrical appliances, basic safety precautions should always be followed to reduce the risk of fire, electric shock and/or injury to persons, including the following:
- READ ALL INSTRUCTIONS.
- Do not touch hot surfaces.
- Do not use the appliance outdoors.
- To protect against fire, electric shock and injury to persons do not immerse the cord or plug in water or other liquid.
- Close supervision is necessary when any appliance is used near children.
- Do not allow children to use or play with the appliance.
- Unplug the appliance from the outlet when not in use and before cleaning. Allow it to cool before inserting or removing parts and before cleaning the appliance.
- Do not operate any appliance with a damaged cord or plug or after the appliance malfunctions, or has been damaged in any manner. Return the appliance to the nearest authorized service facility for examination, repair or adjustment.
- The use of accessory attachments not recommended by the appliance manufacturer may result in fire, electric shock or personal injury.
- Do not let the cord hang over the edge of a table or counter, or touch hot surfaces.
- Do not place on or near a hot gas burner or electric burner, or in a heated oven.
- Do not use the toaster for any purpose other than what it is intended for.
- To disconnect, push the CANCEL button, then remove the plug from the wall outlet.
- After unpacking the appliance, be sure to dispose of the plastic bags carefully so that children or the infirm cannot reach them.
- Ensure that your mains supply voltage is the same as that marked on the underside of your toaster.
- Do not allow the mains lead to hang over the edge of the table or work surface, or anywhere it may be accidentally caught or tripped over.
- Never move the toaster while it is in use.
- Do not use the toaster if your hands are wet.
THIS PRODUCT IS FOR HOUSEHOLD USE ONLY
SAVE THESE INSTRUCTIONS
SHORT CORD SET INSTRUCTIONS
- A short power cord is provided to reduce risks resulting from becoming entangled in or tripping over a longer cord.
- Longer, detachable power supply cords or extension cords are available and may be used if care is exercised in their use.
- If an extension cord is used, the marked electrical rating should be at least as great as electrical rating of the appliance. If the appliance is provided with a 3 wire grounded type cord, the extension should be a GROUNDING TYPE 3-WIRE CORD.
The longer cord should be arranged so that it will not drape over the counter top or table top where it can be pulled on by children or tripped over.
For U.K. and Ireland only:
The wires in this mains lead are coloured in accordance with the following code:
As the colours of the wires in the mains lead of this appliance may not correspond with the coloured markings identifying the terminals in your plug, proceed as follows: The green-and-yellow wire must be connected to the terminal in the plug which is marked with the letter E or by the earth symbol or coloured green or green-and-yellow.
The blue wire must be connected to the terminal which is marked with the letter N or coloured black.
The brown wire must be connected to the terminal which is marked with the letter 1, or coloured red.
Radio interference suppression: in compliance with regulation 82/499/EEC.
AVERTISSEMENTS IMPORTANTS
For U.K. and Ireland only:
WARNING - THIS APPLIANCE
MUST BE EARTHED!
IMPORTANT
The product is fitted with a BSI 1363 plug fused at 13A . If the plug is unsuitable, it should be
disconnected and an appropriate plug fitted as detailed below. If it is necessary to replace the plug fuse, use only fuses that are approved to BSI 1362, rated at 13 A. If in doubt consult a qualified electrician.
The wire in the mains lead are coloured in accordance with the following code:
As the colours of the wires in the mains lead of this appliance may not correspond with the coloured markings identifying the terminals in your plug, proceed as follows;
- the wire which is coloured BLUE must be connected to the terminal which is marked "N" or coloured BLACK.
- the wire which is coloured BROWN must be connected to the terminal which is marked "L" or coloured RED.
- the wire which is coloured GREEN AND YELLOW must be connected to the terminal which is marked “E” or by the symbol or coloured GREEN or GREEN AND YELLOW.
SG68 W
SG68 W/CH
SG68W/UK
ALESSI
Model: SG68 Type:01
220-240V\~50-60Hz1080W
Ser. Nr.
KEMA EUR


Nederland's
1 Breng cen of twice sncden brood in (fig. 3).