
WX845.9 - Saw WORX - Free user manual and instructions
Find the device manual for free WX845.9 WORX in PDF.
| Product Type | Cordless Miter Saw |
| Brand | Worx |
| Model | WX845.9 |
| Rated Voltage | 20 V Max (18 V nominal) |
| No-Load Speed | 3200 RPM |
| Blade Diameter | 216 mm |
| Cutting Capacity (0°/0°) | 220 x 70 mm |
| Cutting Capacity (0°/45°) | 220 x 41 mm |
| Cutting Capacity (45°/0°) | 155 x 70 mm |
| Cutting Capacity (45°/45°) | 155 x 41 mm |
| Miter Range | 0-45° left and right |
| Bevel Range | 0-45° |
| Net Weight | 11.5 kg |
| Power Supply | Lithium-ion Battery 20 V Max |
| Battery Included | Yes (model WA3553) |
| Charger Included | Yes (model WA3880) |
| Guide Laser | Class 2, 650 nm, 1 mW |
| Sound Pressure Level | 92.2 dB(A) |
| Sound Power Level | 105.2 dB(A) |
| Main Functions | Miter cut, bevel cut, compound miter cut, sliding cut |
| Maintenance and Cleaning | Clean with a dry cloth; keep ventilation slots clean; remove battery before maintenance |
| Safety | Rotating lower guard, spindle lock, trigger switch with lock-off pin |
| Spare Parts and Repairability | Battery and charger available as spare parts; replacement blade WA8201; repair by manufacturer or authorized agent |
| General Information | Compliant with standards EN 62841-1, EN 62841-3-9, EN 55014-1, EN 55014-2 |
Frequently Asked Questions - WX845.9 WORX
User questions about WX845.9 WORX
0 question about this device. Answer the ones you know or ask your own.
Ask a new question about this device
Download the instructions for your Saw in PDF format for free! Find your manual WX845.9 - WORX and take your electronic device back in hand. On this page are published all the documents necessary for the use of your device. WX845.9 by WORX.
USER MANUAL WX845.9 WORX
natural_image
Technical line drawing of a mechanical cutting tool with a circular cutter and blade assembly (no text or symbols)| 20V Sliding Miter Saw | EN | P08 |
| 20V Gleitgehrungssäge | D | P16 |
| Scie à onglets coulissante 20V | F | P26 |
| 20 V Troncatrice con funzione di scorrimento | I | P35 |
| Sierra ingletadora deslizante de 20V | ES | P44 |
| 20V Glijdende verstekzaag | NL | P53 |
| 20V Pilarka ukośna | PL | P62 |
| 20V sínes gérvágó fúrészek | HU | P71 |
| 20V Ferăstrău de alunecare | RO | P80 |
| 20V posuvná pokosová pila | CZ | P89 |
| 20V Posuvná pokosová píla | SK | P98 |
| Serra de esquadria deslizante 20V | PT | P107 |
| 20V glidande geringssågar | SV | P116 |
| 20V drsna Mitra žaga | SL | P124 |
text_image
Technical diagram of a cutting machine with numbered parts for identification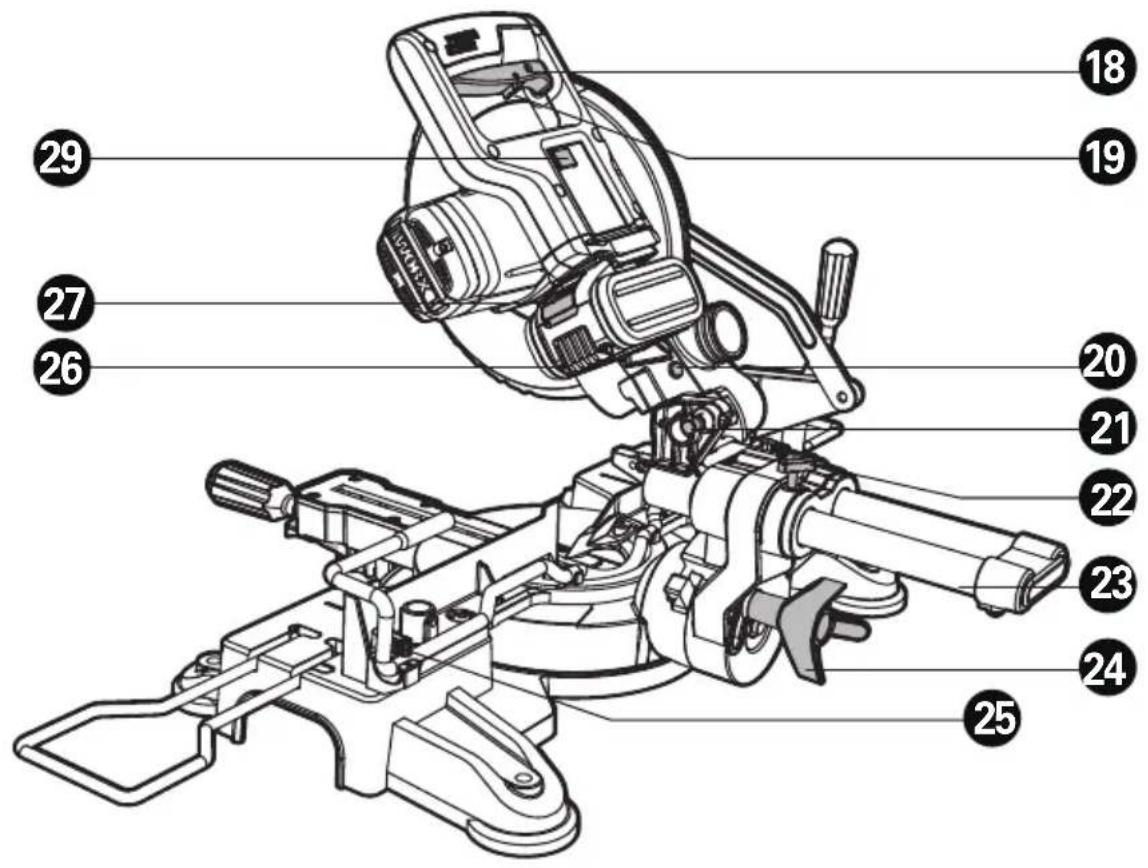
text_image
Technical diagram of a mechanical device with numbered parts for identification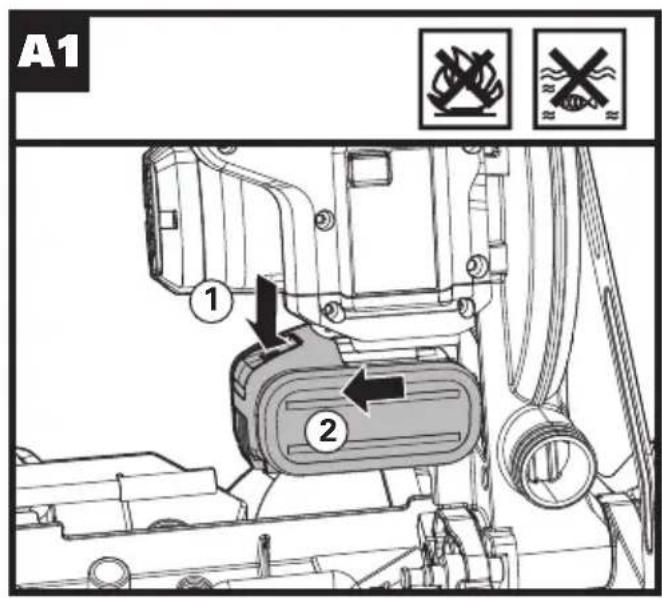
text_image
A1 ① ②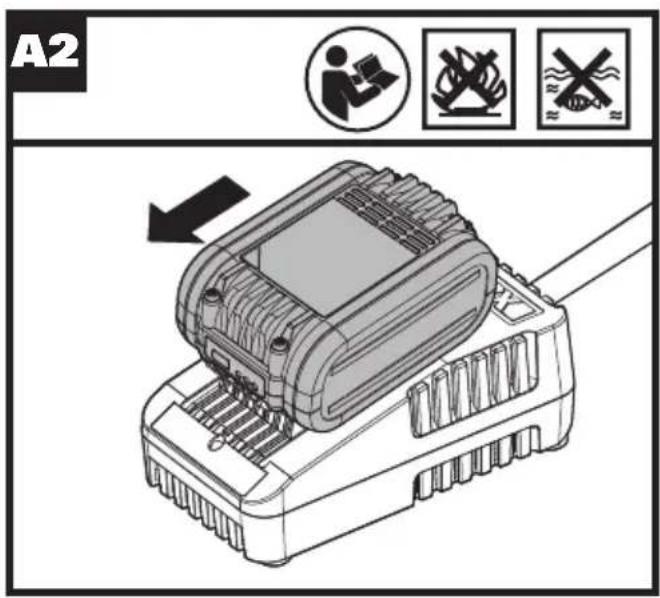
text_image
A2 ↓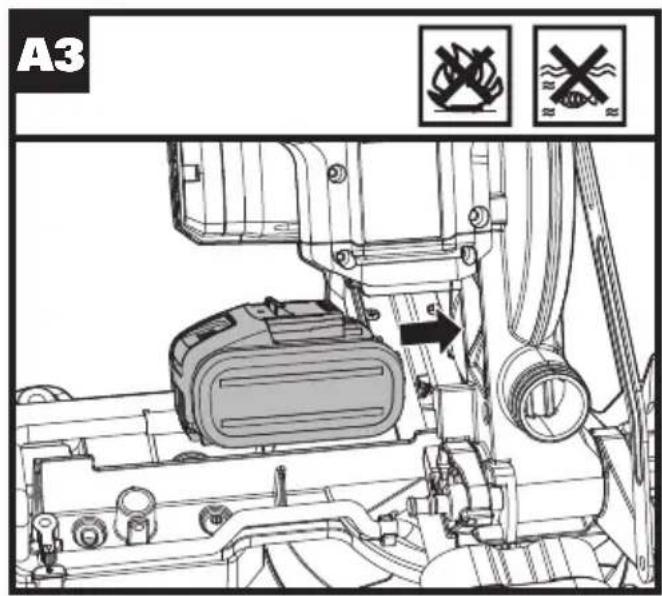
text_image
A3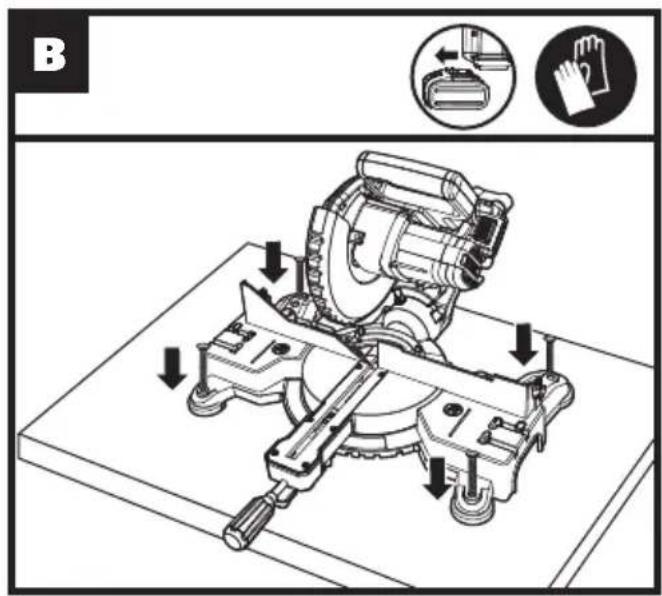
text_image
B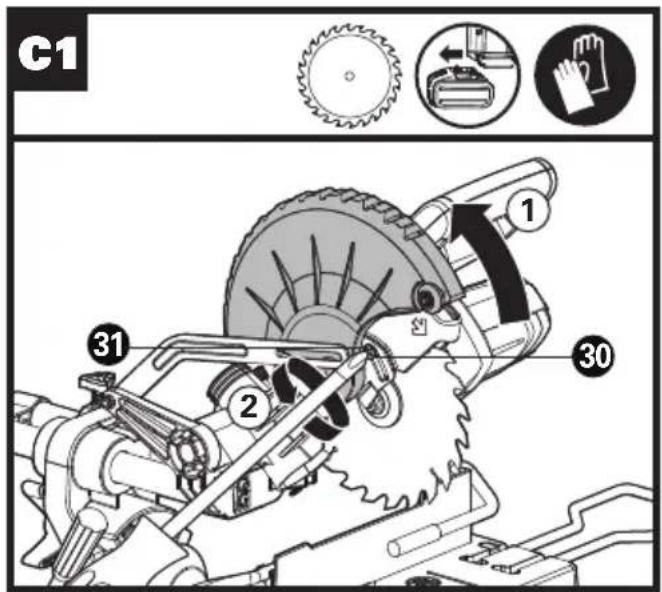
text_image
C1 1 2 30 31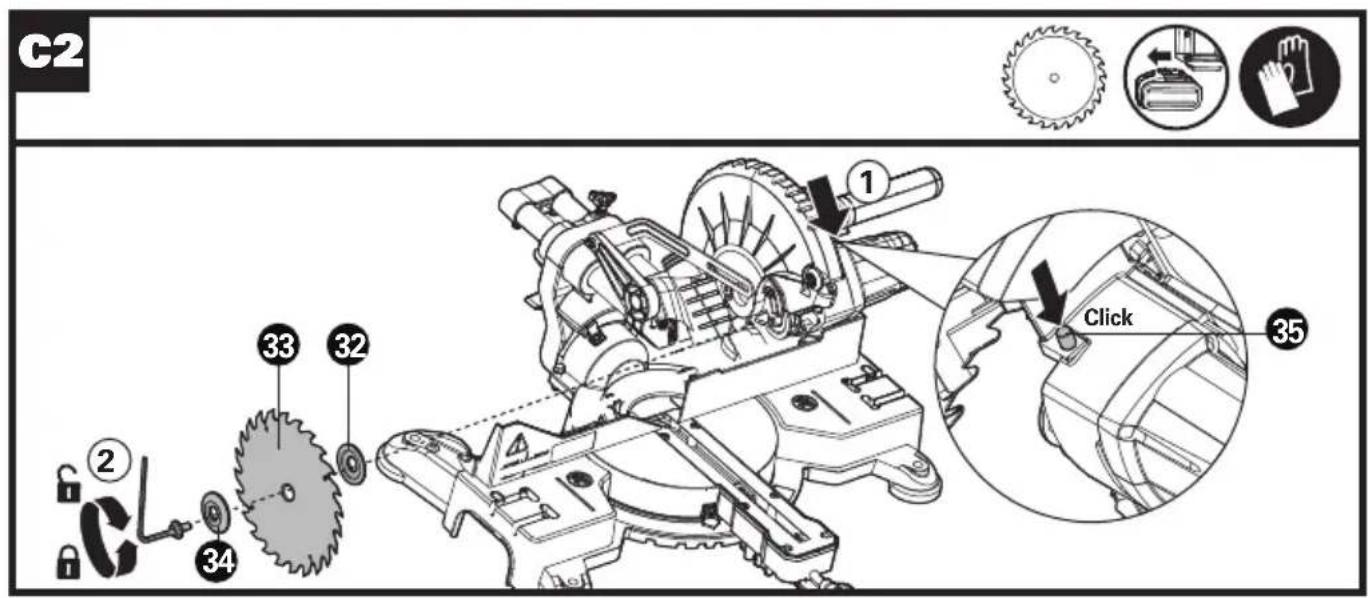
text_image
C2 ① ② ③ ③3 ③2 ③4 Click ③5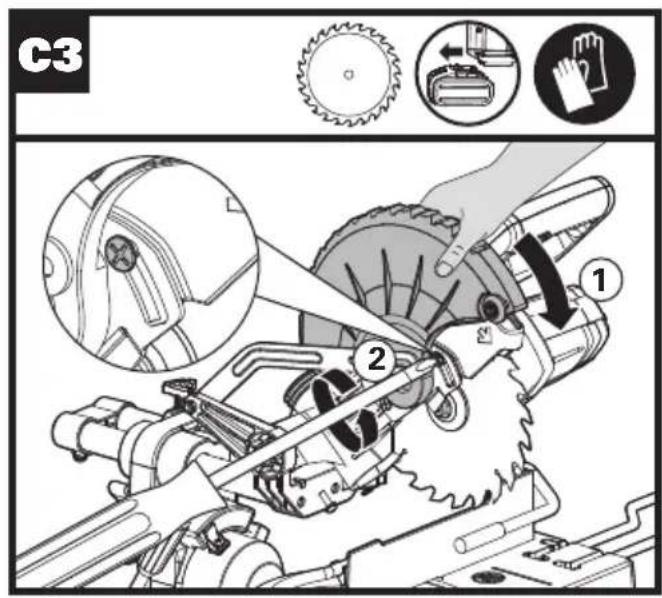
text_image
C3 ① ②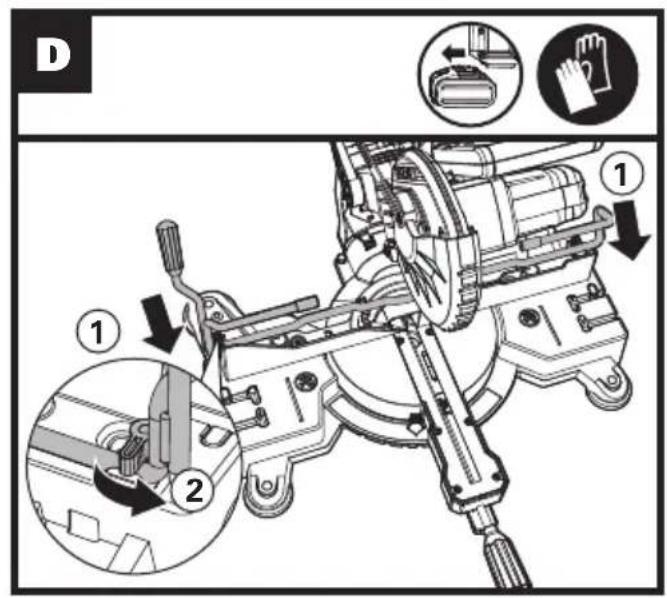
text_image
D ① ② ①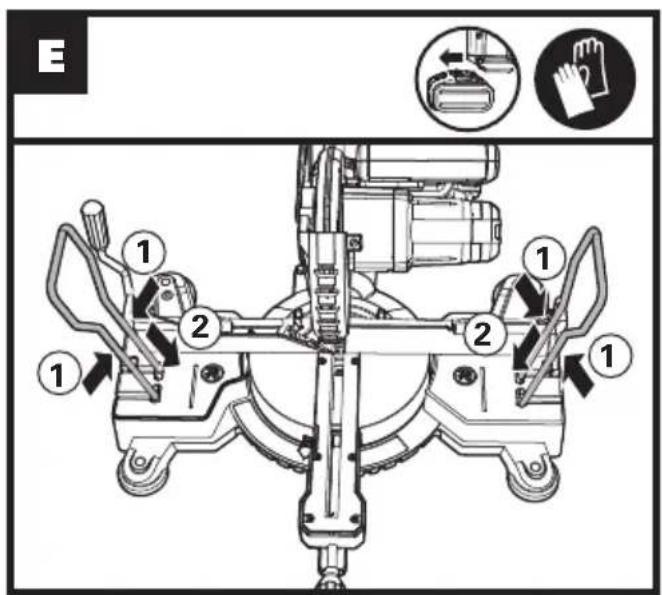
text_image
E 1 2 1 2 1 1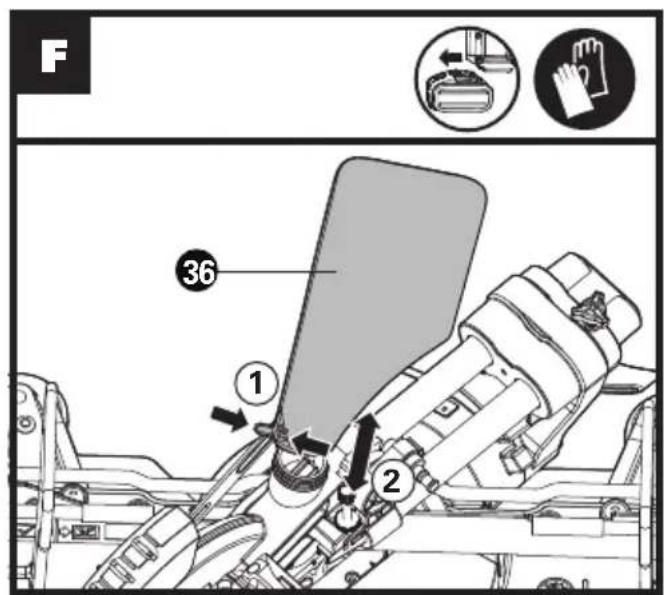
text_image
F 36 1 2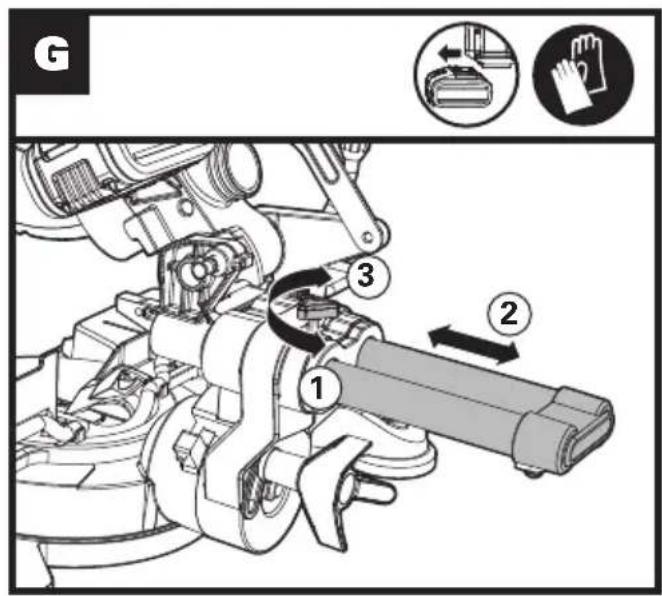
text_image
G 1 2 3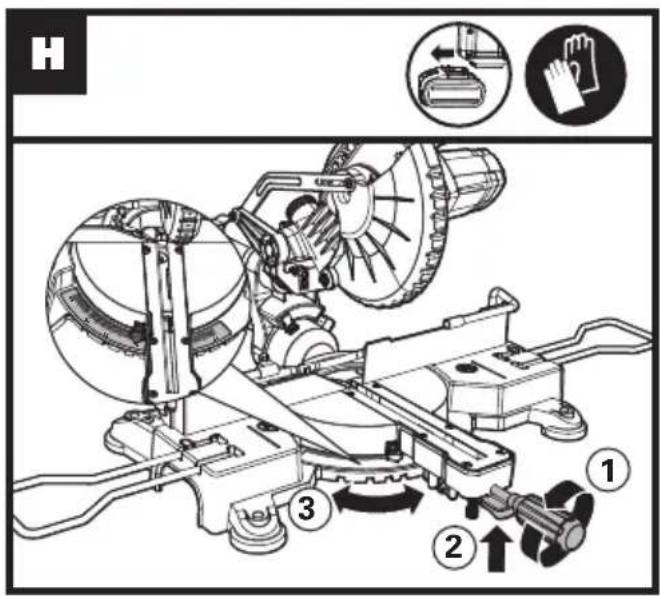
text_image
Technical diagram of a mechanical device with labeled parts and instructional icons for assembly or maintenance.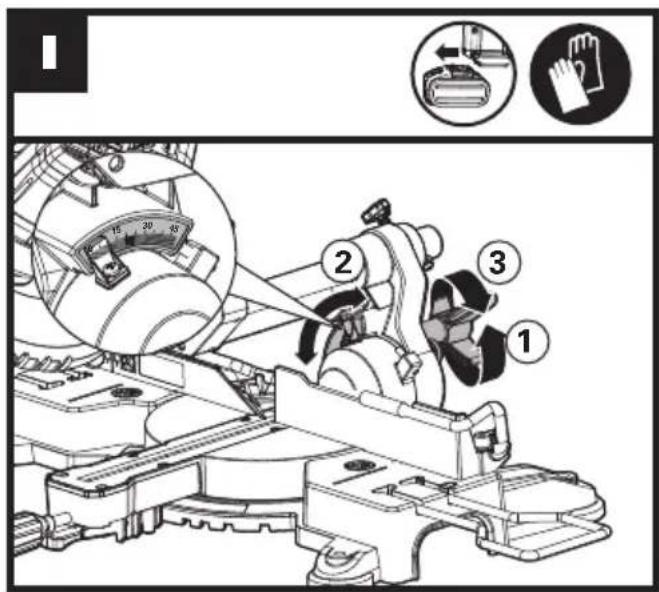
text_image
Technical diagram showing a mechanical assembly with labeled parts and tool icons for inspecting or assembly.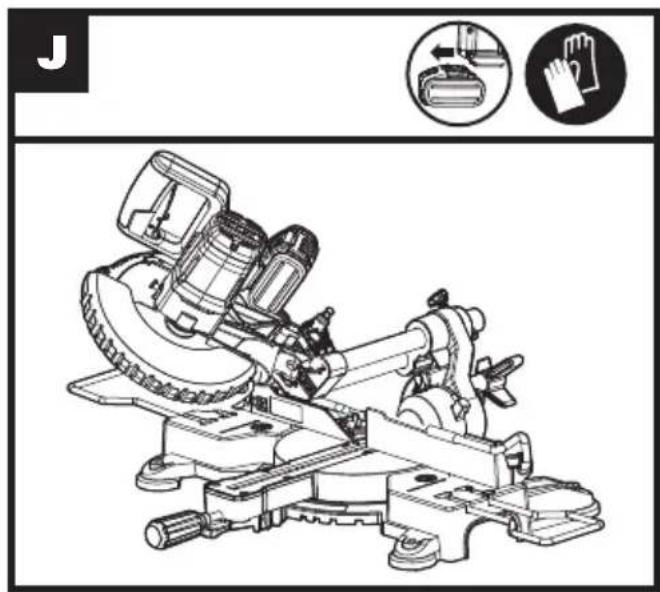
natural_image
Technical line drawing of a cutting machine with hand icons indicating tool placement (no text or symbols)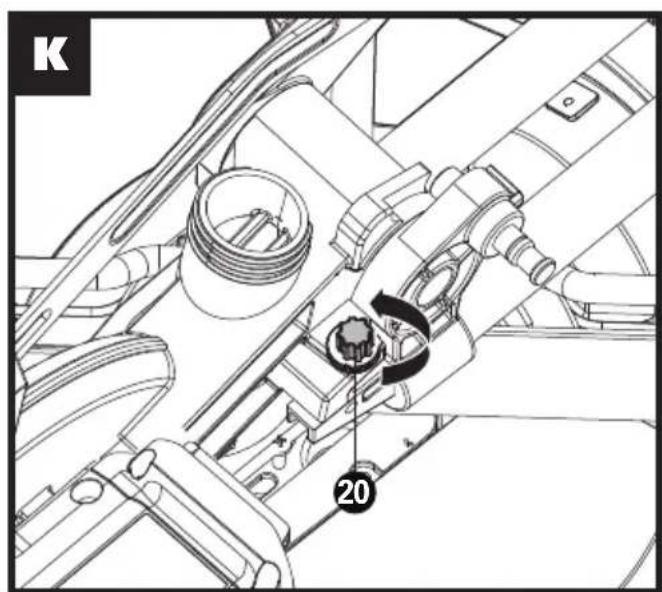
text_image
K 20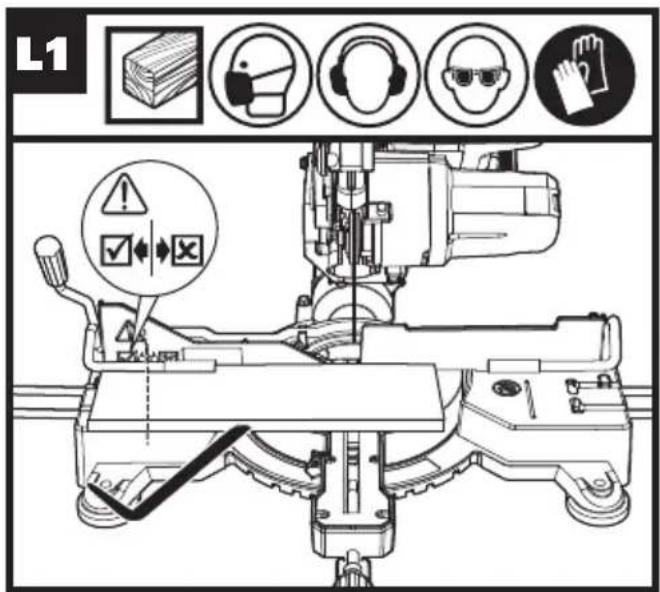
text_image
L1 !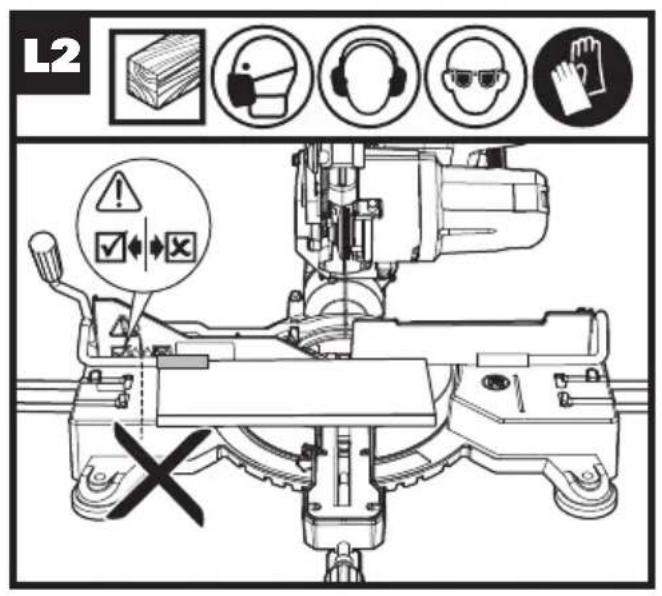
text_image
L2 ✓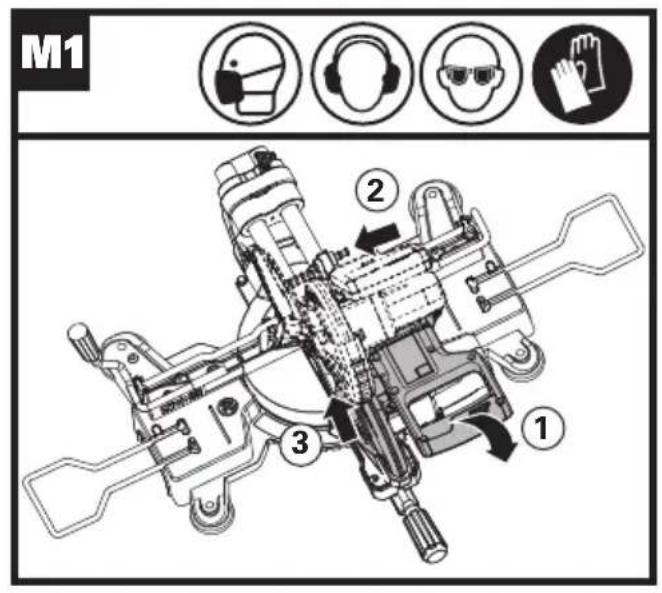
text_image
M1 ① ② ③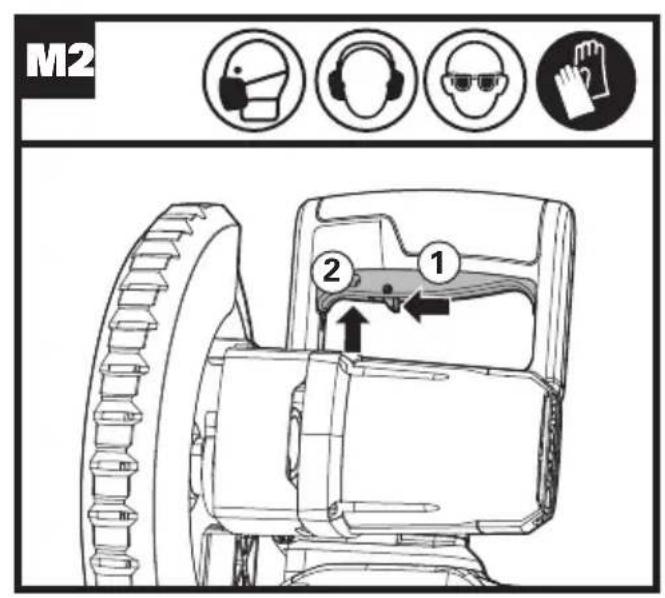
text_image
M2 1 2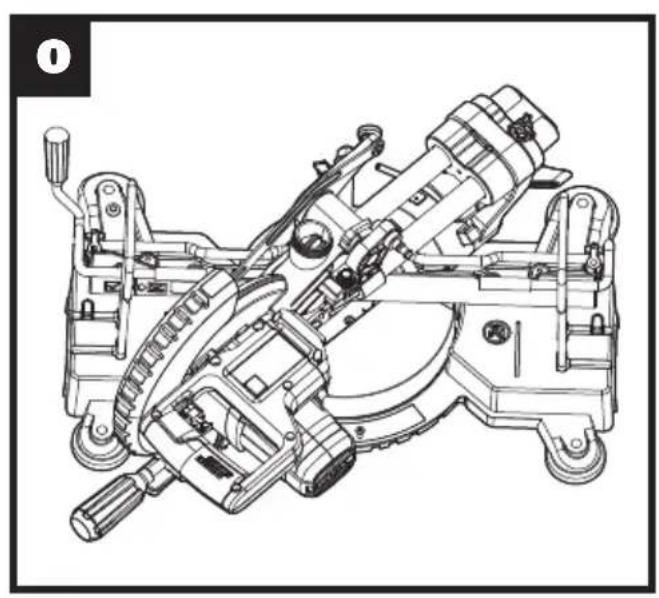
natural_image
Technical line drawing of a mechanical assembly with gears and levers (no text or symbols)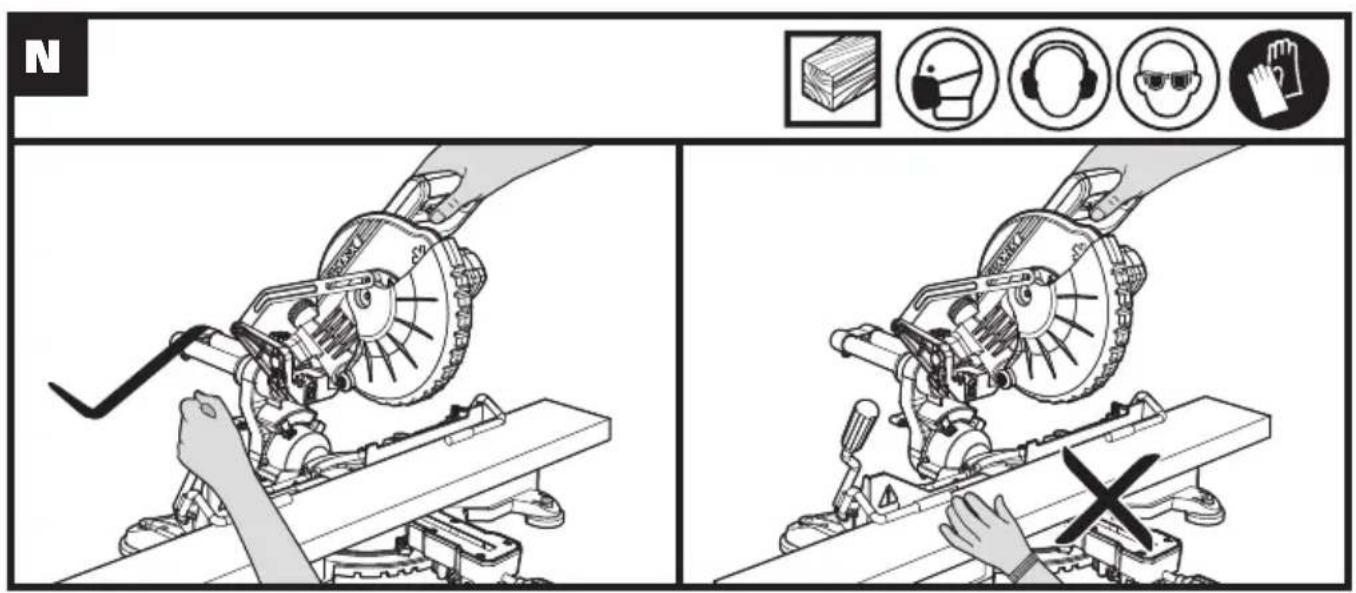
text_image
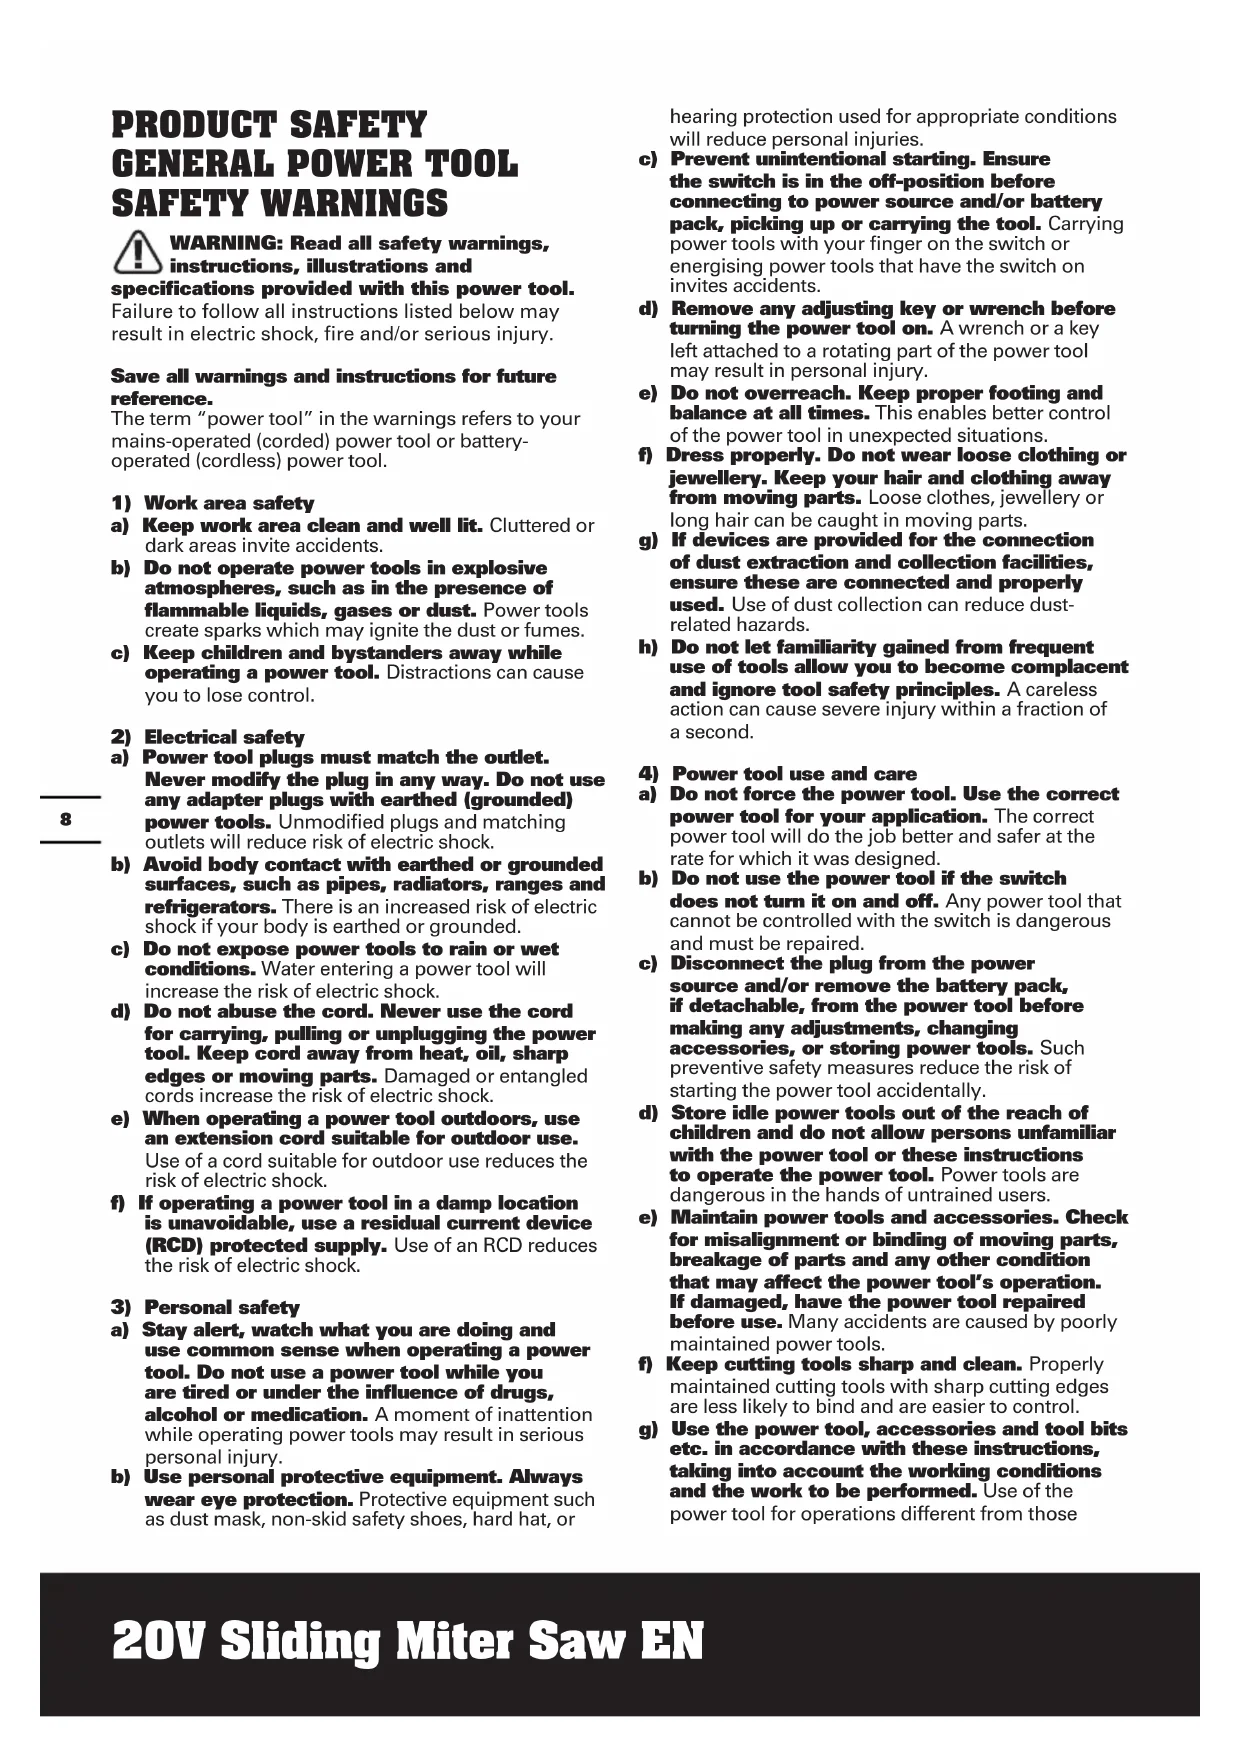
Technical diagram illustrating a mechanical assembly process with labeled components and warning symbolsPRODUCT SAFETY GENERAL POWER TOOL SAFETY WARNINGS

WARNING: Read all safety warnings, instructions, illustrations and
specifications provided with this power tool.
Failure to follow all instructions listed below may result in electric shock, fire and/or serious injury.
Save all warnings and instructions for future reference.
The term "power tool" in the warnings refers to your mains-operated (corded) power tool or battery-operated (cordless) power tool.
1) Work area safety
a) Keep work area clean and well lit. Cluttered or dark areas invite accidents.
b) Do not operate power tools in explosive atmospheres, such as in the presence of flammable liquids, gases or dust. Power tools create sparks which may ignite the dust or fumes.
c) Keep children and bystanders away while operating a power tool. Distractions can cause you to lose control.
2) Electrical safety
a) Power tool plugs must match the outlet. Never modify the plug in any way. Do not use any adapter plugs with earthed (grounded) power tools. Unmodified plugs and matching outlets will reduce risk of electric shock.
b) Avoid body contact with earthed or grounded surfaces, such as pipes, radiators, ranges and refrigerators. There is an increased risk of electric shock if your body is earthed or grounded.
c) Do not expose power tools to rain or wet conditions. Water entering a power tool will increase the risk of electric shock.
d) Do not abuse the cord. Never use the cord for carrying, pulling or unplugging the power tool. Keep cord away from heat, oil, sharp edges or moving parts. Damaged or entangled cords increase the risk of electric shock.
e) When operating a power tool outdoors, use an extension cord suitable for outdoor use. Use of a cord suitable for outdoor use reduces the risk of electric shock.
f) If operating a power tool in a damp location is unavoidable, use a residual current device (RCD) protected supply. Use of an RCD reduces the risk of electric shock.
3) Personal safety
a) Stay alert, watch what you are doing and use common sense when operating a power tool. Do not use a power tool while you are tired or under the influence of drugs, alcohol or medication. A moment of inattention while operating power tools may result in serious personal injury.
b) Use personal protective equipment. Always wear eye protection. Protective equipment such as dust mask, non-skid safety shoes, hard hat, or
hearing protection used for appropriate conditions will reduce personal injuries.
c) Prevent unintentional starting. Ensure the switch is in the off-position before connecting to power source and/or battery pack, picking up or carrying the tool. Carrying power tools with your finger on the switch or energising power tools that have the switch on invites accidents.
d) Remove any adjusting key or wrench before turning the power tool on. A wrench or a key left attached to a rotating part of the power tool may result in personal injury.
e) Do not overreach. Keep proper footing and balance at all times. This enables better control of the power tool in unexpected situations.
f) Dress properly. Do not wear loose clothing or jewellery. Keep your hair and clothing away from moving parts. Loose clothes, jewellery or long hair can be caught in moving parts.
g) If devices are provided for the connection of dust extraction and collection facilities, ensure these are connected and properly used. Use of dust collection can reduce dust-related hazards.
h) Do not let familiarity gained from frequent use of tools allow you to become complacent and ignore tool safety principles. A careless action can cause severe injury within a fraction of a second.
4) Power tool use and care
a) Do not force the power tool. Use the correct power tool for your application. The correct power tool will do the job better and safer at the rate for which it was designed.
b) Do not use the power tool if the switch does not turn it on and off. Any power tool that cannot be controlled with the switch is dangerous and must be repaired.
c) Disconnect the plug from the power source and/or remove the battery pack, if detachable, from the power tool before making any adjustments, changing accessories, or storing power tools. Such preventive safety measures reduce the risk of starting the power tool accidentally.
d) Store idle power tools out of the reach of children and do not allow persons unfamiliar with the power tool or these instructions to operate the power tool. Power tools are dangerous in the hands of untrained users.
e) Maintain power tools and accessories. Check for misalignment or binding of moving parts, breakage of parts and any other condition that may affect the power tool's operation. If damaged, have the power tool repaired before use. Many accidents are caused by poorly maintained power tools.
f) Keep cutting tools sharp and clean. Properly maintained cutting tools with sharp cutting edges are less likely to bind and are easier to control.
g) Use the power tool, accessories and tool bits etc. in accordance with these instructions, taking into account the working conditions and the work to be performed. Use of the power tool for operations different from those
intended could result in a hazardous situation.
h) Keep handles and grasping surfaces dry, clean and free from oil and grease. Slippery handles and grasping surfaces do not allow for safe handling and control of the tool in unexpected situations.
5) Battery tool use and care
a) Recharge only with the charger specified by the manufacturer. A charger that is suitable for one type of battery pack may create a risk of fire when used with another battery pack.
b) Use power tools only with specifically designated battery packs. Use of any other battery packs may create a risk of injury and fire.
c) When battery pack is not in use, keep it away from other metal objects, like paper clips, coins, keys, nails, screws or other small metal objects, that can make a connection from one terminal to another. Shorting the battery terminals together may cause burns or a fire.
d) Under abusive conditions, liquid may be ejected from the battery; avoid contact. If contact accidentally occurs, flush with water. If liquid contacts eyes, additionally seek medical help. Liquid ejected from the battery may cause irritation or burns.
e) Do not use a battery pack or tool that is damaged or modified. Damaged or modified batteries may exhibit unpredictable behaviour resulting in fire, explosion or risk of injury.
f) Do not expose a battery pack or tool to fire or excessive temperature. Exposure to fire or temperature above 130 °C may cause explosion.
g) Follow all charging instructions and do not charge the battery pack or tool outside the temperature range specified in the instructions. Charging improperly or at temperatures outside the specified range may damage the battery and increase the risk of fire.
6) Service
a) Have your power tool serviced by a qualified repair person using only identical replacement parts. This will ensure that the safety of the power tool is maintained.
b) Never service damaged battery packs. Service of battery packs should only be performed by the manufacturer or authorized service providers.
SAFETY INSTRUCTIONS FOR MITRE SAWS
a) Mitre saws are intended to cut wood or wood-like products, they cannot be used with abrasive cut-off wheels for cutting ferrous material such as bars, rods, studs, etc. Abrasive dust causes moving parts such as the lower guard to jam. Sparks from abrasive cutting will burn the lower guard, the kerf insert and other plastic parts.
b) Use clamps to support the workpiece whenever possible. If supporting the workpiece by hand, you must always keep
your hand at least 100 mm from either side of the saw blade. Do not use this saw to cut pieces that are too small to be securely clamped or held by hand. If your hand is placed too close to the saw blade, there is an increased risk of injury from blade contact.
c) The workpiece must be stationary and clamped or held against both the fence and the table. Do not feed the workpiece into the blade or cut "freehand" in any way. Unrestrained or moving workpieces could be thrown at high speeds, causing injury.
d) Push the saw through the workpiece. Do not pull the saw through the workpiece. To make a cut, raise the saw head and pull it out over the workpiece without cutting, start the motor, press the saw head down and push the saw through the workpiece. Cutting on the pull stroke is likely to cause the saw blade to climb on top of the workpiece and violently throw the blade assembly towards the operator.
e) Never cross your hand over the intended line of cutting either in front or behind the saw blade. Supporting the workpiece "cross handed" i.e. holding the workpiece to the right of the saw blade with your left hand or vice versa is very dangerous.
f) Do not reach behind the fence with either hand closer than 100 mm from either side of the saw blade, to remove wood scraps, or for any other reason while the blade is spinning. The proximity of the spinning saw blade to your hand may not be obvious and you may be seriously injured.
g) Inspect your workpiece before cutting. If the workpiece is bowed or warped, clamp it with the outside bowed face toward the fence. Always make certain that there is no gap between the workpiece, fence and table along the line of the cut. Bent or warped workpieces can twist or shift and may cause binding on the spinning saw blade while cutting. There should be no nails or foreign objects in the workpiece.
h) Do not use the saw until the table is clear of all tools, wood scraps, etc., except for the workpiece. Small debris or loose pieces of wood or other objects that contact the revolving blade can be thrown with high speed.
i) Cut only one workpiece at a time. Stacked multiple workpieces cannot be adequately clamped or braced and may bind on the blade or shift during cutting.
j) Ensure the mitre saw is mounted or placed on a level, firm work surface before use. A level and firm work surface reduces the risk of the mitre saw becoming unstable.
k) Plan your work. Every time you change the bevel or mitre angle setting, make sure the adjustable fence is set correctly to support the workpiece and will not interfere with the blade or the guarding system. Without turning the tool "ON" and with no workpiece on the table, move the saw blade through a complete simulated cut to assure there will be no interference or danger of cutting the fence.
I) Provide adequate support such as table extensions, saw horses, etc. for a workpiece that is wider or longer than the table top.
Workpieces longer or wider than the mitre saw table can tip if not securely supported. If the cut-off piece or workpiece tips, it can lift the lower guard or be thrown by the spinning blade.
m) Do not use another person as a substitute for a table extension or as additional support. Unstable support for the workpiece can cause the blade to bind or the workpiece to shift during the cutting operation pulling you and the helper into the spinning blade.
n) The cut-off piece must not be jammed or pressed by any means against the spinning saw blade. If confined, i.e. using length stops, the cut-off piece could get wedged against the blade and thrown violently.
o) Always use a clamp or a fixture designed to properly support round material such as rods or tubing. Rods have a tendency to roll while being cut, causing the blade to "bite" and pull the work with your hand into the blade.
p) Let the blade reach full speed before contacting the workpiece. This will reduce the risk of the workpiece being thrown.
q) If the workpiece or blade becomes jammed, turn the mitre saw off. Wait for all moving parts to stop and disconnect the plug from the power source and/or remove the battery pack. Then work to free the jammed material. Continued sawing with a jammed workpiece could cause loss of control or damage to the mitre saw.
r) After finishing the cut, release the switch, hold the saw head down and wait for the blade to stop before removing the cut-off piece. Reaching with your hand near the coasting blade is dangerous.
s) Hold the handle firmly when making an incomplete cut or when releasing the switch before the saw head is completely in the down position. The braking action of the saw may cause the saw head to be suddenly pulled downward, causing a risk of injury.
t) Use only saw blades recommended by the manufacturer, which conform to EN 847-1, if intended for wood and analogous materials.
GENERAL SAFETY WARNINGS FOR YOUR LASER

WARNING: Read all safety warnings and all instructions. Failure to follow the warnings and
instructions may result in serious injury.
Save all warnings and instructions for future reference.
These lasers do not normally present an optical hazard although staring at the beam may cause flash blindness.
Do not stare directly at the laser beam. A hazard may exist if you deliberately stare into the beam, please
observe all safety rules as follows:
- The laser shall be used and maintained in accordance with the manufacturer's instructions.
- Never aim the beam at any person or an object other than the work piece.
- The laser beam shall not be deliberately aimed at another person and shall be prevented from being directed towards the eye of a person for longer than 0.25 seconds area.
- Always ensure the laser beam is aimed at a sturdy work piece without reflective surfaces, e.g. wood or rough-coated surfaces are acceptable. Bright shiny reflective sheet steel or similar is not suitable for laser applications as the reflective surface may direct the laser beam back at the operator.
- Do not change the laser device with a different type. The manufacturer or an authorized agent must carry out repairs.
- CAUTION: Use of controls or adjustments other than those specified herein may result in hazardous radiation exposure.
Additional safety warning for class 2 laser The laser device fitted to this tool is CLASS 2 with a maximum radiation of 1mW and 650nm wavelength. CLASS 2 LASER RADIATION, DO NOT STARE INTO BEAM
SAFETY WARNINGS FOR BATTERY PACK
a) Do not dismantle, open or shred cells or battery pack.
b) Do not short-circuit a battery pack. Do not store battery packs haphazardly in a box or drawer where they may short-circuit each other or be short-circuited by conductive materials. When battery pack is not in use, keep it away from other metal objects, like paper clips, coins, keys, nails, screws or other small metal objects, that can make a connection from one terminal to another. Shorting the battery terminals together may cause burns or a fire.
c) Do not expose battery pack to heat or fire. Avoid storage in direct sunlight.
d) Do not subject battery pack to mechanical shock.
e) In the event of battery leaking, do not allow the liquid to come into contact with the skin or eyes. If contact has been made, wash the affected area with copious amounts of water and seek medical advice.
f) Seek medical advice immediately if a cell or battery pack has been swallowed.
g) Keep battery pack clean and dry.
h) Wipe the battery pack terminals with a clean dry cloth if they become dirty.
i) Battery pack needs to be charged before use. Always refer to this instruction and use the correct charging procedure.
j) Do not maintain battery pack on charge when
not in use.
k) After extended periods of storage, it may be necessary to charge and discharge the battery pack several times to obtain maximum performance.
I) Battery pack gives its best performance when it is operated at normal room temperature (20 °C ± 5 °C).
m) When disposing of battery packs, keep battery packs of different electrochemical systems separate from each other.
n) Recharge only with the charger specified by WORX. Do not use any charger other than that specifically provided for use with the equipment. A charger that is suitable for one type of battery pack may create a risk of fire when used with another battery pack.
o) Do not use any battery pack which is not designed for use with the equipment.
p) Keep battery pack out of the reach of children.
q) Retain the original product literature for future reference.
r) Remove the battery from the equipment when not in use.
s) Dispose of properly.
t) Do not mix cells of different manufacture, capacity, size or type within a device.
u) Do not remove battery pack from its original packaging until required for use.
v) Observe the plus (+) and minus (-) marks on the battery and ensure correct use.
SYMBOLS
| To reduce the risk of injury, user must read instruction manual | |
| Warning | |
| Wear ear protection | |
| Wear eye protection | |
| Wear dust mask | |
| Do not stare into beam |
| Laser radiation | |
| Make sure the battery is removed prior to changing accessories or making any adjustments to the tool. | |
| Wear protective gloves | |
| Do not burn | |
| Batteries may enter water cycle if disposed improperly, which can be hazardous for ecosystem. Do not dispose of waste batteries as unsorted municipal waste. | |
| Wood | |
| Incorrect | |
| Correct | |
| Lock | |
| Unlock | |
| TCT blade | |
| Do not dispose of batteries, Return exhausted batteries to your local collection or recycling point. | |
| Waste electrical products must not be disposed of with household waste. Please recycle where facilities exist. Check with your local authorities or retailer for recycling advice. |
COMPONENT LIST
| 1 OPERATING HANDLE |
| 2 UPPER FIXED GUARD |
| 3 MOTOR HOUSING |
| 4 LOWER ROTATING GUARD |
| 5 FOLDING WORK SUPPORTS |
| 6 MOUNTING HOLES |
| 7 KERF PLATE |
| 8 MITER LOCKING HANDLE |
| 9 MITER DETENT RELEASE |
| 10 FRONT SUPPORT FOOT |
| 11 MITER SCALE |
| 12 FENCE |
| 13 BLADE KEY |
| 14 WORK-HOLDING LEVER |
| 15 BEVEL SCALE |
| 16 GUARD RETRACTION ARM |
17 DUST PORT
18 TRIGGER SWITCH
19 LOCK-OUT LEVER
20 CUTTING DEPTH ADJUSTMENT SCREW
21 LOCK DOWN PIN
22 SLIDER LOCK KNOB
23 SLIDERS
24 BEVEL LOCK KNOB
25 WORK HOLDING LEVER RETAINING KNOB
26 BATTERY PACK *
27 BATTERY PACK RELEASE BUTTON *
28 LASER
29 LASER ON-OFF SWITCH
30 BLADE BOLT COVER (SEE FIG. C1)
31 BOLT COVER SCREW (SEE FIG. C1)
32 INNER FLANGE (SEE FIG. C2)
33 SAW BLADE (SEE FIG. C2)
34 OUTER FLANGE (SEE FIG. C2)
35 SPINDLE LOCK BUTTON (SEE FIG. C2)
36 DUST BAG (SEE FIG. F)
* Not all the accessories illustrated or described are included in standard delivery.
TECHNICAL DATA
Type WX845 WX845.9 (845 - designation of machinery, representative of battery-operated mitre saw)
| WX845 WX845.9 | ||
| Rated voltage | 20 V -Max** | |
| No load speed 3200/min | ||
| Blade size 216mm | ||
| Cutting capacity | ||
| Mitre 0°/Bevel 0° 220 x 70 mm | ||
| Mitre 0°/Bevel 45° 220 x 41 mm | ||
| Mitre 45°/Bevel 0° 155 x 70 mm | ||
| Mitre 45°/Bevel 45° 155 x 41 mm | ||
| Bevel capacity 0~45 | ° | |
| Mitre capacity | 0~45° L&R | |
| Machine weight | 12.5kg | 11.5kg |
**Voltage measured without workload. Initial battery voltage reaches maximum of 20 volts. Nominal voltage is 18 volts.
NOISE INFORMATION
| A weighted sound pressure | L_pA = 92.2 dB(A) |
| A weighted sound power | L_wA = 105.2 dB(A) |
| K_pA \& K_wA | 3dB(A) |
Wear ear protection.
The declared noise emission value has been measured in accordance with a standard test method and may be used for comparing one tool with another.
The declared noise emission value may also be used in a preliminary assessment of exposure.

WARNING: The noise emissions during actual use of the power tool can differ from the
declared value depending on the ways in which the tool is used especially what kind of workpiece is processed dependant on the following examples and other variations on how the tool is used:
How the tool is used and the materials being cut or drilled.
The tool being in good condition and well maintained. The use of the correct accessory for the tool and
ensuring it is sharp and in good condition.
If any anti noise accessories are used.
And the tool is being used as intended by its design and these instructions.

WARNING: To be accurate, an estimation of exposure level in the actual conditions of use should also take account of all parts of the operating cycle such as the times when the tool is switched off and when it is running idle but not actually doing the job. This may significantly reduce the exposure level over the total working period.
Helping to minimise your noise exposure risk.
Always use sharp chisels, drills and blades.
Maintain this tool in accordance with these instructions and keep well lubricated (where appropriate).
If the tool is to be used regularly then invest in anti noise accessories.
ACCESSORIES
| WX845 | WX845.9 | |
| Battery pack (WA3553) 1 / | ||
| Charger (WA3880) 1 / | ||
| Wood cutting blade (WA8201) | 1 | 1 |
| Blade wrench 1 1 | ||
| Dust bag 1 1 | ||
| Folding work supports 2 2 | ||
| Work-holding lever 1 1 |
We recommend that you purchase your accessories listed in the above list from the same store that sold you the tool. Refer to the accessory packaging for further details. Store personnel can assist you and offer advice.
OPERATING INSTRUCTIONS

NOTE: Before using the tool, read the instruction book carefully.
INTENDED USE
The mitre saw is intended as a stationary machine for making straight lengthways and crossways cuts in wood. Horizontal mitre angles of 0\~45° L&R as well as vertical bevel angles of 0° to +45° are possible.
ASSEMBLY AND OPERATION
| ACTION FIGURE | |
| BEFORE OPERATION | |
| Removing the battery pack See Fig. A1 | |
| Charging the battery pack | See Fig. A2 |
| Installing the battery pack | See Fig. A3 |
| ASSEMBLY | |
| Bench mountingWARNING: Always make sure your miter saw is securely mounted to a workbench or an approved work-stand. | See Fig. B |
| Installing and removing the saw bladeNOTE:1. Loosen, but do not remove the bolt cover screw;2. Do not remove any other screws;3. Press and hold the spindle lock button, keep rotating the saw blade until it locks (a “Click” is heard) before changing the blade.WARNING: Always remove the battery pack before changing the blade!WARNING: The blade bolt cover must be positioned correctly and the bolt cover screw must be screwed securely before cutting.CAUTION: Never depress the spindle lock button while the blade is under power or coasting. | See Fig. C1-C3 |
| Installing the work holding leverWith the lever on the left, lift the assembly over the fence into the locating pivots.Swing the retaining knobs over the shaft to lock in place.NOTE:The lever should move smoothly but not fall.If too loose, tighten the retaining knob screws. | See Fig. D |
| Installing the work supportsThe folding work supports make cutting long work much easier.To install, squeeze the ends together, insert into the slots in the table and allow to spring outward. | See Fig. E |
| 14 | Attaching/Removing the dust bagNOTE: Keep the dust port connected to dust collecting device when using the tool. | See Fig. F | Compound miter cuttingWARNING: ALWAYS take special care when making compound miter setups due to the interaction of the two angle settings.WARNING: The work hold down lever, the WORK HOLDING LEVER, can be used for all normal cuts and will keep your hands safe. Some unusual cuts may require the hold down lever, the WORK HOLDING LEVER, to be removed. | See Fig. J |
| Work PlacementWARNING: ALWAYS ensure the work is against the fence for it's full length before the cut. If there is any gap between the work and the fence the blade can jam in the cut and throw the work.Do not cut bowed work which cannot fully contact the fence.NOTE: Adjust the front support foot (10) to just contact the support table to prevent the chance of rocking forward. | Cutting Depth AdjustmentCutting depth is factory set, but if necessary it can be adjusted slightly. | See Fig. K | ||
| Slide LockNOTE: The saw can be used fixed or sliding. Fixed in the rear position for quick, easy cutting of narrow work. Sliding for cutting wider work. The slide should also be locked for transport. | See Fig. G | OPERATIONWARNING: Never make any cut unless the material is secured on the table and against the fence.WARNING: To ensure the blade path is clear of obstructions, always make a dry run of the cut without power before making any cuts on the workpiece. | ||
| Miter adjustmentNOTE: 1. The front support foot (10) requires adjustment so that it just contacts the supporting work surface to stop the saw tipping forward.2. You can quickly locate 0^,15^ , 22.5^,30^,45^ left or right by releasing the miter detent release as you rotate the miter locking handle. The miter detent will seat itself in one of the stop notches, located in the miter table frame.WARNING: Always tighten miter locking handle, do NOT rely just on the miter detent. | See Fig. H | 1. MINIMUM LENGTH lineWARNING: Check and make sure the workpiece is protruding out of the MINIMUM LENGTH line indicated on the fence. | See Fig. L1&L2 | |
| Bevel adjustmentWARNING: ALWAYS tighten the bevel lock knob securely BEFORE making a cut. Failure to do so could result in movement of the saw arm while making a cut. | See Fig. I | 2.Trigger switchNOTE:1. The lock down pin should be used only when carrying or storing the saw. Pull out the lock down pin to release the saw head before cutting.2. Keep the dust port connected to the dust collecting device when using the tool.WARNING: To avoid cutting injury from the sharp blade, please don't put your hands around the Kerf Plate.CAUTION: Do not cut metal, masonry or fiber cement product with this miter saw. Do not use any abrasive blades. | See Fig. M1&M2 | |
| 3. CuttingWARNING: Don't start cutting until the blade runs stably. Wait until the blade stops rotating BEFORE removing the workpiece. | See Fig. N | |||
| 4.Storage | See Fig. O |
MAINTENANCE
Remove the battery pack from the tool before carrying out any adjustment, servicing or maintenance.
There are no user serviceable parts in your power tool. Never use water or chemical cleaners to clean your power tool. Wipe clean with a dry cloth. Always store your power tool in a dry place. Keep the motor ventilation slots clean. Keep all working controls free of dust. Occasionally you may see sparks through the ventilation slots. This is normal and will not damage your power tool.
FOR BATTERY TOOLS
The ambient temperature range for the use and storage of tool and battery is 0^ C- 45^ C.
The recommended ambient temperature range for the charging system during charging is 0^ C -40 ^ C.
ENVIRONMENTAL PROTECTION

Waste electrical products must not be disposed of with household waste. Please recycle where
■ facilities exist. Check with your local authorities or retailer for recycling advice.
DECLARATION OF CONFORMITY
We,
Positec Germany GmbH
Grüner Weg 10, 50825 Cologne, Germany
Declare that the product
Description WORX Cordless Mitre Saw
Type WX845 WX845.9 (845 - designation of machinery, representative of battery-operated mitre saw)
Function cutting wood and analog materials
Complies with the following Directives:
2006/42/EC
2014/30/EU
2011/65/EU&(EU)2015/863
Standards conform to
EN 62841-1
EN 62841-3-9
EN 55014-1
EN 55014-2
The person authorized to compile the technical file, Name Marcel Filz
Address Positec Germany GmbH
Grüner Weg 10, 50825 Cologne, Germany

text_image
A# C E2019/12/09
Allen Ding
Deputy Chief Engineer, Testing & Certification
Positec Technology (China) Co., Ltd
18, Dongwang Road, Suzhou Industrial
Park, Jiangsu 215123, P. R. China
18, Dongwang Road, Suzhou Industrial
Park, Jiangsu 215123, P. R. China
AVERTISSEMENTS DE SÉCURITÉ GÉNÉRAUX POUR L'OUTIL
INFORMATIONS RELATIVES AU BRUIT
DÉCLARATION DE CONFORMITÉ
Nous,
Positec Germany GmbH
Grüner Weg 10, 50825 Cologne, Germany
18, Dongwang Road, Suzhou Industrial
Park, Jiangsu 215123, P. R. China
AVVISI GENERALI PER LA SICUREZZA DEGLI UTENSILI A MOTORE

18, Dongwang Road, Suzhou Industrial
Park, Jiangsu 215123, P. R. China
18, Dongwang Road, Suzhou Industrial
Park, Jiangsu 215123, P. R. China
ALGEMENE
VEILIGHEIDSWAARSCHUWING- EN VOOR VERMOGENSMACHINE

WAARSCHUWING: Lees alle
ander type accupack.
18, Dongwang Road, Suzhou Industrial
Park, Jiangsu 215123, P. R. China
AVERTISMENTE GENERALE DE SIGURANTĂ
PENTRU UNELTE
ELECTRICE

18, Dongwang Road, Suzhou Industrial
Park, Jiangsu 215123, P. R. China
OBECNÁ BEZPEČNOSTNÍ UPOZORNĚNÍ PRO ELEKTRICKÉ NÁSTROJE

INFORMACE TÝKAJÍCÍ SE HLUČNOSTI
18, Dongwang Road, Suzhou Industrial
Park, Jiangsu 215123, P. R. China
VŠEOBECNÉ BEZPEČNOSTNÉ UPOZORNENIA
31 SKRUTKA KRYTU (POZRI OBR. C1)
32 VNÚTORNÁ PRÍRUBA (POZRI OBR. C2)
18, Dongwang Road, Suzhou Industrial
Park, Jiangsu 215123, P. R. China
AVISOS GERAIS DE SEGURANÇA DE FERRAMENTAS ELÉCTRICAS

18, Dongwang Road, Suzhou Industrial
Park, Jiangsu 215123, P. R. China
GENERELLA SÄKERHETSVARNINGAR FÖR ELVERKTYG

18, Dongwang Road, Suzhou Industrial
Park, Jiangsu 215123, P. R. China
SPLOŠNA VARNOSTNA OPOZORILA

18, Dongwang Road, Suzhou Industrial
Park, Jiangsu 215123, P. R. China
WORX
you've got the power
www.worx.com
Copyright © 2019, Positec. All Rights Reserved.