GENIUS 2X4 - Battery charger NOCO - Free user manual and instructions
Find the device manual for free GENIUS 2X4 NOCO in PDF.
| Product Type | Multi-Bank Battery Charger |
| Brand | NOCO |
| Model | GENIUS 2X4 |
| Number of Banks | 4 |
| Input Voltage | 100-240 VAC, 50-60 Hz |
| Charge Voltage | 6 V and 12 V (depending on mode) |
| Charge Current | 2 A (12 V), 2 A (6 V) |
| Max Battery Capacity | Up to 40 Ah (12 V), maintenance for all sizes |
| Compatible Battery Types | Lead-acid 6V/12V (wet, gel, MF, CA, EFB, AGM, Calcium) and Lithium 12V (LiFePO4 with BMS) |
| Charge Modes | Standby, 12V, 12V AGM, 12V Lithium, 6V, Force |
| Low Voltage Detection | 1 V (12 V), 1 V (6 V) |
| LED Indicators | Charge status (25%, 50%, 75%, 100%), mode, errors (overvoltage, bad battery, reverse polarity, temperature) |
| Dimensions (L x D x H) | 5.7 x 9.4 x 2.3 inches |
| Weight | 3.9 lb |
| Protection Rating | IP60 |
| Cooling | Natural convection |
| Operating Temperature | -20°C to +40°C |
| Storage Temperature | -30°C to +60°C (max 80°C) |
| Safety Features | Reverse polarity protection, overvoltage, short circuit, over temperature; temperature compensation |
| Warranty | 3-year hassle-free |
Frequently Asked Questions - GENIUS 2X4 NOCO
User questions about GENIUS 2X4 NOCO
0 question about this device. Answer the ones you know or ask your own.
Ask a new question about this device
Download the instructions for your Battery charger in PDF format for free! Find your manual GENIUS 2X4 - NOCO and take your electronic device back in hand. On this page are published all the documents necessary for the use of your device. GENIUS 2X4 by NOCO.
USER MANUAL GENIUS 2X4 NOCO
User Guide & Warranty

READ AND UNDERSTAND ALL SAFETY INFORMATION BEFORE USING THIS PRODUCT. Failure to follow these safety instructions may result in ELECTRICAL SHOCK, EXPLOSION, FIRE, which may result in a SERIOUS INJURY, DEATH, or PROPERTY DAMAGE.
Electrical Shock. Product is an electrical device that can shock and cause serious injury. Do not cut power cords. Do not submerge in water or get wet.

Explosion. Unmonitored, incompatible, or damaged batteries can explode if used with product. Do not leave product unattended while in use. Do not attempt to jump start a damaged or frozen battery. Use product only with batteries of recommended voltage. Operate product in well ventilated areas.

Fire. Product is an electrical device that emits heat and is capable of causing burns. Do not cover product. Do not smoke or use any source of electrical spark or fire when operating product. Keep product away from combustible materials.

Eye Injury. Wear eye protection when operating product. Batteries can explode and cause flying debris. Battery acid can cause eye and skin irritation. In the case of contamination of eyes or skin, flush affected area with running clean water and contact poison control immediately.

Explosive Gases. Working in the vicinity of a lead-acid is dangerous. Batteries generate explosive gases during normal battery operation. To reduce risk of battery explosion, follow all safety information instructions and those published by the battery manufacturer and manufacturer of any equipment intended to be used in the vicinity of battery. Review cautionary markings on these products and on engine.

For more information and support visit:
www.no.co/support
Important Safety Warnings
About Genius Multi-Bank. The NOCO Genius Multi-Bank represents some of the most innovative and advanced technology on the market, making each charge simple and easy. It is quite possibly the safest and most efficient charger you will ever use. The Genius multi-bank series is designed for charging all types of 6V & 12V lead-acid batteries, including Wet (Flooded), Gel, MF (Maintenance-Free), CA (Calcium), EFB (Enhanced Flooded Battery), and AGM (Absorption Glass Mat), in addition to 12V Lithium (LiFePO4) batteries. It is suitable for charging battery capacities up to 40 Amp-Hours and maintaining all battery sizes. Getting Started. Before using the charger, carefully read the battery manufacturer's specific precautions and recommended rates of charge for the battery. Make sure to determine the voltage and chemistry of the battery by referring to your battery owner's manual prior to charging. Mounting. It is important to keep in mind the distance to the battery. The DC cable length from the charger, with either the battery clamp or eyelet terminal connectors, is approximately 34 inches (863.6mm). The extension cord is approximately 10 feet (3.0m). With either type of connection, allow for 12-inches (304mm) of slack between connections. Proposition 65. WARNING: This product can expose you to chemicals including lead and exhaust fumes, which are known to the State of California to cause cancer and birth defects or other reproductive harm. For more information go to www.P65Warnings.ca.gov. Personal Precaution. Only use product as intended. Someone should be within range of your voice or close enough to come to your aid in case of emergency. Have a supply of clean water and soap nearby in the case of battery acid contamination. Wear complete eye protection and protective clothing while working near a battery. Always wash hands after handling batteries and related materials. Do not handle or wear any metal objects when working with batteries including; tools, watches or jewelry. If metal is dropped onto battery, it may spark or create a short circuit resulting in electrical shock, fire, explosion which may result in injury, death or property damage. Minors. If the product is intended by "Purchaser" to be used by a minor, purchasing adult agrees to provide detailed instructions and warnings to any minor prior to use. Failure to do so is the sole responsibility of the "Purchaser," who agrees to indemnify NOCO for any unintended use or misuse by a minor. Choking Hazard. Accessories may present a choking hazard to children. Do not leave children unattended with product or any accessory. The product is not a toy. Handling. Handle product with care. The product can become damaged if impacted. Do not use a damaged product, including, but not limited to, cracks to the casing or damaged cables. Do not use product with a damaged power cord. Humidity and liquids may damage product. Do not handle product or any electrical components near any liquid. Store and operate product in dry locations. Do not operate product if it becomes wet. If product is already operating and becomes wet, disconnect it from the-battery and discontinue use immediately. Do not disconnect the product by pulling on the cables. Modifications. Do not attempt to alter, modify or repair any part of the product. Disassembling product may cause injury, death or damage to property. If product becomes damaged, malfunctions or comes in contact with any liquid, discontinue use, and contact NOCO. Any modifications to the product will void your warranty. Changes or modifications not expressly approved by the party responsible for compliance could void the user's authority to operate this device. Accessories. This product is only approved for use with NOCO accessories. NOCO is not responsible for user safety or damage when using accessories not approved by NOCO. Location. Prevent battery acid from coming in contact with the product. Do not operate the product in a closed-in area or an area with restricted ventilation. Do not set a battery on top of product. Position cable leads to avoid accidental damage by moving vehicle parts (including hoods and doors), moving engine parts (including fan blades, belts, and pulleys), or what could become a hazard that may cause injury or death. Operating Temperature. This product is designed to work in ambient temperatures between -4°F and 104°F (-20°C and 40°C). Do not operate outside of temperature ranges. Do not charge a frozen battery. Discontinue use of product immediately if the battery becomes excessively warm. Storage. Do not use or store your product in areas with high concentrations of dust or airborne materials. Store your product on flat; secure surfaces so it's not
prone to falling. Store your product in a dry location. The storage temperature is between -22^ F and 140^ F (-30°C - 60°C) average temperature. Never exceed 80°C under any condition. Compatibility. The product is only compatible with 6-volt & 12-volt Lead-Acid, AGM, and 12-volt Lithium batteries. Do not attempt to use product with any other type of battery. Charging other battery chemistries may result in injury, death or property damage. Contact the battery manufacturer prior to attempting to charge the battery. Do not charge a battery if you are unsure of the battery's specific chemistry or voltage. Medical Devices. Product may emit electromagnetic fields. Product contains magnetic components which may interfere with pacemakers, defibrillators, or other medical devises. These electromagnetic fields may interfere with pacemakers or other medical devices. Consult with your physician prior to use if you have any medical device including pacemakers. If you suspect the product is interfering with a medical device, stop using the product immediately and consult your physician. Cleaning. Power off the product before attempting any maintenance or cleaning. Clean and dry product immediately if it comes in contact with liquid or any type of contaminant. Use a soft, lint-free (micro fiber) cloth. Avoid getting moisture in openings. Explosive Atmospheres. Obey all signs and instructions. Do not operate product in any area with a potentially explosive atmosphere, including fueling areas or areas which contain chemicals or particles such as grain, dust or metal powders. High-Consequence Activities. This product is not intended for use where the failure of the product could lead to injury, death or severe environmental damage. Radio Frequency Interference. Product is designed, tested, and manufactured to comply with regulations governing radio frequency emissions. Such emissions from the product can negatively affect the operation of other electronic equipment, causing them to malfunction. Model Number: Genius Multi-Bank Series This device complies with Part 15 of the FCC Rules. Operation is subject to the following two conditions: (1) this device may not cause harmful interference, and (2) this device must accept any interference received, including interference that may cause undesired operation. NOTE: This equipment has been tested and found to comply with the limits for a Class A digital device, pursuant to Part 15 of the FCC Rules. These limits are designed to provide reasonable protection against harmful interference when the equipment is operated in a commercial environment. This equipment generates, uses, and can radiate radio frequency energy and, if not installed and used in accordance with the instruction manual, may cause harmful interference to radio communications. Operation of this equipment in a residential area is likely to cause harmful interference in which case the user will be required to correct the interference at his own expense.
How To Use
Charging Modes.
The Genius Multi-Bank has six (6) modes: Standby, 12V, 12V AGM, 12V LITHIUM, 6V and Force. Some charge modes must be pressed and held for three (3) to five (5) seconds to enter the mode. These “Press and Hold” modes are advanced charging modes that require your full attention before selecting. It is important to understand the differences and purpose of each charge mode. Always check with battery manufacturer to confirm the right charge mode for your specific battery. Do not operate the charger until you confirm the appropriate charge mode for your battery. Below is a brief description:
| Mode | Explanation | (Peak Voltage Measured At 25°C, Amperage Rating Is Bulk Amperage When Above 0°C) |
| Standby | In Standby mode, the charger is not charging or providing any power to the battery. Energy Save is activated during this mode, drawing microscopic power from the electrical outlet. Canbus is enabled in Standby mode. When in Standby, the orange Standby LED will illuminate. | |
| No Power | ||
| 12V | For charging 12-volt Wet Cell, Gel Cell, Enhanced Flooded, Maintenance-Free and Calcium batteries. When selected, the 12V white LED will illuminate. | |
| 14.5V | 2A | Up To 40Ah Batteries | ||
| 12V AGM | For charging 12-volt AGM batteries. When selected, the 12V AGM white LED will illuminate. | |
| 14.8V | 2A | Up To 40Ah Batteries | ||
| 12V LITHIUM | For charging 12-volt lithium-ion batteries, including lithium iron phosphate. When selected, the 12V Lithium blue LED will illuminate. For use on batteries with Battery Management Systems (BMS) only. | |
| 14.6V | 2A | Up To 40Ah Batteries | ||
| 6V Press & Hold (3 Seconds) | For charging 6-volt Wet Cell, Gel Cell, Enhanced Flooded, Maintenance-Free and Calcium batteries. When selected, the 6V white LED will illuminate. | |
| 7.25V | 2A | Up To 40Ah Batteries | [From Standby Press and Hold 3 Seconds while connected to battery] | |
| Force Mode Press & Hold (5 Seconds) | For charging batteries with a voltage lower than 1V. Press and Hold for five (5) seconds to enter Force Mode. The selected charge mode will then operate under Force Mode for five (5) minutes before returning to standard charging in the selected mode. | |
| 2A | Up To 40Ah Batteries | [From Standby Press and Hold 5 Seconds while connected to battery, then toggle through modes] | |
Using 6V. [Press & Hold for 3 seconds]
6V charge mode is designed for 6-volt lead-acid batteries only, like Wet Cell, Gel Cell, Enhanced Flooded, Maintenance-Free and Calcium batteries. Press and hold for three (3) seconds to enter 6V Charge Mode. Consult the battery manufacturer before using this mode.
Using 12V Lithium.
12V Lithium charge mode is designed for 12-volt lithium-ion batteries only, including lithium iron phosphate.
CAUTION. USE THIS MODE WITH EXTREME CARE. THIS MODE SHOULD ONLY BE USED WITH 12-VOLT LITHIUM BATTERIES THAT HAVE A BUILT-IN BATTERY MANAGEMENT SYSTEM (BMS). LITHIUM-ION BATTERIES ARE MADE AND CONSTRUCTED IN DIFFERENT WAYS AND SOME MAY OR MAY NOT CONTAIN A BATTERY MANAGEMENT SYSTEM (BMS). CONSULT THE LITHIUM BATTERY MANUFACTURER BEFORE CHARGING AND ASK FOR RECOMMENDED CHARGING RATES AND VOLTAGES. SOME LITHIUM-ION BATTERIES MAY BE UNSTABLE AND UNSUITABLE FOR CHARGING.
Force Mode. [Press & Hold for 5 seconds]
Force mode allow the charger to manually begin charging when the connected battery's voltage is too low to be detected. If battery voltage is too low for the charger to detect, press and hold the mode button for 5 seconds to activate Force Mode, then select the appropriate mode. All available modes will flash. Once a charge mode is selected, the Charge Mode LED and Charge LED will alternate between each other, indicating Force Mode is active. After five (5) minutes the charger will return to the normal charge operation and low voltage detection will be reactivated.
CAUTION. USE THIS MODE WITH EXTREME CARE. FORCE MODE DISABLES SAFETY FEATURES AND LIVE POWER IS PRESENT AT THE CONNECTORS. ENSURE ALL CONNECTIONS ARE MADE PRIOR TO ENTERING FORCE MODE, AND DO NOT TOUCH CONNECTIONS TOGETHER. RISK OF SPARKS, FIRE, EXPLOSION, PROPERTY DAMAGE, INJURY, AND DEATH.
Connecting to the Battery.
Do not connect the AC power plug until all other connections are made. Identify the correct polarity of the battery terminals on the battery. The positive battery terminal is typically marked by these letters or symbol (POS, P, +). The negative battery terminal is typically marked by these letters or symbol (NEG, N, -). Do not make any connections to the carburetor, fuel lines, or thin, sheet metal parts.
FOLLOW THESE STEPS WHEN BATTERY IS INSTALLED IN VEHICLE. WARNING: A SPARK NEAR THE BATTERY MAY CAUSE A BATTERY EXPLOSION. TO REDUCE THE RISK OF A SPARK NEAR THE BATTERY:
1.) Position AC and DC cords to reduce risk of damage by hood, door, or moving engine part.
2.) Stay clear of fan blades, belts, pulleys, and other parts that can cause injury to persons.
3.) Check polarity of battery terminals. The POSITIVE (POS, P, +) battery terminal usually has a larger diameter than the NEGATIVE (NEG, N, -) battery terminal.
4.) Determine which battery terminal is grounded (connected) to the chassis. If negative battery terminal is grounded to chassis (as in most vehicles), see Step 5. If positive battery terminal is grounded to the chassis, see Step 6.
5.) For negative-grounded vehicle only, connect POSITIVE (RED) battery clamp or eyelet terminal connector from battery charger to POSITIVE (POS, P. +) ungrounded battery terminal. Connect NEGATIVE (BLACK) battery clamp or eyelet terminal connector to vehicle chassis or engine block away from battery. Connect to a heavy gauge metal part of the frame or engine block.
6.) For positive-grounded vehicle only, connect NEGATIVE (BLACK) battery clamp or eyelet terminal connector from battery charger to NEGATIVE (NEG, N, -) ungrounded battery terminal. Connect POSITIVE (RED) battery clamp or eyelet terminal connector to vehicle chassis or engine block away from battery. Connect to a heavy gauge metal part of the frame or engine block.
7.) Connect the battery charger into a suitable electrical outlet. Do not face the battery when making this connection.
8.) When disconnecting the battery charger, disconnect in the reverse sequence, removing the negative first (or positive first for positive ground systems).
FOLLOW THESE STEPS WHEN BATTERY IS OUTSIDE VEHICLE. WARNING: A SPARK NEAR THE BATTERY MAY CAUSE A BATTERY EXPLOSION. TO REDUCE THE RISK OF A SPARK NEAR THE BATTERY:
1.) Check polarity of battery terminals. The POSITIVE (POS, P, +) battery terminal usually has a larger diameter than the NEGATIVE (NEG, N, -) battery terminal.
2.) Attach at least a 24-inch-long 6-gauge (AWG) insulated battery cable to NEGATIVE (NEG, N, -) battery terminal.
3.) Connect POSITIVE (RED) battery clamp or eyelet terminal connector from battery charger to POSITIVE (POS, P. +) battery terminal.
4.) Position yourself and free end of cable as far away from battery as possible - then connect NEGATIVE (BLACK) battery clamp or eyelet terminal connector to free end of cable.
5.) Connect the battery charger into a suitable electrical outlet. Do not face the battery when making this connection.
6.) When disconnecting charger, always do so in reverse sequence of connecting procedure and break first connection while as far away from battery as practical.
7.) A marine (boat) battery must be removed and charged on shore. To charge it on board requires equipment specially designed for marine use.
Begin Charging.
1.) Verify the voltage and chemistry of the battery.
2.) Confirm that you have connected the battery clamps or eyelet terminal connectors properly and the AC power plug is plugged into an electrical outlet.
3.) [First time use] The charger will begin in Standby mode, indicated by an orange LED. In Standby, the charger is not providing any power.
4.) Press the mode button to toggle to the appropriate charge mode (press and hold for three seconds to enter an advanced charge mode) for the voltage and chemistry of your battery.
5.) The mode LED will illuminate the selected charge mode and the Charge LEDs will illuminate (depending on the health of the battery) indicating the charging process has started.
6.) The charger can now be left connected to the battery at all times to provide maintenance charging.
Auto-Memory: The charger has built in auto-memory and will return to the last charge mode when connected. To change modes after the first use, press the mode button.
Charging Times
Charging Times.
The estimated time to charge a battery is shown below. The size of the battery (Ah) and its depth of discharge (DOD) greatly affect its charging time. The charge time is based on an average depth of discharge to a fully charged battery and is for reference purposes only. Actual data may differ due to battery conditions. The time to charge a normally discharged battery is based on a 50% DOD. Temperature will also impact charging times. The Genius Multi-Bank features thermal compensation that automatically adjusts charging profiles to maximize charging performance.
Battery Size Approx. Time to Charge In Hours
| 6V | 12VAh | |
| 8 | 3.0 | 3.0 |
| 12 | 4.5 | 4.5 |
| 18 | 6.75 | 6.75 |
| 24 | 9.0 | 9.0 |
| 40 | 15.0 | 15.0 |
Understanding Charge LEDs.
| LED | Explanation | |
| 25% Red LED |  | The 25% Charge LED will slowly pulse “on” and “off” when the battery is less than 25% charged. When the battery is 25% charged, the 25% LED will go solid and the next LED will begin to pulse. |
| 50% Red LED |  | The 50% Charge LED will slowly pulse “on” and “off” when the battery is 25% - 50% charged. When the battery is 50% charged, the 50% LED will go solid and the next LED will begin to pulse. |
| 75% Orange LED |  | The 75% Charge LED will slowly pulse “on” and “off” when the battery is 50% - 75% charged. When the battery is 75% charged, the 75% LED will go solid and the next LED will begin to pulse. |
| 100% Green LED |  | The 100% Charge LED will slowly pulse “on” and “off”, when the battery is less than 100% fully charged. When the battery is fully charged, the Green LED will be solid, and the 25%, 50% and 75% Charge LEDs will turn “off”. |
| Optimization Green LED |  | During Optimization, the 100% Charge LED will pulse “on” and “off” slowly. Once the battery is fully optimized the 100% Charge LED will turn solid green. The charger can be left connected to the battery indefinitely. |
Understanding Error LEDs.
Error Conditions will be indicated by the following LEDs.
LED Reason/Solution
| Charger is in Standby mode or Battery voltage is too low for charger to detect.Solid | ||
| Solid | Battery voltage is too high for the selected charge mode. Check the battery and charge mode. | |
| Solid | Possible battery short / Battery will not hold a charge. Have battery checked by a professional. | |
| Solid | Reverse polarity. Reverse the battery connections. | |
| Solid | Charger internal temperature too high / Charger will resume function once the Charger internal temperature drops. | |
| * Flashing | Charger ambient temperature too cold / Charger will resume function once the Charger ambient temperature rises. |

text_image
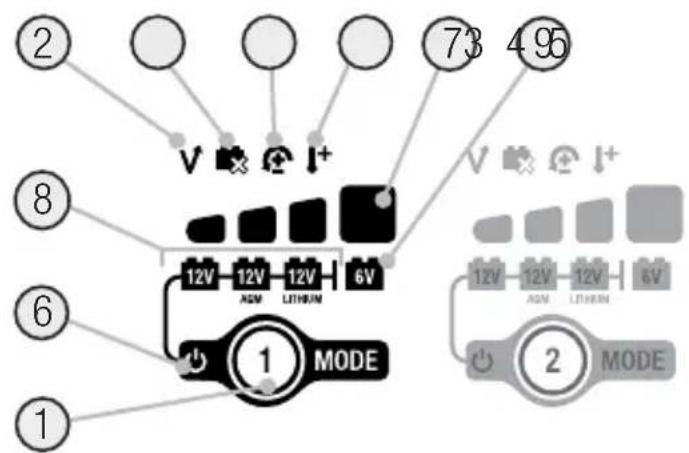
② ⑦ 495 ⑧ ⑥ ① MODE 12V 12V 12V 6V AGM LETHNIC ② MODE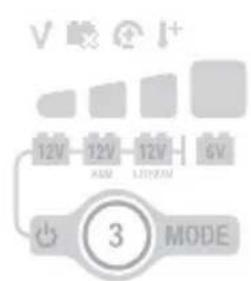
text_image
12V 12V 12V 6V 3 MODE
text_image
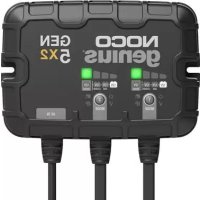
12V 12V 12V 6V ④ MODE(For Genius Multi-Bank 2X2/2X4, each bank is isolated and functions independently.)
1.) Mode Button Push to cycle through charging Modes.
2.) Overvoltage Error LED Illuminates solid Red; Battery Voltage is above Protect voltage.
3.) Bad Battery Error LED Illuminates solid Red when connected battery will not hold a charge.
4.) Reverse Polarity Error LED Illuminates solid Red when reverse polarity is detected.
5.) Hot/Cold LED Illuminates solid Red when internal temperature is too high. Flashes Red (Along with 2.3.4. Error LEDs) when internal temperature is too low.
6.) Standby LED Illuminates when the charger is in Standby Mode, the charger is not charging or providing any power to the battery.
7.) Charge LED indicates the connected battery(s) state-of-charge.
8.) Mode LED Indicates the Charge Mode the charger is currently in. Push the MODE button to cycle through charge Modes.
9.) [Press and Hold] Mode LED Mode button must be pressed and held for 3 seconds to enter the mode.
Technical Specifications
| GENIUS2X2 GENIUS2X4 | ||
| Input Voltage AC: | 100-240 VAC, 50-60Hz | 100-240 VAC, 50-60Hz |
| Working Voltage AC: | 100-240 VAC, 50-60Hz | 100-240 VAC, 50-60Hz |
| Output Power: | 30x2 W Max | 30x4 W Max |
| Charging Voltage: | Various | Various |
| Charging Current: | 2A (12V), 2A (6V) | 2A (12V), 2A (6V) |
| Low-Voltage Detection: | 1V (12V), 1V (6V) | 1V (12V), 1V (6V) |
| Back Current Drain: | <5mA | <5mA |
| Ambient Temperature: | -20°C to +40°C | -20°C to +40°C |
| Type of Batteries: | 6V & 12V | 6V & 12V |
| Battery Chemistries: | Wet, Gel, MF, CA, EFB, AGM, Lithium. | Wet, Gel, MF, CA, EFB, AGM, Lithium. |
| Banks: | 2 | 4 |
| Battery Capacity: | Up to 40Ah, Maintains All Battery Sizes | Up to 40Ah, Maintains All Battery Sizes |
| Housing Protection: | IP60 | IP60 |
| Cooling: | Natural Convection | Natural Convection |
| Dimensions (L x W x H): | 4.4 x 5.1 x 1.9 Inches | 5.7 x 9.4 x 2.3 Inches |
| Weight: | 1.1 Pounds | 3.9 Pounds |
3 Year Hassle-Free Warranty
NOCO warrants that this product (the "Product") will be free from defects in material and workmanship for a period of Three (3) years from the date of purchase (the "Warranty Period"). For defects reported during the Warranty Period, NOCO will, at its discretion, and subject to NOCO's technical support analysis, either repair or replace defective products. Replacement parts and products will be new or serviceably used, comparable in function and performance to the original part and warranted for the remainder of the original Warranty Period.
NOCO'S LIABILITY HEREUNDER IS EXPRESSLY LIMITED TO REPLACEMENT OR REPAIR. TO THE MAXIMUM EXTENT PERMITTED BY LAW, NOCO SHALL NOT BE LIABLE TO ANY PURCHASER OF THE PRODUCT OR ANY THIRD PARTY FOR ANY SPECIAL, INDIRECT, CONSEQUENTIAL OR EXEMPLARY DAMAGES, INCLUDING, BUT NOT LIMITED
TO, LOST PROFITS, PROPERTY DAMAGE OR PERSONAL INJURY, RELATED IN ANY WAY TO THE PRODUCT, HOWSOEVER CAUSED, EVEN IF NOCO HAD KNOWLEDGE OF THE POSSIBILITY OF SUCH DAMAGES. THE WARRANTIES SET FORTH HEREIN ARE IN LIEU OF ALL OTHER WARRANTIES, EXPRESS, IMPLIED, STATUTORY OR OTHERWISE, INCLUDING, WITHOUT LIMITATION, THE IMPLIED WARRANTIES OF MERCHANTABILITY AND FITNESS FOR A PARTICULAR PURPOSE, AND THOSE ARISING FROM COURSE OF DEALING, USAGE OR TRADE PRACTICE. IN THE EVENT THAT ANY APPLICABLE LAWS IMPOSE WARRANTIES, CONDITIONS OR OBLIGATIONS THAT CANNOT BE EXCLUDED OR MODIFIED, THIS PARAGRAPH SHALL APPLY TO THE GREATEST EXTENT ALLOWED BY SUCH LAWS.
This Warranty is made solely for the benefit of the original purchaser of the Product from NOCO or from a NOCO approved reseller or distributor and is not assignable or transferable. To assert a warranty claim, the purchaser must: (1) request and obtain a return merchandise authorization ("RMA") number and return location information (the "Return Location") from NOCO Support by emailing support@no.co or by calling 1.800.456.6626; and (2) send the Product, including RMA number, and receipt to the Return Location. DO NOT SEND IN PRODUCT WITHOUT FIRST OBTAINING AN RMA FROM NOCO SUPPORT.
The original purchaser is responsible (and must prepay) all packaging and transportation costs to ship products for warranty service.
NOTWITHSTANDING THE ABOVE, THIS HASSLE-FREE WARRANTY IS VOID AND DOES NOT APPLY TO PRODUCTS THAT: (a) are misused, mishandled, subjected to abuse or careless handling, accident, improperly stored, or operated under conditions of extreme voltage, temperature, shock, or vibration beyond NOCO's recommendations for safe and effective use; (b) improperly installed, operated or maintained; (c) are/were modified without the express written consent of NOCO; (d) have been disassembled, altered or repaired by anyone other than NOCO; (e) the defects of which were reported after the Warranty Period.
THIS HASSLE-FREE WARRANTY DOES NOT COVER: (1) normal wear and tear; (2) cosmetic damage that does not affect functionality; or (3) Products where the NOCO serial number is missing, altered, or defaced.
HASSLE-FREE WARRANTY CONDITIONS
These conditions apply only to Product during the Warranty Period. The Hassle-Free Warranty is void either by elapsed time from date of purchase (elapsed time from serial number date, if no proof of purchase) or from the conditions listed earlier in this document. Return Product with the appropriate documentation.
With Receipt:
0-3 Years: NO Charge. With proof of purchase, The warranty period begins on date of purchase.
With NO Receipt:
0-3 Years: NO Charge. With NO proof of purchase, The warranty period begins on the serial number date.
We recommend registering your NOCO product in order to upload proof of purchase and extend your effective warranty dates. You may register your NOCO product online at: no.co/register. If you have any questions regarding your warranty or product, contact NOCO Support (email and phone number above) or write to: The NOCO Company, at 30339 Diamond Parkway, #102, Glenwillow, OH 44139 USA.
NOCO genius®
Multi-Bank Series

DANGER
WARUNKI GWARANCJI BEZPROBLEMOWEJ
SYARAT-SYARAT WARANTI MUDAH
MGA KONDISYON SA WARANTIYA NA HASSLE-FREE
(1) 100% DOD (1) Genius Multi-Bank 100%
| Ah (###) | 6V | 12V |
| 8 | 3.0 | 3.0 |
| 12 | 4.5 | 4.5 |
| 18 | 6.75 | 6.75 |
| 24 | 9.0 | 9.0 |
| 40 | 15.0 | 15.0 |
Consumption and Engineering
text_image
Warning symbols with icons and labels, including warning, fire, flame, and person silhouettewww.no.co/support

natural_image
Completely black image with no visible content or text.
bar
| Category | Value | | -------- | ----- | | JA | 100 |
text_image
Simple diagram with horizontal and vertical lines, likely representing a table or grid layout in a technical or mathematical context.| ○ | |
| V | |
| I+ | |
| V ✕ ⚫ I+ |

text_image
② ⑦ 4 95 V I+ 73 8 12V 12V 12V 6V AGM LETRUM ⑥ ① MODE ② MODE
text_image
12V 12V 12V 6V 3 MODE
text_image
12V 12V 12V 6V ④ MODEGENIUS2X2 GENIUS2X4

natural_image
Completely black image with no visible content or text.NOCO genius®
Multi-Bank Series


natural_image
Empty rectangular frame with black border (no text or symbols)www.no.co/support

natural_image
Completely black image with no visible content or text.
bar
| Category | Value | |---|---| | Row 1 | 0 | | Row 2 | 0 | | Row 3 | 0 | | Row 4 | 0 | | Row 5 | 0 |
text_image
Simple diagram with horizontal and vertical lines, likely representing a coordinate or grid layout in a technical or mathematical context.
text_image
Diagram showing five vertical columns with black and white rectangular blocks, likely representing a pattern or selection system.| V | |
| I+ | |
| V ⚫ Ⓤ I+ |

text_image
② ⑦ 495 ⑧ ⑥ ① MODE 12V 12V 12V 6V AGM LITHIN 12V 12V 12V 6V ② MODE
text_image
V 12V 12V 12V 6V MODE 3
text_image
12V 12V 12V 6V ④ MODEGENIUS2X2 GENIUS2X4
NOCO genius®
Multi-Bank Series

text_image
Warning symbols and hazard icons in Chinese, including warning, fire, and flame signs
natural_image
Empty rectangular frame with black border (no text or symbols)www.no.co/support

natural_image
Completely black image with no visible content or text.
bar
| Category | Value | |---|---| | Row 1 | 0 | | Row 2 | 0 | | Row 3 | 0 | | Row 4 | 0 | | Row 5 | 0 |
natural_image
Completely black image with no visible content or text.
text_image
Diagram showing five vertical columns with black and white rectangular blocks, likely representing a pattern or selection system.| V | |
| I+ | |
| V ⚫ Ⓤ I+ |
text_image
② ⑦ 495 ⑧ ⑥ ① MODE 12V 12V 12V 6V AGM LITHIN 12V 12V 12V 6V ② MODE
text_image
V 12V 12V 12V 6V MODE 3
text_image
12V 12V 12V 6V ④ MODEGENIUS2X2 GENIUS2X4
| ( Timestamp) (Peak Voltage) مقطاسة عند درجة 25Two(s) : معدل تدفق ثابت للئيار الكهربائي (Stangby Mode) (Standby LED) (Seykoun مناً باللون البر萎قيي) (Standby AMperage) (English Language) (Canbus) (Orange LED) (English Language) (English Language) (English Language) (English Language) (English Language) (English Language) (English Language) (English Language) (English Language) (English Language) (English Language) (English Language) (English Language) (English Language) (English Language) (English Language) (English Language) (English Language) (English Language) (English Language) (English Language) (English Language) (English Language) (English Language) (English Language) (English Languages) (English Languages) (English Languages) (English Languages) (English Languages) (English Languages) (English Languages) (English Languages) (English Languages) (English Languages) (English Languages) (English Languages) (English Languages) (English Languages) (English Languages) (English Languages) (English Languages) (English Languages) (English Languages) (English Languages) (English Languages) (English Languages) (English Languages) (English Languages) (English Languages) (English Language) (English Language) (English Language) (English Language) (English Language) (English Language) (English Language) (English Language) (English Language) (English Language) (English Language) (English Language) (English Language) (English Language) (English Language) (English Language) (English Language) (English Language) (English Language) (English Language) (English Language) (English Language) (English Language) (English Language) (English language) (English language) (English language) (English language) (English language) (English language) (English language) (English language) (English language) (English language) (English language) (English language) (English language) (English language) (English language) (English language) (English language) (English language) (English language) (English language) (English language) (English language) (English language) (English language) (English language) (English languages) (English languages) (English languages) (English languages) (English languages) (English languages) (English languages) (English languages) (English languages) (English languages) (English languages) (English languages) (English languages) (English languages) (English languages) (English languages) (English languages) (English languages) (English languages) (English languages) (English languages) (English languages) (English languages) (English languages) (English languages) (English language) (English language) (English language) (English language) (English language) (English language) (English language) (English language) (English language) (English language) (English language) (English language) (English language) (English language) (English language) (English language) (English language) (English language) (English language) (English language) (English language) (English language) (English language) (English language) (English Language) (English Language) (English Language) (English Language) (English Language) (English Language) (English Language) (English Language) (English Language) (English Language) (English Language) (English Language) (English Language) (English Language) (English Language) (English Language) (English Language) (English Language) (English Language) (English Language) (English Language) (English Language) (English Language) (English Language) (EnglishLanguage) (English Language) (English Language) (English Language) (English Language) (English Language) (English Language) (English Language) (English Language) (English Language) (English Language) (English Language) (English Language) (English Language) (English Language) (English Language) (English Language) (English Language) (English Language) (English Language) (English Language) (English Language) (English Language) (English Language) (English Language) (EnglishLithium) (English Language) (English Language) (English Language) (English Language) (English Language) (English Language) (English Language) (English Language) (English Language) (English Language) (English Language) (English Language) (English Language) (English Language) (English Language) (English Language) (English Language) (English Language) (English Language) (English Language) (English Language) (English Language) (English Language) (English Language) (English LITHIUM) (English Language) (English Language) (English Language) (English Language) (English Language) (English Language) (English Language) (English Language) (English Language) (English Language) (English Language) (English Language) (English Language) (English Language) (English Language) (English Language) (English Language) (English Language) (English Language) (English Language) (English Language) (English Language) (English Language) (English Language) (English Lighting) (English Lighting) (English Lighting) (English Lighting) (English Lighting) (English Lighting) (English Lighting) (English Lighting) (English Lighting) (English Lighting) (English Lighting) (English Lighting) (English Lighting) (English Lighting) (English Lighting) (English Lighting) (English Lighting) (English Lighting) (English Lighting) (English Lighting) (English Lightening) (English Lightening) (English Lightening) (English Lightening) (English Lightening) (English Lightening) (English Lightening) (English Lightening) (English Lightening) (English Lightening) (English Lightening) (English Lightening) (English Lightening) (English Lightening) (English Lightening) (English Lightening) (English Lightening) (English Lightening) (English Lightening) (English Lightening) (English Lightning) (English Lightening) (English Lightening) (English Lightening) (English Lightening) (English Lightening) (English Lightening) (English Lightening) (English Lightening) (English Lightening) (English Lightening) (English Lightening) (English Lightening) (English Lightening) (English Lightening) (English Lightening) (English Lightening) (English Lightening) (English Lightening) (English Lightening) (English Light Evening) (English Light Evening) (English Light Evening) (English Light Evening) (English Light Evening) (English Light Evening) (English Light Evening) (English Light Evening) (English Light Evening) (English Light Evening) (English Light Evening) (English Light Evening) (English Light Evening) (English Light Evening) (English Light Evening) (English Light Evening) (English Light Evening) (English Light Evening) (English Light Evening) (English Light Evening) (English Light evening) (English Light evening) (English Light evening) (English Light evening) (English Light evening) (English Light evening) (English Light evening) (English Light evening) (English Light evening) (English Light evening) (English Light evening) (English Light evening) (English Light evening) (English Light evening) (English Light evening) (English Light evening) (English Light evening) (English Light evening) (English Light evening) (English Light evening) (English Light morning) (English Light morning) (English Light morning) (English Light morning) (English Light morning) (English Light morning) (English Light morning) (English Light morning) (English Light morning) (English Light morning) (English Light morning) (English Light morning) (English Light morning) (English Light morning) (English Light morning) (English Light morning) (English Light morning) (English Light morning) (English Light morning) (English Light morning) (English Light evening) (English Light evening) (English Light evening) (English Light evening) (English Light evening) (English Light evening) (English Light evening) (English Light evening) (English Light evening) (English Light evening) (English Light evening) (English Light evening) (English Light evening) (English Light evening) (English Light evening) (English Light evening) (English Light evening) (English Light evening) (English Light evening) (English Light afternoon) (English Light afternoon) (English Light afternoon) (English Light afternoon) (English Light afternoon) (English Light afternoon) (English Light afternoon) (English Light afternoon) (English Light afternoon) (English Light afternoon) (English Light afternoon) (English Light afternoon) (English Light afternoon) (English Light afternoon) (English Light afternoon) (English Light afternoon) (English Light afternoon) (English Light afternoon) (English Light afternoon) (English Light afternoon) (English Light evening) (English Light evening) (English Light evening) (English Light evening) (English Light evening) (English Light evening) (English Light evening) (English Light evening) (English Light evening) (English Light evening) (English Light evening) (English Light evening) (English Light evening) (English Light evening) (English Light evening) (English Light evening) (English Light evening) (English Light evening) (English Light evening) (English Light winter) (English Light winter) (English Light winter) (English Light winter) (English Light winter) (English Light winter) (English Light winter) (English Light winter) (English Light winter) (English Light winter) (English Light winter) (English Light winter) (English Light winter) (English Light winter) (English Light winter) (English Light winter) (English Light winter) (English Light winter) (English Light winter) (English Light winter) (English Light evening) (English Light evening) (English Light evening) (English Light evening) (English Light evening) (English Light evening) (English Light evening) (English Light evening) (English Light evening) (English Light evening) (English Light evening) (English Light evening) (English Light evening) (English Light evening) (English Light evening) (English Light evening) (English Light evening) (English Light evening) (English Light evening) (English Light ever) (English Light ever) (English Light ever) (English Light ever) (English Light ever) (English Light ever) (English Light ever) (English Light ever) (English Light ever) (English Light ever) (English Light ever) (English Light ever) (English Light ever) (English Light ever) (English Light ever) (English Light ever) (English Light ever) (English Light ever) (English Light ever) (English Light ever) (English Light every) (English Light every) (English Light every) (English Light every) (English Light every) (English Light every) (English Light every) (English Light every) (English Light every) (English Light every) (English Light every) (English Light every) (English Light every) (English Light every) (English Light every) (English Light every) (English Light every) (English Light every) (English Light every) (English Light every) (English Light ever) (English Light ever) (English Light ever) (English Light ever) (English Light ever) (English Light ever) (English Light ever) (English Light ever) (English Light ever) (English Light ever) (English Light ever) (English Light ever) (English Light ever) (English Light ever) (English Light ever) (English Light ever) (English Light ever) (English Light ever) (English Light ever) (English Light never) (English Light never) (English Light never) (English Light never) (English Light never) (English Light never) (English Light never) (English Light never) (English Light never) (English Light never) (English Light never) (English Light never) (English Light never) (English Light never) (English Light never) (English Light never) (English Light never) (English Light never) (English Light never) (English Light never) (English Light ever) (English Light ever) (English Light ever) (English Light ever) (English Light ever) (English Light ever) (English Light ever) (English Light ever) (English Light ever) (English Light ever) (English Light ever) (English Light ever) (English Light ever) (English Light ever) (English Light ever) (English Light ever) (English Light ever) (English Light ever) (English Light ever) (English Light Ever) (English Light Ever) (English Light Ever) (English Light Ever) (English Light Ever) (English Light Ever) (English Light Ever) (English Light Ever) (English Light Ever) (English Light Ever) (English Light Ever) (English Light Ever) (English Light Ever) (English Light Ever) (English Light Ever) (English Light Ever) (English Light Ever) (English Light Ever) (English Light Ever) (English Light Ever) (English Light ever) (English Light Ever) (English Light Ever) (English Light Ever) (English Light Ever) (English Light Ever) (English Light Ever) (English Light Ever) (English Light Ever) (English Light Ever) (English Light Ever) (English Light Ever) (English Light Ever) (English Light Ever) (English Light Ever) (English Light Ever) (English Light Ever) (English Light Ever) (English Light Ever) (English Light ever) (English Light ever) (English Light ever) (English Light ever) (English Light ever) (English Light ever) (English Light ever) (English Light ever) (English Light ever) (English Light ever) (English Light ever) (English Light ever) (English Light ever) (English Light ever) (English Light ever) (English Light ever) (English Light ever) (English Light ever) (English Light ever) (English LightEver) (English Light ever) (English Light ever) (English Light ever) (English Light ever) (English Light ever) (English Light ever) (English Light ever) (English Light ever) (English Light ever) (English Light ever) (English Light ever) (English Light ever) (English Light ever) (English Light ever) (English Light ever) (English Light ever) (English Light ever) (English Light ever) (English Light ever) (English Lightever) (English Light ever) (English Light ever) (English Light ever) (English Light ever) (English Light ever) (English Light ever) (English Light ever) (English Light ever) (English Light ever) (English Light ever) (English Light ever) (English Light ever) (English Light ever) (English Light ever) (English Light ever) (English Light ever) (English Light ever) (English Light ever) (English Light ever) (English LightEVER) (English Light ever) (English Light ever) (English Light ever) (English Light ever) (English Light ever) (English Light ever) (English Light ever) (English Light ever) (English Light ever) (English Light ever) (English Light ever) (English Light ever) (English Light ever) (English Light ever) (English Light ever) (English Light ever) (English Light ever) (English Light ever) (English Light ever) (English Lightver) (English Light ever) (English Light ever) (English Light ever) (English Light ever) (English Light ever) (English Light ever) (English Light ever) (English Light ever) (English Light ever) (English Light ever) (English Light ever) (English Light ever) (English Light ever) (English Light ever) (English Light ever) (English Light ever) (English Light ever) (English Light ever) (English Light ever) (English Light.)(English Light ever) (English Light ever) (English Light ever) (English Light ever) (English Light ever) (English Light ever) (English Light ever) (English Light ever) (English Light ever) (English Light ever) (English Light ever) (English Light ever) (English Light ever) (English Light ever) (English Light ever) (English Light ever) (English Light ever) (English Light ever) (English Light ever) (English Light ever) |
For more information and support visit:
www.no.co/support
NOCO®
Genius Multi-Bank Series.10122022B