MFR06 A - Deep fryer MPM - Free user manual and instructions
Find the device manual for free MFR06 A MPM in PDF.

User questions about MFR06 A MPM
0 question about this device. Answer the ones you know or ask your own.
Ask a new question about this device
Download the instructions for your Deep fryer in PDF format for free! Find your manual MFR06 A - MPM and take your electronic device back in hand. On this page are published all the documents necessary for the use of your device. MFR06 A by MPM.
USER MANUAL MFR06 A MPM
natural_image
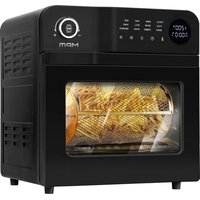
Black and silver M5M air fryer with control panel and digital display (no visible text or symbols)natural_image
Line drawing of an air fryer with a cooking pot and lid (no text or symbols)
natural_image
Line drawing of a portable stove with a lid and side arm, no text or symbols present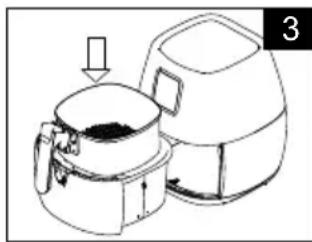
natural_image
Line drawing of a cooking or processing setup with a lid and a side bowl (no text or symbols)
natural_image
Line drawing of an air fryer with a cooking pot and lid, no text or symbols presentWSKAZÓWKI DOTYCZĄCE SMAŻENIA
natural_image
Illustration of a hand holding a pot with a lid filled with food, no text or symbols present
natural_image
Illustration of a hand holding a bag with a black X mark and arrow indicating compression (no text or symbols)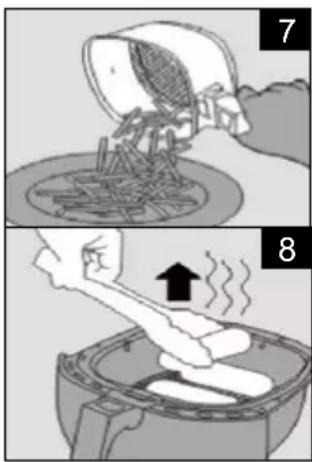
natural_image
Two-step diagram showing a hand pouring liquid into a container, with an arrow indicating heat or steam rising (no text or symbols)Read this Manual thoroughly before use.
Be extremely careful when children are near the appliance
Never leave the appliance unattended when turned on.
▶ Use this appliance only as intended.
Do not immerse the appliance or its power cable in water or other liquids.
▶ Always unplug the power cord when the appliance is not in use or before cleaning.
Do not use the appliance when damaged and/or its power cord or plug is damaged; have an Authorised Service repair it for you.
Use of any accessories not recommended by the manufacturer may cause injury or damage to this appliance.
In case the appliance emits abnormal noises, smells or smoke, it must be turned off immediately. Next, contact an authorised service point to have your appliance repaired.
Do not use this appliance outdoors.
Do not touch the appliance with wet hands.
Never leave the power cord hanging over sharp edges and keep it away from hot surfaces.
Ensure the power cord does not hang over the edge of the surface on which it is placed. Prevent accidental pulling the appliance from this surface.
Do not touch the hot surfaces! Use handles.
The appliance must be stored in a cool, shaded and dry place.
Avoid deformation of plastic elements; do not wash the appliance with hot water and using a dishwasher.
Do not insert hands or objects in the tank during appliance operation.
Prior to cleaning, unplug the appliance from a power source!
- Never place the appliance near other electrical appliances, burners, cookers, ovens, etc.
Always make sure that all parts of the appliance have been properly attached before turning on the power.
When the frying operation is completed, wait until the appliance fully cools off, before its elements are attached or removed or the appliance is cleaned.
▶ While frying using hot air, hot steam is discharged through outlet openings.
Do not place your hands or face near discharged steam or air outlet openings. While removing the bowl from the appliance, also pay attention to steam or air emitted by it.
During appliance operation, do not cover the air inlets and outlets.
Do not place any flammable materials, e.g. net curtains, tablecloths, etc. near the appliance as it may cause fire.
- Products to be fried must always be inserted in the basket.
Do not fill the bowl with oil as it may cause fire.
This appliance is intended for household use only. Never use it continuously for a longer period of time to prevent housing and cover deformation.
If a plug or power cord is damaged, it must be replaced by the manufacturer, service point or another authorised entity to avoid any risks.
The surface temperature may rise when the product is in use.
Connect this appliance to power outlets with a PE connector (i.e. earthed outlets)! Before turning on the appliance, make sure that the mains voltage matches the parameters on the appliance nameplate.
During operation, it is recommended to use protective gloves intended for this purpose.
This product may only be operated by children 8 or more years old or mentally and/or physically deficient persons and persons without knowledge of or experience in operation of this appliance type if supervised or instructed in safe operation, with clear understanding of all related risks. Children without supervision may never clean or maintain this appliance.
- Mind that children must never play with this appliance.
This appliance is not compatible for use with external power-off timers or separate remote control systems.
- Keep this appliance and its power cord out of the reach of children below 8 years old.
Never plug the power cable with wet hands.
- Never unplug the appliance by pulling by the power cord.
- Use the appliance on smooth and stable surfaces.
Do not place the appliance directly by walls or other equipment. Leave at least 10 cm of free space on appliance sides, behind and above it. Do not place any objects on the appliance.
Keep your children safe: do not leave any parts of the packaging readily accessible (i.e. plastic bags, cardboard boxes, polystyrene inserts, etc.).
WARNING! Never let children play with plastic film or bags. Choking/asphyxiation hazard!
WARNING! Oils and fats may burn when overheated. Please be careful!
CAUTION! Hot surface!
APPLIANCE OVERVIEW
A multifunction device whose unique design facilitates frying, grilling, stewing or even roasting without any oil. Fitfryer prepares food using hot air circulation, which ensures that it is crunchy on the outside and delicate on the inside.
Most ingredients may be prepared without adding oil.
Features
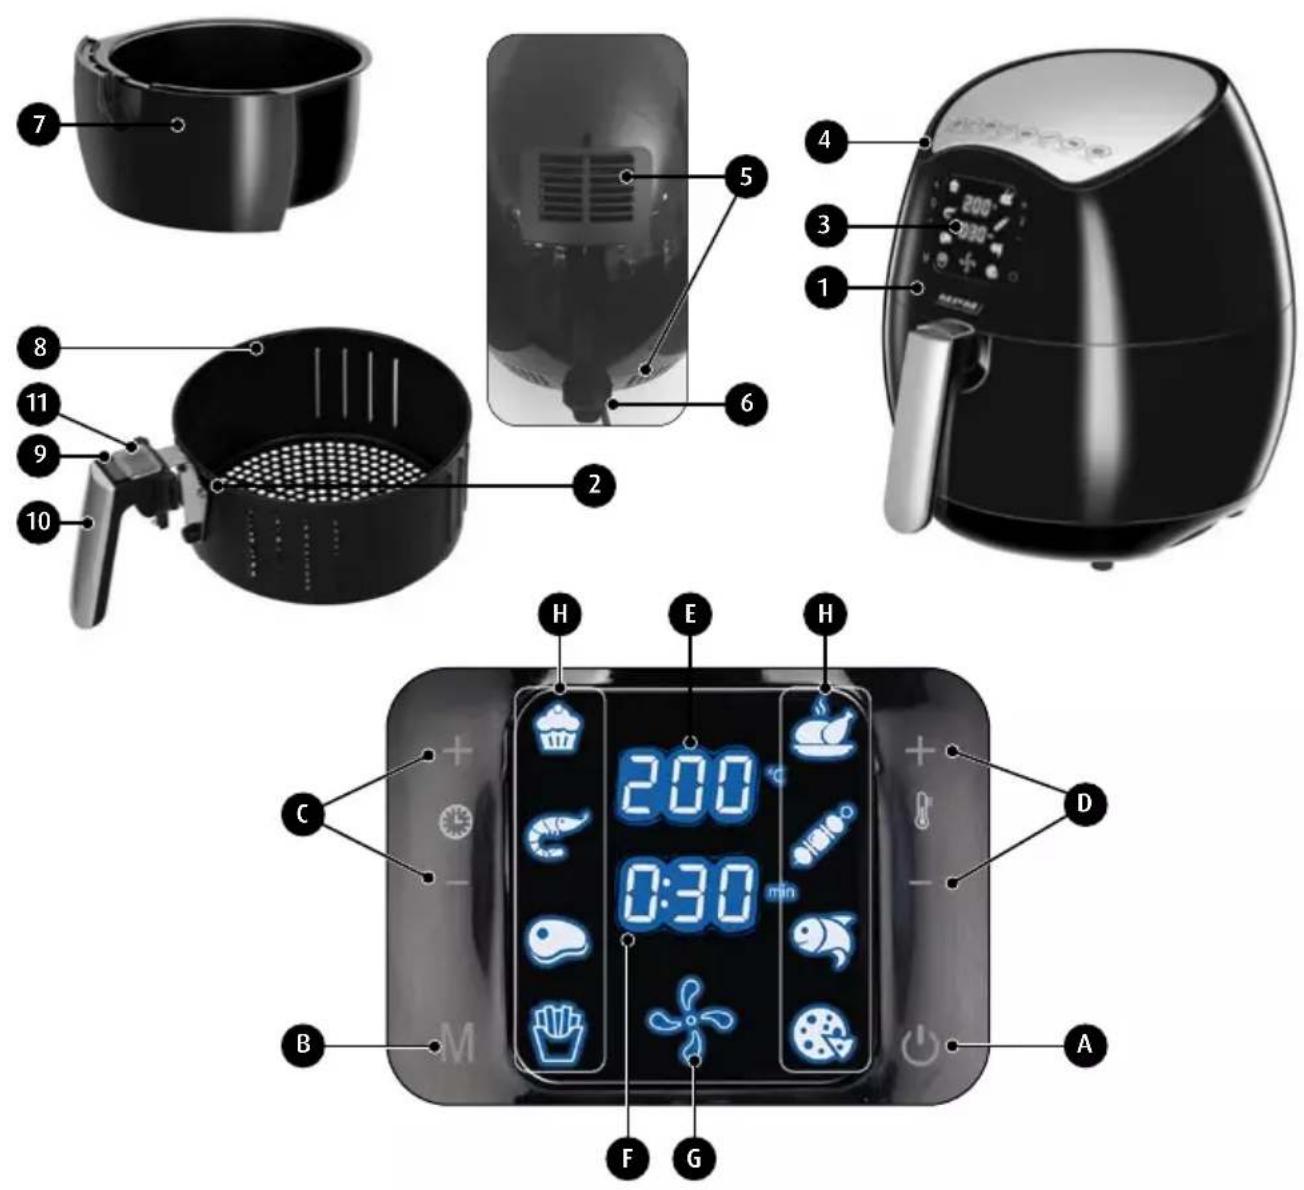
- Housing
- "MAX" level indicator
- Electronic control panel with a display - touch buttons with sound signalling:
A. on/off/START/STOP/PAUSE
B. programme selector button (M)
C. “+” and “-” operation time adjustment buttons (0-30 minutes, with 1-minute intervals)
D. “+” and “-” temperature adjustment buttons (80-200°C, with 5°C intervals)
E. temperature setting display
F. display showing time to finish the process
G. mains connection/appliance operation status icon
H. programme selection icons
- Air intakes
- Air outlets
- Power cord
-
Removable 4.5-litre bowl with non-stick coating
-
Removable 2.8-litre basket with non-stick coating
- Basket release button
- Basket handle
- Safety guard
Connecting to mains and activating the appliance is indicated by a sound signal.
PREPARING FOR USE
- Remove the appliance from its box and also remove all protective cardboard and foil inserts.
- Place the appliance on a flat, stable and level surface.
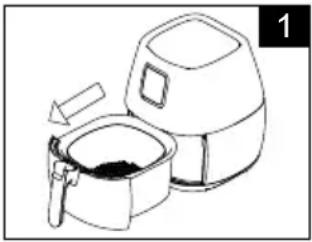
- Pull the handle (10) to slide out the bowl with the basket (Fig. 1).
- To remove the basket (8) pull the button cover (11) and press the button (9) (fig. 2).
- Using a delicate sponge that will not scratch any surfaces, clean the basket and bowl thoroughly in hot water with a little amount of a washing-up liquid.
- Wipe the housing (1) with a wet cloth. Never immerse the housing in water.
- Insert the basket (8) in the bowl (7) (Fig. 3).
- Holding the handle (10), slide the bowl with the basket back in the Fitfryer (Fig. 4).
NOTE! When the appliance is used for the first time, it may emit a slight amount of smoke. It is standard behaviour.
The Fitfryer uses hot air. Do not fill the bowl (7) with oil, frying grease or any other liquid.
CAUTION! Do not place any objects on the appliance as it may interfere with air flow and affect the results of hot-air frying.
FRYING TIPS
- Operate the appliance only on dry and stable surfaces resistant to high temperatures, away from any edges. Locate the appliance in a manner making it possible to fully slide out the bowl and basket assembly.
- Do not use in cupboards. Steam flowing from vents may damage them. Never use the appliance without the basket.
- Always unplug the appliance from power after use. Before cleaning, always wait until the appliance cools off completely! Clean the appliance after each use!
natural_image
Line drawing of an air fryer with a cooking pan and lid, no text or symbols present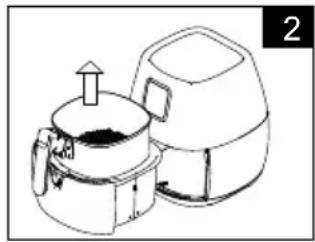
natural_image
Line drawing of a portable stove with a lid and side arm, no text or symbols present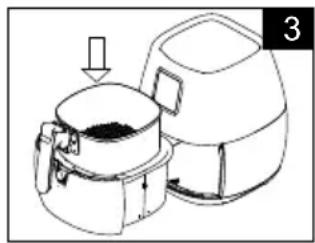
natural_image
Line drawing of a mechanical device with a cylindrical component and a lid, showing internal components and a downward arrow (no text or symbols)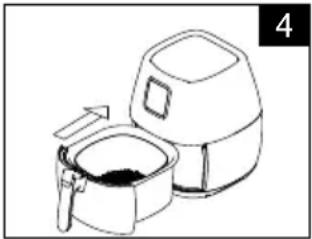
natural_image
Line drawing of an air fryer with a side panel and lid, no text or symbols presentINSTRUCTIONS FOR USE
- Plug the power cord (6) to an earthed socket.
- Use the handle to slide the bowl and basket assembly out (Fig. 1).
- Insert ingredients to the basket (8).
NOTE! Do not fill over the "MAX" indicator level or exceed the maximum amount of ingredients specified in the table (see section "APPROXIMATE FRYING TIME") as it may have negative impact on the quality of dishes prepared.
- Holding the handle (10), slide the bowl with the basket back in the Fitfryer.
NOTE! Do not touch the bowl during appliance operation or shortly after its operation is completed as the bowl reaches very high temperatures. Never use the appliance without the basket inserted in the bowl.
- Press the on switch (3A) to turn on the appliance. The appliance features an automatic switch-off function. If no button is pressed within 5 minutes from turning on the appliance, it will turn off automatically.
- Select a dedicated frying programme using the programme selector "M" (3B). The programme icon (3H) will light up, and the frying time and temperature dedicated for the programme will be displayed.
- Modify the frying time and temperature if necessary using the buttons (3D) and (3C). You can also modify these settings during the programme. It is possible to declare the temperature and time without selecting any programme, but in this case the appliance will stop the frying process automatically when you remove the bowl with the basket.
CAUTION! If the appliance was not pre-heated add 3 minutes to the frying time.
- Press the start/stop button (3A) to start the frying process. The frying process is indicated with icon animation (3G) and air fan operation. The display (3F) will show the time to end the frying process.
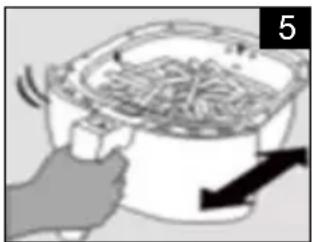
CAUTION! Steam coming out of the outlets during frying is normal. Keep your hands and face away from the outlets to avoid scalding. You need to shake some products during frying (fig. 5) (see the table in section "APPROXIMATE FRYING TIME") after removing the bowl with the basket.
CAUTION! Do not press the basket release button (9) while shaking (fig. 6). To reduce the weight you can remove the basket from the bowl and shake the basket only: put the bowl with the basket on a heatproof surface, open the button cover (11) and press the button (9) to remove the basket.
- A sound signal will indicate that the frying process is over.
CAUTION! You can stop the frying process manually by pressing the start/stop button (3B). If you press the (3A) button again within 20 seconds, the frying process will resume. Otherwise, the frying process will be stopped. The air fan may continue to work for some time after the process has been finished
- Use the handle (10) to slide out the bowl with the basket and check if all ingredients are ready. If they are not ready, use the handle to insert the bowl with the basket into the the Fitfryer and add a few minutes to the time set.
natural_image
Illustration of a hand holding a pot with food being placed, showing a downward arrow (no text or symbols)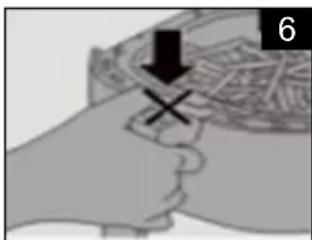
natural_image
Illustration of hands holding a basket with a black X mark and arrow, no text or symbols present
natural_image
Illustration of a hand pouring food into a bowl on a plate (no text or symbols)-
In order to remove small ingredients (e.g. Fries), remove the basket from the bowl.
-
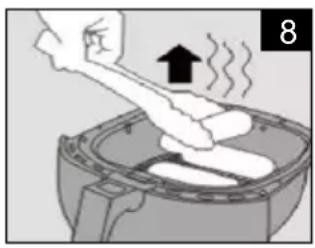
Empty the basket placing the ingredients on a plate. (Fig. 7) Use tongs to remove large or delicate ingredients from the basket (Fig. 8).
-
In order to prepare another portion, repeat the actions from 2 to 12.
-
After finishing, turn off the appliance. To do this, press the power (A) button.
natural_image
Illustration of a hand pressing down on a steaming bag inside a container (no text or symbols)Preparing home-made fries
For the best results, we advise to use pre-baked (e.g. frozen) fries. If you want to make homemade fries, follow the steps below.
- Peel the potatoes and cut them into sticks.
- Soak the potato sticks in a bowl for at least 30 minutes, take them out and dry them with kitchen paper.
- Pour 1/2 tablespoon of olive oil in a bowl, put the sticks on top and mix until the sticks are coated with oil.
- Remove the sticks from the bowl with your fingers or a kitchen utensil so that excess oil stays behind in the bowl. Put the sticks in the basket.
NOTE! Do not tilt the bowl to put all the sticks in the basket in one go, to prevent excess oil from ending up on the bottom of the pan.
- Fry the potato sticks according to the instructions in this chapter.
CLEANING AND MAINTENANCE
- Prior to cleaning, unplug the appliance from the mains socket and wait until the appliance cools off completely.
- Slide out the bowl with the basket so that the appliance cools off more quickly. Wait until the bowl cools off before removing it from the appliance.
CAUTION! The bowl, basket and appliance interior are covered with an anti-sticking coat. Do not clean them using metal kitchen appliances or abrasive agents as it may result in damaging the coat.
- Wipe the housing with a wet cloth. Never immerse the housing in water or any other liquid. Never wash it using a dishwasher.
- Wash the bowl and basket with warm water and a mild detergent. Rinse off and dry completely. Do not use wire brushes or abrasive agents to clean the housing. The basket way be washed in a dishwasher.
- Clean the interior with hot water and a delicate sponge that will not scratch any surfaces.
- Clean the heating element using a cleaning brush to remove all dirt.
- After cleaning and drying, assemble the appliance and store it in a safe place.
If the bottom of the basket or bowl is dirty, fill the bowl with hot water and a little washing-up liquid. Insert the basket to the bowl and let it soak for approx. 10 minutes.
USEFUL TIPS
When the appliance is used for the first time, it may emit a slight unpleasant smell or delicate smoke. It is standard behaviour.
▶ Fry products of similar sizes or thickness as it will ensure their uniform frying at the same time.
Do not fill the basket over the "MAX" level.
Smaller ingredients usually require a slightly shorter frying time than larger ones.
Large volumes of ingredients require a slightly longer frying time than smaller volumes.
- Shake smaller ingredients at the half of their frying time to move them around. This ensures optimum results and prevents uneven frying.
▶ Fitfryer must not be used to prepare very greasy dishes, e.g. sausages.
The optimum volume of ingredients to prepare crispy fries is 500 g.
▶Fitfryer may also be used to preheat ingredients. In order to preheat ingredients, set the temperature to 150^ C, for about 10 minutes.
DEDICATED DISH PREPARATION PROGRAMMES
The appliance features 8 dedicated programmes for specific dish groups. Each programme has its own dedicated frying time and temperature. Depending on what dish you are making and what taste you want to achieve, you can modify each programme to suit your needs by changing the time and temperature settings. It is not necessary to follow the dedicated programmes strictly. They are intended to suggest the recommended starting parameters. Over time, you will probably come up with your own time and temperature settings for each programme depending on what dish you are preparing. Note that the more food in the basket, the longer the frying time should be, and vice versa: the less food, the shorter the time. The following programmes are available:
| Programme icon | Programme name Dedicated running time | Dedicated temperature |
 | “muffins” 30 minutes 160 °C | |
 | “seafood” 20 minutes 160 °C | |
 | “steaks” 25 minutes 180 °C | |
 | “chips” 15 minutes 200 °C | |
 | “chicken” 20 minutes 200 °C |


"shish kebab" 20 minutes 180°C
"fish" 20 minutes 160°C
"pizza" 20 minutes 170 °C
APPROXIMATE FRYING TIME
| Dish Min.-max. | quantity (g) | Temp. (°C) | Time (min) | Shaking Dedicated programme | Programme notes | Additional notes |
| Thin frozen chips | 300-700 | 200 | 9-16 | shake | “chips” | |
| Thick frozen chips | 300-700 | 200 | 11-20 | shake | “chips” | |
| Homemade chips | 300-800 | 200 | 10-16 | shake | “chips” | |
| Homemade chips – dices | 300-750 | 180 | 12-18 | shake | “chips” | reduce the temperature to 180 °C, |
| Rosti fritters | 250 | 180 | 15-18 | shake | “chips” | reduce the temperature to 180 °C, |
| Au gratin potatoes | 500 | 180 | 15-18 | shake | “chips” | Reduce the temperature to 180 °C, |
| Steak | 100-500 | 180 | 10-25 | “steak” | ||
| Pork chop | 100-500 | 180 | 10-25 | “steak” | ||
| Beef shish kebab | 300-500 | 180 | 15-25 | “shish kebab” | ||
| Pork shish kebab | 300-500 | 180 | 15-20 | “shish kebab” | ||
| Chicken's thighs | 100-500 | 200 | 18-22 | “chicken” | ||
| Chicken breast | 100-500 | 200 | 10-20 | “chicken” | ||
| “pizza” | 100-300 | 170 | 15-25 | “pizza” | ||
| Fish | 100-500 | 160 | 20-30 | “fish” | ||
| Seafood | 100-500 | 160 | 15-25 | “seafood” | ||
| Cake | 300 | 160 | 20-30 | “muffins” | ||
| Muffins | 300 | 200 | 15-30 | “muffins” | Increase the temperature to 200 °C, |
TROUBLESHOOTING
See the table below for the most common problems that may occur during appliance operation.
| Problem Possible cause Solution | ||
| The ingredients are fried unevenly in the Fitfryer. | Certain types of ingredients need to be shaken halfway through the preparation time. | Ingredients that lie on top of or across each other(e.g.fries) need to be shaken halfway through the preparation time. |
| Fried snacks are not crispy when they come out of the Fitfryer. | You used a type of snacks meant to be prepared in a traditional deep fryer. | Use oven snacks or lightly brush some oil onto the snacks for a crispier result |
| I cannot slide the pan into the appliance properly. | There are too much ingredients in the basket. | Do not fill the basket beyond the MAX indication. |
| The basket is not placed in the pan correctly. | Push the basket down into the pan until you hear a click. | |
| The handle of the baking tray is obstructing the pan. | Push the handle to a horizontal position, so it does not stick out on top of the basket. | |
| White smoke comes out of the appliance. | You are preparing greasy ingredients. | When you fry greasy ingredients in the Fitfryer, a large amount of oil will leak into the pan. The oil produces white smoke and the pan may heat up more than usual. This does not affect the appliance or the end result |
| The pan still contains grease residues from previous use. | When you fry greasy ingredients in the Fitfryer, a large amount of oil will leak into the pan. The oil produces white smoke and the pan may heat up more than usual. This does not affect the appliance or the end result | |
| Fresh fries are fried unevenly in the Fitfryer. | You did not soak the potato sticks properly before you fried them. | Soak the potato sticks in a bowl for at least 30 minutes, take them out and dry them with kitchen paper. |
| You did not use the right potato type. | Use fresh potatoes and make sure they stay firm during frying. | |
| Fresh fries are not crispy when they come out of the Fitfryer. | The crispiness of the fries depends on the amount of oil and water in the fries. | Make sure you dry the potato sticks properly before you add the oil. |
| Cut the potato sticks smaller for a crispier result | ||
| Add slightly more oil for a crispier result | ||
TECHNICAL SPECIFICATIONS
See the product's nameplate for technical ratings.
Power cord length: 1,15 m

Note! MPM agd S.A. may introduce technical changes to its product without notice.
PROPER DISPOSAL OF THE PRODUCT (waste electrical and electronic equipment)
Poland
This symbol on the product indicates that the product, after its lifetime, should not be disposed with other household wastes. To avoid harmful influence on the environment and human health due to uncontrolled waste disposal, dispose the waste device to the service point of waste household appliances or report collecting it from home. In order to obtain detailed information about the location and how to dispose the waste electrical and electronic equipment in a safe way, contact your retailer or local Department of
Environmental Protection. Do not dispose the device with other municipal waste
natural_image
Line drawing of an air fryer with a cooking pot and lid (no text or symbols)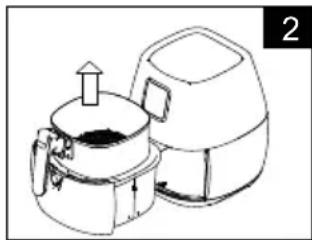
natural_image
Line drawing of a portable stove with an upward arrow indicating heating (no text or symbols)
natural_image
Line drawing of a portable air fryer with a lid and side door, showing internal components (no text or symbols)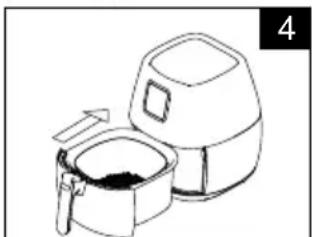
natural_image
Line drawing of an air fryer with a side dish and lid, no text or symbols presentСПОСОБ ПРИМЕНЕНИЯ
natural_image
Illustration of a hand pouring food into a bowl on a plate (no text or symbols)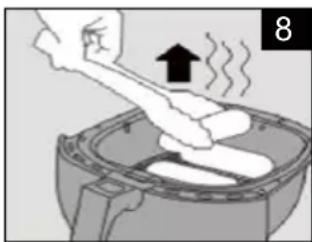
natural_image
Illustration of a hand pressing down on a steaming appliance (no text or symbols)natural_image
Line drawing of an air fryer with a cooking pot and lid, no text or symbols present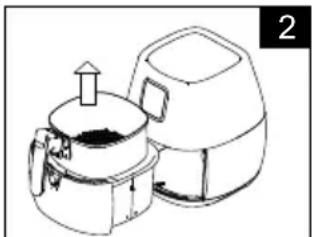
natural_image
Line drawing of a kitchen appliance with a lid and side arm, showing internal components (no text or symbols)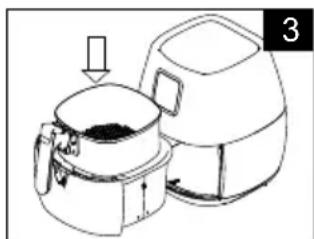
natural_image
Line drawing of a portable air fryer with a lid and handle, no text or symbols present
natural_image
Line drawing of an air fryer with a lid and side arm, no text or symbols presentBRATHINWEISE
natural_image
Illustration of a hand holding a cooking pot with a lid and a downward arrow, no text or symbols presentnatural_image
Illustration of hands holding a basket with a black arrow pointing to a handle (no text or symbols)natural_image
Illustration of a bowl pouring noodles into a plate (no text or symbols)natural_image
Illustration of a hand pressing down on a steaming bag inside a container (no text or symbols)natural_image
Line drawing of an air fryer with a cooking pot and lid (no text or symbols)
natural_image
Line drawing of a portable stove with a lid and side arm, no text or symbols present
natural_image
Line drawing of a mechanical device with a lid and base, showing internal components (no text or symbols)
natural_image
Line drawing of an air fryer with a cooking pot and lid (no text or symbols)CONSEJOS PARA LA FRITURA
natural_image
Illustration of a hand holding a pot with a lid and a downward arrow, no text or symbols present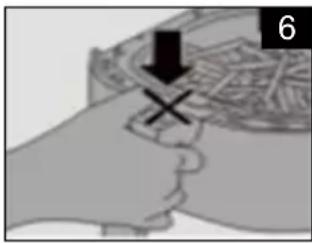
natural_image
Illustration of a hand holding a textured object with a black X mark and arrow, no text or symbols presentnatural_image
Illustration of a hand pouring food from a bowl onto a plate (no text or symbols)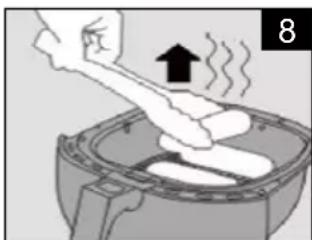
natural_image
Illustration of a hand pressing down on a steaming bag inside a microwave oven (no text or symbols)natural_image
Line drawing of an air fryer with a cooking pot and lid (no text or symbols)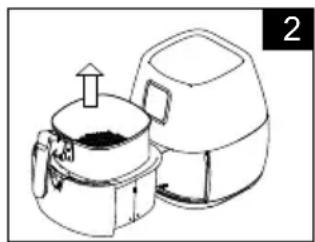
natural_image
Line drawing of a portable stove with an upward arrow indicating airflow or heat transfer (no text or symbols)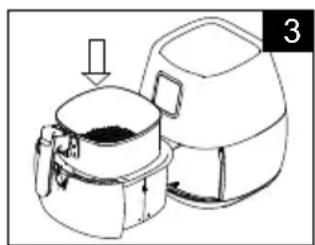
natural_image
Line drawing of a mechanical device with a lid and handle, showing internal components and an arrow indicating motion (no text or symbols)
natural_image
Line drawing of an air fryer with a side dish and lid (no text or symbols)natural_image
Illustration of a hand holding a pot with food being heated by a steamer (no text or symbols)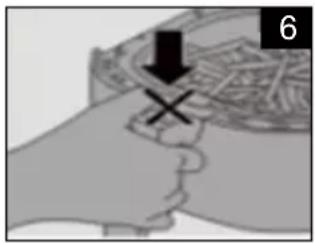
natural_image
Illustration of a hand holding a basket with a black arrow pointing to the basket (no text or symbols)natural_image
Illustration of a hand pouring food into a bowl on a plate (no text or symbols)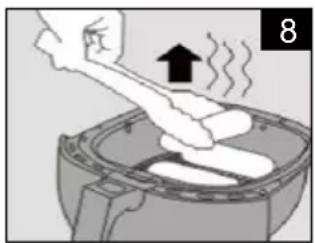
natural_image
Illustration of a hand pressing down on a steaming cylindrical object inside a container (no text or symbols)natural_image
Line drawing of an air fryer with a lid and handle, no text or symbols present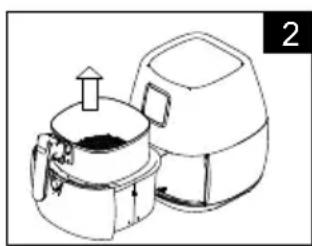
natural_image
Line drawing of a portable stove with a lid and side arm, showing internal components (no text or symbols)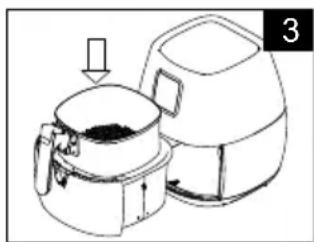
natural_image
Line drawing of a portable stove or oven with a lid and side arm, no text or symbols present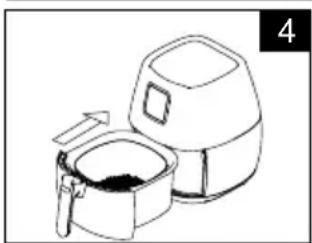
natural_image
Line drawing of an air fryer with a lid and side arm, no text or symbols present
POKYNY PRO SMAŽENÍ
natural_image
Illustration of a hand holding a cooking pot with a lid and a downward arrow, no text or symbols present
natural_image
Illustration of a hand holding a basket with a black X mark and arrow, no text or symbols present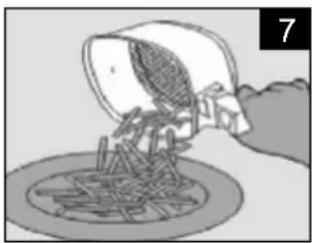
natural_image
Illustration of a hand pouring food into a bowl on a plate (no text or symbols)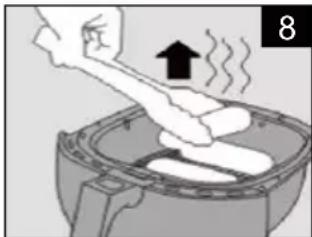
natural_image
Illustration of a hand pressing down on a steaming cylindrical object inside a container (no text or symbols)natural_image
Line drawing of an air fryer with a cooking pot and lid (no text or symbols)
natural_image
Line drawing of a portable stove with a lid and side arm, no text or symbols present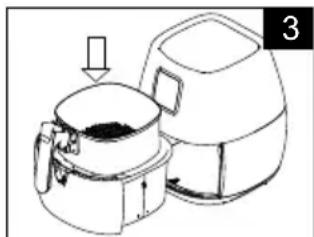
natural_image
Line drawing of a portable stove or oven with a lid and vent, showing internal components and a handle (no text or symbols)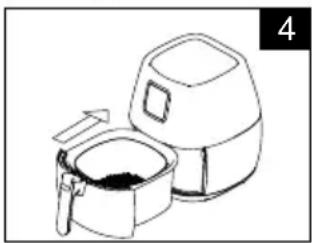
natural_image
Line drawing of an air fryer with a side dish and lid, no text or symbols presentnatural_image
Illustration of a hand holding a cooking pot with a lid and a downward arrow, no text or symbols present
natural_image
Illustration of a hand holding a basket with a black X mark and a downward arrow, no text or symbols present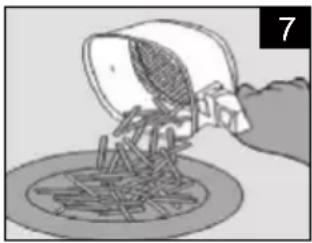
natural_image
Illustration of a hand pouring food into a bowl on a plate (no text or symbols)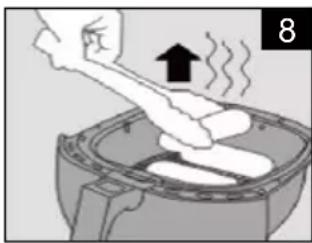
natural_image
Illustration of a hand pressing down on a steaming bag inside a container (no text or symbols)natural_image
Line drawing of an air fryer with a cooking pot and lid (no text or symbols)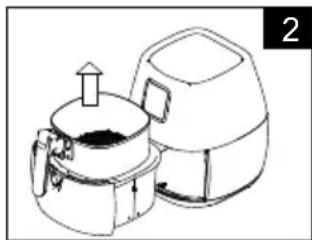
natural_image
Line drawing of a portable stove with a lid and side arm, no text or symbols present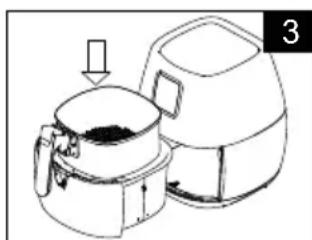
natural_image
Line drawing of a portable stove with a lid and side arm, no text or symbols present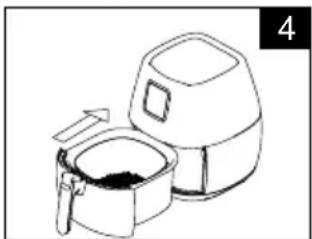
natural_image
Line drawing of an air fryer with a cooking pot and lid (no text or symbols)INSTRUCTIONS POUR LA FRITURE
natural_image
Illustration of a hand holding a cooking pot with steam rising (no text or symbols)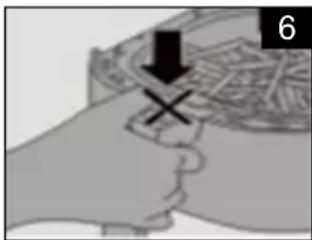
natural_image
Illustration of hands holding a basket with a black arrow pointing to a handle (no text or symbols)natural_image
Illustration of a hand pouring food from a bowl onto a plate (no text or symbols)
natural_image
Illustration of a hand pressing down on a steaming bag inside a microwave oven (no text or symbols)We wish you satisfaction from using the product and invite you to check a wide range of other MPM appliances