YT85003 - Grass trimmer Yato - Free user manual and instructions
Find the device manual for free YT85003 Yato in PDF.

| Product type | Gasoline 2-stroke string trimmer |
| Brand | Yato |
| Model | YT85003 |
| Weight | 7.0 kg |
| Fuel tank capacity | 850 cm³ |
| Cutting width (line) | 430 mm |
| Cutting width (blade) | 255 mm |
| Cutting line diameter | 2.0 mm |
| Line length on spool | 4 m |
| Engine type | 2-stroke, single-cylinder, air-cooled |
| Engine displacement | 42.7 cm³ |
| Maximum power | 1.25 kW |
| Recommended engine speed (blade/line) | 10000 min⁻¹ |
| Spindle speed | 7850 min⁻¹ |
| Recommended idle speed | 2700 - 3400 min⁻¹ |
| Fuel consumption at full power | 0.743 kg/h |
| Spark plug type | L8RTF |
| Spark plug gap | 0.6 - 0.7 mm |
| Fuel mixture | Unleaded gasoline : 2-stroke oil (40:1) |
| Sound pressure level (LpA) | 96.3 dB(A) ± 3.0 |
| Sound power level (LwA) | 110.3 dB(A) ± 3.0 |
| Vibration level (blade/line) | 3.992 ± 1.5 / 10.403 ± 1.5 m/s² |
| Provided cutting elements | Spool with plastic line, metal blade |
| Safety | Blade guard, cutting cover, harness with emergency release |
Frequently Asked Questions - YT85003 Yato
User questions about YT85003 Yato
0 question about this device. Answer the ones you know or ask your own.
Ask a new question about this device
Download the instructions for your Grass trimmer in PDF format for free! Find your manual YT85003 - Yato and take your electronic device back in hand. On this page are published all the documents necessary for the use of your device. YT85003 by Yato.
USER MANUAL YT85003 Yato
text_image
Labeled diagram of a mechanical device with numbered parts, likely an electrical or mechanical component.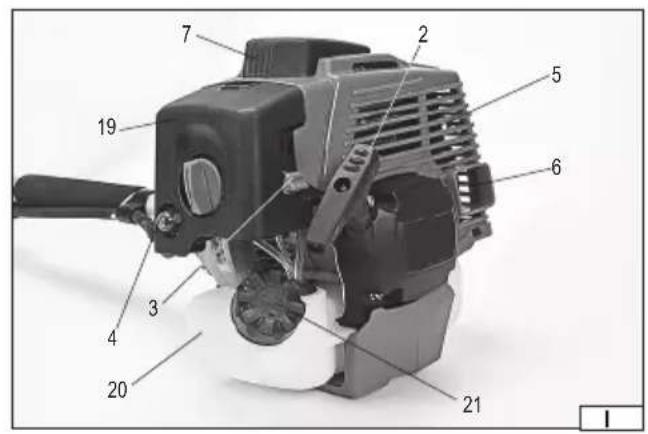
text_image
Labeled diagram of a mechanical device with numbered parts for identification
text_image
10 13 11 12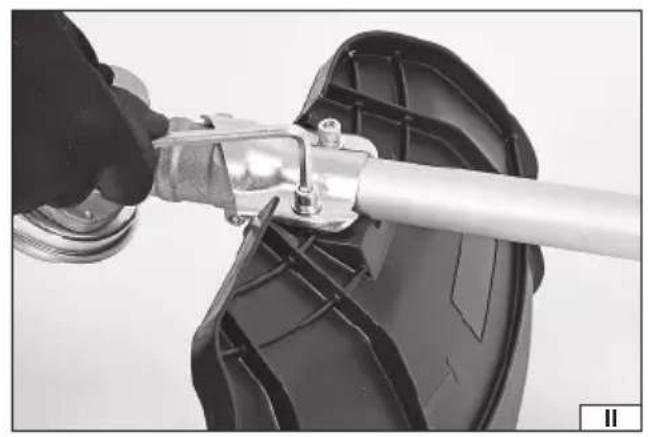
natural_image
Close-up of a hand using a metal tool to adjust or install a mechanical component, no visible text or symbols.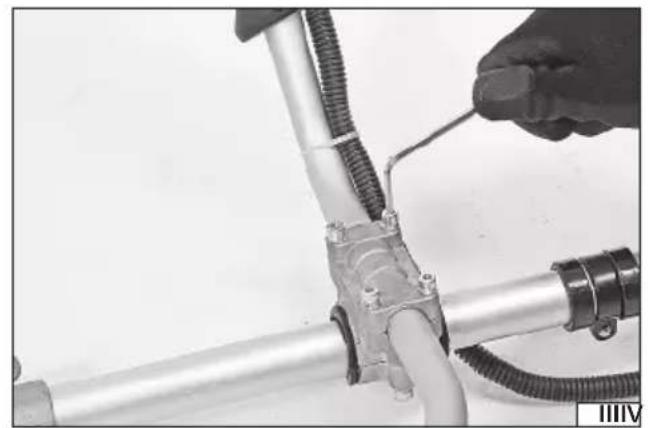
natural_image
Close-up of a hand adjusting a metal pipe fitting with coiled tubing (no text or symbols visible)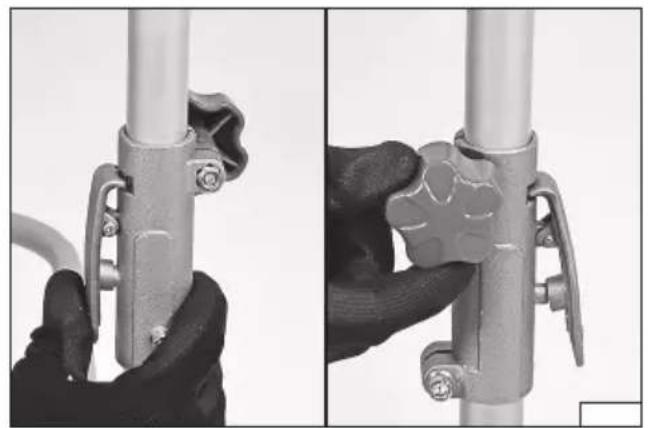
natural_image
Close-up of two hands adjusting a metal pipe fitting with bolts (no text or symbols visible)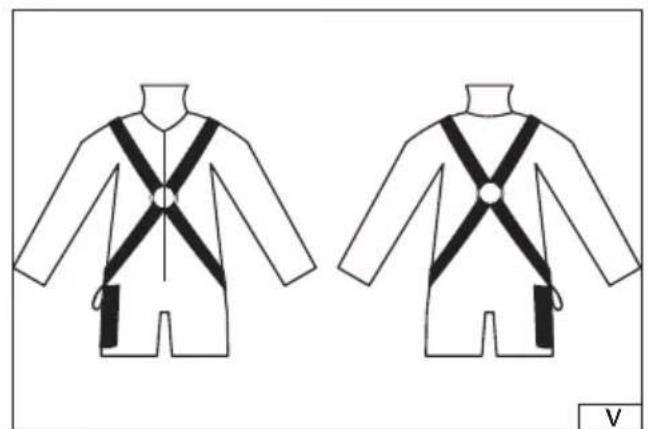
natural_image
Two identical line drawings of a person's shoulder and shoulders with black cross-bracing, no text or symbols present.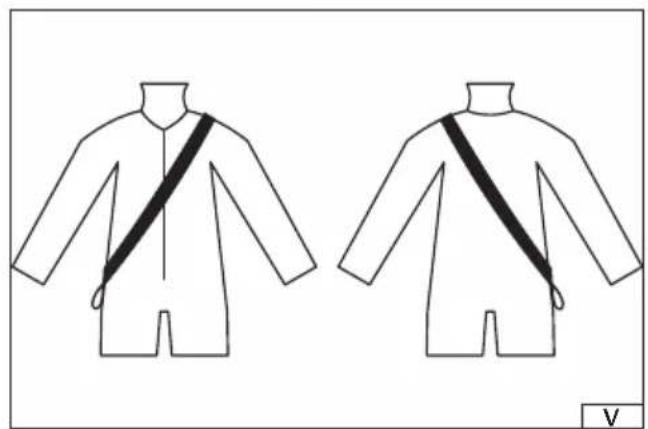
natural_image
Line drawing of two identical sleeveless garments with black straps, no text or symbols present2018
natural_image
Close-up of a mechanical clamp or clip with two black arrows indicating left and right motion directions (no text or symbols)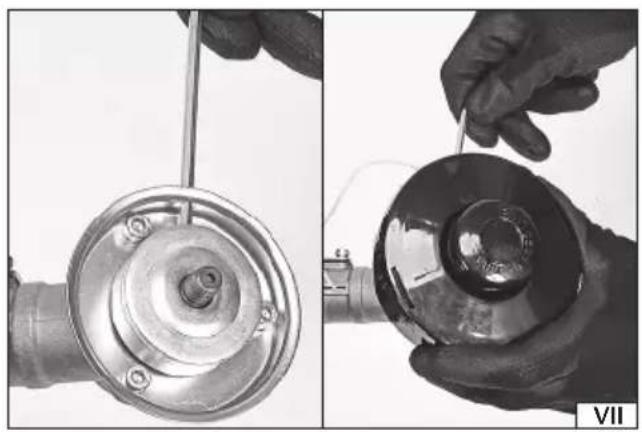
natural_image
Two-panel image showing hands adjusting a mechanical component: one with a metallic knob and screw, the other with a transparent dome (no text or symbols visible)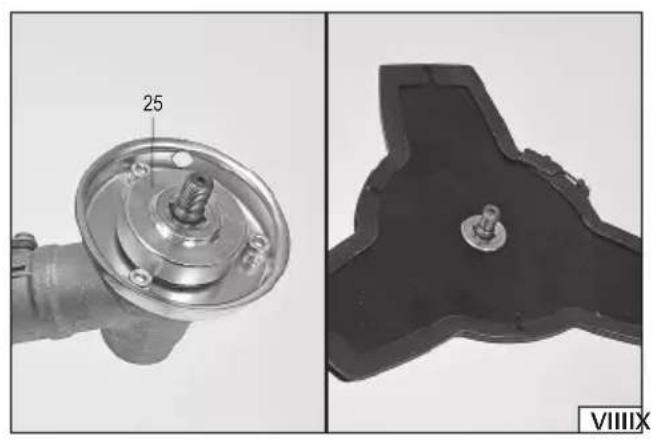
natural_image
Two technical diagrams showing a mechanical component with a labeled part (25) and a close-up of its internal structure (no text or symbols present)
natural_image
Three-panel image showing a mechanical component being inserted into a housing, with no visible text or symbols.
natural_image
Close-up of a black spray gun with a control panel and lever mechanism (no visible text or symbols)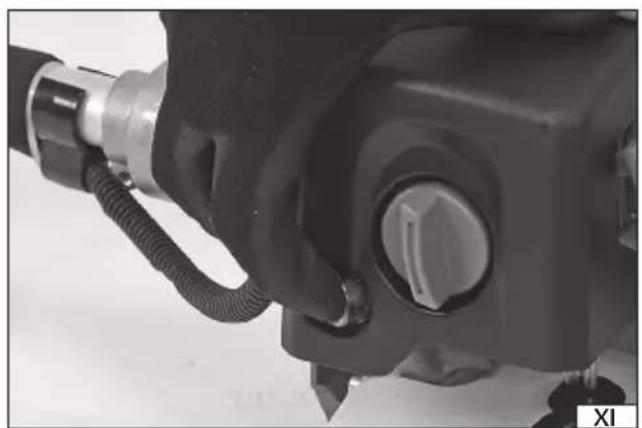
natural_image
Close-up of a mechanical component with hoses and a central knob (no visible text or symbols)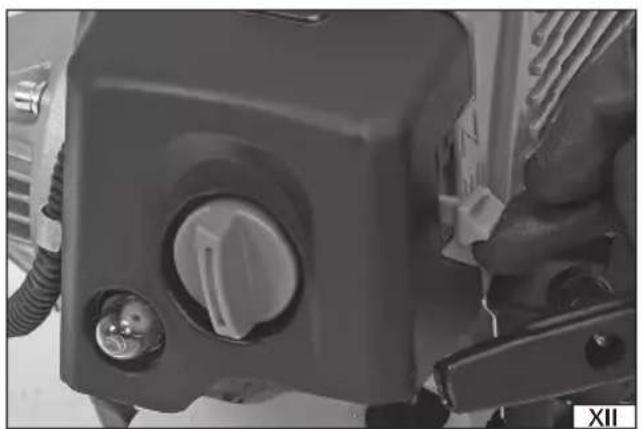
natural_image
Close-up of a mechanical control panel with adjustment knobs and a handle (no visible text or symbols)
natural_image
Close-up of a gloved hand operating a mechanical power tool with a wire, no visible text or symbolsPL D RUS UA LT LV CZ SK H RO E F I NL GR

natural_image
Close-up of a hand holding a mechanical tool, no visible text or symbols
natural_image
Close-up of a black mechanical device with a threaded base and handle (no visible text or symbols)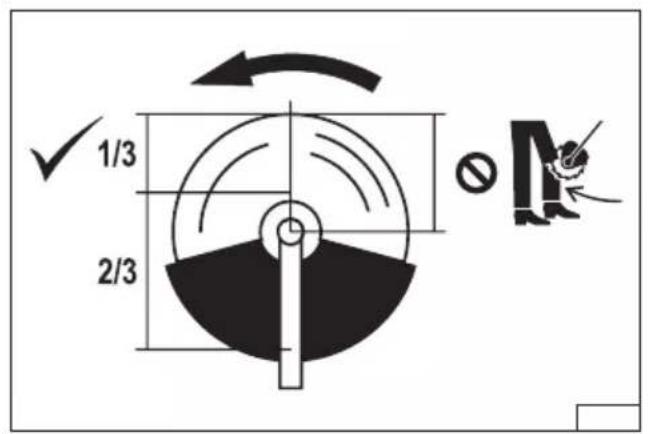
text_image
1/3 2/3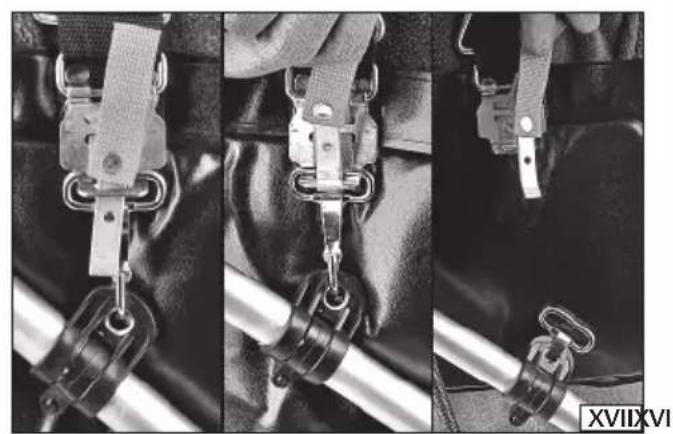
natural_image
Three-panel black-and-white photo showing a car seatbelt buckle being adjusted, with no visible text or symbols.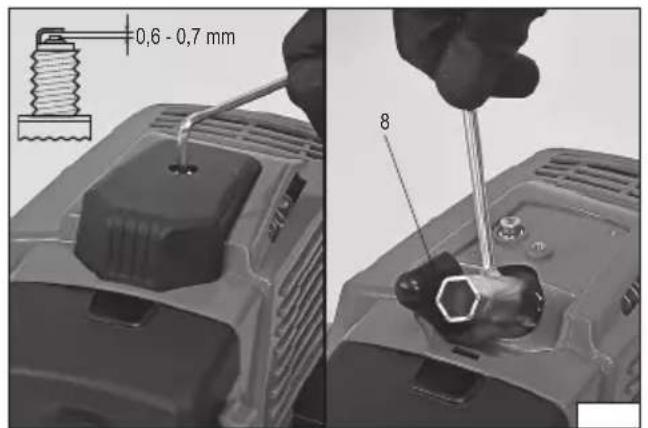
text_image
0,6 - 0,7 mm 8
natural_image
Three-panel black-and-white photo showing a mechanical device with a lens and adjustment tool, no visible text or symbols.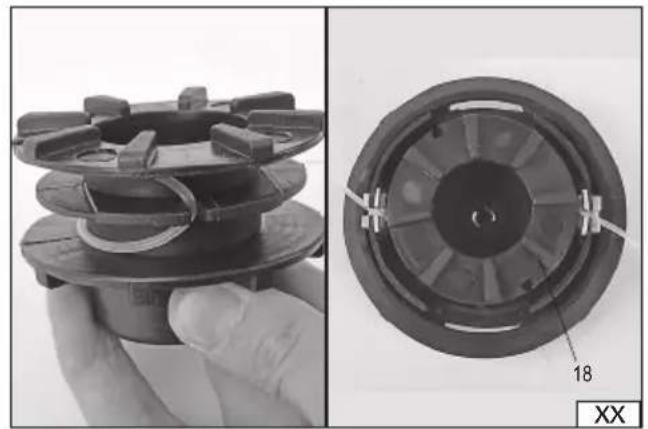
natural_image
Close-up of a hand holding a mechanical component, shown from two angles (top: 18° view; bottom: XX view), no visible text or symbols.PL
-
engine
-
starting line
-
choke lever
-
fulel pump
-
muffle
-
exhaust pipe
-
spark plug
-
spark plug wire
-
holder
-
switch
-
lock of the throttle lever
-
throttle lever
-
lock of the throttle
-
cover of the driveshaft
-
clamping ring
-
cover of the cutting element
-
spool housing
-
spool
-
air fi lter
-
fuel tank
-
cap of the fuel tank
-
blade
-
blade cover
-
the lower fl ange for blade fi xing
-
the upper fl ange of the blade collar
-
belt-harness
D
Read the operating instruction
Wear protective shoes
Wear protective goggles
Wear hearing protectors
Motor swept capacity
Hubraum des Motors
Емкость двигателя
Обем двигуна
Variklio türis
Dzinēja tilpums
Objem motoru
Objem motora
A motor ürtartalma
Cilindree
Capacidad del motor
Cylindrée du moteur
Petrol is to be mixed with oil in the following proportions: petrol: oil - 40:1
Keep the safe distance from hot surface
Maintain a distance of at least 15 m between place of operation and bystanders
Beware of the discarded items
Risk of explosion. Do not fill the fuel tank when the engine is running
Attention! The risk of grass trimmer rebound to back and being hit by the blade
CHARAKTERYSTYKA WYROBU
The grass trimmer is used for work in household. This is designed for cutting the grass in places, which are inaccessible to conventional lawn mowers, for example, near the walls of buildings, fences, trees and shrubs, paths, edging paths, lawns, etc. Grass cutting is carried out by means of a rotating cutting line made of plastic. For cutting of shrubs, woody plant shoots, etc. you should use a metal blade. Correct, reliable, and safe operation of the device is dependent on its proper use, therefore:
Prior to working with the device, you should read all the instruction and keep it around.
For any damages or injuries caused by the tool misuse, failure to comply with safety regulations and instructions of this manual, the supplier is not responsible. The tool misuse causes also the loss of user's rights to the guarantee and warranty.
EQUIPMENT
The grass trimmer is delivered in a complete stage, but before its first use it should be assembled.
Along with the device there are supplied:
- spool with the cutting line
- blade
- belt - harness
TECHNICAL DATA
| Parameter Unit Value | ||
| Catalog number YT-85003 | ||
| Weight [kg] 7,0 | ||
| Fuel tank capacity [cm3] 850 | ||
| Cutting width - cutting line [mm] 430 | ||
| Cutting width - the cutting edge [mm] 255 | ||
| Cutting line diameter [mm] 2,0 | ||
| Length of cutting line on the spool | [m] | 4 |
| Thickness of the blade | [mm] 1,4 | |
| Engine | ||
| the number of cylinders | 1 | |
| the number of strokes | 2 | |
| cooling | air | |
| Spark plug type | L8RTF | |
| Engine displacement | [cm3] | 42,7 |
| Engine power | [kW] 1,25 | |
| The maximum recommended engine speed with the (blade / trimmer line) | [min-1] | 10000 |
| The maximum rotational spindle speed (blade / cutting line) | [min-1] | 7850 |
| Recommended idling speed | [min-1] | 2700 - 3400 |
| Fuel consumption at max. engine power | [kg/h] | 0,743 |
| Noise. | ||
| Acoustic pressure | [dB (A)] | 96,3 ± 3,0 |
| power LwA | [dB (A)] | 110,3 ± 3,0 |
| Vibration level (blade / trimmer line) | [m/s2] | 3,992 ± 1,5 / 10,403 ± 1,5 |
SAFETY INSTRUCTIONS
IMPORTANT Read carefully before starting the operation. Keep for future use.
Every time when in the description appears the term: "device" it should be treated as a "grass trimmer".
PREPARATION
THE DEVICE MAY BE THE CAUSE OF SERIOUS INJURY. Carefully read the instructions manual. Become familiar with the correct handling, operation, maintenance, starting and stopping the device. Become familiar with the correct handling of all controls. Never allow children to operate the device.
Attention! National law may limit the ability to use the device.
Be careful during the cutting near live wires.
Use only the accessories provided by the manufacturer: spool with the cutting plastic line or metal blade. Do not use other equipment than those provided for by the manufacturer, such as discs equipped with the cutting chain. Do not substitute the cutting
GB
line with a metal wire or string. The use equipment other than those specified may result in a serious threat to the safety of the operator and bystanders. Before mounting the cutting element and the cover, you should make sure that they are not damaged, do not have cracks, they are not bent. Make sure that on the metal blade you do not see the rust, and the spool has at least 1 meter of cutting line.
During operation, it is likely, that objects can be thrown towards the operator and bystanders. The operator is responsible for accidents or a threat presented to others or to the environment. Do not work with device, if there are bystanders, especially children. Before starting the work you should assign a safety zone with a radius of at least 15 metres away from the place of work.
Always wear eye and face shields, it protects your eyes, face and respiratory tract against dust, exhaust, and objects, which are thrown out while cutting. Always wear appropriate, fitting to the body, protective clothing. Use only long trousers. Do not wear loose clothing or jewelry, because it can be caught by moving parts of the tool. Wear protective gloves and hearing protection. Wear protective footwear with non-slip soles, do not work barefoot or in sandals. Always wear a protective helmet while working.
The device must be regularly reviewed in accordance with the information contained in the following section. This will allow for more efficient and safer operation.
Take special care when handling the fuel. It is flammable, and its vapors are explosive. Please observe the following recommendations.
- Only use the canisters, which are designed for the fuel.
- Never remove the fuel filler cap nor add fuel when the engine is running. Before tanking wait until the engine and the exhaust system components cool down.
- Do not smoke.
- Never refuel indoors.
- Never store the device or fuel canister in rooms with open fire, for example near the water heater.
- Do not attempt to start the engine, if the fuel is spilled out, before you start device move it away from spilling.
- After refueling always shut and carefully tighten the fuel tank cap.
- Possible emptying the fuel tank must be done outside of the room.
If the blade strikes any foreign object or the device starts to vibrate or make noise in an unusual way, turn off the engine and wait until the elements of hedge shear will stop. Disconnect the wire from the spark plug and take the following steps:
- inspect the damage,
- check whether there are any loose parts and tighten them,
- repair or replace any damaged parts for parts in accordance with the specifications.
When you work you should use hearing protectors. Exposure to excessive noise can lead to permanent hearing damage.
Use protective glasses. During the work the garbage can create risk of eye injury.
You must be familiar with the instructions to switch off the device in case of emergency.
Before use of the device, always check that the cutting element, screws, covers, and other items are not worn or damaged. Replace worn parts before starting work. You should also check that the screw connections not loosened. Tighten the loose bolts.
OPERATION
Do not start the work while you are tired, sick or under the influence of alcohol or other narcotic drugs.
It is forbidden to work with the grass trimmer indoors. The exhaust gases contain poisonous gases, their inhalation may be dangerous for your health and life.
It is forbidden to expose the device to effect atmospheric precipitation and use it in an atmosphere of high humidity. It is also forbidden the use of the device in an atmosphere with an increased risk of fire or explosion.
Work only in daylight or in good artificial light.
If possible, avoid mowing wet grass.
Make sure that the legs always stand firmly on the slopes. Do not run with the grass trimmer, just walk. Do not mow on excessively inclined slopes. When mowing on slopes you should move across slope, never up or down.
Use fuel and oil free from any contamination and intended for two-stroke engines. It is recommended to use only the high quality products. This extends the life of engine.
During the operation, avoid contact with grounded, conductive, and non-isolated objects such as pipes, radiators, or refrigerators.
Do not cover the ventilation inlets and outlets. Even when the grass trimmer is not working.
It is forbidden to touch the engine, which heat up during operation, you could be burned.
Always wear appropriate, fitting to the body, protective clothing. Wear protective gloves and hearing protection.
Always operate the grass trimmer by holding it with both hands. During operation hold the grass trimmer in such a manner that the plane of rotation of the cutting element is always parallel to the ground. It is forbidden to tilt the grass trimmer and lift it excessively. Adopt such position at work that there would be no need to draw hands for a full length.
Equipment handles must be kept clean and free of any oils or greases.
In a case when you notice any damaged or broken parts of the grass trimmer you should stop the work nor to start it.
. Damaged parts must be replaced before the starting of work.
The grass trimmer must be used assist is intended, cutting line should be used only to cut the grass. The blade can cut shrubs and woody shoots of plants. It is forbidden to use the grass trimmer for other purposes, such as for trimming hedges, pruning trees, shearing grain.
GB
Before starting work, prepare the area. You should remove the stones, pieces of wood, branches, wires, bones and other foreign objects, which can cause damage to the grass trimmer or will be thrown out during the operation.
When working with the blade there is a risk of blade rebounding towards you and you being hit by the blade. To minimize this risk, do not cut plant parts which are too hard. Rebounding occurs during the sudden stop of the blade during its operation, for example, in the case of inability to cut a bush. Such stoppage results in rotation of the device in opposite direction to the rotation of blade. To prevent rebound phenomenon and its consequences use extreme caution when working with the blade. Do not place body parts in the area of the possible movement of the blade after rebounding. Maintain proper posture and balance during the work time. Hold the tool handles firmly and always use the supplied harness or sling. The grass trimmer rebound can lead to the fall down of its operator and endanger the operator for contact with rotating blade. The blade should be sharpened.
Turn the engine on in accordance with the instructions, pay attention to the feet, hands and other body parts, whether they are away from the cutting element. Do not keep the hands, feet and other body parts in the vicinity of the rotating parts.
Stop the engine when:
- every time when you need to go away from the device,
- before cleaning, checking, or servicing the device,
- after striking by a foreign object. Check whether the grass trimmer is damaged and, if necessary, make repairs, before restarting.
- if the device begins to vibrate excessively (check immediately).
- during handling and transportation of the device.
ATTENTION! After stopping the engine, the cutting unit rotates for some time. Wait until it stops.
Always observe your surroundings and keep alert to possible threats, which may not be realized due to the noise of the device.
The tool produces a low-intensity electromagnetic field. The electromagnetic field may affect the work of electrical equipment located near this tool and cardiac pacemakers. Before you start the work it is recommended to consult at your doctor and / or manufacturer of the cardiac pacemaker.
TRANSPORT, MAINTENANCE AND STORAGE
Attention! Disconnect the spark plug wire before installation, adjustment, changing accessories or storage of the device. This will allow to avoid accidental starting of the device.
While the grass trimmer is not in use, store it in a dry, secure place, out of reach by outsiders.
Be careful when adjusting the machine to avoid getting your fingers between moving cutting elements, and fixed parts of the grass trimmer. Make sure that the used cutting element is of the correct type.
Before the grass trimmer transporting, empty its fuel tank.
Exchange in order to maintain security, worn or damaged parts. Use only genuine spare parts. Usage of spare parts, which are not original, can increase the risk of failure and lead to injury. The grass trimmer should be repaired only in authorized services, using original spare parts. This will minimize the risk of accidents and damage to the equipment.
The grass trimmer should be stored in a dry, closed room with good ventilation. When storing for extended periods of time, empty the fuel tank and the fuel installation. Do not keep the grass trimmer with fuel in the tank. The grass trimmer should be a subject of maintenance treatment as it is described in the manual.
The blade of grass trimmer should be protected during transport. Protection must remove before you start.
Keep in the proper condition all nuts, bolts and screws, to be certain that the device will be working safely.
GRASS TRIMMER OPERATING
Preparing the grass trimmer for operation
Before its first use, you must install the cutting element, which is corresponding to a given work: the head of the cutting line or blade, cutting element cover the additional handle and belt-harness.
The head of the cutting line should be used just to mow the grass. Use the blade to cut shrubs, woody plant shoots, etc.
In order to mount the guard of cutting element you should fasten it with the screw to spindle cover (II). The provided cover is appropriate for work with the cutting line and blade as well. On cover the blade is fixed, it is used for automatic shortening of the line. If the blade is equipped with protection you should remove it before you start using the line for your work.
Mount the cutter handle. To dismount the upper part of the handle clamp, remove all screws. Next, place the handle connector in the lower part of the clamp and mount the upper part of the clamp. Connect both parts of the clamp by screws (III). Select the clamp location such that it is not necessary to excessively reach for them. In case of observance of hand exhaustion, numbing, or pain during work, stop working, stop the engine and change position of handles to the more comfortable one.
Connect both parts of the cover of the drive shaft. To do this, loosen the clamp knob that connects the driving shaft covers, and then press and hold the lock lever (IV). Insert the lower cover into the clamp and make sure that the hook of the lock reaches the hole in the cover. Secure the connection by tightening the clamp knob (IV) to lock both parts of the driving shaft covers with respect to each other.
Depending on the supplied equipment you should put on the belt or harness (V). The length of strips should be adjusted so they are not pressing the operator's body, but at the same time they do not move during the operation. The grass trimmer can also
GB
be hung on the harness or on a belt other than the one which is supplied with the unit providing that it can be hung on a belt or harness, without any modifications of its mounting.
Hang the grass trimmer z by putting the belt or harness hook through the eye of clamp. Ensure that the safety spring returned back to its initial position. This will prevent the possible spontaneous release of devices from a harness or belt.
Then adjust the angle and position of the handle, for this purpose loosen the mounting knob and set the handle to ensure the full freedom of movement during operation, and ensure that the both handles are placed in such a position to not cause excessive burden. Hands should be bent at the elbows. The cutting element should move in a plane parallel to the ground.
If necessary, you can move the position of the clamp. For this purpose, loosen the screw (VI), move the clamp, and then tighten the screw to block the spontaneous movement of the clamp. Position of the clamp should be adjusted in such a manner, that it would be located just behind the center of gravity of hanging on it the grass trimmer, this will cause that the cutting element is self-tilted towards the ground.
Unhook the grass trimmer from the harness or belt. Remove the belt or harness.
Depending on the choice of the cutting element, mount a spool of cutting line or metal cutting blade.
Attention! Because of the risk of injury, when mounting the blade you should wear protective gloves, and you should mount the blade itself with protective cover attached.
When mounting the reel with cutting line it must be mounted the fixing flange, then, blocking the possibility of spindle rotation, screw on the spool of cutting line (VII).
When installing the blade you should put the upper flange on spindle. Put on the cutting blade on collar so, that the hole in the blade hit the protruding part of the mounting flange (VIII).
Place the bottom flange, cover of the mounting flanges and using bolts securely tighten the blade, blocking the possibility of rotation of the spindle (IX).
Refuelling
A blend of fuel, which is intended for two-stroke engines, is used to drive the grass trimmer. It is forbidden to use only the gasoline. Mix gasoline with oil in the proportions petrol : oil - 40 : 1 1. Mix the mix before pouring it into the fuel tank. Mixing and pouring the fuel must be carried out away from sources of ignition. Do not smoke while refueling. Fill the tank at a distance of at least 3 meters away from starting or operating the device.
In order to protect the engine, you should use a good quality unleaded petrol and good-quality oil for two-stroke air-cooled engines. Do not use the oil intended for four-stroke engines, and oil, which is intended for liquid-cooled engines.
If fuel spills you should carefully rub the remains before starting the grass trimmer.
Do not use mixes older than 30 days.
After addition of fuel to the tank and tightly close its.
Starting and stopping the grass trimmer
The grass trimmer should be placed on a level, flat, hard surface. Make sure that the cutting element does not encounter any obstacles during its revolution. If you installed the blade, make sure that the cover has been removed from it.
It is forbidden to start the grass trimmer without properly fitted items: additional handle and cover of the cutting element.
Switch the power switch to "I- switched on" (X).
Press fuel pump 10 times. (XI)
Set the throttle lever to upper position "CLOSED" (XII).
When holding with one hand the grass trimmer, you should energetically pull the starter line for a few times with the other hand, until the engine begins to start (XIII).
Attention! Do not start the grass trimmer holding it in your hands. The cutting element can touch parts of the body and cause a serious injury.
Move the choke lever to the "OPEN" position, and pull the starter line vigorously until the engine is switched on.
You should not unreel the link to its full length, because this may break it. Attention should be paid to that the starting line be pulled up along the axis of hole, drawing angled link will lead to premature wear of it.
After you start the grass trimmer, you should press the lock button on throttle, and then throttle button itself (XIV) this will invoke rotations of the cutting element. The deeper the button is pressed the higher is engine speed.
On the cover of the cutting element there is inserted an arrow showing the direction of rotation of cutting element. Make sure that the rotation of the cutting element follows in the direction specified by the arrow.
To stop the engine, release the pressure on the throttle button, wait until the rotation of cutting element stops, then switch the on/off switch in position "O - switched off".
If you hear any suspicious noises, or feel the vibration you should immediately disable the grass trimmer by switching the power switch to the "O - switched off".
Attention! When you are starting a warm engine, for example, during short breaks in work lasting for several minutes, it is not necessary to adjust the choke lever to the position "OPEN".
GB
If you need to stop the grass trimmer for an emergency reason you should move the switch to the position "I - switched off" which will stop the engine and, as a consequence, stop the cutting element. You should, however, take into consideration that when you turn off the grass trimmer cutting its element can swirl several more times. It is forbidden to stop the cutting element by applying pressing it to the ground or by hitting the obstacles.
Control handle can be fitted with the button, which is locking on the throttle button pressed at 1/3 the scope of the work. Press the lock button then press the lock of the throttle button, and then the throttle button itself. When you release the pressure on all the buttons, the throttle button should be locked (XV).
Attention! Locking the throttle button can help you start faster in the case of the flooding of engine with fuel or, in the case of starting the engine at low temperatures. Do not use this throttle locking button during normal startups. The lock throttle button should be used only in the case of inability to start the engine in a normal way.
To release the lock you should lightly press the throttle.
Operating the grass trimmer
Proceed to work only when the cutting element obtains the maximum revolutions, to do this, press the throttle to its maximum.
When you are working, you must hold the grass trimmer in such a way that the cutting element moves always in a plane, which is parallel to the ground.
In order to obtain the maximum efficiency of mowing you should determine the maximum length of the cutting line. To do this, start the grass trimmer and let the engine obtain its maximum revolutions then gently hit the spool with line to the ground. This will allow to to unreel the cutting line, and the knife, which is placed in line guard, will prune it to the correct length.
Attention! It is forbidden to rely the spool on the ground during its operation. This will cause to wear all the line on spool.
If, for any reason, the line would not to reel out by itself, you should stop the grass trimmer engine, disconnect spark plug cable, and then check out what was causing the jam.
The line should be reeled out every time when you hear that the engine reaches higher revolutions than during normal operation.
When working It is recommended to move the grass trimmer from right to left. You should avoid mowing with the grass trimmer movement from left to right. This will allow the operator to avoid the remnants of cut grass while mowing.
Avoid mowing the shrubs and bushes. Work the grass trimmer near trees can damage their bark. Hitting stones, bricks, walls, or other similar surfaces with the line can lead to very rapid wear to the cutting line.
In the case the blade is used, you should avoid cutting by its right upper quarter (XVI). This will prevent situation, when the grass trimmer is rebound in the direction of operator in the event of blockage blade during operation.
Harness allows for emergency detaching from the grass trimmer. To do this, pull the red tape on the mounting. The grass trimmer will be detached with the harness latch. Before starting work, disconnect the latch from the clamp of grass trimmer, and then catch it on the harnesses (XVII). During the emergency detachment of the grass trimmer from the harness the trimmer can hit the ground. After each emergency detachment of the harness from the grass trimmer you should make visual inspection for damages and remove them before resuming the work.
MAINTENANCE OF THE GRASS TRIMMER
Before starting any operation, which is described below, turn off the grass trimer. Make sure that the engine is cold. Disconnect the spark plug wire in order to avoid the accidental launch of grass trimmer.
Replacing the spark plug and its maintenance (XVIII)
Dismount the cover of the plug socket. Remove the rubber cover of the plug joint. The distance between electrodes should fall within the range of 0.6 – 0.7 mm. Should there be any contamination observed, attempt to clean electrodes of the plug with the use of brass wire brush. In case cleaning is not effective, replace the plug with a new one. Check the plug condition at least once a month.
Maintenance of the air fi Iter (XIX)
Air fi Iter maintenance should be performed after each use of the grass trimmer.
Unscrew the screw which is supporting the filter cover and remove cover.
Pull out the filter and rinse it in warm water with soap.
Completely dry the filter and mount it back on its place.
Screw the filter cover.
Other maintenance operations
After each use, you should also check the overall condition of the device. Tighten loose screw connections. Check if there are no fuel leaks. Check the patency of the ventilation openings. Check that all guards and covers are in good condition, devoid of cracks or other damage. Before further work you must remove any observed defects.
GB
Maintenance of the muffler and exhaust system
Depending on the used fuel, oil and a mixture ratio, silencer and exhaust system can accumulate nagar or soot. This may cause a decrease in performance of the device. In order to restore the previous performance you should submit the device to manufacturer's authorized service.
Replacing the cutting line (XX)
Unscrew the cover spool from the grass trimmer spindle. At the same time press both lock buttons on spool housing and pull out the spool from its cover. Remove the remnants of old cutting line from the spool. Spool, spool CAP, spring and mounting screw should be clean up with remnants of grass, earth, and other contaminations.
Prepare a section of line with the diameter and length given in the technical data table. In the middle of the length, put the line through the gap between two parts of the spool. Reel the line on both parts of the spool in a counterclockwise direction. Behind the gaps you should leave about 15 cm of the line which should be put through the holes in the housing. Close the spool in its housing.
Mount the spool with cutting line in accordance with the procedure described in point "Preparing the grass trimmer for operation"
Storing the grass trimmer
Proper maintenance before storage will allow for long trouble-free operation of the grass trimmer
Before storing the grass trimmer for an extended period of time, you should empty the tank and the system of the fuel.
Check the condition of the fuel system for leaks. If you find them, remove them before
storage. To do this, you should submit the grass trimmer to an authorized service center.
Drain the tank with fuel, by means, for example, of a plastic fuel pump that is commercially available.
Start the engine and let it idle until it shuts down. This will clean the carburetor of remaining fuel. Allow to cool down the engine.
Remove the spark plug. Through the opening pour one teaspoon of oil for two-stroke engines. Several times, carefully draw starter line, it will distribute the oil in combustion chamber. Install the spark plug.
Clean the grass trimmer from the remnants of grass, soil and other contaminants. The device should be stored in a cool, dry place with good ventilation, away from sources of ignition. The device should be stored in a dry, closed place protected from access by unauthorized persons, especially children.
CHARAKTERISTIK DES ERZEUGNISSES
PRODUKTA RAKSTUROJUMS
CARACTERISTIQUES DU PRODUIT
DECLARATION OF CONFORMITY
0418/YT-85003/EC/2018
We declare and guarantee with full responsibility that the following products:
Bruschcutter; 42,7 cm ^3 ; 1,25 kW; 430 mm / 255 mm; item no. YT-85003
meet requirements of the following European Standards / Technical Specifications:
EN ISO 11806-1:2011
EN ISO 14982:2009
and fulfill requirements of the following European Directives:
2006/42/EC Machinery and safety elements
2014/30/EU Electromagnetic compatibility (EMC) Directive
Serial number: concern all serials numbers of item(s) mentioned in this declaration
The last two digits of the year in which the CE marking was affixed: 18
Year of production: 2018
The person authorized to compile the technical file:
Tomasz Zych
(Place and date of issue)
text_image
TOYA SPÓŁKA AKCYRA DYREKTORDS. ZAKUROW DARIUSZ HAYEK (Name and signature of authorized person)TOYA S.A.
DECLARATION OF CONFORMITY
0418/YT-85003/Noise/2018
We declare and guarantee with full responsibility that the following products:
Bruschcutter; 42,7 cm ^3 ; 1,25 kW; 430 mm / 255 mm; item no. YT-85003
fulfil requirements of the following European Directive: 2000/14/WE
Conformity assessment procedure:
Manufacturer quality-control system, examination of the manufacturer's technical file and periodical inspection by notified body
Notified body:
TÜV Rheinland LGA Products GmbH; notification no. 0197
Tillystraße 2, 90431 Nürnberg, Germany
Measured sound power level on an equipment representative for this type: 110,3 dB(A)
Guaranteed sound power level for this equipment: 114 dB(A)
conformity and references of the other Community Directives applied:
2006/42/EC Machinery and safety elements
2014/30/EU Electromagnetic compatibility (EMC) Directive
97/68/WE Emissions from non-road mobile machinery
Wrocław, 2018.04.03
(Place and date of issue)

text_image
TOYA SPÓŁKA AKCYRA DYREKTORDS. ZAKUROW DARIUSZ HAYEK (Name and signature of authorized person)TOYA S.A.