
67220 - Steam cleaner Lund - Free user manual and instructions
Find the device manual for free 67220 Lund in PDF.
| Product type | Steam mop cleaner |
| Brand | Lund |
| Model | 67220 |
| Catalog number | 67220 |
| Rated voltage | 220-240 V~ |
| Rated frequency | 50/60 Hz |
| Rated power | 1500 W |
| Water tank capacity | 0.55 L |
| Maximum steam temperature | 110 °C |
| Adjustable steam output | 10 - 26 g/min |
| Protection degree | IPX4 |
| Insulation class | I |
| Weight | 1.4 kg |
| Accessories supplied | Large area adapter, flexible and rigid extensions, nozzles (brush, angled, flat), cloth accessory, measuring cup, cap |
| Functions | Steam cleaning for smooth floors, floor mop or hand steamer use, steam regulator |
| Safety | Do not direct steam at people or animals; do not use detergents; do not immerse |
| Maintenance | Empty the tank after use; wash pads at 60 °C; do not use sharp objects to unclog nozzles |
| Use | Indoor use only, household use |
Frequently Asked Questions - 67220 Lund
User questions about 67220 Lund
0 question about this device. Answer the ones you know or ask your own.
Ask a new question about this device
Download the instructions for your Steam cleaner in PDF format for free! Find your manual 67220 - Lund and take your electronic device back in hand. On this page are published all the documents necessary for the use of your device. 67220 by Lund.
USER MANUAL 67220 Lund
natural_image
Black and white photo of a steamer with a mounted handle and base (no visible text or symbols)
natural_image
White electric vacuum cleaner with handle and control panel, no visible text or symbols on device bodyCE
PL GB D RUS UA LT LV CZ SK H RO E F I NL GR
natural_image
Four-panel image showing mechanical components with black and white parts, no visible text or symbols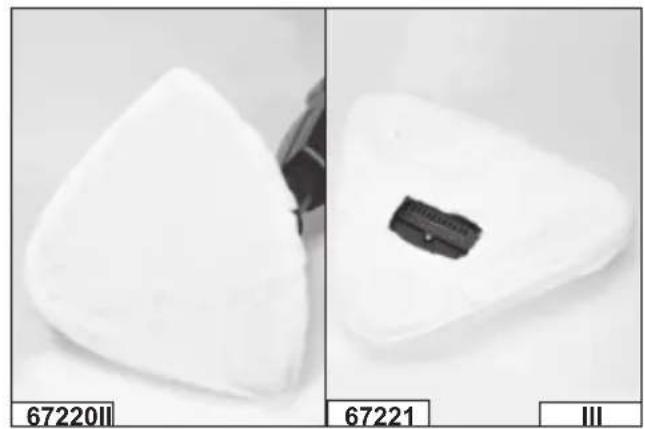
natural_image
Two white triangular objects with black connectors, labeled 67220II, 67221, and III (no text or symbols on objects)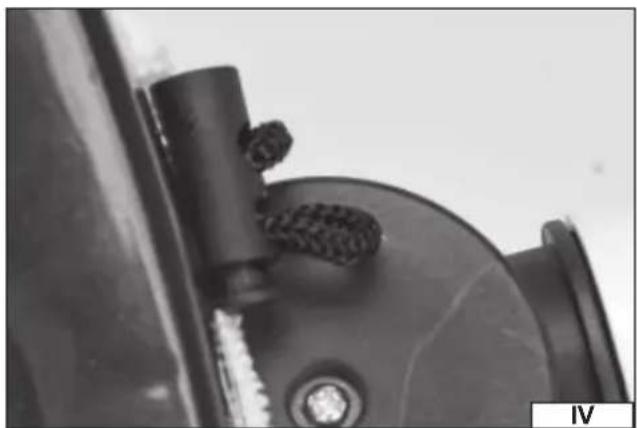
natural_image
Close-up of a mechanical component with a cylindrical shaft and textured grip, labeled 'IV' in the corner (no readable text or symbols)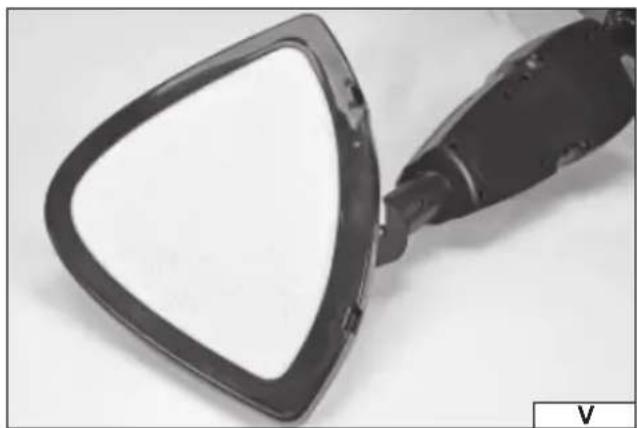
natural_image
Close-up of a black triangular object with a white circular lens, possibly a lens or optical component (no text or symbols visible)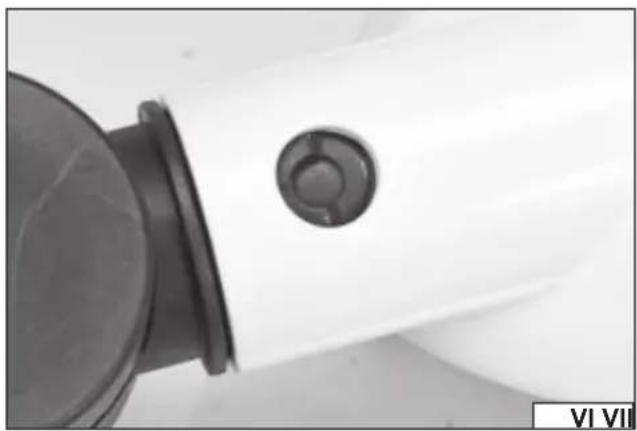
natural_image
Close-up of a white car's side panel with a black circular button and a black handle (no text or symbols visible)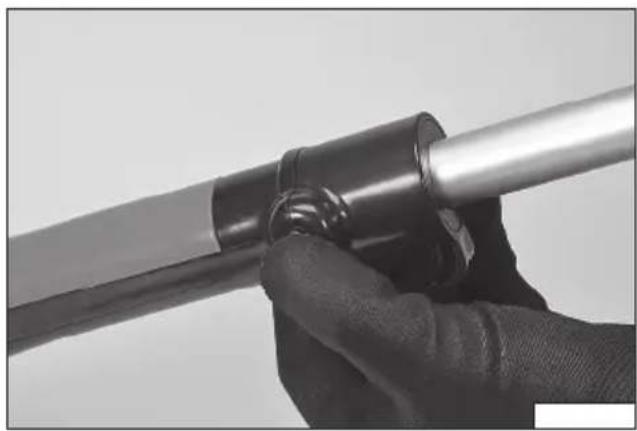
natural_image
Close-up of a hand holding a metallic tool with a coiled cable (no text or symbols visible)natural_image
Close-up of a mechanical component with internal cavities and flanges (no visible text or symbols)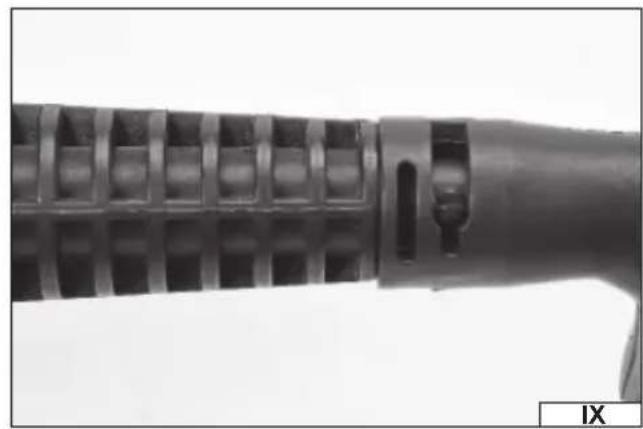
natural_image
Close-up of a mechanical component with helical grooves and internal cavities (no visible text or symbols)
natural_image
Close-up of a black tool applying dark material onto a white foam-like substance (no text or symbols visible)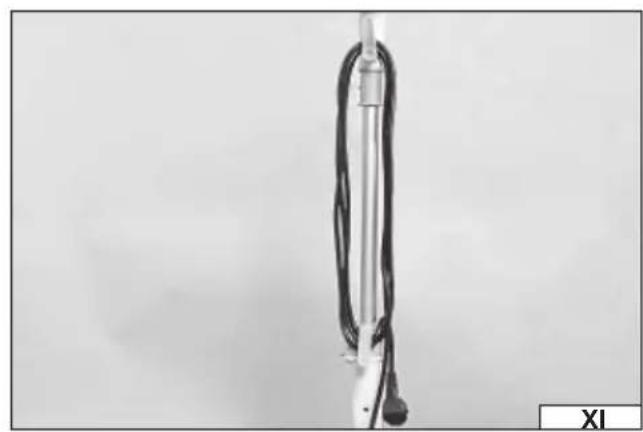
natural_image
Close-up of a vertical metallic device with wires and connectors, labeled 'XI' in the corner (no other text or symbols visible)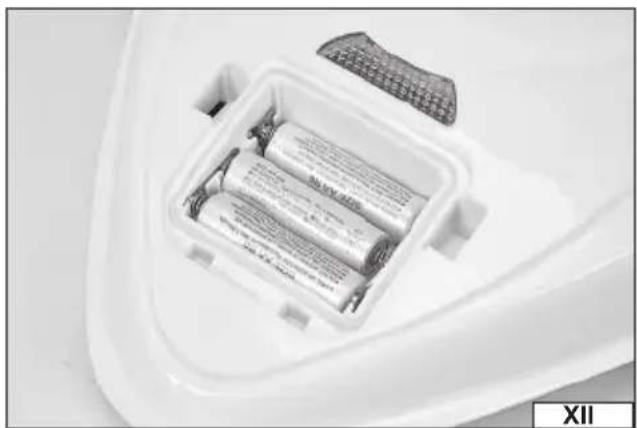
natural_image
White plastic container filled with three batteries, no visible text or symbols on the battery itselfPL GB
Read the operating instruction
Caution! Hot surface.
Attention ! Surface chaude
This symbol indicates that waste electrical and electronic equipment (including batteries and storage cells) cannot be disposed of with other types of waste. Waste equipment should be collected and handed over separately to a collection point for recycling and recovery, in order to reduce the amount of waste and the use of natural resources. Uncontrolled release of hazardous components contained in electrical and electronic equipment may pose a risk to human health and have adverse effects for the environment. The household plays an important role in contributing to reuse and recovery, including recycling of waste equipment. For more information about the appropriate recycling methods, contact your local authority or retailer.
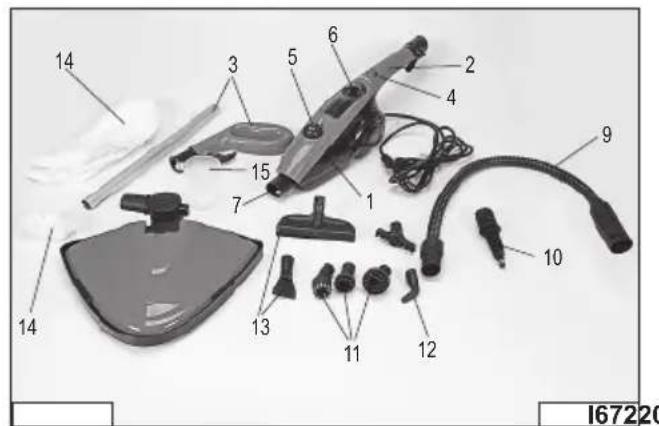
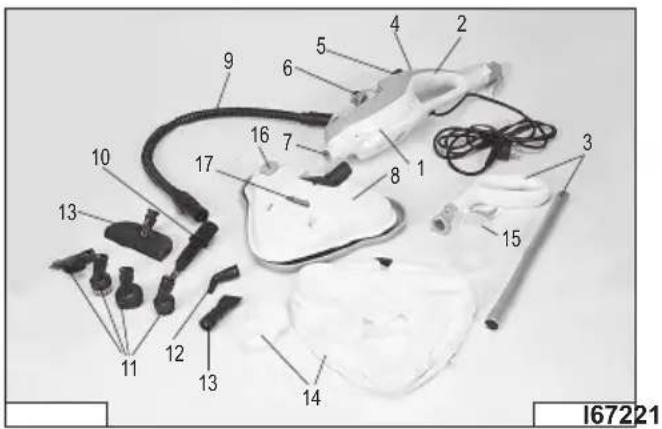
WYPOSAŻENIE PRODUKTU
The steam mop is designed for cleaning large, smooth surfaces with a hot steam jet. Particularly useful in bathrooms, toilets and kitchens. Thanks to the detachable handle, the mop can also be used as a handy steam cleaner for cleaning windows or mirrors, as well as areas which cannot be reached with the mop. The product is intended for domestic applications only, and not for any commercial use. The correct, reliable, and safe operation of the device depends on its proper use, so:
Read and keep the entire manual before the first use of the product.
The supplier shall not be held liable for any damage resulting from failure to observe the safety regulations and recommendations specified in this manual. Use of the product for purposes other than those for which it was intended shall cause the loss of the user's rights to the guarantee and under warranty.
ACCESSORIES
The product is delivered complete, but requires carrying out a number of preliminary actions described in further sections of the manual, before starting operation. The product comes with nozzles of various shapes and purpose, as well as a measuring cup, funnel and a fl at nozzle cloth pad.
SAFETY INSTRUCTIONS
Caution! Read all of the following instructions. Failure to do so may result in electric shock, fire, or personal injury.
FOLLOW THE INSTRUCTIONS BELOW
Do not use the product in an explosive environment containing flammable liquids, gases, or vapours. Before starting the product for the first time, make sure that the product, its accessories, and the power cord have not been damaged. If any damage is discovered, it is not allowed to start working with the product. Any damaged components, including the power cord, must be replaced at an authorized facility. It is not allowed to repair the product on your own. The product is intended for indoor use only. Do not expose the product to any precipitation or moisture. If water and moisture enters the product, the risk of an electric shock is significantly increased. Do not immerse the product in water or any other liquid. Connect the product to the power network providing the voltages and frequencies indicated on the nameplate of the unit, exclusively. The plug of the power cord must match the power socket. Do not modify the plug. Do not use any power adapters to adapt the plug to the socket. An unmodified plug, which matches the socket, reduces the risk of an electric shock. A product with first class electrical insulation must always be connected to an outlet equipped with a protective conductor. The mains power supply should be equipped with a residual current fuse with a tripping current of 30 mA or less. After each application, unplug the power cord from the power socket. Always disconnect the device from the power supply, if it is left unattended, and before putting it away, disassembling, or cleaning. Do not leave the device connected to the power supply unattended. Do not overload the power cord. Do not use the power cord to carry the product, connect, or disconnect the plug from the power socket. Avoid any contact between the power cord and heat sources, oil, sharp edges, and moving parts. Damage to the power cord increases the risk of an electric shock. If the power cord is damaged (e.g. it is cut, its insulation is melted), immediately unplug it from the wall socket, and return it to an authorised service facility. It is not allowed to use the product with a damaged power cord. It is not allowed to have the power cord repaired. It must be changed
GB
for a new one at an authorized service centre. Disconnect the power cord from the power socket, before installing, removing, or adjusting any of the product accessories. Make sure that the selected accessory has been installed correctly, before starting the product. Do not overload the product. The temperature of the housing must not exceed 60^ C. Overloading the product will accelerate its wear and tear, lead to its damaging, and increase the risk of an electric shock. The product must be kept under supervision at all times during operation. The product is not to be used by children. Keep the product and its power cord out of the reach of children. It is important to ensure that children do not see the product as a toy. Children should not be allowed to clean or maintain the product without the supervision of an adult. If the device is still connected to the mains power supply or is cooling down, keep it out of the reach of children. This product cannot be used by people with impaired physical and/or mental abilities, and by people without any experience in or understanding of the operation of the product, unless they are supervised or instructed in the safe use of the product, so that they understand the relevant operating risks. The water tank cannot remain opened when using the device. Do not use the device if it has been dropped, if there are visible signs of damage or if it is leaking. Never point the steam jet at yourself, other people or animals. Contact with hot steam can cause severe burns. Never fill the product with a substance other than clean, cold water. In particular, do not use flammable substances such as alcohols or solvents. Do not add any other substances to water, e.g. detergents.
PRODUCT OPERATION
Preparing the appliance for operation
Caution! All actions described in this section must be carried out with the product unplugged. Make sure that the power cord has been unplugged from the socket.
The product must be unpacked and all parts of the packaging completely removed. It is recommended to keep the packaging, as it can be helpful in further transporting and storing of the product.
Check the product for damage. In the event of any damage being found, do not use the product, before the damage has been remedied or the damaged components changed for new components, free of defects.
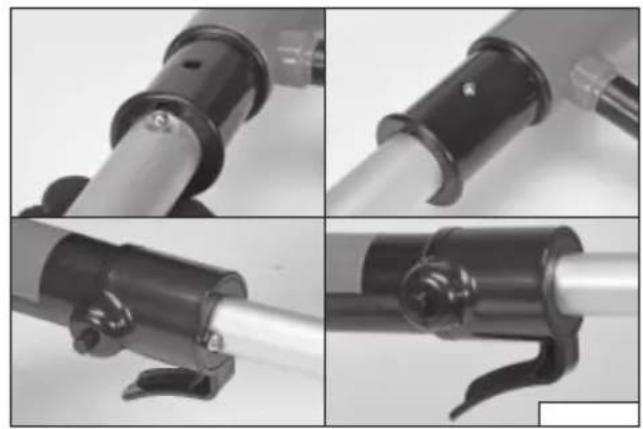
If the device is to be used as a mop, attach the handle by sliding the handle into the opening of the housing (II) until the latch engages. Check correctness of the installation, a correctly fitted handle cannot be pulled out of the housing.
After installing the handle, the hooks on the handle and housing can be used to retract the power cord for storage of the device (XI).
Place the cloth pad on the large surface cleaning attachment so that it completely covers the bottom of the attachment (III). Pull the string on the edge of the pad, secure with the stopper (IV) and slide the loose end of the string underneath the pad.
Put the cover (V) on the edge of the attachment with the pad.
Fix the attachment to the socket around the steam outlet. Slide the pin of the attachment into the socket until the latch button clicks into the socket opening (VI). To disassemble the attachment, press the button and slide the attachment pin out of the socket around the steam outlet.
The large surface cleaning attachment on the 67221 model has a UV lamp. The lamp is powered by AA batteries or rechargeable batteries, which should be placed in the battery compartment located in the upper part of the attachment housing. Pay attention to the correct polarity of the battery (XII). Turn the lamp on by pressing the switch in the upper part of the attachment housing. The lamp will light up when you press the proximity button located on the bottom of the attachment housing. After applying the attachment to the surface to be cleaned. If the lamp is turned off using the switch in the upper part of the attachment housing, the setting of the lower switch is irrelevant. The operation of the UV lamp is signalled by the lighting of the lamp located in the attachment.
Warning! Do not point the UV lamp light towards the eyes and skin.
If the device is to be used as a cleaner, the holder must be removed. Press and hold the button (VII) near the housing opening and pull the handle out.
Install the nozzle used for a particular type of operation in the socket around the steam outlet. Install the nozzle using the rigid or flexible extension. The extension must be installed and removed in the same manner as the attachment described above.
GB
The nozzle is attached to the bayonet connector of the extension. Place the nozzle on the extension connector so that the pins of the extension hit the notches in the nozzle mounting socket (VIII). Then turn the nozzle to lock it (IX). Check if the nozzle is correctly installed and cannot be taken off by pulling it towards the steam outlet.
A cloth pad can be put over the flat nozzle by placing it so that it completely covers the bottom of the nozzle (X).
Without the pad, the fl at nozzle can be used as a rubber puller.
Water fi lling and emptying
Caution! Make sure that the product is disconnected from the power supply before filling it with water or emptying. The plug of the power cord is pulled out of the socket. The product and the water stored in it must also be cooled.
Remove the water tank cap by turning it anticlockwise. Fill the tank with water up to its nominal capacity specified in the technical data table.
A measuring cup is included with the product and it is recommended to use it, as this will minimise the risk of splashing water when filling the tank. Splashed water should be thoroughly cleaned before connecting the device to the mains power supply.
After filling the tank, screw the tank cap in the reverse order of installation. It is forbidden to use the device with an open tank.
After use, disconnect the product from the power supply by unplugging the power cord from the socket.
Wait until the product and the water remaining in the tank have cooled down completely. Remove the tank cap, turn the device upside down so that the inlet is facing downwards and empty the tank completely. Screw the tank cap on.
Switching the device on and off
After installing the device and filling the tank with water, place the device on a level, firm and stable surface, make sure that the switch is in the "off" position - O, and then put the product plug into the mains socket. Move the switch to the "on" position - I, and wait until steam escapes from the nozzle and starts working.
Warning! Make sure that body parts are not near the steam outlet. Hot steam can cause severe burns.
The device has a knob to adjust the amount of steam released from the nozzle. Turning the knob clockwise increases the intensity of the steam jet and turning it counter-clockwise decreases the intensity.
After finishing work, move the switch to the "off" position - O, wait for the steam to stop escaping from the nozzle. Place the device on a level, firm and stable surface, unplug the power cord from the socket and leave the product to cool down completely.
MAINTENANCE AND STORAGE
After use, disconnect the product from the power supply by pulling out the power cord plug and wait until the water in the tank has cooled down completely. Then unscrew the tank cap and empty the tank completely by turning the device upside down. Then leave the device with the tank open until the remaining water from the tank has been completely dried. After drying the tank, screw the cap back on.
The cloth pads will be damp after use, remove them and leave to dry. Pads can be washed in mechanical washing machines at temperatures up to 60 degrees C. Do not dry mechanically and do not iron.
Clean the housing of the unit with a slightly damp cloth, then dry or leave to dry. Never immerse the device housing in water or other liquids. Do not use alcohol, solvents, corrosive or abrasive agents for cleaning.
Do not use sharp objects for unclog the nozzles. Clogged nozzles must be replaced with new nozzles before further use.
Store the product in dry, shaded and well ventilated places. The place of storage should protect the device from access by unauthorised persons, especially children. It is recommended to store the product in the packaging it was delivered in.
TECHNICAL DATA
| Parameter Units Value | ||
| Cat. No. 67220, 67221 | ||
| Rated voltage [V~] 220 - 240 | ||
| Rated frequency [Hz] 50/60 | ||
| Rated power [W] 1500 | ||
| Water tank capacity [l] 0.55 | ||
| Maximum steam temperature [ | °C] | 110 |
| Capacity | [g/min] 10 - 26 | |
| Ingress protection rating | IPX4 | |
| Protection class | I | |
| Weight | [kg] | 1.4 |
| UV lamp rated voltage | [VDC] | 4.5 |
| UV lamp batteries | 3 x AA |
GERÄTEBESCHREIBUNG
CARACTÉRISTIQUES DU PRODUIT


Brand : Lund
Model : 67220
Category : Steam cleaner