
EOD4P57H - Electric oven ELECTROLUX - Free user manual and instructions
Find the device manual for free EOD4P57H ELECTROLUX in PDF.
| Product Type | Built-in Electric Oven |
| Brand | Electrolux |
| Model | EOD4P57H |
| Dimensions (H x W x D) | 594 x 595 x 569 mm |
| Built-in Dimensions (H x W x D) | 590 (600) x 560 x 550 (550) mm |
| Weight | 32.1 kg |
| Cavity Volume | 72 L |
| Energy Efficiency Class | A+ |
| Energy Consumption (Conventional) | 0.93 kWh/cycle |
| Energy Consumption (Fan Forced) | 0.69 kWh/cycle |
| Power Supply | 230 V / 50 Hz, 1.5 m cable |
| Cooking Functions | Fan Forced, Top/Bottom Heat, SteamBake, Pizza, Bottom Heat, Frozen Foods, Moist Fan Forced, Grill, Turbo Grill, Assisted Cooking |
| Pyrolytic Cleaning | Yes, 3 programs (C1: 1h, C2: 1h30, C3: 2h30) |
| Interior Lighting | Halogen lamp, withstands 300°C |
| Child Lock | Yes, via Lock key |
| Automatic Shut-off | Yes, timing based on temperature |
| Included Accessories | Metal grid, baking tray, roasting dish, cooking probe, telescopic rails |
| Spare Parts Available | Bulb, door glass panels, cooking probe, grid supports |
| Repairability | Approved after-sales service, original parts |
Frequently Asked Questions - EOD4P57H ELECTROLUX
User questions about EOD4P57H ELECTROLUX
0 question about this device. Answer the ones you know or ask your own.
Ask a new question about this device
Download the instructions for your Electric oven in PDF format for free! Find your manual EOD4P57H - ELECTROLUX and take your electronic device back in hand. On this page are published all the documents necessary for the use of your device. EOD4P57H by ELECTROLUX.
USER MANUAL EOD4P57H ELECTROLUX
How to install your AEG/Electrolux
Oven - Column installation

(^*mm)


3.2 Sigurimi i furrës ne kabinet

4. PÉRSHKrim I PRODUKTIT
Available on the App Store

GETION Google Play
How to install your AEG/Electrolux Oven - Column installation


How to install your AEG/Electrolux Oven - Column installation


How to install your AEG/Electrolux Oven - Column installation


13. PROBLEEMOPLOSSING

WAARSCHUWING!
Welcome to Electrolux! Thank you for choosing our appliance.


In our drive to be sustainable, we are reducing paper assets and provide full user manuals online. Access your full user manual at electrolux.com/manuals
Get usage advice, brochures, trouble shooter, service and repair information at electrolux.com/support
For more recipes, hints, troubleshooting download My Electrolux Kitchen app.

Available on the App Store

GETION Google Play
Subject to change without notice.
CONTENTS
1.SAFETY INFORMATION 126
2.SAFETYINSTRUCTIONS 128
3. INSTALLATION 131
4.PRODUCT DESCRIPTION 133
5.CONTROL PANEL 133
6. BEFORE FIRST USE 134
7.DAILYUSE. 135
8.CLOCK FUNCTIONS 140
9. USING THE ACCESSORIES 141
10. ADDITIONAL FUNCTIONS 143
11. HINTS AND TIPS 144
12.CARE AND CLEANING. 147
13.TROUBLESHOOTING 151
14. ENERGY EFFICIENCY 153
15.MENU STRUCTURE 154
16. ENVIRONMENTAL CONCERNS 155
1. SAFETY INFORMATION
Before the installation and use of the appliance, carefully read the supplied instructions. The manufacturer is not responsible for any injuries or damage that are the result of incorrect installation or usage. Always keep the instructions in a safe and accessible location for future reference.
1.1 Children and vulnerable people safety
- This appliance can be used by children aged from 8 years and above and persons with reduced physical, sensory or mental capabilities or lack of experience and knowledge if
they have been given supervision or instruction concerning the use of the appliance in a safe way and understand the hazards involved. Children of less than 8 years of age and persons with very extensive and complex disabilities shall be kept away from the appliance unless continuously supervised.
- Children should be supervised to ensure that they do not play with the appliance.
- Keep all packaging away from children and dispose of it appropriately.
- WARNING: The appliance and its accessible parts become hot during use. Keep children and pets away from the appliance when in use and when cooling down.
- If the appliance has a child safety device, it should be activated.
- Children shall not carry out cleaning and user maintenance of the appliance without supervision.
1.2 General Safety
- This appliance is for cooking purposes only.
- This appliance is designed for single household domestic use in an indoor environment.
- This appliance may be used in, offices, hotel guest rooms, bed & breakfast guest rooms, farm guest houses and other similar accommodation where such use does not exceed (average) domestic usage levels.
- Only a qualified person must install this appliance and replace the cable.
- Do not use the appliance before installing it in the built-in structure.
- Disconnect the appliance from the power supply before carrying out any maintenance.
-
If the supply cord is damaged, it must be replaced by the manufacturer, its Authorised Service Centre or similarly qualified persons to avoid an electrical hazard.
-
WARNING: Ensure that the appliance is switched off before replacing the lamp to avoid the possibility of electric shock.
- WARNING: The appliance and its accessible parts become hot during use. Care should be taken to avoid touching heating elements or the surface of the appliance cavity.
- Always use oven gloves to remove or insert accessories or ovenware.
- To remove the shelf supports first pull the front of the shelf support and then the rear end away from the side walls. Install the shelf supports in the opposite sequence.
- Do not use a steam cleaner to clean the appliance.
- Do not use harsh abrasive cleaners or sharp metal scrapers to clean the glass door since they can scratch the surface, which may result in shattering of the glass.
- Before pyrolytic cleaning, remove all accessories and excessive deposits/spills from the appliance cavity.
2. SAFETY INSTRUCTIONS
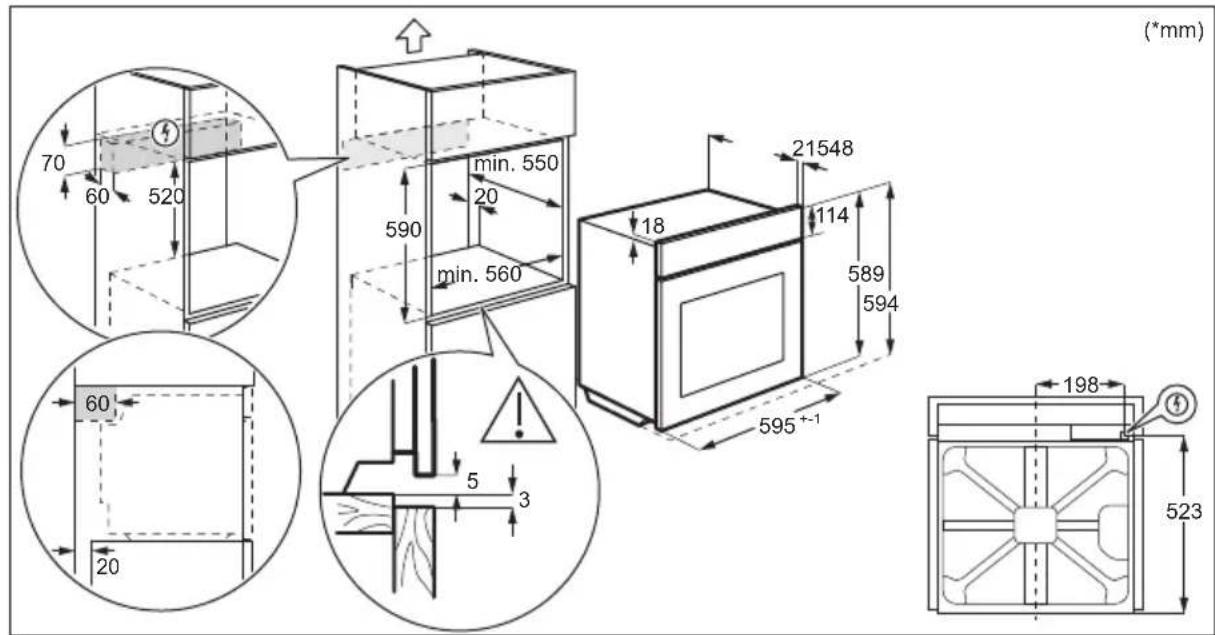
2.1 Installation

WARNING!
Only a qualified person must install this appliance.
- Remove all the packaging.
- Do not install or use a damaged appliance.
- Follow the installation instructions supplied with the appliance.
Always take care when moving the appliance as it is heavy. Always use safety gloves and enclosed footwear. - Do not pull the appliance by the handle.
- Install the appliance in a safe and suitable place that meets installation requirements.
- Keep the minimum distance from other appliances and units.
- Before mounting the appliance, check if the appliance door opens without restraint.
- The appliance is equipped with an electric cooling system. It must be operated with the electric power supply.
Cabinet minimum height 590 (600) mm (Cabinet under the worktop minimum height)
Cabinet width 560 mm
Cabinet depth 550 (550) mm
Height of the front of the 594 mm appliance
Height of the back of the 576 mm appliance
Width of the front of the ap- 595 mm plance
Width of the back of the ap- 559 mm plance
Depth of the appliance 569 mm
Built in depth of the appliance 548 mm
Depth with open door 1022 mm
Ventilation opening minimum size. Opening placed on the bottom rear side
Mains supply cable length. Cable is placed in the right corner of the back side
1500 mm
Mounting screws 4 × 25 ~mm
2.2 Electrical connection

WARNING!
Risk of fire and electric shock.
- All electrical connections should be made by a qualified electrician.
The appliance must be earthed. - Make sure that the parameters on the rating plate are compatible with the electrical ratings of the mains power supply.
Always use a correctly installed shockproof socket. - Do not use multi-plug adapters and extension cables.
- Make sure not to cause damage to the mains plug and to the mains cable. Should the mains cable need to be replaced, this must be carried out by our Authorised Service Centre.
- Do not let mains cables touch or come near the appliance door or the niche below the appliance, especially when it operates or the door is hot.
- The shock protection of live and insulated parts must be fastened in such a way that it cannot be removed without tools.
- Connect the mains plug to the mains socket only at the end of the installation. Make sure that there is access to the mains plug after the installation.
- If the mains socket is loose, do not connect the mains plug.
- Do not pull the mains cable to disconnect the appliance. Always pull the mains plug.
- Use only correct isolation devices: line protecting cut-outs, fuses (screw type fuses removed from the holder), earth leakage trips and contactors.
-
The electrical installation must have an isolation device which lets you disconnect the appliance from the mains at all poles. The isolation device must have a contact opening width of minimum 3 mm.
-
Fully close the appliance door before you connect the mains plug to the mains socket.
- This appliance is supplied with a main plug and a main cable.
Cable types applicable for installation or replacement for Europe:
H07 RN-F, H05 RN-F, H05 RRF, H05 VV-F, H05 V2V2-F (T90), H05 BB-F
For the section of the cable refer to the total power on the rating plate. You can also refer to the table:
Total power (W) Section of the cable (mm^2)
maximum 1380 3x0.75
maximum 2300 3x1
maximum 3680 3x1.5
The earth cord (green / yellow cable) must be 2 cm longer than the brown phase and blue neutral cables.
2.3 Use

WARNING!
Risk of injury, burns and electric shock or explosion.
- Do not change the specification of this appliance.
Make sure that the ventilation openings are not blocked. - Do not let the appliance stay unattended during operation.
- Deactivate the appliance after each use.
- Be careful when you open the appliance door while the appliance is in operation. Hot air can release.
- Do not operate the appliance with wet hands or when it has contact with water.
- Do not apply pressure on the open door.
- Do not use the appliance as a wo surface or as a storage surface.
-
Open the appliance door carefully. The use of ingredients with alcohol can cause a mixture of alcohol and air.
-
Do not let sparks or open flames to come in contact with the appliance when you open the door.
- Do not put flammable products or items that are wet with flammable products in, near or on the appliance.

WARNING!
Risk of damage to the appliance.
-
To prevent damage or discoloration to the enamel:
-
do not put ovenware or other objects in the appliance directly on the bottom.
- do not put aluminium foil directly on the bottom of cavity of the appliance.
- do not put water directly into the hot appliance.
- do not keep moist dishes and food in the appliance after you finish the cooking.
-
be careful when you remove or install the accessories.
-
Discoloration of the enamel or stainless steel has no effect on the performance of the appliance.
- Use a deep pan for moist cakes. Fruit juices cause stains that can be permanent.
- Always cook with the appliance door closed.
- If the appliance is installed behind a furniture panel (e.g. a door) make sure the door is never closed when the appliance operates. Heat and moisture can build up behind a closed furniture panel and cause subsequent damage to the appliance, the housing unit or the floor. Do not close the furniture panel until the appliance has cooled down completely after use.
2.4 Care and cleaning

WARNING!
Risk of injury, fire, or damage to the appliance.
-
Before maintenance, deactivate the appliance and disconnect the mains plug from the mains socket.
Make sure the appliance is cold. There is the risk that the glass panels can break. -
Replace immediately the door glass panels when they are damaged. Contact the Authorised Service Centre.
- Be careful when you remove the door from the appliance. The door is heavy!
- Clean regularly the appliance to prevent the deterioration of the surface material.
- Clean the appliance with a moist soft cloth. Use only neutral detergents. Do not use abrasive products, abrasive cleaning pads, solvents or metal objects.
- If you use an oven spray, follow the safety instructions on its packaging.
2.5 Pyrolytic cleaning

WARNING!
Risk of Injury / Fires / Chemical Emissions (Fumes) in Pyrolytic Mode.
-
Before carrying out the pyrolytic cleaning and initial preheating remove from the oven cavity:
-
any excess food residues, oil or grease spills / deposits.
-
any removable objects (including shelves, side rails, etc., provided with the appliance) especially any non-stick pots, pans, trays, utensils, etc.
-
Read carefully all the instructions for pyrolytic cleaning.
- Keep children away from the appliance while the pyrolytic cleaning operates. The appliance becomes very hot and hot air is released from the front cooling vents.
-
Pyrolytic cleaning is a high temperature operation that can release fumes from cooking residues and construction materials, as such consumers are advised to:
-
provide good ventilation during and after the pyrolytic cleaning.
-
provide good ventilation during and after the initial preheating.
-
Do not spill or apply water on the oven door during and after the pyrolytic cleaning to avoid damaging the glass panels.
- Fumes released from all pyrolytic ovens / cooking residues as described are not harmful to humans, including children, or persons with medical conditions.
- Keep pets away from the appliance during and after the pyrolytic cleaning and initial
preheating. Small pets (especially birds and reptiles) can be highly sensitive to temperature changes and emitted fumes.
- Non-stick surfaces on pots, pans, trays, utensils etc., can be damaged by the high temperature pyrolytic cleaning operation of all pyrolytic ovens and can be also a source for low level harmful fumes.
2.6 Internal lighting

WARNING!
Risk of electric shock.
- Concerning the lamp(s) inside this product and spare part lamps sold separately: These lamps are intended to withstand extreme physical conditions in household appliances, such as temperature, vibration, humidity, or are intended to signal information about the operational status of the appliance. They are not intended to be used in other applications and are not suitable for household room illumination.
-
This product contains a light source of energy efficiency class G.
-
Use only lamps with the same specifications.
2.7 Service
To repair the appliance contact the Authorised Service Centre.
- Use original spare parts only.
2.8 Disposal

WARNING!
Risk of injury or suffocation.
- Contact your municipal authority for information on how to dispose of the appliance.
- Disconnect the appliance from the mains supply.
- Cut off the mains electrical cable close to the appliance and dispose of it.
- Remove the door catch to prevent children or pets from becoming trapped in the appliance.
3. INSTALLATION

WARNING!
Refer to Safety chapters.
3.1 Building in

YouTube
www.youtube.com/electrolux
www.youtube.com/aeg
How to install your AEG/Electrolux
Oven - Column installation


3.2 Securing the oven to the cabinet

4.PRODUCT DESCRIPTION
4.1 General overview

4.2 Accessories
- Wire shelf
For cookware, cake tins, roasts.
Baking tray
For cakes and biscuits.
- Grill-/Roasting pan
To bake and roast or as pan to collect fat.
1 Control panel
2 Knob for the heating functions
3 Display
4 Control knob
5 Heating element
6 Socket for the food sensor
7 Lamp
8 Fan
9 Cavity embossment
10 Shelf support, removable
11 Shelf positions
- Food sensor
To measure how far the food is cooked.
- Telescopic runners
With the telescopic runners you can put in and remove the shelves more easily.
5. CONTROL PANEL
5.1 Retractable knobs
To use the appliance press the knob. The knob comes out.
5.2 Control panel overview
| ○ | OK | ○ |
| Timer | Fast Heat Up | Light Food Sensor Confirm setting Press Turn the knob |
| Select a heating function to turn on the appliance. | ||
| Turn the knob for the heating functions to the off position to turn the appliance off. | ||
5.3 Display

Display with key functions.
Display indicators
| Basic indicators | ||||
| Lock | Assisted Cooking | Cleaning | Settings | Fast Heat Up |
| Timer indicators | ||||
| Minute minder | STOPEnd time | Time Delay | Uptimer | |
| Progress bar - for temperature or time. The bar is fully red when the appliance reaches the set temperature. | ||||
| Steam cooking indicator | ||||
| Food sensor indicator | ||||
6. BEFORE FIRST USE

WARNING!
Refer to Safety chapters.
6.1 Initial cleaning
Before the first use, clean the empty appliance and set the time:


00:00
Set the time. Press

6.2 Initial preheating
Preheat the empty oven before the first use.
Step 1 Remove all accessories and removable shelf supports from the oven.
Step 2
Set the maximum temperature for the function:

Let the oven operate for 1h
Step 3
Set the maximum temperature for the function:

Let the oven operate for 15 min.

The oven can emit an odour and smoke during preheating. Make sure that the room is ventilated.
7. DAILY USE

WARNING!
Refer to Safety chapters.
7.1 How to set: Heating functions
Step 1 Turn the knob for the heating functions and select a heating function.
Step 2 Turn the control knob to set the temperature.

- press and hold to turn on the function: Fast Heat Up. It is available for some oven functions.
Steam cooking
Make sure that the oven is cold.
Step 1 Step 2 Step 3 Step 4


Fill the cavity embossment with tap water.
Select the steam heating function.
Set the temperature.
Preheat the empty oven for 10 min to create humidity.
Put food in the oven.

The maximum capacity of the cavity embossment is 250 ml. Do not refill the cavity embossment during cooking or when the oven is hot.
When the steam cooking ends:
Step 1 Step 2 Step 3
Turn the knob for the heating functions to the off position to turn off the oven.
Carefully open the door. Released humidity can cause burns.
Make sure that the oven is cold. Remove the remaining water from the cavity embossment.
7.2 Heating functions
| Heating function Application | |
| True Fan Cooking | To bake on up to three shelf positions at the same time and to dry food. Set the temperature 20 - 40 °C lower than for Conventional Cooking. |
| Conventional Cooking | To bake and roast food on one shelf position. |
| SteamBake | To add humidity during the cooking. To get the right colour and crispy crust during baking. To give more juiciness during reheating. To preserve fruit or vegetables. |
| Pizza Function | To bake pizza. To make intensive browning and a crispy bottom. |
| Bottom Heat | To bake cakes with crispy bottom and to preserve food. |
| Frozen Foods | To make convenience food (e.g., french fries, potato wedges or spring rolls) crispy. |
| Moist Fan Baking | This function is designed to save energy during cooking. When you use this function, the temperature in the cavity may differ from the set temperature. The residual heat is used. The heating power may be reduced. For more information refer to "Daily Use" chapter, Notes on: Moist Fan Baking. |
| Grill | To grill thin pieces of food and to toast bread. |
| Turbo Grilling | To roast large meat joints or poultry with bones on one shelf position. To make gratins and to brown. |
| Menu | To enter the Menu: Assisted Cooking, Cleaning, Settings. |
7.3 Notes on: Moist Fan Baking
This function was used to comply with the energy efficiency class and ecodesign requirements (according to EU 65/2014 and EU 66/2014). Tests according to:
IEC/EN 60350-1
The oven door should be closed during cooking so that the function is not interrupted
and the oven operates with the highest energy efficiency possible.
When you use this function the lamp automatically turns off after 30 sec.
For the cooking instructions refer to "Hints and tips" chapter, Moist Fan Baking. For general energy saving recommendations refer to "Energy Efficiency" chapter, Energy Saving.
7.4 How to set: Assisted Cooking
Every dish in this submenu has a recommended heating function and temperature. Use the function to prepare a dish quickly with default settings. You can also adjust the time and the temperature during cooking.
| For some of the dishes you can also cook with: | The degree to which a dish is cooked: | ||
| · Food Sensor · Rare | · Medium · Well done | ||
| Step 1 Step 2 Step 3 Step 4 | |||
| P1-P45 | OK | ||
| Enter the menu. Select Assisted Cooking. Press OK | Select the dish. Press OK. | Insert the dish to the oven. Confirm setting. | |
| 7.5 Assisted Cooking | |||
| Legend | Legend | ||
| Preheat the appliance before you start cooking. | |||
| Food sensor available. Place the Food sensor in the thickest part of the dish. The appliance turns off when the set Food sensor temperature is reached. | Shelf level. | ||
| The amount of water for the steam func- tion. | The display shows P and a number of the dish that you can check in the table. | ||
| Dish Weight Shelf level / Accessory | |||
| Roast Beef, rare | baking tray Fry the meat for a few minutes on a hot pan. Insert to the appliance. | ||
| Roast Beef, medium | 1-1.5 kg; 4-5 cm thick pieces | ||
| Roast Beef, well done | |||
| Steak, medium 180-220 g per piece; 3 cm thick slices | roasting dish on wire shelf Fry the meat for a few minutes on a hot pan. Insert to the appliance. | ||
| Beef roast / braised (prime rib, top round, thick flank) | 1.5-2 kg | roasting dish on wire shelf Fry the meat for a few minutes on a hot pan. Add liquid. Insert to the appliance. | |
| Dish Weight Shelf level / Accessory | ||
| 6 | Roast Beef, rare (slow cooking) | 1 - 1.5 kg; 4 - 5 cm thick pieces |
| 7 | Roast Beef, medium (slow cooking) | |
| 8 | Roast Beef, well done (slow cooking) | |
| 9 | Fillet, rare (slow cooking) | 0,5 - 1.5 kg; 5 - 6 cm thick pieces |
| 10 | Fillet, medium (slow cooking) | |
| 11 | Fillet, done (slow cooking) | |
| 12 | Veal roast (e.g. shoul-der) | 0.8 - 1.5 kg; 4 cm thick pieces |
| 13 | Pork roast neck or shoulder | 1.5 - 2 kg |
| 14 | Pulled pork (slow cooking) | 1.5 - 2 kg |
| 15 | Loin, fresh 1 - 1.5 kg; 5 - 6 cm thick pieces | roasting dish on wire shelf Use your favourite spices. Add liquid. Roast covered. |
| 16 | Spare Ribs 2 - 3 kg; use raw, 2 - 3 cm thin spare ribs | roasting dish on wire shelf Turn the meat after half of the cooking time. |
| 17 | Lamb leg with bones 1.5 - 2 kg; 7 - 9 cm thick pieces | roasting dish on wire shelf Use your favourite spices. |
| 18 | Whole chicken 1 - 1.5 kg; fresh | roasting dish on baking tray Add liquid. Turn the meat after half of the cooking time. |
| 19 | Half chicken 0.5 - 0.8 kg | baking tray Use your favourite spices. |
| 20 | Chicken breast 180 - 200 g per piece | casserole dish on wire shelf Use your favourite spices. Fry the meat for a few minutes on a hot pan. |
| 21 | Chicken legs, fresh - | baking tray If you marinated chicken legs first, set lower temperature and cook them longer. |
| 22 | Duck, whole 2 - 3 kg | roasting dish on wire shelf Use your favourite spices. Put the meat on roasting dish. Turn the duck after half of the cooking time. |
| 23 | Goose, whole 4 - 5 kg | deep pan Use your favourite spices. Put the meat on deep baking tray. Turn the goose after half of the cooking time. |
| 24 | Meat loaf 1 kg | wire shelf Use your favourite spices. |
| 25 | Whole fish, grilled 0.5 - 1 kgper fish | baking tray Fill the fish with butter and use your favourite spices and herbs. |
| 26 | Fish fillet - | casserole dish on wire shelf Use your favourite spices. |
| 27 | Cheesecake - | 2; 8 cm springform tin on wire shelf |
| 28 | Apple cake - | 1d-150 ml; baking tray |
| 29 | Apple tart - | 2; pie form on wire shelf |
| 30 | Apple pie - | 1d-150 ml; 22 cm pie form on wire shelf |
| 31 | Brownies 2 kg of dough | 3; deep pan |
| 32 | Chocolate muffins - | 1d-150 ml; muffin tray on wire shelf |
| 33 | Loaf cake | 2; loaf pan on wire shelf |
| 34 | Baked potatoes | 1 kg |
| 35 | Wedges | 1 kg |
| 36 | Grilled mixed vegeta- bles | 1 - 1.5 kg |
| 37 | Croquets, frozen | 0.5 kg |
| 38 | Pommes, frozen | 0.75 kg |
| 39 | Meat / vegetable la- sagna with dry pasta sheets | 1 - 1.5 kg |
| 40 | Potato gratin (raw po- tatoes) | 1 - 1.5 kg |
| 41 | Pizza fresh, thin | - |
| 42 | Pizza fresh, thick | - baking tray lined with baking paper |
| 43 | Quiche - | - 2; baking tin on wire shelf |
| 44 | Baguette / Ciabatta / White bread | 0.8 kg 0.8 kg 150 ml; baking tray lined with baking pa-per More time needed for white bread. |
| 45 | All grain / rye / dark bread all grain in loaf pan | 1 kg 1 kg 150 ml; baking tray lined with baking pa-per / wire shelf |
8. CLOCK FUNCTIONS
8.1 Clock functions
| Clock Function Application | |
| Minute minder | When the timer ends, the signal sounds. |
| STOP Cooking time | When the timer ends, the signal sounds and the heating function stops. |
| Time Delay | To postpone the start and / or end of cooking. |
| Uptimer | Maximum is 23 h 59 min. This function has no effect on the operation of the oven. To turn on and off the Uptimer select: Menu, Settings. |
8.2 How to set: Clock functions
| How to set: Time of day | ||
| Step 1 Step 2 Step 3 | ||
| = | = | = |
| To change the time of day enter the menu and selec-lect Settings, Time of day. | Set the clock. | Press: OK |
| How to set: Minute minder | ||
| Step 1 | The display shows:0:00 | Step 2 Step 3 |
| Press: | Set the Minute minder | Press:OK |
| ① Timer starts counting down immediately. | ||
| How to set: Cooking time | ||||
| Step 1 Step 2 | The display shows:0:00STOP | Step 3 Step 4 | ||
| Choose a heating function and set the temperature. | Press repeatedly: | Set the cooking time. | Press:OK | |
| i Timer starts counting down immediately. | |||||||
| How to set: Time Delay | |||||||
| Step 1 Step 2 | The dis-play shows: the time of day | Step 3 Step 4 | Step 5 Step 6 | ||||
| Select the heating function. | Press repeat-edly: | START | Set the start time. | Press: OK | The display shows: STOP | Set the end time. | Press: OK |
| i Timer starts counting down at a set start time. | |||||||
9. USING THE ACCESSORIES

WARNING!
Refer to Safety chapters.
9.1 Inserting accessories
A small indentation at the top increases safety. The indentations are also anti-tip
devices. The high rim around the shelf prevents cookware from slipping of the shelf.
Wire shelf:
Push the shelf between the guide bars of the shelf support and make sure that the feet point down.

Baking tray / Deep pan:
Push the tray between the guide bars of the shelf support.

9.2 Food Sensor
Food Sensor - measures the temperature inside the food.
There are two temperatures to be set:
| °C The oven temperature. | The core temperature. |
| For the best cooking results: | |
| Ingredients should be at room tem- perature. | Do not use it for liquid dishes. During cooking it must remain in the dish. |
| How to use: Food Sensor | |
| Step 1 Turn on the oven. | |
| Step 2 Set a heating function and, if necessary, the oven temperature. | |
| Step 3 Insert: Food Sensor. | |
| Meat, poultry and fish Casserole | |
Insert the tip of Food Sensor into the centre of meat, fish, in the thickest part if possible. Make sure that at least 3/4 of Food Sensor is inside of the dish.
Insert the tip of Food Sensor exactly in the centre of the casserole. Food Sensor should be stabilized in one place during baking. Use a solid ingredient to achieve that. Use the rim of the baking dish to support the silicone handle of Food Sensor. The tip of Food Sensor should not touch the bottom of a baking dish.


Step 4 Plug Food Sensor into the socket at the front of the oven. The display shows the current temperature of: Food Sensor.
Step 5 - press to set the core temperature of the sensor.
Step 6 OK - press to confirm. When food reaches the set temperature, the signal sounds. You can choose to stop or to continue cooking to make sure the food is well done.
Step 7 Remove Food Sensor plug from the socket and remove the dish from the oven.
WARNING!
There is a risk of burns as Food Sensor becomes hot. Be careful when you unplug it and remove it from the food.
10. ADDITIONAL FUNCTIONS
10.1 Lock
This function prevents an accidental change of the appliance function.
Turn it on when the appliance works - the set cooking continues, the control panel is locked.
Turn it on when the appliance is off - it cannot be turned on, the control panel is locked.


- OK - press and hold to turn on the OK - press and hold to turn it off.
function.
A signal sounds.
i 3x flashes when the lock is turned on.
10.2 Automatic switch-off
For safety reasons the appliance turns off after some time, if a heating function works and you do not change any settings.

(^) (h)

30-115 12.5
120-1958.5
200-2455.5

(°C) (h)
250 - maximum 3

The Automatic switch-off does not work with the functions: Light, Food sensor, Time Delay.
10.3 Cooling fan
When the appliance operates, the cooling fan turns on automatically to keep the surfaces of the appliance cool. If you turn off the appliance, the cooling fan can continue to operate until the appliance cools down.
11. HINTS AND TIPS
11.1 Cooking recommendations

The temperature and cooking times in the tables are guidelines only. They depend on the recipes and the quality and quantity of the ingredients used.
Your appliance may bake or roast differently to the appliance you had before. The hints below show recommended settings for temperature, cooking time and shelf position for specific types of the food.
If you cannot find the settings for a special recipe, look for the similar one.
11.2 Moist Fan Baking
For the best results follow suggestions listed in the table below.


(°C) (min)
Sweet rolls, 16 pieces baking tray or dripping pan 180 2 20 - 30
Rolls, 9 pieces baking tray or dripping pan 180 2 30 - 40
Pizza,frozen,0.35kgwire shelf220210-15
Swiss Roll baking tray or dripping pan 170 2 25 - 35
Brownie baking tray or dripping pan 175 3 25 - 30
Souffle, 6 pieces ceramic ramekins on wire shelf
200325-30
Sponge flan base flan base tin on wire shelf 180 2 15 - 25
| (℃) (min) | |
| Victoria sandwich baking dish on wire shelf 170 2 40 - 50 | |
| Poached fish, 0.3 kg baking tray or dripping pan 180 3 20 - 25 | |
| Whole fish, 0.2 kg baking tray or dripping pan 180 3 25 - 35 | |
| Fish fillet, 0.3 kg pizza pan on wire shelf 180 3 25 - 30 | |
| Poached meat, 0.25kg baking tray or dripping pan 200 3 35 - 45 | |
| Shashlik, 0.5 kg baking tray or dripping pan 200 3 25 - 30 | |
| Cookies, 16 pieces baking tray or dripping pan 180 2 20 - 30 | |
| Macaroons, 24 pieces baking tray or dripping pan 180 2 25 - 35 | |
| Muffins, 12 pieces baking tray or dripping pan 170 2 30 - 40 | |
| Savory pastry, 20piecesbaking tray or dripping pan 180 2 25 - 30 | |
| Short crust biscuits,20 piecesbaking tray or dripping pan 150 2 25 - 35 | |
| Tartlets, 8 pieces baking tray or dripping pan 170 2 20 - 30 | |
| Vegetables, poached, 0.4 kgbaking tray or dripping pan 180 3 35 - 45 | |
| Vegetarian omelette pizza pan on wire shelf 200 3 25 - 30 | |
| Mediterranean vegetables, 0.7 kgbaking tray or dripping pan 180 4 25 - 30 |
11.3 Moist Fan Baking - recommended accessories
Use the dark and non-reflective tins and containers. They have better heat absorption than the light colour and reflective dishes.
| Pizza pan | Baking dish | Ramekins | Flan base tin |
| Dark, non-reflective 28 cm diameter | Dark, non-reflective 26 cm diameter | Ceramic 8 cm diameter, 5 cm height | Dark, non-reflective 28 cm diameter |
11.4 Cooking tables for test institutes
Information for test institutes
Tests according to IEC 60350-1.
| (℃) (min) | |||
| Small cakes, 20 per tray | Conventional Cooking | Baking tray 3 170 20 - 35 - | |
| Small cakes, 20 per tray | True Fan Cooking | Baking tray 3 150 - 160 20 - 35 - | |
| Small cakes, 20 per tray | True Fan Cooking | Baking tray 2 and 4 150 - 160 20 - 35 - | |
| Apple pie, 2 tins Ø20 cm | Conventional Cooking | Wire shelf 2 180 70 - 90 - | |
| Apple pie, 2 tins Ø20 cm | True Fan Cooking | Wire shelf 2 160 70 - 90 - | |
| Fatless sponge cake, cake mould Ø26 cm | Conventional Cooking | Wire shelf 2 170 40 - 50 Preheat the oven for | 10 min. |
| Fatless sponge cake, cake mould Ø26 cm | True Fan Cooking | Wire shelf 2 160 40 - 50 Preheat the oven for | 10 min. |
| Fatless sponge cake, cake mould Ø26 cm | True Fan Cooking | Wire shelf 2 and 4 160 40 - 60 Preheat the oven for | 10 min. |
| Short bread True Fan Cooking | Baking tray 3 140 - 150 20 - 40 - | ||
| Short bread True Fan Cooking | Baking tray 2 and 4 140 - 150 25 - 45 - | ||
| Short bread Conventional Cooking | Baking tray 3 140 - 150 25 - 45 - | ||
| Toast, 4 - 6 pieces | Grill Wire shelf 4 max. 1 - 5 Preheat the oven for | 10 min. | |
| Beef burger, 6 pieces, 0.6 kg | Grill Wire shelf, dripping pan | 4 max. 20 - 30 Put the wire shelf on | the fourth level and the dripping pan on the third level of the oven. Turn the food halfway through the cooking time. Preheat the oven for 10 min. |
12. CARE AND CLEANING

WARNING!
Refer to Safety chapters.
12.1 Notes on cleaning
| Cleaning Agents | Clean the front of the appliance only with a microfibre cloth with warm water and a mild detergent. |
| Use a cleaning solution to clean metal surfaces. | |
| Clean stains with a mild detergent. | |
| Everyday Use | Clean the cavity after each use. Fat accumulation or other residue may cause fire. |
| Moisture can condense in the appliance or on the door glass panels. To decrease the condensation, let the appliance work for 10 minutes before cooking. Do not store the food in the appliance for longer than 20 minutes. Dry the cavity only with a microfibre cloth after each use. | |
| Accessories | Clean all accessories after each use and let them dry. Use only a microfibre cloth with warm water and a mild detergent. Do not clean the accessories in a dishwasher. |
| Do not clean the non-stick accessories using abrasive cleaner or sharp-edged objects. |
12.2 How to clean: Cavity embossment
Clean the cavity embossment to remove limestone residue after cooking with steam.
Step 1 Step 2 Step 3
Pour: 250ml of white vinegar into the cavity embossment. Use maximum 6% vinegar without any additives.
Let the vinegar dissolve the limestone residue at the ambient temperature for 30 minutes.
Clean the cavity with warm water and a soft cloth.
For the function: SteamBake clean the oven for every 5 - 10 cooking cycles.
12.3 How to remove: Shelf supports
Remove the shelf supports to clean the oven.
Step 1 Turn off the oven and wait until it is cold.
Step 2 Pull the front of the shelf support away from the side wall.

Step 3 Pull the rear end of the shelf support away from the side wall and remove it.
Step 4 Install the shelf supports in the opposite sequence. The retaining pins on the telescopic runners must point to the front.

12.4 How to use: Pyrolytic Cleaning
Clean the oven with Pyrolytic Cleaning.

WARNING!
There is a risk of burns.

CAUTION!
If there are other appliances installed in the same cabinet, do not use them at the same time as this function. It can cause damage to the oven.
Before the Pyrolytic Cleaning:
Turn off the oven and wait until it is cold.
Remove all accessories. Clean the oven floor and the inner door glass with warm water, a soft cloth and a mild detergent.
Pyrolytic Cleaning
Step 1
Enter menu: Cleaning
Option Duration
| Pyrolytic Cleaning |
| C1 - Light cleaning 1 h |
| C2 - Normal cleaning 1 h 30 min |
| C3 - Thorough cleaning 2 h 30 min |
| Step 2 OK - press to select the cleaning programme. |
| Step 3 OK - press to start the cleaning. |
| Step 4 After cleaning, turn the knob for the heating functions to the off position. |
| When the cleaning starts, the oven door is locked and the lamp is off. Until the door unlocks the display shows: |
| When the cleaning ends: | |
| Turn off the oven and wait until it is cold. | Clean the cavity with a soft cloth. Remove the residue from the bottom of the cavity. |
12.5 Cleaning Reminder
| The oven reminds you when to clean it with pyrolytic cleaning. | |
| flashes in the display for 5 sec after each cooking session. | To turn off the reminder enter the Menu and select Set-tings, Cleaning Reminder. |
12.6 How to remove and install: Door
The oven door has three glass panels. You can remove the oven door and the internal glass panels to clean them. Read the whole "Removing and installing door" instruction before you remove the glass panels.
| CAUTION! Do not use the oven without the glass panels. |
Step 1 Open the door fully and hold both hinges.

Step 2 Lift and pull the latches until they click.

Step 3 Close the oven door halfway to the first opening position. Then lift and pull to remove the door from its seat.
Step 4 Put the door on a soft cloth on a stable surface.

Step 5 Hold the door trim (B) on the top edge of the door at the two sides and push inwards to release the clip seal.
Step 6 Pull the door trim to the front to remove it.

Step 7 Hold the door glass panels by their top edge and carefully pull them out one by one. Start from the top panel. Make sure the glass slides out of the supports completely.

Step 8 Clean the glass panels with water and soap. Dry the glass panels carefully. Do not clean the glass panels in the dishwasher.
Step 9 After cleaning, install the glass panels and the oven door.
If the door is installed correctly, you will hear a click when closing the latches.
Make sure that you put the glass panels (A and B) back in the correct sequence. Check for the symbol / printing on the side of the glass panel, each of the glass panels looks different to make the disassembly and assembly easier.
When installed correctly the door trim clicks.
Make sure that you install the middle panel of glass in the seats correctly.


12.7 How to replace: Lamp

WARNING!
Risk of electric shock.
The lamp can be hot.
Always hold the halogen lamp with a cloth to prevent grease residue from burning on the lamp.
| Before you replace the lamp: | ||
| Step 1 Step 2 Step 3 | ||
| Turn off the oven. Wait until the oven is cold. | Disconnect the oven from the mains. | Put a cloth on the bottom of the cavity. |
Back lamp
Step 1 Turn the glass cover to remove it.
Step 2 Clean the glass cover.
Step 3 Replace the lamp with a suitable 300^ heat-resistant lamp.
Step 4 Install the glass cover.
13. TROUBLESHOOTING

WARNING!
Refer to Safety chapters.
13.1 What to do if...
In any cases not included in this table please contact with an Authorised Service Centre.
| The appliance does not turn on or does not heat up |
| Problem Check if... |
| You cannot activate or operate the appliance. The appliance is correctly connected to an electrical supply. |
| The appliance does not heat up. The automatic switch-off is deactivated. |
| The appliance does not heat up. The appliance door is closed. |
| The appliance does not heat up. The fuse is not blown. |
| The appliance does not heat up. The Lock is off. |
| Components |
| Problem Check if... |
| The lamp is turned off. Moist Fan Baking - is turned on. |
| The lamp does not work. The lamp is burnt out. |
| The Food sensor does not operate. The plug of the Food sensor is fully inserted into the socket. |
| Error codes |
| The display shows... Check if... |
| Err C2 You removed the Food sensor plug from the socket. |
| Err C3 The appliance door is closed or the door lock is not broken. |
| Err F102 The appliance door is closed. |
| Err F102 The door lock is not broken. |
| 00:00 There was a power cut. Set the time of day. |
| If the display shows an error code that is not in this table turn the house fuse off and on to restart the appliance. If the error code recurs contact an Authorised Service Centre. |
| Cleaning |
| Problem Check if... |
| The water leaks out of the cavity embossment. There is too much water in the cavity embossment. |
13.2 Service data
If you cannot find a solution to the problem yourself, contact your dealer or an Authorised Service Centre.
The necessary data for the service centre is on the rating plate. The rating plate is on the front frame of the appliance cavity. Do not remove the rating plate from the appliance cavity.
We recommend that you write the data here:
Model (MOD.)
Product number (PNC)
Serial number (S.N.)
14. ENERGY EFFICIENCY
14.1 Product Information and Product Information Sheet
| Supplier's name Electrolux | |
| Model identification | EOD4P57H 949499868 KODDP77H 949499871 |
| Energy Efficiency Index 81.2 | |
| Energy efficiency class A+ | |
| Energy consumption with a standard load, conventional mode 0.93 kWh/cycle | |
| Energy consumption with a standard load, fan-forced mode 0.69 kWh/cycle | |
| Number of cavities 1 | |
| Heat source Electricity | |
| Volume 72 I | |
| Type of oven Built-In Oven | |
| Mass | EOD4P57H 32.1 kg |
| KODDP77H 32.5 kg | |
IEC/EN 60350-1 - Household electric cooking appliances - Part 1: Ranges, ovens, steam ovens and grills - Methods for measuring performance.
14.2 Energy saving

The appliance has features which help you save energy during everyday cooking.
Make sure that the appliance door is closed when the appliance operates. Do not open the appliance door too often during cooking. Keep the door gasket clean and make sure it is well fixed in its position.
Use metal cookware to improve energy saving.
When possible, do not preheat the appliance before cooking.
Keep breaks between baking as short as possible when you prepare a few dishes at one time.
Cooking with fan
When possible, use the cooking functions with fan to save energy.
Residual heat
The fan and lamp continue to operate. When you turn off the appliance, the display shows the residual heat. You can use that heat to keep the food warm.
When the cooking duration is longer than 30 min, reduce the appliance temperature to
minimum 3 - 10 min before the end of cooking. The residual heat inside the appliance will continue to cook.
Use the residual heat to warm up other dishes.
Keep food warm
Choose the lowest possible temperature setting to use residual heat and keep a meal warm. The residual heat indicator or temperature appears on the display.
Cooking with the lamp off
Turn off the lamp during cooking. Turn it on only when you need it.
Moist Fan Baking
Function designed to save energy during cooking.
When you use this function the lamp automatically turns off after 30 sec. You may turn on the lamp again but this action will reduce the expected energy savings.
15. MENU STRUCTURE
15.1 Menu
| Step 1 Step 2 Step 3 Step 4 Step 5 | ||||
| - select to enter the Menu. | Select the option from Menu structure and press OK | Select the setting. | OK - press to confirm setting. | Adjust the value and press OK |
Turn the knob for the heating functions to the off position to exit the Menu.
| Menu structure | ||
| Assisted Cooking | Cleaning | Settings |
| Settings | |
| 01 Time of day Change 02 Display brightness 1 - 5 | |
| 03 Key tones 1 - Beep | 04 Buzzer volume 1 - 4 |
| 2 - Click | |
| 3 - Sound off | |
| 05 Food Sensor Action 1 - Alarm and stop | 06 Uptimer On / Off |
| 2 - Alarm | |
| 07 Light On / Off 08 Fast Heat Up On / Off | ||
| 09 Cleaning Reminder On / Off 10 Demo mode Activation code: | ||
| 2468 | ||
| 11 Software version | Check | 12 Reset all settings Yes / No |
16. ENVIRONMENTAL CONCERNS
Recycle materials with the symbol Put the packaging in relevant containers to recycle it. Help protect the environment and human health by recycling waste of electrical and electronic appliances. Do not dispose of
appliances marked with the symbol with the household waste. Return the product to your local recycling facility or contact your municipal office.
Available on the App Store

GETION Google Play
How to install your AEG/Electrolux Oven - Column installation


3.2 Seadme kinnitamine köogimöblisse
4. TOOTE KIRJELDUS
4.1 Üldine ülevaade

4.2 Lisatarvikud
Traatrest
How to install your AEG/Electrolux Oven - Column installation


How to install your AEG/Electrolux
Oven - Column installation


Available on the App Store

GETION Google Play
How to install your AEG/Electrolux Oven - Column installation


Available on the App Store

GETION Google Play
Galimi pakeitimai.
TURINYS
1.SAUGOSINFORMACIJA. 282
2.SAUGOS INSTRUKCIJOS 284
3.IRENGIMAS 287
4.GAMINIOAPRAŠYMAs. 289
5. VALDYMOSKYDELIS 289
6.PRIES NAUDODAMI PIRMA KARTA 290
7. KASDIENIS NAUDOJIMAS 291
8. LAIKRODZIO FUNKCIJOS 296
9.PRIEDU NAUDOJIMAS 298
10.PAPILDOMOS FUNKCIJOS 300
11.PATARIMAI 301
12. VALYMAS IR PrieziURA 304
13. TRIKCIU SALINIMAS 309
14. ENERGIOS EFEKTYVUMAS 310
15.MENIU STRUKTURA 311
16. APLINKOS APSAUGA 312
1. SAUGOS INFORMACIJA
How to install your AEG/Electrolux Oven - Column installation


How to install your AEG/Electrolux Oven - Column installation


3.2ПрицВрсТуВаБеHa NeчКаТа 3a Плakap

4.ОПИС HA ПОН3ВОДOT
4.1 Onwt npereid

4.2Додатоцn
- Peueta
3a caIOBn 3a roTbeHe, nIeXOBn 3a KOlaUH, neYeHa.
- Плес за посенье
3a konayn 6nckBNTn.
Taba 3a ckapa/neuehe meco
3a neehe decepTn meco nI Kako npex 3a co6npaHe Ha MaCHOTnTe.
1 KOnTpOHa Ta6Na
2 Konue 3a cyHKnnte Ha rpeehe
3 EkpaH
4 KOnTpOJHo konye
5 Enemert 3a rpeehe
6 LTekep 3a ceH3opoT 3a xpaHa
7 CBeTnIka
8 Benthjatop
9BTncHyBaBe BO wynnHaTa
10 Notnpa 3a noiuc, Mo6nHa
11 P03nHn Hn
- Cēn3op 3a xpaHa
3a mepehe KOKy e 3rotBeHa xpaHaTa.
TeJeCKONCKUHNIKN
Co TeNeckONCKNTe UHHN MOKeTe NOnECHO Da rN CTaBaTe N BaDnTe peWetKNTe.
5. KOHTPOJIHA TABJIA
5.1 Tpkalza konsto ce NOBnekyBaat
3a da ro KopnCTnte anapaTOT, npNTncHeTe ro Tpkaieto. KoHTpOInHTo konue n3neryBa NaDBop.
5.2 Перлед на koHTpoJHaTа6la
Yekop 1 Yekop 2 Yekop 3 Yekop 4

HanoHete ja n3rpabnpaHaTbHATpeHHOCT CO BOda oD YeMa.

Yekop 1 Yekop 2 Yekop 3
IcTypeTe:250 ml 6en ouet BO n3rpaBnpaHata BHaTpeuHocT. KopncTeTe 6% Bnckn ouet 6e3 aINTNB.
OCTaBeTe BnHckNt OcET Da ro pactBOp npeoctHaTnOT 6uRop Ha co6Ha TEMpepaTpya 30 MmHyTu.
IcHCTeTe ja BHaTpeuHocTa co TOnna BOda n MEka Kpna.
3aФункцида:SteamBakeчисе japephathaHacekon5-10цИклуснHa roTbeHe.
12.3 Kaoko da oTcTaHeTe:Држачи Ha peWeTkn
I3BaTe Tn DpKaUte 3a peWetKn 3a da ja IcNCTnte neYkata.
Yekop 1 NcknyeTe ja neykaTn noyekajTe doKeKa He ce OlaNi.
Yekop 2 Nobneye ro npedHnoT den od npkaHTe HactpaHa oD ctpaHnHnoT sI.

YeKOp 3 NObJeHcTe ro 3aHnOr DeI Od DpKaHTe Ha peWetKeTHe HAcTpHa Od CTpaHnHnOT sN d N 3BaJeTe ja.
Yekop 4 CTabete ng noJnncnte no o6paTeH peoocne. Irnte 3a notnpahe Ha TeJeckoncknte uHH Mopa da 6uadT Hacouehn KOH npedhata ctpaHa.

12.4 Haun Ha KopncTeHe: YncteBe co npOJn3a
Ynctete ja pephata co Ynctebe co npopn3a.

PENEyPENEYBAHbE!
PocToI np3nk oD, n3ropeHnU.

BHIMAHNE!
Ako nma dpyrna anapatn MOHTnpaH NBO nCTNOT pIakap, HEmoJTe da rN KOpNCNTe nCTOBpeMeHO CO OBaa 0yHKcunja. Toa MoKe da ja OWTeTu NeKkata.
| Пред чисе co пиролиза: | ||
| Искneyе差别 поочкату почекajтдд се олд. | Искneyе差别 поочкату почекajтдд се олд. | |
| Чисе差别 поочи: Чисе差别 no/ Чисе差别 no | Столото на ватешина в ratа co Тонla вда, мека крпа и баг детергent. | |
| Чисе差别 no | ||
| Чесор 1 | Влесене ватеши: / | |
| Опциja Вremetrрейche | ||
| C1 - Лесно чисе差别 1 h | ||
| C2 - Нормално чисе差别 1 h 30 min | ||
| C3 - Temелно чисе差别 2 h 30 min | ||
| Чесор 2 | OK - поочише差别 за ja узбереше поогамата за чисе. OK - поочише差别 за залоче чисе. OK - поочише差别 за залоче чисе. OK - поочише差别 за залоче чисе. OK - поочише差别 за залоче чисе. OK - поочише差别 за залоче чисе. OK - поочише差别 за залоче чисе. OK - поочише差别 за залоче чисе OK - поочише差别 за залоче чисе. OK - поочише差别 за залоче чисе. OK - поочише差别方圆. OK - поочише差别方圆. OK - поочише差别方圆. OK - поочише差别方圆. OK - поочише差别方圆. OK - поочише差别方圆. OK - поочише差别方圆. OK - поочише差别方圆. OK - поочише差别方圆. OK - поочише差别方圆. OK - поочише差别方圆. OK - поочише差别方圆 OK - поочише差别方圆 OK - поочише差别方圆 OK - поочише差别方圆 OK - поочише差别方圆 OK - поочише差别方圆 OK - поочише差别方圆 OK - поочише差别方圆 OK - поочише差别方圆 OK - поочише差别方圆 OK - поочише差别方圆 OK - поочише差别方圆 КORA ke залоче чисе差别, в ratа差别 за чисе. КORA ke залоче чисе差别, в ratа差别方圆. КORA ke залоче чисе差别, в ratа差别方圆. КORA ke залоче чисе差别, в ratа差别方圆. КORA ke залоче чисе差别, в ratа差别方圆. КORA ke залоче чисе差别, в ratа差别方圆. КORA ke залоче чисе差别, в ratа差别方圆. КORA ke залоче ч竺差别. КORA ke залоче ч竺差别. КORA ke залоче ч竺差别. КORA ke залоче ч竺差别. КORA ke залоче ч竺差别. КORA ke залоче ч竺差别. КORA ke залоче ч竺差别. КORA ke залоче ч竺差别. КORA ke залоче ч竺差别. КORA ke залоче ч竺差别 КORA ke залоче ч竺差别 КORA ke залоче ч竺差别 КORA ke залоче ч竺差别 КORA ke залоче ч竺差别 КORA ke залоче ч竺差别 КORA ke залоче ч竺差别 КORA ke залоче ч竺差别 КORA ke залоче ч竺差别 КORA ke залоче ч竺差别 KORA ke залоче ч竺差别 КORA ke залоче ч竺差别 КORA ke залоче ч竺差别 КORA ke залоче ч竺差别 КORA ke залоче ч竺差别 КORA ke залоче ч竺差别 КORA ke залоче ч竺差别 КORA ke залоче ч竺差别 КORA ke залоче ч竺差别 КIDA差别 no КIDA差别 no | OK - поочише差别 за чисе. OK - поочише差别 за залоче чисе. OK - поочише差别 за ралоче. OK - поочише差别 за ралоче. OK - поочише差别方圆. OK - поочише差别方圆 OK - поочише差别方圆 OK - поочише差别方圆 OK - поочише差别方圆 OK - поочише差别方圆 OK - поочише差别方圆 OK - поочише差别方圆 OK - поочише差别方圆 OK - поочише差别方圆 OK - поочише差别方圆 |
12.5 NotceTHNK 3a YnCteHbe
Pephata Be notceTyBa kora da ja nchntte co chtebe co npoJn3a.

TpeKHa ha ekpaHOT 5 cekynn no cekoe roTbeHe.
3a da ro ncknyuHTe NOTcETHnKOT BHeCte MeHn I36epet HaroDyBaHa, NOTcETHnK 3a YnCTeHbe.
12.6 Kako da n3BaIte n da MOHTnPate: Bpata
BpaTata Ha pepHata nMa Tprn CtaKneHn PNOU. MoXeTe Da ja OTCTpaHnte BpaTata Ha pepHata N BHaTpeuHNTe CtaKneHn PNOU 3a Da rN NCuHcTnTe. IpoUHTajTe ro CEJIOCHOT OynatCTBO „BaDeHe m MOHTnpaHBe BpTa" npE dA rN N3BaAnTe CtaKneHn PNOU.

BHIMAHNE!
HekopucteTe ja neykaTa 6e3 cTakneHnTe nloyn.
Yekop 1 OToBopeTe ja BpaTataeIoocHo n DpXKeTe rN DBeTe wapKn.

YeKOp 2 POnuHHeTe rN n NobJeUeTe rN paKaTe DoKeKa He KNIKNHaT.

Yekop 3 3aTbOpete ja BpaTata Ha pepHata do npBaTATA no3nuiJa. Iotoa KpeHete n NOBneHeTe 3a da ja n3BaDnte BpaTata od JekuTteTO.
Yekop 4 IonoKete ja Bpata Ta Bp3 Meka Kpna Ha cta6nHa NOBpuHa.

Yekop 5Држete ja obnorata ha BpataTa (B)Ha rohpnoT pa6 Ha BpaTata Ha DBeTe cTpaHn TypHeTe HABHaTpe 3a da ce OTnyuTn 3aNTNBkata.
Yekop 6 NobJeTe ja oBnOrata Ha BpaTaHa nppei n3BaTe ja.

Yekop 7 DpkeTe r CTaKHeHrTe nNouHa H BpaTaTa 3a HBHNOT ropeH pa6 u BHmATEnHO NOBneYeTe m eHa no eHa. 3anoHrTe oD rohpata nOya.OcInypeTe ce deKa cTakItoeNoCHO ce n3n3HaNo od dpXkaHTe.

YeKOp 8 He yIcTeTe rN CTakHeHnTe pOu n Co B0da n cany. BHMaTeIHO n36pUWeTe rN CTakHeHnTe pOu.
YeKOp 9 No YnCTeHbeto, MoHTnpajTe r CTaKnHeHaTn nIOuN bPaTaTa Ha pepHaTa.
Ako Bpata TepaBnHO MoHTnpaHa,Ke CnyuHHeTc KnK Kora rN 3aTbopaTe paKaTe.
IorpnkeTe ce da rN BpaTneCTaKneHnTE nnou(A n B)Ha3ad no Toueh peoocne. PpOBepeTo cM60not / neyatoT ha cTpaHata Ha cTaKneHaTa nnoya,cekoja CTakNeHa nNoa u3rneeJa pa3nUHO 3a da MOxKe IecHO da CE MOHTnpa N DEMOHTnpa. Kora ke ce moHTnpa npabunHo nopabot Ha BpaTata KNIKKHyBa.
Iorpnkete ce npabnno da ja noctabte cpeHaTa ctaKneHa nOoA BO JekuTeto.


Kora e moxho, He nped3arpeBajTe ro anapaTOT nped rotBeHe.
IpaBte KOJIky IJTO e MOXHO NOMaJI Nay3n MEy rotBeHbETo KORA npaBnTe NOBeKe jaDeBa nCTOBpeMeHo.
TOrBeHe co BeHTnlaTop
Kora e moxho, KopncTeTe rN cyHKunTe 3a roTBeHe CO BeHTnlaTop 3a Da 3aWTeDnte eHepnja.
PpeocTaHaTToNnHa
BeHTnlaTopoT n CBeTnIkata npOdoJkyBaat co pa6ota. Kora ke ro ncknyuHte anapatot, ekpaHot ja nokakyBa npeocTaHaTaTa TOJIInHa. MoKeTe da ja ynoTppe6nte TOJIInHaTa 3a da ja oDpKHe xpaHaTa TOnna.
Kora Tpaehbeto Ha rotBeHbeto e nooJiro od 30 MnHyTn, HamaJeTe ja TempepaTypaHa ha anapatOT 3a MmHmym 3-10 MNHyTn nped Kpajot OD rotBeHbeto. IpeocTaHaTaTa TOnnHa BO anapaTOT Ke npoDoJxN da RotBn.
KopncTeTe ja npeocTaHaTata TOnnHa 3a 3arpeBaBe XpaHa.
OdpKyBaHe Ha TOnnHa Kaj XpaHaTa
Ondepete ja Hajnckata noctabka 3a TemnepaTypa 3a da ja nCKopncnte npoeocHaTATOnnHa N da ro Odpxnte
jaTeHbeto TOnNo. Noka3aTeJOT 3a IpeocTaHaTa TOnnHa Hn TempepaTypa ce NojabyBa Ha ekpaHot.
TOTBeHe co NCKnyeHa CBETNJa
NcknyeTe ja CBeTnIkaTa 3a BpeMe Ha rotBeHbeto. BknyeTe ja kora ke imate notpe6a.
NeuTe co BJaKeH Bo3dyx
Функциа 3a StTeDeHBe Ha eNeKtpnHa eHeprJna 3a BpeMe Ha rotBeHbeto.
Kora ja kopncntte obaa cyHKunja, naMnata aBTOMATCKI ce ncknyuBa no 30 cek.
Moxete da ja BknyuTe CBetnIkaTa NOBTOPO HO OBaa aKunja Ke rH HamaN OyeKyBaHnte uTeDeHa Ha eHeprna.
15. CTPYKTYPEA HA MEHN
15.1 Mehn
| Чекор 1 Cherkop 2 Cherkop 3 Cherkop 4 Cherkop 5 | ||||
| -在其3берете за весе范围内. | Одberете ща орцијато od Мениструktураты и питисhevе OK | 在其3берете ща поставке. | OK -在其3берете за весе范围内. | Проблagedе ща весе范围内. |
3aBpTeTe ro konyeTo 3a cyHKunnte Ha rpeeHe ha noJox6Ta ncknyeHo 3a da n3ne3eTe od MeH.
| Мениструктура | ||
| ГOTBEHE co nomош | ЧИSTЕМ | Нагodyваьа |
| Haramduvaьа | ||
| 01 Врeme BO Dehot Помени 02 Oсветлиесгпа | ekpanot | 1 - 5 |
| 03 TohOBи на кОПчиьа 1 - СВиреbe | 04 Лачина на 3Вуунот сигнал | 1 - 4 |
| 2 - Кли 3 - 3ВуКOT e Исклuchуен | ||
| 05 Сензор захая Актуност | 1 - Альм и краj 2 - Альм | 06 Врeme на павOTе БКлuchуени / Исклuchуени |
| 07 Сvetло Вkluchени / | Исклuchени | 08 Бразо загреве Вkluchени / Исклuchени |
| 09 ПOTсETнIK 3a чИстени Вkluchени / | 10 Демо-реким Шфра за | akтунибve: 2468 |
| 11 Вершиja на софtrightсп范围内 Роверка 12 Ресеня рогине | нагodyваьа | Да / He |
16.ΓP涅KA 3A OKOJIINHATA
How to install your AEG/Electrolux Oven - Column installation


Available on the App Store

GETION Google Play
Ne rezervam dreptul asupra efectuãrii de modificãr.
CUPRINS
- INFORMATII PRIVIND SIGURANTA 378
- INSTRUCTION DE SIGURANTA 380
- INSTALAREA 384
4.DESCRIEREAPRODUSULUI 385
5.PANOUL DE COMANDA 386 - INAINTE DE PRIMA UTILIZARE 387
- UTILIZAREA ZILNICA 387
- FUNCTIILE CEASULUI 393
- UTILIZAREA ACCESORIILOR 394
- FUNCII SUPLIMENTARE 396
11.INFORMATIISIFATURI 397
12.INGRIJREA SICURATAREA 400 - DEPANARE 405
- EFICIENTÄ ENERGETICA 406
- STRUCTURA MENIULUI 407
- INFORMATII PRIVIND MEDIUL 408
1. INFORMA TII PRIVIND SIGURAN T A
How to install your AEG/Electrolux Oven - Column installation


3.2 Fixarea aparatului de mobilier

4. DESCRIEREA PRODUSULUI

Pasul 1 Pasul 2 Pasul 3 Pasul 4


Pasul 1 Pasul 2 Pasul 3
Pasul 1 Pasul 2 Pasul 3
Pasul 1 Pasul 2 Pasul 3 Pasul 4 Pasul 5
Available on the App Store

GETITON Google Play
IpaBOHaN3MeHeHncoXpaHAreTcR.
COДЕРЖAHNE
1.CBEDEHNAIOTEXHNIKEBE3ONACHOCTN 409
2. YKA3AHNЯ NO BE3ONACHOCTN 412
3.YCTAHOBKA 415
4. ONICAHNE INPUBOPA 417
5. PAHEJIb UYPABJIEHnIa 418
6. INPEED INEPBbIM INCNOJIb3OBAHnEM 419
7. EXEKHEBHOE INCIOJIb3OBAHNE 419
8.ФУHKUIN YACOB 425
9. INCINOLB3OBAHNE DOONHHTENbHbIX PUNHADNEKHOCTEY..... 427
10.ДОПОЛНТЕЛБHBIEФУHKUIN 429
11. NOJ3HbIE COBETbl 430
12. YXOD I OUNCTKA 433
13. NOUCK N YCTPAHEHNE HENCPABHOCTEY 439
14.3HEPETNUECKA 3ΦΦEKTBHOCTb. 440
15.CTPYKTPA MEHIO 441
16. OXPAHA OKPYKAIOUeI CPeIbI 442
1. CBEdENI NO TEXHnke B3OpACHOCTN
Ipeed yctaHOBkoN n 3KcPlyataunei np6opab HnMaTeJbHo O3HaKOMbTEcB C hactoJeHnCTpyKUeN NO 3KcPlyatau. I3rOToBntJIb He HecET OTBeTCTBENHOCTb 3a KaKHe-JIbO TpaBMbl IIN yUep6, BO3HnKUne BCJeDCTBnE HenpaBnIbHOJ yCTaHOBKn IIN 3KcPlyatau. Bcerda XpaHInTe 3Tu IHcTpyKUIO IOd pyKO B HaJeXHOM MeCte dJa PocJeDuOSeRo NcNoJb3OBaHnJ.
1.1 Be3oNaChOcTb DeTei N JnC OrgaHnueHHbIMN BO3MOxHOCTaMn
3TOT npi60p MOKeT nCNOJb3OBaTbcra DeTbMn cTapSe BOCbMn IeT n JIuCaMn C OrpaHnueHHbIMn 0n3nueckmN, CEHCOPHbIMn IJIY UmCTBeHHbIMn CnOcO6HOCTaMn N C HeIOCTaTOUHbIM ONbITOM IJIY 3HaHHaMMN TOJbKO pRy UcNoBn HaxoXJeHnRA NOI PrncmOTpOM IINca, OTBeuaIOUeRo 3a INx 6e3OpacHOCTb, IINI PocJIe NOnyueHna COOTBETCTByIOUx INHCTpyKcN, PO3BOJIAOUX IM 6e3OpACHO 3KcPlyaTnpOBaTB n3DeJIne IN DaIOUx IM PpeDCTaBLeHne OB OnaChOCTn, CBa3aHHoN C erO 3KcPlyaTaUcn. JeTAM MnaDiwe 8 Iet n JInzam C yapko BbIPaJKeHHbIMn IN KOMPiEKCbIMn HApUSeHnA M N 3dOpOBbY 3aPpeUaTeCn HaxoINTbcra Pardom C npi6opom 6e3 IOCTOAHHO rPncMOToPa.
- Дети должнынховпся под писмотром дя недonyшени有很大 с риборom.
XpaHnTe Bce ynaKOBOuHbI MaTePnAJIbI BHe DoCraEMoCTn DeTei n yTnIn3npyTe Ix NaJeKaUm O6pa3OM.
BHIMAHNE! Pn6op n erO OTKpbIbIe 3JIeMeHbI CINbHO HArpeBaIoTcB O BpEmaKcPnIyatauIn. He noDnyckaIte DeTei N DomaunHX XnBOTbIX K np6Opy Bo BpEmaERO NCNoJb3OBaHnA, a TAKKe KOrda Pn6Op eSe He ycpeI OCTbITb.
- Ecni npnbop ochaueh yctpoiCTBOM 3aunTbI deTei, erocneDuET BKJIIOuHTb.
OuNTka n DoCTyHoe NOIb3OBaTeJIIO TexHnueckoe 6cnyKBAHne np6opa He dOJIxHbI BblIOJHrTbcr DeTbMn 6e3 npncMOtpa.
Tnbl Ka6eJeN, npiroDhbI e IJIyCTaHOBKn nn 3ameHbIB Ebpone:
H07 RN-F, H05 RN-F, H05 RRF, H05 VV-F, H05 V2V2-F (T90), H05 BB-F
Pn BbIbope ceeyHna Ka6eJn nCnoJb3ynte 3HaueHne noHNO MoUHocTN (cm. Ta6JIuKy c TexHnueckmN daHHbIM).TakKe moXHo 6paTntbcra K Ta6nue:
06uaMoHoctb (Bt)
Ceyehne ka6eJia (MM2)
MaKcMym 1380 3x0.75
MaKcMym 2300 3x1
MaKcMym 3680 3x1.5
How to install your AEG/Electrolux
Oven - Column installation


3.2 KpenIeHne dYxOBOrO uKaΦa K KyxOHHO Me6eJIi

4.ОПИСАНЕ ПИБОРА
4.1 O6nn o63op

4.2 Akceccyapbl
PeweTka IyncnoIb3OBAHnC nocydo, fOpMaMn Iy BblneuKn, a TaKxpe npn npuroTOBHeHn XapkoRo.
-3MaJIHPOBaHHbI npOTnBeHb IЯ npiroTOBJeHna KOHNTePCKNX ⅢdennI neeHbJ.
- Tny6okn 3MaJInpoBaHHbI nPoTnBeHb Dnra rPnla
1 PanaHb ynpabHeHnA
2 PyuKa BbIbopa peKIMoB HArpeBa
3 DnCnNei
4 Puyka ynpaBneHnA
5 HarpeBaTeBbHbI 3JeMeHT
6 He3doIJaNoDKNIOUeHnTePmoUyna
7 lamna ocbeueHHa
8 BeHTnJIrTOp
9 BbIeMka kamepbbl
10 CbemHaonopa npOTNBH
11 NpOJKeHn npOTnBn
HnkaTopbI, oTo6paXaembIe Ha nucnlee

War 1 War 2 War 3 War 4
HaonHnTe BbiEMKy KamepbI BOOnpoBOHOB BOOn.

BbIbepepeHm HaraeBa c npom.

YCTaHOBtE TemnepaTpy.
Ipeed Naayalom npirotoTOBJIeHn nporpeiTe NyctoDyXOBoi KkaB TeueHne npimepHO 10 MInHyT dJa co3a-HNBAJXHOCTN.
IocTaBbTe NmUy B DzyXoBOi KkaΦ.

MaKcImaIbHna EMKocTb BbIeMkn IJn KaMepbI DyxOBO rkaΦa coCTabNaeT 250 Mn. He HanoJIrTe BbiEMky KaMepbI DyxOBO rkaΦa BO BpeM npiroTOBHeHn nn KOrda np6op ropAun.
IIO OKOHaHHn npHroTOBneHna napy:
War 1 War 2 War 3
3aainTe Bpem npnroTOBNEHn.

Haxmnte

Cpa3y HauHETc8 o6paTHbI OTcHT BpeMeH.
Cnoc06 hactpoyn: OToPouka nyska
War 1 War 2

Bb6epnte peKIM Ha- rpeBa.

HeckoJIbKO pa3 HaXMITE:

Ha nuc- paxaetc: Bpem cyTOK CTAPT
War 3 War 4
3aatae Bpemnyka.

HaMMTe OK.
Ha nucnnee oTo6pa3nt- C: --

War 5 War 6

3aainTe Bpem OKOHuaHn.

Haxmte OK.

Taimep naHnaet 6paThbI OTCHT 3aDaHHoro BpeMeHn nycka.
9.ИСПОЛьЗOBAHNEДОПОЛНITEЛБHBIX ПИНадлEXЖHOCTeI

BHIMAHNE!
CM. rnaBbl, copejkaune CbeHnno texhne 6e3onacHOCTn.
9.1 YctaHOBka npHaJneXHocTei
He6oIbwoB bIcTyn HaBepxy noBbiwaet 6e3oNaChocTb. BbICTynbI TaKke cnYXaT
3auntoi OT onpokndbHaHn. Blicokn oboDK no nepimetpy peweTkn cnyknt dna npedotBpaueHn cockaJIb3bBaHn nocydIc peweTkn.
PeweTka:
BCTaBbTe peWetky MeKdy HappaIouuMn y6eDINBwncb, yTO ONOpbl CMOTpT BHN3.

3MaJInpoBaHHbI pOToHB/ IpOToHBdJaXapKn:
BCTaBBTe npOTnBeH MeKdy HAnpaBJIIOUIMN PnaHKAMn DyXOBORO WkaΦa.

9.2 Tepmoцун
Tepmoyn - n3mepaTe mnpaTy BHyTpni npdykTa.
Heo6xoJIMO yctaHOBtB Dba 3HaueHn TaepaTpybI:

Temnepatypa duyxoboro ukafoa.

Temnepatypa BHytpn npOdykTa.
HrpeHnENTbI DOnKhbI NMeTb KOMHaTHyIO TEMepaTyP.
He nCnoB3yIe npn npnroTOBneHN KNDKx 6JIou.
Bo Bpem npiroTOBnHn DOJKeH octaBaTbCn npOdyKe.
Приименени:Термоцун
Uar1BkJIOHTeDyXOBOu KaΦ.
War 2 3aaiTe peXIM HarpeBa n npn Heo6xOuMoCTn TempePaTy pyduXOBOrO ukaFa.
War 3 BCTaBbTe: Tepmouyn.
MraCo, nTnua npb6a 3aneKaHKn
BCTaBBTe HakoHeuHnK TepMoUyn BcHTp KycKa mca nn pbl6bl, NO BO3MOxHooCTN BbIbpaB camyTOJCTyIO eO yAcTb. Y6eINTecb, cTO KaK MmHmym 3/4 TepMoUyn HaxoDNTcBHyTpN 6JIoJa.
Bctabte HakoheunK Tepmoyn ToHb CEHTpe 3ane KaHN. Tepmoyn He doJKeH MeHrT CBOero NOIOKeHN B 6nOe BO Bpem 3aneKaHN. Iner 3TOrO 3aΦNKcnpyTe erO npn NOMoU Ondoro n3 60Jee TBepdbx INHrpEINHeH TOB. BocnoIb3yITCb Kpaem nocdy drr 3aneKaHN DnA fNkcaun cnNIkoHOBo pyuKn Tepmoyn. HakoheunK Tepmoyn He doJKeH kacatbcra DNUsa nocdy dlra 3aNeKaHN.


War 4 BCTaBbTe TepmoUyn B rHe3do, paCnoJoxKeHHOe cnepeDn dYxOBOrO uKaΦa.
Ha dncnlee oTo6pa3ntcTekyua TEmnepaTypa: TepMoUyn.
War 5

IyctaHOBkTeMnepaTybBHyTp npOdyKaHaKMnTe.
War 6

Korda npodykt doctnHET 3aHaHHoTemnpaTypb,6ydt BbIaH cnHan. Iocne 3TOrO Bbl cMOKeTe 3aBepuNTb npiroToBJeHne nn npoDoJXHTb erO,doBeJa npodykTb Do nonHo npoXapEHHOCTn/nponeKaHna.
War 7 BbHbTe TepmoUyn UHyp n3 rHe3a n IOCTaHbTe 6nIO n3 dYxOBoro kkafo.

BHIMAHHE!
CyuectByeT onaCHOCTb noIyueHnOxOROB, KOrDa TepMoUyn CTaHOBNTcRToprUm. BybTe OCTOpOxHbI npn n3BneueHn uTeKepa n3 rHe3da n HakoHeuHnka n3 npOdykTa.
10.ДОПОЛНТЕЛБHBIEФУHKЦИ
10.1Блokир.KHONOK
3TaФункипpeDoTbpaaetCnyaHoeI3MeHeHnepeKMa np6opa.
Ee moxho BkIountb BO bpema pa60tbnp6opa.3To He nobnraet Ha Bbipahnbpexm n Bpema npiroTOBHe,HO no3BOJNT 3a5IOKINPOBaT naHeJIynpabNeHn.
Функцю можно Bклioчntь n TOrda, kOrda cAm npi6op BbKlIOueH. 3To He npiBedeT K BkIIOueHIO npi6opa, Ho NaHeNb ynpaBNeHn 6ydt 3a6IokIpObaHa.


OK—HaXMMTe uYdepxKuBaIte, yTo6bI BKNIOHTb OyHKUHO.
Pa3dacTc8ByKOBoCnHaJ.
OK—HaxMnTe n ydepxkBaIte, TTO6bI BbIKIOuHTb FyHKUIO.

3x
Mnraet, KOrda BkJIOHcHa 6JIOKInpObKa.
10.2 ABToMaTnueCKeBbIKJIoueHne
B ueJx 6e3oNaChocn npi6op BblIouaetcYpe3 onpeJeHHe BpemB clyuae,ecn KaKo-JIbO peKIM HaPeBa npoJXkaET BblIOJIHTbcA,a N3MeHeHn KaKnx-JIbO HAcTpoE KNoIb3OBaTeIeM He npOn3BOdntc.

(°C) (4)

30-115 12.5
120-1958.5
200-2455.5

(°C) (4)
250-Makcymm3

ABTOMaTnueckoe BbIKIooHne He pa6oTaet Co cNeDyUOuMMn OcBeUeHne, TepmoUyn, OToCpOuaKnycka.
10.3 BeHTnIaTOp oxJaXdEHHa
Bo Bpempa6oTbI np6opa BeHTnJrTop aBTOMaTnueckn BKIOUcAeTc, yTO6bl OxnaXdaTb NOBepXHOCTn np6opa. Ppi BBIKIOUeHnn np6opa BeHTnJrTop npOdoJIkaeT pa6oTaTb Do Tex nop, noka np6op He OCTbIHet.
11. NOJE3HbIE COBETbl
11.1 Pekomehdaun no npiroTOBneHIO

PnBBeHbIe B Ta6JIuax 3HaueHnra TeMnepaTybI IN BpeMeHn npiroTOBJIeHn RAJIaOTcOpNEHTPOBOUHbIMN OHn 3aBNCrT OT peuNTa, a TAKKe OT KaueCTBa N KOJIueCTBa NCNOJb3yEmbIX INHRpeDInEHTOB.
Baw np6op moKet OTnuaTbca xapaKTePOM npiroToBneHn BbineKn uXapKOro ot npdebluyero. B pekomEnDaunx Hnke npuBoaTcpeKomeHdyemble HacTpOKn TeMnpaTypbl, BpeMeH npiroTOBneHn nnoKeHn npotNBHe IJr onpeJeHbIX BINOB npOyKTOB.
Ecnn haTn ycTaHOBKn dJa KOHKpeTHoro peeenta He ydaetc, nonuTe noxoxn peeert.
11.2Влжная ковсия
Дяdoctижehн ONTIMaJIbHbIXpe3yJIbTaTOB BOCNoJIb3yIITecb peKOMeHdaZnAMyN, npNBedeHHbIMN B Ta6JInue HNXe.
11.4 Ta6nucbl npiroTOBneHna Ira TectnpyuOx OpraHn3aun.
OuHsauTe BbIeMky OT N3BeCTKOBOrO HaNeta, octaUeROcNocJI nprirotOBHeHnC INcNoB3OBAHnEM napa.
War 1 War 2 War 3
| HaneiTe 250 ml 6enoro ykcycaВ | OctabTe ykcyc ha 30 MmHyT npn | OuHCTnTe BHyTpeneHHIO KaMepy |
| BbIeMKy BHyTpehHei KamepbI. Ic- | KOMHaTHoI TempepaType, N03BOJINB | MЯrkO TprAnKO, CMOyeHHO B TeP- NoI BOJe. |
| IPOJIb3yIte Ykcyc KOHcETpauCIn He | emy pAcTBOpNTb N3BeCTKOBbl Ha- | |
| BbIe 6% i 6e3 KaKnx-ln6o do6a- BOK. |
IyHKn: 3aneKaHne c napom BbIMoTe dYxOBoi kKaKdIe 5-10 uKnIOB nprirotOBHeHn.
12.3 ChyTne: HappaBlaIoUe dIa npotNBHei
Ipeed 3aMeHoJ lambl:
War 1 War 2 War 3
War 4 YcTaHOBnTe CTeKJIaHHHyo KpbIiKy.
13. ПОИСК И UYSTРАЕНЕ HENСПAPВHOCTЕN

BHIMAHHE!
Cm. rnaBbl, coepkaune CbeHnno texnke 6e30nacHOCTn.
13.1 YTo deJaTb, ecn...
B cnyuayx, He yka3aHHbIX B daHHoT Ta6nue, o6paaTeCb B aBTOpN3OBaHHbI CepBnchblu eHTp.
Pn6op He BkIouaetcNn Hn He HarpeBaetc
PpO6JIeMa Y6eIuTeCb, yTO...
Pn6op He Bknoaetc Hn He pa6oTaet. Pn6op noKJIOueH K cTeN 3eKTPoNTaHn HaIneKaUIM o6pa30M.
Pn6op He BbINOJIHReT HarpeB. BbIKIOUeHO aBtOMaTIueCKoe OTKIOUeHne.
Pn6op He BbInoHnReT HarpeB. DBepa np6opa 3aKpbTa.
Pn6op He BbINOJIHReT HarpeB. Cpa6oTan npedoxpAHTeIb.
Pn6op He BbinoHReT HarpeB. BIOKupOBka OTKJIOUaetcra.
KOMNOHEThbI
PpO6JIeMa Y6eIuTeCb, yTo...
He ropnt lamna ocBeueHn. BnaKna KOHBeKzna BKIOueHO.
He roput lamma ocbeuen. lamna neperopeja.
ФункцяТерmoун He pa6oTaet.Шт ekep Tepmouyn nonHocTBb BCTaBHeHaВ rHe3do.
KoDbI Own6ok
Ha ducnnee oTo6paxaetc... Y6eIntecb, yTO...
Ou6ka C2 Bbl Chann Tepmoyn BuNky ceTeBOro hHypa.
OuH6ka C3 DBepua npi6opa 3akpyta, a 6IoknpoBka DBepu bI yHKUOHpyeT HaJIeKaUM o6pa3OM.
Ou6ka F102 DBepua np6opa 3akpbita.
Ou6Ka F102 BIOKIpOBKa DBePcI NcPpBaHa.
00:00 C6oB 3JNeKTPoNITaHnY. YcTaHObKa BpeMeHn CyTOK.
Ecni Ha dincnnee oTo6paKaetcKoD Oun6Kn, He npBBeHnBb B Ta6Jnue, BblKnHouNte N BkHouNte ppeOxpanHe Na domaunhem paCnpdeJeNTbHom untke dIy nepe3anycka npnbopa. Ecni KOD OUn6Kn NoBntc ChOBa, obpatntecb B cepBnchbI cHTp.
OuInCTka
PpO6JIeMa Y6eIuTeScb, yTo...
OuInCTka
N3 BbIeMKn KaMepbl DyXOBORO ⅢKaΦa BbJIINBaETcR BO-da.
CINKOM MHOROBdbIB BbIeMKe KamepbI dYXOBOrO uKapa.
13.2ДаHHbIe O TeXHnueckOM O6cJIyXnBaHn
EcnncamocToTeNbHO cnpaBnTbcra npo6nemOHe ydaetc,obpaNTecb B Mara3H,B KOtopom 6bl npno6peTeH np6op,nnB aBTOp3OBaHHb CEpBnCHbIeHTp.
PnroTOBJIeHHe c nCNoJIb3ObaHHem BeHTNJrTopa
IIO BO3MOXHOCTN Bb6npaTne cyHKUIN nprirotOBJIeHNA, B KOTOpbIX NcNoJb3YeTCa BEHTNJrTOp, YTO6bl Cbepey 3JIeKTPo3HeprnO.
OctatouHoe TENIO
BentnIaTOp n lamna ocBeueHnnaPdoJkaOT pa6oTaTb. Nocne BblKluOeHnnpnbopa Ha dinCnnee oTo6paXkaetcOCTaTOUHOe TEnNo. 3To TEnNO MoxHo
NcNoJb3OBaTb IJIy NODepXaHn8 6IIOB TENJOM COCTOHN.
Ecnn dnteNbHocb npuroTOBneHnna
npebbwaet 30 mHyT, yMehbinte
TemnepaTypy np6opa Do MNHmAbhOH 3a
3-10 mHyT do OKOHuaHnna npuroTOBJeHnna.
PpOdoJnxTc npuroTOBJeHne OCTaToHoro
TeNla BHyTpni np6opa.
IcnoIb3yIte ocTaToHoe tenlo dIpa3oRpeBa dpyrnx 6nIOd.
CoxpaHeHne NnB TEnlOM COCTOHN
IJa IcNoJIb30BaHnA OCTaToCHOro TeNna DnR
COxpaHeHn NnB TEnlOM COCTOHN
BbIbpaIte MaKcIMMaJIbHO Hn3Koe 3HaueHne
TeMnepaTpybI n CoxpaHnTe 6JIIO B TeNne.
Ha dncnlee 6yDet OTo6paxaTbcra
HHdNKaUg NcTaToCHOro TeNna INn TEkyuaar
Tempeatypa.
PpuroToBJeHne C BbIKJIOUeHHoN JAmNoBbIKIouHe Iamny Ha BpeM npuroToBJeHn. BkIooaIte ee TOnbKO npH Heo6xOIMocTn.
BlaXHa KOHBeKzna
Данна Функця сециально pa3pa6otana ДлЯ обеспецни зхонOMN Злектpoэнрги.
Pn nCNOJb3OBAHnn DaHHoN cyHKcHnJaAMna BbIKIOuHaETcraYepe3 30 cekyHd. NaMny MOxHO BKJIIOHTb CHOBA, HO daHHoe DeIcTBnE COKpaTNT OXnDaembl 3cΦeKT OT 3KOHOOMN 3JIeKTPo3HepRn.
15. CTPYKTYPEA MEHIO
15.1 MeHIO

War 1 War 2 War 3 War 4 War 5

- BbIepuTe,
TO6bBOITNMeHIO.

Bb6epnte npaMeTp B MeHIO ctpykType n


BbIbepuTe Hactpoyn Ky.

OK -HaKMnTe DnI NOdTBepXeHnHa-CTpoiKn.

YCTaHOBNTe 3HaueHNE HAXMNTe OK
YcTaHOBnTe pyKy Bb6opa peKIMOB HArpeBa B noJoxHeHne «BbIK», YTo6bl BbIITn3 MeHIO.
Available on the App Store

GETION Google Play
3aDpxaHo npaBO n3MeHa.
CAJPKAJ
- INHΦOPMAUJIJE O B6E3BEdHOCTN 443
2.BE3BENHOCHA YIYTCTBA 445 - INHCTAIIAUJIA 449
- ONIC PPOU3BOIDA 451
5.KOMAHHATABla 451 - INPE INPBE YNOTPEBE 452
7.CBAKOJIHEBHA YIOTPEBA. 453
8.ФУHKUJIJE CATA. 459
9.KOPNIUHTHeIe IPIIBOPA. 460
10.ДОДАТHEФУHKUJIJE 462
11.KOPINCHIN CABETI 463
12.HERA N YIUITHEBE 466
13.PELIABAHBE IPOBJIEMA. 471
14.EHEPRETCKA EOKACHOCT 473
15.CTPYKTKPA MEHINJA 474 - EKOLOUSAIITAHBA 475
1. INHΦOPMAUJIJE O B6E3BEdHOCTN
Ipe nHcTanaJne i KopnshHeBa ypeJaja, naKbNBO npOHTajTe npINOJKeHO ynyTCTBO. IpOn3BoJau HnJe ODROBOpaH 3a 6nIO KaKBe NOBpeDe nII NSteTy Koje cy pe3yIITaT HeNCnPabHe IHcTanaJne nII yNoTpe6e. CyBaJTe yNyTCTBO 3a yNoTpe6y Ha 6e36eDHom i npInCTyNauHOM MeCTy 3a 6dyHe KopnshHeJbe.
1.1 Be36eHocT deue n ocetJBnBnx oc06a
Obaj ypehaj mory da kopncte deca ctapnja od 8 roDInHa n ocObe ca cMaJIbeHIM fI3NcKIM, yJHIM IJIIM MeHTaJIHIM cNooc6bHocTtMa, Kao ocObe KoJIma HeIOCTaJy NCKycTBo I 3HaJIe, yKOJIko IM ce oBe36eDN HaID3Op IJIIM Ce dAjy UnyTCTBa y Be3n ca ynoTpe6om ypehaja Ha 6e36eDaH Naun H yKOJIko CXBaTajy moryhe onacHocTn. Deuy MnaHa od 8 roDInHa, Kao n ocObe ca BeOMa TeWKIM n CLOXeHIM INHBaJINDITetOM, Tpe6a dpJxATn daJIbe od ypehaja, OcIM aKO cy NOd cTaJIHIM HAD3OpOM.
- Д ecу Tpeba KoHTpOJIncaTи KaKo ce He 6n irpaJa ca ypehajem.
- Дожи te cby ambaajy daJIbe od Deue n Ondnojte je ha odroBapajyHn HauHn.
- UПОЗОРЕБЕ: Урегaj и НBEROBи ДOCТУПНИ DeLOВи могу ьNTи Врели TOKOM Коршненьа. ДожITE Deцу И Кун He Лубимце дале od урегajа Када урегaj ради И Када ce Xлади.
- Ako obaj anapatima ypehaj 3a 6e36eHocT dece, tpe6a ra aktubnpatn.
- Deça He cmejy da obaBbajy yniShneHbe n KOpncnUko odPkaBaHe ypehaja 6e3 na30pa.
1.2 Onstemepe 6e36eHoctn
ObajypehajjeHameHeHcMo3a KyBaHbe.
Obaj ypehaj je HameHbEn 3a ynoTpe6y y jeHOM domaHnHCTBy y 3aTBOpEHm npocToPIma.
- Ypehaj ce moke kopnCTHTy KaHcJIapnJaMa, XOTeJCKM c6aMa, MOTeJIHaMa, NaHCNOHMa, CEOCKM TpyNCTHUKNM domaHnHCTBnMa n CInuHm ObjKTnMa 3a CMeIstaj rDe yNoTpe6a He 6n IpeBa3nla3nla (npoceaH) HnBO NOTPOShHe NO domaHnHCTBy.
- Camo KBaJIHΦIKNKOBaHa OCo6a MoXe Da MOHTnpa OBajypehaj n 3aMeHn Ka6I.
He kopnstte obaj ypehaj npe Hero wto ra yrpadnte.
- Iscjbyuhte ypehaj n3 ctpyje npe 6nlo KaKBor odpxaBaHa.
- YkoIIko je ka6I 3a HanajaJIe OwTeHEn, Hera Mopa da 3amEHn npOn3BoJau, odroBapajyHn OBlaWHeHn cepBnCHn ceHTap nIi IIna cInuHne KBaIINΦnKauzJe, KaKo 6n Ce n36erIa eNeKTPnUHa onaCHOCT.
- YN03OPEHbE: YBepnte ce da je ypehaj nckbuyen npe Hero wTO 3aMeHnte cnjaJInu cy kako bncTe n36ern Moryhnoct da dohe do eJeKtpnHOr Woka.
- UПОЗЕРБЕ: Урегaj И НBEROBи ДOCТУПНИ DeLOВИ MOry ьNTи Врели TOKOM KOpшнeBa. Тpeба ВODNTи paЧуна дa ce ИЗБERHe ДОДИРИВaHbe Гржнх eЛeMeHaТа ИПИ yHyTpawHbIx NOВршиHa anapata.
- KaDa BaAnTe npi6op nIи nocyhe n3 pepHe nIи nx CTaBbATE y pePhy, yBeK Hocnte 3aUHTHe pyKaBnCe.
- Да бисте уклонлішине koje држе peшетke, npво NOвуцпгЕ пpeднг Deo shnHa, a 3aTm 3aДнг Deo da 6nste nx OndBojnln Od 6ochnx 3nOBA. NocTaBbAbe shnHa 3a NOdprkny peшетke BpShn ce obphytm peodocneDom.
- HemojTe KopnCTiTn napOuNCTaU 3a YnshHe ypeJaja.
- HemojTe KOpnCTiTn rpy6a a6pa3nBHa cpeiCTBa 3a
- uHneHe nIu OoTpe MeTaJIHe cyHjepe 3a uHneHe
- cTaKJIeHIX BpTaJ ep OHI MOry I3rpe6aTn NOBpShInHy 360r
- Yera MoKe DoHn Do paCnPcKaBaHbA cTaKJa.
- Ппрпролитчког чишнеба, уклонITE cab ппбор n3 peрне, кao и OCTатke xpahe Или масноне koje cy прocуTe/ haTаложене унтуар уpeнaja.
2.БE3БЕДHOCHA YПУТСТВА
2.1 MoHTaKa

YNO3OPEHBe!
Cama KBaIuΦnKOBaHa ocOba moKe da HCTaInpa OBaj ypehaj.
- YKJIOHIne KOMnIeTHy am6aIaxy.
- HemojTe Da uHctaInpaTe nn KOpNCtnte ouTehen ypehaj.
-
PnpdpkaBajTe ce ynyTcTaba 3a MOHTnpaIbe Koje cTe do6nIn y3 ypehaj.
-
YBek BodnTe paUHa npuNkOM nomepaHa ypehaja 3aTo uTo je TeXaK. YBek KopnCTnTe 3aHTnThe pyKaBnCe n 3aTbOpeHy obyhy.
He ByuTe ypehaj 3a puuCy.
-Инсталрajte ypehaj Ha cnryphno n npNKpndHO MeCTO Koje NcnyHbAba 3axTeBe 3a INHCTaIaujy.
HeonxoJNo je npndpkaBatn ce MmHmamHor pactojaHa oD npyrnx ypehaja n Kxnbcknx eemeHaTata.
-Пре монтaxeуpehajа,npoBepuTe da Jn ce Bpata ypehaja oTbapajy 6e3aDpUKe.
Obaj ypehaj je onpeMJBeh CnCTemom 3a eNeKtpuHo xnaheHe. Mopa ce ynotpe6babaTn ca n3BOpOM eNeKtpuHOr HanajaHa.
| Минимална висна ку- хиьског[elemente] (Minи- мална висна[elemente] испов радно) БирINA kушильског[ele- mentа] | 590 (600) mm |
| ДубINA кушильског[ele- mentа] | 550 (550) mm |
| Висна пedingе стpaneе уреега] | 594 mm |
| Висна заюе стpaneе уpe- нaja | 576 mm |
| ШирINA пedingе стpaneе уреега] | 595 mm |
| ШирINA заюе стpaneе уреега] | 559 mm |
| ДубINA уреега 569 mm | |
| ДубINA уграhalor ype- нaja 548 mm | |
| ДубINA са OTворень вва- тума | 1022 mm |
| Минимална вличINA ВENTEWAQUHOR OTBOPA. OTBOP NOCTABBEH на до- ъоб заюс STPANI | 560x20 mm |
| ДухINA кабla за habа- ъe. Кабл je постав�ен у деснOM углу са заюс STPANI | 1500 mm |
| МontaxIN 3aВртьи 4x25 mm |
2.2ПрикJBуYeHeHa eJIeKTpNHy MpeJy

YN03OPEHBe!
Pn3nk oJ nojapa n ctpyHor ynapa.
Cba npKbUyHbHa cTpyje Tpe6a da 0abn KbaJnФNKOBaH eNeKTpNap.
- Ypehaj mopa da 6yde y3embeH.
- YBepnte ce da cy napaMeTpHa nnouCn ca TexHnUcKm KapaKTepnCTnKaMa KOMNaTn6nHn ca OndroBaPajyHm napaMeTpMa eNeKTpNHe MpeXe 3a HanajaHe.
- YBek KopnCTnte npOnncHO yrpaheHy yTnHnCu ca 3aHTITOM od CtpyjHOr ydapa.
HemojTe da kOpunctte aanTepe ca Bnue yTuHnua n npOdyxHe ka6NoBe. - PpOBepnte da Hncte OwTeTnI rnaBHO HanajaBe n Ka6JI 3a HanajaBe. YKoJIko CTpyJHn Ka6JI Tpe6a Da ce 3aMeHN, To Tpe6a Da oabN haw OBnAWeHn CepBnCHn ueHTap.
He do3BoJnte da ka6n 3a Hanajahe doJnpyje nn DoJhe 6n3y BpaTma ypejaja nn Hnsn nCnoJ ypejaja, HapouHTo KaJa ypehaj paN nn KaJa cy Bpata BpeJ.
3aHTTa OD ydapa DeNoBa NOD HANOHOM nI30NoBaHnX DeNoBa Mopa Da ce npuBpCTn Tako Da He MoKe Da Ce yKNOHn 6e3 aJata.
-Прикьунite Галови Кабл за Hanajaые на 3идну утчниуTek Ha Краю Инстаци.Бодente paунада постюп писту мржиму утkaу hy haKOH Инстаци.
Ako je 3nHa yTuHnca na6aba, HemojTe Da npKbuyjete MpeXn yTuKa.
He ByuTe Ka6I 3a HanajaBe KaKo 6nCTe NCKbUyn ypehaj. Ka6I nckbUynte TaKO ITO he Te n3Byhyn yTuKaun 3yTuHnue.
Kopncntte cmo ncpaBhe paCTaBHe npeknlaue: 3aHTnThe npekndaue, ocngrypaue (ocngypaue ca haboem Tpe6aCKnHytn ca Hocaya), ayTomatcke 3aHTnTHe npekndaue n KOHTaKtope.
Y eJektpnHoj nHcTalaunj mopa noctoJTu pAcTabHn IpeKnJaU KoJn BaM omOryhaba Da nckbYuHTe CBe qa3e HanajaHa ypehaja. Pa3MaK n3MeHy KOHTaKaTa Ha pAcTabHOM IpeKnJaU Mopa Da n3HOCh HajMaHe 3 mm.
-NotnyHO 3aTBOpnte Bpata Ha ypehajy npe Hero wTO NOBExKeTe MpeXHN yTnKaU y 3NDHy yTNCHNUY. - Ypehaj ce nCnOpuyje ca CtpyJHm yTnKaUem n CtpyJHm Ka6JOM.
Tinobn Ka6noBa 3a nHcTaIauJy nn 3ameHy 3a Ebpony:
H07 RN-F, H05 RN-F, H05 RRF, H05 VV-F, H05 V2V2-F (T90), H05 BB-F
3a npecek ka6na nornejaTe noDatke o ykynhoj cha3n Ha nlouyn ca TexHnukm
kapaKTePncTnKaMa: TakoHe moKeTe nOrIeDaTu n Ta6eny:
Ykynha chara (W) Ipecek ka6na (mm^2)
MAKcIMaJIHo 1380 3x0.75
MAKcImaJIHO 2300 3x1
MAKcImaJIHo 3680 3x1.5
ПровODнк 3a y3eMьeБe (3eJIeH/N/JyTN npOBODnK) Mopa 6ntn 3a 2 cm dJxN od 6paOH npOBODnka 3a φa3y n ПЯВOR npOBODnKa 3a Hny.
2.3 Ynotpe6a

YN03OPEHbE!
Ioctoj np3nk od nobpeHnBaHa, oneKOTnHa n ctpyjHor yapa nn ekcnno3nje.
HemojTe da MeBaTe cneuKauJy OBorypehaja.
Bodnte paunha da oTBOpn 3a BeHTnnaunjy He 6dy 3anyuheHn.
He octabjate ypehaj 6e3 nA30pa TOKOM pada.
- Upehaj Tpe6a NCKJbUHTN HAKOH CBAKe ynoTpe6e.
-Будnte onpe3Hn KaI OTbapaTe Bpataypehaja dok OH paHm. Moxe ce decntn daH3aHe Bpeo Ba3dyx.
- HemojTe pyKOBaTu ypehajem KaJa cy Bam MOKpe pyKe IJIi KaJa je OH y KOHTaKTy ca BODOM.
Hemojte n3laaratn OTbopeha Bpata BeJIKOM ONTepeheHy.
HemojTe KopunctuIypehaj kao paHy NOBpUnHy IIN npocTOp 3a OndarAhe.
- Пжьво OTВОРиTe BpTa ypehaja. Kopuшнebe caCToJaKa KoJn caPxKe anKoxOЛ мождовсп ДО ИСпapаBaHa aKoxOHa n MeSHAha Ca Ba3dYxOM.
Bapnue nn OTbopeHn PnAmen He cmejy da 6ydy y 6n3nHypehaja kaDa OTbapate Bpata.
3anaBnBe MaTepeJne nn npedMeTe HATOnJIbeHe 3anaBnBm MaTepnJaMa HemojTe CTaBbTaN yHyTap n Nopedypehaja nn Ha hera.

YN03OPEHbE!
Noctojnpn3nk oD owTeheha ypehaja.
-Дабистe спpeuиоштeheиruhak boje ha emajnapaHmnoBpunHaMa:
- HemojTe cTAbbataN nocyhe n3 pepHe nnIpyre npedMeTe yypehajy dIpeKTHo Ha dHO.
-He cTAbJbajTe anyMnHjymcky fOnnjy DnpeKTHO Ha dHO yHyTpawhOCTn ypehaja. - HemojTe cinnatn Body dIpuekTHO y bpyh ypehaj.
-
HemojTe npkatau yypehajy BnaXnHO nocyhe n XpaHy hakOH 3aBpWeTkA kyBaHa.
-Будnte naxJBnBn KaJa cKnDaTe nnn noctabJbate np6op. -
Губитak boje Ha emajnilpaHIM NOBpUnHaMa Илн HehajyHem YeJInKy He yTnue Ha cam paI ypeJaja.
Kopuncte Dy60k nnex 3a 3aJIbBeHe KOnaue.BoHN COK MoKe Da oCTaBn TpaJHe MpJIbe.
-Дok спемате Ѿно, Вра差别уpeиа Трба увек за уду 3аТВорета.
Ako je ypehaj MOHTnpaH n3a naHeNa HameTaja (Hnp. Bpata), oBe36eIte da npnIKOM paDa Bpata HnKaDa He 6ydy 3aTBopeHa. I3a 3aTBopeHor naHeNa HameTaja Mory Da ce NaKyne TOnNoTa IN Bnara n npoy3pOkyj HAKnAdHO OwTeHeJbe ypehaja, KynTu a nn noJa. He 3aTbapajTe naneHameTaja CBe DOK ce ypehaj y NOTnyHOCTn He OxJaHn HAKOH KopuShHeBa.
2.4 Hera n Ynshene

YN03OPEHbE!
Ioctoj np3nk od 03nehnuBaHa, noxapa nn ouTeheha ypehaja.
- Ppe uHHeBa NCKbUyInTe ypehaj n 3ByuNTe yTuKaU n3nDHe yTuHnCe.
- PpOBepnte da nn je ypehaj xnaH. Noctojn pn3nk da ce noIome cTaKJIeHe nIOue.
- Odmax 3aMeHnte cTaKJIeHe nIOue Ha BpaTIma aKO ce oUTeTe. Obpatnte ce OBlaaunehOM cepBnCHOM ueHTpy.
-Будnte пжьиви када скпдате Врata ca ypehaja.Врatura cy Teшka!
- PeoBHO uHCTnTe ypehaj da 6ncte cnpeuI npOaIaHe NOBpUHcKOr MaTePnJana.
- Ypehaj YnCTHTe BJIaXHOM MeKOM KpNOM. KopnCTHTe NCKbByuBO HeyTpapanHe DetepueHTe. HEmoJTe KopnCTNTa 6pa3NBHe npOn3BODe, abpa3NBHe jacTyuHHe 3a uHHe, pactBapaue nIIM MetaJIHne npEdMeTe.
- YKoJINKO KOpIcTnTe cnpej 3a pepHy, npuIpxaBajTe ce ynyTCTaba o 6e36eHNoCTn Ha amBaJaxn.
How to install your AEG/Electrolux Oven - Column installation


Anapat ce He yKbuyje nn He 3arpeBa
PpO6JIeM PpOBepuTe...
He mokeTe da ykbuynte nnn KOpncntte ypehaj. Ypehaj Hnje npabunno npnkbyueH Ha eJektpnHy mpeKxy.
Ypehaj ce He 3arpeBa.ФункиJA ayTomatckor nCKbuyuBaHa je DeaKTnBupaHa.
Ypehaj ce He 3arpeBa. BpaTa ypehaja cy 3aTBopeHa.
Ypehaj ce He 3arpeBa. OcnrypaHnje nperopeo.
Ypehaj ce He 3arpeBa. BpaBa je nckbyyeHa.
KOMnoHeHTe
PpO6JIem PpOBepnTe...
How to install your AEG/Electrolux Oven - Column installation


3.2 Upevnenie rury k linke

4. POPIS VYROBKU
Available on the App Store

GETION Google Play
Pridržujemo si pravico do sprememb.
KAZALO
- VARNOSTNE INFORMACIJE 507
- VARNOSTNA NAVODILA 509
- NAMESTITEV 512
- OPIS IZDELKA 514
- UPRAVLJALNA PLOŠCA 514
6.PRED PRVOUPORABO 515
7.VSAKODNEVNAUPORABA 516
8.CASOVNE FUNKCIJE 521 - UPORABA DODATNE OPREME 523
10.DODATNE FUNKCIJE 525 - NAMIGI IN NASVETI 526
12.VZDRZEVANJE IN CISCENJE 529 - ODPRAVLJANJE TEZAV 533
- ENERGIJSKA UČINKOVITOST 534
- STRUKTURA MENIJA 535
- SKRB ZA OKOLJE 536
1. VARNOSTNE INFORMACije
How to install your AEG/Electrolux Oven - Column installation

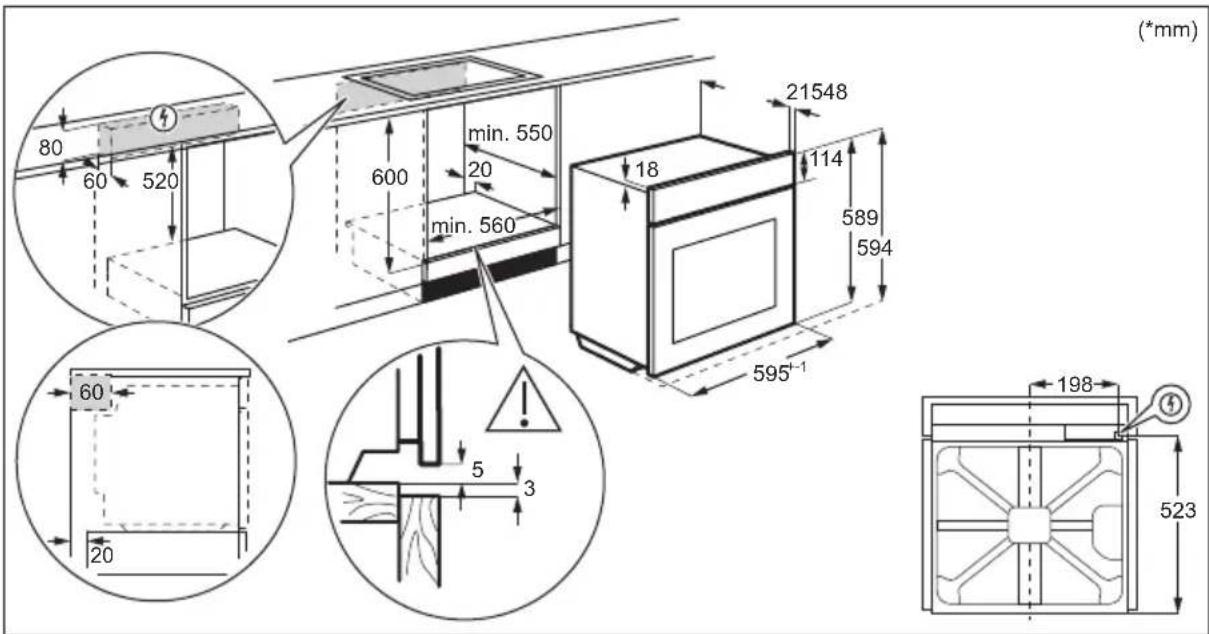

Available on the App Store

GETION Google Play
Möke 3miHHTnca 6e3 onoBicHHra.
3MICT
- IHOPMALI 3 TEXHIK INE3NEKN 537
- IHCTPYKlI 3 TEXHIK N E3NEKN 539
3.YCTAHOBKA. 543 - ONIC BnPO6y 545
- PAHEJIb KEpyBAHHra 545
- INPEED INEPUIM BUKOPINCTAHNAM 546
- ⅢOIDEHHE BIKOPNCTAHHЯ 547
8.ФУнкцIΓОДИNHИKA 553
9.BVKOPNCTAHHnI PnIaI.. 554
10.ДОДATKOBIФУHKU.. 556 - IOPADI I PEKOMEHDAUJI 557
- DOrJIaT A YIcCTKA 560
13.YCYHEHHIPOBJIEM 566
14.EHEPROEΦEKTBHICTb. 567
15.CTPYKTPA MEHIO. 568 - OXOPOHA DOBkIJIJIa 569
1. HΦOPMAUJI 3 TEXHIK N E3NEKN
Ipeed yctaHOIO Ta ekCnlyaTaciio npilaNy ciiD yBaXHO npoHTaTI IHCTpyKciIO KOpNCTyBaA. BInpo6Hnk He Hece BiIDNoBidaIbHocTi 3a TpaBMn abo 36ntkn chepe3 HnPaBnIbHe BCTaHOBJIeHHaBO BnKOpNCtAHNHa. IHCTpyKciII 3 ekCnlyaTacii cIiD 36epirATn B 6e3neuHOMy i DoCTynHOMy Miczi 3 MeTOHO KOpNCTyBaHNr B MaIbYTHbOMy.
1.1 Be3peka iTei I Bpa3JIbIcx oci6
-ДiTиВiД 8 pOKiB Ta OcO6n 3 O6mExeHIMN φi3nUHMN, ceHCOPHIMn a6o nCnxixHIMM MOxJIINBOCTaMn yu HeIOCTaTHiM DoCBiDom i 3HaHHaMn MOxTyB KOpNCtYBaTnCzI M npIaIOM JIiSe NiD HargIaDM, a6o 3a yMOBn IonepeHbOrO OTPMaHnY IHCTpyKciN 3 6e3neuHoro KOpNCtYBaHnR npIaIOM Ta PO3yMiHHr NOB'3aHnX 3 ZIM Pn3NKiB. DiTn Do 8 pOKiB Ta OcO6n 3 BaxKoTO Ta KOMJIeKCHOHO Henpaue3daTHiCTHIO MOxTyB nepe6yBaTu N06n3y npIaIy JIiWe 3a yMOBn, YKIo 3HaXoJTBcR niD 6e3nepePBHNm CnoCTepeXeHnRm.
CπiδκyιTe 3a Tm, a6n diTn He 6abuIinc8 3 npɪnaDOM.
- TpimaiTe yci nakyBaIbHi MaTepiAni noaJIi BiD iTei Ta yTnI3yIte ix HaneKHM YINHOM.
- ПОПЕДЖЕHHЯ! Рплад iйorobiДКрnti nobepxhi HarpiBaIOTbCS nID quac BnKOpncTaHnry. He donyckaite diTei Ta domaushix TBapnH Do npilaDy nID qac noro BnKOpncTaHnry Ta oxolodJceHHra.
-Якшо пилад осашино 3ac06amn 3axncty BiДdoCTynу dITEи,ix Heo6xidno akTnByBatn.
- YnueHna 6o o6cnyroByBaHH npuady dItbMn Do3BOJrEeTbcra Nnwe nId HaraIaOM.
1.2 3aŋbHa 6e3neKa
- Léen pnpad npn3naueho BnKJIouHNo dIy npnroTyBaHnI iJxI.
- Zei npnilad npn3naeHni dIy BnKOpNCtAHNry B domaunix yMOBax y npnmiueHHi.
- Zei npilad moxHa BnKOpncTOBbATn B ophiacx, roTeIbHnx Homepax, Hanib-roTeJx, npimiiEHHx dIy fepMepcboKoro Tpyn3My Ta iHux noi6Hnx npimiuEHHx, de 3actocyBaHHra cboRo npilady He nepeBnuSy (cepeHi) pIBeHnpo6yTOBOrO KOpncTyBaHHra.
-
YctaHOBJIIOBAtN uei npilaad i 3amIHIOBaTn Ka6eIb NOBInHeH IINSe KBaJIiΦiKOBaHn φaxiBeCb.
He KopnctyItec npnilaOM,doKn Ioro He 6yde BCTaHOBJIeHO y B6yIDOBaHy KOHCTpyKciIO. -
Перш, Нix Виконы вати оретацii 3 Тхни Horo обслуroyвань, Bi'd'еднaite ппад Bi'd джерела ЖИВЛЕНЯ.
- Y pa3i пошкоженя[elektpruHOro ka6eIIO noRo Mae 3amHHTN Bnpo6Hnk, Ioro aBTOpN3OBaHni cepBicHni ceHTp abo iHwi analoriguHo KBaJIiΦikOBaHi ocO6n 3aJnyHKHeHHyypXeHHra eIeKtpuHm cTpyMOM.
- ПОПЕДЖЕHHЯ: ункуту ураженя eilektpnHm ctpymom, nepш hix поинТи мінглamny, пөреконайтеся, со ппад вимкнeho.
- ПОПЕДЖЕHHЯ: Рплад i为其о Вдкрnti поьерхни нагівагься пд час викорисання. Слд 6утни оберекни, соб He Торкатися нагівальнix[elementiv abo поьерхни витушьOi kaМери рпладу.
3aBxDn KOpNCTyITeCk KyXOHHmN pyKaBnIaMn, KOJI BNTraTe Ta BCTabIeTe akceCyapn YI Nocyd. - Κоби 3няти onopи полчok, спочатку Notягніть передно части hy onopи полчки, a NOTIM II 3адно части hy встору вд 6iuchx CTiHOK. Κоби BCTaHOВNTи onopи полчok, ВИКОHAйTe HaBeDEHy BИше пpoцeДуpy y 3ВОРТий полдовноcti.
He BnKOpncToBvIte napOoNcUyBaU dIa OuNcEHHa npnaIaIy.
He BnKOpNCTOBuYTe dIy OunUeHNeckJHOIOBepxHi DBepzT JopcTKi a6pa3nBHI 3acO6n YI MeTaJIeBi 5kpe6Kn, OCKIbKn Ie MoKe npn3BeCTn Do NpOBN TpiUnn Ha cKJI, 5o MoKe CnpuHHnTn pyHyBaHHra CKJa. - Перед поролитуним очирей виимы Bci akcesуари 3 duyoboiшафп та вдаліть залшкіixi 3 kameри рпладу.
2. IHCTPYKl3 TEXHIKN BE3NEKN
2.1 BctaHOBJIeHHJ
NONEPEDKEHHRA!
YcTaHOBIOBaTn cei npnaI IOBHeH I#e KbaIiΦIKOBaHn φaxiBeu.
- NobHicTIO 3HIMiTb yNaKOBky.
He BCTaHOBJIIOHTe Hn He BNKOpNCTOByTe NOWKoJKeHn npNJad.
-ДotpmytecayHCTpykui 3i BCTaHOBJIeHH,IO NOCTaHaOTbcra pa3OM i3 npunaom.
- Bynte oBepexhi niD yac nepemiuHn npuJa, OCKIbKn Bih BaKKn.
BnKOpNCTOByIte 3axncHi pyKaBnUKN Ta B3yTTa, 10 NOCTaHaEeTbC8 B KOMnJIeKTI.
- He tārḥīt bī pūnlaɪd 3a pyučy.
BCTaHOBJIHOIte npuJa y 6e3neuHOMy iIXOJaIOMy Micci, uo BiINOBiJaB CnMOram 3i BCTaHOBJIeHHJ.
-ДOTPIMyIteCByBnMOr ⅢODo MInImaJIbHOI BiIcTaHI Do IHNIX npuJaIb YI npedMetIb. - Ppeed BCTaHOBHeHHm npuJaDy nepekoHaITeC, 0o NOro DBepuTa BIDKpNBauTbC6e3 nepeWkoJ.
- PpnilaOcHaueHo eJeKtpnHIO CnCTeMOIO OxolodKeHH.BiH NOBHeH npauOBaTN BiD Jxepena XNBlenHH.
PnCTPOIO Mae CTaHOBHTN He MeHJIE 3 MM.
-IOBHCIO 3aKpNte DBePraTa npnnay, nepeD TmK BCTaBnTn BnKy Ka6eIIO XNBHeHH B pO3ETky.
Ley npnaOcnaeHO eNeKtpnHm Ka6eIem i3 BNkoIO.
TnN Ka6eIb DnB BCTaHOBneHHa 6o 3amHn dnn CbpOnn:
H07 RN-F, H05 RN-F, H05 RRF, H05 VV-F, H05 V2V2-F (T90), H05 BB-F
Ipepei3 ka6eIIO Bka3aHO y po3diJI npo 3araIbHy notyXHicTb Ha Ta6nUci 3 TexHiuHMn daHmN. TakoK IIO IHOpMaio MOxHa 3HaHTy Ta6nUci:
3araJbHa noTyK-HicTb (Bt)
PonepeuHn nepeTnKa6eJIO (MM²)
MaKcMym 1380 3x0.75
MakcHymy 2300 3x1
MaKcHmym 3680 3x1.5
Ka6eJIb 3a3eMJIeHHra (3eJIeHn/JKOBtNl) NOBHeH 6yTn Ha 2 cm IOBUnM, HIX KOpuHBeHn Ka6eJIb pa3n Ta HeItpaJIbHn CnHi Ka6eJIb
2.3 KopncTyBaHHa

NONEPENKHHI
IcHyE He6e3neKa TpaBMyBaHHa, OniKIB, ypaXeHHra eNeKTpUHm Ctpymom i Bn6yxy.
He 3miHouTe TexHiCyHi cneuPhiKauiI cyboro npnna.
- IpekehainTecB TOMy, uO BeHTnIaHi OTbOpH He 3a6JIOKOBaHO.
-Пд уас рботи ппаду He 3аишай Te Ioro 6e3 Hargy.
BumkaTe npnilad nicJkoKHO BnKOpNCtAHH.
-Будъеоберекhi,BIDHINHIOUHy DBePcraTa npnay nIq yac noro po6otn.MoxKnBe BvBilbHeHHrapeyoro nobITpr.
He npaioTe 3 npnaIam, kUO Bawi pyKIMOKpi a6o kUO BIN KOHTaKTye 3 BOIO.
He hatnckaIte Ha BiDUnHeHi DBepeyTa.
He BnKOpNCTOByIte npuIaJ kpo6Ouy NOBepxHIO a6o Jk NOBepxHIO dJIa 36epirAHnpeeu.
-ObepexHo BiDUnHnIe DBePcTa npnlaNy. BnkOpncTahnHa INrpeDiEcHTiB 3i CnIPTOM MOKe Ipn3BecTu Do yTBOpEHnCymiwi cnIpyu nobitpr.
BidunHanyDBePcTa, nIbHynte, 06n npa i3 npucPoem He 6yno dKepeyn yTbopeHH icKop Ta BiKpnTOrO BOrHIO.
He knaidtbycepeDnHy npnilady,napd i3 Hm a6o Ha hboRo Ierko3aMnCTi peOBUHn YN PpeDMETN, 3MOeHi B IerKo3aIMNCTHNX peOBUHax.

NONEPEDKEHHI
IcHye p3nK NOsKOxEHH npnaNy.
- 3ao6irtn noKoJxHn o a60 3he6apBneHHo emani, dOpymyTeCra TAKNX peKOMeHdaui:
-He cTaBTe nocyI a6o iHwi npEaMeTn 6e3nocepEnhbo Ha dHO npnnaNy;
-He KnaDiTb aIiOMiHiEBy foJIbry 6e3nocepEdHbo Ha dHo KaMepn npuJa;
-He cTaBTe nocyd i3 BODOIO 6e3nocepedHbO B po3irpiTn npnilad;
-He 3aIiuaIte B npIaIcTpaBn I npOyKTI 3 BnCOKIM BMICTOM BOJOrn nic73abepuHn npiroTyBaHH iKi;
-6ydbTe o6epexhi, BnMaHou n a6o BCTaHOBNIIOUOnn akcecyapn.
3he6apBneHnE mani a6o HepXaBIOOCTani He BnInBa e eKTHBHCbpo60Tu npnaNy.
BukopncOByTe rIb6Ke DeKO dJIa BnIKaHHaTOPTiB i3 BeNIKIM BMICTOM BOIOrn.CiK,IO BUNIJaETbcra i3 cpykTIB, MoKe 3aIIuWATn CTiKi IINM.
3aBxDn roTyIe i3 3aunHeHMM DBepeTAMn npNJady.
-Якшо пилад розміцeho поау Me6neBoi naheJI (HanpNKlaI, DBepaT), nepekoHaNTecra, lo DBepTa BiKpnto nДчac po6otn npuAry.Жap i BOJORA moKytb yTBOpOBaTncя no3aDy 3akpToi Me6neBoi naHeJI, cnpuHryOUnn noaIbwe noWKoJKeHHa npuAdy, KopnyCy a6o NiIorH. He 3akpNaIte Me6neBy naHeJI, DOKI npuJaN nobHiCTU He oxONoHe nicra BVKopNCtAHHra.
2.4 Dorigla i uueneHHa

NONEPEDKEHHRA
IcHye pN3NK OTPmHaHHa TpaBM, noXeKia a6o noXKOJxHeHHn npnaNy.
- Ipeed noaTkom pemOnTy npnlaad Tpe6a Bi'edHaTN BiEeKtpomepexi, 3HraBwn 3anobixnK a6o BnTgHyBwn Shhyp XNBHeHHr 3 po3eTKn.
-ДаTe npuJaIy oxoJohTyI. IChYe pu3nK TORO, zu CKnHi naneI MOxTyb TpichHyTn. - Y pa3i NOWKOJxHnHcKJHnX naHeNei DBepaT cIiD oJpa3y 3aMInTu naHeJI. 3BepHiTBcA Do aBTOpN3ObaHoro cepBicHOro ceHTpy.
-БудьTe OБерекhi,Зимаюч ДевцЯТa 3 npnilady.ДевцЯТa Baxk! - Perynayrho Ounuye Te npua, 06 3anobirn nookjckenHIO Maepiany nobepxhi.
- PpOtpIb npnnaB OJoroIO M'koIO raHcyipKOIO. 3aCtOCOByIte IuIe HeITpaIbHI MNUoi 3acO6N. He BIKOpNCTOByIte abpa3NBHi 3acO6N, KOpCTKI cepBETKn IJN OUYIeHHN, PO3HNHKN a6o MeTaNBeI ppeMTeN.
- YKUO BUN KOPNUCTYETECA aepo30JAMN DJIYI UHJENH JdyXOBHX 1aΦ, O6OB'J3KOBO JOTPMUYTEc iHCTpykui i3 6e3neKn, HABeDEHNx Ha ynaKOBci.
How to install your AEG/Electrolux Oven - Column installation


3.2ЯкзakpinntnydychOBkyBcekuii
4.ОПИСВИРОБY
4.1 3aŋbHn oŋra

4.2 Akcecyapn
KombiHOBaHa pewiTka
IJIy nepeBipKn CTyneHr roTOBHOCTI CtpaN.
- TeleckoniiHc npmaMoByBaHi
TeneckoniuHi cnpmaOByBaCi cnpoUyIb BCTaBJIHH Ta BNMaHHe NOINQK.
5. ПАHEЛь KEpyBAHHЯ
5.1 Bucybhi nepemkaui

YcTaHOBiTb Temnepaotypy.
PonepeHbOpnpriTe npoXHIOdyxOBy wadby BnpoD0Bk 10 xBnINH dIra CTBopeHHBOJOrOCTi.
IocTaBTe CtpaBy B DyXOBy waofo.
MakcmaIbHa cHicTb 3aJIb6HH Kamep n cTaHOBnTb 250 mI. He 3anOBHIOte 3aJIb6Hy kamep n iI qac roTyBaHH a6o KOJI dYXOba waΦa rapa.
7.2Функцинарриby
7.4 HanaHTyBaHHa: Donomora npn roTyBaHHi
Для кожhoiстрави в цьому пдменио заимоновано Функцio harpiby ta temnéратур. Викоростови te zuо Функцio ляшникoro рпiroтуваимастрави 3 налштуваим 3a помobчаннam. Можна takож ретуювати уac i Temnéратур поразrom rotybaнг.
9.1 BcTaHOBJIeHHaKceCyapiB
HeBEnka 3arNn6nHa Bropi nokpaUye 6e3neky. KpIM TOrO, 3arNn6nHn 3anobiraHOt b
pekeiHaHHIO. Bucokn o6iOk HABKpyrN NOIuKN He dae nocydy 3ickOB3HyTN 3 NOIuKN.
Kom6iHOBaHa pewiKa:
PpocyhTe peWitKy mIX HnnpHMm nHaHKamn OonopHnx peNOK i nepeKoHaTecra, 00 II HixKn CnpmaBOHaHO DOHN3y.

DeoBniiK/Γn6oke deko:
PpocyHbTe DeKo MIX HAnpMaMHm PnHaHKamn OOnOpHnx peiok.

9.2 Tepmouzn
Tepmouyn-Bmipioe TemnepaTypy BCEpeiHi npOdykTy.
| Heobxdno BcTaHOBnTn Dba 3NaUeHnY Tempepatypn: |
| °C Tempepatypa duxooi shaФи. Tempepatypa BCEpdihi npodykTu. |
| Для найрашоу pezuliTaTy roTyBaHHa: |
| IHRpeDiEHTN NOBHHi MaTI KIMHaT- Hy Tempepatypu. He BnKopncSTOBuIte ДЯ рIDKx ПiДчac priRogTuBaHHa BIn NOBHHen 3aJIi- SHAATSCY BCEpdihi cTrpaBn. |
Cnoci6 BnKOpncTaHn: TepmoUy
Kpok 1 YbimKHiTb dyxOBy wafy.
Kpok 2 YcTaHOBt b yHKuH HarpIb Ta, kkuo NotpiHo, Tempepatpy dYxOBoi Wadn.
Kpok 3 YcTaBTe: TepMoUyn.
M'aco, domaunn Tnua Ta pna Ka
BCTABTe KINKTEPMOUy B CEHTp M'ra, p6n, 3a MOXJIINBOCTI HauTobu Ioro YacTHNY. IpekoHa-TEcA, 10 OohaMeHwe 3/4 TepMOUyn 3haxOHTbcr BCEpeDNI Hi CtpaBn.
BctabTe KInyK Tepmoyn came B ceHtri JapomiuHoro nocdy. Tepmoyn niD yac BnNikAHn noTpioHo 3akpinu, uo6 He pyxABcra. IaI cybO rCKOpNCaTae TbePm iHrpeiHToM. BnKOpNCbYte kpa nocdy dR BnNikAHn, uo6 NiTpmuAtn CnIKOHOBy pyky TepmoynKiHnK Tepmoyn He nobHeh TopKaTncdHa nocdy dR BnNikAHn.


Kpok 4 BcTaBTe TepMoUyn B rHizDo cnepey duyxOBoi waФn.
Ha ducnnei Biio6paxaetbca notouHa tempeatypa: Tepmoun.
Kpok 5

—HaTnCHiTb, 06 yCTaHOBtN TeMnpeAtpy BcepeuHi npOdyKTy.
Kpok 6
OK-HaTnCHiB,0o6 niTbEPdHTn.
KoJI n Ctpaba DoCraAe BCTaHOBneHoi TeMnepaTpyn, LyHae CnRHaJ. MoXHa 3ynHHTn po6Oty dYxoBOI waФn a6o npOIOBXKNTn roTyBaHHn Jn Da6pOro npOCmaKeHHN CTpaBn.
Kpok 7 BnMItb Tepmoyn BNky 3 rHizda Ta BnMItb ctpaBy 3 dyxobo i wa.

NONEPEJXEHH!
IcHye pn3nK o6nKeTncra, ockJIbKn TepMoUyn cTae rapaue. BydTe o6epexHi nii Yac BiDknUoyehn Ta BnDaJeHH DaTuHa 3 iXi.
Y tabnucx yka3aHO opieHOBHI 3NaueHHr TempepaTyra Y acy npiroToBaHH. BOH 3aJekatb BiD peenty, a TAKOK kOCTi Ta KJIbKoCTi IHRpeJeHTIB, 00 BKNOPNCOTByOTbcra.
Pe3yIbTaTn BnIiKaHn Ta CmXeHHa Ctpab 3a DOnOMoHO UBOrnpuIaNHy HEmOxJIbNO npIBHrTN 3 TUMN, kki BN OTPmyBaHn 3a DOnOMoHO iHux npuaJIB. HabeJeHi HxKHe BkazBKn MICTaTb peKomeHDoBaHi HaJaTuBaHHa TEMnepaTpyn, yacy roTyBaHHa Ta noIOKeHHn noIuCi dner neBHX TnIB npOdyKTIB.
JaKuo Bn He MoKeTe 3HaHTn HalaTuBaHHaIe NEBHOro pecenty, CKOpNCaTecra HaJIaUTyBaHHaN aHaJIorHOro pecenty.
11.2 Bôlora KoHBekciä
ДлЯ OTPиMaHнЯ NaHкраиnx pe3yЛьТаTIBdoTPmMyIteCЯ peKOMeHdaцi, 3a3HaueHnx y Ta6nici HxKue.
| X | Y | Z | & |
| (°C) (xv.) | |||
| Соложki влочи, 16 шт. | deko门前 вишикни abo гли- бoka јаровnia | 180 2 20 - 30 | |
| Буточни, 9шт. deko门前 вишикни abo гли- бoka јаровnia | 180 2 30 - 40 | ||
| Пица, заморожения, 0,35 кг | peшітka 220 2 10 - 15 | ||
| X | (℃) (XB.) | 1 | |
| Рулел ist джемом Decco до Вишикannа abo гли-бoka јаровна | 170 2 25 - 35 | ||
| Бpayни Decco до Вишикannа abo гли-бoka јаровна | 175 3 25 - 30 | ||
| Суфпe, 6ш. керамчни Форmoочи на peшитцi | 200 3 25 - 30 | ||
| Бickвітні корожі Decco до Корожа на решітцi 180 2 15 - 25 | |||
| Бickвітні міordі Decco до Вишикannа на peшіtцi | 170 2 40 - 50 | ||
| Пробavenу ріба, 0,3 кг Decco до Вишикannа abo гли-бoka јаровна | 180 3 20 - 25 | ||
| Цлі ріба, 0,2 кг Decco до Вишикannа abo гли-бoka јаровна | 180 3 25 - 35 | ||
| Риbethе ріпe, 0,3 кг Decco до піи на решітцi 180 3 25 - 30 | |||
| Варене м'ясо, 0,25 кг Decco до Вишикannа abo гли-бoka јаровна | 200 3 35 - 45 | ||
| Шашик, 0,5 кг Decco до Вишикannа abo гли-бoka јаровна | 200 3 25 - 30 | ||
| Пechив, 16ш. Decco до Вишикannа abo гли-бoka јаровна | 180 2 20 - 30 | ||
| Мигдаль'ticteчka, 24ш. Decco до Вишикannа abo гли-бoka јаровна | 180 2 25 - 35 | ||
| Маши, 12ш. Decco до Вишикannа abo гли-бoka јаровна | 170 2 30 - 40 | ||
| Солona вишика, 20ш. Decco до Вишикannа abo гли-бoka јаровна | 180 2 25 - 30 | ||
| Пechиво 3 піочноюста, 20ш. Decco до Вишикannа abo гли-бoka јаровна | 150 2 25 - 35 | ||
| Таразалтук, 8ш. Decco до Вишикannа abo гли-бoka јаровна | 170 2 20 - 30 | ||
| Овочи, варeni, 0,4 кг Decco до Вишикannа abo гли-бoka јаровна | 180 3 35 - 45 | ||
| Вeredapianchekni om-let | Decco до піи на решітцi 200 3 25 - 30 | ||
| Серадземонорьki obочi, 0,7 кг Decco до Вишикannа abo гли-бoka јаровна | 180 4 25 - 30 | ||
11.3 Bonora konBekzij - peKoMeHdoBaHi akcecyapn
BnKopncToByTe TemHi MaTObi fOpMn Ta nocyd.BoHn Kpaue norInHaOTb TeNIO, HIX Cbitn konip Ta 6nckyu nocyd.
Kpok 4 YcTaHOBiTb CkIaHn nnapOH.
13. YCYHEHЯ ПЮБЛЕМ

NONEPEDKEHHRA!
IINB. po3diin 3 iHopmaicio IooTexhikn 6e3nekn.
13.1ДiВ pa3i BnHnKHeHHЯ npo6JIeM
Y 6yNb-Якnx BnnaKax, rki He 3a3NaYeHi y ciH Ta6nci, 3BepHITbcr DO aBTOpN3OBAHOcpeBicHoro ceHTpy.
Ppnaad He BMnKaCTbca a6o He po3irpiBaCTbca
Pp6Jema PpekoHaTecs, 0
He BdaeTbcra BBimKHyTu npuaad a6o npuBecTu noRo BV Ppuaad npaBnIbHo niE'edHaHO do eNeKTpomepeki. diio.
Pnna He HarpBaetbcra. DeakTINBOBaHO aBtOMaTHUHe BUMKHeHHr.
PpnaIaHnHarpiBaetbca.DBepuTa npnauy 3aunHeHi.
PpnaHe HarpBaetcba.3anobixnKnepeperopib.
Pnna He HarpBaetc. BnokyBaHnBnMKeHo.
KOMHOHEHTN
Pp6Jema PpekoHaTecr, 10
JaMaHa BImKHeHa. BoJorA KOHBeKzIy - yBIMKHeHO.
JaMaHa He CbITbcra. JaMnoUka neperopia.
Функця Терmoцун He npaцho. BnIka Tepmozyn nobHicTbCTabHeHa b po3eKy.
KoHn NOMNIOK
BidobpaKeHHa HnCnJIeI NpekoHaTeCe, 10
Err C2 Bn BntTgHyI NepMoUy n BNkY 3 pOeTK.
Err3 DBeprTa dyxOBoi waΦn 3aunHei a6o 3amok DBeprT
He 3JamaHO.
Err102Доверцята пидау зауненi.
Err102 3aMOK dBepaT He 3IaMaHo.
00:00 Byuna npinnHeHa noa a eNeKtpoeHepri. BcTaHObitb
cacdo6n
KaHnHa DnCnEi BiO6paKaεTbca KOD NOMInK, AkoRHeMaε Bui TabuNi, BmKHITb 3aNo6ixHK DomaHboI MepeKi, Notim 3HOBy yBIMKHITb Noro Ta nepe3anyctItb dYxOby wafy. KaHo KOD NOMInK 3'ABJraETbca 3HOBy, 3BepHiTcRaDo ABTopn3OBaHOro cepBicHOro ceHTpy.
OuHnHn
PpO6IeMa IpeKoHaITeC, 10
Boa Bntikae i3 3arIn6HH KamepN. 3a6araTo BoDy y 3aJIin6HHi KamepN.
13.2Даию TeXHicHoro obcnyroByBaHHa
Якwo Bn He moxe Te BupiunTu npo6nemy camoctiHno, 3bepHiTbcrdo 3aknaDy, De Bn npud6aann npnilad, a6o do abTopu3ObaHoro cepBicHoro ueHTpy.
Даhi,notpi6hi Дя СервichoRo ueHtpy,Bka3aHI Ha Ta6nUci 3 TexHiuHIMN daHIMN.ПаснорТа Ta6nUcKa po3TaioBbAHa Ha nepeIhBomy kpaI KaMepn npuJa. He 3HimaTe nacnpThy Ta6nUky 3 KaMepn npuJa.
PekomeHnycMo 3aNcaTu dahi TyT:
MoIeIb (MOD.)
KoI Bnpo6y (PNC)
CepiHn Homep (S.N.)
14. EHEPFOEΦEKTBHICTb
BnKOpNCToBvIe 3aIIuKObTe TEnNo dny po3irpiBaHnHa Hx CTpaB.
PiDtpmMyBaHHa CtpaBn TeNIO
Bn6epitb haHnKyu Tempeatpy 3 MoKnBnx, uo6 BnKOpncTaTu 3aNtKOBe TeNIO dIy 36epexeHn IxKi TeNIO. Ha DInCnPei 3'ABJIeTbcr IHdNKATOp 3aNNKOBOro TEnla a6o Tempeatpyu.
TOTyBaHH3 BUMKHeHOJ JAMNOO
BmKhitb lamny niic yac roTybaHHa.
BmkaTe ii Inue 3a noTpe6n.
Bolora KoHBeKzia
Функця,приз nauseдалгьзбержени eheprii niД.Yac roTybaHH.
Pn BnkOpncTaHHi ciCi fynKciI lamna BmNkaetbcra ABtOMaTHNo yepe3 30 cekyHd.
Bn moKeTe BBIMKHyTn lamny 3HOby, aJe cy iI npu3BeDe do 3HnxEHHy OuyiBaHOi eFeKTNBHOCTI 36epExeHHra eheprii.
15. CTPYKTPA MEHIO
15.1 MeHIO
Kpok 1 Kpok 2 Kpok 3 Kpok 4 Kpok 5
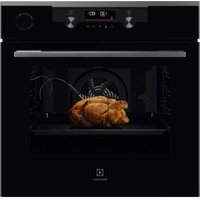
- Sigurimi i furrës ne kabinet
- PÉRSHKrim I PRODUKTIT
- PROBLEEMOPLOSSING
- WAARSCHUWING!
- Welcome to Electrolux! Thank you for choosing our appliance.
- CONTENTS
- SAFETY INFORMATION
- Children and vulnerable people safety
- General Safety
- SAFETY INSTRUCTIONS
- Installation
- WARNING!
- Electrical connection
- Cable types applicable for installation or replacement for Europe:
- Total power (W) Section of the cable (mm2)
- Use
- Care and cleaning
- Pyrolytic cleaning
- Internal lighting
- Service
- Disposal
- INSTALLATION
- Building in
- YouTube
- Securing the oven to the cabinet
- 4.PRODUCT DESCRIPTION
- General overview
- Accessories
- CONTROL PANEL
- Retractable knobs
- Control panel overview
- Display
- BEFORE FIRST USE
- Initial cleaning
- Initial preheating
- DAILY USE
- How to set: Heating functions
- Steam cooking
- Step 1 Step 2 Step 3 Step 4
- When the steam cooking ends:
- Step 1 Step 2 Step 3
- Heating functions
- Notes on: Moist Fan Baking
- How to set: Assisted Cooking
- CLOCK FUNCTIONS
- Clock functions
- How to set: Clock functions
- USING THE ACCESSORIES
- Inserting accessories
- Wire shelf:
- Baking tray / Deep pan:
- Food Sensor
- ADDITIONAL FUNCTIONS
- Lock
- This function prevents an accidental change of the appliance function.
- Automatic switch-off
- Cooling fan
- HINTS AND TIPS
- Cooking recommendations
- Moist Fan Baking
- Moist Fan Baking - recommended accessories
- Cooking tables for test institutes
- CARE AND CLEANING
- Notes on cleaning
- How to clean: Cavity embossment
- How to remove: Shelf supports
- How to use: Pyrolytic Cleaning
- CAUTION!
- Before the Pyrolytic Cleaning:
- Pyrolytic Cleaning
- Cleaning Reminder
- How to remove and install: Door
- How to replace: Lamp
- Back lamp
- TROUBLESHOOTING
- What to do if...
- Service data
- We recommend that you write the data here:
- ENERGY EFFICIENCY
- Product Information and Product Information Sheet
- Energy saving
- Cooking with fan
- Residual heat
- Keep food warm
- Cooking with the lamp off
- Moist Fan Baking
- MENU STRUCTURE
- Menu
- ENVIRONMENTAL CONCERNS
- TOOTE KIRJELDUS
- Üldine ülevaade
- Lisatarvikud
- TURINYS
- SAUGOS INFORMACIJA
- 3.2ПрицВрсТуВаБеHa NeчКаТа 3a Плakap
- 4.ОПИС HA ПОН3ВОДOT
- Onwt npereid
- 4.2Додатоцn
- KOHTPOJIHA TABJIA
- Tpkalza konsto ce NOBnekyBaat
- Перлед на koHTpoJHaTа6la
- Yekop 1 Yekop 2 Yekop 3 Yekop 4
- Yekop 1 Yekop 2 Yekop 3
- Kaoko da oTcTaHeTe:Држачи Ha peWeTkn
- Haun Ha KopncTeHe: YncteBe co npOJn3a
- PENEyPENEYBAHbE!
- BHIMAHNE!
- NotceTHNK 3a YnCteHbe
- Kako da n3BaIte n da MOHTnPate: Bpata
- TOrBeHe co BeHTnlaTop
- PpeocTaHaTToNnHa
- OdpKyBaHe Ha TOnnHa Kaj XpaHaTa
- TOTBeHe co NCKnyeHa CBETNJa
- NeuTe co BJaKeH Bo3dyx
- CTPYKTYPEA HA MEHN
- Mehn
- 16.ΓP涅KA 3A OKOJIINHATA
- CUPRINS
- INFORMA TII PRIVIND SIGURAN T A
- Fixarea aparatului de mobilier
- DESCRIEREA PRODUSULUI
- COДЕРЖAHNE
- CBEdENI NO TEXHnke B3OpACHOCTN
- Be3oNaChOcTb DeTei N JnC OrgaHnueHHbIMN BO3MOxHOCTaMn
- Tnbl Ka6eJeN, npiroDhbI e IJIyCTaHOBKn nn 3ameHbIB Ebpone:
- 06uaMoHoctb (Bt)
- KpenIeHne dYxOBOrO uKaΦa K KyxOHHO Me6eJIi
- 4.ОПИСАНЕ ПИБОРА
- O6nn o63op
- Akceccyapbl
- HnkaTopbI, oTo6paXaembIe Ha nucnlee
- IIO OKOHaHHn npHroTOBneHna napy:
- Cnoc06 hactpoyn: OToPouka nyska
- War 1 War 2
- War 3 War 4
- War 5 War 6
- 9.ИСПОЛьЗOBAHNEДОПОЛНITEЛБHBIX ПИНадлEXЖHOCTeI
- YctaHOBka npHaJneXHocTei
- PeweTka:
- Tepmoцун
- Heo6xoJIMO yctaHOBtB Dba 3HaueHn TaepaTpybI:
- Приименени:Термоцун
- War 5
- War 6
- BHIMAHHE!
- 10.ДОПОЛНТЕЛБHBIEФУHKЦИ
- 10.1Блokир.KHONOK
- 3TaФункипpeDoTbpaaetCnyaHoeI3MeHeHnepeKMa np6opa.
- ABToMaTnueCKeBbIKJIoueHne
- BeHTnIaTOp oxJaXdEHHa
- NOJE3HbIE COBETbl
- Pekomehdaun no npiroTOBneHIO
- 11.2Влжная ковсия
- Ta6nucbl npiroTOBneHna Ira TectnpyuOx OpraHn3aun.
- ChyTne: HappaBlaIoUe dIa npotNBHei
- ПОИСК И UYSTРАЕНЕ HENСПAPВHOCTЕN
- YTo deJaTb, ecn...
- Pn6op He BkIouaetcNn Hn He HarpeBaetc
- KOMNOHEThbI
- KoDbI Own6ok
- OuInCTka
- 13.2ДаHHbIe O TeXHnueckOM O6cJIyXnBaHn
- PnroTOBJIeHHe c nCNoJIb3ObaHHem BeHTNJrTopa
- OctatouHoe TENIO
- BlaXHa KOHBeKzna
- CTPYKTYPEA MEHIO
- MeHIO
- CAJPKAJ
- INHΦOPMAUJIJE O B6E3BEdHOCTN
- Be36eHocT deue n ocetJBnBnx oc06a
- Onstemepe 6e36eHoctn
- 2.БE3БЕДHOCHA YПУТСТВА
- MoHTaKa
- YNO3OPEHBe!
- 2.2ПрикJBуYeHeHa eJIeKTpNHy MpeJy
- YN03OPEHBe!
- Tinobn Ka6noBa 3a nHcTaIauJy nn 3ameHy 3a Ebpony:
- Ykynha chara (W) Ipecek ka6na (mm2)
- Ynotpe6a
- Hera n Ynshene
- Anapat ce He yKbuyje nn He 3arpeBa
- KOMnoHeHTe
- Upevnenie rury k linke
- POPIS VYROBKU
- KAZALO
- VARNOSTNE INFORMACije
- 3MICT
- HΦOPMAUJI 3 TEXHIK N E3NEKN
- Be3peka iTei I Bpa3JIbIcx oci6
- 3aŋbHa 6e3neKa
- IHCTPYKl3 TEXHIKN BE3NEKN
- BctaHOBJIeHHJ
- NONEPEDKEHHRA!
- TnN Ka6eIb DnB BCTaHOBneHHa 6o 3amHn dnn CbpOnn:
- 3araJbHa noTyK-HicTb (Bt)
- PonepeuHn nepeTnKa6eJIO (MM²)
- KopncTyBaHHa
- NONEPENKHHI
- NONEPEDKEHHI
- Dorigla i uueneHHa
- NONEPEDKEHHRA
- 4.ОПИСВИРОБY
- 3aŋbHn oŋra
- Akcecyapn
- ПАHEЛь KEpyBAHHЯ
- Bucybhi nepemkaui
- HanaHTyBaHHa: Donomora npn roTyBaHHi
- BcTaHOBJIeHHaKceCyapiB
- Kom6iHOBaHa pewiKa:
- DeoBniiK/Γn6oke deko:
- Tepmouzn
- Cnoci6 BnKOpncTaHn: TepmoUy
- NONEPEJXEHH!
- Bôlora KoHBekciä
- Bonora konBekzij - peKoMeHdoBaHi akcecyapn
- YCYHEHЯ ПЮБЛЕМ
- 13.1ДiВ pa3i BnHnKHeHHЯ npo6JIeM
- Ppnaad He BMnKaCTbca a6o He po3irpiBaCTbca
- Pp6Jema PpekoHaTecs, 0
- KOMHOHEHTN
- Pp6Jema PpekoHaTecr, 10
- KoHn NOMNIOK
- BidobpaKeHHa HnCnJIeI NpekoHaTeCe, 10
- OuHnHn
- 13.2Даию TeXHicHoro obcnyroByBaHHa
- PekomeHnycMo 3aNcaTu dahi TyT:
- EHEPFOEΦEKTBHICTb
- PiDtpmMyBaHHa CtpaBn TeNIO
- TOTyBaHH3 BUMKHeHOJ JAMNOO
- Bolora KoHBeKzia
- CTPYKTPA MEHIO
Brand : ELECTROLUX
Model : EOD4P57H
Category : Electric oven