Zonder Klaar - Vacuum Cleaner Zeegma - Free user manual and instructions
Find the device manual for free Zonder Klaar Zeegma in PDF.

User questions about Zonder Klaar Zeegma
0 question about this device. Answer the ones you know or ask your own.
Ask a new question about this device
Download the instructions for your Vacuum Cleaner in PDF format for free! Find your manual Zonder Klaar - Zeegma and take your electronic device back in hand. On this page are published all the documents necessary for the use of your device. Zonder Klaar by Zeegma.
USER MANUAL Zonder Klaar Zeegma
text_image
Technical diagram showing the installation of a vacuum cleaner with labeled parts and steps in Chinese6

flowchart
graph TD
    A["6 AUTO"] --> B["ECO"]
    B --> C["MAX"]
    C --> D["8.7% MAX"]
    D --> E["1 AUTO ECO MAX"]
    E --> F["4"]
    E --> G["5"]
7

text_image
Diagram illustrating the process of a food preservation device, showing step-by-step transformation from a container to a granular base.8

flowchart
graph TD
    A["Valve with attached components"] --> B["Assembly Step 1"]
    B --> C["Assembly Step 2"]
    C --> D["Assembly Step 3"]
    D --> E["Battery with Cable"]
    style A fill:#f9f,stroke:#333
    style B fill:#ccf,stroke:#333
    style C fill:#cfc,stroke:#333
    style D fill:#fcc,stroke:#333
    style E fill:#ffc,stroke:#333
text_image
9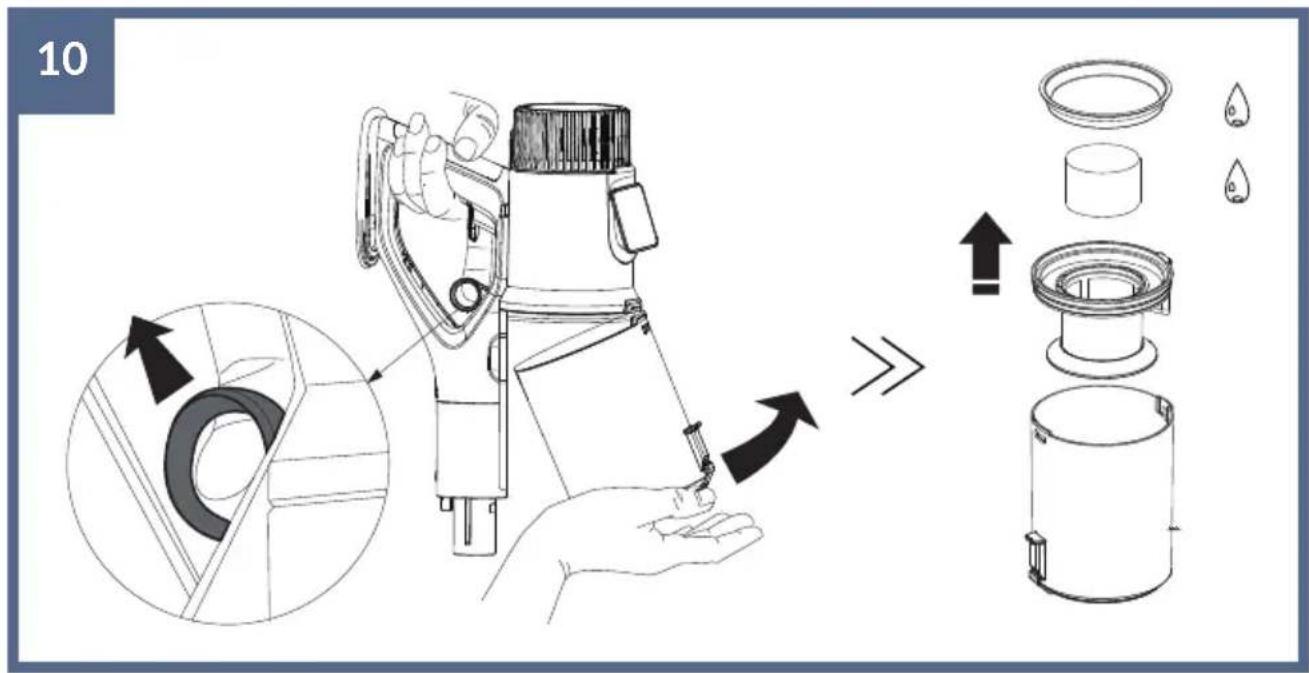
text_image
10 →
natural_image
Technical line drawing of a mechanical component with a highlighted section and arrow (no text or symbols)Introduction
Dear customer!
Thank you for placing trust in us and choosing Zeegma.
We provide you with a product perfect for everyday use thanks to the use of high-quality materials and modern solutions.
We are convinced that the product will meet your requirements as it has been manufactured with utmost care.
Before you use the product, please read this operating manual carefully.
Should you have any remarks or questions concerning the product, please do not hesitate to contact us:
support@zeegma.com
Important
Please read this manual before you start using the device to see its functions and use them in accordance with intended use.
- The device can be used by children aged at least 8 and persons with limited physical, sensory or mental capabilities, as well as persons who lack relevant knowledge and experience in using the device, provided they actions are supervised or they have been instructed on safe use of the device and related risks beforehand.
• This device is not a toy. Do not let children play with it.
• Children must not clean and maintain the device if unattended.
- Keep this manual for future reference.
- Do not leave the active device unattended.
- Use only the storage battery supplied or recommended by the manufacturer.
- Do not use the equipment when the hole is blocked (e.g. with dust or hair). Regularly clean the device.
- Do not try to repair the device on your own (it does not apply to suggestions from the chapter: Troubleshooting). If the device does not work properly, contact the manufacturer's authorized service center.
- The device is supplied with a storage battery which can be repaired by competent persons only.
- Do not use the vacuum cleaner if the flow of air is limited. When
holes of the floor brush are locked and the device does not suck air, please switch the product off and unplug. Only then can you remove all obstacles. When the cleaning procedure is over, put the storage battery back and turn the device on.
- After every cleaning, make sure the brush, filters and dust bin have been properly mounted.
- Use filters and parts supplied or recommended by the manufacturer. Use of filters and parts which have not been recommended by the manufacturer may violate the manufacturer's guarantee.
- Do not use the device without supplied tips, dust bin and filters.
- Before you mount and use the device, make sure all filters have been properly dried.
- Do not immerse the device and turbo brush in water or other liquids.
- If the device acts up, has been dropped, damaged, left out of home, contact the manufacturer's authorized service center.
- Do not touch the charger or equipment if your hands are wet.
- When you are assembling or disassembling the floor brush, the device must be off and unplugged.
- To charge the storage battery, use only the power adapter supplied together with this device.
- Do not use the device to vacuum hard or sharp items (such as broken glass, nails, pins, screws, coins and similar).
- Do not use the device to vacuum smoking or burning pieces (such as matchsticks, butt ends, hot ash), micro-dust (such as lime, cement, wood pieces, plaster).
- Do not use the device to vacuum liquids, particularly inflammable fluids (such as petrol, petroleum oil or lighter fuel), and chemicals (such as acids, detergents).
- Do not use the device if any of the components gets hot, emits abnormal sounds or odors.
CE

The product complies with requirements of EU directives.
Pursuant to the Directive 2012/19/EU, this product is subject to selective collection. The product must not be disposed of together with domestic
waste as it may pose a threat to the environment and human health. The worn-out product must be handed over to the electrics and electronics recycling center.
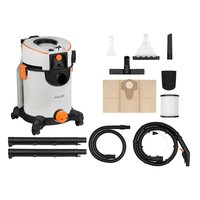
Description (fig. 1)
- Vacuum cleaner main unit
- Storage battery
- Tube
- Electric turbo brush
- Wall holder with a charging feature
- Crack nozzle
- Upholstery nozzle
- Nozzle with horsehair
- Charger
- Replaceable roll for soft surfaces
-
Replaceable roll for hard surfaces
-
Flexible tube (additional accessory, depending on a variant purchased)
-
Small turbo brush for upholstery and soft surfaces (additional accessory, depending on a variant purchased)
Charging
Note! Remember to switch the vacuum cleaner off before you start charging! The display will inform you about charging automatically.
- When the battery is full, the device will stop charging automatically.
- You can connect the device directly to the source of charging (fig. 2).
- You can disconnect and charge the storage battery directly by connecting it to the charger (fig. 3).
- You can charge the device on a wall holder, connected to the charger (fig. 4).
How to use (fig. 5)
Switch the device on by pressing and holding the central key on the handle. You can choose an additional option and press the side key to lock the on/off switch.
Select the desired working mode on the touch display. When you switch the device on and off, the auto mode always activates.
Description of the display (fig. 6)
- Suction power
-
Battery level
-
Selected working mode
- Tank level and/or filter clogging indicator
- Brush locking indicator
- Change of working modes
How to empty the dust bin
Before you empty the bin, switch the device off. Press the bin flap releasing key and empty it. Use the device only if the dust bin has been properly installed (fig. 7).
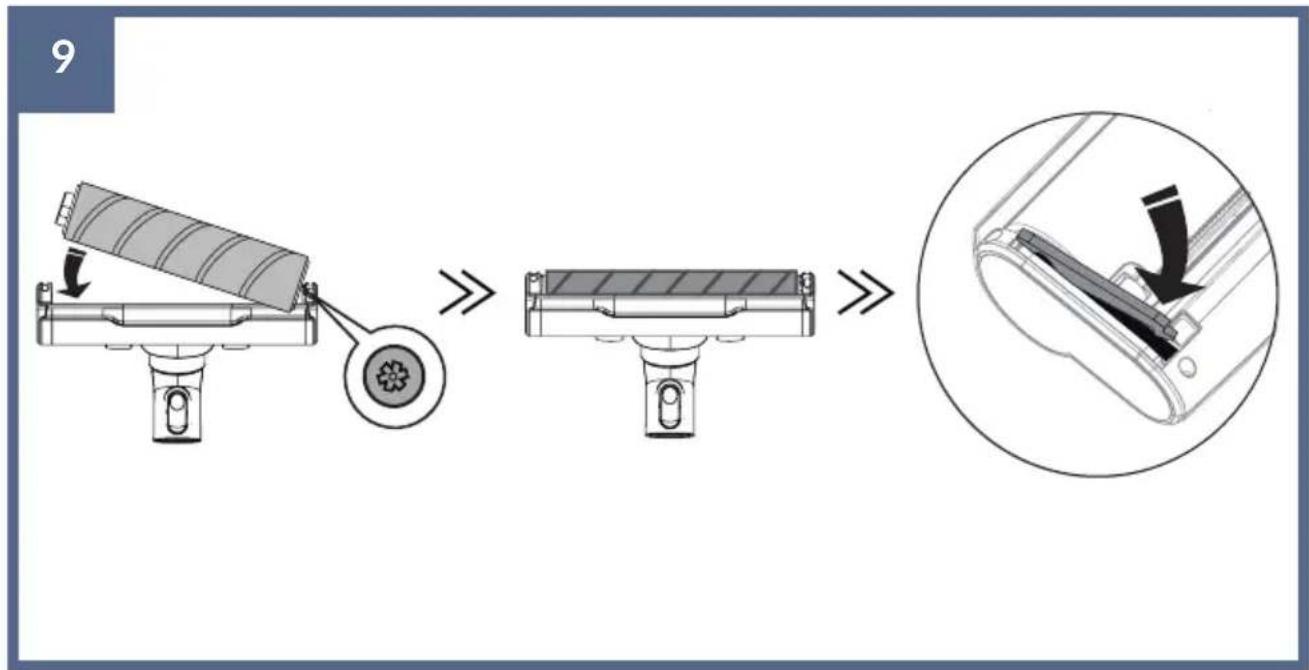
How to replace the rotating roll (fig. 8)
- Unplug the device.
- To remove the roll, hold the side switch at the bottom of the turbo brush, a side valve will pull out. Take it out and then take the round roll out.
- Insert the roll to install it, and then lock the valve in the turbo brush.
Note! Pay attention to precise installation of the round brush. Wrong installation may cause the brush to malfunction (fig. 9).
How to clean and maintain (fig. 10)
- Before you start cleaning, unplug the device.
- To remove the dust bin, pull the trigger (marked in fig. 10) and pull the tank out.
- Remove the microfiber filter, unscrew and take the filtration system out – wash under running water.
- HEPA filter is at the back of the device – do not wash in water, replaceable filter.
- Wash the interior of the dust bin under running water, clean the remaining part of the device with a wet cloth.
- Wipe the dust sensor with a wet cloth.
- Use only dry parts and filters.
- If you can notice that the suction power drops, clean filters in the first place.
- Do not make the device dry off in the sunlight or in humid area.
- To put the dust bin back, put the bin until you can hear a „click”.
Important! Do not wash filtering elements in the washing machine and do not dry them with a hair drier.
Note! Do not use the brush to wash filters. Make sure you do not damage
the filter refill. Make sure all pieces are dry before you put them into the vacuum cleaner.
Important! Regularly wash filters and use a wet cloth to wipe the dust sensor which is responsible for regulation of the flow in auto mode.
* Dust sensor is located in the hollow, under the dust bin (fig. 11).
Troubleshooting
| Problem Cause Solution | ||
| The product does not work | Storage battery is flat Charge | the storage battery |
| Storage battery life is over Replace the storage battery | ||
| Damaged motor Contact the manufacturer | ||
| The vacuum cleaner has no suction power or its power is low | Filter in the device is clogged up | Carefully wash the filter under running water. Precisely dry off before use to make sure bacteria do not grow |
| Dust bin is full Empty the dust bin | ||
| Dust bin is not properly installed | Install the dust bin correctly | |
| Replaceable roll is blocked Clean the replaceable roll | ||
| HEPA filter must be replaced Buy a new HEPA filter and replace it very 6 months | ||
| The battery does not charge | Poor contact between the device and a docking station | Do not touch or move the docking station as long as you can see a charging light. |
| Change the charging method, connect the device straight to the charger | ||
| The charging light does not glow | Storage battery stopped working | Contact the manufacturer |
| The docking station is not connected to power supply. | If the cable is connected to power supply, make sure it is not damaged | |
| Air coming out of the vacuum cleaner emits an unpleasant odor | Filter is not clean Wash the filter and dry the filter off before use to prevent growth of bacteria or replace the filter | |
| During the first few cycles of operation, the device may emit a smell of plastic. It is a normal phenomenon | The smell of plastic will vanish after some time | |
The pictures are for reference only. The real design of the products may differ from the pictures presented.
DE
Einleitung
Liebe Kunden!
EU Declaration of conformity
- BLACK: 5903771701556
- Name and address of the manufacturer or his authorized representative:
BrandLine Group Sp. z o. o.
- This declaration of conformity is issued under the sole responsibility of the manufacturer:
BrandLine Group Sp. z o. o.
- Subject of declaration: ZONDER KLAAR
- The subject of this declaration mentioned above is in conformity with the relevant requirements of the EU harmonization legislation:
2014/35/EU - LVD Directive
2014/30/EU - EMC Directive
2011/65/EU - RoHS Directive
- References to the relevant harmonized standards used, or references to other technical specifications, for which compliance is declared:
EN 60335-1:2012+A11:2014+A13:2017
+A1:2019+A2:2019+A14:2019
EN 60335-2-2:2010+A11:2012+A1:2013
EN 62233:2008
EN 55014-1:2017
EN 55014-2:2015
EN IEC 61000-3-2:2019
EN 61000-3-3:2013+A1:2019
IEC 62321-3-1:2013
IEC 62321-4:2013+A1:2017
IEC 62321-5:2013
IEC 62321-6:2015
IEC 62321-7-1:2015
IEC 62321-7-2:2017
IEC 62321-8:2017
- Additional information:
Signed on behalf of: BrandLine Group Sp. z o. o.
Poznań, 16.07.2021
(place and date of issue)

text_image
WICEPREZES ZARZADU Jan Libera Member of the board (signature)ZEEGMA
2011/65/EU - RoHS Directive
2014/30/EU - EMC Directive
2011/65/EU - RoHS Directive
2014/30/EU - EMC Directive
2011/65/EU - RoHS Directive
2014/30/EU - EMC Directive
2011/65/EU - RoHS Directive
2014/30/EU - EMC Directive
2011/65/EU - RoHS Directive
2014/30/EU - EMC Directive
2011/65/EU - RoHS Directive
2014/30/EU - EMC Directive
2011/65/EU - RoHS Directive
2014/30/EU - EMC Directive
2011/65/EU - RoHS Directive
2014/30/EU - EMC Directive
BrandLine Group Service – Support
List of Authorized Service Centers:
www.zeegma.com/en/service
Detailed warranty conditions are available on the website:
Thank you for purchasing our product!