BVL 31 Bp - Vacuum Cleaner Kärcher - Free user manual and instructions
Find the device manual for free BVL 31 Bp Kärcher in PDF.
| Vacuum type | Backpack vacuum cleaner |
| Brand | Kärcher |
| Model | BVL 31 Bp |
| Power supply | Lithium-Ion battery 36 V (not included) |
| Nominal power | 350 W |
| Tank capacity | 3 L |
| Maximum airflow | 35.4 l/s |
| Maximum vacuum | 18.9 kPa (189 mbar) |
| Runtime (normal mode) | 16 to 41 min depending on battery |
| Runtime (Eco mode) | 26 to 73 min depending on battery |
| Operating weight | 5.0 kg |
| Dimensions (L x W x H) | 220 x 320 x 390 mm |
| Hose diameter | 35 mm |
| Hose length | 1.0 m |
| Noise level | 65 dB(A) |
| Filtration | Motor protection filter + felt bag; HEPA filter optional |
| Use | Professional (hotels, schools, hospitals, etc.) |
| Eco mode | Yes, dedicated button |
| Included accessories | Floor nozzle, telescopic tube, crevice nozzle, shoulder straps, belts |
| Protection class | III |
| Maintenance | Replace filter bag, motor protection filter; HEPA once a year |
| Safety | Automatic shutdown on overheating, motor protection |
| Warranty | According to country conditions |
Frequently Asked Questions - BVL 31 Bp Kärcher
User questions about BVL 31 Bp Kärcher
0 question about this device. Answer the ones you know or ask your own.
Ask a new question about this device
Download the instructions for your Vacuum Cleaner in PDF format for free! Find your manual BVL 31 Bp - Kärcher and take your electronic device back in hand. On this page are published all the documents necessary for the use of your device. BVL 31 Bp by Kärcher.
USER MANUAL BVL 31 Bp Kärcher
natural_image
Line drawing of a vacuum cleaner with coiled hose and control panel (no text or symbols)Deutsch 5
English 9
Français 13
Italiano 17
Nederlands 21
Español 25
Português 29
Dansk 33
Norsk 37
Svenska 41
Suomi 45
Ελληνικά 49
Türkçe 54
Русский 58
Magyar 63
Čeština 67
Slovenščina 71
Polski 75
Românește 79
Slovenčina 83
Hrvatski 87
Srpski 91
Български 95
Eesti 100
Latviešu 104
Lietuviškai 108
Українська 112
中文 116
العربيئة 120
B
natural_image
Line drawing of various household appliances including a vacuum cleaner, hose, and accessories (no text or labels)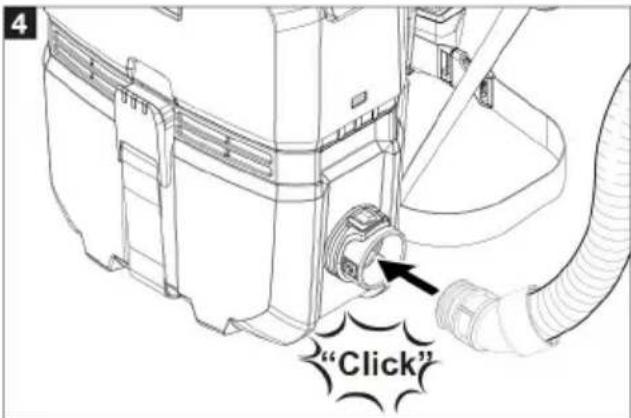
natural_image
Technical diagram of a mechanical component with labeled parts (no readable text or symbols)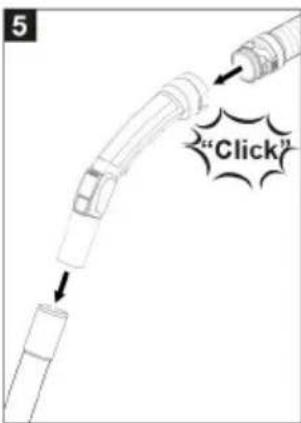
natural_image
Line drawing of a vacuum cleaner with a black arrow indicating the component (no text or symbols present)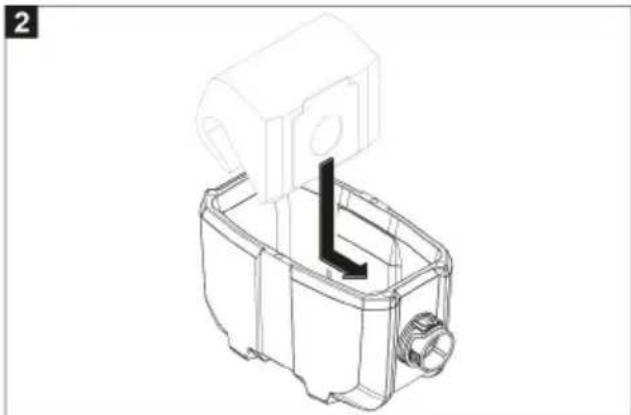
natural_image
Technical line drawing of a mechanical component with a black arrow indicating a specific feature (no text or symbols present)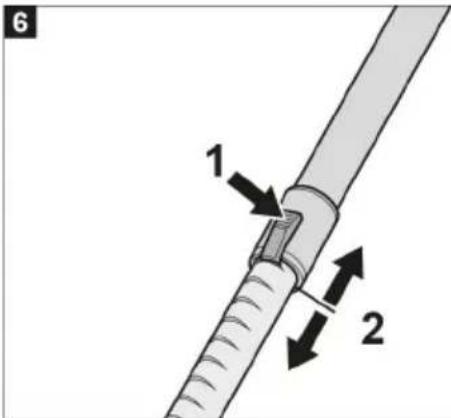
natural_image
Technical line drawing of a mechanical component with arrows indicating parts of an assembly (no text or symbols present)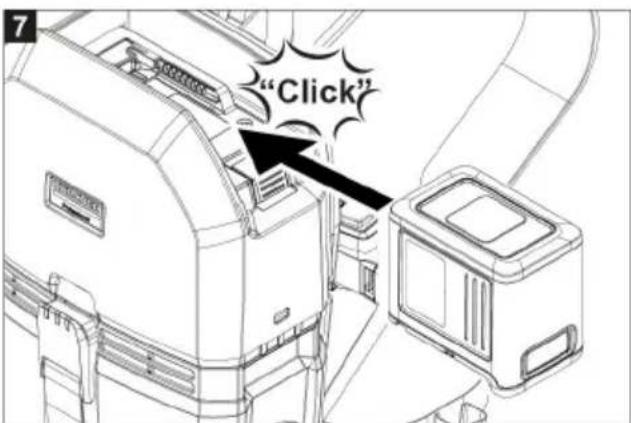
natural_image
Illustration of a person adjusting a belt buckle with arrows indicating motion (no text or symbols)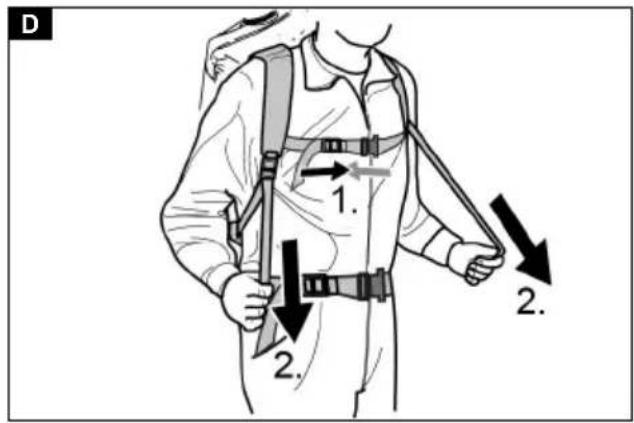
natural_image
Technical line drawing of a mechanical component with an arrow indicating a specific part (no text or symbols present)Inhalt
Chairman of the Board of Management

S. Reiser
Director Regulatory Affairs & Certification
71364 Winnenden (Germany)
Tel.: +49 7195 14-0
Fax: +49 7195 14-2212
Winnenden, 2020/10/01
Technische Daten
Environmental protection....9
Intended use....9
Safety information 9
Description of the device 9
Symbols on the device 10
Preparation.... 10
Initial startup 10
Operation.... 10
Transport 11
Storage.... 11
Care and service 11
Troubleshooting guide.... 11
Warranty 11
Accessories and spare parts 11
Declaration of Conformity.... 12
Technical data 13
General notes


Read these original instructions and the enclosed safety instructions before using the device for the first time. Act in ac-
cordance with them.
Keep both books for future reference or for future owners.
- If the operating instructions and safety instructions are not observed, the device can be damaged and dangers could arise for users and other persons.
- Notify the dealer immediately in the case of shipping damage.
- Check the package contents when unpacking for missing accessories or for damage.
Environmental protection

The packing materials can be recycled. Please dispose of packaging in accordance with the environmental regulations.

Electrical and electronic appliances contain valuable, recyclable materials and often components such as batteries, rechargeable batteries or oil, which - if handled or disposed of incorrectly - can
pose a potential threat to human health and the environment. However, these components are required for the correct operation of the appliance. Appliances marked by this symbol are not allowed to be disposed of together with the household rubbish.
Notes on the content materials (REACH)
Current information on content materials can be found at: www.kaercher.com/REACH
Intended use
⚠ WARNING
Health risk
Inhalation of dusts that are harmful to health Do not use the device for vacuuming up dusts that are harmful to health.
ATTENTION
Damage to the device
Short-circuit due to high levels of humidity
Only use and store the device indoors.
- This universal vacuum cleaner for carpets is intended for dry cleaning floor and wall surfaces.
- This device is suitable for commercial use, e.g. in hotels, schools, hospitals, factories, shops, offices, and rental companies.
Safety information
Pacemaker
⚠️DANGER
Danger due to radiated high frequency/electric magnetic fields
Health risk when wearing a pacemaker
Observe the following safety instructions when handling the device.
- If you are wearing a pacemaker, we recommend that you consult your doctor or the manufacturer of the pacemaker about possible precautions before operating the device.
- Not all types of pacemakers are equally resistant to radiation in the immediate vicinity of radiated high frequency/electric magnetic fields, which could lead to problems in the operation of the device.
- If your doctor can not guarantee your safety, do not use the device!
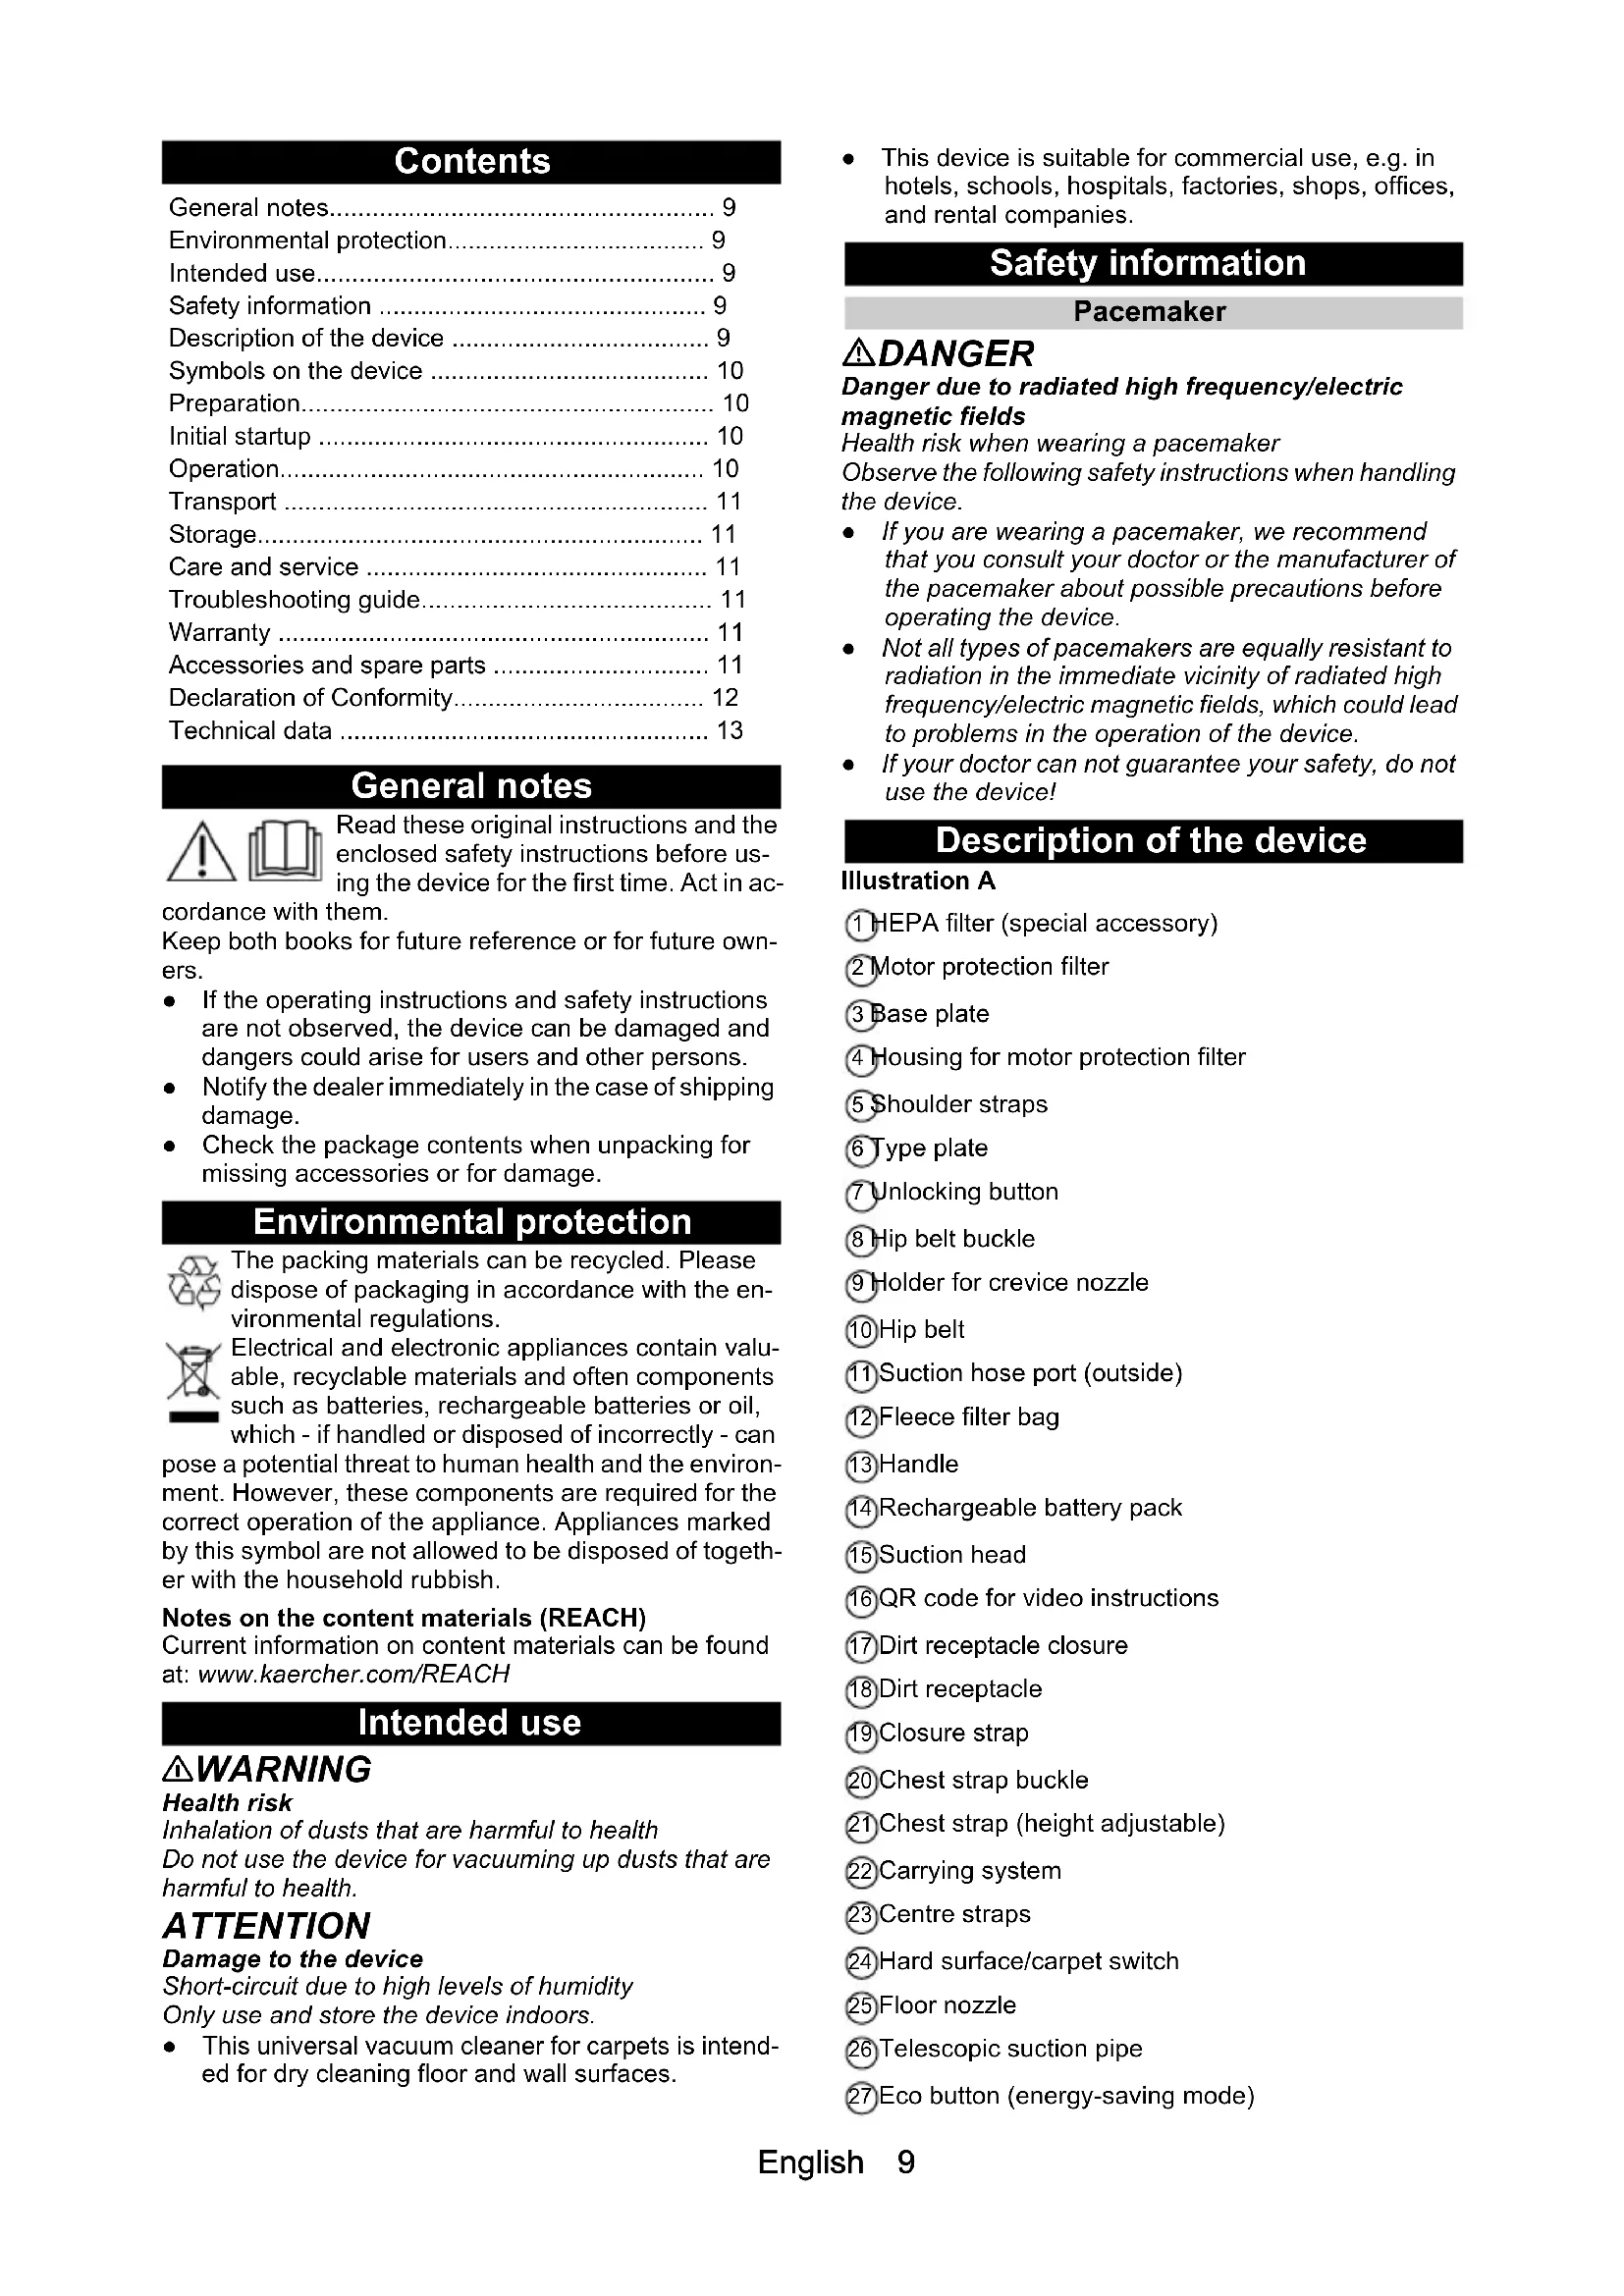
Description of the device
Illustration A
① HEPA filter (special accessory)
② Motor protection filter
③ Base plate
④ Housing for motor protection filter
⑤ Shoulder straps
⑥ Type plate
⑦ Unlocking button
⑧ Hip belt buckle
⑨ Holder for crevice nozzle
⑩Hip belt
⑪ Suction hose port (outside)
⑫Fleece filter bag
13Handle
⑭Rechargeable battery pack
15 Suction head
⑯ QR code for video instructions
⑰Dirt receptacle closure
⑱Dirt receptacle
⑲Closure strap
20 Chest strap buckle
21 Chest strap (height adjustable)
22 Carrying system
23 Centre straps
24 Hard surface/carpet switch
25 Floor nozzle
26Telescopic suction pipe
27 Eco button (energy-saving mode)
28 Charge indicator
29 Main switch
③0 Control unit
③1 Suction control
③2 Angle piece
③3 Suction hose
Colour coding
- Control elements for the cleaning process are yellow.
- Control elements for maintenance and servicing are light grey.
Symbols on the device
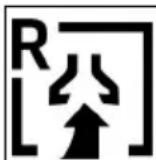
Suction hose connection for right-handed users
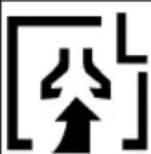
Suction hose connection for left-handed users

QR code for video instructions

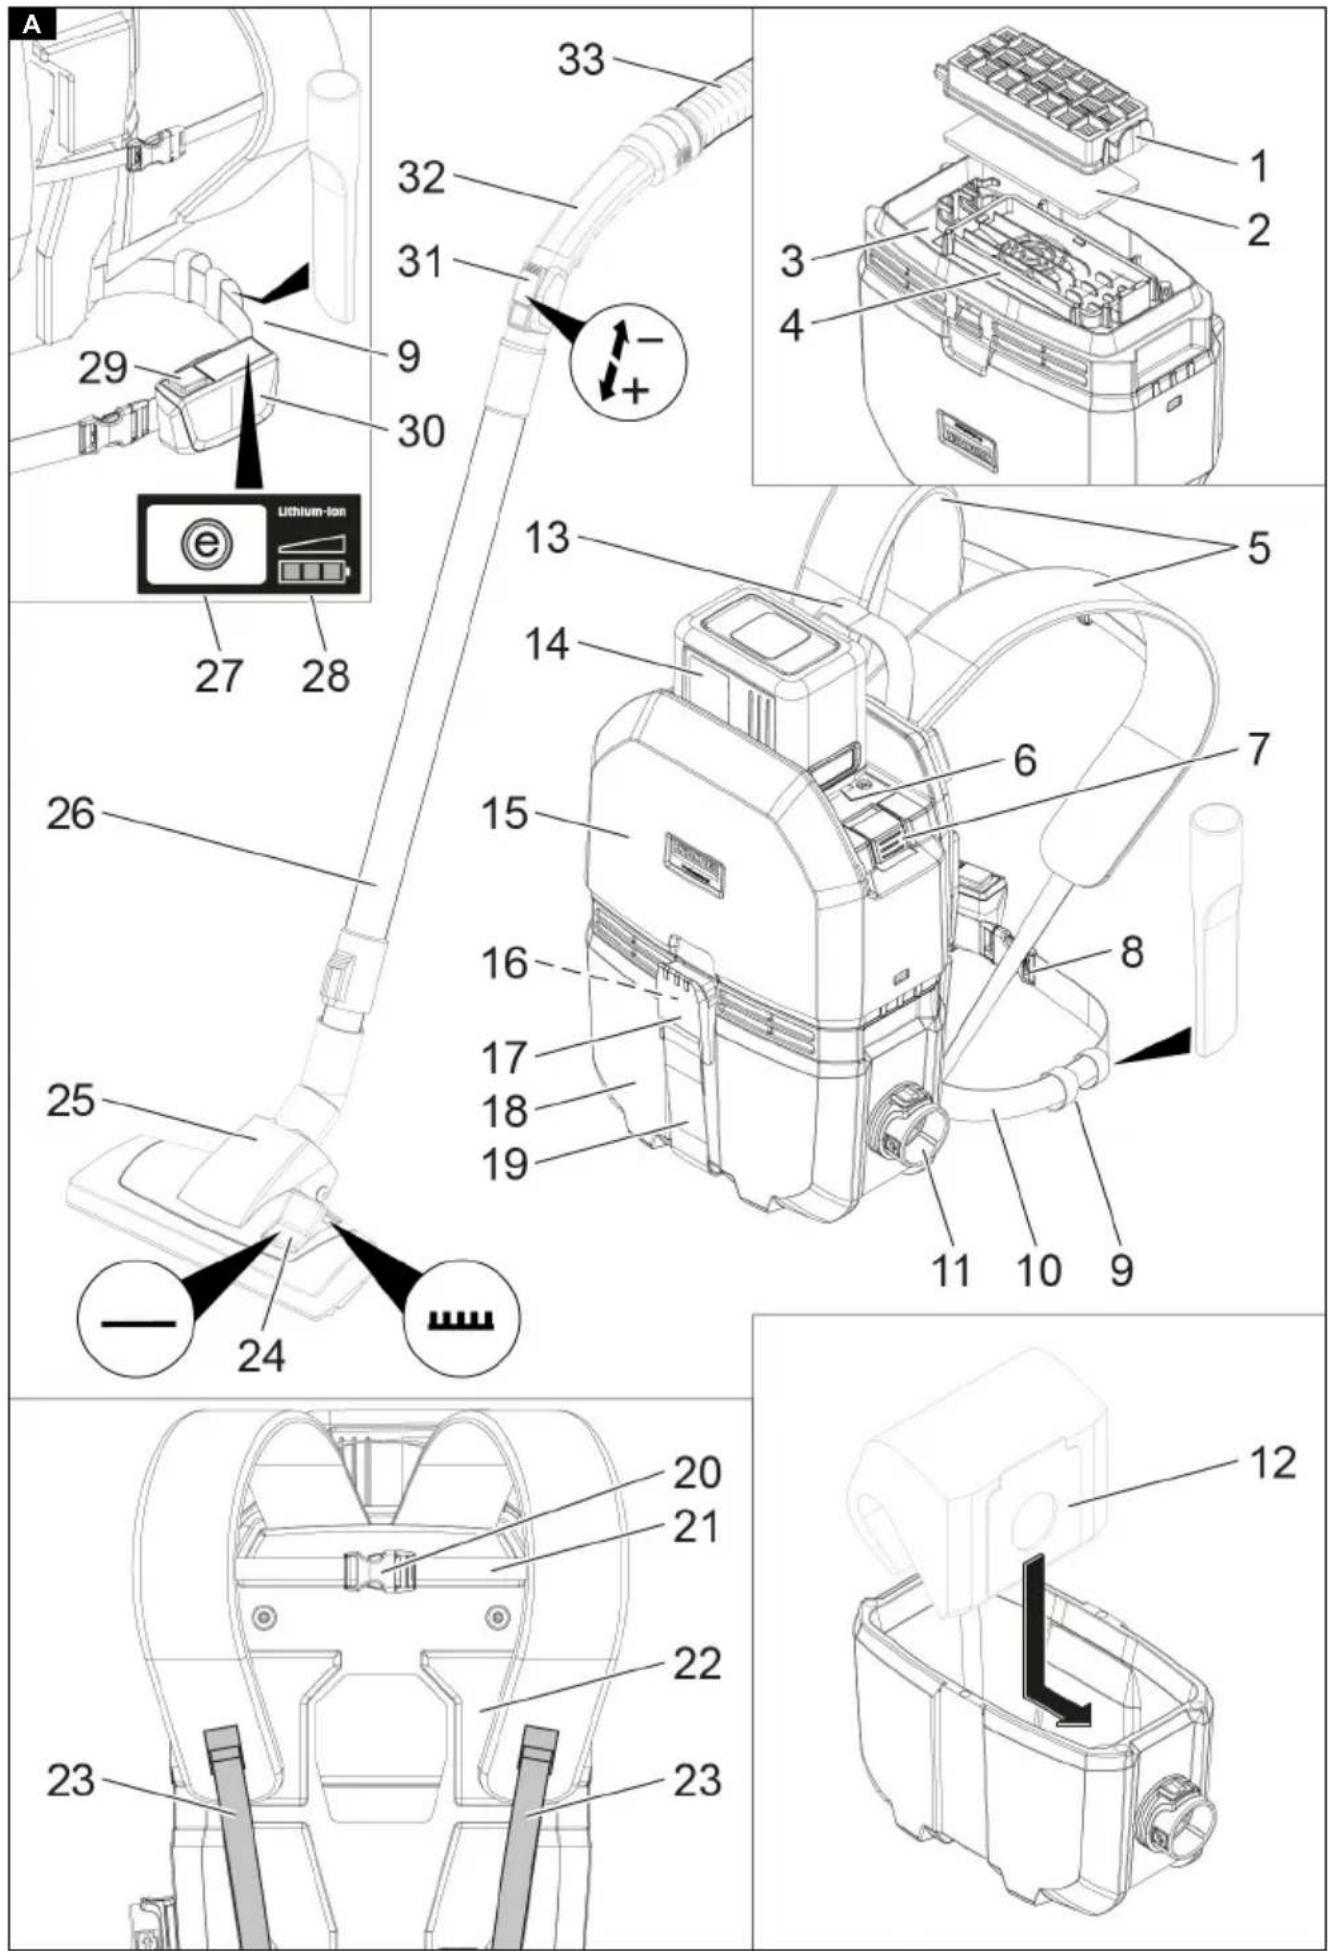
Preparation
- Unpack the device and install the accessories. Illustration B
Initial startup
Inserting the fleece filter bag
Note
Do not use the device without a fleece filter bag.
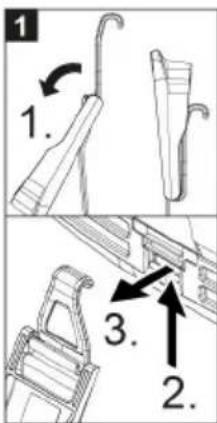
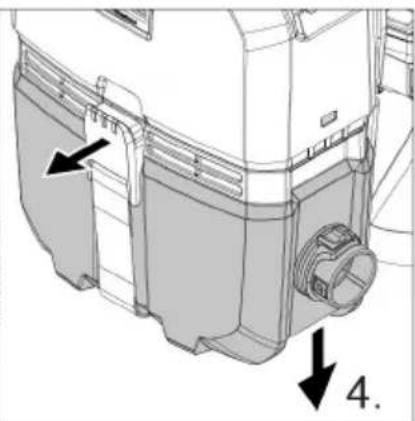
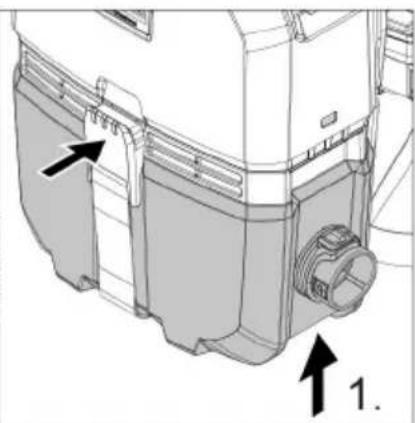
- Unlock and remove the dirt receptacle.
Figure 1
- Pull the fleece filter bag with rubber flange over the suction hose port (inside).
Figure 2
- Fit and lock the dirt receptacle.
Figure 3
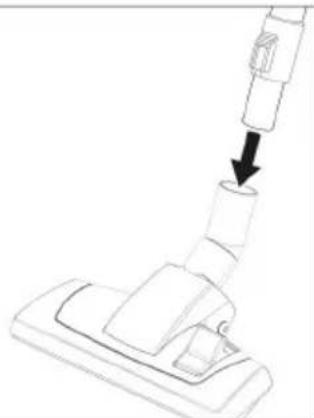
Inserting the battery pack
- Slide the battery pack into the battery holder and lock it in place.
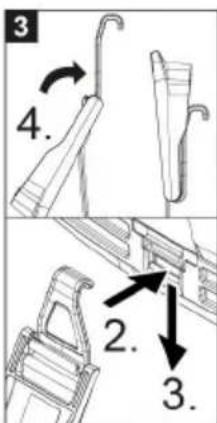
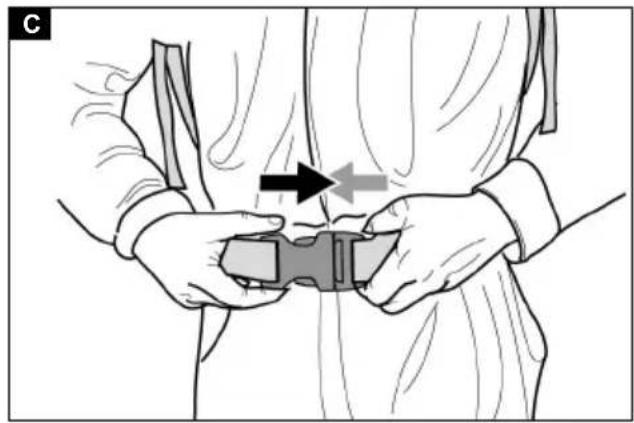
Adjusting the hip belt, chest strap and shoulder straps
- Put the device on its back.
- Engage the buckle of the hip belt and adjust the hip belt.
- Engage the buckle of the chest strap and adjust the chest strap (height adjustable). Adjust the device to the body by pulling on the centre straps.
Illustration C
Illustration D
Charging the battery pack
Note
Please read the operating instructions of the charger manufacturer, especially the chapters on safety instructions!
Note
Please read the operating instructions of the battery pack manufacturer, especially the chapters on safety instructions!
Note
The battery pack is partially charged on delivery. Charge before use and when necessary.
Note
The battery pack can only be charged when it is removed.
- Press the unlocking button and remove the battery pack.
- Charge the battery pack according to the operating instructions of the charger manufacturer and the battery pack manufacturer.
Operation
ATTENTION
Danger due to technical defect
Risk of damage to the device
Immediately switch off the engine as the suction performance decreases.
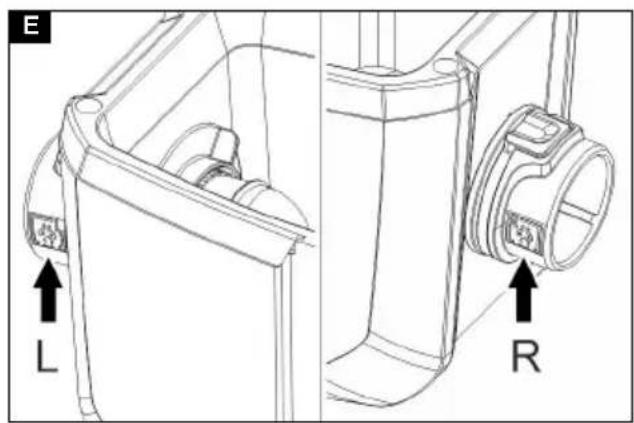
Aligning the dirt receptacle
- Align the dirt receptacle so that the suction hose comes out on the working side when the carrying system is worn (right/left-handed operation). The respective symbol can then be seen on the front. Illustration E
Switch on the device
- Switch on the device at the main switch.
Eco mode
Eco button (energy-saving mode): The device works with reduced suction performance. The battery run time is extended.
- To activate Eco-mode: Actuate the Eco button.
- To switch off Eco-mode: Actuate the Eco button repeatedly.
Note
For optimum suction results:
- Deactivate Eco mode for carpets.
• Vacuum hard surfaces with or without ECO mode.
Adjusting the suction power
- Regulate the suction power on the suction control.
Cleaning mode
- Set the floor nozzle switch to hard surface or carpet.
- Perform cleaning.
Switching off the device
- Switch off the device at the main switch.
Each time after use
- Empty the dirt receptacle.
- Clean the device and accessories with a damp cloth after use.
Storing the device
- Push in the telescopic suction pipe.
- Store the device in a dry room or hang it by the handle and secure it against unauthorised use.
Transport
△CAUTION
Failure to observe the weight
Risk of injury and damage
Be aware of the weight of the device during transportation.
- When transporting the device in vehicles, secure it to prevent it from slipping or overturning in accordance with the respective valid guidelines.
Storage
⚠CAUTION
Risk of injury and damage!
The device may tip over on sloping surfaces.
Be aware of the weight of the device during storage.
The device may only be stored indoors.
- Press the unlocking button and remove the battery pack to prevent discharge.
Care and service
⚠️DANGER
Danger of electric shock
Injuries due to touching live parts
Switch off the device.
Remove the battery pack.
Changing the fleece filter bag
-
Unlock and remove the dirt receptacle. Figure 1
-
Remove the fleece filter bag.
-
Pull the new fleece filter bag with rubber flange over the suction hose port (inside). Figure 2
-
Fit and lock the dirt receptacle. Figure 3
Replacing the HEPA filter
HEPA filter (special accessory): Change once a year
-
Unlock and remove the dirt receptacle.
-
Turn the suction head by 180°.
-
Unlock and remove the HEPA filter (special accessory).
-
Insert a new HEPA filter (special accessory) and click it into place.
-
Turn the suction head by 180°.
-
Fit and lock the dirt receptacle.
Replacing the motor protection filter
-
Unlock and remove the dirt receptacle.
-
Turn the suction head by 180°.
-
If necessary, unlock and remove the HEPA filter (special accessory).
-
Remove the motor protection filter.
-
Fit the new motor protection filter.
-
If necessary, insert the HEPA filter (special accessory) and click it into place.
-
Turn the suction head by 180°.
-
Fit and lock the dirt receptacle.
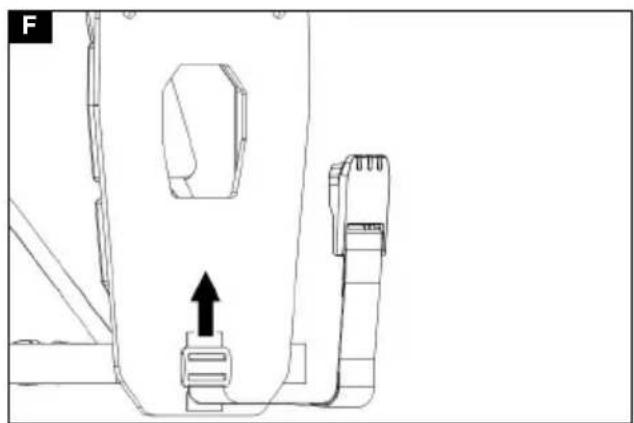
Readjusting the closure strap
-
Unlock and remove the dirt receptacle.
-
Readjust the closure strap so that the dirt receptacle lies tightly against the suction head. Illustration F
-
Fit and lock the dirt receptacle.
Troubleshooting guide
⚠️DANGER
Danger of electric shock
Injuries due to touching live parts
Switch off the device.
Remove the battery pack.
Note
The device must be switched off immediately if a malfunction occurs (e.g. filter breakage). The malfunction must be eliminated before switching the device on again.
The device stops during operation
The motor thermo-protector has triggered
-
Changing the fleece filter bag.
-
Replace the motor protection filter.
-
Check all parts for clogging.
-
Switch on the device.
Suction power decreases
-
Changing the fleece filter bag.
-
Correctly position/lock the dirt receptacle, readjust the closure strap if necessary.
Escaping dust when vacuuming
-
Change the faulty fleece filter bag.
-
Check the fit of the fleece filter bag.
-
Correctly position/lock the dirt receptacle, readjust the closure strap if necessary.
-
Insert the motor protection filter correctly.
No or insufficient suction performance
-
Remove any blockages from the suction nozzle, suction pipe or suction hose.
-
Replace the defective suction hose.
-
Changing the fleece filter bag.
-
Correctly position/lock the dirt receptacle, readjust the closure strap if necessary.
-
Replace the motor protection filter.
Device not running
-
Switch on the device.
-
Allow the overheated board to cool down.
-
Charge the battery pack.
-
Insert the battery pack.
Customer Service department
If the malfunction cannot be corrected, the device must be checked by the Customer Service department.
Warranty
The warranty conditions issued by our relevant sales company apply in all countries. We shall remedy possible malfunctions on your appliance within the warranty period free of cost, provided that a material or manufacturing defect is the cause. In a warranty case, please contact your dealer (with the purchase receipt) or the next authorised customer service site.
(See overleaf for the address)
Accessories and spare parts
Only use original accessories and original spare parts.
They ensure that the appliance will run fault-free and safely.
Information on accessories and spare parts can be found at www.kaercher.com.
Spare parts list
Only use KÄRCHER original battery packs, not non-rechargeable batteries.
| Description Order num- | ber, spare part | Item No., unpacked |
| Battery pack Battery Power+ 36/75 | 2.445-043.0 6 | .445-059.0 |
| Battery pack Battery Power+ 36/60 | 2.042-022.0 6 | .445-085.0 |
| Battery pack Battery Power 36/50 | 2.445-031.0 6 | .445-039.0 |
| Battery pack Battery Power 36/25 | 2.445-030.0 6 | .445-038.0 |
| Quick charger Battery Power+ 36/60 (EU) | 2.445-045.0 6 | .445-063.0 |
| Quick charger Battery Power+ 36/60 (GB) | 2.445-047.0 6 | .445-065.0 |
| Quick charger Battery Power+ 36/60 (AU) | 2.445-051.0 6 | .445-069.0 |
Declaration of Conformity
EU Declaration of Conformity
We hereby declare that the machine described below complies with the relevant basic safety and health requirements in the EU Directives, both in its basic design and construction as well as in the version placed in circulation by us. This declaration is invalidated by any changes made to the machine that are not approved by us.
Product: Dry vacuum cleaner
Type: 1.394-xxx
Currently applicable EU Directives
2006/42/EC (+2009/127/EC)
2011/65/EU
2014/30/EU
Harmonised standards used
EN IEC 63000: 2018
EN 55014-1: 2017 + A11: 2020
EN 55014-2: 2015
EN 60312-1: 2017
EN 60335-1
EN 60335-2-69
EN 62233: 2008
National standards used
The signatories act on behalf of and with the authority of the company management.
H. Jenner
Chairman of the Board of Management
S. Reiser
Director Regulatory Affairs & Certification
Documentation supervisor:
S. Reiser
Alfred Kärcher SE & Co. KG
Alfred-Kärcher-Str. 28 - 40
71364 Winnenden (Germany)
Ph.: +49 7195 14-0
Fax: +49 7195 14-2212
Winnenden, 2020/10/01
Declaration of Conformity (UK)
We hereby declare that the product described below complies with the relevant provisions of the following UK Regulations, both in its basic design and construction as well as in the version put into circulation by us. This declaration shall cease to be valid if the product is modified without our prior approval.
Product: Dry vacuum cleaner
Type: 1.394-xxx
Currently applicable UK Regulations
S.I. 2008/1597 (as amended)
S.I. 2012/3032 (as amended)
S.I. 2016/1091 (as amended)
Designated standards used
EN IEC 63000: 2018
EN 55014-1: 2017 + A11: 2020
EN 55014-2: 2015
EN 60312-1: 2017
EN 60335-1
EN 60335-2-69
EN 62233: 2008
National standards used
The signatories act on behalf of and with the authority of the company management.

H. Jenner
Chairman of the Board of Management

S. Reiser
Director Regulatory Affairs & Certification
Documentation supervisor:
S. Reiser
Alfred Kärcher SE & Co. KG
Alfred-Kärcher-Str. 28 - 40
71364 Winnenden (Germany)
Ph.: +49 7195 14-0
Fax: +49 7195 14-2212
Winnenden, 2020/10/01
Technical data
| BVL 3/1 Bp (Pack) | ||
| Electrical connection | ||
| Battery pack nominal voltage V 36 DC | ||
| Protection class III | III | |
| Nominal power W 350 | ||
| Maximum power W 350 | ||
| Device performance data | ||
| Tank content I 3 | ||
| Air quantity (max.) l/s 35,4 | ||
| Vacuum (max.) kPa | (mbar) | 18,9 (189) |
| Operating time at full battery charge - Battery Power 36/25 bat-tery pack | Minutes | 16/Eco: 26 |
| Operating time at full battery charge - Battery Power 36/50 bat-tery pack | Minutes | 31/Eco: 52 |
| Operating time at full battery charge - Battery Power+ 36/60 battery pack | Minutes | 33/Eco: 55 |
| Operating time at full battery charge - Battery Power+ 36/75 battery pack | Minutes | 41/Eco: 73 |
| Dimensions and weights | ||
| Typical operating weight | kg | 5,0 |
| Length x width x height | mm | 220 x 320 x 390 |
| Diameter of the suction hose | mm | 35 |
| Length of the suction hose | m | 1,0 |
| Ambient conditions | ||
| Ambient temperature | °C | 0/+40 |
| Determined values in acc. with EN 60335-2-69 | ||
| Sound pressure level L_pA | dB(A) | 65 |
| Uncertainty K_pA | dB(A) | 2 |
| Hand-arm vibration value m/s | ^2 | <2,5 |
| Uncertainty K | m/s^2 | 0,2 |
Subject to technical modifications.
Contenu
2006/42/CE (+2009/127/CE)
2011/65/UE
2014/30/UE
Chairman of the Board of Management

S. Reiser
Director Regulatory Affairs & Certification
71364 Winnenden (Germany)
Winnenden, 2020/10/01
Chairman of the Board of Management
S. Reiser
Director Regulatory Affairs & Certification
71364 Winnenden (Germany)
Tel.: +49 7195 14-0
Fax: +49 7195 14-2212
Winnenden, 2020/10/01
Dati tecnici

H. Jenner
Chairman of the Board of Management

S. Reiser
Director Regulatory Affairs & Certification
71364 Winnenden (Germany)
Tel.: +49 7195 14-0
Fax: +49 7195 14-2212
Winnenden, 2020/10/01
Technische gegevens
| BVL 3/1Bp(Pack) |
2006/42/CE (+2009/127/CE)
2011/65/UE
2014/30/UE
Chairman of the Board of Management

S. Reiser
Director Regulatory Affairs & Certification
71364 Winnenden (Germany)
Tel.: +49 7195 14-0
Fax: +49 7195 14-2212
Winnenden, 2020/10/01
Datos técnicos
2006/42/CE (+2009/127/CE)
2011/65/UE
2014/30/UE

H. Jenner
Chairman of the Board of Management

S. Reiser
Director Regulatory Affairs & Certification
Winnenden, 2020/10/01
Dados técnicos
2006/42/EF (+2009/127/EF)
2011/65/EU
2014/30/EU

H. Jenner
Chairman of the Board of Management
S. Reiser
Director Regulatory Affairs & Certification
71364 Winnenden (Germany)
Tlf.: +49 7195 14-0
Fax: +49 7195 14-2212
Winnenden, 2020/10/01
Tekniske data
| BVL 3/1Bp(Pack) |
Elektrisk tilslutning
Sett inn dukfilterpose
Merknad
Støvutslipp under suging
2006/42/EF (+2009/127/EF)
2011/65/EU
2014/30/EU
Anvendte harmoniserte standarder
EN IEC 63000: 2018
EN 55014-1: 2017 + A11: 2020
EN 55014-2: 2015
EN 60312-1: 2017
EN 60335-1
EN 60335-2-69
EN 62233: 2008

H. Jenner
Chairman of the Board of Management

S. Reiser
Director Regulatory Affairs & Certification
71364 Winnenden (Germany)
Tlf.: +49 7195 14-0
Winnenden, 2020/10/01
Tekniske data
| BVL 3/1Bp(Pack) | ||
| Elektrisk tilkobling | ||
| Nominell spenning batteri V 36 DC | ||
| Beskyttelsesklasse III | III | |
| Nominell effekt W 350 | ||
| Maksimal effekt W 350 | ||
| Effektspesifikasjoner apparat | ||
| Innhold i beholderen I 3 | ||
| Luftmengde (maks.) I/s 35,4 | ||
| Vakuum (maks.) kPa | (mbar) | 18,9(189) |
| Driftstid ved full batterilading - bat-teripakke Battery Power 36/25 | Minutter | 16/Eco:26 |
| Driftstid ved full batterilading - bat-teripakke Battery Power 36/50 | Minutter | 31/Eco:52 |
| Driftstid ved full batterilading - bat-teripakke Battery Power+ 36/60 | Minutter | 33/Eco:55 |
| Driftstid ved full batterilading - bat-teripakke Battery Power+ 36/75 | Minutter | 41/Eco:73 |
| Mål og vekt | ||
| Gjennomsnittlig driftsvekt kg 5,0 | ||
| Lengde x bredde x høyde | mm | 220 x320 x390 |
| Diameter sugeslange | mm | 35 |
| Lengde sugeslange | m | 1,0 |
| Omgivelsesbetingelser | ||
| Omgivelsestemperatur | °C | 0/+40 |
| Registrerte verdier iht. EN 60335-2-69 | ||
| Lydtrykknivå L_pA | dB(A) | 65 |
| Usikkerhet K_pA | dB(A) | 2 |
| Hånd-arm-vibrasjonsverdi | m/s^2 | <2,5 |
| Usikkerhet K | m/s^2 | 0,2 |
Med forbehold om tekniske endringer.
Innehåll
H. Jenner
Chairman of the Board of Management

S. Reiser
Director Regulatory Affairs & Certification
D-71364 Winnenden (Germany)
Tfn: +49 7195 14-0
Fax: +49 7195 14-2212
Winnenden, 2020/10/01
Tekniska data

H. Jenner
Chairman of the Board of Management
S. Reiser
Director Regulatory Affairs & Certification
71364 Winnenden (Germany)
Puh.: +49 7195 14-0
Winnenden, 2020/10/01
Tekniset tiedot
Chairman of the Board of Management
S. Reiser
Director Regulatory Affairs & Certification
71364 Winnenden (Germany)
Tηλ.: +49 7195 14-0
Φαξ: +49 7195 14-2212
Winnenden, 2020/10/01
Τεχνικά στοιχεία
2006/42/AT (+2009/127/AT)
2011/65/AB
2014/30/AB
Chairman of the Board of Management

S. Reiser
Director Regulatory Affairs & Certification
Winnenden, 2020/10/01
Teknik bilgiler
Chairman of the Board of Management

S. Reiser
Director Regulatory Affairs & Certification
71364 Winnenden (Germany)
Тел.: +49 7195 14-0
Факс: +49 7195 14-2212
Winnenden, 2020/10/01
Chairman of the Board of Management

S. Reiser
Director Regulatory Affairs & Certification
Winnenden, 2020/10/01
Műszaki adatok
| BVL 3/1Bp(Pack) |
2006/42/ES (+2009/127/ES)
2011/65/EU
2014/30/EU

H. Jenner
Chairman of the Board of Management

S. Reiser
Director Regulatory Affairs & Certification
Winnenden, 2020/10/01
Technické údaje
2006/42/ES (+2009/127/ES)
2011/65/EU
2014/30/EU

H. Jenner
Chairman of the Board of Management
S. Reiser
Director Regulatory Affairs & Certification
Winnenden, 2020/10/01
Tehnični podatki
| BVL 3/1 Bp (Pack) | |||
| Električni priključek | |||
| Nazivna napetost paketa akumulatorskih baterij | V | 3 6 | |
| Razred zaščite III | III | ||
| Nazivna moč | W | 3 | 5 0 |
| Največja moč | W | 350 | |
| Podatki o zmogljivosti naprave | |||
| Vsebina posode I 3 | |||
| Količina zraka (maks.) I/s 35,4 | |||
| Podtlak (maks.) kPa | (mbar) | 18,9 (189) | |
| Čas delovanja pri polni bateriji – Paket akumulatorskih baterij Battery Power 36/25 | minute | 16/Eco: 26 | |
| Čas delovanja pri polni bateriji – Paket akumulatorskih baterij Battery Power 36/50 | minute | 31/Eco: 52 | |
| Čas delovanja pri polni bateriji – Paket akumulatorskih baterij Battery Power+ 36/60 | minute | 33/Eco: 55 | |
| Čas delovanja pri polni bateriji – Paket akumulatorskih baterij Battery Power+ 36/75 | minute | 41/Eco: 73 | |
| Mere in mase | |||
| Tipična delovna masa | kg | 5,0 | |
| Dolžina x širina x višina | mm | 220 x 320 x 390 | |
| Premer sesalne gibke cevi | mm | 35 | |
| Dolžina sesalne gibke cevi | m | 1,0 | |
| Okoljski pogoji | |||
| Okoljska temperatura | °C | 0/+40 | |
| Ugotovljene vrednosti v skladu s standardom EN 60335-2-69 | |||
| Raven tlaka hrupa LpA | dB(A) | 65 | |
| Negotovost KpA | dB(A) | 2 | |
| Vrednost tresljajev za dlani/roke | m/s2 | <2,5 | |
| Negotovost K | m/s2 | 0,2 | |
Pridržujemo si pravico do tehničnih sprememb.
Spis treści
2006/42/WE (+2009/127/WE)
2011/65/UE
2014/30/UE

H. Jenner
Chairman of the Board of Management

S. Reiser
Director Regulatory Affairs & Certification
71364 Winnenden (Germany)
Tel.: +49 7195 14-0
Winnenden, 2020/10/01
Dane techniczne
Directive UE relevante
2006/42/UE (+2009/127/UE)
2011/65/UE
2014/30/UE
Norme armonizate aplicate
EN IEC 63000: 2018
EN 55014-1: 2017 + A11: 2020
EN 55014-2: 2015
EN 60312-1: 2017
EN 60335-1
EN 60335-2-69
EN 62233: 2008

H. Jenner
Chairman of the Board of Management

S. Reiser
Director Regulatory Affairs & Certification
71364 Winnenden (Germania)
Tel.: +49 7195 14-0
Fax: +49 7195 14-2212
Winnenden, 2020/10/01
Date tehnice
2006/42/ES (+2009/127/ES)
2011/65/EÚ
2014/30/EÚ

H. Jenner
Chairman of the Board of Management

S. Reiser
Director Regulatory Affairs & Certification
71364 Winnenden (Germany)
Tel.: +49 7195 14-0
Fax: +49 7195 14-2212
Winnenden, 2020/10/01
Technické údaje
www.kaercher.com/REACH
Namjenska uporaba
⚠UPOZORENJE
2006/42/EZ (+2009/127/EZ)
2011/65/EU
2014/30/EU
Primijenjene uskladene norme
EN IEC 63000: 2018
EN 55014-1: 2017 + A11: 2020
EN 55014-2: 2015
EN 60312-1: 2017
EN 60335-1
EN 60335-2-69
EN 62233: 2008
Primijenjene nacionalne norme

H. Jenner
Chairman of the Board of Management
S. Reiser
Director Regulatory Affairs & Certification
Opunomoćenik za dokumentaciju:
S. Reiser
Alfred Kärcher SE & Co. KG
Alfred-Kärcher-Str. 28 - 40
71364 Winnenden (Njemačka)
Tel.: +49 7195 14-0
Telefaks: +49 7195 14-2212
Winnenden, 2020/10/01
Tehnički podaci
| BVL 3/1Bp(Pack) |
2006/42/EZ (+2009/127/EZ)
2011/65/EU
2014/30/EU
Primenjene harmonizovane norme
EN IEC 63000: 2018
EN 55014-1: 2017 + A11: 2020
EN 55014-2: 2015
EN 60312-1: 2017
EN 60335-1
EN 60335-2-69
EN 62233: 2008
Primenjene nacionalne norme
Potpisnici deluju po nalogu i uz punomoć upravnog odbora.

H. Jenner
Chairman of the Board of Management

S. Reiser
Director Regulatory Affairs & Certification
Lice ovlašćeno za dokumentaciju:
S. Reiser
Alfred Kärcher SE & Co. KG
Alfred-Kärcher-Str. 28 - 40
71364 Winnenden (Germany)
Tel.: +49 7195 14-0
Winnenden, 2020/10/01
Tehnički podaci
| BVL 3/1 Bp (Pack) | ||
| Električni priključak | ||
| Nominalni napon akumulatorskog pakovanja | V | 3 |
| Klasa zaštite III | III | |
| Nominalna snaga W 350 | ||
| Maksimalna snaga W 350 | ||
| Podaci o snazi uređaja | ||
| Zapremina posude I 3 | ||
| Protok vazduha (maks.) I/s 35,4 | ||
| Podpritisak (maks.) | kPa (mbar) | 18,9 (189) |
| Vreme rada pri punom punjenju akumulatora - akumulatorsko pakovanje Battery Power 36/25 | minuta | 16/Eco: 26 |
| Vreme rada pri punom punjenju akumulatora - akumulatorsko pakovanje Battery Power 36/50 | minuta | 31/Eco: 52 |
| Vreme rada pri punom punjenju akumulatora - akumulatorsko pakovanje Battery Power+ 36/60 | minuta | 33/Eco: 55 |
| Vreme rada pri punom punjenju akumulatora - akumulatorsko pakovanje Battery Power+ 36/75 | minuta | 41/Eco: 73 |
| Dimenzije i težine | ||
| Tipična radna težina | kg | 5,0 |
| Dužina x širina x visina | mm | 220 x 320 x 390 |
| Prečnik usisnog creva | mm | 35 |
| Dužina usisnog creva | m | 1,0 |
| Uslovi okruženja | ||
| Temperatura okoline | °C | 0/+40 |
| Utvrdene vrednosti prema EN 60335-2-69 | ||
| Nivo zvučnog pritiska L_pA | dB(A) | 65 |
| Nepouzdanost K_pA | dB(A) | 2 |
| Vrednost vibracije na šaci i ruci | m/s^2 | <2,5 |
| Nepouzdanost K | m/s^2 | 0,2 |
Zadržano pravo na tehničke promene.
Съдържание
Chairman of the Board of Management

S. Reiser
Director Regulatory Affairs & Certification
71364 Winnenden (Germany)
Тел.: +49 7195 14-0
Факс: +49 7195 14-2212
Winnenden, 2020/10/01
Технически данни
2006/42/EÜ (+2009/127/EÜ)
2011/65/EL
2014/30/EL
Chairman of the Board of Management

S. Reiser
Director Regulatory Affairs & Certification
71364 Winnenden (Germany)
Tel: +49 7195 14-0
Winnenden, 2020/10/01
Tehnilised andmed
BVL 3/1
Bp
(Pack)
Elektriühendus
Akupaki nimipinge V 36 DC
Kaitseklass III

Nimivõimsus W 350

H. Jenner
Chairman of the Board of Management

S. Reiser
Director Regulatory Affairs & Certification
Winnenden, 2020/10/01
Tehniskie dati
Chairman of the Board of Management

S. Reiser
Director Regulatory Affairs & Certification
Winnenden, 2020/10/01
Techniniai duomenys

71364 Winnenden (Germany)
Тел.: +49 7195 14-0
Факс: +49 7195 14-2212
Winnenden, 2020/10/01
www.kaercher.com/REACH
按规定使用
警告
健康危害
吸入有害粉尘
请勿使用本设备抽吸有害粉尘。
注意
设备损坏
高湿度会导致短路
仅在室内使用和存放设备。
Battery Power+ 36/60
Battery Power+ 36/75
الأبعاد الوزن
Battery Power+ 36/75
Battery
Battery Power+ 36/60
www.kaercher.com/REACH
natural_image
Black and white icon of a hand giving a thumbs-up gesture (no text or symbols)THANK YOU!
Register your product and benefit from many advantages.
www.kaercher.com/welcome


Rate your product and tell us your opinion.
natural_image
Icon showing a gear and wrench inside a square frame (no text or symbols)www.kaercher.com/dealersearch
Alfred Kärcher SE & Co. KG
Alfred-Kärcher-Str. 28-40
71364 Winnenden (Germany)
Tel.: +49 7195 14-0
Fax: +49 7195 14-2212