
Bastiaan RWF - Car seat Lionelo - Free user manual and instructions
Find the device manual for free Bastiaan RWF Lionelo in PDF.

| Product Type | Child car seat, groups 0/0+/I/II/III (0-36 kg) |
| Brand | Lionelo |
| Model | Bastiaan RWF |
| Dimensions (approx.) | L 44 x W 44 x H 61-85 cm (adjustable with headrest) |
| Weight (approx.) | Approx. 10 kg |
| Power supply | None (non-electronic) |
| Safety standard | ECE R44/04, universal and semi-universal category |
| Restraint system | 5-point harness for groups 0/0+/I; seat belt for groups II/III |
| Installation | Rear-facing (0-18 kg) or forward-facing (9-36 kg); attachment by 3-point seat belt, ISOFIX + Top Tether, or ISOFIX + belt |
| Seat rotation | Yes, 360° rotation with unlock button (side position for boarding) |
| Recline | 5 positions including a lying position (rear-facing); adjustable via handle under the seat |
| Adjustable headrest | Yes, height adjustable via a lever; coordinated with harness height |
| Reduction cushion | Included for newborns (up to approx. 1 year); removable |
| Maintenance and cleaning | Removable cover, washable in warm water with mild soap; do not dry in sun. Buckle and plastics washed in warm water without strong detergent |
| Spare parts and repairability | Cover, harness, buckle, reduction cushion; do not modify the seat. If in doubt, contact the manufacturer |
| General information | Do not use on front seat with active airbag. Replace after an accident. Store away from sunlight |
Frequently Asked Questions - Bastiaan RWF Lionelo
User questions about Bastiaan RWF Lionelo
0 question about this device. Answer the ones you know or ask your own.
Ask a new question about this device
Download the instructions for your Car seat in PDF format for free! Find your manual Bastiaan RWF - Lionelo and take your electronic device back in hand. On this page are published all the documents necessary for the use of your device. Bastiaan RWF by Lionelo.
USER MANUAL Bastiaan RWF Lionelo
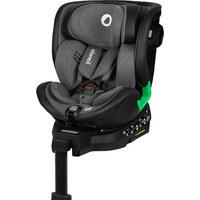
natural_image
Black and gray car seat with lioneb branding, no visible text or symbols beyond the logo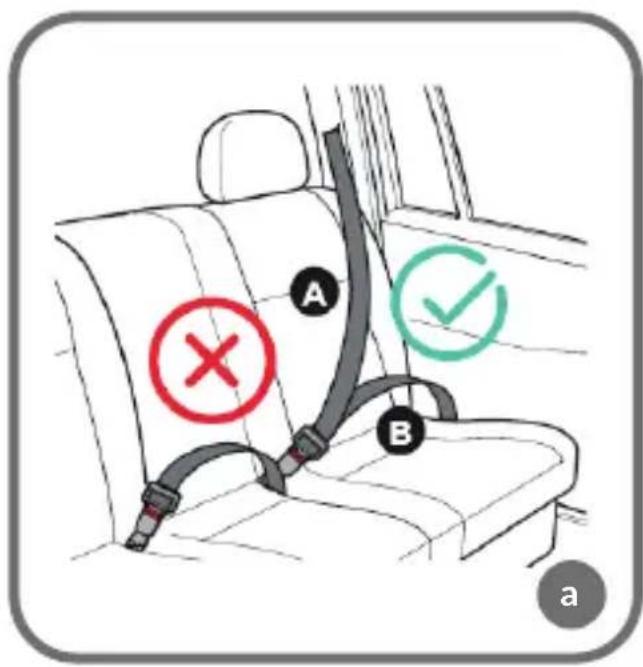
2
natural_image
Illustration of a hand holding a small mechanical component with a red arrow indicating direction (no text or symbols)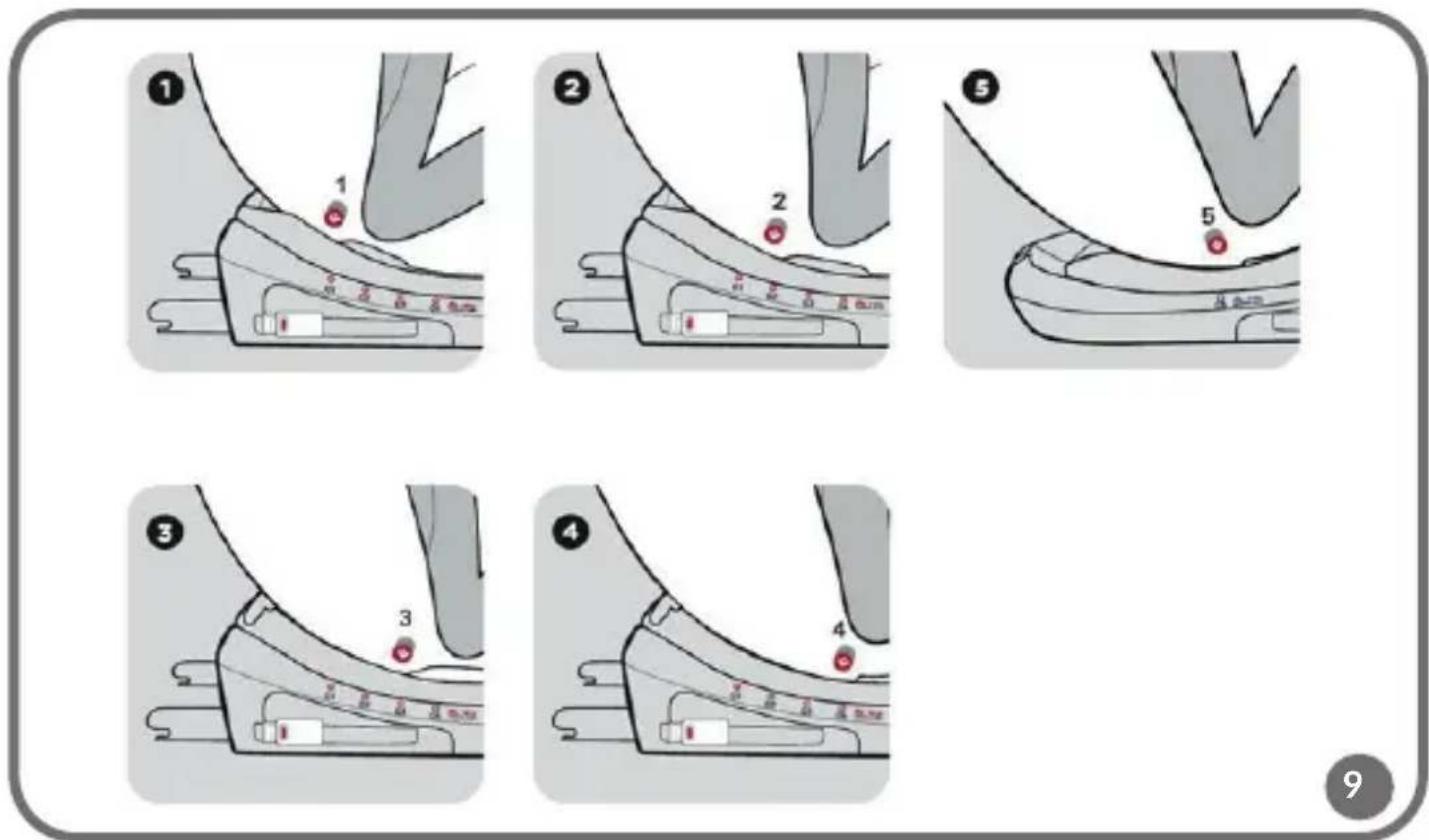
natural_image
Diagram of a mechanical assembly with a red arrow indicating direction (no text or symbols present)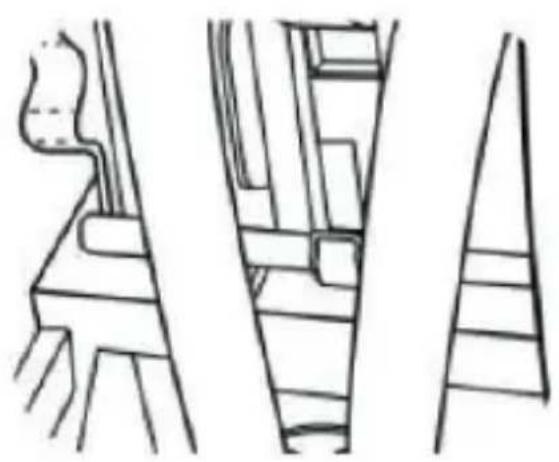
natural_image
Line drawings of three abstract architectural or mechanical components with no visible text or symbols10
natural_image
Illustration of a hand placing a red object into a grid-like structure (no text or symbols)
natural_image
Diagram of a mechanical assembly with internal components and alignment lines (no text or symbols)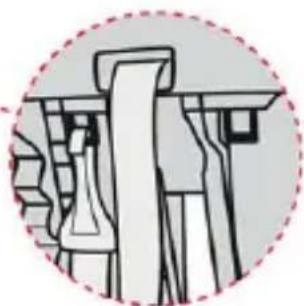
natural_image
Pure mechanical assembly diagram without any text, numbers, or symbols11
natural_image
Line drawing of a hand holding a small object, possibly a tool or device, with no visible text or symbols.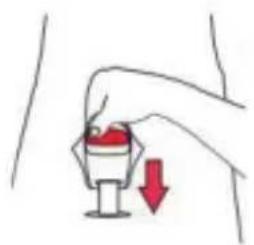
natural_image
Illustration of a hand holding a cup with a red downward arrow indicating compression or reduction (no text or symbols)
natural_image
Diagram showing a person performing a medical or ergonomic procedure with red arrows indicating direction of movement (no text or symbols present)
natural_image
Simple line drawing of a hand pressing down on a table with a red arrow indicating the press (no text or symbols)12


natural_image
Illustration of three steps in a car seatbelt car, showing seat positioning and force application (no text or symbols)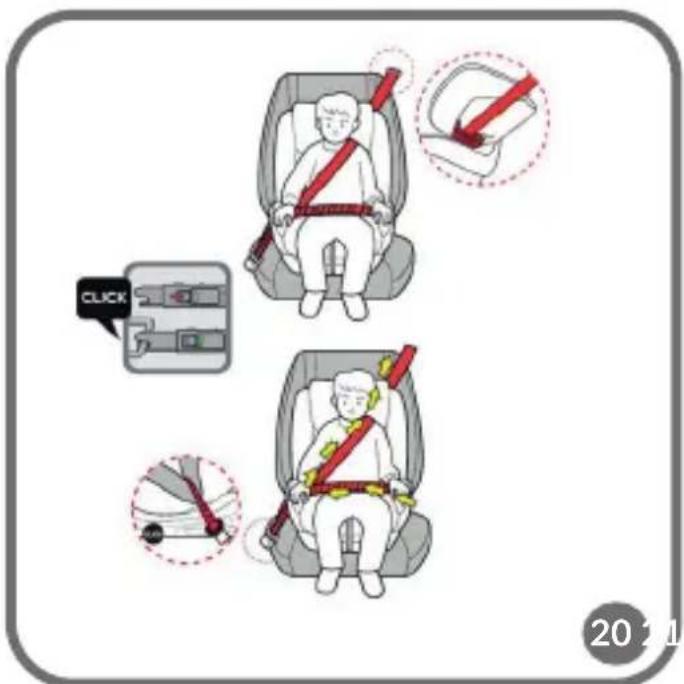
natural_image
Illustration of a baby car seat with pink fabric overlay (no text or symbols)Dear customer!
Should you have any remarks or questions concerning the product, please do not hesitate to contact us: help@lionelo.com
Before you use the child safety seat for the first time, please read this manual carefully.
Producer:
BrandLine Group Sp. z o. o.
Please read this manual before you use the product and keep it for future reference. The manual can help you assemble the child safety seat properly. A wrong assembly may pose a threat to your child. The manufacturer shall not be held responsible for potential damage arising from wrong assembly of the seat.
This child safety seat is intended for weight categories (groups): 0, 0+, I, II and III, which means it can be used by children whose weight does not exceed 36kg.
Weight group 0, 0+: 0-13 kg,
Weight group I: 9-18 kg,
Weight group II: 15-25 kg,
Weight group III: 22-36 kg.
- Hard elements and plastic parts of the child restraint system must be placed and installed in a way that they do not get trapped by sliding seat or vehicle door if the vehicle is used normally.
- For a rear-facing position: do not use the child safety seat in places in which an airbag is active
- The belts which hold the child safety seat must be tightened properly.
- Any safety belts which hold the child must be well-adapted to its body. The belts must not be twisted.
- Make sure the hip belts go low so that a pelvis is properly supported.
- Any accident or collision may damage the child safety seat, even if you cannot see it. If the device has been subject to sudden overloads during accidents, please replace it. In case of any doubts, please contact the seller or manufacturer.
-
Do not modify the child safety seat or install any additional elements unless a technical certification body has approved it. To provide your child with top safety, fix and use the device in accordance with the manual.
-
Plastic elements of this child safety seat may heat up in the sun and cause sunburns.
- Protect your child and child safety seat against sunlight (for example you can cover it with a light clothing). If the child safety seat is not covered, try not to expose it to the sunlight. Otherwise the child safety seat may be too hot for your child's skin.
- Never leave your child in the car unatt ended.
- Luggage and similar elements must be secured in order not to cause any injuries and damage in case of collision. In the event of a road accident, unsecured items may be deadly.
- You should not use the child safety seat without its fabric cover. It is an integral part of the set and influences the operation of the restraint system.
- You must not substitute the cover for a cover from other set.
- Keep the child safety seat manual. Keep it in the car in which you have installed the seat.
- If you assemble ISOFIX child restraint system, please get familiar with the vehicle manufacturer's manual.
- It is forbidden to use other points of contact than those described in the manual and marked on the child restraint system.
- In case of any doubts regarding the position of the safety belts buckle for adults in relation to main points of contact, please contact the child safety seat manufacturer.
- Att enti on – do not use forward-facing child seat if the child's weight does not exceed 9 kg
Safety in the car:
To provide top safety to yourself and passengers during travel, make sure:
- Folding elbow rests have been folded (verti cal positi on).
- If the child safety seat is mounted on the passenger's front seat, this seat is pushed to the back as far as possible.
● Any items which may cause damage in the car in case of collision have been secured properly. - All passengers have fastened their seat belts.
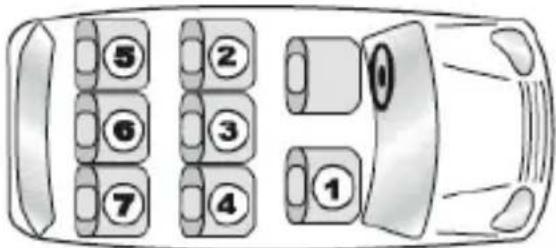
The child safety seat is suitable for installation only on forward-facing car seats. It is forbidden to mount the child safety seat on rear-facing seats/couches. They are used e.g. in vans or minibuses.
NOTE! When installed with car seat belts: never use the child safety seat with 2-point safety belts.
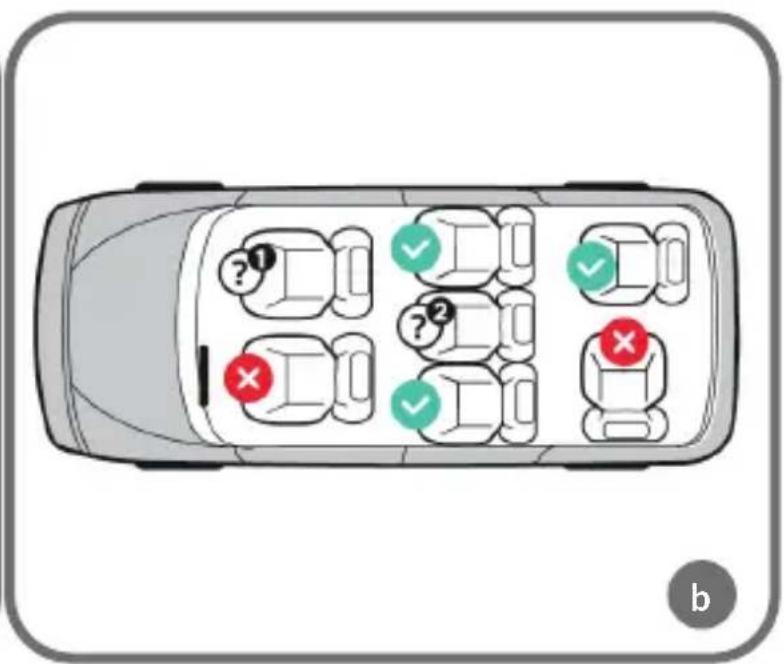
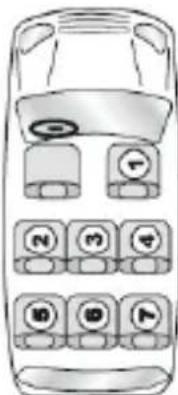
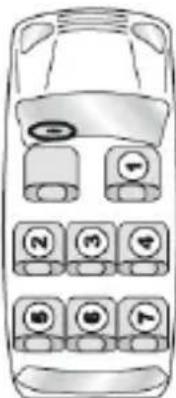
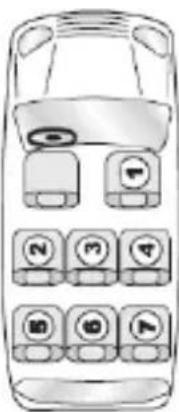
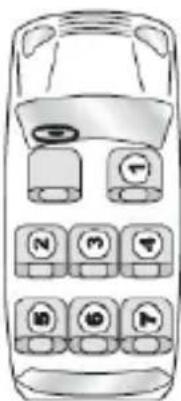
see fig. a,b

Correct position of the child safety seat in the car

Wrong position of the child safety seat in the car
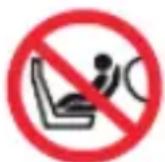
? 1 Do not place the rearward facing child seat here if the front airbag is active.
? 2 Assembly here is only possible if the child seat can be att ached using the 3-point seat belt.
INFORMATION
NOTE
The child restraint belongs to the categories ‘universal’. Approved in accordance with UN Regulation No. 44, series of amendments 04, for general vehicle use and suitable for mounting on most car seats. Correct installation is possible if the vehicle manufacturer has stated in the vehicle’s instruction manual that the vehicle is suitable for the installation of ‘universal’ child restraints for this age group. This child restraint has been classified as ‘universal’ under more demanding conditions in relation to conditions applying to previous designs that do not have this information. In case of doubt, consult the manufacturer or the retailer of the device. Suitable for installation only if type-approved vehicles are equipped with three-point seat belts fitted with a retractor that has been approved in accordance with UN Regulation No. 16 or other equivalent standards.
Information about the ISOFIX system:
NOTE! 1. This is an ISOFIX CHILD RESTRAINT SYSTEM. It is approved in accordance with UN Regulation No. 44, 04 series of amendments for general use on vehicles equipped with ISOFIX anchorages.
- It fits vehicles with positions approved as ISOFIX positions (according to the vehicle's instruction manual) depending on the child seat category and attachment.
- ISOFIX weight group and size class for which the device is intended:
D for group 0+, I (0 - 18 kg)
B1 for group I (9 - 18 kg)
When used for groups 0+, I, II, III - category "semi-universal"
This child restraint system is classified for use in the “semi-universal” category and is suitable for installation in the following cars:
| CAR FRONT REAR | ||||
| Outer Centre | Outer Centre | |||
| (model) NO NO YES NO | ||||
See the user manual for a list of models. This device can also be installed in seating positions in other car models. If in doubt, consult the device manufacturer or retailer. Rearward-facing installation: do not install the device on seats equipped with active front airbags.
CHILD SAFETY SEAT OVERVIEW
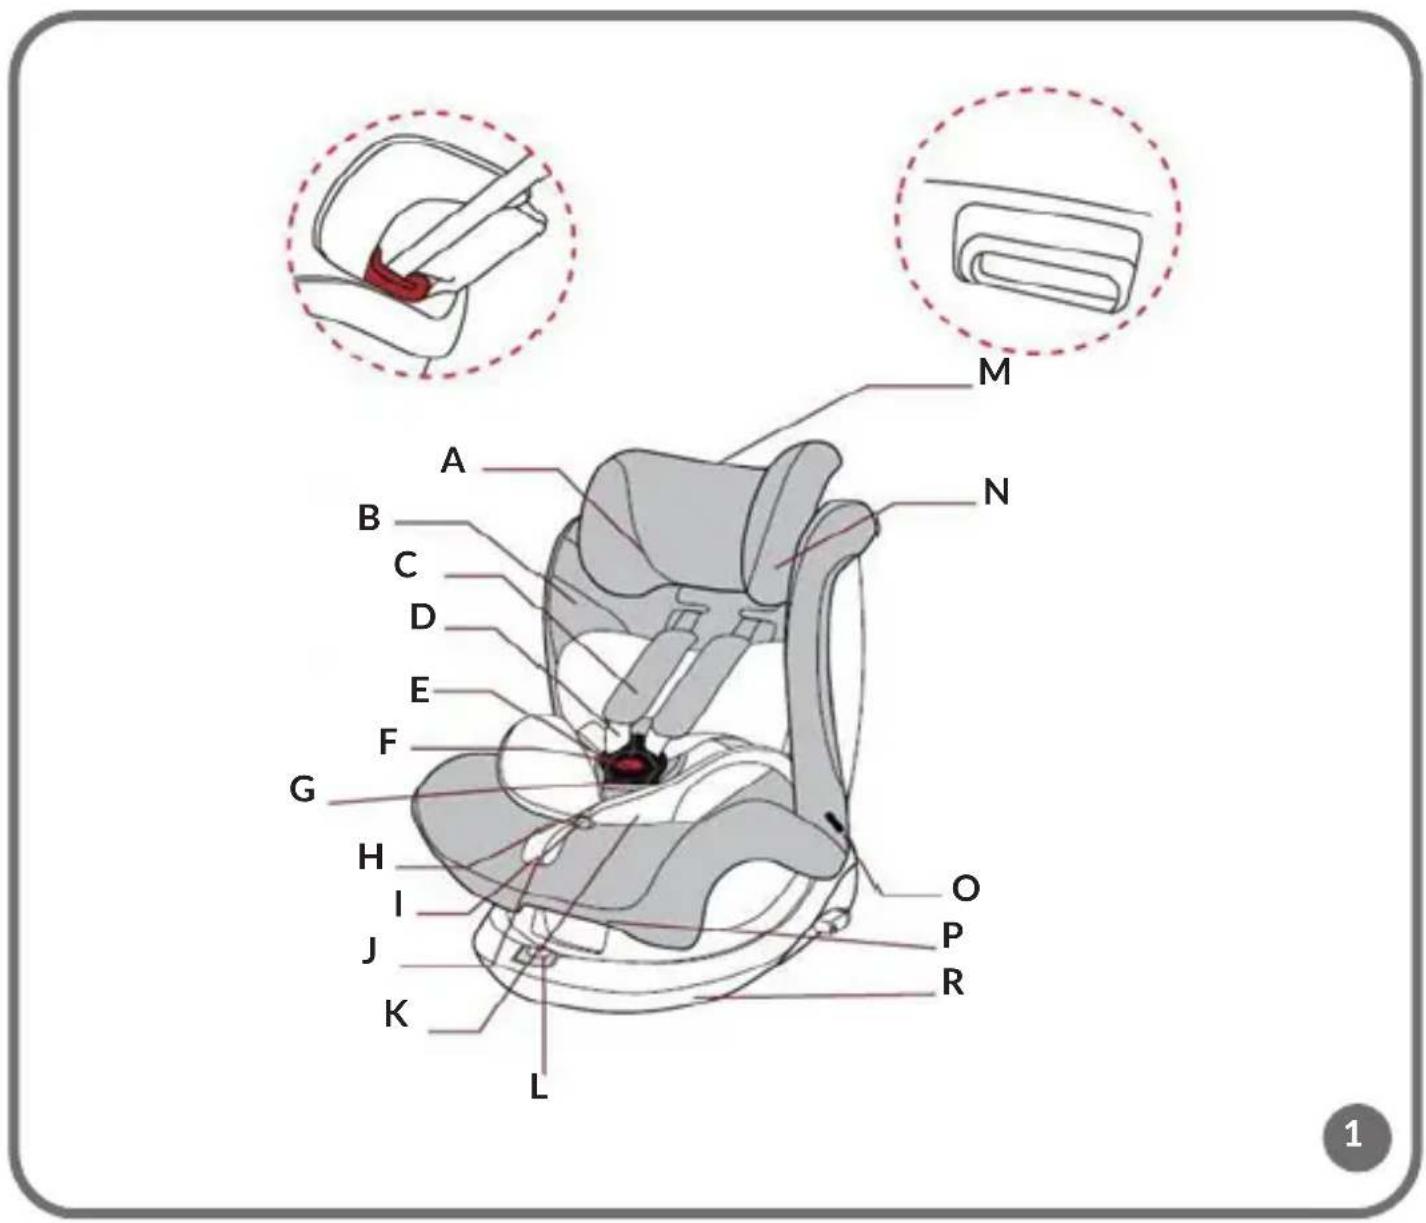
DESCRIPTION (fig. 1 and 2)
A. Shoulder belts guide
B. Child safety seat cover
C. Belts protective pad
D. Shoulder belt
E. Buckle latch
F. Belts unfastening button
G. Buckle
H. Crotch pad
I. Belt tension adjustment button
J. Belt tension adjustment
K. Seat liner
L. Seat rotation button
M. Headrest adjustment lever
N. Headrest
O. Hip belt guide
P. Seat recline handle
R. Base
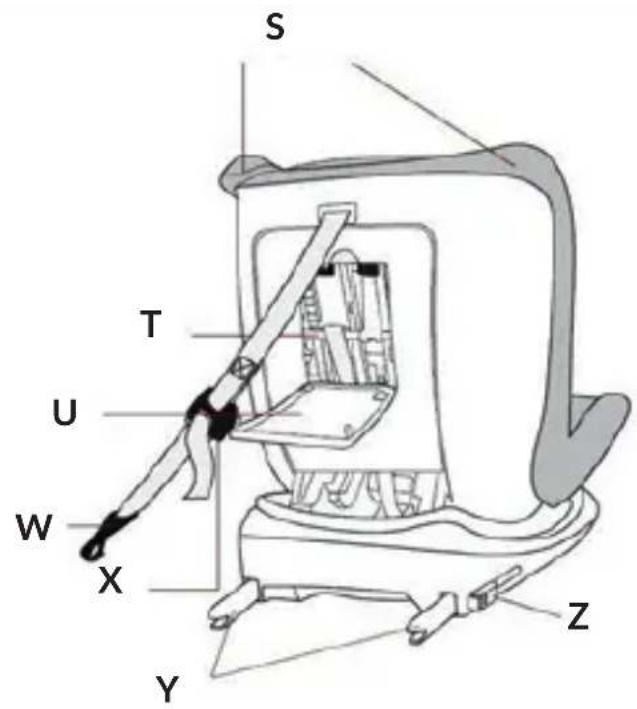
S. Hip belt guide
T. Upper belts connector
U. Manual locker
W. TOP TETHER fixing belt
Y. ISOFIX locking arms
Z. ISOFIX button
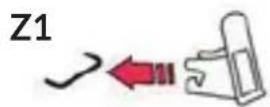
Z1. ISOFIX pads
X. TOP TETHER fixing belt adjustment
HOW TO FASTEN CHILD SAFETY SEAT BELTS
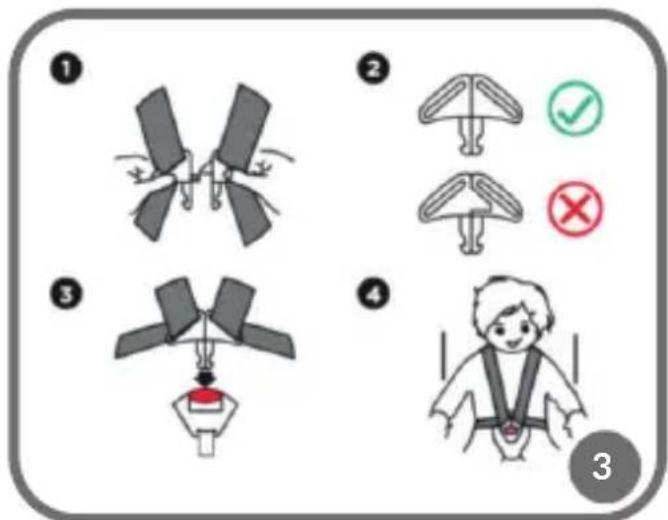
To fasten belts in the child safety seat (fig. 3):
- Connect belts buckles.
- Insert them in the buckle (G), you will hear a distinctive „click”.
- Make sure the belts have been tightened properly and are not twisted.
To undo 5-point belts of the child safety seat: press the red button on the buckle (F) and loosen the belts.
HOW TO DISASSEMBLE CHILD SAFETY SEAT BELTS
- Loosen the belts (see chapter: HOW TO ADJUST TENSION OF CHILD SAFETY SEAT BELTS).
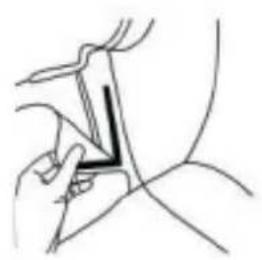
- Open the manual locker (U).
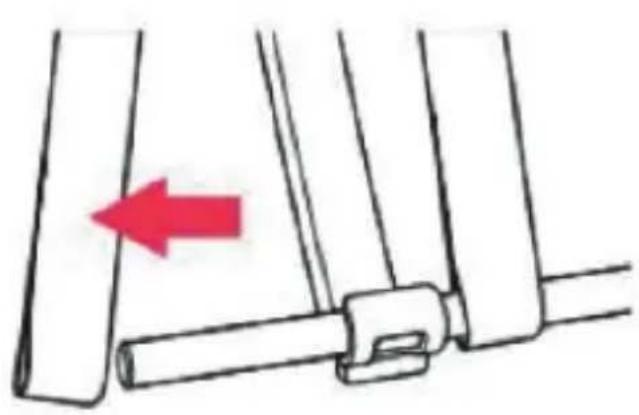
- Pull out the metal connector of the belts (T) from the plastic fastener and then remove belts from it (fig. 11).
- The metal belt connector must be placed in a special spot for future use (see: fig. 10).
- Unfasten Velcros on belt protective cushions.
- Unfasten child safety seat covering Velcros. Pull the buckle through the hole in the covering.
- Fasten belts and hide them in the glovebox in the child safety seat (see: fig. 12). Installation of belts must be performed in a reversed order.
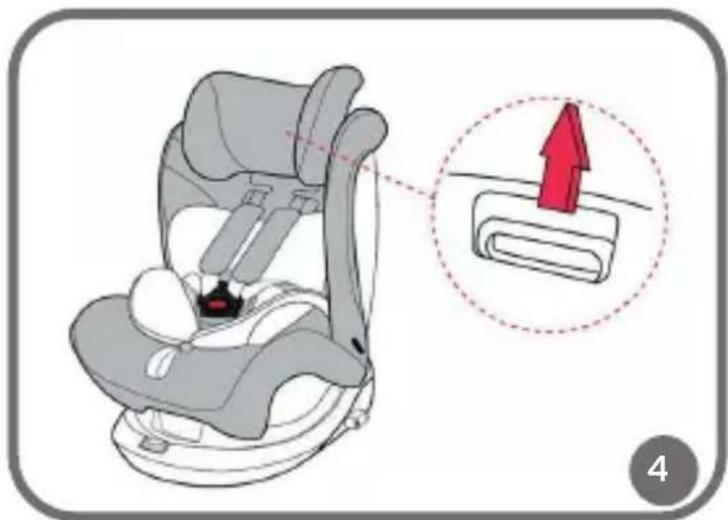
HOW TO ADJUST HEADREST AND HEIGHT OF SHOULDER BELTS (fig. 4)
Note! The height of shoulder belts is integrated with the height of the headrest.
Groups 0, 0+ and I
To change height of belts and headrest: loosen shoulder belts as much as you can and next grab the headrest adjustment lever (M). Choose the desired height and release the lever. Try to move the headrest to check if it has been secured properly.
Groups II and III
Slide down belts from the upper belts connector (T) located inside the manual locker (U). Pull out the child safety seat belts at the front, and put outstanding tips of belts into the protective cushions so that they do not disturb. Now you can close the locker and lift the headrest. Hide the belts connector in a safe place for future use.
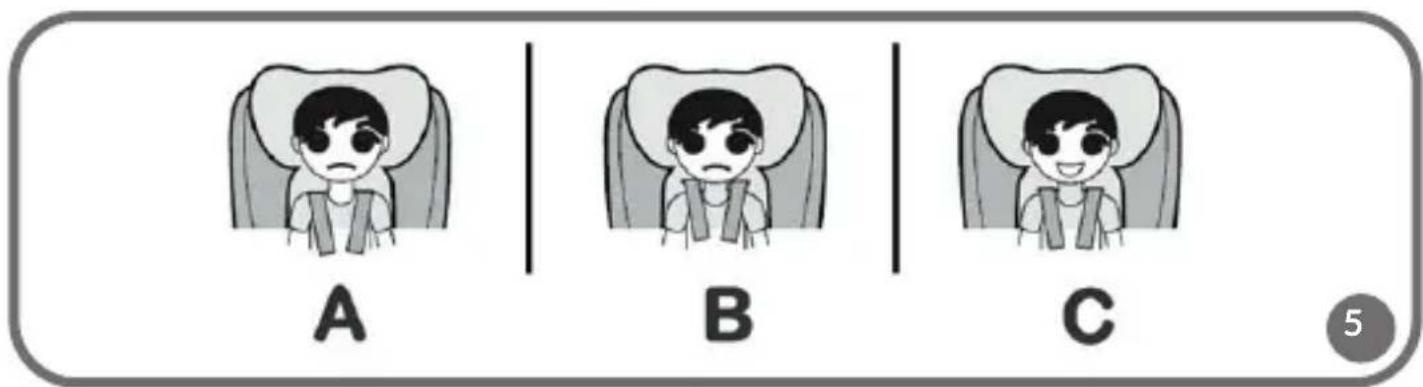
Position the headrest so that shoulder belts are at the child's arms height. The belts must not be too high (at the ears level or higher), they cannot be too low either (e.g. behind child's back). See: fig. 5.
A - too low
B - too high
C - perfect height of shoulder belts
HOW TO ADJUST CHILD SAFETY SEAT BELTS TENSION
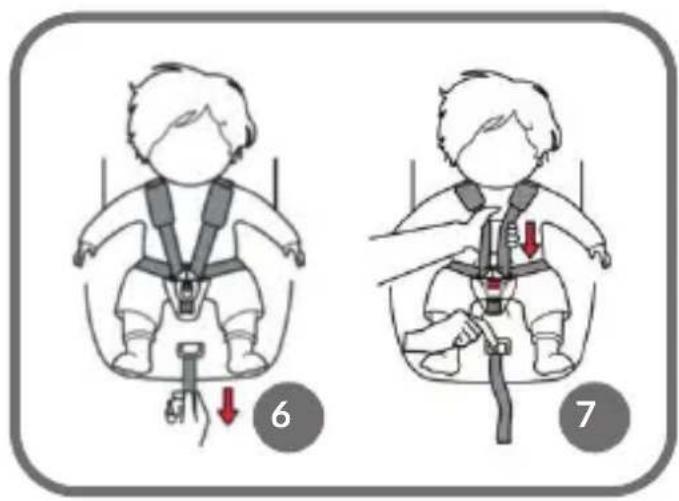
- To tighten the belts, pull the tension adjustment strap (J) (fig. 6).
- To loosen the belts, press the adjustment button (l) and pull the shoulder belts (fig. 7).
Note! Make sure the child safety seat belts fit tight the child's body and are not twisted. Make sure the hip belts go low and protect the child's pelvis. The belts must fit tight the child's body but must not be too tight and cause discomfort.
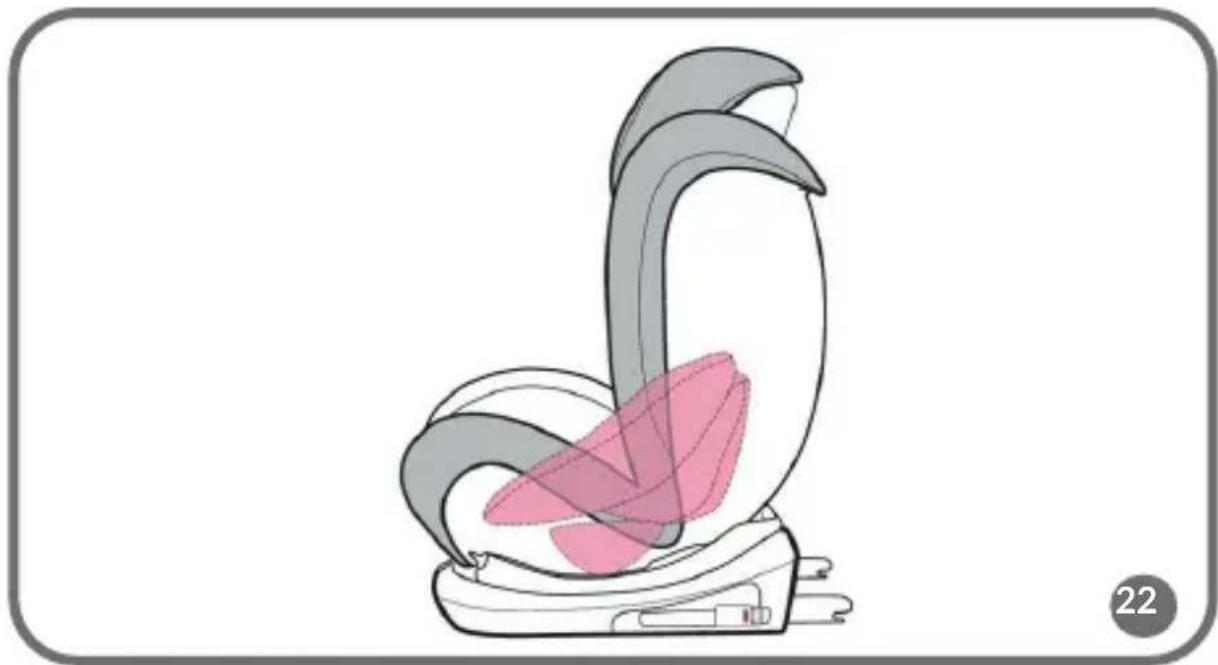
SEAT LINER
If the child needs more space in the child safety seat, remove the seat liner (fig. 22). It is advisable to use this liner until the child turns 1.
HOW TO REMOVE COVER
- Remove 5-point belts of the child safety seat (see: HOW TO DISASSEMBLE CHILD SAFETY SEAT BELTS).
- Unfasten Velcros and remove the covering from the child safety seat.
To put the cover back on, retake the aforesaid actions in a reversed order.
NOTE: Never use the child safety seat without the cover.
HOW TO ROTATE THE CHILD SAFETY SEAT
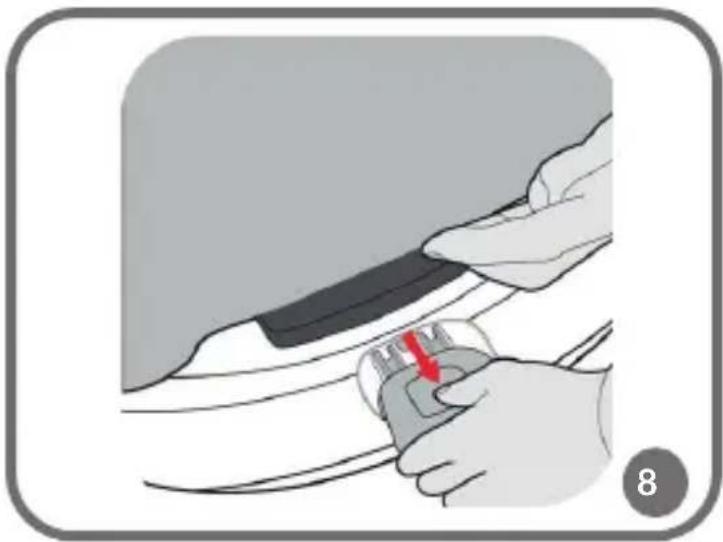
Pull the rotation key (L) and rotate the child safety seat (see: fig. 8).
Note! After every change, make sure the child safety seat has been secured in a desired position properly and does not rotate on its own.
During travel, the child safety seat must be in a forward- or rear-facing position. „Side" position is allowed only when you put the child in and take the child out of the seat during stopovers.
HOW TO RECLINE CHILD SAFETY SEAT
| Groups 0, 0+, I Group | I | |
| Rear-facing position Position | 5 – lying Position 5 | – lying |
| Group I Groups II, III | ||
| Forward-facing position | Position 1 – 4 Position | 1 – sitting |
The child safety seat can be set at five inclination angles (including one lying position when rear-facing position is set). See: fig. 9.
To recline the child safety seat, grab the handle (P) located between the seat and base, and set the desired inclination.
To set the child safety seat in a lying position, press the rotation key (L), rotate the seat by 180^ and then set the backrest in a lying position.
HOW TO ASSEMBLE THE CHILD SAFETY SEAT IN THE CAR
A. HOW TO ASSEMBLE WITH A CAR SAFETY BELT
GROUP 0 (0 - 13 kg)
For this weight group the child safety seat is mounted in a rear-facing position, in lying position. For instructions on how to adjust the child safety seat inclination, see: HOW TO RECLINE CHILD SAFETY SEAT.
See: fig. 13
- Place the child safety seat on the car seat.
- Pull the car safety belt and pull the hip part under the seat liner (K) through the hip belt guide (O).
- Pull the shoulder part of the car safety belt through the shoulder belt guide (S).
- Fasten the belt, tighten it as much as you can and make sure it is not twisted. Press the child safety seat against the car seat.
- Put the child in it.
After you have completed the assembly, make sure the belts have been carried through the guides properly and have been fastened correctly. To do so, try to move the child safety seat and check if it is stable.
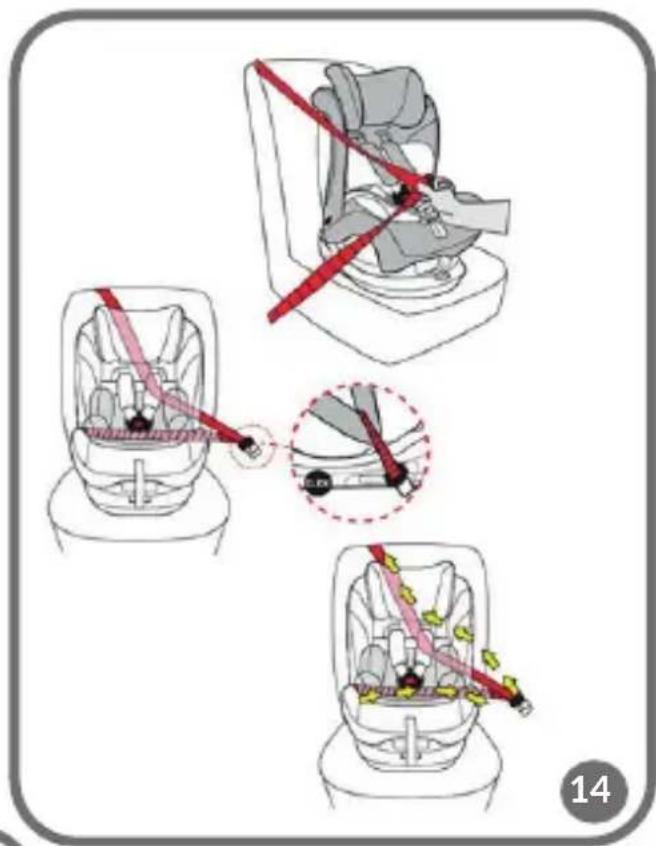
GROUP I (9 - 18 kg) See: fig. 14.
For this weight group the child safety seat is mounted in a forward-facing position, in positions 1-4.
- Place the child safety seat on the car seat.
- Pull the shoulder part of the car belt through the shoulder belt guide (S).
- Pull the hip part of the car belt through the hip belt guide (O).
- Pull the shoulder belt behind the child safety seat backrest through the third guide (O).
- Fasten the child safety seat.
- Press the child safety seat against the car seat and pull the car belt as much as you can.
- Put the child in it.
After you have completed the assembly, make sure the belts have been carried through the guides properly and have been fastened correctly. To do so, try to move the child safety seat and check if it is stable.
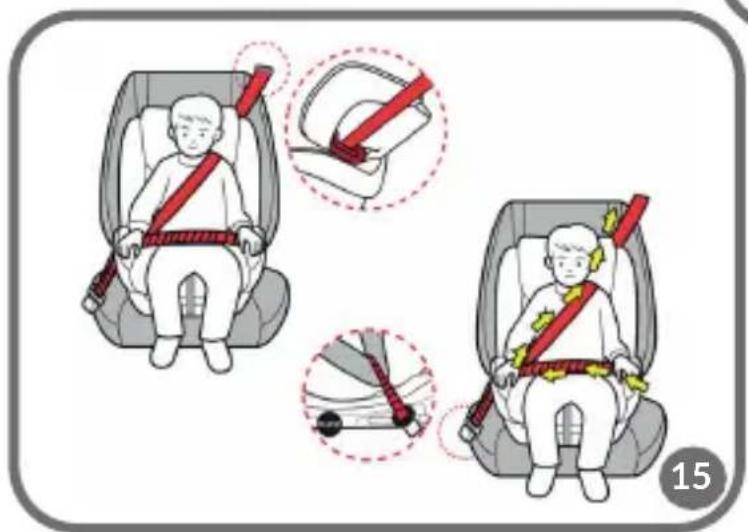
GROUPS II and III (15 - 36 kg)
For these weight groups, you have to disassemble 5-point belts of the child safety seat. The child safety seat must be mounted in a forward-facing position.
See: fig. 15.
- Place the child safety seat on the car seat, put the child in it.
- Pull the shoulder belt of the car through the shoulder belt guide (A) on the headrest.
-
Pull the hip part of the car belt through the hip belt guide (O) at the seat. Carry the shoulder belt through the same guide.
-
Fasten the belts.
-
Tighten the car belt.
Make sure the shoulder part goes through the child's collarbone, not its neck. The hip part must be as low as possible in relation to child's hip.
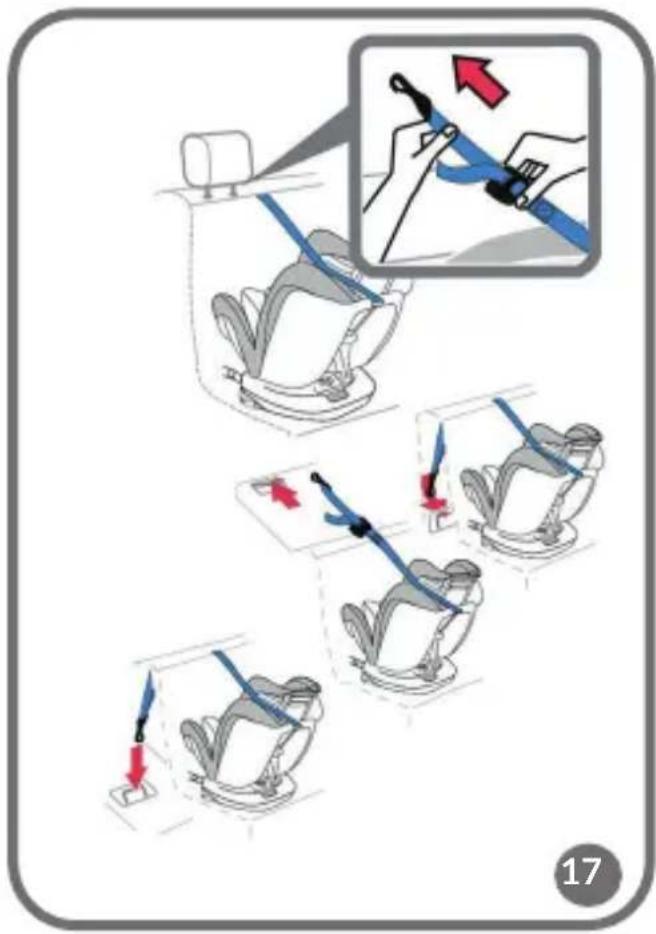
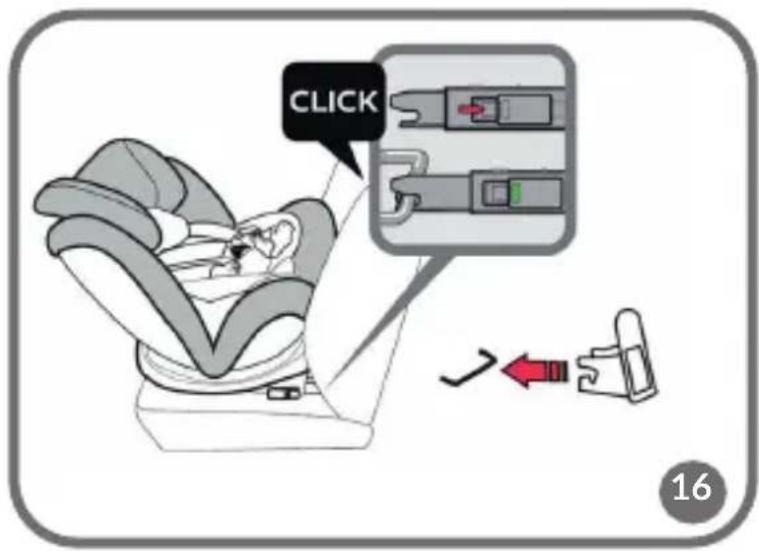
B. HOW TO ASSEMBLE WITH ISOFIX SYSTEM AND TOP TETHER OR ISOFIX, TOP TETHER + CAR SEAT BELTS
GROUPS 0, I (0 - 18 kg)
Installation in a rear-facing position.
See: fig. 16 and 17.
- Place the child safety seat on the car seat.
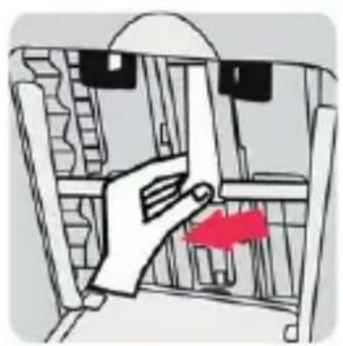
- If necessary, put both ISOFIX pads (Z1) on fixing points of your car. Press ISOFIX buttons (Z) to pull out the connecting arms (Y). Pull them out as far as possible and then connect to fixing points of your car. After you have heard a „click”, press the child safety seat against the car seat. ISOFIX latch indicators should be green on both ISOFIX arms (fig. 16).
- Pull TOP TETHER fixing belt out and next extend it with the use of the adjustment (X). Fasten the handle in the spot suggested in the vehicle manual (see: fig. 17). Tighten TOP TETHER with the use of the adjustment (X). The upper fixing belt is properly tightened when you can see a green indicator in the buckle.
Note - the upper belt fastening point can differ, depending in the car. The figure 17 shows examples of fixing, depending on the car model.
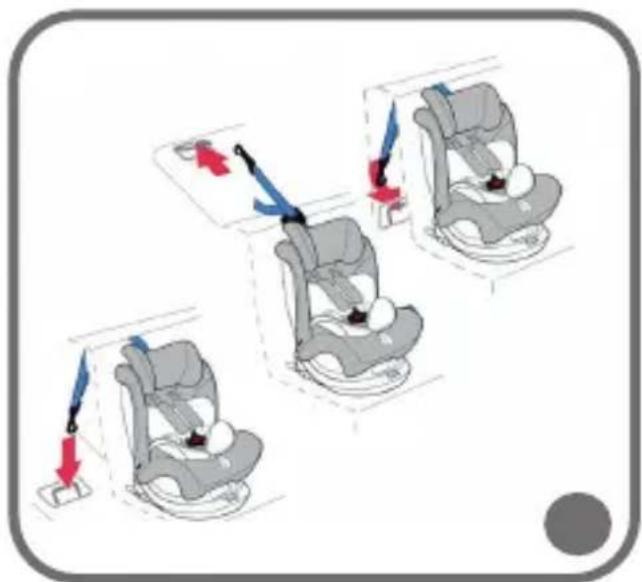
GROUP I (9 - 18 kg)
Installation in a forward-facing position.
- Place the child safety seat on the car seat.
- If necessary, put both ISOFIX pads (Z1) on fixing points of your car. When you can hear a „click”, press the child safety seat against the car seat as much as you can. Press ISOFIX buttons (Z) to pull out the connecting arms (Y). Pull them out as far as you can, and then connect to fixing points of your car. ISOFIX latch indicators should be green on both ISOFIX arms (fig. 18)
- Pull TOP TETHER fixing belt out and next extend it with the use of adjustment (X). Fasten the handle in the spot suggested in the vehicle manual (see: fig. 19). Tighten TOP TETHER with the use of the adjustment (X). The upper fixing belt is properly tightened when you can see a green indicator in the buckle.
Note – the upper belt fastening point can differ, depending on the car. The figure 19 shows examples of fixing, depending on the car model.
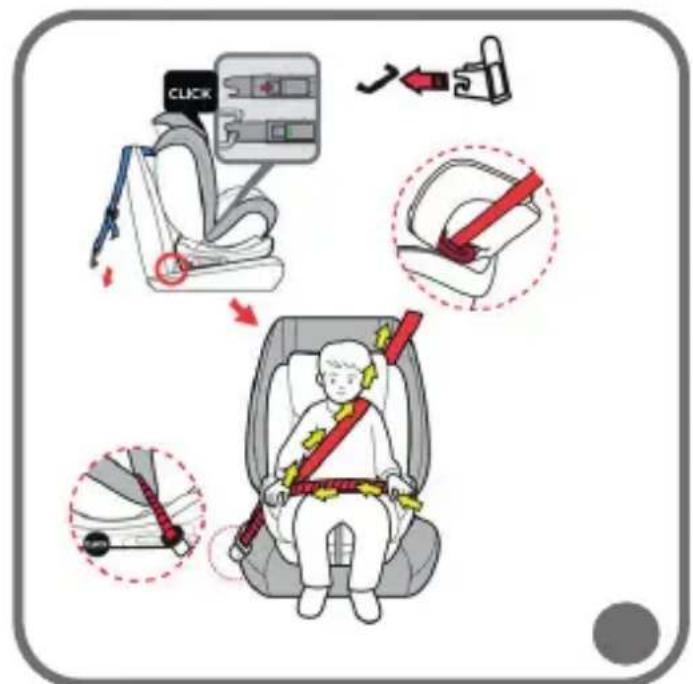
GROUPS II, II (15 - 36 kg)
For these weight groups, you have to disassemble 5-point belts of the child safety seat. Mount the child safety seat in a forward-facing position.
- Place the child safety seat on the car seat.
- Put both ISOFIX pads (Z1) on fixing points of your car. Press ISOFIX buttons (Z) to pull out the connecting arms (Y). Pull them out as far as you can, and then connect to fixing points of your car. The latch indicator should be green.
Next take one of the steps below - a or b. Installation with ISOFIX handles only is prohibited!
A. ISOFIX + car belts (see: fig. 20).
- Place the child in the child safety seat.
- Pull the car safety belts.
- Carry the shoulder belt through the shoulder belt guide (A) and hip belt through the hip belt guide (O).
Make sure the shoulder belt goes through the child's collar, not its neck.
- Fasten car safety belts.
-
Tighten car safety belts.
B. ISOFIX + TOP TETHER + car belts -
Take step described in „a” concerning assembly with car belts. Make sure the shoulder belt goes through the child's collar, not its neck.
- Pull out TOP TETHER fixing belt and next extend it with the use of adjustment (X). Fasten the handle in the spot suggested in the vehicle manual (see: fig. 19). Tighten TOP TETHER with the use of adjustment (X). The upper fixing belt is properly tightened when you can see a green indicator in the buckle.
HOW TO MAINTAIN AND CLEAN
You can clean the cover in warm water with soap or soft detergent. Do not dry the cover in the sun. Clean the buckle, child safety seat belts and plastic elements with warm water. Do not use strong detergents. If you do not use the product, store it in a dark and dry place, away from sunlight.
The pictures are for reference only. The real design of the products may differ from the pictures presented.
The product has been tested and meets all the requirements of the: ECE R44.04
Drogi Kliencie!
GRUPPO I (9 - 18 kg)
Vedi: fig. 14.
GRUPPO I (9 - 18 kg)
BESCHRIJVING (AFB. 1 EN 2)
O. Heupgordel geleider
SKUPINA I (9 - 18 kg)
Viz obr. 14.
SKUPINY II a III (15 - 36 kg)
SKUPINY 0, I (0 - 18 kg)
SKUPINA I (9 - 18 kg)
SKUPINY II, II (15-36 kg)
| ALFA ROMEO | ||
| 156 Wagon | 2003 | 24 |
| 156(Faxen 19 2003) | 1997-2005 | 24 |
| 156 Sportswagon | 1997-2005 | 24 |
| 159 SW(Faxen 2008) | 2006 | 24 |
| Giuffetta 940 | 2010 | 24 |
| GT Sportcoupe | 2004 | 24 |
| M To | 2008 | 124 |
| AUDI | ||
| A1 (8X) 3 | 08/10 | 24 |
| A1 (8X) 5 | 02/12 | 24 |
| A2 | 1999-2005 | 24 |
| A3, S3 (AB1)3+5 | 1996-2003 | 24 |
| A3, S3 (AB2)3+5 | 2003 | 24 |
| A3 (AB2) | 2008 | 24 |
| A3 (Faxen 3) (IP*) | 2010 | 124 |
| A4 Avanti (B5) | 1996-2001 | 24 |
| A4 (B6) | 2002-2006 | 124 |
| A4 (B6) | 2000-2004 | 24 |
| Phedra (Facelit 2009) | 2002 | |
| Thema | 11/11 | |
| Ypsilon (Facelit 2007) | 2003 | |
| Ypsilon (402) | 06/11 | |
| LANDROVER | ||
| Discovery 4(Facelit 10/11) | 2009 | |
| Finlander 2(Facelit 103/11) | 2006 | |
| Range Rover | 09/12 | |
| Range RoverEroque 5 3+5 | 2011 | |
| Range Rover Sport(Facelit 2010) | 2006 | |
| LEXUS | ||
| CT 200h (A10(A)) | 03/11 | |
| GS 450h (HL10(A)) | 06/12 | |
| IS (XEZ) (Facelit) | 11/10 | |
| RX 400h | 2006 | |
| RX 450h | 2009 | |
| MASERATI | ||
| Quattroports | 2008 | |
| Gran Turismo | 2008 | |
| MAZDA | ||
| 2 DE | 2007 | |
| 2 DY | 2003-2007 | |
| 2 (Facelit) | 10/10 | |
| 3 | 2003 | |
| 3 (Facelit) | 11/10 | |
| 3 BL | 04/09 | |
| 323 | 01/01 | |
| 5 (Facelit 2008) | 2006 | |
| 5 CW | 09/10 | |
| INFINITI | ||
| M35h (Y51H) | 09/11 | 24 |
| SUZU | ||
| D-MAX Double Cap | 2007 | 24 |
| KIA | ||
| Carent | 2006 | 24 |
| Carnival | 2006 | 2457 |
| Ceed | 12/06 | 24 |
| Ceed | 2007 | 24 |
| Ceed | 03/12 | 24 |
| Ceed (JD) | 06/12 | 24 |
| Ceed sw (JD) | 09/12 | 24 |
| Pro Ceed | 01/11 | 24 |
| Opirus (Facelit 2006) | 2003 | 24 |
| Picante (Facelit 2007) | 2004-2011 | 24 |
| Rio | 05/05 | 24 |
| Rio UB | 2012 | 24 |
| Soul | 02/09 | 24 |
| Soul (Facelit) | 10/11 | 24 |
| Soranto | 10/09 | 24 |
| Soranto (XIM)(Facelit) | 10/12 | 24 |
| Sportage(Facelit 09/2008) | 2006 | 24 |
| Sportage SL | 2010 | 24 |
| Venga | 11/09 | 24 |
| LANCIA | ||
| Delta3 | 2008 | 24 |
| Rivin (JS) | 06/12 | 24 |
| Musa (Facelit 2007) | 2004 | 24 |
| FR-V 6 | 2005 | 24 |
| Insight | 04/09 | 24 |
| Jazz 5 | 11/08 | 24 |
| Jazz (AA) | 04/11 | 24 |
| HYUNDAI * | ||
| Getz | 2002-2005 | 24 |
| Getz | 2005-2008 | 24 |
| H1 | 24 | |
| H10 | 2006 | 24 |
| I20 | 2009 | 24 |
| i20 (PBT)3+5 (Face#R) | 24 | |
| i30 | 24 | |
| i30 (FCH) | 24 | |
| i30 (GD) | 24 | |
| i30 ow (GD) | 24 | |
| i40 | 24 | |
| IX20 (JC) | 11/10 | 24 |
| IX35 | 2010 | 24 |
| IX55 | 2009 | 24 |
| Matrix | 2006 | 24 |
| Santa Fe | 04/06 | 24 |
| Santa Fe (Face#R) | 01/10 | 24 |
| Santa Fe | 03/12 | 24 |
| Santa Fe (DM) | 09/12 | 24 |
| Sonata, I40 | 2006 | 24 |
| Tucson 21 | 24 | |
| Veloster | 06/11 | 24 |
| Mondeo Turrier(BA7) (Facelift) | 11/10 | 24 |
| Mondeo(Facelift 2010) | 2007-2010 | 24 |
| Mondeo (BA7)(Facelift) | 12/10 | 24 |
| Ranger | 06/11 | 24 |
| S-Max(Facelift 2010) | 2006 | 234 |
| Tourneo Connect(Facelift 2009) | 2003 | 24 |
| TransitTransit Connect | 2006 | 23 |
| Transit Kombi | 11/11 | 23 |
| Transit Custom | 08/12 | 236 |
| HONDA * | ||
| Accord | 2008 | 24 |
| Accord 4+5 | 2009 | 24 |
| Accord | 06/11 | 24 |
| City 4 | 2009 | 24 |
| Civic Typ R EP3 | 2001-2006 | 24 |
| Civic 4+5 | 2006 | 24 |
| Civic 4D | 11/11 | 24 |
| Civic 5D | 01/12 | 24 |
| CR-V | 01/02 | 24 |
| CR-V | 2006 | 24 |
| CR-V | 10/12 | 234 |
| CR-Z | 06/10 | 24 |
| Laredi | 02/04 | 24 |
| Nafbu | 12/11 | 24 |
| Nafbu (RLG) | 07/12 | 24 |
| Nattz 31 | 06/05 | 24 |
| Nubira | 2004-2009 | 24 |
| Nubira | 2004-09/05 | 24 |
| Orlando | 01/11 | 24 |
| Spark | 03/10 | 24 |
| Trax | 01/13 | 24 |
| Volt (OHJCD) | 10/11 | 24 |
| CHRYSLER * | ||
| S00C | 2006 | 24 |
| Codge Colliner | 2006 | 24 |
| Codge Nitro | 2006 | 24 |
| Codge Ram (1500) | 2002-2008 | 234 |
| Grans Voyager | 2001-2007 | 2457 |
| Jeep Commander | 2006 | 24 |
| Jeep GrandChrysler(Wk) | 12/10 | 24 |
| Jeep Wrangler UJB minos(Facelll) | 11/11 | 24 |
| Antara | 11/05 | 24 |
| Astra | 2014 | 24 |
| Astra GTC | 09/11 | 24 |
| Astra J | 12/09 | 24 |
| Astra J Sedan (P-1) | 09/12 | 24 |
| Astra J Sport Tourer | 2011 | 24 |
| Astra J Sport Tourer(P.USVM) | 10/10 | 24 |
| Combo C(Freelin 2003) | 2011-2011 | 24 |
| Corse C | 2003-2003 | 24 |
| Corsa D (OPC) | 2003 | 24 |
| Corse D FL (S-D) | 01/11 | 2 |
| Insignra | 2003 | 24 |
| Insignra | 2003 | 24 |
| Insignra | 08/11 | 24 |
| Meriva (Fresell 2006) | 2003 | 24 |
| Meriva B | 2011 | 24 |
| Makxa | 06/12 | 24 |
| Signum(Fresell 2005) | 2003-2003 | 24 |
| Vivetro (Fresell 2006) | 2001 | 3 |
| Zafira B (Fresell 2006) | 05/05 | 24 |
| Zafira C | 09/11 | 24 |
| Zafira C Tourer | 01/12 | 24 |
| PEUGEOT * | ||
| 167 | 2005 | 24 |
| 206 | 12/08 | 24 |
| 208 C.C | 2001-2001 | 1 |
| Cell (230) 5(Food# 2008) | 2008 | 24 |
| Grandis | 2004-2011 | 24 |
| Lancer | 2007 | 24 |
| Lancer FL | 11/11 | 24 |
| Outlender | 2006 | 24 |
| Pajero V80 | 0207 | 4 |
| NISSAN * | ||
| Cube Z12 | 2008 | 24 |
| Juke (F15) | 2010 | 24 |
| Leaf (ZED) | 0412 | 24 |
| Maxima (A33) | 2000-2004 | 24 |
| Micro (K11) | 1993-2003 | 24 |
| Micro (K12) | 2003 | 24 |
| Micro CC | 2005 | 1 |
| Micro (K13) | 11/10 | 24 |
| Mureno (Food# 2008) | 2003 | 24 |
| Noble | 2004 | 24 |
| Pathfinder (R51) | 2007 | 24 |
| Piko | 2009 | 24 |
| Primera (P11) | 1996-2002 | 24 |
| Qashqai+2 | 10/08 | 24 |
| Qashqai+2 (fac=Hf) | 03/10 | 24 |
| Ticla | 2004 | 24 |
| OPEL / VAUXHALL * | ||
| Agila B | 2008 | 24 |
| Ampera | 10/11 | 24 |
| C (C204) | 06/11 | 24 |
| C (W 204) | 03/11 | 24 |
| C Ran | 09/12 | 24 |
| CL (Facelft) | 07/10 | 4 |
| CLC 180 | 2008 | 24 |
| CLS (Fascil 2008) | 10/04 | 24 |
| CLS (C210) | 01/11 | 24 |
| E | 03/02 | 24 |
| E (W 211) | 2006 | 24 |
| E (S 211) | 2006 | 24 |
| E (W212, S212) | 2009 | 24 |
| E (C207) | 2009 | 24 |
| E (A207) | 2010 | 24 |
| G (W653)(Facelft 2009) | 1990 | 24 |
| GLK | 2008 | 24 |
| GLK (X204) (Facelft) | 08/12 | 24 |
| M (V196) | 11/11 | 24 |
| R (W251/V251) | 12/05 | 2457 |
| R (W251) | 09/10 | 24 |
| S (W211)(Facelft 2009) | 2005 | 24 |
| Viano (W414) | 2001-2005 | 234 |
| Viano L6 | 09/03 | 2457 |
| Viano (Facelft 2010) | 09/03 | 2456 |
| Viano (W439)(Facelft) | 10/10 | 246 |
| Vilo (V639)(Facelft) | 10/10 | 2356 |
| MITSUBISHI | ||
| AGX | 2010 | 24 |
| Colt (Z30) 3+5 | 2004-2008 | 24 |
| 6(Face#in 2008) | 05/02-2008 | |
| 6(Face#in 2009) | 2008 | 24 |
| 6(Face#in 2010) | 2009 | 24 |
| CX5 | 12/11 | 24 |
| CX7 | 2007 | 24 |
| CX7(Face#in) | 2009 | 24 |
| MX5 L2 Typ NB | 1996-2005 | |
| Premacy | 1999-2005 | 24 |
| RX8 | 2003 | 24 |
| RX8(Face#in) | 2008 | 24 |
| MERCEDES * | ||
| A(W168) | 03/01 | 24 |
| A(W169)(Face#in 2008) | 05/05 | 24 |
| A(T76) | 09/12 | 24 |
| B(Face#in 2008) | 08/05 | 24 |
| B(AZ48) | 11/11 | 24 |
| C(W203) | 05/00 | 24 |
| C(S203) | 05/01-2007 | 24 |
| C(W204) | 2007 | 24 |
| C(IS 204) | 2007 | 24 |
| C(T204) | 03/11 | 24 |
| Albea | 2004 | 24 |
| Albea Freelback(Facolin 2006) | 2007 | 24 |
| Alben XL | 2008 | 24 |
| Exeo | 2009 | 124 |
| Exeo | 24 | |
| Exeo (Fucolin) | 12/11 | 24 |
| Ibiza (6K) | 1983-2002 | 24 |
| Ibiza (6L)(Fucolin 2006) | 2002-2008 | 24 |
| Ibiza (6J) | 2008 | 24 |
| Ibiza | 24 | |
| Leon (1P) | 2005 | 24 |
| Leon 3+5 | 05/12 | 24 |
| Vi 3(baugleichen VW Up) | 2011 | 24 |
| Vi 5(baugleichen VW Up) | 05/12 | 24 |
| Tolede M1 5 | 1989-2004 | 24 |
| Tolede | 2004 | 24 |
| Tolede | 05/12 | 24 |
| SKODA | ||
| Cáligo(baugleichen VW Up) | 2011 | 24 |
| Cáligo 3 + 5 | 05/12 | 24 |
| Fabla I (Fucolin 2004) | 1989-2007 | 24 |
| Fabla II | 2007 | 24 |
| Megane II 3+5 | 09/02 | 124 | |
| Megane III 3+5 | 2008 | 24 | |
| Megane III Grandtour | 06/09 | 24 | |
| Megane III CC (Z) | 06/10 | 24 | |
| Mccuta | 09/04 | 24 | |
| Montus (Facelit) | 2008 | 24 | |
| Sandero III | 12/12 | 24 | |
| Scenario II▼ | 2003-2006 | 124 | |
| Scenario II▼ (Facelit) | 09/06 | 124 | |
| Scenario III▼ | 2009 | 234 | |
| Trafic II Phase 1 | 2001-2006 | 36 | |
| Trafic II Phase 2(7 octin 2007) | 2007-07/10 | 3 | |
| Trafic II Phase 3 | 08/10 | 23 | |
| Twingo | 1998-2007 | 124 | |
| Twingo II | 2008 | 124 | |
| Vel Salls(Facelit 2005) | 2002 | 24 | |
| ZCE | 10/12 | 124 | |
| ZCE | 03/13 | 124 | |
| SAAB * | |||
| 9-3 Sportkombi | 2005-2007 | 24 | |
| 9-5 Sportkombi | 2005-2010 | 24 | |
| SEAT * | |||
| Alhambra(Facelit) | 2005 | 234 | |
| Alhambra (7N) | 10/10 | 2345 | |
| PORSCHE | ||
| Cayenne (Fiscal 2007) | 2003 | 124 |
| Panamera | 2009 | 24 |
| RENAULT | ||
| Captur | 04/13 | 124 |
| Cto III 3-5 | 2007 | 24 |
| Cto II | 09/08-2006 | 1 |
| Cto II | 1998-2005 | 24 |
| Cto III (Fiscal 2009) | 08/05 | 24 |
| Cto IV | 08/12 | 124 |
| Cto Grandtour III | 2008-2009 | 24 |
| Cto Grandtour | 2009 | 24 |
| Esplice IVGrande Esplice IV(Fiscal 2009) | 2002-2010 | 23457 |
| Esplice (K) | 12/10 | 23457 |
| Fluence (Z) | 08/10 | 24 |
| Fluence (ZE) | 2011 | 24 |
| Grand Modus | 2008 | 24 |
| Grand Scenic III ▼ | 2009 | 234 |
| Kangro III | 2008 | 124 |
| Kangro be bop | 2008 | 24 |
| Kolhos ▼ | 2008 | 24 |
| Laguna III (FacidIII) | 11/10 | 24 |
| Laguna Saint TourIII (T) (FacidIII) | 11/10 | 24 |
| Megane I GrandTour | 1999-2003 | 24 |
| Megane CC (C) | 06/10 | 24 |
| 201 | 2006 | 24 |
| 207 CC | 04/07 | 1 |
| 207 SW | 2006 | 24 |
| 208 C | 04/12 | 24 |
| 308 | 2007 | 124 |
| 308 CC | 2009 | 24 |
| 308 CC FL | 11/11 | 24 |
| 308 SW | 2007 | 124 |
| 308 SW (FocciB) | 05/11 | 24 |
| 508 (8) | 03/11 | 24 |
| 508 SW (8) | 03/11 | 24 |
| 508 RXH SW (8) | 02/12 | 24 |
| 80T(FocciB 2008) | 2002 | 2457 |
| 2010 | ||
| 1007 (1) | 01/05 | 24 |
| 4007 | 2007 | 24 |
| 4008 (B) | 06/12 | 24 |
| 5008 | 09/09 | 3 |
| Expert | 2007 | 2457 |
| Partner | 1006 | 3 |
| Partner Toppe | 2008 | 1 |
| PONTIAC | ||
| Grand AM | 1998 | 24 |
| 2004 | ||
| S60 (E) | 03/10 | 24 |
| S80 (Typ AS)(Fasc#l 2000) | 2005 | 24 |
| V40(Fasc#l 2000) | 1995-2004 | 24 |
| V40 (M) | 09/12 | 24 |
| V50 | 2004 | 24 |
| V60 (F) | 2010 | 24 |
| V70 | 2003-2007 | 24 |
| V70 | 2007 | 24 |
| V70 | 08/11 | 24 |
| XC60 | 2005 | 24 |
| XC70 | 2007 | 24 |
| XC70 | 08/11 | 24 |
| XC90 L 5+7 | 2002 | 24 |
| * | ||
| Amark | 2013 | 24 |
| Beetik | 1993 | 24 |
| Beetika | 2002 | 24 |
| Beetik (Fasc#l) | 2005 | 24 |
| Beetika 3 | 07/11 | 24 |
| Caddi 7) | 2004 | 24 |
| Caddi 7) | 09/10 | 24 |
| CrossPolo IV(Typ 9N3) | 2005-2013 | 24 |
| EOS(fasc#l 2010) | 2005 | 124 |
| EOS (F) (F=ndift) | 10/10 | 1 |
| Fax | 04/05 | 24 |
| Golf IV | 09/07-2003 | 24 |
| Coro b | 2000 | 24 |
| Coro b Verso | 2004-2009 | 24 |
| IQ | 2009 | 24 |
| Land Cruiser (J12) | 2002 | 24 |
| Land Cruiser (V6) | 2008 | 24 |
| Land Cruiser | 11/09 | 24 |
| Preva (Facelit 2003) | 2000-2009 | 24 |
| Prius | 2003-2009 | 24 |
| Prius (Facelit 04/12) | 2003 | 24 |
| Prius (XW4(A)) | 06/2 | 24 |
| RAV4 | 2000-2008 | 24 |
| RAV4 (Facelit) | 05/10 | 24 |
| Urban Cruiser | 2009 | 4 |
| Verso S (XP12(A)) | 03/11 | 24 |
| Yaris 3+5 | 1999-2005 | 24 |
| Yaris 3+6(Facelit 2009) | 2006 | 24 |
| Yaris 3+5 | 08/1 | 24 |
| Yaris (Verzo(Facelit 2003) | 1999-2005 | 24 |
| VOLVO * | ||
| C30 | 2006 | 24 |
| G70 | 2005 | 24 |
| XC70 | 2007 | 24 |
| S40 (Facelit 2007) | 2003 | 24 |
| SUBARU * | ||
| Forester III | 2008 | 24 |
| Impreza | 2007 | 24 |
| Legacy Facelit 2007) | 2004 | 24 |
| Legacy | 06/09 | 24 |
| Outback(Facelit 2007) | 2003 | 24 |
| Outback | 06/09 | 24 |
| Trezia | 05/11 | 24 |
| BUZUKI * | ||
| Alto VII | 2009 | 24 |
| Kizashi (FR) | 09/10 | 24 |
| Splash | 2007 | 24 |
| Splash (EX) (Facelit) | 05/12 | 24 |
| Swift | 02/05-10/10 | 24 |
| Swift | 09/10 | 24 |
| SX4 | 2008 | 24 |
| TATA * | ||
| Indica Vista | 2008 | 24 |
| TOYOTA * | ||
| Auria (Facelit 2012) | 2007-2010 | 24 |
| Auria (Facelit) | 03/10 | 24 |
| Auria Hybrid | 09/10 | 24 |
| Avensis (T22) | 2000-2003 | 24 |
| Avensis (T27) | 2009 | 24 |
| Avensis (T21) | 01/12 | 24 |
| Fabia II Combi (5J)(FaceIII) | 06/10 | 24 |
| Feltria | 1994-2001 | 24 |
| Octavia II | 2004 | 124 |
| Octavia II (FaceIII) | 2009 | 124 |
| Octavia Scout | 2007-2012 | 24 |
| Octavia | 1112 | 124 |
| Rapid | 05/12 | 24 |
| Rapid (NH) | 10/12 | 24 |
| Roomster | 2006 | 24 |
| Roomster (FaceIII) | 05/10 | 24 |
| Superb I(FaceIII 2006) | 10/01-2008 | 24 |
| Superb II | 2008 | 24 |
| Superb | 2010 | 24 |
| Superb (ST) | 02/10 | 124 |
| Yell | 2009 | 24 |
| SMART | ||
| Fortour® Typ 454 | 2004-2006 | 24 |
| Fortavo Typ 451 | 2007 | 1 |
| Fortavo Typ 451 (FL) | 10/10 | 1 |
| Go# IV Variant[IMAGE] | 1999-2006 | 24 |
| Go# V | 2003 | 24 |
| Go# V (R32) | 09/05 | 24 |
| Go# V Plus7) | 2005 | 24 |
| Go# V Plus | 2006-2009 | 24 |
| Go# V Variant[IMAGE] 5 | 2007 | 24 |
| Go# VI | 08/08 | 24 |
| Go# VI Variant(Facelift 2009)[IMAGE] | 2009 | 24 |
| Go# VI (1K)[IMAGE] | 06/11 | 24 |
| Go# VI Plus(Facelift) | 2009 | 24 |
| Go# VII | 08/12 | 24 |
| Jetta VI | 01/11 | 24 |
| Passat (B6)[IMAGE](Facelift 2010) | 2005 | 24 |
| Passat B7[IMAGE]; [IMAGE] | 2010 | 24 |
| Passat B7 Altraci[IMAGE] | 02/12 | 24 |
| Passat CC | 2008 | 24 |
| Phaeton | 2002 | 24 |
| Polo III(Facelift 1999) | 1994-2001 | 24 |
| Polo III(Facelift 1999) | 1999-2001 | 24 |
| Polo IV | 2005 | 24 |
| Polo V | 2009 | 24 |
| Scirocro III | 08/08 | 24 |
| Sharan (Facelift) | 2004 | 234 |
| Sharan II^7) | 2010 | 23457 |
| T5 California(Facelift 2010) | 2003 | 467 |
| T5 Multivan | 2003 | 2457 |
| T5 Multivan(Facelift 2010) | 2003 | 2457 |
| Tiguan | 2007 | 24 |
| Tiguan (Facelift) | 07/11 | 24 |
| Touareg (7L)(Facelift 2006) | 2002-2010 | 24 |
| Touareg II (C2) | 2010 | 24 |
| Touran7) | 2003 | 24 |
| Touran7) | 2007 | 24 |
| Touran FL (1T)7) | 09/10 | 24 |
| Touran GP27) | 2010 | 24 |
| UP! (Lupo I) | 08/11 | 24 |
| UP! (Lupo I) | 05/12 | 24 |
Szczegółowe warunki gwarancji dostępne są na stronie: Detailed warranty conditions are available on the website: Detaillierte Garantiebedingungen finden Sie auf der Website: Подробные условия гарантии доступны на сайте: Le condizioni di garanzia dettagliate sono disponibili sul sito web: Les conditions de garantie détaillées sont disponibles sur le site: Las condiciones de garantía detalladas están disponibles en el sitio web: Gedetailleerde garantievoorwaarden zijn beschikbaar op de website: Išsamias garantijos sąlygas rasite svetainėje: Podrobné záruční podmínky jsou k dispozici na webových stránkách: A részletes garanciális feltételek elérhetők a weboldalon: Condiții detaliate de garanție sunt disponibile pe site:
www.lionelo.com
Thank you for purchasing our product Dziękujemy za zakup urządzenia naszej marki Vielen Dank für den Kauf unserer Markenausrüstung Спасибо за покупку нашего продукта Grazie per aver acquistato il nostro prodotto Merci d'avoir acheté notre produit Gracias por adquirir nuestro producto Bedankt voor het aanschaffen van ons product Dëkojame, kad Ísigijote mûsų prekės ženklo įrenginį Dëkujeme vám za zakoupení zařízení naší značky Köszönjük, hogy márkájú készülékünket választotta Vă multumim că ați achiziționat un dispozitiv al mărcii noastre
lionelo

- Dear customer!
- Producer:
- Safety in the car:
- NOTE! When installed with car seat belts: never use the child safety seat with 2-point safety belts.
- INFORMATION
- NOTE
- Information about the ISOFIX system:
- When used for groups 0+, I, II, III - category "semi-universal"
- CHILD SAFETY SEAT OVERVIEW
- DESCRIPTION (fig. 1 and 2)
- HOW TO FASTEN CHILD SAFETY SEAT BELTS
- HOW TO DISASSEMBLE CHILD SAFETY SEAT BELTS
- HOW TO ADJUST HEADREST AND HEIGHT OF SHOULDER BELTS (fig. 4)
- Groups 0, 0+ and I
- Groups II and III
- HOW TO ADJUST CHILD SAFETY SEAT BELTS TENSION
- SEAT LINER
- HOW TO REMOVE COVER
- HOW TO ROTATE THE CHILD SAFETY SEAT
- HOW TO RECLINE CHILD SAFETY SEAT
- HOW TO ASSEMBLE THE CHILD SAFETY SEAT IN THE CAR
- HOW TO ASSEMBLE WITH A CAR SAFETY BELT
- GROUP 0 (0 - 13 kg)
- GROUP I (9 - 18 kg) See: fig. 14.
- GROUPS II and III (15 - 36 kg)
- HOW TO ASSEMBLE WITH ISOFIX SYSTEM AND TOP TETHER OR ISOFIX, TOP TETHER + CAR SEAT BELTS
- GROUP I (9 - 18 kg)
- GROUPS II, II (15 - 36 kg)
- HOW TO MAINTAIN AND CLEAN
- Drogi Kliencie!
- GRUPPO I (9 - 18 kg)
- Vedi: fig. 14.
- BESCHRIJVING (AFB. 1 EN 2)
- SKUPINA I (9 - 18 kg)
- SKUPINY II a III (15 - 36 kg)
- SKUPINY 0, I (0 - 18 kg)
- SKUPINY II, II (15-36 kg)
- www.lionelo.com
- lionelo
Brand : Lionelo
Model : Bastiaan RWF
Category : Car seat