SES 10 - Vacuum Cleaner Ritter - Free user manual and instructions
Find the device manual for free SES 10 Ritter in PDF.
| Product type | Built-in pedestal vacuum cleaner |
| Brand | Ritter |
| Model | SES 10 |
| Usage | Domestic (kitchen) |
| Appliance dimensions (W x H) | 342 x 103 mm |
| Cavity dimensions (clear width x clear height) | 365 x 105 mm |
| Required depth | 460 mm |
| Power supply | Mains (voltage and power according to rating plate) |
| Dust bag | Swirl A07 (included) |
| Included accessories | Insertion nozzle, 3 m flexible hose, flat crevice tool, brush attachment |
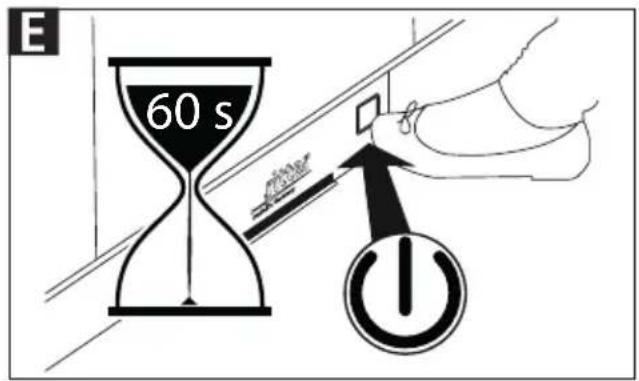
| Automatic shut-off | Yes, after 60 seconds |
| Warranty | 2 years manufacturer |
| Standards | CE |
| Maintenance | Cleaning with dry or damp cloth; dust bag replacement |
| Safety | Installation by professional, do not use without bag, do not repair yourself |
| Customer service | Contact local service (www.ritterwerk.de) |
Frequently Asked Questions - SES 10 Ritter
User questions about SES 10 Ritter
0 question about this device. Answer the ones you know or ask your own.
Ask a new question about this device
Download the instructions for your Vacuum Cleaner in PDF format for free! Find your manual SES 10 - Ritter and take your electronic device back in hand. On this page are published all the documents necessary for the use of your device. SES 10 by Ritter.
USER MANUAL SES 10 Ritter
| de | Gebrauchs- und Montageanleitung | Einbau-Sockelsauger |
| en | Operating and assembly instructions | Built-in vacuum cleaner |
| fr | Notice d‘utilisation et de montage | Aspirateur sur socle encastré |
| cs | Návod k montáži a obsluze | Vestavný vysavač do soklu |
| da | Brugs- og monteringsvejledning | Sokkelstøvsuger |
| es | Instrucciones de uso y de montaje | Aspiradora de zócalo empotrable |
| fi | Käyttö- ja asennusohje | Jälkiasennettava sokkeli-imuri |
| hr | Upute za uporabu i montažu | Ugradbeni podni usisavač |
| hu | Használati és szerelési útmutató | Beépíthető lábazati porszívó |
| it | Istruzioni per l‘utilizzo e il montaggio | Aspiratore a battiscopa incassato |
| nl | Gebruiks- en montageaanwijzing | inbouw-plintzuiger |
| no | Bruksanvisning og monteringsveiledning | Integrert støvsuger |
| pl | Instrukcja montažu | Odkurzacz podszafkowy do zabudowy |
| ro | Instrucțiuni de utilizare și montare | Aspirator încorporabil |
| ru | Руководство по эксплуатации и сборке | Встроенный пылесос |
| sk | Návod na použitie a montáž | Vstavaný soklový vysávač |
| sl | Navodila za uporabo in montažo | Vgradni sesalnik |
| sv | Bruks- och monteringsanvisning | Sockeldammsugare |
| deenfr | |||
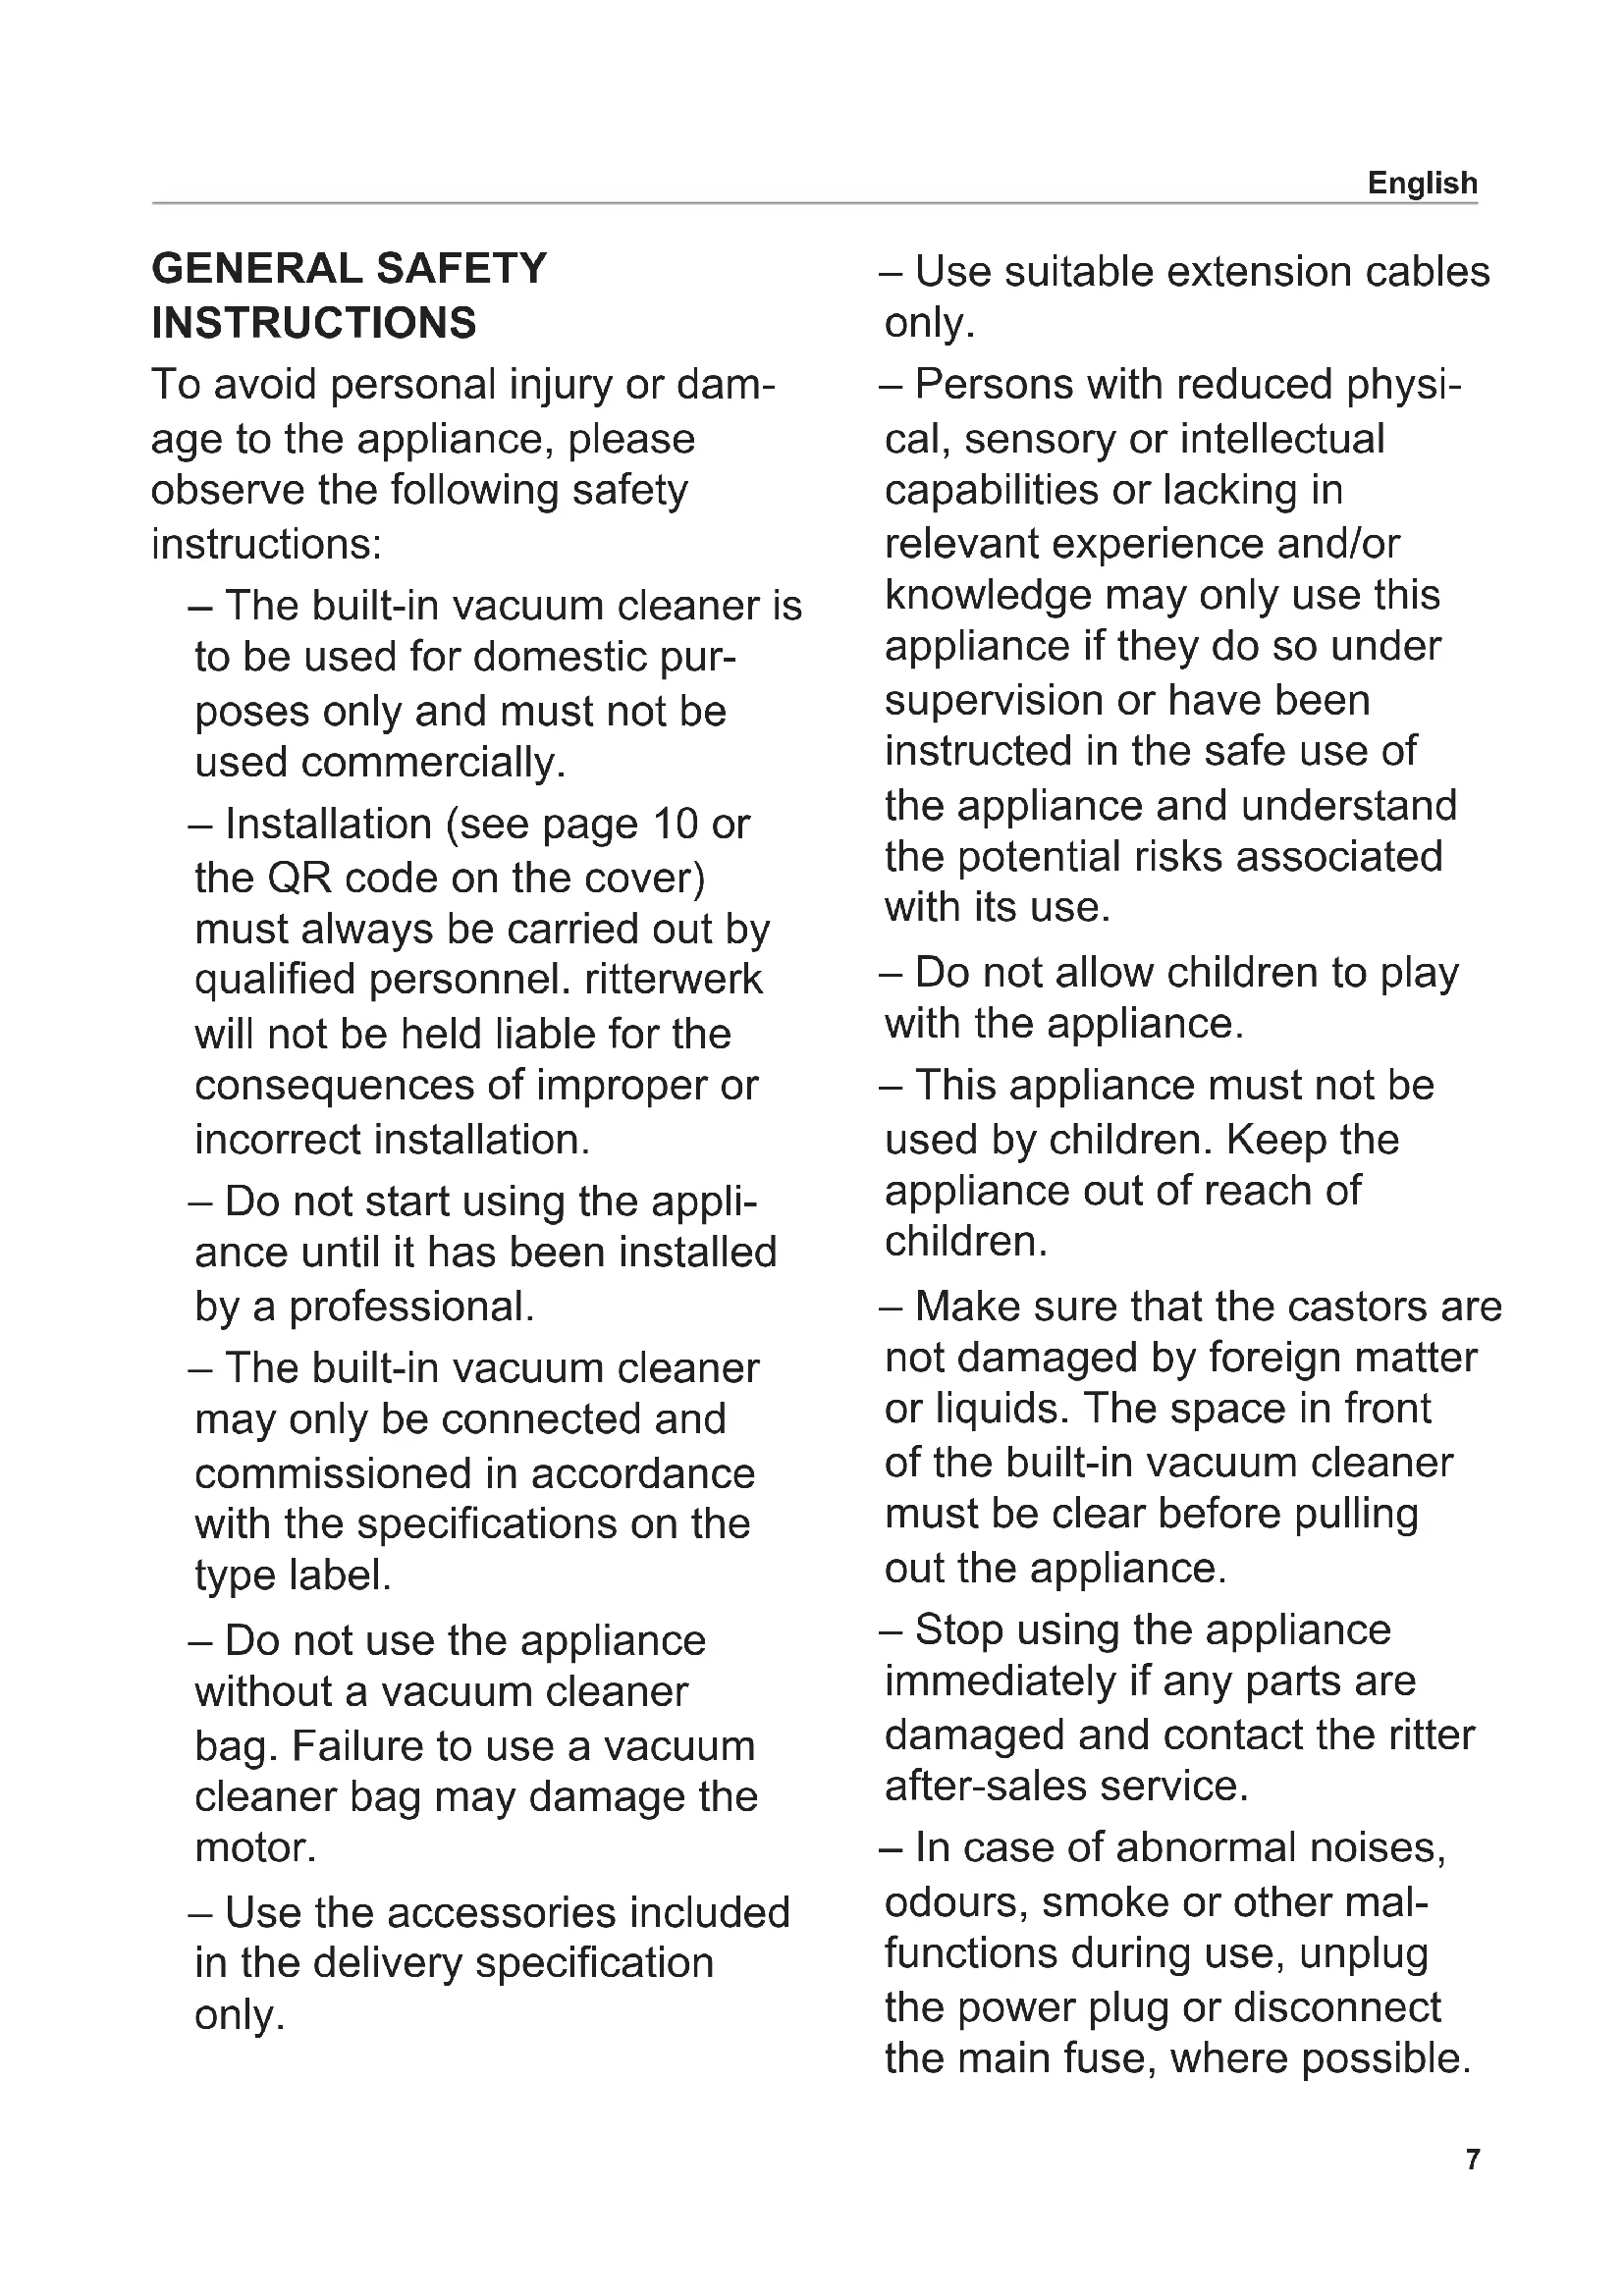
| 1 | Deckel Lid Couvercle | ||
| 2 | Schalter Switch Commutateur | ||
| 3 | Einzug Suction opening Entrée | ||
| 4 | Schlauch Tube Tuyau | ||
| 5 | Fugendüse Crevice nozzle Suceur plat | ||
| 6 | Einschubdüse Push-in nozzle Buse d'insertion | ||
| 7 | Bürstenaufsatz Brush attachment Fixation de la brossecsdaes | ||
| 1 | Kryt Låg Tapa | ||
| 2 | Vypínač Kontakt Interruptor | ||
| 3 | Vstupní štěrbina Indtræk Alimentador | ||
| 4 | Hadice Slange Tubo flexible | ||
| 5 | Štěrbinová tryska Fugedyse Boquilla para juntas | ||
| 6 | Zásuvná tryska Indskubningsdyse Boquilla insertable | ||
| 7 | Kartáčový nástavec Børstedel | Cepillo |
natural_image
Line drawing of a hand using a saw to cut a piece of wood or metal, showing stepwise cutting (no text or symbols)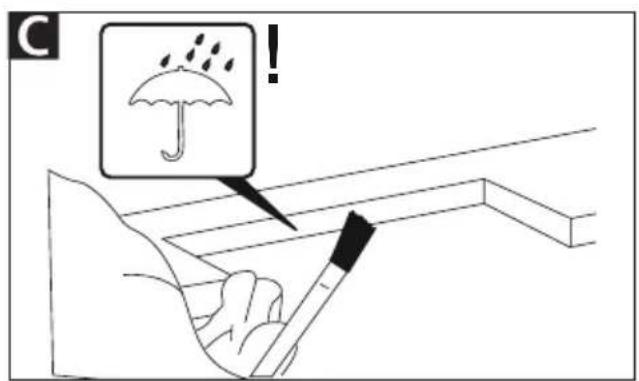

natural_image
Line drawing of a hand inserting a card into a cabinet (no text or symbols)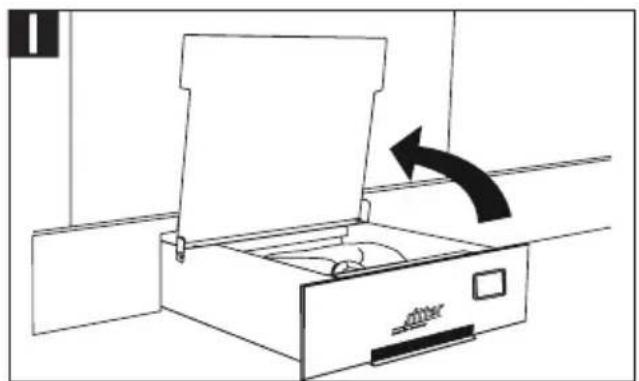
natural_image
Line drawing of an open drawer with a black arrow indicating direction (no text or symbols)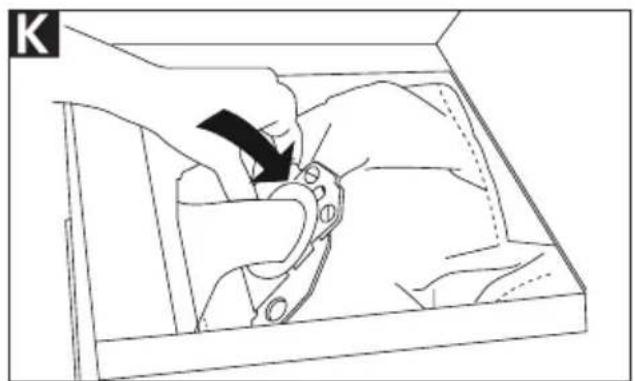
natural_image
Line drawing of a hand using a tool to adjust or install a mechanical component inside a container (no text or symbols)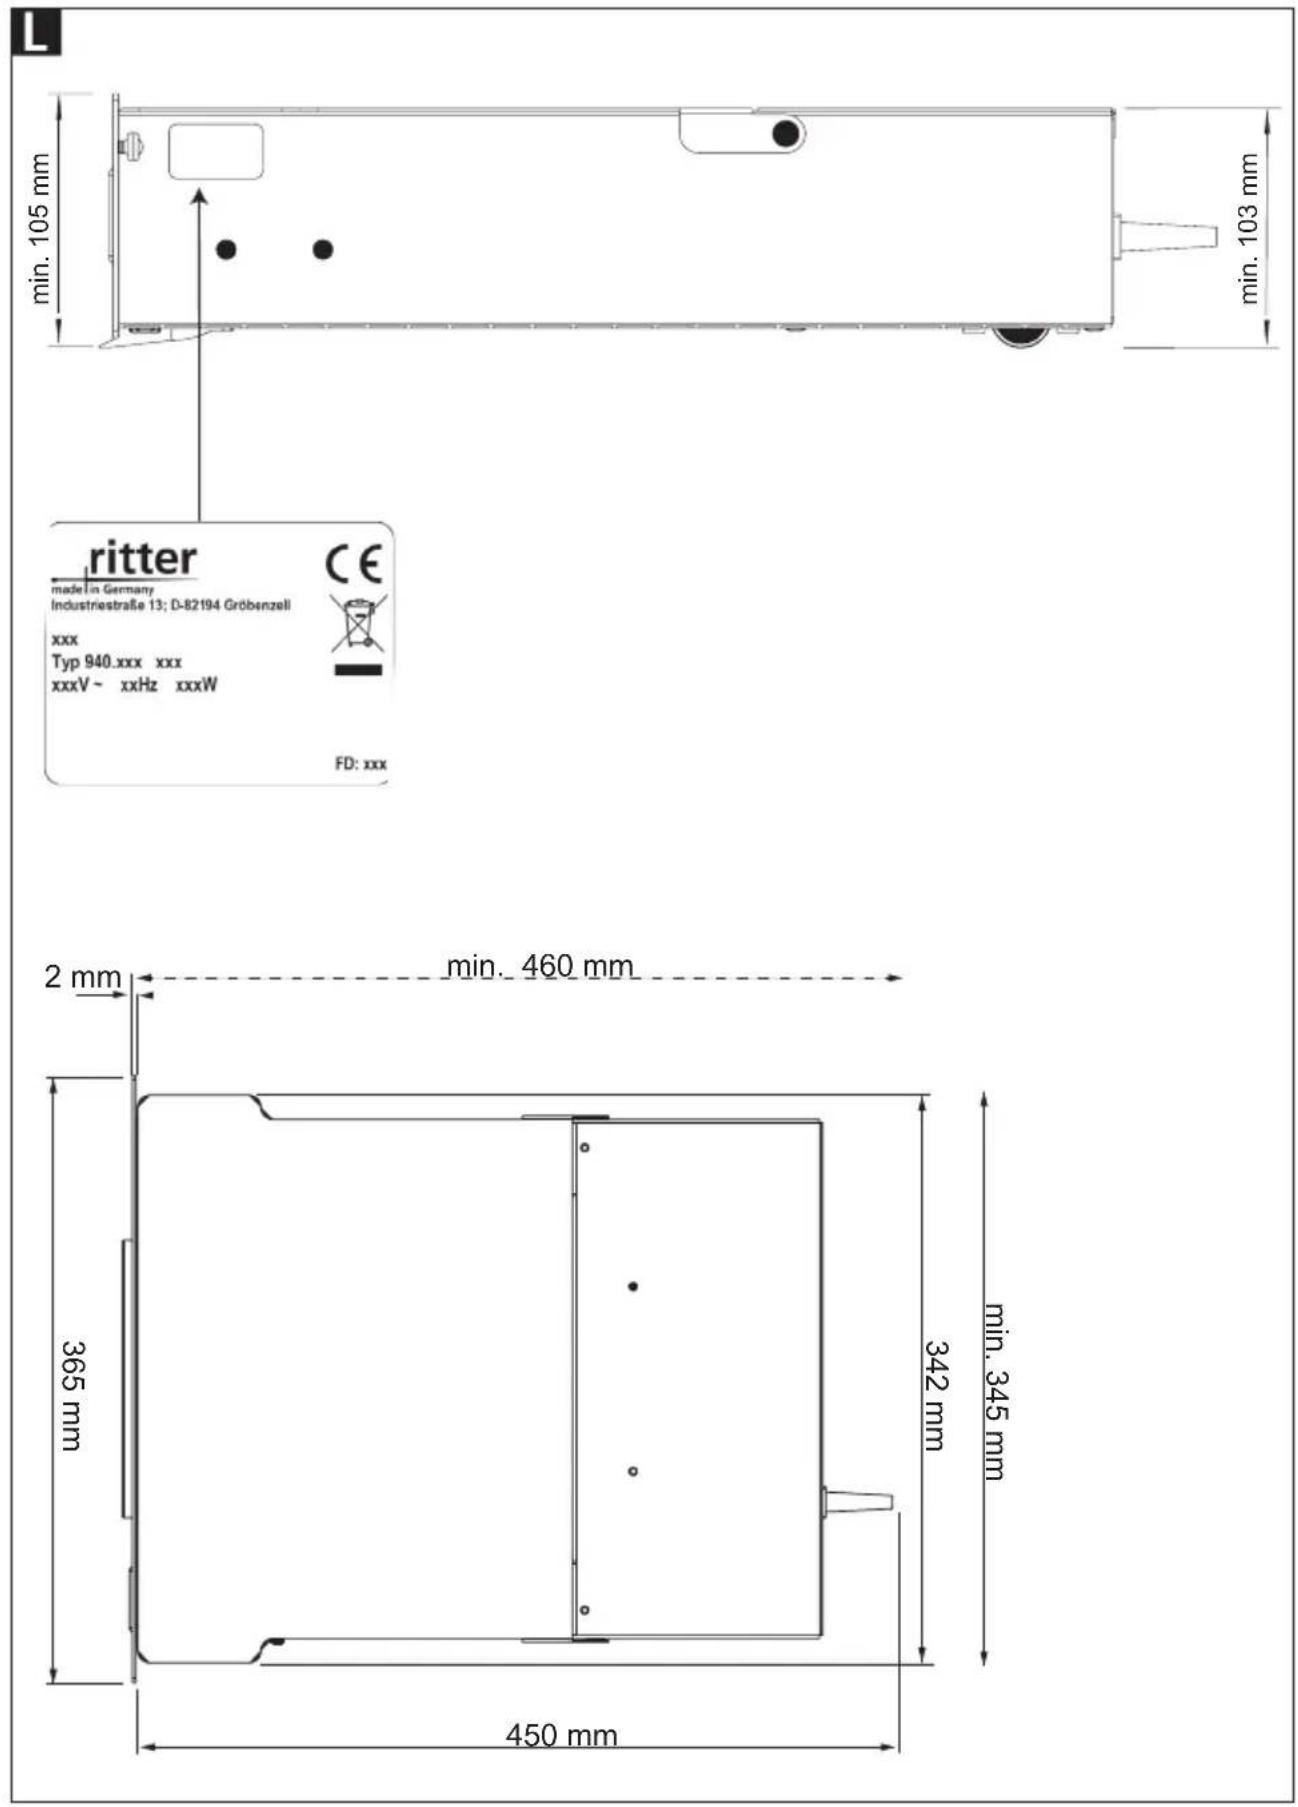
| de | Gebrauchs- und Montageanleitung ...... 2 |
| en | Operating and assembly instructions ...... 7 |
| fr | Notice d‘utilisation et de montage...... 11 |
| cs | Návod k montáži a obsluze...... 15 |
| da | Brugs- og montagevejledning...... 19 |
| es | Instrucciones de montaje y de uso...... 22 |
| fi | Käyttö- ja asennusohjeet...... 26 |
| hr | Upute za uporabu i montažu ...... 30 |
| hu | Használati és összeszerelési útmutató ...... 34 |
| it | Istruzioni per l‘utilizzo e il montaggio ...... 38 |
| nl | Gebruiks- en montage aanwijzing ...... 42 |
| no | Bruksanvisning og monteringsveiledning..46 |
| pl | Instrukcja obsługi i montażu...... 50 |
| ro | Instrucțiuni de utilizare și montare ...... 54 |
| ru | Руководство по эксплуатации и инструкция по сборке...... 58 |
| sk | Návod na použitie a montáž...... 62 |
| sl | Navodila za uporabo in vgradnjo...... 66 |
| sv | Bruks- och monteringsanvisning ...... 70 |
GENERAL SAFETY INSTRUCTIONS
To avoid personal injury or damage to the appliance, please observe the following safety instructions:
- The built-in vacuum cleaner is to be used for domestic purposes only and must not be used commercially.
- Installation (see page 10 or the QR code on the cover) must always be carried out by qualified personnel. ritterwerk will not be held liable for the consequences of improper or incorrect installation.
- Do not start using the appliance until it has been installed by a professional.
- The built-in vacuum cleaner may only be connected and commissioned in accordance with the specifications on the type label.
- Do not use the appliance without a vacuum cleaner bag. Failure to use a vacuum cleaner bag may damage the motor.
- Use the accessories included in the delivery specification only.
- Use suitable extension cables only.
- Persons with reduced physical, sensory or intellectual capabilities or lacking in relevant experience and/or knowledge may only use this appliance if they do so under supervision or have been instructed in the safe use of the appliance and understand the potential risks associated with its use.
- Do not allow children to play with the appliance.
- This appliance must not be used by children. Keep the appliance out of reach of children.
- Make sure that the castors are not damaged by foreign matter or liquids. The space in front of the built-in vacuum cleaner must be clear before pulling out the appliance.
- Stop using the appliance immediately if any parts are damaged and contact the ritter after-sales service.
– In case of abnormal noises, odours, smoke or other malfunctions during use, unplug the power plug or disconnect the main fuse, where possible.
- Never attempt to repair the appliance yourself. If the seal on the motor housing is broken, the warranty becomes irrevocably void.
Risk of injury
– Never use the pulled-out appliance as a climbing aid.
– Risk of tripping when the appliance is pulled out.
- Never open the motor compartment while the motor is running.
Please read these instructions thoroughly before you start to use the appliance. Keep these operating instructions in a safe place and ensure that they are included with the appliance if passing it on to a third party.
Alternatively, the current operating instructions are available at www.ritterwerk.de.
INTENDED USE
The built-in vacuum cleaner is used for the quick removal of crumbs and dust in the kitchen. If the appliance is used for any purpose other than its intended use, or if it is operated incorrectly, severe injuries may occur or the appliance may be damaged. All warranty and liability claims will be rendered null and void in this case.
VACUUMING
E Tap the switch (2) with your foot to switch on the vacuum cleaner.
F Sweep dust and crumbs to the suction opening (3) of the vacuum cleaner.
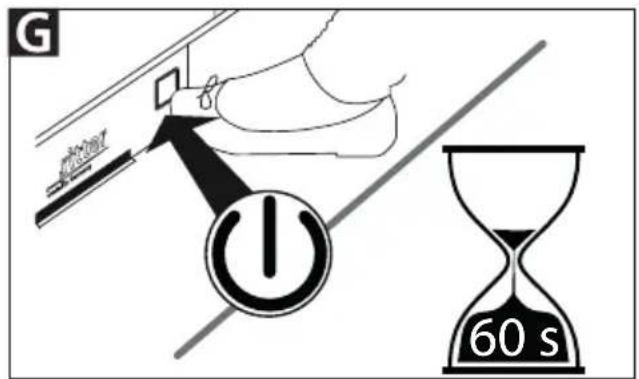
G Tap the switch again to switch off the vacuum cleaner. Alternatively, the vacuum cleaner switches itself off automatically after 60 seconds.
CHECKING/CHANGING THE BAG
Note:
Failure to use a vacuum cleaner bag may damage the motor.
- Before using the appliance, make sure that a Swirl® A07 vacuum cleaner bag is correctly fitted.
- If the suction power decreases, check the vacuum cleaner bag.
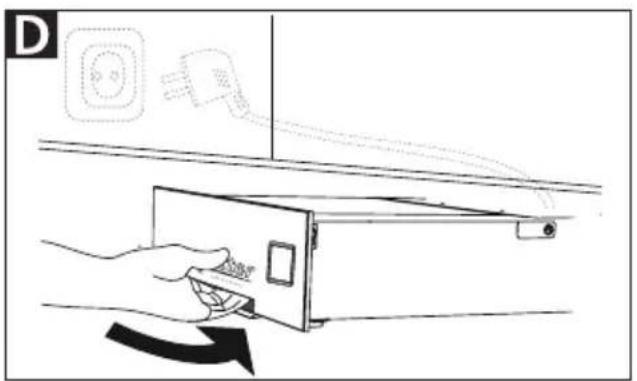
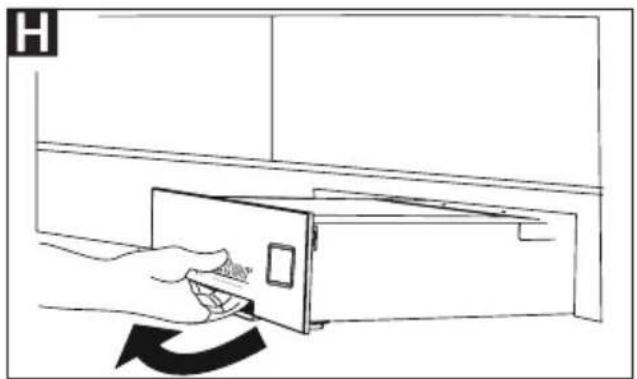
H Pull the vacuum cleaner out.
I Flip up the lid (1).
K Remove the vacuum cleaner bag if it is full.
- Insert a new vacuum cleaner bag. One bag is included in the scope of delivery.
CLEANING
- Clean the vacuum cleaner with a dry or slightly moist cloth only.
MAINTENANCE
The built-in vacuum cleaner is maintenance-free.
DISPOSAL
At the end of its service life this product must not be disposed of as part of normal domestic waste. It must be taken to a dedicated collection point for recycling electrical and electronic devices. This is indicated by the symbol on the product, the operating instructions or the packaging.
The materials can be used again in accordance with their identification. The re-use, material-sensitive recycling or other forms of recycling of old appliances enables you to make a vital contribution to protecting our environment.
Please consult with the disposal office at your local authority.
REACH DIRECTIVE
Accessories include a push-in nozzle, a flexible 3 m tube, a crevice nozzle and a brush attachment.
SERVICE, REPAIRS AND SPARE PARTS
Please contact your local after-sales service for service, repairs and spare parts.
The appliance complies with the CE specifications.
Mains voltage/power consumption:
Refer to the type label on the side of the appliance.
WARRANTY
This ritter built-in vacuum cleaner comes with a 2-year manufacturer's warranty, calculated from the date of purchase and in accordance with EU warranty directives. Your legal warranty claims according to § 437 ff. BGB (German Civil Code) remain unaffected by this regulation. The manufacturer warranty applies to all devices sold within the European Union. For details of the warranty conditions, see www.ritterwerk.de/warranty. For any warranty claims or for customer service, the built-in vacuum cleaner must always be sent to the customer service centre in your country.
ASSEMBLY AND INSTALLATION
Please refer to the illustrations provided at the front and back of these instructions.
For more information about installation, see also www.ritterwerk.de/installation-notes or the QR code on the cover.
Safety instructions
To avoid personal injury or damage to the appliance, please observe the following safety instructions:
- Assembly must be performed by qualified personnel only. ritterwerk will not be held liable for the consequences of improper or incorrect assembly.
- The power cord must be routed in such a way that the appliance can be fully inserted without pinching it. The power cord must be routed directly and without obstruction from the built-in system to the socket to be installed in the floor cabinet.
– Unplug the power plug from the socket before assembly.
Installation conditions
Appliance dimensions:
- Width of appliance cover plate: 365 mm Appliance width: 342 mm - Appliance height: 103 mm
The following dimensions represent minimum values:
- Clearance width: 365 mm - Clearance height: 105 mm - Required depth: 460 mm
Mounting the socket
Note:
A surface-mounted socket (that complies with VDE/DIN 49440, ÖVE, SEV) must be mounted either on or behind the rear panel at the height of the built-in vacuum cleaner.
It must be possible to slide the vacuum cleaner in fully when the power plug is plugged in.
The power plug must be easily accessible to the user to ensure that the appliance can be unplugged from the mains as required (for example, prior to cleaning).
Installing the vacuum cleaner
A Mark the slot to be cut out on the skirting board.
B Cut out the slot using a saw.
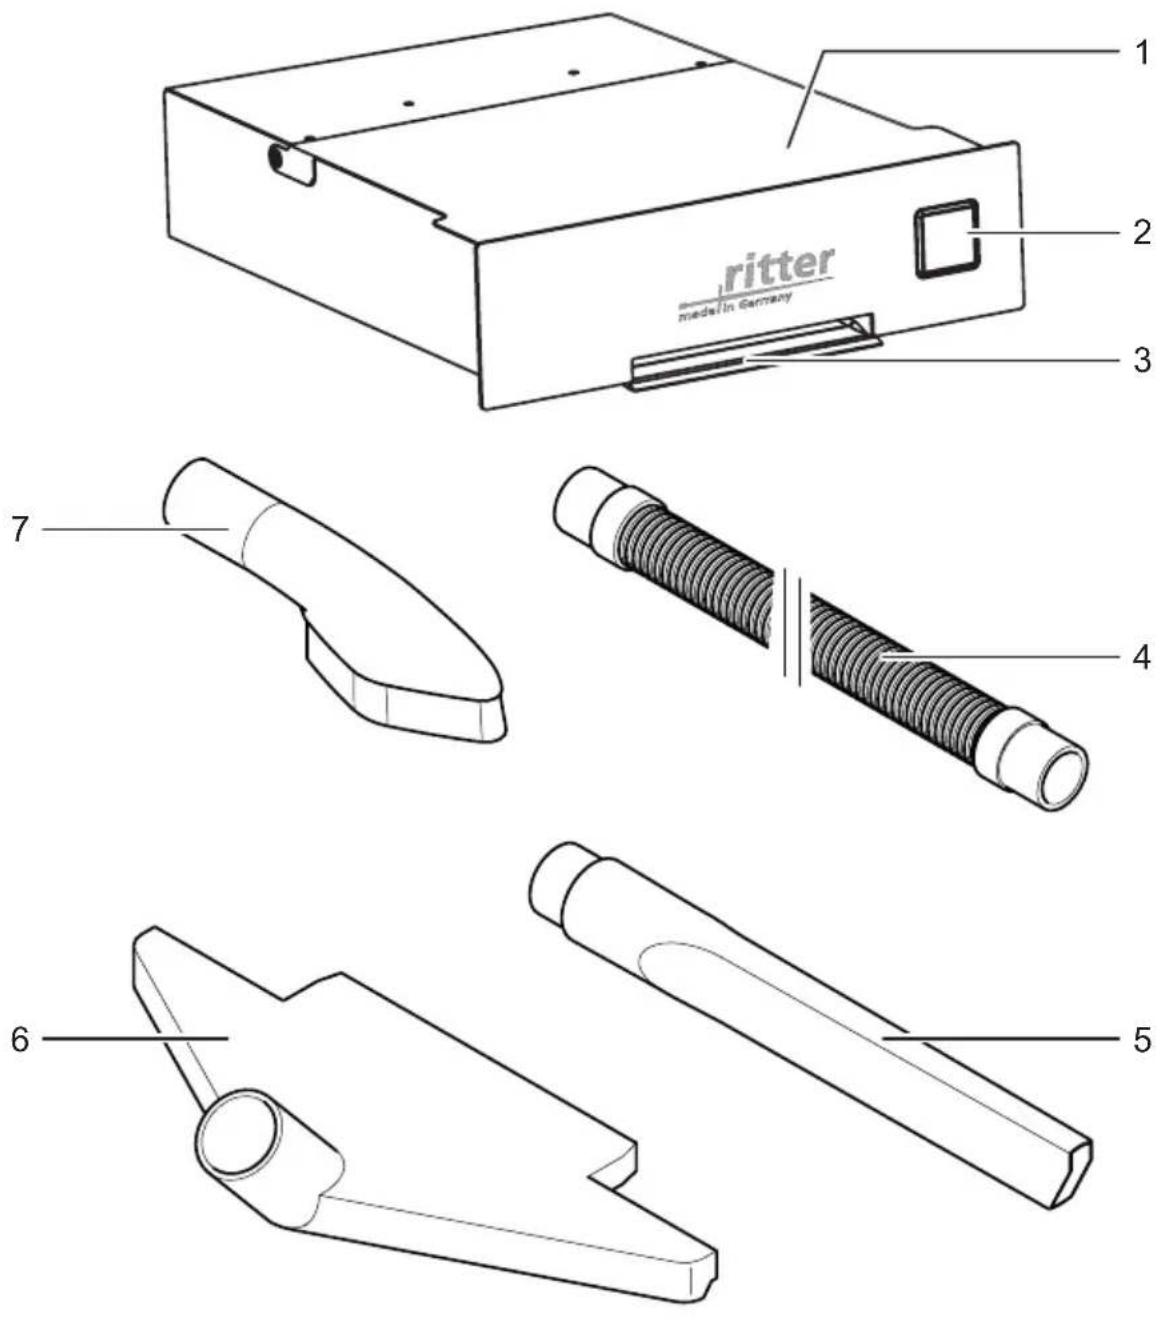
C Paint the inner edges of the skirting board with a water-resistant varnish.
D Insert the power plug into the socket and slide the vacuum cleaner into the slot.
Note: All dimensions in the assembly drawings stated in mm!
INSTRUCTIONS DE SÉCURITÉ GÉNÉRALES
KONTROL/SKIFT AF ST∅VSUGERPOSE
Henvisning: