
PAN IRT800+ - Thermometer Pancontrol - Free user manual and instructions
Find the device manual for free PAN IRT800+ Pancontrol in PDF.
| Product type | Non-contact infrared thermometer |
| Brand | Pancontrol |
| Model | PAN IRT800+ |
| Power supply | 1 9V battery (type 6F22) |
| Display | 4-color LCD with backlight |
| Laser | Class 2, power < 1 mW, wavelength 630-670 nm |
| Infrared measurement range | -50 °C to 800 °C / -58 °F to 1472 °F |
| Infrared accuracy | ± 3 °C (from -50 to 0 °C); ± (1.5% + 2 °C) (from 0 to 800 °C) |
| Type K probe range | -10 °C to 537 °C / 14 °F to 999 °F |
| Type K probe accuracy | ± (1.5% + 2 °C) |
| Ambient temperature range | 0 °C to 45 °C (accuracy ± 1 °C); -10 °C to 0 °C or 45 °C to 60 °C (± 1.5 °C) |
| Humidity range | 20% to 80% (accuracy ± 4%); < 20% or > 80% (± 5%) |
| Dew point range | -10 °C to 50 °C (accuracy ± 1.5 °C) |
| Optical resolution | 12:1 |
| Response time | 0.5 second |
| Auto power off | Approximately 15 seconds |
| Operating conditions | 0 °C to 40 °C, 32 °F to 104 °F |
| Storage conditions | -10 °C to 60 °C, 14 °F to 140 °F |
| Adjustable emissivity | 0.10 to 1.00 (default 0.95) |
| Main functions | Infrared measurement, type K probe, ambient temperature, humidity, dew point, mold alert, UV leak detection, temperature difference alarm, laser, UV light |
| Package contents | Measuring device, 9V battery, instruction manual (type K probe not included) |
| Warranty | 2 years legal |
Frequently Asked Questions - PAN IRT800+ Pancontrol
User questions about PAN IRT800+ Pancontrol
0 question about this device. Answer the ones you know or ask your own.
Ask a new question about this device
Download the instructions for your Thermometer in PDF format for free! Find your manual PAN IRT800+ - Pancontrol and take your electronic device back in hand. On this page are published all the documents necessary for the use of your device. PAN IRT800+ by Pancontrol.
USER MANUAL PAN IRT800+ Pancontrol
other
| Segment | Value | | ------- | ----- | | Top Left | 125 | | Middle Left | 84 | | Bottom Left | 42 | | Bottom Right | 500 |Fig. 3
INDEX


Deutsch DE 1 - DE 11
English EN 1 - EN 10
Français FR 1 - FR 11
Italiano IT 1 - IT 11
Infrared thermometer
CONTENTS
- Introduction ......2
- Scope of delivery....3
- Safety Instructions .... 3
- Symbols μescription ....4
- Panel μescription ....4
- Symbols of the μisplay ....5
-
eneral Specifications ....5
- Operating Instructions ....6
- Maintenance 9
-
guarantee and Spare Parts 10
17 Introduction
Thank you for purchasing PAN<ONTROL. For over 20 years the PAN<ONTROL brand is synonymous with practical, economical and professional measuring instruments. We hope you enjoy using your new product and we are convinced that it will serve you well for many years to come.
Please read this operating manual carefully before using the device to become familiar with the proper handling of the device and to prevent faulty operations. Please follow all the safety instructions. Nonobservance cannot only result in damages to the device but in the worst case can also be harmful to health.
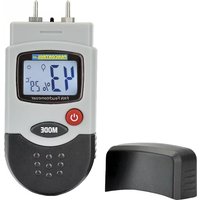
The PAN IR-T 800+ is a touch-free infrared thermometer for surfaces. Alternatively, a K-element (e.g. immersion sensor) can be connected. The PAN IR-T 800+ can also measure ambient temperature, humidity, and dew point. In the case of walls, the risk of mould formation can be displayed.
With66the66UV66light,66leaks66in66pipes66can66be66detected66in66certain66gases conditioning6systems).6
6
The6technical6progress6is6subject6to6change.6
6
27 Scope of delivery
After6unpacking6please6check6the6package6contents6for6transport6damage6and6completeness.6
• Measurement6device6
- %attery(s)6
- Operating6manual6
(Type6K6temperature6probe6Not6included6in6the6scope6of6delivery.)6
6
37 Safety Instructions
- Protect your eyes! Never direct the laser in the face of people or animals? Watch also for reflective surfaces!
6
• To6 ensure6 the6 safe6 use6 of6 the6 device,6 please6 follow6 all6 the6 safety6 and6 operating6instructions6given6in6this6manual.6
- %efore6 using6 the6 device,6 make6 sure6 that6 it6 is6 intact6 and6 is6 functioning6 properly.6
- Keep6the6device,6especially6the6lenses,6clean6and6dust-free.6
- The6device6 must6no6longer6be6used6if6the6housing6is6damaged,6if6one6or more6 functions6 fail6 if6 no6function6 is6 displayed,6 or6 if6 you6suspect6 something6is6not6right.6
- If6 the6 safety6 of6 the6 user6 cannot6 be6 guaranteed, 6 the6 device6 may6 not6 be6 operated6 and 6 secured6 against6 use. 6
- If6 the6 battery6 symbol6 appears6 in6 the6 display,6 replace6 the6 battery6 immediately.6
• Always switch off the appliance before opening the device to exchange the battery or the fuse.
- o not keep the infrared thermometer too close to a hot surface.
- o not use the device near strong magnetic fields (for e.g. welding transformer), as this can distort the display.
• μo not store the device in places which are exposed to direct sunlight.
- Remove the battery if the device is not used for a long time.
47 Symbols Description
CE
<onforms to the relevant European Union directive (EN-+1010)

Risk of μanger. Important information See instruction manual

This product should not be disposed along with normal domestic waste at the end of its service life but should be handed over at a collection point for recycling electrical and electronic devices.

Attention laser radiation!
57 Panel Description
Note Fig. 1
| 1 | alarm-LEμ | 7 | Laser-LEμ |
| 2 | μisplay | 8 | UV-light |
| 3 | IR-( Laser)-switch / "μOWN"-button | 9 | K-Element-connection |
| 4 | Mode-button | 10 | Test button (trigger) |
| 5 | UV- light-switch / "UP"-button | 11 | %attery compartment |
| + | IR-Sensor |
6. Symbols of the Display
Note Fig. 2
| 1 | Ambient temperature 7 Type K temperature probe active |
| 2 | Humidity (%) 8 Infrared temperature measurement active |
| 3 | Dew point 9 emissivity |
| 4 | Surface temperature of the measured object 10 Battery icon |
| 5 | Laser-Display 11 Data hold |
| 6 | Temperature unit (C / F) |
9. General Specifications
Display LCD 4-colored with backlight
Laser Laser radiation class 2
Power < 1mW
Wavelength 630 - 670 nm
Response spectrum 8 - 14 μm
emissivity adjustable (0.1 to 1.0)
response time 0,5 s
Optical resolution 12:1 (Note Fig. 3)
Auto power off ca. 15 s
Power supply 1 x 9V (6 F 22) Battery(s)
Operating temperature 0°C to 40°C (32°F to 104°F)
Storage temperature -10°C to 60°C (14°F to 140°F)
| Function Range | Accuracy of the value displayed | |
| Infrared temperature measurement | -50°C - 0°C(-58°F - 32°F) | +/- 3°C (6°F) |
| 0°C - 800°C(32°F - °1.472°F) | +/- (1,5% +2°C(4°F)) | |
| Type K temperature probe | -10°C - 537°C(14°F - 999°F) | +/- (1,5% +2°C(4°F)) |
| Ambient temperature | 0°C -45°C(32°F - 113°F) | +/- 1°C(2°F) |
| -10 - 0°C (14 -32°F) or 45 - 60°C (113 - 140 °F) | +/- 1,5°C(3°F) | |
| Humidity | 20% -80%<20% or >80% | +/-4%+/-5% |
| μew point | -10°C - 50°C(14°F - 122°F) | +/-1,5°C (3°F) |
8. Operating Instructions
General information
- Protect your eyes! Never direct the laser in the face of people or animals. Watch also for reflective surfaces!
- Please refer to the sketches on the first pages of this manual.
• After a sudden change in the ambient temperature, the Infrared thermometer has to be adjusted. This may take up to 30 minutes. The thermometer will only function properly if the internal temperature of the unit and the ambient temperature are the same. - Infrared thermometers measure the surface temperature of an object. The device cannot measure through transparent surfaces like glass. It would measure the temperature of the glass surface. Cover the surface using a black adhesive tape to compensate for this. Give the adhesive tape some time to assume the temperature of the test object and then measure the
temperature of the adhesive tape. <ontaminated optics (for e.g., by smoke, dust or vapour) affect the accuracy of the measurement.
- If the distance between the measuring device and the test object increases, the measured area becomes correspondingly larger. The relationship between the distance and measured area can be seen in the graph Fig. 3.
- Ensure that the area to be measured of the test object is larger than the measuring point. The smaller the test object, the smaller must be the distance to the measuring device. The test object should be at least twice as large as the measuring point to get an accurate measurement. The minimum size of the object to be measured is displayed through the ring of laser points around the <central measuring point.
emissivity
The emissivity describes the energy-emitting properties of materials. Most of the organic materials have an emissivity of 0.85 ... 0.98 (0,95 preset in the device). The emissivity can be adjusted from 0.10 to 1.0.
| Substance emissivity Substance emissivity | |
| %rick 0,93 to 0,9+ Human skin 0,98 | |
| Ice 0,9+ to 0,98 Timber 0,90 | |
| Sand 0,90 Paper 0,70 to 0,94 | |
| Plaster 0,80 to 0,90 Iron oxides 0,78 to 0,82 | |
More values can be found under:
Set the device with the mode key that only the emission level is displayed. You can now set the desired value with the ▼ / ▲ buttons. A long press changes the value quickly.
Press the test button (trigger) to switch on the device and to start the measurement process.
Set temperature unit
Press the MOμE button 2 seconds until the unit °F or °< appears on the display.
Laser / UV6light
Press the "μOWN"-button to turn off the Laser. Press the "UP"-button to turn on the UV light.
Refrigerant from air-conditioning fluoresce under UV light. Turn the laser off and the UV light on. So, you can find leaks in air conditioners.
Surface measurement
Temperature difference6alarm
Set the device with the mode key displays ambient temperature and surface temperature.
Measure desired surface.
If the difference between the surface and the surrounding area is too large, the alarm LEμ (1) lights up red.
Mildew alrm
If the surface temperature is near or below the dew point, the alarm LEμ (1) lights up red.
Type K temperature probe
<connect the device to the K-probe. Observe the correct polarity! <connect the temperature probe to the device to be tested wait a few moments and read the value displayed. If necessary, use heat conducting paste.
9. Maintenance
Only authorized service technicians may repair the instrument.
Changing the battery(s)
Replace the battery(s) when the battery symbol or %ATT is displayed on the L<μ.
Open the battery compartment with a coin.
Replace the battery. Mind the correct polarity.
<lose the battery compartment.
μisposal of the flat battery should meet environmental standards.
Remove the battery if the device is not used for a long time.
Cleaning
If the instrument is dirty after daily usage, it is advised to clean it by using a humid cloth and a mild household detergent. Prior to cleaning, ensure that instrument is switched off and disconnected from external voltage supply and any other instruments connected. Never use acid detergents or dissolvent for cleaning.
107 Guarantee and Spare Parts
PAN<ONTROL instruments are subject to strict quality control. However, should the instrument function improperly during daily use, your are protected by a 24 months warranty from the date of purchase (valid only with invoice). Only trained technicians may carry out repairs to this device. In case of spare part requirement or in case of queries or problems, please get in touch with your vendor or:

Dipl.Ing. Ernst KRYSTUFEK GmbH & Co KG
Error and misprints reserved.
2017-12
- INDEX
- CONTENTS
- Introduction
- Scope of delivery
- Safety Instructions
- Symbols Description
- Panel Description
- Symbols of the Display
- General Specifications
- Operating Instructions
- General information
- emissivity
- Set temperature unit
- Laser / UV6light
- Surface measurement
- Temperature difference6alarm
- Mildew alrm
- Type K temperature probe
- Maintenance
- Changing the battery(s)
- Cleaning
- Guarantee and Spare Parts
Brand : Pancontrol
Model : PAN IRT800+
Category : Thermometer