
223345 - Oven Hendi - Free user manual and instructions
Find the device manual for free 223345 Hendi in PDF.
| Product type | Professional oven |
| Brand | Hendi |
| Model | 223345 (digital control) |
| Usage | Commercial use (restaurants, cafeterias, bakeries) |
| Control type | Digital with screen and programming |
| Cooking functions | Manual cooking, programmed cooking (up to 99 programs, 3 phases per program) |
| Cooking modes | Convection, grill, grill+fan, defrost |
| Humidification | Yes, adjustable in steps (0%, 20%, 40%, 60%, 80%, 100%) |
| Temperature range | Up to 300°C (minimum recommended temperature for steam: 80-100°C) |
| Timer | Up to 120 minutes or continuous operation |
| Electrical connection | 400V three-phase (L1, L2, L3, N, PE) - Protection class I |
| Water connection | Yes, pressure 1.5-2 bar, max hardness 5°f |
| Material | Stainless steel |
| Capacity | Not specified (professional type) |
| Cleaning | Manual with mild detergent; trays dishwasher safe |
| Maintenance | Regular cleaning of food residues; descaling if hard water |
| Safety | Safety thermostat, door microswitch, automatic shutdown at end of cooking |
| Included accessories | Baking trays (dishwasher safe) |
| Weight | Not specified (heavy, requires 2 people to move) |
Frequently Asked Questions - 223345 Hendi
User questions about 223345 Hendi
0 question about this device. Answer the ones you know or ask your own.
Ask a new question about this device
Download the instructions for your Oven in PDF format for free! Find your manual 223345 - Hendi and take your electronic device back in hand. On this page are published all the documents necessary for the use of your device. 223345 by Hendi.
USER MANUAL 223345 Hendi
GB: Read user manual and keep this with the appliance.
GB: For indoor use only.
natural_image
Simple line drawing of a wine glass with a fork (no text or symbols)
natural_image
Symbol of a trash bin with crossed lines indicating no waste or discharge (no text or labels)

GB: NOTE: This manual is translated from original English manual using AI and machine translations.
GB: Technical specifications / DE: Technische Angaben / NL: Technische gegevens / PL: Dane techniczne / FR: Données techniques / IT: Parametri di base / RO: Parametrii de bază / GR: Bašukéç napáµetpoi / HR: Tehnički podaci / CZ: Technická specifikace / HU: Můszaki adatok / UA: Texníční характеристики / EE: Tehnilised andmed / LV: Tehniskās specifikacijas / LT: Techninės specifikacijos / PT: Especificações técnicas / ES: Especificaciones técnicas / SK: Technické špecifikácie / DK: Technical specifications / FI: Tekniset tiedot / NO: Tekniske spesifikasjoner / SI: Tehnične specifikacije / SE: Tekniska specifikationer / BG: Texнически спецификации / RU: Texнические данные
| A 2238376 223352 223369 223345 | |||
| B 1 1 1 2 | |||
| C - + + + | |||
| D - - - 0 / 20 / 40 / 60 / 80 / 100% | |||
| E 220-240V ~ 50/60Hz | |||
| F 3,1kW 3,2kW 3,1kW 3,1kW | |||
| G | I | ||
| H 4x 450x340 mm | |||
| I 75mm | |||
| J 0-260°C | 30-260°C | ||
| K | 0-120 min | ∞ / 1-999 min | |
| L | 4kg | ||
| M | 560x603x(H)530 | ||
| N | 35kg | 38kg | 40kg |
A: GB:Item no. / DE:Art.-Nr. / NL:Artikelnr. / PL:Nr pozycji / FR:N° d'article / IT:N. articolo / RO:Nr. articolului/ GR:Aρ. εἰδους / HR:Broj stavke / CZ:Položka č. / HU:Cikkszám / UA:Homer elementa / EE:Artikli nr / LV:Vienums Nr. / LT:Prekès Nr. / PT:Item n.o / ES:N.o de artículo / SK:Č. položky / DK:Varenr. / FI:Kohteen nro / NO:Varenr. / SI:Št. izdelka / SE:Art.nr / BG:Homer na element / RU:Homer позиции
B: GB: Control panel: 1 - electromechanical / 2 - digital / DE: Bedienfeld: 1 - elektromechanisch / 2 - digital / NL: Bedieningspaneel: 1 - elektromechanisch / 2 - digitaal / PL: Sterowanie: 1 - elektromechaniczne / 2 - cyfrowe / FR: Panneau de contrôle: 1 - électromécanique / 2 - numérique / IT: Pannello di controllo: 1 - elettromeccanico / 2 - digitale / RO: Panou de control: 1 - electrom
canic / 2 - digital / GR:Півакає елёyxου: 1 - плектропнховикоє / 2 - щпфіакоє / HR:Upravljačka ploča: 1 - elektromehanička / 2 - digitalna / CZ:Ovládací panel: 1 - elektromechanický / 2 - digitální / HU:Kezelőpanel: 1 - elektromechanikus / 2 - digitális / UA:Пультуправління: 1 - електромеханічний / 2 - цифровий / EE:Juhtpaneel: 1 - elektromehaaniline / 2 - digitaalne / LV:Vadības panelis: 1 - elektromehānisks / 2 - digitāls / LT:Valdymo pultas: 1 - elektromechaninis / 2 - skaitmeninis / PT:Painel de controle: 1 - eletromecânico / 2 - digital / ES:Panel de control: 1 - electromecánico / 2 - digital / SK:Ovládací panel: 1 - elektromechanický / 2 - digitálny / DK:Kontrolpanel: 1 - elektromekanisk / 2 - digital / FI:Ohjauspaneeli: 1 - sähkömekaaninen / 2 - digitaalinen / NO:Kontrollpanel: 1 - elektromekanisk / 2 - digital / SI:Nadzorna plošča: 1 - elektromehanska / 2 - digitalna / SE:Kontrollpanel: 1 - elektromekanisk / 2 - digital / BG:Панел за управление: 1 - електромеханичен / 2 - цифров / RU:Панель управления: 1 - электромеханическая / 2 - цифровая
C: GB: Humidification / DE: Befeuchtung / NL: Bevochtiging / PL: Nawilżanie / FR: Humidification / IT: Umidificazione / RO: Umidificare / GR: Yyρασία / HR: Ovlaživanje / CZ: Zvlhčování / HU: Párásítás / UA: Зволоження / EE: Aurutamine / LV: Mitrināšana / LT: Drékinimas / PT: Umidificação / ES: Humidificación / SK: Zvlhčovanie / DK: Befugtning / FI: Kostutus / NO: Fukting / SI: Vlaženje / SE: Befuktning / BG: Овлажняване / RU: Увлажнение
D: GB:Steam percentage settings / DE:Einstellungen für den Dampfprozentsatz / NL:Stoom percentage instellingen / PL:Ustawienia procentu pary / FR:Paramètres de pourcentage de vapeur / IT:Impostazioni della percentuale di vapore / RO:Setări procentuale de abur / GR:Puθμίσεις ποσοστών στμού / HR:Postavke postotka pare / CZ:Nastavení procenta páry / HU:A göz százalékos beállításai / UA:Налаштування рівня пари / EE:Auruprotsendi seaded / LV:Tvaika procentuālās vērtības iestatījumi / LT:Garo procento nustatymai / PT:Configurações de porcentagem de vapor / ES:Ajustes de porcentaje de vapor / SK:Nastavenia percenta pary / DK:Indstillinger for dampprocent / FI:Höyryprosenttiasetukset / NO:Innstillinger for dampprosent / SI:Nastavitve odstotka pare / SE:Inställningar för ångprocent / BG:Процентни настройки на парата / RU:Настройки процента пара
E: GB: Rated voltage and frequency / DE: Nennspannung und Frequenz / NL: Nominale spanning en frequentie / PL: Znamionowe napięcie i częstotliwość / FR: Tension et fréquence nominales / IT: Tensione e frequenza nominali / RO: Tensiune nominală și frecvență / GR: Ovojaotikn táon kai ouxvótnta / HR: Nazivni napon i frekvencija / CZ: Jmenovité napětí a frekvence / HU: Névleges feszültség és frekvencia / UA: Nominalna napругa ta частota / EE: Nimipinge ja -sagedus / LV: Nominālais spriegums un frekvence / LT: Vardinė jtampa ir dažnis / PT: Tensão e frequência nominais / ES: Tensión y frecuencia nominales / SK: Menovité napätie a frekvencia / DK: Nominel spænding og frekvens / FI: Nimellisjännite ja -taajuus / NO: Nominell spenning og frekvens / SI: Nazivna napetost in frekvenca / SE: Märkspänning och frekvens / BG: Nominalno напрежение и честота / RU: Nominalnohe напряжение и частота
F: GB: Rated input power / DE: Nenneingangsleistung / NL: Nominaal ingangsvermogen / PL: Znamionowa moc wejściowa / FR: Pu issuance d'entrée nominale / IT: Potenza nominale in ingresso / RO: Putere nominală de intrare / GR: Ovojaotikn ioxuç eiuóbou / HR: Nazivna ulazna snaga / CZ: Jmenovitý vstupní výkon / HU: Névleges bemeneti teljesítmény / UA: Номінальна вхідна потужність / EE: Nimisisendvõimsus / LV: Nominālā ieejas jauda / LT: Vardinė jėjimo galia / PT: Potência de entrada nominal / ES: Potencia de entrada nominal / SK: Menovitý vstupný výkon / DK: Nominel indgangseffekt / FI: Nimellistuloteho / NO: Nominell inngangseffekt / SI: Nazivna vhodna moč / SE: Märkineffekt / BG: Номинална входяща мощност / RU: Номинальная входная мощность
G: GB: Protection class (Class) / DE: Schutzklasse (Klasse) / NL: Beschermingsklasse (klasse) / PL: Klasa ochrony (klasa) / FR: Classe de protection (classe) / IT: Classe di protezione (classe) / RO: Clasă de protecție (clasă) / GR: Klăon prostaociaç (katnyopia) / HR: Klasa zaštite (klasa) / CZ: Trída ochrany (trída) / HU: Védelmi osztály (osztály) / UA: Kлас захисту (klac) / EE: Kaitseklass (klass) / LV: Aizsardzības klase (klase) / LT: Apsaugos klasè (klasè) / PT: Classe de proteção (classe) / ES: Clase de protección (clase) / SK: Trieda ochrany (trieda) / DK: Beskyttelsesklasse (klasse) / FI: Suojausluokka (luokka) / NO: Beskyttelsesklasse (klasse) / SI: Razred zaščite (razred) / SE: Skyddsklass (klass) / BG: Kлас на защита (Klac) / RU: Klacc защиты (klacc)
H: GB: Capacity / DE: Kapazität / NL: Capaciteit / PL: Pojemność / FR: Capacité / IT: Capacità / RO: Capacitate / GR: Хврптикόтнта / HR: Kapacitet / CZ: Kapacita / HU: Kapacitás / UA: Місткість / EE: Mahutavus / LV: Efektivităte / LT: Pajègumas / PT: Capacidade / ES: Capacidad / SK: Kapacita / DK: Kapacitet / FI: Tilavuus / NO: Kapasitet / SI: Zmogljivost / SE: Kapacitet / BG: Капацитет / RU: Вместимость
I: GB:Distance between trays / DE:Abstand zwischen den Tablett / NL:Afstand tussen trays / PL:Odległość między prowadnicami / FR:Distance entre les plateaux / IT:Distanza tra i vassoi / RO:Distanța dintre tăvi / GR:Anòotaon μεταξύ διοκων / HR:Udaljenost između ladica / CZ:Vzdálenost mezi zásobníky / HU:Távolság a tálcák között / UA:Bíдстань між лотками / EE:Kandikute vaheline kaugus / LV:Attālums starp paplātēm / LT:Atstumas tarp padėkly / PT:Distância entre bandejas / ES:Distancia entre bande jas / SK:Vzdialenost medzi zásobníkmi / DK:Afstand mellem bakker / FI:Levyjen välinen etäisyys / NO:Avstand mellom brett / SI:Razdalja med pladnji / SE:Avständ mellan brickor / BG:Растояние между тавите / RU:Растояние между лотками
J: GB: Temperature / DE: Temperatur / NL: Temperatur / PL: Temperatura / FR: Température / IT: Temperatura / RO: Temperatura / GR: Θερμοκρασία / HR: Temperatura / CZ: Teplota / HU: Hómérséklet / UA: Температура / EE: Temperatuur / LV: Temperatūra / LT: Temperatūra / PT: Temperatura / ES: Temperatura / SK: Teplota / DK: Temperatur / FI: Lämpötila / NO: Temperatur / SI: Temperatura / SE: Temperatur / BG: Температура / RU: Температура
K: GB:Time settings (Min.) / DE:Zeit-Einstellungen (Min.) / NL:Tijd-instellingen (Min.) / PL:Ustawienia czasu (Min.) / FR:Paramètres de temps (Min.) / IT:Impostazioni ora (Minuti) / RO:Setări de timp (Min.) / GR:Puθμίσεις ώρας (Ελάχ.) / HR:Postavke vremena (Minuta) / CZ:Nastavení času (Min.) / HU:Időbeállítások (Min.) / UA:Налаштування часу (Шахти) / EE:Kellaaja seaded (Mins) / LV:Laika iestatījumi (Min.) / LT:Laiko nuostatos (Min.) / PT:Definições de hora (Min.) / ES:Ajustes de tiempo (Min.) / SK:Nastavenia času (Min.) / DK:Tidsindstillinger (Min.) / FI:Aika-asetukset (Minuuttia) / NO:Tidsinnstillinger (Minutter) / SI: Časovne nastavitve (Min) / SE:Tidsinställningar (Min) / BG: Настройки за време (Минути) / RU:Настройки времени (Мин.)
L: GB:Max. load per tray / DE:max. Beladung pro Tablett / NL:Maximaal lading per lade / PL:Maks. obciążenie na tace / FR:Max. charge par plateau / IT:Massimo carico per vassoio / RO:Max. încărcare pe tavă / GR:Méyiotn. forto ová díoko / HR:Maks. opterećenje po ladici / CZ:Max. zatížení na zásobník / HU:Max. töltet tálcánként / UA:Maks. завантаження на лоток / EE:Max laadi-mine salve kohta / LV:Maks. ielāde uz paplāti / LT:Maks. apkrova viename dékle / PT:máx. carga por bandeja / ES:máx. carga por bandeja / SK:Max. zaťaženie na zásobník / DK:Maks. fyld pr. bakke / Fl:Max. kuorma per lokero / NO:Maks. belastning per brett / SI:maks. obremenitev na pladenj / SE:Max. last per bricka / BG:Maks. зареждане на тава / RU:Mаксимум. нагрузka на лоток
M: GB:Dimensions / DE:Abmessungen / NL:Afmetingen / PL:Wymiary / FR:Dimensions / IT:Dimensioni / RO:Dimensiuni / GR:Διαστάσεις / HR:Dimenzije / CZ:Rozměry / HU:Méretek / UA:Pózmíri / EE:Mōötmed / LV:Izmēri / LT:Matmenys / PT:Dimensões / ES:Dimensiones / SK:Rozmery / DK:Mål / FI:Mitat / NO:Mål / SI:Mere / SE:Mått / BG:Размери / RU:Размеры
N: GB:Net weight / DE:Nettogewicht / NL:Nettogewicht / PL:Waga netto / FR:Poids net / IT:Peso netto / RO:Greutate netă / GR:Kαθαρό βάρος / HR:Neto težina / CZ:Čistá hmotnost / HU:Nettó tömeg / UA:Bara нетто / EE:Netokaal / LV:Neto svars / LT:Grynasis svoris / PT:Peso líquido / ES:Peso neto / SK:Čistá hmotnost / DK:Nettovægt / FI:Nettopaino / NO:Nettovekt / SI:Neto teža / SE:Nettovikt / BG:Нетно тегло / RU:Вес нетто
GB: Remark: Technical specification is subjected to change without prior notification.
Thank you for purchasing this Hendi appliance. Read this user manual carefully, paying particular attention to the safety regulations outlined below, before installing and using this appliance for the first time.
Safety instructions
- Only use the appliance for the intended purpose it was designed for, as described in this manual.
- The manufacturer is not liable for any damage caused by incorrect operation and improper use.
• DANGER! RISK OF ELECTRIC SHOCK! Do not attempt to repair the appliance by yourself. Do not immerse the electrical parts of the appliance in water or other liquids. Never hold the appliance under running water.
- NEVER USE A DAMAGED APPLIANCE! Check the electrical connections and cord regularly for any damage. When damaged, disconnect the appliance from the power supply. Any repairs should only be carried out by a supplier or qualified person to avoid danger or injury.
- WARNING! When positioning the appliance, route the power cable safely if necessary to avoid unintentional pulling, being damaged, coming into contact with the heating surface, or causing a tripping hazard.
- WARNING! As long as the plug is in the socket the appliance is connected to the power supply.
- WARNING! ALWAYS switch off the appliance before disconnecting from the power supply, cleaning, maintenance or storage.
- Only connect the appliance to an electrical outlet with the voltage and frequency mentioned on the appliance label.
- Do not touch the plug/electrical connections with wet or damp hands.
- Keep the appliance and electrical plug/connections away from water and other liquids. If the appliance falls into water, remove the power supply connections immediately. Do not use the appliance until it has been checked by a certified technician. Failure to follow these instructions will cause life threatening risks.
- Connect the power supply into an easily accessible electrical outlet so you can disconnect the appliance immediately in case of emergency.
- Make sure the cord does not come in contact with sharp or hot objects and keep it away from open fire. Never pull the power cord to unplug it from the socket, always pull the plug instead.
- Never carry the appliance by its cord.
- Never try to open the housing of the appliance yourself.
- Do not insert objects into the housing of the appliance.
- Never leave the appliance unattended during use.
- This appliance should be operated by trained personnel in kitchen of the restaurant, canteens or bar staff, etc.
- This appliance should not be operated by persons with reduced physical, sensory or mental capabilities, or persons that have a lack of experience and knowledge.
- This appliance should, under any circumstances, not be used by children.
- Keep the appliance and its electrical connections out of reach of children.
- Never use accessories or any extra devices other than those supplied with the appliance or recommended by the manufacturer. Failure to do so could pose a safety risk to the user and could damage the appliance. Only use original parts and accessories.
- Do not operate this appliance by means of an external timer or remote-control system.
- Do not place the appliance on a heating object (gasoline, electric, charcoal cooker, etc.).
- Do not cover the appliance in operation.
- Do not place any objects on top of the appliance.
- Do not use the appliance near any open flames, explosive or flammable materials. Always operate the appliance on a horizontal, stable, clean, heat-resistant and dry surface.
- The appliance is not suitable for installation in an area where a water jet could be used.
- Leave a space around the appliance for ventilation during use (Fig. 4 on page 4).
- WARNING! Keep all ventilation openings on the appliance free from obstruction.
Special safety instructions
- WARNING! To avoid scalding, do not use loaded containers with liquids or cooking goods that become fluid by heating in shelves positioned at levels higher than 1.6m above the floor.
- CAUTION! RISK OF BURNS! HOT SURFACES! The temperature of the accessible surfaces are very high during use. Touch only the control panel, handles, switches, timer control knobs or temperature control knobs.
- WARNING! When opening the door of the cooking compartment, hot steam can come out.
• An equipotential bonding terminal is provided to allow cross bonding with other equipment. - WARNING! Before obtaining access to terminals, all supply circuits must be disconnected.
- If the supply cord is damaged, it must be replaced by the manufacturer, its service agent or similarly qualified person in order to avoid a hazard.
- WARNING! Fat and oil become very hot during operation. Beware of this.
- Do not use the oven to prepare food or liquids in a closed container as the container may explode.
- Do not pour out the water towards the glass door, or the door may break during operation.
- This appliance must to be installed under a extractor hood.
- The new hose-sets supplied with the appliance are to be used and that old hose-sets should not be reused.
- ATTENTION! Do not install appliance without feet.
Intended use
- This appliance is intended to be used for commercial applications, for example in kitchens of restaurants, canteens, hospital and in commercial enterprises such as bakeries, butcheries, etc., but not for continuous mass production of food.
- The appliance is designed for cooking and baking. Any other use may lead to damage to the appliance or personal injury.
- Operating the appliance for any other purpose shall be deemed a misuse of the device. The user shall be solely liable for improper use of the device.
Grounding installation
This appliance is classified as protection class I and must be connected to a protective ground. Grounding reduces the risk of electric shock by providing an escape wire for the electric current.
This appliance is fitted with a power cord with grounding plug or electrical connections with grounding wire. The connections must be properly installed and grounded.
Control panel - 223376, 223352
(Fig. 1 on page 3)
- Thermostat indicator.
- Temperature setting knob.
- Time setting knob.
- Humidification button (only 223352).
Control panel - 223369
(Fig. 2 on page 3)
- Grill and fan function.
- Grill function.
- Convection function.
- Defrost function.
- Multifunctions setting indicator.
- Temperature setting knob.
- Thermostat indicator.
- Time setting knob.
- Humidification button.
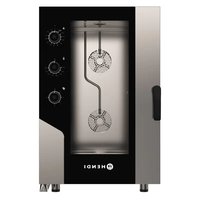
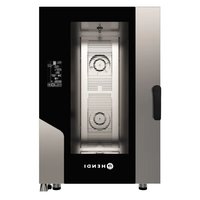
Control panel - 223345
(Fig. 3 on page 3)
- ON/OFF button.
- Cooking programmes indicator.
- Cooking programmes.
- Time setting.
- Temperature setting.
- Thermostat operating indicator.
- Operating in Celsius degrees indicator.
- Operating in Fahrenheit degrees indicator.
- Increasing value button.
- Decreasing value button.
- Humidification indicator.
- Humidification / steam setting button.
- Cooking phases indicators.
- Cooking phases setting button.
- START / STOP indicator.
- START / STOP button.
Remark: The content of this manual applies for all listed items unless specified otherwise. The appearance may vary from the shown illustrations.
Power connection
- Open the back of the appliance and locate the terminal block.
- Loosen the cable entry and insert the power cord through it.
- Connect the cable conductors following the diagram on the external adhesive plate: make ONLY the links indicated without changing them. The yellow/green earth conductor shall be at least 3 cm longer than the others.
-
PE (yellow/green): earth protection conductor.
• N (blue): neutral conductor.
• L1/2/3 (brown/grey/black): phase conductors. -
Incorrect connection coul cause overheating to the terminal block leading to fusion and an electric shock risk.
- Check the absence of electrical dispersion between phases and earth. Check the electrical continuity between the external carcass and the ground wire of the net. It is recommended to use a multimeter to perform these operations.
- Close the back with screws and lock the cable by screwing the nut of the cable presser.
Water connection
The incoming water must have the following characteristics:
• Maximum temperature of 30^ C.
• Maximum hardness of 5^ f (french degrees).
• Pressure values between 150-200 kPa (1,5-2 bar).
- In case of excessively hard water ( >5^ f) use demineralisers to prevent accumulation of limestone inside the cooking chamber and internal pipes damage etc.
Preparation before use
- Remove all protective packaging and wrapping.
- Check that the device is in good condition and with all accessories. In case of incomplete or damaged delivery, please contact the supplier immediately. In this case, do not use the device.
- Before use ensure that no non-proper objects (instruction booklets, plastic bags or anything else) or residues of detergents are present in the chamber of the equipment; likewise, make sure that the smoke discharge is free of obstruction and there are no flammable materials in its vicinity.
- Clean the accessories and the appliance before use (See ==> Cleaning & Maintenance).
- Make sure the appliance is completely dry.
- Place the appliance on a horizontal, stable and heat resistant surface that is safe against water splashes.
- Keep the packaging if you intend to store your appliance in the future.
- Keep the user manual for future reference.
NOTE! Due to manufacturing residues, the appliance may emit a light odor during the first few uses. This is normal and does not indicate any defect or hazard. Make sure the appliance is well ventilated.
Operating instructions
Electromechanical control (223376, 223352, 223369)
- TIME ADJUSTMENT - When the manual option (☐) is selected, the oven will always be switched on for an infinite time until the operator intervenes. When a certain value is selected, the oven remains on for that amount of time (maximum 120 minutes).
- TEMPERATURE ADJUSTMENT - This knob allows you to select the desired cooking temperature.
- THERMOSTAT INDICATOR - This indicator lamp is turned on when the heating elements of the oven are switched on and therefore the internal temperature of the cooking chamber is lower than the value set by the thermostat knob. When the light is switched off means that the heating element is off and that the cooking chamber has reached the set temperature.
- STEAM/HUMIDITY BUTTON (only 223352, 223369) - This button allows you to activate the humidification function. Humidification is active as long as the button is pressed.
ATTENTION: For the humidification function to work satisfac-
torily, the temperature must be set to at least 80-100 °C. In addition, for good cooking it is necessary to preheat the oven to the desired temperature before activating the steam supply.
- FUNCTION SELECTOR KNOB (only 223369) - There is five functions to select:
- OFF (position 0) - appliance is turn off.
- DEFROST (position ☒) - light and fan are working; heating elements are off.
- CONVECTION (position ☒) - light, fan and heating elements is working; only grill heating element is off.
- GRILL (position 2221) - light and grill heating elements are working; fan and convection heating elements are off.
- GRILL + FAN (position ☒) - light, fan an grill heating element are working; convection heating elements are off.
Digital control (223345) - manual cooking:
- Press ON / OFF button ⏻ to activate appliance.
- To set temperature press temperature button ⏻ - chamber temperature will be display on screen; to change value press increasing button or decreasing button - displayed value will flashing. Press temperature button again or wait 5 sek for saving setted value. During cooking current chamber temperature will be display on screen; to check set temperature press temperature button. When heating is on thermostat indicator lights on red, if temperature is reached, indicator light on green.
- To set time press time button and change value using increasing button or deacreasing button. Press time button again to confirm the set time. During operation counting down time will be displayed until shutdown.
- To set infinity time mode go below minimum time value (1 min) - screen will display "--" and appliance will operate until pressing button 😊. During operation screen will display time of use in minutes (that means how long appliance has been in operation).
- To start operate appliance press button - pre-heating mode starts automatically and after "beep" sound the appliance will be ready to food loading. After closing door appliance will start with preset time and temperature automatically. You can change time and temperature in any time during operation. To interrupted operate press button
- To generate steam in chamber manually press steam button - steam will generate as long as the button is pressed.
- Count-down time will be displayed on the screen. After end of time, "beep" sound will be emitted for 40 sek., fan and heaters will turn off and screen will display communicate "END".
Digital control (223345) - programmed cooking:
- There are 99 programmable cycles available - each one with 3 phases. To create new program press book button - on the screen will display "P01". Choose desire program number using increasing button for decreasing button and confirm pressing book button again.
-
Phase 1 indicator will light on - set temperature and time as de-cribe above. You can set steam percentage pressing steam button and then pressing increasing button or deacreasing button to choose between 0%, 20%, 40%, 60%, 80% or 100% - to save value press steam button once again or wait 5 seconds. Note: To change steam percentage during operate, stop cycle / phase pressing button, change value and then start cycle / phase again.
-
To go to setting of second phase press cycle button C - second phase indicator will light on. Set all parameters as describe previously. Make the same steps for setting third phase. To save all three setted steps press book button. To skip one or two phases (that mean set cycle only with one or two phases) choose 0 value in time setting of second or third phase and save program.
- Start stored program pressing button 📋. Load food after pre-heating cycle and "beep" sound - preset program will start automatically after closing door. To go to next phase before time runs out, press and hold cycle button C
- After end of time, "beep" sound will be emitted for 40 sek., fan and heaters will turn off and screen will display communicate "END".
- To delete program choose infinite time in first phase and save the program.
- To return to manual cooking mode: press and hold ON/OFF button ⏻ until "MAN" communicate appers on the screen.
Cleaning & maintenance
- ATTENTION! Always disconnect the appliance from the power supply and cool down before storage, cleaning & maintenance.
- Do not use water jet or steam cleaner for cleaning and do not push the appliance under the water as the parts will get wet and electric shock might be resulted.
- If the appliance is not kept in a good state of cleanliness, this can adversely affect the life of the appliance and result in a dangerous situation.
- Food residues should be regularly cleaned and removed from the appliance. If the appliance is not cleaned properly, it will reduce its lifespan and may result in a dangerous condition during use.
Cleaning
- Clean the cooled exterior surface, interior chamber, door and interior glass with a cloth or sponge slightly dampened with a mild soap solution.
- For reasons of hygiene, the appliance should be cleaned before and after use.
- To clean the glass inside the door, open the door and unscrew the upper and lower screws to release the glass. The entire door can be cleaned in that position, with glass still hinged to the door.
- Avoid water contacting the electrical components.
- Never immerse the appliance in water or other liquids.
- Never use aggressive cleaning agents, abrasive sponges, or cleaning agents containing chlorine. Do not use steel wool, metallic utensils, or any sharp or pointed objects for cleaning. Do not use petrol or solvents!
- Only baking trays and extractable parts from chamber are dishwasher safe.
Manual cleaning of the chamber
To perform the manual cleaning correctly, follow the following steps:
- Turn on the appliance and set the temperature to 80^ .
- Leave it on for 10 minutes (with steam function, for preset ovens).
- Turn off the appliance and let it cool down.
-
Remove the supports of the side trays.
-
Spray the detergent over the entire internal surface of the oven and wait 10 minutes.
- Rinse the cooking chamber thoroughly at the end of the cleaning cycle.
- It is strictly forbidden to wash the cooking chamber at temperatures above 70°C. Danger of burn.
Maintenance
- Check the operation of the appliance regularly to prevent serious accidents.
- If you see that the appliance is not working properly or that there is a problem, stop using it, switch it off and contact the supplier.
- All maintenance, installation and repair work must be carried out by specialised and authorised technicians, or recommended by the manufacturer.
Transportation and Storage
- Before storage, always make sure that the appliance has been disconnected from the power supply and completely cooled down.
- Store the appliance in a cool, clean and dry place.
- Never place heavy objects on the appliance as this could damage it.
- Do not move the appliance while it is under operation. Disconnect the appliance from power supply when moving and hold it at the bottom.
- Special care must be taken when moving or transporting the machine due to its heavy weight. Move with at least 2 persons or using a cart. Move the appliance slowly, carefully, and never incline more than 45^ .
Troubleshooting
If the appliance does not function properly, please check the below table for the solution. If you are still unable to solve the problem, please contact the supplier/service provider.
| Problems Possible cause Possible solution | ||
| The appliance does not start. | The door are open. Close the door. | |
| Micro switch doesn't indicate closed door. | Contact the supplier. | |
| The fan stops when the appli-ance is on. | The safety thermostat indicated. | Turn the appliance off and wait until the ther-mostal reset itself. |
| The safety thermostat broke. | Contact the supplier. | |
| There is no wa-ter inflow from the humidifier pipes. | Water inlet is closed. Open the water inlet. | |
| The water supply is not connected correctly. | Check the water connection. | |
| The water filter is obstruct-ed by impurities. | Clean the water filter. | |
| The cooking is not uniform. | Fans do not invert the rotation's direction. | Contact the supplier. |
| One of the fans do not operate (specific models only). | ||
| Heating elements are broken. | ||
| Faulty door sealing. Check door gasket. | ||
| The appliance is completely OFF. | There is lack of power. | Restore the power supply. |
| The power supply is not connected correctly. | Check the power connection. | |
| The safety thermostat indicated. | Contact the supplier. | |
| Water leaks from the door gasket. | The surface touching the gasket is dirty. | Clean the surface. |
| The gasket is damaged. | Contact the supplier. | |
| The door can not be closed properly. | ||
| Error appears (digital control): ERR/Er1 | Oven Probe Fault. Contact the | supplier. |
Warranty
Any defect affecting the functionality of the appliance which becomes apparent within one year after purchase will be repaired by free repair or replacement provided the appliance has been used and maintained in accordance with the instructions and has not been abused or misused in any way. Your statutory rights are not affected. If the appliance is claimed under warranty, state where and when it was purchased and include proof of purchase (e.g. receipt).
In line with our policy of continuous product development we reserve the right to change the product, packaging and documentation specifications without notice.
Discarding & Environment
When decommissioning the appliance, the product must not be disposed of with other household waste. Instead, it is your responsibility to dispose to your waste equipment by handing it over to a designated collection point. Failure to follow this rule may be penalized in accordance with applicable regulations on waste disposal. The separate collection and recycling of your waste equipment at the time of disposal will help conserve natural resources and ensure that it is recycled in a manner that protects human health and the environment.
For more information about where you can drop off your waste for recycling, please contact your local waste collection company. The manufacturers and importers do not take responsibility for recycling, treatment and ecological disposal, either directly or through a public system.
DEUTSCH
PKS Hendi South East Europe SA
5 Metsovou Str.
18346 Moschato, Athens, Greece
Tel: +30 210 4839700
Email: info@pks-hendi.com
Hendi Polska Sp. z o.o.
ul. Firmowa 12
62-023 Robakowo, Poland
Tel: +48 61 658 7000
Email: info@hendi.pl
Hendi Italia S.R.L.
Via Leonardo da Vinci 4
39100 Bolzano (BZ), Italy
Tel: +39 800 727 438
Email: office.italy@hendi.eu
Hendi GmbH
Ehring 15
1208, 12/F Exchange Tower
33 Wang Chiu Road, Kowloon Bay, Hong Kong
Tel: +852 2154 2618
Email: info-hk@hendi.eu
Hendi Food Service Equipment Romania S.R.L.
https://www.linkedin.com/company/hendi-tools-for-chefs/
www.youtube.com/HendiEquipment
GB: Changes, printing and typesetting errors reserved.


- Safety instructions
- Special safety instructions
- Intended use
- Grounding installation
- Control panel - 223376, 223352
- (Fig. 1 on page 3)
- Control panel - 223369
- (Fig. 2 on page 3)
- Control panel - 223345
- (Fig. 3 on page 3)
- Power connection
- Water connection
- Preparation before use
- Operating instructions
- Digital control (223345) - manual cooking:
- Digital control (223345) - programmed cooking:
- Cleaning & maintenance
- Cleaning
- Manual cleaning of the chamber
- Maintenance
- Transportation and Storage
- Troubleshooting
- Warranty
- Discarding & Environment
- DEUTSCH
- PKS Hendi South East Europe SA
- Hendi Polska Sp. z o.o.
- Hendi Italia S.R.L.
- Hendi GmbH
- Hendi Food Service Equipment Romania S.R.L.
Brand : Hendi
Model : 223345
Category : Oven