USER MANUAL Klang s1 LOEWE
natural_image
Modern dining room interior with a large wooden table, black chairs, and decorative pendant light (no visible text or symbols)
Comprehensive user guide

See full manual online
Vielen Dank,
Bluetooth-Audio....9
CD 10
www.spotify.com/connect/third-party-licenses.
9 Amazon Music
natural_image
Two identical diagrams of a trash bin with no visible text, numbers, or symbols.
www.spotify.com/connect/third-party-licenses
https://www.deezer.com/legal/cgu
amazon music
https://www.amazon.co.uk/gp/help/customer/display.html?nodeId=201380010
for choosing a Loewe product. We are happy to have you as a customer. At Loewe, we combine the highest standards of technology, design and user friendliness. This applies equally for TV, video, audio and accessories. Neither technology nor design accomplishes an end in itself, but together should facilitate the highest possible audio and visual experience for our customer.
Our design has not even been guided by short-term, fashionable trends. Because after all, you have purchased a piece of high-quality equipment, that you want to enjoy tomorrow and the next day.

Content
Scope of delivery 16
Documentation....16
Position of the rating plate .....16
Important safety instructions......17
Remote control 18
Main Unit Components....19
Start-up....20
Main menu 20
Internet radio....20
Podcasts....21
Spotify 21
Amazon Music 21
Music player (USB) 22
Digital radio DAB+....22
FM Radio 23
Bluetooth Audio 23
CD 24
Sleep timer 24
Alarm clock 24
System settings 24
Equaliser....25
Network settings....25
Time settings 26
Language....26
Factory reset 26
Software update....26
Setup wizard 26
Info 26
Privacy Policy 26
Backlight 26
Loewe radio
- control of the radio via App....26
Disposal 27
Licenses....27
Technical data 27
Troubleshooting....28
Scope of delivery
Carefully unpack the device and make sure all accessories are present:
- Main unit
■ Remote control (incl. 2 x CR2032 batteries)
Power cable
- Quick start guide
■ FM/DAB Antenna
Documentation
This part of the operating manual contains essential basic information. The device is commissioned and set up by means of the intuitive operation guide after the device has been switched on for the first time.
A detailed user handbook describing the functions and features of your new Loewe product can be downloaded in electronic form from the Loewe website.
Visit our homepage under:
www.loewe.tv/de/support
In this section, you will also find the FAQs - frequently asked questions.
Official web forum:
www.loewe-friends.de
You can reach the Customer Care Center by phone:
09261 99-500 (Mo to Fr: 09:00 - 17:00)
Position of the rating plate
Labels with model number and operating voltage can be found on the bottom of the product.
1 Important safety instructions
Attention: Read this page carefully to ensure safe operation of the device.
Follow all safety and operating instructions when using this product.
You should keep the safety and operating instructions for future reference.
You should strictly follow all warnings provided on the product and listed in the operating instructions.
Explanation of symbols

Double Insulated (Class II) Equipment. This electrical appliance has been designed in such a way that it does not require a safety connection to electrical earth (ground).

This mark indicates this unit belongs to class 1 laser product.

This symbol indicates risks caused by high voltages.

This symbol is to alert the user to other, more specific risks.

This symbol indicates dangers caused by the development of fire.
1.1 Installation
1.1.1 Placement
Place the unit on a stable, even surface.
1.1.2 Do not use this device near water

The device should never be exposed to water droplets or water splashes, such as those found near a bathtub, wash basin, kitchen sink, washing machine, wel basement or swimming pool. Never place containers filled with liquids, such as e.g. flower vases, on the device.
1.1.3 Ventilation

Slots and openings in the housing are used to ventilate the device to ensure reliable operation of the device and to protect the device from overheating. Do not block the ventilation holes. Install the device according to the manufacturer's instructions. Never block the ventilation holes by placing the device on a bed, sofa, rug, or similar soft surfaces. This device should not be installed in a bookshelf or built-in wardrobe unless adequate ventilation is ensured.
1.1.4 Heat

Do not install the device near hot surfaces, such as radiators, fan healers, stoves or other devices (including amplifiers) that can be hot. Never place objects with open flame, such as candles or lanterns, on or near the device. The installed batteries should not be exposed to excessive heat such as direct sunlight, fire or the light.
1.1.5 Accessories
Use only the accessories specified by the manufacturer.
1.1.6 Network connection
Please make sure that the firewall function is activated at your network access point (router). Consult your router's instruction manual.
If you do not want to set up a network connection, please do not run the setup wizard.
1.2 Usage
1.2.1 Intended use
This device is intended exclusively for the reception and playback of sound signals.
1.2.2 Remote control
Exposing the remote control sensor to direct sunlight or high-frequency fluorescent light may cause malfunction. In such cases, you should move the system to a different location to avoid such malfunction.
The supplied batteries are intended for functional testing and may have a limited lifetime. If the range of the remote control decreases, replace the old batteries with new ones.
1.2.3 Overload

Never overload mains sockets, extension cords or multiple sockets, otherwise there is a risk of fire or electric shock.
1.2.4 Thunderstorm

The device should be disconnected from the mains during thunderstorms and if it is not used for a long time.
1.2.5 Penetration of foreign material and liquid
Be careful not to allow foreign material or liquid to enter this device through ventilation holes, otherwise it may come into contact with high voltage components or short circuit resulting in a fire or electric shock. Never spill liquids of any kind on this device.
1.2.6 Risks associated with high volume

The device is not designed for listening with headphones. To prevent possible hearing damage, do not listen at high volume for long periods.
1.2.7 Disconnection from power supply
The power button does not completely disconnect the power supply in any position. To completely disconnect the device from the mains, unplug the mains cable from the socket.

The mains plug must be easily accessible so that the unit can be disconnected from the mains at any time.
This product contains a semiconductor laser system inside the cabinet and is classified as a "CLASS 1 LASER PRODUCT". To prevent being exposed to the laser beam, do not remove the cover.
1.3 Maintenance
1.3.1 Device maintenance
Never attempt to carry out the maintenance of this device yourself, because live parts can be exposed through the openings or by removing covers, contacting which can be hazardous. Leave all maintenance to qualified service personnel.
1.3.2 Clean only with a dry cloth!
Unplug the mains adapter of this device from the mains socket before cleaning this product. Never use liquid cleaning detergents or cleaning sprays. Use only a damp cloth for cleaning.
1.4 Batteries

Caution! Do not ingest battery!
The remote control supplied with this product contains a coin cell battery. If the coin cell battery is swallowed, it can cause severe internal burns in just 2 hours and can lead to death.
Keep new and used batteries away from children.
If the battery compartment does not close securely, stop using the product and keep it away from children.
If you think batteries might have been swallowed or placed inside any part of the body, seek immediate medical attention.

Caution!
Risk of explosion if the batteries are replaced with the wrong type.
Do not heat or disassemble batteries. Never throw batteries into fire or water
Do not carry or store batteries with other metallic objects. The batteries could short circuit, leak or explode.
Never recharge a battery unless it is confirmed to be a rechargeable type.
When the Remote Control is not to be used for a long time (more than a month), remove the battery from the Remote Control to prevent it from leaking.
If the batteries leak, wipe away the leakage inside the battery compartment and replace the batteries with new ones.
Do not use any batteries other than those specified.
1.5 Repair
1.5.1 Damages requiring repair
Maintenance and repair work should only be carried out by a qualified customer service. Maintenance/repair is required if the device has been damaged (e.g. the mains adapter) if liquid has entered the device, if objects have entered the device, if the device has been exposed to rain or moisture, when it stops working properly or has fallen down.
1.5.2 To minimize the risk of electric shock, fire, etc.
Do not remove screws, covers or body parts.
1.6 Automatic energy saving function
The radio is equipped with an automatic energy saving function. This switches the device to standby mode within 15 minutes if it is played at a very low volume or if the radio is muted. Please note that the setting can't be changed.
Hereby, Loewe Technology GmbH declares that the radio equipment type Loewe klang s1 (s3) complies with Directive 2014/53/EU. The full text of the EU declaration of conformity is available at the following Internet address: https://www.loewe.tv/de/support
This product can be used across all EU member states.
Due to the 5 GHz frequency range of the built-in WLAN module, use in the following countries is only permitted inside buildings:
| A1 | BE | BG | CZ | DK | LE | FR | DE | IS | IE | II |
| EL | ES | CY | LV | LI | LT | LU | HU | MT | NL | NO |
| PL | PI | RO | SL | SK | IR | FI | SE | CH | UK | HR |
2 Remote control
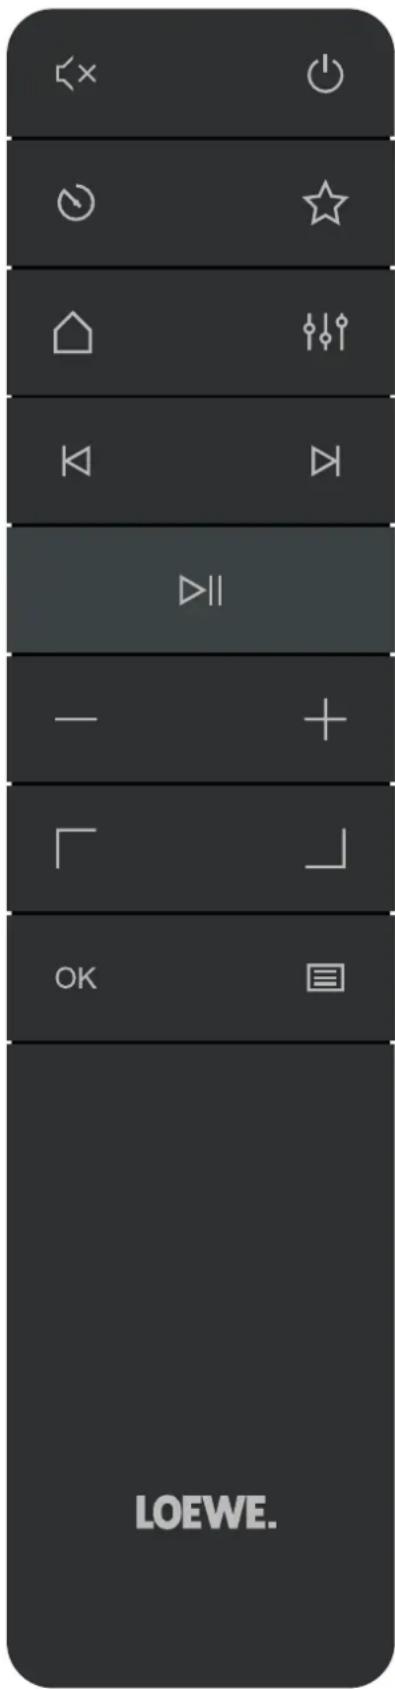
| Sound Mute / Unmute. |
| Switches the radio on or switches to standby mode. |
| Sleep timer - press repeatedly to set desired time after which radio goes into standby mode. |
| Shows favourites list on the display. |
| Home menu - press to change the modes: Internet Radio, Podcasts, Spotify, Amazon Music, Doczer, DAB radio, FM radio, Bluetooth, Music player, CD (klang s3 only). |
| Equaliser |
| Short press - previous audio track / scan previous FM station.Long press - rewind track / step back in the menu. |
| Short press - next audio track / scan next FM station.Long press - fast forward track. |
| Play / Pause audio track. |
| Reduce volume level. |
| Increase volume level. |
| Move up or left in the menu. |
| Move down or right in the menu. |
| Press to confirm selection in the menu. |
| Displays or exits the menu of the current audio mode. |
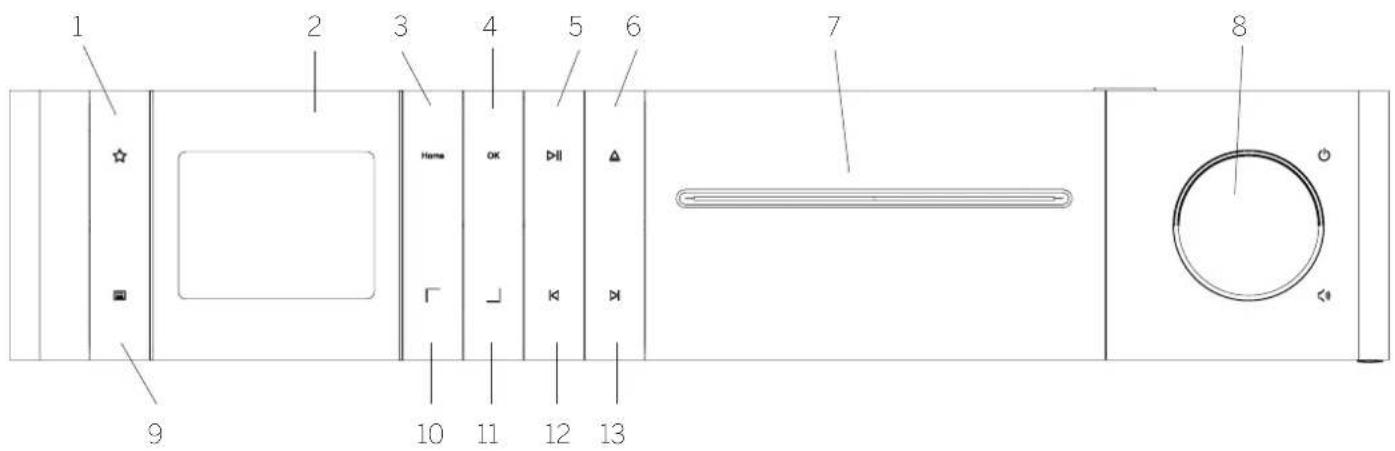
3 Main unit Components
Loewe klang s1
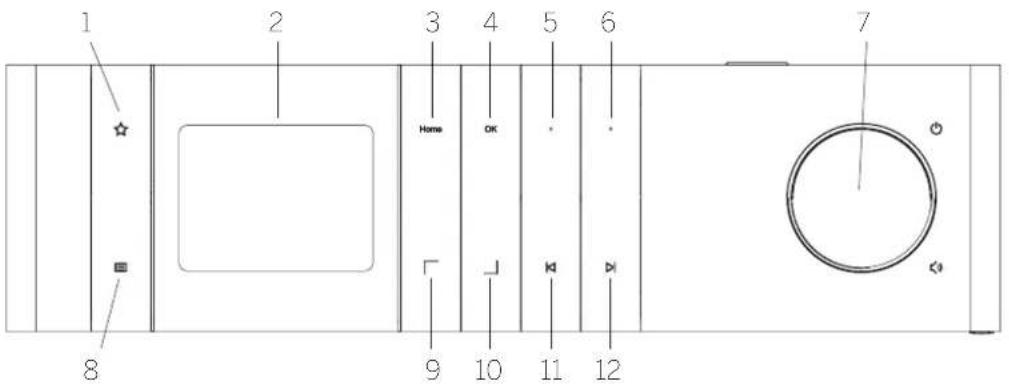
- Favourites list – Shows favourites list on the display.
- LCD TFT display
- Home - Shows home menu, where modes can be selected.
- OK - Press to confirm selection in the menu.
-
Fav1 - In Radio mode: press shortly to recall favourite radio station stored as Fav1. Press and hold to store current radio station as Fav1. In Spotify, Bluetooth, USB mode: Play/Pause function.
-
Fav2 - In Radio mode: press shortly to recall favourite radio station stored as Fav2. Press and hold to store current radio station as Fav2.
- Volume knob - Press to switch the radio on or switch to standby mode. Rotate to the left to decrease volume level. Rotate to the right to increase volume level.
-
Menu - Short press - shows additional information about current station/track. Long press - Displays the menu of the current audio mode.
-
Up/Left - Move up or left in the menu.
- Down/Right - Move down or right in the menu.
- Previous track - Short press - previous audio track / scan previous FM station. Long press - rewind track / step back in the menu.
- Next track - Short press - next audio track / scan next FM station. Long press - fast forward track.
Loewe klang s3
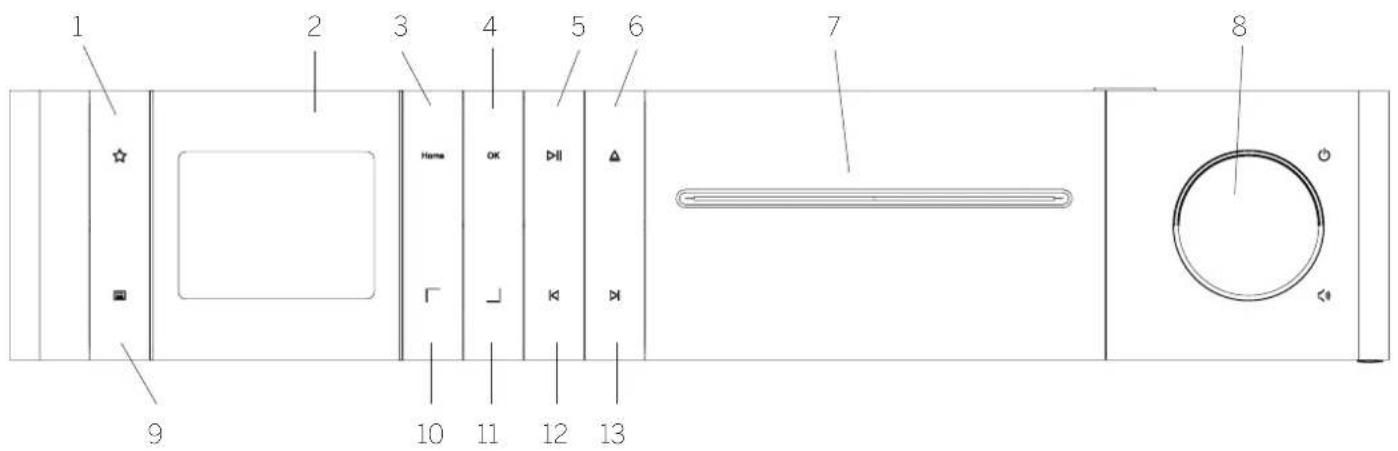
- Favourites list - Shows favourites list on the display.
- LCD TFT display
- Home - Shows home menu, where modes can be selected.
- OK - Press to confirm selection in the menu.
- Play/Pause - Play/Pause function.
-
Eject - Eject CD from the CD compartment.
-
CD compartment
- Volume knob - Press to switch the radio on or switch to standby mode. Rotate to the left to decrease volume level. Rotate to the right to increase volume level.
- Menu - Short press - shows additional information about current station/track. Long press - Displays the menu of the current audio mode.
-
Up/Left - Move up or left in the menu.
-
Down/Right - Move down or right in the menu.
- Previous track - Short press - previous audio track / scan previous FM station. Long press - rewind track / step back in the menu.
- Next track - Short press - next audio track / scan next FM station. Long press - fast forward track.
4 Start-up
4.1 Connecting
Connect the power cable to the radio and to the mains socket.
To ensure optimum acoustic performance and safe cable routing, please place the unit at least 5 cm away from the wall.
Open the battery compartment of the remote control and insert the batteries with correct polarity. Place both batteries "+" side up (facing you) and close the battery compartment.
4.2 Network connection
In order to receive Internet radio, the radio must be integrated into a network. To do this, the router must be switched on and connected to the Internet. Make sure that the Wi-Fi connection of the router is activated. You can also consult the router's operating instructions.
4.3 Switching On / Off (standby)
Press the button on the remote control or on the device to switch on the radio. Press the button again to put the device into standby mode. To switch it off completely, disconnect it from the power supply.
You can navigate through the menus by pressing the 7 buttons on the remote control. The selection is confirmed by pressing the OK button.
4.5 Entering passwords, search texts, etc.
Use the 7 buttons to select the corresponding numbers and/or letters individually and confirm the selection by pressing OK. To correct an incorrect entry, please go to the [BKSP] field and confirm with the OK button on the remote control. This will delete the last entry. Use the [CANCEL] field to cancel the entry completely. If your selection is complete, please navigate to the [OK] field and confirm the selection by pressing the OK button.
4.6 Adjusting volume and "Mute"
You can adjust the volume by pressing the + and - buttons on the remote control or by turning the volume knob on the device. Pressing the button mutes the radio. Another pressing of the button restores the original volume.
By repeatedly pressing the button on the device, depending on the source and station, additional information can be displayed:
■ Description
- Name of the station, the current program, content, topics, etc.
Genre
- The program style (genre) of the station is displayed
- Signal level and signal error
Bit rate
- Channel information
■ Today's date and current time
4.8 Setup wizard
At the first start the Setup Wizard starts automatically. At the first start-up all available menu languages are listed. Select the desired language with the / button and confirm with OK.
4.9 Starting the setup wizard
For a simple and quick initial start-up (selling the time and date, setting up the internet connection, etc.), we recommend that you run the setup wizard. To do this, please select [YES]. If you want to skip the setup wizard, select [NO].
All settings that are made using the setup wizard can later be made individually via the system settings.
Alternatively, the setup wizard can be run again at any time.
If you decided to run setup wizard, you will be shown following options:
[Date/Time]
12/24 hour format
[Auto update (Time & Date)]
[Update from DAB] or [Update from FM]. With the automatic update via the radio network FM / DAB / DAB +, the time and date are provided by the broadcasters. When adjusting via these sources, the time is set correctly even after a power failure.
[Update from NET] - When this option is selected, the time and date are automatically set via the Internet connection. In addition, the time zone and summer/winter time can be adjusted.
[No update] - The time and date must be set manually.
[Keep network connection]
If you select [Yes] radio will keep network connection during standby mode. This allows fast start of radio. It also enables you to switch on the radio using the "Loewe radio" App.
5 Main menu
To display the Main menu, press the button on the remote control or press and hold button on the radio. The menu of selected audio mode is displayed. In this menu, select [Main menu] to open the Main menu. This menu contains various audio sources and settings options:
- [Internet radio]
■ [Podcasts]
■ [Spotify]
■ [Amazon Music]
■ [Deezer]
■ [Music player] (USB)
■ [DAB Radio]
■ [FM Radio]
- [Bluetooth Audio]
■ [CD] (Loewe klang s3 only)
■ [Sleep timer]
- [Alarm clock]
■ [System settings]
6 Internet radio
The internet radio offers a huge selection of different offers around the world. You can select the stations in a variety of ways. To do this, please select the [Internet radio] in the Home menu.
6.1 Station search
The radio offers various options for searching for the desired station.
Navigate within the menu items and options. Once you have found the desired station, confirm your selection with the OK button. Internet radio playback can be stopped by pressing the ▶||button on the remote control. Another pressing of the button reloads the station.
6.1.1 Search for countries and regions
To search for stations from certain continents, countries and regions, press the button to call up the [Station list]. Confirm the selection.
Select the [Location] menu to select a country or region.
6.1.2 Search for genres
To search for stations with specific music styles or themes, proceed as follows:
Press the button to call up the [Station list]. After confirming the selection, navigate to the [Discover] menu. After confirmation, you can further narrow down your search according to the origin or language of the station.
6.1.3 Search by name
If you know the name of the desired station, you can search for it specifically:
Press the ☐ button to call up the [Station list]. After confirming the selection, navigate to the [Search] menu. Enter all or part of the station name in the input mask and select the "OK" field to start the search. You will receive a list of all stations whose names contain the text you are looking for.
6.1.4 Popular stations
You can find a selection of the most popular stations as follows:
Press the button to call up the [Station list]. After confirming the selection, navigate to the [Popular] menu and select the desired station.
6.1.5 Local stations
To specifically search for stations from the country of the current location of the radio, please proceed as follows:
Press the button to call up the [Station list]. After confirming the selection, navigate to the menu with the country name of the current location (e.g. "Germany").
6.2 Favourites (memory locations)
20 memory locations (favourites) are available for storing your favourite stations. You can assign these favourites to stations from the sources [Internet radio] and [Podcasts].
On the radio, you can assign memory locations 1-2 using the keys on the unit. To do this, select the desired station and press a Fav1 or Fav2 key until [Preset stored] appears on the display. The memory locations can be called up by pressing the button briefly.
6.2.2 Storing stations in memory locations 1 - 20
Select the desired station and hold down the button on the radio or on the remote control. Now select a memory location from the list of station memories and confirm the selection with the OK button on the radio or on the remote control. The [Preset stored] appears on the display.
You can easily call up the memory locations by briefly pressing the ☆ button on the radio or on the remote control. Use the 7 buttons to select a station and press OK to confirm.
Note: The memory locations cannot be deleted, but can only be overwritten with other stations.
7 Podcasts
Podcasts are available articles on various topics, e.g. Information broadcasts, news and much more. As with internet radio, here you can filter Podcasts or search for a Podcast in the entire database. To do this, please select the source [Podcasts] in the home menu.
7.1 Finding podcasts
The radio offers various options for searching for podcasts.
Navigate within the menu items and options. Once you have found the podcast you are looking for, confirm your selection with the OK button. Playback of podcasts can be paused and restarted by pressing the ▶ button on the remote control. By pressing the ▶/ ▶ you can fast forward and rewind within the podcast at increasing speed (max. 32 times). Brief pressing of the ▶ button you can jump to the beginning of the podcast.
7.1.1 Search for countries and regions
To search for podcasts from specific continents, countries and regions, press the 📄 button to call up the [Podcast list]. Confirm the selection.
Select the [Location] menu to select a country or region.
7.1.2 Search for genres
To find podcasts with specific content or topics, proceed as follows:
Press the 📁 button to call up the [Podcast list]. After confirming the selection, navigate to the [Discover] menu. After confirmation, you can further narrow down the search according to the origin or language of the podcasts.
7.1.3 Search by name
If you know the name of the podcast you want, you can search for it:
Press the 📄 button to call up the [Podcast list]. After confirming the selection, navigate to the [Search] menu. Enter all or part of the podcast name in the input mask and select the [OK] field to start the search. You will receive a list of all podcasts or episodes whose names contain the text you are looking for.
7.1.4 Popular podcasts
In order to search for popular podcasts from the country of the current location of the radio, please proceed as follows:
Press the 📄 button to call up the [Podcast list]. After confirming the selection, navigate to the menu with the country name of the current location (e.g. "Germany").
7.2 Favourites (memory locations)
20 storage spaces (favourites) are available for storing podcasts. You can assign these favourites to stations from the sources [Internet radio] and [Podcasts].
On the radio, you can assign memory locations 1-2 using the keys on the unit. To do this, select the desired podcast and press a Fav1 or Fav2 key until [Preset stored] appears on the display. The memory locations can be called up by pressing the button briefly.
7.2.2 Saving podcasts on memory locations 1 - 20
Select the desired podcast and hold down the star button on the radio or on the remote control. Now select a memory location from the list of station memories and confirm the selection with the OK button on the radio or on the remote control. The [Preset stored] appears on the display.
You can easily call up the memory locations by briefly pressing the ☆ button on the radio or on the remote control. Use the 7 buttons to select a podcast and press OK to confirm.
Note: The memory locations cannot be deleted, but can only be overwritten with other stations.
8 Spotify
Use your phone, tablet or computer as a remote control for Spotify. Go to spotify.com/connect to learn how. The Spotify Software is subject to third party licenses found here:
www.spotify.com/connect/third-party-licenses.
9 Amazon Music
To use this service on your radio you need an Amazon Music account (information at music, amazon.com).
9.1 Log in to Amazon Music
The first login to Amazon Music must be made using the "Loewe Radio" app (see chapter "Loewe Radio - radio control via the application").
In the "Loewe radio" app, select your radio, tap on the [Source] and select [Amazon Music]. Tap on the [Browse] at the top of the screen and then tap on the [Login with Amazon]. Enter your login details and sign-in.
The radio is now connected to your Amazon Music account.
9.2 Control of Amazon Music
Ensure the radio is connected to the wi-fi network and select the source [Amazon Music] in the home menu.
In the menu, press / to select a desired item. Press OK to confirm selected item. Hold down the K button to return to the previous menu.
While playing music, press / to open the Amazon Music menu.
Use the radio buttons or remote control to change the volume, play/pause the audio and jump forwards and backwards through your playlists.
Alternatively you can use "Loowe radio" app to select and play your songs or playlists.
9.3 Favourites (memory locations)
8 memory locations (favourites) are available for storing songs.
On the radio, you can assign memory locations 1-2 using the keys on the unit. To do this, select the desired song and press a Fav1 or Fav2 key until [Preset stored] appears on the display. The memory locations can be called up by pressing the button briefly.
9.3.2 Saving songs in memory locations 1-8:
Select the desired song and hold down the ☆ button on the radio or on the remote control. Now select a memory location from the list of memories and confirm the selection with the OK button on the radio or on the remote control. The [Preset stored] appears on the display.
You can easily call up the memory locations by briefly pressing the button on the radio or on the remote control. Use the / buttons to select a song and press OK to confirm.
Note: The memory locations cannot be deleted, but can only be overwritten with other songs.
10 Deezer
To use this service on your radio you need a Deezer account (information at www.deezer.com).
10.1 Log in to Deezer
Ensure the radio is connected to the wi-fi network and select the source [Deezer] in the home menu. You will be prompted to enter your Deezer login information; e-mail and password.
Note: This service will be available for the radio at a later date, after the software update.
10.2 Control of Deezer
In the menu, press 7 to select a desired item. Press OK to confirm selected item. Hold down the K button to return to the previous menu.
While playing music, press / to open the Deezer menu.
Use the radio buttons or remote control to change the volume, play/pause the audio and jump forwards and backwards through your playlists.
Alternatively you can use "Loewe radio" app to select and play your songs or playlists.
10.3 Favourites (memory locations)
8 memory locations (favourites) are available for storing songs.
On the radio, you can assign memory locations 1-2 using the keys on the unit. To do this, select the desired song and press a Fav1 or Fav2 key until [Preset stored] appears on the display. The memory locations can be called up by pressing the button briefly.
10.3.2 Saving songs in memory locations 1 - 8:
Select the desired song and hold down the button on the radio or on the remote control. Now select a memory location from the list of memories and confirm the selection with the OK button on the radio or on the remote control. The [Preset stored] appears on the display.
You can easily call up the memory locations by briefly pressing the ☆ button on the radio or on the remote control. Use the √ buttons to select a song and press OK to confirm.
Note: The memory locations cannot be deleted, but can only be overwritten with other songs.
11 Music player (USB)
You can use this source to play MP3 files (16 bit/48 kHz) from a USB stick. To do this, please select the source "USB" in the main menu.
When inserting a USB stick, please confirm [USB disk inserted – open folder?] with [YES]. The display then shows the available files and folders. If you select [NO] at this point, you will be switched back to the last selected audio source or the last used menu.
11.1 Playing MP3 files
Select the desired folder or track from the menu, the music playback is started with the OKthe menu, you can use the 7 buttons to navigate through the folder structures. Press and hold Button to return to the previous folder.
On the track playback screen, the ▶||button pauses or resumes playback. By continuously pressing the ▶/ ▶buttons you can fast forward and rewind within the track with increasing speed (max. 32 times). Brief pressing of the ▶ takes you to the beginning of the track or to the previous Track.
11.2 Random play and repeat
To play MP3 files in a folder in random rows, or to repeat the playback of the files, please proceed as follows:
Press the ☐ button on the remote control or press and hold the ☐ button on the unit and select [Repeat play] and/or [Shuffle play]. The functions are switched on or off with the OK button.
11.3 Playlist
You have the option to create a playlist for your MP3 files. 200 memory locations are available for this. To save a track in the playlist, press the OKbutton in the track list until [Added to My playlist] appears in the display. The track is now saved in the playlist. To play the list, press the 📄 button, select [Playlist] and confirm the desired track.
The random play and repeat functions are also available. You can delete the current playlist by executing the [Clear My playlist] function in the [Menu]. If you confirm [Remove all from My playlist] with [YES] the list is deleted. Individual tracks cannot be removed from the playlist.
Note: If there are tracks in the playlist that are not on the current USB stick, the playback is aborted with the error message [Cannot open selected media.] Then press the button to remove the error message. Create a new playlist.
12 Digital radio DAB+
Before you can tune and listen to DAB radio, you will need to install antenna (not provided within the scope of delivery) on the back side of the radio.
To receive the digital radio DAB+, please switch to the source [DAB Radio] in the home menu. When switching for the first time, an automatic station search is started. The [Scan] appears on the display, as well as the number of stations found so far and a corresponding progress bar.
Some stations offer additional information as a so-called Slideshow.
To display these on the radio display in large format, press the OK button on the remote control or on the radio. Pressing the button again switches the display back.
12.1 Station search
To search for receivable stations, you can start an automatic search. To do this, use the button to open the menu and select [Scan]. The [Scan] appears on the display, as well as the number of stations found so far and a corresponding progress bar. The stations are then saved in alphabetical order.
Stations that were found during a previous search but cannot currently be received are shown in the station list with a "?" in front of the station name.
12.2 Manual tune
You can also set ensembles manually. To do this use the button to call up the menu and select [Manual tune]. Then select the desired station and confirm with OK. Now information about the ensemble and the signal strength are displayed. Another pressing of the OK button saves the corresponding stations in the list.
12.3 Station list
Press the ☐ button and confirm [Station list] with OK. Use the ☐ 7 buttons to select a station and press OK to confirm. The device starts playing automatically.
Note: The reception quality of a station depends on factors such as weather, installation location and antenna orientation. If a station from the station list cannot be received, change the orientation of the antenna or the location of the radio. Stations that can no longer be received can be removed from the station list.
12.4 Delete stations that can no longer be received
Stations that can no longer be received can be deleted from the list. To do this, press the button and select [Prune invalid] Under [This removes all invalid stations, continue?] select [YES] and these stations will be deleted. Selecting [NO] takes you back into the menu without deleting the stations.
12.5 Favourites (memory locations)
40 memory locations ('favourites) are available for storing DAB+ stations.
On the radio, you can assign memory locations 1-2 using the keys on the unit. To do this, select the desired station and press a Fav1 or Fav2 key until [Preset stored] appears on the display. The memory locations can be called up by pressing the button briefly.
12.5.2 Saving DAB+ stations in memory locations 1 - 40
Select the desired station and hold down the button on the radio or on the remote control. Now select a memory location from the list of station memories and confirm the selection with the OK button on the radio or on the remote control. The [Preset stored] appears on the display.
You can easily call up the memory locations by briefly pressing the ☆ button on the radio or on the remote control. Use the □ 7 buttons to select a station and press OK to confirm.
Note: The memory locations cannot be deleted, but can only be overwritten with other stations.
12.6 DRC (Dynamic Range Control)
Some DAB+ stations support DRC, which reduces the difference between loud and soft tones. The following settings are possible:
[DRC high]
Strong compression of the different volumes. The dynamic is greatly reduced.
[DRC low]:
Low compression without much loss of dynamics.
[DRC off]:
There is no compression.
To make the settings, proceed as follows:
Press the ☐ button and select [DRC]. The settings for DRC can be changed in the following menu. The current setting is indicated by [*].
12.7 Station order
By default, the radio sorts the stations in alphabetical order. The stations can also be sorted by ensembles. To make the settings, proceed as follows:
Press the ☐ button and [Station order]. The sellings can be changed in the following menu. The current setting is indicated by [*].
13 FM Radio
Before you can tune and listen to FM radio, you will need to install antenna (not provided within the scope of delivery) on the back side of the radio.
Select [FM RADIO] in the home menu to switch to FM reception.
13.1 Station search
You can automatically search for FM stations. To start the automatic station search, please press the OK button on the remote control or on the radio. The search stops at the next station found and starts playing.
13.2 Search settings
You can use this function to determine whether only stations with a strong reception signal are taken into account. To do this, press the button and select [Scan setting]. In the following menu [FM station scan] you can now answer the question [Strong stations only] with [YES] or [NO]. The current setting is identified by [*].
13.3 Audio settings
For stations with poor reception, a slight quality improvement can be achieved by switching to mono reception. To do this, press the button and select [Audio setting]. In the following menu [FM weak reception] you can now answer the question [Listen in Mono only] with [YES] or [NO]. The current setting is identified by [*].
13.4 Favourites (memory locations)
40 memory locations (favouriles) are available for storing FM stations.
On the radio, you can assign memory locations 1-2 using the keys on the unit. To do this, select the desired station and press a Fav1 or Fav2 key until [Preset stored] appears on the display. The memory locations can be called up by pressing the button briefly.
13.4.2 Storing of FM stations in memory locations 1 - 40:
Select the desired station and hold down the button on the radio or on the remote control. Now select a memory location from the list of station memories and confirm the selection with the OK button on the radio or on the remote control. The [Preset stored] appears on the display.
You can easily call up the memory locations by briefly pressing the ☆ button on the radio or on the remote control. Use the / buttons to select a station and press OK to confirm.
Note: The memory locations cannot be deleted, but can only be overwritten with other stations.
14 Bluetooth Audio
The Bluetooth function enables the wireless transmission of music files (audio streaming) to the radio. Smartphones, tablets or similar devices can be paired. To do this, select the source [Bluetooth Audio] in the home menu.
14.1 Pairing Bluetooth devices for the first time
Make sure that the terminal device to be paired is switched on and Bluetooth is activated. Select the source [Bluetooth Audio] in the home menu. The [Bluetooth Discoverable] appears on the display. Now open the Bluetooth settings on the terminal device to be paired and start searching for available Bluetooth devices there. Select "Loewe klang s1(s3)" and start the pairing process.
After successful pairing, [Connected] appears on the display. Now the music playback can be controlled via the phone/tablet. To do this, use the music App of your choice.
Basic operation of play/pause and skip forward/backward is possible using the corresponding buttons on the remote control.
Note: Some devices require a PIN code when connecting, then enter "0000".
14.2 Automatic connection after pairing has already taken place
If the source is switched from [Bluetooth Audio] or the radio is switched off, the Bluetooth connection is disconnected. If the radio is switched on again or switched back to the [Bluetooth Audio] source, an automatic connection is established.
Note: If an automatic connection is not possible, please proceed as follows:
Press the button and select [View details]. Then open the [Paired Device List], to select and connect the desired device. Press the OK button to establish the connection and [Connected] appears briefly on the display.
14.3 Pairing another device
To connect another device to the radio, please press the 📄 button and select [Setup Bluetooth]. This will disconnect the current connection.
Now proceed as when you first pair a device. Afterwards, this device is also saved in the list of paired devices and can be selected via the corresponding menu (see above). A maximum of 8 devices can be saved.
15 CD (klang s3 only)
You can use this source to listen to your CDs. Please select the source [CD] in the home menu.
15.1 CD playback
Insert a disc into the CD compartment. Only standard 12 cm discs are supported. Make sure the CD label side is facing the front side of the radio. The CD starts playing automatically. Press or repeatedly to skip to the previous/next track. Press and hold or to rewind or fast forward current track.
Tip: Insert a CD when the radio is in standby mode. The radio wakes up and starts playing the disc.
Note: Some MP3 files may not be supported.
15.2 Random play and repeat
To play CD tracks/MP3 files in random order or play files repeatedly:
To turn on shuffle play, press the button, select [Shuffle] and press OK to confirm. Then select option [On] and press the OK button again to confirm.
To repeat tracks, press the ☐ button, select [Repeat] and press OK to confirm. Then select [Repeat 1] to repeat one track or [Repeat all] to repeat all tracks. Confirm your selection by pressing the OK button.
15.3 Ejecting a CD
To eject the disc from the CD compartment, press the ▲ button on the radio.
16 Sleep timer
With this function you can switch the radio to standby mode automatically after a set period of time. You can choose between 15, 30, 45 or 60 minutes, [Sleep OFF] deletes the previously set period of time. To do this, press the button while the audio source is selected and select [Main menu]. Use the or to navigate in the menu and select [Sleep]. Use the or button in the [Set sleep time] menu to select the desired time period and confirm with the OK button. Exit the menus again with the button. Alternatively, you can use the button on the remote control to set the time period.
The remaining time is shown in the bottom left of the display, with minutes running backwards.
17 Alarm clock
This radio has 2 individually adjustable alarm times. You can call up the alarm clock from the main menu. Press the ☐ button while the audio source is selected and select [Alarms].
17.1 Enable
Select here on which days the alarm should be activated. The following selection is available:
$$
\begin{array}{l} \text {[ O f f ] / [ D a i l y ] / [ O n c e ] / [ W e e k e n d ] /} \ \text {[ W e e k d y s ]} \end{array}
$$
Select [Off] to deactivate an activated alarm clock.
17.2 Time
Set the hours first with the or buttons and then the minutes after pressing the OK.
17.3 Mode
Here you set the audio source with which you want to wake up. The following selection is available: [Buzzer] / [Internet radio] / [DAB] / [FM]
17.4 Preset
The station with which to wake up is specified here. The station last listened to or the stations saved in the favourites are available here. Does not apply to buzzer mode.
17.5 Volume
Set the desired alarm volume here.
17.6 Save
Once you have made all the settings, please press the OK button to save the settings.
An activated alarm clock is shown with an alarm symbol and the number of the active alarm clock at the bottom left of the display. In standby mode you can also see the set alarm time.
17.7 Switching off the alarm clock after waking up
To switch off the alarm clock until the next alarm cycle, please press the Button on the device or on the remote control [Alarm off] appears briefly on the display. If you only want to interrupt the alarm function for a few minutes (snooze), you can use any other button. The alarm delay is set by pressing a button in steps 5, 10, 15 and 30 minutes and can also be extended again and again. After a short time, the radio automatically switches back to [Standby] and the time remaining until waking up again is displayed next to the flashing alarm symbol.
Note: The saved wake-up times are retained in the event of a power failure.
18 System settings
In the system settings you can change the settings of the radio and call up important information about it. To display the System settings menu, press the Button on the remote control or press and hold the Button on the radio. The menu of selected audio mode is displayed. In this menu, select [System settings] to open the System settings menu. The [System settings] menu contains following choices:
■ [Equaliser]
[Network]
[Time/Date]
■ [Language]
- [Factory reset]
■ [Software update]
- [Setup wizard]
■ [Info]
■ [Privacy policy]
■ [Backlight]
■ [Ambient Light]
19 Equaliser
With the equalizer you can adjust the sound of the radio to your liking. You can choose from pre-configured settings or create your own profile. Please proceed as follows:
Press the button and select [System Settings] and then [Equaliser]. Alternatively, you can press the button on the remote control. You can select a sound profile with the or buttons and then confirm with OK. The following profiles are available: [Normal] / [Flat] / [Jazz] / [Rock] / [Movie] / [Classic] / [Pop] / [News] / [My EQ]
Setting up [My EQ]
To do this, please navigate to [My EQ profile setup] and confirm with OK. The [Bass] and [Treble] can now be set in the following menu. Confirm the [Bass] or [Treble] with the OK button, make the appropriate settings with the □ or □ buttons and confirm with the OK button. When you have finished adjusting the bass and treble, press and hold the □ button to save the changes. Select [YES] and press OK to save this new equalizer profile. The active sound profile is marked with [*].
20 Network settings
20.1 Network wizard
The network wizard helps to connect the radio to the Internet. To call it up, please proceed as follows: Select the [Network] in the [System Settings] menu and then confirm [Network wizard]. The radio now starts a search for available WLAN connections and then lists them. The various networks can be selected using the or buttons. At the end of the list there is the option to select [Rescan] or [Manual config].
20.2 Wireless network connection (WLAN)
Depending on the network, you have several options to choose from to connect to the network. Networks that support a WPS connection (Wi-Fi Protected Setup) are identified in the list by the preceding designation [WPS ...]. Other connections are open networks or connections that are protected by the password.
Note: An active network connection is indicated by a white symbol at the bottom right of the display. If no connection is active, this symbol is crossed out.
20.3 WPS/Password protected/Open connection
A WPS connection enables the radio to be connected to your network in a simple yet protected manner. There are two options available. Establishing the connection through
PBC = Push-Button-Configuration (configuration at the push of a button) or by the PIN procedure, in which the web interface of your router prompts you to enter a randomly generated sequence of numbers.
20.4 PBC setup
Select the desired network [WPS ...]. Then select the [Push button] option in [WPS menu] and confirm. Now press the WPS button on your router or access point (AP). Please refer to the operating instructions of your router or AP for the exact procedure. Then press the OK button on the remote control or radio to initiate a network connection. Alternatively, the process can also be started in the [Network] menu under [PBC WLAN setup]. Follow the instructions on the display.
20.5 Setup using PIN
Select the desired network [WPS ...]. Then use the [WPS menu] to select and confirm the [PIN] option. The radio now generates an 8-digit code, which you should confirm with the OK button and then enter the number via the user interface of the router or AP. Please refer to the Router or AP manual for more information.
20.6 Skip WPS/Setup using password
Select [Skip WPS] to establish the connection using the Wi-Fi password. In the case of networks without WPS support, you can directly enter the password. Now enter the password and confirm it with the [OK] button. If the entry is correct, the radio connects to your network and establishes an Internet connection.
20.7 Open connection
We recommend that you do not connect to an open network. If the network you have selected is not encrypted, you can confirm this with the OK button. Then the internet connection is established.
20.8 Manual network connection setup
If DHCP is active, please proceed as follows:
Please select the menus [Network] -> [Manual settings] -> [Wireless] -> [DHCP enable]. Then enter the full SSID (network name) and confirm it with the [OK] button. Now choose the appropriate encryption method. Please refer to the configuration of the router or AP. Depending on the method selected, the network key is now entered and confirmed with the [OK] button.
If DHCP is inactive, please proceed as follows:
Please select the menus [Network] -> [Manual settings] -> [Wireless] -> [DHCP disable]. Now enter the information for [IP address], [Subnet mask], [Gateway address], [Primary DNS] and [Secondary DNS]. The values can be set using the or button. Use the OK, to select the individual number. Then proceed as described under [DHCP active].
20.9 Show network settings
In this menu you will find all settings of the network profile currently in use. To do this, select the [View settings] menu in the [Network] menu. The values can be displayed using the □ or button.
20.10 NetRemote PIN setup
In this menu you can set a 4-digit PIN that will be requested when the "Loewe radio" App is setup for the first time. The default is "1234". The PIN should be changed immediately.
20.11 Network profile
Here you can see the list of network profiles saved on the radio. If you have created several profiles, choose the one closest to the corresponding router or AP.
You can delete network profiles that are no longer required by pressing the or button to select the profile to be deleted and confirm with the OK button. The active network profile is marked with [*].
Note: The active network profile cannot be deleted.
20.12 Clear network settings
In this menu you can delete the network settings of the current profile. To do this, select the [YES] button and confirm your entry with the OK. Selecting the [NO] button cancels the process.
20.13 Keep network connected
This menu is used to set whether the WLAN connection to the network should be maintained in standby mode. This enables you to switch on the radio using the "Loewe radio" App. This means that the power consumption in standby mode is somewhat higher. Select the [YES] or [NO] button for the setting and confirm the entry with the OK.
21 Time settings
Settings for time and date can be made in the [Time/Date] menu. The following options are available:
In this menu you can set the time and date manually. The values can be changed using the or button. Use the OK button to save the value. After saving a value, next block of numbers will be automatically selected. Repeat previous steps to set all values for date and time.
Here you can specify the source from which the time and date should be updated. The following options are available:
[Update from DAB]: Time and date are updated via DAB.
[Update from FM]: The time and date are updated via FM.
[Update from Network]: The network updates the time and date.
[No update]: Time and date must be set manually.
The currently selected option is marked with [*]
In this menu you can specify whether the clock should be displayed in 12 or 24 hour format. Select desired option with the button, confirm with the OK button. The currently selected option is marked with [*].
In this menu you can specify your time zone. Select desired time zone with the or button. Confirm selection with the OK button. The currently selected option is marked with [*].
In this menu you can turn on or off the daylight savings time. Select desired option with the [or] button. Confirm selection with the OK button. The currently selected option is marked with [*].
22 Language
In the [Language] menu you can set the menu language of the radio. If you have started up the device with the Setup wizard, the device language has already been set there. To select a language, please use the or buttons and confirm this by pressing the OK button.
The following languages are available:
Danish, German, English, Finnish, French, Italian, Dutch, Norwegian, Polish, Portuguese, Swedish, Spanish, Turkish.
23 Factory reset
To reset the radio to the delivery state, please select [YES] in the menu [Factory reset].
Attention: All previous settings are deleted.
If you select [NO] the process is cancelled.
Note: In any case, reset the radio to the delivery state before you pass it on (e.g. sell, give away or disposal).
24 Software update
In this menu you can check whether a software update is available for the radio.
If you select [Auto-check setting] the radio automatically checks the availability of new software updates on a regular basis.
Select the menu item [Check now] to search for a new version. If newer software is found, please select [YES] to install it or [NO] to cancel the update. If [YES] the radio restarts to carry out the process.
Then the software is downloaded and you are asked with [Proceed] whether the update should be carried out. Please choose [YES] if you consent or [NO] to cancel the update. The [Warning: do not remove power] and the software version to be installed flash alternately. When the process is complete, [Update completed] appears on the display and you can confirm the process with the OK button.
You can check the version number of the installed software under the [System settings] menu under [Info].
Attention!
Make sure that there is a stable power supply before you start a software update.
An interruption during an update can cause irreparable damage to the radio!
25 Setup wizard
You can start the setup wizard again in the [Setup wizard] menu. To do this, proceed as described under "Starting the setup wizard" chapter.
26 Info
In this menu you will find the version number of the current firmware, among other things. Have this ready if you want to contact customer service.
27 Privacy policy
Please read the data protection regulations listed on this website:
privacy-klang.loewe.tv
28 Backlight
The display illumination can be programmed in 3 brightness levels. The following settings can be made in the [Backlight] menu:
[Timeout]: Time until the display is set to the [Dim level] lighting level.
Choices: [On / 10 / 20 / 30 / 45 / 60 / 90 / 120 / 180 seconds]
[ON] means that the radio always remains in the brightness level of the [On level].
[On level]: Brightness of the display when the radio is switched on. Choices: [High] / [Medium] / [Low]
[Dim level]: Brightness adjustment for operation and standby. Choices: [Medium] / [Low]
29 Ambient light
The [Ambient light] menu controls the illumination of the volume knob when the radio is turned on. You can change the light intensify by selecting one of the following options: [High] / [Medium] / [Low] / [Off]
30 Loewe radio - control of the radio via App
The "Loewe radio" application (App) developed by Frontier Silicon gives you full control of radio on your smartphone.
Regardless of whether you are setting up the device for the first time, configuring Equalizer or managing your favourite channels - "Loeweradio" offers you all the features on your smartphone or tablet and offers you even more convenience. Download the "Loeweradio" App from the Google Play Store or the Apple App Store.
30.1 Initial setup of the device with "Loeweradio"
When switched on for the first time, or after the radio has been set to the factory settings, the radio is in SETUP mode and a so-called micro-access point (own WLAN network) is generated. This allows your smartphone or tablet to connect to the radio.
30.2 Set up with Android
Make sure the radio is in SETUP mode. Open the "Loewe radio" App on your smartphone or tablet and select the menu item [SET UP AUDIO SYSTEM].
Press [NEXT] and select the menu item [CHOOSE ACCESS POINT].
The WLAN menu of the terminal device opens, select the [Loewe klang s1 (s3)] network there. After connecting, [Connected to Loewe klang s1 (s3)] appears in the App. Follow the further instructions of the App to set up the radio completely. Finally, the radio connects to the network and you can now operate the device with the "Loewe radio" App by pressing [Start using my audio system].
30.3 Set up with iOS
Make sure the radio is in SETUP mode. Open the "Loewe radio" App on your iPhone or iPad and select the menu item [SET UP AUDIO SYSTEM].
Press [NEXT] and select the menu item [CHOOSE ACCESS POINT]
The WLAN menu of the terminal device opens, select the [Loewe klang s1 (s3)] network there. After connecting, [Connected to Loewe klang s1 (s3)] appears in the App. Follow the further instructions of the App to set up the radio completely. Finally, the radio connects to the network and you can now operate the device with the "Loewe radio" App by pressing [Start using my audio system].
Disposal
![LOEWE Klang s1 - Press [NEXT] and select the menu item [CHOOSE ACCESS POINT] - 1](/content/2026/04/588921/images/7555ee1c9198dc9abd7ebeb12cd1adee14942cd34ca549cda5b4ff2466531cb1.jpg)
natural_image
Two identical diagrams of a trash bin with no visible text, numbers, or symbols.
Disposal of used electrical and electronic equipment and batteries.
The crossed-out wheeled bin symbol on the product or its packaging indicates that this product must not be treated as normal household waste, but must be returned to a collection point for the recycling of electrical and electronic equipment and batteries. By helping to properly dispose of this product, you are protecting the environment and the health of your fellow human beings. Improper or incorrect disposal endangers the environment and health. For more information about the recycling of this product, please contact your local authority or your municipal waste disposal service. Attention: The "Pb" sign under the battery symbol indicates that this battery contains lead.
The end user is responsible for deleting data on the old device using the menu item [Factory reset] before disposal (see chapter "Factory reset").
Licenses
Bluetooth®
The Bluetooth® word mark and logos are registered trademarks of Bluetooth SIG Inc. and any use of such marks by Loewe Technology GmbH takes place under license. Other trademarks and trade names are those of their respective owners.
Spotify
The Spotify Software is subject to third party licenses found here:
www.spotify.com/connect/third-party-licenses
Google Play and the Google Play logo are trademarks of Google LLC.
Apple and the Apple logo are trademarks of Apple Inc., registered in the U.S. and other countries. App Store is a service mark of Apple Inc.
deezer
https://www.deezer.com/legal/cgu
amazon music
https://www.amazon.co.uk/gp/help/customer/display.html?nodeId=201380010
All product and company names are trademarks™ or registered® trademarks of their respective holders. Use of them does not imply any affiliation with or endorsement by them.
Technical data
| Loewe device type: klang s1 klang s3 | | |
| Part number: 60607xxx 60608xxx | | |
| Power supply: AC 100 V - 240 V / 50/60 Hz | |
| Power consumption in standby mode: <1,0W <1.0W | | |
| Audio output power: 2 x 20 W 2 x 30 W | | |
| DAB tuning range BAND III | 174.928 MHz - 239.200 MHz |
| FM tuning range | 87.50 MHz - 108.00 MHz |
| WLAN supported Standards: | IEEE 802.11a/b/g/n |
| WLAN power/frequency range: | Maximum power <100 mW at 2412 - 2472 MHzMaximum power <100 mW at 5180 - 5320 MHzMaximum power <100 mW at 5500 - 5700 MHzMaximum power <100 mW at 5745 - 5825 MHz |
| WLAN supported encryption | WEP, WPA, WPA2 (PSK), WPS |
| WLAN supported streaming formats | MP3, AAC / AAC + (up to 48 kHz, 16 bit) |
| Bluetooth version | V4.2 |
| Bluetooth power/frequency range: | Maximum power <10 mW at 2402 - 2480 MHz |
| Bluetooth protocols: A2DP, AVRCP | |
| USB playable files: | MP3 (Bit rates: 32 - 320 kBit/s) |
| CD formats: | -- | CD-DA, CD-R, CD-RW, MP3; (12 cm disc only) |
| Device dimensions (W x H x D): | 335 x 120 x 90 mm | 460 x 160 x 90 mm |
| Device weight: | 3.1kg | 4.8kg |
| Ambient temperature: | 5°C - 35°C |
31 Troubleshooting
In case of device malfunction, before calling the help line we recommend to check the list below.
| Problem Possible cause Remedy/notes |
| No sound | a. Device is not connected to the electrical outlet.b. Sound is muted by remote control.c. Volume is decreased to minimum.d. Wrong source is selected. | a. Plug in the power plug properly.b. Press the × button on remote control to ensure radio is not muted.c. Adjust the volume to the correct level.d. Make sure the desired source is selected. |
| The system does not respond to button press | Software bug may have caused device stopped receiving commands from the buttons and restart is needed by disconnecting from power. | Unplug the AC adapter and reconnect it. |
| Remote control does not work | a. Battery power may be lowb. Batteries were inserted wrongly into battery compartment.c. The distance between the remote control and the unit is too big. | a. Replace the batteries with new ones.b. Ensure batteries are inserted with correct polarities aligned as shown in battery compartment.c. Reduce the distance between the remote control and the unit. |
| Radio antenna is missing in the packaging | Radio antenna is not provided with this device. | If you wish to receive FM/DAB/DAB+ radio, you need to buy antenna separately. |
| Problems with radio reception | a. Antenna may be wrongly oriented.b. Unit may be in location where is weak or no signal. Possibly other electrical appliances in vicinity interfere with the reception.c. Location is not suitable for receiving DAB+ signals. | a. Reorient the antenna.b. Find a more suitable location.c. Please check whether your geographic location is covered by DAB+ signal. |
| A network connection cannot be established | a. WLAN function on the device is off.b. Password which you entered for WLAN connection is invalid.c. In case you have DHCP switched off, you will need to enter valid IP address manually.d. Device may have trouble connecting to the network because it has not assigned IP address by the router.e. A firewall is activated in the network.f. Device is outside of Wi-Fi reception range.g. Router or access point could encounter a software bug and restart is required to refresh Wi-Fi network. | a. Connect to WLAN following the steps described in the chapter “Network settings”b. Re-enter correct password.c. Try to set an IP address on the device.d. Activate the DHCP function on the router and on the radio, and re-establish the connection on the device.e. Sel firewall so that access is possible.f. Place the radio closer to the router or access point.g. Restart the router or access point. |
| Bluetooth name of this unit is not visible on my Bluetooth device | Bluetooth function of your device is deactivated. | Ensure the Bluetooth function is activated on your Bluetooth device. |
Hartelijk dank
www.spotify.com/connect/third-party-licenses.
9 Amazon Music
natural_image
Two identical diagrams of a trash bin with no visible text, numbers, or symbols.
www.spotify.com/connect/third-party-licenses
https://www.dcezer.com/legal/cgu
amazon music
https://www.ama/on.co.uk/gp/help/customer/display.html?nodeld=201380010
www.spotify.com/connect/third-party-licenses
9 Amazon Music
natural_image
Two identical diagrams showing a cart with wheels and diagonal lines, no text or symbols present.
www.spotify.com/connect/third-party-licenses
https://www.dcezer.com/legal/cgu
amazon music
https://www.ama/on.co.uk/gp/help/customer/display.html?nodeId=201380010
www.spotify.com/connect/third-party-licenses.
9 Amazon Music
natural_image
Two identical line diagrams of a waste bin with no text or symbols, showing no actual text or labels.
www.spotify.com/connect/third-party-licenses
https://www.dee/er.com/legal/cgu
amazon music
https://www.amazon.co.uk/go/help/customer/dis-spay.htm?nodeld=201380010
7.1.4 Podcasts populares
natural_image
Two identical diagrams of a waste bin with no visible text, numbers, or symbols.
www.spotify.com/connect/third-party-licenses
https://www.deezer.com/legal/cgu
amazon music
https://www.amazon.co.uk/gp/help/customer/display.html?nodeId=201380010
7.1 Procurar podcasts
7.1.4 Podcasts populares
www.spotify.com/connect/third-party-licenses.
9 Amazon Music
natural_image
Two identical line diagrams of a waste bin with no text or symbols, showing no actual text or labels.
www.spotify.com/connect/third-party-licenses.
https://www.dee/er.com/legal/cgu
amazon music
https://www.amazon.co.uk/gp/help/customer/display.html?nodeId=201380010
www.spotify.com/connect/third-party-licenses.
9 Amazon Music
natural_image
Two identical diagrams of a waste bin with no visible text, numbers, or symbols.
www.spotify.com/connect/third-party-licenses
https://www.dee/er.com/legal/cgu
amazon music
https://www.amazon.co.uk/gp/help/customer/display.htm?redeld=201380010
www.spotify.com/connect/third-party-licenses
9 Amazon Music
Abyste monli tuto službu použivat, budete potřebovat čet na Amazon Music (informace naleznete na music. amazon.com).
natural_image
Two identical diagrams of a waste bin with no visible text, numbers, or symbols.
www.spotify.com/connect/third-party-licenses
https://www.dee/er.com/legal/cgu
amazon music
https://www.amazon.co.uk/gp/help/customer/display.html?nodeId=201380010
www.spotify.com/connect/third-party-licenses.
9 Amazon Music
natural_image
Two identical diagrams of a trash bin with no visible text, numbers, or symbols.
www.spotify.com/connect/third-party-licenses
Google Play a logo Google Play su ochranné známky spolčnosti Google LLC.
https://www.dcezer.com/egal/cgu
amazon music
https://www.ama/on.co.uk/gp/help/customer/display.htm?nodeld=201380010
www.spotify.com/connect/third-party-licenses.
9 Amazon Music
Lai izmantotu šo pakaipojumu sava radio, nepieclošams Amazon Music konts (informaciju skahet šeit: music.arazon.com).
Ja at asāt [NĒ]. process tick atcolts.
natural_image
Two identical diagrams of a trash bin with no visible text, numbers, or symbols.
Nolieloto elektrisko un elektronisko iekärtu un akumulatoru likvidēšana.
www.spotify.com/connect/third-party-licenses
Google Pay un Google Pay logotips in Google LLC prečzimes.
Apple un Apple logotips ir Apple Inc. prečzimes, kas registrėlas ASV un cilās valstis. App Store ir Apple Inc. pakalpojumu zime.
deezer
https://www.dcezer.com/legal/cgu
amazon music
https://www.ama/on.co.uk/gp/help/customer/display.html?nodeId=201380010
Visi izstradajumi un uznemumu nosaukumi ir to attie cigo pašnicku pročzimos™ vai registrčtas® pročzimos. To izmantošana nenczime nekadu piedenbu tem vai to albaistu.
Tehniskie dati
| Loewe ierīces veids: klang s1 klang s3 | | |
| Dajas numurs: 60607xxx 60608xxx | | |
| Strāvas padeve: AC 100 V - 240 V / 50/50 Hz | |
| Strāvas pateriņš gaidstaves režima: <1,0 W <1,0 W | | |
| Audio izvados jauda: 2 x 20 W 2 x 30 W | | |
| DAB regulošanas diapazons BAND III 174 928 MHz - 239 200 MHz |
| FM regulešaras diapazons | 87,50 MHz - 108,00 MHz |
| WLAN atbalstitie standarti: | IEEE 802.11a/b/g/n |
| WLAN jauda/frekvenču diapazons: | maksimala jauda <100 mW pie 2412-2472 MHzmaksimala jauda <100 mW pie 5180 - 5320 MHzMaksimala jauda <100 mW pie 5500 - 5700 MHzMaksimala jauda <100 mW pie 5745-5825 MHz |
| WLAN atbalstita šifrešana | WEP, WPA, WPA2 (PSK), WPS |
| WLAN atbalstitie straumešanas formati | MP3, AAC / AAC + (Ildz 48 kHz, 16 biti) |
| Bluetooth versija | V4 2 |
| Bluetooth jauda/frekvenču diapazons: | Maksimala jauda <10 mW pie 2402-2480 MHz |
| Bluetooth protokoli: | A2DP, AVRCP |
| USB atskarojamie faili: | MP3 (bitu atrumi: 32-320 kBiti/s) |
| CD formati: | -- | CD-DA, CD-R, CD-RW, MP3; (Ukai 12 cm diski) |
| lerices izmeni (P x A x Dz.): | 335 x 120 x 90 mm | 460 x 160 x 90 mm |
| lorices svars: | 3.1 kg | 4.8 kg |
| Apkartejas vices temperatura: | 5 °C - 35 °C |
natural_image
Two identical diagrams of a waste bin with no visible text, numbers, or symbols.
www.spotify.com/connect/third-party-licenses
https://www.dee/er.com/legal/cgu
amazon music
https://www.amazon.co.uk/gp/help/customer/display.html?nodeId=201380010
www.spotify.com/connect/third-party-licenses.
9 Amazon Music
natural_image
Two identical line diagrams of a trash bin with no visible text, numbers, or symbols.
www.spotify.com/connect/third-party-licenses
https://www.deezer.com/legal/cgu
amazon music
https://www.amazon.co.uk/gp/help/customer/display.html?nodeId=201380010
www.spotify.com/connect/third-party-licenses.
9 Amazon Music
natural_image
Two identical diagrams of a trash bin with no visible text, numbers, or symbols.
www.spotify.com/connect/third-party-licenses
https://www.deezer.com/legal/cgu
amazon music
https://www.amazon.co.uk/gp/help/customer/display.html?nodeId-201380010
www.spotify.com/connect/third-party-licenses.
9 Amazon Music
natural_image
Two identical diagrams of a waste bin with no visible text, numbers, or symbols.
www.spotify.com/connect/third-party-licenses
https://www.dee/en.com/legal/cgu
amazon music
https://www.amazon.co.uk/gp/help/customer/display.html?nodeId=201380010
www.spotify.com/connect/third-party-licenses.
9 Amazon Music
natural_image
Two identical diagrams of a waste bin with no visible text, numbers, or symbols.
www.spotify.com/connect/third-party-licenses
https://www.dee/er.com/legal/cgu
amazon music
https://www.amazon.co.uk/gp/help/customer/display.html?noceld=201380010
www.spotify.com/connect/third-party-licenses.
9 Amazon Music
18 Systeminnstillinger
natural_image
Two identical diagrams of a waste bin with no visible text, numbers, or symbols.
www.spotify.com/connect/third-party-licenses
https://www.deezer.com/legal/cgu
amazon music
https://www.amazon.co.uk/gp/help/customer/display.html?nodeId-201380010
www.spotify.com/connect/third-party-licenses.
9 Amazon Music
Za upotrebu ove usluge na radiju potreban vam je kori- snički račun za Amazon Music (informacije na stranici music.amazon.com).
9.1 Prijava na Amazon Music
Pryu prijavu na Amazon Music potrebno je obavri putem aplikacije "Loewe Radio" (poglavlje "Loewe Radio - upravljanje radiom putem aplikacije").
U aplikaciji "Loews radio" odaberite svoj rado, cedirnite [Izvor] odaberite [Amazon Music]. Dodirnite [Pregled] pri vhu zaslona, a zatim cedirnite [Prijava uz Amazon]. Unesite svoje podatke i prijavite se.
Radio je sada povezan s vaširn korisničkim računom usluge Amazon Music.
natural_image
Two identical diagrams of a waste bin with no visible text, numbers, or symbols.
Oclaganje rabljene električne elektroničke opreme baterija.
Simbol prekriženog koša za otpakke s kozačima na proizvodu linjogovoj arnbažižnači da so ovaj proizvod ne smje tretireti kao običan kućanski otpad, nego ga je potrebno predali na mjesima za prikupljanje le recikliranje električne i elektroničke opreme i baterija. Pravilnim odlaganjem ovog proizvoda štitile okelš i ljudsko zcravlje. Nepravilno odlaganje ugrožava oko š i zdravlje. Za više informacija o odlaganju ovog proizvo- da obratte se lokalnim nadležnim tijelima ili službi za odlaganje komunalnog otpada. Pažnja: Oznaka "Pb" ispod simbola baterije znači da baterija sadrži o ovo.
www.spotify.com/connect/third-party-licenses
https://www.dee/er.com/legal/cgu
amazon music
https://www.amazon.co.uk/gp/help/customer/display.html?ncdeId=201380010
www.spotify.com/connect/third-party-licenses.
9 Amazon Music
Za uporabo te storitve na radiu potrebujete račun Amazon Music (informacije na naslovu music.amazon.com).
9.1 Prijava v Amazon Music
natural_image
Two identical line diagrams of a trash bin with no text or symbols, each containing a cross symbol and a horizontal bar at the bottom (no text or labels present)
www.spotify.com/connect/third-party-licenses
Google Play in logotip Google Play sta blagovni znamki družbe Google LLC
https://www.deezer.com/legal/cgu
amazon music
https://www.amazon.co.uk/gp/help/customer/display.html?nodeId=201380010
Music player (USB) 274
Digital radio DAB+......274
FM Radio 275
Audio me Bluetooth....276
CD 276
09261 99-500 (Me to Fr: 9:00 PD - 5:00 MD)
www.spotify.com/connect/third-party-licenses.
9 Amazon Music
natural_image
Two identical diagrams of a waste bin with no visible text, numbers, or symbols.
www.spotify.com/connect/third-party-licenses
https://www.dee/er.com/legal/cgu
amazon music
https://www.amazon.co.uk/gp/help/customer/display.html?redeld=201380010
www.spotify.com/connect/third-party-licenses.
9 Amazon Music
11 Player muzical (USB)
12.6 DRC (Dynamic Range Control/Control Interval Dinamic)
natural_image
Two identical diagrams of a waste bin with no visible text, numbers, or symbols.
Software u Spotify se supure licențelor terte aflate aic:
www.spotify.com/connect/third-party-licenses
https://www.deezer.com/legal/cgu
amazon music
https://www.amazon.co.uk/gp/help/customer/display.html?nodeId=201380010
www.spotify.com/connect/third-party-licenses
9 Amazon Music
natural_image
Two identical diagrams of a trash bin with no visible text, numbers, or symbols.
www.spotify.com/connect/third-party-licenses
https://www.deezer.com/legal/cgu
amazon music
https://www.amazon.co.uk/gp/help/customer/display.html?nodeId=201380010
www.spotify.com/connect/third party licenses
9 Amazon Music
natural_image
Two identical diagrams of a trash bin with no visible text, numbers, or symbols.
www.spotify.com/connect/third-party-licenses
https://www.deezer.com/cgal/cgu
amazon music
https://www.amazon.co.uk/gp/help/customer/display.html?noceld=201380010
www.spotify.com/connectl/third-party-licenses
9 Amazon Music
natural_image
Two identical line diagrams of a trash bin with no visible text, numbers, or symbols.
www.spotify.com/connect/third-party-licenses
Google Play по Other Google Play е товарними знаками компані Google LLC.
https://www.deezer.com/cgal/cgu
amazon music
https://www.amazon.co.uk/gp/help/ customer/display.html?noceld=201380010

Download on the
App Store

٣-1赞成 التشغيل
التوصيلات ٤,١
(بكن الإ generating على السؤال [الامع] (FM station scan) (FM station scan) (Strong stations only) (NO) (YRS)
13,4 إعداد صوت
( Sudan Guatemala/ال Tariff) [Set Time/Date] ٢١,١
:DAB (Update from DAB)
:DAB (Update from DAB)
:DAB (Update from FM)
الن Expected (الن Expected) : يتم (دسته من الترّب) [Update from FM]
FM
www.spotify.com/connect/third-party-licenses
https://www.deezer.com/legal/cgu
amazon music
https://www.amazon.co.uk/gp/help/customer/
r·{r∧•}·=display.html?nodeId
www.spotify.com/connect/third-party-licenses.
9 Amazon Music
natural_image
Two identical diagrams of a waste bin with no visible text, numbers, or symbols.
www.spotify.com/connect/third-party-licenses
Google Play ve Google Play logosu, Google LLC'nin licari markalandir.
https://www.deezer.com/legal/cgu
amazon music
https://www.amazon.co.uk/gp/help/customer/display.html?nodeId=201380010
(09:00-17:00: 09261 99-500
תְרָה בְּרָה בְּרָה
371....Spotify
371.....Amazon Music
372 (USB)
372....DAB+ 50077
373....FM
373 Bluetooth
374
374
374
374
374
375
375
375
376
376
376
376
376
376,
Loewe
376
377
377
377
378
תְרָה
הכלהה-הכלהה-הכלהה-הכלהה-הכלהה-הכלהה-הכלהה-הכלהה-הכלהה-הכלהה-הכלהה-הכלהה-הכלהה-הכלהה-הכלהה-הכלהה-הכchia
.6
LCD TFT
.1
.2
.3
.7
.4
.8
.5
.9
Loewe klang s3
www.spotify.com/connect/third-party-licenses
Amazon Music 9
:הכלה 8-1הכלההוּרָהוּרָהוּרָהוּרָהוּרָהוּרָהוּרָהוּרָהוּרָהוּרָהוּרָהוּרָהוּרָהוּרָהוּרָה
[FM] / [DAB] / [הכלהה]
17.4
< [הכלהה] < [הכלהה] < [הכלהה] < [DHCPה]
הכלה (AP) WPS men in 1970, 1971.
[1] WPS ... [WPS ...]
[PIN] WPS 8
הכלהה/ WPS 20.6
תְבָרִי
https://www.deezer.com/legal/cgu
amazon music
https://www.amazon.co.uk/gp/help/customer/display.html?ncdeId=201380010
www.spotify.com/connect/third-party-licenses
on Google Play 5w 500m Google Play
Google LLC 5w 500m Google Play
תְבַרָה


Luxe Genesis Pvt Ltd
552,1st Main, 1st Cross, 8th block
Koramangala
560095 Bangalore
India
Tel+91845145123
E-Mail: luxegenesis@gmail.com
PT
Gaplasa S.A
Parque Suécia
Avda. do Forte, 3
geral.loewe@mayro.pt
PL
Audio Klan Sp.
u. Gen. Władysława Andersa 12 lok.LU2.
00 201 Wars/awa
Poland
Te (00)8004912045
www.audioklan.pl
E-Mail: service.pl@loewe.do
RU
Armada Sound LLC
Nizhegorodskaya str. 29-33, stroniye
7109052 Moscow
Russia
Tel +7 (495) 259 6 259
E-Mail:asn@armadasound.com
SK
Basys SK, s.r.o.
Stará Vajnorská 37/C
831 04 Bratislava
Sovakia
|el+421249106620
Valeni Lobanovsky avenue 14
03037 Kyiv
Ukraine
Tel:138(044)406-65-20
E Mail: info@karma.digital
Vivendi Group
Stolichnoe shosse 101, B11
03131 Kyiv
Ukraine
E-mail:vgroupkiev@gmail.com
Loewe Technology GmbH.
Customer Care Center
Industriestraße 11
Subject to modifications
Modifications reservée