USER MANUAL VR 201 PetPro Vileda
natural_image
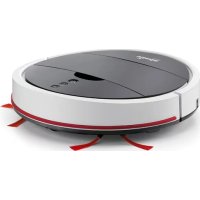
Black robotic vacuum cleaner with control buttons and tassels (no visible text or symbols)
User & care guide • Bedienungsanleitung • Manuale d'uso e manutenzione • Guía de usuario y cuidados • Manual de utilização e cuidados • Guide d'utilisation et d'entretien • Onderhouds- en gebruikshandleiding • Bruksanvisning och skötselguide • Bruker og vedlikeholdsmanual • Käyttö- ja hoito-opas • Instrukcja użytkowania i czyszczenia • Navodila za uporabo in nego • Uživatelská príručka • Uživatel'ská príručka • Vodič za korisnika i za njegu
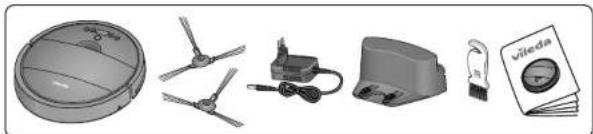
PACKAGING CONTENT & QUICK START GUIDE
- Lieferumfang & Schnellstart Anleitung - Contenuto della confezione e Guida Rapida - Contenido y Guía de inicio rápido - Conteúdo da embalagem & manual de iniciação rápida - Contenu de la bolte et démarrage rapide - Inhoud van de doos en snelle start - Förpackningsinnethall och snabbstartungsguide - Emballagens indhold & Hurtigstartungsguide - Pakkausken sisältó ja pikakaytiópas - Zawartość opakowania i iskrócona instrukcja obsługii - Vsebina pakiranja & Híter začetek - Obsah baleni a stručný průvodce - Obsah balenia a stručný spřevodca - Sadzaj pakiranja i vodić za brzi start
natural_image
Illustration of various electronic devices including a dome, propeller, motor, and a notebook (no text or symbols visible)
text_image
1
X
1 m
1 m
2 m
flowchart
graph TD
    A["OFF ON"] --> B["Device with checkmark"]
    B --> C{Check}
    C -->|Yes| D["OK"]
    C -->|No| E["Failure to switch"]
    D --> F["OK ON"]
    E --> G["Error"]
text_image
3a
3b
flowchart
graph TD
    A["Device Setup"] --> B["Network"]
    B --> C["Display"]
    C --> D["5-6h Time Delay"]
    D --> E["OK/Cancel"]
    style A fill:#f9f,stroke:#333
    style B fill:#ccf,stroke:#333
    style C fill:#cfc,stroke:#333
    style D fill:#fcc,stroke:#333
    style E fill:#ffc,stroke:#333
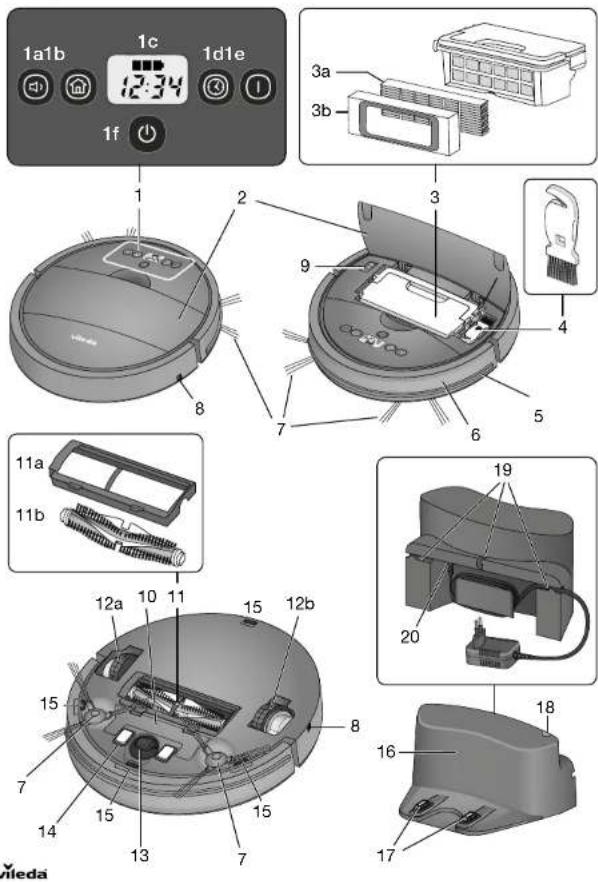
PRODUCT OVERVIEW
- Produktübersicht - Descrizione del prodotto - Descripción del producto - Visão geral do produto
- Présentation du produit - Productvoorselling - Produktöversikt - Produktoversigt
- Tuotekuvaus - Przegląd produktu - Pregled izdelka - Pfehlad produktu - Prehlad produktu
- Pregled proizvoda
text_image
1a1b
1c
1d1e
12:34
1f
3a
3b
1
2
3
4
5
6
7
8
9
10
11
12a
12b
13
14
15
16
17
18
19
20
3
4
5
6
7
8
MAINTENANCE
Wartung Manutenzione Mantenimiento Manutenção Entretien Onderhoud Underhall Vedigeholdelse/vedlikehold Huolto Konservacja Vzdrževanje Udržba Udržba Održavanje

natural_image
Close-up of a mechanical component with arrows pointing to internal parts (no visible text or symbols)
natural_image
Close-up of hands installing or adjusting a mechanical component with arrows indicating motion (no text or symbols visible)
natural_image
Mechanical assembly diagram showing a component with arrows indicating direction (no text or symbols)
natural_image
Mechanical assembly diagram showing a spring-loaded component with no visible text or symbols
text_image
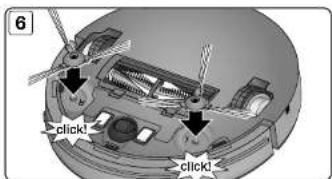
6
click
click
text_image
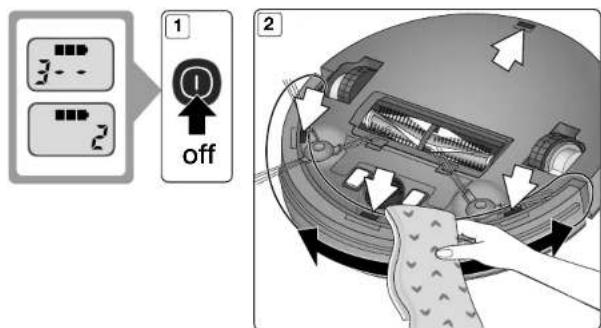
1
2
off
2
natural_image
Two-panel diagram showing a hand inserting a component into a device, with no visible text or symbols.
natural_image
Mechanical assembly diagrams showing hand positioning and internal components (no text or labels)
text_image
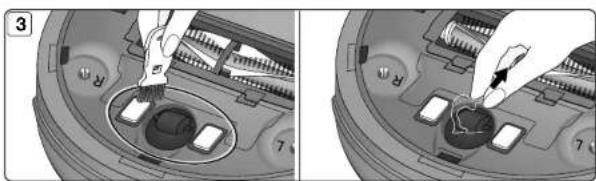
1
2
off
2
3
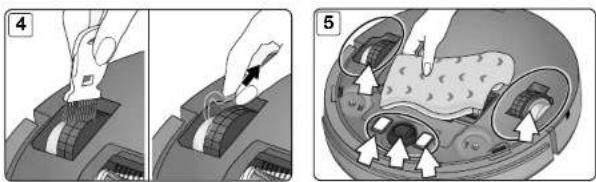
text_image
Diagram illustrating cleaning and waste management steps with labeled instructions and warning symbols
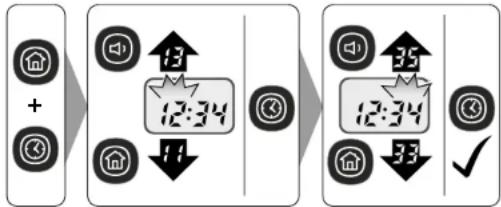
SCHEDULING
Time Setting Zeit einstellen Impostazione dell'orario Configuración de la hora Definición das horas Règlage de l'heure Tijd instellen Tidsinställning Tidsinstilling Ajan asettaminen Ustawienie czasu Nastavitev časa Nastavení času Nastavenie času Postavljanje vremena
flowchart
graph LR
    A["+"] --> B["+"]
    B --> C["12:34"]
    C --> D["13"]
    D --> E["↓"]
    E --> F["11"]
    F --> G["3"]
    G --> H["35"]
    H --> I["12:34"]
    I --> J["33"]
    J --> K["✓"]
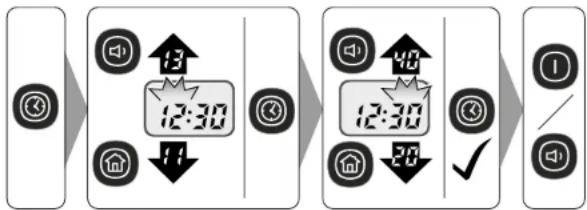
Daily cleaning schedule Programmierung täglicher Reinigungszelt Programmazione della pulizia quotidiana 2 Programmación diaria de limpieza 3 Programação diária da limpeza 4 Programmation quotidienne du nettoyage Dagelijke schoonmaak programmeren 5 Schemaläggning av daglig städning Daglig rengeringsskema/timeplan Päivittänen imurointiojhelma Dzienny harmonogram sprzatâniae Casovno dnevno programiranje čiščenja Denný úklidový plán Denný čistiaci plán Raspored dnevnog čiščenja
flowchart
graph LR
    A["Home"] --> B["Radio Icon 13"]
    B --> C["12:30"]
    C --> D["Downward Arrow 11"]
    D --> E["Home Icon 48"]
    E --> F["12:30"]
    F --> G["Downward Arrow 28"]
    G --> H["Home Icon 7"]
    H --> I["✓"]
    I --> J["Home Icon 1"]
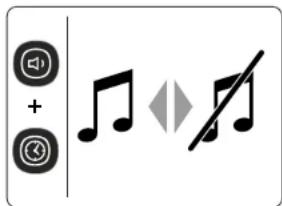
Sound on / off ① Ton ein/ausschalten ① Suono on / off ① Sonido activado / desactivado ② Som ligado/desligado ③ Son on / off ④ Geluid aan / uit ⑤ Liud pá/av ⑥ Lyd til/fra / pá/av ⑦ Äänet päällä/pois ⑧ Włączanie i wyłączanie dźwięków ⑨ Vklop / Izklop zvoka ⑩ Zapnuti / Vypnuti zvuku ⑪ Zapnutie/Vypnutie zvuku ⑫ Zvuk uključen / isključen
text_image
Diagram showing audio playback icons and musical notes, including speaker, amplifier, and stop controls
vileda®
Thank you for choosing our new Vileda VR 201 PetPro robotic vacuum cleaner. VR 201 PetPro will become your partner for daily cleaning, helping remove dirt, dust and even pet hair from your floors so you don't have to.
CONTENTS
- GENERAL WARNINGS 9
- GETTING TO KNOW VR 201 PETPRO 13
- PRODUCT OPERATION 14
- MAINTENANCE 15
- TROUBLESHOOTING 16
- ENVIRONMENTAL AND PRODUCT RECYCLING 17
- PRODUCT SPECIFICATION 17
- VILEDA PRODUCT GUARANTEE 17
1. GENERAL WARNINGS
IMPORTANT
Read all instructions before use. Retain instructions for future reference.
WARNING
Use the robot only as described in this manual. Failure to follow all instructions listed below may result in electric shock, fire and/or serious injury.
When using any electrical robot, basic safety precautions should always be observed, including the following, in order to reduce the risk of fire, electrical shock, leaking batteries or personal injury.
USE RESTRICTIONS
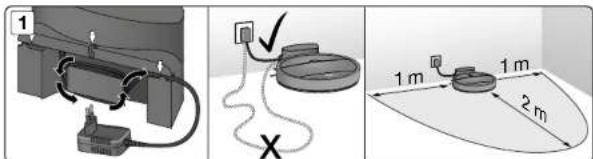
- When starting the robot, place it in the middle of a room or surface, at least half a metre away from an edge with a drop.
- Only for indoor use. Do not use outdoors or on balconies.
- Intended for domestic use only.
- The robot is not a toy. Do not sit or stand on it. Small children and pets should be kept away from the robot and supervised when the robot is cleaning.
- Do not put heavy or sharp objects on the top of the product.
- Do not let the robot pick up anything that is flammable, burning or smoking.
- Do not use this robot to pick up anything wet.
- Do not use on long-pile carpets or rugs or on wet floors, for example in the bathroom or laundry room.
- Only use this product in temperatures from 15^ to 35^ . Do not use this product in a high-temperature environment or direct sunlight for a long period of time.
- Before using, pick up objects like clothing, loose papers, pull cords for blinds or curtains, power cords, and any fragile objects off the floor as they may entangle with the cleaning brushes.
- Ensure the dust box is empty before use.
- WARNING: Black or dark coloured types of floors and stairs could reduce the reliability of drop sensors. Test with your specific floor and stairs before use.
PERSONAL SAFETY
- The intended use is described in this manual. The use of any accessory or attachment or the performance of any operation with this robot other than those recommended in this instruction manual may present a risk of personal injury.
- This robot is only intended for use by adults over the age of 18. This robot may only be used by children aged from 8 years and above and persons with reduced physical, sensory or mental capabilities or lack of experience and knowledge if they have been given proper supervision or proper instruction
concerning use of the robot in a safe way and understand the hazards involved.
• Children shall not play with the appliance.
- Children shall not play with the Robot and should only use the Robot as intended.
- This appliance contains batteries that are only replaceable by skilled persons.
- Cleaning and user maintenance shall not be made by children without supervision.
- Store in a dry place.
- Store out of reach of children.
- Use only with the attachments recommended by the manufacturer.
- Do not use without the filter in place.
- Keep the product and all accessories away from fire, hot surfaces and any flammables.
- Do not immerse the robot in water or other liquid.
- Do not use this product in areas above your body, as this may increase the risk of personal injury.
ELECTRICAL SAFETY INSTRUCTIONS
- Never modify the charger in any way.
- The charger has been designed for a specific voltage. Always check that the mains voltage is the same as that stated on the rating plate.
- Before use, check the charger cord for signs of damage or ageing.
- Do not abuse the charger cord; never carry the charger by the cord.
- Do not over-bend the power cord or apply pressure to the power cord with heavy or sharp objects.
- Never pull the charger cord to disconnect from a socket; grasp the charger and pull to disconnect.
- Keep the charger cord away from hot surfaces and sharp edges.
- Do not handle the charger, plug, adapter and wires or the robot with wet hands.
- Do not store or charge the robot outdoors.
- Unplug the charger before cleaning or maintaining. Product contains electronic parts. Do not submerge it or spray it with water. Clean with a dry cloth only.
BATTERY USE AND CARE
- Only use the battery supplied with the product.
- WARNING: For the purposes of recharging the battery, only use the detachable supply unit (GQ12-190060-AG / GQ12-190060-AB / NLB060190W1E4S58 / NLB060190W1U4S58) provided with this appliance.
- Do not attempt to use the charger with any other product nor attempt to charge this product with another charger, as this may damage the product and the battery, and will invalidate your guarantee.
- Only use the battery supplied with the product or provided by the manufacturer.
- Leaks from battery cells can occur under extreme conditions. If the liquid gets on the skin, wash it immediately with soap and water. If the liquid gets into the eyes, flush them immediately with clean water for a minimum of 10 minutes and seek urgent medical attention.
- This product contains Lithium-Ion batteries. Do not incinerate batteries or expose to high temperatures, as they may explode.
- When the battery pack is not in use, keep away from other metal objects such as: paper clips, coins, keys, nails, screws or other small metal objects that can make a connection from one terminal to another.
- Shorting the battery terminals may cause fire.
- The battery must be removed from the robot before it is discarded.
- The battery is to be disposed of safely and in accordance with Environmental and Product Recycling, as per page 17 of this manual. The battery must not be disposed of with household waste.
-
The robot must be disconnected from the mains supply when removing the battery.
-
WARNING: If the battery is damaged in any way, do not attempt to recharge it. Contact Vileda customer service address (see last page).
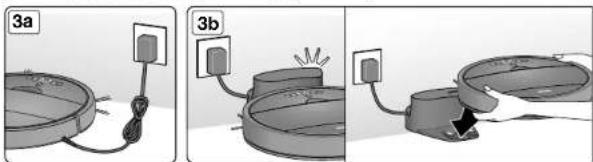
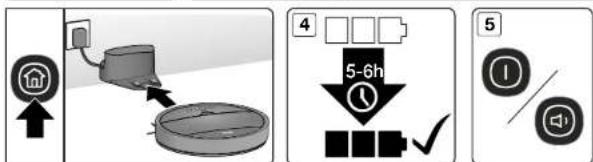
- Charge the battery for 6 hours before first use. After the first use, charging time is about 5-6 hours.
- If the robot is not to be used for 3 months or longer, charge it directly by the power adapter for 6 hours.
- WARNING: Only use a battery supplied by Vileda.
SERVICE
| 1. Display | 3b. Filter frame | 12a/12b. Wheels |
| 1a. Silent button | 4. Maintenance brush | 13. Front wheel |
| 1b. Home button to find docking station and decrease time for time or schedule setting | 5. Soft bumper | 14. Charging contacts |
| 6. Front bumper incl. obstacle sensors | 15. Drop sensors |
| 16. Docking station |
| 1c. Time, error code and battery status indication | 7. Side brushes | 17. Charging poles for automated charging in the docking station |
| 8. Charging socket |
| 1d. Plan button | 9. Main switch | 18. LED indication of docking station |
| 1e. Auto-cleaning button | 10. Battery cover |
| 1f. Power button | 11. Main brush unit | 19. Cable management system |
| 2. Dust box cover | 11a. Main brush cover with removal clamps | 20. Power supply socket |
| 3. Dust box incl. fine dust filter |
| 3a. Fine dust filter | 11b. Main brush | |
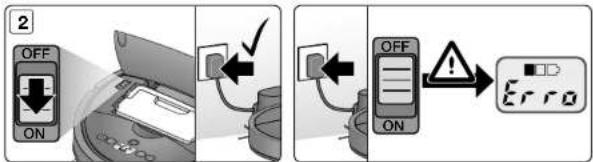
TO TURN ON THE ROBOT, ACTIVATE THE MAIN SWITCH: "ON" (9)
In standby or auto-cleaning mode, press the SILENT button to enter the quiet cleaning mode for more comfort while cleaning.
The robot will automatically choose the optimal cleaning pattern and reduce its noise level, by reducing speed, brush bar rotation and suction power for a more quiet product performance.
In silent cleaning mode, press SILENT button to enter the standby mode.
In plan mode: increase number when scheduling cleaning and setting time
In standby or operating mode, press the HOME button to find docking station and charge.
In plan mode: decrease number when scheduling cleaning.
1c. TIME, ERROR CODE AND BATTERY STATUS INDICATION
The number and letter combinations display the current time, scheduled cleaning and error codes.
The battery indication displays the remaining capacity level and battery charging status.
You can program the cleaning time of your robot according to your needs. The robot will then automatically start to clean every day at the set time.
Step 1: In standby mode press the PLAN and HOME button to enter the clock setting mode
Step 2: In standby mode press the PLAN button to enter the time setting mode for daily cleaning
To clear the scheduled cleaning time, press the PLAN button for 5 seconds
In standby or silent mode, press AUTO button to enter the auto cleaning mode.
The robot will automatically choose the optimal cleaning pattern, consisting of an iteration of auto, zig-zag and spiral movement pattern.
In auto cleaning mode, press the AUTO button to enter standby mode.
Press the POWER button to switch the robot on and off. By pressing it when the robot is working, it enters standby mode.
In standby mode, press POWER button to enter sleep mode.
Note: To switch off the sound of the robot press SILENT + PLAN button simultaneously
3. PRODUCT OPERATION
3.1 BATTERY CHARGING & RECHARGING
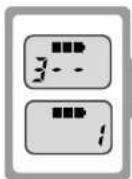
The battery indication (1c) is displayed in three blocks:
Three blocks illuminated: Battery is fully charged and full Auto and Silent program can be used.
Two blocks illuminated: Battery is half charged.
One block illuminated: Battery level is low. Recommended to start charging.
One block blinking: Battery needs to be charged. No cleaning mode possible.

TIPS TO EXTEND THE BATTERY LIFE:
• Before first use, charge the robot for 5-6 hours.
- Charge the robot as soon as battery power is low.
- If the robot is not to be used for a long time, fully charge the battery, turn the power switch off,
remove and store it in a cool, dry place.
- If the robot is not to be used for 3 months or longer, charge it directly by the power adapter for 5-6 hours.
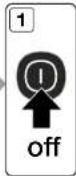
3.2 TURNING ON AND OFF
STARTING UP
To turn your robot on, activate the mainswitch, next to the dust box (9). You will hear a sound and the LED display and the buttons will be illuminated.
If the plan mode is activated, the plan button will get illuminated as well.
To start the AUTO or SILENT cleaning cycle press the "AUTO" or "SILENT" mode button
To pause the robot press the activated button again.

Note: When starting the robot, place it in the middle of a room or surface, at least half a metre away from an edge with a drop.
STANDBY
Standby means, the robots main power is turned on, and the robot is ready to use. The power button is flashing. When the robot is cleaning, press the activated button on main body to pause the robot and enter standby mode.
SLEEP MODE
In sleep mode the robots display will turn dark (but robot is not powered off). The power button is pulsating slowly.
In order to save power, you can turn the robot into sleep mode from standby mode via either of the following methods:
- Long press "POWER" button on main body
- Robot will automatically enter sleep mode if the power is low or after 5min in standby mode
POWER OFF
To turn the device off, deactivate the robot at its main switch (9).
Note: when storing the robot for a longer period of time, make sure the robot is switched off
3.3 TIME SCHEDULING
Please take page 8 in the manual for reference.

TIPS FOR EASY SCHEDULING
- The scheduling time uses the machine's time as a reference. So, before scheduling, please set
the robots time clock to be the same as real time.
• Once scheduled the machine, it will start cleaning at that time automatically, when the main switch
is switched on. The programmed time will remain saved, even when switching the device off.
- To clear the scheduled cleaning time, press the "PLAN" button for 5 seconds.
Note: The robot can only be set when it's in standby or charging on docking station. If the robot is in sleep mode, long press "POWER" button on main body. If the robot is in cleaning mode, pause it before scheduling.
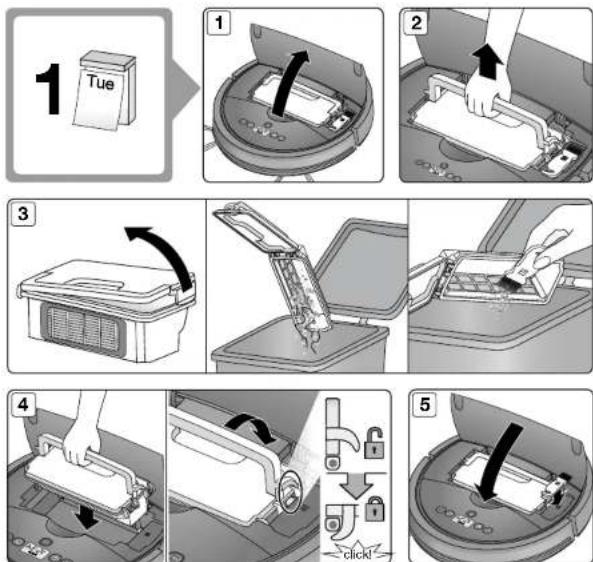
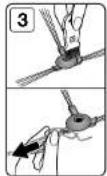
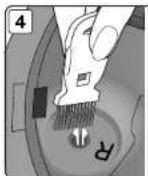
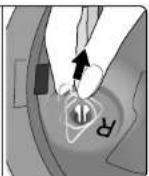
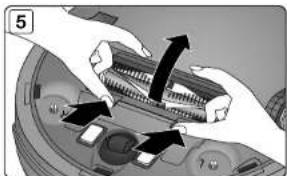
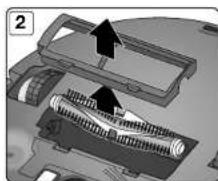
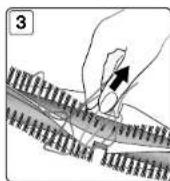
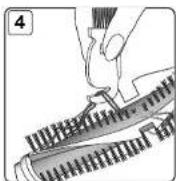
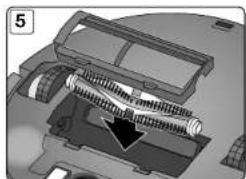
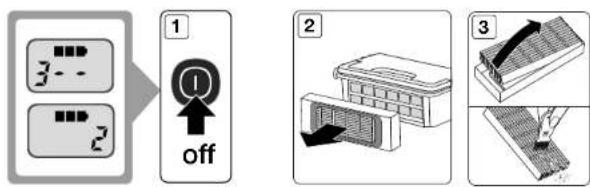
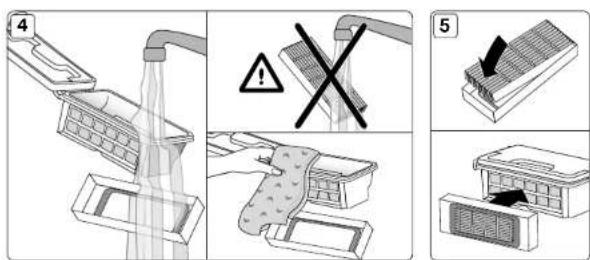
4. MAINTENANCE
Please take page 4-7 in the manual for reference
Tips for keeping the performance stable:
To keep your Vileda robot at the best level of performance, it is recommended to maintain the robot regularly.
| Robot Part | Care Frequency | Care Code | Replacement Frequency |
| Dust box After every use — — | | |
| Side brush and main brush | Once per week (twice per week in home with pets) and when maintenance code "1" is displayed |  | Every 6-12 months for the side brushes |
| High efficiency filter Once per month (twice per month in home with pets) and when maintenance code «2» is displayed |  | High efficiency filter: Every 4 months |
| Front wheel and driving wheels Drop sensors Charging contacts | Once per month and when maintenance code "2" is displayed |  | — |

BATTERY REMOVAL AND REPLACEMENT
Only use a replacement battery as supplied by Vileda.
• Make sure the device is switched off at the main switch
- Remove the screws on the battery cover with a screw driver
- Remove the battery cover
- Lift the battery and remove it from the housing
- Unplug the wire connector that links the battery and robot
- TROUBLESHOOTING
| Problem Possible reason Possible solution | |
| Robot is not running • Battery is too low | • Dust box is not inserted (correctly) | • Recharge the battery for 6 hours• Insert the dust box |
| Low or no suction • Dust box is full | • Filter is blocked with dirt• Filter is missing | • Empty dust box• Clean the filter with brush• Put filter back in place |
| Abnormal movement • Wheels are dirty | • Drop sensors are dirty | • Clean wheels• Clean crop sensors |
| Low battery after charging or no charging possible | • Battery connection is not good• Charger or battery is defective | • Contact the Vileda service (address see last page) |
| Display shows the error code | • Main brush and side brushes are blocked | • Clean main brush and side brushes as described in the chapter "Maintenance" |
| Display shows the error code | • Front wheel and driving wheels are dirty/blocked• Charging contacts are dusty• Drop sensors are dusty• Fine dust filter is blocked | • Clean the respective parts as described in the chapter "Maintenance" |
| Error code“A / U / B / N” | • Dust box not (correctly) inserted | • Remove and reassemble dust box in the robot |
| Error code“E / r / r / o” | • Battery connection is not good. | • Contact the Vileda service (address see last page) |
| Error code“E / various / various / various” | • Device off the ground• Sensors jammed or dirty | • Put robot on solid ground• Check sensitivity of the front bumper• Clean bottom anti-drop sensor lens• Clean front bumper sensor lens |
| Error code“L / various / various / various” | • Motors overload or jammed | • Check if fan opening is free and clean dust box• Check if wheels or brush unit is stuck or wired by obstacles |
If above described solutions do not work, please try switching off and on and check again.
For further help, technical advice, or to order spare or replacement parts contact Vileda (address see last page).
6. ENVIRONMENTAL AND PRODUCT RECYCLING
The Vileda vacuum cleaning robot VR 201 PclPro fulfils the EU directive 2012/19/EC, covering electrical and electronic appliances and the management of its disposal.
The packaging material is entirely recyclable, and marked with the recycling symbol. Follow local regulations for scrapping. Keep the packaging materials (plastic bags, polystyrene parts, etc.) out of children's reach, as they are potentially dangerous.
When the product has reached the end of its life please do not dispose of it with general household waste. To prevent possible harm to the environment or human health from uncontrolled waste disposal, recycle it responsibly to promote the sustainable reuse of material resources.

The symbol identifies the Vileda VR 201 PetPro as a product submitted to the regime of selective electrical appliance recycling collection.
The product contains a Li-Ion battery which should not be disposed of with general household waste. Deposit the battery in an official collection point for its recycling.
Batteries can be detrimental for the environment and can explode if they are exposed to high temperatures. The violation of these precautions could cause fire and / or serious injuries.
For more detailed information about treatment, recovery and recycling of this robot, please contact your local city office, your household waste disposal service or the shop where you purchased the product.
For example, disposal of the robot and any part of it may need to be taken to a Designated Collection Facility.
- PRODUCT SPECIFICATION
| Model 0769-02 | |
| Mechanical Specifications Size 32 x 8 cm | Weight ~2.2 kg |
| Electrical Specifications Rated Voltage 10.6 V | Battery Li-Ion 10.8 V / 2600 mAhCharging Time 5~6 h |
| Charger Specifications | Rated Input Voltage 100-240 V ACRated Output Voltage 19 V DCRated Output Current 600 mA |
8. VILEDA PRODUCT GUARANTEE
A. SCOPE
- Freudenberg Household Products LP ("FHP") guarantees the product to be free from defects in materials and workmanship a for period of two years from the date of purchase.
- If the product becomes faulty for any reason for which FHP is responsible within two years from the date of purchase ("the Guarantee Period"), FHP or an authorised service network member in the Guarantee Area (meaning anywhere within the United Kingdom, including the Channel Islands and the Isle of Man and the Republic of Ireland) will repair or replace it subject to the terms and limitations below. FHP may replace defective products or parts with new or refurbished products or parts. All products and parts replaced become the property of FHP.
- This guarantee does not cover:
a) periodic maintenance or repair or parts replacement due to wear and tear;
b) consumables (namely components that are expected to require necessary periodic replacement during the lifetime of a product such as pads);
c) damage or defects caused by use, operation or treatment of the product inconsistent with normal personal or domestic use;
d) damage or deterioration in the condition or performance of the product arising as a result of:
1. misuse, including:
- treatment resulting in physical, cosmetic or surface damage to or deterioration in product;
- failure to install or use the product for its normal purpose or in accordance with FHP's instructions on installation or use;
- failure to maintain the product in accordance with FHP's instructions on maintenance;
- installation or use of the product in a manner inconsistent with the technical or safety laws or standards in the country where it is installed or used;
II. use of the product with accessories, peripheral equipment and other products of a type, condition and standard other than prescribed by FHP;
III. repair or attempted repair by persons who are not FHP or authorised service network members; IV. accidents, fire, liquids, chemicals, other substances, flooding, vibrations, excessive heat, improper ventilation, power surges, excess or incorrect supply or input voltage, radiation, electrostatic discharges including lighting, other external forces and impacts; or
V. any event or circumstances beyond the reasonable control of FHP.
B. TERMS
- Guarantee services will be provided only if the original invoice or sales receipt (indicating the date of purchase, model name and dealer's name) is presented with the defective product within the Guarantee Period. FHP may refuse free-of-charge guarantee service if these documents are not presented or if they are incomplete or illegible. This Guarantee will not apply if the model name or serial number on the product has been altered, deleted, removed or made illegible.
- Except where FHP has a legal duly to reimburse them, this Guarantee does not cover transport costs or any risks associated with the transportation of the product to and from FHP.
- If FHP or one of its authorised service network members carries out a diagnostic test on the product and that test demonstrates that the product is working properly and no hardware fault is present, you will not be entitled to a repair under this Guarantee. In that event, you will be liable to pay for any repairs to rectify the defect and the cost of the diagnostic test.
C. EXCLUSIONS AND LIMITATIONS
- Except as stated above, FHP makes no guarantee (express, implied, statutory or otherwise) regarding product quality, performance, accuracy, reliability, fitness for a particular purpose, or otherwise.
- FHP does not take responsibility for any damage caused by the incorrect use of the product. Save as set out elsewhere in this Guarantee, the responsibility of FHP will not exceed the purchase price of the product. If you have any doubts referring to the correct use of the product or in relation to this Guarantee, please call Vileda Customer Service.
- Nothing in this Guarantee is intended to restrict or limit FHP's liability in any way in which it would be unlawful to do so, including for death or personal injury caused by FHP's negligence, or damage to private property caused by the goods proving to be defective while in the consumer's use as a result of FHP's negligence or for defective products under the Consumer Protection Act 1987.
D. YOUR LEGAL RIGHTS RESERVED
This Guarantee is in addition to, and does not affect, your legal rights in relation to goods that are faulty or not as described. All products will be provided in accordance with the contract. Further advice relating to your legal rights can be obtained from your local Citizens Advice Bureau or Trading Standards Office. You may assert any rights you have at your sole discretion.
E. YOUR GUARANTOR
The Guarantee for this product is provided and will be honoured by Freudenberg Household Products LP, 2 Chichester Street, Rochdale, Lancashire, OL16 2AX. www.vlleda.com/uk Tel: 0345 7697356.
vileda®
8. VILEDA PRODUKTGARANTIE
A. UMFANG
8. GARANTIA DO PRODUTO VILEDA
A. ÂMBITO
8. GARANTIE DU PRODUIT VILEDA
A. PORTÉE
- VILEDA PRODUCTGARANTIE 81
1. ALGEMENE WAARSCHUWINGEN
BELANGRIJK
6. AFVALVERWERKING, PRODUCTRECYCLING
8. VILEDA PRODUCTGARANTIE
A. OMVANG
product, zoals batterijen of filters);
8. VILEDAS PRODUKTGARANTI
A. OMFATTNING
4. VEDLIGEHOLDELSE/VEDLIKEHOLD
Se side 4-7 i manualen som reference
Tips til at bevare en stabil ydeise:
8. VILEDA PRODUKTGARANTI
A. OMFANG
Freudenberg Home and Cleaning Solutions AB.
Du kan kontakte Vileda via kontaktformularen på www.vileda.dk eller ved at ringe til forbrugerkontakt på til. (+45) 70 21 00 52, tryk 3.
Freudenberg Home and Cleaning Solutions AB., Box 4013, 203 11 Malmö
vileda®
8. GWARANCJA NA PRODUKT VILEDA
A. ZAKRES
D. VAŠA PRIDRŽANA ZAKONSKA PRAVA
Freudenberg Home and Cleaning Solutions GmbH