SNT2400EK2753 - Blower EGO - Free user manual and instructions
Find the device manual for free SNT2400EK2753 EGO in PDF.
| Brand | EGO |
| Model | SNT2400EK2753 |
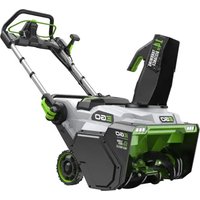
| Type | Cordless Snow Blower |
| Voltage | 56 V DC |
| Clearing Width | 61 cm |
| Intake Height | 51 cm |
| Wheel Size | 38 cm |
| Weight | 68 kg |
| Operating Temperature | -20°C to 10°C |
| Storage Temperature | -20°C to 70°C |
| Guaranteed Sound Power Level | 98 dB(A) |
| Vibration Level (Left Handle) | 0.3 m/s² (K=1.5 m/s²) |
| Vibration Level (Right Handle) | 0.4 m/s² (K=1.5 m/s²) |
| Compatible Battery | EGO ARC Lithium 56 V 5.0 Ah or higher capacity |
| Key Features | Variable speed auger, variable speed self-propulsion, LED lighting, 100° rotatable chute, adjustable deflector |
| Lighting | LED headlights and side lights |
| Self-Propelled | Variable speed with forward and reverse |
| Chute Adjustment | Manual rotation up to 100° and continuously adjustable deflector |
| Adjustable Skid Shoes | Height adjustable based on snow conditions |
| Shear Pin | Replaceable, two spare pins included |
| Warranty | Visit egopowerplus.com |
Frequently Asked Questions - SNT2400EK2753 EGO
User questions about SNT2400EK2753 EGO
0 question about this device. Answer the ones you know or ask your own.
Ask a new question about this device
Download the instructions for your Blower in PDF format for free! Find your manual SNT2400EK2753 - EGO and take your electronic device back in hand. On this page are published all the documents necessary for the use of your device. SNT2400EK2753 by EGO.
USER MANUAL SNT2400EK2753 EGO
text_image
56 VOLT CORDLESS SOPERATOR'S MANUAL
56 VOLT LITHIUM-ION
text_image
Technical diagram of a snowman with numbered parts labeled for identification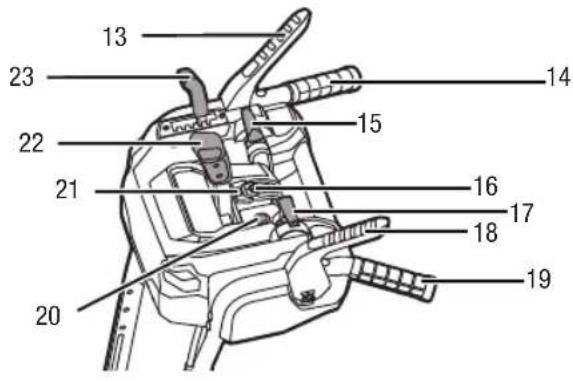
text_image
13 23 22 21 20 15 14 16 17 18 19A2
text_image
24 25 26 27
natural_image
Line drawing of a mechanical clamp or tool with handle and lever (no text or symbols)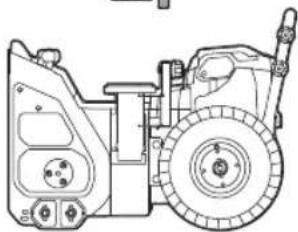
natural_image
Technical line drawing of a mechanical device with front and side views (no text or symbols)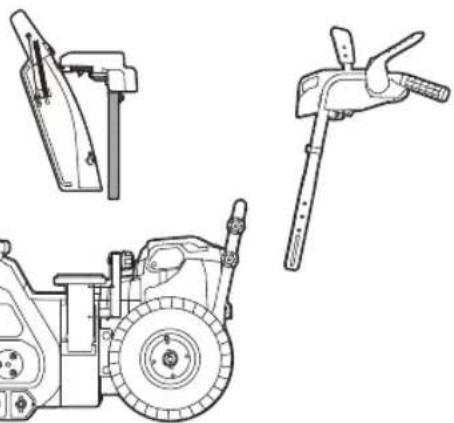
natural_image
Technical line drawings of three mechanical components: a clamp, a tool, and a tractor (no text or labels)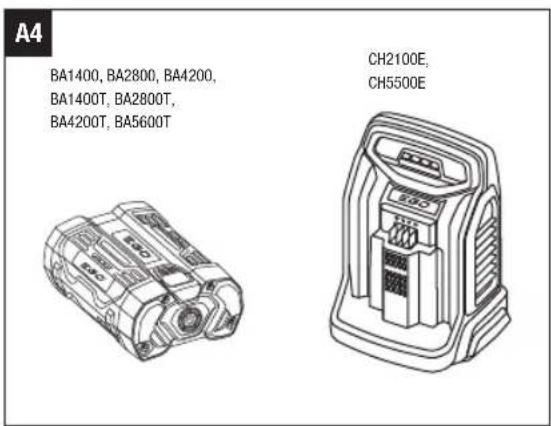
text_image
A4 BA1400, BA2800, BA4200, BA1400T, BA2800T, BA4200T, BA5600T CH2100E, CH5500E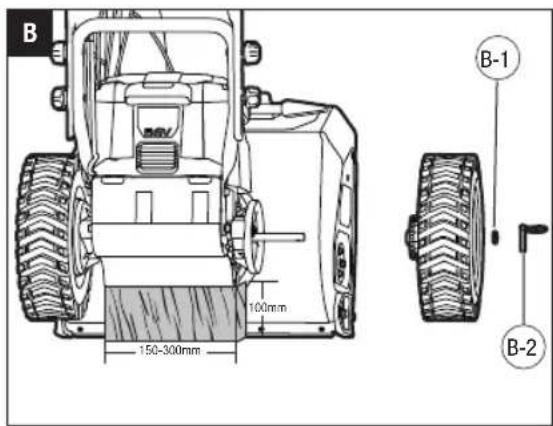
text_image
B 100mm 150-300mm B-1 B-2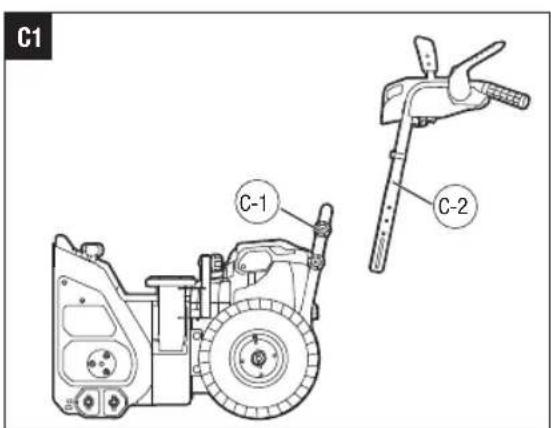
text_image
C1 C-1 C-2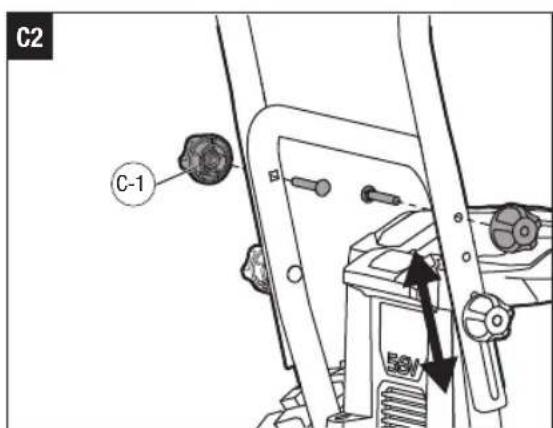
text_image
C2 C-1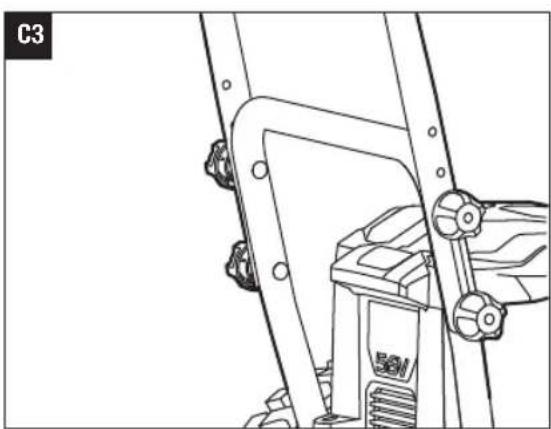
natural_image
Technical line drawing of a mechanical assembly with mounting brackets and a base plate (no text or symbols)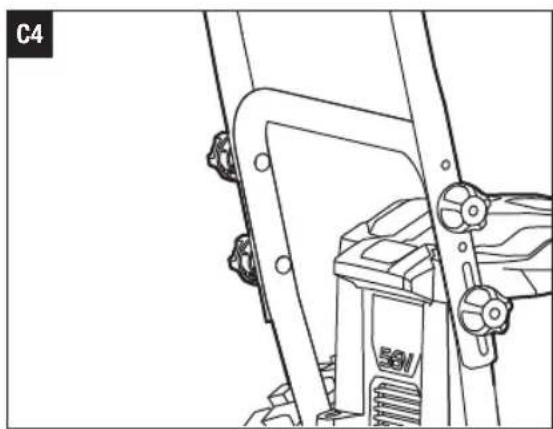
natural_image
Technical line drawing of a mechanical device with mounting brackets and a base plate (no text or symbols)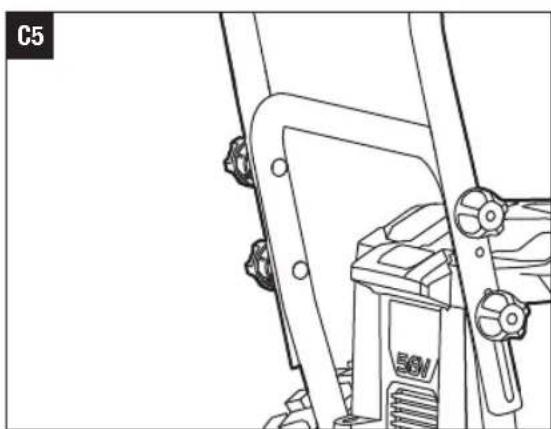
natural_image
Technical line drawing of a mechanical device with no visible text or symbols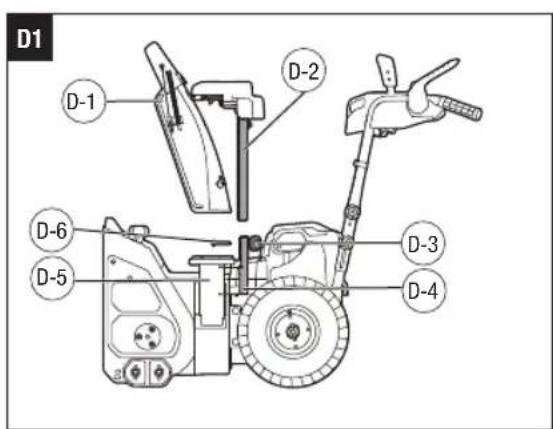
text_image
D1 D-1 D-2 D-6 D-5 D-3 D-4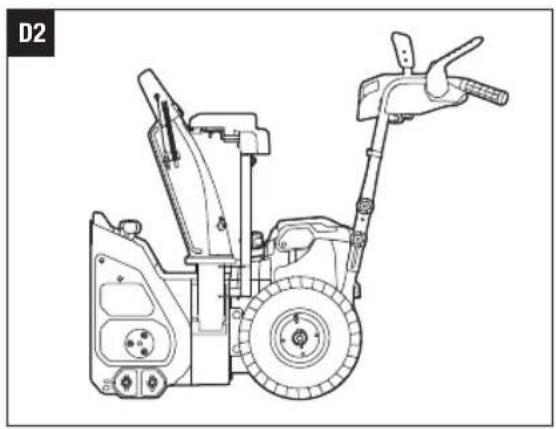
natural_image
Technical line drawing of a snowman tiller with attached blade and wheel (no text or symbols)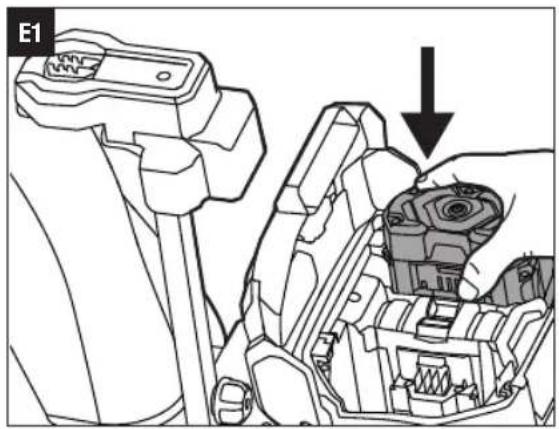
natural_image
Mechanical assembly diagram showing a hand holding a component with an arrow pointing to a detail (no text or symbols present)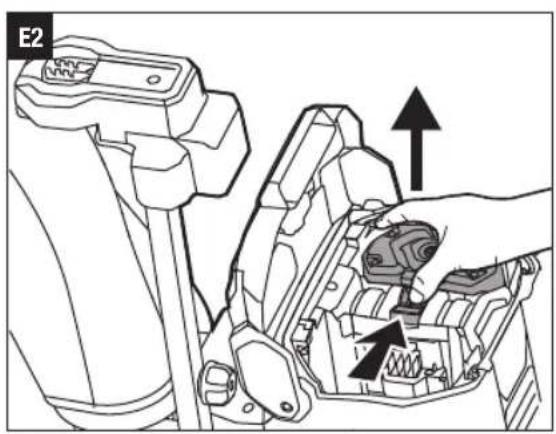
text_image
E2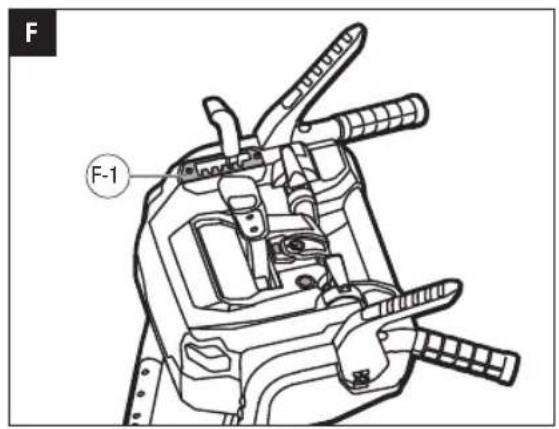
text_image
F F-1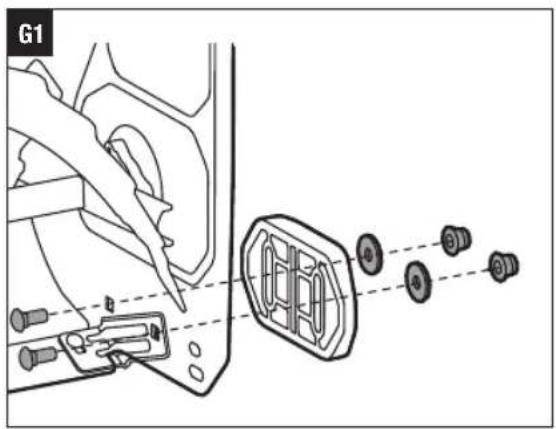
text_image
G1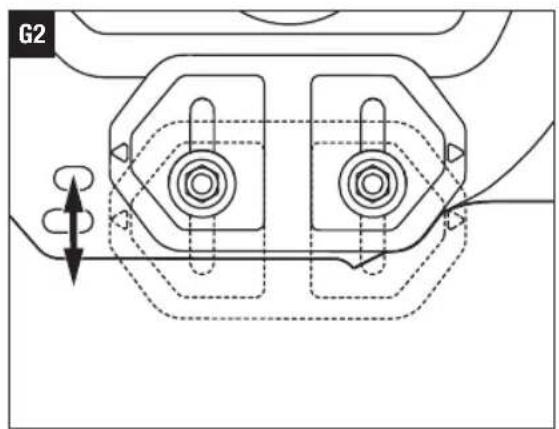
natural_image
Technical diagram of a mechanical component with symmetrical features and dashed lines indicating hidden edges (no text or symbols)
text_image
H1 I-1 I-2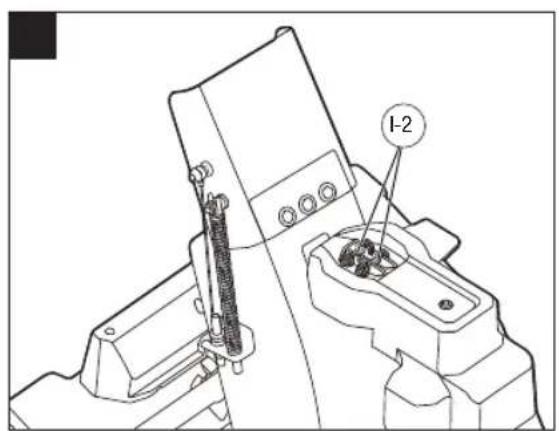
text_image
I-2READ ALL INSTRUCTIONS!
Intended use: Removing snow from areas such as driveways and sidewalks.
WARNING: Be sure to read and understand all safety instructions in this Operator's Manual, including all safety alert symbols such as "DANGER," "WARNING," and "CAUTION" before using this tool. Failure to follow all instructions listed below may result in electric shock, fire, and/or serious personal injury.
WARNING: The operation of any power tools can result in foreign objects being thrown into your eyes, which can result in severe eye damage. Before beginning power tool operation, always wear safety goggles or safety glasses with side shields or a full face shield when needed. We recommend a Wide Vision Safety Mask for use over eyeglasses or standard safety glasses with side shields.
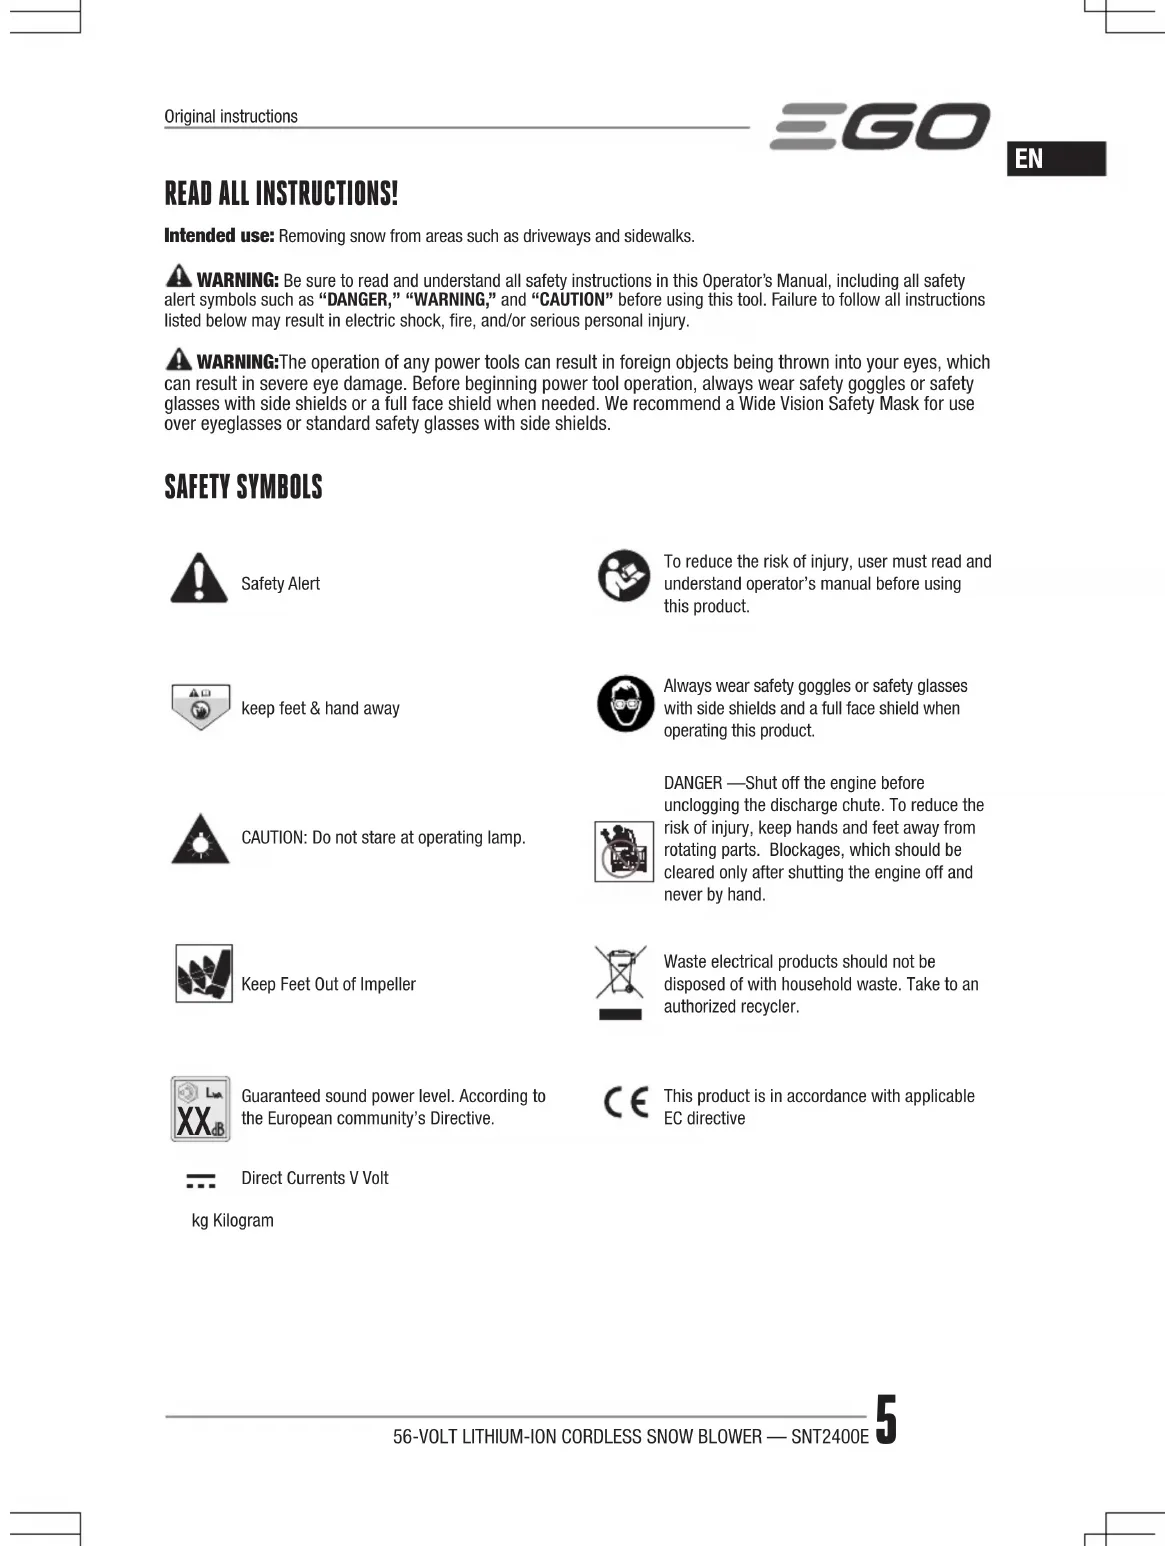
SAFETY SYMBOLS

Safety Alert

To reduce the risk of injury, user must read and understand operator's manual before using this product.

keep feet & hand away

Always wear safety goggles or safety glasses with side shields and a full face shield when operating this product.

CAUTION: Do not stare at operating lamp.

DANGER —Shut off the engine before unclogging the discharge chute. To reduce the risk of injury, keep hands and feet away from rotating parts. Blockages, which should be cleared only after shutting the engine off and never by hand.

Keep Feet Out of Impeller
Waste electrical products should not be disposed of with household waste. Take to an authorized recycler.

Guaranteed sound power level. According to the European community's Directive.

This product is in accordance with applicable EC directive

Direct Currents V Volt
kg Kilogram
SPECIFICATIONS
| Voltage | 56 V--- | |
| Clearing Width 61cm | ||
| Intake Height 51cm | ||
| Wheel Size 38cm | ||
| Weight 68 kg | ||
| Recommended Operating Temperature | -20°C-10°C | |
| Recommended Storage Temperature | -20°C-70°C | |
| Measured sound power level L_WA | 96.61 dB(A)K=1.6 dB(A) | |
| Sound pressure level at operator's ear L_PA | 82.5 dB(A)K=4 dB(A) | |
| Guaranteed sound power level L_WA (measured according to 2000/14/EC) | 98 dB(A) | |
| Valuation of vibration a_h : | Left handle | 0.3 m/s ^2 K=1.5 m/s ^2 |
| Right handle | 0.4 m/s ^2 K=1.5 m/s ^2 | |
DESCRIPTION
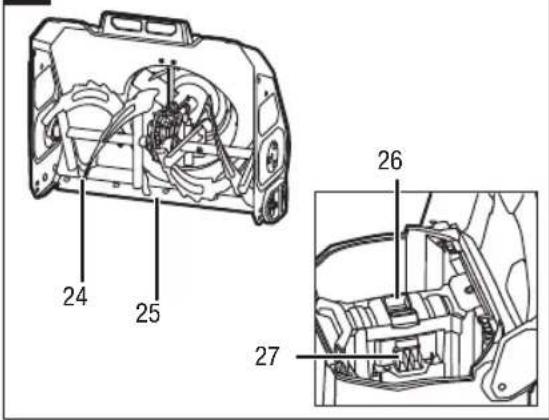
KNOW YOUR SNOW BLOWER (Fig. A1 & A2)
- Side Rail
- Battery Cover
- Battery Compartment
- Wheels
- Skid Shoe
- LED Headlights
- Deck
- Chute Cleaning Tool
- Snow-Discharge Chute
- Chute Deflector
- Rear Handle
- LED Sidelights
- Auger Switch Trigger
- Right Main Handle
- Auger Speed-Control Lever
- Safety Button
- Self-Propel Speed-Control Lever
- Self-Propel Trigger
- Left Main Handle
- LED Light Button
-
LED Indicator
-
Chute-Rotation Handle
- Chute-Deflector Handle
- Auger
- Scraper Bar
- Battery-Release Button
- Electric Contacts
PACKING LIST (FIG. A3) ASSEMBLY
MOUNTING/DETACHING WHEEL
- Position the snow blower according to Fig. B for easier mounting.
- Remove the outer gasket and wheel-locking pin from the shaft.
- Assemble the wheel and outer gasket. Lock them with the wheel-locking pin.
Notice: Check the wheel before installation to make sure the arrow of the wheel is forward (Fig. B).
B-1 Outer Gasket B-2 Wheel-Locking pin
TO INSTALL THE HANDLE ASSEMBLY
NOTICE: The handle assembly requires assembly before operating the snow blower (Fig.C1)
C-1 Locking Knob C-2 Handle Assembly
Loosen the four locking knobs and pull out the bolts. Save them for reassembly.
Choose a comfortable operating position according to your height (Fig. C2). The handle assembly can be set to three different heights (Fig. C3 & Fig. C4 & Fig. C5).
Upper Operating Position as Fig. C3
Middle Operating Position as Fig. C4
Lower Operating Position as Fig. C5
TO INSTALL THE SNOWDISCHARGE CHUTE ASSEMBLY
WARNING: Never operate the snow blower without the complete discharge chute in place.
- Loosen the knob on the inner support pole and remove the bolt (Fig. D1). Save the knob and bolt for reassembly.
| D-1 | $now-Discharge Chute D-2 | Outer Support Pole |
| D-3 | knob D-4 Inner Support Pole | |
| D-5 | Base D-6 Bolt |
- Lift the snow-discharge chute assembly, align the outer support pole with the inner support pole to slide the outer support pole into place. Make sure that the snow discharge chute is seated on the base (Fig. D2).
- Secure the snow discharge chute assembly with the reserved knob and bolt.
OPERATION
TO ATTACH/DETACH THE BATTERY PACK
CHARGE BEFORE FIRST USE.
Use only with battery packs and chargers listed in fig. A4
NOTE: For best performance, we recommend use with two 5.0 Ah EGO 56V Arc-Lithium batteries or with two EGO 56V Arc-Lithium batteries of greater capacity.
When not in use, 56V battery packs should be stored in an enclosed area where the temperature will not drop below -20°C. Optimal charging temperatures are between 5°C and 40°C.
To Attach
Push the battery pack into the battery compartment until you hear a "click" (Fig. E1).
To Detach
Depress the battery-release button in the battery compartment (Fig. E2).
NOTICE: Make sure that the latch on the snow blower snaps into place and that the battery pack(s) are secured to the unit before starting operation.
STARTING/STOPPING THE SNOW BLOWER
CAUTION: Do not attempt to override the operation of the safety button.
WARNING: Ensure that other people and pets remain at least 30m away from the snow blower when it is in use.
WARNING: The auger will continue to rotate for a few seconds after the snow blower is turned off. Allow the auger to stop rotating before starting it again.
NOTICE: Do not rapidly turn the snow blower off and on.
To Start the Snow Blower
- Ensure that the handle assembly is securely adjusted to appropriate height, the side-discharge chute assembly is mounted properly, the chute and chute deflector are adjusted to an appropriate position.
- Insert the battery pack(s) to the snow blower and close the battery cover.
- Press the safety button (A-16) and hold for 1 second, and the LED indicator (A-21) will blink green. Press the auger-switch trigger (A-13) to turn on the snow blower while the LED indicator blinks.
NOTICE: The snow blower can be turned on by the auger switch trigger only when the LED indicator blinks.
NOTICE: The snow blower may not properly start if its batteries' temperature is -20^ or less. If the snow blower doesn't start, remove the battery from the snow blower and allow it to warm indoors for 10 minutes or longer. Reinstall the battery and try again.
To Stop the Snow Blower
Fully release the auger switch trigger.
NOTE: The electric brake in the Automatic Braking Mechanism will stop the auger rotation within 3 seconds of the auger switch release.
Variable-Auger-Speed System
The speed of the auger can be adjusted to control the throwing distance.
To increase/decrease the speed, push the auger speed-control lever (A-15) forwards/backwards.
Variable-Speed Self-Propel System
This snow blower is equipped with variable-speed self-propel capability. it is independent of auger rotation.
To operate the self-propel system without auger rotation, press the self-propel trigger (A-18) to the handle. To increase the speed, move the self-propel-speed control lever (A-17) forwards. To decrease the speed, move the self-propel speed control lever backwards.
To turn the self-propel function off, release the self-propel trigger.
To move the snow blower backward, first stop the self-propel function; pull the self-propel speed-control lever to REVERSE Position, then press the self-propel trigger.
EN
三GO
NOTICE: The speed is fixed when operating the snow blower in reverse with self-propel; the speed-control lever cannot change the speed in reverse.
NOTICE: The snow blower cannot be switched to move backward while the self-propel function is moving it forward.
AUGER SWITCH TRIGGER AND SELF-PROPEL TRIGGER LINKAGE
When the self-propel trigger (A-18) and the auger-switch trigger (A-13) are pressed at the same time then release the auger-switch trigger (right hand), the auger-switch trigger will remain engaged. This feature allows you to adjust the auger speed, self-propelling speed, and discharging direction of the snow while the auger rotates.
To stop the auger, release the self-propel trigger, both the auger and the self-propel function will stop.
CHUTE AND DEFLECTOR ADJUSTMENT
The chute can be adjusted to change both the direction and the distance of the discharged snow to assist you in moving snow away from one area and placing it in another.
The direction of snow removal can be adjusted up to left 100° and right 100°.
Pull the chute-rotation handle (A-22) to the left/right to rotate the chute to the left/right.
The throwing distance of the snow blower is adjusted by moving the chute deflector up or down.
To increase or decrease the distance that the snow is thrown, pull the chute deflector handle (A-23) backward or forward to raise or lower the chute deflector (A-10). Once arriving at the desired chute deflector position, engage the chute deflector handle into the locking slot(F-1) (Fig. F).
LED SIDELIGHTS (A-12) AND HEADLIGHTS (A-6) OPERATION
Press the LED light button once to turn on both the sidelights and headlights.
Press the LED light button twice to turn off the sidelights.
Press the LED light button three times to turn off all the lights.
NOTICE: All the LED lights will turn off automatically if the snow blower is not being operated within 5 minutes.
LED INDICATOR (A-21) ON THE SNOW BLOWER
The snow blower is equipped with a LED indicator to indicate the charge level of the battery pack(s) and the working status of the snow blower.
| LED INDICATOR | Meaning Action | |
| Shinning Green | Snow blower is working properly; each battery has at least 15% of its charge. | n/a. |
| Flashing Red | The battery is nearly depleted. | Stop the snow blower and charge the battery pack(s). |
| Flashing Green and Red alternately | Error | Contact EGO customer service center |
| Shinning Orange | The snow blower stops due to overheating. | Remove the batteries from the snow blower, move them to the shade and cool them at least 15 minutes. |
| Flashing orange | The snow blower is overloaded. | First remove the battery pack, then check and clean if snow has collected beneath the deck. Slow down your pace when snow moving. If this does not work, please contact EGO customer service center. |
| OFF & LED on battery flashing | Battery overheat. (See section “BATTERY HIGH-TEMPERATURE PROTECTION” in this manual) | Remove the battery from the snow blower and wait until the battery pack cools down to approximately 67°C, then reinstall the battery and restart the snow blower. |
EN
SNOW BLOWER OVERLOAD PROTECTION
Your snow blower has built-in overload-sensing elements. When the snow blower is overloaded, the motor will decrease the speed automatically and you will hear the volume of the motor decrease. Slow down your pace or narrow the clearing width, then the motor speed will automatically resume its normal setting. If this remedy does not solve the overload situation, the sensor will shut off the motor automatically and the LED indicator on the snow blower will flash orange. Remove the battery pack(s) from the snow blower, wait 10 seconds, and check to see if there is snow or ice stuck in the auger and deck. If necessary, follow instructions for “Clearing a Clogged Chute”. Reinstall the batteries and restart the snow blower.
CLEARING A CLOGGED CHUTE
WARNING: Always use the chute cleaning tool (A-8) which is attached to the machine as an accessory, do not use your hand.
BATTERY HIGH-TEMPERATURE PROTECTION
The battery pack will generate heat during operation. The heat dissipates more slowly in hot weather. If the battery temperature exceeds 70^ C during operation, the protection circuit will immediately turn off the snow blower to protect the battery pack from heat damage. The status indicator on the snow blower will off, about the LED on the battery, please see 'BATTERY PROTECTION' section in battery operator's manual for details. Release the bail switch, wait until the battery pack cools down to approximately 67^ C, then restart the snow blower.
OPERATING TIPS
DANGER: Never use a snow blower on frozen lakes, rivers, or similar surfaces. Death or serious injury could occur if the ice breaks.
DANGER: Never use the snow blower on a rooftop or other unstable surface, which can result in death or serious personal injury.
WARNING: Do not use snow blower on ice, which can cause the operator to slip and fall, resulting in possibly serious personal injury.
WARNING: Do not wear loose clothing, scarves, or jewelry. They can be caught in moving parts and cause death or serious personal injury.
WARNING: Keep all snow discharge pointed away from all electrical devices to reduce the risk of electrocution or electric shock.
WARNING: Never point the snow blower or discharge chute in the direction of people or pets. Thrown snow or other objects can cause serious personal injuries.
WARNING: Make sure that the area to be cleared is free of stones, sticks, wires, gravel, and other objects that could be accidentally thrown by the snow blower in any direction and cause serious personal injury to the operator and others.
■ If the unit comes in contact with any type of obstruction or debris during use, stop the snow blower, remove the battery pack(s), remove the obstruction, and inspect the unit carefully for damage before proceeding.
WARNING: Never reach into the discharge chute or place any body part in front of the snow blower when the unit is operating or when the battery pack(s) are installed. Always ensure all moving parts have stopped and the battery pack(s) have been removed before clearing any obstructions. Failure to follow these instructions can result in serious personal injury.
■ Take notice of the direction of the wind before beginning. When possible, discharge snow in the same direction as the wind to prevent snow from being thrown back into your face.
■ Some parts of the snow blower can freeze under extreme weather conditions. Do not attempt to operate the unit with frozen parts.
- When finished, allow the motor to run for an additional few minutes to prevent moving parts from freezing, then turn the chute rotation handle back and forth several times to free it from any ice buildup. Make sure to clean off any snow and ice from the base of the chute.
In snowy and cold conditions, some controls and moving parts may freeze. Do not use excessive force when trying to operate frozen controls. If you have difficulty operating any control or part, start the machine as "STARTING/STOPING THE SNOW BLOWER" section shown and let it run for a few minutes.
MAINTENANCE
GENERAL MAINTENANCE
Avoid using solvents when cleaning plastic parts. Most plastics are susceptible to damage from various types of commercial solvents and may be damaged by their use. Use clean cloth to remove dirt, dust, oil, grease etc.
EN
三GO
LUBRICATING THE MACHINE
All of the bearings in this product are lubricated with a sufficient amount of high grade lubricant for the life of the unit under normal operating conditions. Therefore, no further bearing lubrication is required.
REPLACING AND ADJUSTING THE SKID SHOES
- Remove the batteries.
- Loosen and remove the nuts, gaskets and the skid shoe from the screws (Fig. G1).
- Replace the skid shoe with a new one, if necessary.
- The height of the skid shoes can be adjusted according to the actual snow conditions without thoroughly removing the nuts, just loosen them, adjust the skid-shoe position and then retighten (Fig. G2).
REPLACING THE SHEAR PIN
The shear pins are located in the auger shaft (Fig. H1). They aid in absorbing the instant stall torque when the auger strikes obstacles during working and protect the gearbox and motor from damage.
H-1 Auger Shaft H-2 Shear Pin
To replace the shear pins, remove the batteries, remove the broken shear pin from the auger shaft and replace it with new bolts.
NOTICE: Two additional shear pins are stored onto the chute assembly, replace with the new one if the original one is broken (Fig. H2).
STORING THE SNOW BLOWER
CAUTION: Ensure that all melted snow that may drip from the snow blower is properly wiped up to prevent a slip and fall hazard.
■ Remove the battery pack(s) and store in a secure location out of the reach of children.
Before storage, wipe any moisture, dirt, or debris from the battery area.
■ Wipe the snow blower with a clean dry cloth.
■ Check all nuts, bolts, knobs, screws, etc., for tightness.
■ Inspect moving parts for damage, breakage, and wear. Have repairs made on any damaged or missing parts.
■ Store the snow blower in a clean, dry, enclosed place out of the reach of children.
■ Do not store near corrosive materials such as fertilizer or rock salt.
Protecting the environment
Do not dispose of electrical appliances as unsorted municipal waste, use separate collection facilities.
Contact your local government for information regarding the collection systems available.
If electrical appliances are disposed of in landfills or dumps, hazardous substances can leak into the groundwater and get into the food chain, damaging your health and well-being.
TROUBLESHOOTING
WARNING: Always remove the battery pack(s) when servicing or transporting the snow blower. Always protect your hands by wearing gloves when performing any maintenance on the snow blower auger or scraper.
| PROBLEM CAUSE SOLUTION | ||
| Snow blower is not starting. | Battery charge is low.The auger-switch trigger is not depressed at the moment of the LED indicator flashing green.The auger is frozen by snow or ice.The battery is overteated. The LED indicator on the battery flashes orange or shines red (see the section “BATTERY HIGH-TEMPERATURE PROTECTION” in this manual). | Charge the battery.Press the auger switch trigger when the LED indicator blinks. If the LED indicator stops blinking, the snow blower will not be response to the pressing of auger-switch trigger.Remove the battery pack(s) firstly, use the supplied chute clean tool to clear the snow or ice that obstructs on the auger. Restart the snow blower.Remove the overheated battery from the snow blower and wait until the battery pack cools down to approximately 67°C, then reinstall the battery and restart the snow blower. |
| The motor is on but the auger does not turn on. | The shear pin is broken. | Replace the shear pin following the section “REPLACING THE SHEAR PIN” in this manual. |
| The LED light button is insensitive to the first pressing. | The internal self-checking process causes a slight delay in the first keystroke response. | Press the LED light button and hold for 1 second. |
| The LED indicator on the battery keeps on after the snow blower auger stops working or self-propel system turns off. | The electric circuit is in standby for next restart. The LED will shut off automatically if the snow blower is not operated in 5 to 10 mintues. | Just leave it or remove the batteries from the battery compartment. |
WARRANTY
Please visit the website egopowerplus.com for full terms and conditions of the EGO Warranty policy.
LISTA DE PEÇAS (IMAGEM A3)
MONTAGEM
MONTAR/DESMONTAR A RODA
LIMPAR UMA SAÍDA OBSTRUÍDA
LUCI LED LATERALI (A-12) FANALI LED (A-6)
BYTE OCH JUSTERING AV MEDARNA
GENERELT VEDLIKEHOLD
A CSOMAG TARTALMA (A3 ÁBRA)
ÖSSZESZERELÉS
A KERÉK FEL- ÉS LESZERELÉSE
A NYÍRÓCSAPOK CSERÉJE
Current continuu V Volt
kg Kilogram
SPECIFICATII
INDIKATOR LED (A-21) NA SNEŽNI FREZI
UPOTREBA LED BOČNIH (A-12) I PREDNJIH SVJETALA (A-6)
356000000 356000000 356000000
RUKOVANJE LED BOČNIM SVETLIMA (A-12) I PREDNJIM SVETLIMA (A-6)
Pritisnite dugme za LED svetla jednom da biste uključili i bočna i prednja svetla.
Pritisnite dugme za LED svetla dva puta da biste isključili bočna svetla.
Pritisnite dugme za LED svetla tri puta da biste isključili sva svetla.
H-1 n7n 0in H-2 0t1s