Carbide 100R - Desktop Computer CORSAIR - Free user manual and instructions
Find the device manual for free Carbide 100R CORSAIR in PDF.

| Product type | Mid-tower computer case (system unit) |
| Brand | Corsair |
| Model | Carbide Series 100R Silent Edition |
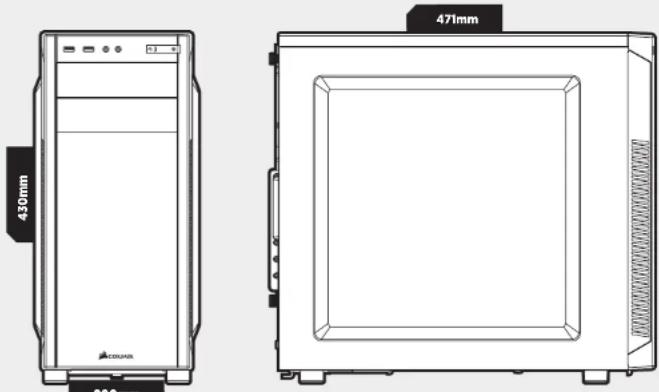
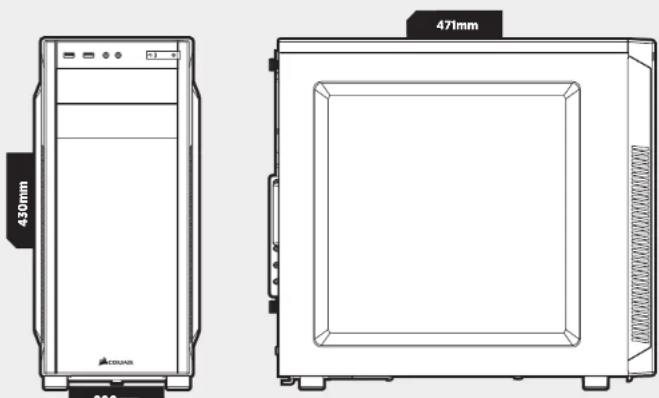
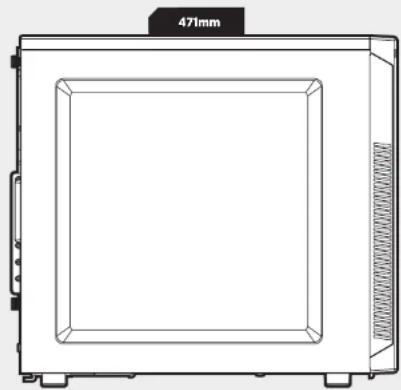
| Dimensions (L x W x H) | 471 x 200 x 430 mm |
| Weight | 4.9 kg |
| Required power supply | Standard form factor power supply (not included) |
| Max power supply length | 260 mm |
| Max graphics card length | 414 mm (upper slot), 275 mm (lower slot) |
| Max CPU cooler height | 150 mm |
| Fan positions | Front: 2 x 120 mm or 2 x 140 mm; Rear: 1 x 120 mm |
| Included fan | 1 x 120 mm 3-pin |
| Storage bays | 4 tool-free 3.5/2.5 inch trays + 1 tool-free 3.5/2.5 inch cage |
| Optical bays | 2 x 5.25 inches with tool-free removable covers |
| Front I/O connectors | 2 x USB 3.0, headphone/microphone jack, Power and Reset buttons |
| Dust filter | Removable filter for bottom power supply |
| Material | Steel, plastic |
| Color | Black (interior and exterior) |
| Maintenance and cleaning | Remove side panels and front panel to access components; bottom dust filter removable and washable |
| Safety | Compliant with European directives (RoHS, WEEE) |
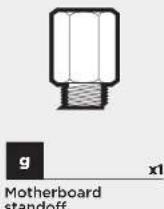
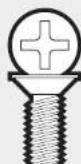
| Spare parts and repairability | Accessory kit included (screws, cables, standoffs); parts available via RMA at support.corsair.com |
| General information | Silent mid-tower case, elegant design, tool-free mounting for most components |
Frequently Asked Questions - Carbide 100R CORSAIR
User questions about Carbide 100R CORSAIR
0 question about this device. Answer the ones you know or ask your own.
Ask a new question about this device
Download the instructions for your Desktop Computer in PDF format for free! Find your manual Carbide 100R - CORSAIR and take your electronic device back in hand. On this page are published all the documents necessary for the use of your device. Carbide 100R by CORSAIR.
USER MANUAL Carbide 100R CORSAIR
All rights reserved. CORSAIR, the sails logo, and Carbide Series are registered trademarks of CORSAIR in the United States and/or other countries. All other trademarks are the property of their respective owners. Product may vary slightly from those pictured.
49-00M02 AB

CORSAIR
CARBIDE SERIES*
100R
SILENT EDITION
INSTALLATION GUIDEGUIDEGINSTALLATION INSTALLATIONSANLEITUNG INSTALLATIEHANDLEIDING GUIDA ALLINSTALLAZIONE Guia de Instalacion GUIA DE INSTALACAO PRZEWODNIK PO INSTALACJI
Table of Contents Case Specifications
Congratulations 1
Case specifications 2
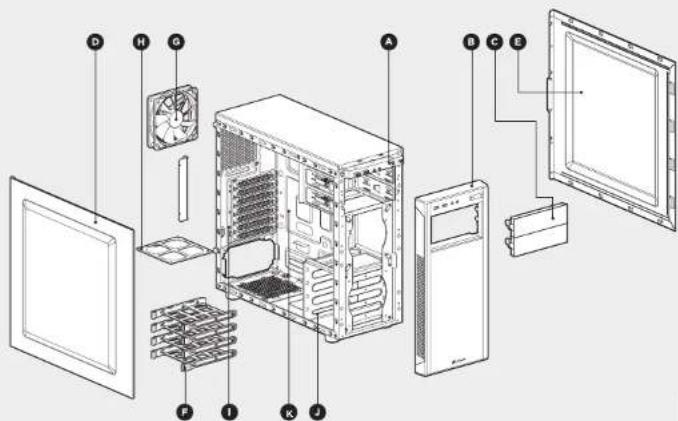
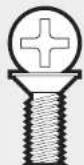
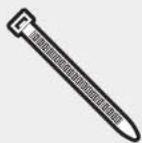
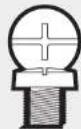
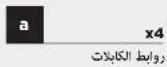
Accessory kit contents 3
Case features 4
Removing the slide panels 5
Instaing the motherboard 5
Installing PCI-e/PCI card(s) 6
Installing the PSU 6
Removing the front fascia 7
Installing an ODD 7
8
Installing a second front fan 8
Powering the case fans 9
Instaing the front I/O connectors 9
Frequently asked questions 10
Congratulations!
Thank you for purchasing the Carbide Series
100R Silent Edition Mid-Tower PC Case.
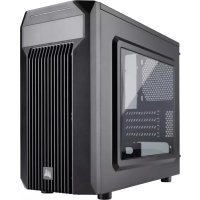
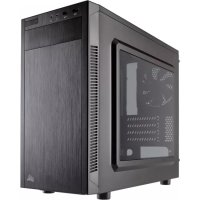
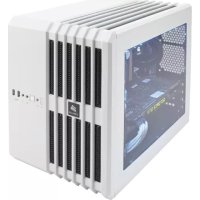
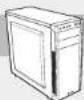
The Carbide Series 100R Silent Edition mid tower PC case lets you hide a high-powered, killer gaming rig inside of a chassis that would look at home in any professional environment. It's easy to customize with plenty of tool-free installation options, highly expandable with extra fan ports and drive bays to support SSDs, and performance-minded with USB 3.0 support and direct airflow to the GPU. The Carbide Series 100R Silent Edition looks simple and elegant from the outside, but the inside provides you with all the options you need for an amazing system.
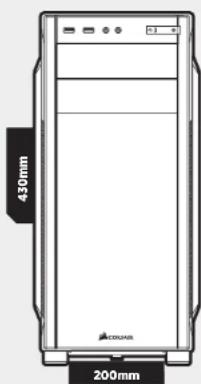
Length 471mm
Width 200mm
Height 430mm
Weight 4.9kg
Maximum GPU length:
Top slots 414mm
Lower slots 275mm
Maximum CPU cooler height 150mm
Maximum PSU length 260mm

CARBIDE SERIES 100R SILENT EDITION
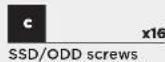
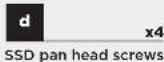
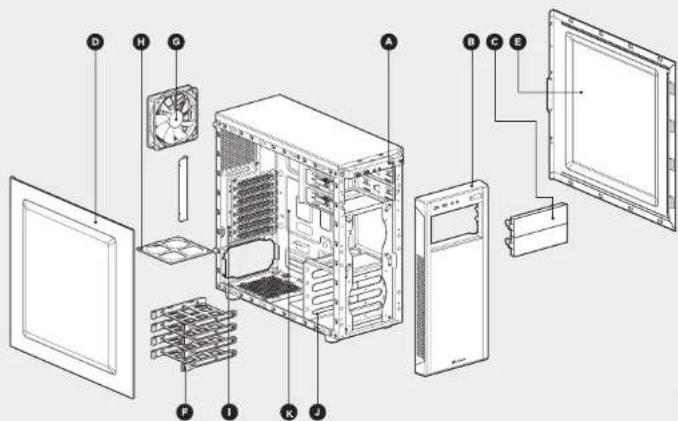
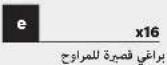
Accessory Kit Contents


Case Features
I/O Panel (x2 USB 3.0, Headphone/Mic, and Power/Reset)
Removable front fascia
x2 Tool-free removable ODD covers
Solid side panel
Solid side panel
x4 Tool-free 3.5" hard drive trays with 2.5" compatibility
3-pin 120mm Fan
Bottom PSU dust filter
PCI-e screw rail
x1 Tool-free 3.5" hard drive cage with 2.5" compatibility
CPU backplate cutout

CARBIDE SERIES 100R SILENT EDITION
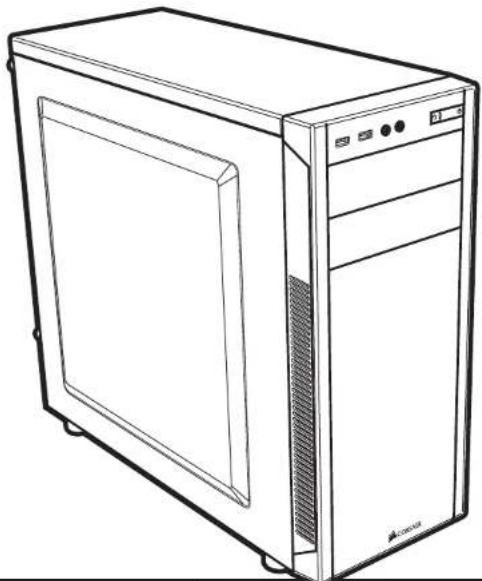
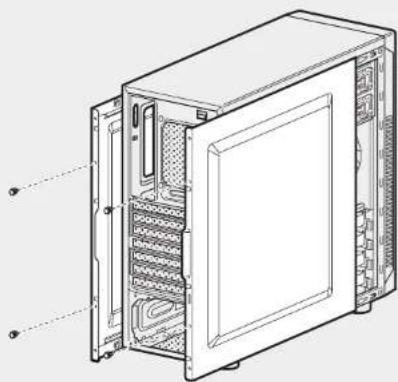
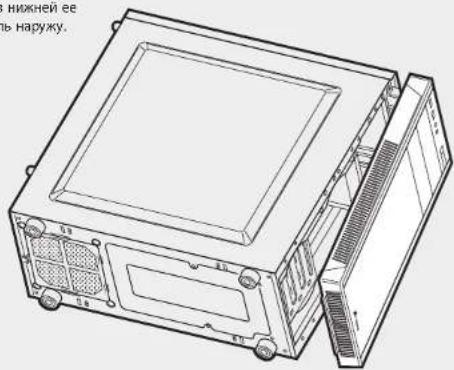
1. Removing the Side Panels
Simply remove the
thumbscrews then slide the side panels back and out.
Note: CORSAIR recommends removing both side panels and setting them aside when building your system to avoid accidental damage. Both side panels are interchangeable and should be removed to reduce clutter.
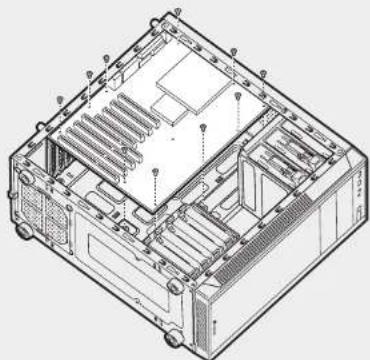
2. Installing the Motherboard
First, install your
motherboard's I/O shield
(see your motherboard s
manual for guidance)
Align your motherboard with the pre-installed standoffs.
Use the provided screws.
to secure the
motherboard to the
motherboard tray.
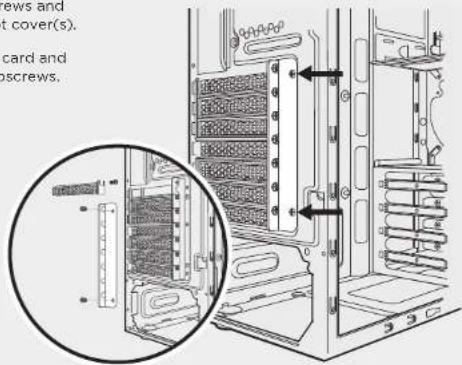
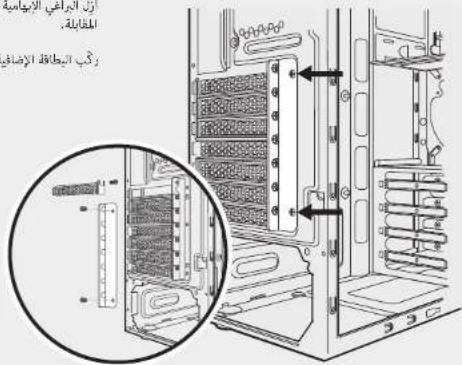
3. Installing PCI-e/PCI Card(s)
Remove thumbscrews and corresponding slot cover's
Install the add-on card and secure with thumpscrews.
4. Installing the PSU (Power Supply Unit)
Position the PSU on the
bottom of the case then align
the case holes and secure the
PSU with screws provided with your power supply.

CARBIDE SERIES 100R SILENT EDITION
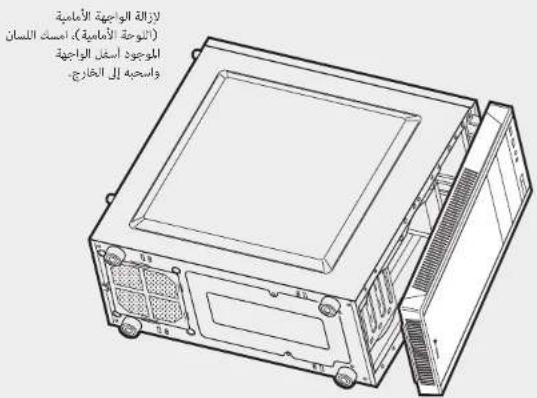
5. Removing the Front Fascia
To remove the front fascia (front panel), grasp the tab located at the bottom fascia and pull outward.

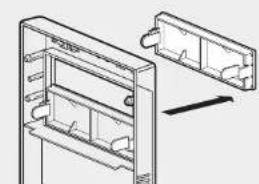
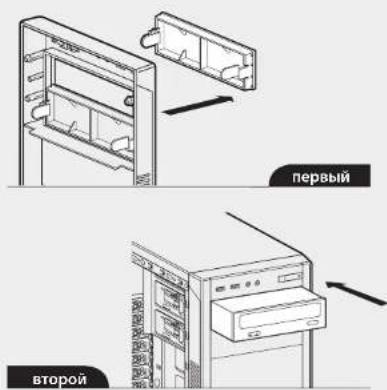
6. Installing an ODD (Optical Disk Drive)
First, remove the front panel 5.25^ drive bay cover then slide the ODD into the drive bay until the tool-free latch clicks, securing the drive. To release an optical drive, push in the tool-free tab then pull the drive outward.

First
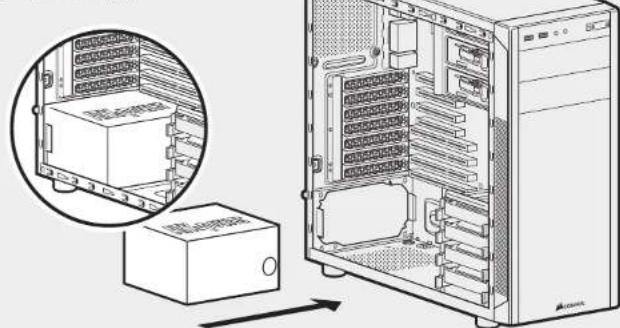
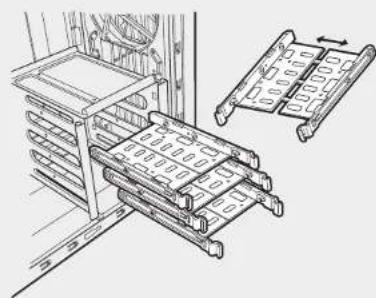
7. Installing SSDs and HDDs
The four included drive trays support both 3.5^ and 2.5^ devices.
To install a 3.5^ HDD, pull the drive tray from each side to extend the mounting points. Next, place your HDD onto the tray and push the drive back to a close. No screws are necessary to secure the drive onto the tray.
To install a 2.5" SSD, place the drive on the tray and use the provided screws install the SSD.

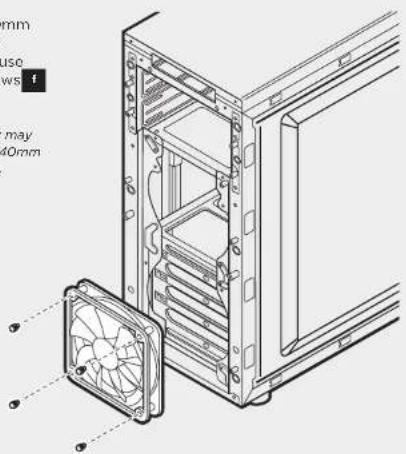
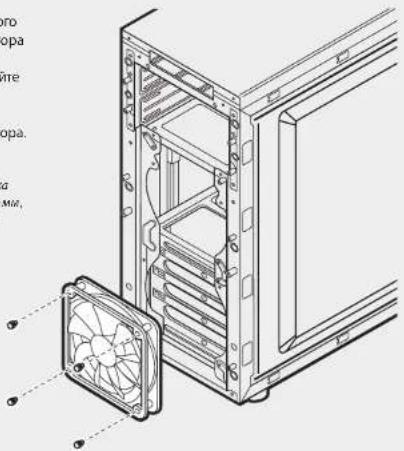
8. Installing a Second Front Fan
To install an additional 120mm or 140mm fan, remove the front fascia (step 5) then use the provided long fan screws to mount the new fan.
Note: To maximize airflow you may install either x2 120mm or x2 140mm fans in the front of the chassis.

CARBIDE SERIES 100R SILENT EDITION
9. Powering the Case Fans
- Connect the SATA power connector to the PSU SATA power cable.
- Connect the 3 or 4-Pin fan connector to the case fan header.
- Push the fan speed selector button on your case to toggle fan speed.

3
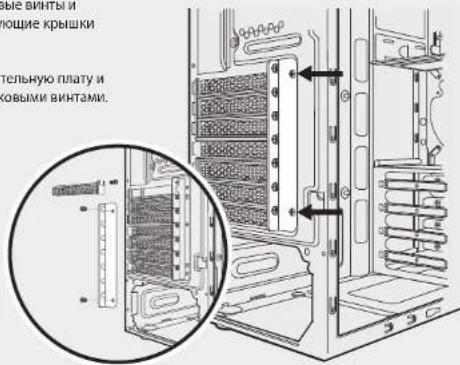
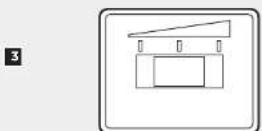
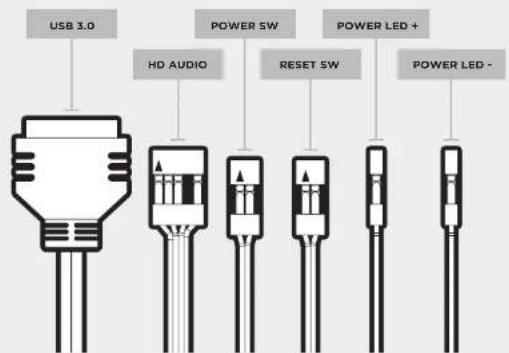
10. Installing the Front I/O Connectors
See your motherboard's manual for front panel header locations and pin-outs.

Frequently Asked Questions
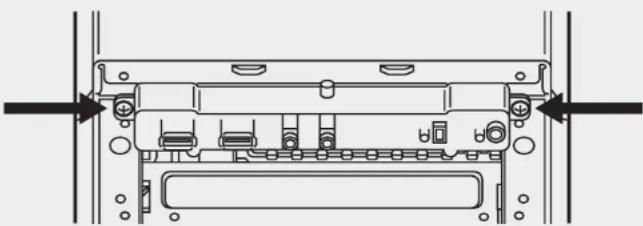
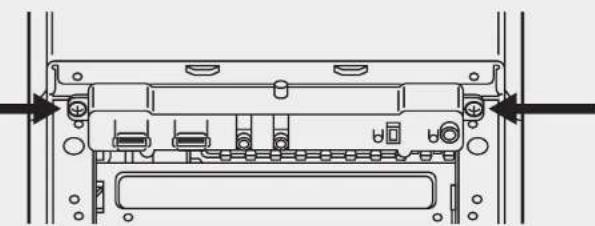
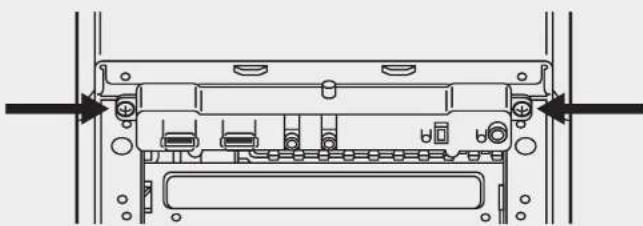
- How do I remove the I/O Panel?
If needed, you can uninstall your I/O panel by removing the front fascia (step 5) then unscrewing the 2 screws at each side of panel. (see drawing)
- Does the polarity matter with the I/O panel's power and reset header? No, only the LED headers.
- Who should I contact if I received my case damaged or one of the fans is no longer working?
Please go to support.corsair.com and request an RMA so that we can replace the damaged part(s).
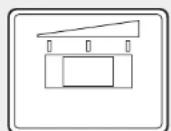
- Where can I mount a fan?
| Fan Mount Locations | |
| Front x2 120mm or x2 140mm | |
| Top x | |
| Rear 120mm | |
| Bottom x | |
| Side x | |
| Mid x | |
To learn more about this case visit the product page at corsair.com.

CARBIDE SERIES 100R SILENT EDITION
Maximale PSU-length 260mm

CARBIDE SERIES 100R SILENT EDITION
Inhoud accesoireskit


per PC Carbide Series 100R Silent Edition.
mid-tower Carbide Series 100R Silent Edition.
Remova os parafusos e as tampa(s) de slot correspondente(s).
Series 100R Silent Edition Mid-Tower PC.
Obudowa Carbide Series 100R Silent Edition mid tower
x4 Dlugie s Ruby do wentylatorow
Series 100R Silent Edition fopMata Mid-Tower.
Kopnyc Caribe Series 1008 Silent Edition opomata Mid Tower
Nop30BONET KpBbATCHORCUHbTaBHy BbKOOPnO3BODHTBHy
NPOBYOCTAHCNUO BHUYI KOPNYCA, BHEUHNI NID KOTOPORO
NODXoDIT DIAIOBIO pOPOEccNOHaBHO CpeB. Ero KOHOFpyaHIO
NEKTOI HMeEHRTC NOMOULBMOHCKETBA KOMNOHEHTOB, KOTOPBLE
yCTAHABINBAOTCA 6E 3CNIOB30BAHNHICHTPMEHTOB. ERO
BO3MOXHOCTN NEKTO PACuHHPRETC B6rOAnDPARDOONHNTeBLHBM
NQPAMBEHNTAAIMN IN DICKOBHM OTCeKAM PRAOB6CEHENH
NOIDEPKKN TBEPOTeBLHbIX HAKONITENE. KpOME TOLO, ECTB
BO3MOXHOCTN NOPEKKN USB 3.0 IN OPAHNAJIMN PMAIMO
BO3DyUNHO NOTOK K rpaFneckOMY pOueceCOPP. Kopnyc Caribe
Series Silent Edition 1008 BvRnAUT nPoCTo I NfERaTHO
ChApKNI, HO BHTPN PpeOcTabnT RCE BO3MOXHOCTN DIAO CO3DAHNA
3ameaTeHNBOH CTANHNI.
AaHa 471mm
UmpuHa 200mm
BbCota 430mm
Bec 4.9kg
MaKmMaBHa dHnHa rpaHneckoro npoecoppa
BepxHne pasbembl 414mm
Huhhie paaee 27mm
Makcmahba HbCota BHTnTota 150mm
MaKcHmAbha pMHa HCTOCHKa nHTAH. 260mm
CARBIDE SERIES 100R SILENT EDITION
Copepxnmoe komnlekta akceccyap08


BNTOBJRA MaTePunCKOINaTbI MnJNKeCTKINDcKOB

BIBTOB DJI TBePDoTeBbHbIX MIN OINTWECKHX IMCOKB


ДИЛПБИХВЕТСТДАЙ
BEVIHITALTOPOB


Oc6eHHocnKopnyca
PAnenbBbOda-BbIBDa(2pa3bemaUSB3.0,HayuHmK/MnKpOhoN,NTaHne/c6pcoc)
CbeHna nepeHnnaHb
2KpbIiKN ONTHueCKHX DnCKOB,CHHMAeMbIX 6e3 INONB3OBAHHINHCTpyMeHTOB
TBePdb6okobnaHem
TBePdbB6okobn naHnn
4 0TECKAДIJI KECTKHX 3.5-IOIMOBIXI DHCIOB,COBMECTMIBE C2.5-IOIMOBIMY CTPOTRCTBAMN
3-KOHrAKThbM 120-MM BEHTINATOP co
HMHHHn bInBeBOF mBtp HcToHnKa nTaHn
HapabnauaPcI-e cBHTOBbIM KpenneHem
1 0TCEKIAJNEKTCHX3.5-DOIMOBBXHINCKOB,6E3OTBEPOTHHME,COBMCTHMME C 2.5-DIOIMOBBMYI YCPTOPCTBAM
Bbipe3 nA BENTnAToPApnoecccopa
CARBIDE SERIES 100R SILENT EDITION
1. CHATNE 60KOBbIX naHEni
PINOCTO OTOAEHHTE 6APAUKOBIE BNTb, CDBINBTE BOKOBIE NAHEIN M CHIMMATE IX.
Pnnpnnmue. So 0u6ebokohne cyu7yhuMn npnepenrnnnnpnncnncnncnncnnnnnnnnnnnnnnnnnnnnnnnnnnnnnnnnnnnnnnnnnnnnnnnnnnnnnnnnnnnnnnnnnnnnnnnnnnnnnnnnnnnnnnnnnnnnnnnnnnnnnnnnnnnnnnnnnnnnnnnnnnnnnnnnnnnnnnnnnnnnnnn nn n 0u6abnnae 8b cnpomny bocokoe naneeo Obe bokobne nanehu Eko2moaemdoanmumn m u oonmnhn 60000000000000000000000000000

2.YcTaHOBKaMaTePNHCKOINnAaTbI
CHaHAn yCTAHOBHTAe 3AryuHKO nTOPOB BTOBBOBBA DnA MATEPHNCKI PnTbIcM. HfOPMAUIN B YPKOBDCTBE NO MATEPHNCKI (Pnate).
BbipOBHnRE MATEPHNCKy PnATy C npDeBApNTeBHO YCTAHOBNEHBMn ONOPHBMM N3OINPFOUOMM BKHMTAM.
Inonbnytne npedostcbrnHbte BKNTH KpennnHMA TATEPHNCKI pntbls b ee oTeke.

3.YctahOBka nnat PCI-e/PCI
OBepHATE bapauKobie BHTbI CHMHITE COOTBETCTBYOUI KpbuK PAHMOB.
Yctahobite dononhntenbhyno nlyaTo a2kpeIe ne cepaIkoBbIM BHNTAM
4.YCTaHOBkaMCTOHTHnKaNTMaHm
ПОДКИТЕ ДICTИЗНМДСТНИЕН НИХИКHIО NOHALEK KOPYNTCA,3ATEM БВОРБЕМЕ thro COTBEPCTMANN В.KOPYNTA 3AKPENITTE пгоростделовимьи ВИЗТМА.

CARBIDE SERIES 100R SILENT EDITION
5.CHTne nepedne naenn
Длг chintупегдемн NaHem
BOsMHTeCb 3a БсTуВ nHxHnEe
QuHn cNNotHtMn NaHem NaHyKy
6.yCTaHOBka ONTMuecknx DNCKOB
Pnpege bcerO,CHMNTe KpMbki
otcKa pIa 5.25" dNcKa hA
nepeHd naiHn,3atE 3aDkHnraTe
OTNIKcckn Dnk B OTcKn
DNCKa, NOKa OH He 3aQHcKpyTcA
3aauNkAM;OTbPKa HE TpeBcyTcR.
IINs IINaeueHNOTNeKcKO DNCKa
OTBePKa HE TpeBcyTcR - HAKmTIe
NA HbYbOK NbBHnTReT Dnck HApXy.
7.yctahOBKa TBepDoTeNbHbIX XKeCTKINX DnCKOB
YeIbpe IMeEOJIIMXCAIINCKOBHXOTCEKAI NOIIJeKHNBAIOK TAK3.5-TAKN2.5-IOHMOBIEIINCK
JYCTAOHBOK 3.5-IOHMBOO
JXCTKO TO JCKBA BHTBE TCKOBBNIOTCEK C KAKDOI CTOPOHJI BY
PACUPIREIN MECTA YCTAOHBOK.
3ATEM NOMETCTIE KECTKNIK DNNCK
B OTCEK H ZADBHNTE DNNK DIA
KAKDTHN.
TCKBAQUNI.
OTCKEK BHNTI HE TpeBGYOTCA.
IINYCTAHOBK2.5-IOIMMOBOF TBEPODHTBHOH NCKA NOMCTNE ERO BOTcN HCNONb3yTE IpNDQCTANHEBb BHTblI DNN YCTAHOBK DNCAe
8.YctaHOBKa BTOPOrO nepeDHeRo BeHTnIATopa
JyctahOBKa DononHHTenbHO 120-MM MM 140-MM BEHTINBtopa CHIMITE nepeDHHO NAHEn (JeCTBNE5,3aTeM KcNOnbSyte IpeDcTANHe HBeHHnBE BHTINBtOPe BoNTI JIJI MONTAKA HOBO BCHTINBtopa
PIMUNAMNIAJ, JINO DCMUHKEHJA
MOKUMAMHOOI 03ADYUMHOOM NOMOA
MONHOYMANOHUMuho 120 MU
MOu 140-MuMMHUMoA
peRcHNOuCnMuKpNyCA

CARBIDE SERIES 100R SILENT EDITION
9. NITAHNE BENTHINATOPOB KOPNYCA
1.ПОДКИНDE PASTBEN TINHAN SATA K PASTBEN SATA H BOKOE TINHAN.
2. Podknoiweite 3- uin 4-KoHTAKTHN pa3bEm BeHTnIToPA Kpa3bEMy BeHTnIToPA Kopnyca.
3.ДЯретураьоганя ckopoc'tn
Врацевен BENTNITROPA
HAMMITE pepeknIOUATen
Hb6opa ckopoc'tn BEHTNITROPA

10.YctaHOBAKepeDnHexpa3beMoB BBOda/BbIODa
Pacononokhenpa3bEmOBN KONTAKTOB DnpepeHn naHem CM. B pykoOboCTBeNo MATEPHICKI ONTAE.
Yactro3aabaemble Bonpocbi
- KaK CHaTb NaHEnb BBOa-BbBOa?
PnI Heo6OJMOCT MoXHO YIaJIbTH NaHEnb BBOa-BBBOa,CHH NpeCHeIO naHEnb (JeTcme 5) n OTKpyTN 2 BHTA C KaKJOI CTropHOI naHEnn BBOa-BBBOa.
-
IMeT TII 3HaeHHe NOpAHOCTb Pn HcNpB3OBOAH pa3bema nHTAHm C6pOca NaHEn BBOa-BBbOa? He, OHa BaKaH TaONbKO DnCETODIOHbIX pa3bEmoB.
3.KKOMY Heo6xOmo 6opatntbce,ecn KOpNc nOnyeh NoBpeHHeHHm Hm OHN INB BENTINPOB 6OBue he pa60aTe?
PeepnHTe HA cain support.com n 3anpcote papeHne Ha Bo38pat MATEpHAnor (RMA),vTOBbM CMOTN 3aMeHbI NbpeKJENHeHbV cactH. -
Ie moXHO yCTaHOBnTb BEHTnTnTOp?
414mm
275mm
150mm (CPU)
260mm

CARBIDE SERIES 100R SILENT EDITION
Uull 2g0000000


a1020000000000000000000000000000000000000000000000
b Cw#i ddd jy jyj y

PCI-e/PCI(uU)23U,sj.3
2011()
(PSU) 1
2a 1 a 1 1 1 1 1 1 1 1 1 1 1 1 1 1 1 1 1 1 1 1 1 1 1

CARBIDE SERIES 100R SILENT EDITION
aaiyaiyaiy1.5
(ODD)
jao jao jao jao jao jao jao jao jao jao jao jao jao jao jao jao jao jao jao jao jao jao jao jao jao jao jao jao jao jao jao jao jao jao jao jao jao jao jao jao jao jao jao jao jao jao jao jao jao jao jao

(HDD) aUuJ 133 (SSD) 133 133 133 133 133 133 133 133
kaii 50g 315g 26g 24g 22g 20g 18g 16g 14g 12g 10g 9g 8g 7g 6g 5g 4g 3g 2.5 g 2.0 g 1.5 g 1.2 g 1.0 g
C 35.5 100000000000000000000000000000000000000000000000000000000000000000000000000
a 250 250 250 250 250 250 250 250 250 250 250 250 250 250 250 250 250 250 250 250 250 250 250 250 250 25

2.15 2.16120g, y S J8
05 5(5 aal) aalal aal alal alal alal alal alal alal alal alal alal alal alal alal alal alal alal alal alal alal alal alal alal alal alal alal alal alal
aag aalb0g yy/16y 4y 4y 4y 4y 4y 4y
LED
g (RMA) support.corsair.com
()
100
| x2 120mm or x2 140mm | yall yall |
| x | yall yall |
| 120mm | yall yall |
| x | yall yall |
| x | yall yall |
| x | yall yall |
corsalr.com gge ge gai iao o jg j a dell e Jg o j
CARBIDE SERIES 100R SILENT EDITION
目錄機箱規格
After the Implementation of the European Directive 2012/16/EJ in the national legal system, the following applies:
- Electrical and electronic devices may not be disposed of with domestic waste.
Consumers are obligated by law to return electrical and electronic devices at the end of their service lives to the public contacting points set up for this purpose of point of arrival. Details to this are defined by the national law of the respective country. This symbol or the product, the instruction manual or the documentation on the product is subject to these regulations. By recycling, reusing the materials or other forms of utilizing old devices, you are making an important contribution to protecting our environment.
FR REMARQUE CONCERNANT LA PROTECTION DE LIENVIDONNEMENT
EMEIMHJN IINPOATZIA TOY REPARABONDIO
Mnre crrn rnpnnrnnn nnnnne 05mss 2012/19, Lrs othre
eepes eeppeeppeeppeeppeeppeeppeeppeeppeeppeeppeeppeeppeeppeeppeeppeeppeeppeeppeeppeeppeeppeeppeeppeeppeeppeeppeeppeeppeeppeeppeeppeeppeeppeeppeeppeeppeeppeeppeeppeeppeeppeeppeeppeeppeeppeeppeeppeeppeeppeeppeep peppp
TE CREVYK KORUMAYA LIKINSK NO
Ulsa uluk haksir systemen 2012/79/Lu syag Avrapa Direktrini kablulay bilgic pacher gecerdik. -Bilgic ve elektronik chtarat esaki akte bilkite barfar erisleni. Taktiklerkan keran gizdik; elektronik ve elektronik chazak kalimuri darmirkiran zaru gelaligho zu darilert sezaltafarnibai bu ane kurtuluri en kumar elpali emelirene direkum zeruznaya kuzluyi kuzluyi kuzluyi kuzluyi kuzluyi kuzluyi kuzluyi kuzluyi kuzluyi kuzluyi kuzluyi kuzluyi kuzluyi kuzluyi kuzluyi kuzluyi kuzluyi kuzluyi kuzluyi kuzluyi kuzluy i kuzluyi kuzluyi kuzluyi kuzluyi kuzluyi kuzluyi kuzluyi kuzluyi kuzluyi kuzluyi kuzluyi kuzluyi kuzluyi kuzluyi kuzluyi kuzluyi kuzluyi kuzluyi kuzluyi kuzluy
EBERMINKING ON MILJBESEKYTTELLE
Fiber implementation of FI, direciv 2019/19/FU1 dat natunatiori.
purifkate system at fanglere gondarle.
Elektronik og elektronikodem eredn i kike baroteksek sommert
davon eletrode in der fanglere.
Fungtigern wirksam fortgegen, fil at inersestelektronik og elektronikodem eredn und styrten at de pustere kredite, veiodet. til da afferentia indingendesdar, er den erostat ist. tida fordare.
Gyiprjeringen, dem die lindematien im national enginierung liede.
respective terc. Cecst sybros por praktiket, brugmenteinnaten
aler embolizan nighher, at at protet or underlat sioe
berne anrederungen des beziehungszeitvorsatzes von misterlichen wener
anere forner und adforvatwic geckte stener cngter du la he grad it at basketya vora snila.
SVM ANMARKING MOLIKSYDKEF
After lepimentaranting van EU directly 2012/08/FFU dit nationatiale
raltbysvermet goeder fidele
Eelectrakte en elektronische onder firshtasseraas mas
Hushfaden.
Koraderment in ang: lang sylgegreci at telle aeternally
coleciteke et elektronikne cicheter till e cortefonts
upszamilngosposten sour oprednates for daa indandie
forschungssolll. Dafar erding datte fielmabla definiens
evopocipatiin de lae rupicncae, ducan deo.
sony aan produkt, buccarvisingen eler forcoingenin Indirecr
att en productum anlatis nata de taie regelwerk. Baeur atertming
daversoning van material otler ande orner am enveening
van genia anherer, biserat zu ill att dyodys var iligre.
5K POZANMA O OCHRANE VOTVENEHO PROSTEDRA
Po impeoemerti eukoslavn smarica 2013/18/EU o
smlrnnnne prrnnoe xybrin paluia hua nsmnnm
- lichtchovskii zhenadema as reina bivdovodspu
kemunymn adadom.
Zelokomrn kran uzhdni proximn vnilt akhikke
ckondronics zanedria ce u konendon cnc prudenccev
Fivovacna varhevi zbanie miesta, krala su yvovcna na
vivacnna zhanovnna zhenadema a krala nsmnna
vivatsternychnich pravochi protocipoch danki knary. Teno
symon na vizyka, v pravolnachnich prudice alebo na chala
naiy vyzhakn podilna nyi tiropanen. Tachyckia,
optovnyn vizychni matranskiy aleb icnyi narni fomert
sozhnye vizychni zhenadema sprucepoe k adchrane
Naba Zretniya preslvala.

This equipment has been scaled and found to comply with the limits for a Class B digits device, pursuant to part 15 of the FCC Rules. These limits are designed to provide reasonable protection against harmful interference in a residential institution. This equipment generates, uses and operates in accordance with the Federal Regulations 404-2008, as well as applicable regulations, including those required to be used to communicate. However, there is no guarantee that interference will not occur in a particular installation. This occupant does cause harmful interference to radio or television reception, which can be determined by turning the equipment off and on, the user is responsible for ensuring that the equipment is operating at its intended speed.
-
Recipients or relocate the receiving antenna.
-
Increase the separation between the equipment and receiver.
-
Connect the equipment into an outlet on a circuit different from that in which the receiver is connected.
- Connect the device to an expensive radio/TV technical for help.
FCC Cution Any changes or rundifications not expressly aporved by the party rochnsible for complianoe could said the user's authority
to operate this equipment. (i) this device does not cause hepatic interference and
(2) this cannot accept any inference (and, including inference that may cause undesired operation).
EN This Class B digital apparatus meets all requirements of the Canadian Interference-Causing Equipment Regulations. CAN ICSF 3/5/NM5 3/5).
The Author(s) Representative in Europe
Dr. Dr. Dr. Dr. Dr. Dr. Dr. Dr. Dr. Dr. Dr. Dr. Dr. Dr. Dr. Dr. Dr. Dr. Dr. Dr. Dr. Dr. Dr. Dr. Dr. Dr. Dr. Dr. Dr. Dr. Dr. Dr. Dr. Dr. Dr. Dr. Dr. Dr. Dr. Dr. Dr. Dr. Dr. Dr. Dr. Dr. Dr. Dr. Dr. Dr. Dr.
[1] CONSAR MEMORY, Inc. dichroa et la presente approcheo a conforma al doletivit 201/65/UR, F possabla richiderea une copie della cacherezione origini di conforma inviendo un compendio elettronico/Documentation."Tempatura di funzioni 0C-40-40
ES CONSAIREMORY, Inc. doctree que esta eqrupo cuplee cor les dirictive 2019/05/UL. Pueco observe une copie de la déclaracion de conformidad original en "consa.com/ documentation", Temporatura de funcaionamento: 0^ + 40^
PT A CORSAIR MEMORY. Inc. declara que esta copertura本站 en conformidad como Direkto 2011/65/US, F. Posible abotonue ciepe de交代 de conmaricacion originaleartes do operacion y copertura "documentacion". Temperatura o operacion: 0^ + 40^
Pf. Flavia CORSAL HISTORY, Inc. d.o.o., to us: zydrangea jest ogjocne zzykretyswym 2019/05/LKopke doklarz yzodradosi maszte uyskace pod adresce corser.com documentation. Temporale aracy; od 40^ do +40^