Carbide 88R - Desktop Computer CORSAIR - Free user manual and instructions
Find the device manual for free Carbide 88R CORSAIR in PDF.
| Product Type | Micro-ATX Mid-Tower Case |
| Dimensions (LxWxH) | 440 x 198 x 378 mm |
| Weight | 4.6 kg |
| Power Supply | Bottom-mounted power supply, maximum length 160 mm |
| Compatible Motherboard | Micro-ATX, Mini-ITX |
| Maximum Graphics Card Length | 383 mm |
| Maximum CPU Cooler Height | 150 mm |
| 3.5" Hard Drive Bays | 2 (tool-free) |
| 2.5" SSD Bays | 2 (tray mount) |
| 5.25" Optical Drive Bay | 1 (tool-free) |
| Included Fans | 1 x 120 mm at rear |
| Additional Fan Mounts | Front: 2 x 120 mm, Top: 2 x 120 mm |
| Front I/O Connectors | 1 x USB 3.0, 1 x USB 2.0, headphone/mic jack, Power and Reset buttons |
| Side Panels | One with window, one normal |
| Front Panel | Removable, minimalist style |
| Dust Filter | For bottom power supply |
| Maintenance and Cleaning | Regular cleaning of bottom dust filter |
| Safety | Compliant with Directive 2011/65/EU (RoHS). Recycling according to Directive 2012/19/EU (WEEE) |
| Spare Parts and Repairability | Replaceable parts (fans, filters). Customer support via support.corsair.com for RMA requests |
| General Information | Brand Corsair, model Carbide 88R, category Central Unit (case), manual available in multiple languages |
Frequently Asked Questions - Carbide 88R CORSAIR
User questions about Carbide 88R CORSAIR
0 question about this device. Answer the ones you know or ask your own.
Ask a new question about this device
Download the instructions for your Desktop Computer in PDF format for free! Find your manual Carbide 88R - CORSAIR and take your electronic device back in hand. On this page are published all the documents necessary for the use of your device. Carbide 88R by CORSAIR.
USER MANUAL Carbide 88R CORSAIR
© 2015-2019 CORSAIR MEMORY, Inc.
All rights reserved. CORSAIR, the sails logo, and Carbide Series are registered trademarks of CORSAIR in the United States and/or other countries. All other trademarks are the property of their respective owners. Product may vary slightly from those pictured.
49-001257 AB

CORSAIR
natural_image
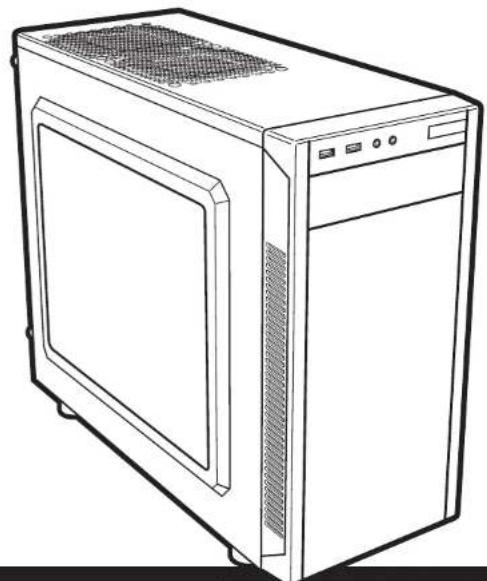
Line drawing of a desktop computer tower case with ventilation grilles and front panel (no text or symbols)CARBIDE SERIES®
88R
INSTALLATION GUIDE ■ GUIDE D'INSTALLATION
INSTALLATIONSANLEITUNG ■ MANUALE DI INSTALLAZIONE
Table of contents Case specifications
| Congratulations | 1 |
| Case specifications | 2 |
| Accessory kit contents | 3 |
| Case features | 4 |
| Removing the side panels | 5 |
| Installing the motherboard | 5 |
| Installing PCI-e/PCI card(s) | 6 |
| Installing the PSU | 6 |
| Removing the front fascia | 7 |
| Installing an ODD | 7 |
| Installing HDDs | 8 |
| Installing SSDs | 8 |
| Powering the case fans | 9 |
| Installing the front I/O connectors | 9 |
| Frequently asked questions | 10 |
Congratulations!
Thank you for purchasing the
Carbide Series 88R Micro-ATX Mid-Tower PC Case.
The Carbide Series 88R Micro ATX Mid Tower Case is sleek and refined. With a minimalist front panel, blacked out interior, and large side panel window, you might find yourself spending as much time staring at your next PC as you do using it. Full SSD and USB 3.0 compatibility means you can use fast drives and modern peripherals without worrying about whether you'll have room.
| Length | 440mm |
| Width | 198mm |
| Height | 378mm |
| Weight | 4.6kg |
| Maximum GPU length | 383mm |
| Maximum CPU cooler height | 150mm |
| Maximum PSU length | 160mm |

natural_image
Technical line drawings of a two-part electronic device with labeled dimensions (378mm and 198mm) and a 440mm top view (no text or symbols beyond measurement labels)
CARBIDE SERIES 88R
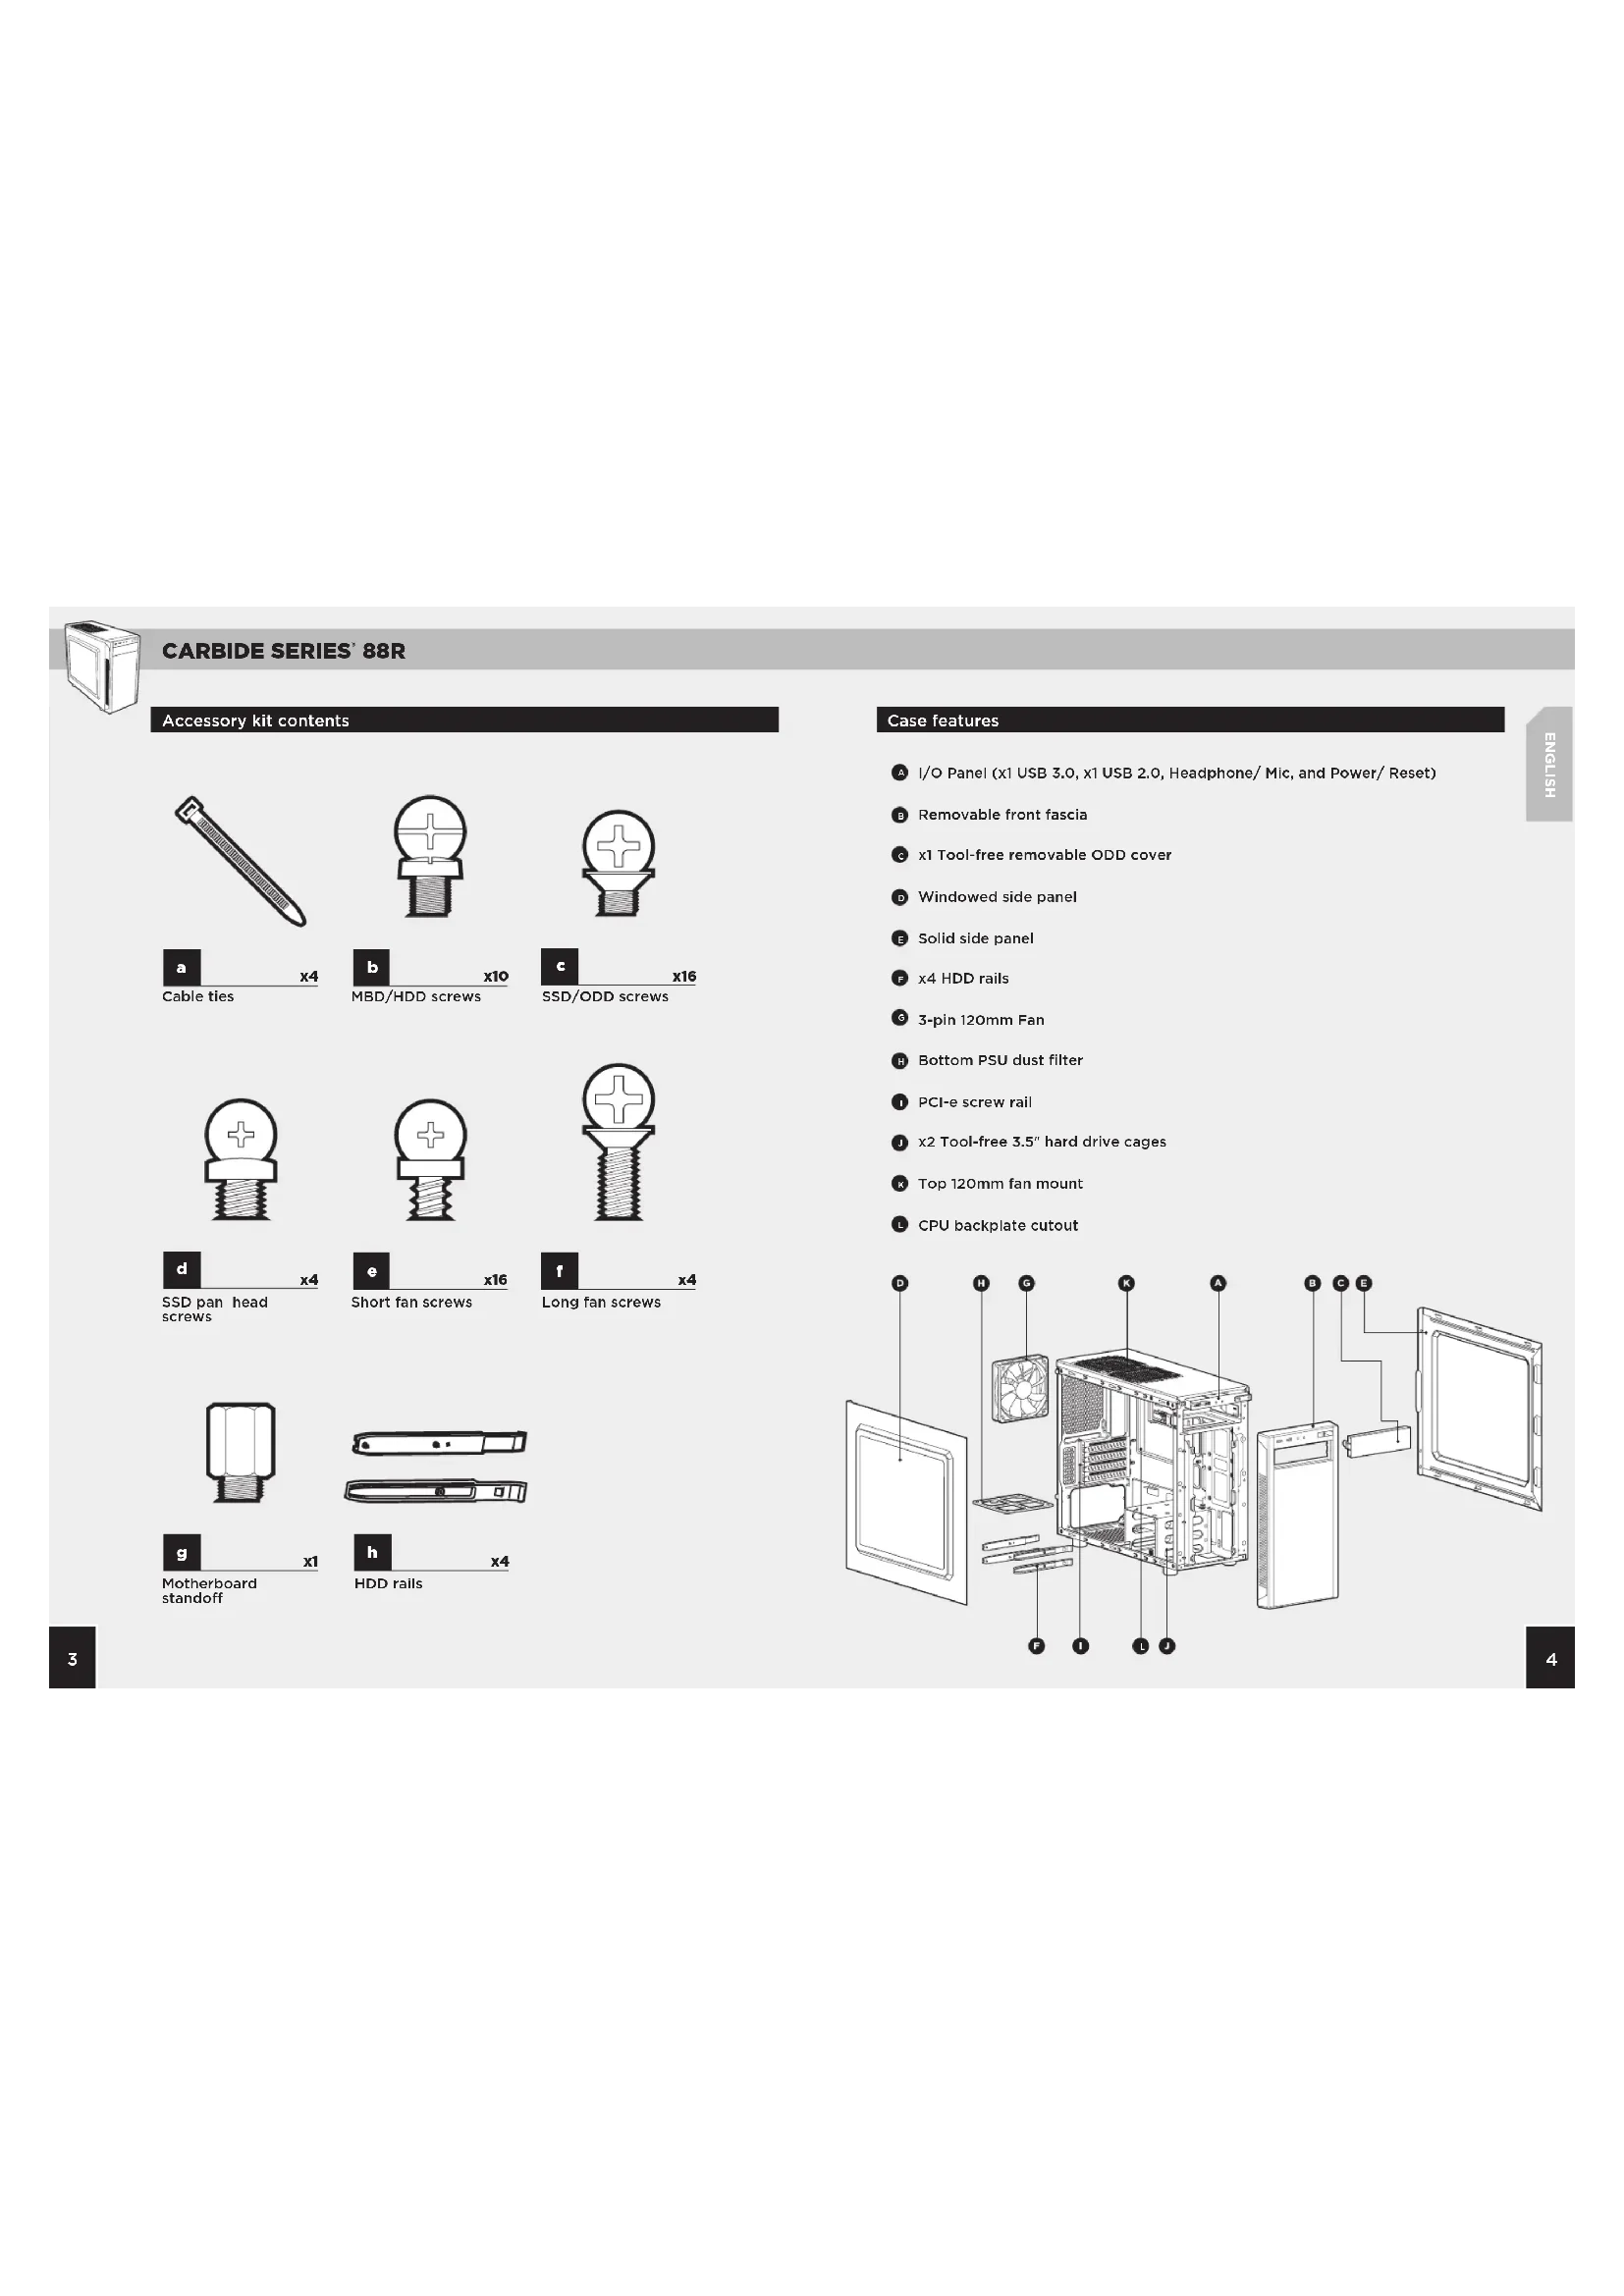
Accessory kit contents
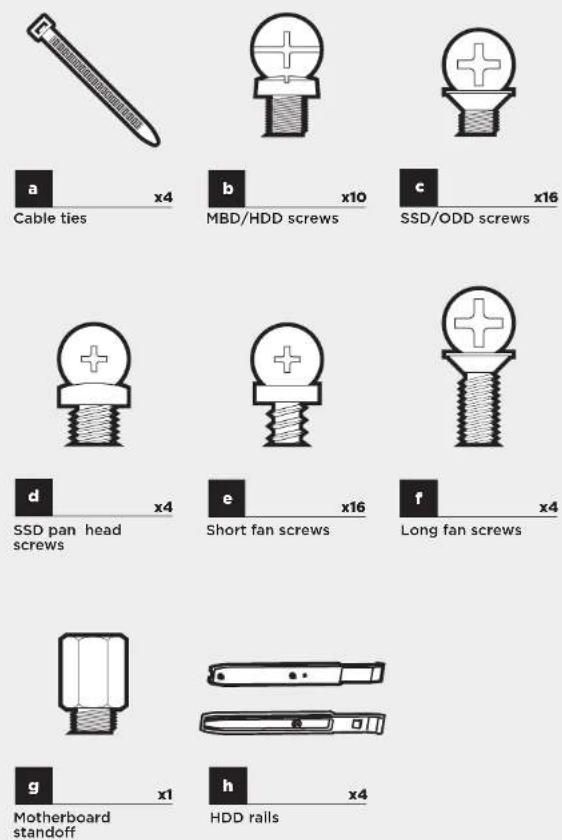
Case features
A I/O Panel (x1 USB 3.0, x1 USB 2.0, Headphone/ Mic, and Power/ Reset)
Removable front fascia
c x1 Tool-free removable ODD cover
Windowed side panel
E Solid side panel
x4 HDD rails
6 3-pin 120mm Fan
Bottom PSU dust filter
PCI-e screw rail
x2 Tool-free 3.5" hard drive cages
Top 120mm fan mount
CPU backplate cutout
text_image
Exploded view diagram of a desktop computer showing internal components like CPU, fan, and monitor with labeled parts A through K.
CARBIDE SERIES 88R
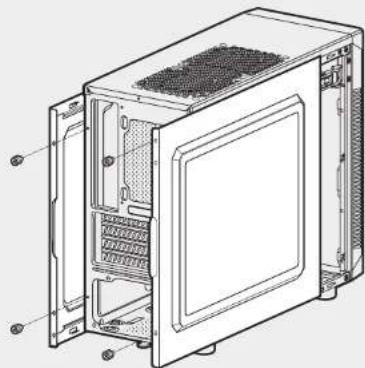
Simply remove the
thumbscrews then slide the side panels back and out.
Note: CORSAIR recommends removing both side panels and setting them aside when building your system to avoid accidental damage. Both side panels are interchangeable and should be removed to reduce clutter.
natural_image
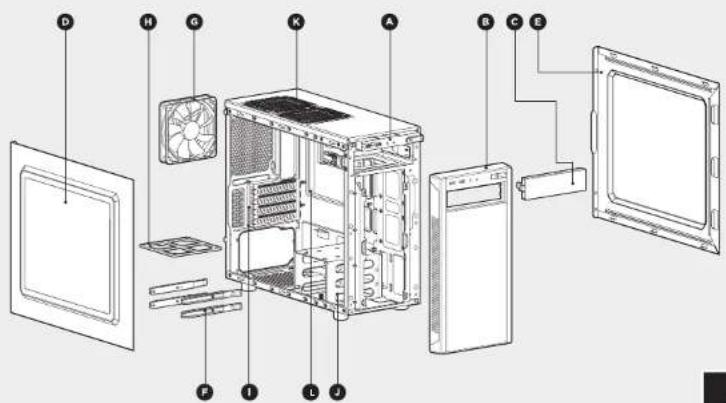
Technical line drawing of a computer tower case with visible internal components and mounting holes (no text or labels)First, install your
motherboard's I/O shield
(see your motherboard's manual for guidance).
Align your motherboard with the pre-installed standoff s.
Use the provided screws
to secure the
motherboard to the motherboard tray.
natural_image
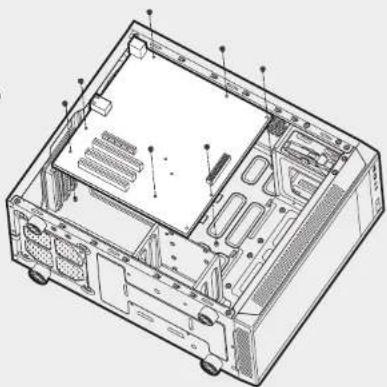
Technical line drawing of an internal computer chassis showing casing, drive bays, and ventilation slots (no text or labels)3. Installing PCI-e/PCI card(s)1. Removing the side panels
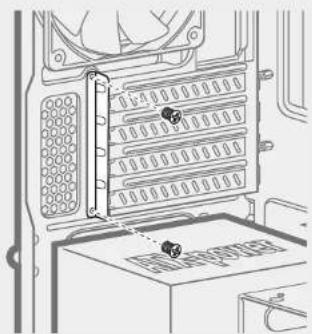
Remove slot cover, install expansion card, and secure with screw(s) as necessary
natural_image
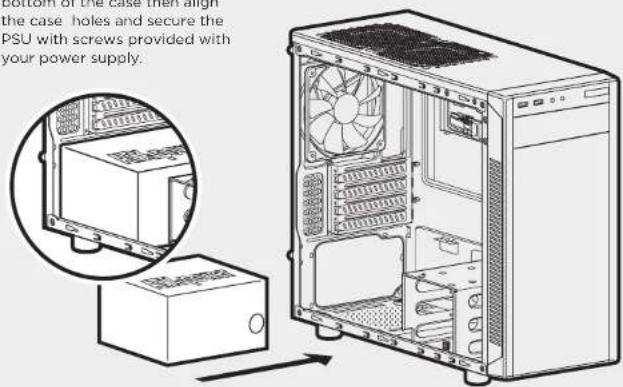
Technical line drawing of a computer drive bay with no visible text or symbols4. Installing the PSU (power supply unit)2. Installing the motherboard
Position the PSU on the
bottom of the case then align the case holes and secure the PSU with screws provided with your power supply.
text_image
bottom at the base with align the case holes and secure the PSU with screws provided with your power supply.
CARBIDE SERIES 88R
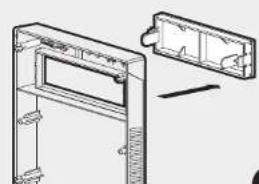
5. Removing the front fascia
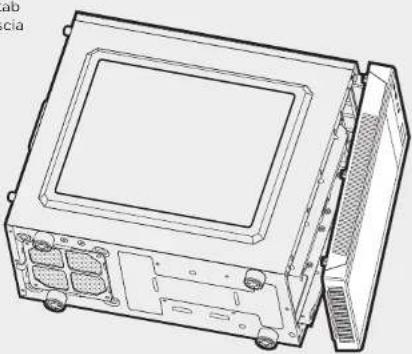
To remove the front fascia (front panel), grasp the tab located at the bottom fascia and pull outward.
natural_image
Technical line drawing of a computer chassis with front panel and internal components (no text or symbols)First, remove the front panel 5.25" drive bay cover then slide the ODD into the drive bay until the tool-free latch clicks, securing the drive. To release an optical drive, push in the tool-free tab then pull the drive outward.
natural_image
Technical line drawing of a door frame with an open door and internal components (no text or symbols)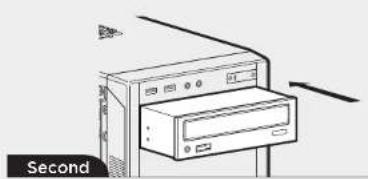
natural_image
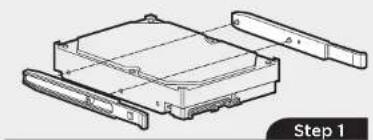
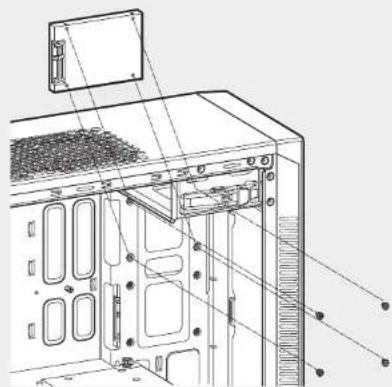
Illustration of a desktop computer tower with an attached drive unit, labeled 'Second' (no text or symbols on the device itself)7. Installing HDDs
Step 1 - Clamp the side rails to the drive, with prongs and drive connectors facing the same way.
natural_image
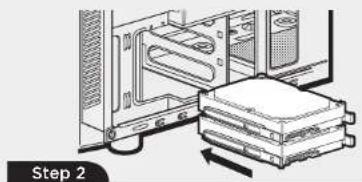
Technical line drawing of a mechanical housing assembly with no visible text or symbolsStep 2 - Slide the drive and rail assembly into the HDD cage from behind the motherboard as shown.
natural_image
Diagram of a computer setup showing a rack with an open storage unit and a stack of books, labeled 'Step 2' (no text or symbols on the diagram itself)8. Installing SSDs6. Installing an ODD (optical disk drive)
Insert an SSD into the mounting tray and attach with screws as shown.
natural_image
Technical line drawing of a computer tower internal structure showing drive, ventilation, and mounting points (no text or labels)
CARBIDE SERIES 88R
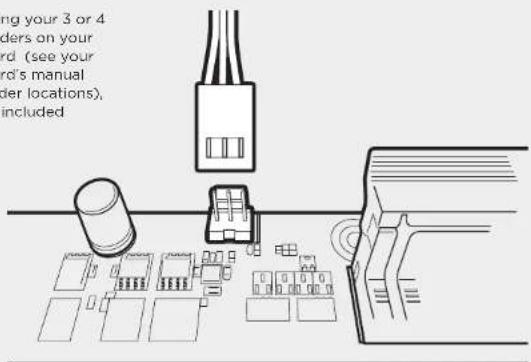
9. Powering the case fans
After locating your 3 or 4 pin fan headers on your motherboard (see your motherboard's manual for fan header locations), plug in the included fan cable.
text_image
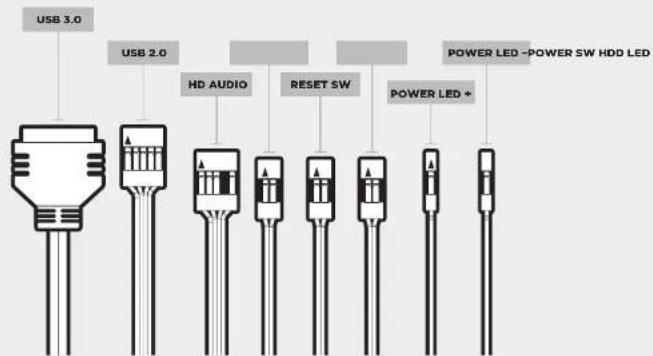
ng your 3 or 4 ders on your rd (see your rd's manual der locations), included10. Installing the front I/O connectors
See your motherboard's manual for front panel header locations and pin-outs.
text_image
USB 3.0 USB 2.0 HD AUDIO RESET SW POWER LED - POWER SW HDD LED POWER LED +Frequently asked questions
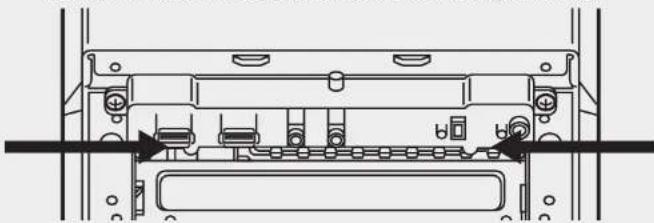
- How do I remove the I/O Panel?
If needed, you can uninstall your I/O panel by removing the front fascia (step 5) then unscrewing the 2 screws at each side of panel. (see drawing).
natural_image
Technical line drawing of a device rear panel with connectors and ports (no text or symbols)- Does the polarity matter with the I/O panel's power and reset header? No, only the LED headers.
- Who should I contact if I received my case damaged or one of the fans is no longer working? Please go to support.corsair.com and request an RMA so that we can replace the damaged part(s).
- Where can I mount a fan?
| Fan mount locations | |
| Front x2 120mm | |
| Top x2 120mm | |
| Rear 120mm (included) | |
| Bottom x | |
| Side x | |
| Mid x | |
To learn more about this case visit the product page at corsair.com.

CARBIDE SERIES® 88R
text_image
Exploded view diagram of a desktop computer showing internal components like CPU, fan, and monitor with labeled parts A through K.
CARBIDE SERIES 88R
natural_image
Technical line drawing of a computer oven with visible internal components and mounting holes (no text or labels)natural_image
Technical line drawing of an internal computer chassis showing casing, drive bays, and ventilation slots (no text or labels)3. Installation des cartes PCI-e/PCI
natural_image
Technical line drawing of a computer drive with a panel and socket (no text or symbols)natural_image
Technical line drawing of an open computer case with internal components and ventilation slots (no text or symbols)natural_image
Technical line drawing of a door frame with an open door and internal components (no text or symbols)
text_image
Deuxièmenatural_image
Technical line drawing of a computer tower internal structure showing ventilation slots and mounting points (no text or labels)
CARBIDE SERIES 88R
natural_image
Technical line drawing of a mechanical or electronic component with no visible text or symbolstext_image
Exploded view diagram of a desktop computer showing internal components like fan, drive, and tower
CARBIDE SERIES 88R
natural_image
Technical line drawing of a computer oven with visible internal components and mounting holes (no text or labels)natural_image
Technical line drawing of an open computer chassis showing internal components and mounting points (no text or labels)natural_image
Technical line drawing of a computer drive bay with no visible text or symbolsnatural_image
Technical line drawing of a computer chassis with front panel and internal components (no text or symbols)natural_image
Technical line drawing of a door frame with internal components and an external bracket (no text or symbols)
natural_image
Diagram of a computer tower with an open drive, labeled 'Zweite' (no other text or symbols)natural_image
Technical line drawing of a mechanical housing assembly (no text or symbols)natural_image
Diagram of a computer setup showing a rack with an open storage unit and a stack of books, labeled 'Schritt 2' (no text or symbols on the diagram itself)natural_image
Technical line drawing of a computer tower internal structure showing drive, ventilation, and socket components (no text or labels)
CARBIDE SERIES® 88R
Stecken Sie das im
natural_image
Technical line drawing of a device rear panel with connectors and ports (no text or symbols)natural_image
Technical line drawings of a two-part electronic device with labeled dimensions (378mm and 198mm) and a 440mm top view (no text or symbols beyond measurement labels)
CARBIDE SERIES 88R
text_image
Exploded view diagram of a desktop computer system with labeled components
CARBIDE SERIES 88R
natural_image
Technical line drawing of a computer tower case with visible internal components and mounting holes (no text or labels)natural_image
Technical line drawing of an internal computer chassis showing casing, drive bays, and ventilation slots (no text or labels)natural_image
Technical line drawing of a computer drive bay with no visible text or symbolsnatural_image
Technical line drawing of an open computer chassis with internal components (no text or symbols)natural_image
Technical line drawing of a door frame with an open door and internal components (no text or symbols)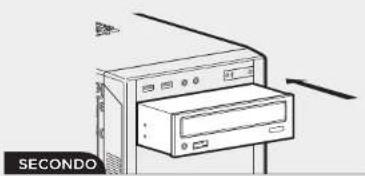
natural_image
Line drawing of a computer tower with ventilation slots and a labeled section 'SECONDO' (no text or symbols on the main diagram)natural_image
Technical line drawing of a mechanical housing assembly (no text or symbols)natural_image
Technical line drawing of a computer tower internal structure showing ventilation slots and drive components (no text or labels)
CARBIDE SERIES 88R
natural_image
Technical line drawing of a mechanical or electronic component with no visible text or symbolsnatural_image
Technical line drawings of a two-part electronic device with labeled dimensions (378mm and 198mm) and a 440mm top view (no text or symbols beyond measurement labels)
CARBIDE SERIES 88R
text_image
Exploded view diagram of a desktop computer showing internal components like CPU, fan, and monitor with labeled parts A through K.
CARBIDE SERIES 88R
natural_image
Technical line drawing of a computer oven with visible internal components and mounting holes (no text or labels)natural_image
Technical line drawing of an internal computer chassis showing casing, drive bays, and ventilation slots (no text or labels)3. Cómo instalar la(s) tarjeta(s) PCI-e/PCI1. Cómo remover los paneles late
natural_image
Technical line drawing of a computer drive with a panel and socket (no text or symbols)natural_image
Technical line drawing of a computer chassis with front panel and internal components (no text or symbols)natural_image
Technical line drawing of a computer tower internal structure showing drive, ventilation, and socket components (no text or labels)
CARBIDE SERIES 88R
natural_image
Technical line drawing of a device rear panel with connectors and ports (no text or symbols)natural_image
Technical line drawings of a two-part electronic device with labeled dimensions (378mm and 198mm) and a 440mm top view (no text or symbols beyond measurement labels)
CARBIDE SERIES 88R
text_image
Exploded view diagram of a desktop computer tower with labeled components from fan to monitor
CARBIDE SERIES 88R
natural_image
Technical line drawing of a computer tower case with visible internal components and mounting holes (no text or labels)natural_image
Technical line drawing of an open computer chassis showing internal components and mounting points (no text or labels)natural_image
Technical line drawing of a computer drive bay with no visible text or symbolstext_image
Technical diagram showing internal components of a computer tower with Chinese text annotations describing part names and functions.
CARBIDE SERIES 88R
natural_image
Technical line drawing of an open electronic device casing with internal components (no text or symbols)natural_image
Technical line drawing of a door frame with an inset showing internal components (no text or symbols)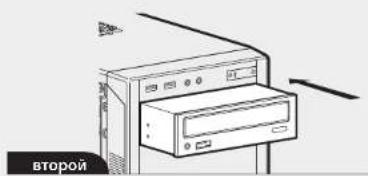
natural_image
Illustration of a computer tower with a rack unit and monitor, no text or symbols present7. Установка HDDs
natural_image
Technical line drawing of a mechanical housing assembly (no text or symbols)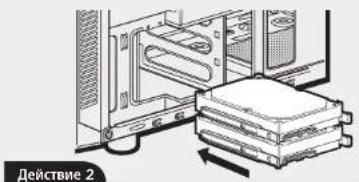
natural_image
Technical line drawing of a computer tower internal structure showing drive, ventilation, and socket components (no text or labels)
CARBIDE SERIES® 88R
natural_image
Technical line drawing of a device rear panel with connectors and ports (no text or symbols)natural_image
Technical line drawings of a two-part electronic device with labeled dimensions (378mm and 198mm) and a 440mm top view (no text or symbols beyond measurement labels)
CARBIDE SERIES 88R
text_image
Exploded view diagram of a desktop computer showing internal components like CPU, fan, and monitor with labeled parts A through K.
CARBIDE SERIES 88R
natural_image
Technical line drawing of a computer tower case with visible internal components and mounting holes (no text or labels)natural_image
Technical line drawing of an internal computer chassis showing casing, drive bays, and ventilation slots (no text or labels)natural_image
Technical line drawing of a computer drive bay with no visible text or symbolsnatural_image
Technical line drawing of a computer chassis with front panel and internal components (no text or symbols)natural_image
Technical line drawing of a door frame with an open door and internal components (no text or symbols)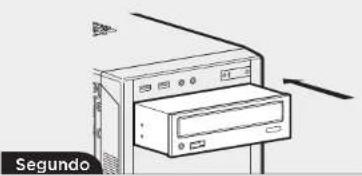
natural_image
Line drawing of a computer tower with an open door, no text or symbols presentnatural_image
Technical line drawing of a mechanical housing assembly (no text or symbols)natural_image
Diagram of a computer setup showing a rack with an open storage unit and a stack of books, labeled 'Etapa 2' (no text or symbols on the diagram itself)natural_image
Technical line drawing of a computer tower internal structure showing drive, ventilation, and socket components (no text or labels)
CARBIDE SERIES® 88R
natural_image
Technical line drawing of a device rear panel with connectors and ports (no text or symbols)text_image
Exploded view diagram of a desktop computer system with labeled components from fan to monitor
CARBIDE SERIES 88R
1. サイドパネルの取り外し
natural_image
Technical line drawing of a computer tower case with visible internal components and mounting holes (no text or labels)natural_image
Technical line drawing of a computer drive bay with no visible text or symbolsnatural_image
Technical line drawing of an internal computer chassis showing casing, drive bays, and ventilation slots (no text or labels)natural_image
Technical line drawing of an open electronic device casing with internal components (no text or symbols)natural_image
Technical line drawing of a door frame with an open door and internal components (no text or symbols)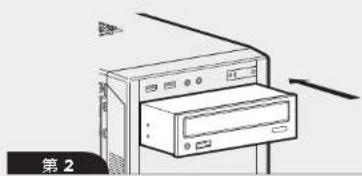
natural_image
Diagram of a computer tower with an open drawer and monitor, labeled '第2' (no text or symbols on the diagram itself)natural_image
Technical line drawing of a computer tower with visible internal components and mounting bracket (no text or symbols)
CARBIDE SERIES 88R
9. ケースファンへの電力供給
natural_image
Technical line drawing of a device rear panel with connectors and ports (no text or symbols)The manufacturer is not responsible for any radio or TV interference caused by unauthorized modifications to this equipment. Such modifications could void the user authority to operate the equipment.

This equipment has been tested and found to comply with the limits for a Class B digital device, pursuant to part 15 of the FCC Rules. These limits are designed to provide reasonable protection against harmful
10 Interference in a residential installation. This equipment generates, uses and can radiate radio frequency energy and, if not installed and used in accordance with the instructions, may cause harmful interference to radio communications. However, there is no guarantee that interference will not occur in a particular installation. If this equipment does cause harmful interference to radio or television reception, which can be determined by turning the equipment off and on, the user is encouraged to try to correct the interference by one or more of the following measures:
Reorient or relocate the receiving antenna
Increase the separation between the equipment and receiver,
Connect the equipment into an outlet on a circuit different from that to which the receiver is connected.
Consult the dealer or an experienced radio/TV technician for help.
This device must not be co-located or operating in conjunction with any other antenna or transmitter.
Operation is subject to the following two conditions:
(1) this device may not cause harmful interference, and
(2) this device must accept any interference received, including interference that may cause undesired operation.

CORSAIR MEMORY, Inc. declares that this equipment is compliance with Directive 2011/65/EU. A copy of the original declaration of conformity can be obtained at "regulatory@corsair.com".
Wormerweg 8, 1311 XB, Almere, Netherlands
EL REPRESENTANTE AUTORIZADO EN EUROPA CORSAIR MEMORY, BV Wormeryesø 8.131 XB, Almere, Netherlands
O REPRESENTANTE AUTORIZADO NA EUROPA CORSAIR MEMORY. BV Wormerweg 8, 1311 XB, Almere, Netherlands

NOTE ON ENVIRONMENTAL PROTECTION
After the implementation of the European Directive 2012/19/EU in the national legal system, the following applies:
Electrical and electronic devices may not be disposed of with domestic waste.
Consumers are obligated by law to return electrical and electronic devices at the end of their service lives to the public collecting points set up for this purpose of point of sale. Details to this are defined by the national law of the respective country. This symbol on the product, the instruction manual or the package indicates that a product is subject to these regulations. By recycling, reusing the materials or other forms of utilizing old devices, you are making an important contribution to protecting our environment.