SNG 7.26 - Iron SINGER - Free user manual and instructions
Find the device manual for free SNG 7.26 SINGER in PDF.

| Product type | Steam iron |
| Brand | Singer |
| Model | SNG 7.26 |
| Power | 2600 W |
| Water tank capacity | 300 ml (max) |
| Functions | Steam ironing, steam boost, spray function, vertical ironing, auto shut-off (30s horizontal, 8 min vertical), self-cleaning |
| Soleplate type | Soleplate with steam holes |
| Temperature setting | Control knob with international symbols (low, medium, high) |
| Steam control | Adjustable from minimum to maximum, off position |
| Indicator light | Power light (heating) and auto-off light (green blinking) |
| Power supply | Standard electrical plug (220-240 V, 50/60 Hz) - deduced from power |
| Maintenance | Self-cleaning recommended every 10-15 days, clean soleplate with damp cloth |
| Safety | Auto shut-off, do not immerse, do not use if cord damaged, stable surface |
| Weight | Approximately 1 kg (estimate) |
| Dimensions | Approximately 30 x 15 x 20 cm (estimate) |
| Cord length | Approximately 2 m (estimate) |
Frequently Asked Questions - SNG 7.26 SINGER
User questions about SNG 7.26 SINGER
0 question about this device. Answer the ones you know or ask your own.
Ask a new question about this device
Download the instructions for your Iron in PDF format for free! Find your manual SNG 7.26 - SINGER and take your electronic device back in hand. On this page are published all the documents necessary for the use of your device. SNG 7.26 by SINGER.
USER MANUAL SNG 7.26 SINGER
natural_image
Exterior view of a SINGER air iron with visible brand and model number (no text or symbols on the device itself)INSTRUCTION MANUAL
SINGER
HOME ESSENTIALS™
GBR
DEU
ITA
ESP
PRT
FRA
DNK
FIN
NOR
SWE
CZE
POL
RUS
HUN
SVK
NL
| |
- | - |
INSTRUCTIONS
SINGER SNG 7.26
FULL FUNCTION
STEAM IRON
220/240V 50/60Hz 2600W

IMPORTANT SAFETY INSTRUCTIONS
When using your flatiron, basic safety precautions should always be followed, including the following:
READ ALL INSTRUCTIONS BEFORE USING
- Use iron only for its intended use.
- To protect against a risk of electric shock, do not immerse the iron in water or other liquids.
- The iron should always be turned to "min", before plugging or unplugging from outlet. Never yank cord to disconnect from outlet; instead, grasp plug and pull to disconnect.
-
Do not allow cord to touch hot surfaces. Let iron cool completely before putting away. Loop cord loosely around iron when storing.
-
Always disconnect iron from electrical outlet when filling with water or emptying and when not in use.
-
Do not operate iron with a damaged cord or if the iron has been dropped or damaged. To avoid the risk of electric shock, do not disassemble the iron. Take it to a qualified serviceman for examination and repair. Incorrect reassembly can cause a risk of electric shock when the iron is used.
-
Close supervision is necessary for any appliance being used by or near children. Do not leave iron unattended while connected or on an ironing board.
-
Burns can occur from touching hot metal parts, hot water, or steam. Use caution when you turn a steam iron upside down – there may be hot water in the reservoir.
-
If the malfunction indicator goes on, the flatiron is not operating normally. Disconnect from the power supply and have the flatiron serviced by qualified service personnel.
-
The iron must be used and rested on a stable surface.
-
The iron is not to be used if it has been dropped, if there are visible signs of damage or if it is leaking.
SPECIAL INSTRUCTIONS
- To avoid a circuit overload, do not operate another high wattage appliance on the same circuit.
- If an extension cord is absolutely necessary, a 10-ampere cord should be used. Cords rated for less amperage may overheat. Care should be taken to arrange the cord so that it cannot be pulled or tripped over.
SAVE THESE INSTRUCTIONS
More specifically:
DO NOT let children or untrained persons use the appliance without supervision.
NEVER immerse the iron, cable or plug in any liquid.
DO NOT leave the hot iron touching fabrics or very inflammable surfaces.
DO NOT leave the appliance unnecessarily plugged in. Disconnect the plug from the mains when the appliance is not being used.
NEVER touch the appliance with wet or damp hands.
DO NOT use the power cord or the appliance in order to pull the plug out of the socket.
DO NOT leave the appliance exposed to the weather (rain, sun, etc.).
DO NOT leave the iron without supervision when it is connected to the power supply.
DO NOT fill the reservoir with water before removing the plug from the socket.
PLEASE NOTE!
Do not use chemical additive, scented substances or decalcifiers. Failure to comply with the above-mentioned regulations leads to the loss of guarantee.
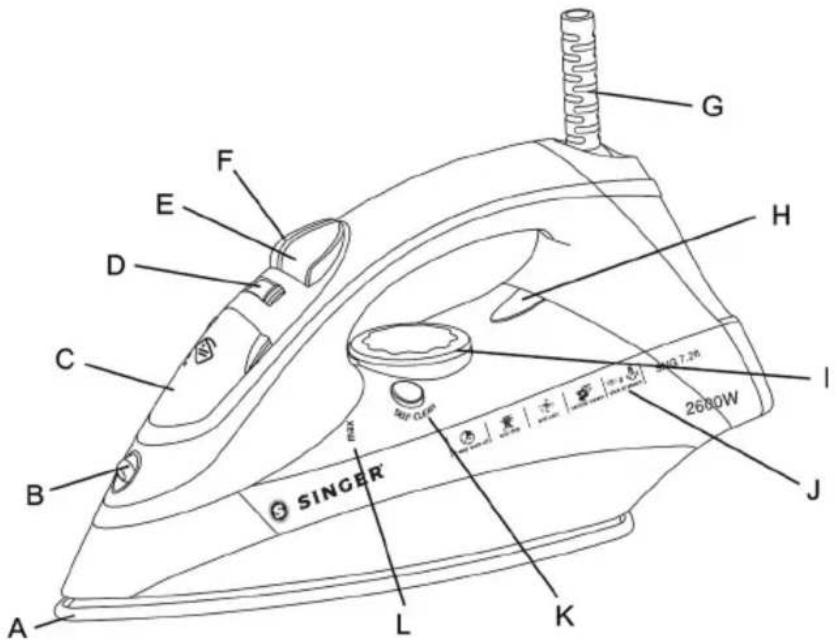
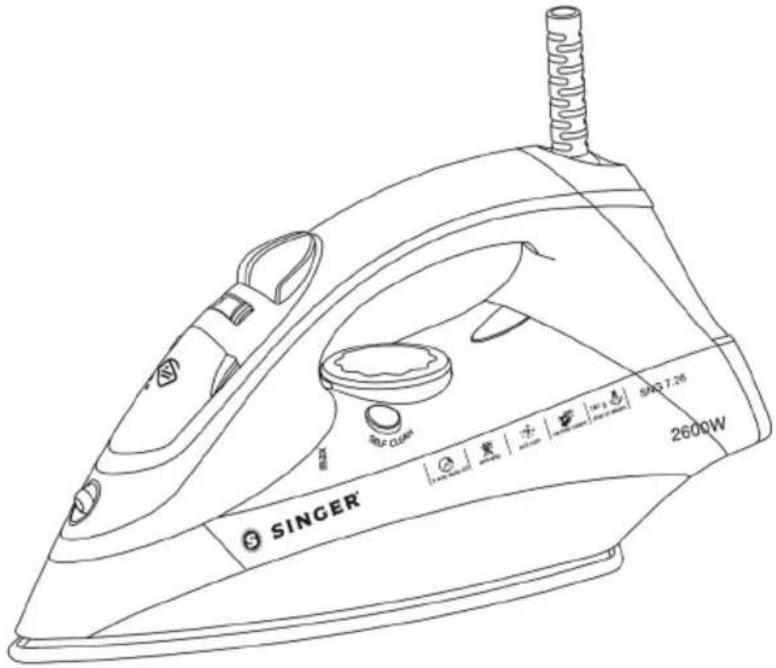
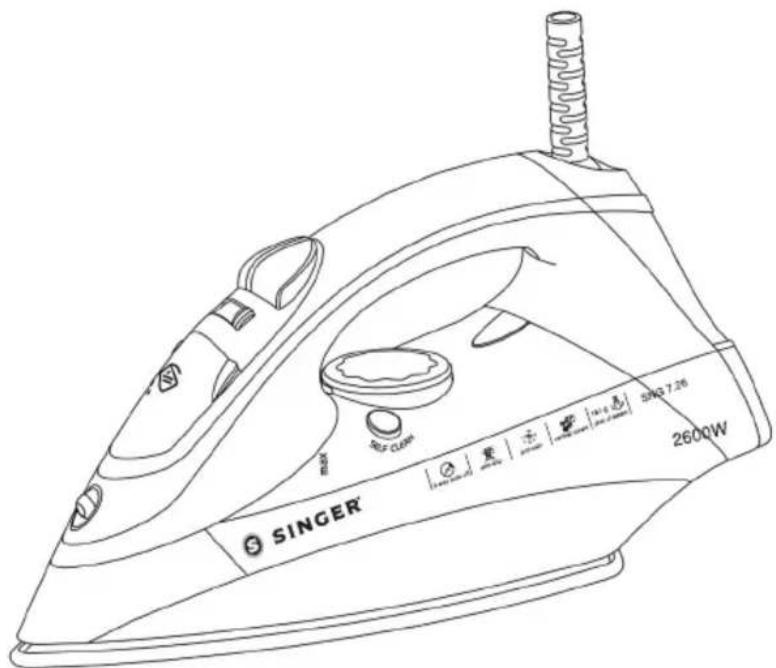
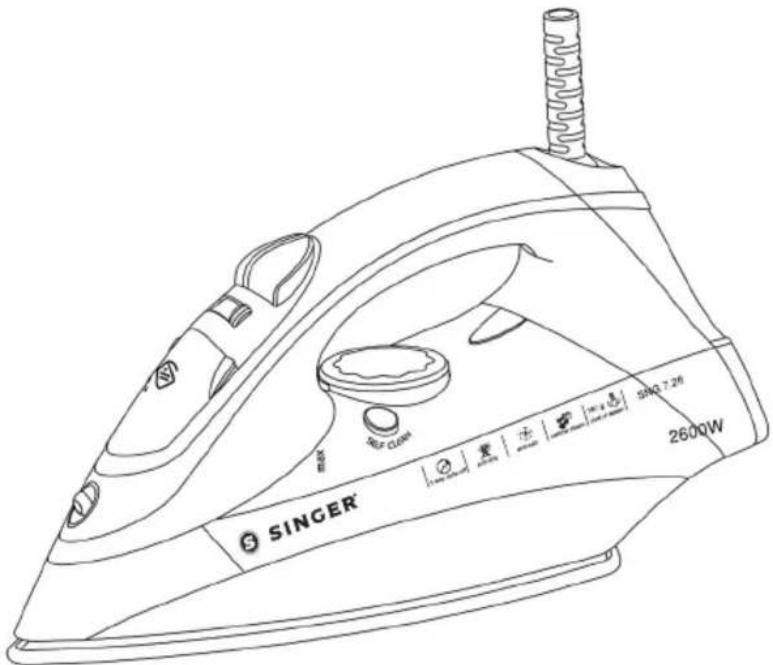
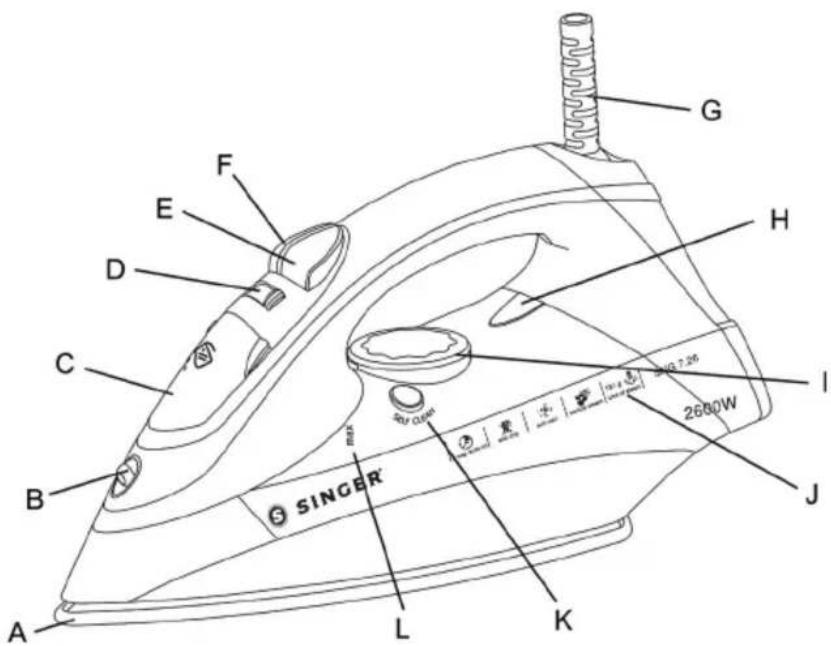
DESCRIPTION OF DEVICE
A. Plate with steam vents B. Spray organ
C. Filler cap D. Steam dial
E. Shot-steam button F. Spray button
G. Sleeving H. Power light //Auto shut off light
I. Thermostat knob J. Transparent water tank
K. Calc-Clean button L. Maximum filling level
GENERAL INSTRUCTIONS
When using the iron for the first time, you may notice a slight emission of smoke and hear some sounds made by the expanding plastics. This is quite normal and it stops after a short time. We also recommend passing the iron over an ordinary cloth before using it for the first time.
PREPARATIONS
Soft the laundry to be ironed according to the international symbols on the garment label, or if this is missing, according to the type of fabric.
Start ironing the garments requiring a low temperature.
This reduces the waiting times (the iron takes less time to heat up than to cool down) and eliminates the risk of scorching the fabric.
| GARMENT FABRIC THERMOSTATLABEL TYPE REGULATION | ||
 | synthetic low temperature | • |
 | silk - wool medium temperature | •• |
 | Cotton - linen high temperature | ••• |
 | Fabric not to be ironed | |
STEAM IRONING
Filling the reservoir
- Check that the plug is disconnected from the socket.
- Move the steam knob D to " [Fig. 5].
- Open the cap C.
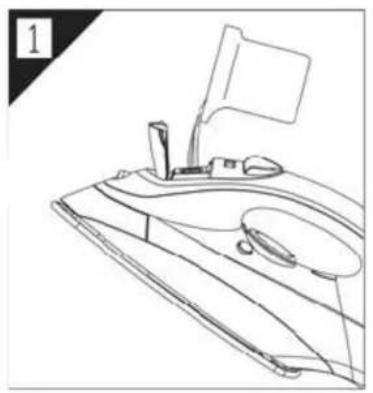
- Raise the tip of the iron to help the water enter the opening without overflowing [Fig. 1].
- Slowly pour the water into the reservoir using the special measure and taking care not to go over the maximum level (about 300ml) indicated by "MAX" on the reservoir.
- Close the cap C.
Selecting the temperature.
- Put the iron in a vertical position.
- Put the plug in the socket.
- Adjust the temperature knob L according to the international symbol on the garment label [Fig. 3]. The power light M indicates that the iron is heating up. Wait until the power light goes off before ironing.
Warning: during ironing, the power light M comes on at intervals, indicating that the selected temperature is maintained. If you lower the selected temperature after ironing at a high temperature, do not start ironing until the power light comes on again.
Selecting the steam.
The quantity of steam is regulated by the steam knob D.
- Turn the steam knob to a position between minimum and maximum depending on the quantity of steam required and the temperature selected [Fig. 5].
Warning: the iron gives off steam continuously only if you hold the iron horizontally. You can stop the continuous steam by placing the iron in a vertical position or by moving the steam knob to "☐". As indicated on the steam knob D and in the initial table, you can only use steam at the highest temperatures. If the selected temperature is too low, water may drip onto the plate.
Selecting Shot-steam and steam when ironing vertically.
Press the shot-steam button E to generate a powerful burst of steam that can penetrate the fabrics and smooth the most difficult and tough creases. Wait for a few seconds before pressing again [Fig. 4].
By pressing the shot-steam button at intervals you can also iron vertically (curtains, hung garments, etc.) [Fig. 6].
Warning: the shot-steam function can only be used at high temperatures. Stop the emission when the power light M comes on, than start ironing again only after the light has gone off.
DRY IRONING
To iron without steam, follow the instructions in section "steam ironing", leaving the steam selector D on position "X".
SPRAY FUNCTION
Make sure that there is water in the reservoir. Press the spray button F slowly (for a dense spray) or quickly (for a vaporized spray) [Fig. 2].
Warning: for delicate fabrics, we recommend moistening the fabric beforehand using the spray function, or putting a damp cloth between the iron and the fabric. To avoid staining, do not use the spray on silk or synthetic fabrics.
AUTO STOP (SNG 726)
If the iron is left motionless for more than 30 seconds, the heating element will be switch off, automatically. To indicate that the iron has shut off, the Auto stop pilot light(green) will start blinking and six sound signals will be audible.
In a horizontal position, this will happen after 30 seconds.
In a vertical position, this will happen after 8 minutes.
--When picking up the iron again, the Auto stop pilot light will go out. The supply pilot light will come on. This indicate that the iron is heating up again.
--Wait for the supply pilot light to go out. Then you can recommence ironing.
SELF-CLEANING
The self-cleaning feature cleans inside the plate, removing impurities. We recommend using it every 10-15days. Directions:
- Fill the reservoir up to the maximum level indicated and set the steam selector (3) to "

- Set the thermostat knob (14) to the maximum temperature and wait for the pilot light (12) to turn off.
- Pull the plug out of the socket and hold the iron horizontally over the sink.
- Hold the cleanout button (15) setting until all the boiling water, steam, impurities come out [Fig. 7].
- When the soleplate has cooled down, you can clean it with a damp cloth.
CLEANING
Please note: before cleaning the iron in any way, make sure that the appliance plug is not connected to the socket.
Any deposits, starch residue or size left on the plate can be removed using a damp cloth or an unabrasive liquid detergent.
Avoid scratching the plate with steel wool or metallic objects.
The plastic parts can be cleaned with a damp cloth then wiped over with a dry cloth.
HOW TO PUT IT AWAY
- At the end of the using, regulate the steam dial to "point.
- When there is no steam, regulate the temperature dialto "min" point. Disconnect the plug of the iron from the socket.
- Empty the reservoir by turning the iron upside down and gently shaking it.
- Leave the iron vertically to cool down completely.
- Roll up the power cord with the rewinder
- Always put the iron away in a vertical position.
ADVICE FOR GOOD IRONING
We recommend using the lowest temperatures with fabrics that have unusual finishes (sequins, embroidery, flush, etc.).
If the fabric is mixed (e.g. 40% cotton 60% synthetics), set the thermostat to the temperature of the fibre requiring the lower temperature.
If you don't know the composition of the fabric, determine the suitable temperature by testing on a hidden corner of the garment. Start with a low temperature and increase it gradually until it reaches the ideal temperature.
Never iron areas with traces of perspiration or other marks: the heat of the plate fixes the stains on the fabric, making them irremovable.
The size is more effective if you use a dry iron at a moderate temperature: excess heat scorches it with the risk of forming a yellow mark.
To avoid marking silk, woolen or synthetic garments shiny, iron them inside out.
To avoid marking velvet garments shiny, iron in one direction (following the fibre) and do not press down on the iron.
The heavier the washing machine is loaded, the more garments come out creased. This also happens when the spin drying revolutions are very high.
Many fabrics are easier to iron if they are not completely dry.
For example, silk should always be ironed damp.
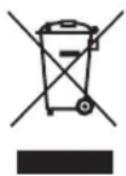
Meaning of crossed - out wheeled dustbin:
Do not dispose of electrical appliances as unsorted municipal waste, use separate collection facilities.
Contact you local government for information regarding the collection systems available.
If electrical appliances are disposed of in landfills or dumps, hazardous substances can leak into the groundwater and get into the food chain, damaging your health and well-being.
When replacing old appliances with new ones, the retailer is legally obligated to take back your old appliance for disposals at least free of charge.
natural_image
Line drawing of a boat's hull with a flag and handle (no text or symbols)
natural_image
Line drawing of a steam iron with a labeled component (no text or symbols present)
natural_image
Line drawing of an iron iron with a dial indicator and arrow pointing to the handle (no text or symbols)
natural_image
Line drawing of an iron (£) with steam rising and rain falling (no text or symbols)
natural_image
Line drawing of a steam iron with a handle and mounting bracket (no text or symbols)
natural_image
Line drawing of a steam iron with exhaust smoke, showing internal components and motion (no text or symbols)
natural_image
Line drawing of a steam iron with a dial indicator (no text or symbols)
natural_image
Line drawing of a mechanical device with a coiled spring (no text or symbols)DEU
DAMPFBÜGELEISEN
SINGER SNG 7.26
220/240V \~50/60 Hz max 2600W

natural_image
Line drawing of a boat's hull with a flag and handle (no text or symbols)
natural_image
Line drawing of a steam iron with a labeled component (no text or symbols)
natural_image
Line drawing of an iron iron with a dial indicator and arrow pointing to the handle (no text or symbols)
natural_image
Line drawing of an iron (£) with steam rising and rain falling (no text or symbols)
natural_image
Line drawing of a steam iron with a handle and mounting bracket (no text or symbols)
natural_image
Line drawing of a steam iron with exhaust smoke, showing internal components and motion (no text or symbols)
natural_image
Line drawing of a steam iron with a dial indicator (no text or symbols)
natural_image
Line drawing of a mechanical device with a coiled spring (no text or symbols)ISTRUZIONI PER L'USO
SINGER SNG 7.26
FERRO A VAPORE
FULL FUNCTION
220/240V \~50/60 Hz max 2600W

ITA
IMPORTANTI NORME DI SICUREZZA
ISTRUZIONI BASE
natural_image
Line drawing of a boat's hull with a flag and handle (no text or symbols)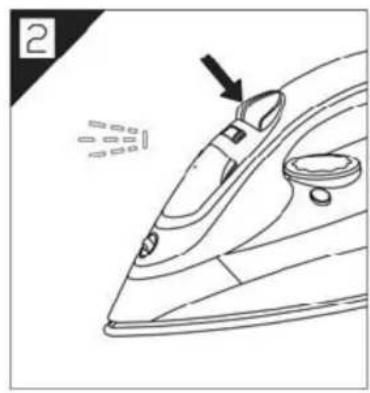
natural_image
Line drawing of a steam iron with a labeled component (no text or symbols)
natural_image
Line drawing of an iron iron with a dial indicator and arrow pointing to the handle (no text or symbols)
natural_image
Line drawing of an iron (£) with steam rising and rain falling (no text or symbols)
natural_image
Line drawing of a steam iron with a handle and mounting bracket (no text or symbols)
natural_image
Line drawing of a steam iron with exhaust smoke, showing internal components and motion (no text or symbols)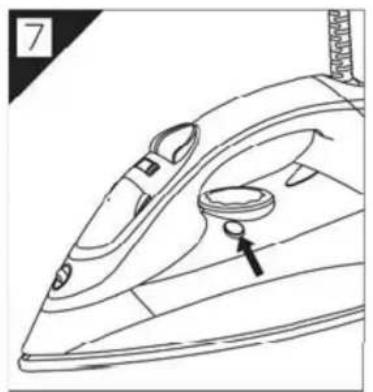
natural_image
Line drawing of a steam iron with a dial indicator (no text or symbols)
natural_image
Line drawing of a mechanical device with a coiled spring (no text or symbols)INSTRUCCIONES
SINGER SNG 7.26 PLANCHA DE VAPOR DE FUNCIONES COMPLETAS
220/240V \~50/60 Hz max 2600W

ESP
ESP
INSTRUCCIONES GENERALES
natural_image
Line drawing of a boat's hull with a flag and handle (no text or symbols)
natural_image
Line drawing of a steam iron with a labeled component (no text or symbols)
natural_image
Line drawing of an iron iron with a dial indicator and arrow pointing to the handle (no text or symbols)
natural_image
Line drawing of an iron iron with raindrops and a label '4' (no text or symbols on the diagram itself)
natural_image
Line drawing of a steam iron with a handle and mounting bracket (no text or symbols)
natural_image
Line drawing of a steam iron with exhaust smoke, showing internal components and motion (no text or symbols)
natural_image
Line drawing of a steam iron with a dial indicator (no text or symbols)
natural_image
Line drawing of a mechanical device with a coiled spring (no text or symbols)INSTRUÇÕES
SINGER SNG 7.26
FERRO A VAPOR
FUNÇÃO TOTAL
220/240V \~50/60 Hz max 2600W

INSTRUÇÕES DE SEGURANÇA IMPORTANTES
natural_image
Line drawing of a boat's hull with a flag and handle (no text or symbols)
natural_image
Line drawing of a steam iron with a labeled component (no text or symbols)
natural_image
Line drawing of an iron iron with a dial indicator and arrow pointing to the handle (no text or symbols)
natural_image
Line drawing of an iron (£) with steam rising and rain falling (no text or symbols)
natural_image
Line drawing of a steam iron with a handle and mounting bracket (no text or symbols)
natural_image
Line drawing of a steam iron with exhaust smoke, showing internal components and motion (no text or symbols)
natural_image
Line drawing of a steam iron with a dial indicator (no text or symbols)
natural_image
Line drawing of a mechanical device with a coiled spring (no text or symbols)INSTRUCTIONS
SINGER SNG 7.26
FONCTION COMPLÈTE
FER À VAPEUR
220/240V \~50/60 Hz max 2600W

www.singer.com
CONSIGNES DE SÉCURITÉ IMPORTANTES
natural_image
Line drawing of a boat's hull with a flag and handle (no text or symbols)
natural_image
Line drawing of a steam iron with a labeled component (no text or symbols)
natural_image
Line drawing of an iron iron with a dial indicator and arrow pointing to the handle (no text or symbols)
natural_image
Line drawing of an iron (£) with steam rising and rain falling (no text or symbols)
natural_image
Line drawing of a steam iron with a handle and mounting bracket (no text or symbols)
natural_image
Line drawing of a steam iron with exhaust smoke, showing internal components and airflow direction (no text or symbols)
natural_image
Line drawing of a steam iron with a dial indicator (no text or symbols)
natural_image
Line drawing of a mechanical device with a coiled spring (no text or symbols)BRUGSANVISNING
SINGER SNG 7.26
FULD-FUNKTIONELT
DAMPSTRYGEJERN
220/240V \~50/60 Hz max 2600W

natural_image
Line drawing of a boat's hull with a flag and handle (no text or symbols)
natural_image
Line drawing of a steam iron with a labeled component (no text or symbols)
natural_image
Line drawing of an iron iron with a dial indicator and arrow pointing to the handle (no text or symbols)
natural_image
Line drawing of an iron (£) with steam rising and rain falling (no text or symbols)
natural_image
Line drawing of a steam iron with a handle and mounting bracket (no text or symbols)
natural_image
Line drawing of a steam iron with exhaust smoke, showing internal components and motion (no text or symbols)
natural_image
Line drawing of a steam iron with a dial indicator (no text or symbols)
natural_image
Line drawing of a mechanical device with a coiled spring (no text or symbols)OHJEET
SINGER SNG 7.26
MONIPUOLISIN TOIMINNOIN VARUSTETTU
HÖYRYSILITYSRAUTA
220/240V \~50/60 Hz max 2600W
FIN
YLEISIÄ OHJEITA
natural_image
Line drawing of a boat's hull with a flag and handle (no text or symbols)
natural_image
Line drawing of a steam iron with a labeled component (no text or symbols)
natural_image
Line drawing of an iron iron with a dial indicator and arrow pointing to the handle (no text or symbols)
natural_image
Line drawing of an iron (£) with steam rising and rain falling (no text or symbols)
natural_image
Line drawing of a steam iron with a handle and mounting bracket (no text or symbols)
natural_image
Line drawing of a steam iron with exhaust smoke, showing internal components and airflow direction (no text or symbols)
natural_image
Line drawing of a steam iron with a dial indicator (no text or symbols)
natural_image
Line drawing of a mechanical device with a coiled spring (no text or symbols)INSTRUKSJONER
SINGER SNG 7.26
FULL-FUNKSJONS
DAMPSTRYKEJERN
220/240V \~50/60 Hz max 2600W

NOR
VIKTIGE SIKKERHETSINSTRUKSJONER
natural_image
Line drawing of a boat's hull with a flag and handle (no text or symbols)
natural_image
Line drawing of a steam iron with a labeled component (no text or symbols)
natural_image
Line drawing of an iron iron with a dial indicator and arrow pointing to the handle (no text or symbols)
natural_image
Line drawing of an iron (£) with steam rising and rain falling (no text or symbols)
natural_image
Line drawing of a steam iron with a handle and mounting bracket (no text or symbols)
natural_image
Line drawing of a steam iron with exhaust smoke, showing internal components and airflow direction (no text or symbols)
natural_image
Line drawing of a steam iron with a dial indicator (no text or symbols)
natural_image
Line drawing of a mechanical device with a coiled spring (no text or symbols)BRUKSANVISNING
SINGER SNG 7.26
ÅNGSTRYKJÄRN
MED FULLSTÄNDIGA FUNKTIONER
220/240V \~50/60 Hz max 2600W

SWE
VIKTIGA SÄKERHETSFÖRESKRIFTER
ALLMÄNNA IN STRUKTIONER
natural_image
Line drawing of a boat's hull with a flag and handle (no text or symbols)
natural_image
Line drawing of a steam iron with a labeled component (no text or symbols)
natural_image
Line drawing of an iron iron with a dial indicator and arrow pointing to the handle (no text or symbols)
natural_image
Line drawing of an iron (£) with steam rising and rain falling (no text or symbols)
natural_image
Line drawing of a steam iron with a handle and mounting bracket (no text or symbols)
natural_image
Line drawing of a steam iron with exhaust smoke, showing internal components and motion (no text or symbols)
natural_image
Line drawing of a steam iron with a dial indicator (no text or symbols)
natural_image
Line drawing of a mechanical device with a coiled spring (no text or symbols)NAPAŘOVACÍ ŽEHLIČKA
SINGER SNG 7.26 NÁVOD K OBSLUZE
220/240V \~50/60 Hz max 2600W

DŮLEŽITÉ POKYNY K BEZPEČNOSTI
TYTO POKYNY SI USCHOVEJTE
Zejména:
natural_image
Line drawing of a boat's hull with a flag and handle (no text or symbols)
natural_image
Line drawing of a steam iron with a labeled component (no text or symbols)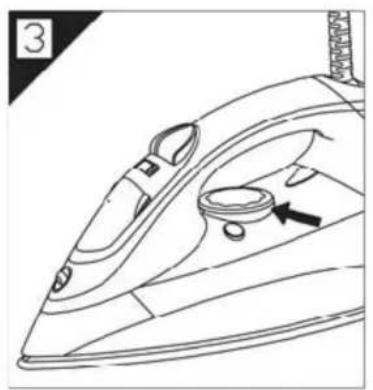
natural_image
Line drawing of an iron iron with a dial indicator and arrow pointing to the handle (no text or symbols)
natural_image
Line drawing of an iron (£) with steam rising and rain falling (no text or symbols)
natural_image
Line drawing of a steam iron with a handle and mounting bracket (no text or symbols)
natural_image
Line drawing of a steam iron with exhaust smoke, no text or symbols present
natural_image
Line drawing of a steam iron with a dial indicator (no text or symbols)
natural_image
Line drawing of a mechanical device with a coiled spring (no text or symbols)INSTRUKCJA OBSŁUGI
SINGER SNG 7.26 ŻELAZKO PAROWE
220/240V \~50/60 Hz max 2600W
POL
WAŻNE ZALECENIA DOTYCZĄCE BEZPIECZEŃSTWA
ZALECENIA OGÓLNE
natural_image
Line drawing of a boat's hull with a flag and handle (no text or symbols)
natural_image
Line drawing of a steam iron with a labeled component (no text or symbols)
natural_image
Line drawing of an iron iron with a dial indicator and arrow pointing to the handle (no text or symbols)
natural_image
Line drawing of an iron (£) with steam rising and rain falling (no text or symbols)
natural_image
Line drawing of a steam iron with a handle and mounting bracket (no text or symbols)
natural_image
Line drawing of a steam iron with exhaust smoke, no text or symbols present
natural_image
Line drawing of a steam iron with a dial indicator (no text or symbols)
natural_image
Line drawing of a mechanical device with a coiled spring (no text or symbols)ОБЩИЕ УСЛОВИЯ
natural_image
Line drawing of a boat's hull with a flag and handle (no text or symbols)
natural_image
Line drawing of a steam iron with a labeled component (no text or symbols)
natural_image
Line drawing of an iron iron with a dial indicator and arrow pointing to the handle (no text or symbols)
natural_image
Line drawing of an iron (£) with steam rising and rain falling (no text or symbols)
natural_image
Line drawing of a steam iron with a handle and mounting bracket (no text or symbols)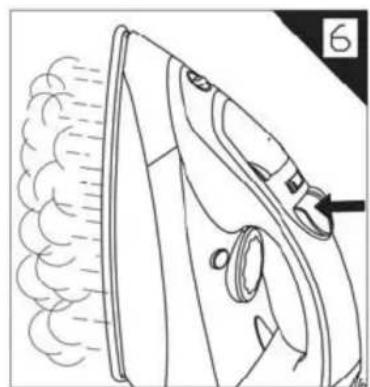
natural_image
Line drawing of a steam iron with exhaust smoke, no text or symbols present
natural_image
Line drawing of a steam iron with a dial indicator (no text or symbols)
natural_image
Line drawing of a mechanical device with a coiled spring (no text or symbols)GÓZÖLÓS VASALÓ
SINGER SNG 7.26
KEZELÉSI ÚTMUTATÓ
220/240V \~50/60 Hz max 2600W
HUN
www.singer.com
FONTOS BIZTONSÁGI UTASÍTÁSOK
natural_image
Line drawing of a boat's hull with a flag and handle (no text or symbols)
natural_image
Line drawing of a steam iron with a labeled component (no text or symbols)
natural_image
Line drawing of an iron iron with a dial indicator and arrow pointing to the handle (no text or symbols)
natural_image
Line drawing of an iron (£) with steam rising and rain falling (no text or symbols)
natural_image
Line drawing of a steam iron with a handle and mounting bracket (no text or symbols)
natural_image
Line drawing of a steam iron with exhaust smoke, no text or symbols present
natural_image
Line drawing of a steam iron with a dial indicator (no text or symbols)
natural_image
Line drawing of a mechanical device with a coiled spring (no text or symbols)INSTRUKCJA OBSŁUGI
SINGER SNG 7.26
NAPAROVACIA ŽEHLIČKA
220/240V \~50/60 Hz max 2600W

DŮLEŽITÉ POKYNY K BEZPEČNOSTI
VŠEOBECNÉ POKYNY
natural_image
Line drawing of a boat's hull with a flag and handle (no text or symbols)
natural_image
Line drawing of a steam iron with a labeled component (no text or symbols)
natural_image
Line drawing of an iron iron with a dial indicator and arrow pointing to the handle (no text or symbols)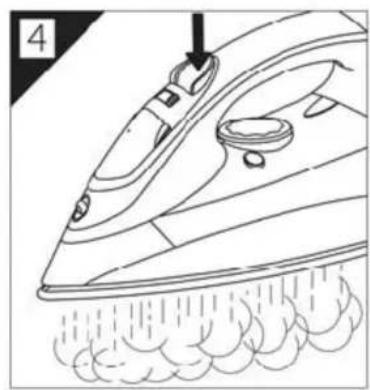
natural_image
Line drawing of an iron (£) with steam rising and rain falling (no text or symbols)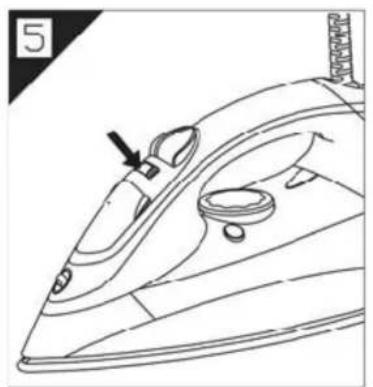
natural_image
Line drawing of a steam iron with a handle and mounting bracket (no text or symbols)
natural_image
Line drawing of a steam iron with exhaust smoke, no text or symbols present
natural_image
Line drawing of a steam iron with a dial indicator (no text or symbols)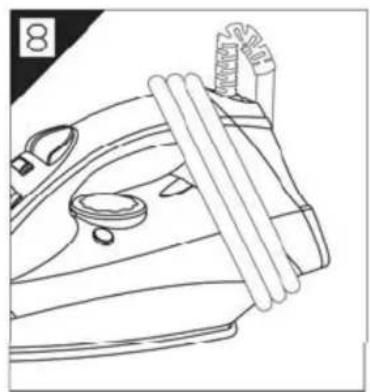
natural_image
Line drawing of a mechanical device with a coiled spring (no text or symbols)HANDLEIDING
SINGER SNG 7.26 MULTIFUNCTIONELE STOOMSTRIJKIJZER
220/240V \~50/60 Hz max 2600W

BELANGRIJKE VEILIGHEIDSINSTRUCTIES
BESCHRIJVING VAN HET APPARAAT
A. Stoomgaten strijkzool B.Spray-gaatje
C. Water vul deksel D. Stoomwijzer
E. Extra stoomknop F. Spray knop
G. Coating H. Lampje/ automatisch uitschakel lampje
I. Thermostaatcurso J. Transparante waterreservoir
K. Ontkalkingsknop L. Maximum Waterniveau
ALGEMENE INSTRUCTIES
natural_image
Line drawing of a boat's hull with a flag and handle (no text or symbols)
natural_image
Line drawing of a steam iron with a labeled component (no text or symbols)
natural_image
Line drawing of an iron iron with a dial indicator and arrow pointing to the handle (no text or symbols)
natural_image
Line drawing of an iron (£) with steam rising and rain falling (no text or symbols)
natural_image
Line drawing of a steam iron with a handle and mounting bracket (no text or symbols)
natural_image
Line drawing of a steam iron with exhaust smoke, no text or symbols present
natural_image
Line drawing of a steam iron with a dial indicator (no text or symbols)
natural_image
Line drawing of a mechanical device with a coiled spring (no text or symbols)SINGER Customer Service
Germany
http://singer.com/global/spain.html