FW 500 - Mincer GRAEF - Free user manual and instructions
Find the device manual for free FW 500 GRAEF in PDF.
User questions about FW 500 GRAEF
0 question about this device. Answer the ones you know or ask your own.
Ask a new question about this device
Download the instructions for your Mincer in PDF format for free! Find your manual FW 500 - GRAEF and take your electronic device back in hand. On this page are published all the documents necessary for the use of your device. FW 500 by GRAEF.
USER MANUAL FW 500 GRAEF
EN Operating Instructions
Product overview. 20
Detailed overview - meat mincer. 21
Detailed overview - sausage stuffing attachment 22
Detailed overview - Kebbe attachment 23
Detailed overview - sausage stuffing attachment 24
General aspects 25
Information on these operating instructions. 25
Intended use 25
Limitation of liability. 26
Safety instructions 26
Unpacking 28
Requirements on the installation location 28
Prior to first use 28
Operation 28
Mincing machine attachment 29
Sausage stuffing attachment 30
Kebbe attachment 30
Spritzbiscuit attachment 31
Reverse run 32
Cleaning 32
After-sales service 32
Disposal 32
Two-year warranty 32
DE
EN
FR
NL
ES
IT
DK
SE
NO
PL
UKR
HU
Product overview
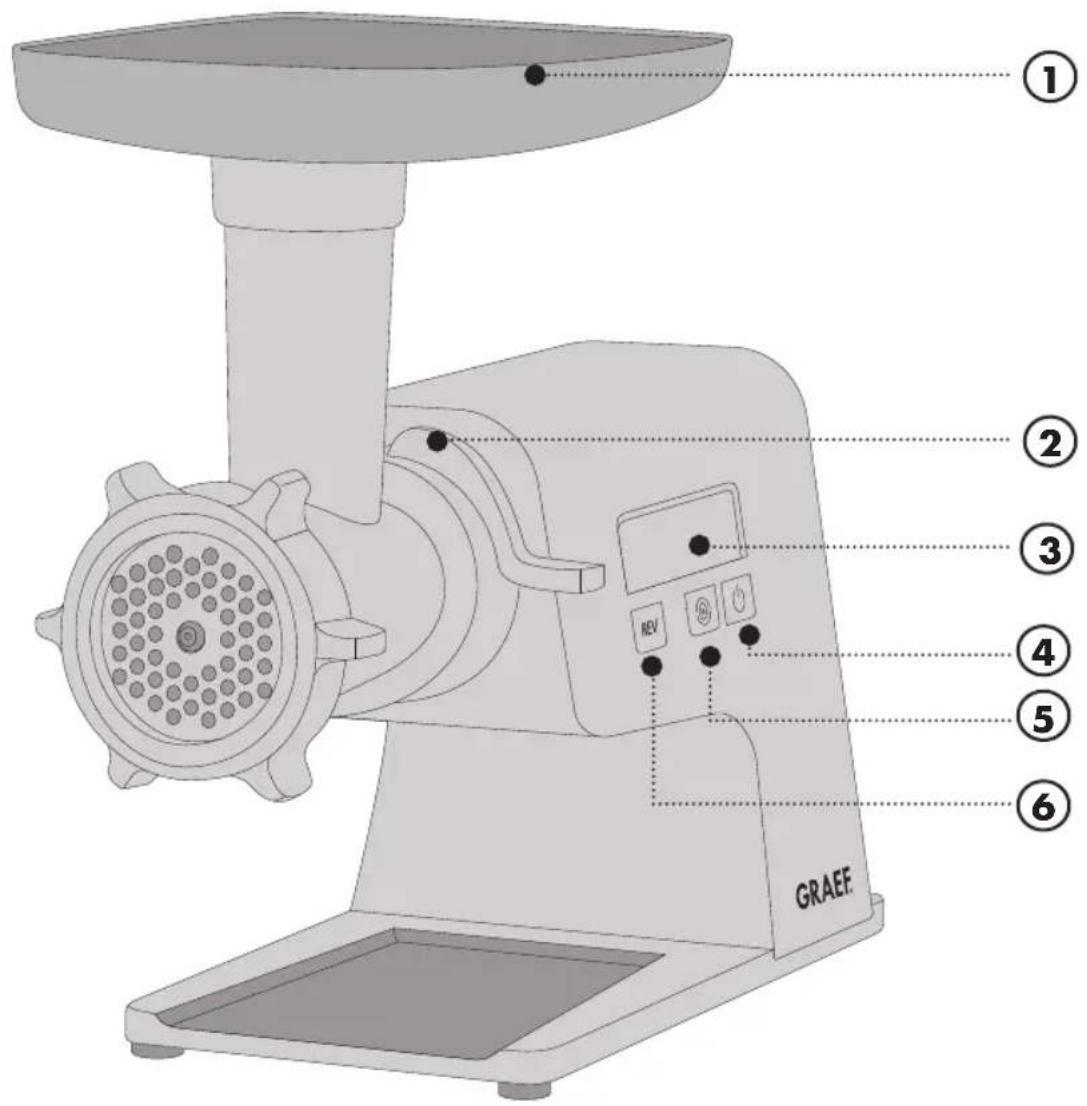
- Filling tray
- Locking lever
- Display
- Start / Stop button
- Speed button ( = 1, = 2)
- REV button (reverse run)
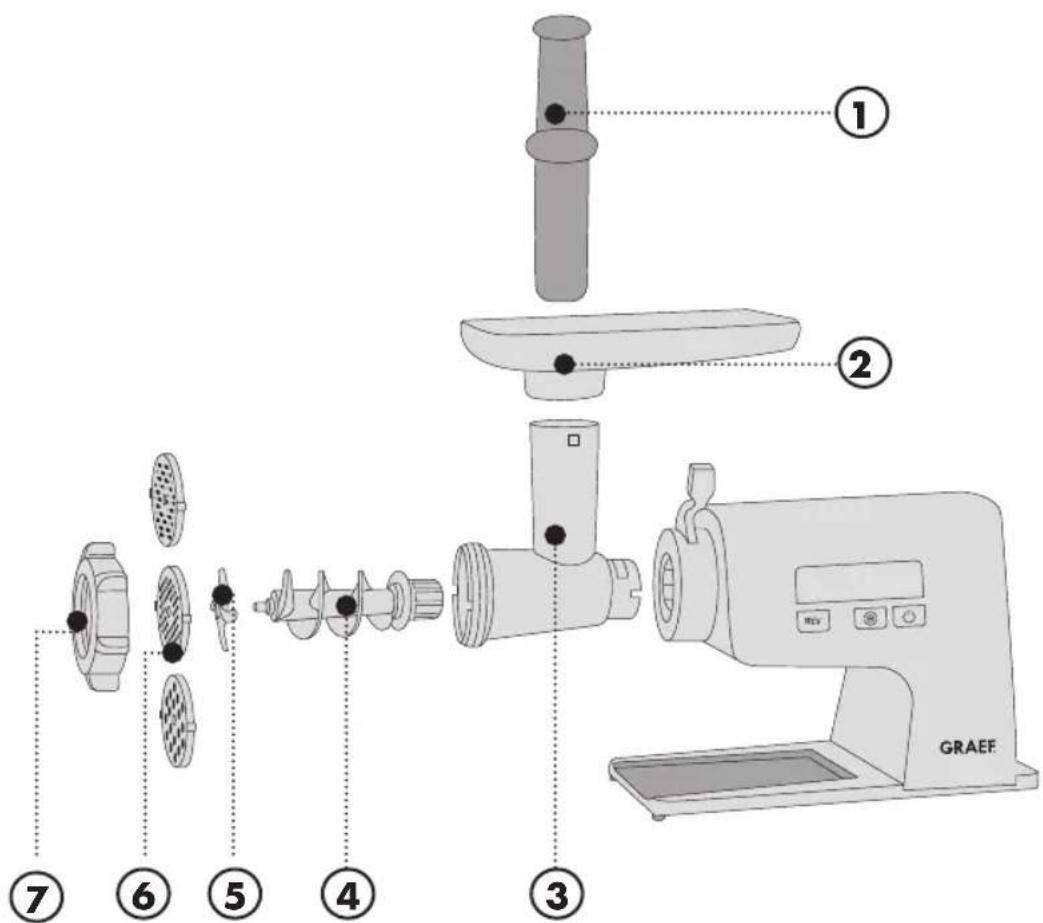
Detailed overview - meat mincer
DE
EN
FR
NL
ES
IT
DK
SE
NO
PL
UKR
HU
- Stuffer
- Filling tray
- Worm housing
- Worm
- Blade
- Perforated disc (Ø 3 mm fine, Ø 5 mm medium, Ø 8 mm coarse)
- Ring nut
Detailed overview - sausage stuffing attachment
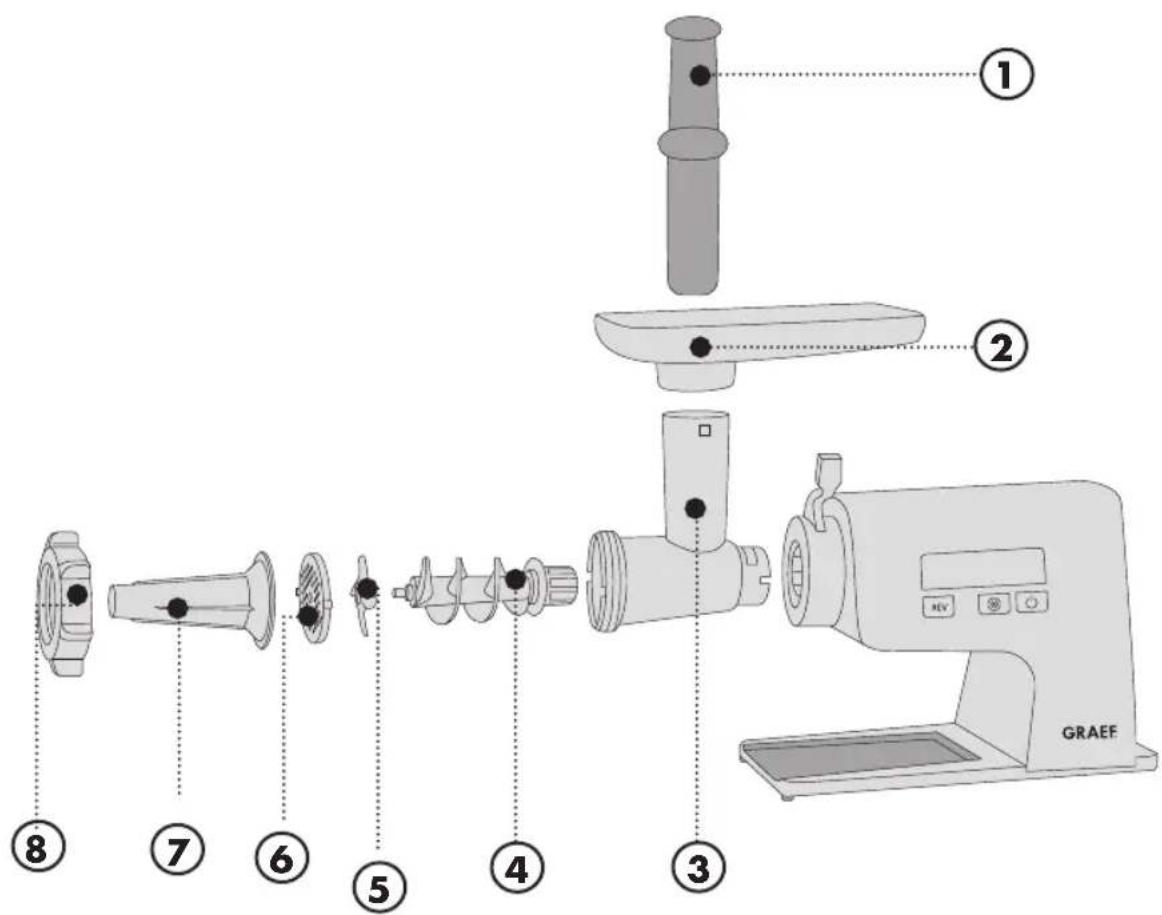
- Stuffer
- Filling tray
- Worm housing
- Worm
- Blade
- Perforated disc (fine, medium, coarse)
-
Sausage stuffing attachment
-
Ring nut
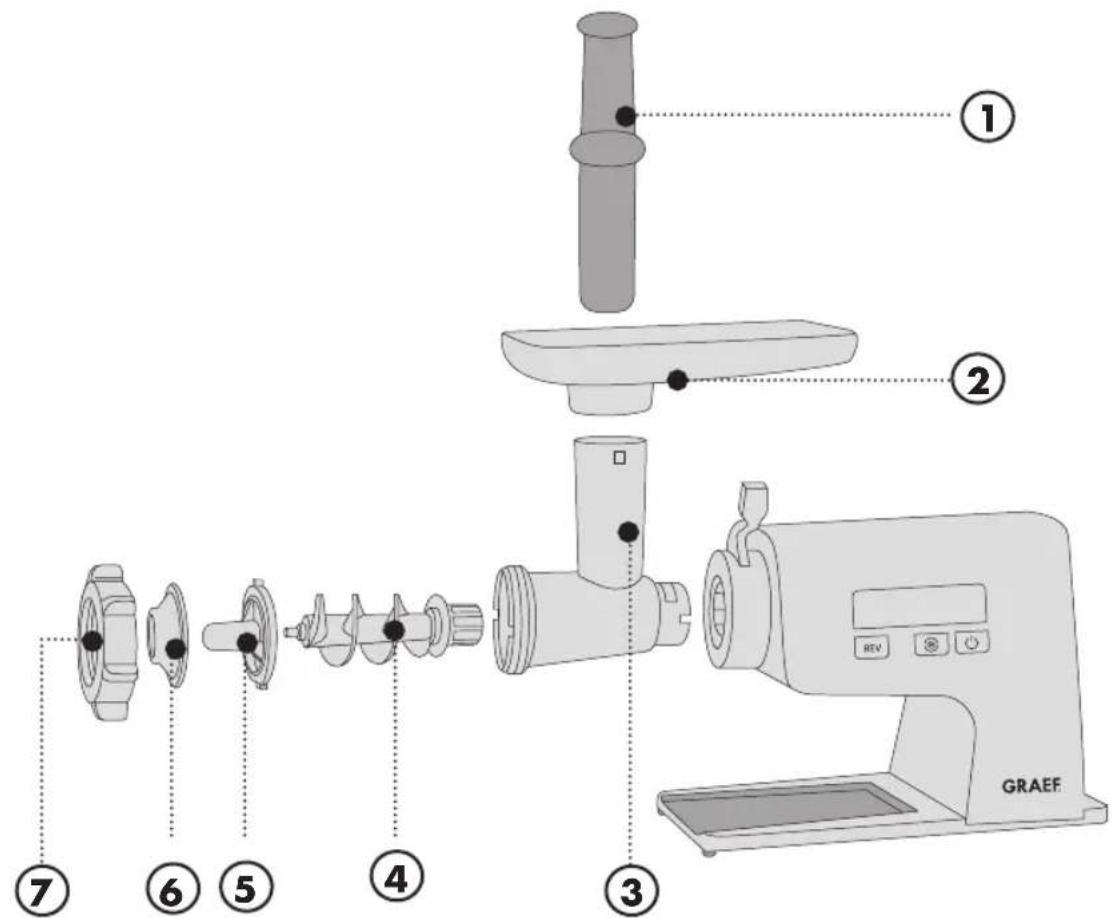
Detailed overview - Kebbe attachment
DE
EN
FR
NL
ES
IT
DK
SE
NO
PL
UKR
HU
- Stuffer
- Filling tray
- Worm housing
- Worm
- Kebbe attachment, long
- Kebbe attachment, short
- Ring nut
Detailed overview - sausage stuffing attachment
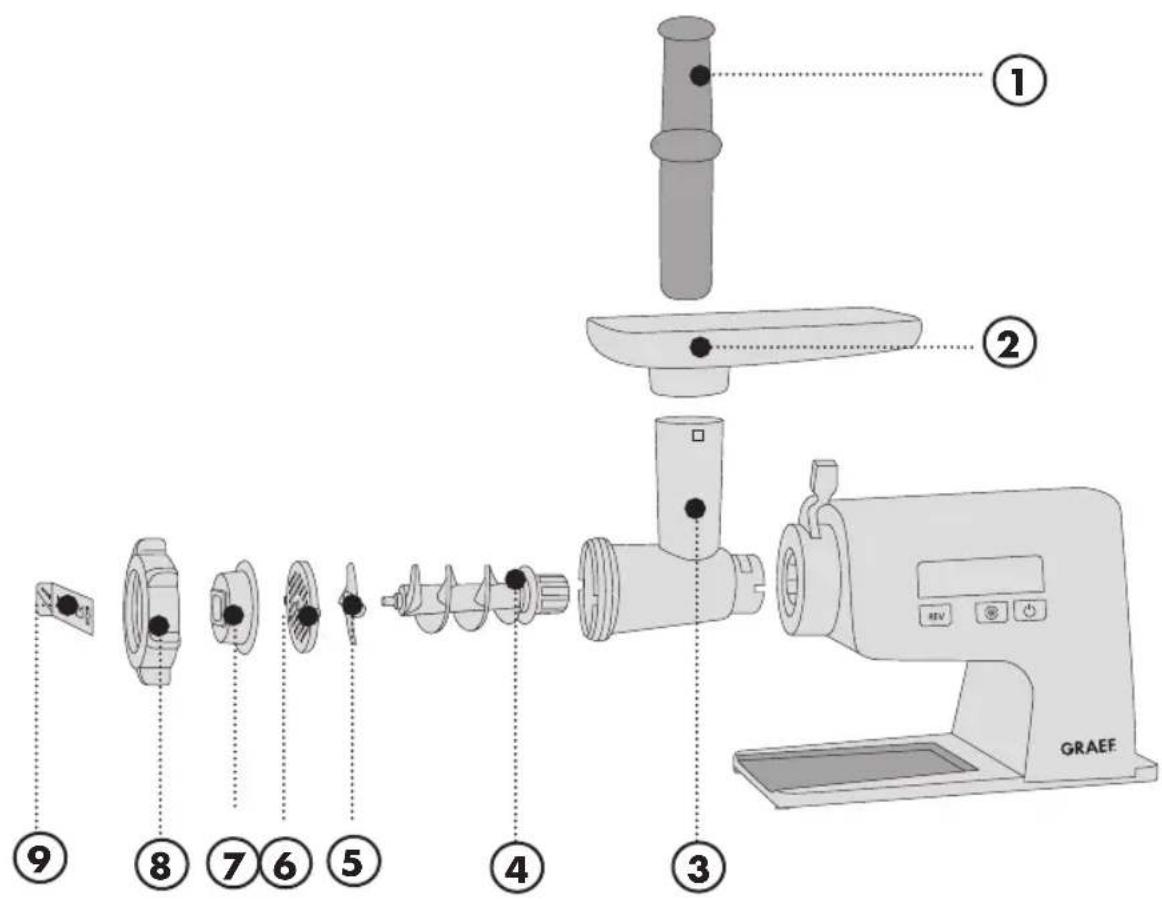
- Stuffer
- Filling tray
- Worm housing
- Worm
- Blade
- Perforated disc (fine, medium, coarse)
- Spritz biscuit attachment
-
Ring nut
-
Spritz biscuit template
General aspects
Dear Customer,
You have made a good choice by buying the professional meat mincer. You have purchased a recognised quality product. We would like to thank you for buying this machine and wish you a lot of fun with your new meat mincer.
Information on these operating instructions
These operating instructions provide you with important information about the commissioning, security, the intended use and care of the meat mincer (in the following referred to as "unit"). The operating instructions shall have to be available at the unit at all times. The instructions have to be read and applied by every person who deals with
- initial operation,
- operation,
- fault correction and/or
- or is instructed to clean the unit.
Keep these operating instructions and pass them on to the next owner along with the unit. These operating instructions cannot take into consideration every conceivable use. For further information or in case of problems which are not dealt with or not dealt with sufficiently in these instructions, please get in touch with Graef customer service or your specialist dealers.
Intended use
This unit is not intended for commercial use. Use the mincing machine in closed-up rooms only. You can process meat, fish, poultry, bacon and dough. By no means cut hard matter, such as frozen foodor bones. Another or any exceeding use shall not be considered intended. This appliance is intended for domestic and similar use, such as:
Staff kitchens in shops and office
In agricultural estates
- By guests in hotels, motels and other living quarters;
In bed and breakfast boarding houses
Another or any exceeding use shall not be considered intended.
The appliance can cause dangers, if is not used as intended.
-
Use the unit exclusively as intended.
-
Observe the procedures described in these operating instructions.
Claims of any kind caused by damage by unintended use shall be excluded.
The risk shall be borne sole by the operator.
Limitation of liability
All technical information, data and notes on the installation, the operation and the care contained in these operating instructions correspond to the last status before printing, and are rendered under consideration of our previous experience and to the best of knowledge. No claims may be derived from the particulars, illustrations and descriptions in these instructions.
The manufacturer shall not assume any liability for damage caused by:
Non-observation of the instructions,
- unintended use,
- incorrect repairs,
- technical modifications,
- use of unapproved spare parts.
Translations shall be carried out to the best of knowledge. We shall not assume any liability for translation mistakes. The original German text only shall be binding.
Safety instructions
This unit is in conformity with the safety instructions mentioned hereinbefore. However, incorrect handling may lead to injury and damage.
For safe handling of this unit, please observe the following safety instructions:
- Before using this device for the first time, check it for visible outer damages on the housing, connection cable and plug. Do not operate a damaged unit.
- If the connection cable is damaged, it must be replaced by the manufacturer, the after-sales service or a similarly qualified person in order to prevent danger.
- Repairs may be carried out only by an expert or by Graef after-sales service. Incorrect repairs may cause considerable hazards for the user. In addition, any claim under guarantee is forfeited.
-
Within the guarantee period the unit may be repaired only by Graef after-sales service, otherwise the warranty claim expires.
-
Defective parts must be replaced by original spare parts only. It is only with these parts that the safety requirements are met.
- This unit must not be used by children. Keep the unit and its connection cable away from children.
- This unit may be used by persons with reduced physical, sensory or mental abilities or deficiencies in experience and knowledge, if they are supervised or have been instructed in the safe use of the unit, and in addition understand the resulting dangers.
Children must not play with this unit. - In the absence of supervision and prior to assembly, during cleaning disconnect the unit from the mains.
- The unit is not intended to be used with an external timer or a separate remove control.
- Always disconnect the connection cable by using plug; do not pull the connecting cable.
- Prior to connecting the unit, compare the details regarding voltage and frequency on the name plate with those of your electrical network. These details must correspond so that no damage occurs to the unit.
- Do not use the unit if the mains cable or plug are damaged.
- Prior to using the appliance any further, have a new connection cable installed by the Graef customer service or by an authorised skilled person.
- Do not open the housing under any circumstances. If live connections are touched or the electrical and mechanical construction are modified, there is the danger of electric shock.
- Never touch live parts. This might cause an electric shock or, in the worst case, lead to death.
- Never carry the unit by its power cable.
- Never transport the appliance while it is in operation.
- Never touch the plug with moist hands.
- Packaging materials must not be used for playing. There is a danger of suffocation.
- Before cleaning, make sure that the unit is switched off and is not connected to the power supply.
- Do not use any aggressive or abrasive detergents and no solvents.
-
Do not scratch off stubborn soiling with hard objects.
-
Do not flush the unit in water and do not immerse it in water.
- The food processes must be free of hard components (such as bones, frozen pieces).
Unpacking
Proceed as follows to unpack the unit:
- Pull the unit out of the cardboard box.
- Remove all packaging and possible stickers on the unit (do not remove the name plate).
Requirements on the installation location
For safe and fault-free operation of the unit, the following has to be observed during installation:
- Use a firm, even, horizontal, non-slip and heat resistant surface with a sufficient load capacity.
- Choose the location in such a way that children cannot reach moving parts (in particular the blade) of the unit.
- The unit is not designed for installation in a wall or a built-in cupboard.
- Do not set up the unit in a hot, wet or moist environment.
- The power outlet must be easily accessible so that the power cable can be quickly removed in case of emergency.
Prior to first use
Clean all individual parts thoroughly in order to remove potential production left-overs. See "Cleaning".
Operation
NOTE
- The maximum duration of use is abt. 5 minutes. Subsequently, let the unit cool down for about 10 minutes before using it again.
IMPORTANT!
- Handle the blade with care as it may be sharp and may lead to injuries.
-
The sharp side must face forward into the direction of the perforated disc.
-
Check to see that the opening is on the locating bolt in the housing.
-
Press on "Rev" when food has got stuck in the worm. Hold this button for approx. 5 seconds.
- Never put your fingers into the feed chute. Always use the stuffer.
- Remove or place the worm housing only at standstill and the connecting cable removed.
- If the unit switches off during the processing operation, it is overheated. Disconnect the mains plug and let the unit cool down for 1 hour.
Mincing machine attachment
- Insert the worm housing and close the locking lever.
- Place the worm in the worm housing.
Now place the blade. - Place the requested perforated disc.
Now screw on the ring nut. - Insert the filling tray.
- Insert the plug into the socket, the unit is then in standby mode.
- Put a plate or bowl below the outlet.
- Place the food to be processed into the filling tray. Cut meat beforehand into strips of about 2.5cm in width and about 10cm in length.
NOTE
If you do not press the Start/Stop button within 5 minutes, the unit will switch off. To switch on the unit again, press the Start/Stop button.
- Press the Start/Stop button.
- Press the speed button. Here you have the choice between two speed levels (1 and 2).
- Subsequently use the provided stuffer to push only.
- After finishing the mincing process, press the Start / Stop button.
- In order to disassemble the unit, pull the plug out of the socket, push the locking lever upward, remove the attachment and disassemble all individual
parts in reverse sequence.
Sausage stuffing attachment
- Place the worm in the worm housing.
Now place the blade. - Place the requested perforated disc.
- Place the sausage stuffing attachment.
Now screw on the ring nut. - Insert the filling tray.
- Insert the plug into the socket, the unit is then in standby mode.
- Put a plate or bowl below the outlet.
- Pullthe artificialornatural sausageskin overthesausagestuffing attachmentnose. Tip: For a better result, in advance put the artificial or natural sausage skin in lukewarm water for about 10 minutes.
- Place the food to be processed into the filling tray. Cut meat beforehand into strips of about 2.5cm in width and about 10cm in length.
NOTE
If you do not press the Start/Stop button within 5 minutes, the unit will switch off. To switch on the unit again, press the Start/Stop button.
- Press the Start/Stop button.
- Press the speed button. Here you have the choice between two speed levels (1 and 2).
- Subsequently use the provided stuffer to push only.
- After finishing the mincing process, press the Start / Stop button.
- In order to disassemble the unit, pull the plug out of the socket, push the locking lever upward, remove the attachment and disassemble all individual parts in reverse sequence.
Kebbe attachment
- Place the worm in the worm housing.
- Place the former and subsequently the Kebbe attachment.
Now screw on the ring nut. - Insert the filling tray.
- Insert the plug into the socket, the unit is then in standby mode.
-
Put a plate or bowl below the outlet.
-
Place the food to be processed into the filling tray. Cut meat beforehand into strips of about 2.5cm in width and about 10cm in length.
NOTE
If you do not press the Start/Stop button within 5 minutes, the unit will switch off. To switch on the unit again, press the Start/Stop button.
- Press the Start/Stop button.
- Press the speed button. Here you have the choice between two speed levels (1 and 2).
- Subsequently use the provided stuffer to push only.
- After finishing the mincing process, press the Start / Stop button.
- In order to disassemble the unit, pull the plug out of the socket, push the locking lever upward, remove the attachment and disassemble all individual parts in reverse sequence.
Spritz biscuit attachment
- Place the worm in the worm housing.
- Subsequently place the blade.
- Place the requested perforated disc.
- Place the spritz biscuit attachment in the ring nut so that it rests front at the opening.
- Now screw on the ring nut. Before screwing the ring nut tight, lock the spritz biscuit attachment so that it is straight on the ring nut.
- Now fit the mould for the different spritz biscuit variations.
- Insert the filling tray.
- Insert the plug into the socket, the unit is then in standby mode.
- Put a plate or bowl below the outlet.
- Place the food to be processed into the filling tray. Cut meat beforehand into strips of about 2.5cm in width and about 10cm in length.
NOTE
If you do not press the Start/Stop button within 5 minutes, the unit will switch off. To switch off the unit, press the Start/Stop button for about 3 seconds.
- Press the Start/Stop button.
- Press the speed button. Here you have the choice between two speed levels (1 and 2).
-
Subsequently use the provided stuffer to push only.
-
After finishing the mincing process, press the Start / Stop button.
- In order to disassemble the unit, pull the plug out of the socket, push the locking lever upward, remove the attachment and disassemble all individual parts in reverse sequence.
Reverse run
If the unit blocks, press "REV". The screw rotates into the opposite direction.
Cleaning
Clean the unit with a soft moist cloth, and let to dry subsequently. Do not flush the unit in water and do not immerse it in water.
All accessory parts can be cleaned in warm water using washing-up liquid.
NOTE
- The unit and all accessory parts are not dishwasher-safe.
- Pull the mains plug before each cleaning process.
Let all parts dry completely after cleaning. Reassembly the mincing machine attachment again.
After-sales service
If your unit is defective, please contact your specialist dealer or the Graef customer service on +49 2932-9703677 or write an e-mail to service@graef.de
Disposal

At the end of its service life, this product cannot be disposed of in normal domestic waste, but has to be taken a collection point ensuring the recycling of electronic household waste. The symbol on the product and in the operating instructions point out to this fact. Reuse
the materials according to their marking. With the reuse, recycling or other forms of recycling of old equipment, you make an important contribution to the protection of our environment. Please ask your municipal administration for the disposal point.
Two-year warranty
For this product, we assume 24 months manufacturer warranty for defects, which are due to production or material defects. Your legal warranty claim in conformity with Section 439 et seq. of the German Civil Code (BGB) shall remain unaffected by this regulation. The guarantee does not cover any damage
ge which is caused by incorrect handling or use as well as defects which only slightly influence the function or the value of the unit. We do not assume any liability for damage caused by lack of or insufficient maintenance. In this case, the warranty will become null and void as well. Moreover, transport damage provided we are not responsible shall be excluded from the claims under guarantee. Guarantee shall be ruled out for damage, the repair of which has not been carried out by us or one of our representations. In case of justified complaints, we shall repair the defective product or replace it by a product without defects at our discretion.
Table des matieres
Chere cliente, cher client,
IpeTeH3ii 6yNb-RAKO BnDy BHacJIIOK NOsKOJxEHN, cnpuHHeHO B pa3i HnnpaBnBHorO BnKOpNCtAHN, BnKJIouaOTbcr. Pn3NK Hece BnKJIouHo KOpNCtYBaU.
O6mexeHnBiDIOBidaIbHOCTi
BcraTexnHna iHOpMaia, dani Ta iNCTpyKu3 MoTaxy, ekcnnyataaTa texnHoro o6cnyroByBaHHa, 0oMiCTaBcB uui iNCTpyKu3 ekcnnyataa, BiINOBiAdIOb OCTaHHbOMy cTahy Ha MOMeHT BHXOy B npyk I HadaIoTBc3 ypaXyBaHHaM HaIoro nonepdHbOro DocBiDy i 3HaNb. XoDi niPteH3ii He moKyTB 6ytN OTpIMaHI 3 iHOpMaui, iInoctpaui Ta onnciB y ui iNCTpyKu.
Bnpo6HnK He Hece HiaKOi BiINoBIaJIbHOCTi 3a 36NTKN y 3B'ra3ky 3:
HeDOTpIMaHHa m iHCTpyKu,
HeHAnExHHM BnKOpNCtAHHm,
HeHAnExHHm pEmoHTOM,
TEXHICHHM3MiHAMN,
BNIKOPNCTAHHnM HeBIDNOBIDHX 3aPACHNX qACTINH.
IpeeknpiiroTOBneHi cymHIO Ta BiNOBiHO Do Hauoro pIBn 3HaHb. MHe He HeceMo XoJHO BIDNOBIaJIbHOCTI 3a NOMIKn Ipeeknady. TInk BHXiHN TeKCT Ha HimeCbKi MOBi 3aIIWAeTBCr O6OB'3KOBIM DnBVKOHnH.
Ihctpykci 3 texhikn 6e3nekn
Cey npictri BIDIOBIAe BCtAHOBHeHm npabnam texhikn 6e3neKn. Onda HnpabNbHe BnKOpNCtAHn MoKe np3BeCTn Do TpaBMyBaHHra Oci6 Ta NOsKOJXeHHa.
Дя 6e3neuHOrO BnKOpNCTaHHЯ npNcTpoI OOTpMMyTeCb HabeJeHx HnXyie Ihctpykui 3 texhikn 6e3nekn:
- Pered BnKOpNCTaHnHm nepeBipTe npnstpi Ha HaraBHicb 3OBHIshix BnIMHX N0sKOJxHb KopnyCy, 3'EnHyBaIbHO Ka6eJIIO Ta WTeNCeJIIO. He BnKOpNCTOByte DeΦeKTnHn npnstpi.
-
YKsO 3'EDHyBaIbHn Ka6eIb NOxKOJxHn, Ioro MoKe 3aMInTu Nlwe BInpo6HnK, Ioro CnyX6a NiTpUmKn KJIeHTiB a6o KBaIiΦikOBaHa ocO6a, Uo6 yHnKHyTn He6e3neKn.
-
Pemont moxe npoBOnTu TIlbKn faxibeue b a6o cnyX6a nItpmKn KJIeHTIB Graef). HenpaBnBnH peMOHT moxe cnPunHnTn 3NaHy He6e3neky dny KopncTyBaay. Kpim TorO, TepmH dI rapaHTII 3akInHuYetbcra.
- BiDpemOnTyBaTn npInctpiM MoXHa IINWe npOTaROM rapaHTiHOro TepMiHy cIyX6OIO OBCnyroBvBAHHa KNIeHTIB Graef, iHaKwe TepMin DII rapaHTii 3aKiHcyETbcra.
-Дeф ek thi KOMnoHent MoXHa 3amHOBaTH TlbKn OpiHnBnMn 3anachmN qactnHAM. TlbKn ZJ qactHH rapaHTObaHO BiINObiaIOTb BImoram 6e3neKn. - Κεη πριστρίη He πριδηαυχήν ἀν ἐνκοριστανήν ἀπθμύ. Πριστρίη τα έγότο 3'επηναβήν καδέŋb συπάτην πριματην ποδαλήν βίδιπεύ.
- Ппстрий може викоростоватис особами 3i 3нжehими φi3нчими, ceHCOPHIMn a6o po3yMOBIMn 3di6noCTaMn a6o BiDCyTHiCtIO DoCBiPy Ta/ a6o 3HaHb 5Odo BnKOpNCTaHHa, 3a yMOBn,якso BOHn 3haxOJaTBcR niD harlaDom a6o 6yIn npoiHCTpykTobahi 5Odo 6e3neuHOro BnKOpNCTaHHa npicstpoio i 3po3yminn dxepeNa He6e3neKn.
-ДiTЯМЗбОрно ГраТи 3ппстpoЕМ. - YKso HeMae Harny Ta nepei 36ipkoio, po3bnpaHnM a6o ouuueHHm, npictpi 3abxdn cnid Biiknouatn Bid eJeKtpomepexi.
- Ппстрий не пиз nauseю роботи i3 3OBhiHIM taHmepom a6o OKpeMIM nyltom dinCTaHciHoro KepyBaHHra.
3abxndn BntraaTe 3'edHyBaIbHn Ka6eIb i3 po3eTKn 3a ITeNCeIb, a He 3a 3'edHyBaIbHn Ka6eIb. - Перед підклоченям ппсстpoю поінійе даи пpo Hanpyru i chactotу, 3a3начени на tabлчци 3 texhiHmN daHmN, 3 daHmN BaWooi eNeKtpomepexi. Li dani nobHHi 36iratncs, 0o6 3anobirtn noWKoJxehnIO npcstpoio.
He BnKOpncToBvIe npictri, kUo 3'edHyBaIbHn Ka6eIb a60 wTeNCeIb noWKoJxehi. - Pered noaBnM 3actocybaHnM npntpo BCTaHObitb HOBn 3'EnHyBaIbHn Ka6eIb 3a DonomoroIO cnyXb NiITpIMKn KJIeHTIB Pae (Graef) a6o ynoBHOBAxHOrO faxibra.
Hi B ykomy pa3i He cnid Biikpmbatn Kopnyc npncptpo. Kkto TOpKhytncctpyMOBnx 3'edHaNb a6o 3miHHTn eNeKtpnuHy Ta MexaHiy KOHCTpyKciio,ichye He6e3neka ypaXeHHra neKtpnuHm cTpyMOM.
Hikon He TopkaTec8 6yB-8Kx Yactn, kI 3haxOaTbcN iD HanpyroI.
Lc me moke cnpuHHTn ypaXeHHra eNeKtpuHm cTpymom a6o, y ripwoMy BInpaIky, HABITb Cmeptb.
He trpmaite npictpi3a 3'ednhyBaIbHn Ka6eIb.
- Hikoli He TpaHcnpTyte npictpi nic yac noro po6otn.
He TopkaTecb wTekepa MOKpIMn pykAMN.
- PakybaIbHI MaTePiAn He NobHHi 6yTu BnKOpNCToBahi IJr rpn. lChye He6e3neKa 3aDuxn.
- PepekohaTecra, 0o npicptiBnMKHeHO Ta He NiKIOUeHO Do eNeKTpOmepeXi nepeD ouHcENHm Ta KOJI BIn He BNKOpNCTOByETbcra.
He BnKOpncToBvIte arpeCnBHi a6o a6pa3nBHi MIOUci 3acO6n a6o po3uHHNK.
He Bnukpi6aIte TBepdi 3a6pydHeHHra TBepnIMn npedMeTAMN.
He npommbaTe npictpiB BOIO TO Ta He 3aHypioTe Ioro y BDOy.
- PpOdykTn, kki 6yDyTB o6po6neH, NOBHHi 6yTN BilbHi BID TBepdNx iHrpeDiEHTiB (HaNPnKlaad, KiCTOK, 3aMOpOxeHx npOdyKTiB).
Po3napkybaHHa
Poznakobuyu npncpti, BnkohaTe hactynH i:
BnMItb npncptpi 3 kopo6kn.
- BnДanitb Bci DeTani ynaKOBKn Ta HakNeiKn Ha npicTrooi (He BnDAnIe TInNOBy Ta6nUky).
BnMOrn do Micra BCTaHOBJIeHHa
Дя 6e3neuhoI Ta 6e3nomnkoBoi pOboTn npncToIO NiJ Yac BCTaHOBNeHHeo6xIDHO DToPmUyBatNcHABeJeHnx HNXue Di:
BukopncToByte TBepny, nlocky, rOpn3oHTaIbHy, HeKOB3Hy i TepMoCTiKy NOBepxHIO 3 DOCTaTHbOIO BAHTaXoNiiOMHICTIO.
Bubepitb Micue yctaHOBKn Takn m YINOM, 0o6 dITn He do6npaIncrdo puyomnx qactn (ocO6nbo Hoxa) npuctroio.
- Ппстрий не пиз nauseю в га устовки в настину abо вбуновнишфу.
He po3miuye npictpi y rapaomy, mokpmy a6o Boloromy cepedobnui.
- Po3eTka NOBHHa 6yTN IerkoIOCTynHOIO, 3'EDHyBaIbHn Ka6eJIb MoXHa 6yNo IerKO BNTaHTN B pa3i HAD3BnuaHnx CNTyaCiJ.
IpeepnBHKOpHnHaM
PeteNbHO ouHCTiB Bci OKpeMi Detani, 0o6 3BilbHHTN ix BiD 6yDb-RAKnx BInpo6HnUx 3aIIuKIB. Ipy zuBOrO nnBtbcra "OunueHHa".
O6cIyroByBaHHa
BKA3IBKA
- MakcimamJIbHe 6e3nepeBHe BnKOpNCaHn CtaHOBnTb 6nI3bKO 5 xBnIH. NToIM daiTe npncTroO oxoNoHyTu npOTraGM 10 xBnIH, nepi HIX NOBTOpHO BnKOpNCTOBvBATN Ioro.
BAJKJINBO!
- Повдьтеся 3 HOжем оберекho, BiH rOCTpri i Moxe cnpuHHTI TpABMn.
- Гострасторога NOВИнна спразмоватися Вперд до прфорованогу ДИСКА.
- Пepeконайся, со полбменя розашовае на 6oJIкрпльень в коруci.
- YKsqo iKa 3aknHnna B shnei, HATNCHTb "Rev". Ytpmnyte ue nepemkauch npotrarom 5 cekyhd.
- Hikon He 3acobyte nalbci Do Bany dny HanOBHeHHa. 3abxdi BHKOpncTOByTe wTOBXaU.
3HimaiTe a6o BCTabIaIe Kopnyc IHeKa Iiwe ToDi, KOnn npicrtpi nepe6yBaE B pexmI HepyxomocTi Ta 3'EnHyBaIbHn Ka6eB BiD'edHaHn. - YKsO npnstpiBnMkaetbcn iuc o6p06Kn, BIn nepeepiBaetbc. BntarHtB wTeNceIbHy BNky Ta daIte npnstpo 0xOJohytn npotraom 1 roDHH.
HacaKa IJIa M'acopy6Kn
BctabTe kOpnyc uHeKa i 3aΦikcyIte baxinb 6nokyBaHHra.
- Покадитьшеньв Корпсдяшеньka.
- Tenep BCTABTe hIX.
BctabTe notpi6nH nepoopobAHn dNcK.
- Tenep npinkpytib rBnHTObe kIbue.
- Poklaɪt b πɪdən dʒa HapOBHeHŋ.
Bctabe tencelb y po3ety, npicpiip naepoe B peximi ouikybaHHa.
HacaKaIra HAnOBHeHHKOB6ac
- Покадитьшеньв корпсдяшеньka.
- Tenep BCTABTe hIX.
BctabTe notpi6nH nepoopobAHn dNcK.
BCTABTe HacaKy IJNA HANOBHeHH KOB6ac.
Tenepe npikpyitb rBnHTOBe kInbue. - Oknaqitb nioohnHaNoBHeHHa.
BctabTe 7tencelb y po3etky, npictpi npaioe B pexmi oikybaHHra. - Tomictitb tapinky abo mcky niHocnK.
- Hatairhitb cintetiny a6o hatypalbny knkky 3a hic hacdkn dna HanoBHeHHKOB6ac.
Iopada: Ira kpaoro pe3yntaty nomicti b cnhtetny a6o Hataypalbny Knkiy B Tenny Body npn6n3HO Ha 10 xBnnH.
-Помістіпpoукн,якnotpiбнообрobит,在пдондг�ановен. 3a3daleriьnapixteM'acoCmyxkamnshinpHO 6JIN3bko2.5cm i doBXHNO6JIN3bKO10cm.
BKA3IBKA
Якwo npotrarom 5 xBnHn He hATnCKaTn KhoNky "Pyck/3ynnHa", npnstpi BnMKnHeTbcr. 3HOBy BBIMKHyTn npnstpi, HATnCHiB KhoNky "Pyck/ 3ynnHa".
- Hatachitb KhoNky "Iyck/3yinnHka".
- Hatachitb KhoNky WbNdkocti. TyT Bn MoXeTe Bn6paTn MIX DbOMa pIBHmN WbNdkocti (1 i 2).
-ДяВiДшTOBxUBAHнВИКОпСТОВуЧteЛишeшTOBXaч,иO BXODNTbdoKOMПЕКТУNOCTaЧАHH.
-Писязавершени роботи мсорубкн ratnchitb Khonky"Pyck/3ynnka". - Дя demontуnpсгю втугіль розтк,пocун'te baxиь 6LOkyBaHHBROPy,3HIMtB Hacaiky Ta demontTuTe Bci OkpeMi DeTani y 3BOPOTHOMY NOPaKy.
HacaKa JnKotIeT
- Покладит bшнек в корпс дяшнeca.
BCTABTeΦopMyBaU,a notim HacayIgKOTnet.
Tenepe npikpyitb rBnHTObe kInbue. - POKnaiItb nIDOnHnHaHNoBHeHHa.
Bctabe tencelb y po3ety, npicpiip naepoe b peximi ouikybaHHa. - Tomictitb tapiKy a6o Mncky niHocNK.
-ПомістіпpoДукті,якіnotpiбHo o6рobиТи,y niДон дЯ HabOBHeHЯ. 3a3dAneriД hapixTe M'aco CMyЖКAMN shinHOIO 6JIn3bKO 2,5 cm i DOBXnHOIO 6JIn3bKO 10 cm.
BKA3IBKA
Якwo npotraom 5 xBnH He haTnCKaTH KhoNky "Pyck/3ynnHa", npncptpi BnMkHeTbca. 3HOBy BBimKHyTN npncptpi, HATNCHTb KhoNky "Pyck/ 3ynnHa".
- Hatachitb KhoNky "Iyck/3ynHka".
- Hatachitb KhoNky WbNdkOcTi. TyT Bn MoXeTe Bn6paTn MIX DbOMa pIBHmN WbNdkOcTi (1 i 2).
-ДяВiДшTOBxUBAHHЯ BnKOpNCTOByIte JINIe StTOBXaY, IO BXODITb DO KOMPJIeK TY NOCTaUAHHЯ.
-Писязавершени роботи мсорубкн натусять конky"Пуck/3упинka".
-Дя demontaxy npictpoIO BITaHrHitb 3 po3eTK, nocyhbTe baxiNb
6nokybaHHBropy,3HimItb Hacaiky Ta demoHTyIte Bci Okpemi deTani y 3BOPOTOMY NOPaIKy.
HacaKa Ira neuBa, BnuabJeHoro M'acopy6koio
- Покладит bшнек в корпс дяшнeca.
- Tenep BCTABTe HIX.
BctabTe notpi6Hn nepoopobAHn nnck. - Tenep nomictiht hacaikky dna neuBa B rBnHTObe KInbue TaK, 0o6 BOHO byno B npeedhi yactnHi OTbOpy.
- Tenep npikpyitb rBnHTObe kInbue. Nepu hix 3aTayBaTu rBnHTObe KInbue, 3aΦikcyte HacaKy dny neuBa Takm YHOM, Uo6 BOHa KpinnaCb npMo B rBnHTOBomy KInbci.
- Tenep BCTABTe φopmy對於 pi3HOMaHITnIX TnIb neuBa.
- Poklaɪt b πɪdən dʒa HapOBHeHŋ.
Bctabe tencelb y po3ety, npicpiip naepoe B peximi ouikybaHHa. - Tomictitb tapinky a6o mncky niHocNK.
- Помістіп探测укту, якіnotрибнооброб'tи, у підіон дя наювень. 3a3далерідні hapіхт e'm'aco CMyЖКAMN shprnHO 6n3bko 2,5 cm i DOBXHNO 6n3bko 10 cm.
BKA3IBKA
Kuo npotrom 5 XbuiH He Hatackatn KhoNky "Pyck/3yynHka", npnstpi BImkHeTbcra. 06 BBimKHytn npnstpi, HatachItb KhoNky "Pyck/3yynHka" npotrom 3 cekynd.
- Hatachitb KhoNky "Iyck/3ynHka".
- Hatachitb KhoNky WbNdkOcTi. TyT Bn MoXeTe Bn6paTn MIX DbOMa pIBHrMM WbNdkOcTi (1 i 2).
- Дя ВдштOBxВаннЯ ВИКОпСТОвуйTe Лшe ШТOBхач, Уо BXODNTbdoKOMПЕКТУ NOCTaЧАнь.
-Писязавершени роботи мсорубкн Hatисить Кногку "Пуск/3упинka". - Дя demontуnpсгю впгиь ртсь 3 po3eTKI, nocyhte baxinb 6LOkyBaHHBry, 3HIMtB Hacdky Ta demontyTe Bci OkpeMi DeTani y 3BOPOTHomY npRkY.
3BOPOTHn 3aNyck
KIO npicpi 3a6lokoBaHO, HATNCiB KhoNky "REV". BnHT o6eptaetbcra y
3BOPOTHOMY HANpRMyK.
OuHnueHHa
OuHCTiB npnctpiM'koIO BOIoroIO rAnHipKOIO Ta daIte NOMy BucoxHyTN. He npomBaIte npnctpiB BOIO TO He 3aHypioTe NOro y BODy.
Bci yactin npnctpoIO moXHa nCTNTI B TeNII BODI 3a DOnOMOrO MNUOchor 3ac06a.
BKA3IBKAI
ДаиTe BCIM DeTaNAM NOBHCITIO BnCOxHyTN NiCnA OUnIeHn. 3HOBy BCTaHOBIb HacadKy dIra M'acopy6kn.
Cnyx6a niTpnmkn KJIeHTiB
Kkuo Baw npnstpi Graef nowkoJxHc 3BepHItbcr do BaWoToToproBeIbHoro nocepEHNka a6o cnyXb n iTpUmKn KJIeHTIB fipMn Ipae (Graef) 3a Homepom 02932-9703677 a6o hajiunltb ham eJeKTPOHHoro nncta ha service@graef.de
Ytinizacij

Ley npoykt He moxHa ytni3ybaTn pa3om i3 3BnuaHmni no6yTOBmN BIXOaMn, Ioro nOtpi6HO BiDBe3Tu nyHKT 3bOpy dIpepeo6Kn no6yTOBnx eJeKtpoHHnx BixOJIB. Lcno3Haayetbcra Cnmbolom Ha npoykti Ta B iHCTpykci i3 3actocyBaHn. MaTepiaJIi
πiДягьВТОПИНи nepepo6i BiIDNoBIDHо DoixMapkyBaHHa.3aBЯкINOBTOPOMy BnKOpNCTAHHIO,nepepo6i MaTePIaIB a6o iHsIM φOpMaMnepepo6Kn CTapnx npIcTpoIB Bn po6nte BaxJIbNBIhEcOK y 3axNCT HaWoROHABKOJIshHbOcrepeDobuHa. ByIb Iacka, 3BepHiTbcra Do MlcueBx opraHIBBlaAnIoo BiINOBIaIbHOrO nyHKTy yTHNI3auii.